Wolf
-
Posts
160 -
Joined
-
Last visited
Content Type
Profiles
Forums
Events
Gallery
Everything posted by Wolf
-
I've been playing around with casting the tail light and reverse light assemblies. I found that I could pour the red section by itself, cure it with a UV light, and then pour the rest of the assembly in clear resin creating a complete red and clear light assembly. I then traced out the shape of the kit part on to thin styrene sheet and cut it out. This part was then covered in Bare Metal Foil to create a background reflector and then glued to the clear section with 5 minute epoxy. The raised ribs on each section were painted with a Molotow fine tipped chrome pen. First the clear red section was given a very thin top coat of Tamiya clear red to give it a bit more depth than just the red resin alone. I also managed to clean up most of my work bench. That gave me space to actually paint something. I gathered up the pieces of Fireball's Rallye wheels and painted the steel wheel section with Testors Metallic Silver decanted from the spray can. Once dry I gave each wheel a coat of Pledge Shine (Future Floor Wax) to give them a shine just off dead flat. Each trim ring was painted with Tamiya's Gloss Black lacquer, also decanted from the spray can, and then sprayed with four very light coats of Alclad II Polished Aluminum. The wheel centre caps were painted with Gunze Mr. Metal Dark Iron. The centre cap was masked off and sprayed with Polished Aluminum as well. The fine edge along the circumference of each centre cap was painted with the Molotow chrome pen as were each of the wheel nuts. The assemblies have been dry fit into the tires as I still have to add the valve stems from the backside of each trim ring. Fireball's Rallye wheels are fantastic and well worth the price in my opinion. I still have to add the raised white lettering decals to each tire and that will come from Ray's Kits decal sheet. Still lots to do but some progress has been made. Work, family, friends, and summer weather has kept me away from the bench so I'll take whatever progress I can get. Right? Cheers, Wolf

-
Welcome here Mike! I look forward to seeing what you’re workin’ on. Cheers, Wolf
-
My paint from Scale Finishes arrived today. Got t’ say, if the paint in the bottle turns out the same colour when sprayed on the body, I’m goin’ to be a very happy guy! I’ve already determined I’ll be using this same color on a vintage Porsche I have sittin’ in the stash. Never heard of Winchester Grey before but it’s an absolutely gorgeous Color. And that’s comin’ from a guy that dreams in Red! Cheers, Wolf
-
Ouch! Started reading on this page and I got the feeling something hadn’t gone right. That Sucks! Have you thought about masking off the chrome trim, spraying gloss black, and then Alclad II Chrome? Admittedly I haven’t tried that myself yet but I will on my Hemi ‘Cuda. Cheers, Wolf
-
Thank-you Anton, I realize the kit engine is lacking in detail in quite a few places. I’m hoping to create enough extra detail and gizmology that the overall effect will cover the obvious shortfalls with the Hemi. I’ll have to read through the attached threads to get enough ideas to make it all work. I’m not inclined to purchase an entire kit just to get a more detail correct engine. Modelling skills will hopefully win the day. Cheers, Wolf
-
Thanks John, I'm going to try and pour a few more of the tail lights and reverse lights before I call the process a complete success. I also need to pour the front park light/turn signal lenses as I made a silicone mould for those too. As far as the dash is concerned I'm going to have to wait until the new Instrument decals arrive so I can determine the exact placement and dimensions of the holes I have to drill to accept the decals. They may not arrive, according to Vicky at Rays Kits, until August. That's Ok though as there's still lots to do on the rest of the build. Wolf
-
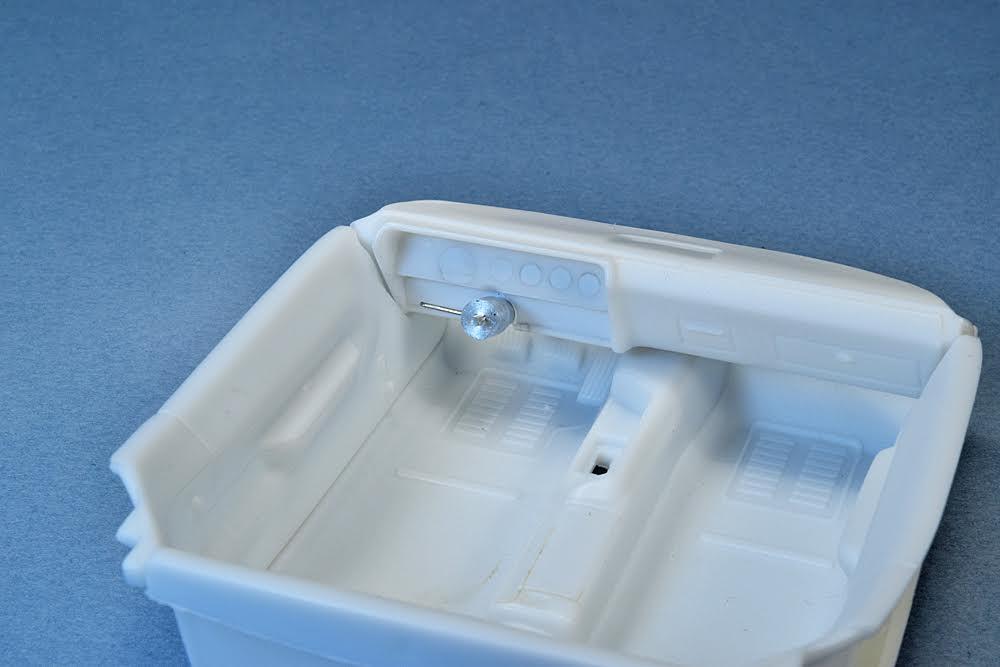
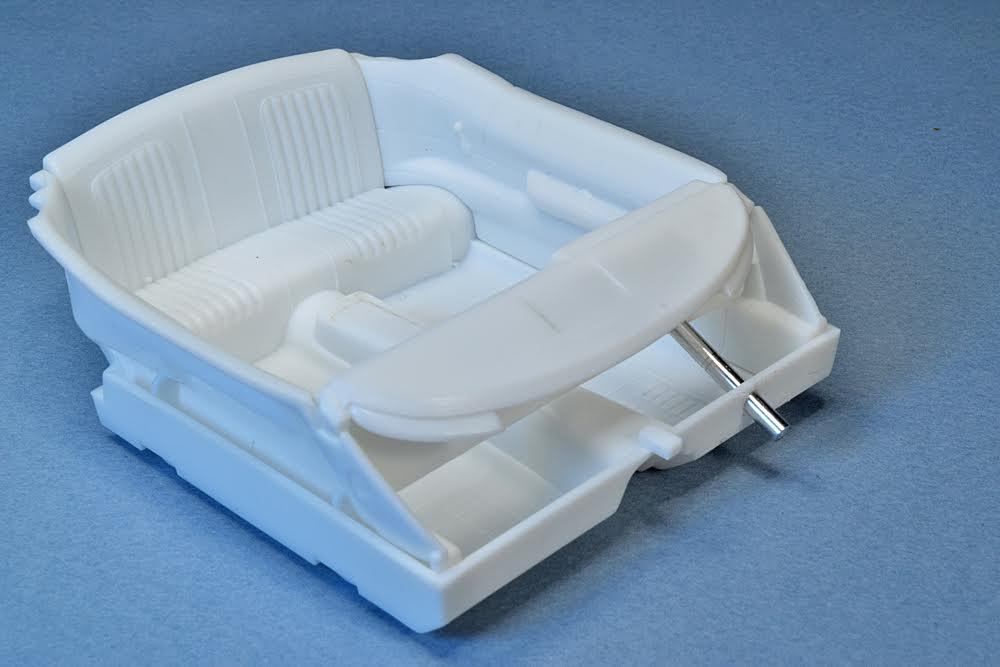
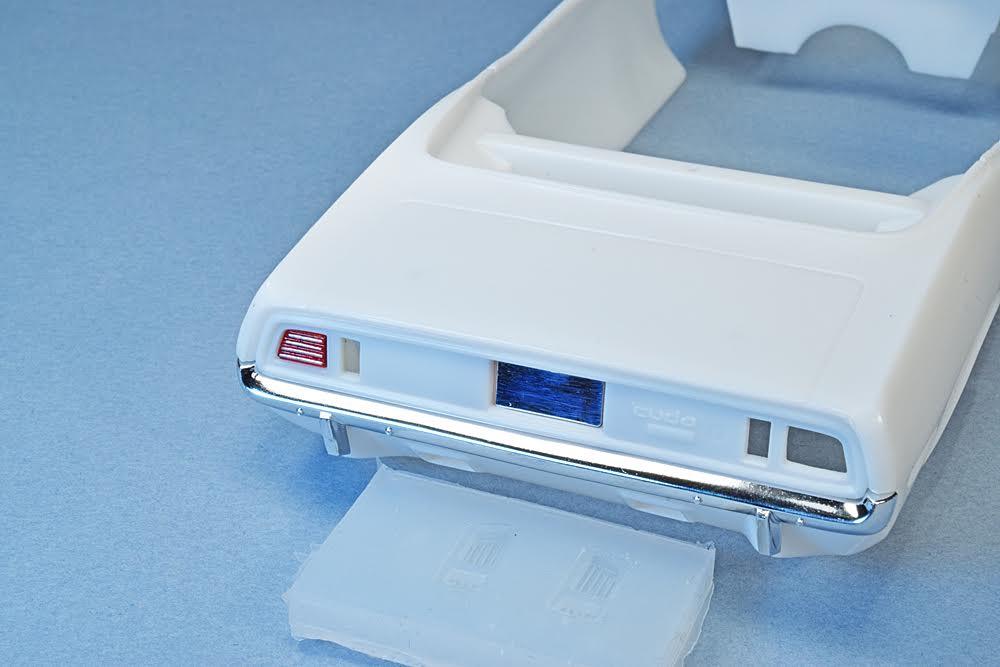
So I need a Rallye dash……… As the vehicle I’m modelling has the optional Rallye dash and the Revell 1/24th kit doesn’t provide that piece I had little choice but to convert the kit dash into a Rallye instrument cluster. The existing holes for the instrument dials were filled with styrene discs made with my Waldron standard size punch and die set. Any small gaps were filled with CA and sanded smooth. The bulge at the bottom of the dash face for the larger speedometer gauge was filed and sanded down as well. The lower portion of the dash was rebuilt eliminating the stereo face and the opening for the steering column was refined to accommodate the Parts by Parks steering column. I’m going to have to scratch build a new heater control panel too. A hole was drilled through the front of the interior floor pan for the column to pass through. The excess length of the column will get trimmed down later. I also tried my hand, for the first time, at trying to create a silicone mould for the tail lights and casting the lenses in clear red UV resin. In both cases I got extremely lucky and had success at both attempts. Every once in a while Lady Luck smiles upon a guy like me. You can see the silicone mould below the back bumper. I added the rear lower roll pan as well, filled any resulting gaps, and there were a few of ‘em, with thick CA. Once the CA cured I used a razor saw guided with dymo tape to create the panel lines between the rear quarter panels and the roll pan. I’ll post more pics of that next time. Cheers, Wolf
-
Thanks Bill and Dennis for looking in and leaving comments. Always appreciated! Cheers, Wolf
-
Finally got my Winchester Gray paint ordered from Scale Finishes. Looking forward to trying them out. I've been using Tamiya lacquers for years so I hope these paints are fairly similar in the way they apply. Cheers, Wolf
-
That looks great and what a beautiful color. From what I can see I'd probably go with rubbing down the paint as is without clear coat. Very sharp Bob! Cheers, Wolf
-
Many happy returns of the day Ted! Wishing you many more with good health and prosperity.
Cheers, Wolf
-
Beautiful work Steve! I’ve always maintained that the devil is in the details and there’s lots of awesome details displayed here. I love the little finger pull on the ashtray lid. In those days every passenger had an ashtray. Today, thankfully, new cars don’t come with ‘em anymore. If you want to seriously destroy your vehicle’s resale value just smoke in it! Cheers, Wolf
-
Neat little Bug! I bet those taillights were fun to mask and paint. I had a ‘69 in Savanah Beige with brown interior. Seeing your model brings back a lot of fond memories. Well done Dave. Cheers, Wolf
-
Thank-you Michael, The more I look at photos the more work I realize I’m going to have to do. It’s really like a snowball rolling down hill affect. It’s a good thing I really like the car! Cheers, Wolf
-
Hi Bob, I would be inclined, if the plastic on the hood is thick enough, to cut a very small wedge (width wise) out of the back of the hood and pull the sides in. Use extra thin fast drying Tamiya cement and clamp it 'till the glue sets. Then sand the the sides of the hood to straighten out the profile. Just heat and sanding could leave you with a hood that's badly distorted. Without seeing exactly what you have to work with that's what I would try. You might be able to get away with just a couple of straight cuts either side of the hood center line instead of a wedge. That should give you enough to move the sides of the hood in. Cheers, Wolf
-
Wait, John, what? You started this when? I can't even get all the parts off the sprues in the time it took you to finish this! Nice Plum Crazy Purple color too! Cheers, Wolf
-
Thanks John, I'm not planning on going too crazy with the exhaust but figured I'd touch the stuff that might be visible when viewing the model from ground level. I'll probably use a #11 blade and give the mufflers something of an undercut to give them more of a 3D look. That'll also make them a bit easier to paint because I can place the edge of my masking tape in the undercut giving me a nice sharp edge. A little bit of pre/post shading should do the rest. Cheers, Wolf
-
How can you tell a fellow modeler has ADD and OCD? They never build in a linear fashion jumping all over the place but bring it all together in the end They build slowly and spend way too much time researching everything 'till everything has to be fixed Nothing is good enough. See above. They get buried in details. There's more but these are clearly telltale signs................. Anyways, here's a shot of what the Dana 60 rear end will look like installed. The nice thing is that the dimensions from front to back are identical to the kit part so the driveshaft doesn't need any modifications lengthwise. You can see that one of the exhaust tips has been opened up and the right leaf spring hanger has been rebuilt to make it look a bit better than a plastic lump. The other tip and leaf spring hanger 'ill get done as well. We must have symmetry, right? The new rear end makes such a big difference. Cheers, Wolf
-
Thanks Carl, I built the Monogram Coupe many years ago (almost 40, holy moley I'm getting old) and didn't think it was too bad back then. Some other kits of the same vintage offered much more though. Today this kit shows it's not aging all that gracefully. Cheers, Wolf
-
Sharp! Very cool concept and beautifully done. I can easily imagine a lot of these sitting in people’s driveways back in ‘65. Cheers, Wolf
-
Thanks Keith, I can’t wait to see what I do with it next either. I keep looking at the same photos and find new stuff. After hours of scouring over detail photos for quite some time l just realized this morning that the 1:1 ‘Cuda in Winchester Gray doesn’t have chrome (stainless?) trim around the wheel arches! It’s not a big deal but I assumed all ‘71 ‘Cuda’s had ‘em. The firewall and inner fender panels are going to require work too. There’s definitely more to do than I originally thought! Cheers, Wolf
-
Yup! Exactly Kenneth! Cheers, Wolf
-
Hah! The photo of the interior is the exact one I've been studying. It's making me resign myself to convert the dash to the Rallye version. I've also noted the two red pull knobs at the bottom, either end of the dash. It's definitely the little details............just like the red distributor cap boot for the coil wire on the distributor side only. Who does that? Cheers, Wolf.
-
Thanks Rex! Sometimes missing or complete lack of certain details can be a source of aggravation. That's very true. But then, what fun would we have, right? Cheers, Wolf
-
Hi John, Ya know, I've been looking at a lot of photos and videos of this car, and I heard it didn't have a radio installed. Sometimes you miss the forest for the trees. And yet I completely forgot about that detail. Thank-you. As well as eliminating the radio face I can make sure the dash pad doesn't have a speaker grill! Cheers, Wolf