Wolf
-
Posts
160 -
Joined
-
Last visited
Content Type
Profiles
Forums
Events
Gallery
Everything posted by Wolf
-
Hi Bob, I would still thin it a bit. Put on light coats to get your coverage and then spray it on wet. Thinning it a bit more helps it to atomize better. Obviously you’re going to have to play around with it a bit more to get what works best for you in your climate. If you have an old paint mule it would be an ideal way to experiment. Cheers, Wolf
-
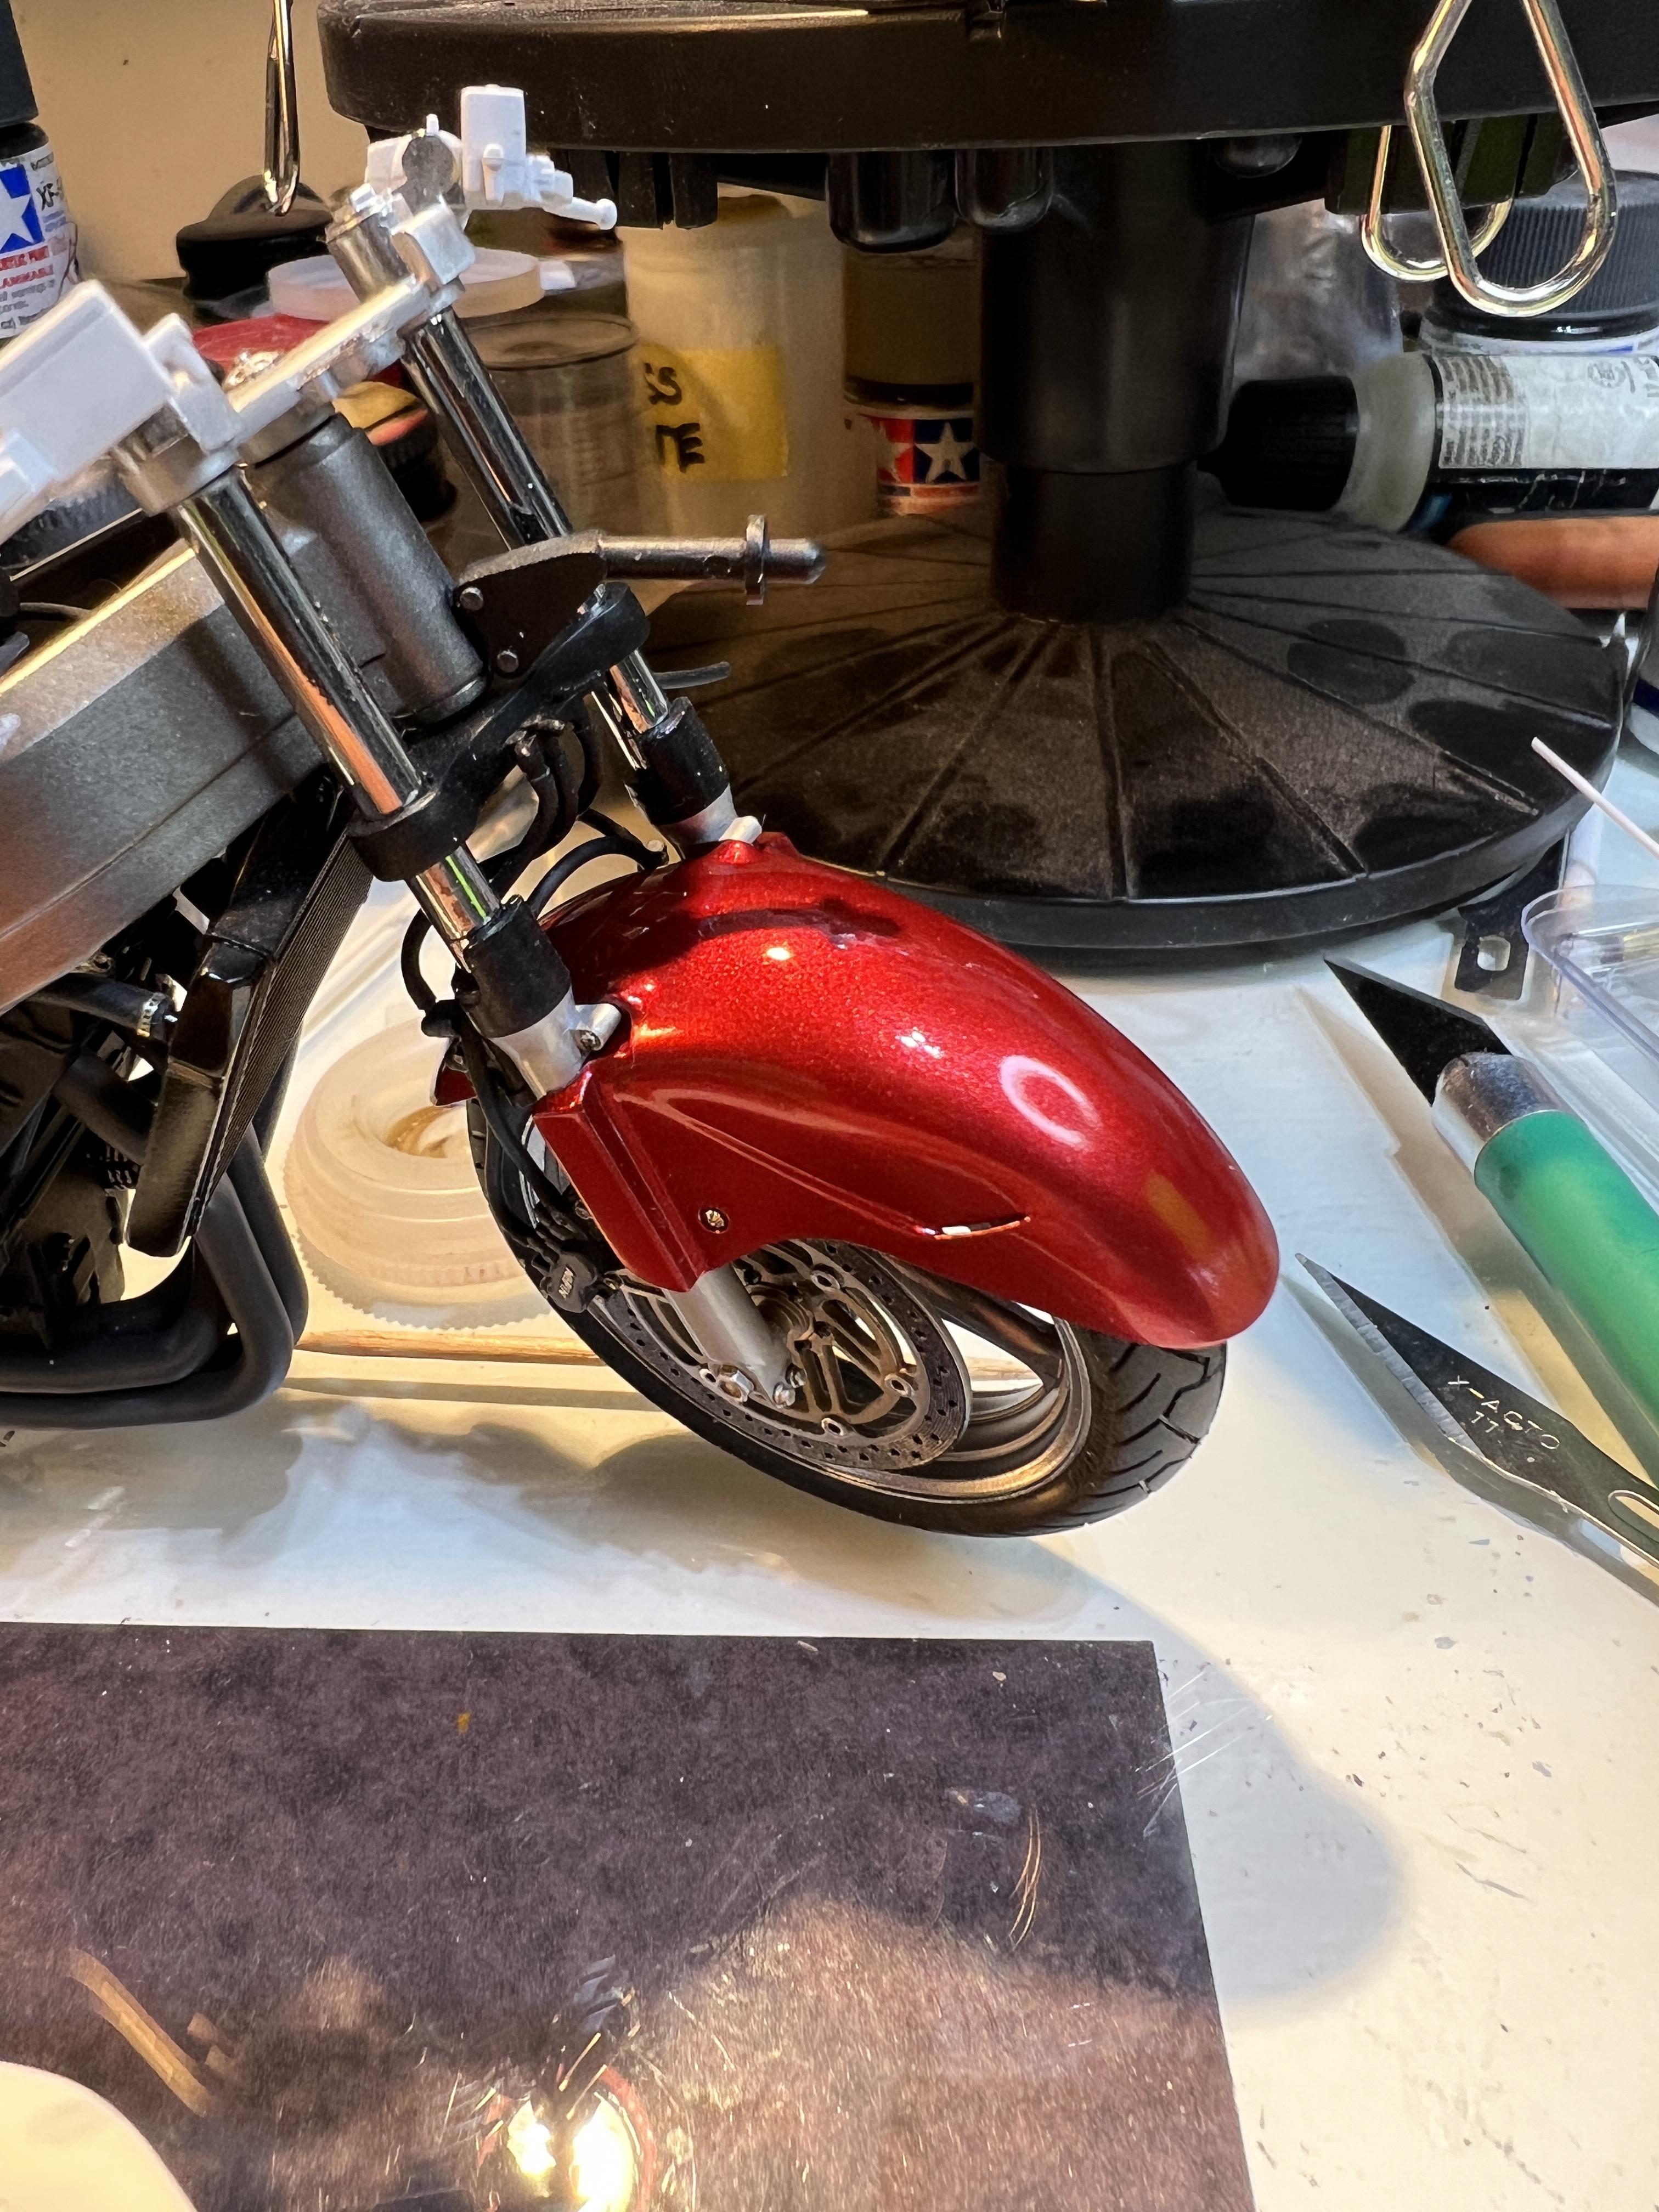
Hi Bob, Not to overstate the obvious but there’s definitely something wrong. I’ve been decanting Tamiya’s lacquer spray paints for years now and have never experienced the grainy finish you have. One thing you mentioned is that you sprayed the decanted paint without adding thinner. From experience, I always thin it a bit more with lacquer thinner before it goes into the airbrush. I’ve also found that warming the paint up a bit before spraying helps it level out much nicer. Put the container you’ve put the decanted and thinned paint in to some nice warm water for a few minutes beforehand. I use a small glass dish filled with water and set on a coffee cup warmer. Judging from your photo I don’t think your clear coat is going to hide the rough texture of your base paint. You’ll either have to sand/polish it out more or strip and start again. I also use Tamiya’s Fine White primer as you have so that’s definitely not part of the problem unless the primer finish wasn’t smooth as well. This is the front fender of a 1/12 Tamiya bike I’m working on using Tamiya’s TS-95 Pure Metallic Red decanted, thinned, and sprayed over their white primer. I hope you don’t mind me butting in on your thread. Good luck with your Nomad. My favourite year too. Cheers, Wolf

-
 I’ve been checking for updates in your WIP thread and thought maybe the build had stalled. Now I find it here and she’s all done. Well done Mark! I had a blast building mine as I’m sure you did building yours. Quite a kit eh? Cheers, Wolf
 -
Boy, those Blue Stuff decals do go on very nice, don’t they? Coming along very nicely Jim. Cheers, Wolf
-
Love what you did for the switches and controls Mark. You have to own this kit to appreciate how small those decals are. And yet, for a 1/6th scale kit, they should have been included on the decal sheet. They make a great impact on the detail level of those two parts. ?? Well done Mark! Cheers, Wolf
-
Beautiful work so far, Mark. Isn’t it a nice refreshing build where everything is relatively straight forward? No major modifications necessary, just paint, glue, and assemble. Tamiya sure delivered with this one. Cheers, Wolf
-
Wow!, Fantastic project so far! I look forward to seeing how this develops further. Cheers, Wolf
-
Nicely done so far Mark, This build definitely evokes a strong sense of deja-vu. This kit was definitely one of my very favourite builds. Cheers, Wolf
-
Hi Mark, With regards to the rims, eliminating the seam is a bit time consuming but not a big deal. Try carefully dry fitting the spokes though. When I went to install them I found the holes they go in to were slightly too small with the rims halves glued together. A bit of reaming out was trick. I’m assuming you’re going with the white base color if doing the rims in anodized gold. I went with the red base but did the gold rims anyways because I think they looked way better than black. Just the way I would like it if I had the 1:1 bike. Cheers, Wolf
-
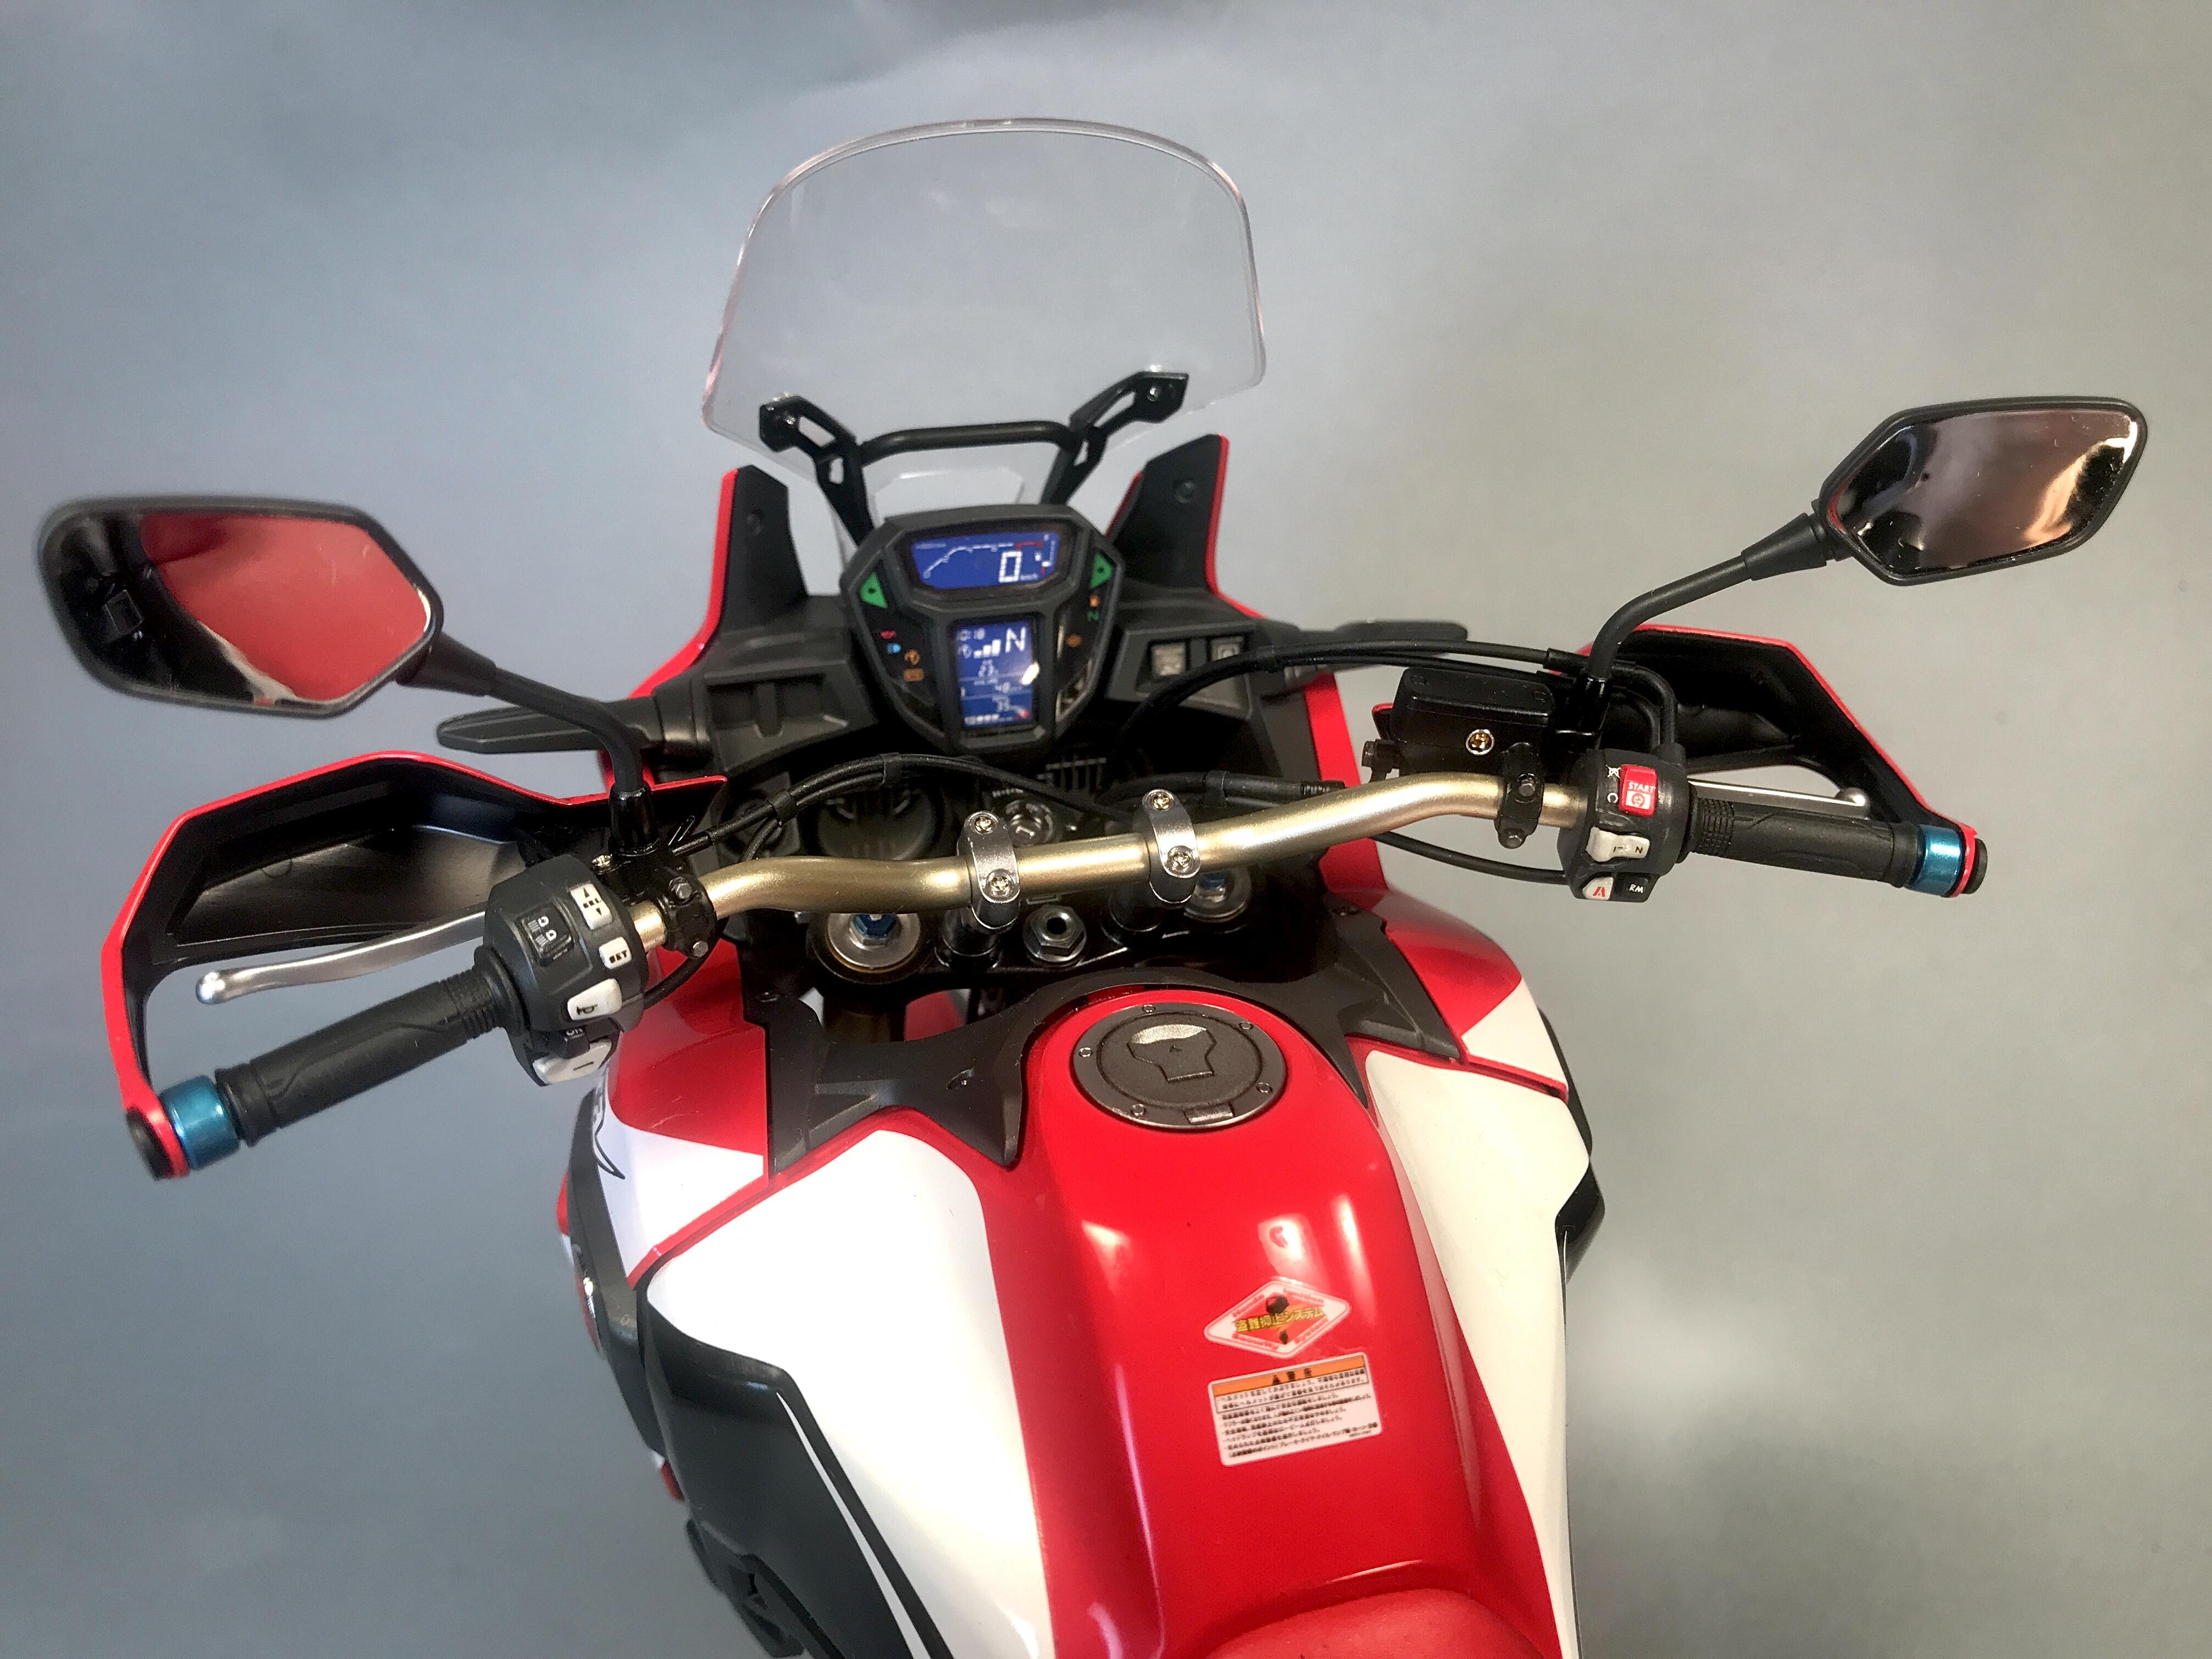
Hi Mark, This kit is, in my opinion, the best of Tamiya’s 1/6 scale bikes in terms of what you get in the box. I’ve built a few and still have a couple in the stash. Of course it’s Tamiya’s latest bike kit so it benefits from all the newest model making technology. I built the kit a couple of years ago and was particularly impressed with the rims and how delicate the spokes are moulded. I opted for the detail-up chain as I wanted the chain to move with the rotation of the rear wheel and in the end it looks far more realistic than the kit piece. The only detail I added to the build was the missing fluid level sight glass on the front brake fluid reservoir and the stencils on all the control switches on the handlebars. If the kit has a short fall it’s the lack of data stencils for all the function switches on the handle bar controls. In 1/6th scale I think it’s an obvious omission as the details are large enough to notice especially with the kit already being so detailed. I used lots of bits and pieces of decal from multiple sources to make up the stencils. The symbol on the horn button was 3 separate bits of decal that came off a 1/72nd scale WW I German aircraft data stencil sheet! I hope you don’t mind me posting a photo of my build that shows the added data stencils. Cheers, Wolf
-
Beautifully done Steven, The addition of the rubber seals for the vent windows is a very nice touch. It’s always the clean execution of little details that make the difference. Cheers, Wolf
-
Beautiful work Steven! Including the foil work. Are you using BMF? I ask because it doesn’t appear to have any distinguishable grain which I find BMF usually does. The windshield moldings look incredibly smooth. Cheers, Wolf
-
Welcome back to the plastic part of the hobby and to the forum. Is your Tamiya Corsair the 1/32nd scale kit? Cheers, Wolf
-
Greetings, salutations, and welcome here Howard! I look forward to seeing you ‘vette in progress. Cheers, Wolf (from just north of the 49th in Abbotsford)
-
Absolutely gorgeous GTO! My favourite colour too! I just recently got back into building cars and spend almost no time on Facebook so I’d be hard pressed to believe, looking at your build, that this kit has such a bad wrap. Simply beautiful Tommy! Cheers, Wolf
-
Whoa, that baby pops! Stunning colour and not an easy one to paint. Well done Michael. She looks fast just standin’ still. I remember a Porsche like this coming up fast behind me on the autobahn while I was driving from Mainz to Jever back in 2000. A couple of flashes of the headlights and it was gone like I was standing still. I was doin’ 160 kmph, the max allowable speed rating for the tires on my car! Damn! Cheers, Wolf
-
Hi Ken, I'm currently working on the Revell Hemi 'Cuda convertible. At the price you got the kit for you can't loose. However, depending on what your goal is with this build, this particular kit, the convertible included, is far from accurate. It's surprising as most other Revell/Monogram kits of the same vintage seem to be a lot better. If you're building it out of the box you'll still have a nice model though. Is that the route you're taking? If you do decide to dress it up a little and you're going with the stock Rallye Wheels, 1972 coronet (John Shoe) is right regarding the Fireball Models Rallye Wheels. They are a beautiful substitute for the kit wheels and as they come in a number of separate pieces I found they were easier to paint and build up. I hope you don't mind me posting a couple of photos of the Fireball Models wheels if you're not familiar with them. I'm certainly not trying to highjack your thread. If you feel I'm infringing on your posts please let me know and I'll remove them. Cheers, Wolf
-
Hi Rich, Thanks for your reply. The 250 GTO kit I have is the basic Fujimi kit. I have the Historic Racing Miniatures engine set coming as well as the HD Borrani wheels. I’d like to get a photo etch set for the car and hoping I can source one soon. The Revell Type-E looks like it would be a fine companion to the GTO. Cheers, Wolf
-
Both your Jaguars look beautiful Rich! Love the photos! I’ve always been more inclined to favour the looks of the coupe over the roadster so it’s appreciated that you included a photo with both. I recently acquired the Ferrari 250 GTO kit and would love to get one of the E-type to display side by side. Even Enso Ferrari himself admitted the E-type Jag was one of the most beautiful cars ever made! Cheers, Wolf
-
Lookin’ real sharp Chris. I would add some valve stems to the wheels though. She’s gonna look fantastic when you have ‘er all wrapped up! Cheers, Wolf
-
Wonderful details Steve! The dimmer switch reminded me of a young lot kid we had working at the dealership quite a few years ago. We had taken in, on trade, an old Ford Pick-Up and when one of our lot kids went to move it he drove it up to where I was standing. He said, “hey Wolf, what’s this thing do?” while madly clicking away on the switch. I explained that was an old style foot operated dimmer switch for the headlights. The expression on his face was priceless as he replied, “noooo waaaay, really?” I couldn’t help but burst out laughing. Cheers, Wolf
-
Welcome here Thomas! I’m originally from Alsfeld in Hessen. That was many years ago though. I would love to see some of your models. I share very similar tastes in modelling subjects. Cheers, Wolf
-
Thank-you Bill. I have to say I’m enjoying the progress so far myself. Surprisingly though there’s definitely a lot more work involved than I originally had anticipated. I suspect correcting (as much as possible) the inner fender walls and firewall are going to be the biggest challenge of this build. Cheers, Wolf
-
Thank-you David! This was my first attempt at moulding and casting clear parts so it was a good learning experience. As for the wheels and tires, all credit goes to Joseph from Fireball Models, I just painted ‘em. ? Cheers, Wolf
-
Hi John, Thanks for the comments regarding the tail light/reverse light assemblies. I thought I had good castings the first time around but found a couple of flaws when I went to paint the thin chrome trim. The 2nd time was the charm. I was impressed with Joseph’s Rallye Wheels when I saw them on the Fireball website. Now even more so since cleaning them up and painting them. They really are beautiful pieces and go together perfectly. I’m extremely happy with having purchased them. Cheers, Wolf