cifenet
-
Posts
856 -
Joined
-
Last visited
Content Type
Profiles
Forums
Events
Gallery
Everything posted by cifenet
-
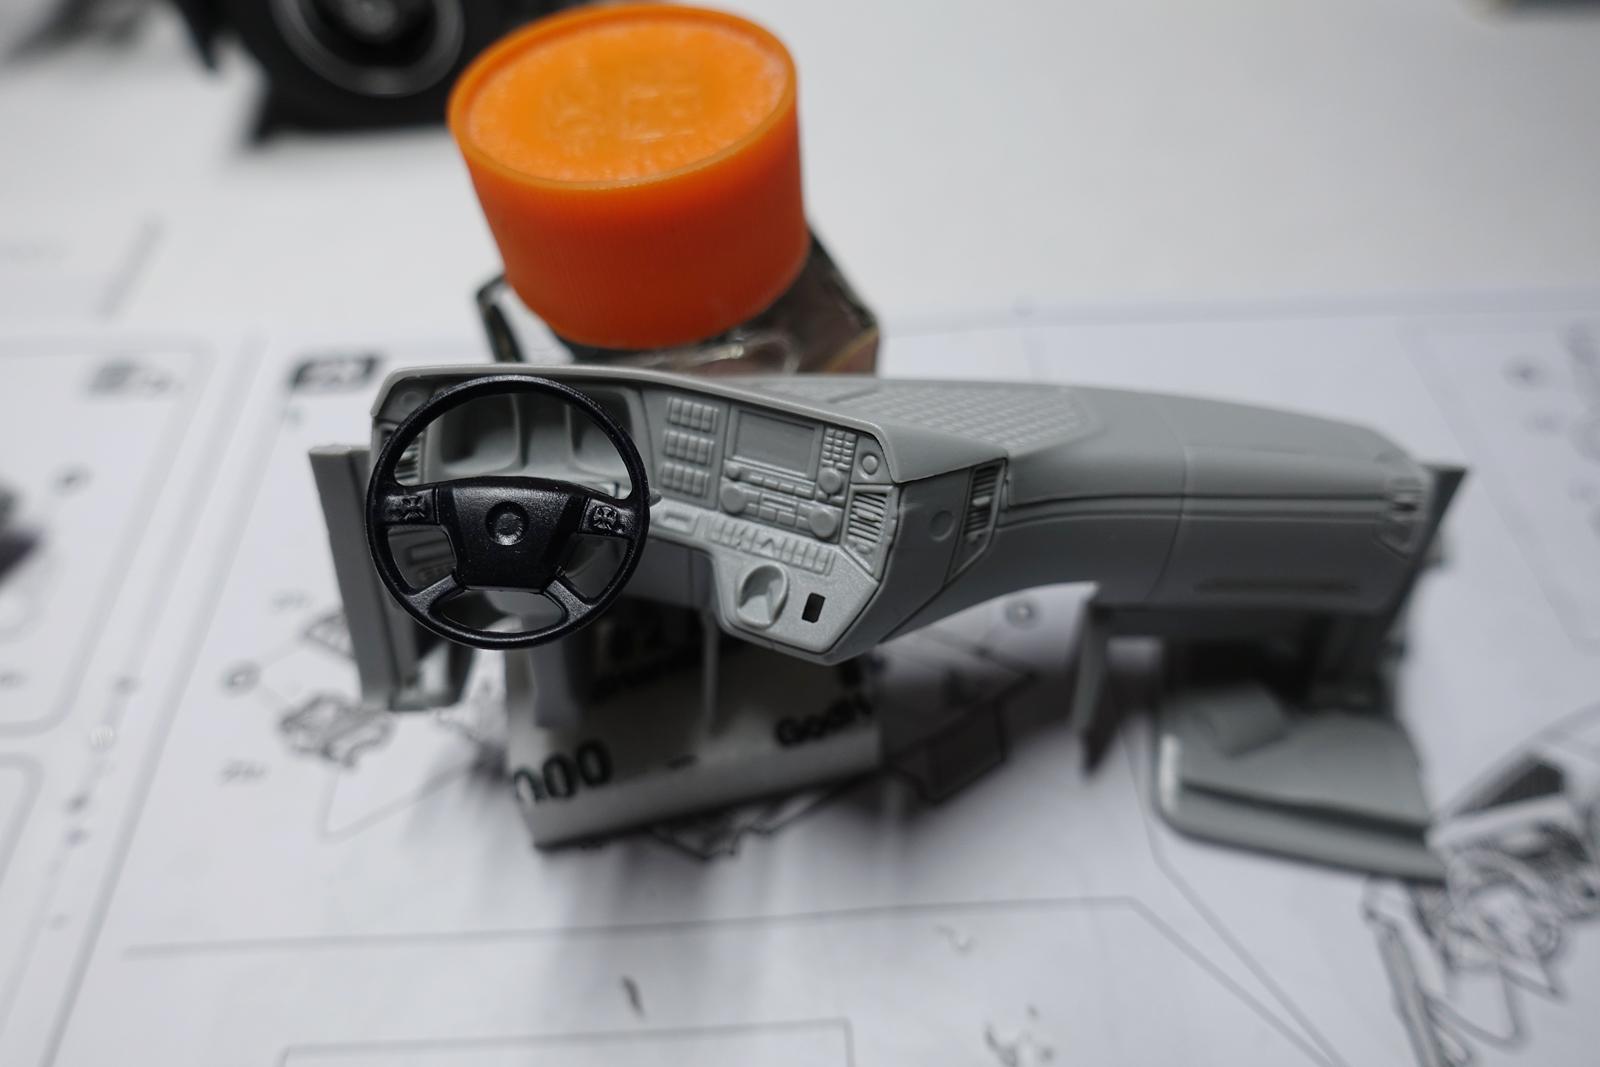
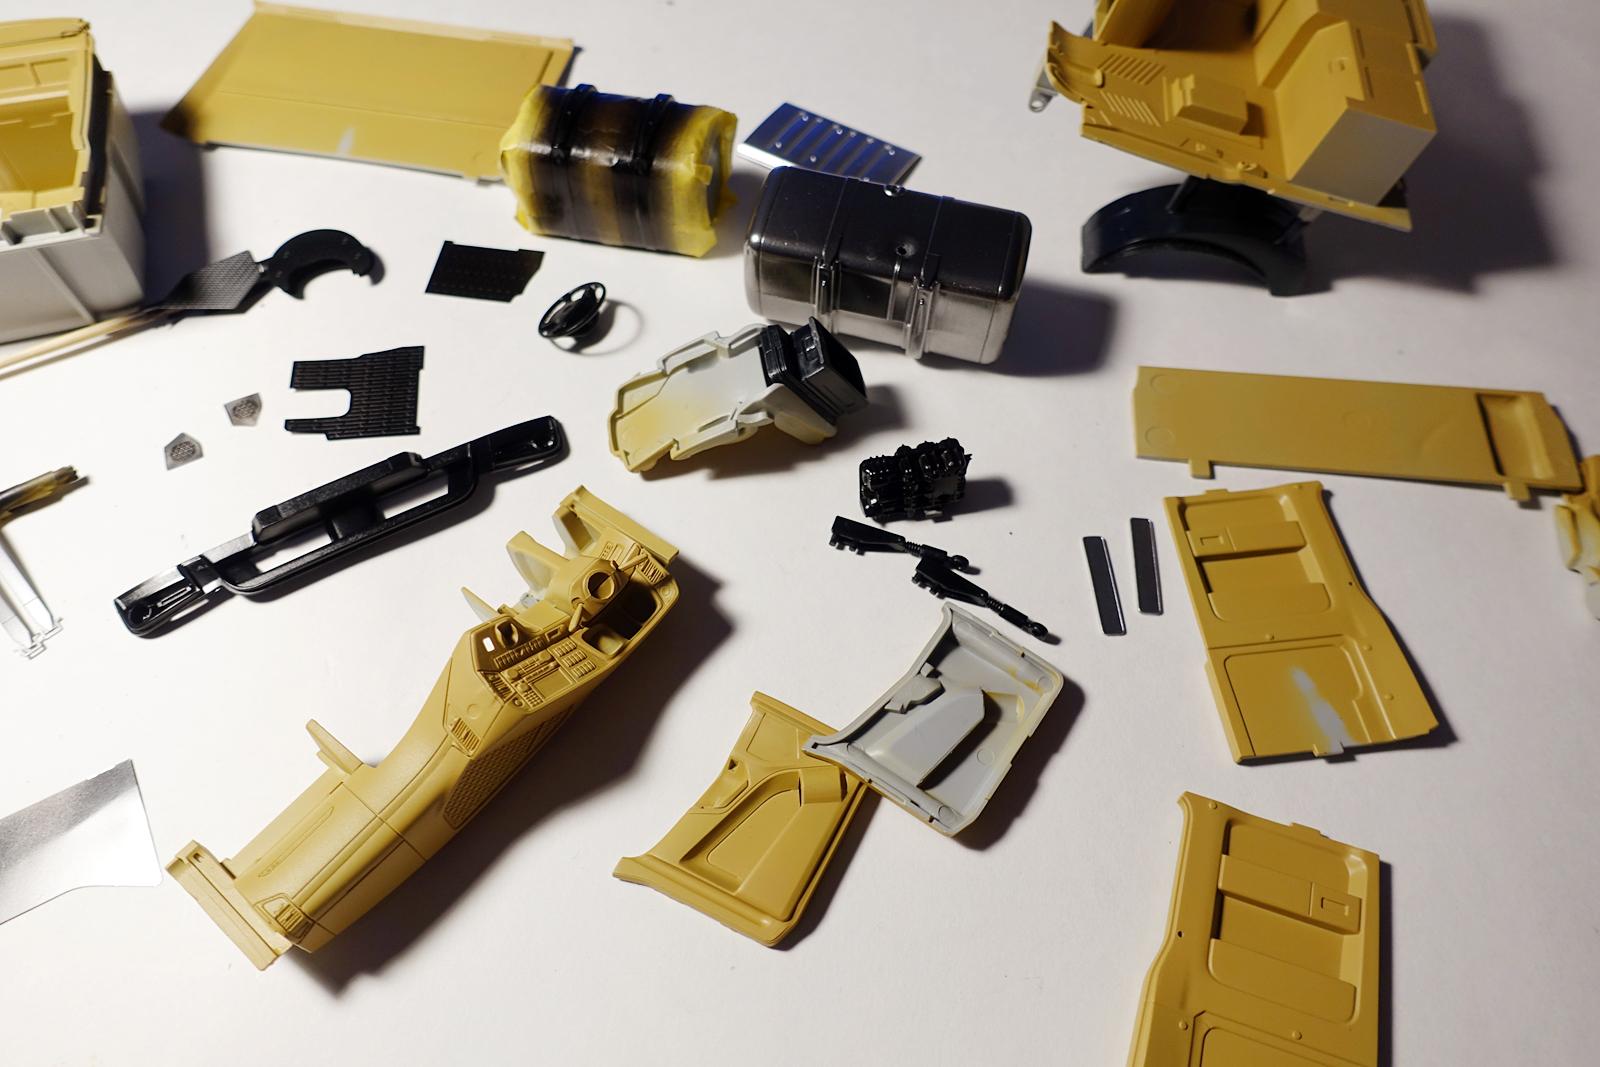
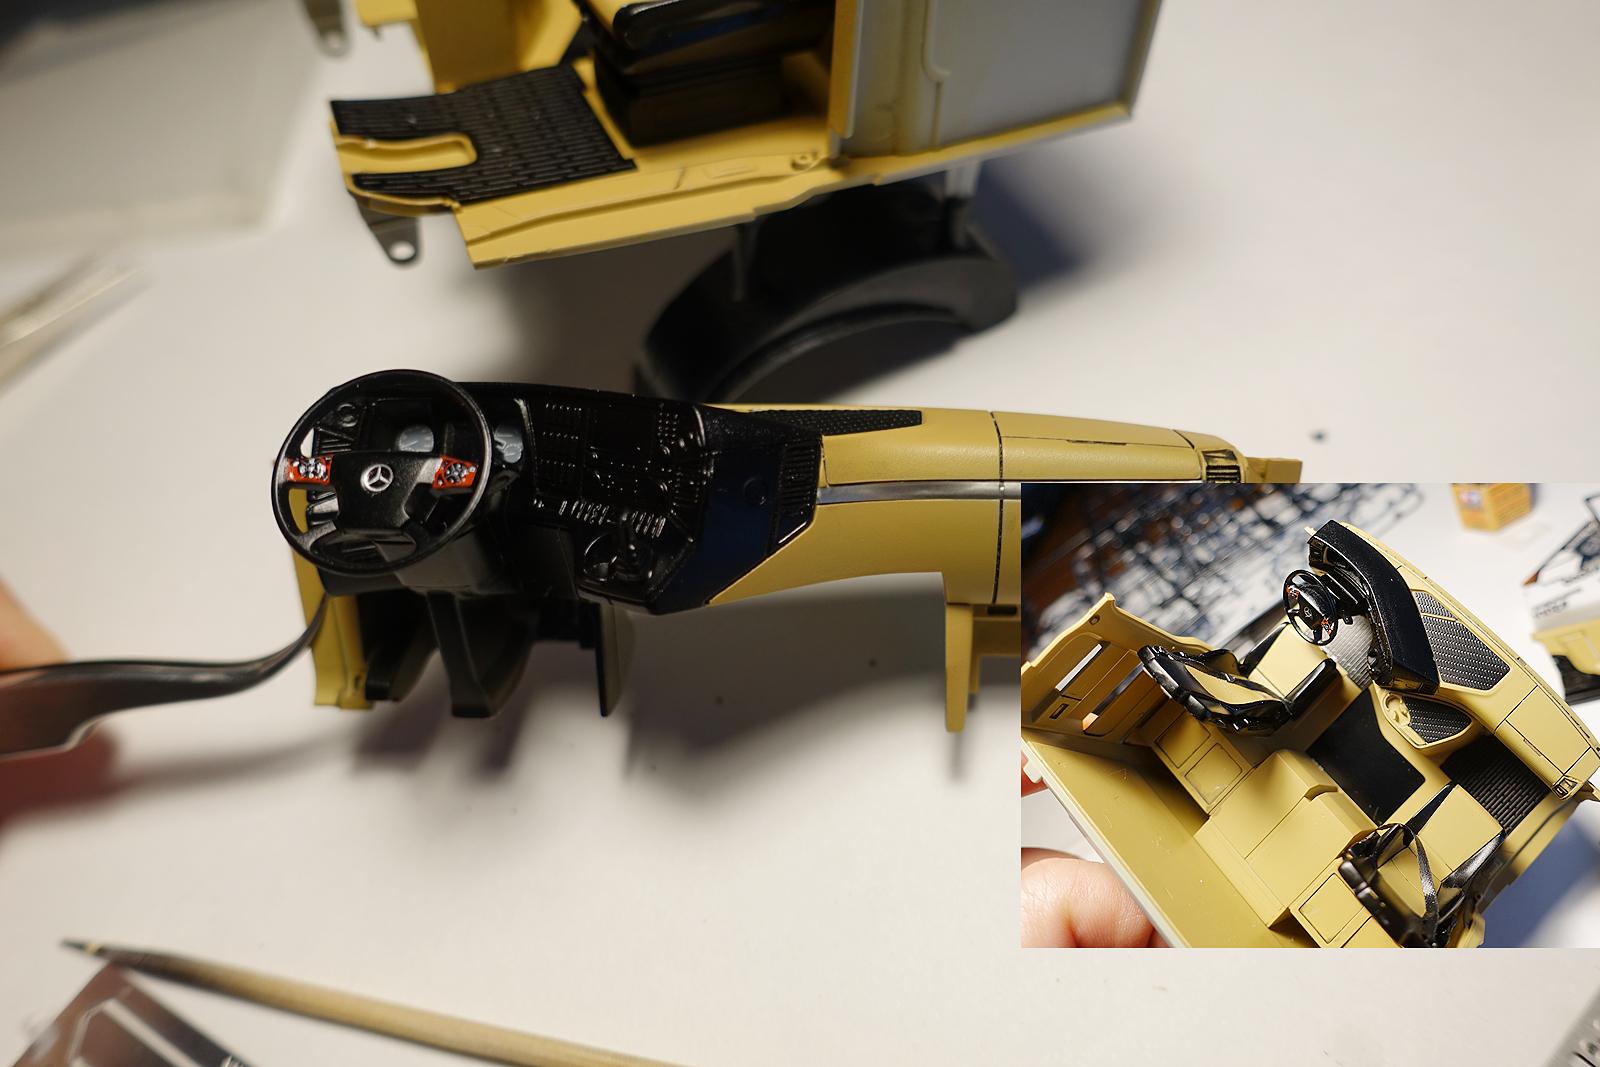
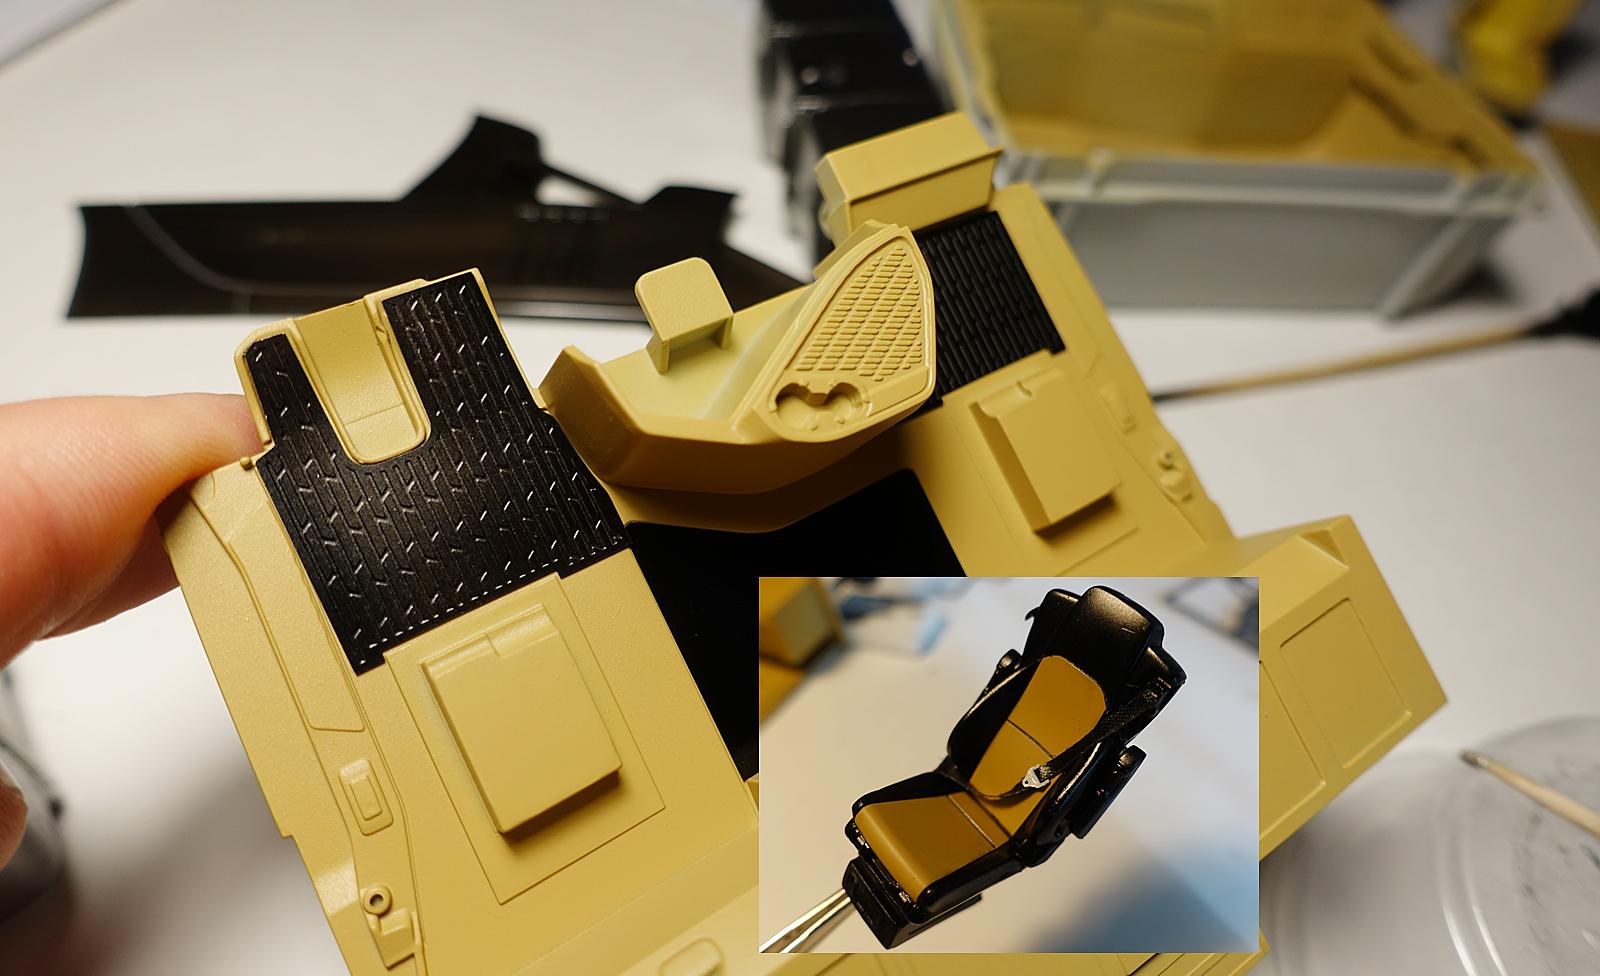
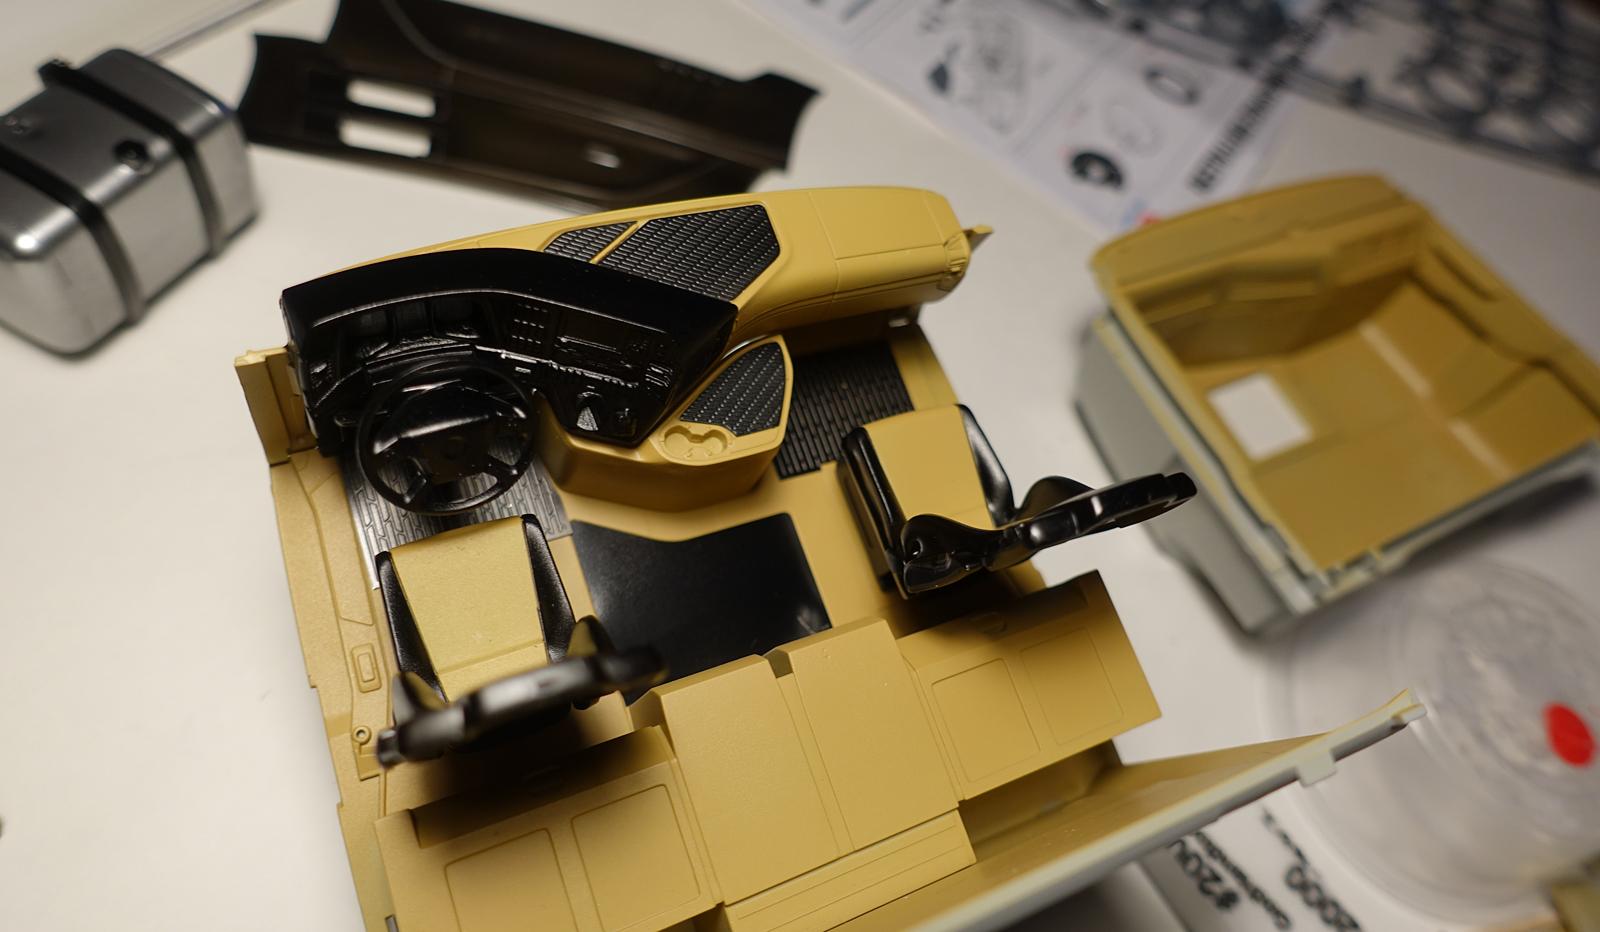
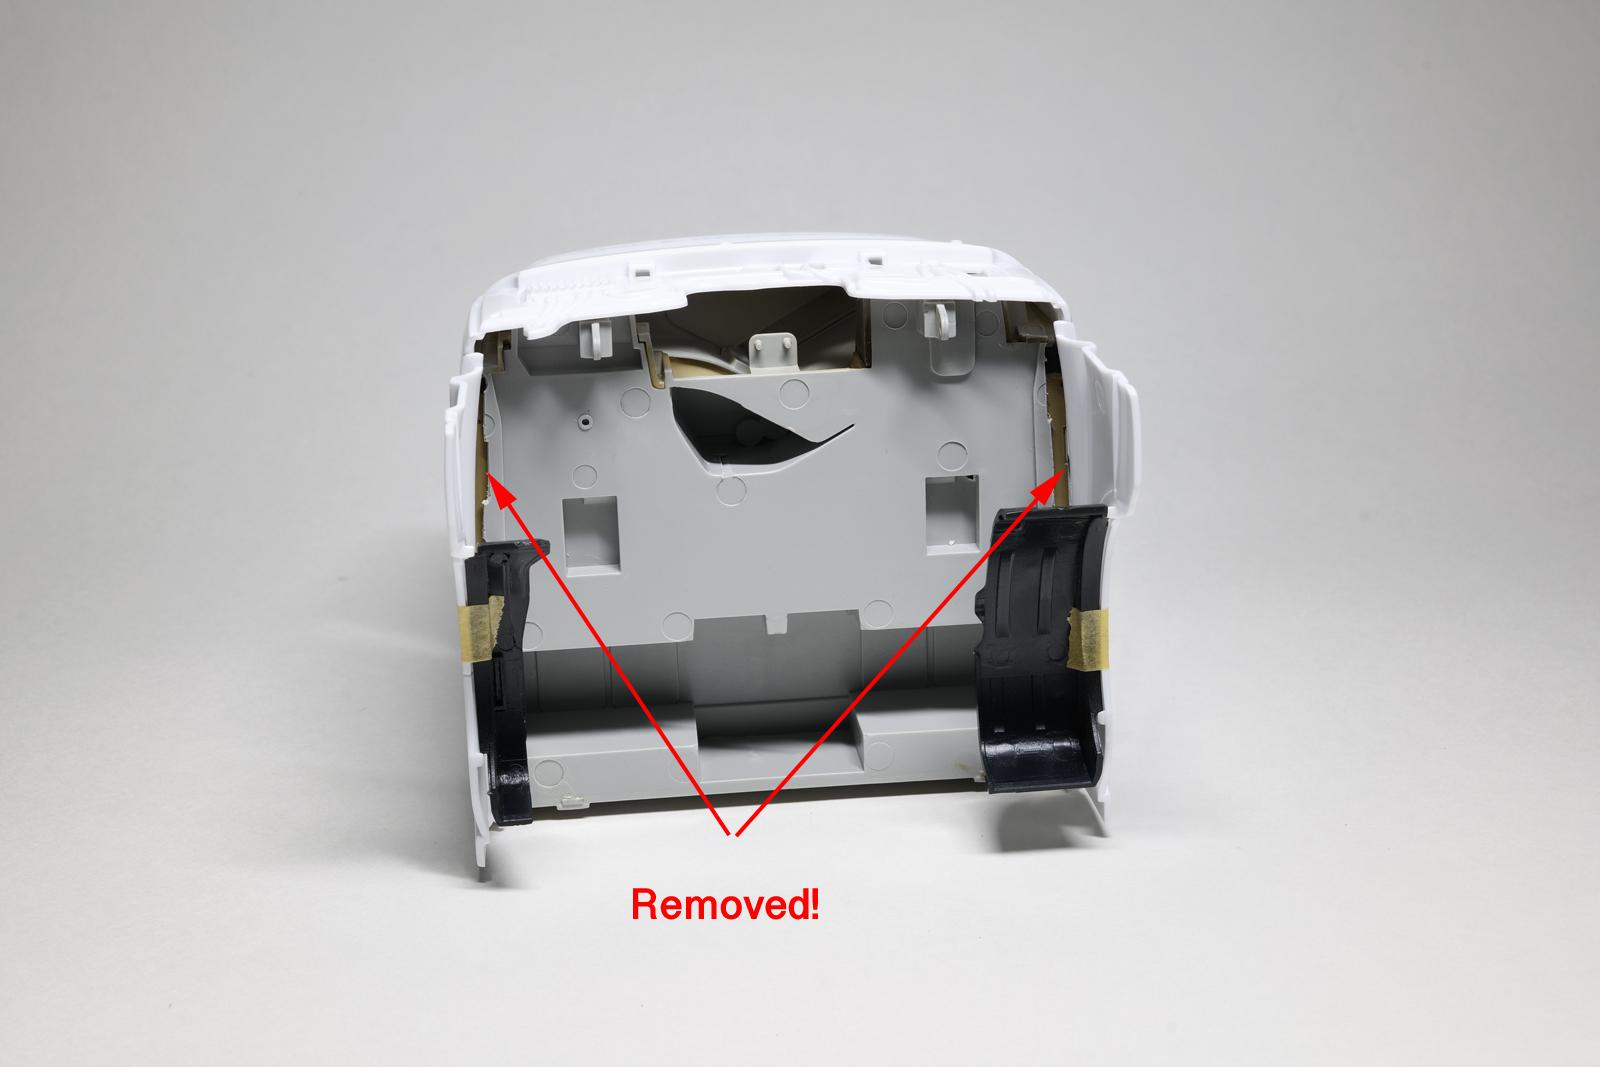
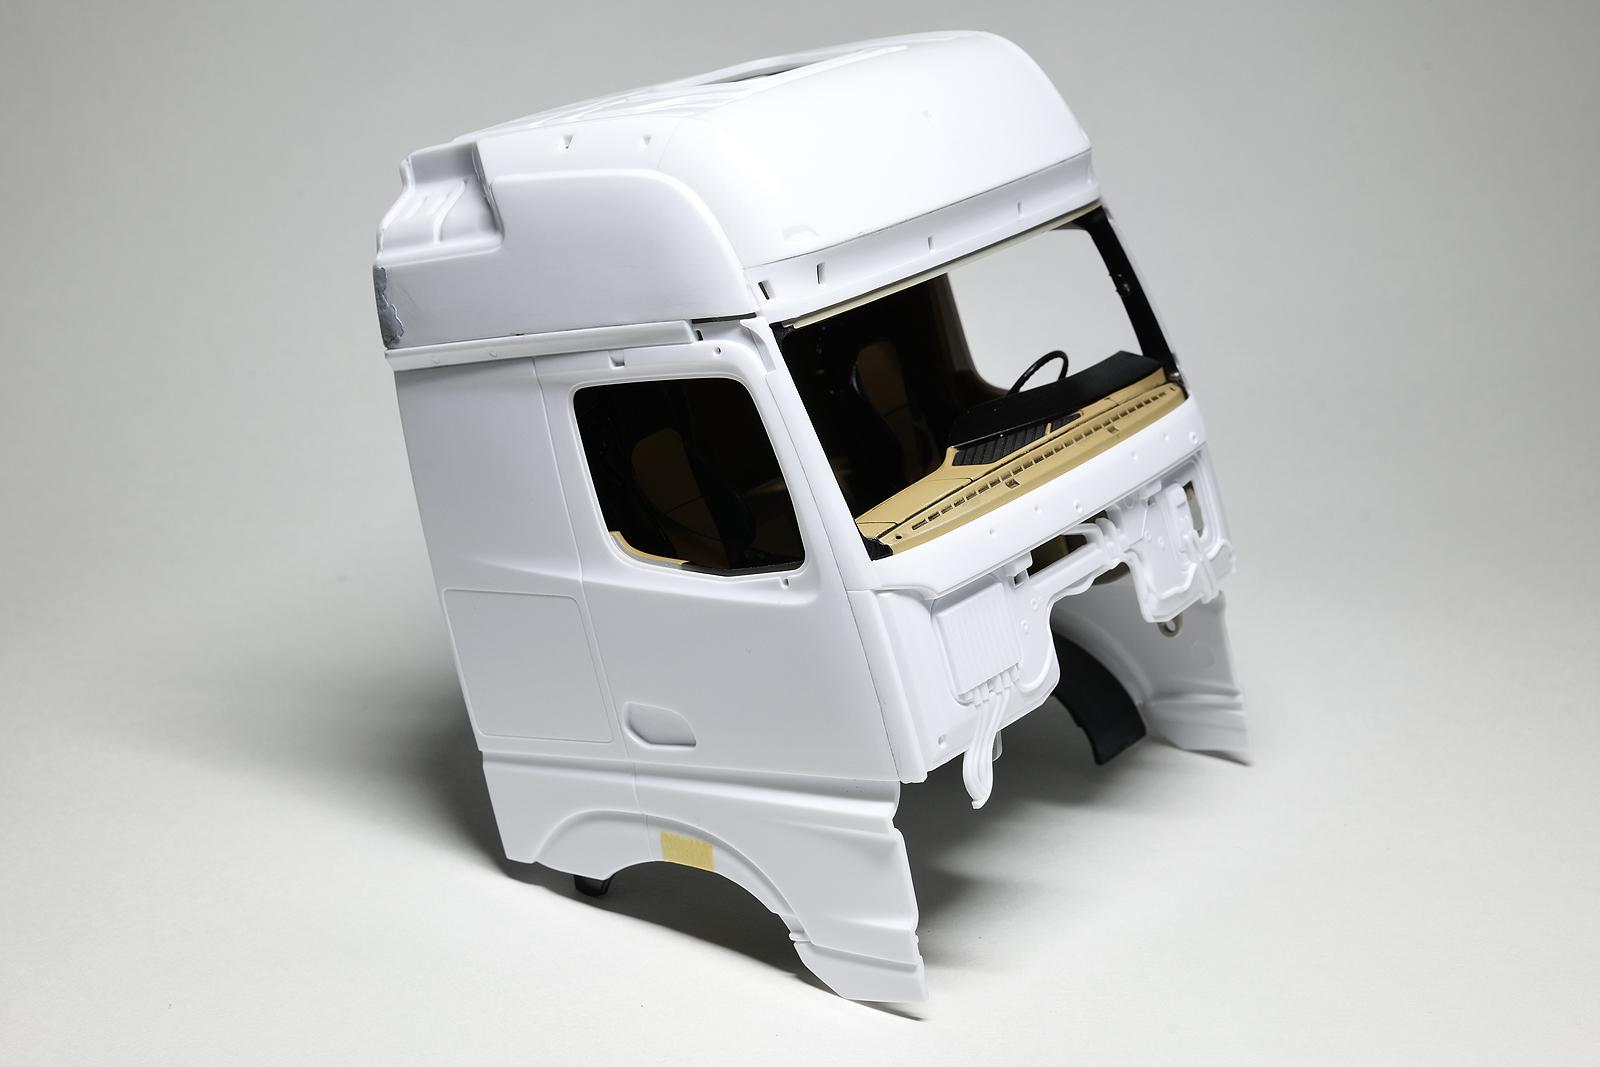
 Made more progress. I need to finish this truck quick with quality. The interior work is started and for simplicity, I decided to use two tone interior with no other additional details. I am going to paint the exterior cab as one piece. As I mentioned from previous post, Italeri doesn't want you to do that. But I will make some small modification to the kit to allow it! Italeri steps: build/paint interior cabin paint each exterior panel attach exterior panels around the interior cabin My steps: build/paint interior cabin modify the interior cabin so it can be detached from the exterior attach unpainted exterior panels around the interior cabin (except the back panel) fill/putty joint seams take out the interior cabin paint the cab as one piece reassemble the interior by inserting back to the cab I didn't mean to complicate things, but looks like I just did! My intention was not to add interior cabin details here, but I did work on "minor" ones. For the interior cabin assembly, P/E sets are used. In this case, sun visors, floor mats, and speaker covers. I don't know how much it will improve the overall look though. It is going to be quite dark to see inside once the truck is completed. The kit has great details already! Again, I made no attempt to further detail these other than paint in black. Painting time! Roughly took 30 minutes and I am assembling things right away. Lacquer paints do dry quick and hence I can work quicker here. I used Sandy Brown from Mr. Hobby for beige tone and used semi gloss black for contrast. Basic seat belt material is included in the Hobby Design detail kit, so I added two seat belts. Some aluminum trims were added using metal foil strips. I believe the interior cabin work is done here and the interior work took about an hour from start to finish. I also started to add details for fuel tanks. First I simulated the rubber gaskets for the tank straps using flat black and then added the P/E tank straps on top. The tank straps were painted with black primer which should provide paint-chip resistant finish. This is how I was able to insert/remove the interior cabin. I cut away the cabin floor from each side(about 0.25 inches). Then carefully glued all of the exterior panels except the back panel. This setup allows me to insert the cabin interior from the back and push up. To remove the interior cabin, I can pull it down and back. I can simply glue the back when everything is done. The joint seam is actually hidden for the back panel so I am hoping everything will work out. Lastly, the bottom will be covered with a thin styrene sheet so no one will know what I did... Filling the gap and seam everywhere. This was the step that I wanted to do prior to painting. So far so good. A new problem: tilting the cab forward lifts the back end. I will need to add some weight somewhere... If I were to build this kit next time (I do want to build one properly!), I may add clay or play-doh inside of those fuel tanks to balance the weight. My next step- painting the body!
-
Lovely collections! Each build has unique body color! Great job, indeed!
-
Wow, what a beautiful build! Love the color and overall finish is excellent! I thought it the was the photos of actual car till I saw people figures. And I want that RC cola vending machine!
-
AMT "Miller" GMC Astro 95
cifenet replied to Goodwrench3's topic in WIP: Model Trucks: Big Rigs and Heavy Equipment
Looking good and things are in the right spot! All your engine pipes are connecting well also! I remember building this kit as my first truck and it was difficult for me. When it comes to attaching things onto the frame, the instructions weren't explicit and I had to do many "trial and error" approach to connect all the dots. Interestingly, even with all the problems I faced, I had so much fun building one; I ended up buying another kit so I can build another one in near future! -
It's in the post!
cifenet replied to Rockford's topic in WIP: Model Trucks: Big Rigs and Heavy Equipment
Hi Steve, At first, I didn't understand what you meant by post, but I figured it out. That is some work you are putting into. If you didn't tell, I would have thought that is how the kit came out as. It definitely adds details and transfers into something unique! -
My 75 Dodge Bighorn
cifenet replied to Scott Eriksen's topic in Model Trucks: Big Rigs and Heavy Equipment
Great job! You replicated the actual truck very well. Love the front grille, matches perfectly! It could be just me, but the truck looks very sporty too! -
International PayStar 5000 with Rex mixer
cifenet replied to Dutzie's topic in Model Trucks: Big Rigs and Heavy Equipment
Is that real cement!? Very realistic indeed. The mixer looks very good, I like it very much. I also like that overall orange color, not shiny and not too faded. It is just right! -
GMC Crackerbox
cifenet replied to carsntrucks4you's topic in Model Trucks: Big Rigs and Heavy Equipment
Nicely weathered truck you got there! It shows the truck has been providing its faithful service many many years. That half hanging front license plate is a nice touch. Thanks for sharing the work! -
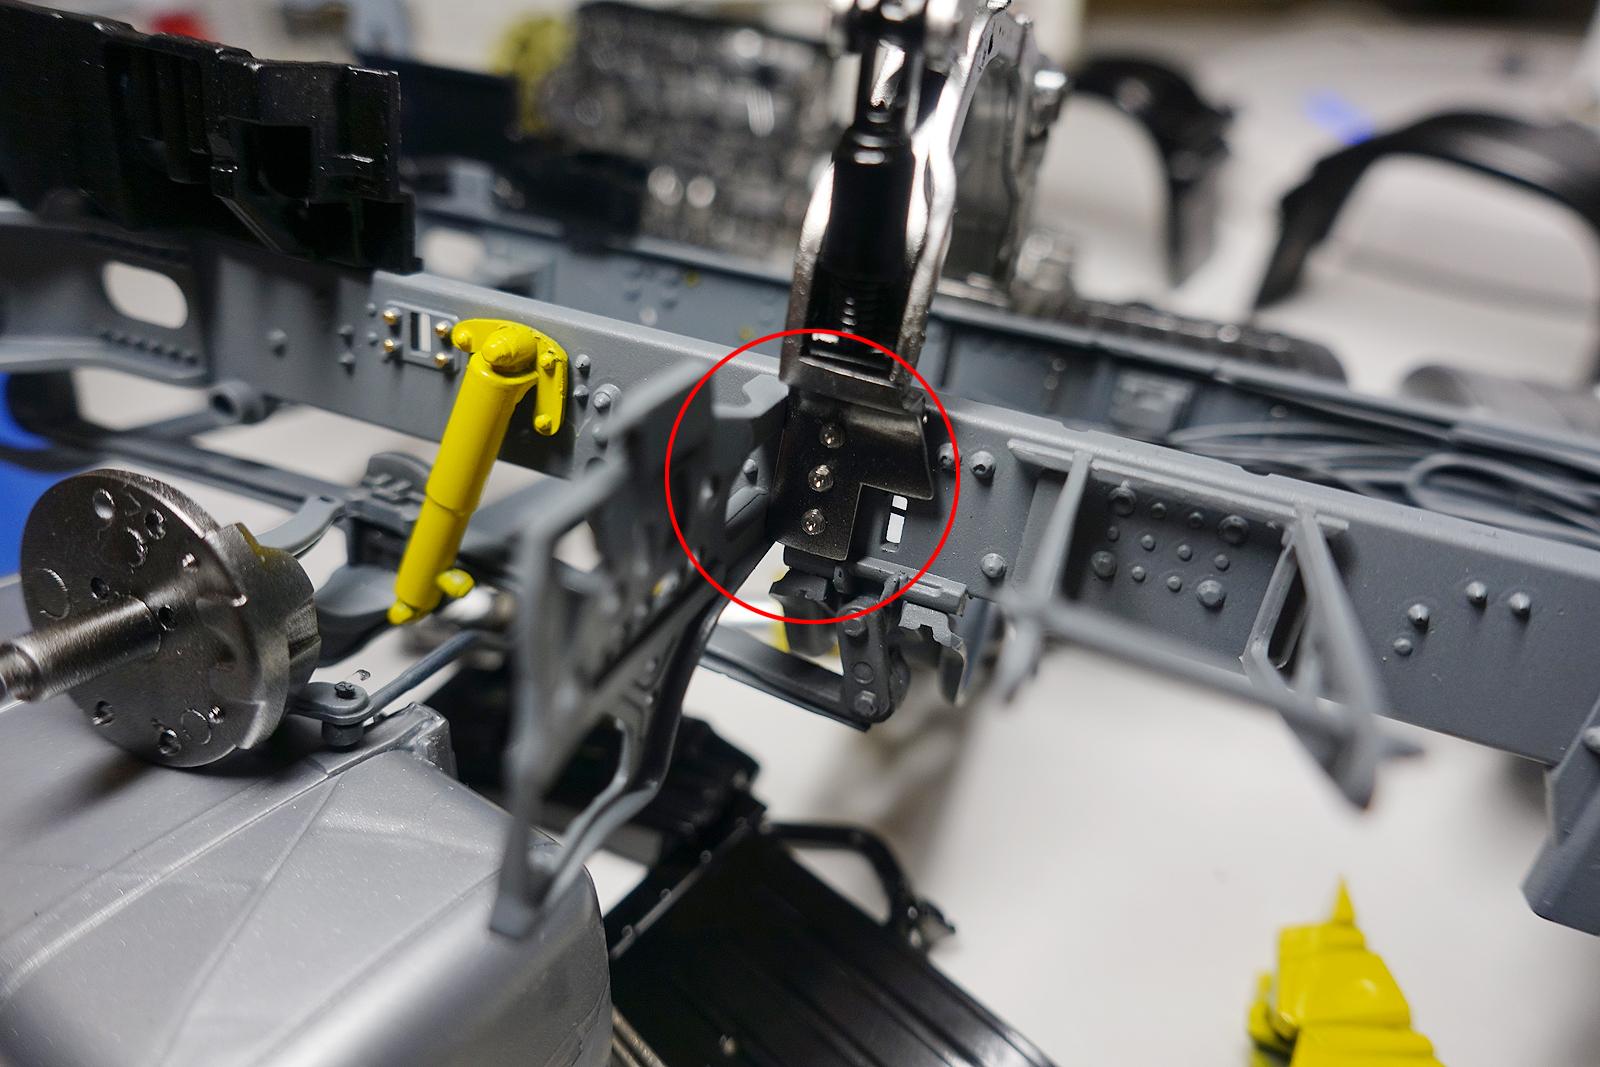
Happy New Year Håkan! Thanks for the feedback on this and keeping this build with me. For the problem, maybe I wasn't clear when explaining the issue. I wish it is the top grille that interferes, but unfortunately it isn't. The problem is with these two pieces (two red boxes) having no clearance and preventing the cab movement: To be exact, these four corners (red arrows) get locked in. Tightly! After studying the mechanism from my mock build, in order to display the truck in tilted forward position so engine bay is revealed, you must tilt the cab and assemble first, then attach this bottom piece. The cab will rest on the top of this bottom piece and it keeps the cab in tilt position. Wow. I am going to modify the hinge (green arrows) so the cab can be pulled upward when tilting is required. That can provide some extra clearance to tilting and it shouldn't increase the existing height of the cab. Hopefully, it is a quick fix. Haha, you are correct, all of the clean diesel components including DPF, EGR, and DEF related stuff always give trouble especially as soon as the vehicle warranty expires! And I heard they are expensive to fix! What about that!
-
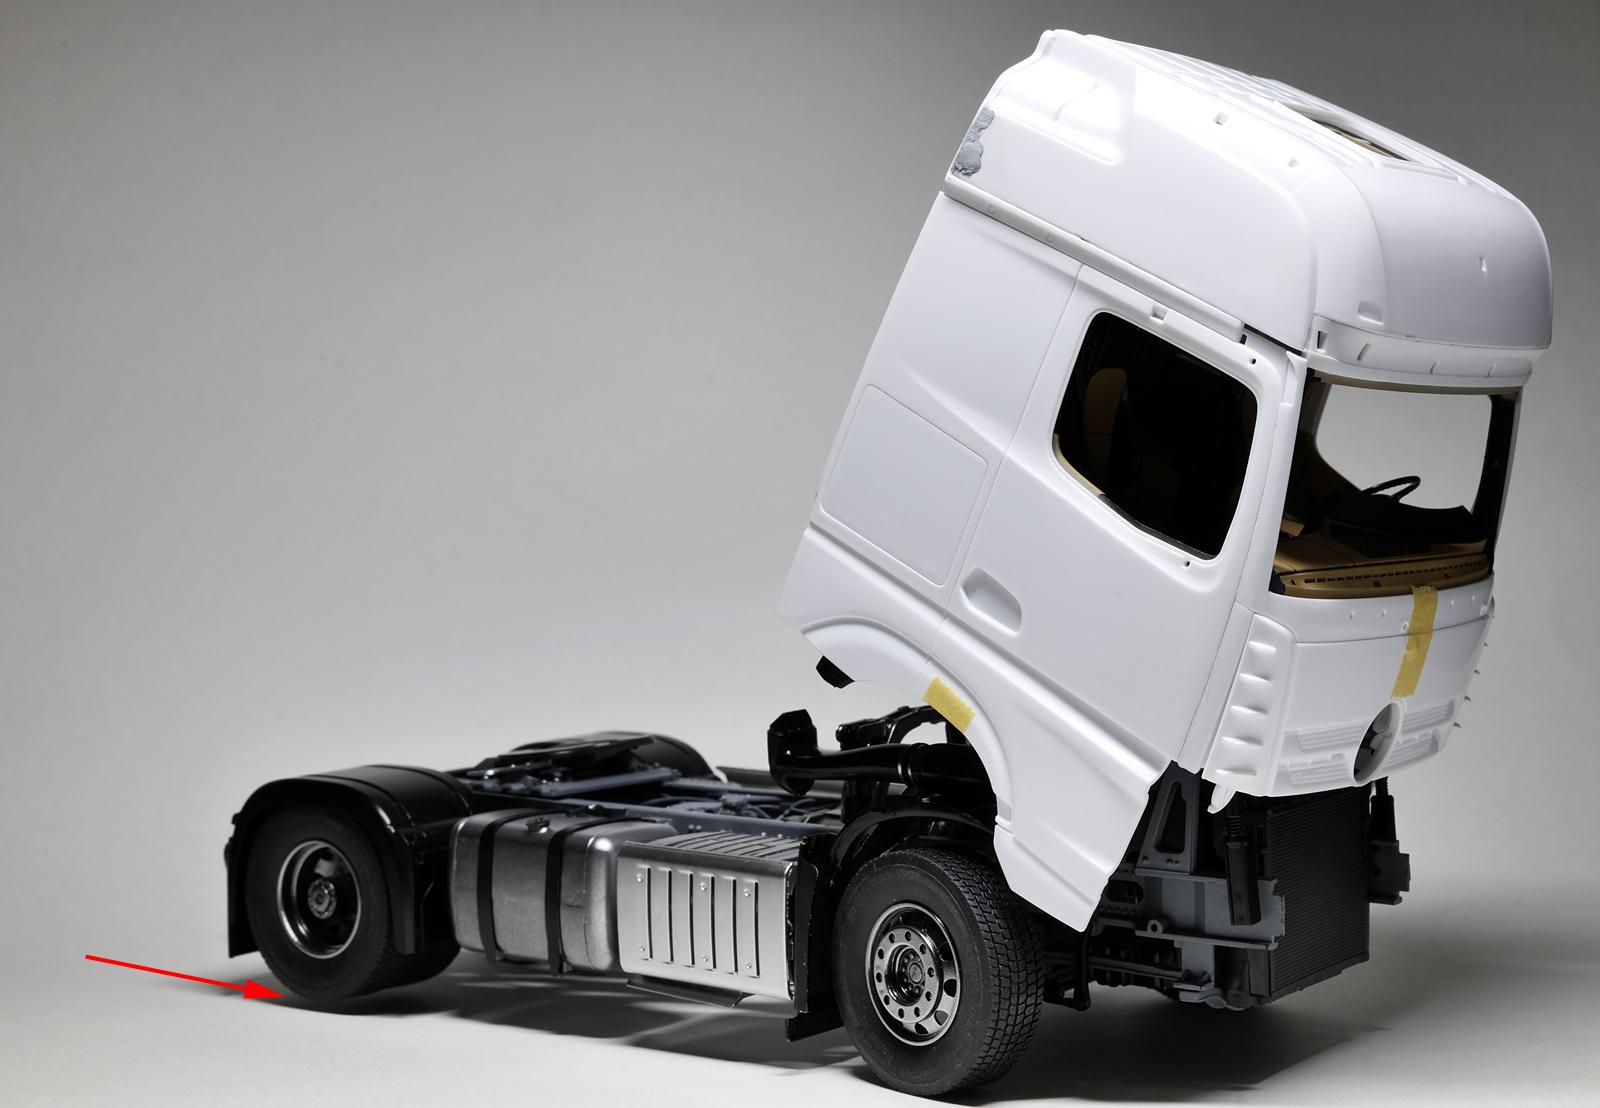
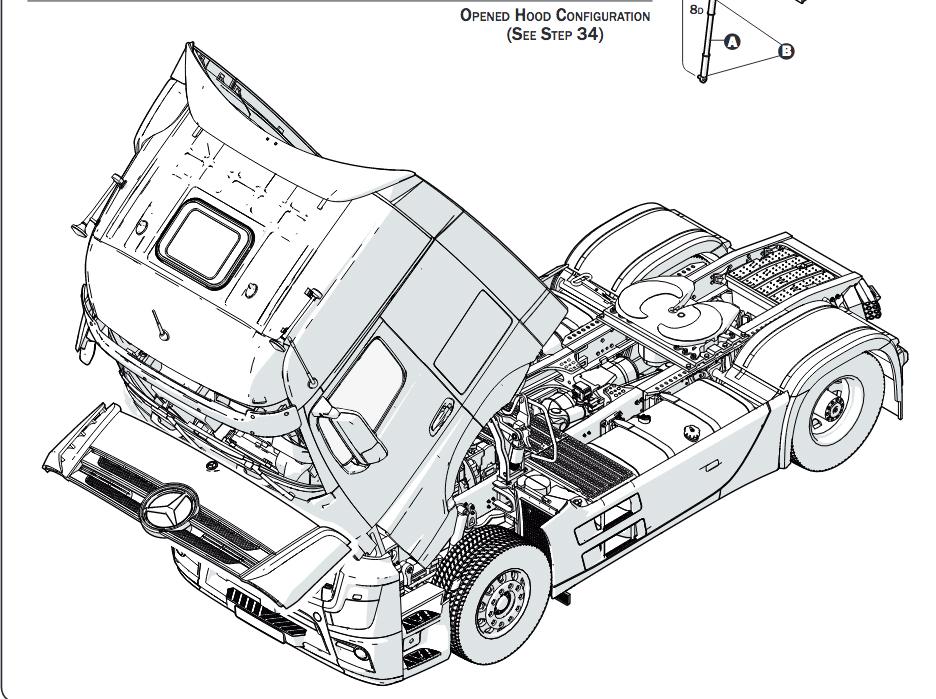
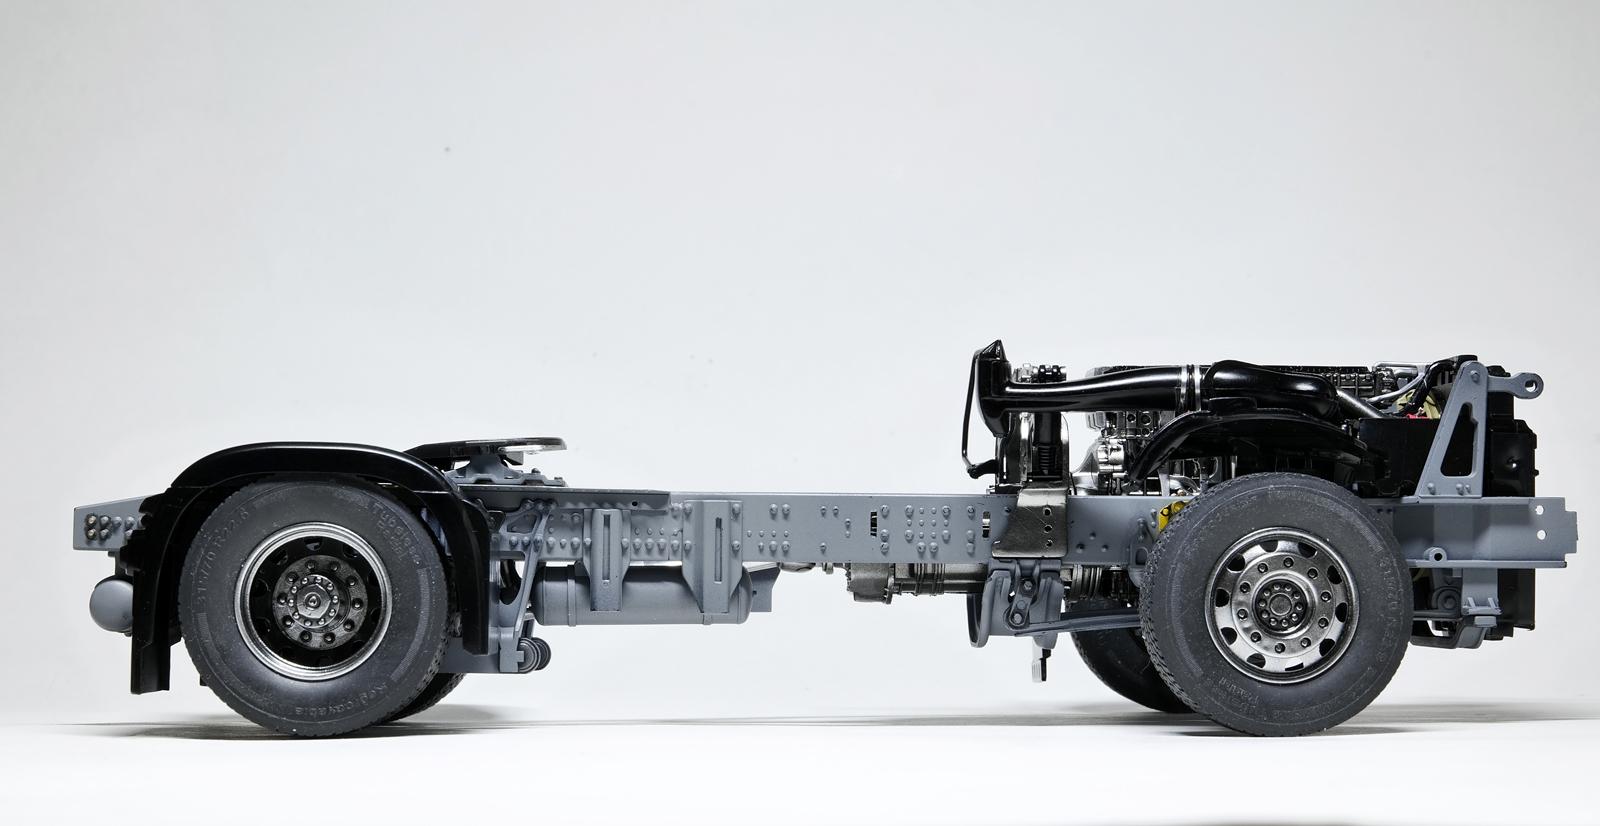
The GigaSpace is the configuration that you could order and it provides spacious cabin where you can comfortably drive, live, and sleep. Looking at the specification sheet, the head room is roughly 2.13 meters (84 inches)! You can stand and walk around inside the cabin. Not bad at all! I am slowly attaching each component one by one, and the truck is taking its shape nicely. Except a couple of "what to look out for" areas in this build diary, so far my build experience was quite pleasant. Yes, the rectangle looking silver box is the exhaust! I decided not to further detail the brakes. Once the wheels are mounted, no disc rotors/calibers will show up. After all, I am building this to finish quickly. I checked the fitment of various components including the air intake system. The lower body panels position well also and I verified their attachment locations. No unexpected finding so far and I started to "mock" build the cab. Using some masking tape to hold parts, I was able to complete this mock build. I examined things as to how I would need to build and paint the cab. I was basically planning my next move. I really like the look of this truck. Mercedes Benz did a fantastic job styling and designing this truck. I cannot believe this design is already 10+ years old though. Still the truck looks fresh and very modern to my eyes. By the way, this is when I also realized that I need to build this truck in one of the following configurations: Open hood configuration (means the cab in tilted position) Closed hood configuration (means the cab in driving position) The truck does not allow you to open and close the hood (cabin) once you make your choice and build that configuration. Strangely, the kit does have a functioning mechanism so you can tilt the cab! See below (red arrows): BUT the front bumper piece blocks the operation! I confirmed it with the instructions also, if you are building the truck in opened hood configuration, this is how the truck would look: I can't believe that my only option of displaying/revealing the engine is to make the truck in "Opened Hood Configuration". I wanted a quick build, but looks like this build may drag longer.
-
Thanks for the correction, Håkan! Hahaha, my honest mistake. I am so embarrassed! I guess the exhaust outlet is hidden underneath here, For some reason when I saw a duct pipe shape component, I started referring as an exhaust! Let me go correct my build diary here.
-
This is some amazing information and knowledge, Håkan! I do like the look of Scania T142H, it has that US truck look. Maybe I will try building one some day. Good to know it is a decent kit to start with. At any rate, let's hope Italeri can get their act correct and start producing more convincing truck kits going forward. P.S.- I had wonderful time visiting Stockholm and Gustavsberg right before Covid hit. It was unexpected, but I must say some of the best patisseries I ever had as well!
-
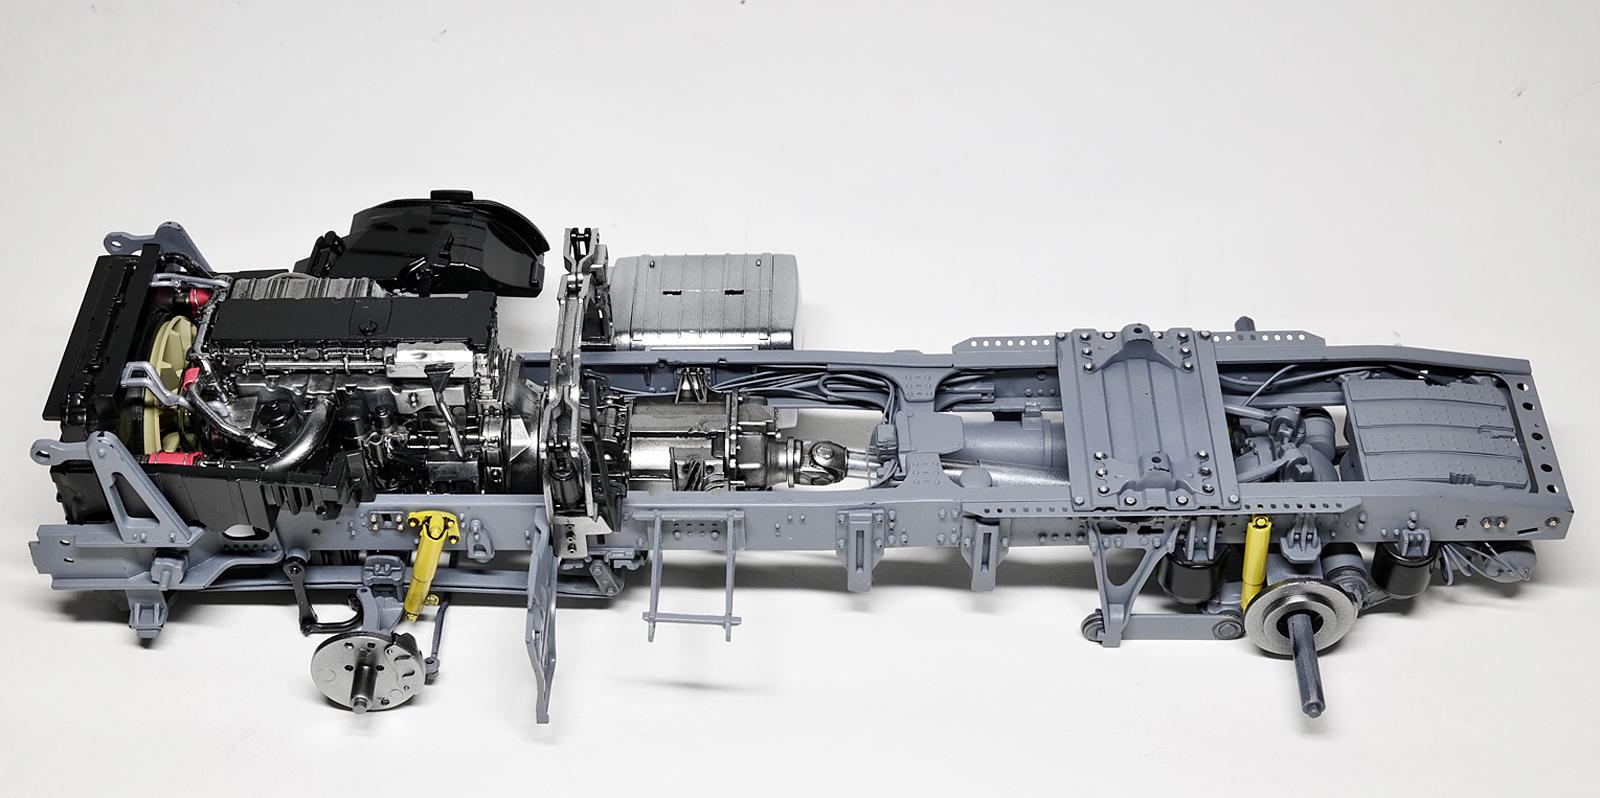
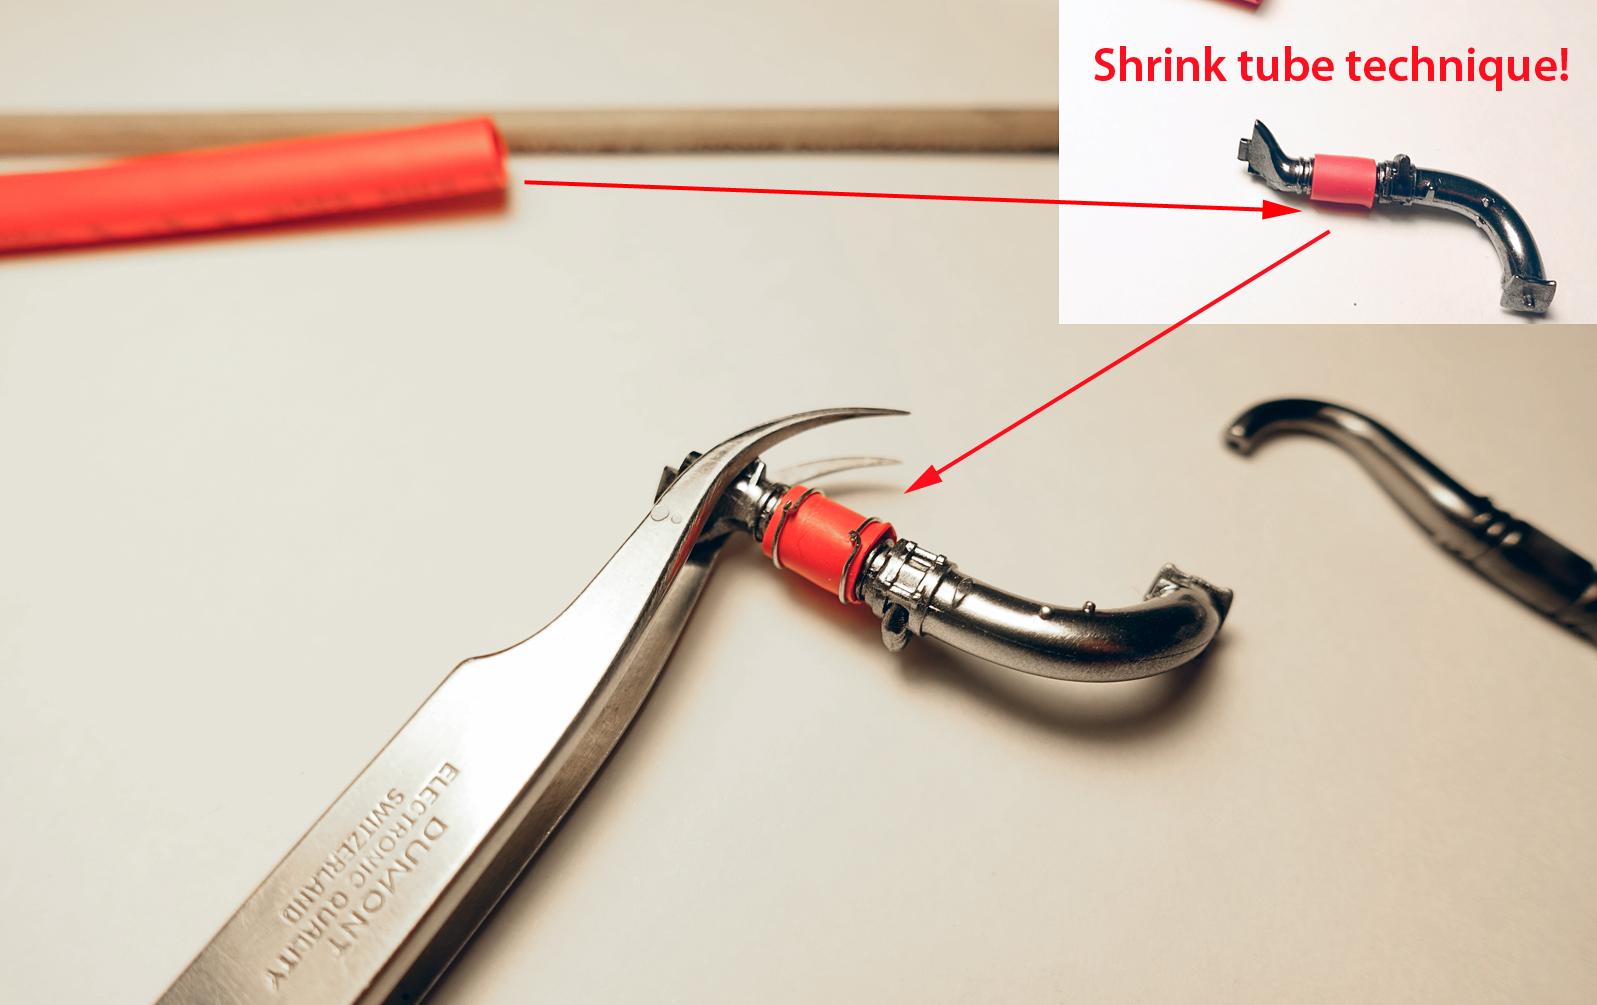
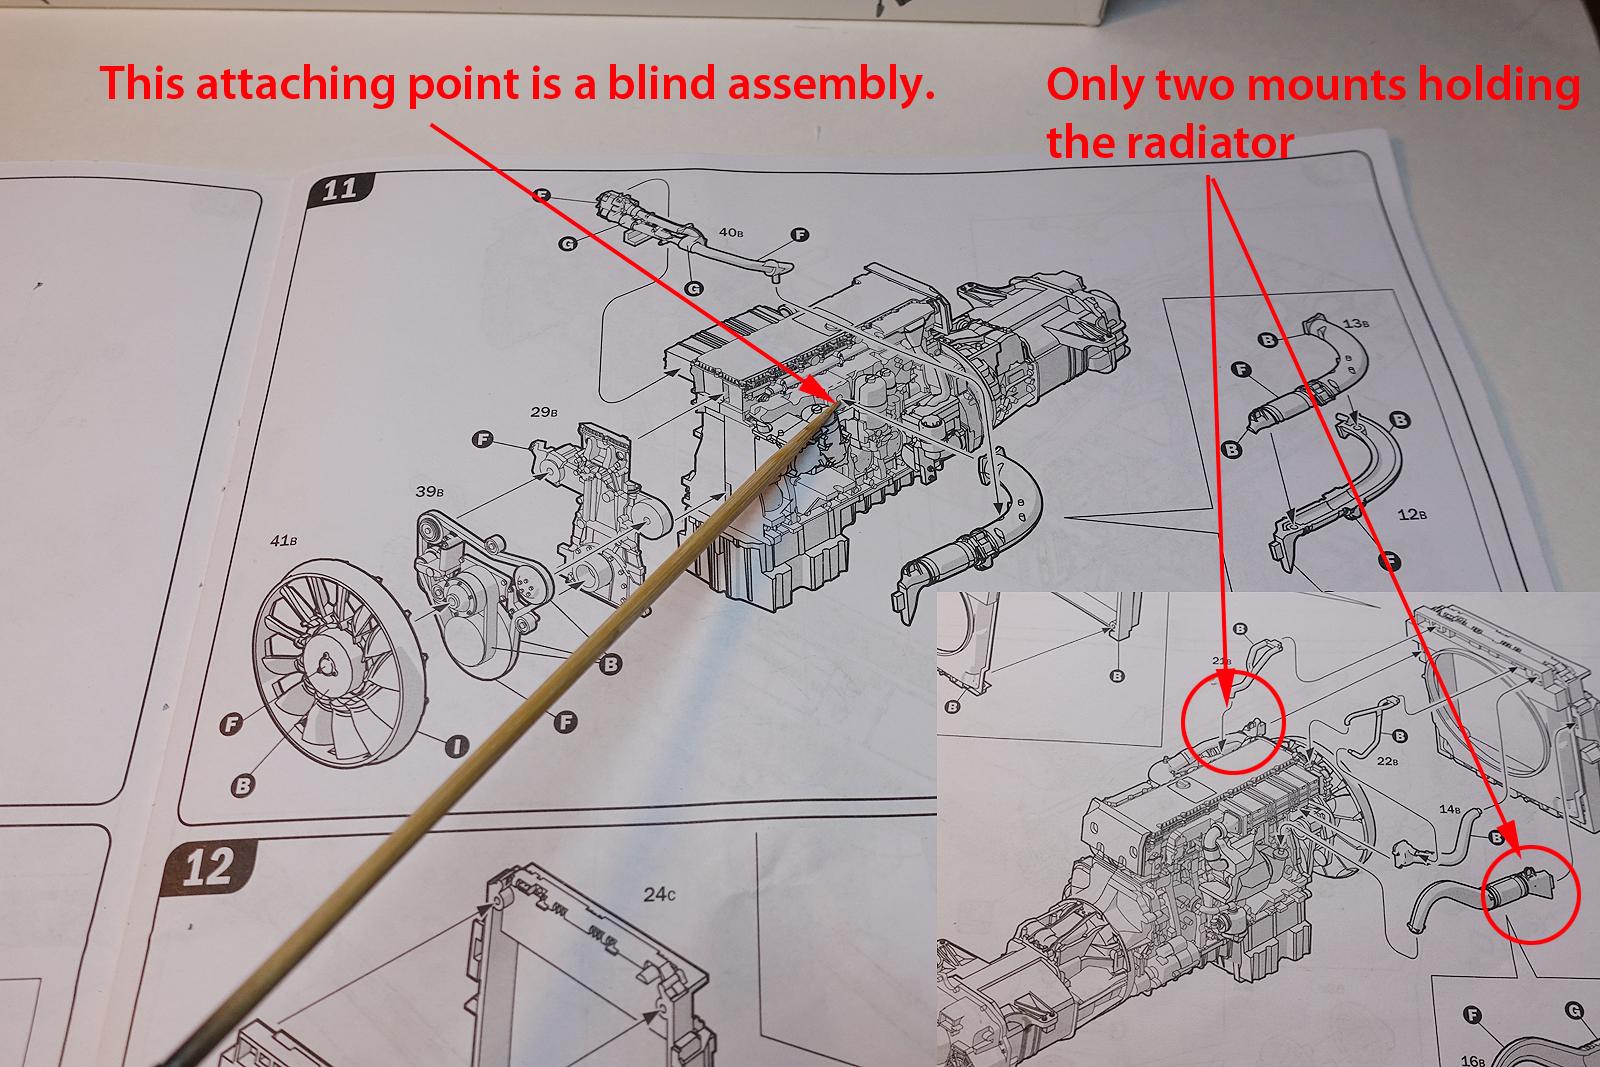
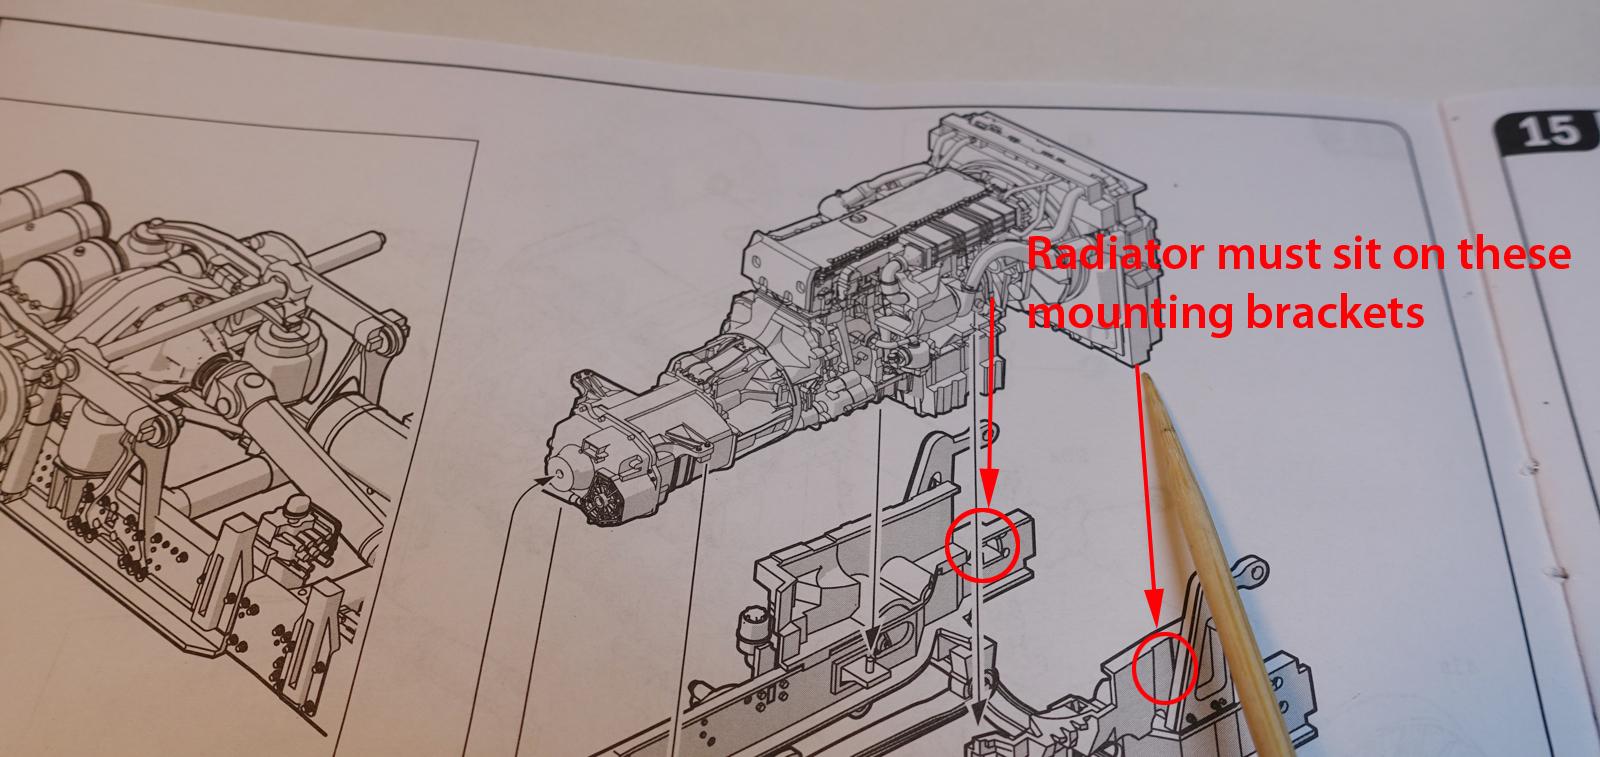
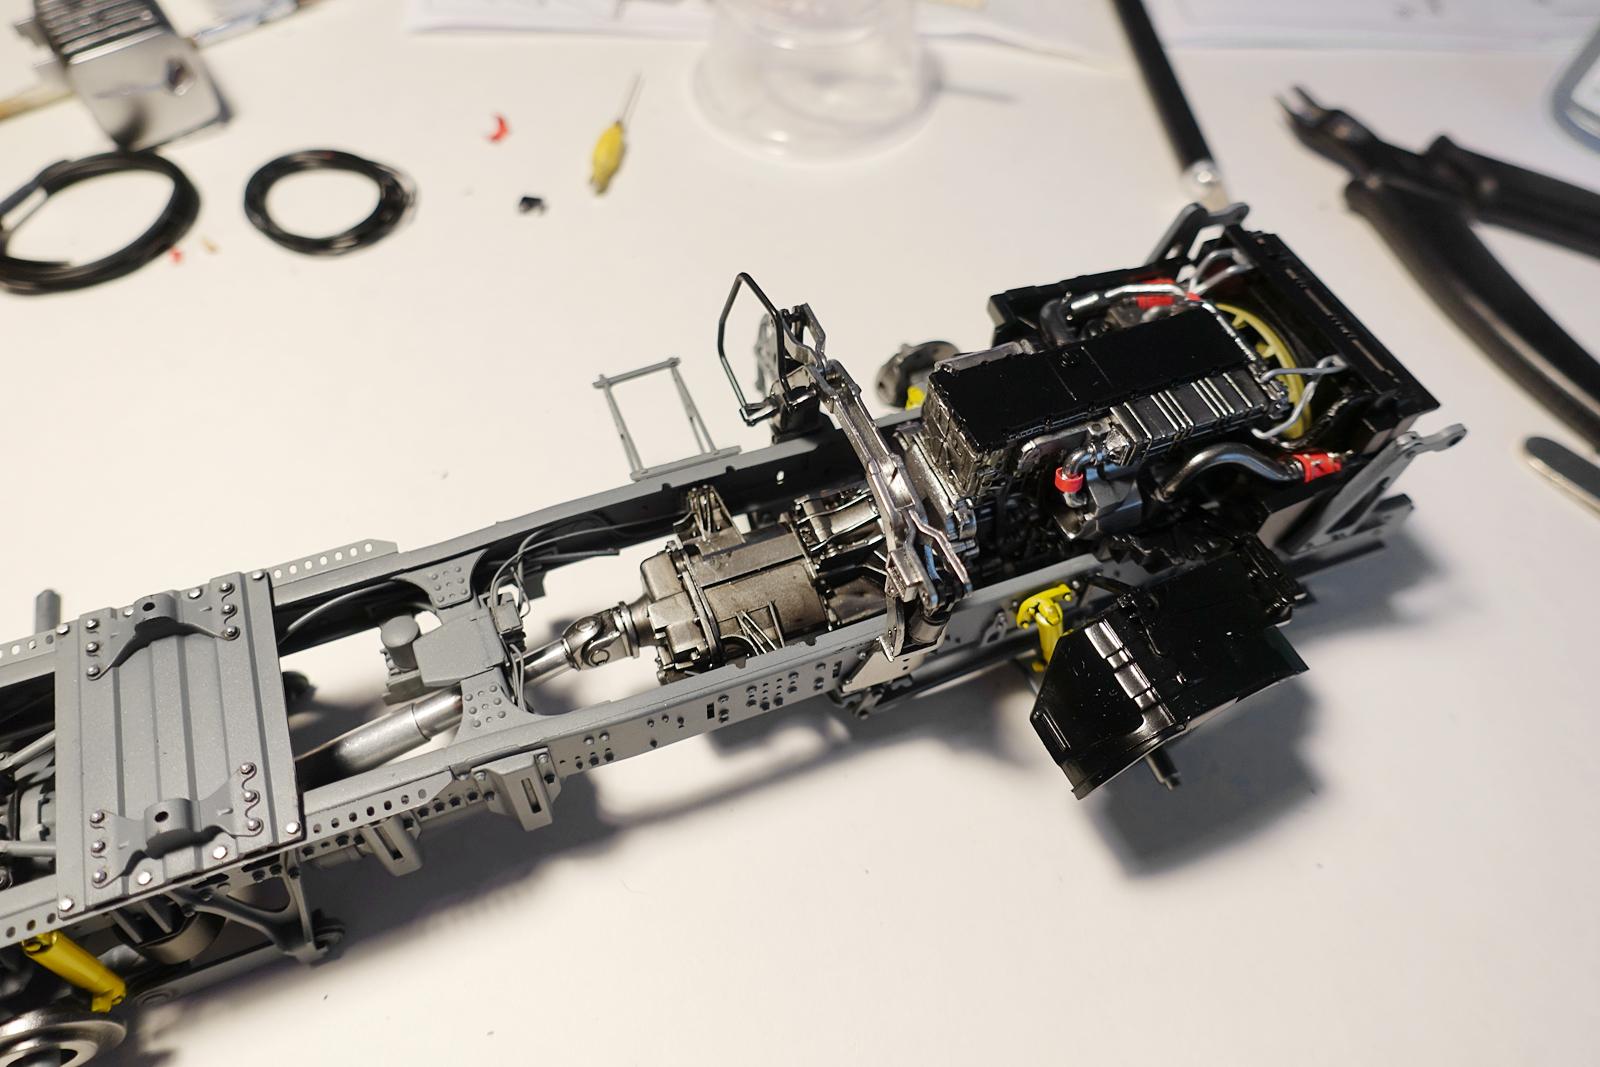
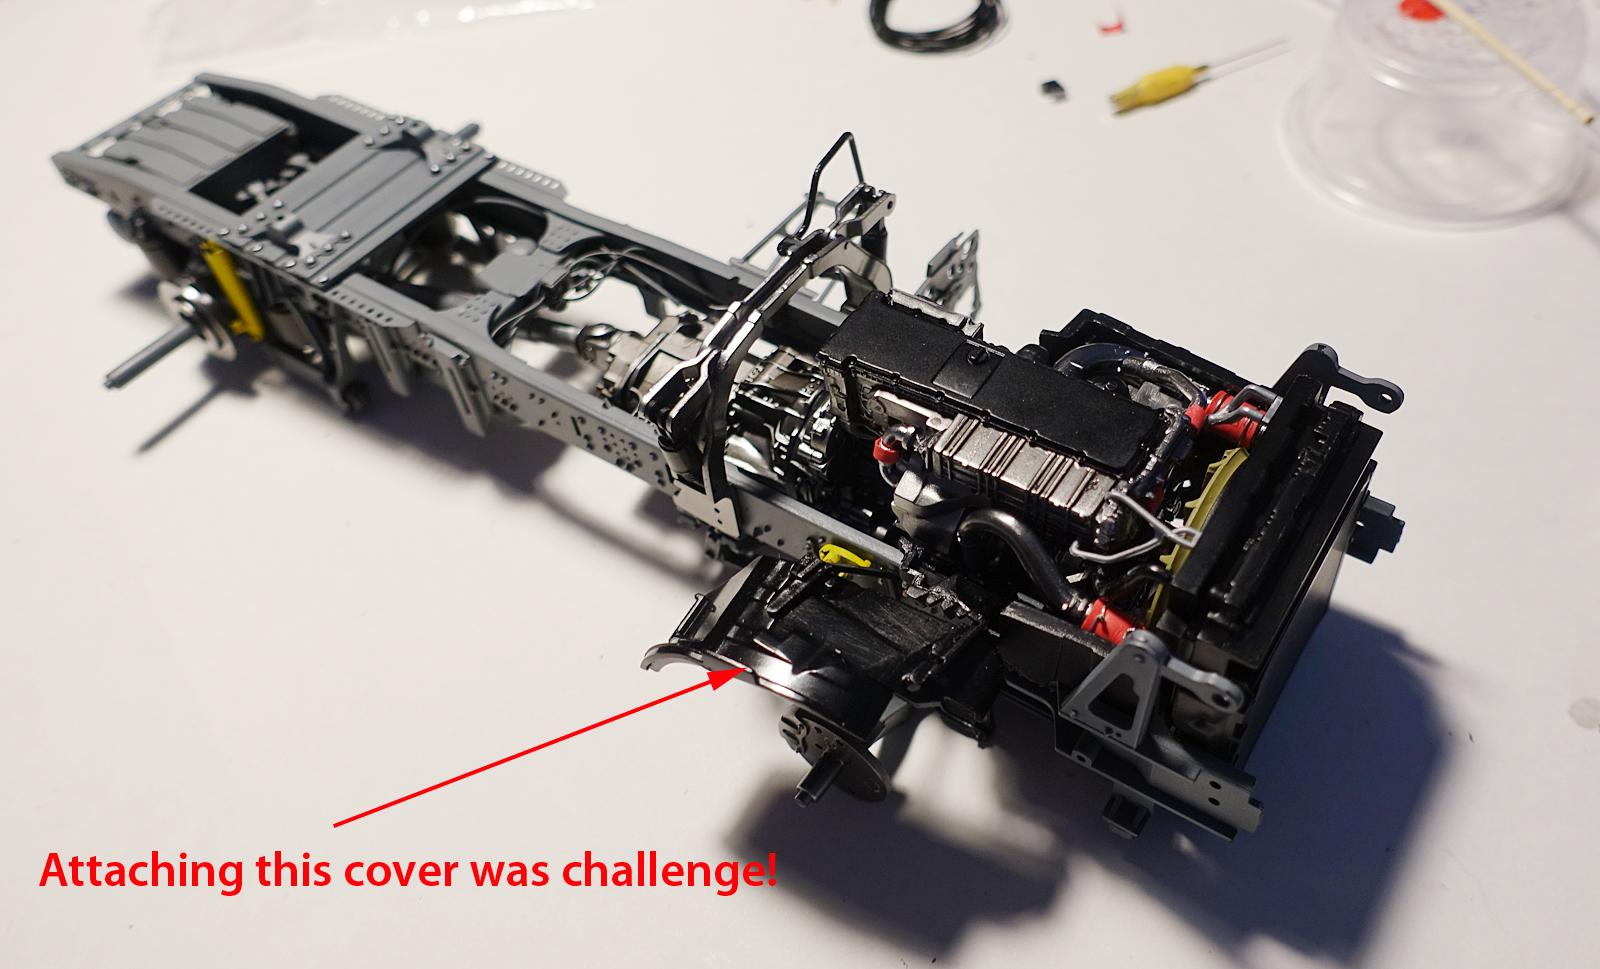
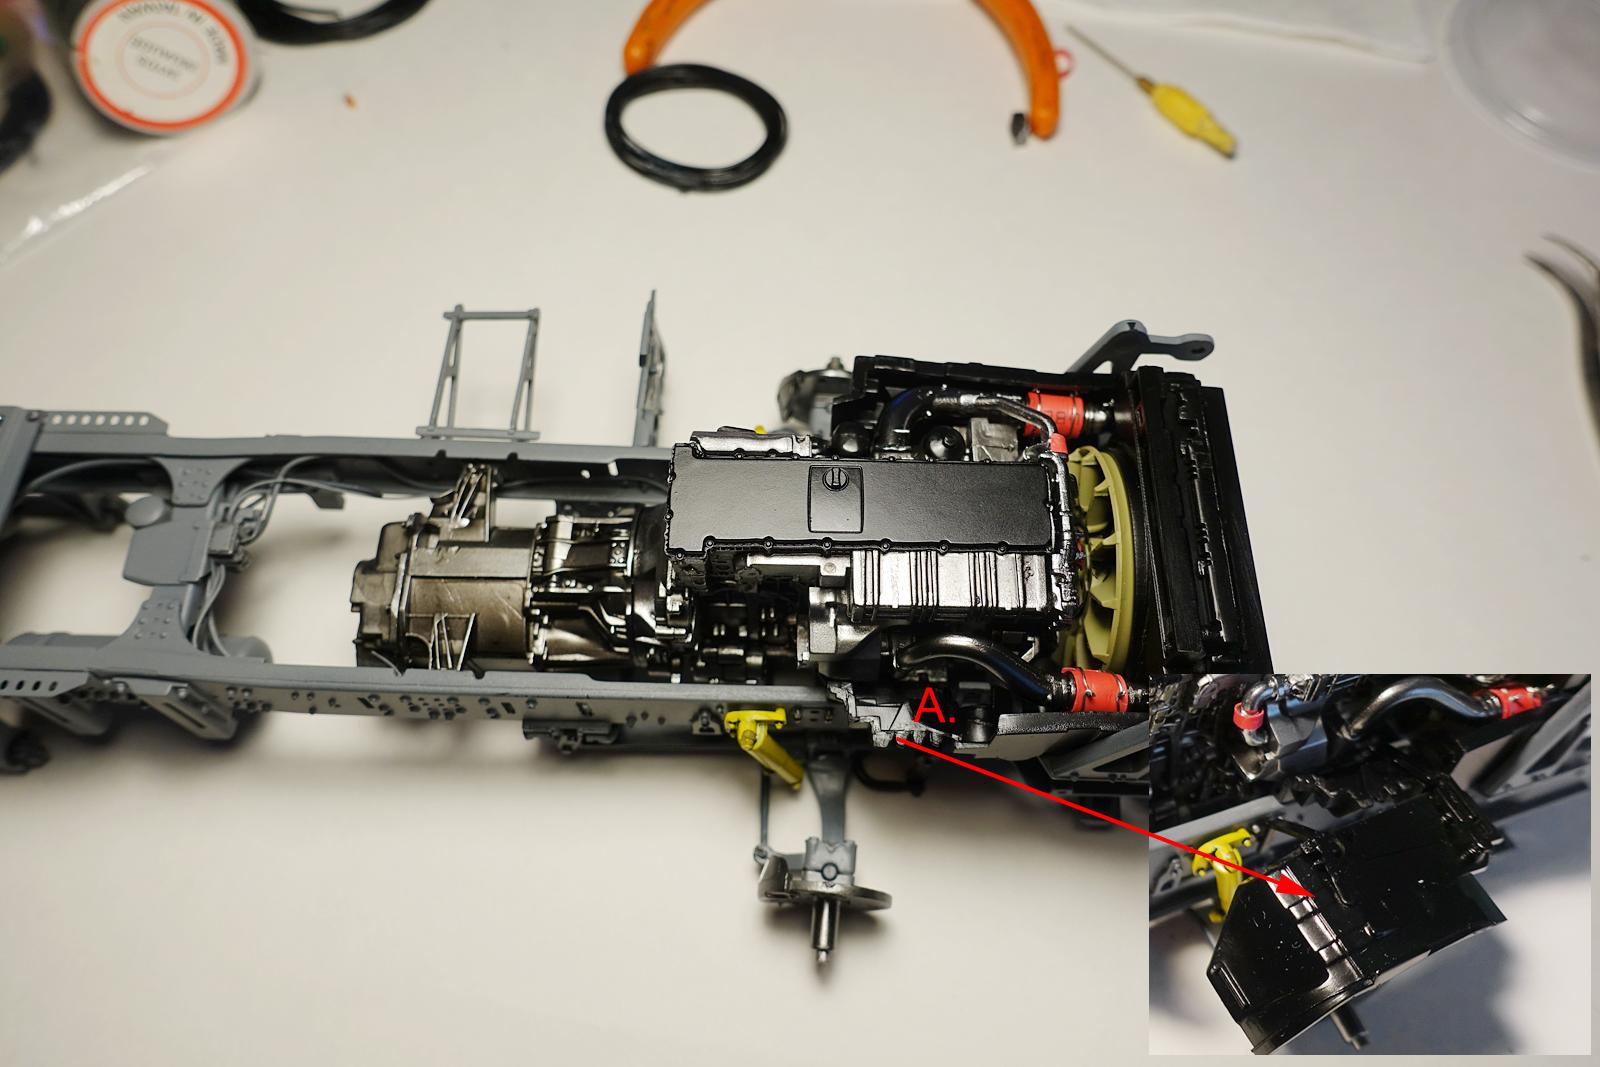
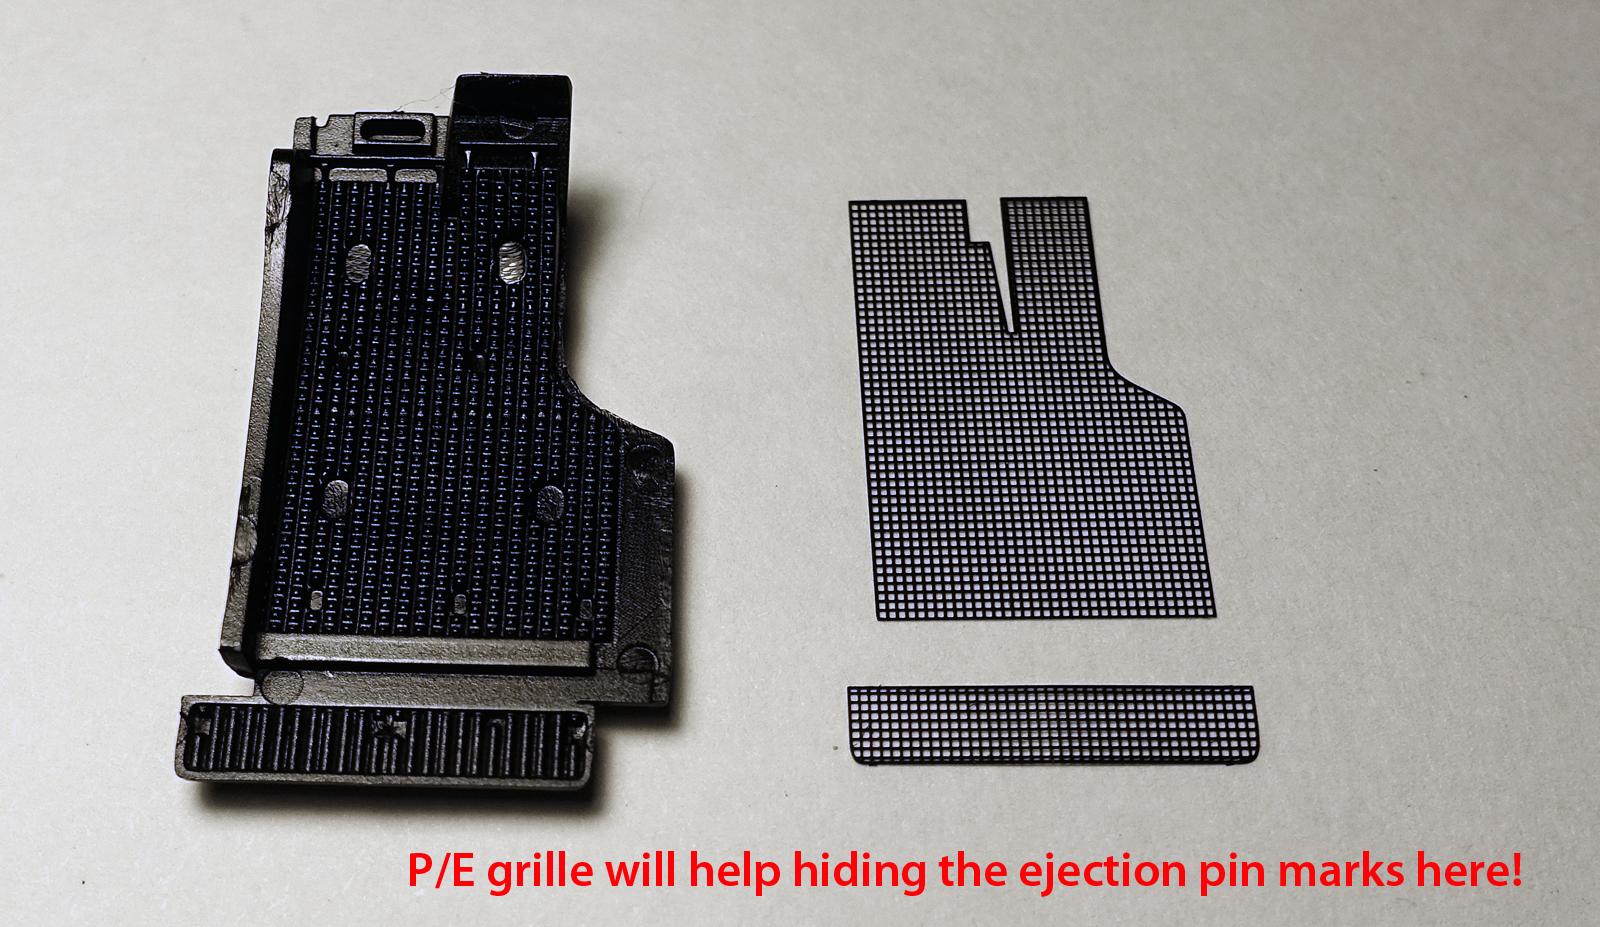
Interesting and informative discussions, I thank you gentlemen! The cabin assembly is something I will think about later, but for now, I am moving forward. The Hobby Design detail parts help improving the look of existing parts; it helped the mud guards assembly hiding pin marks. Moving onto the engine piping now. The instructions call for "red" gloss paint here, I used some red shrink tube instead. Then wrapped a thin wire to simulate the hose straps. These two coolant pipes on the radiator sides gave some problems attaching. They attached to the radiator suspended in the air. This is another challenge I faced. As you can see, these two coolant pipes struggled to hold the weight of the radiator. And I just can't attach the radiator without checking its position which is required in the next step. You may say, no problem, just super glue it! I can simply use CA glue to mount it securely, but then the radiator position has to be correct so it can sit on the radiator support on the frame. It really is a blind assembly. I had to repeat the assembly a couple of times till I made everything fit correctly. With the radiator mounted with coolant pipes on the side, it is a tight fit. So the correct positioning on everything is vital here. This is another challenge with an intake (not exhaust) mounting assembly. This is another blind assembly where the previously mounted location matters. AMT does this throughout their builds too. A. is where the intake mount arms are mounted to. My frame work is almost done, next I should be able to tackle the cabin interior work.
-
Same here, I enjoyed the discussions on Italeri kits and detail information on mold making concept as well. Thanks for that! Yes, I know what you are referring, I have also built several kits just because mainly the subjects I liked. I used to have all the energy to correct things as I build, but now I am just getting lazy wanting a perfect kit so I don't even need to putty a thing. ?
-
Right, I understand the logic here and these hobby manufactures are in this business for making money. I also agree that it is super beneficial for the manufactures to come out with variations of a given kit and such, so they can re-use most of the "runners" except for the parts needed to build a specific version. But they shouldn't end up producing an incorrect kit though. Now I hear some of the latest kits won't have engines included for the same reasons. It is a tough world out there for us modellers!
-
Wow, that makes perfect sense! I can see how one large cab piece can contribute to higher cost when it comes to mold injection process and designing the actual mold for it. As you explained in detail, I can easily imagine the actual injection mold getting larger by 3~4 times just to support the one piece cab. So it does make sense why they are trying to make everything flat now. But the cost saving is one thing, the design could have been better when it comes to assembling the cab. I would have no issues if they allowed us to insert the cabin interior from the bottom. That way, I can always take it out once the external panels are assembled.
-
Hey Håkan, This is interesting how they decided to run the business when I see so many truck kits are available from Italeri. Yeah, I wouldn't want to build my brand new truck that has totally incorrect setup! I did watch someone posted a video clip complaining how the newest (and expensive) Italeri Scania S730 kit is basically a repackaged (incorrect) kit with new exterior. At first I thought it was an isolated problem, but now you mention it, it looks like the problem is actually a common practice. Based on reference photos I found, I think this MP4 Actros kit seems fairly correct. So that is a good thing.
-
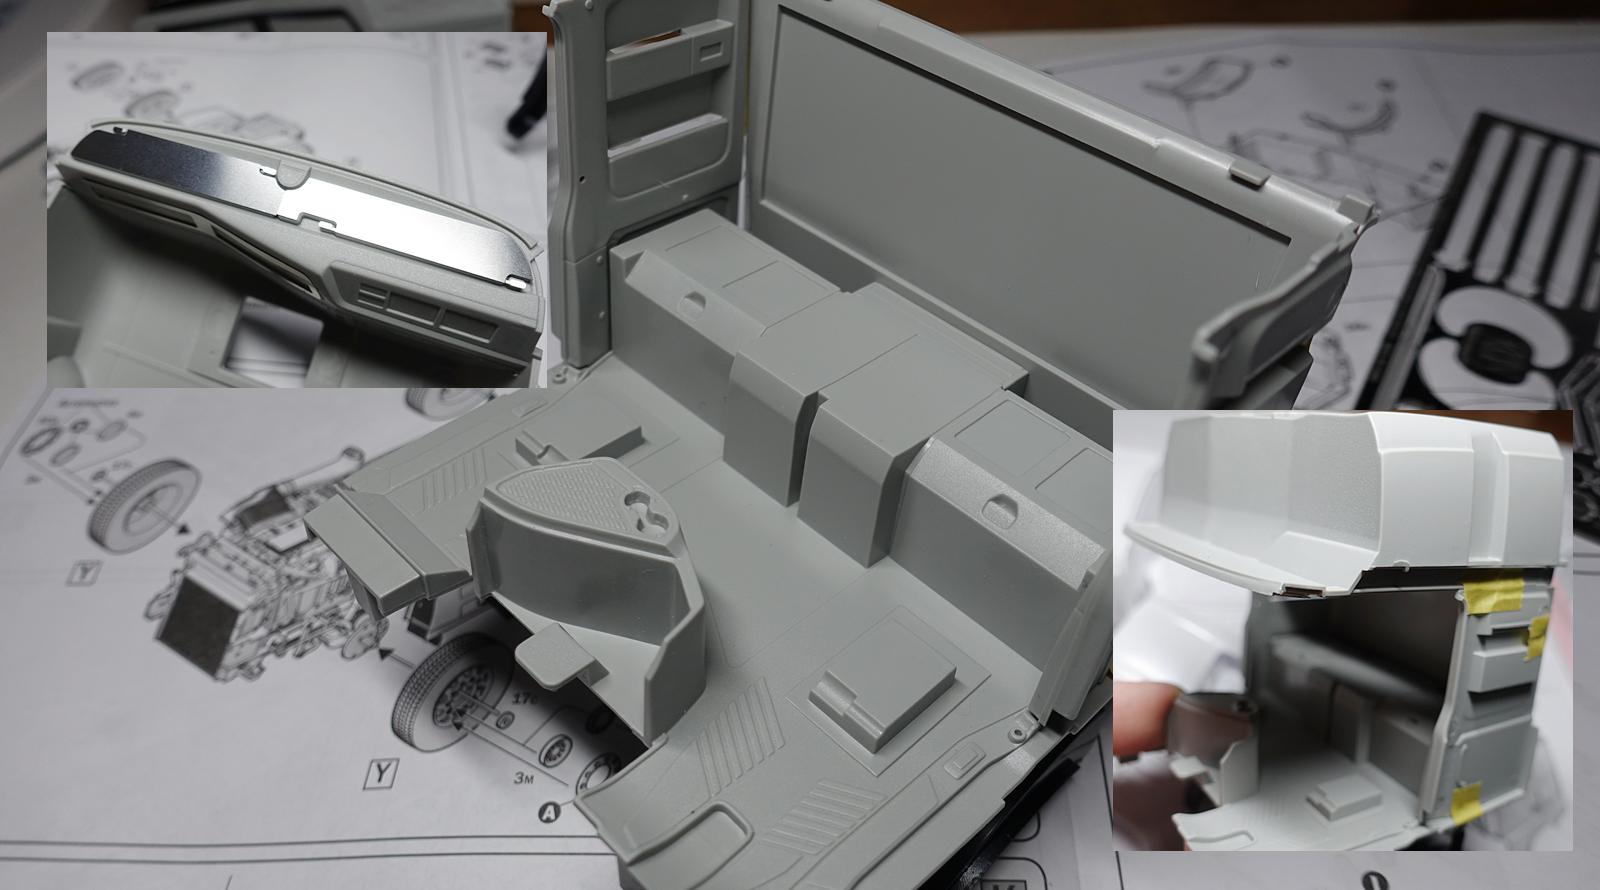
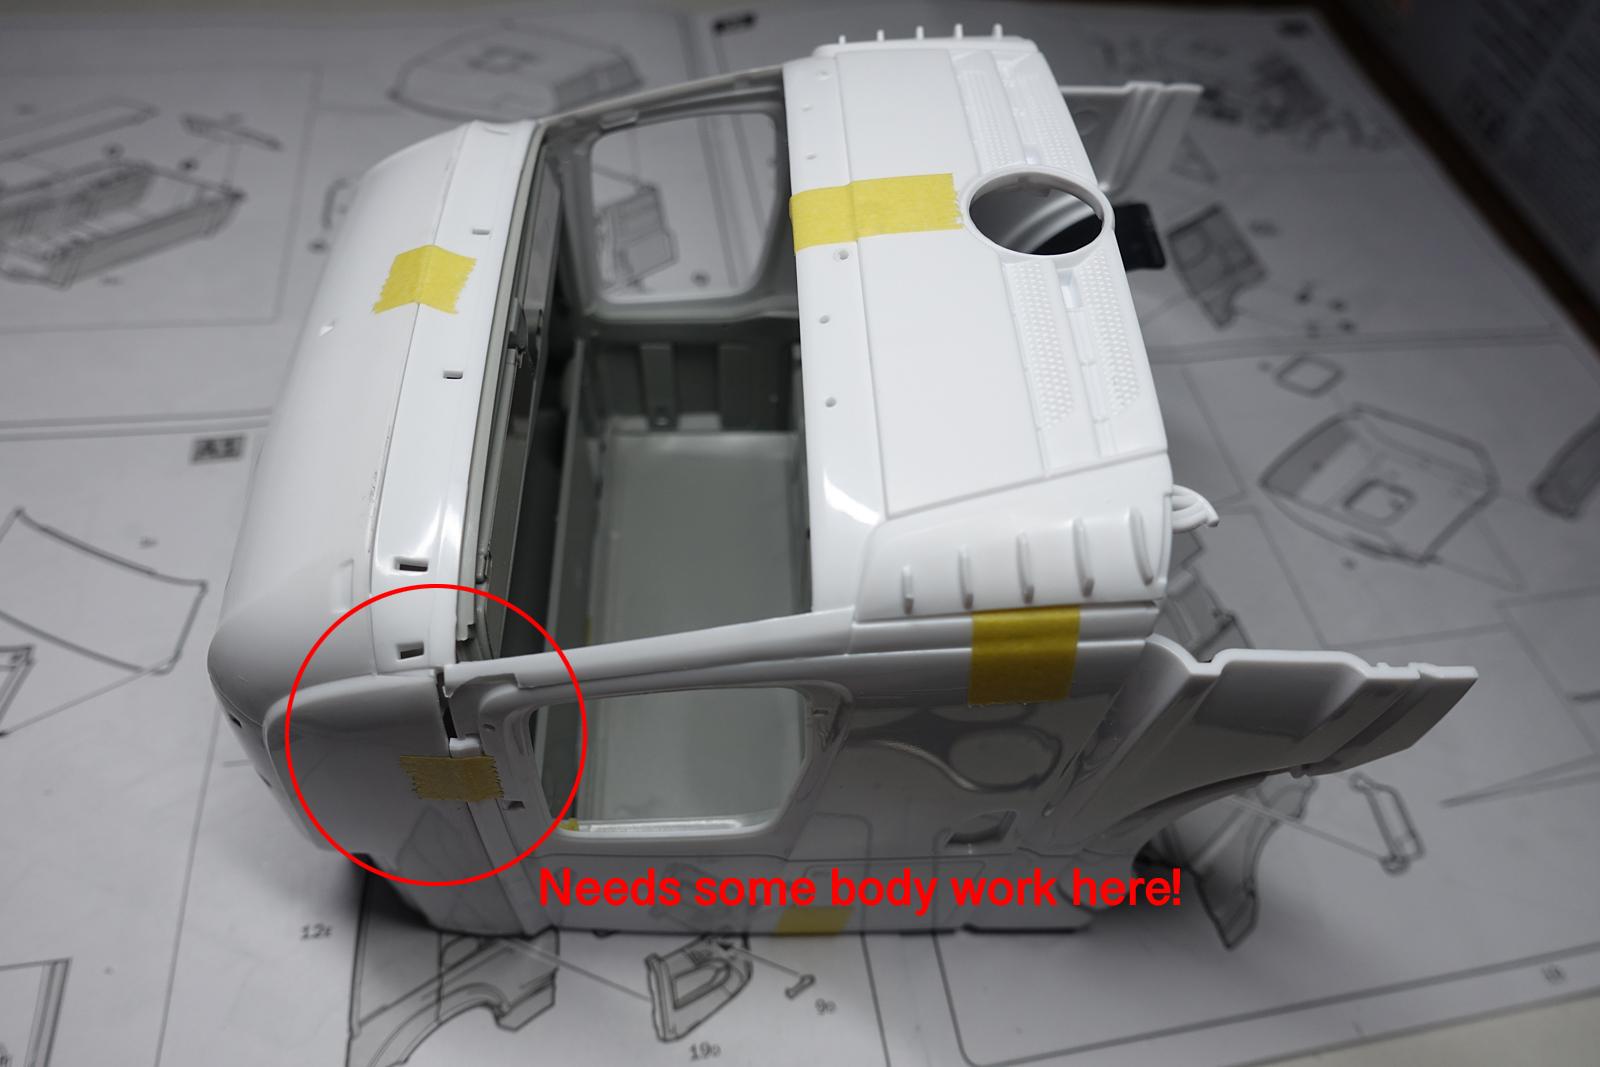
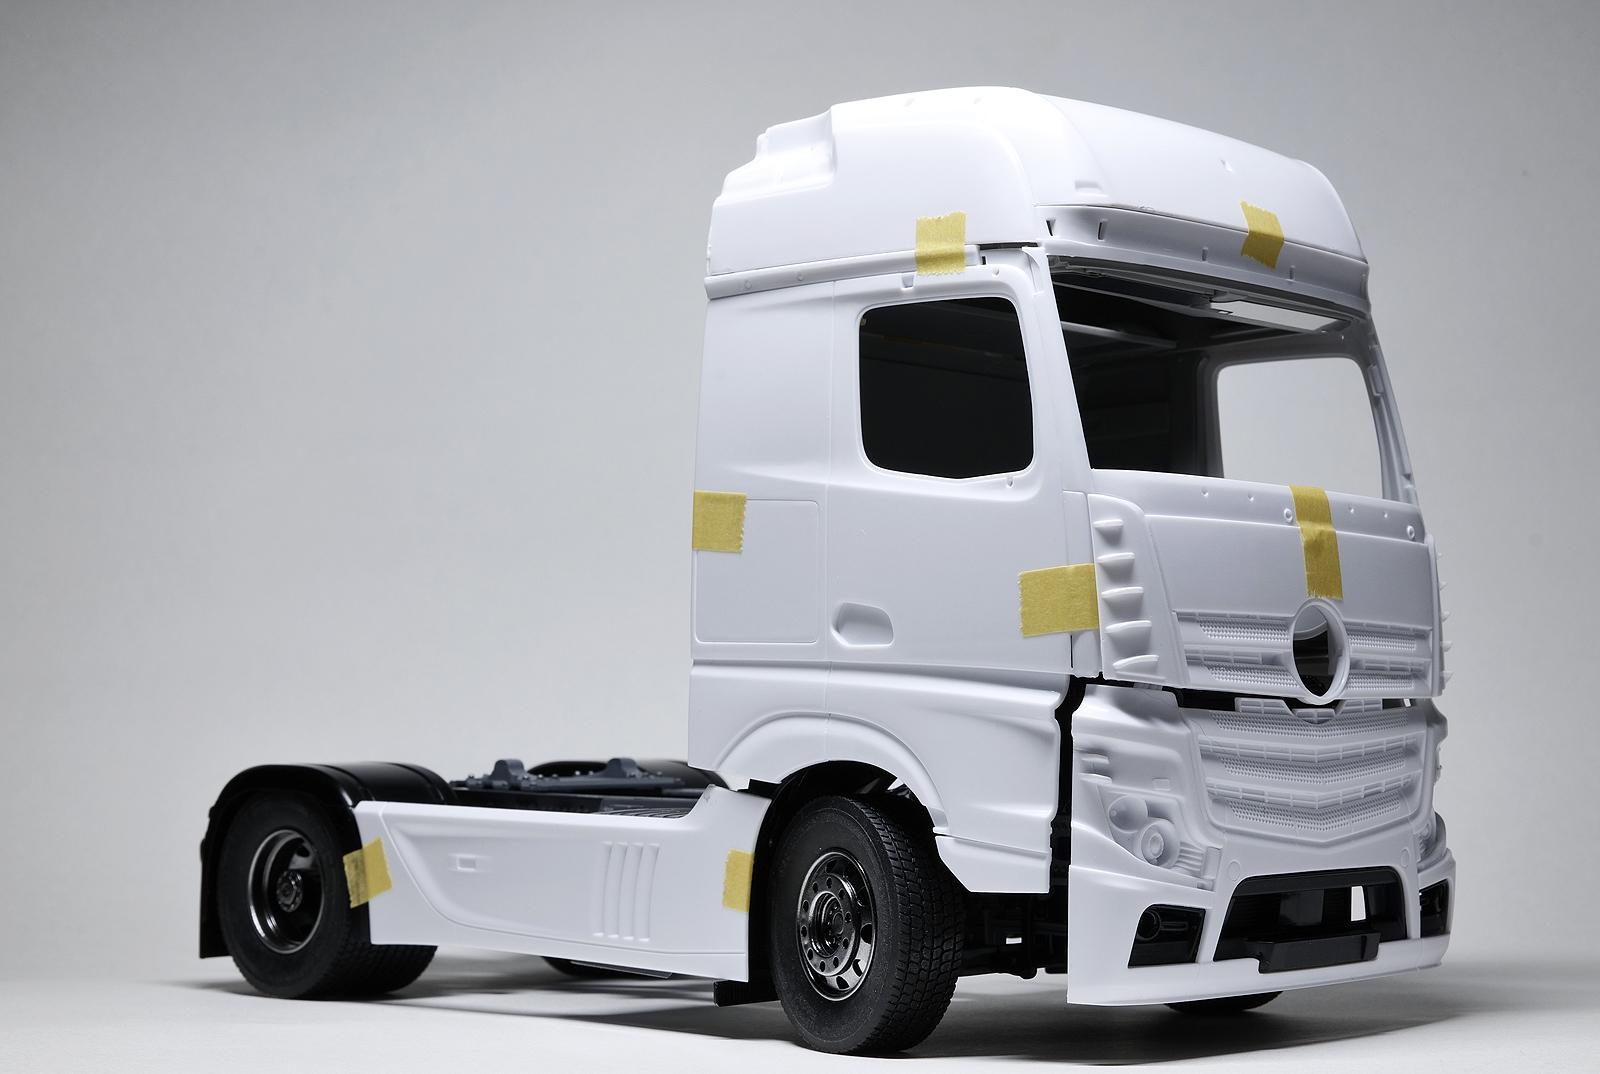
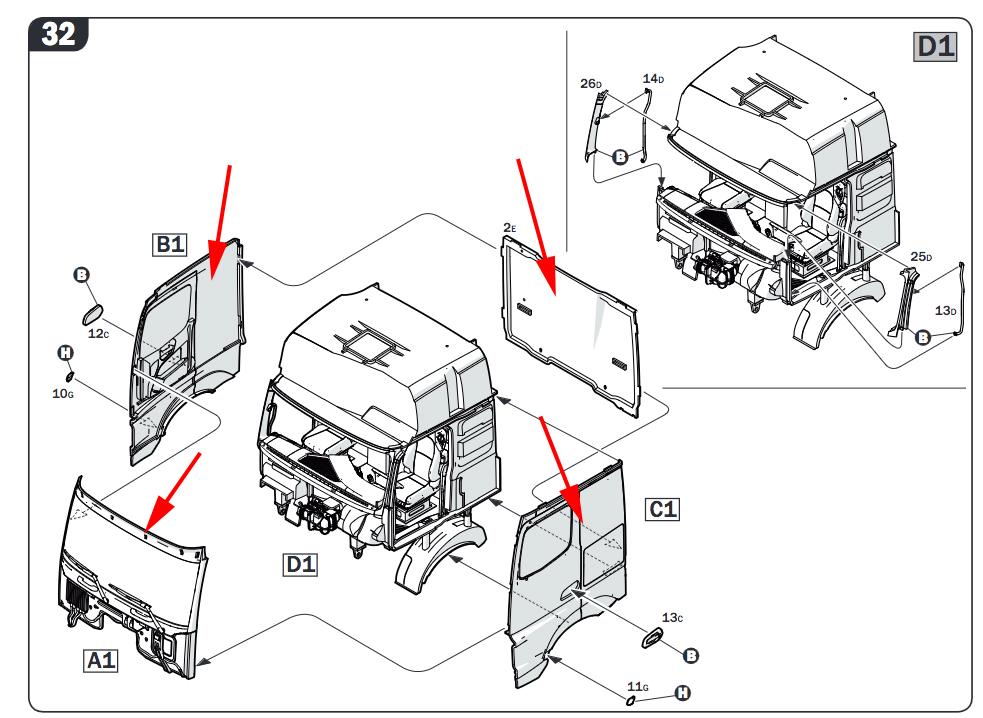
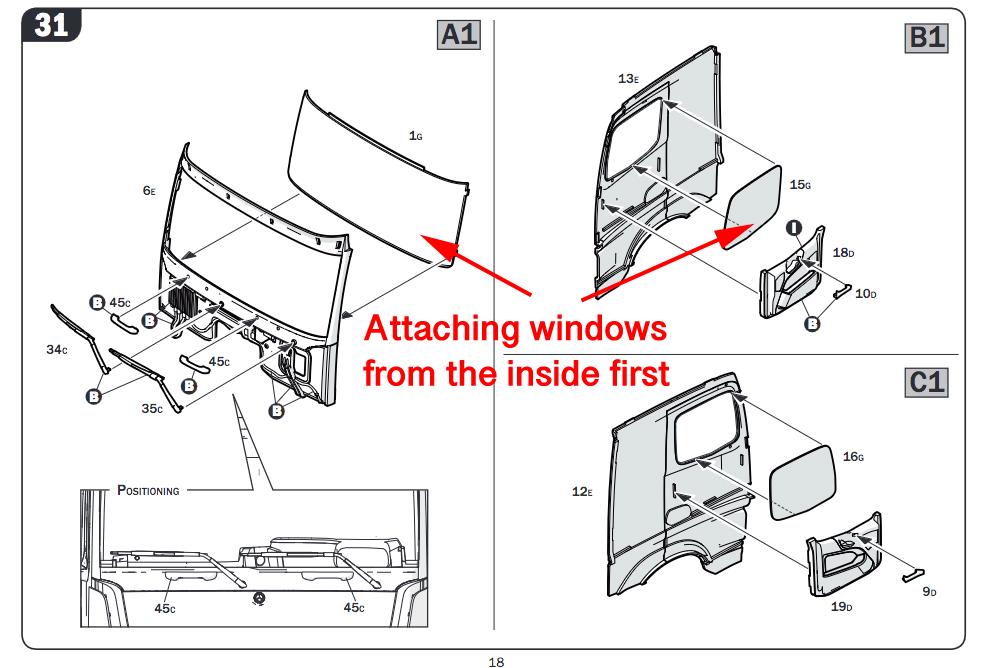
One thing worries me about this kit is building the cab. Looks like most of Italeri kits want you to put together each cab panel first (front, top, left, right, and back). The problem is, per instructions, you will need to complete the assembly of interior cabin including painting first. Then windows/windshields must be mounted from inside as shown in step 31. This means, you will need to complete the exterior painting unless you are going to mask windows and paint these panels later! I want to avoid masking the windows to just paint, I rather want to paint the exterior first and then insert windows at the end. This is the cleaner way to build. Unfortunately, this kit doesn't allow you to do that. For step 32 above, you will need to paint/finish building the interior cabin (D1) . Also all of the exterior panels must be painted and ready to be assembled at this time. It may not be a big problem if you don't think about this carefully, but the problem is, I CANNOT assume that this assembly of exterior panels will be perfect. I did a quick mock build on the cab and the joint lines do not look clean. I want to glue everything, fill all the gap joints, and smooth things out, but I can't. The build requires you to have everything painted prior to the attach all panels. The interior cabin does not come out either, it bites all panels as you assemble. Once you attach all exterior panels, you won't be able to take the cabin out. Somehow I need to modify the cabin part so the exterior can be built around and then to be able to take out the cabin later so I can continue painting the exterior... At least this is the one option I came up with I don’t know why the kit is designed this way, but it certainly created a unpleasant headache for me. I hope you guys can see the challenge I am facing here.
-
Haha, that is true! At the end, I am thinking it is how much you commit to spend the time and effort on something you build. Your Kenworth T600 is something that I can't never do, endless effort required!
-
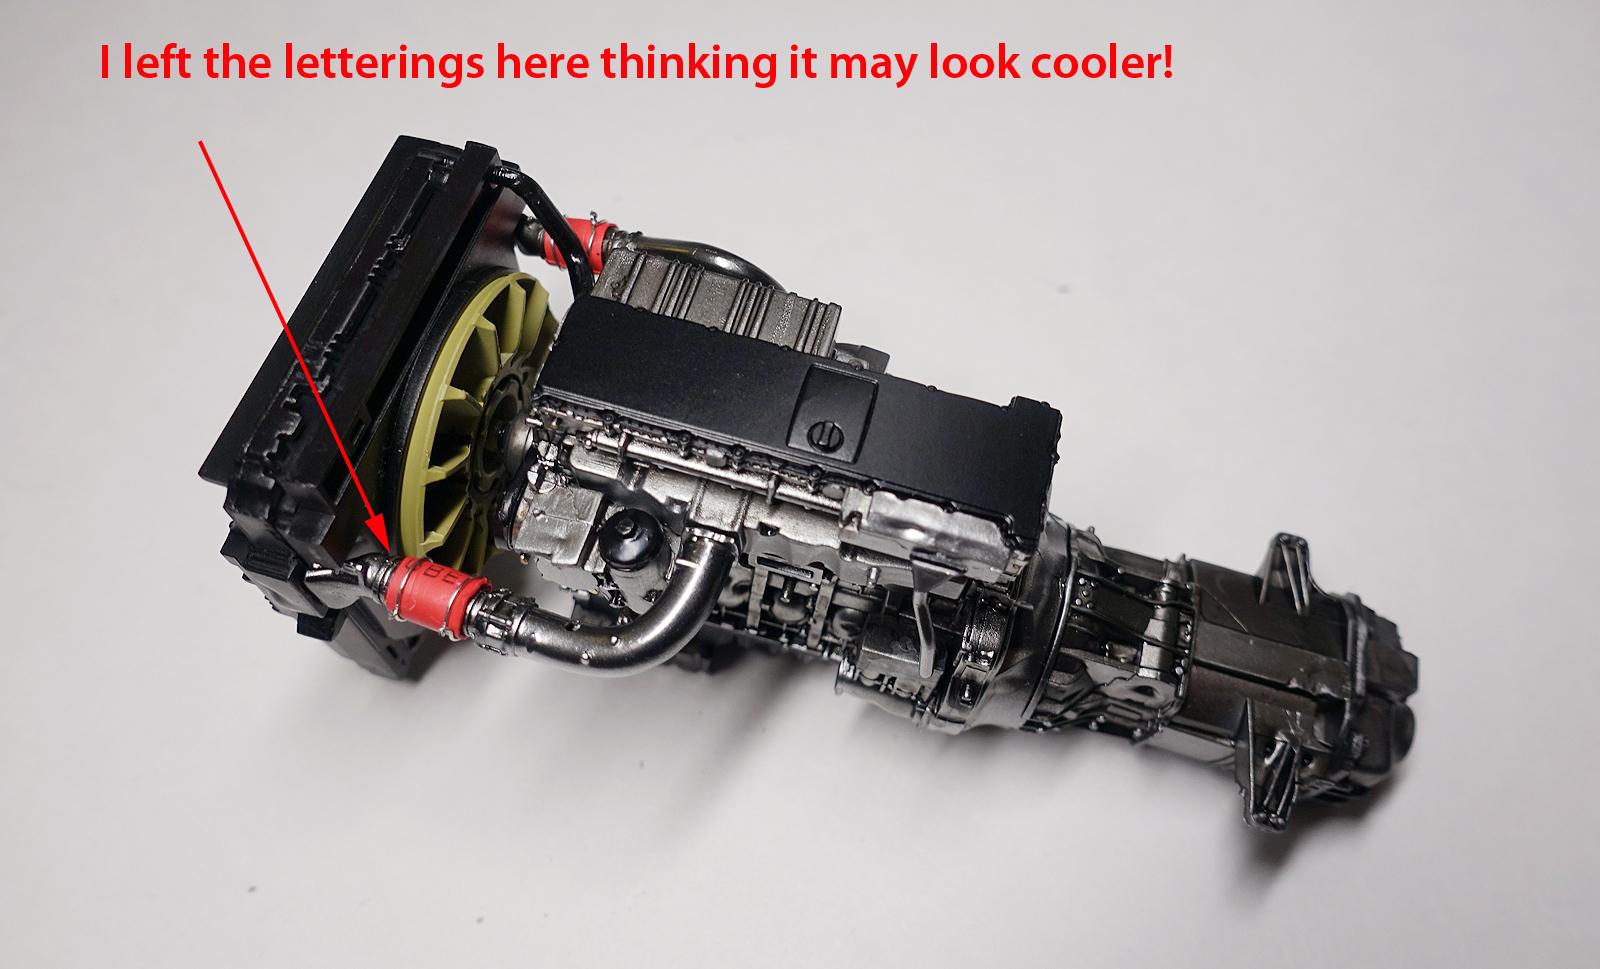
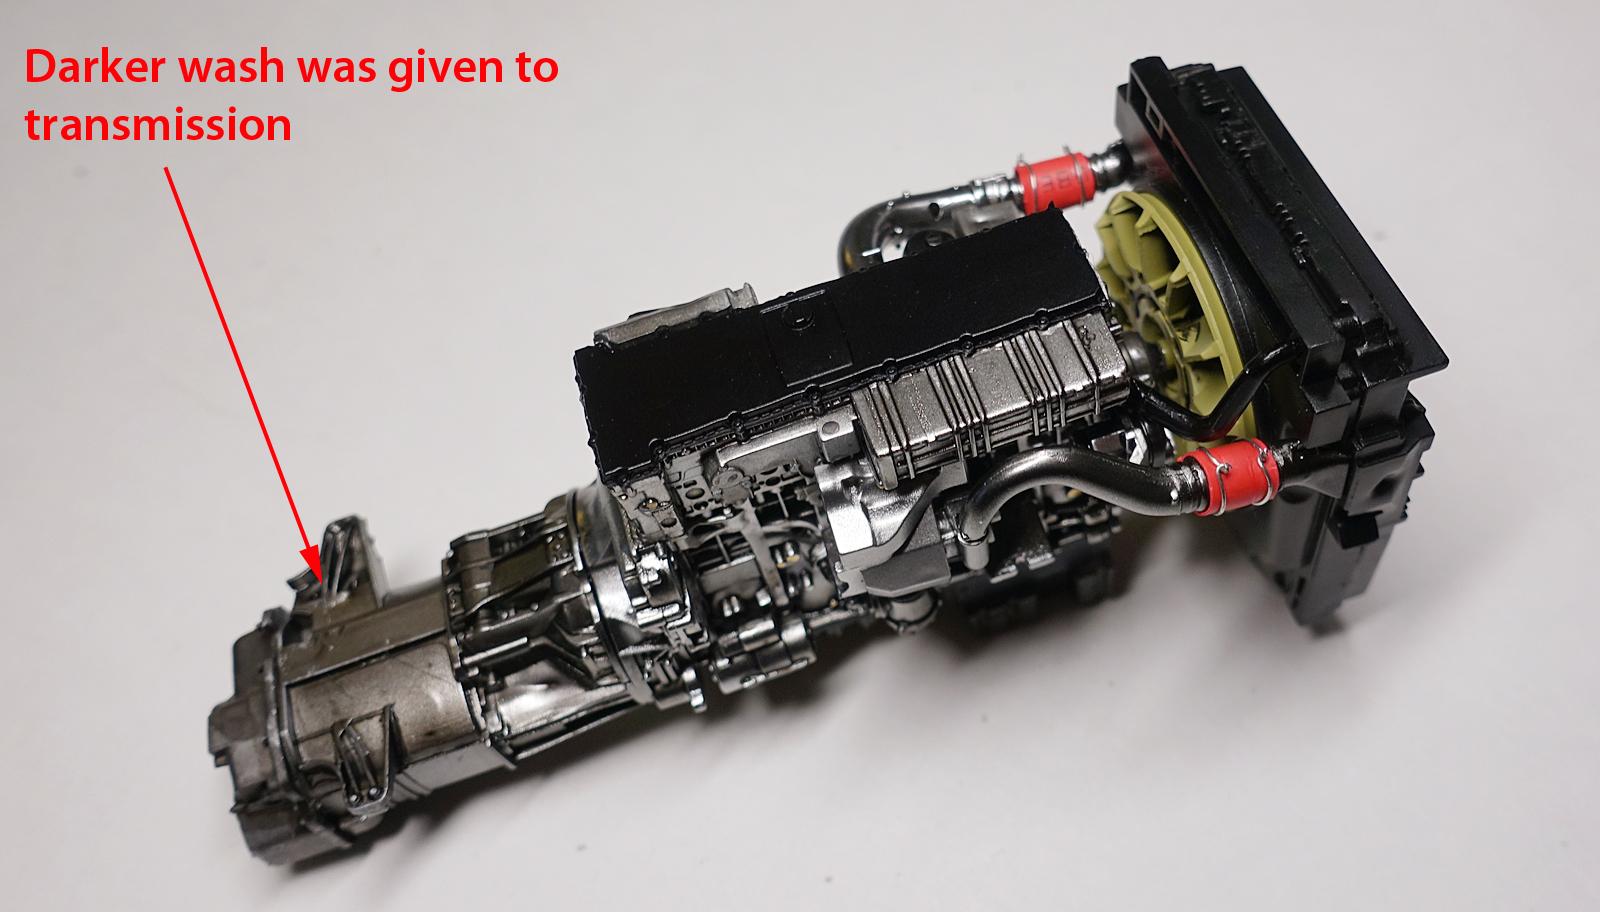
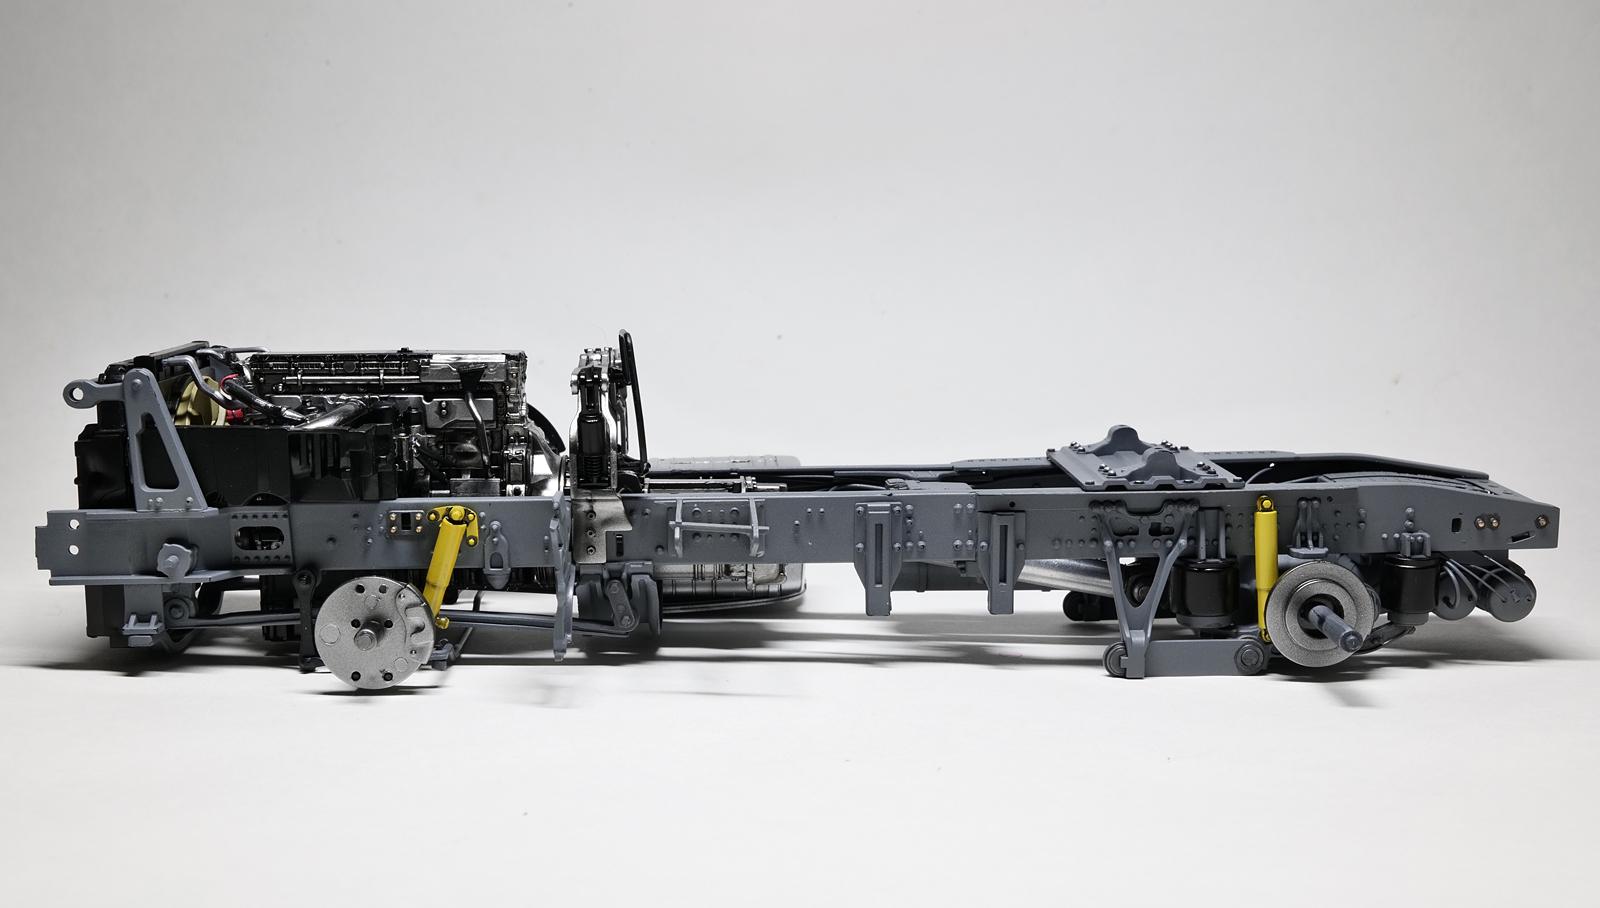
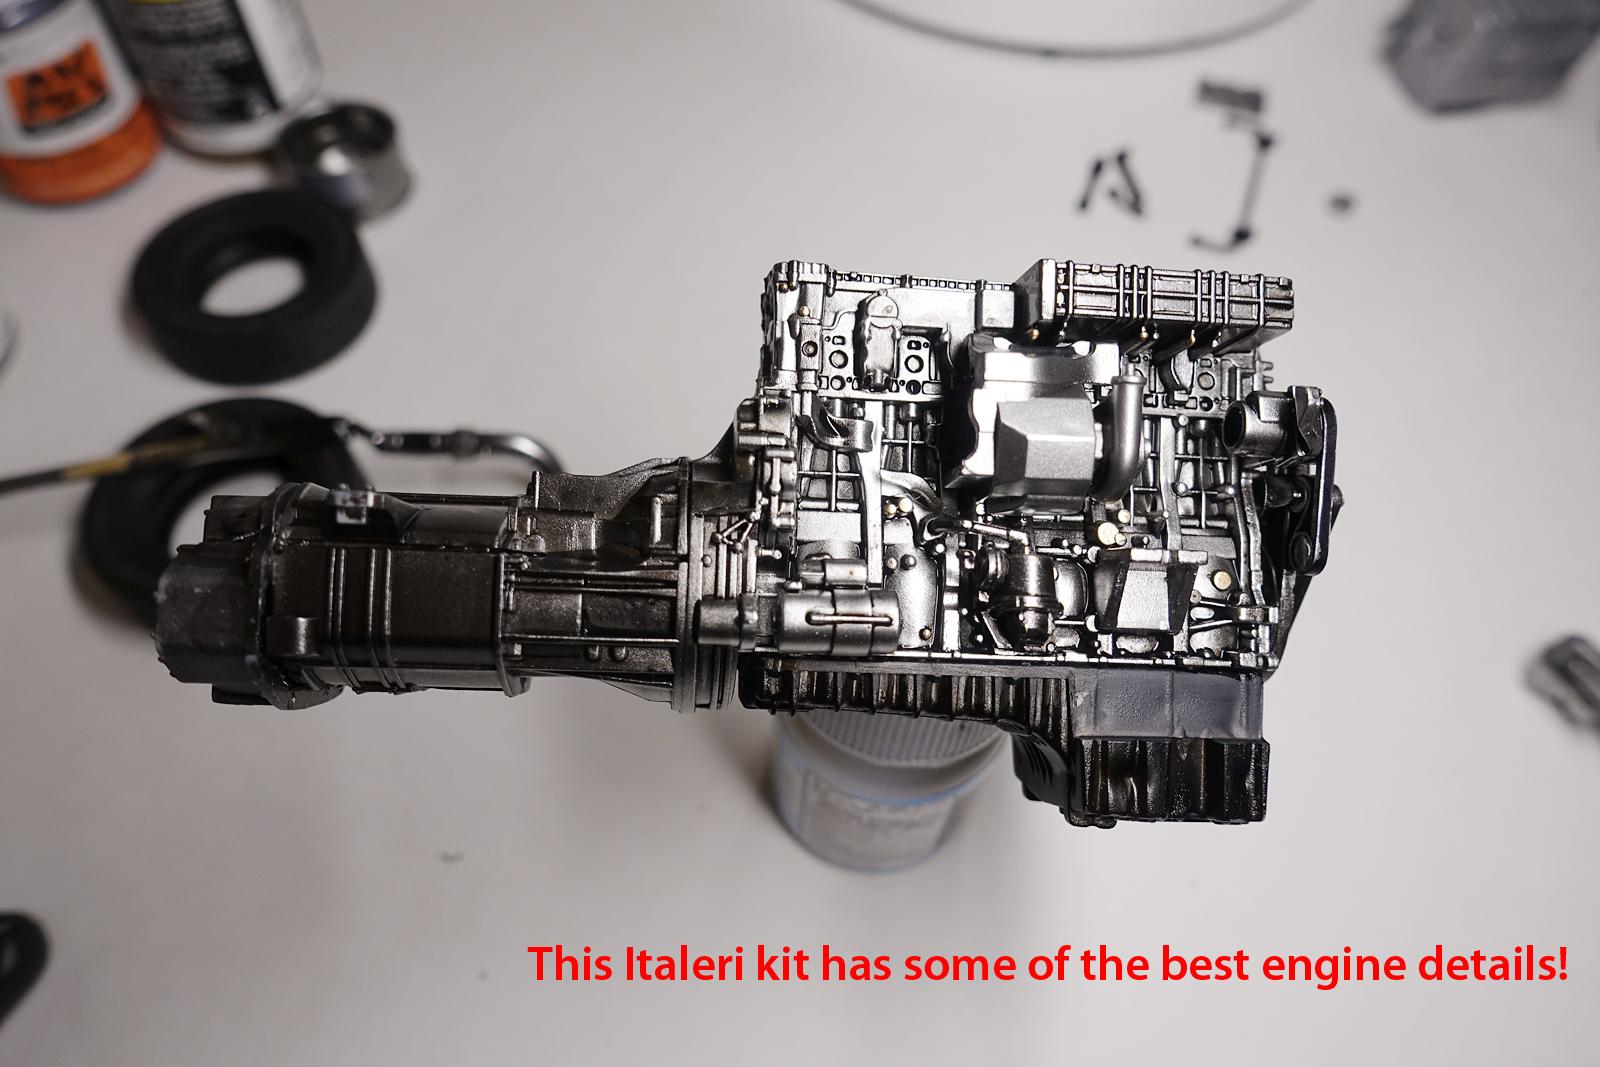
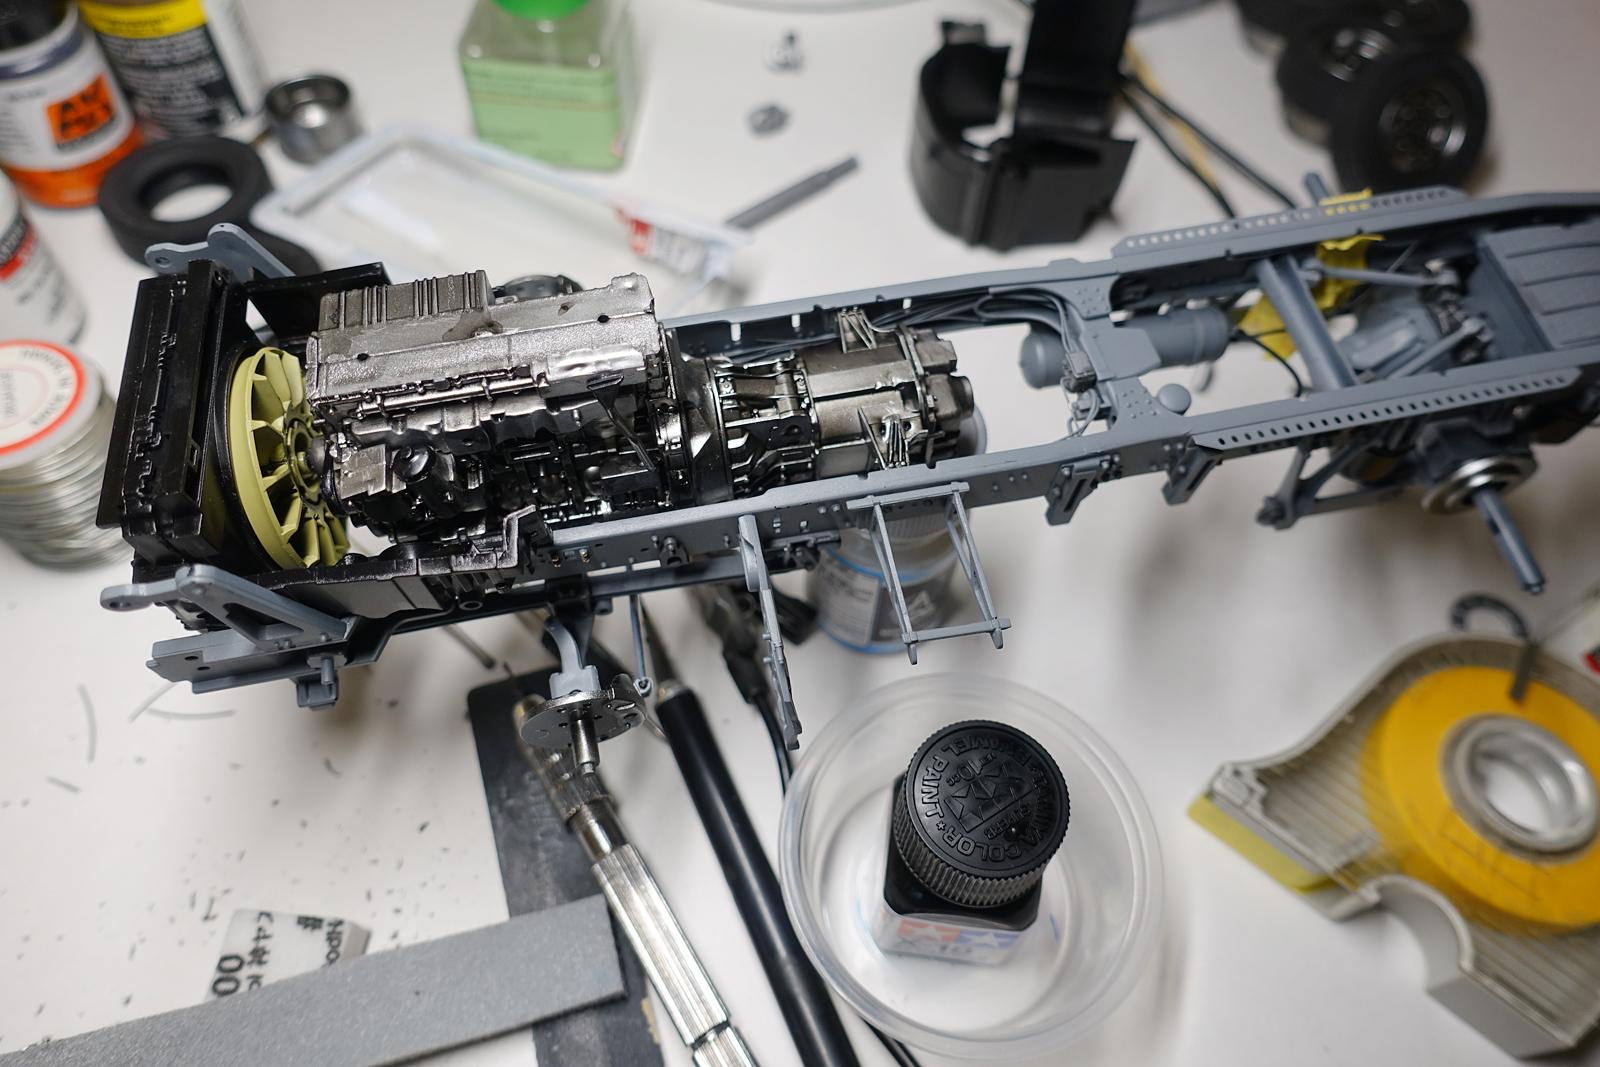
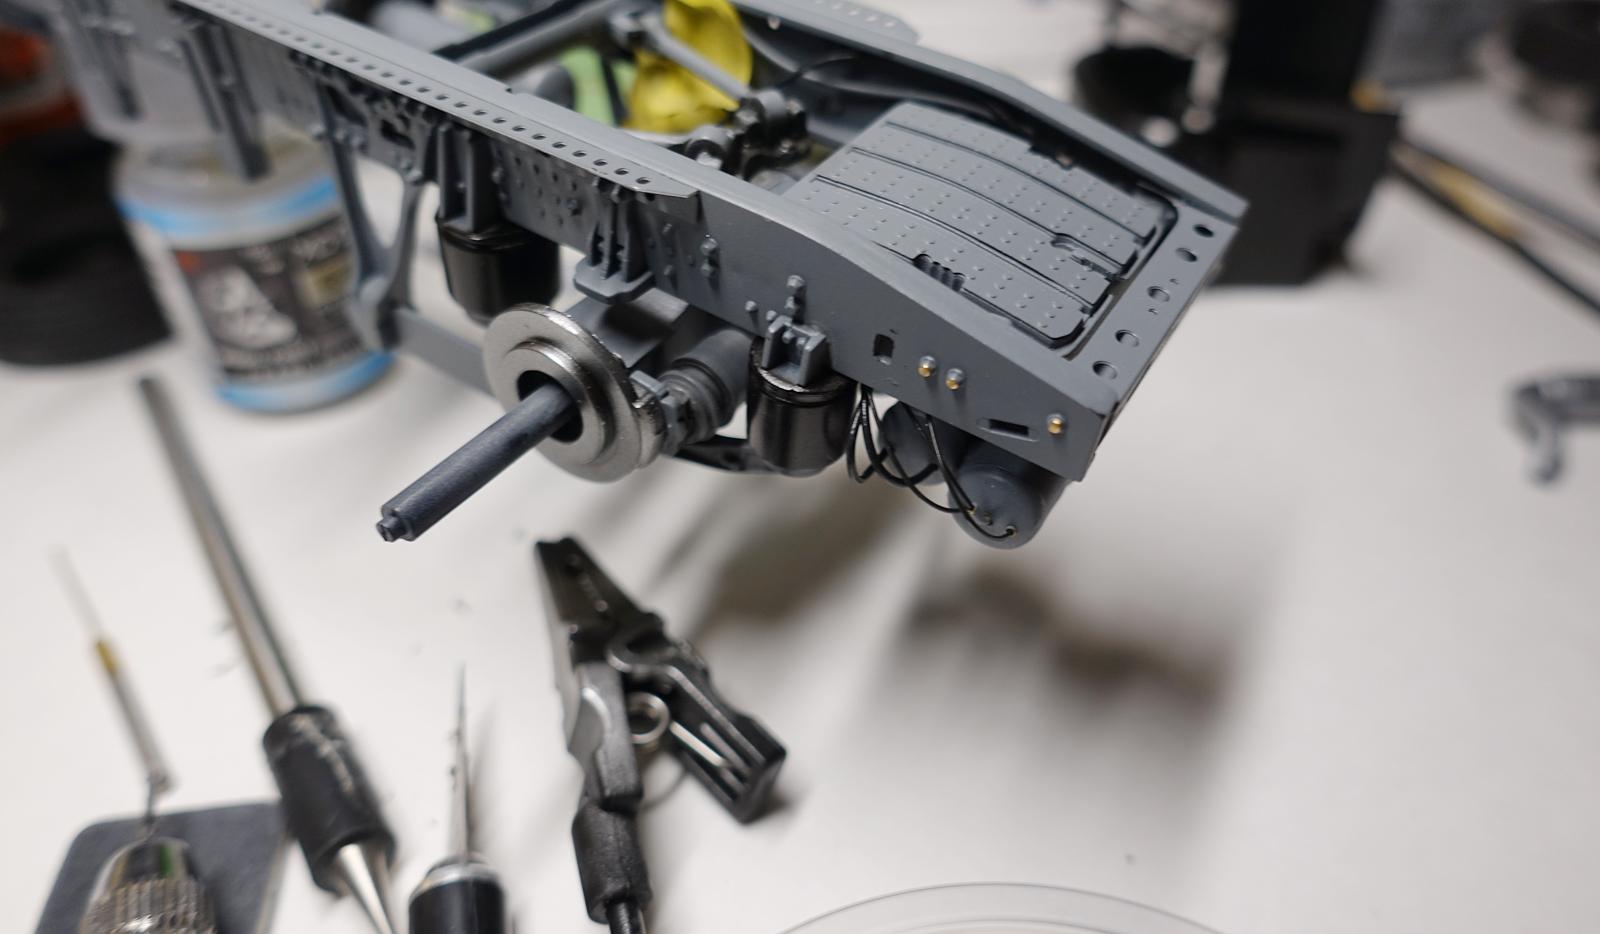
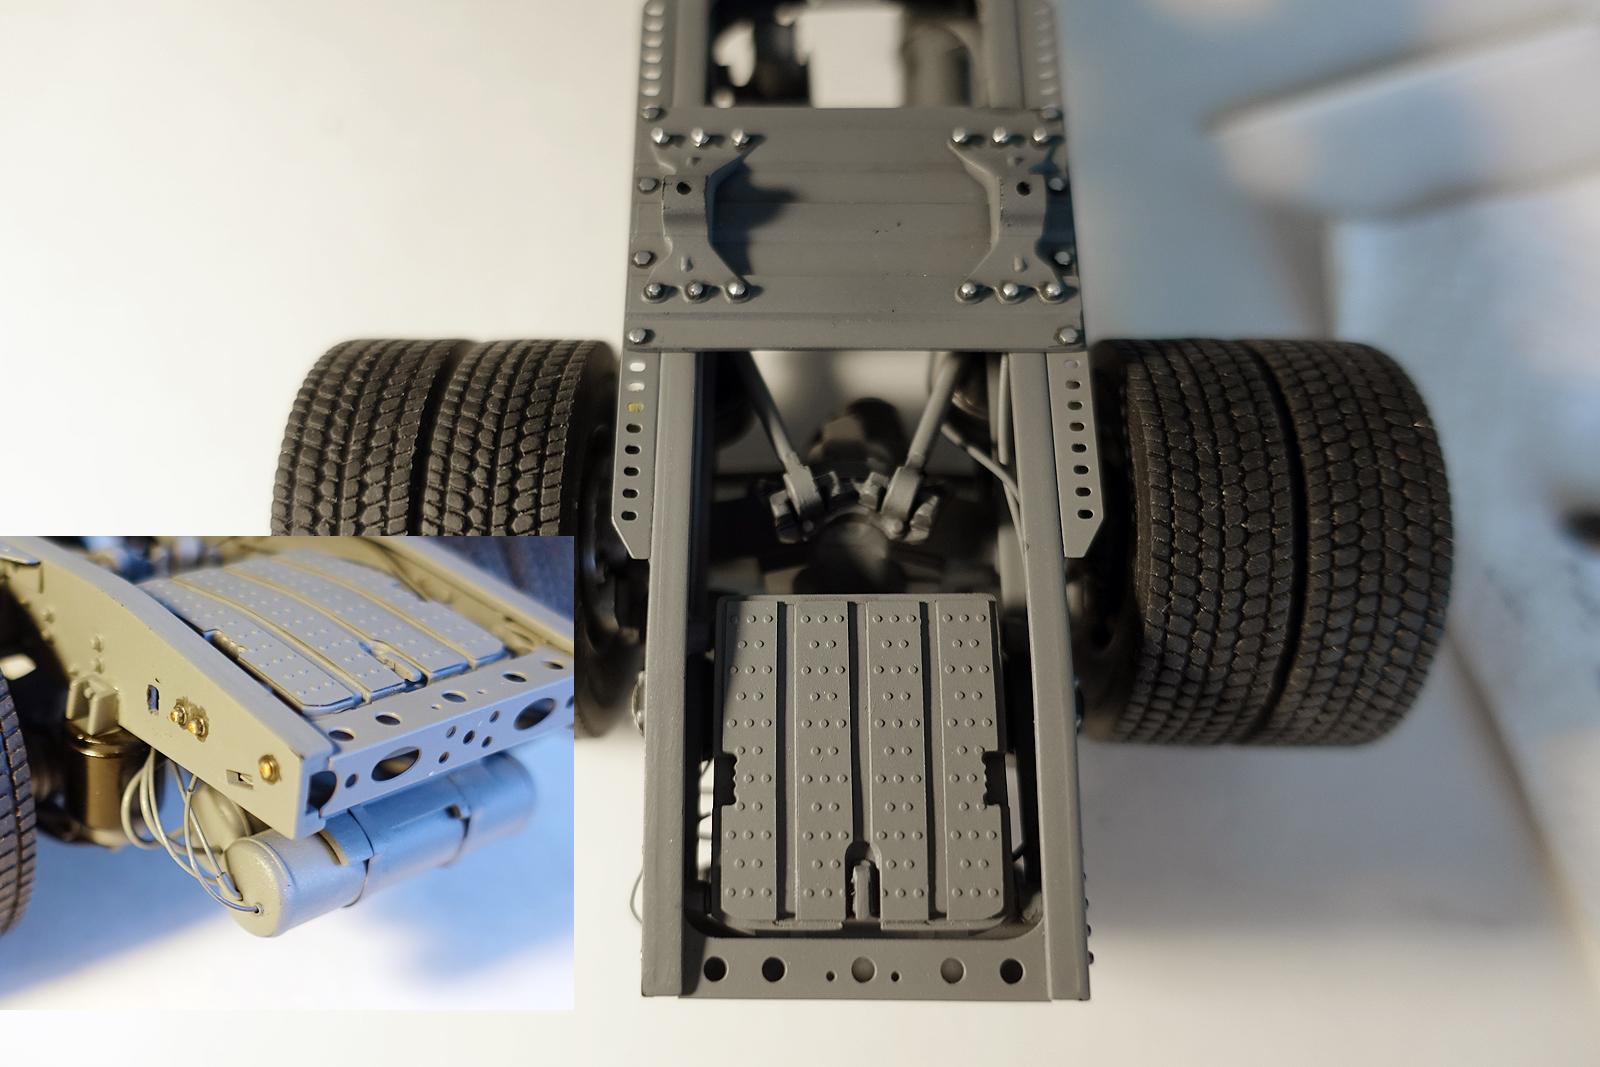
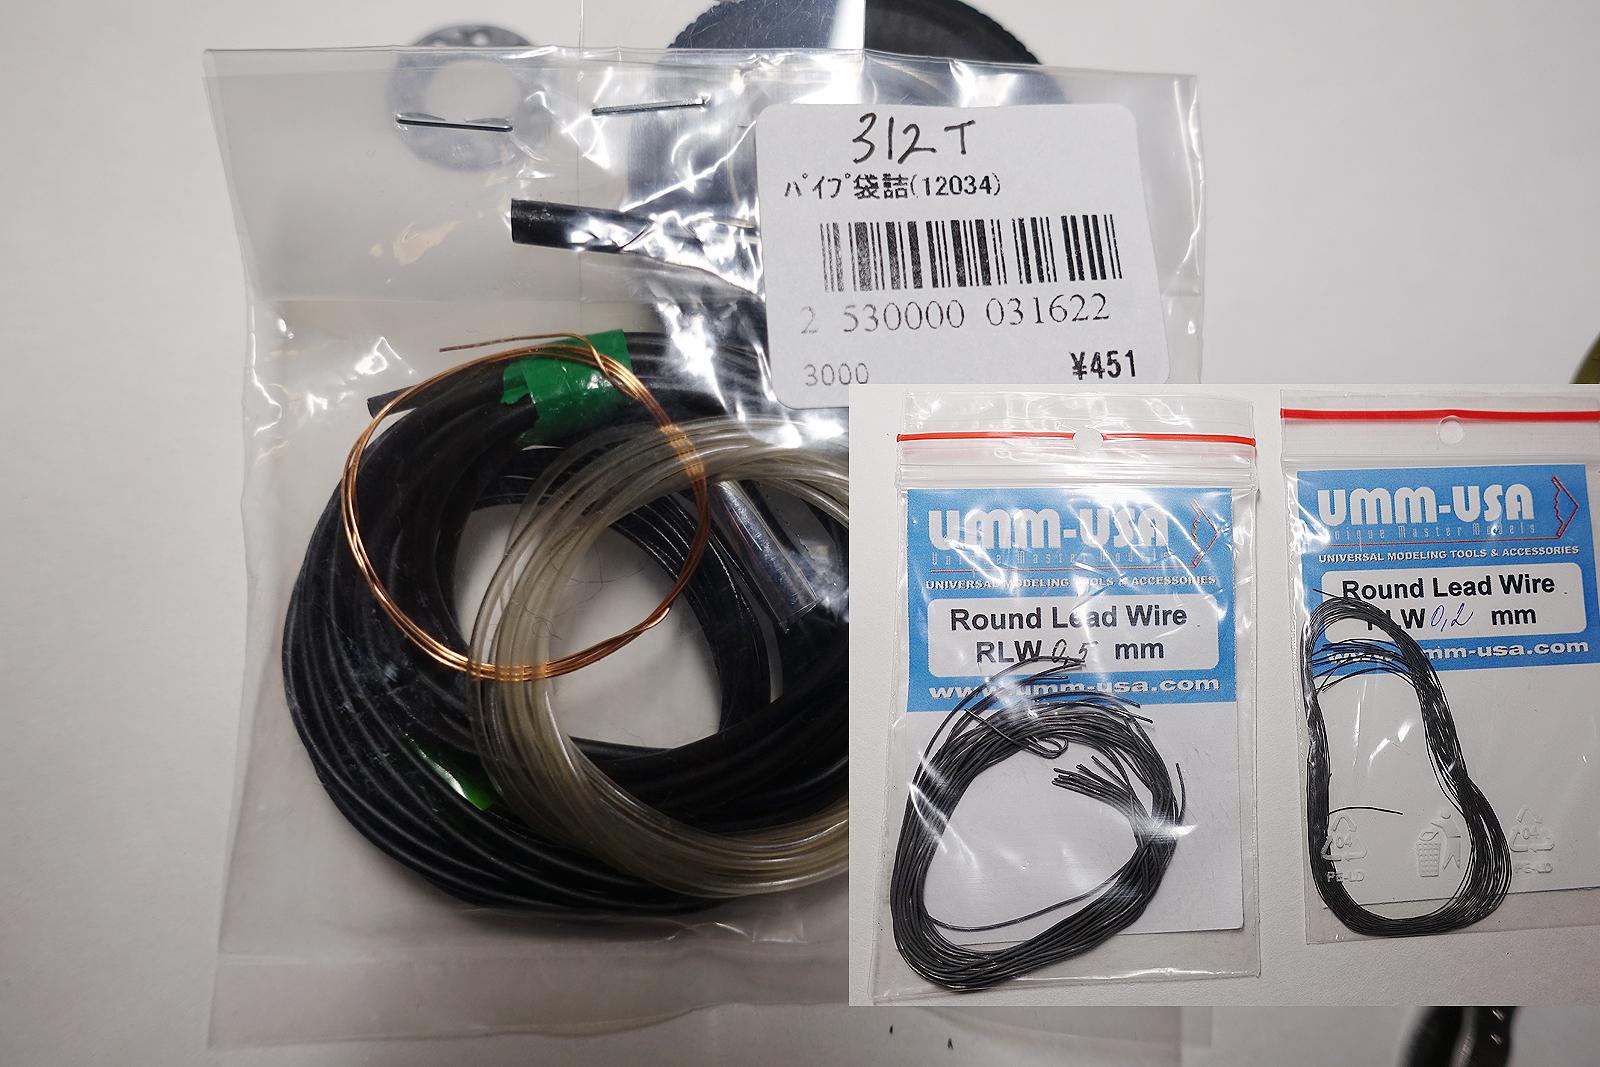
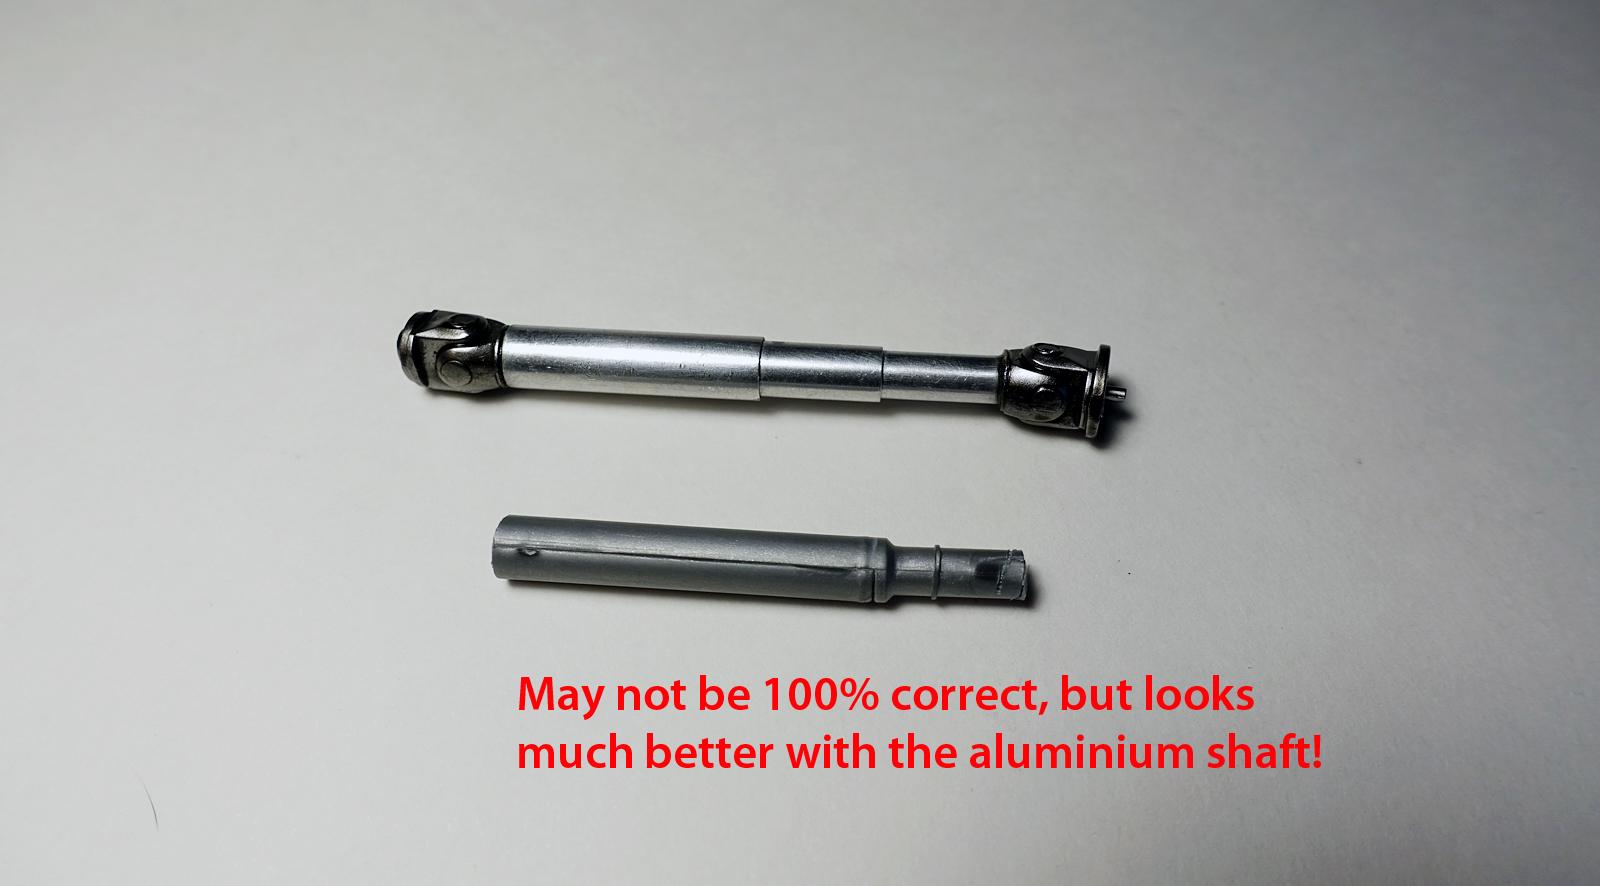
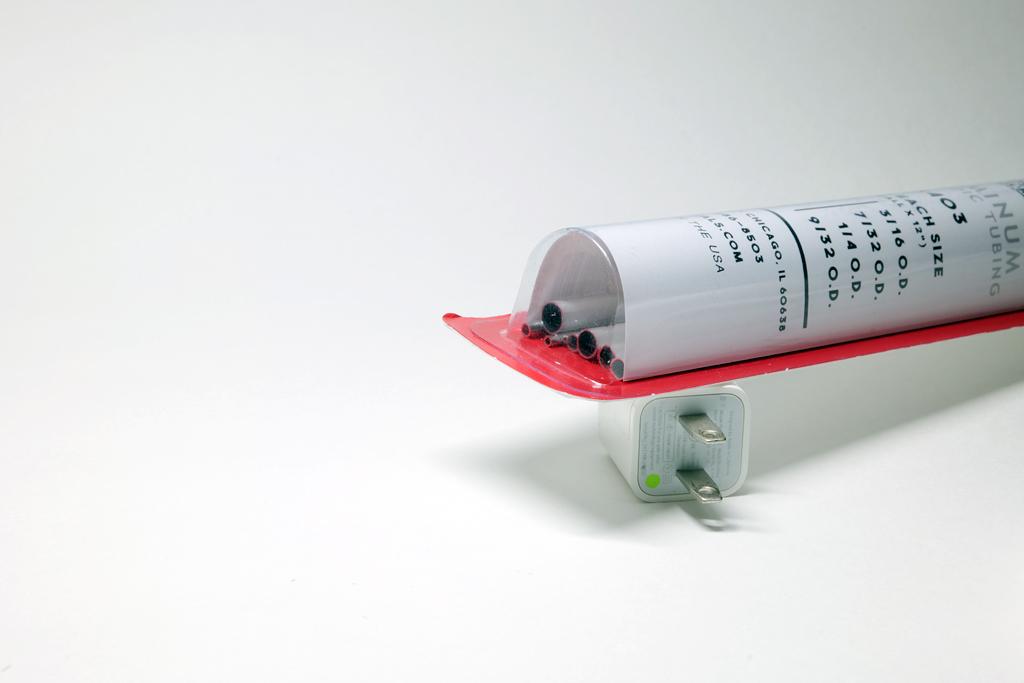
I must say the engine details in this kit is some of the best I have seen. That does mean much, but I really enjoy looking at the details on the engine blocks. It is shame the most of the details will be covered once the cabin sits on the top. After a couple of wash applications, the overall metallic tone became calmer. It can be fun playing around with this type of effect in scale modeling! The engine fits tight, but the problem I can see is the mounting of radiator. I will discuss more on this later. I am only adding minor details when they are exposed externally. One of those areas can be the compressor tanks mounted in rear. The air hoses do not connect anywhere, I made them to disappear into the frame. I simply wanted to make it look busy with several air hoses. This is an easy work, quick progress! I picked up this cable set from Tamiya Model Factory located in Shimbashi, Japan while visiting not too long ago. I am using them everywhere in this kit. They actually call this a "pipe" set and it really is meant to be used for Tamiya's 1/12 Ferrari 312T kit. ¥451 is roughly $3.10 at that time and I thought it was a big bargain. Also some of the fine wiring work, I used lead wires from UMM-USA. They flex and stay flexed which is a big plus. Some of the mistakes I made so far aren't big, but they are annoying for sure. I missed sanding these molding lines. I suppose I am trying to build things quick and taking some risk! The lines showing up under the suspension arms do not bother me much, but I decided to redo the ones located on the side. After sanding out the surface clean, I drilled some holes so I can insert my own bolts. Tuner Model Manufactory made some of the best and economical tuned parts. I will use these on the side. Hopefully they bring some quality impact to the build. I think these are better. I am glad I decided to fix it. But these will be hidden too once panels are attached! Another mistake I made was when I tried to expose metal surface after covering it with black paint. Need to repaint this again. I found out the front of the radiator isn't visible once the front bumper/grille is mounted. Silly how things happened for no reason. I used Aluminum tubes from K&S #3403 to replace the existing drive shaft. Not 100% accurate, but I think the result is worth it. Another painting session started. The build has been fun so far and I really like building this kit. My shocks are in yellow and hopefully they can provide some eye catching look!
-
International CO-4000, Navajo Trucking.
cifenet replied to Repstock's topic in Model Trucks: Big Rigs and Heavy Equipment
Bravo! Great work here, the underside of cabin area has so much more happening. Super smooth clear finish on the exterior also. The yellowish photos actually work wonders, brings out that old feelin~ -
International CO-4000, Navajo Trucking
cifenet replied to Repstock's topic in WIP: Model Trucks: Big Rigs and Heavy Equipment
Great job on this, the color is very nostalgic also. High quality work indeed! -
I see, then I don't feel too bad about this one. Thanks again!
-
Nicely done! I like the slammed look here. Everything is top notch, great job!
-
Right on! Oh yeah, AMT has its own charm! It is moving quite fast which makes the building experience more fun for me~