cifenet
-
Posts
856 -
Joined
-
Last visited
Content Type
Profiles
Forums
Events
Gallery
Everything posted by cifenet
-
 The completed article is here:
 -
I am glad it is all over now. It felt like a good dream to think about, but matter in fact, it was a nightmare. Yes, European trailer is what I want to do, but I just don't know what to get yet... And some of them are quite pricey! Thanks Gary, but you have "multiple" outstanding builds!
-
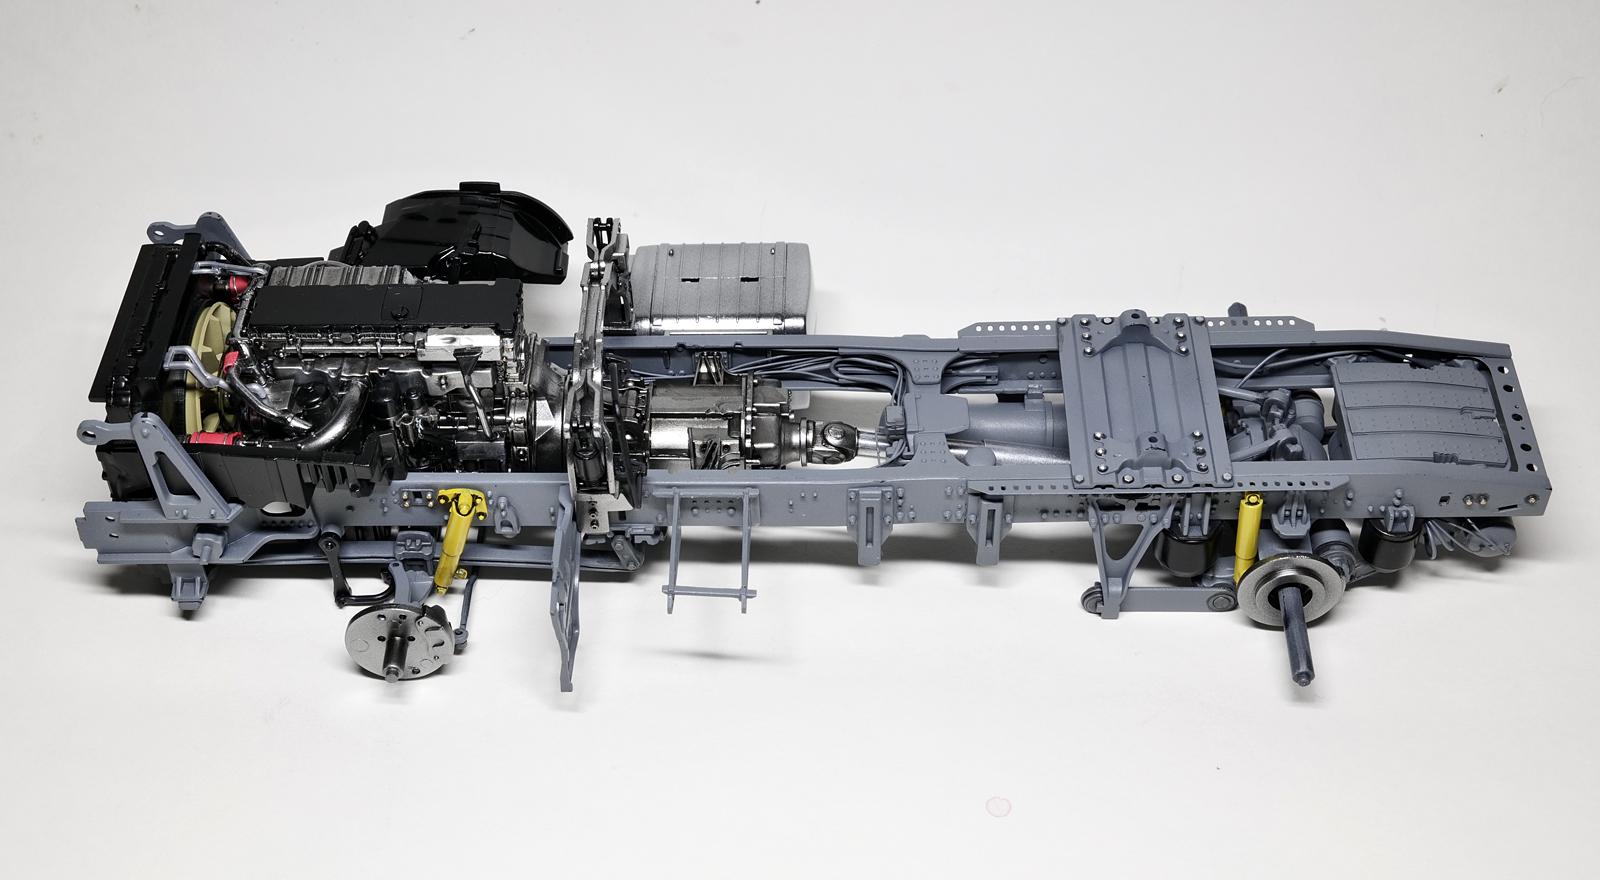
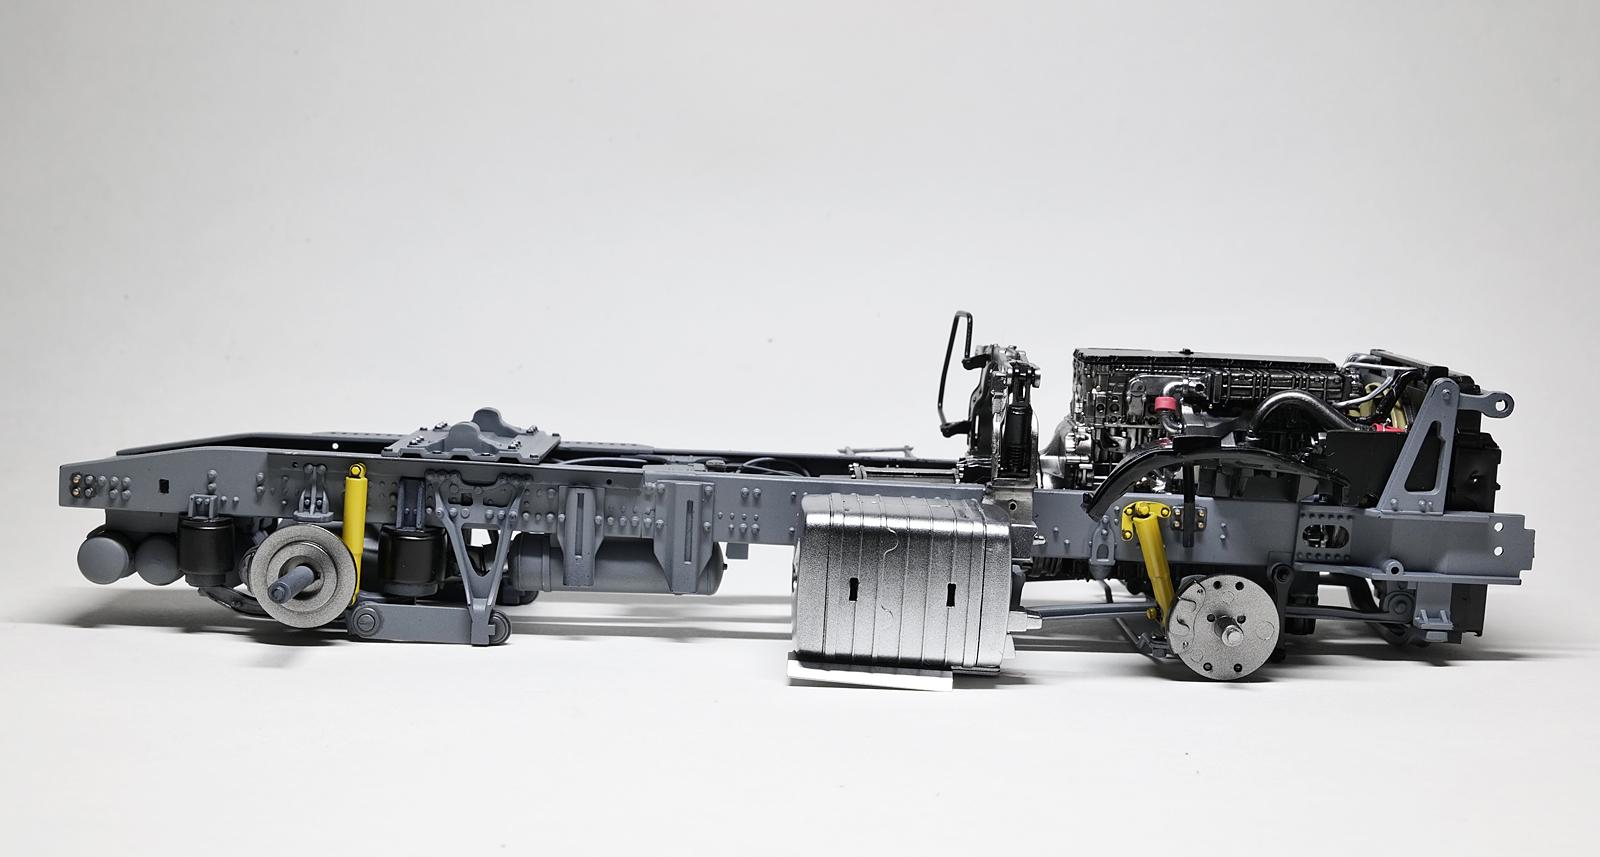
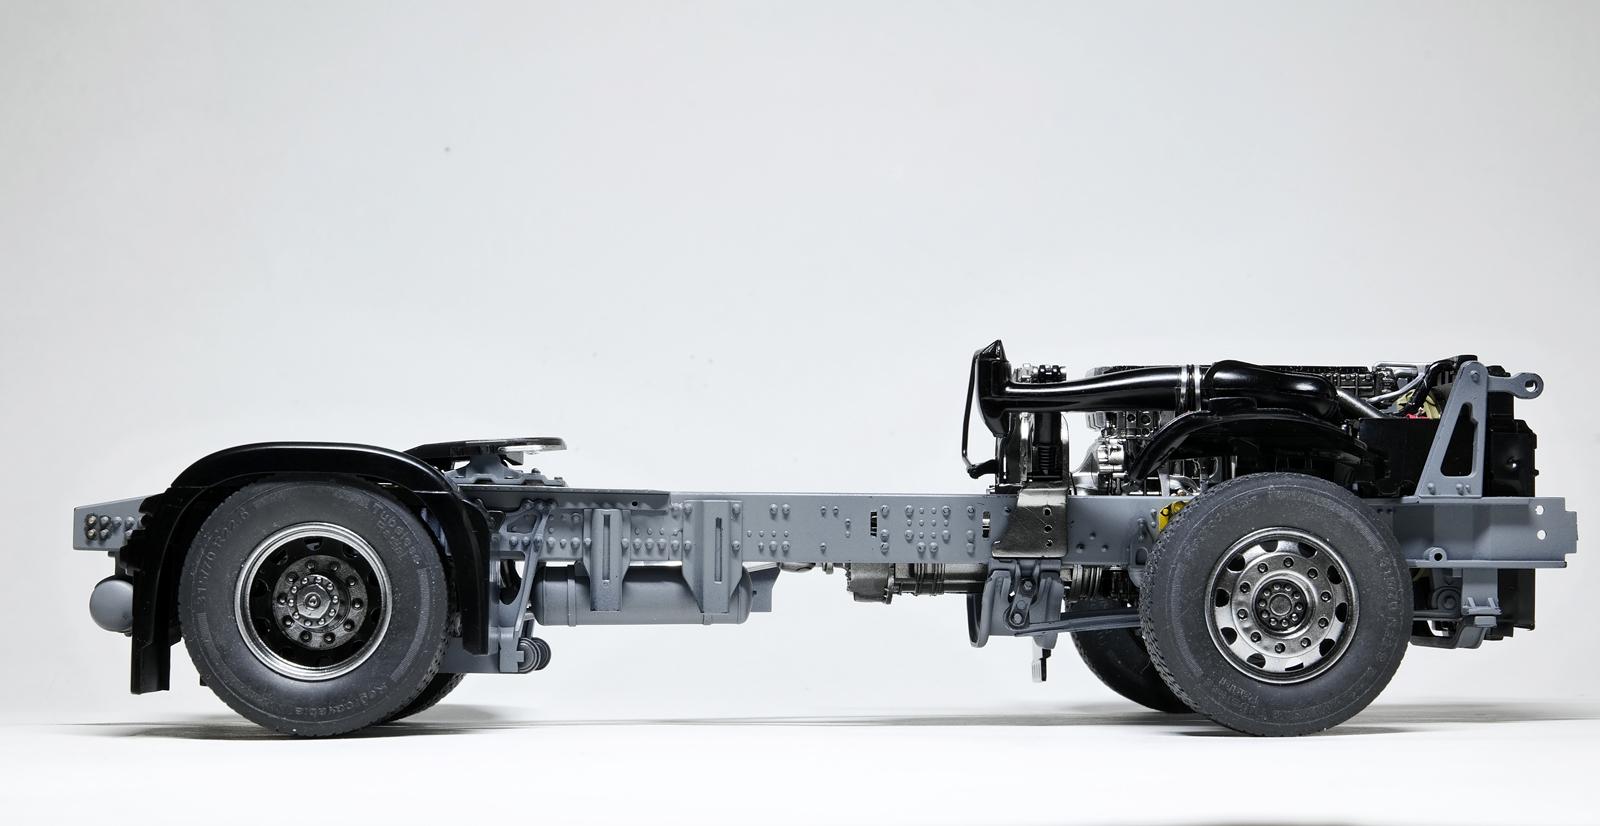
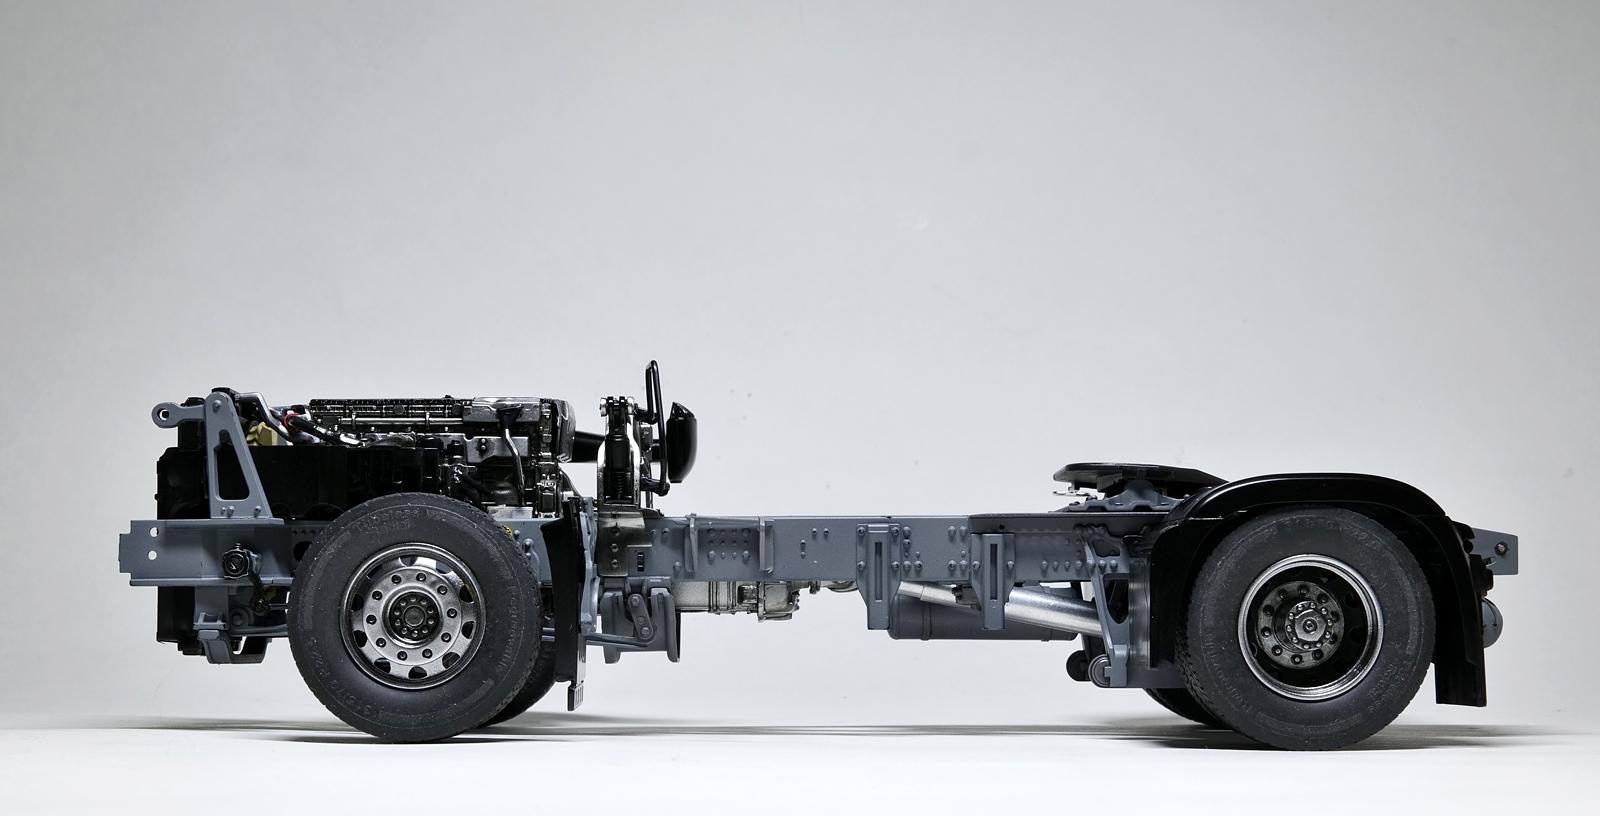
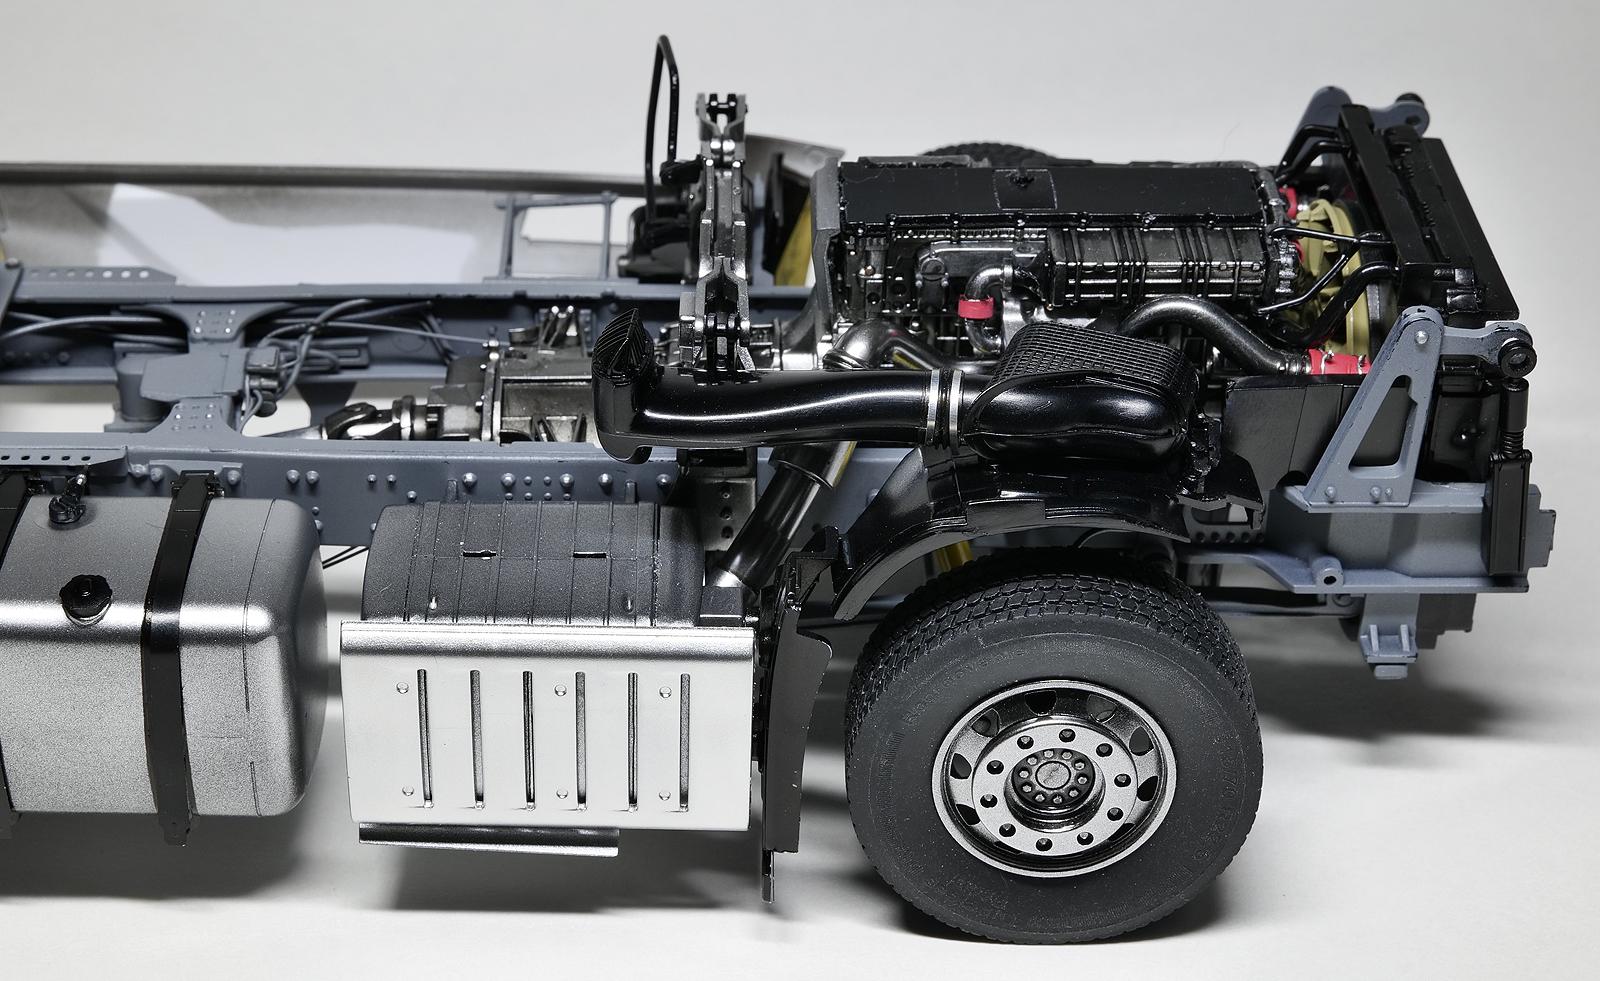
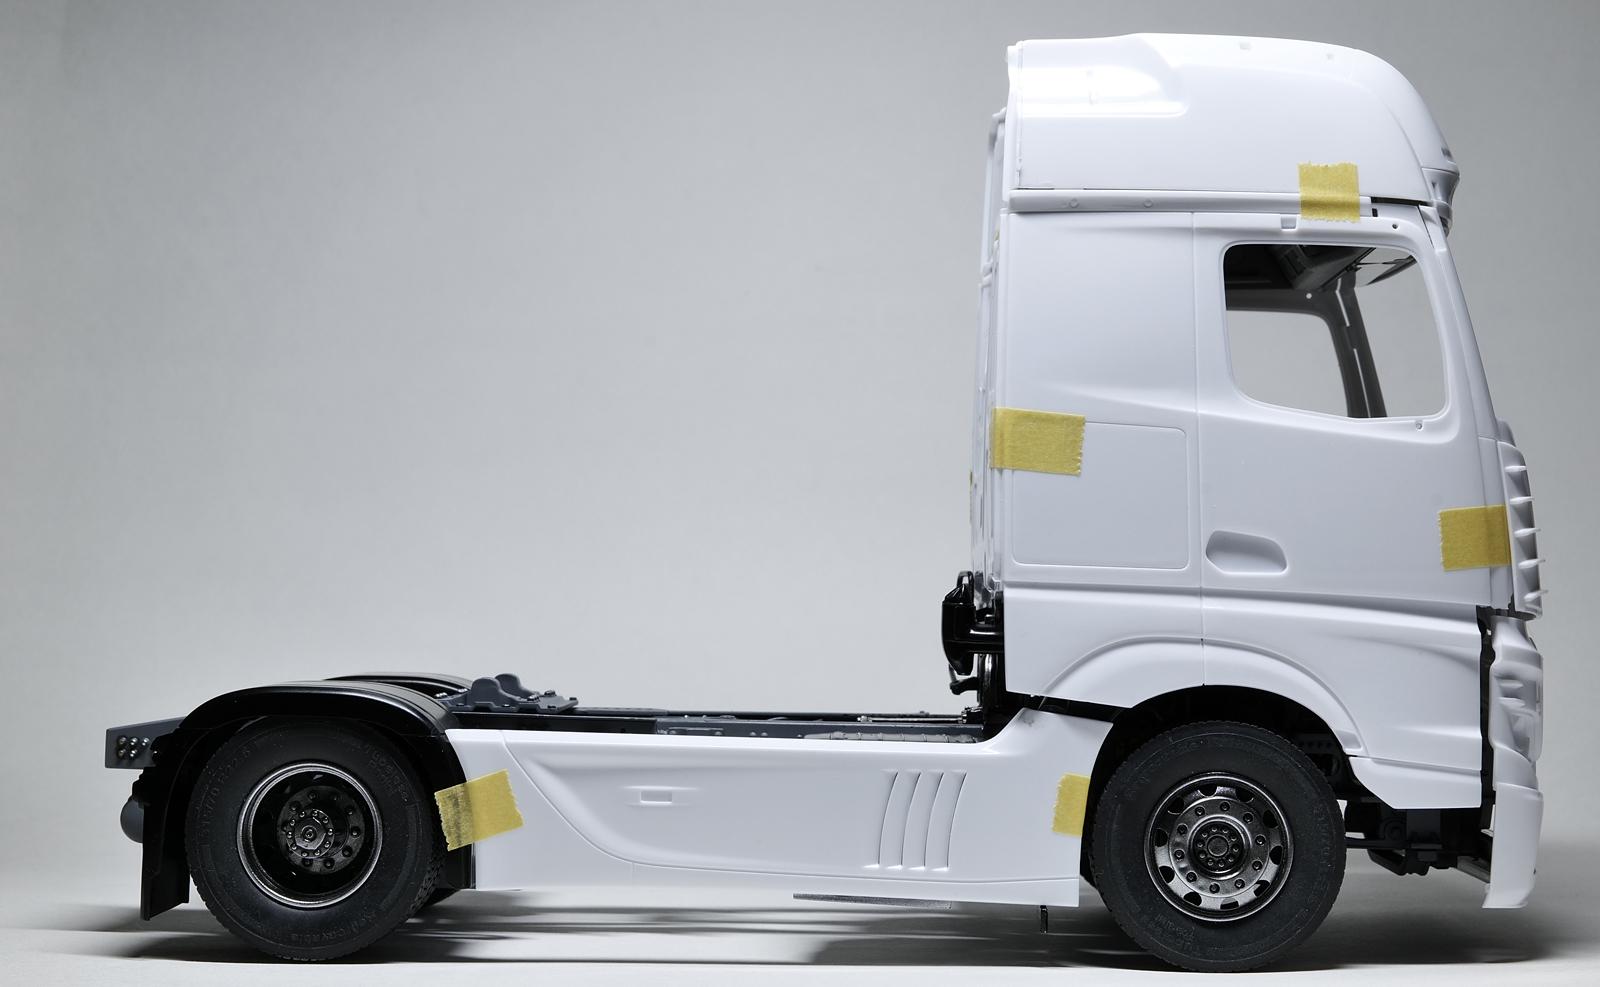
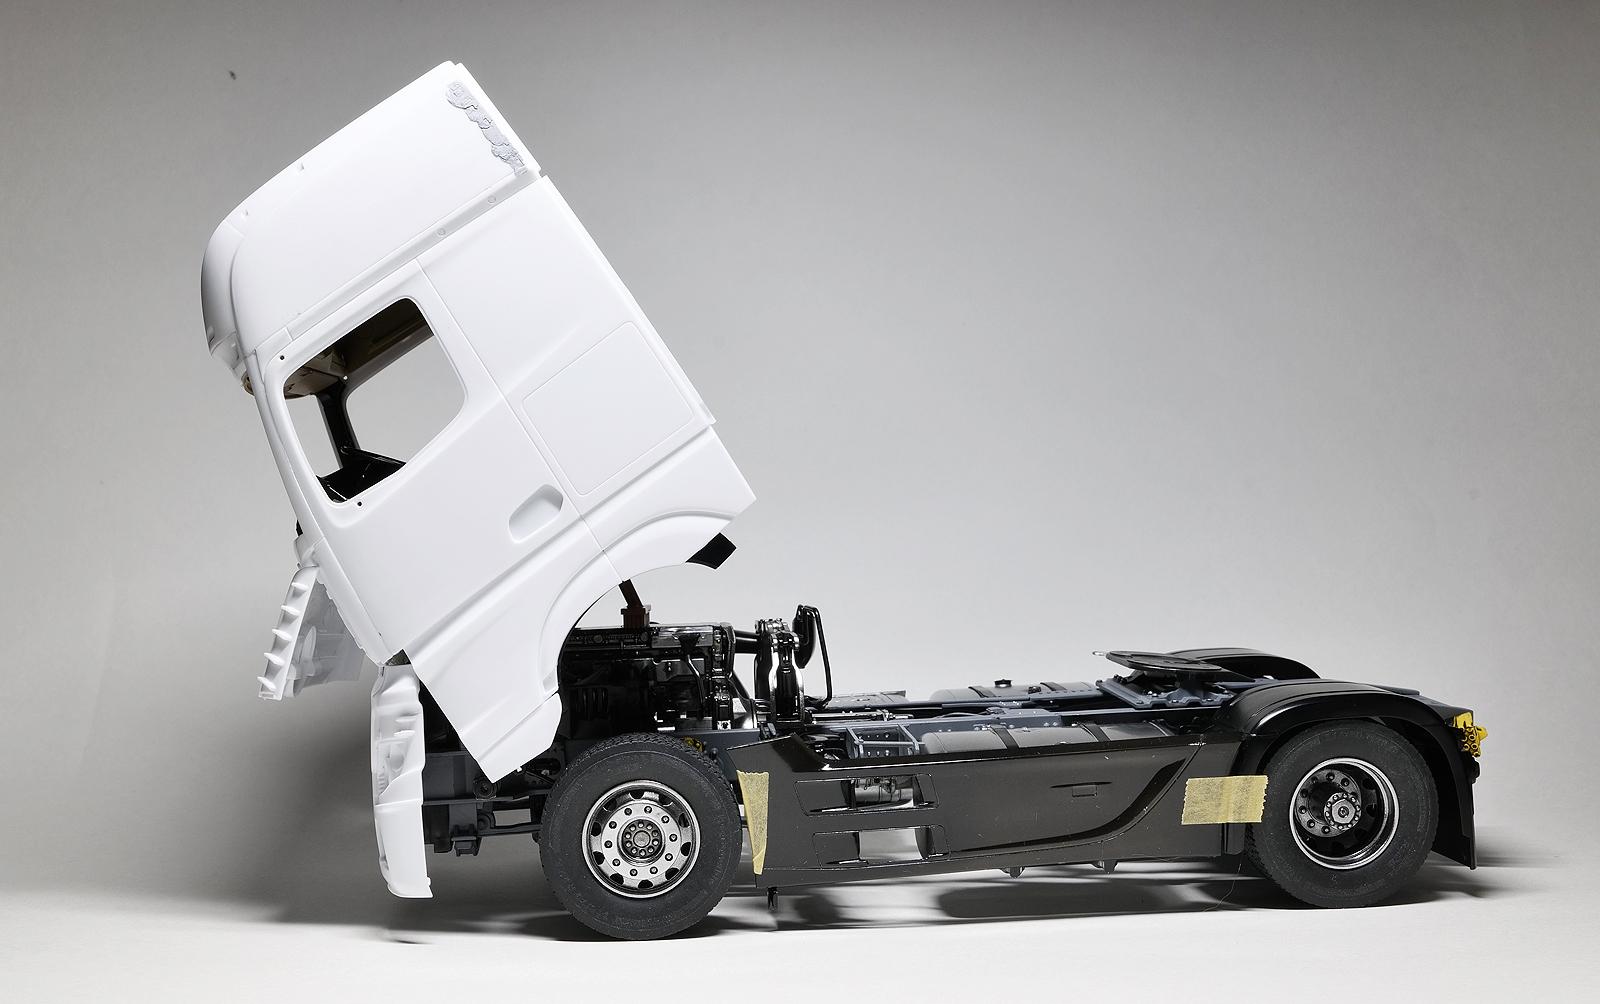
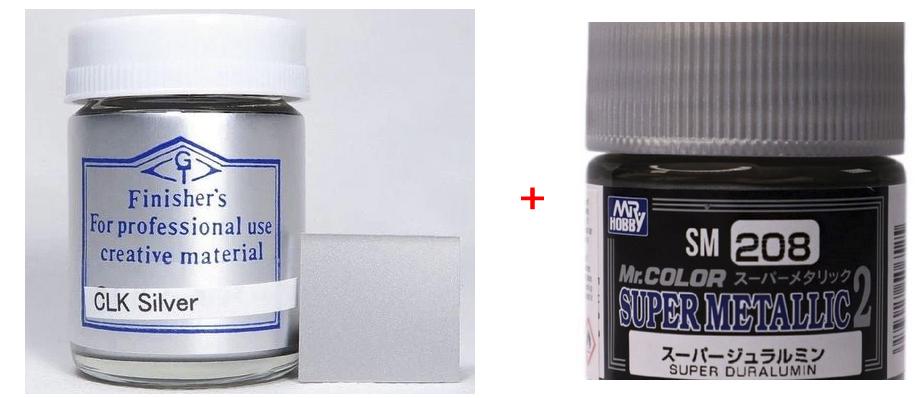
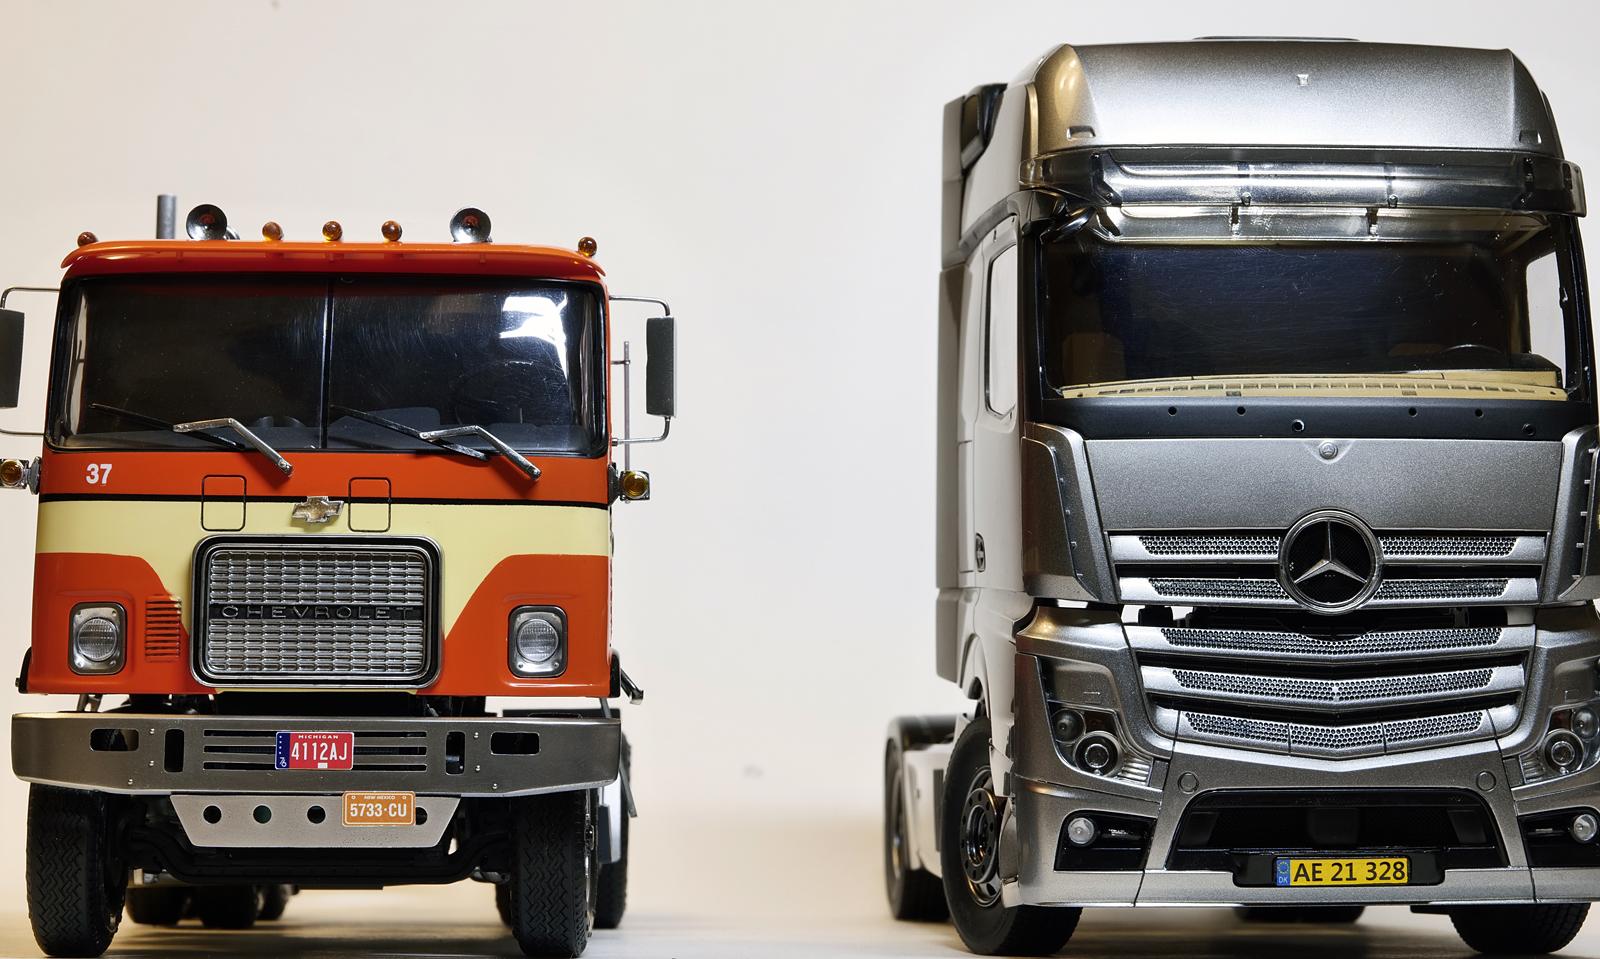
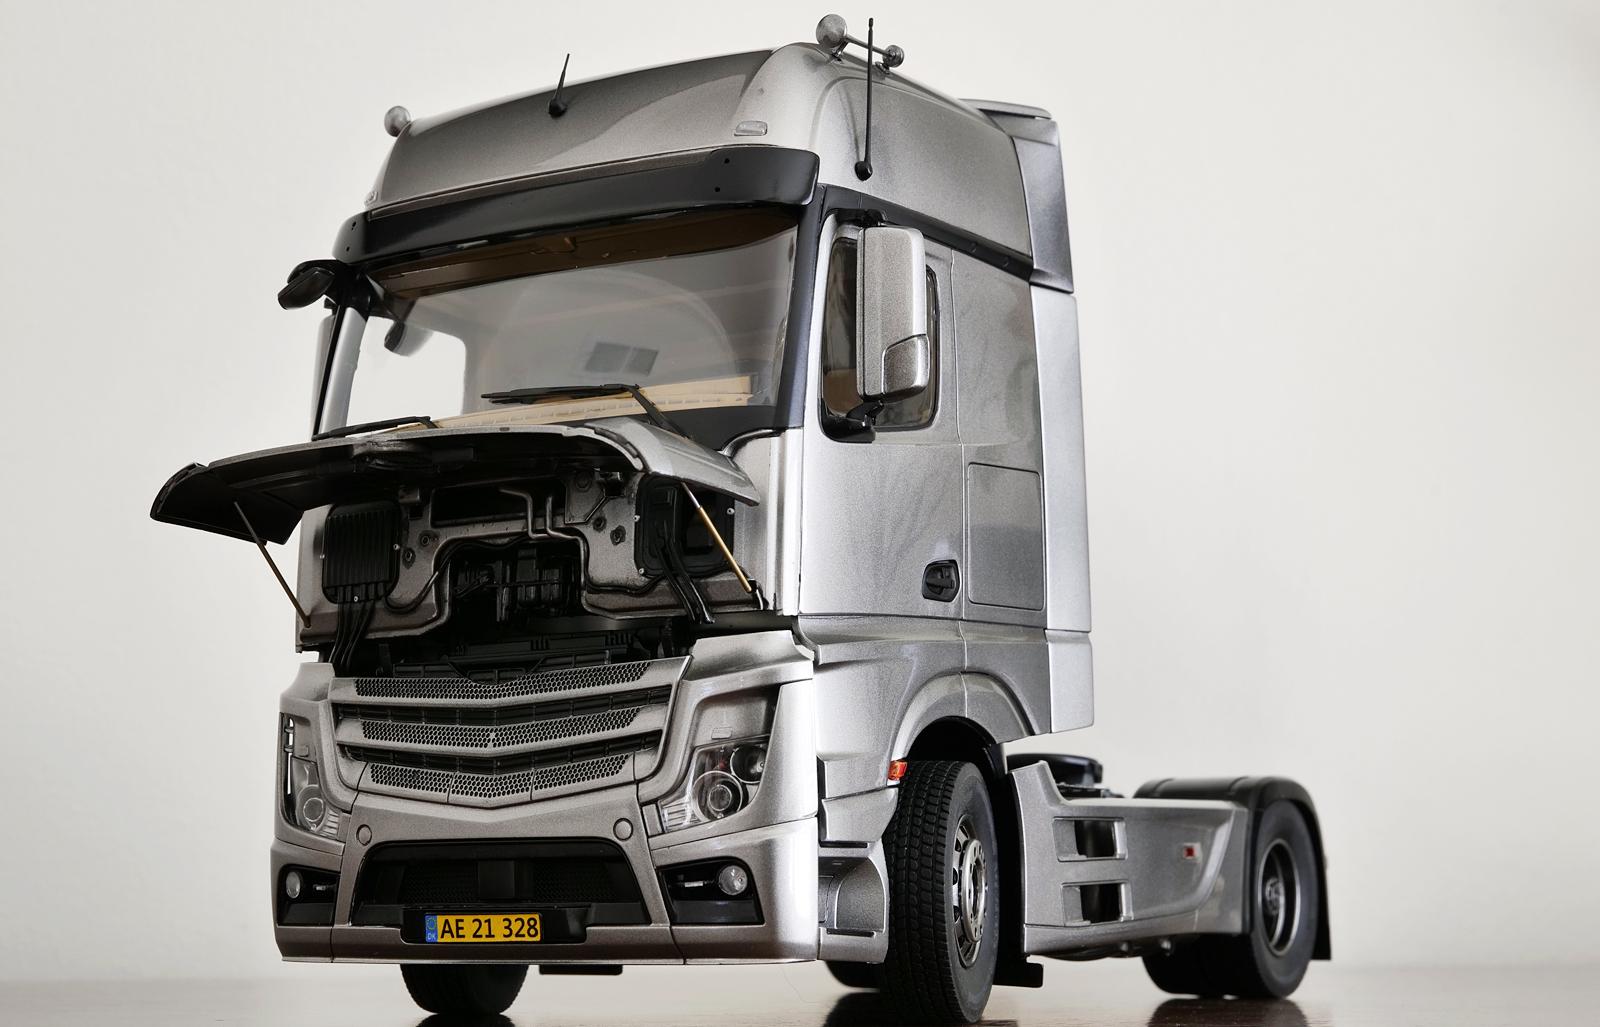
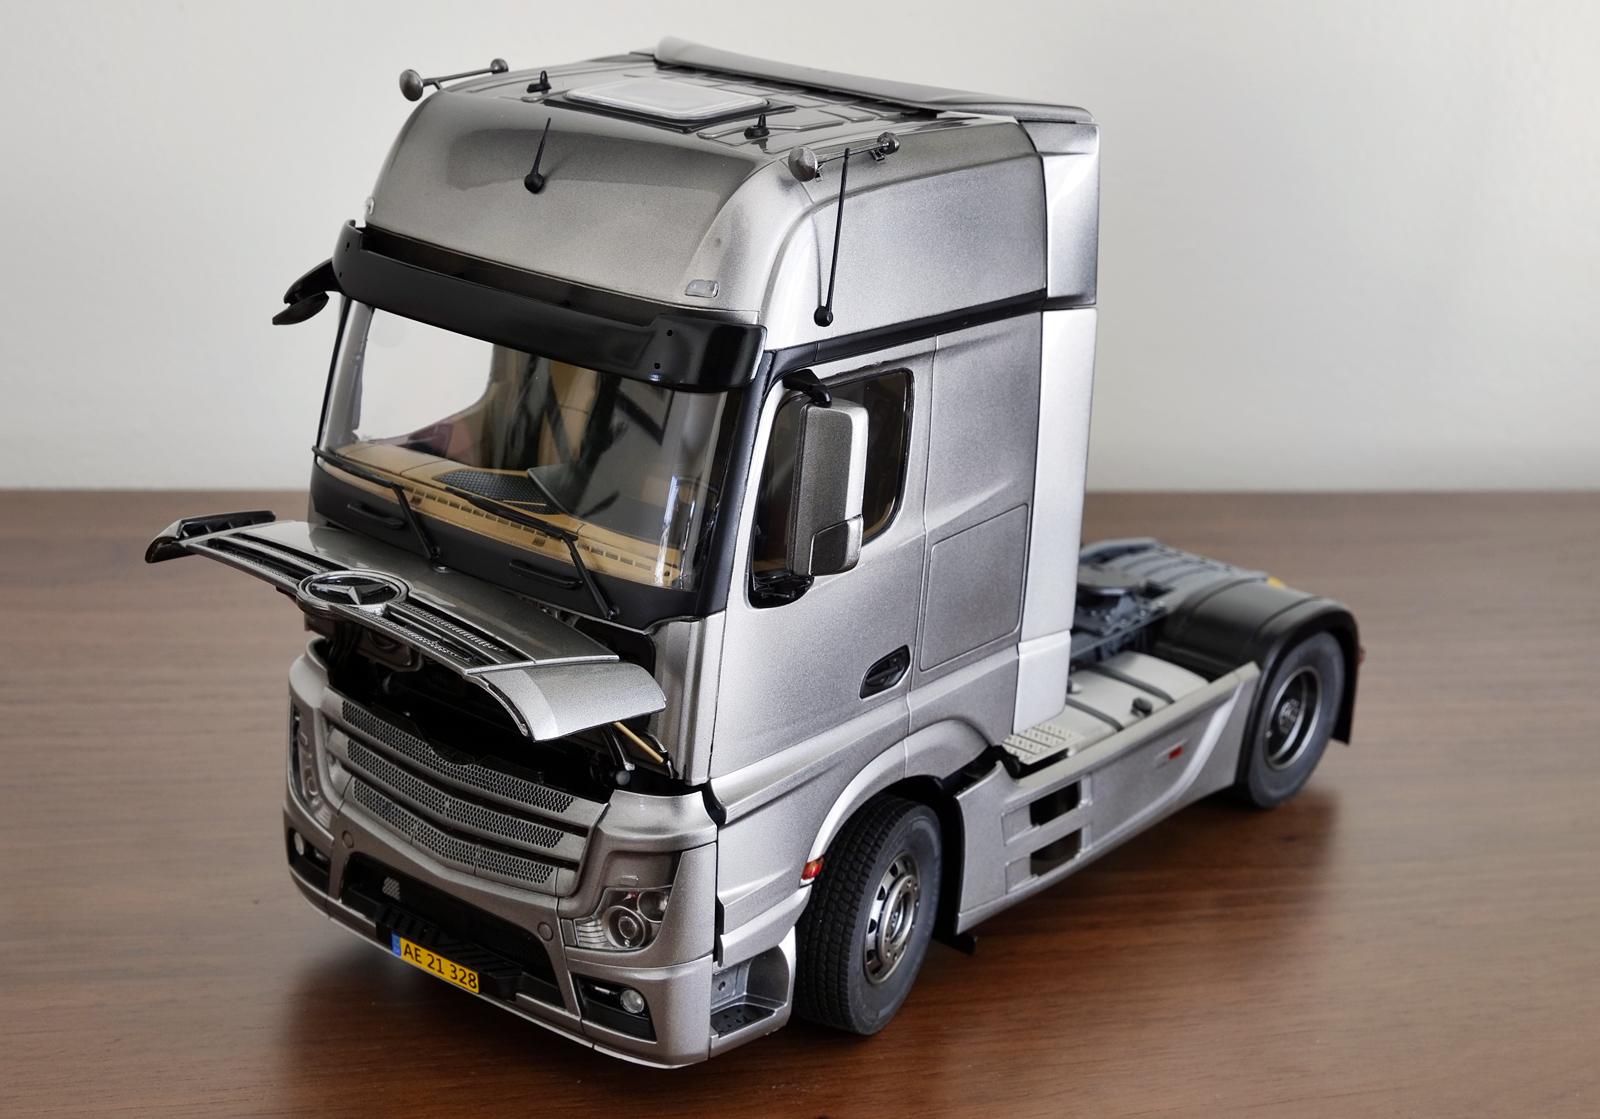
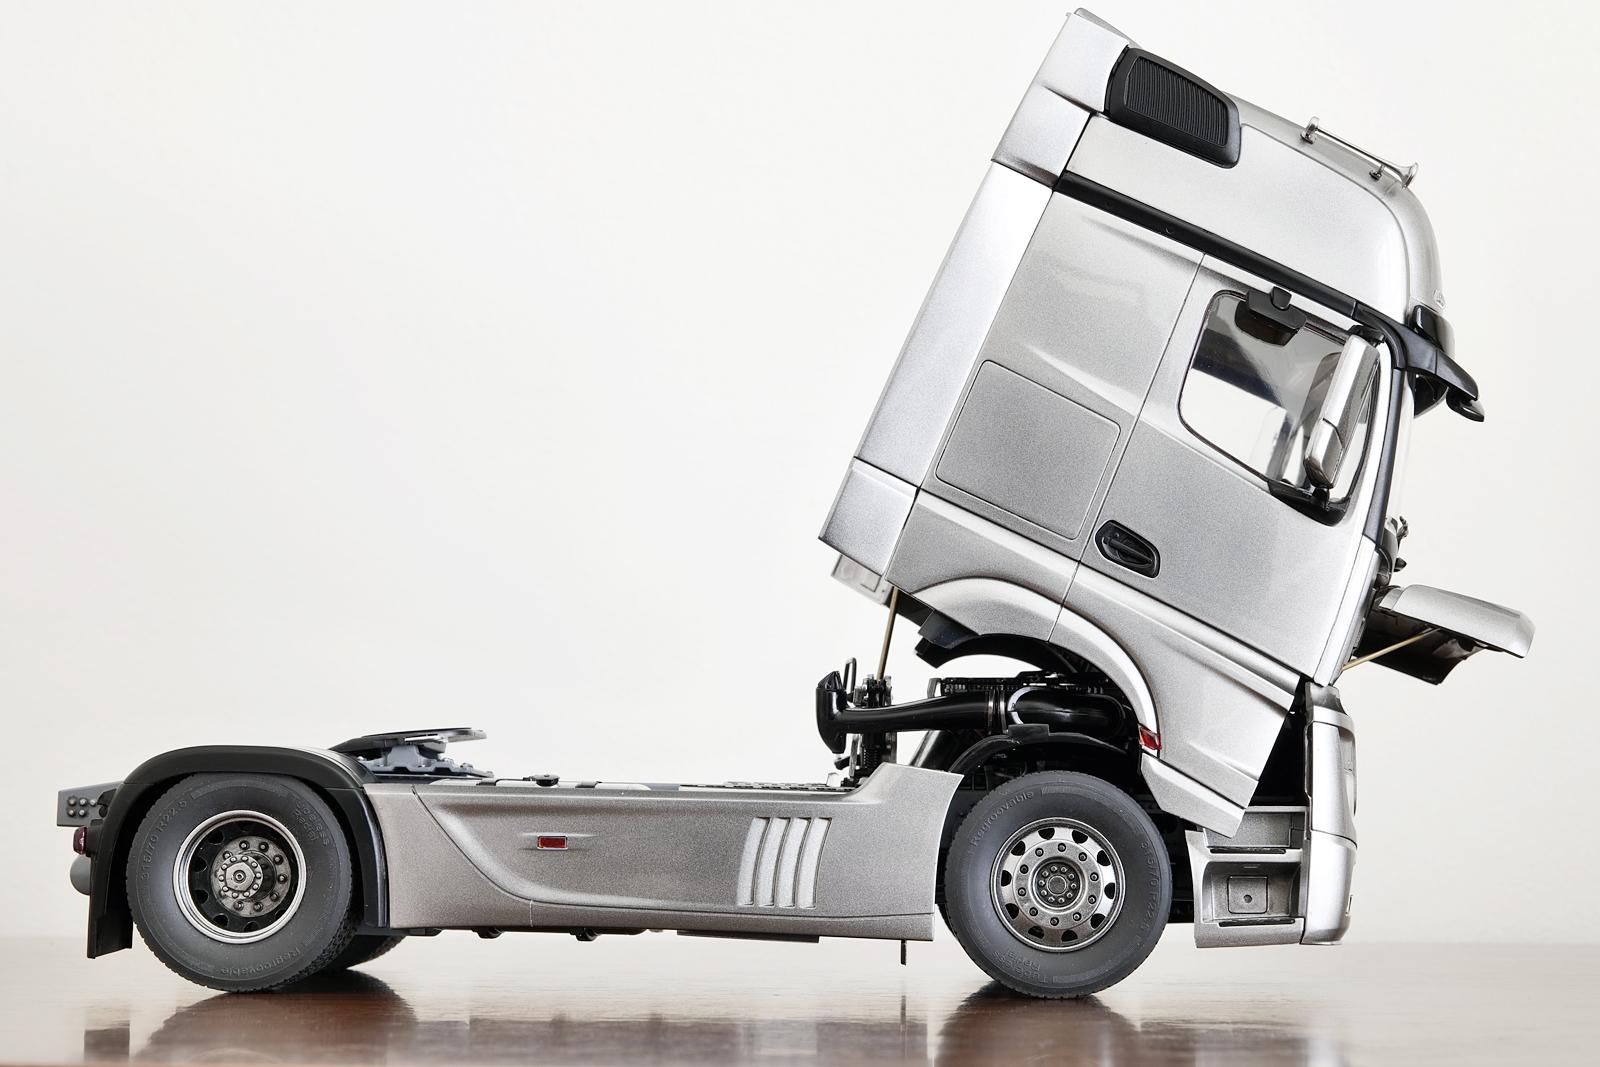
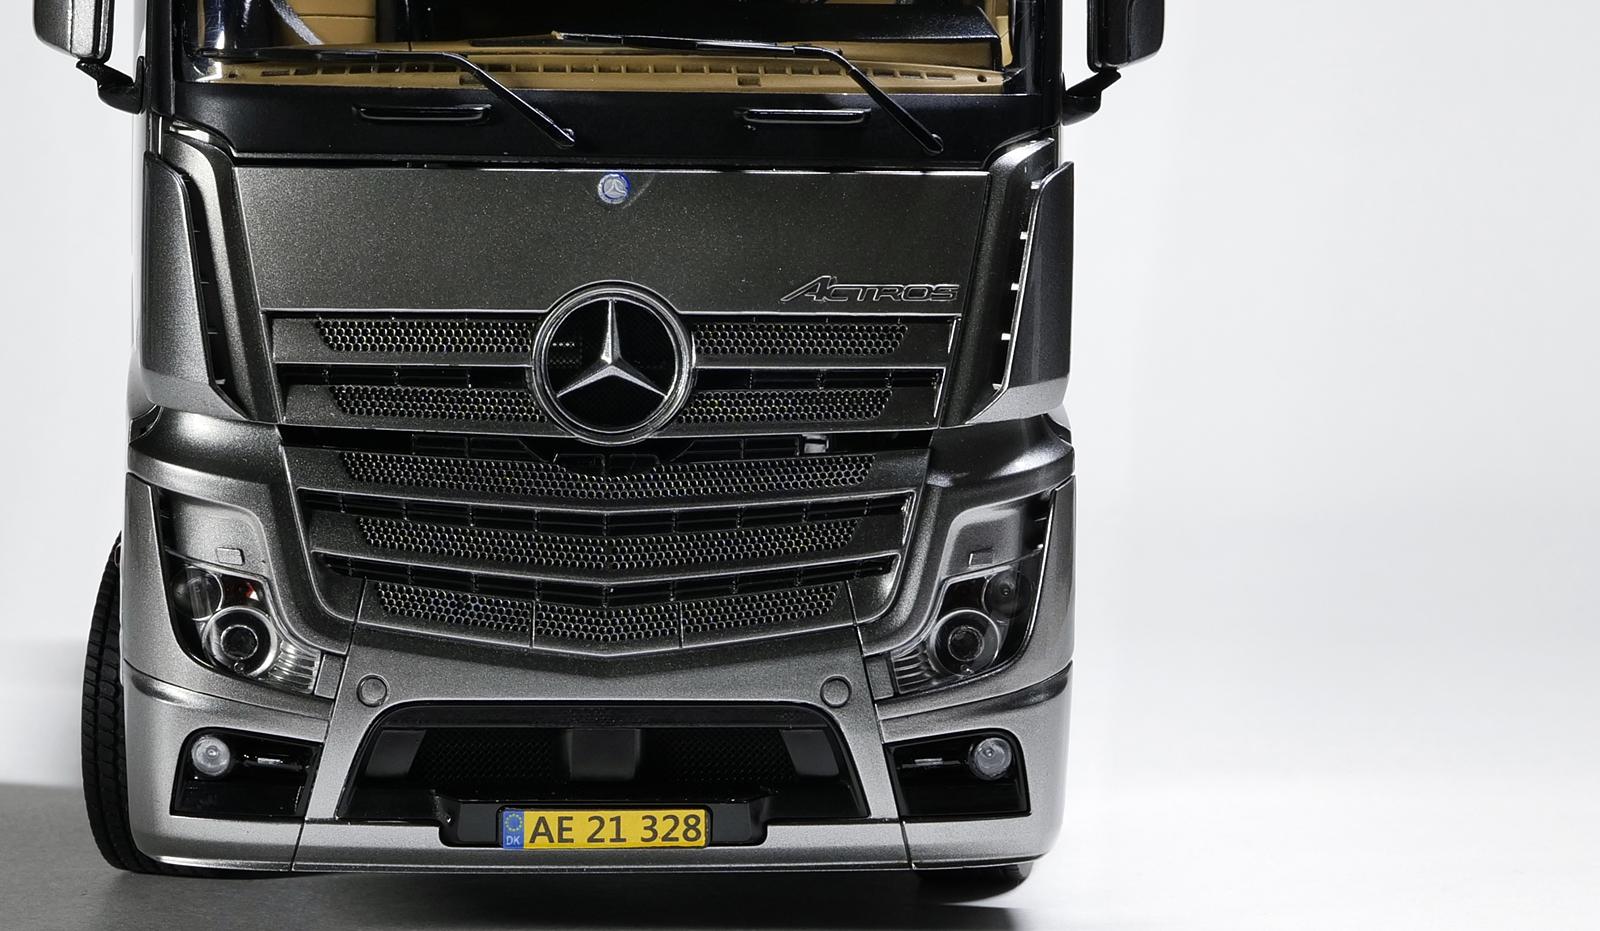
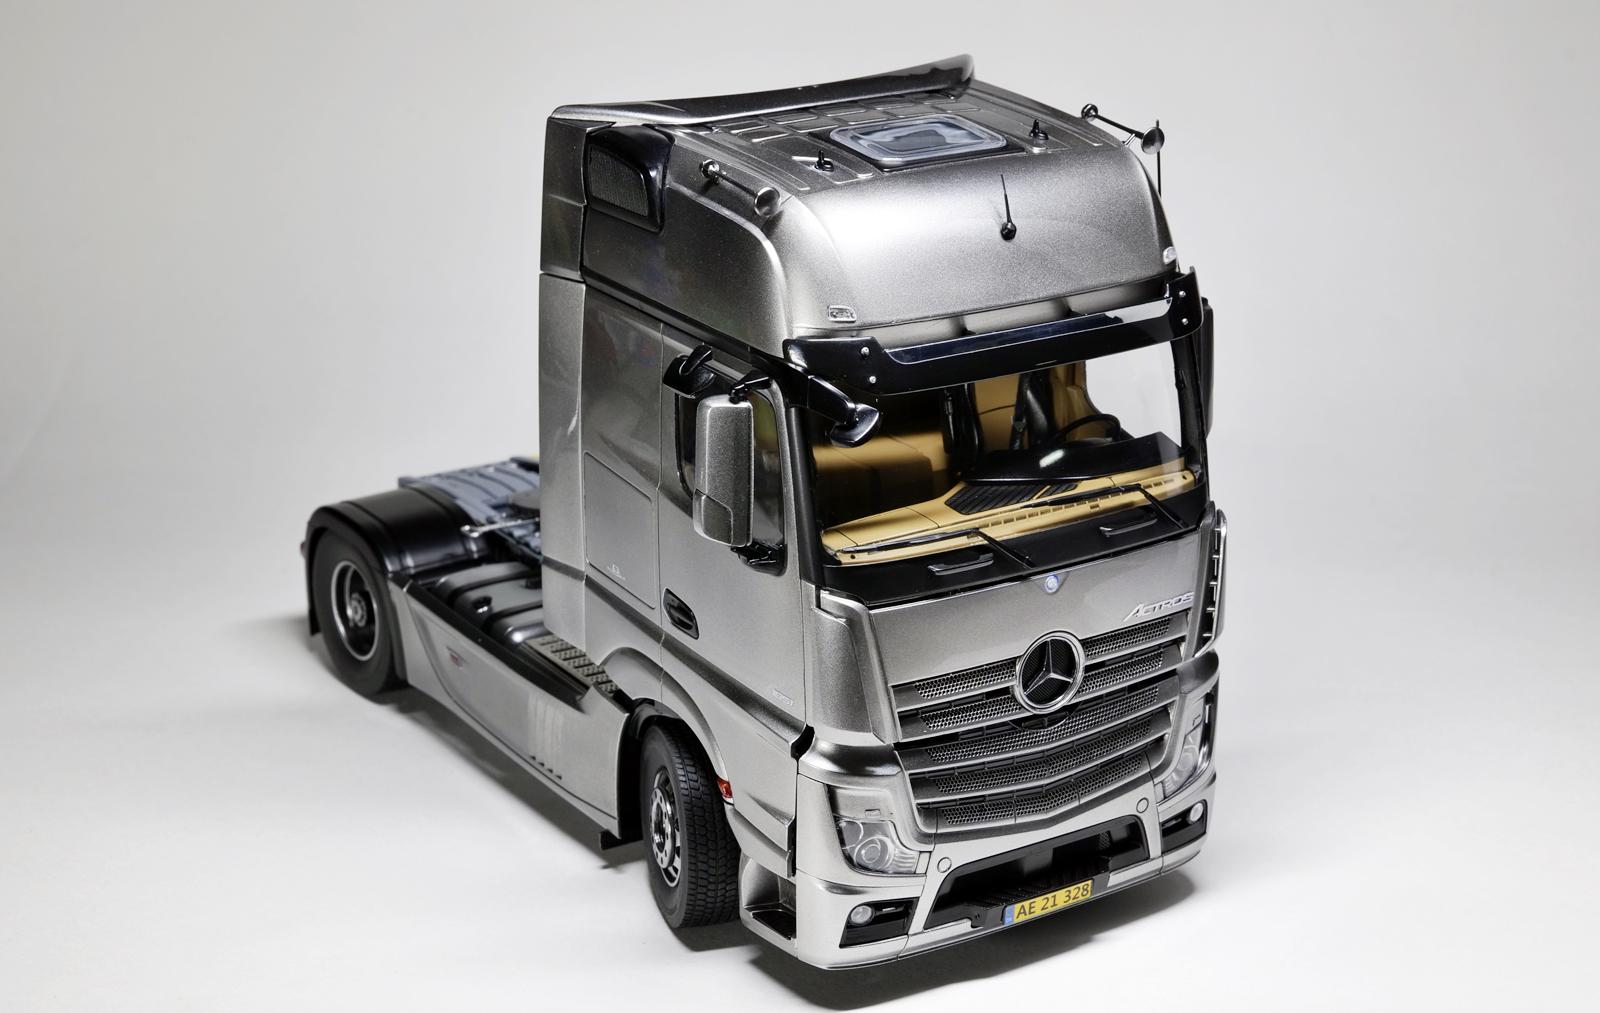
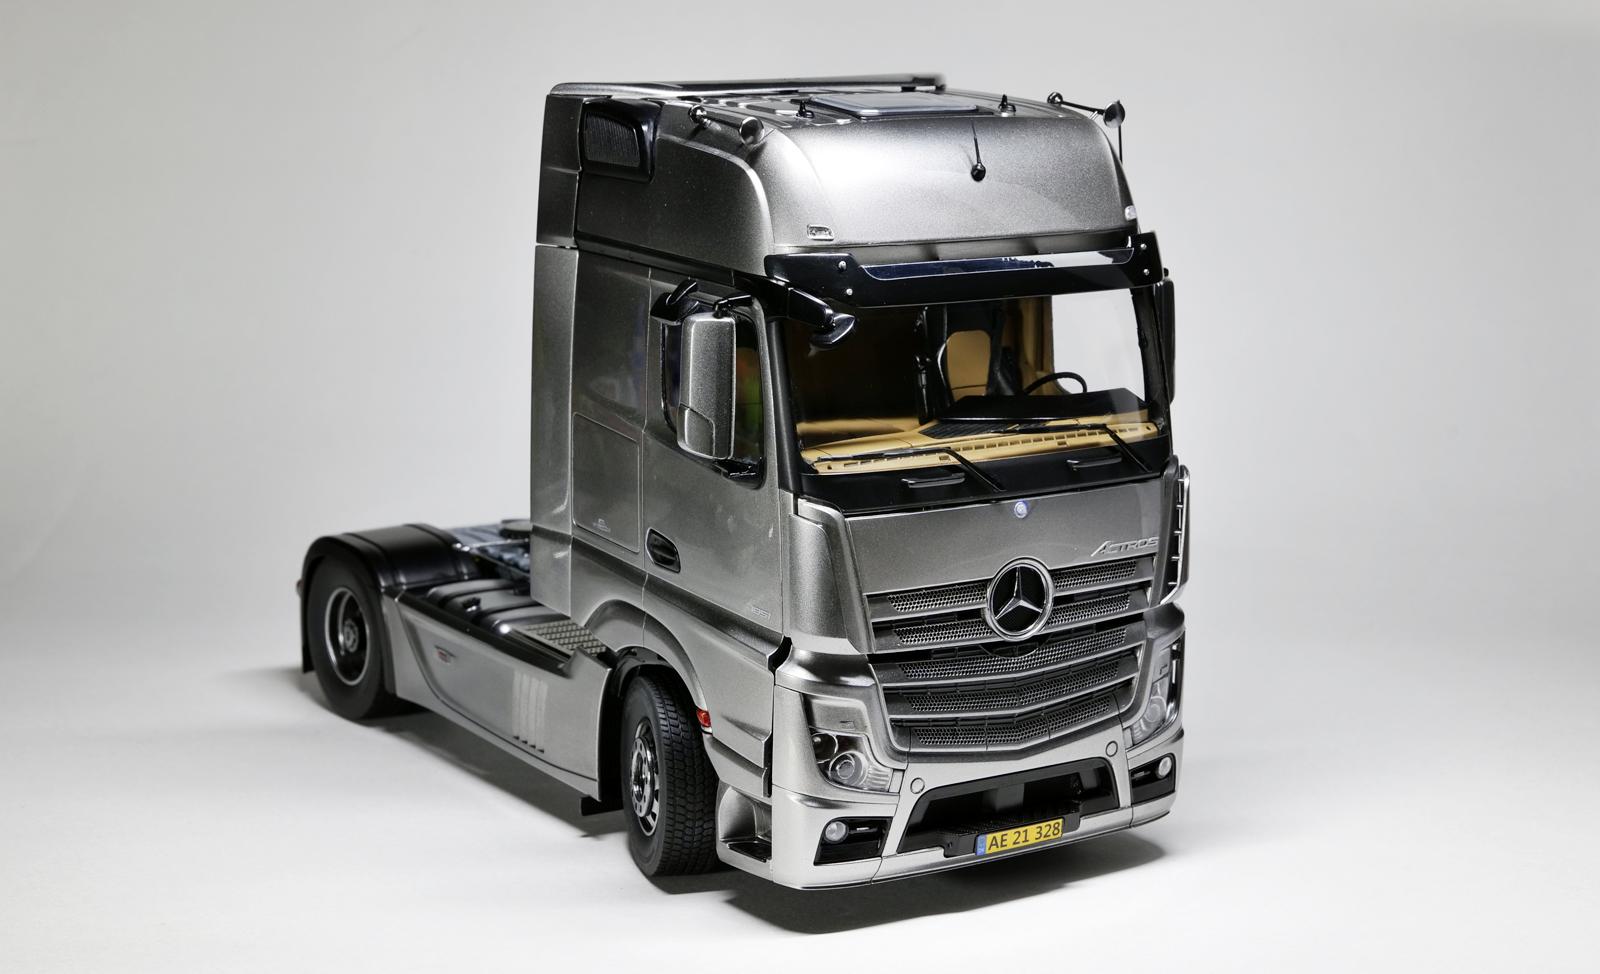
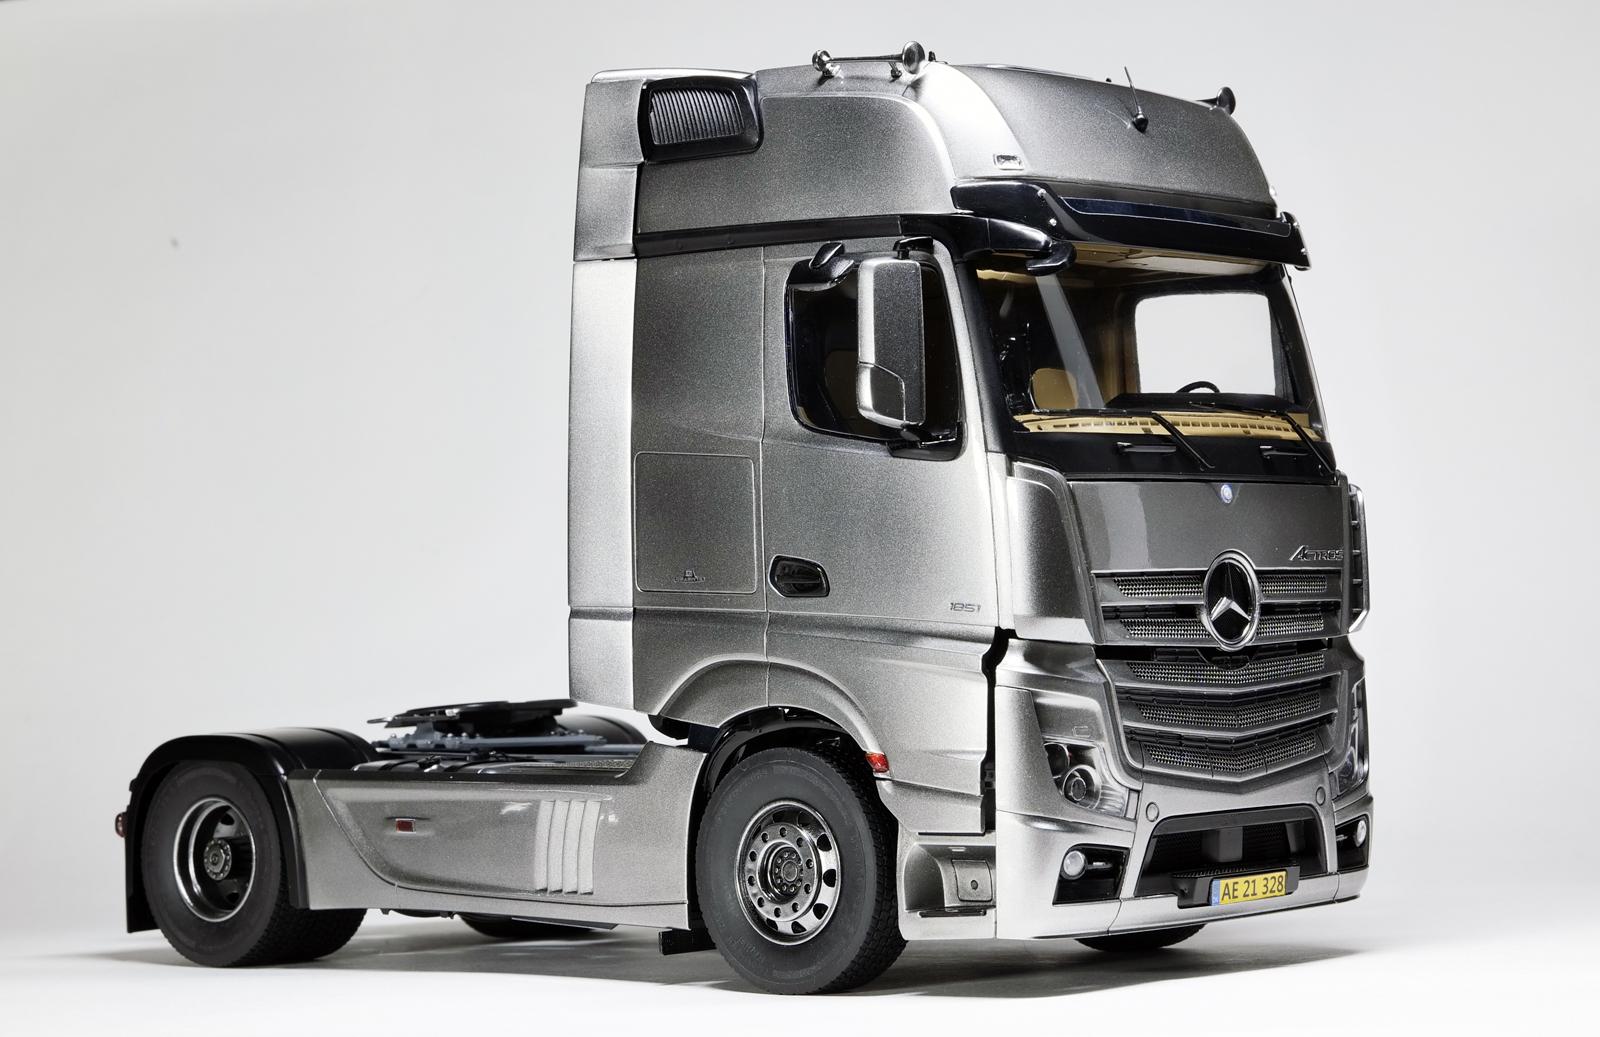
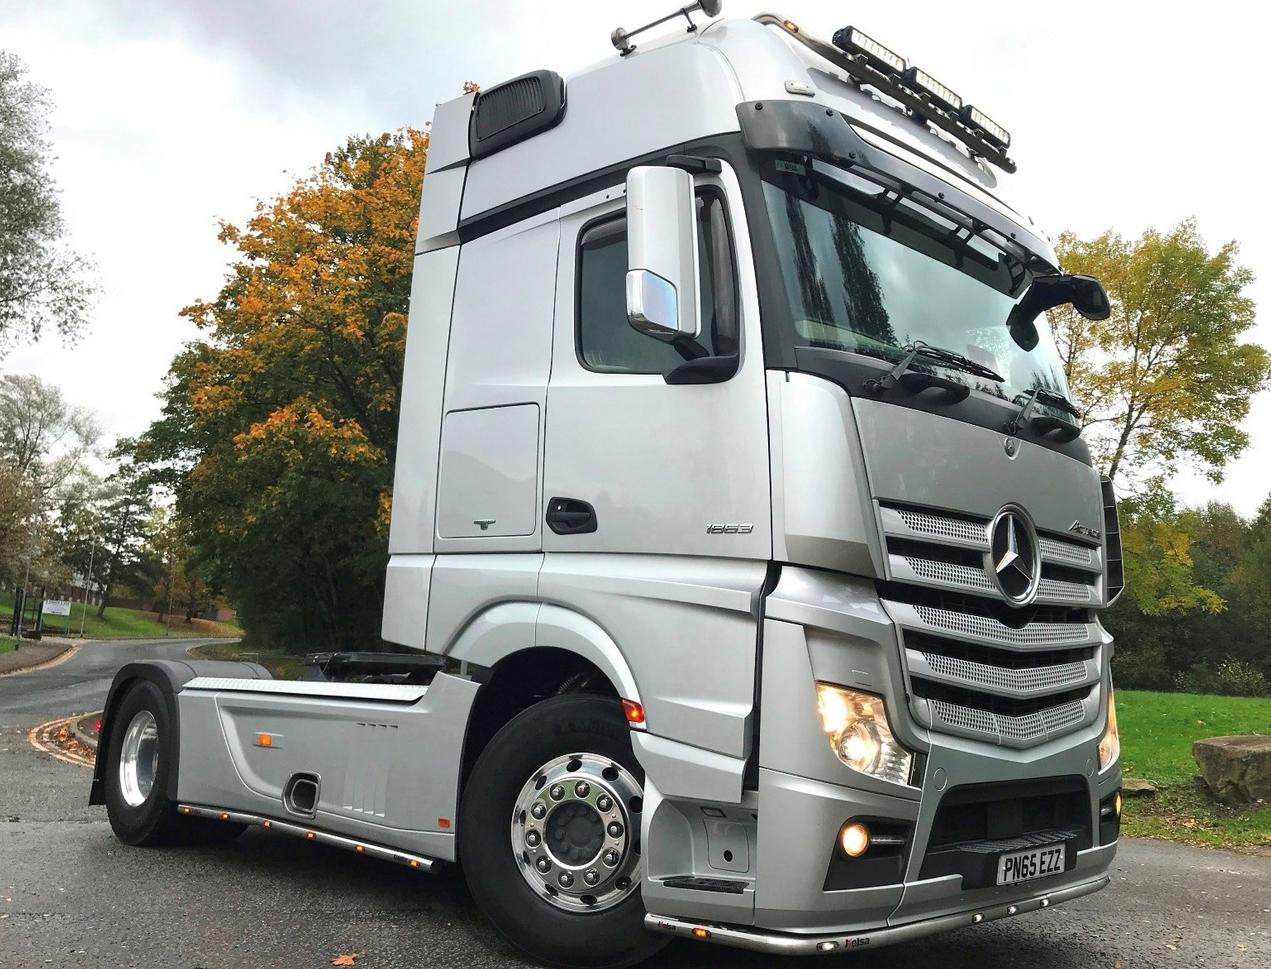
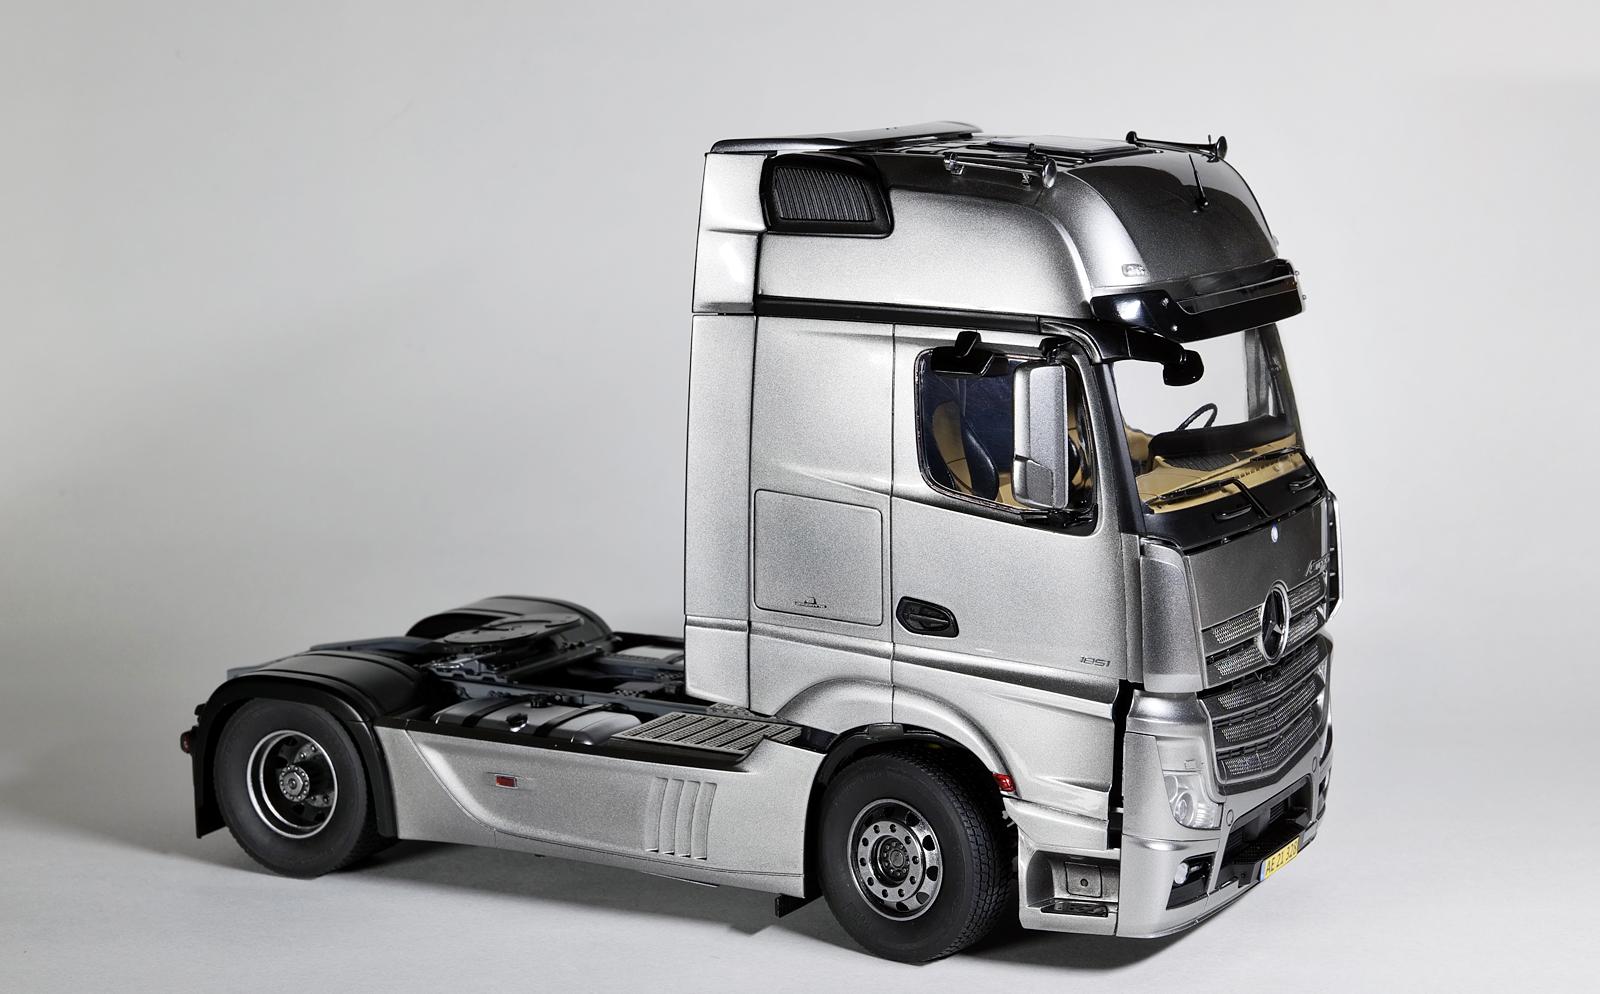
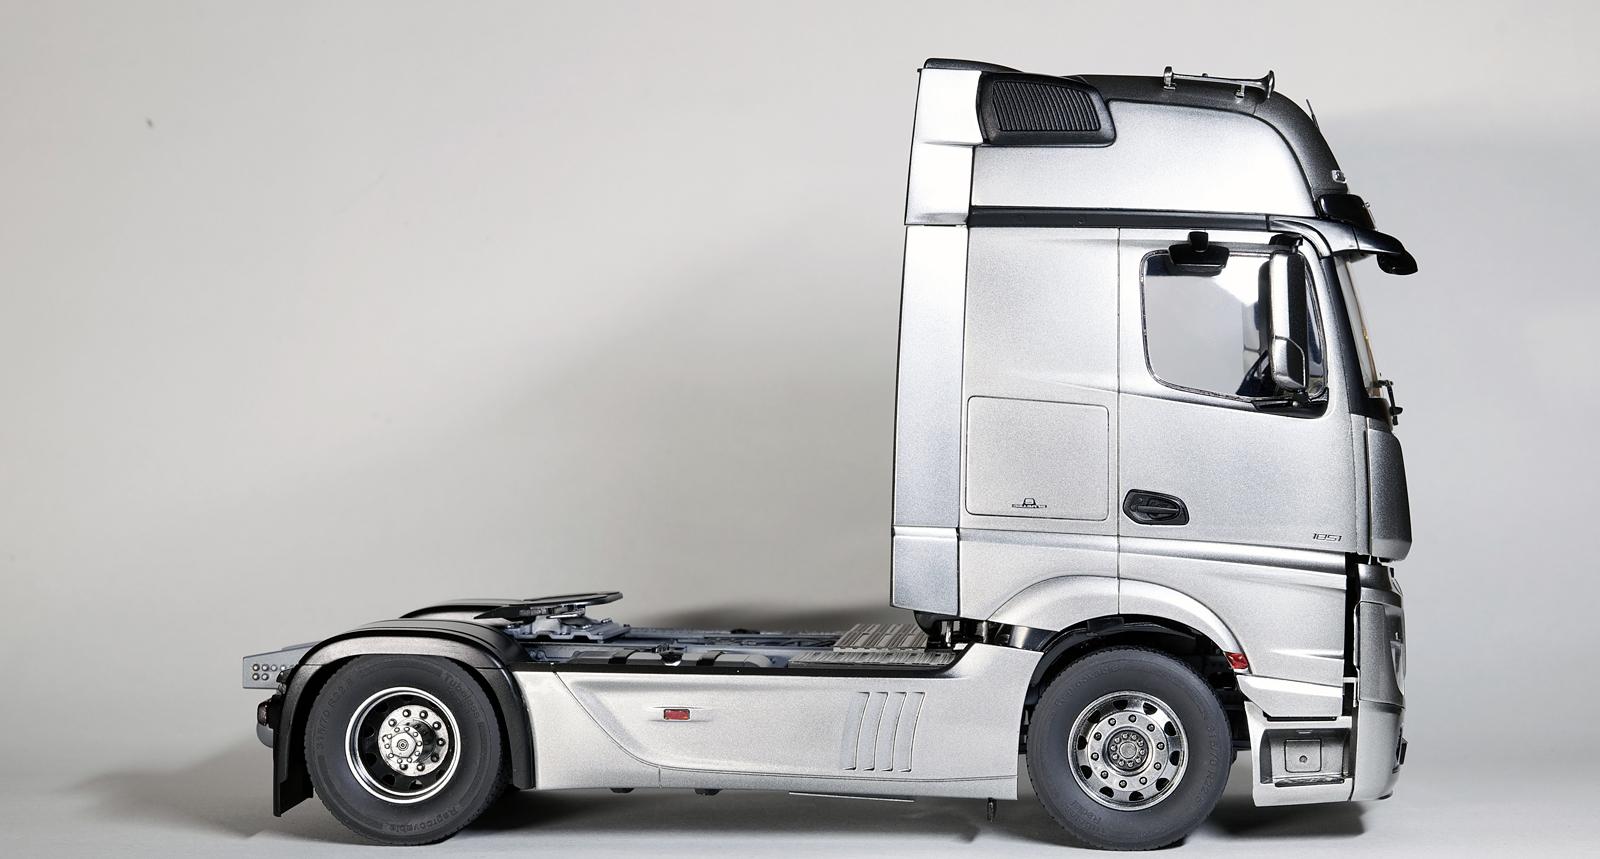
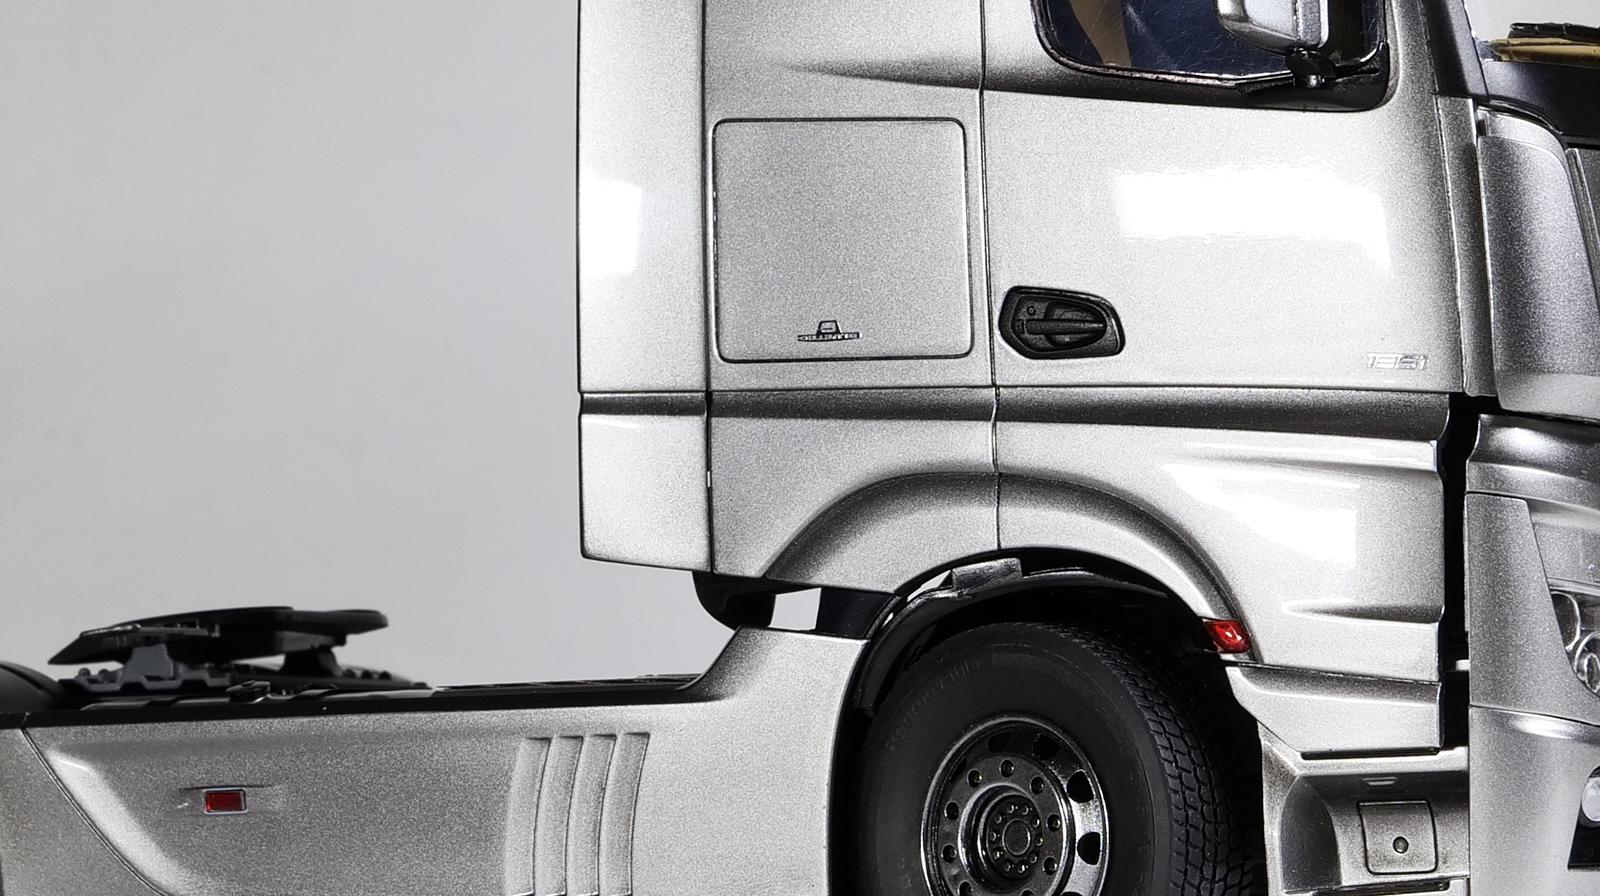
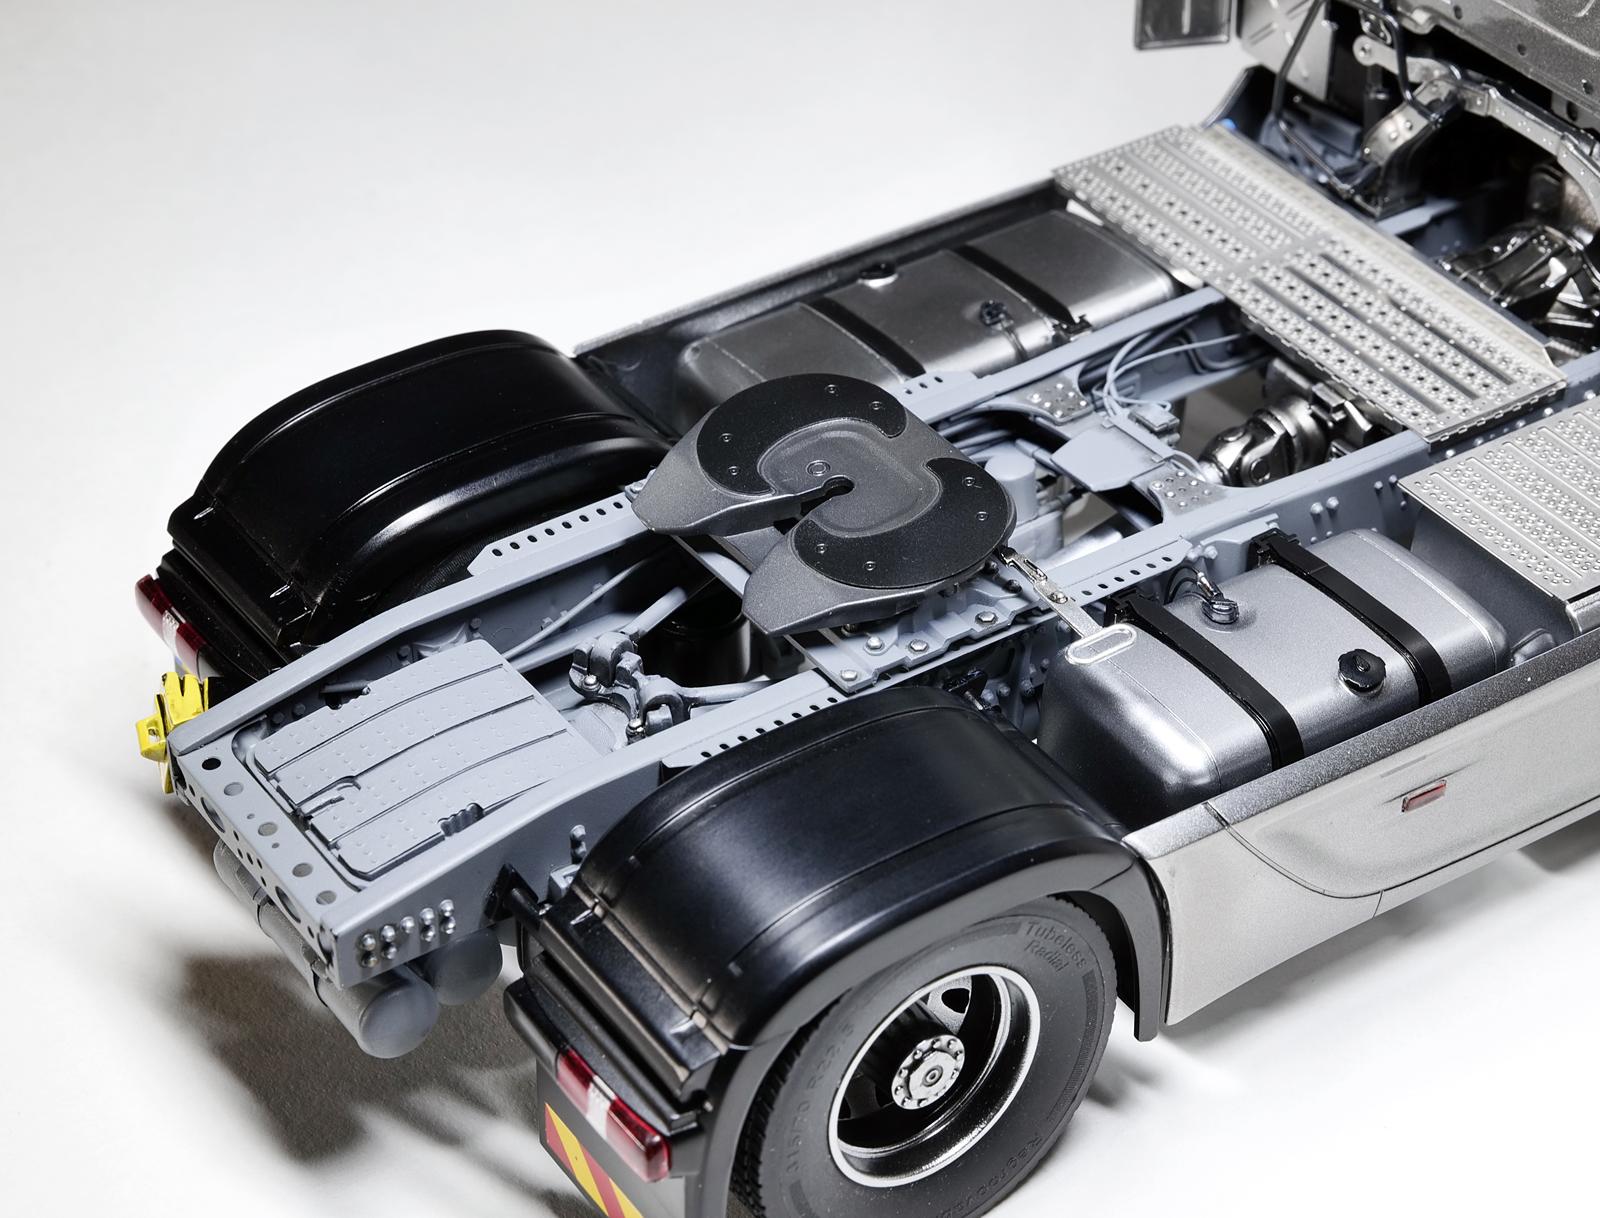
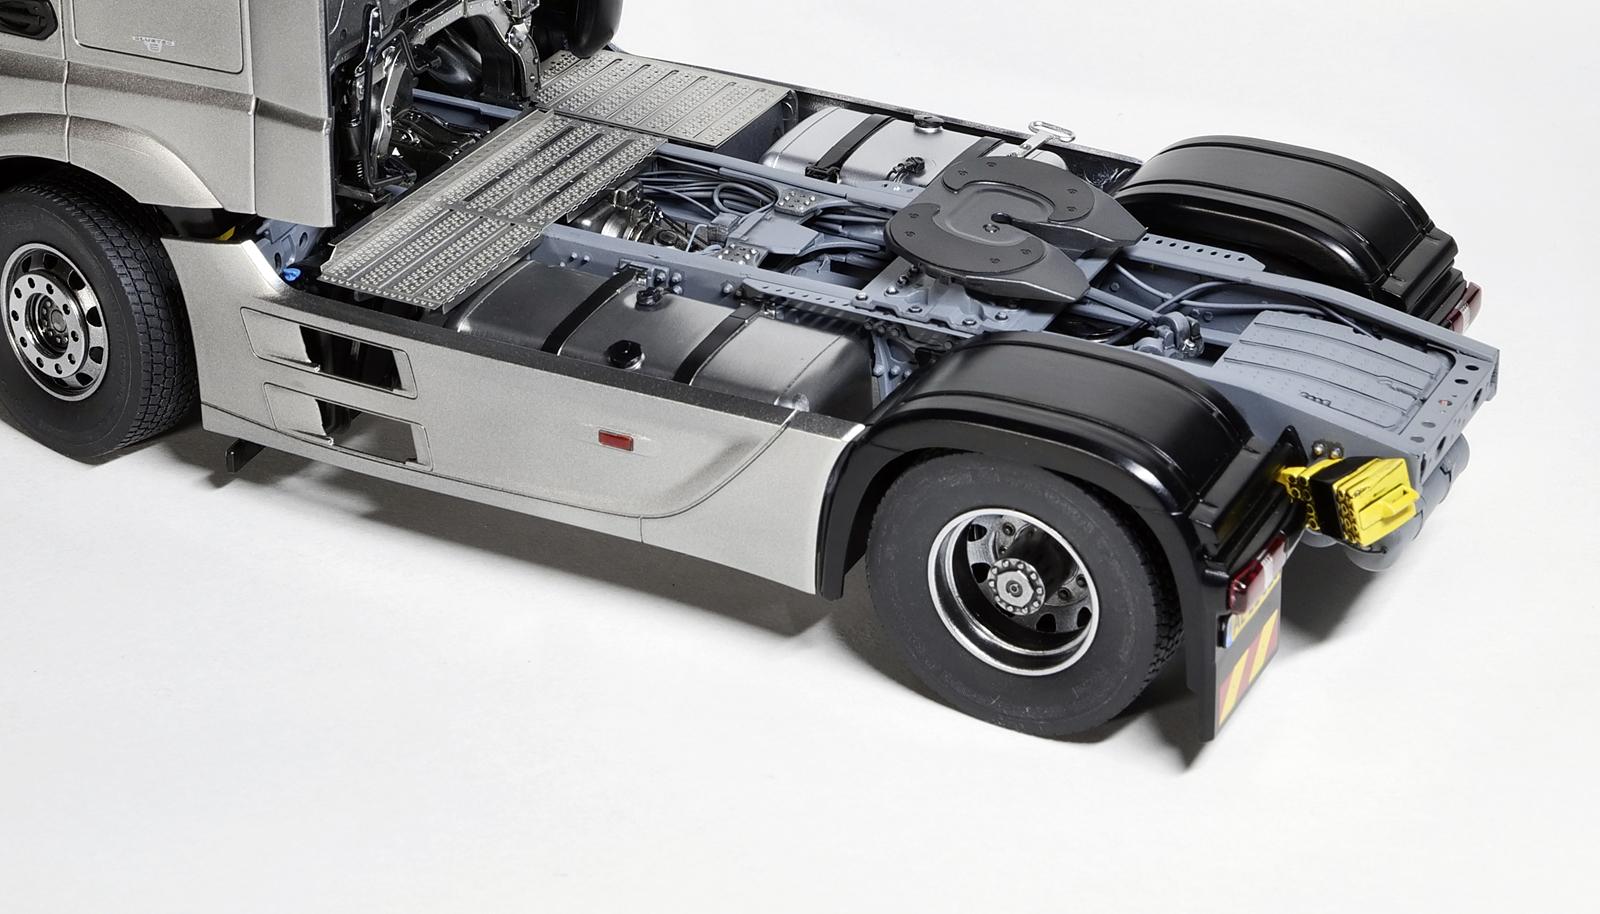
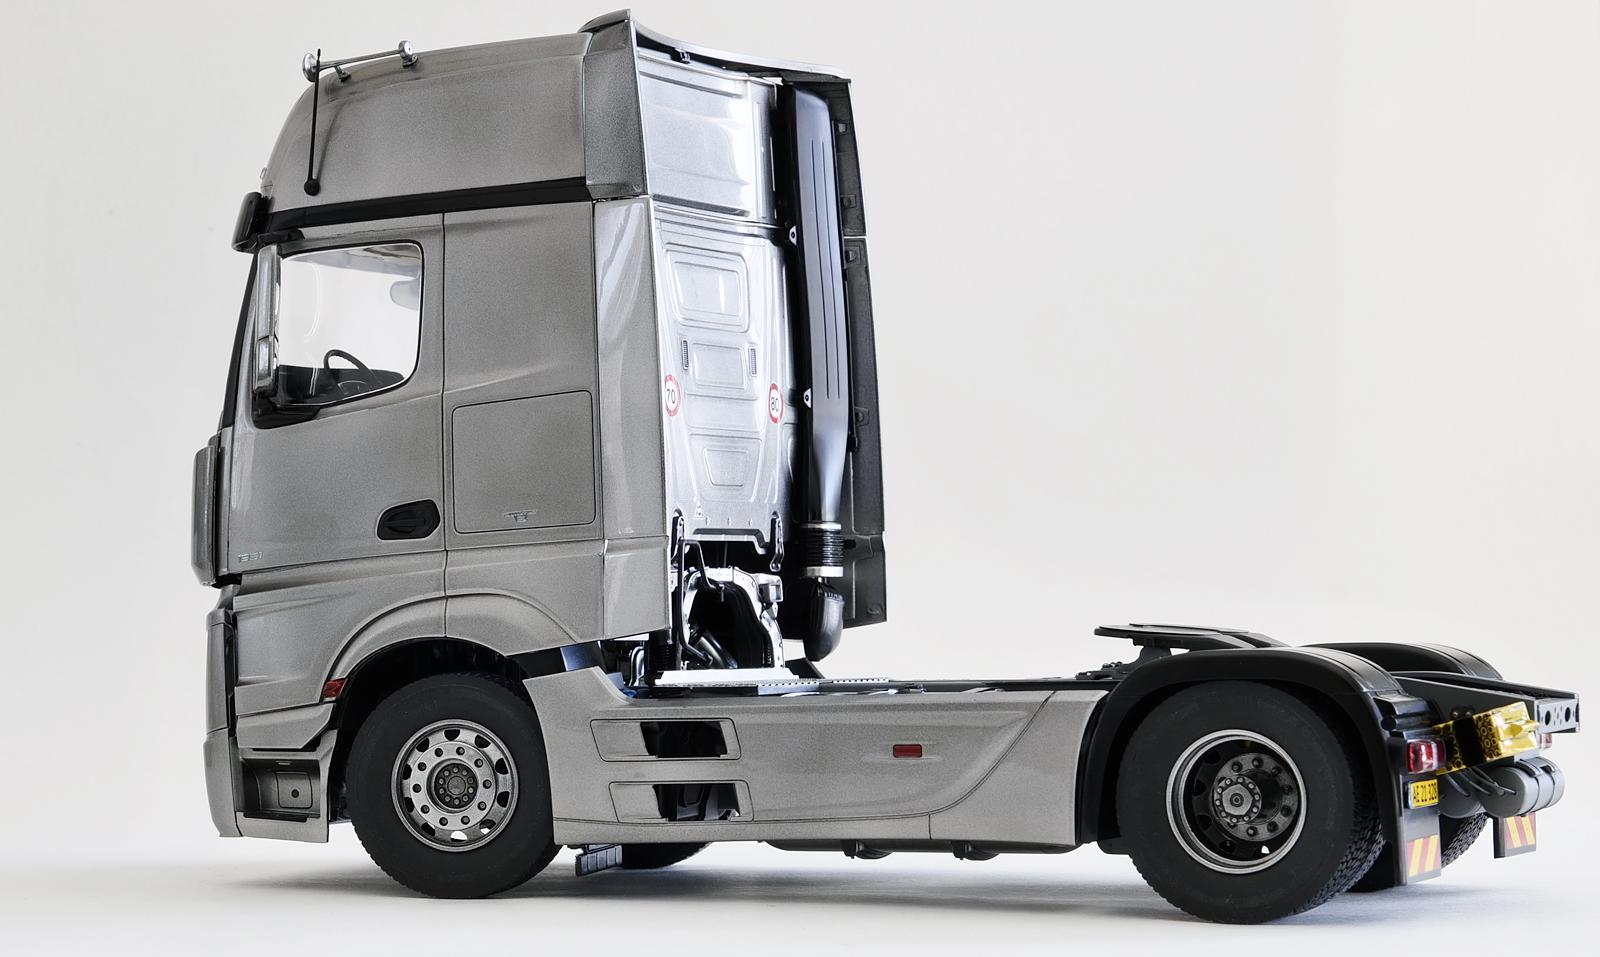
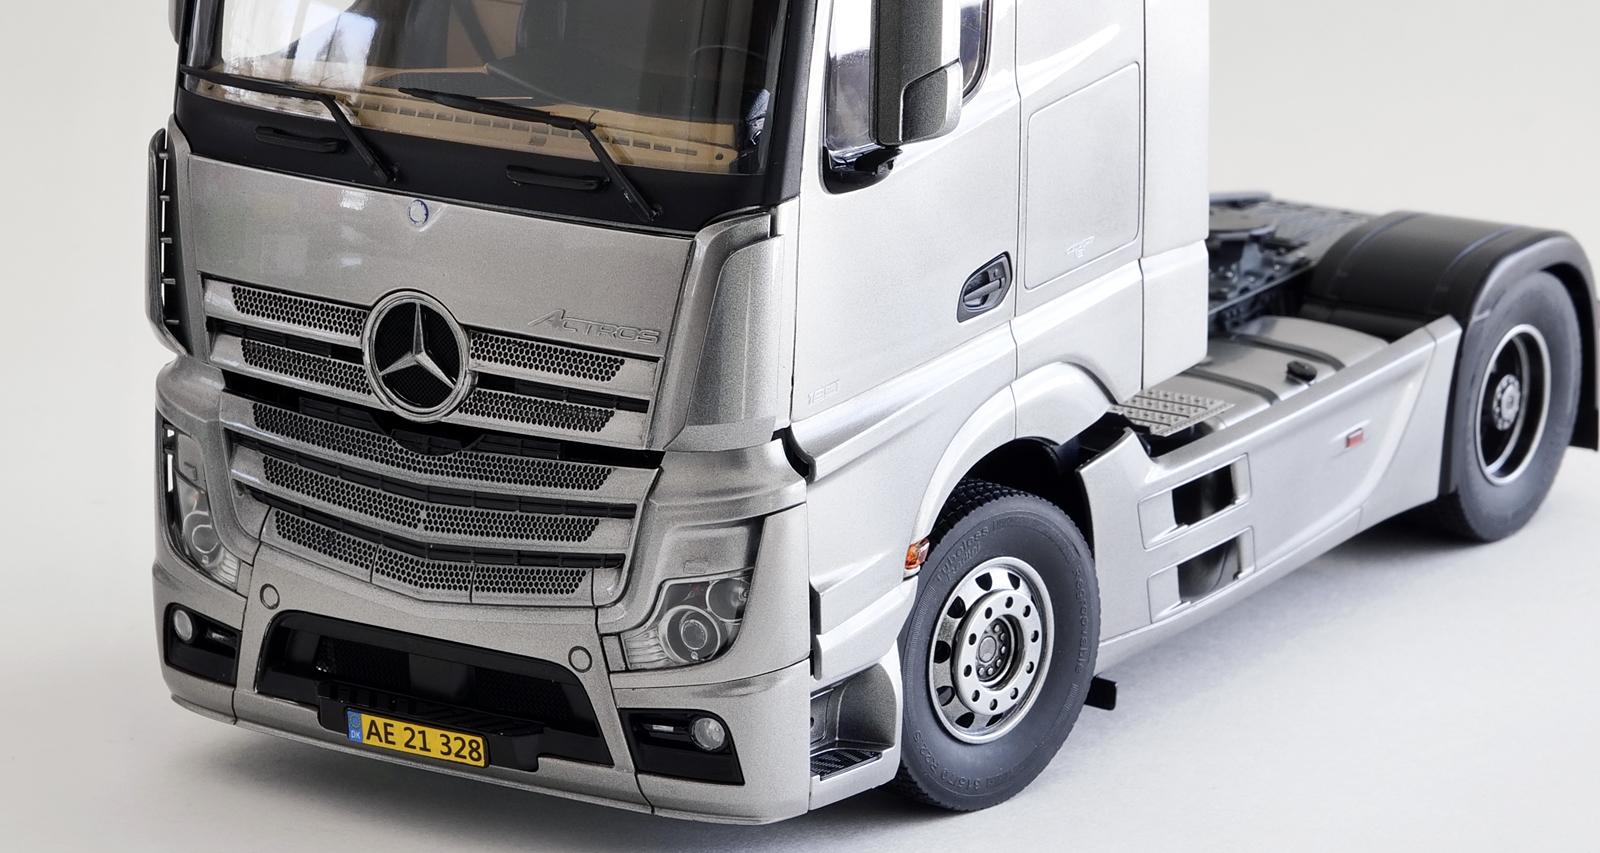
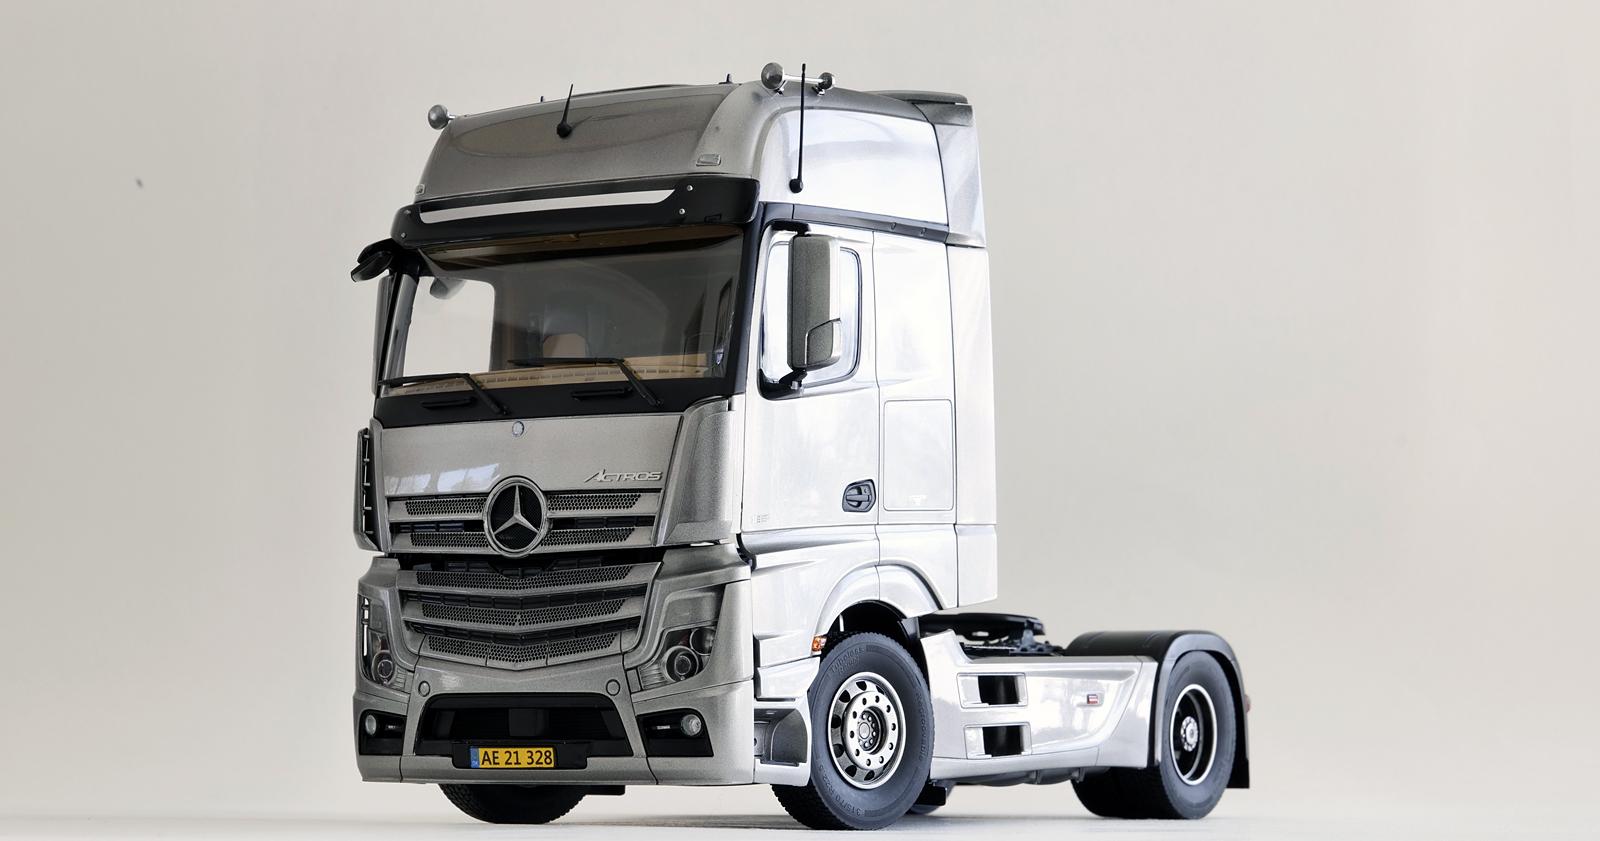
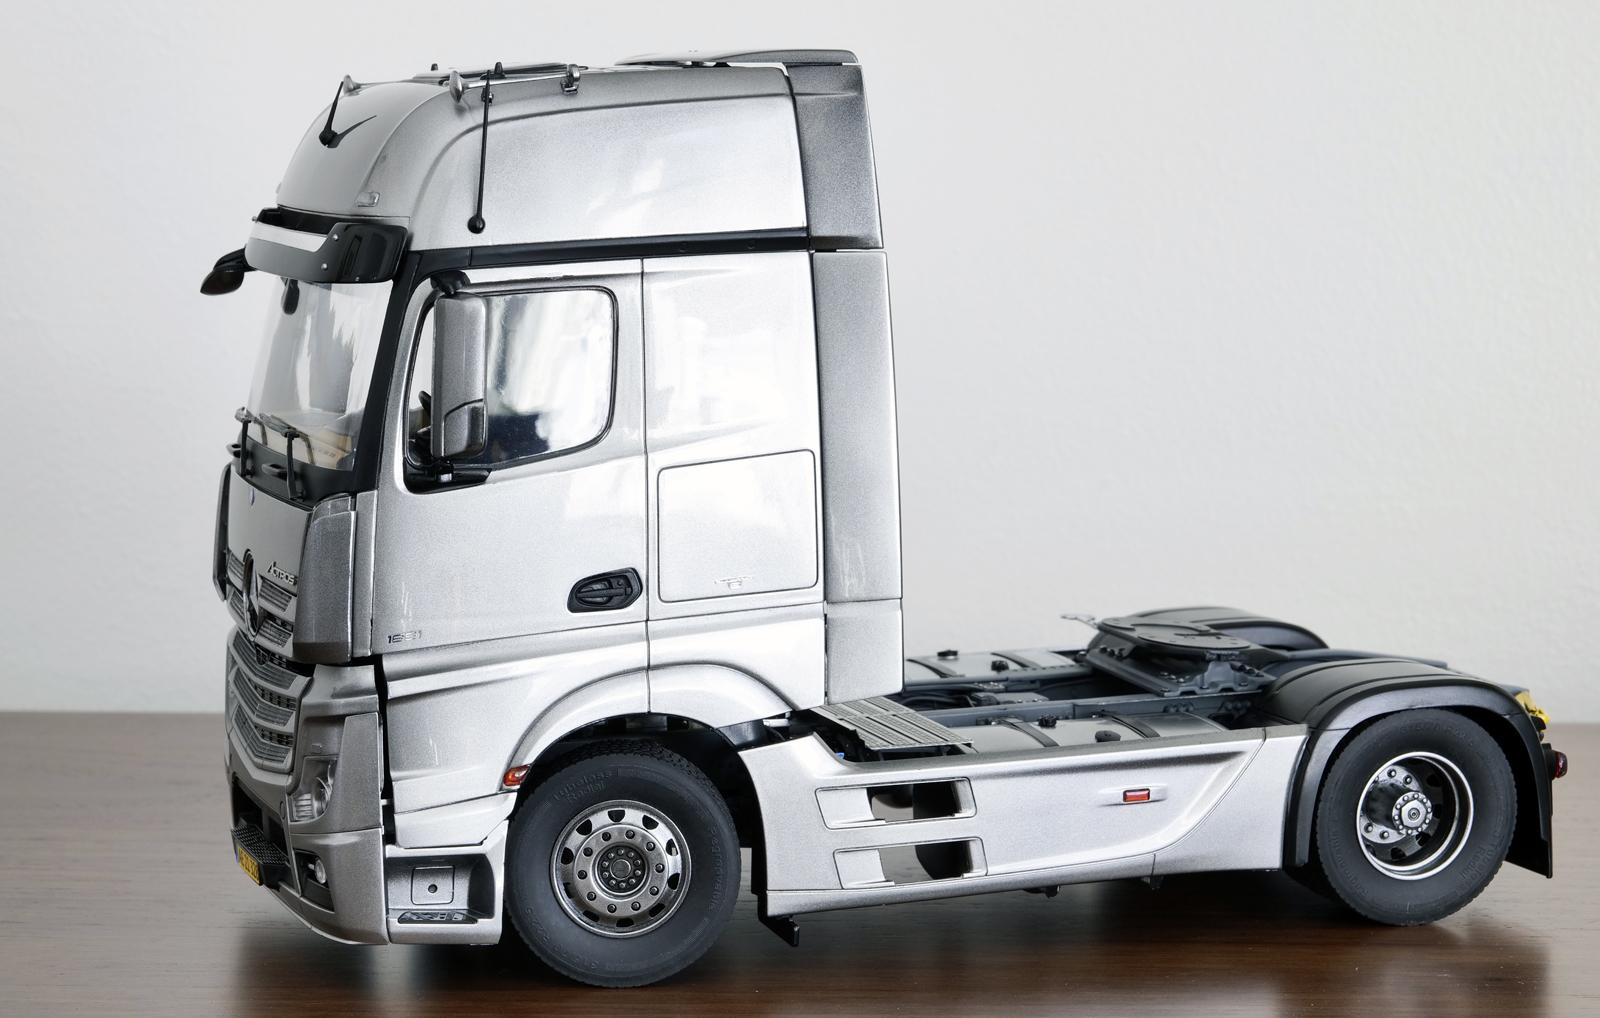
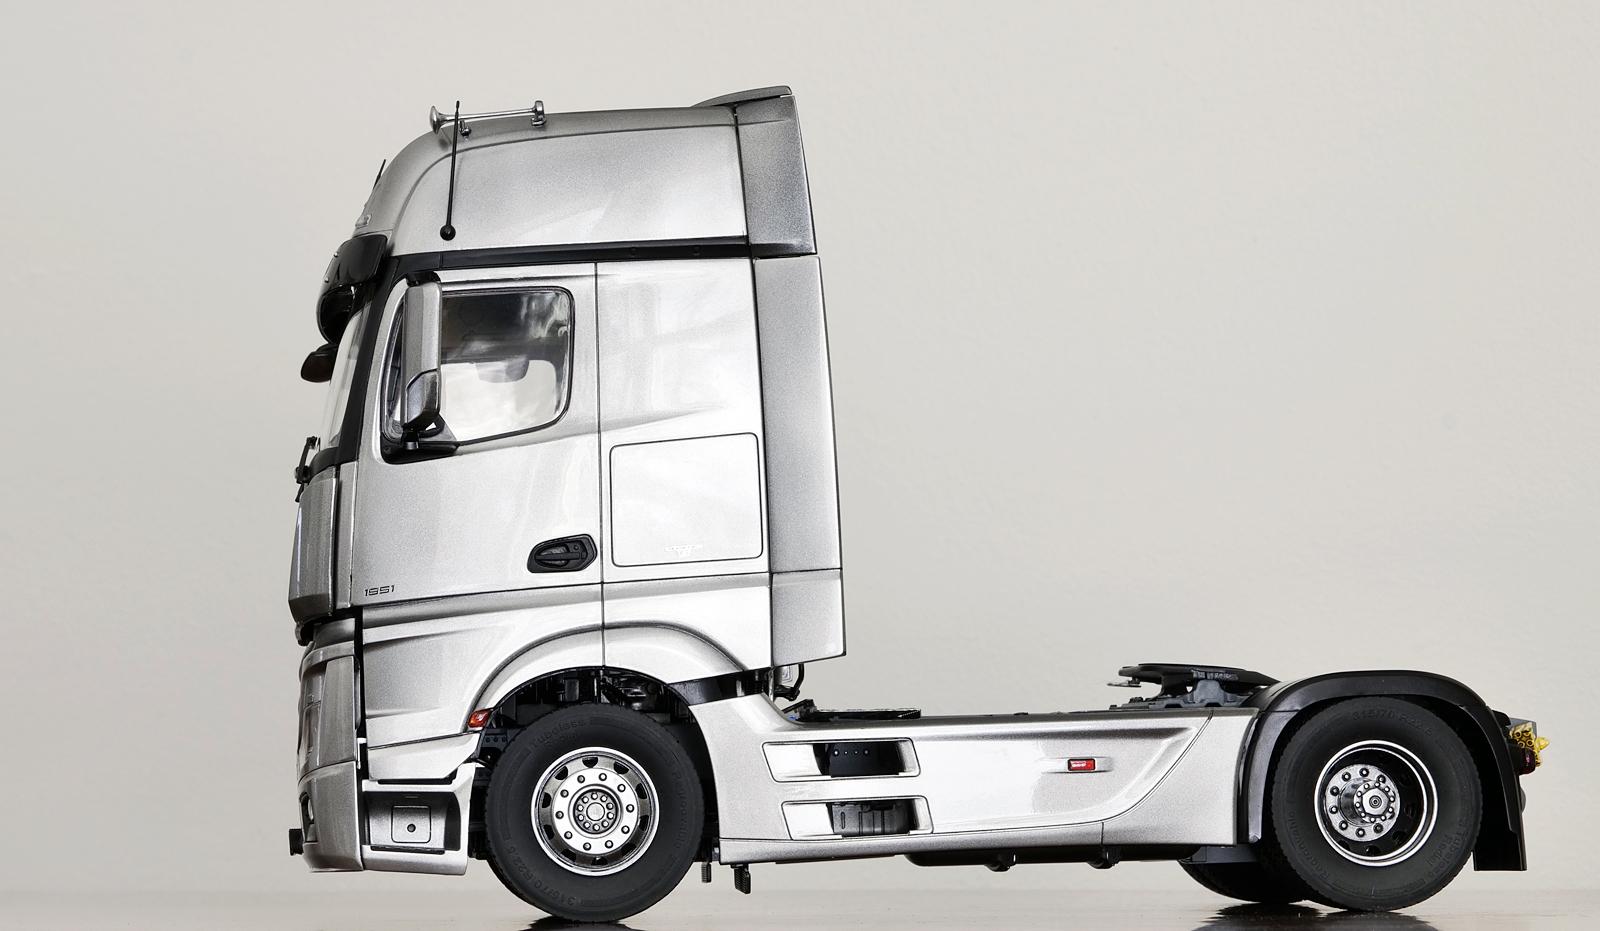
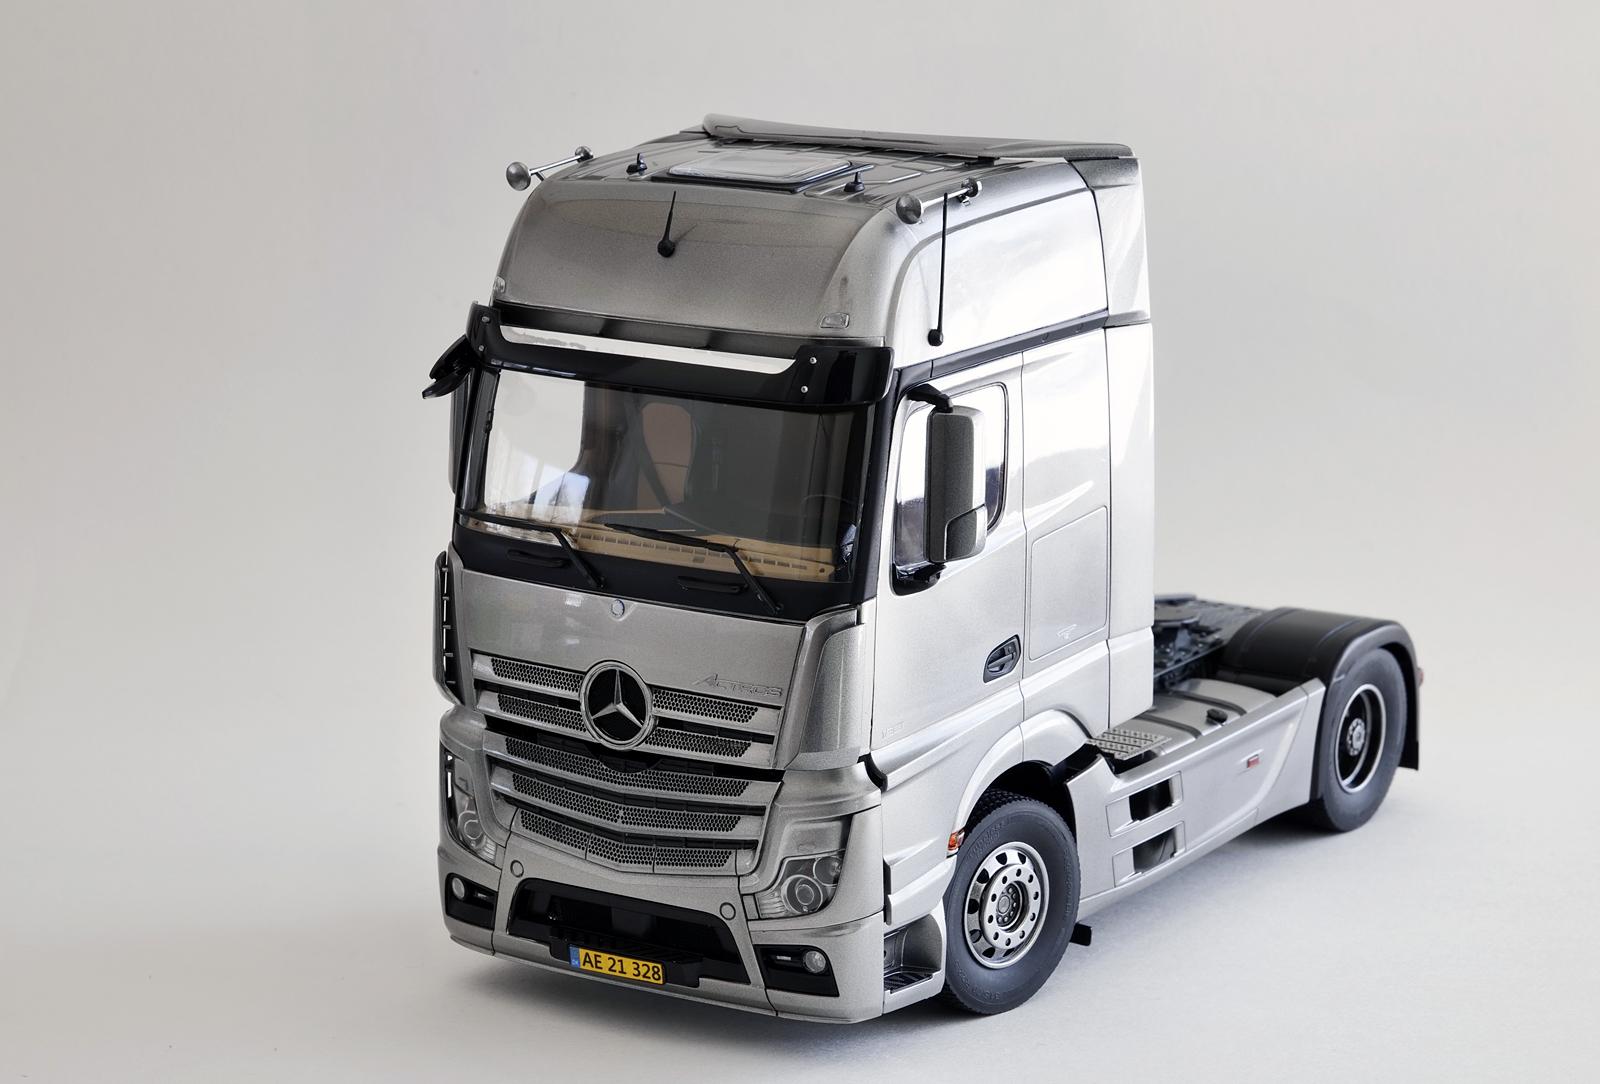
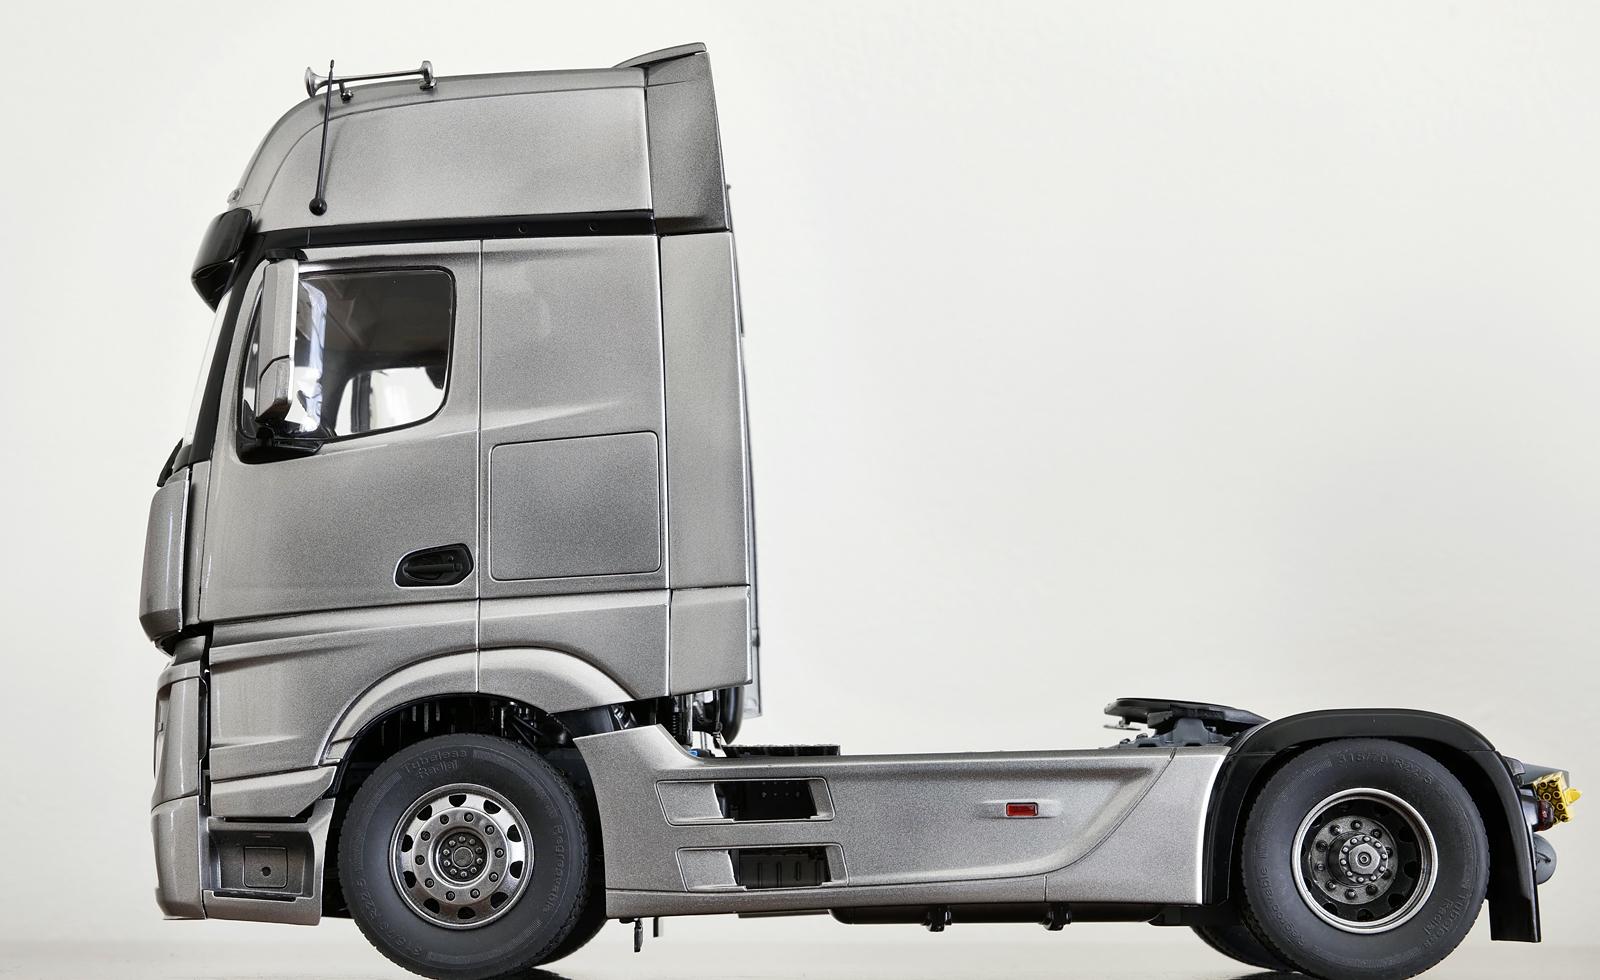
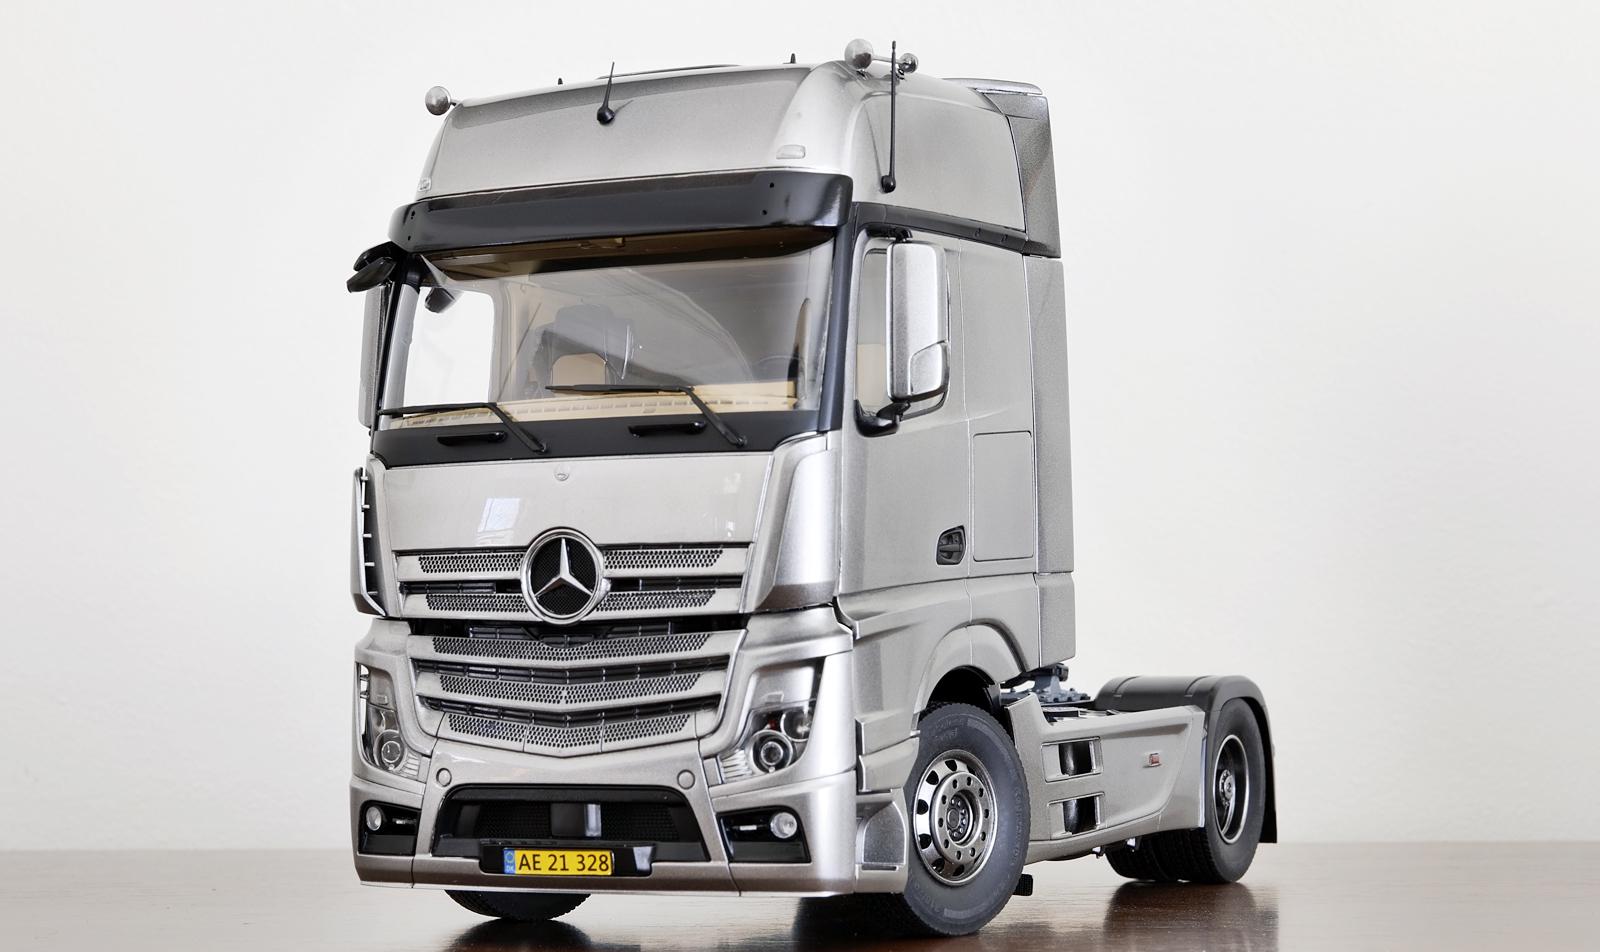
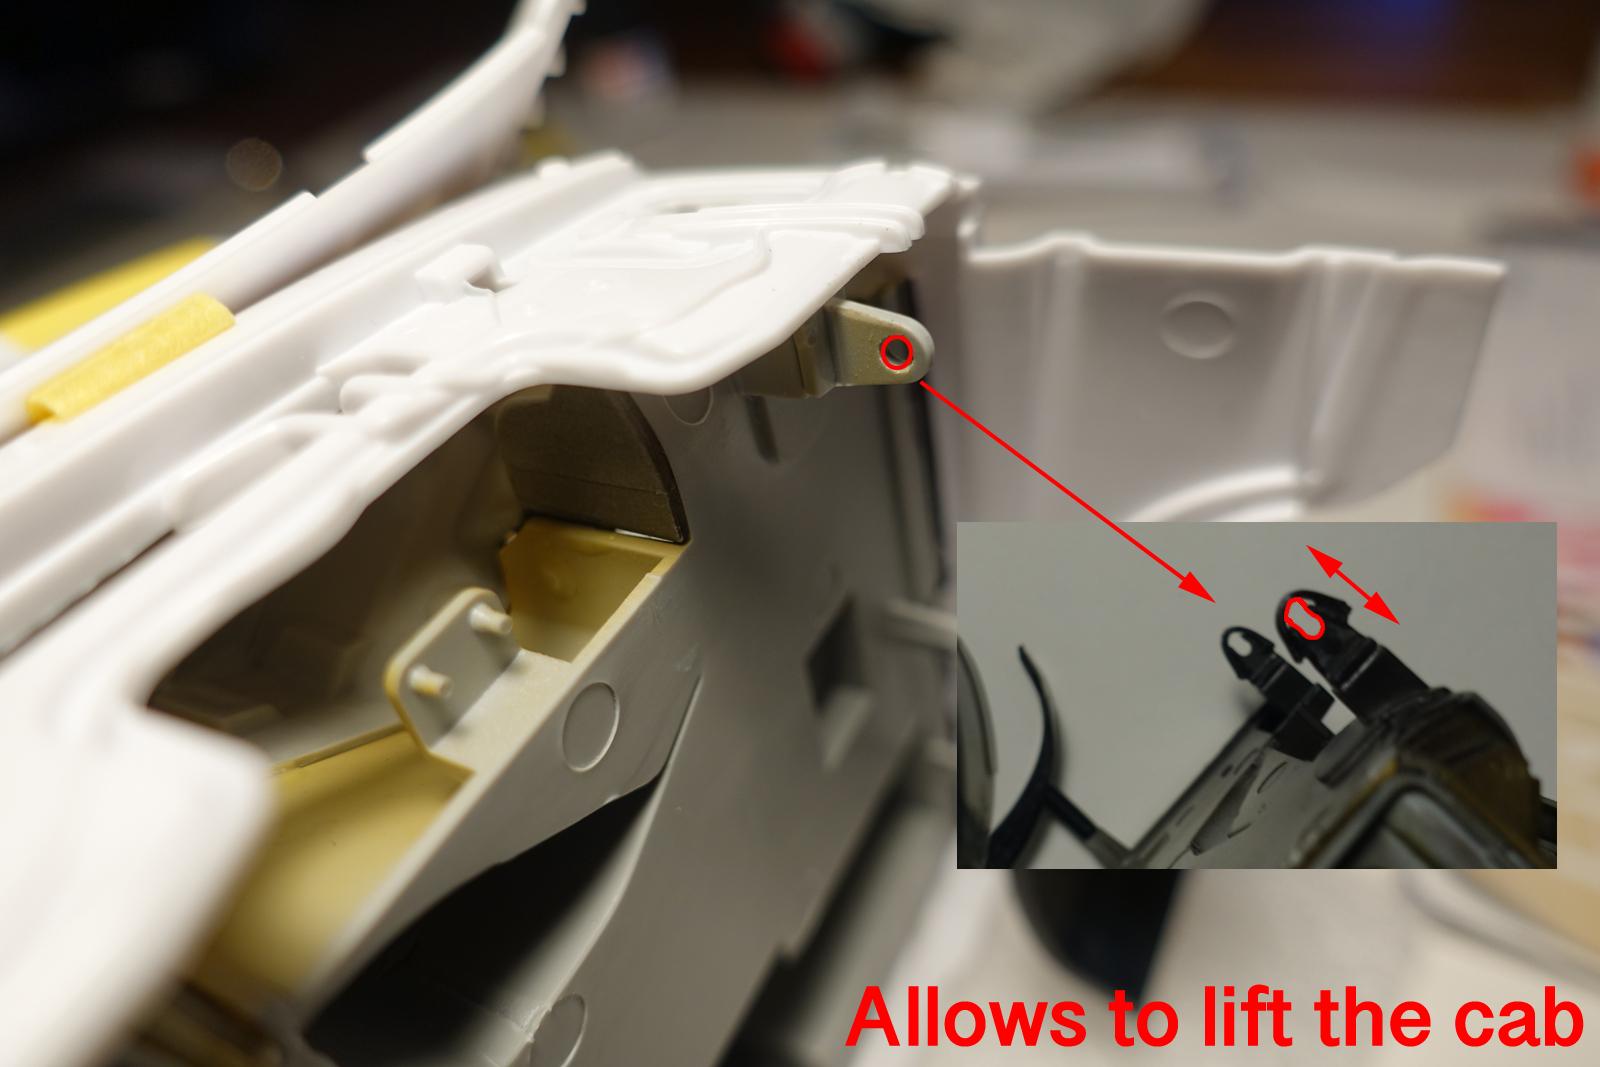
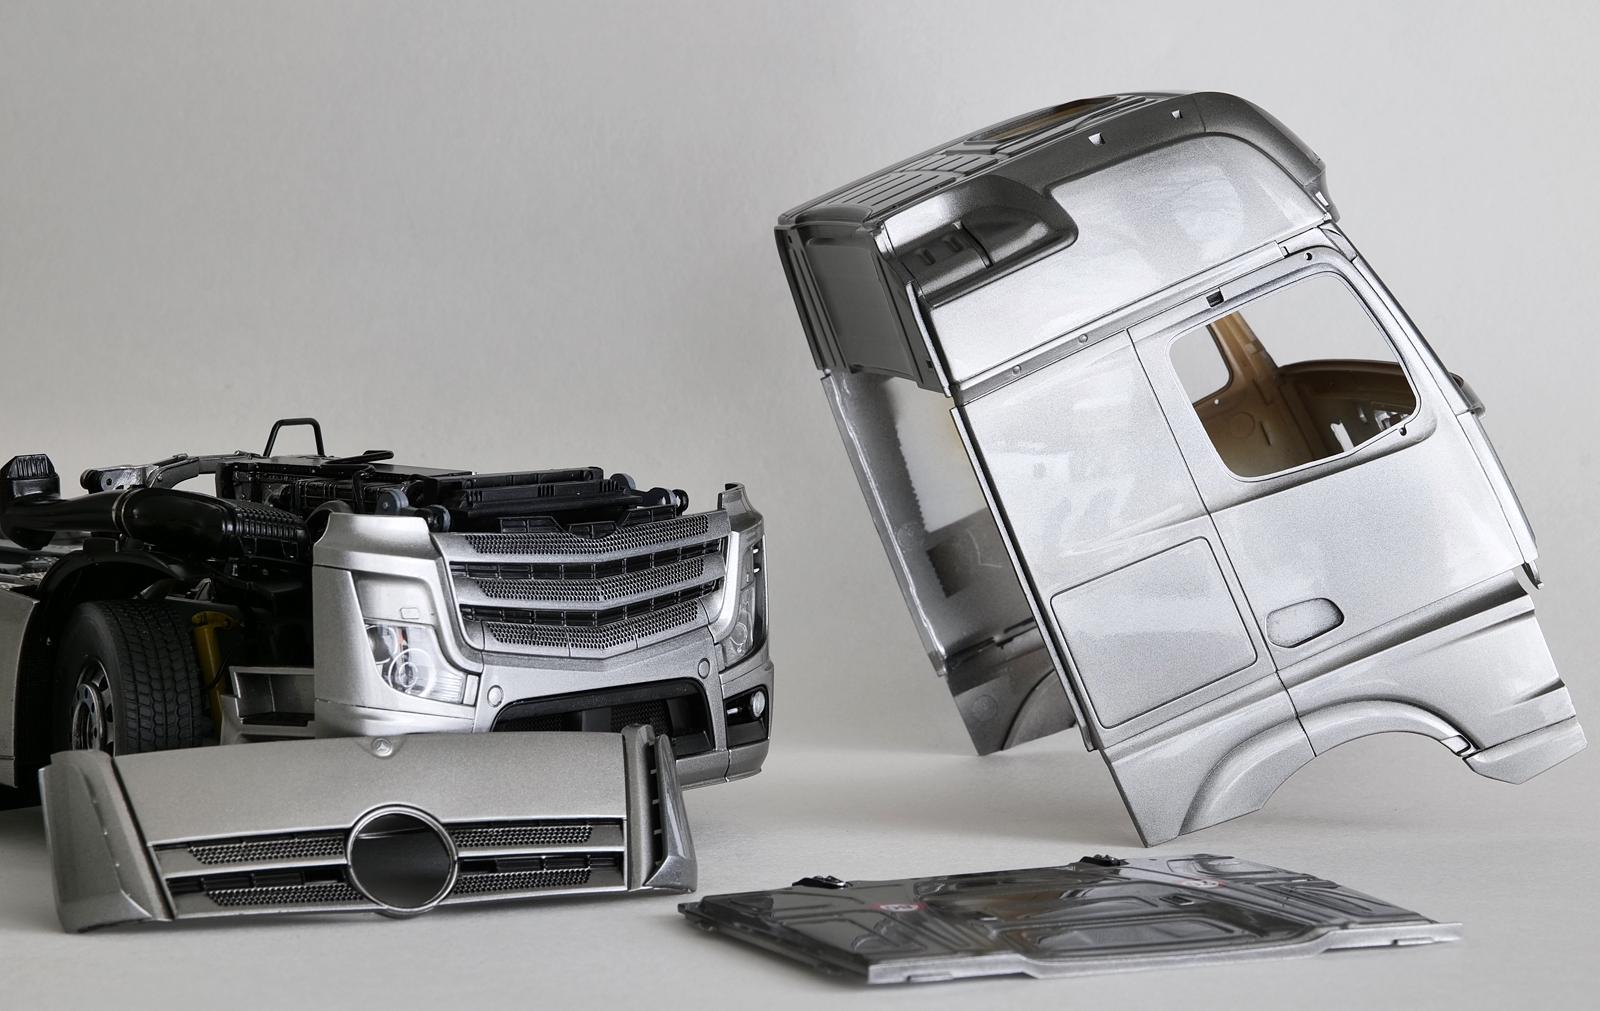
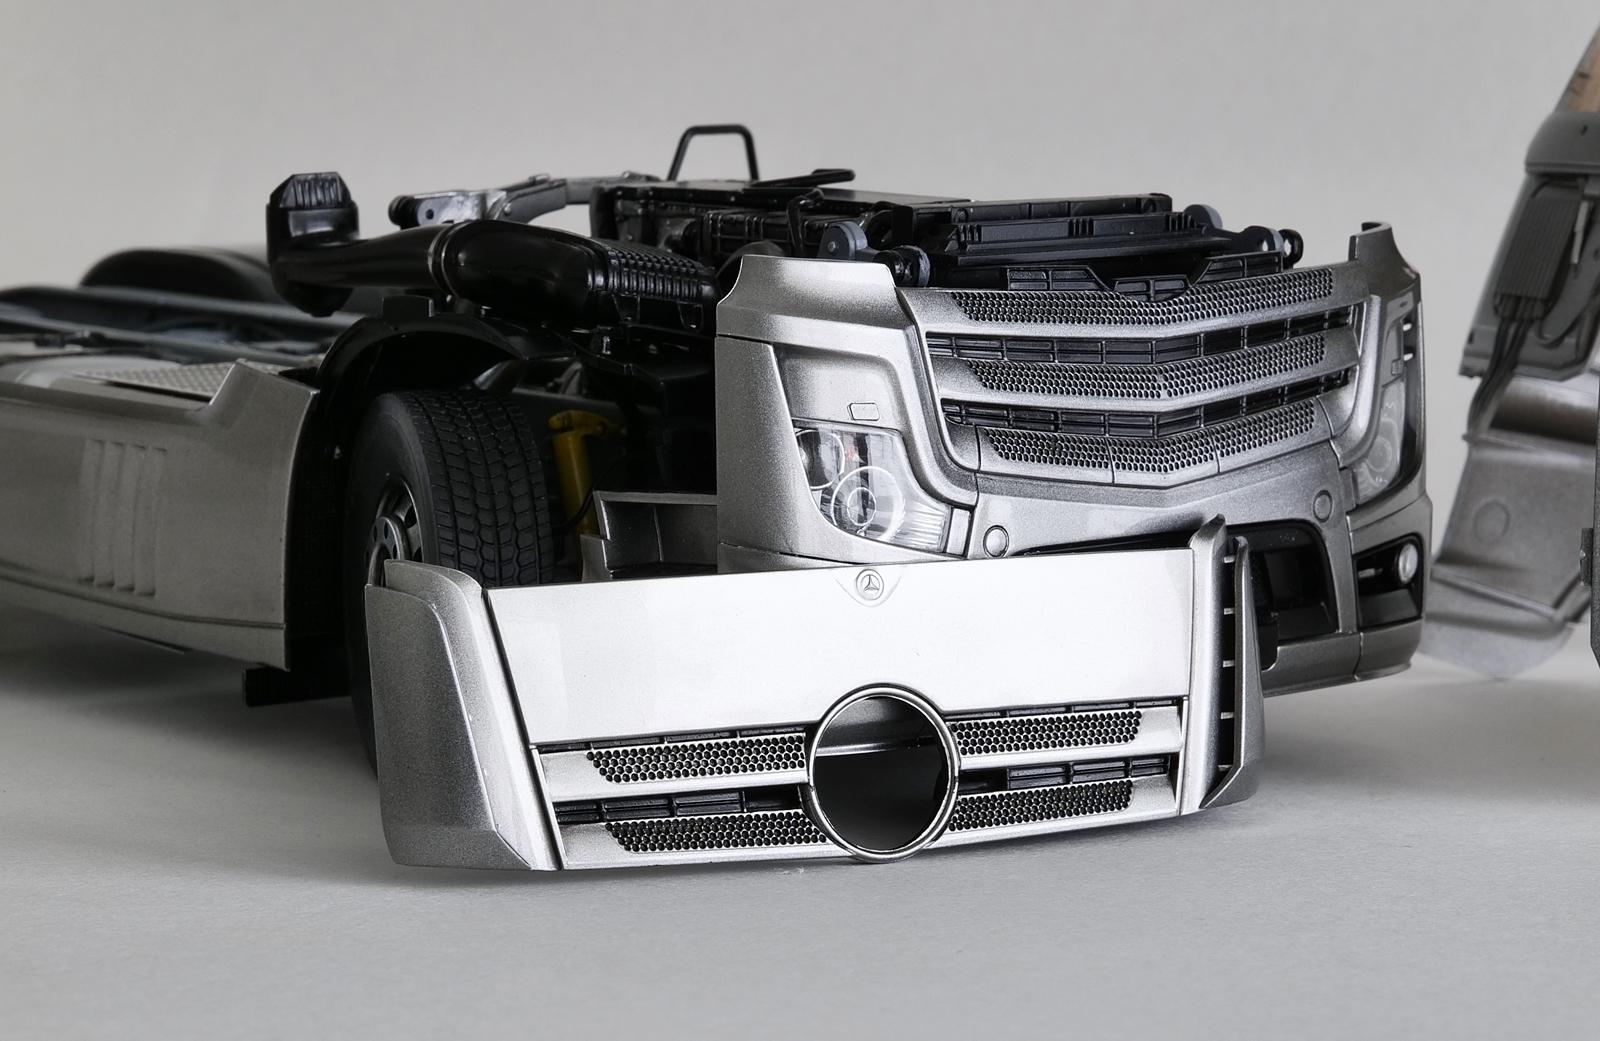
I just finished building a modern German truck kit from Italeri and it was both delightful and humbling experience. My motivation to start something new and finish it in days came during the Christmas week, but that eventually turned into 3+ weeks. I built mostly box stock and I didn't try to correct/improve anything that may require efforts. I did use its Hobby Design Detail set to enhance the overall look though. What I liked: - builds into a quite accurate and detailed modern truck - joyful building experience except one part- dealing with Italeri's multiple panel cab assembly - being a 1/24th scale, the final result is outright massive and gorgeous (to me) What I didn't like: - a very challenging kit as it requires careful pre-planning of how to paint and assemble. Most of the times, you end up attaching painted parts to painted body panels. - many sink marks to clean up - the cab does not tilt, I ended up modifying the hinge mechanism to tilt Overall, this kit left me with some frustration wanting to do better job next time. It really stimulates your building skill in many aspects, I really want to try this kit again. If I wasn't so concerned about the truck having a tilting cab, it could have been certainly an easier and quicker build. The kit has great chassis and engine details straight out of the box. I really enjoy putting these together. The exterior is also very accurately reproduced in the kit. The body proportion and the overall stance look correct without corrections. This was the biggest problem of the kit for me. In order to display the engine details, you must build it in this open cab position (fixed position). Some modification was required to make the tilting cab operable and it called for some unconventional building techniques. I am sure there are better ways to do it, but I didn't. My base color was a mixture of CLK Silver and Super Duralumin as shown above. This created some interesting paint job. It is bright silver by day, but turns into dark metallic grey at night. And mostly it is due to my camera unable to capture the metallic finish at night when the light reflected off the truck is quite strong. First, here is a quick size comparison with U.S. COE truck. I know the left is 1/25th scale and the right is 1/24th, but you can easily see Actros isn't anything less of truck here. The upper grille opens up. This is how much I can tilt forward without scrapping off the paint in the front bumper piece. I really appreciate the front design with its massive grille and aerodynamic fairings. After I built the truck, I realized there are many aftermarket products available to further enhance the truck's capability. When I get to build another one, I will definitely consider adding those roof lights and ground effects with chicken lights. And give darker/greenish hue to the windshield! This one in the photo has a side exhaust which I like. They are all very doable modifications, I think. The Hobby Design Detail kit includes metal transfers for emblems. I think they clearly boost the fine details of the truck. I only added a bunch of cables/hoses. And the kit has all the components fully represented! I am missing air supply hoses and electrical cords to the trailer here. I wanted to add, but I am keeping my main objective- "a quick build". Overall, I had fun building it and hope to build another Italeri kit next time. Lastly, here is my WIP for the truck:

-
Great job putting this truck together and the final result definitely shines here. I can easily see so many hours are spent to maintain this quality. And amazing collection you got going, keep it up! ?
-
Weathered nicely, and super realistic! Nice job finishing this one.
-
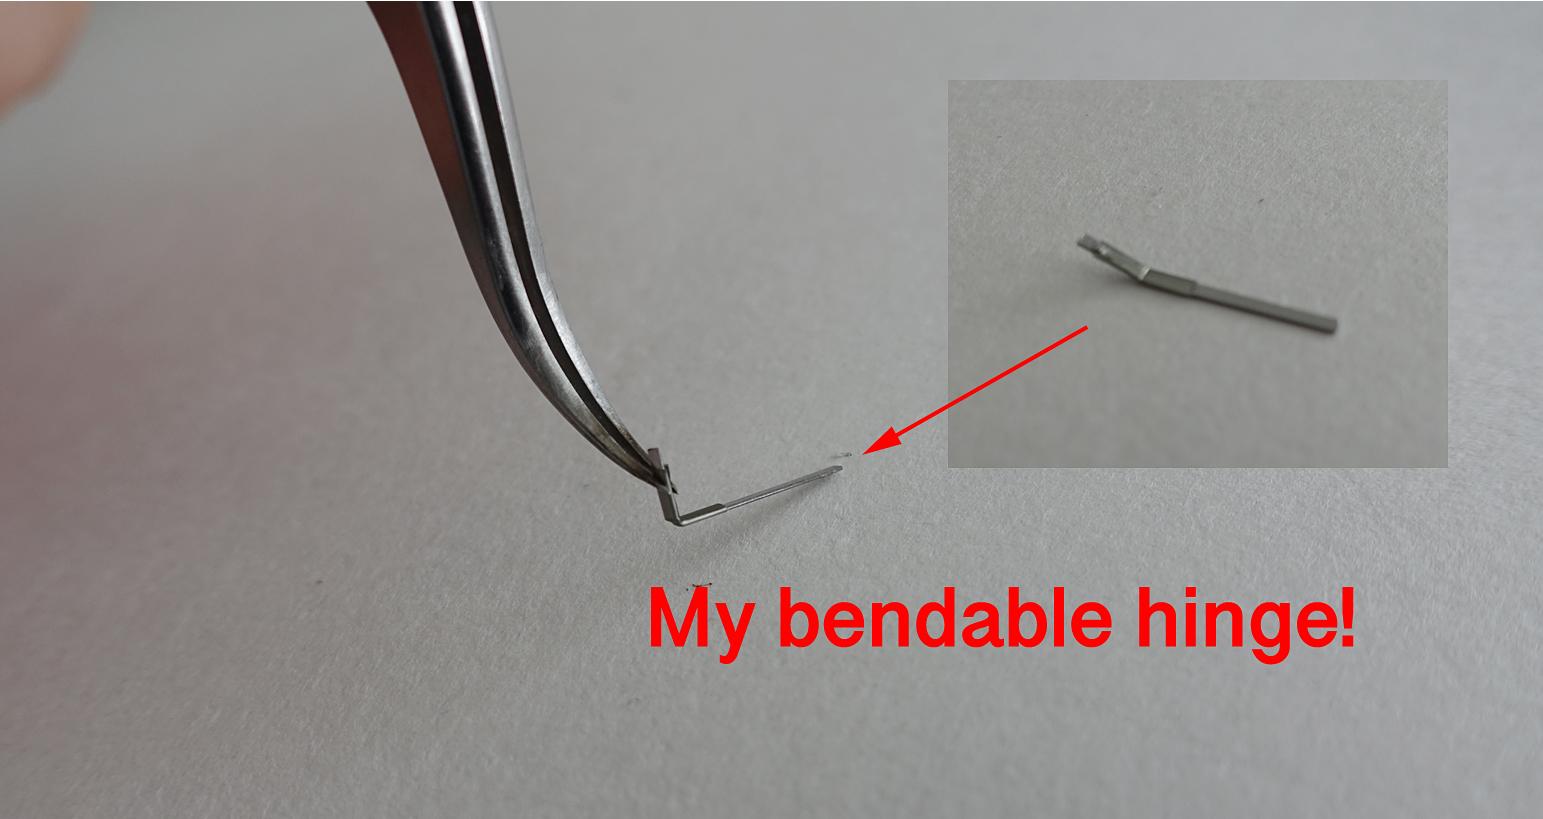
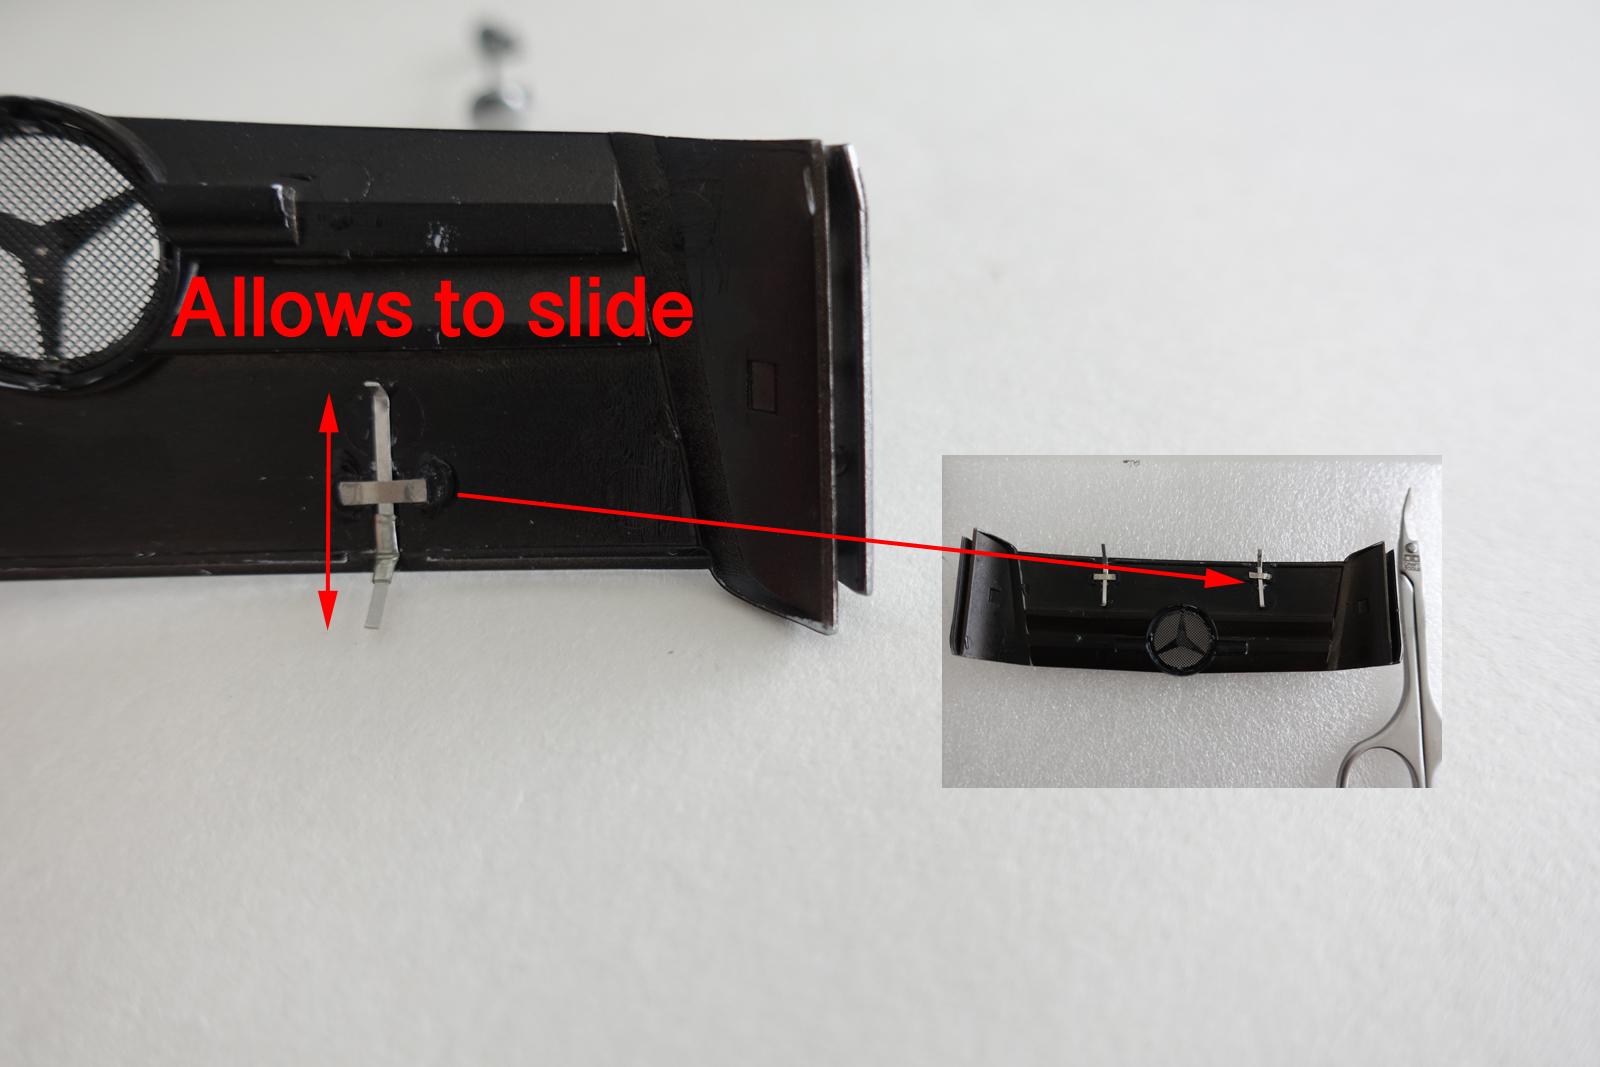
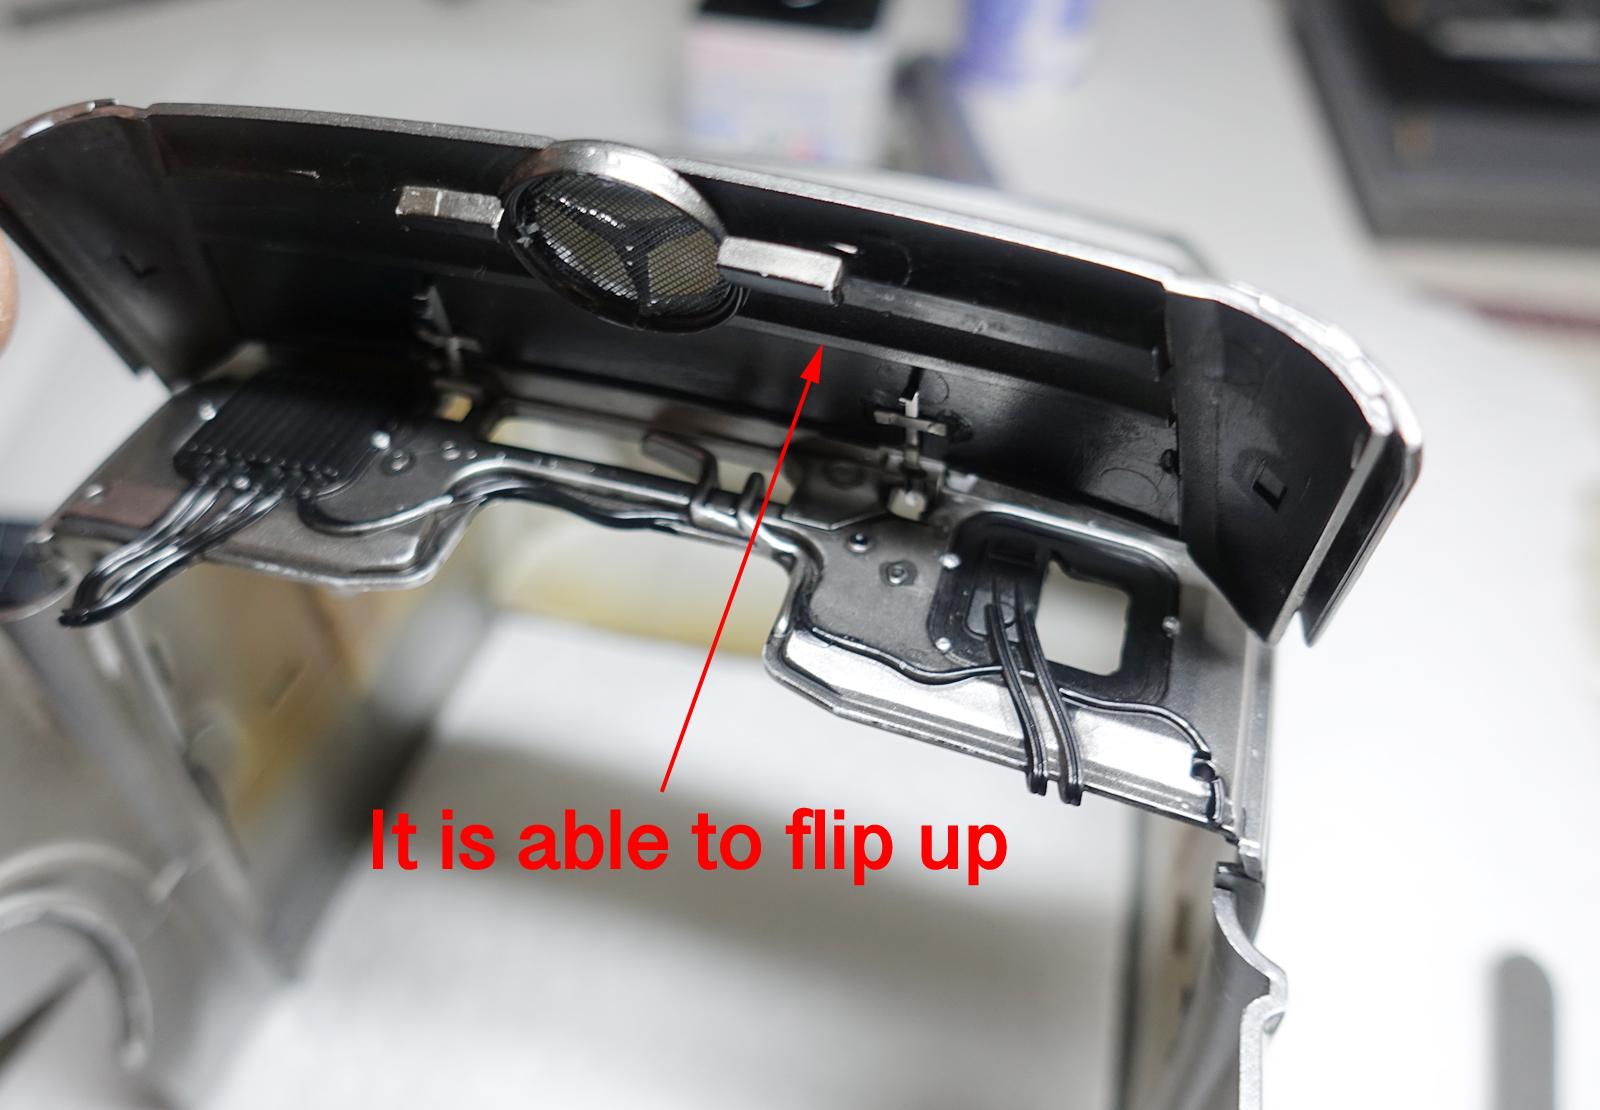
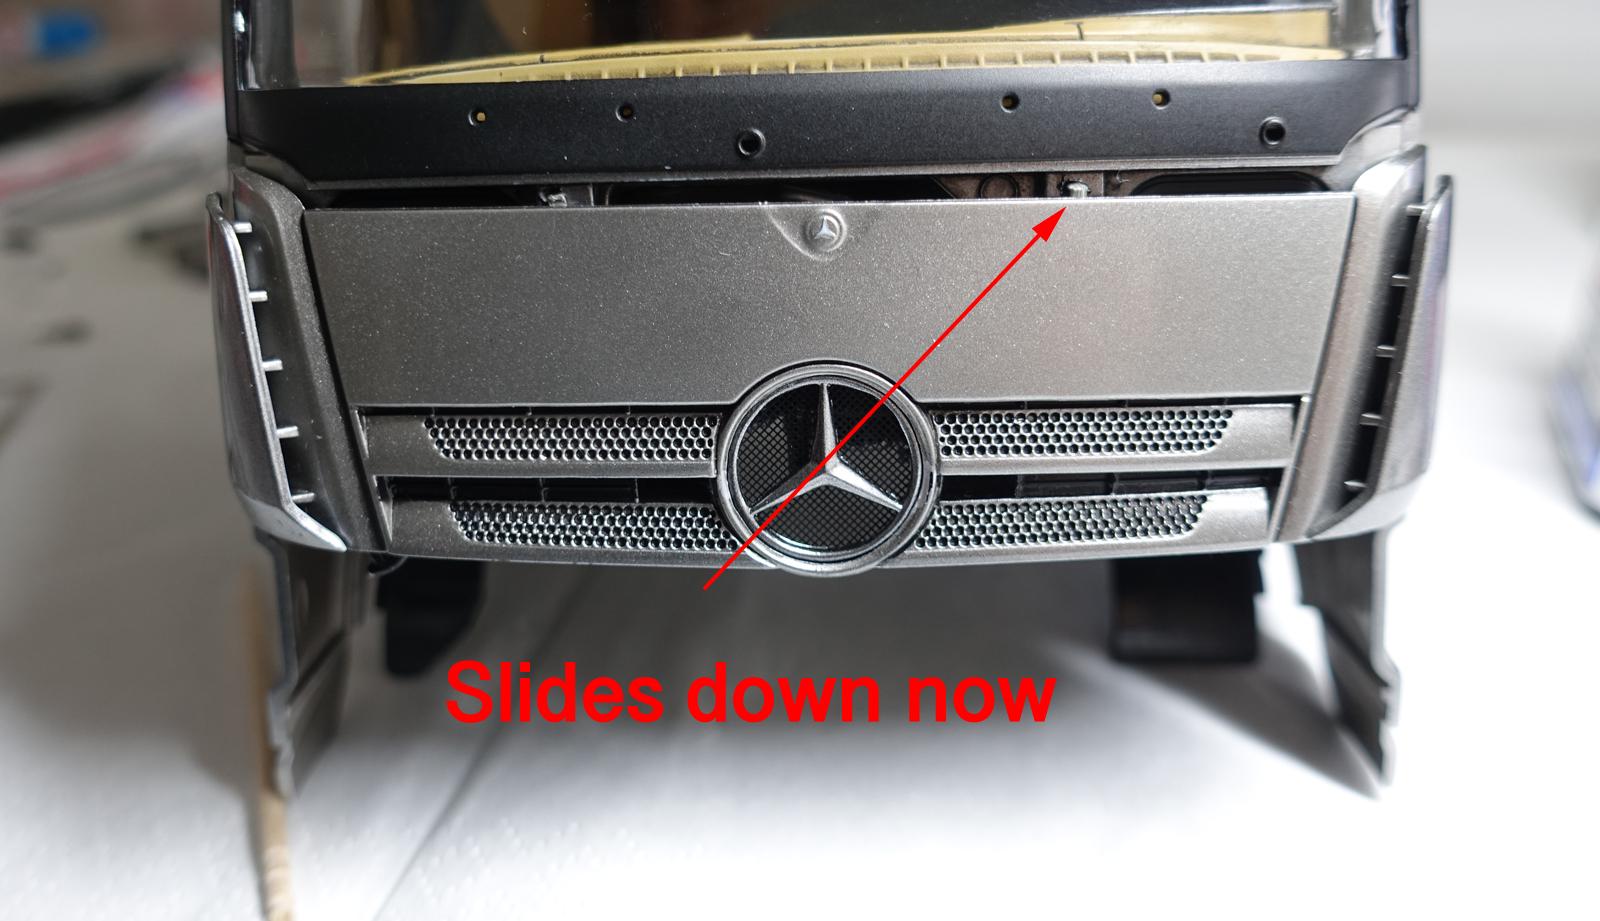
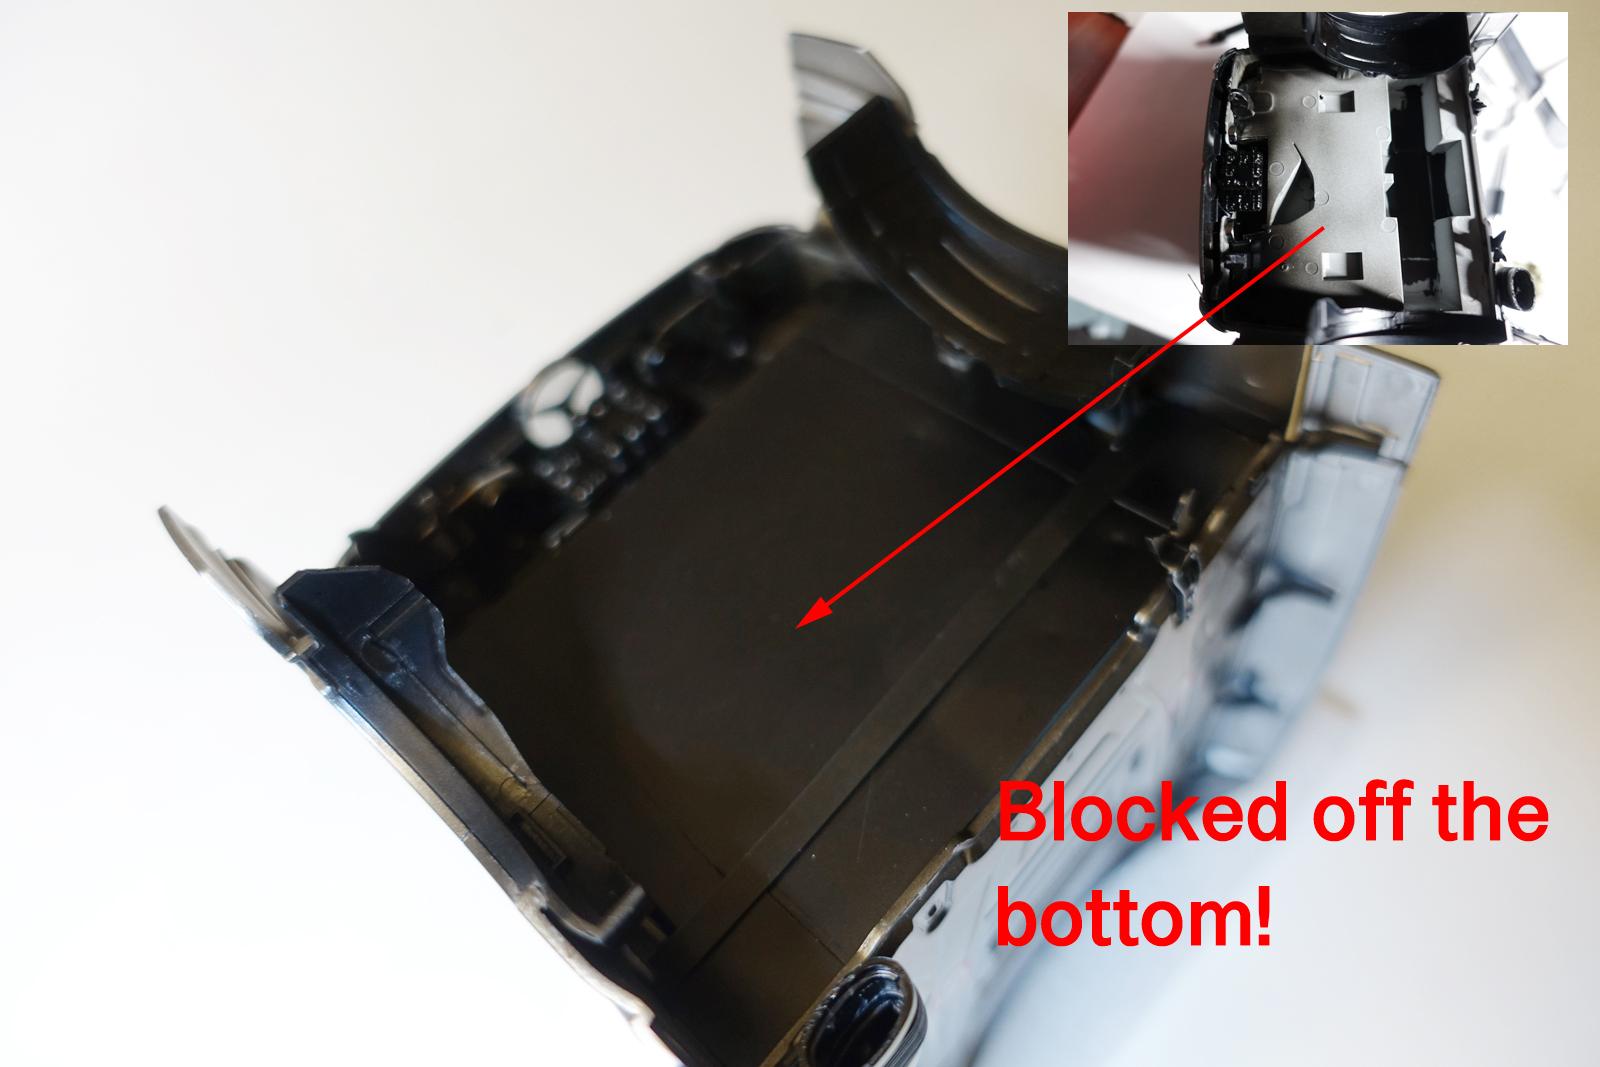
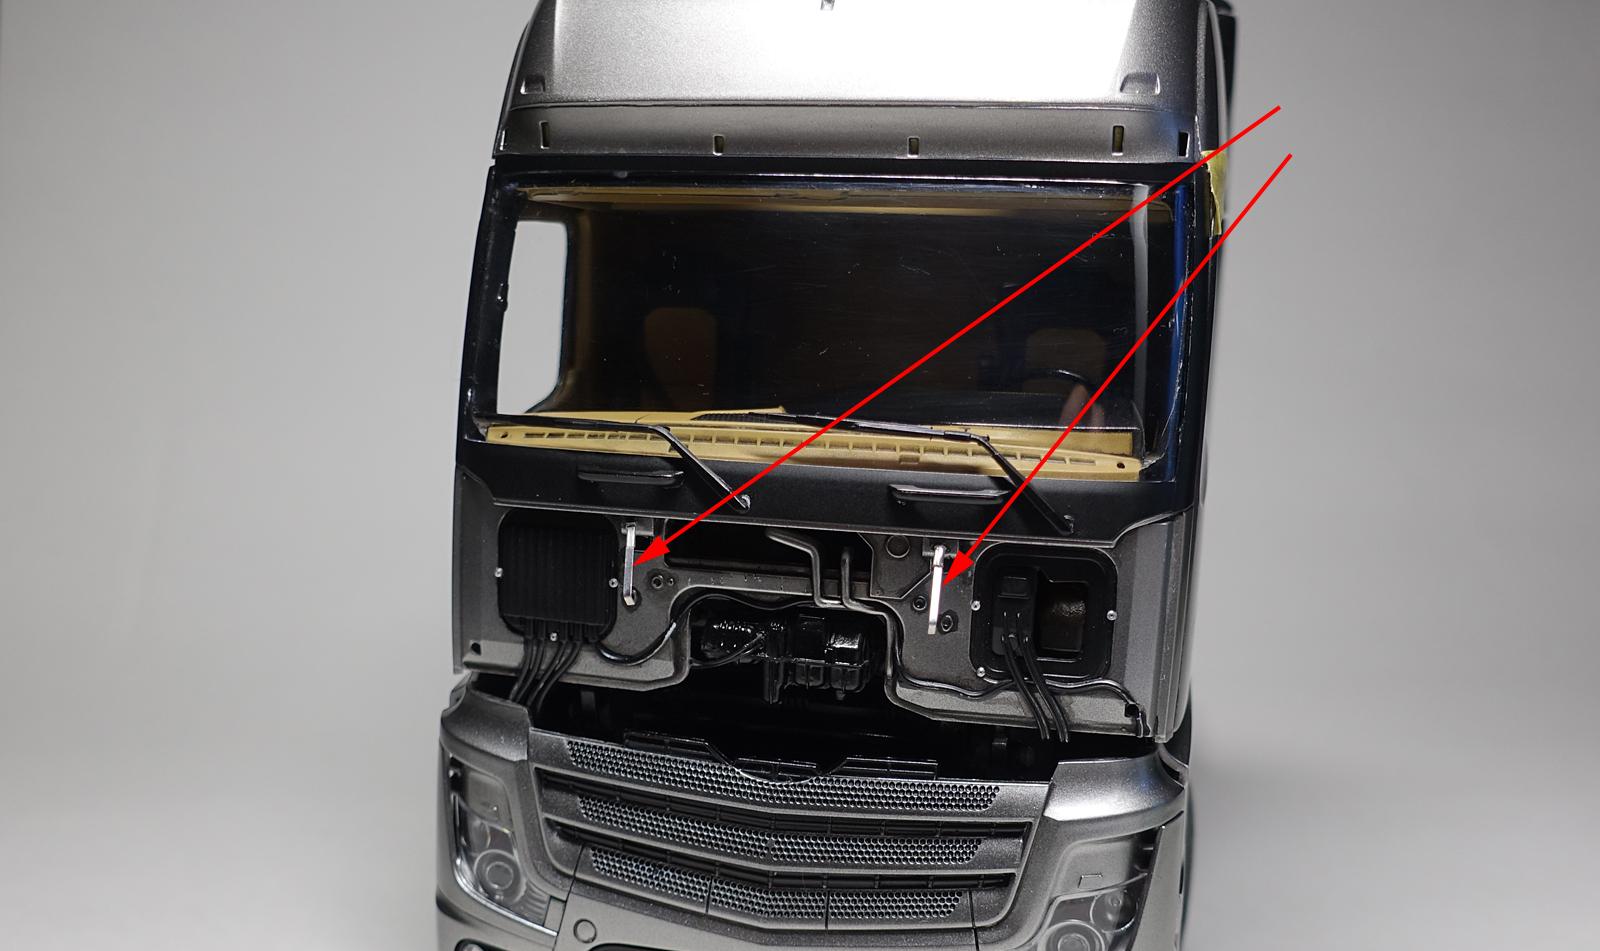
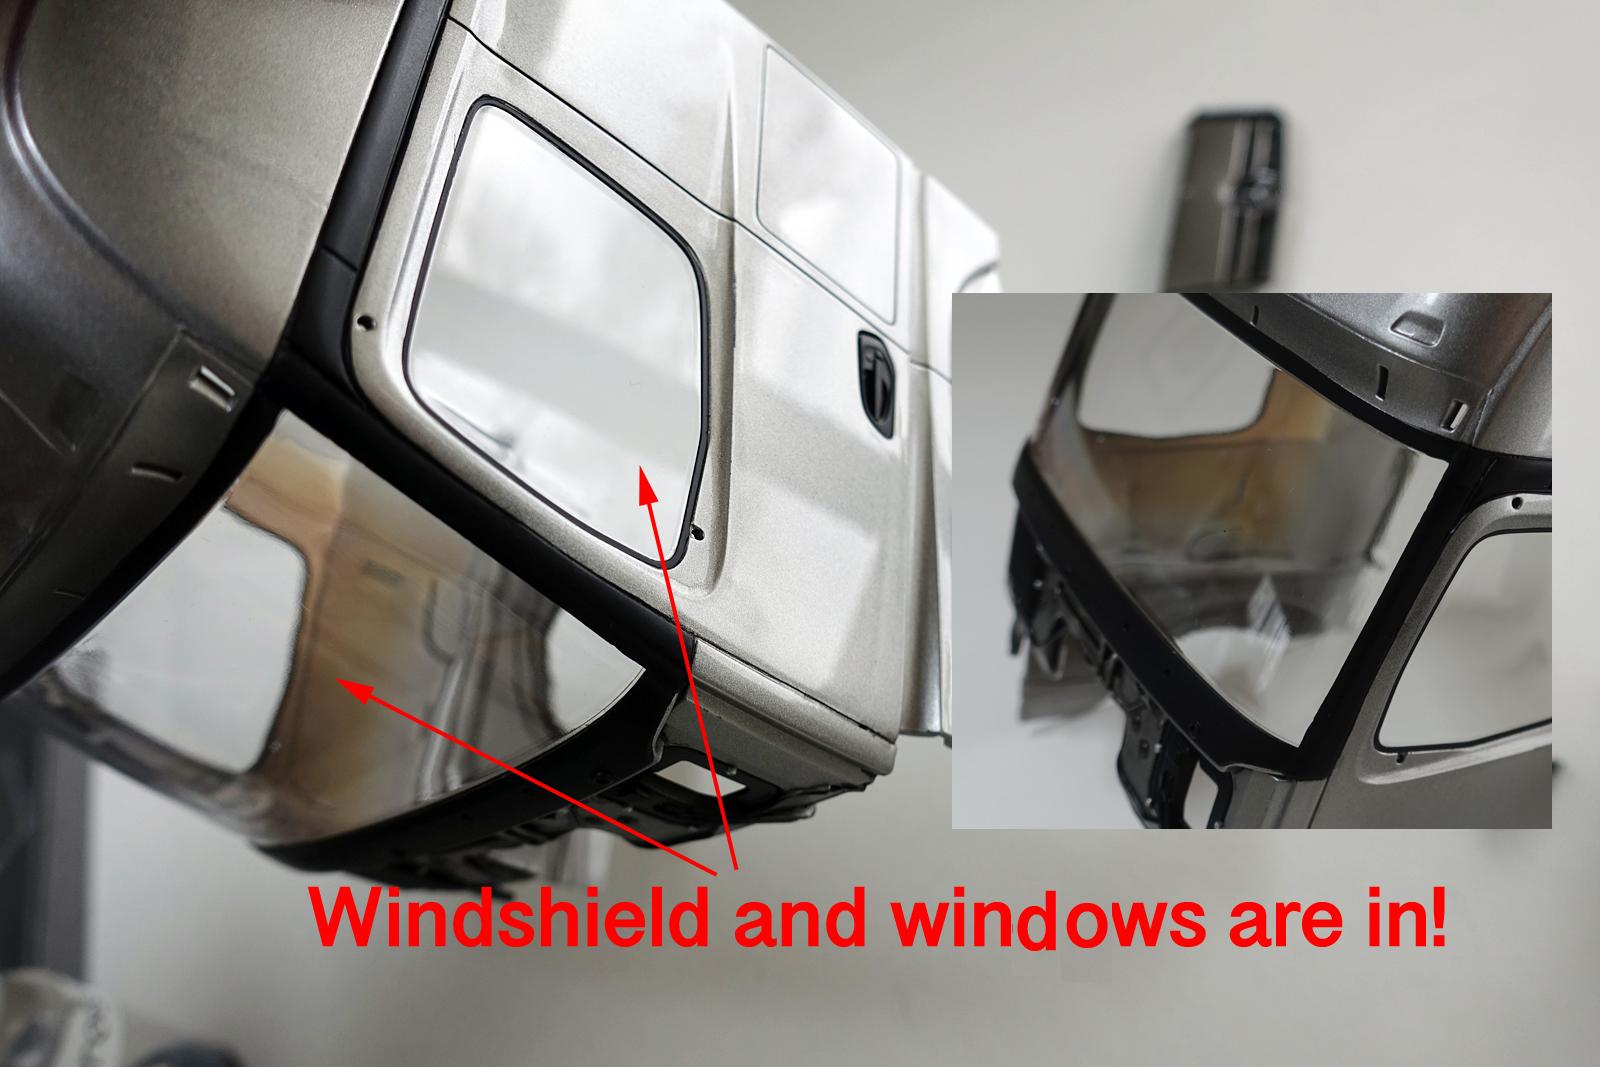
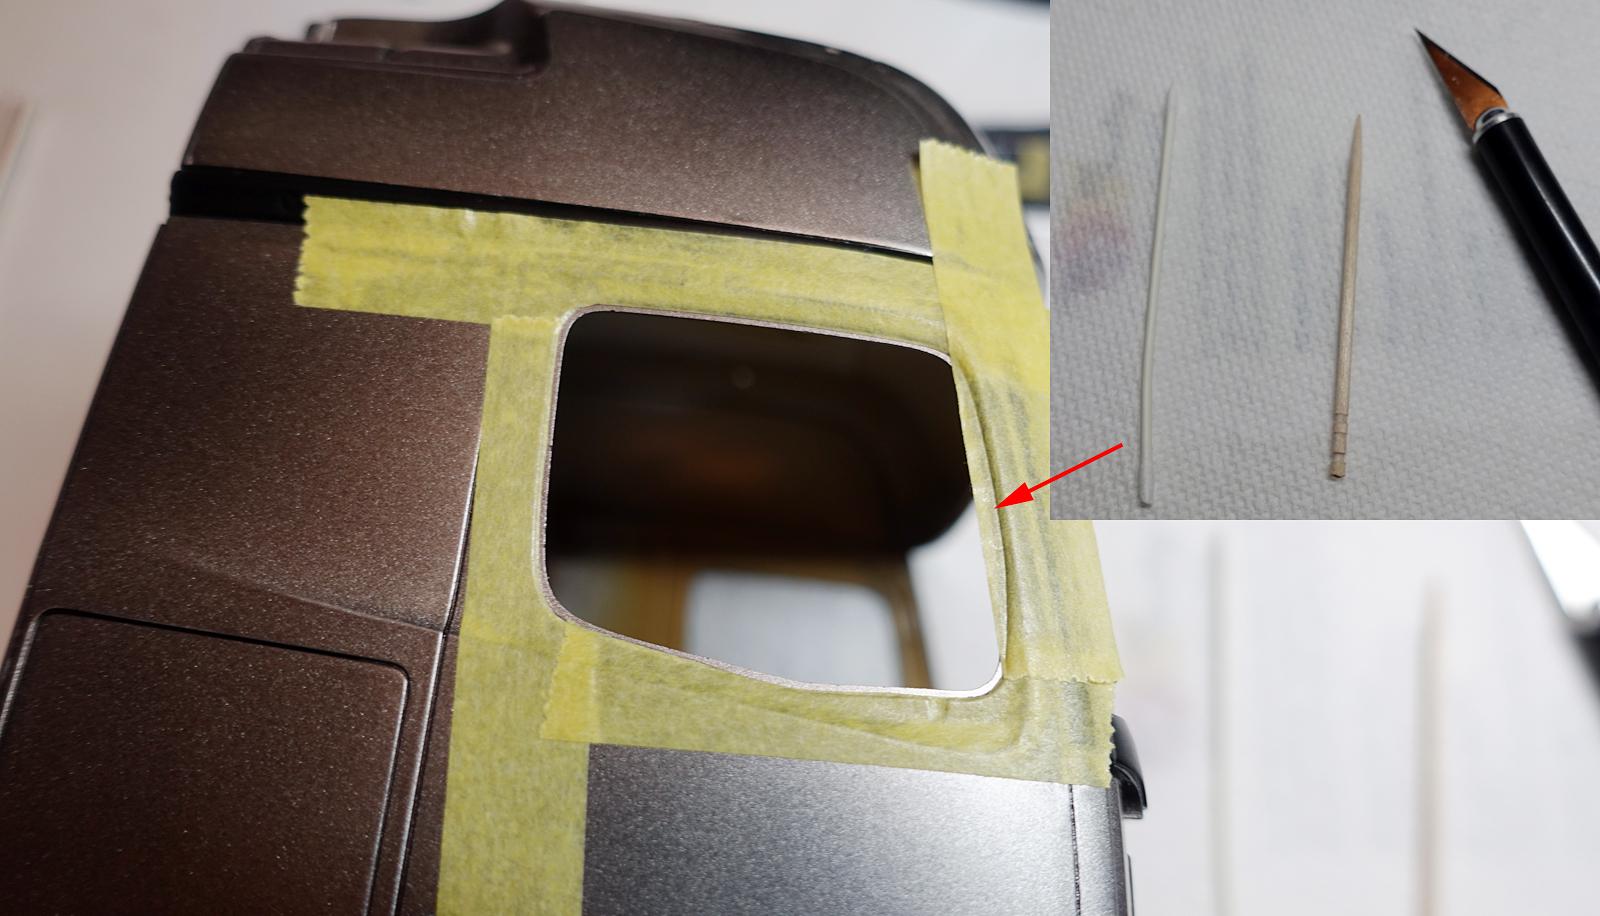
My original intention was to start and finish building this kit in a week or so. I ended up cutting some corners and skipping steps along the way, but still ended up taking 3 weeks. How silly was I to think that I can pull this off. Nevertheless, I think the end is near and another quick upgrade is here. This is how I am able to make the front upper grille piece to flip. It is two thin metal strips wrapped around with an adhesive/flexible tape allowing the middle to bend. As far as the durability is concerned, I bet I can flip this back and forth probably 100+ times till the tape gives up. So there you have it, my flip is good for 100 times. Cheap and easy, but an ugly solution, indeed. I started to add basic details on the inner panel and drilled a hole on each end where the hinge end will be inserted. It is an unattractive way of implementing it, but the hinges are hidden and they aren't visible unless you look under the grille. I made many paint scuffs everywhere while working on the hinge mechanism, so I am actually doing some massive paint correction/repairing right now. Hinges are installed. These will pull out roughly 1/8th of an inch to create enough space for the front cover to flip up. They are made to slide out, but won't fall out as a stopper was glued at the end of the each strip. In order to flip this cover open, I slide them down while pulling it out at the same time. Then it flips. I also mounted the windshield and windows from the inside. I always try not to touch the clear parts to minimize unwanted scratches. This was another reason why I wanted to build the entire cab FIRST before painting. I can always repair glue joints and also confirm that my windshield/windows fit perfectly into the fully constructed cab. Having stated above, this multiple piece cab assembly method made everything difficult and it was a big challenge for the first timer like myself. I looked at the built example by Italeri and they left all kind of glue marks themselves! My mirrors are now painted. Italeri provided chrome stickers for the mirror, but they didn't attach cleanly on curved mirrors. So painted mine. The bottom was also blocked here so when the cab is tilted, at least you won't see the ugly bottom as how the kit left off. I didn't do a proper research on what is under the cab and I just glued a large plastic sheet. Bad me. As the last final step, I am adding emblems, repairing paint scuffs, and lastly cleaning the body panels. I will admit that this wasn't an easy kit to build, but I greatly enjoyed the time building it. I know that European trucks aren't for everyone, but I think they are excellent in what they do and I just enjoy learning more about them. For my next subject, I would like to try an older European truck from either 80's or 90's. I think they are quite beautiful in their own way. Lastly, I thank you all for following this thread providing positive encouragements and valuable feedback along the way.
-
Hey Steve, I think this was a mistake on my part. Getting lazy and didn't want to think through prior to starting the build. I ended up handling the cab way to many times after the painting, I had to re-polish and repaint some of the parts. Thanks again for the compliment, but I think I underestimated this Italeri kit and the kit threw me some wild punches!
-
Looks just like the one in the photo! Nice job on this. I don't think I have seen a purple garbage truck before, but now I just did!
-
Looks cool with that tall cab, it certainly looks special!
-
359 Pete
cifenet replied to TopherMcGinnis's topic in WIP: Model Trucks: Big Rigs and Heavy Equipment
Great color and paint work! -
Ah, my bad! But looks great with bright color!
-
2023 BRGB Tri axle T600 K-whooper
cifenet replied to Gary Chastain's topic in WIP: Model Trucks: Big Rigs and Heavy Equipment
Wow, it looks like it just came out of a truck factory tuning shop with nicely modified body kits! The paint is sleek and smooth too. Now it is ready for some heavy pulling! -
That wrecker part is looking very sweet. Like the color combo too. And love your organized trays on the back! While you are at it, can I take two set of wipers, three seat belts, and one air filter to go?
-
Looking better and better as you are adding details! And that red frame is screaming! Good progress so far for sure!
-
2021 Pierce Ascendent Tower
cifenet replied to Chariots of Fire's topic in WIP: Model Trucks: Big Rigs and Heavy Equipment
Your story is very familiar to all of us! And the courage to know "when to stop and redo" is something we all need. I can already see your methodical approach and fine tuning efforts on the 2nd cab! Nice going! -
It's in the post!
cifenet replied to Rockford's topic in WIP: Model Trucks: Big Rigs and Heavy Equipment
That is freaking awesome! Love those photos. Thanks for sharing the history. BTW, Nice touch on the brake lines, I like how they hang down, looks like the real thing. -
Very cool progress!
-
2023 BRGB Tri axle T600 K-whooper
cifenet replied to Gary Chastain's topic in WIP: Model Trucks: Big Rigs and Heavy Equipment
This is the fun stage where slowly the truck is coming alive! The exhaust shields and pipes look fantastic here. Very realistic. All of the small details look great too. -
2023 BRGB 70's Kenworth W 900
cifenet replied to lwwoodss's topic in WIP: Model Trucks: Big Rigs and Heavy Equipment
Superb! I think this will turn out amazing! -
The color looks great and nice job on the bed cover!
-
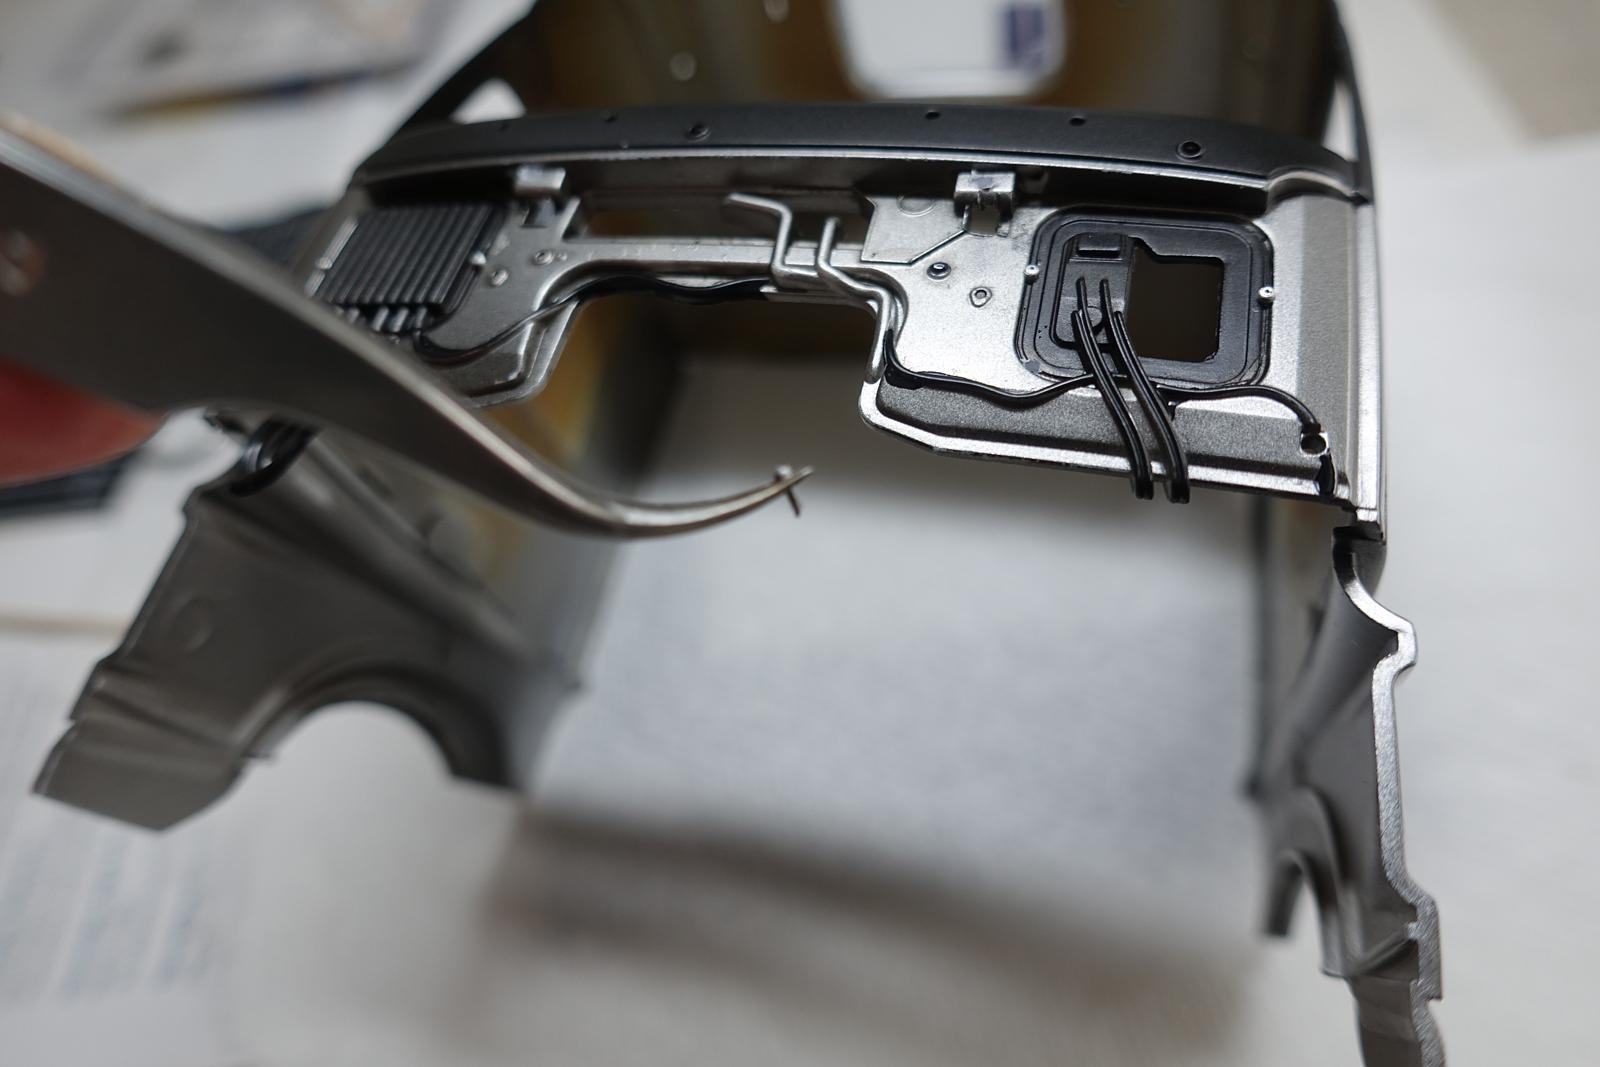
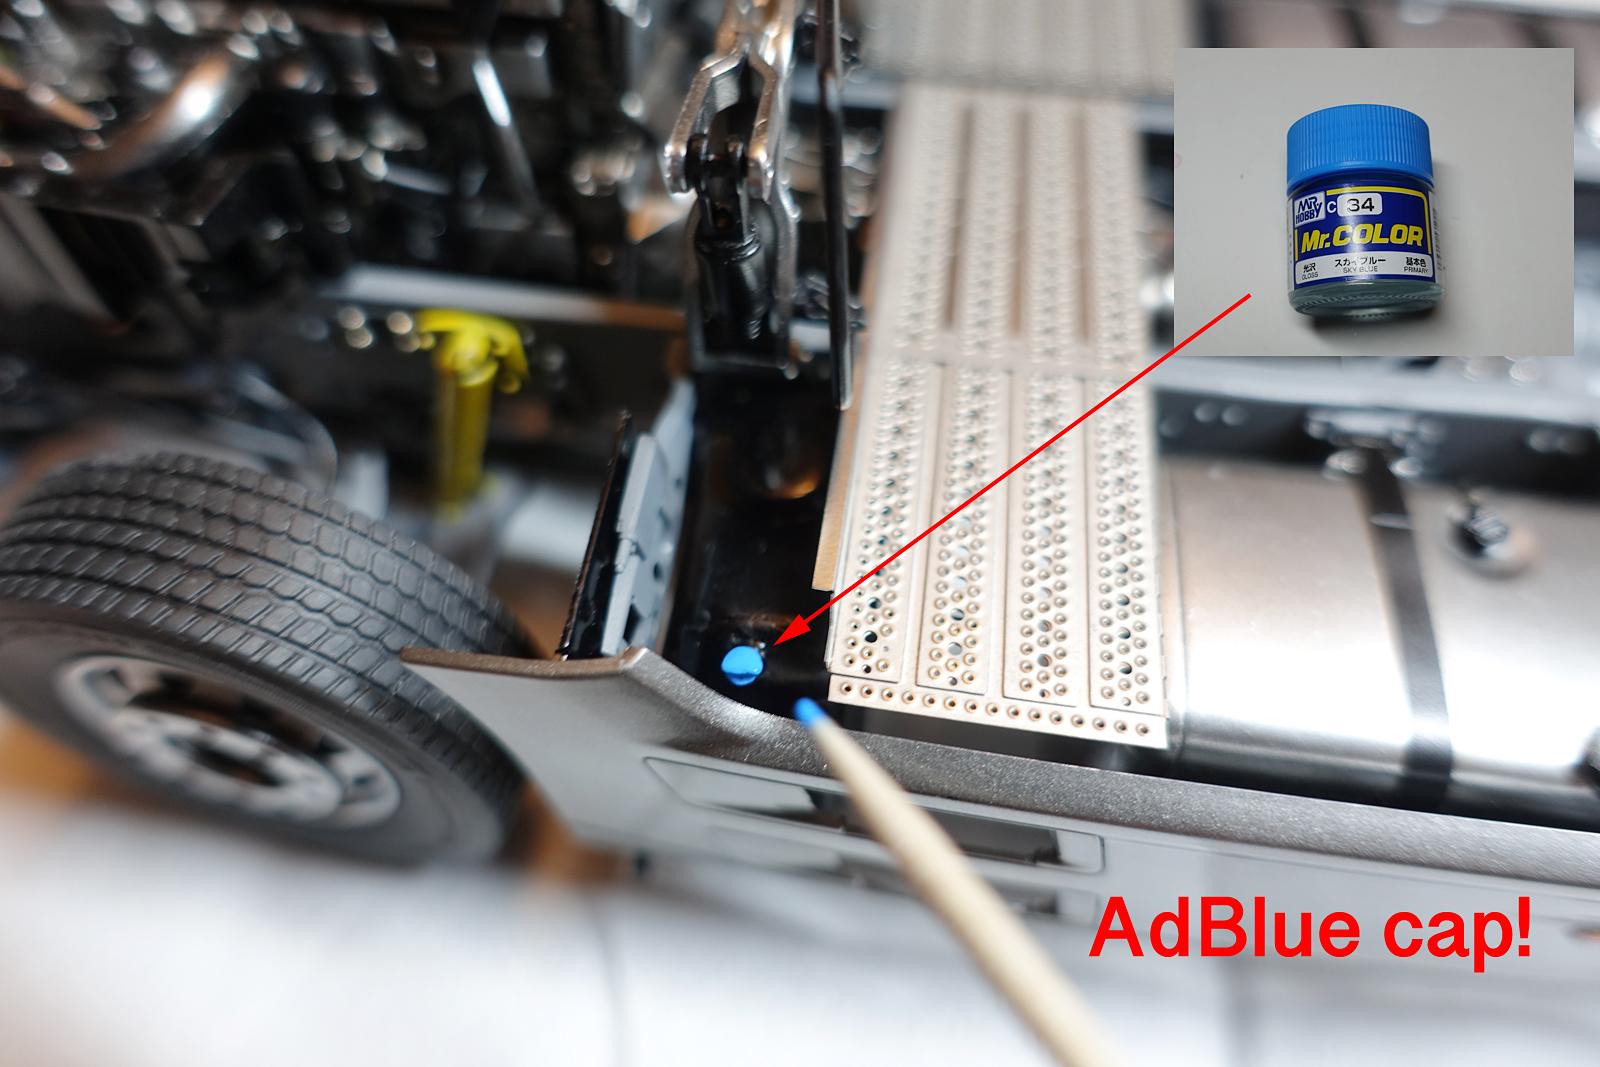
My update: Polishing work still on-going and the third coat of clear applied. I am quite satisfied with the shine and glossy finish here. Normally, I would want to apply an additional heavy coat of clear, but I think this is enough... From the frontal view, the truck is looking super massive with its high roof and this has to be my favorite view of the truck. Next, I went through some frustration dealing with aerodynamic parts. All of the aero parts had bad pin marks and I fixed them multiple times. My issue: once I filled and sanded and confirmed that they are okay through my naked eyes, the surface defects would show up again as soon as painting session started. I would sand them off and repeat the whole process only to find out I still have problems. I think the main cause was that my sanding sticks gave up on me; I should have replaced them with a fresh set. After fourth attempt, I think I have something acceptable to work with. I was going to NOT mount these out of my frustration at one point. I also painted the mirrors here. Another challenge I am dealing is the visor piece being transparent. I used "smoke" color as my primary color, but my airbrush spit something bad and now it is ruined. I will either strip off the paint and repeat, or just simply spray over with solid black. I hate stripping paints, so I am leading towards to adding solid black finish. No one will know it is supposed to be semi-transparent anyway! Once I was satisfied with the final clear coat finish on the body, I began painting the black trims including the window moldings. The toothpick is a good tool for this type of masking job and I also use pointy cotton swaps to seal the masking tape edges. Of course, a sharp knife blade is must here. Talking about the toothpick as a tool, I also use it often to paint parts. Here, I painted the "AdBlue" tank cap using Sky Blue color. I think it is a close match. Unless I am building military subjects, I think most of my paintings are done via an airbrush. I would only use a brush to paint if parts are small and delicate. Oddly, toothpicks see more action from me than paint brushes! I painted this with a toothpick also. It is more of transferring a small amount of paint rather than brushing which works quite well. Now there are TWO big problems with this kit which I am trying to solve. They need to be addressed if I want my cab to tilt forward and back. I explained the problem in one of the previous postings. Unfortunately, the kit requires you to select either the open or close position and your truck is stuck in that position forever. In order to allow the cab to tilt, I will need: Condition 1: to allow the upper grille piece to open and close Condition 2: The Condition 1 above needs to be in "open" position first. And then the cab ALSO needs enough clearance space between the cab itself and the lower grille piece so cab can tilt forward. I was able to resolve Condition 2. I addressed the tilting the cab problem by introducing a vertical movement of the cab. The hinges were modified to allow this movement. Again, a quick solution was all I was looking for and this was how I did it. Now I can pull up the cab to create clearance space ( + 3/8 inch) to tilt the cab forward. The Conditon 1 is still in Working-In-Progress and it is to make the upper grille piece to flip open/close. I am going to come up with a design so I can slide out the grille and flip up. I CANNOT simply add fixed hinges here because the grille piece needs to come out first to flip up (another clearance issue)... Hopefully I can provide more details in the next update on what my solution is going to be. The trims are painted and the truck needs its interior now. Also, the Benz emblem was added. I painted it in chrome to make the logo stand out, but it really doesn't. Still many parts left to attach and assemble!
-
Hey Steve, knowing all the great builds I see here, that is a big stretch for sure! To be honest, I wanted to build something quick over the holidays so I can feel accomplished, but it is dragging now. When I was young, I remember building a kit and finishing it in a same day, but now it is never a possible... Thank you, Mathias!! I hope the European truck is something of interest! I know the subject isn't quite popular as Mack or Peterbilt here, but I really enjoy the modern look and configuration on these!
-
An everydayFord day cab tractor
cifenet replied to BIGTRUCK's topic in WIP: Model Trucks: Big Rigs and Heavy Equipment
I like the whole setup, your implementation on this is great! -
Now that is quite unique! Interesting project you got going and the build so far looks great!
-
Like what you did so far, the color is very vibrant too including the two tone wheels!