cifenet
-
Posts
856 -
Joined
-
Last visited
Content Type
Profiles
Forums
Events
Gallery
Everything posted by cifenet
-
Very realistic looking build! Nice job on this! I like the front grille came out also, looking great.
-
 Hi Alex! Your supportive comment is very welcome! Thanks!
 -
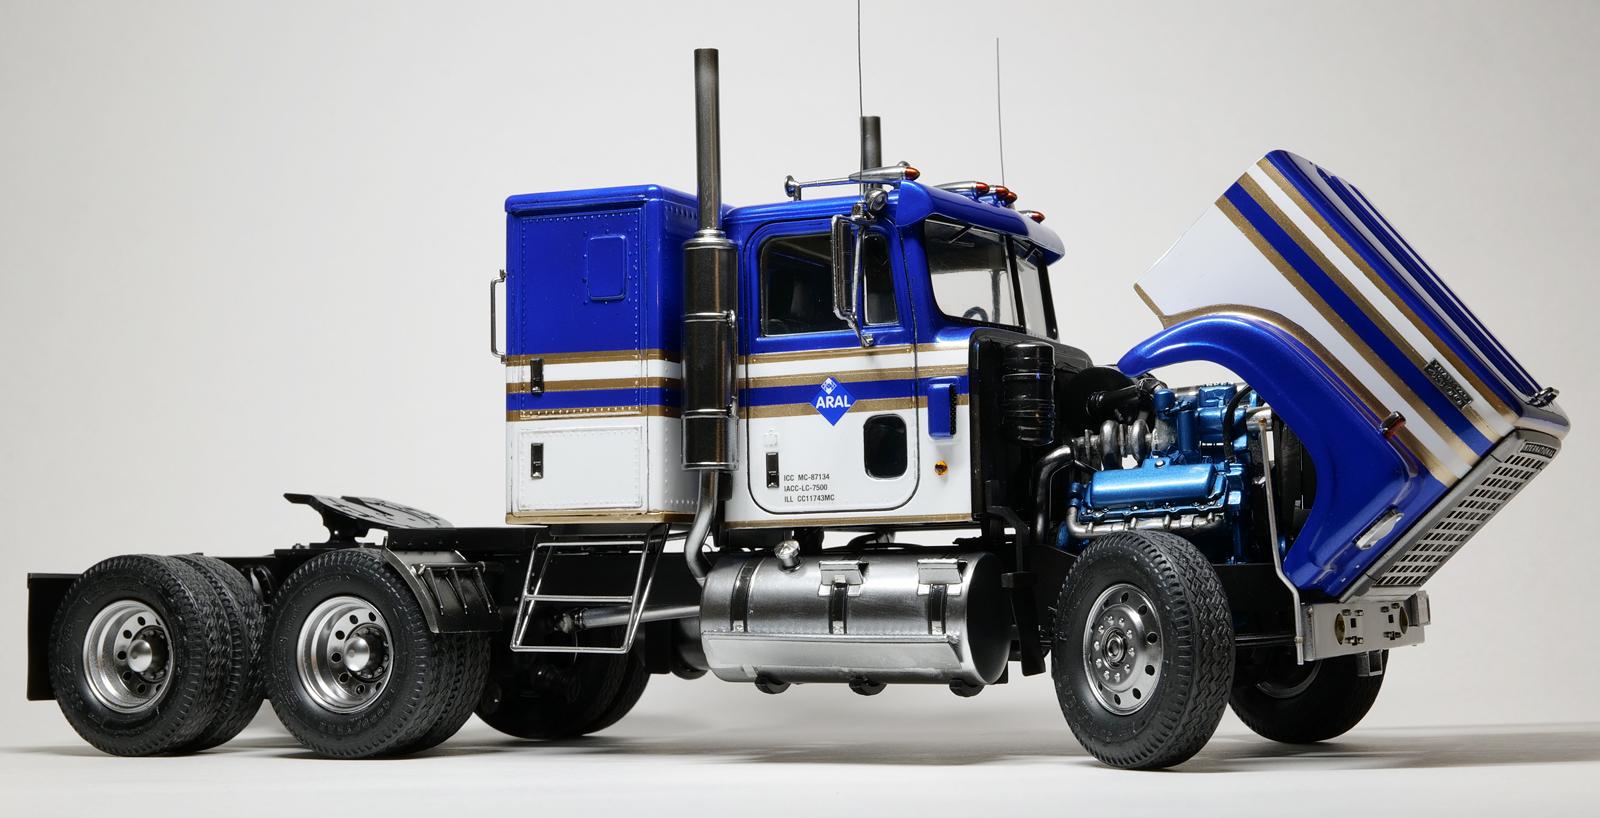
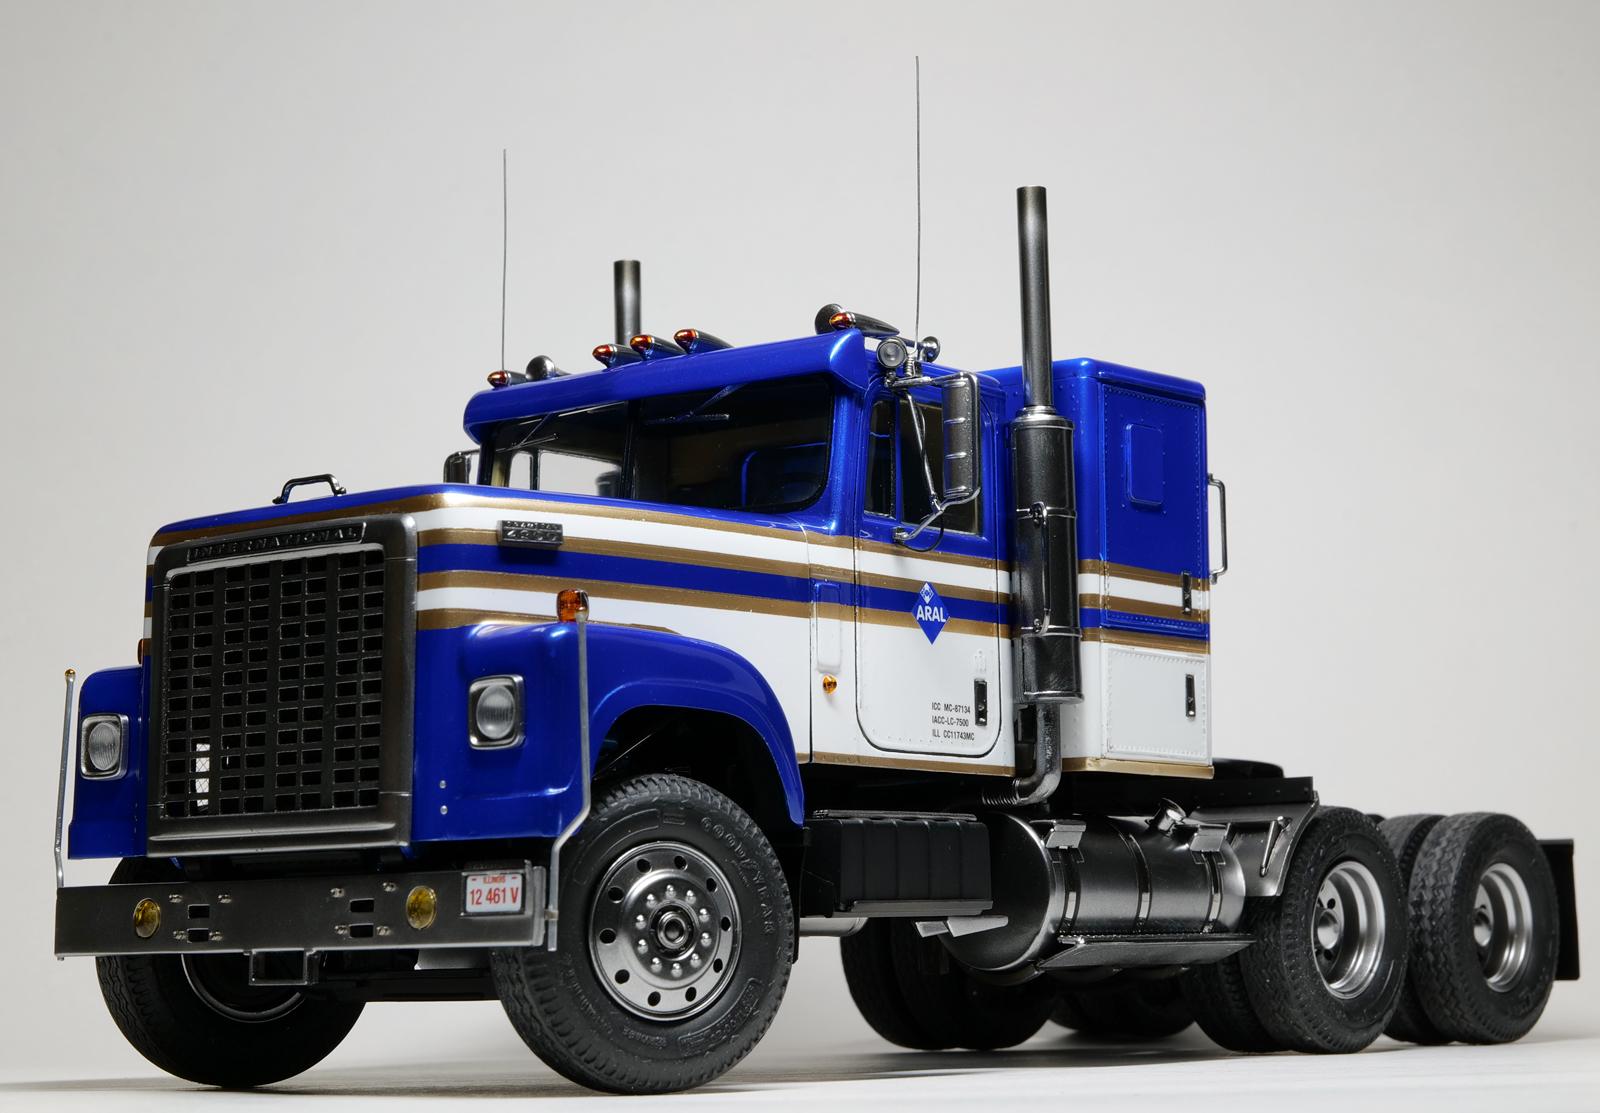
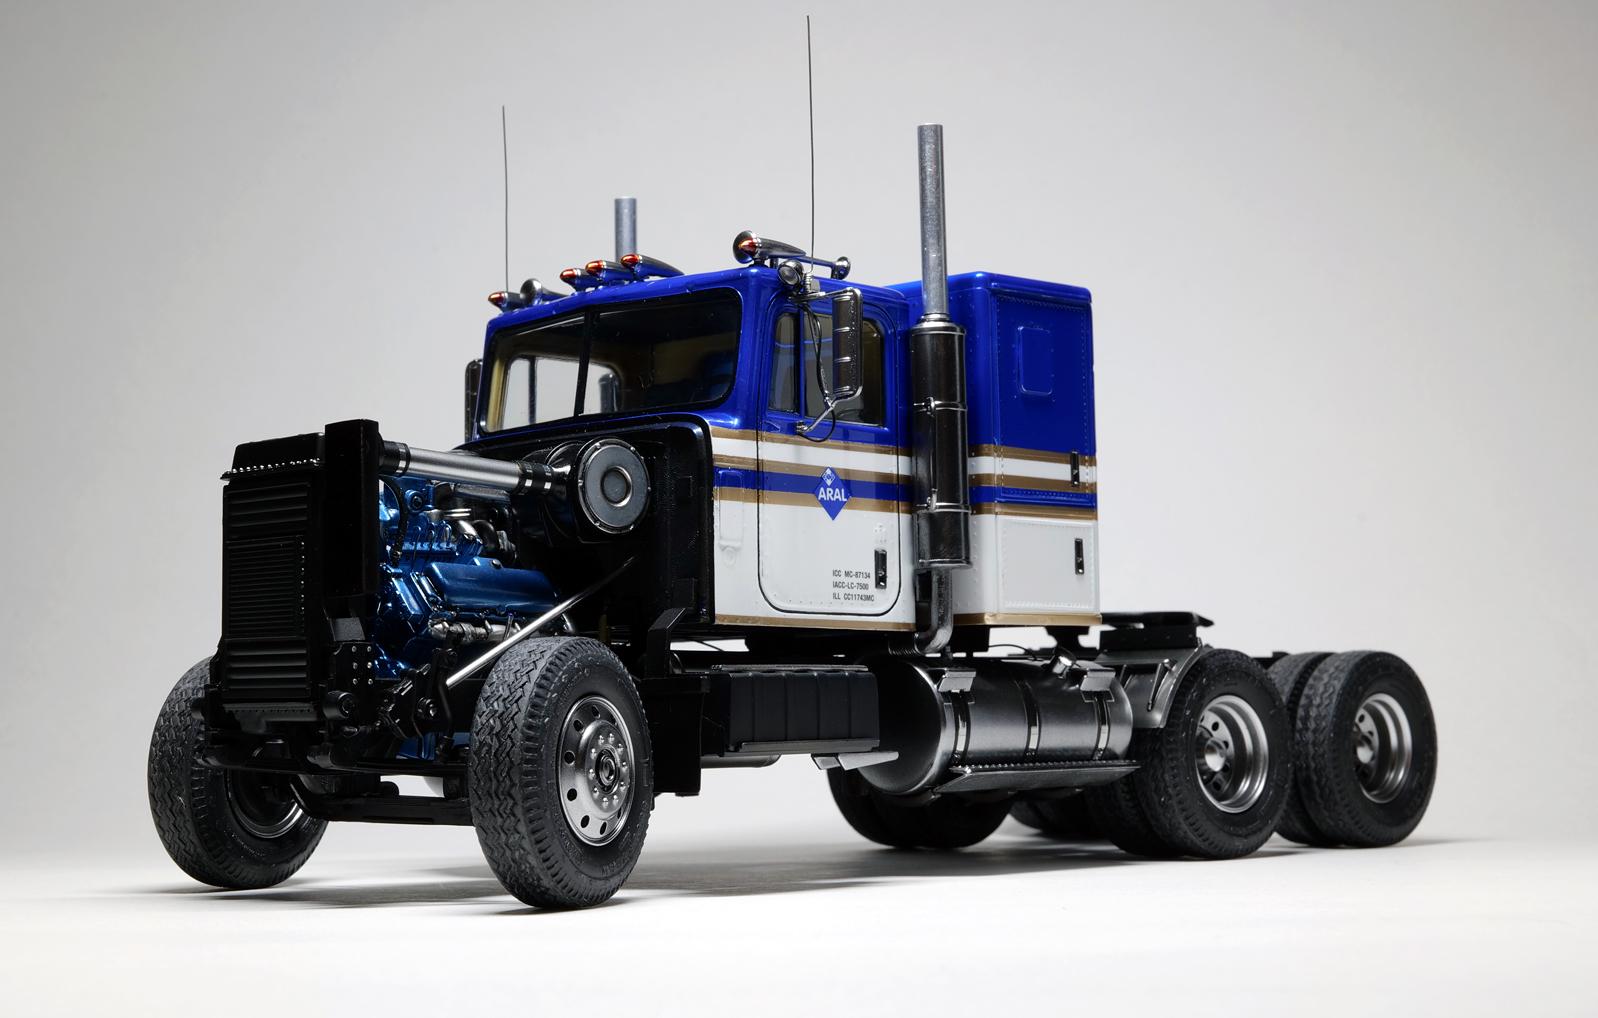
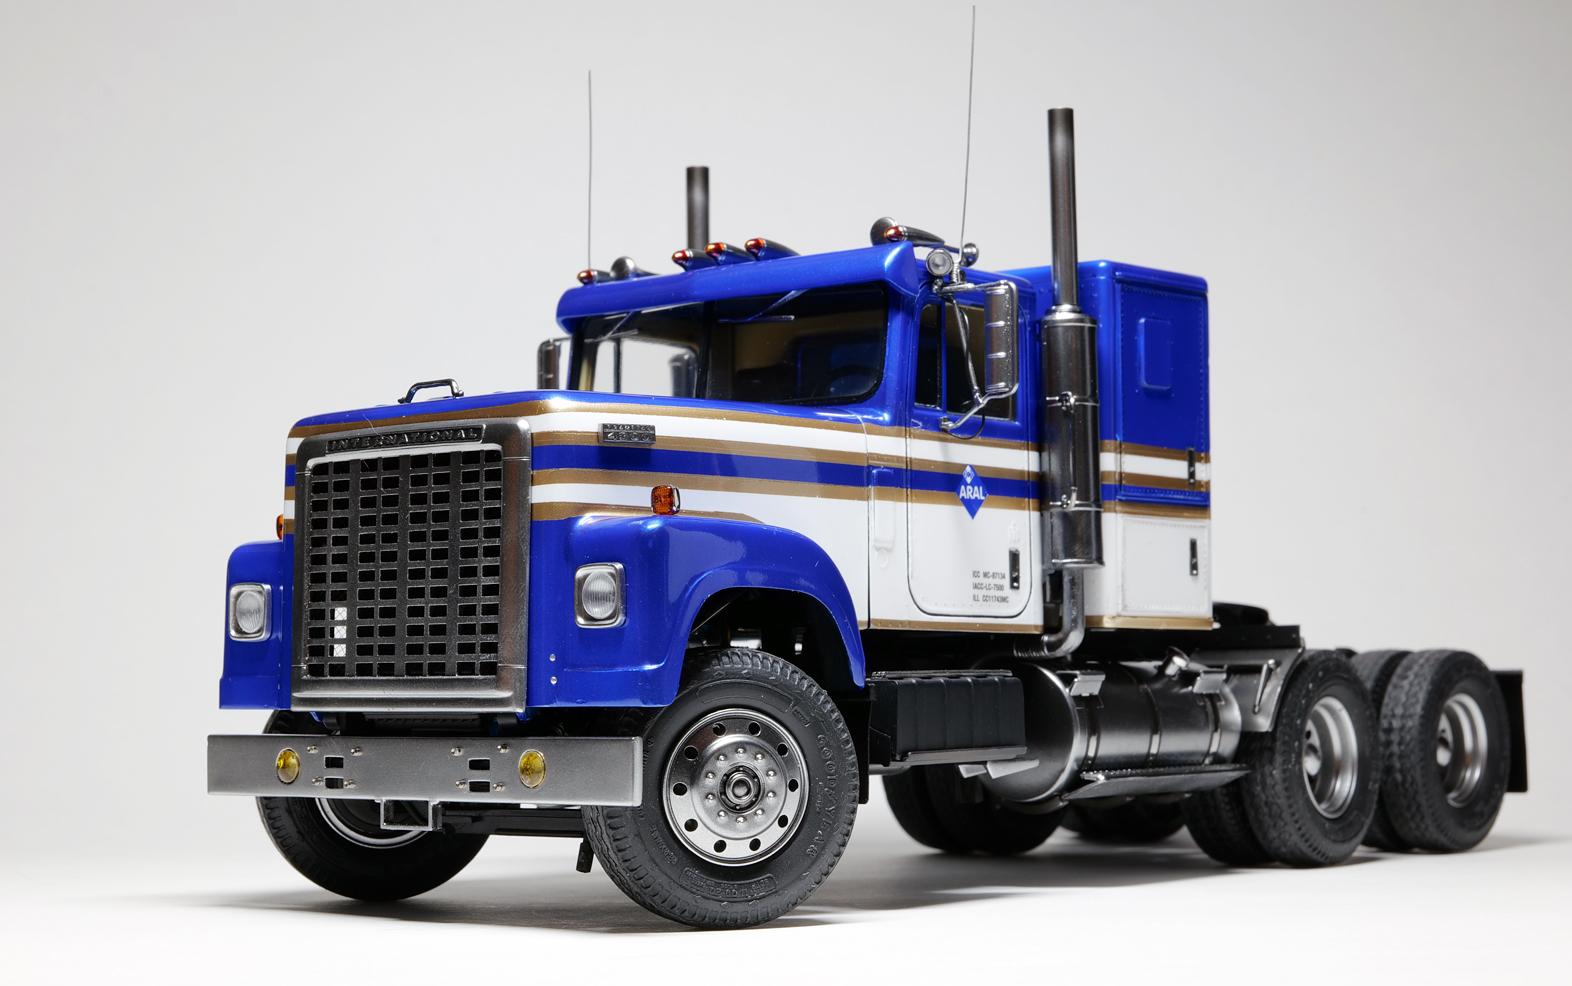
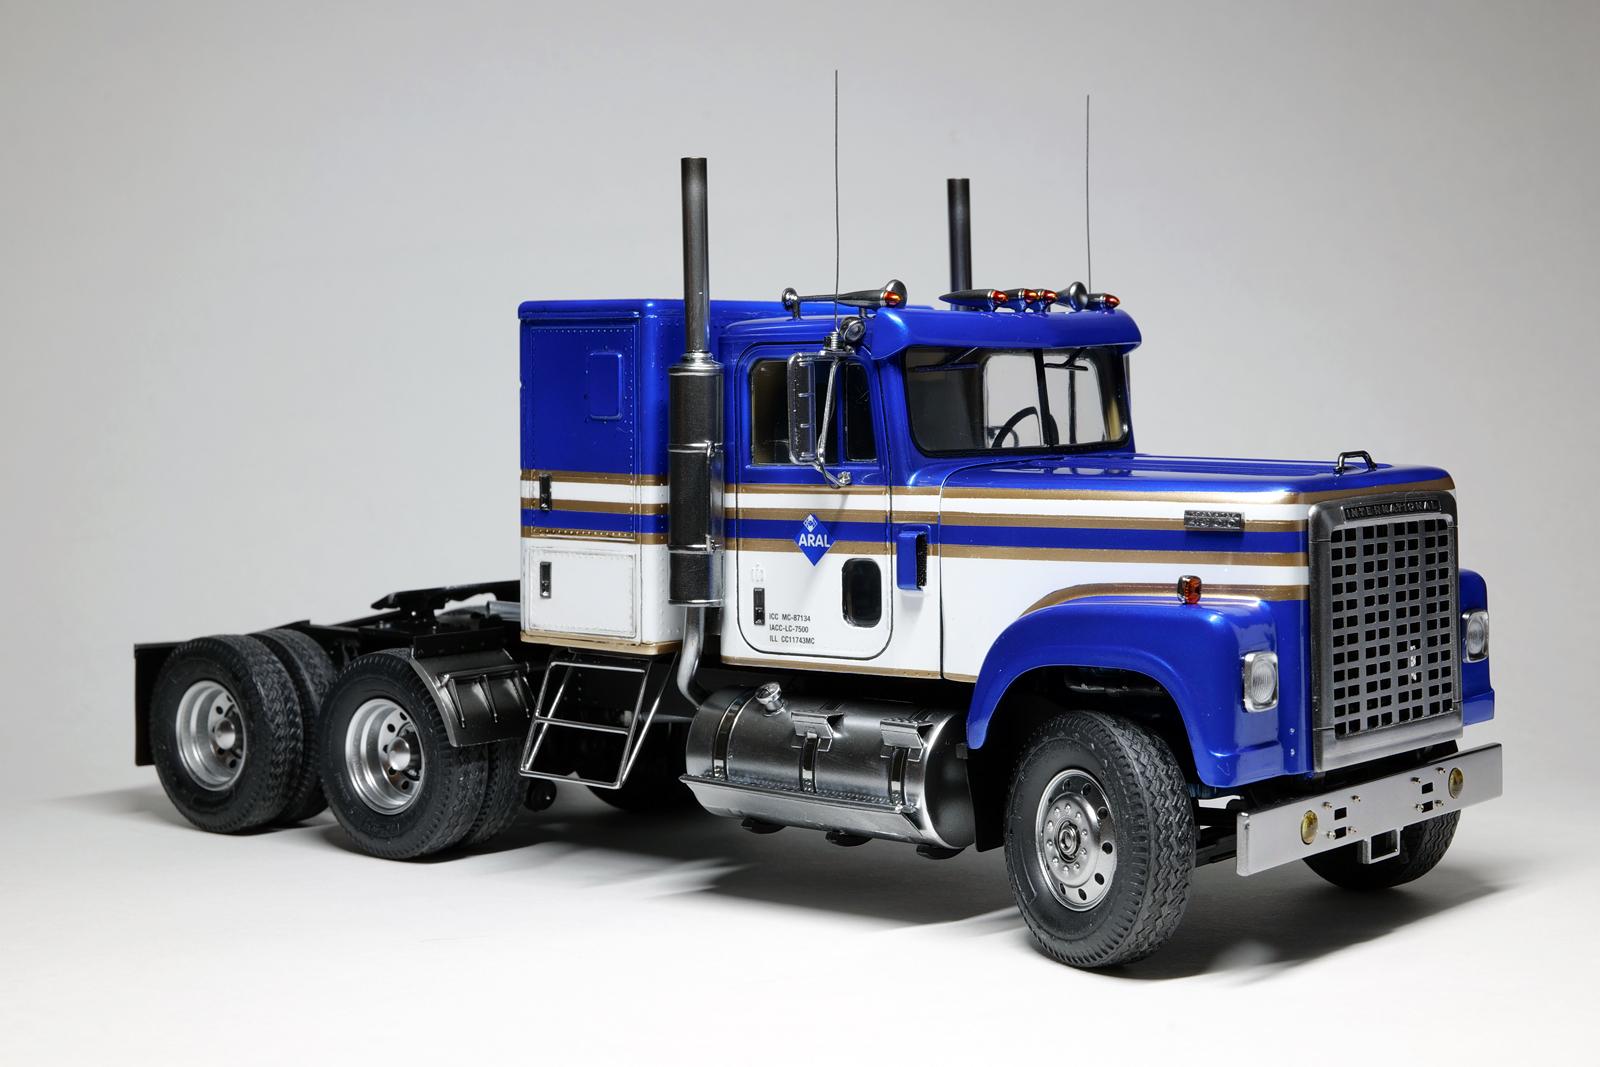
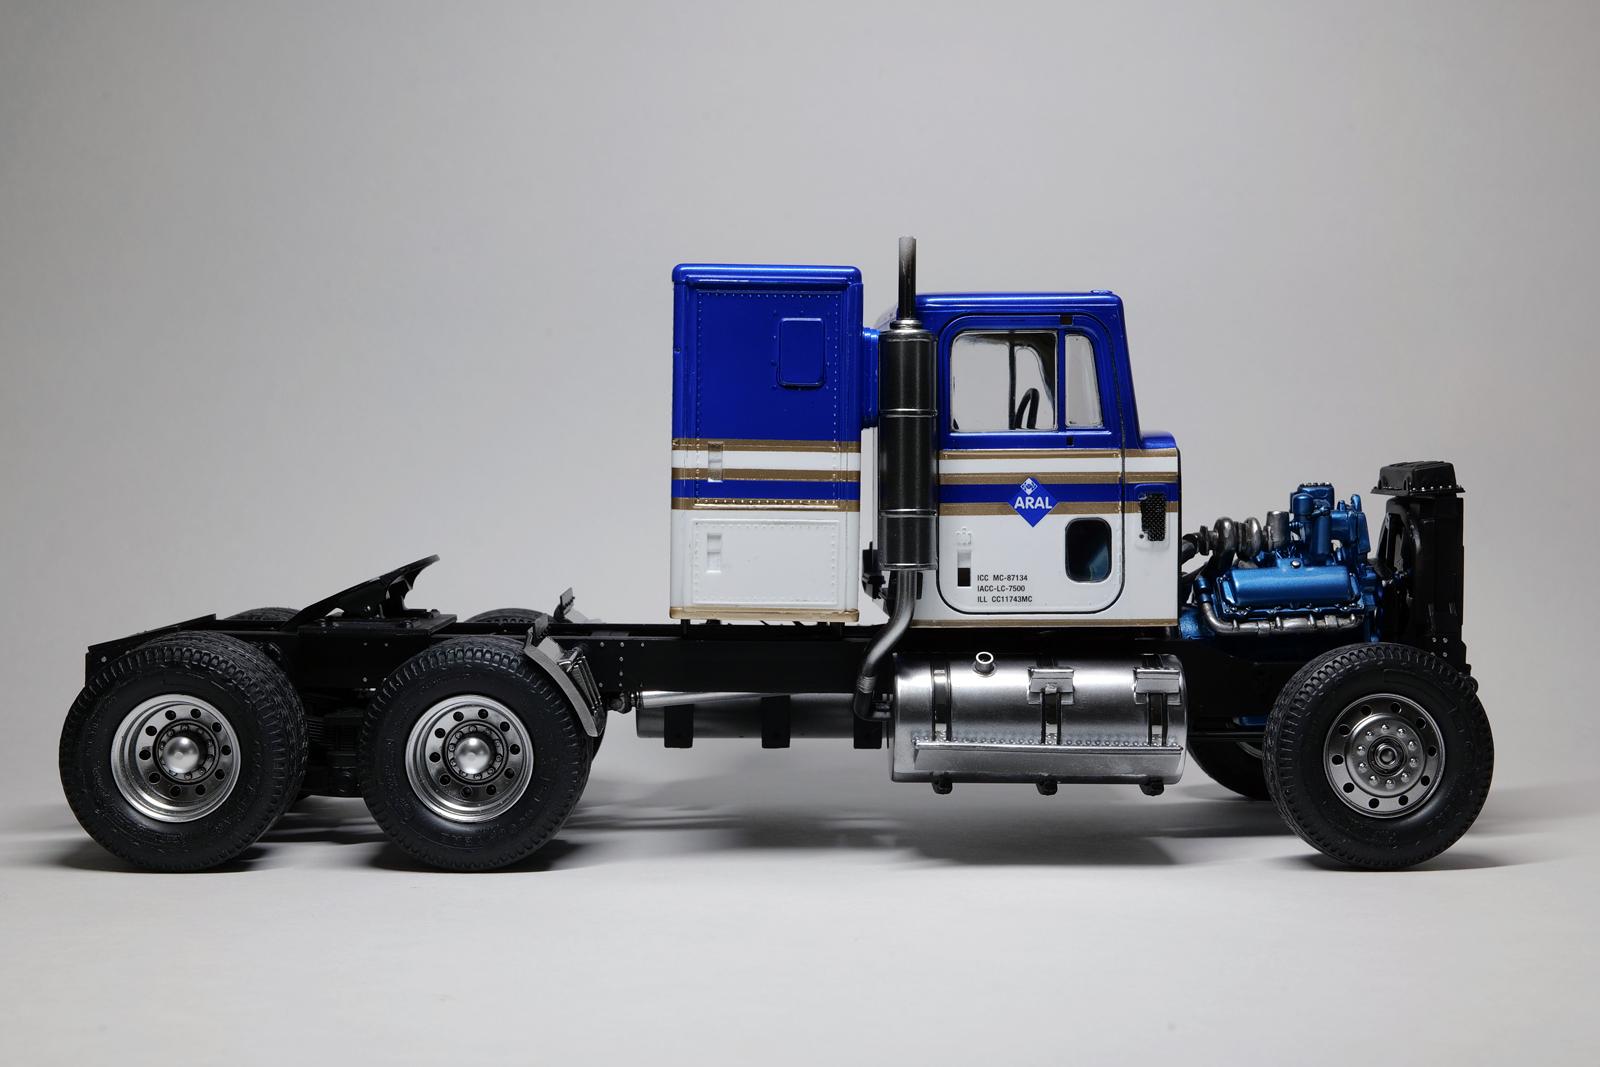
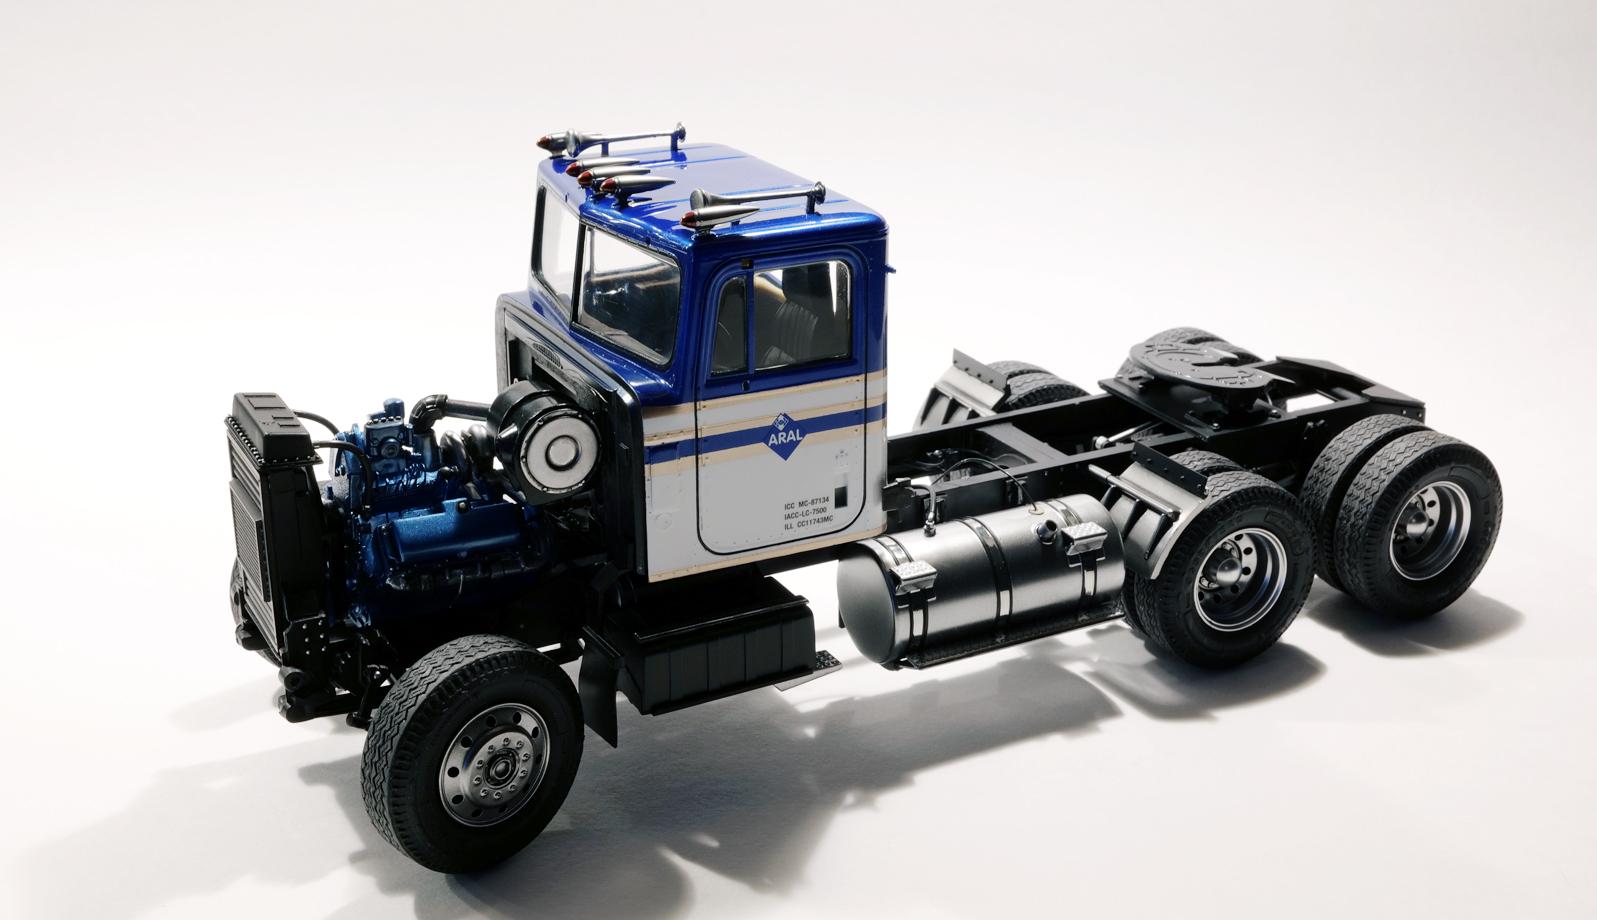
Hi guys, I finally finished another semi-truck and this time, it was very enjoyable. I started roughly three weeks ago and I put about 45-50 hours building it. I find these semi-truck kits delightful, they have distinctive features which you can build around to give characters! It was super fun and the feeling of accomplishment of getting it done is addictive! Now some close up photos for details: And here is the WIP I worked on for the truck: Thanks for watching!

-
You are taking this into another level for sure! Great work so far and I can definitely see things are shaping up.
-
2023 BRGB Movin' On Kenworth
cifenet replied to leafsprings's topic in WIP: Model Trucks: Big Rigs and Heavy Equipment
The interior looks very luxurious! Nice job! And a good technique to hide the tank seam line! -
Changing Gears
cifenet replied to J.B. Customs's topic in WIP: Model Trucks: Big Rigs and Heavy Equipment
This is becoming a very interesting WIP! Hope to follow more! It is also interesting how you paint the color where parts are still attached to part sprue. When the parts are detached from the tree, how would you address the unpainted spots that are exposed? Would that be just simple spot touch up, or do you go back and spray second coat? Just curious~ -
Thanks for the explanation on this, Steve! I could see that placing the fuel tank at certain location would be a priority factor rather than making sure that they are in symmetrical location between left and right. On the driver side, I see the truck has battery box under the cabin whereas the passenger side has the fuel tank underneath. I can see some challenge balancing two fuel tanks and a battery box (assuming multiple batteries are heavy!) and at the factory thought this was the best they could do... Nevertheless, when I found out this truck has unsymmetrical fuel tank configuration, it really bothered me at first. And thanks again for the kind feedback on this build! Thanks, Ronnie! I initially wanted to do black/white combo with gold stripes, but thought metallic blue would look more interesting! Thanks, Justin! I am glad I was able to finish it; I have old builds that still waiting for me to resume the work... Hi Gary, appreciated your positive comments!
-
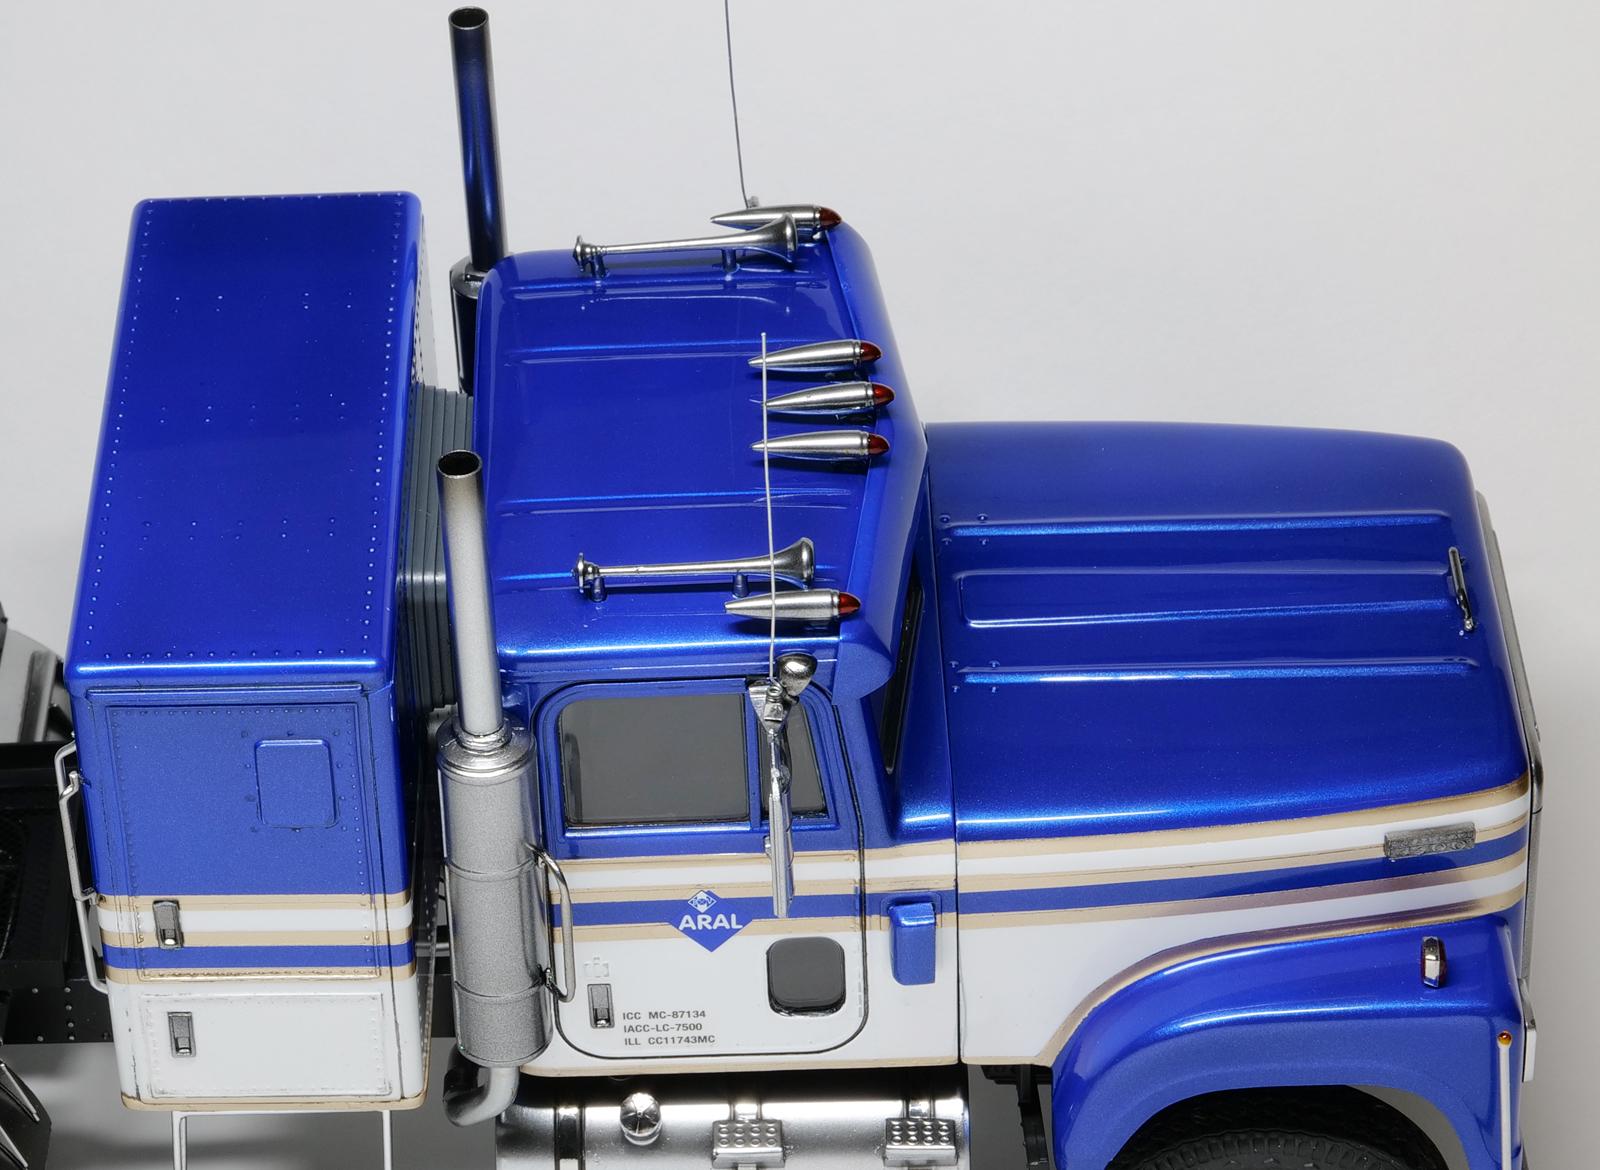
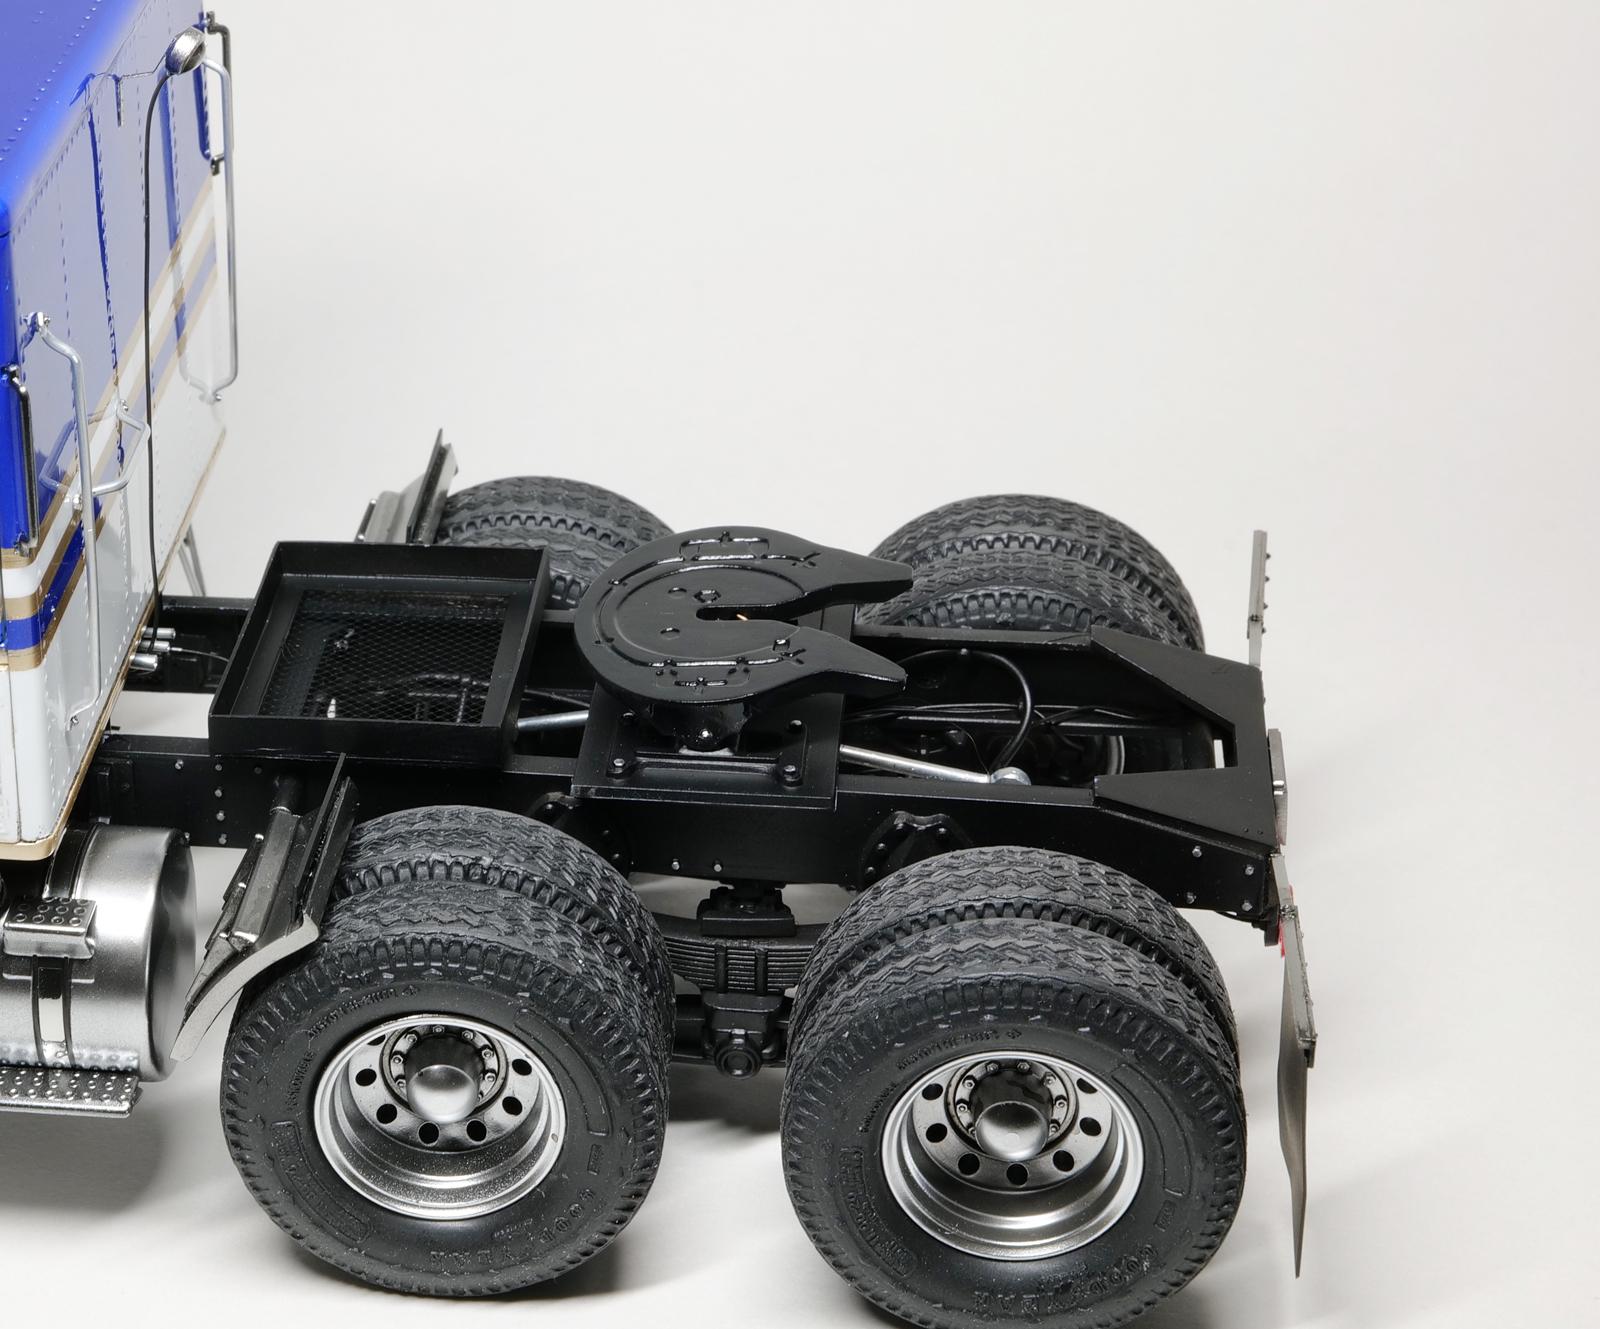
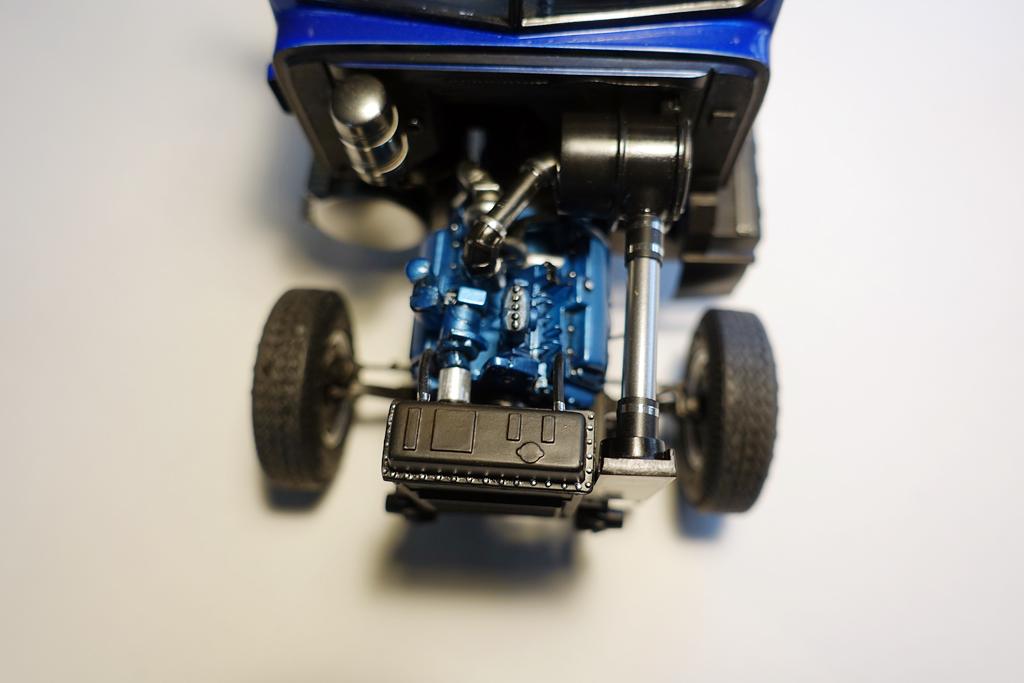
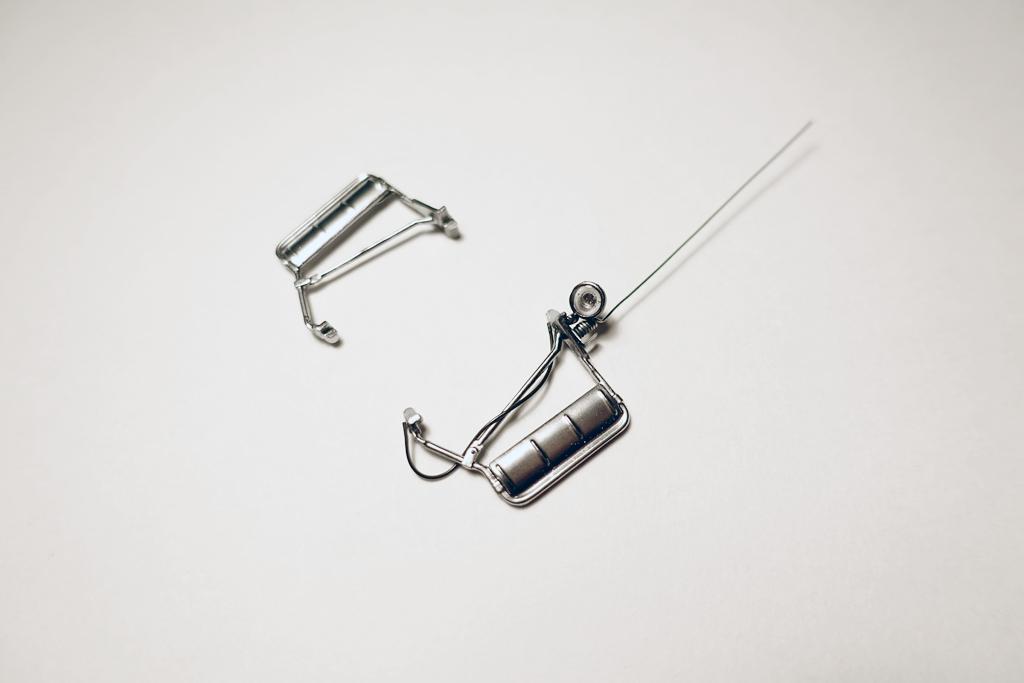
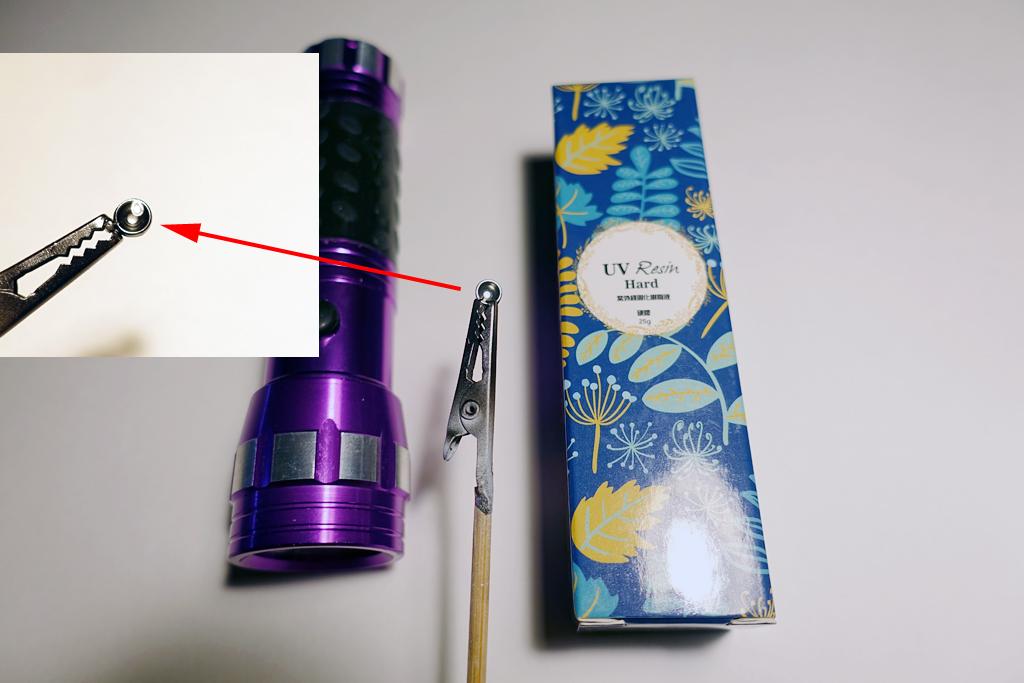
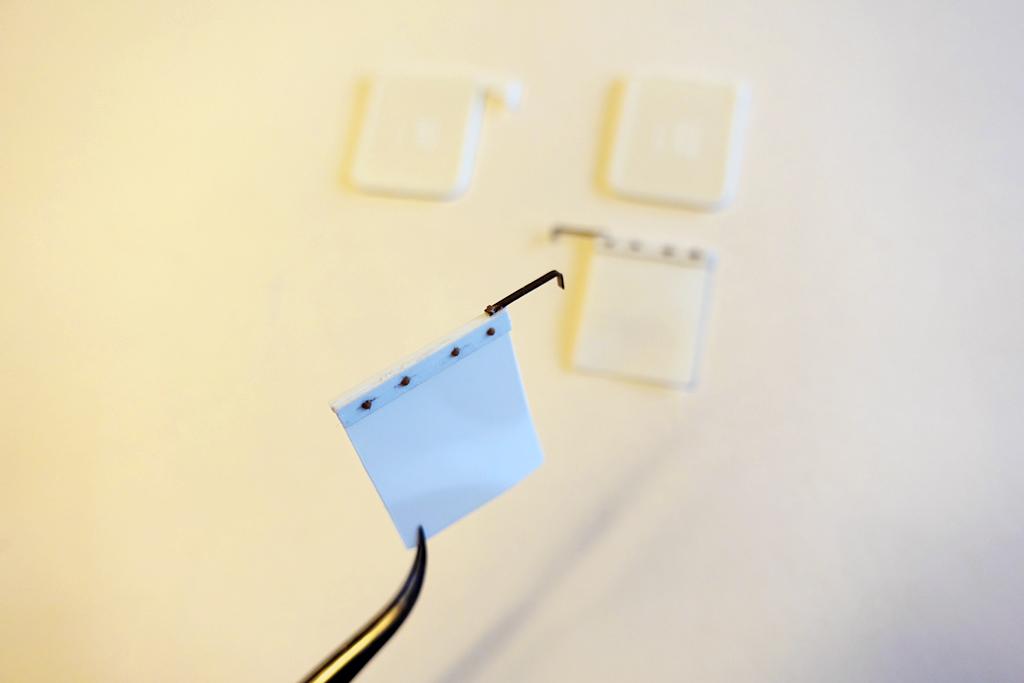
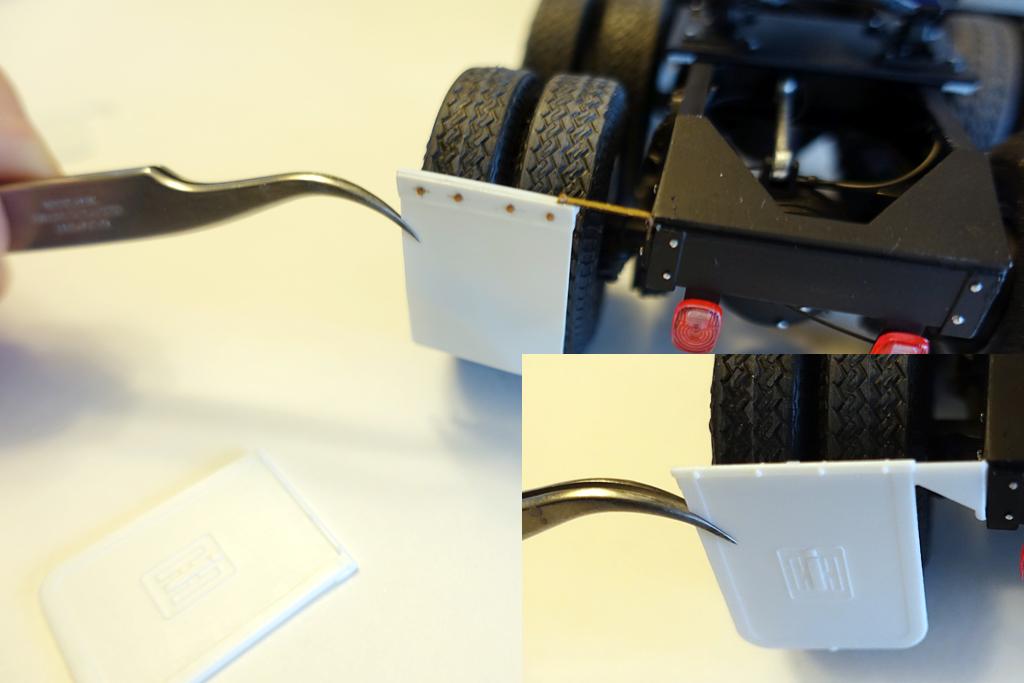
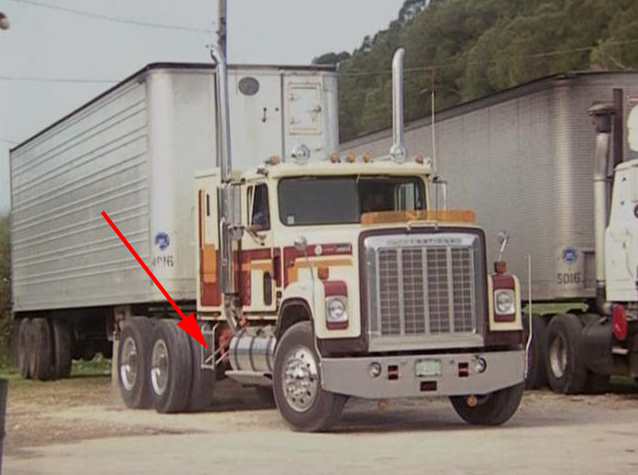
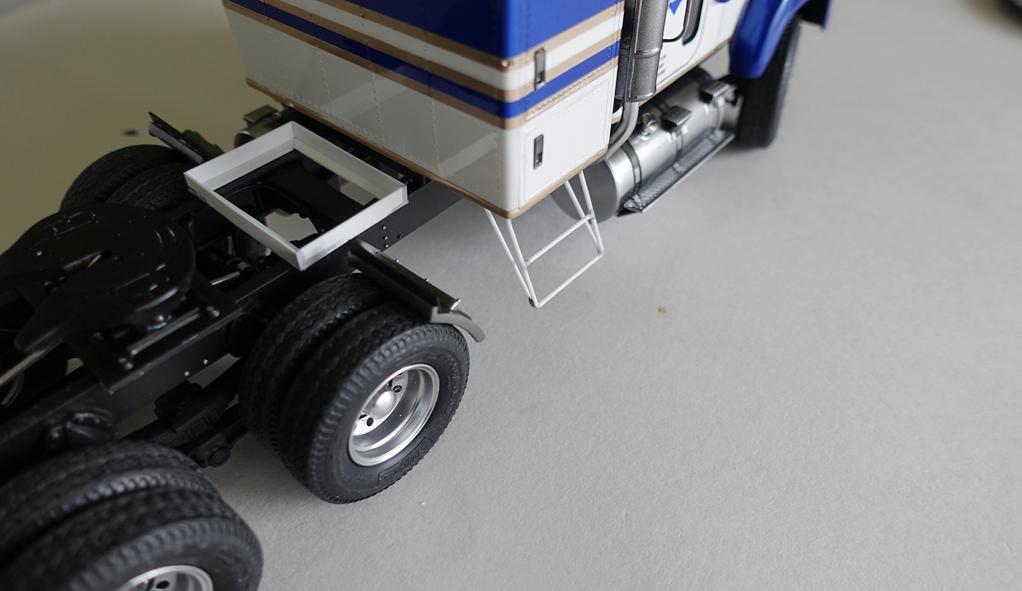
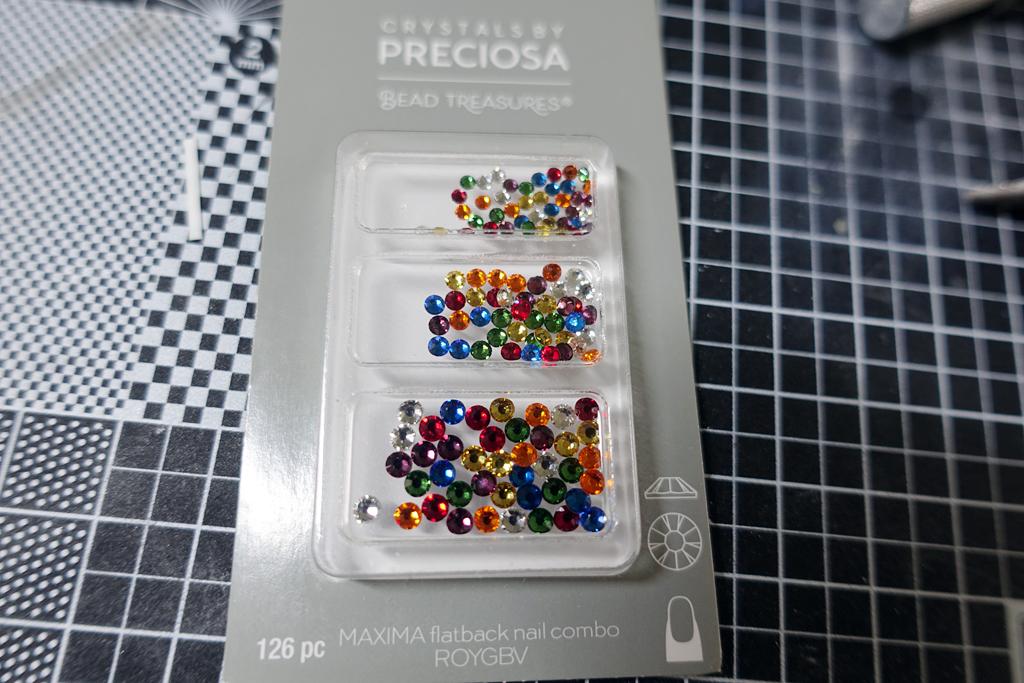
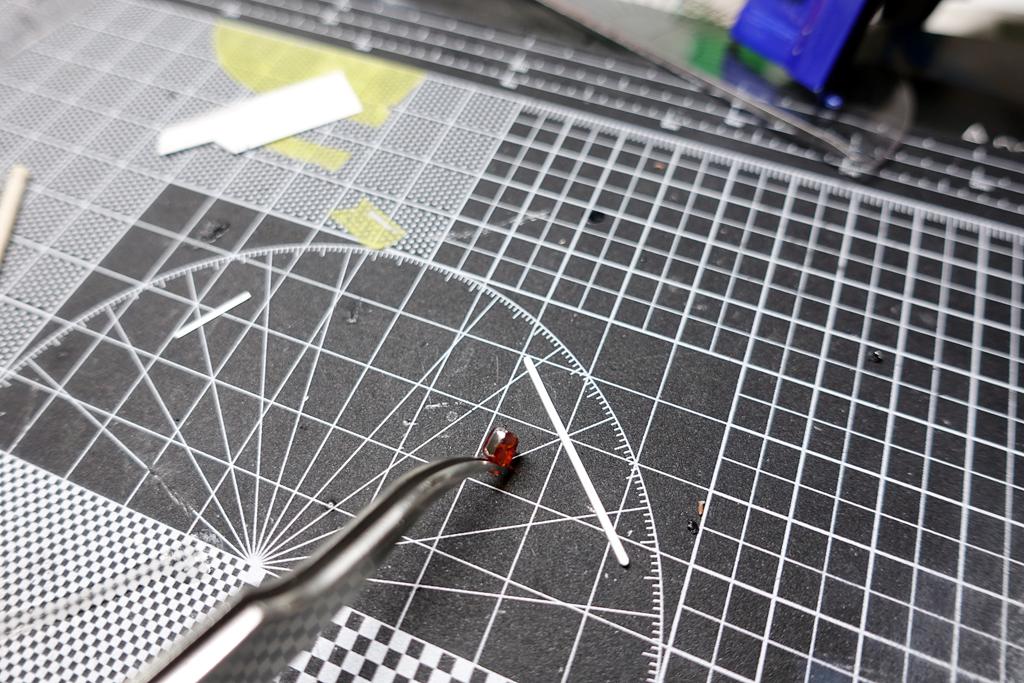
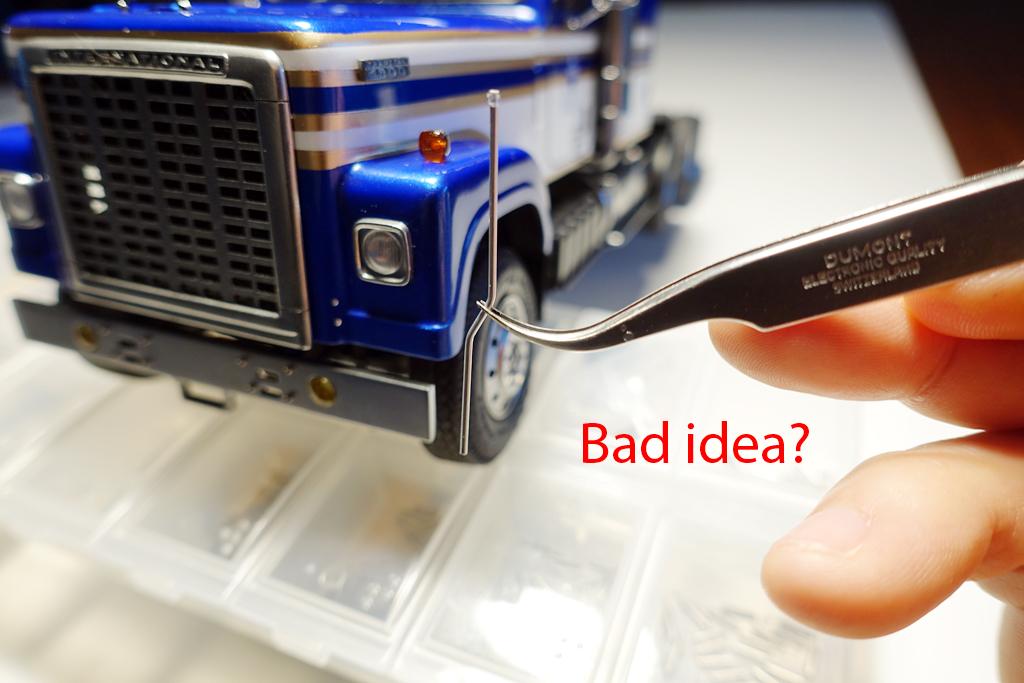
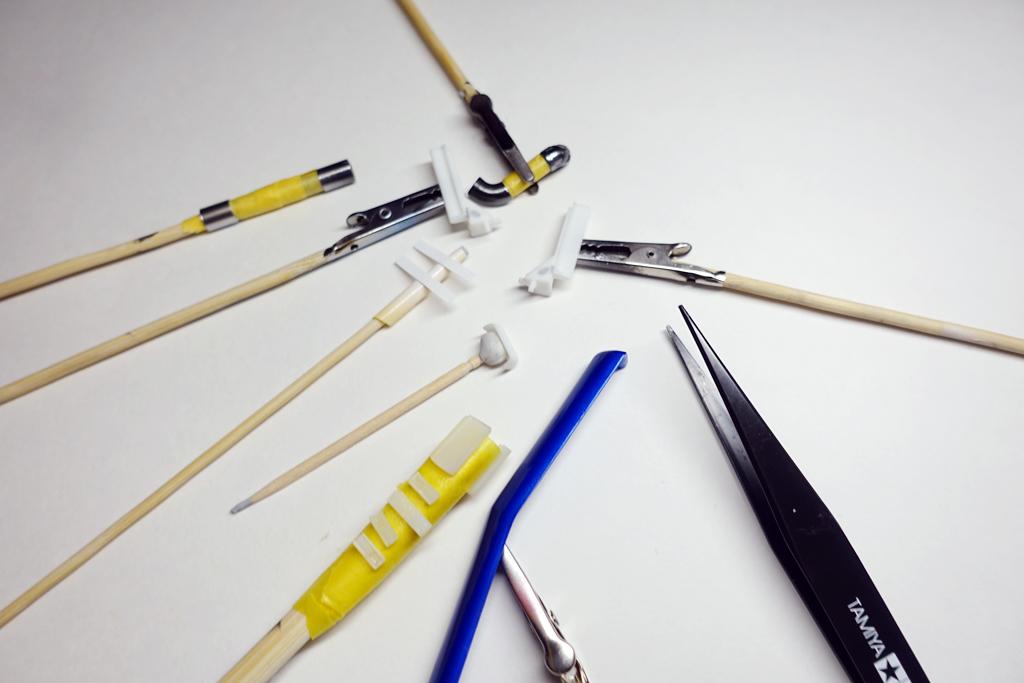
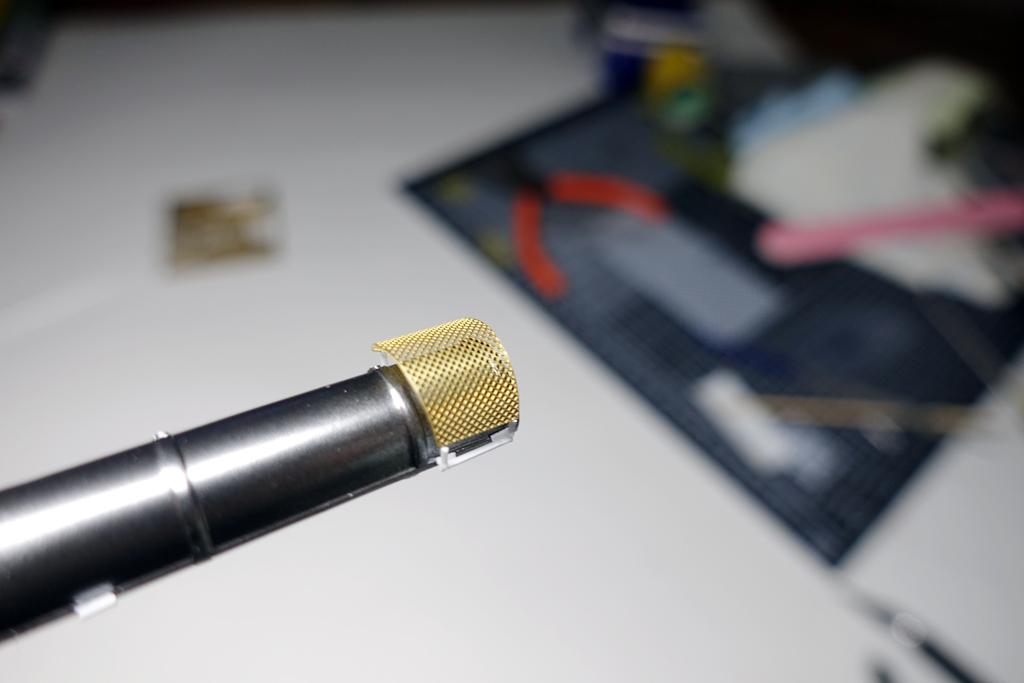
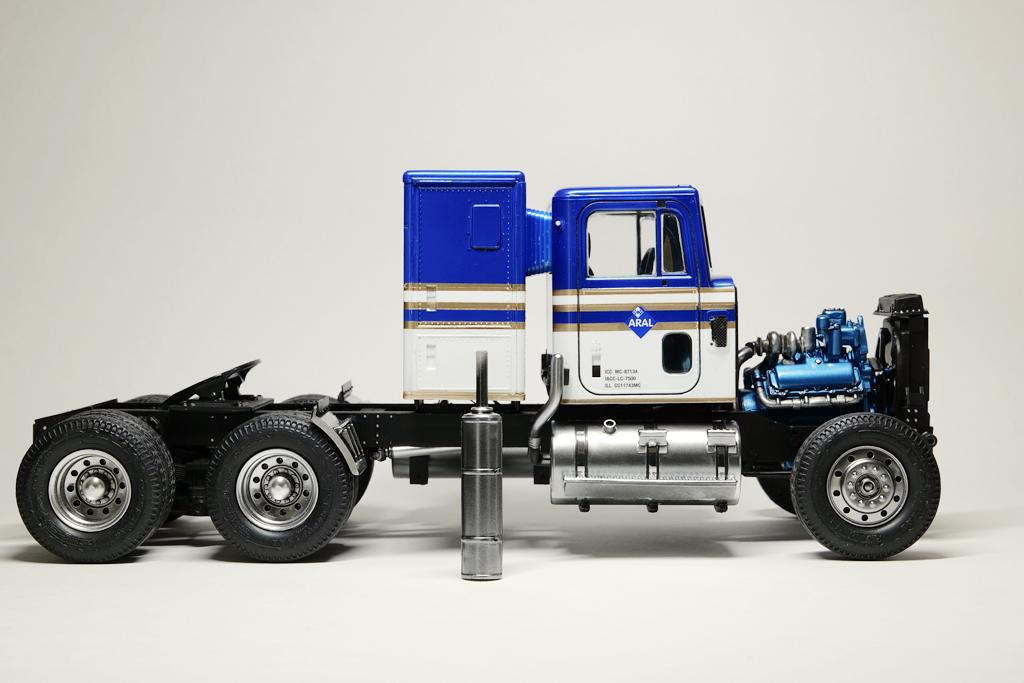
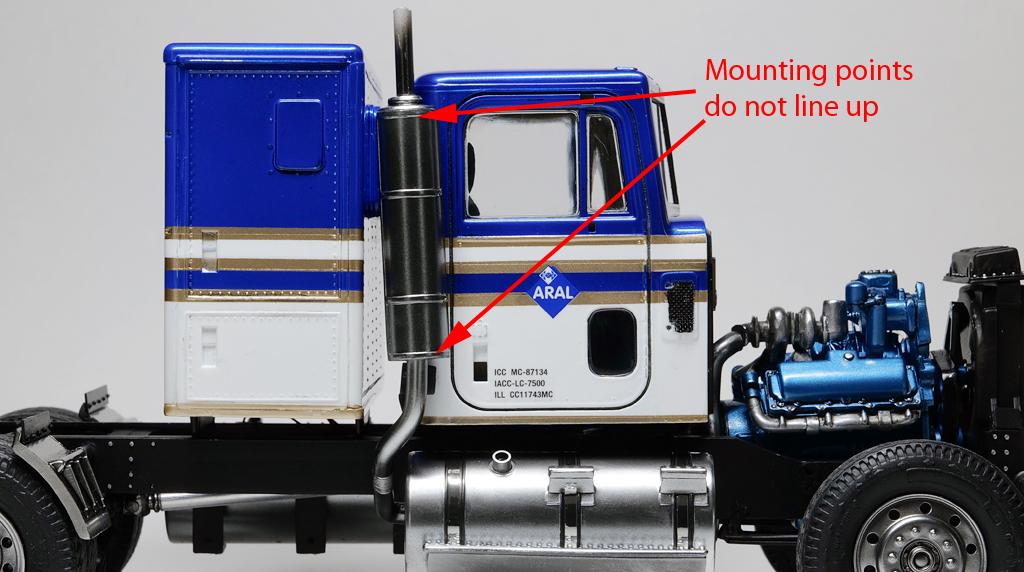
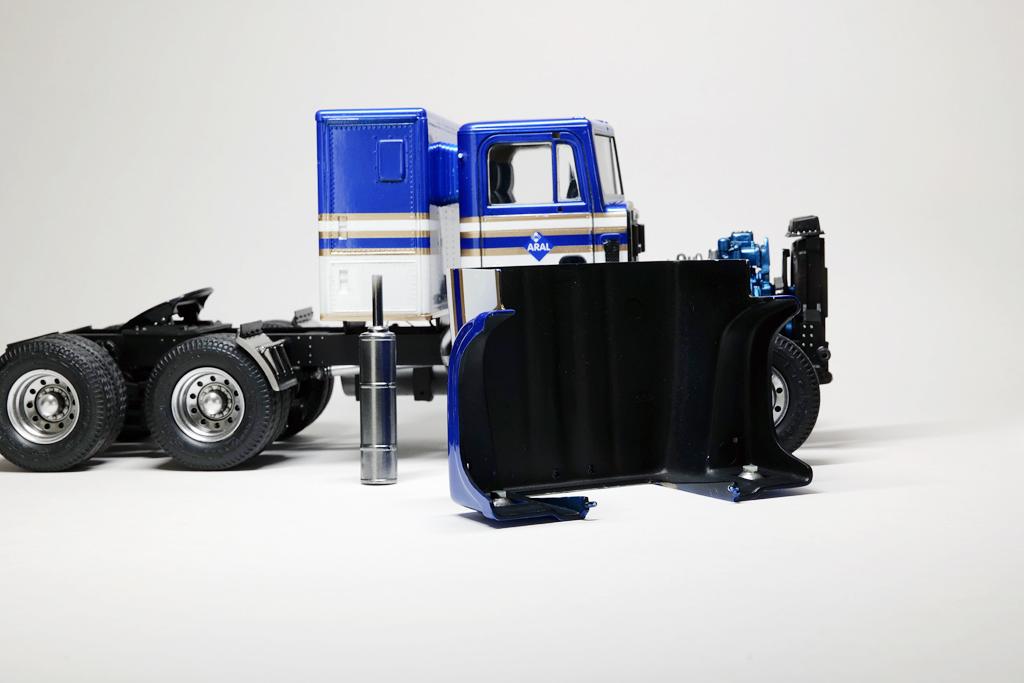
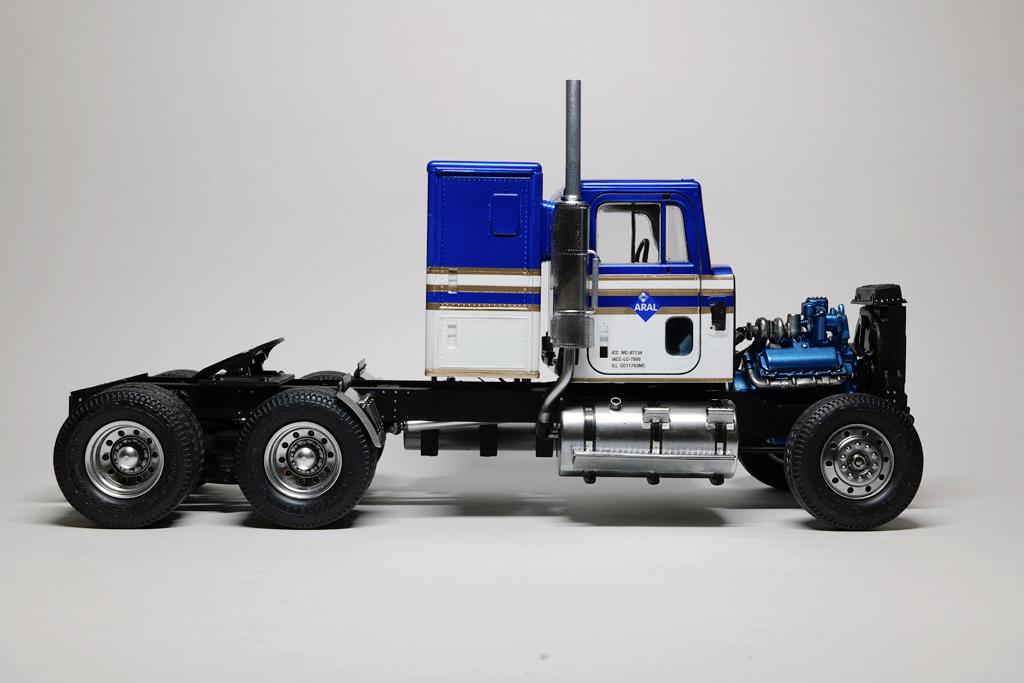
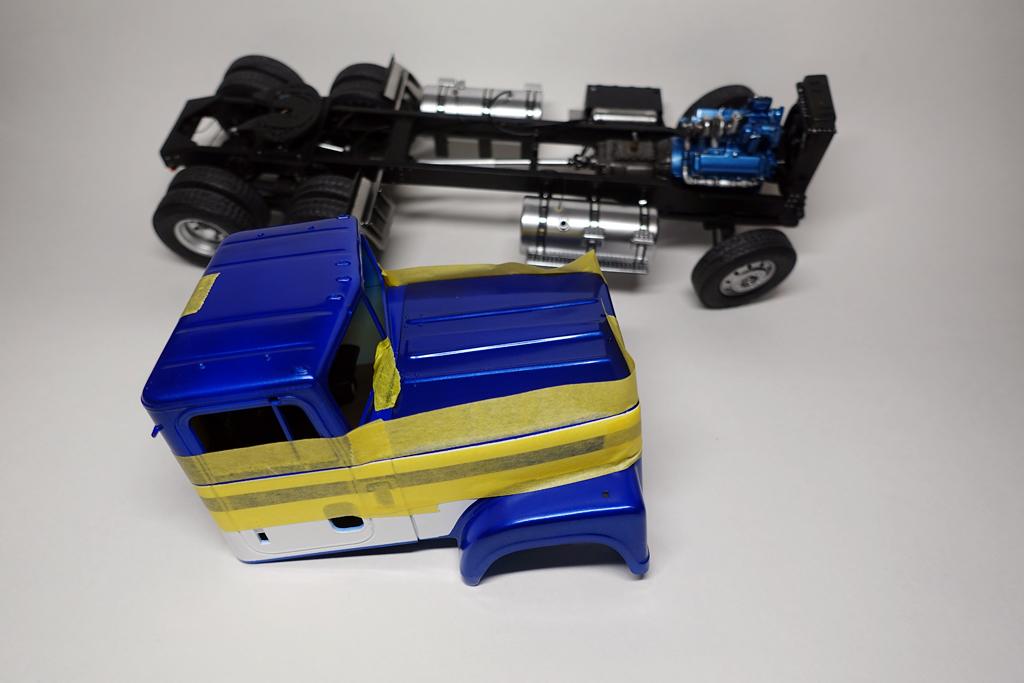
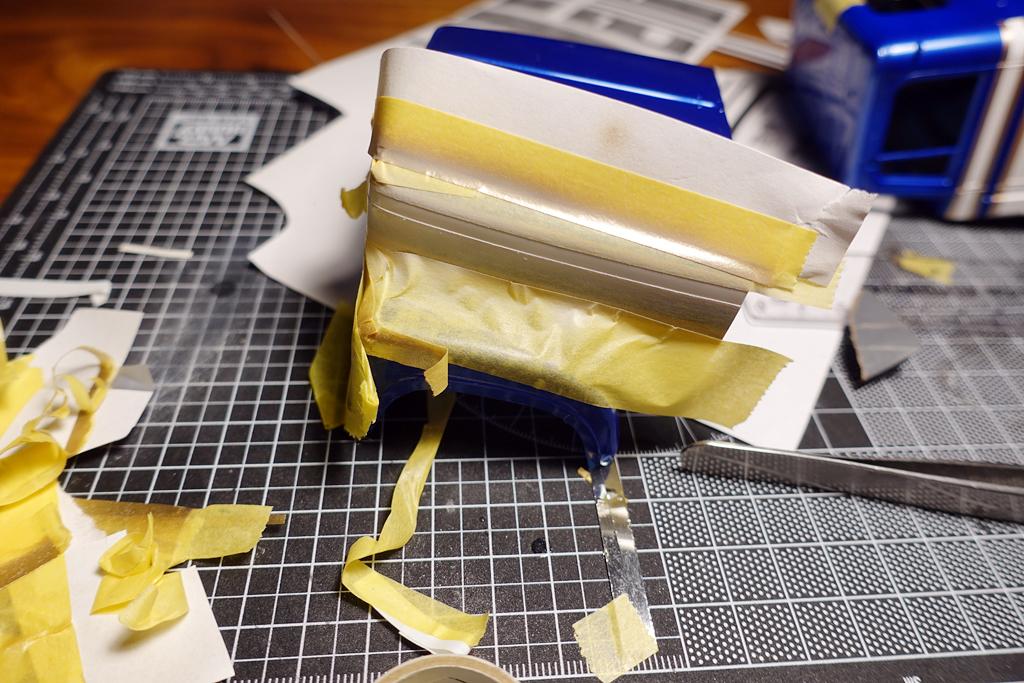
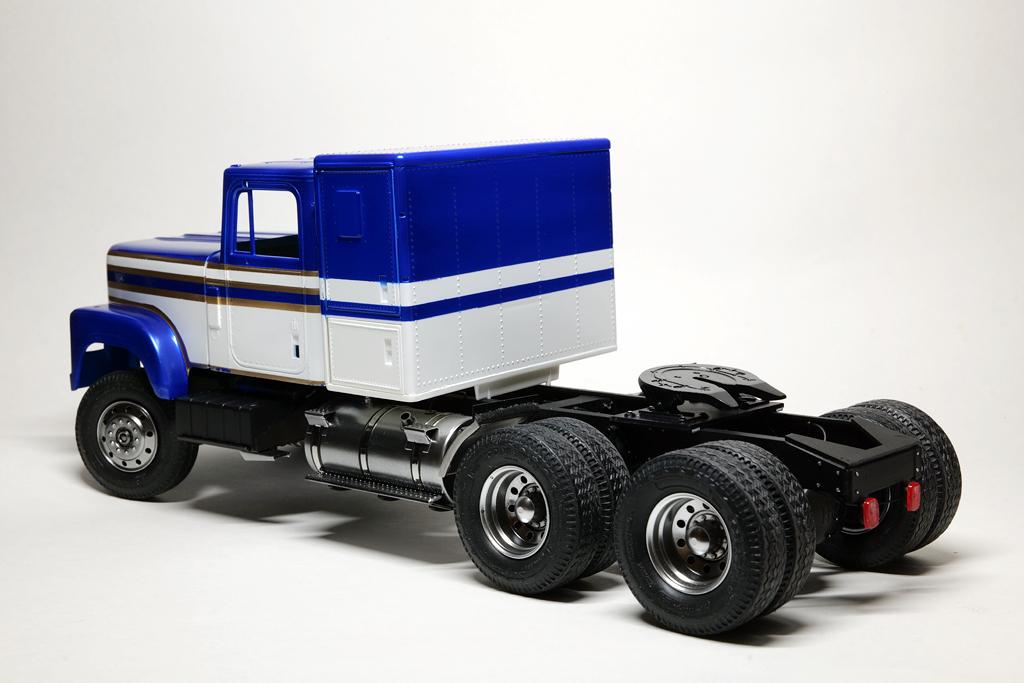
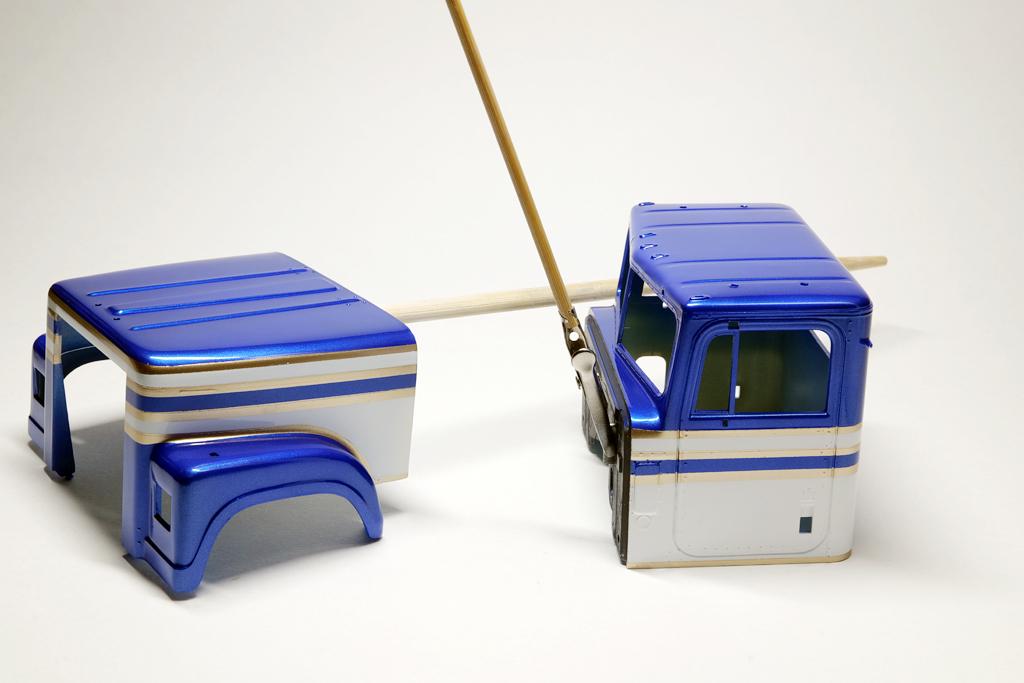
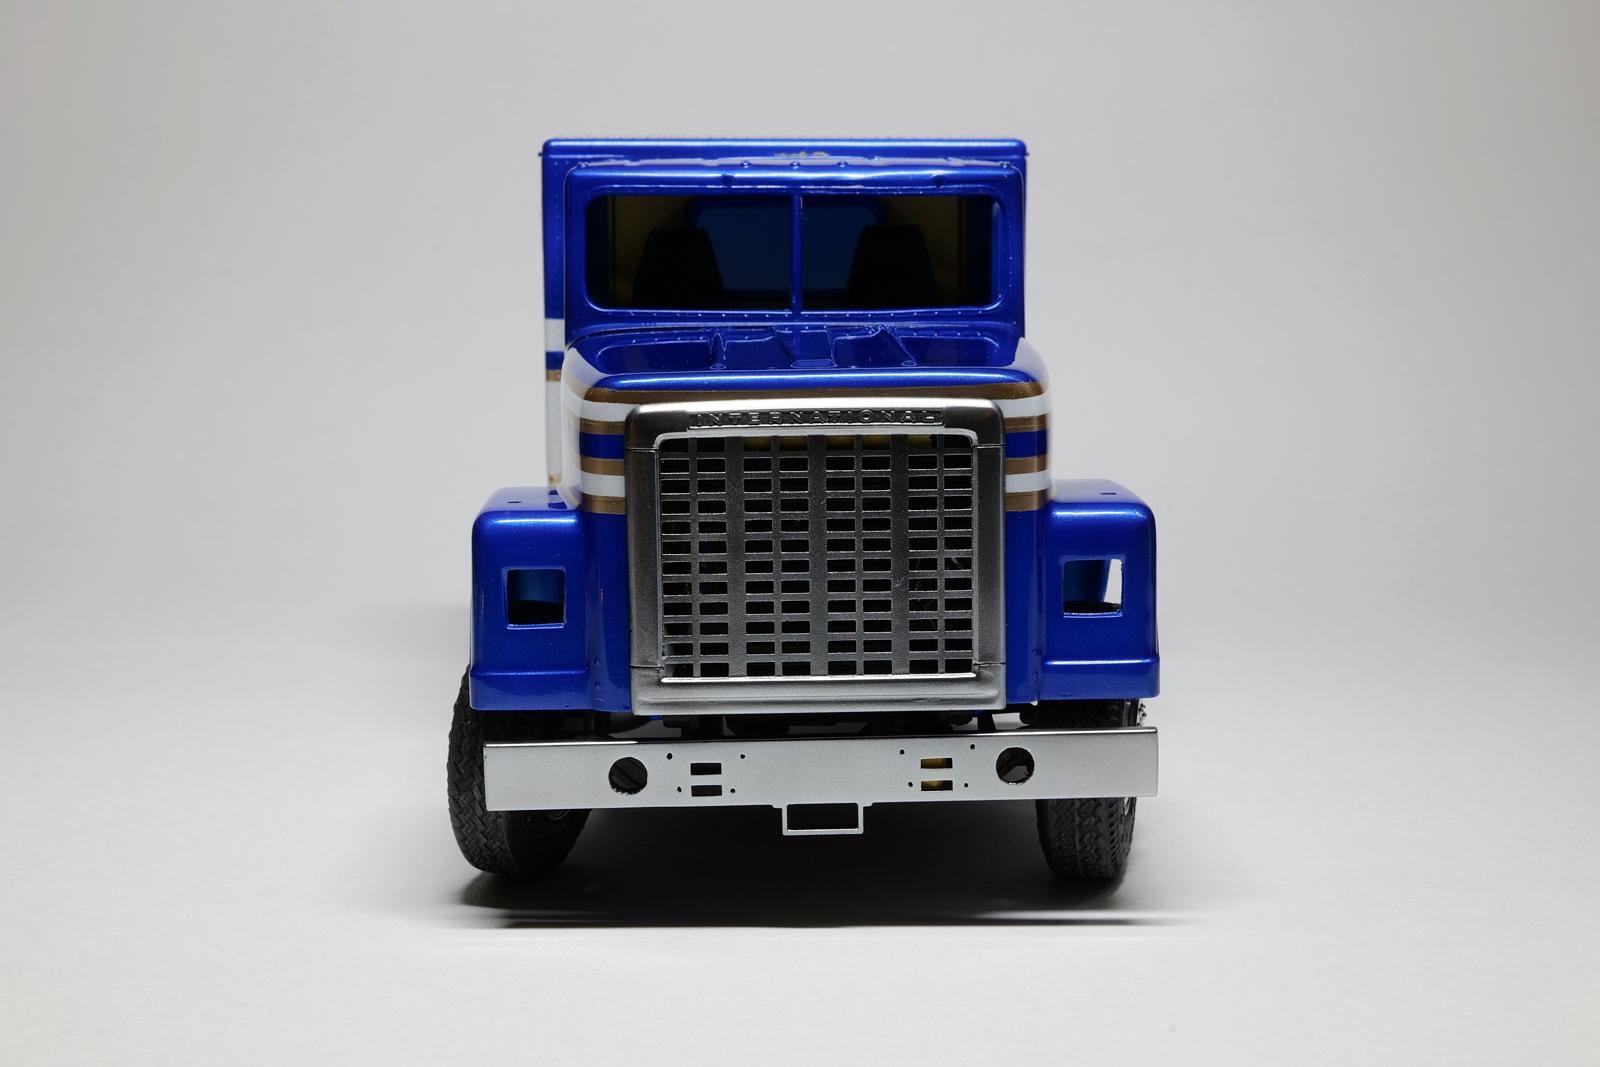
I managed to wrap up the build over the weekend and here is the update. This would be my last update for International Transtar 4300 Eagle. I would like to do another truck before I try something less stressful. And I have to mention that building these heavy vehicles does reward you with a sense of accomplishment at the end. I added a small support beam (a toothpick wrapped with some masking tape!) so I can insert the intake pipe here as nothing holds this in place. I painted and wrapped the intake pipe with metal foil strips. It is probably the easiest way to detail hose connectors although P/E clamp sets offer better results. My mirrors looked very boring, I decided to add some details. The kit included two spot lights, but the instructions do not mention where they go. And they were missing the clear lens parts. I used UV resin to clear the lens. Antennas, electrical/communication cables, and spot lights added. The pictures doesn't show, but I added reflective tapes to simulate the mirrors as well. This is how the truck looks after completing the engine details, exhaust stacks, and mirrors. Mud guards were also something that I wanted to improve. The parts from the kit were too thick and stiff looking. Initially, I wanted to just add support brackets using the P/E fret (L shape area) portion, but I gave up that idea quickly since things were getting laborious. Instead, I rebuilt the parts using plastic sheet and plastic rods. Definitely easier to work with. Simple, but I think it should do the trick. I still do not know why some of these trucks has staggered fuel tanks setup. They are not symmetrical in terms of the left and right position. My common sense says they can disturb the weight balance in a bad way, so why this setup? Could someone educate me, please? Because of this setup, the area pointed with the red arrow (above) feels "empty". My internet search reveals that certain trucks mount an "extra" fuel tank or a tool chest in this area and some has this step ladder mounted (see red arrow) for the sleeper. I decided to go with the step ladder setup and simply made up something that looks "functional". I also started working on storage shelf that sits on the frame. I bought these the other day and my wife laughed at me so hard. She thought I was going to use these on my nails. They may not work as is, but once you add clean resin to round the diamond cut, all of sudden, these can be very useful for replacing side markers and turn signals. I used these to replace my torpedo lights on Chevy Titan. They looked very convincing. I will be using them to represent side markers for International Transtar 4300 Eagle. Another painting session, I actually enjoy airbrushing as long as the part counts stay low! I gave yellow coat for shocks. Bilstein shocks, maybe? I gave exhaust smoke stain on the exhaust pipes also. After giving some stains and washes, I had odd urge to wash more. I gave dirty wash on the sleeper, but it didn't work for my taste and cleaned off some. I will see what direction I want to do with this. Added the mud guard and shocks. From this point, everything is going to be attaching various parts... I feel like I can add more stuff for the engine, but I got lazy and wanted to just finish quicker. My engine work is done for this kit. I wrapped the blinkers with metal foil strips hoping to improve details. I don't think this is correct in terms of the real thing though. I permanently attached the bumper and grille. Once you attach the grille, you cannot detach the hood anymore (you can still flip it open). The hinge mechanism requires you to spread the front part of the hood so the attaching pins can come off, but attaching grille will prevent the hood to be flexible at front. I painted the sleeper boot that connects to cabin also. I am also thinking about adding these lane guides (is that the correct term?), but they interfere when the hood flips open. I will need to further implement this so everything works. I think the truck is 95% done! The sleeper needs work, still needs attachments, and bit more polishing left. I started building this three weeks ago and I totally enjoyed the building experience. My execution of the build wasn't satisfying and at times, I was kept making silly mistakes which dragged on the progress. I am sure the way I built this truck isn't correct in terms of the actual vehicle, but this is what I could only accomplish knowing (or not knowing) the subject. I certainly would like to give another truck a try, but perhaps I will need to do some reference studying first. Thanks for watching!
-
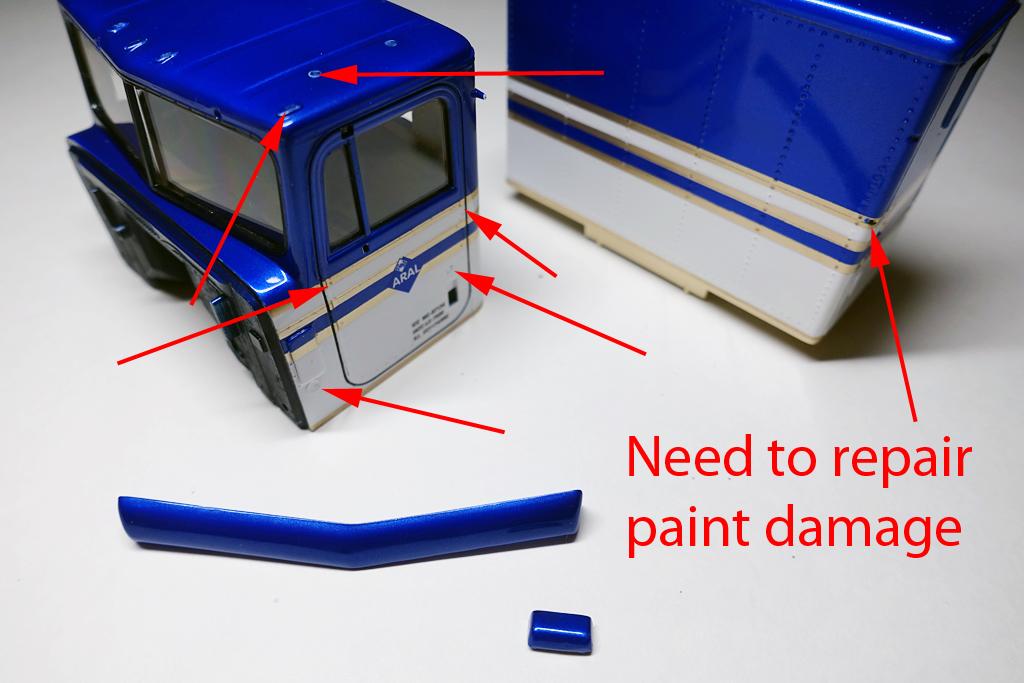
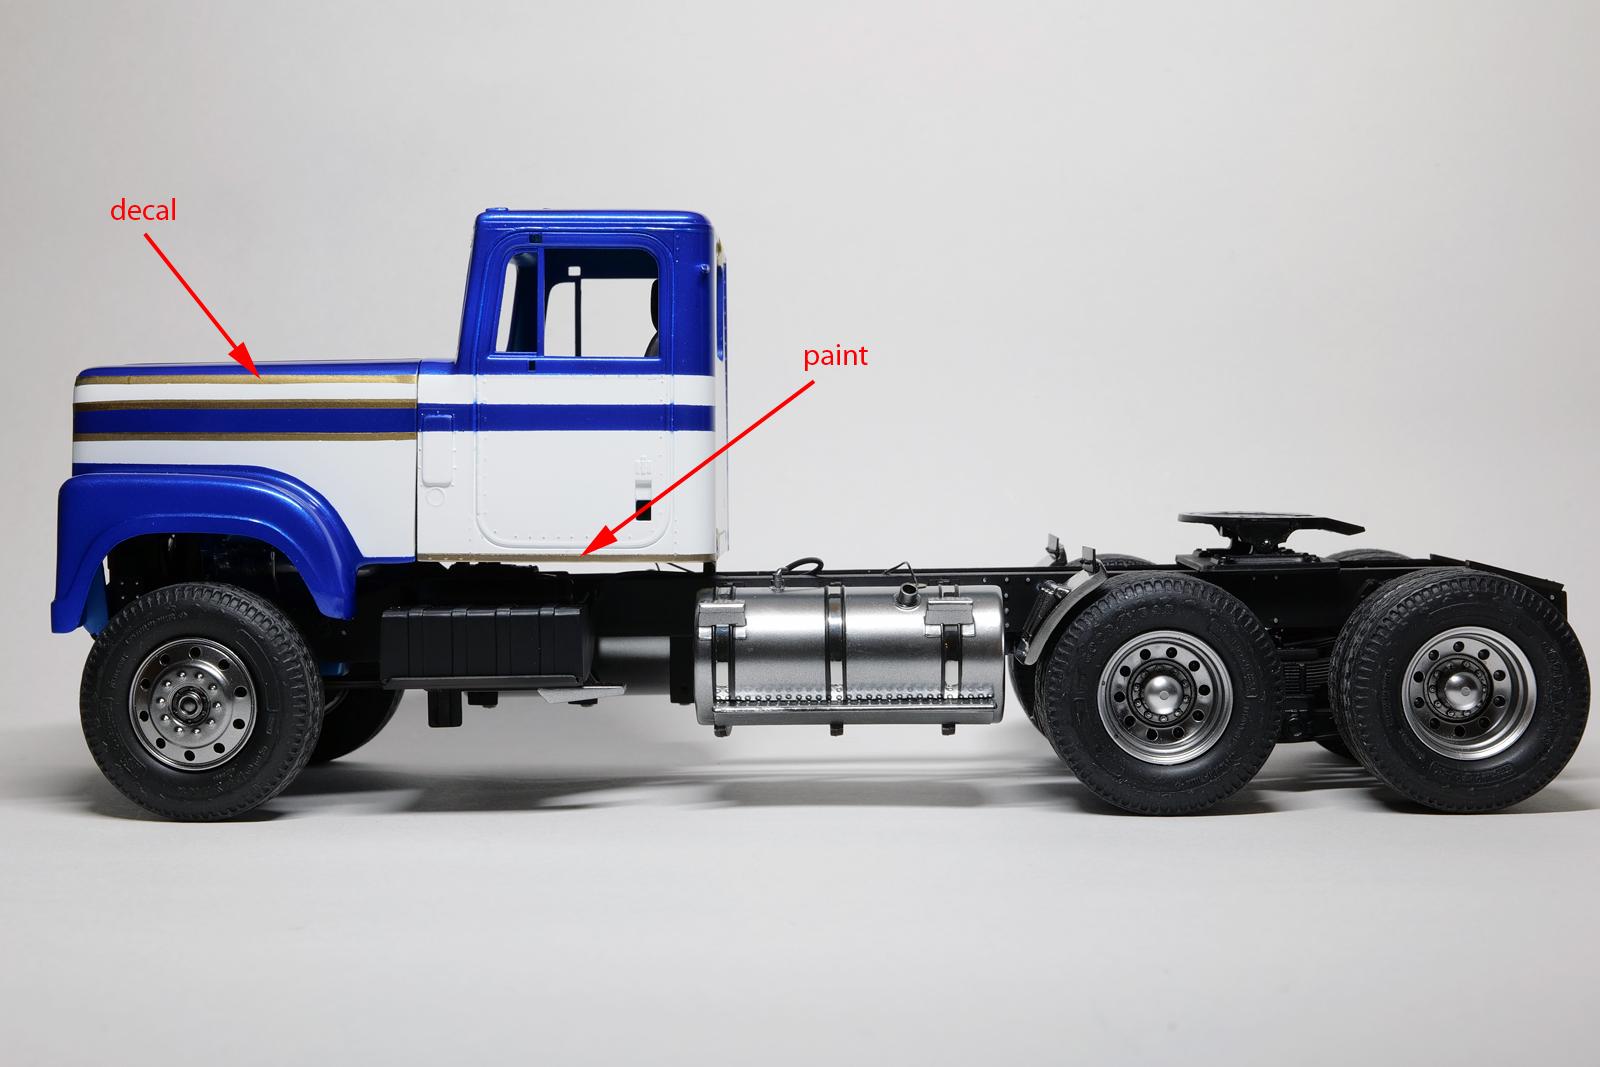
Thanks for the kind words, I am flattered. And I am also starting to realize that building these trucks makes you to be humble... By the way, some of the boxes does say these kits are for skill level 2 (out of 3) and age 12+. That cannot be true. I can't see 12 years old kids making these till the end, anyway. They need to warn the builders that "frustration" is included free inside! Appreciated your supportive feedback! But as you can see, I am making many mistakes including the stripes not having "equal" gaps and paint borderline showing up from under coat... I'd redo from beginning if I can, but I think I passed the point of no return. I just promised myself that my next won't have this kind of problems....
-
Classic and beautiful! They are nicely put together. Thanks for sharing the models!
-
Superb! Awesome job on finishing this kit! I wonder if Alclad gloss acrylic based, it certainly gave the model a good shine. Did you paint the wheels as well? They look great as well.
-
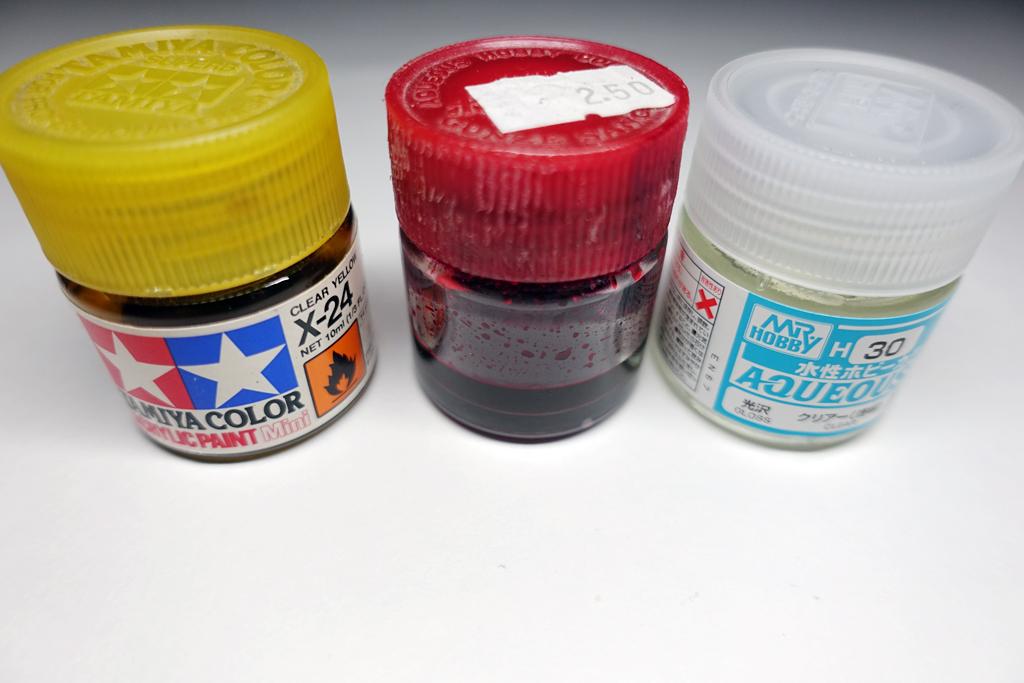
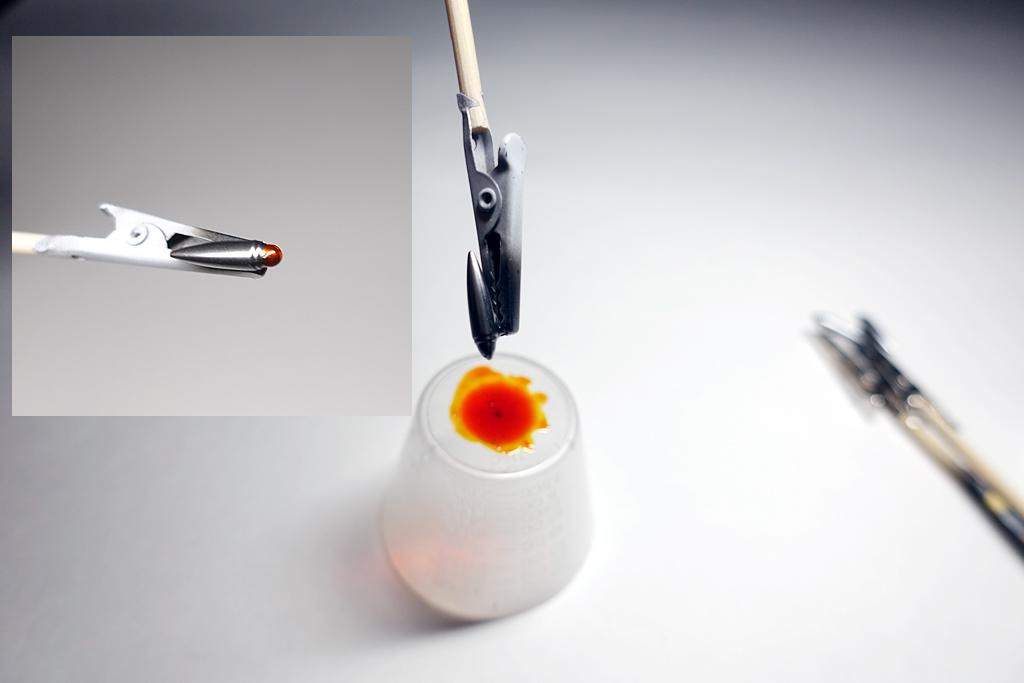
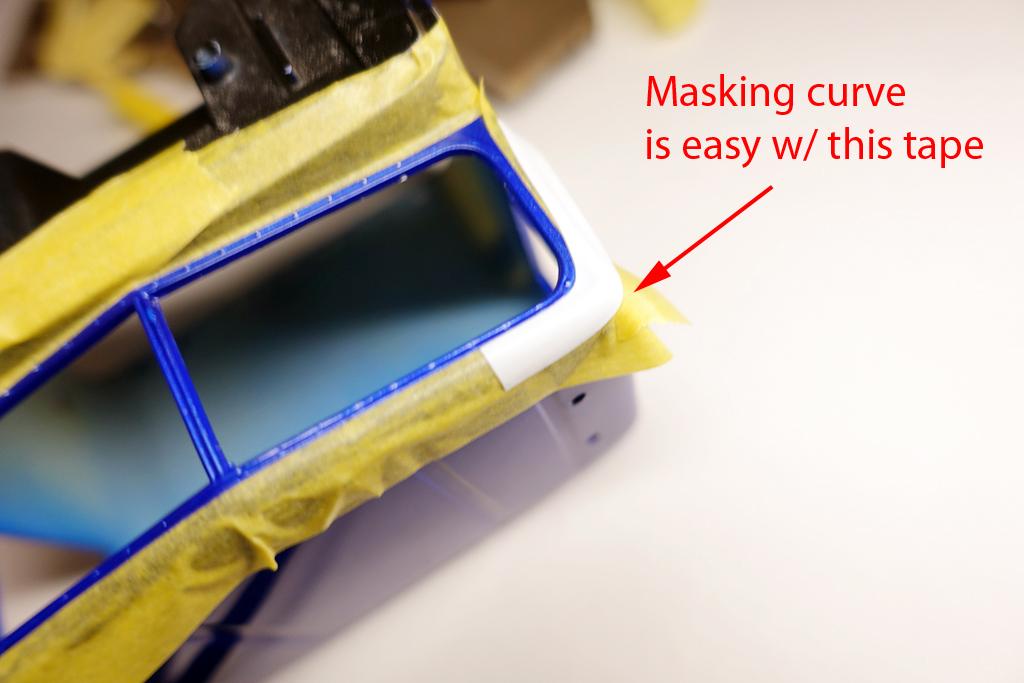
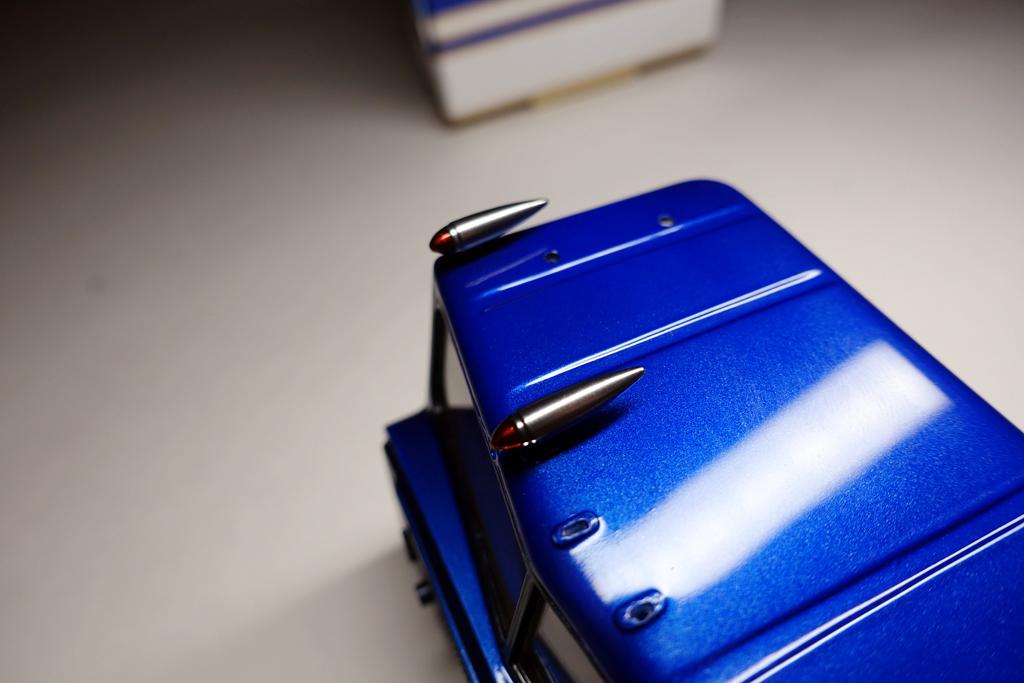
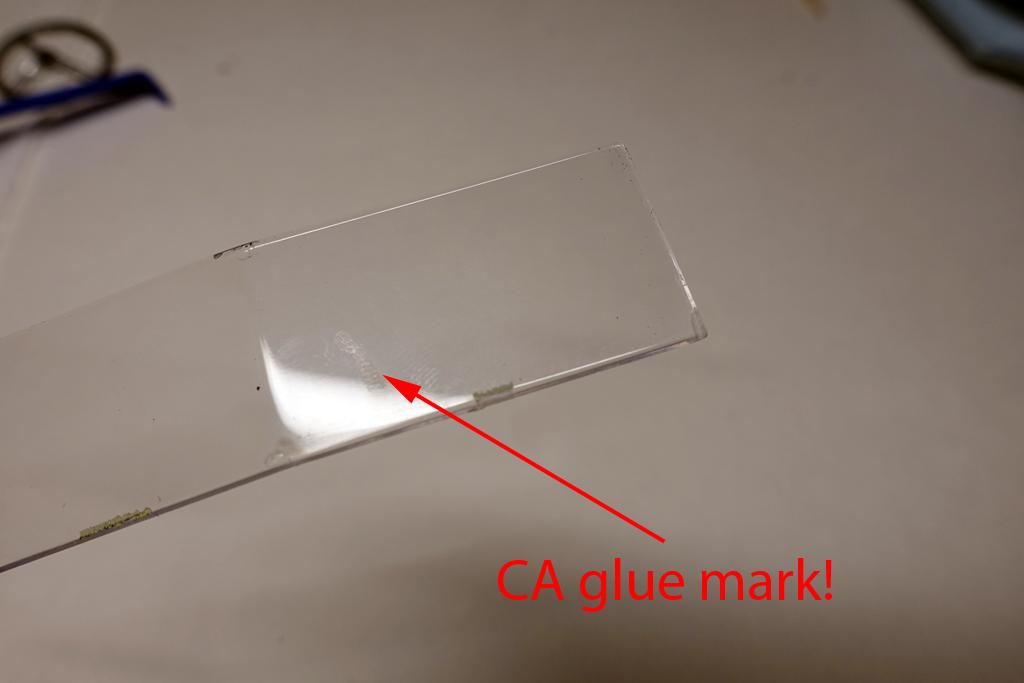
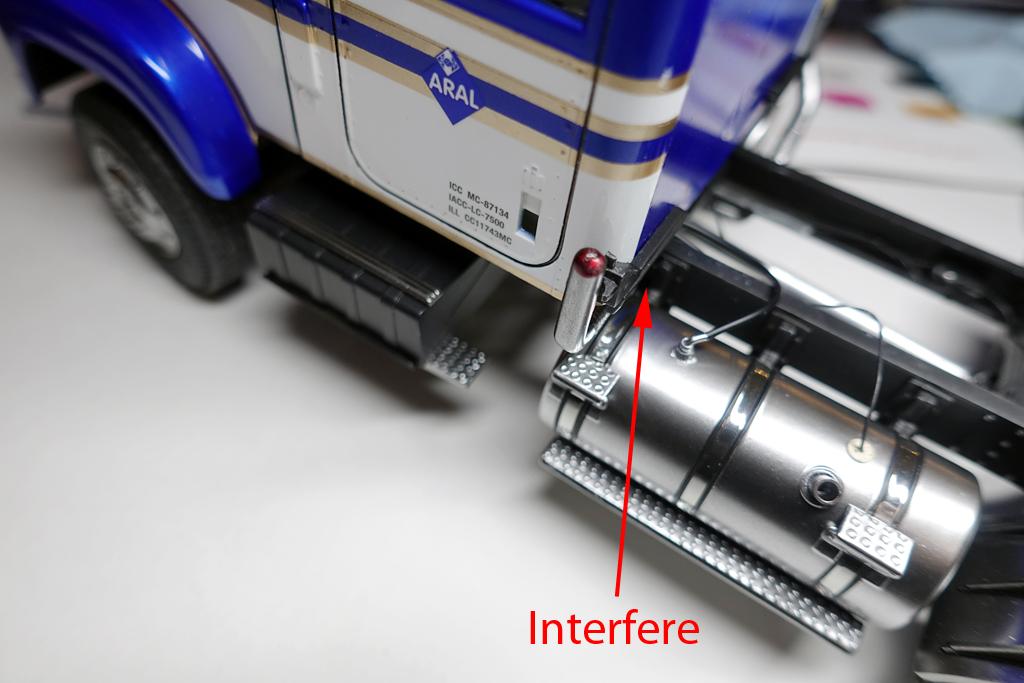
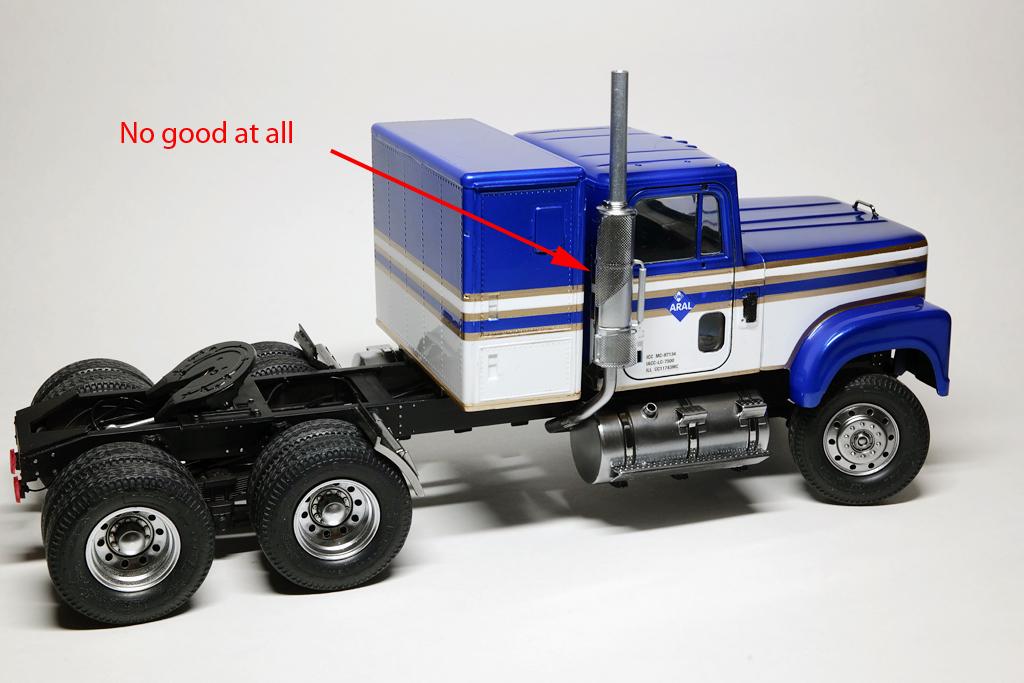
Made more progress on the truck over the weekend. Things aren't going well in the late stage of the build, I am making too many mistakes forcing me to repeat same work multiple times. Starting out with some simple task, the torpedo lights were painted. After giving a metallic finish on the light housing, I painted the front light cover with a random mixture of clear yellow, clear red, and clear. Instead of painting, I opted for "dipping" method. By dipping the part into the pool of paint, I get a thicker coat without brush strokes. I could have cut out the front section and replace them with clear parts, but I just didn't do that for these. When it comes to painting, I don't do all my painting in one or two sessions, so I always have parts to paint as I progress. I spent another 10 minutes masking and painting various parts. The front windshield gaskets were also masked using Tamiya curve tape and painted using gloss black. And the disaster strikes! I had to mask sides when painting the front windshield gasket. The result? The decals got pulled off with masking tapes!! Looks like multiple clear layers did not seal decals properly. I am thinking the decals adhesion had issues here, but I really do not know. There were other paint chips from normal handling of the body, but it is going to take some time repairing this issue. I will basically need to sand the surface down again and re-apply the clear. Ok, I spent the afternoon correcting some paint flaws and repairing the decals. Luckily, smaller decals seem to be working okay with the look, so I will clear the decals and move forward. As I mention,things are not going well, a CA glue smudge on the front windshield! Again, I had to buff it off and nothing was going well at this point. Suddenly, I had urge to dress up the exhaust stacks, but only a couple of sections. For some reason I thought it would look "cooler" and I began my work. This was my initial idea and I continued with painting and mounting work. As I was working on exhaust stacks, I start my work to position exhaust pipes. Sadly, the fitment wasn't accurate at all. The right side was flexible enough for me to force the attachment of the pipe in a correct place, but the left wouldn't fit properly. It was hitting the fuel tank and I had to sand off the pipe where it was bending around the fuel tank. I think anyone makes this kit should either place the left fuel tank 1/8inch behind, or do similar surgery on the piping as I did... I painted the inside of the front hood with flat black. Even a simple task such as this, I faced a problem where the over-spray ruined the exterior panel. I had to buff it out again I initially wanted to add some details and heat shield in this area, but due to constant "re-work" of correcting mistakes, I quickly gave up that idea... After attaching the exhaust using the mount points, it became an issue where it doesn't sit straight... I had to cut away both top and bottom mounting points till the stack sits straight. This is after addition of heat shields to the exhausts. I added some handle bars too, but at the end, they didn't look good at all. Too fat and too busy for my liking. I actually spent roughly 3-4hours building this feature and only to scrap the whole things. I began my "re-do"... This is my theme for this build, "measure once, cut twice"... While painting was drying on the exhaust stacks, I started my engine details. Added the air intake and radiator hoses. At minimum, I will add some wiring here and there later. Thanks for watching!
-
This one is one good looking build. Good job!
-
Super! I thought the photos were taken from a movie somewhere, very realistic and your great craftsmanship shows!
-
Thanks for sharing this. looks very awesome so far! Even the boxes look cool!
-
Peterbilt 351
cifenet replied to The Brush's topic in WIP: Model Trucks: Big Rigs and Heavy Equipment
Wow, I don’t even know how this works. Great job getting this going! Would definitely follow this. -
Rollback is finished !
cifenet replied to ncbuckeye67's topic in WIP: Model Trucks: Big Rigs and Heavy Equipment
Great effort and work putting this done! I can see many parts were used and it is also functional! -
Too much details you got going! I am definitely interested in seeing how the engine would come out!
-
Changing Gears
cifenet replied to J.B. Customs's topic in WIP: Model Trucks: Big Rigs and Heavy Equipment
And it is a good start indeed! -
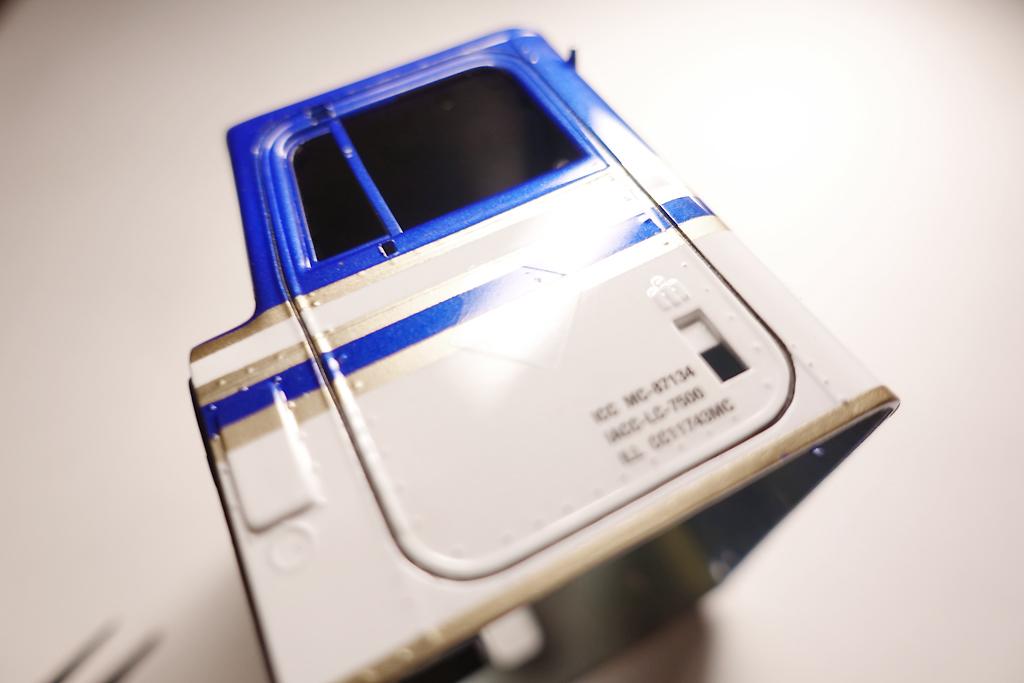
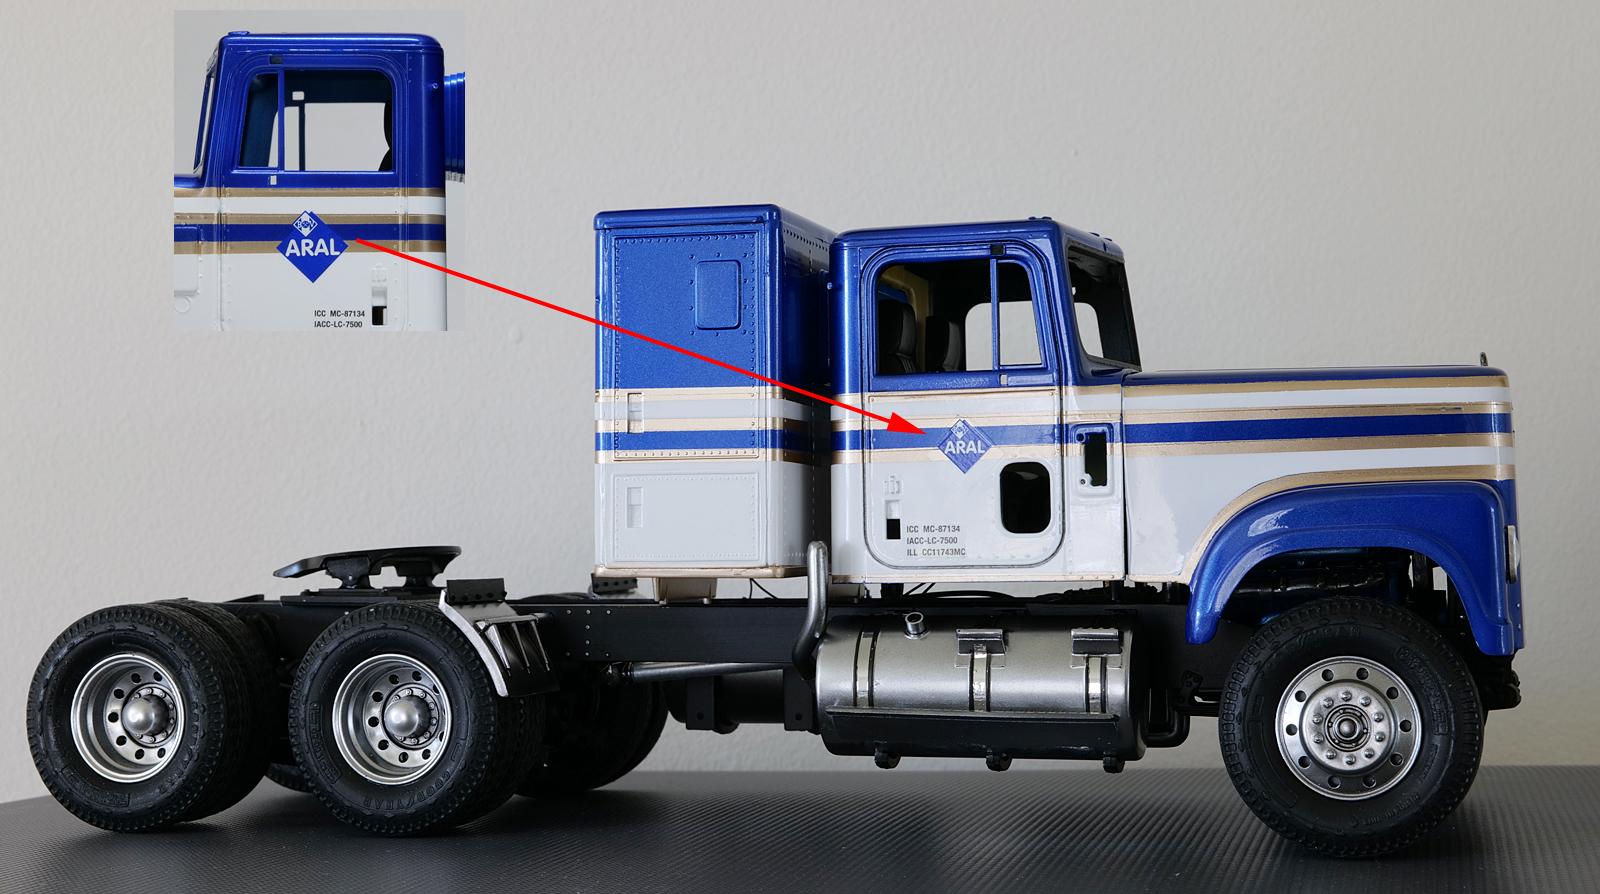
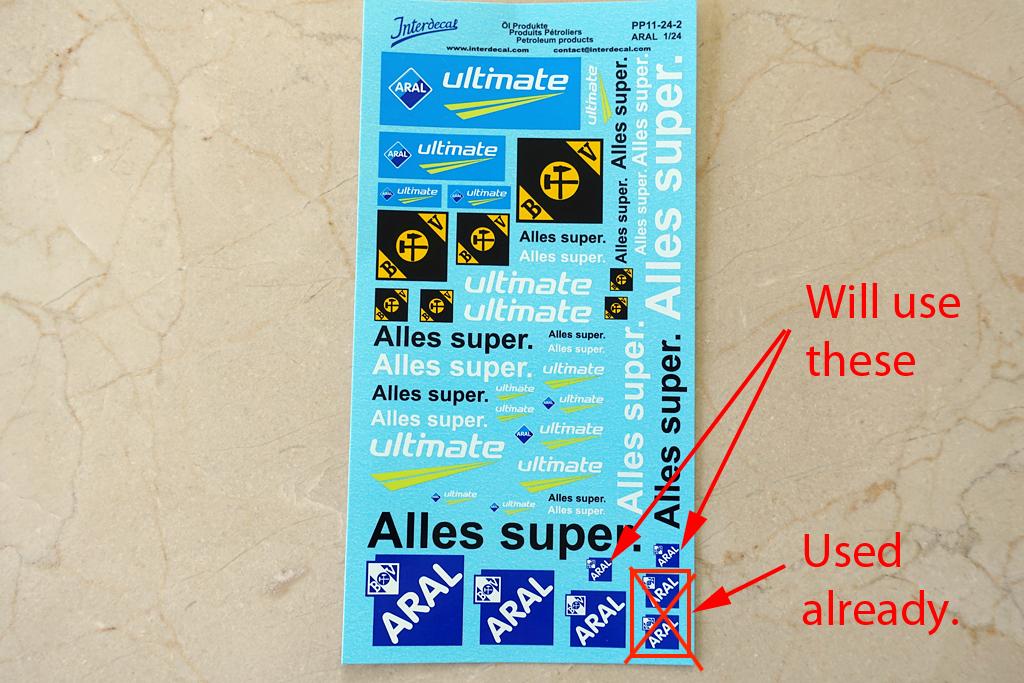
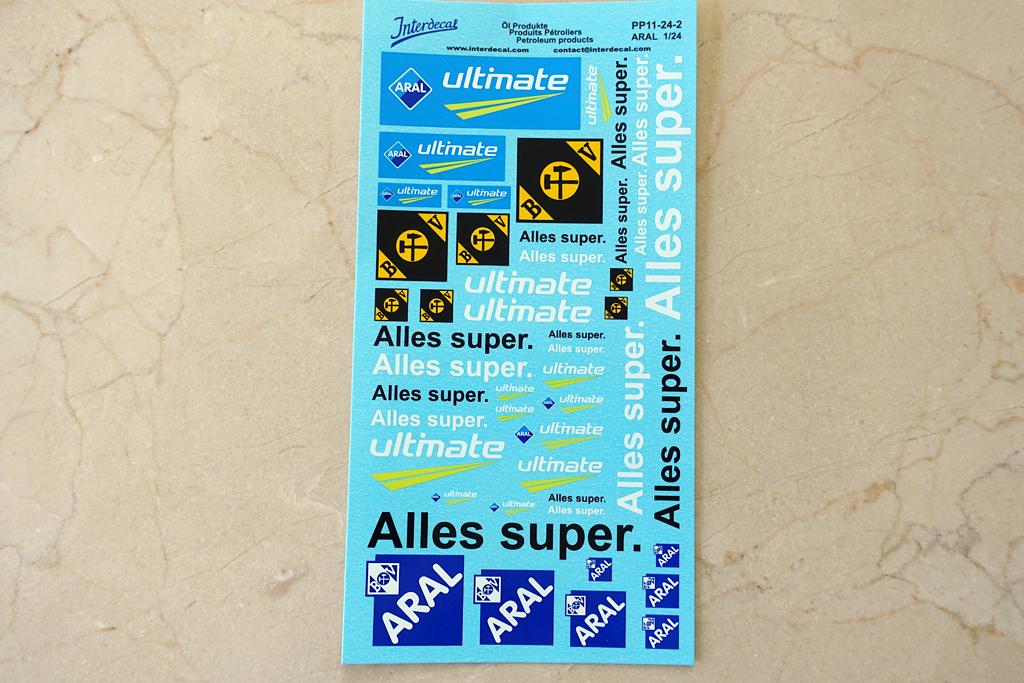
Appreciated your support on this so far, I counted the photos I have been uploading here and it is reaching 80+ already. If you guys can put up with it, I will probably reach around 130+ by the time I am done with this truck. Dealing with decals was not fun and I had to alter the original plan. I did a quick comparison between the gold decal and gold paint and saw minimal difference. Choosing Gaianote 08 Gold instead of decals was a good idea. Gaianote shoots smooth and dries quick and hard. I like using them. The paint code "Ex-" indicates extra size. I began masking activities. I found this task easier than cutting the decals straight 1/8th inch wide and laying around the entire vehicle. The problem of the masking this type of pattern is that, stripes can be tricky to align straight and evenly spaced. Your eyes can only measure so much and the accuracy suffers as you get tired doing same thing over and over again. I decided not to raise my stress level and reminded myself that this is only a hobby. So I only corrected obvious mistakes and continued making progress. The pictures show my re-work of painting to correct the stripe alignment. Various masking tapes were used, but I was only able to produce mediocre result. I see rough edges in various places. The biggest rookie mistake I made was that I forgot to sand down the paint edges, the gold stripes reveal paint borderlines between blue and white. Bad me. It is too late to fix this and my hope is that clearcoat may help hiding it with some sheen later. The painting work started on the sleeper section also. While my sleeper is getting painted, I gave a couple of clearcoat layers on the hood and cabin section. Things are looking better for now. Polishing is something I think requires good practice and patience. I do not use polyurethane clearcoat, so manual polishing is must. I usually start with 2400 grit polishing cloth and move all the way up to 12000. When purchasing the gold decals, I also picked this decal set thinking "ARAL" logo would look good on my truck. It is a German petrolem/oil company so it won't be correct for this US truck with US registration/plate, but I still thought the design of the logo looks classic and the color matches well. I like the front view of the truck, it reminds me of a "security armored" truck that goes around and collects money from banks!
-
Great job making this so clean and keeping it realistic. Nice photography as well!
-
Great finish on the model, and the details are top notch!
-
Super fantastic finish and looks like the photos are from car museum! Great job on this. A question, did you custom mix the color? I like the tone of it.
-
Changing Gears
cifenet replied to J.B. Customs's topic in WIP: Model Trucks: Big Rigs and Heavy Equipment
This is some investment and Good information here so far. I also dig fire engines, I think they are fun to build (although I have not build one yet), it has many components that can be challenging though! -
This is very enjoyable to follow. Your build execution is high quality, great job so far.