cifenet
-
Posts
856 -
Joined
-
Last visited
Content Type
Profiles
Forums
Events
Gallery
Everything posted by cifenet
-

1949 Freightliner Bubblenose
cifenet replied to RoninUtah's topic in Model Trucks: Big Rigs and Heavy Equipment
Great job putting this together, not the typical subject I see. The truck has its classic feel to it and you built it very nicely capturing the look. -
Great work! Looks awesome. Can’t wait to see how everything comes together!
-
Nice details you are working on, looking good! These small details do matter, I think all of these definitely will improve the overall look. It may look delicate, but the rod size looks perfect for the mirror application as well.
-
Changing Gears
cifenet replied to J.B. Customs's topic in WIP: Model Trucks: Big Rigs and Heavy Equipment
Fantastic progress! Good job! -
1/25 Revell Peterbilt 359
cifenet replied to cifenet's topic in WIP: Model Trucks: Big Rigs and Heavy Equipment
Thanks for the hint. I have never thought of the food coloring. I am digging up some info right now. At the end, if I find myself not comfortable for executing this, I will probably keep the window parts as they are. -
Dodge Cabover
cifenet replied to Repstock's topic in WIP: Model Trucks: Big Rigs and Heavy Equipment
Wow, it is like looking at a technical drawing. Amazing attempt and a great result so far! I wonder how you would address the round edge of the cab. I suppose the cab looks very boxy, it may not be an issue. -
2023 BRGB Movin' On Kenworth
cifenet replied to leafsprings's topic in WIP: Model Trucks: Big Rigs and Heavy Equipment
Great paint job! Smooth! You may not even need to polish this. I know laying out a good paint layer is the half the battle, but this is progressing well. -
I see the difference now. But unless you pointed out, I would probably not notice it at all. The radiator looks proper to me, and I can see that many pieces were used to create the shape. I really wonder how the truck will turn out at the end. Great process so far!
-
Peterbilt 351
cifenet replied to The Brush's topic in WIP: Model Trucks: Big Rigs and Heavy Equipment
The way this truck is standing looks very good. Well balanced and poised. Love the details and I can see tremendous efforts went into it! Keep it up! -
1/25 Revell Peterbilt 359
cifenet replied to cifenet's topic in WIP: Model Trucks: Big Rigs and Heavy Equipment
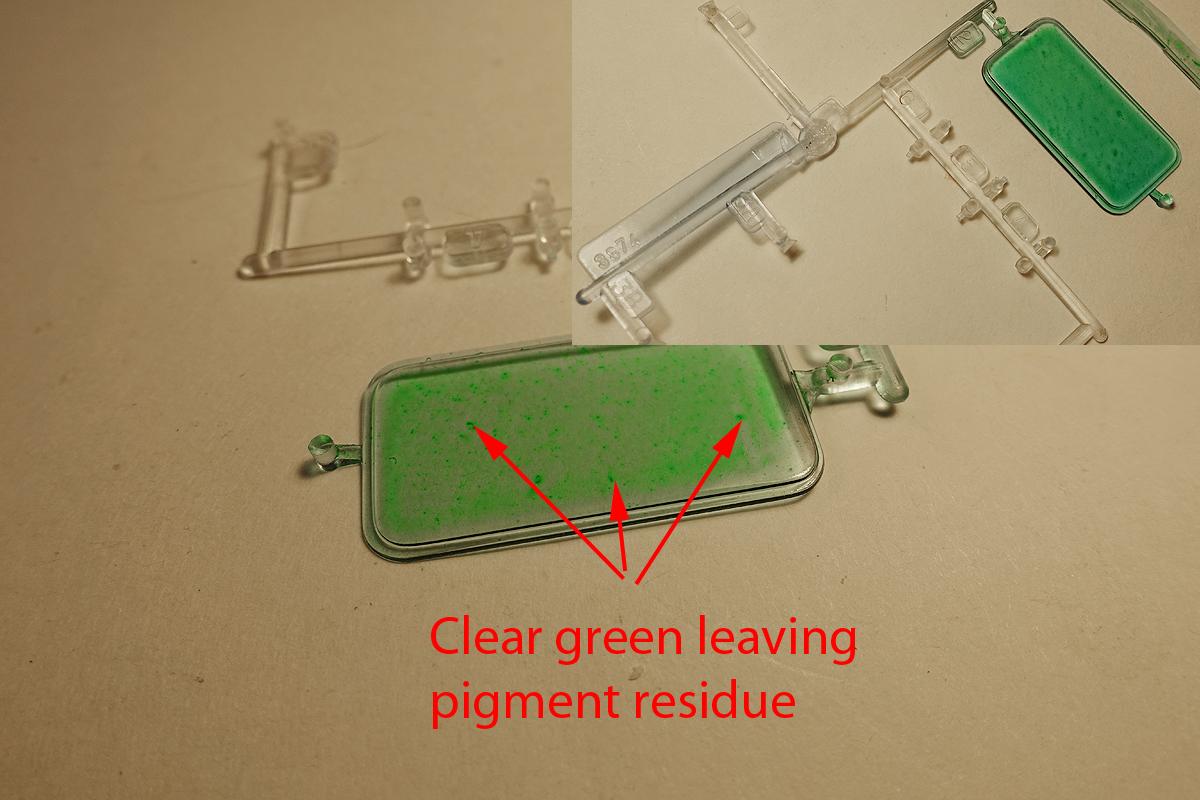
Thanks Ronald! And awesome info and an interesting story about painting engines white! I would have painted black so it will never look dirty. About the clear plastic pieces having "greenish hue", this is exactly what I am currently trying to figure out. My kit included clear windows, but I think these trucks have tinted windows (having more of blue/greenish shade). I have purchased "clear green" paint to mimic just that, but not having a successful attempt just yet. I will figure it out one way or another. I was testing to tint, but looks bad right now. Hi Steve, you are too kind. I am building something out of the box, but your 1/32nd scale work is definitely impressive since you are building something out of nothing.
-
T2 Westfalia
cifenet replied to avidinha's topic in Model Trucks: Pickups, Vans, SUVs, Light Commercial
Great color, classic look and great finish! Thanks for sharing this! -
Love the details and it came out fantastic! You basically made a great car out of nothing! Good job!
-
Williams FW23 BMW Formula One
cifenet replied to Rich Chernosky's topic in Other Racing: Road Racing, Salt Flat Racers
Awesome work! This isn't the easiest kit to build for sure! Looks like Revell never fixed their groove tires all these years though. At any rate, your FW23 is one great looking model! -
This is one sweet work! Brilliant work, I may add! I love the quality finish and the photography is also excellent! Also great job applying decals to the bare metal, I can hardly see any transfer film edges!
-
It isn't common to see a silver Camero, but this one came out fantastic! Nice job completing it very well!
-
Beautiful job on both of the cars! But the green metallic jump out loud, very cool!
-
1/25 Revell Peterbilt 359
cifenet replied to cifenet's topic in WIP: Model Trucks: Big Rigs and Heavy Equipment
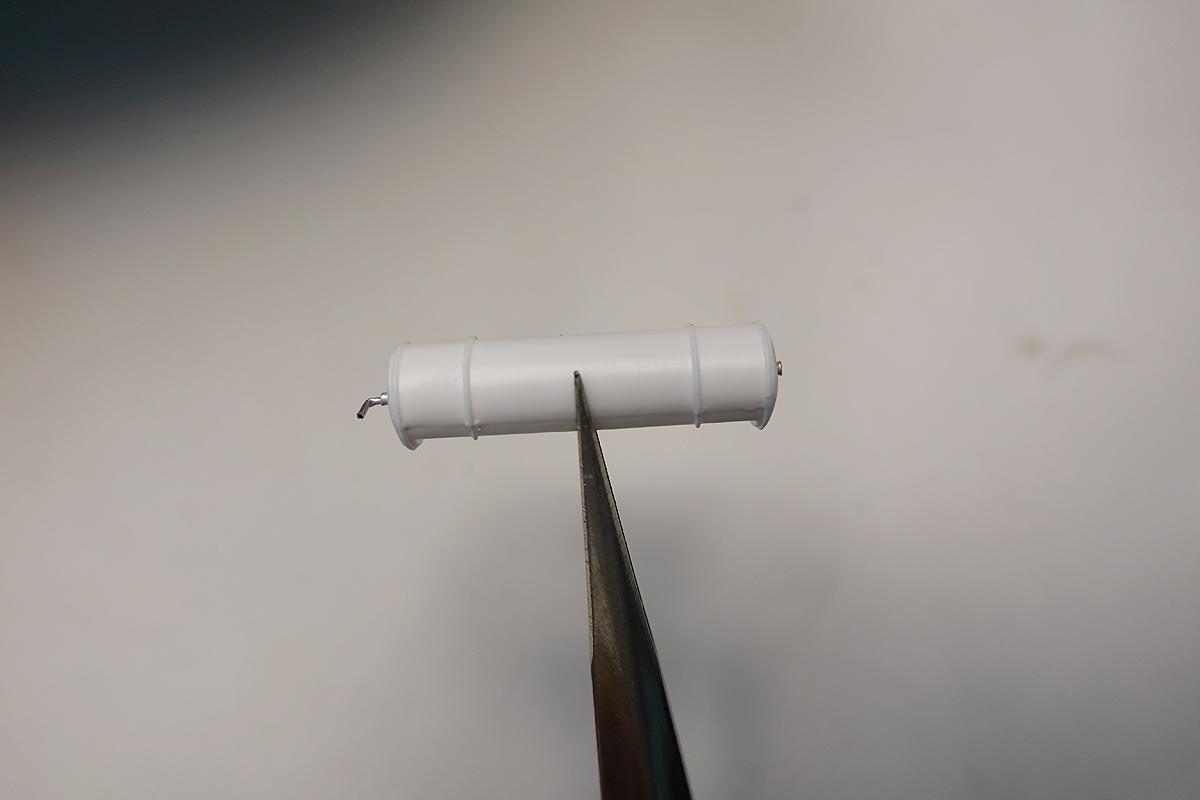
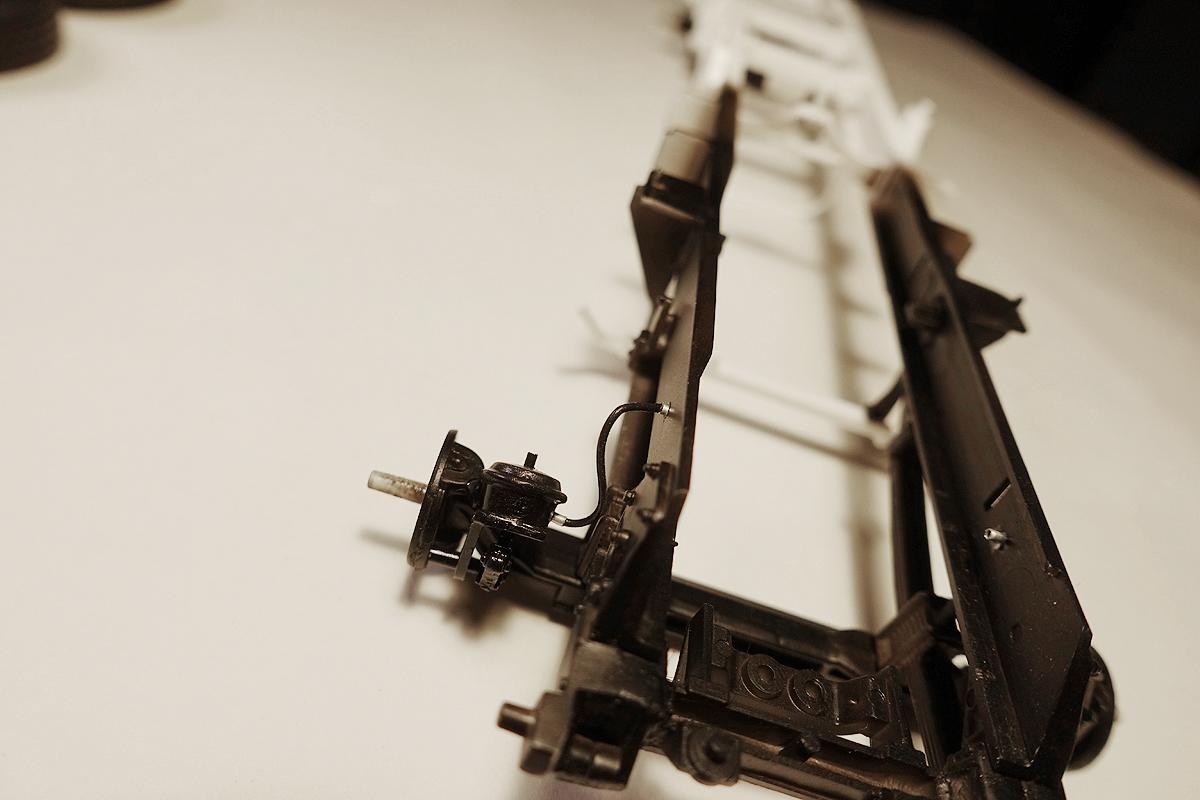
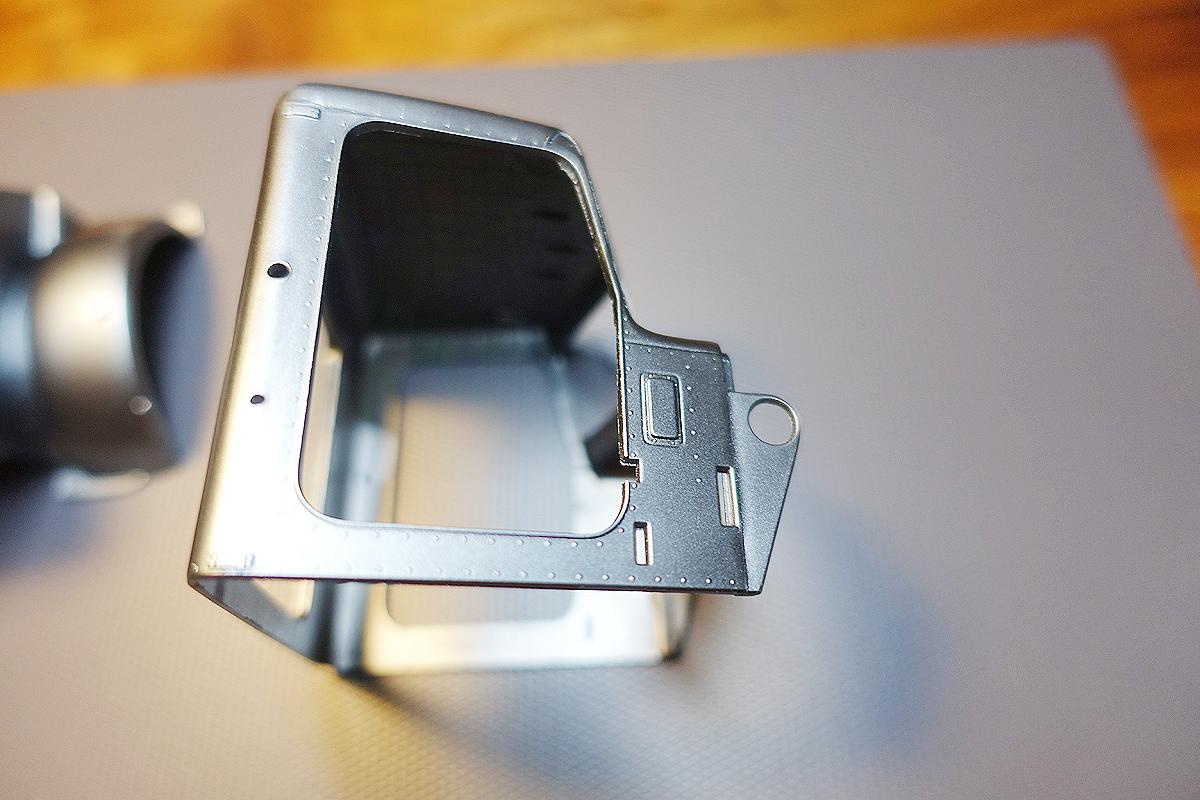
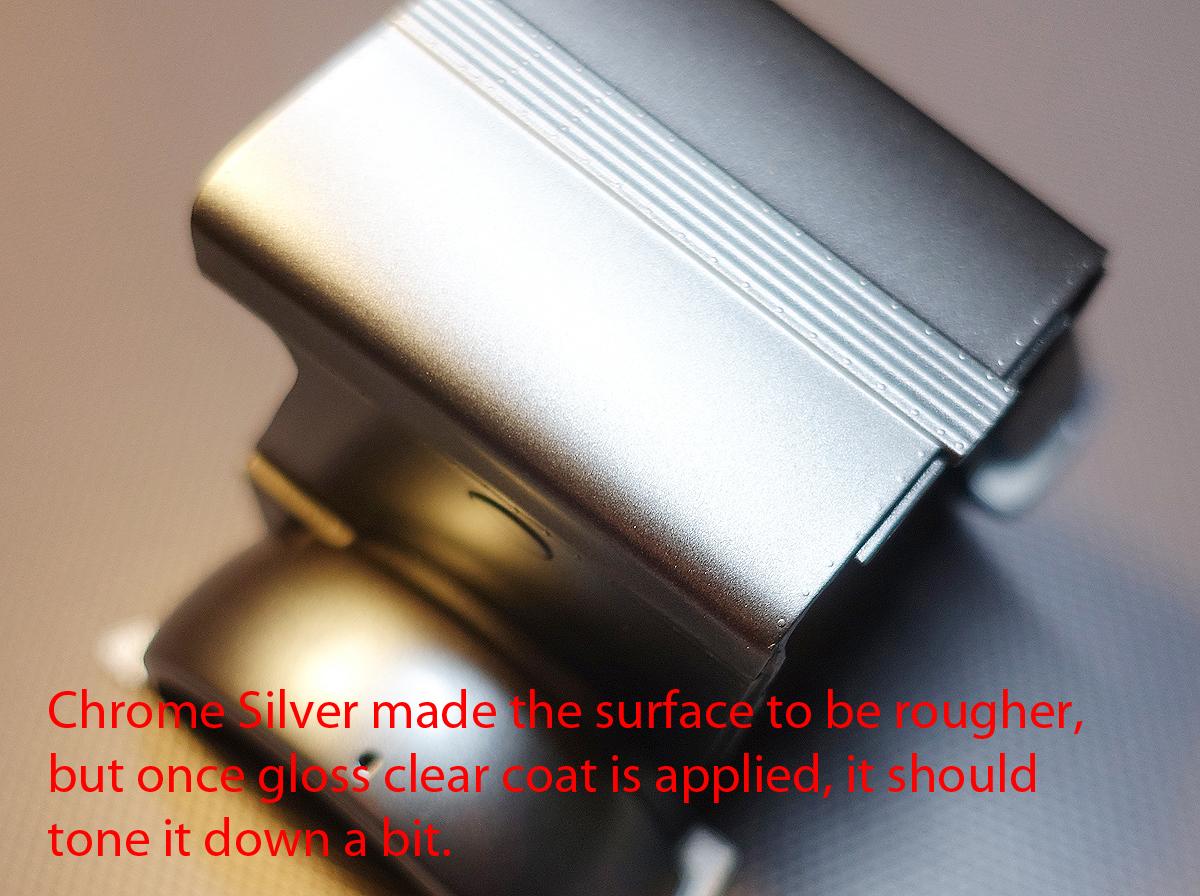
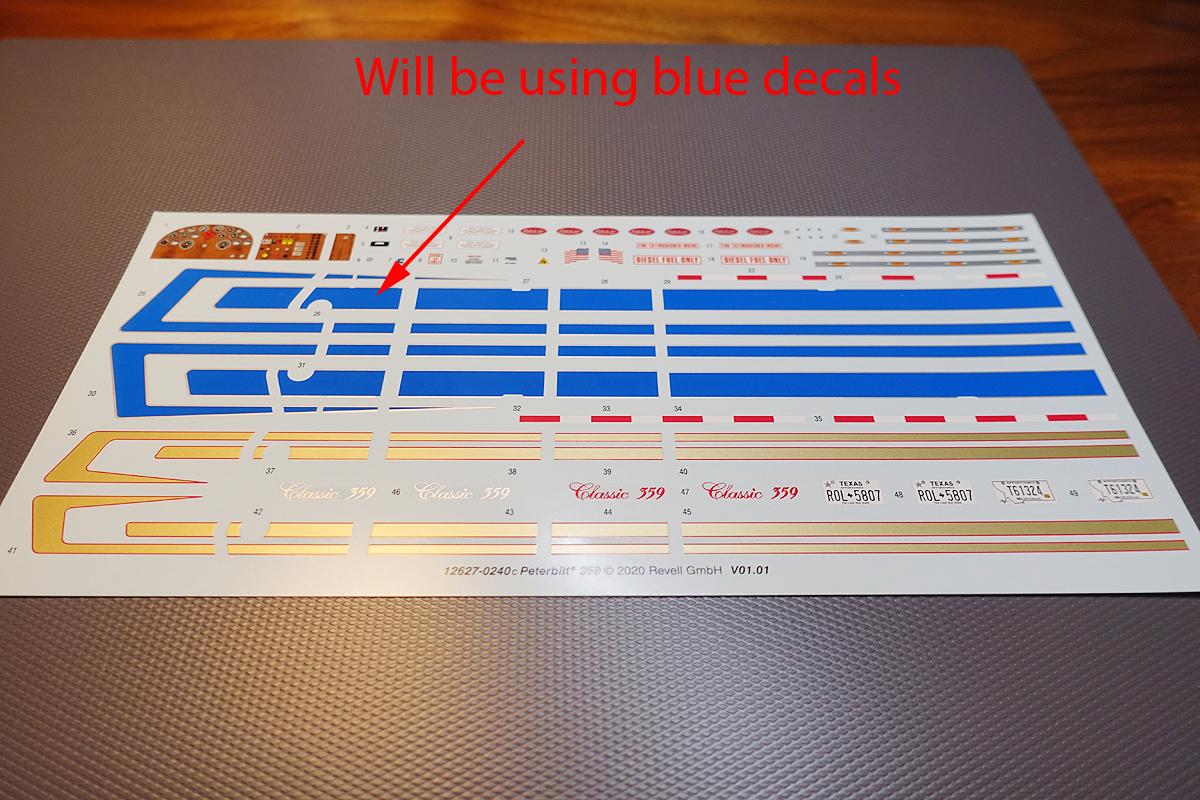
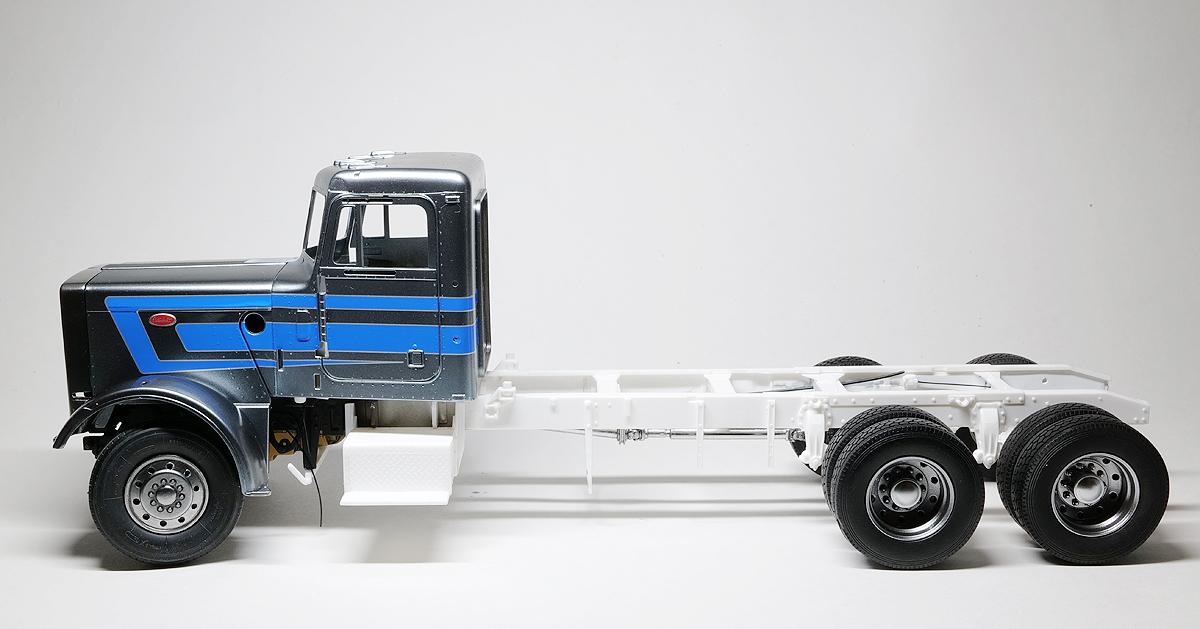
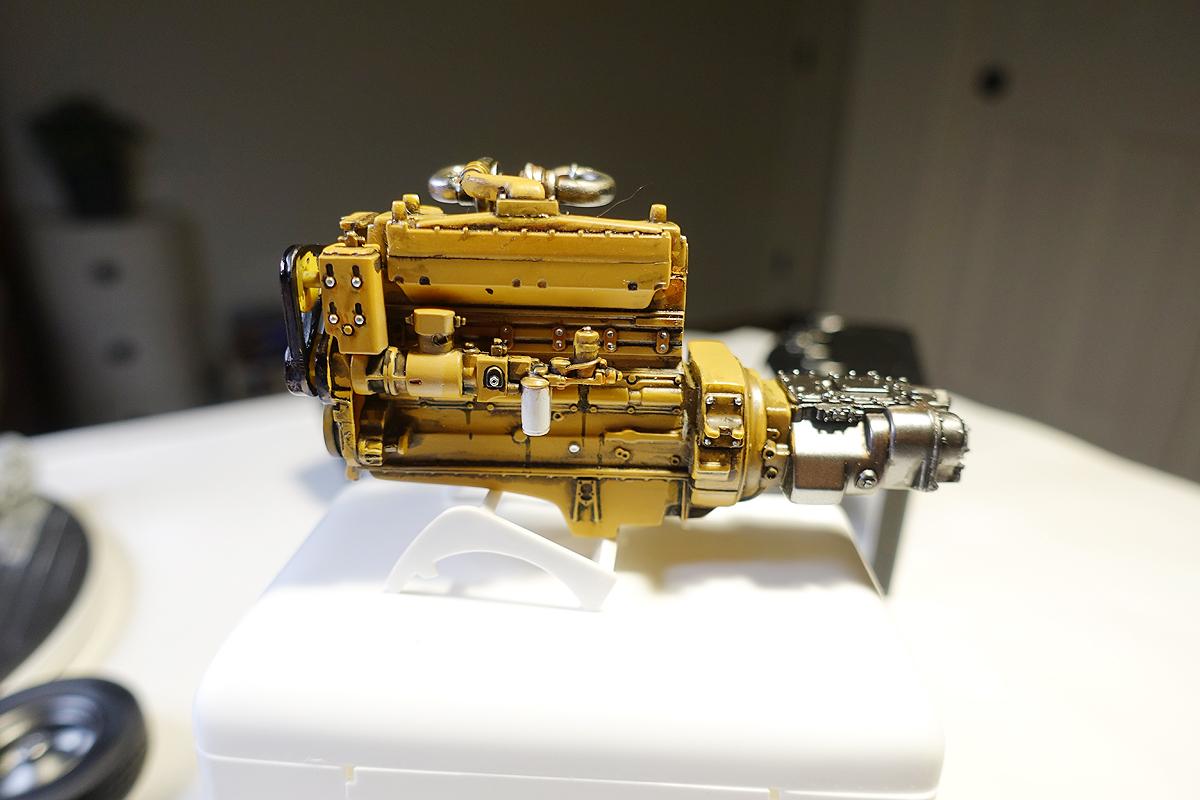
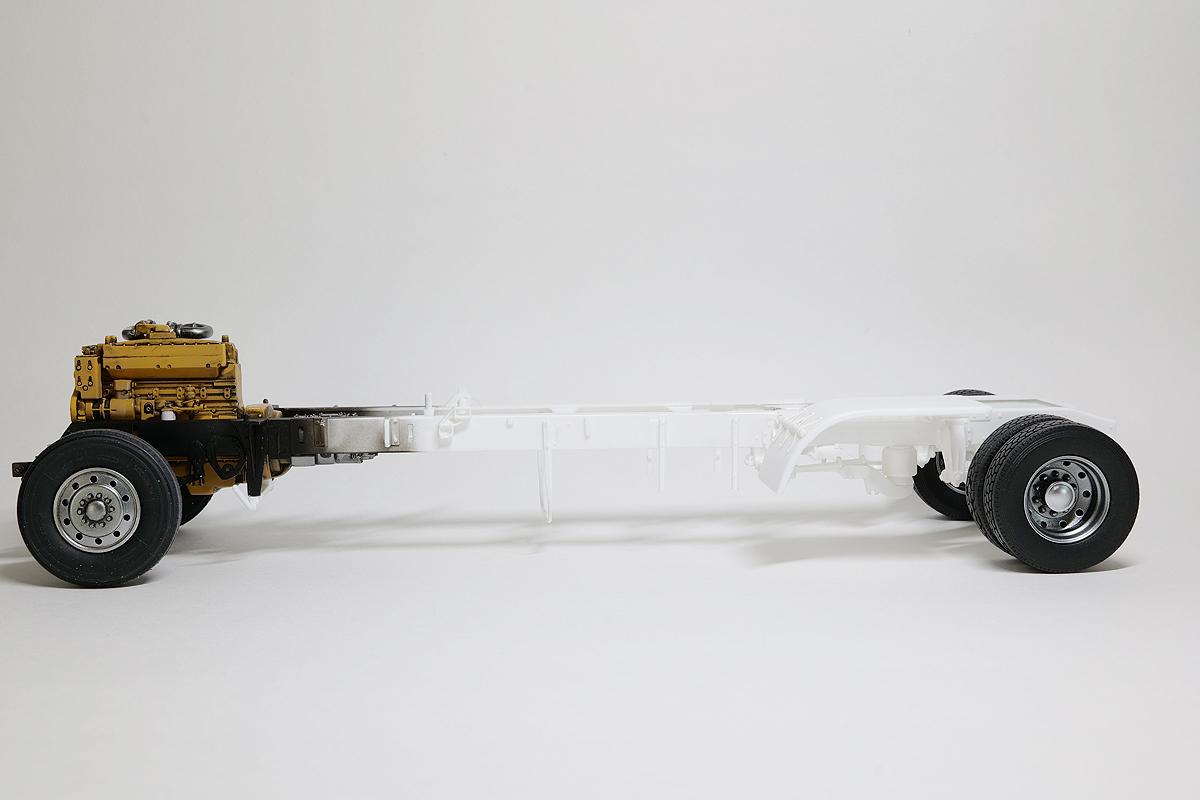
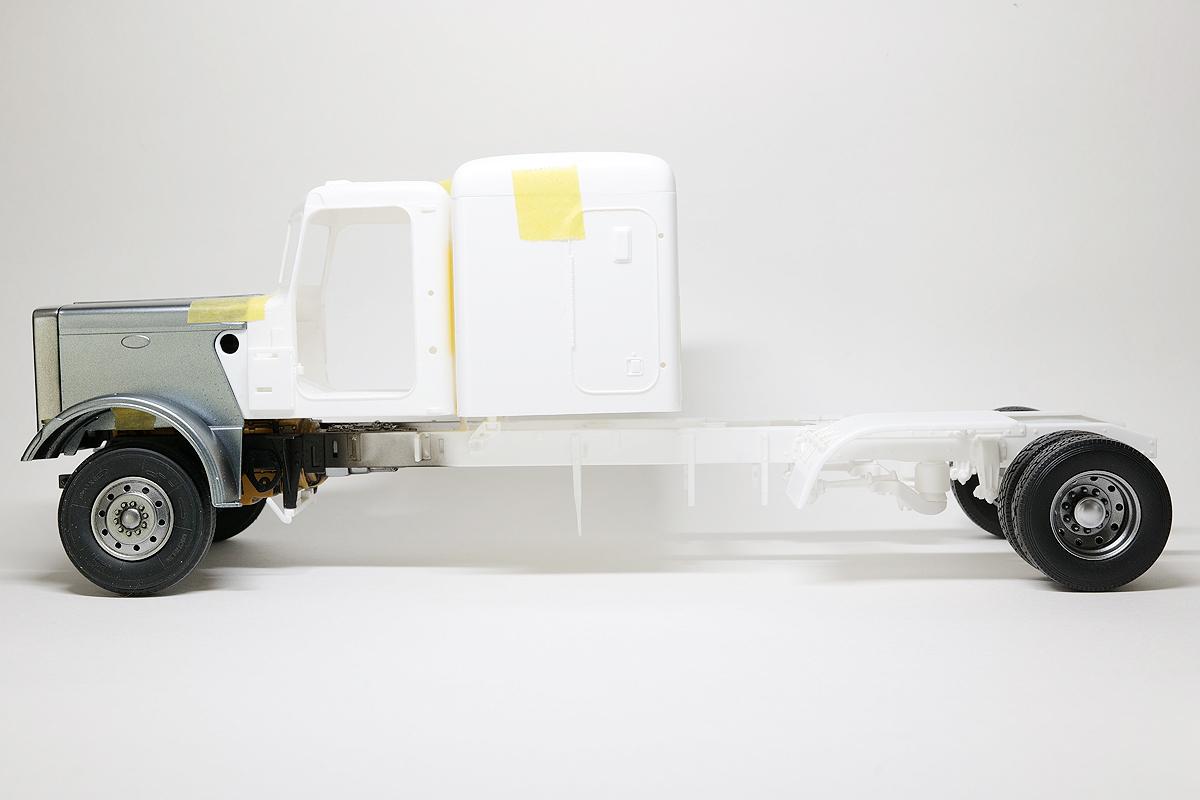
Continuing the work... Assembling the sleeper is done by building up sectional panels. This may seem straightforward, but I found it to be difficult because: 1. the instructions were vague in terms of where to attach each panel. 2. had fitting issues causing the back panel to sit slightly wider than front. I left some glue residue on the panels as I was fighting to squeeze the rear panel in. 3. the idea is to attach all of the panels and then fine tune as glue sets in. But this task was somewhat tricky. For one, as noted above, I wasn't sure if the floor piece needs to be attached on top or bottom of these guide tabs? I didn't think about this too much and assembled as shown above, but my decision ended up causing me one bad headache. I will cover this later. As usual, once the factory chrome is stripped, I have multiple options to detail the from bumper. I will definitely add additional driving lights and also replace the bolts with stainless parts. The middle openings can be cut open, but I wasn't sure how the frame details will be still revealed once mounted. Improved tank details. Using various aluminum rods and tubes, adding details can be easy. Smaller tubes can be cut with a hobby knife (by rolling a tube using a typical knife blade), but large ones need a mini cutter like the one pictured above. I think I picked this up at a local hardware store relatively cheap. I could easily use hex nuts to detail, but then again, using small aluminum tubes seem okay for the brake line details. I began detailing the frame and worked on small components that will need to be attached on and around the frame. Quickly performed a mock build by connecting differentials and drive shafts to the engine. I confirmed no surprises! Before laying out clear, I need to apply decals to the hood and cab. Again, the sleeper will come at the end. These decals are very good compared to AMT. I think these were made by Cartograf in Italy. They are usually very accurate and react well against my decals solutions (Micro sol/Micro set). I will be using the blue stripes for my silver truck. Excluding the sleeper, the hood, cab, and the door shown above must be lined up together when applying decals otherwise the livery lines will not be straight. I managed to screw up lining this one though. Luckily, this area will be behind an air intake and mostly likely be hidden! Applying clear to various body parts is a process that I still get nervous. It isn't the fear of making mistakes, but one mistake meant a possibility of performing unnecessary work to repeat things. The worst case would be to strip the paint to the bare plastic and repeat the whole thing! And in this case, everything went well except I made a mistake by touching this roof spoiler. Why did I touch it!? Why did I touch it!? BTW, I did block out my fingerprint from the picture, just trying to be safe against cybercrime. While taking these photos, I found the front wheels are sitting "in" too much. Maybe the fenders are sticking out too much? But I have no way to narrow the distance between the fenders. I need to find a way to insert wheel spacers to create a wider front track now... Probably 1/8th inch on each side or even 5/32nd inch! Thanks for following so far!
-
1/25 Revell Peterbilt 359
cifenet replied to cifenet's topic in WIP: Model Trucks: Big Rigs and Heavy Equipment
Sure, but “kit bashing” literally sounds crude, a “customization” sounds more professional! Thanks, Hakan! -
1/25 Revell Peterbilt 359
cifenet replied to cifenet's topic in WIP: Model Trucks: Big Rigs and Heavy Equipment
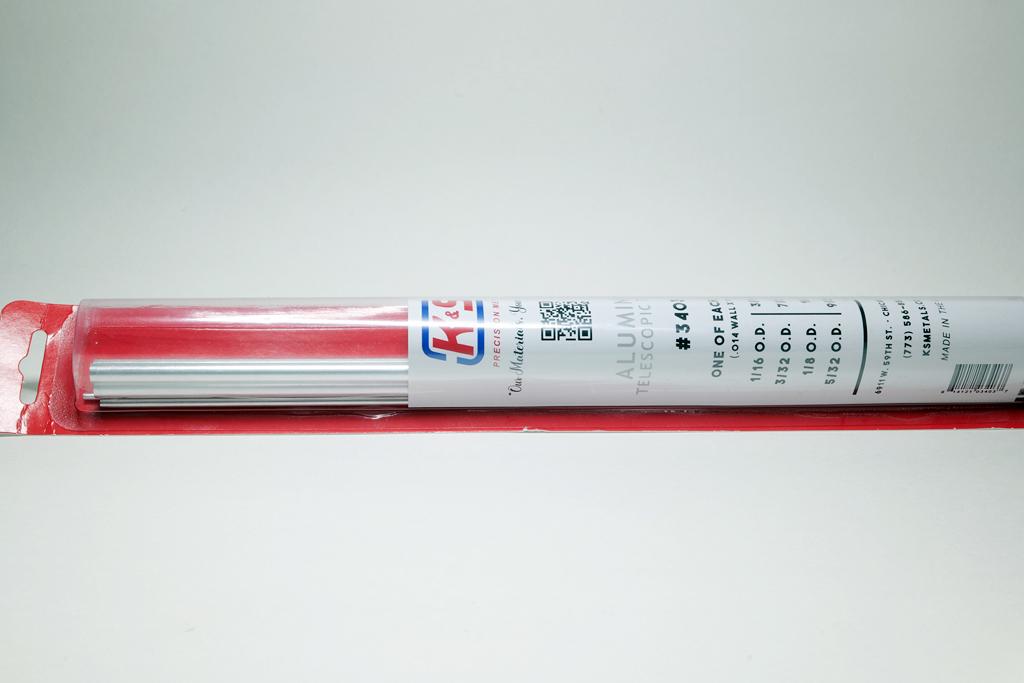
More update on 359, I managed to put a couple of hours last night. I don't want to lose my motivation to finish building this truck so I will avoid taking a long break in between. I have a couple of kits which started years ago and never resumed just because I lost interest building them. This can't happen here, so it must continue! I suppose I could add extensive details to the engine, but I decided to go easy thinking I can get away with simple black wash. I will highlight some areas even though it may not be 100% accurate, but it should be still convincing enough. Other smaller parts were also addressed at the same time. I try to replace bar/shaft/tubing with the actual aluminum tubes whenever I see an opportunity. In this case, I replaced the driveshaft with various aluminum/brass parts. I often use a product from K&S (#3403) which has enough aluminum tubes to scratch build driveshafts, exhaust pipes, and other mechanical components including sway bars and such. I added various cable holders on the frame. These came from a craft store where they have materials for making beads. I began the painting process starting with the front hood and fenders. The initial paint job came out okay. Still looks darker, but the important thing is that there is no imperfection on the surface where I have to sand. Some metallic paints cannot be polish including this one. It will destroy the metal flakes (pearl) so it was important that my surface is as smooth as possible. The camera doesn't pick it if the angle isn't right, but it has slight bluish tone which I liked. On the other hand, I also painted chrome on the grille and the result wasn't too good. I discovered some rough edges and rough surface after the painting session. I don't want to redo the whole thing at this point, so I will find some less destructive way to address it later. While the paint was drying on the hood, additional activities were perform to dress up the engine. The transmission and turbo parts were painted. I will add minor wiring details later, but the engine is ready. This is more looking like Peterbilt 359. Similar to the build approach I took for International Transtar 4300 build, I will first paint and detail the hood/cab. The sleeper will come later. Just trying to make the work smaller and easier to manage. Divide and conquer! Thank you all for watching!
-
1/25 Revell Peterbilt 359
cifenet replied to cifenet's topic in WIP: Model Trucks: Big Rigs and Heavy Equipment
I suppose this is the game I can play with AMT truck kits in order to build the one I want. Since these trucks can be highly customized, I am thinking AMT could have released an individual engine kit, a separate wheel kit, a frame package, a cab, different types of fuel tanks, etc! Then the combination of building a truck can be limitless! I guess AMT does this already (you can purchase different engines and wheels), but I can see a company doing this at at the level of "full" customization as long as the demand is strong. Thank Jeff! I can't wait till you show us the school bus in "Under Glass" section! -
Peterbilt 378 Daycab
cifenet replied to TruckerAL's topic in Model Trucks: Big Rigs and Heavy Equipment
Wow, this one is super sleek and very different! The wheels look good, wheel covers look awesome, and the massive front bump shows off the tough look! I like the choice of color as well. Superb! -
Alaskan Hauler KW W925
cifenet replied to TruckerAL's topic in Model Trucks: Big Rigs and Heavy Equipment
The truck has all of the details and everything is well done! But talk about some bravery! I can't attempt something this like, but I see what you did here. It feels like still wet getting out of mud/dirty snow mixture. Alaskan theme works for being tough and dirtied up performing its duty! -
All I can say is "Clean, no problem, everything looks good, well done!"
-
Great result, indeed! I can see all of the fine details that you took care of. I know older Fujimi auto kits aren't the best to work with especially when they add custom body trims to create another kit. I got punched a couple of times thinking Fujumi kits to be another Tamiya brand. Overall, looking at the finished product, I can witness the tremendous efforts and skills went into building this. Nice job!
-
ongoing oilfield project
cifenet replied to cdntrucking's topic in WIP: Model Trucks: Big Rigs and Heavy Equipment
Amazing details, almost like engineering project by itself! The truck is turning out to be massive!