OldNYJim
-
Posts
277 -
Joined
-
Last visited
Content Type
Profiles
Forums
Events
Gallery
Everything posted by OldNYJim
-
Thanks fellas! Thank YOU Bill! The files to print the kit are here: https://cults3d.com/en/3d-model/tool/drop-tank-racer-skale-1-24?srsltid=AfmBOopNat8FfM3f9FaKimNqbWFinJwZmZrp1HlvOGAR8FINRYvtg1dB And for the salty part of the base I used this, primarily: https://amzn.to/3WAAunP And a little of this… https://www.hobbylobby.com/crafts-hobbies/hobbies-collecting/diorama-figurines/snow-powder/p/98176 …secured with this: https://www.hobbylobby.com/crafts-hobbies/hobbies-collecting/diorama-figurines/model-spray-glue/p/92341 I’m no expert at this stuff, but luckily this scene was pretty easy, as diorama bases go… I about wrapped this one up this week - all I had to do was some assembly, and that wasn’t TOO much work… Aside from the plug wires I built this box stock mostly; but I’d like to do a super detailed build of one of these next time I build one. Fun little kit though, and it practically fell together. I’d add magnets to help the body to hold together better next time I build one, separate some parts for easier painting and pre-plan to add brake-lines and fuel lines and whatnot - it’s a lot easier to print a part with holes than drill some of those thin resin surfaces without damage, but for a fun low-stress build this one was a blast! Thanks for following along…onto the next one!!

-
You’re REALLY good at this - nice work!
-
I like the Hudson you’re working on but I like this one even more….nice work!
-

Round 2 Announcements as of 9/12/25 from Stevens Intl.
OldNYJim replied to Justin Porter's topic in Car Kit News & Reviews
I’m excited for this one to come back - I picked up one last time it was reissued and I remember seeing one on clearance at HL at a later date and not picking up up…and now they’re, like, $50. I’ll be grabbing three so I can make all the variations -
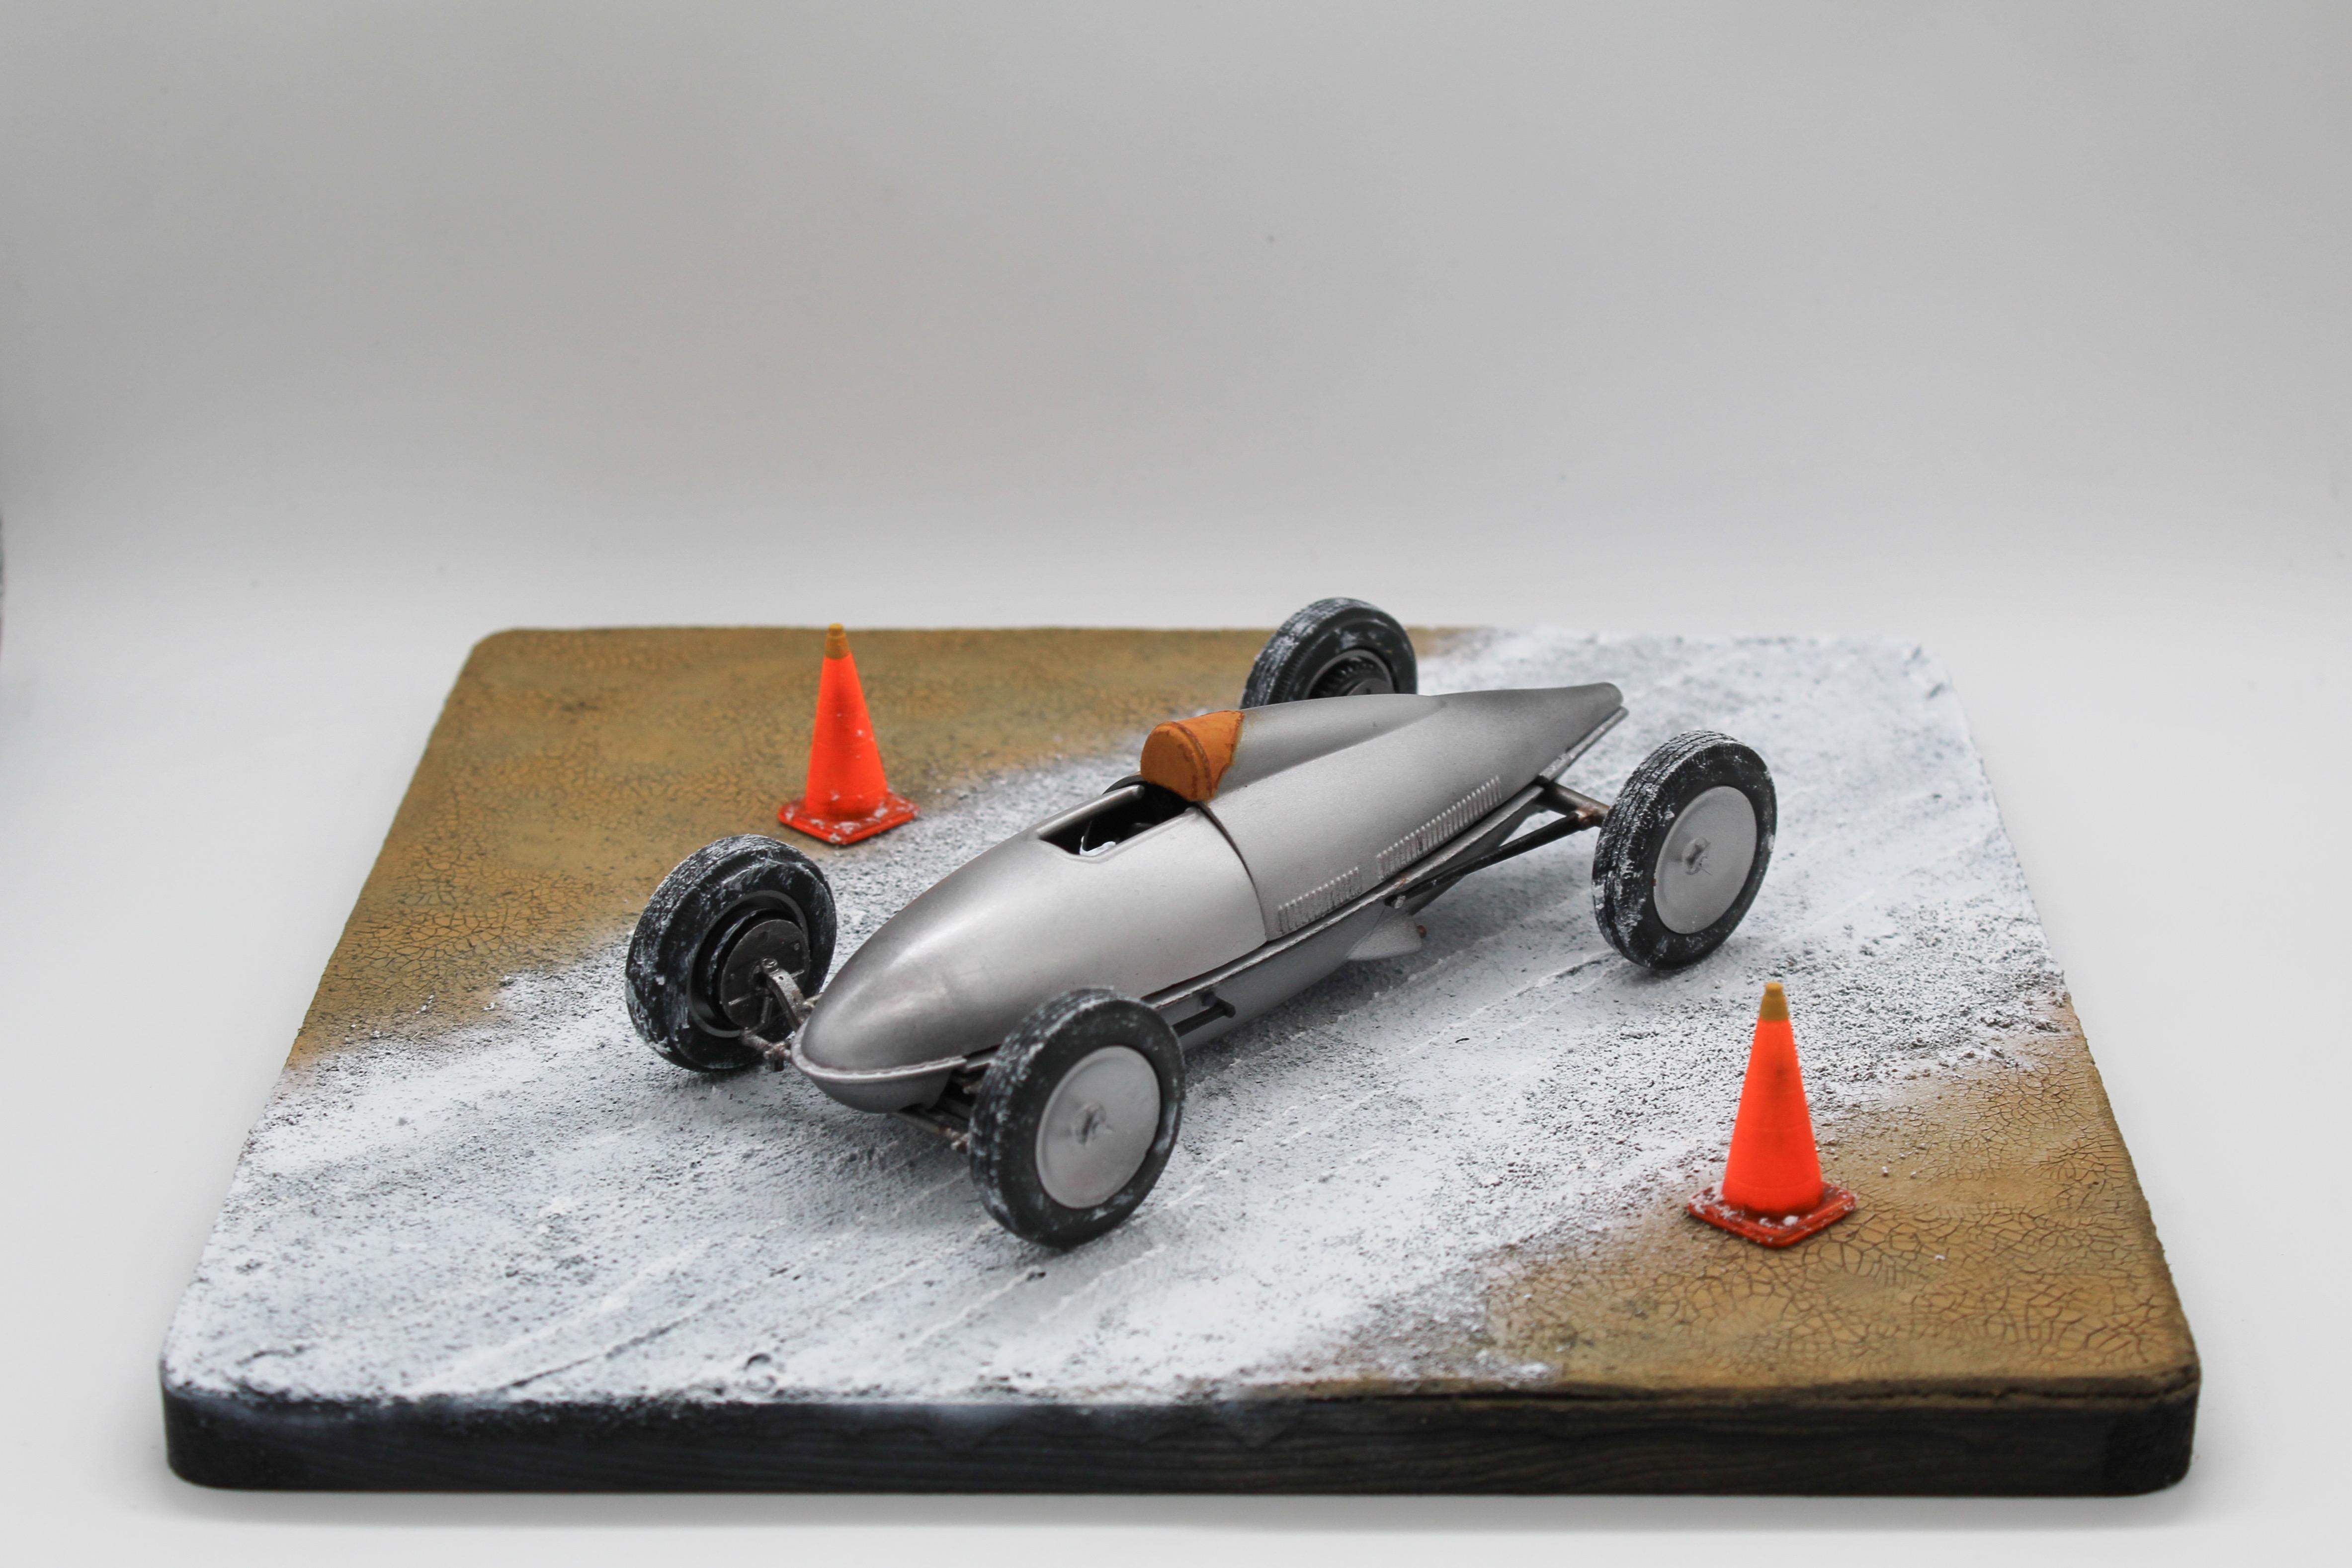
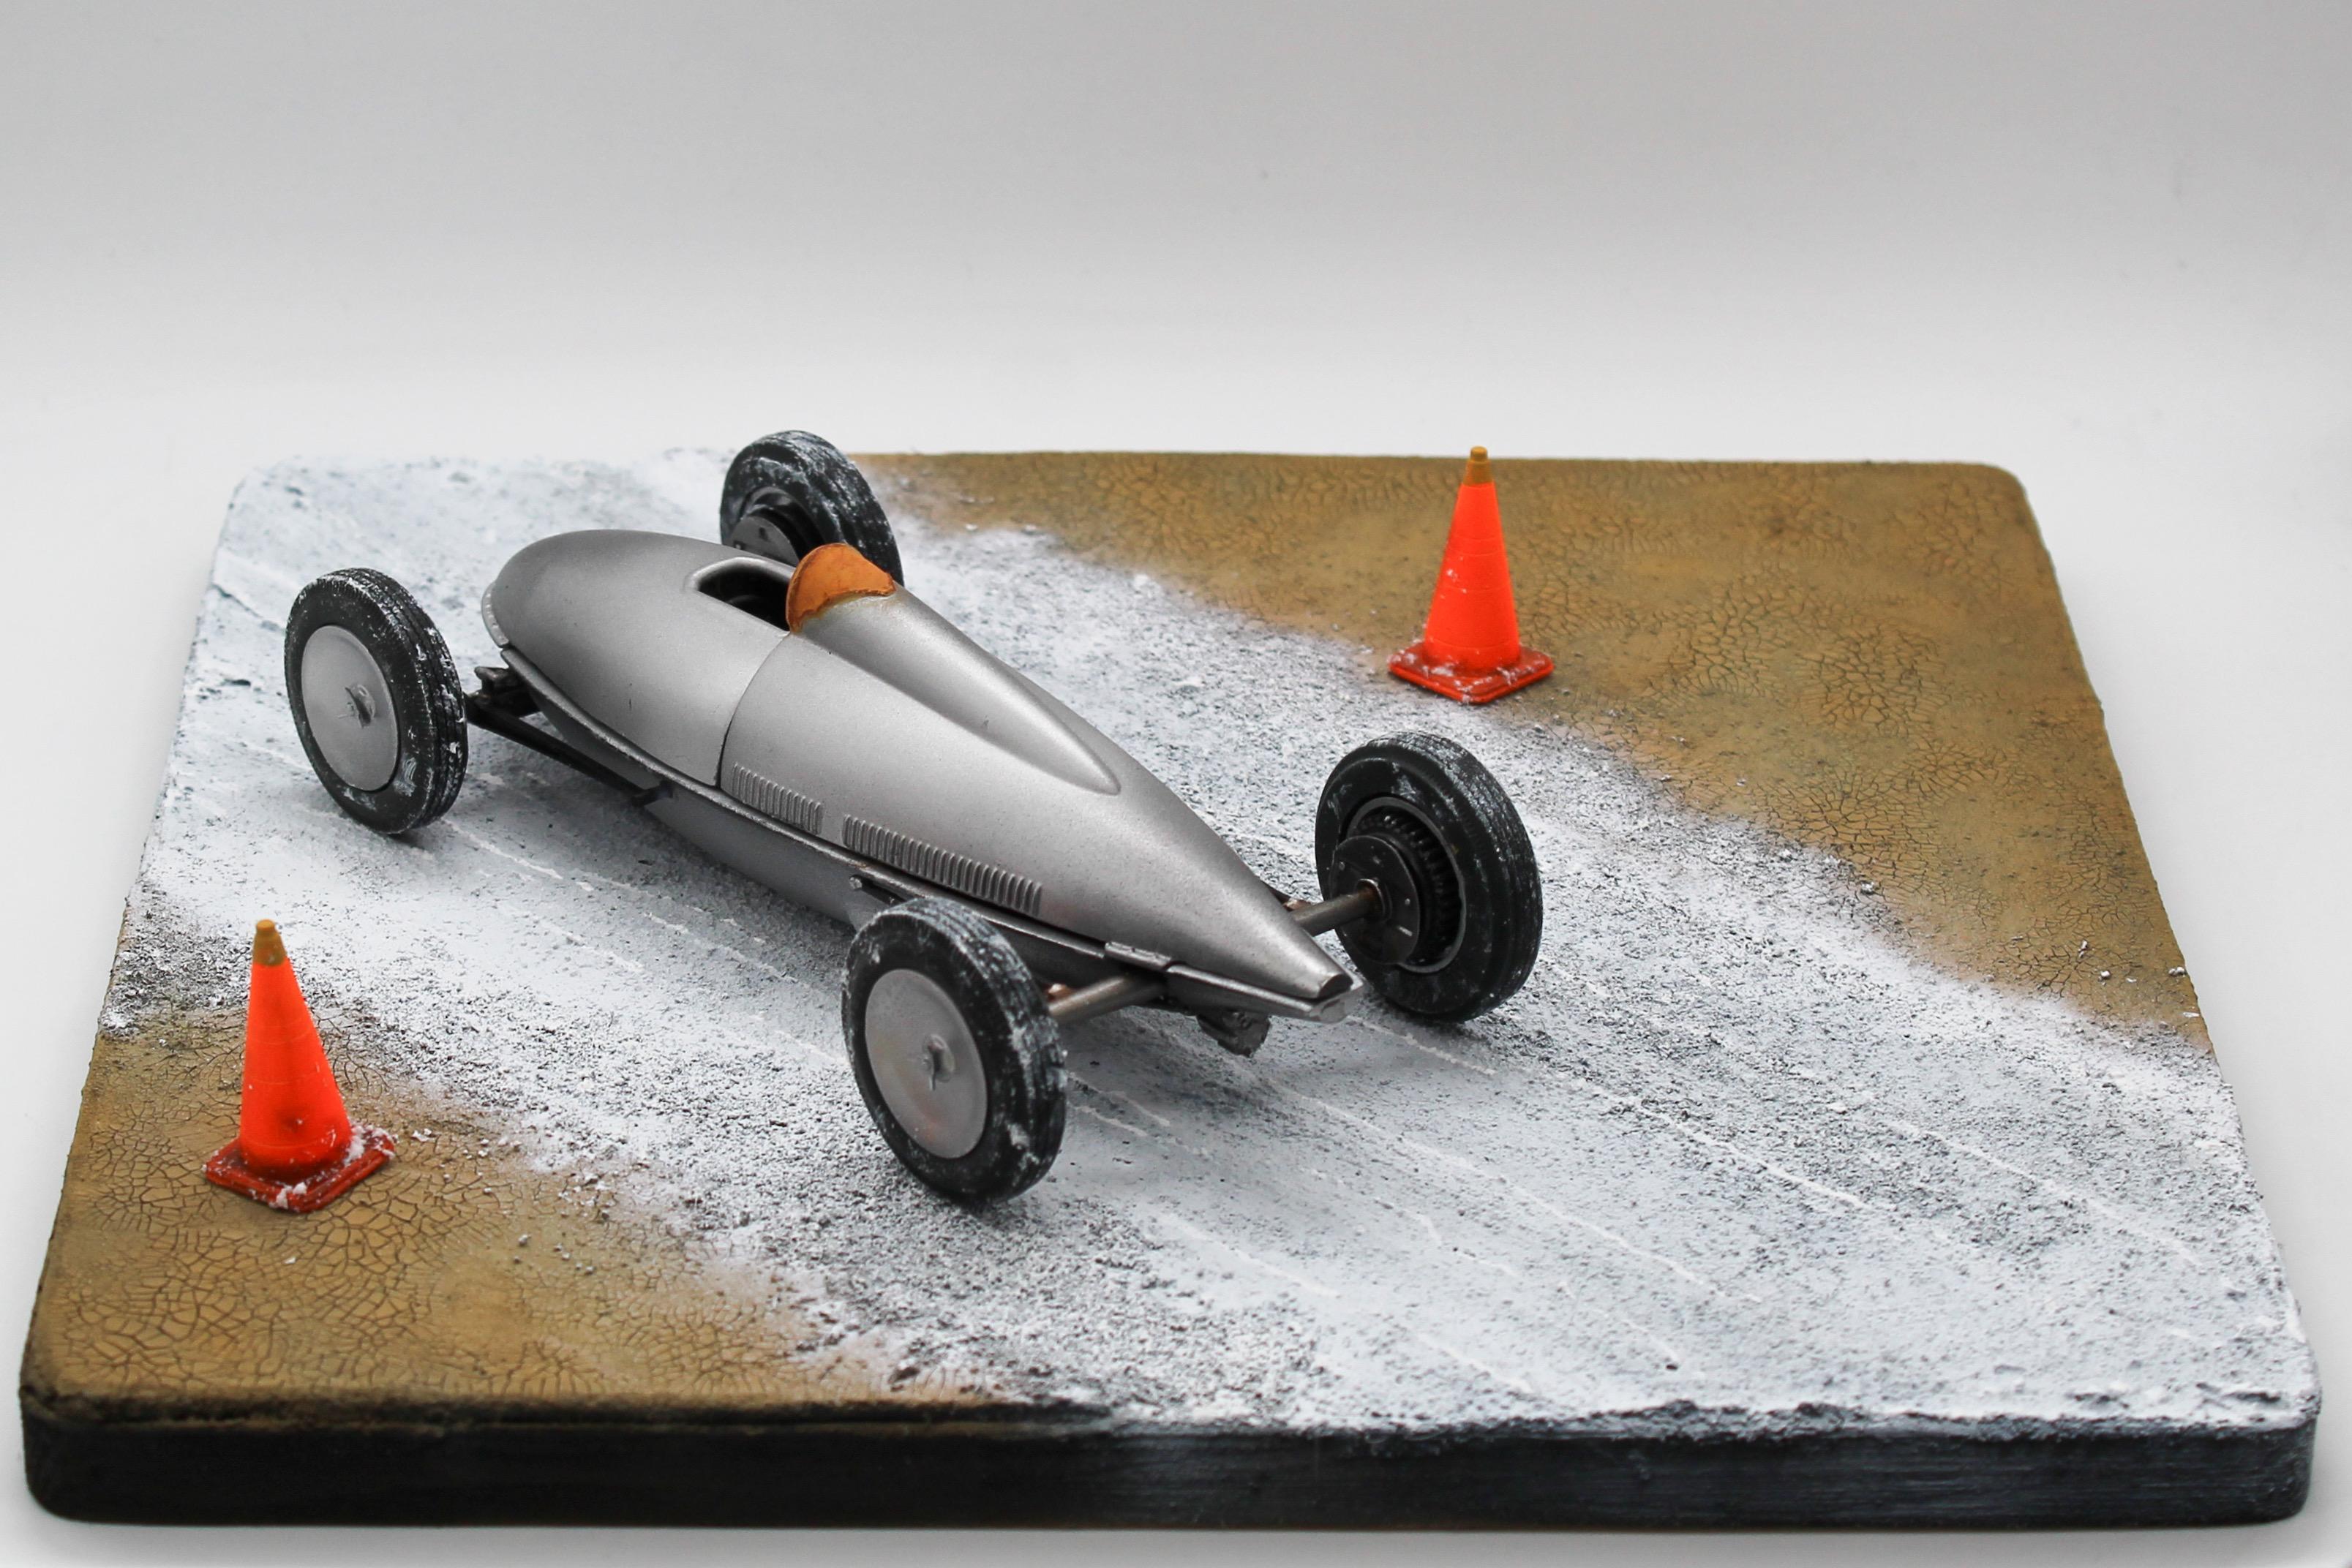
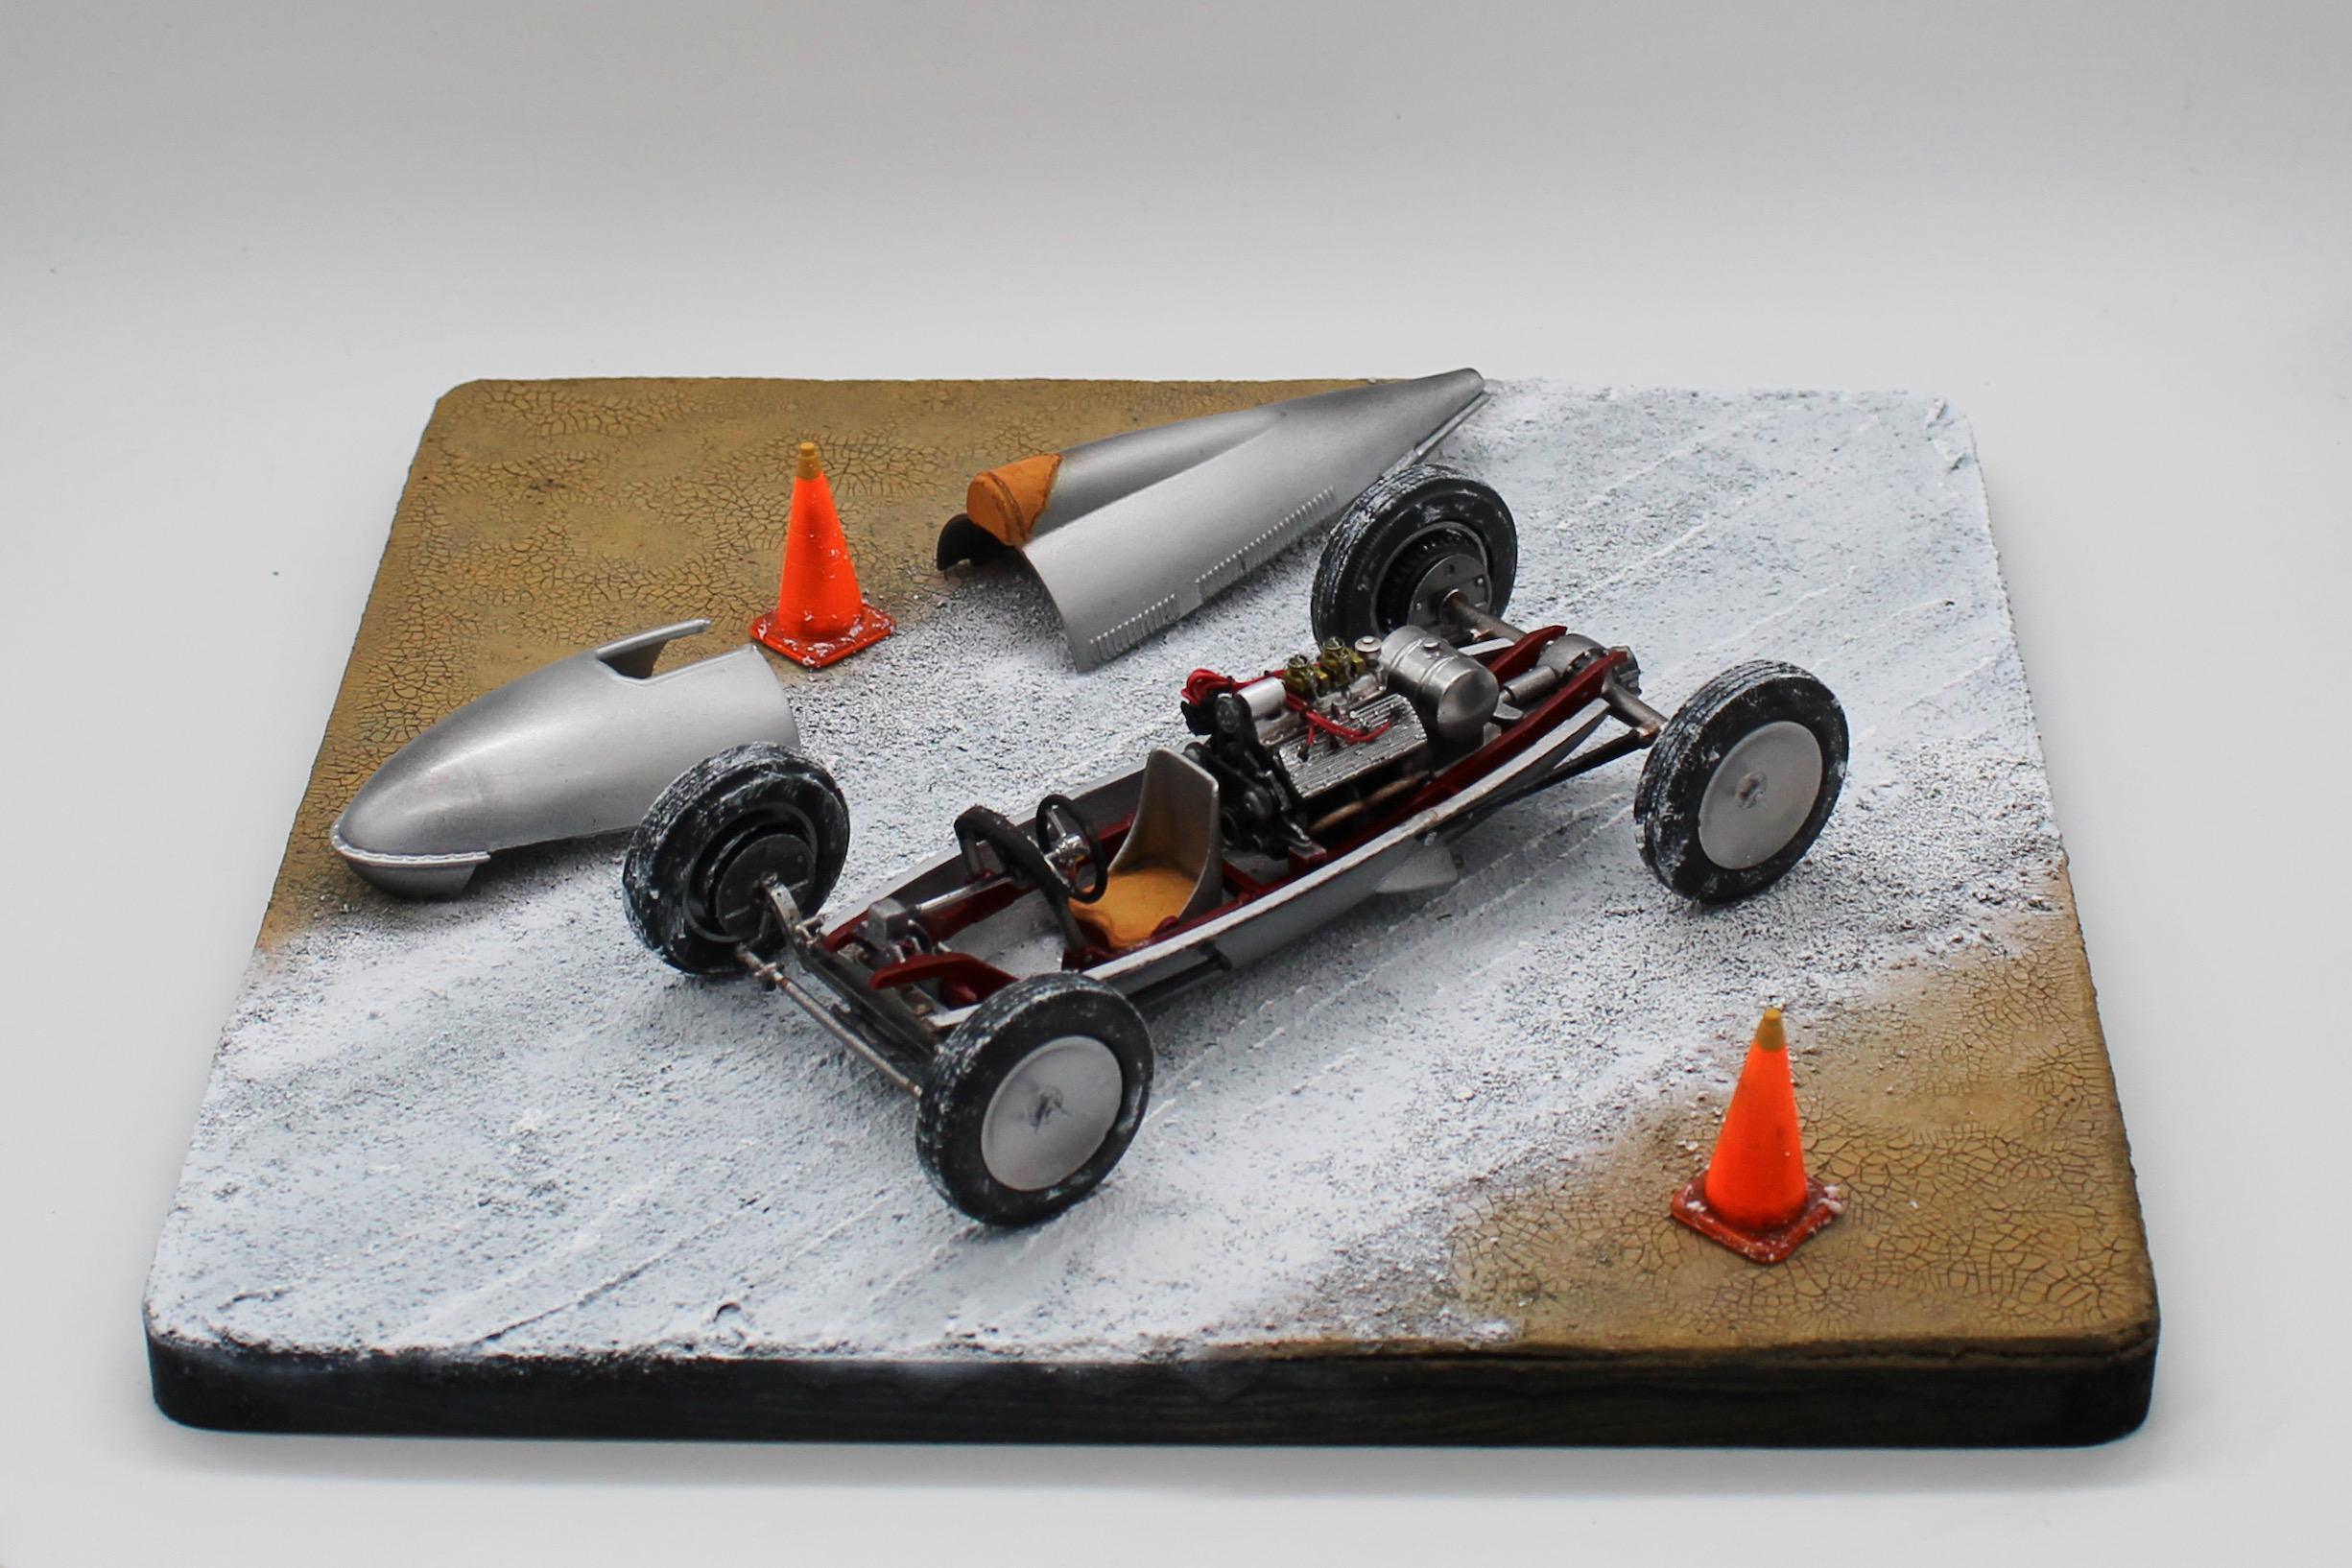
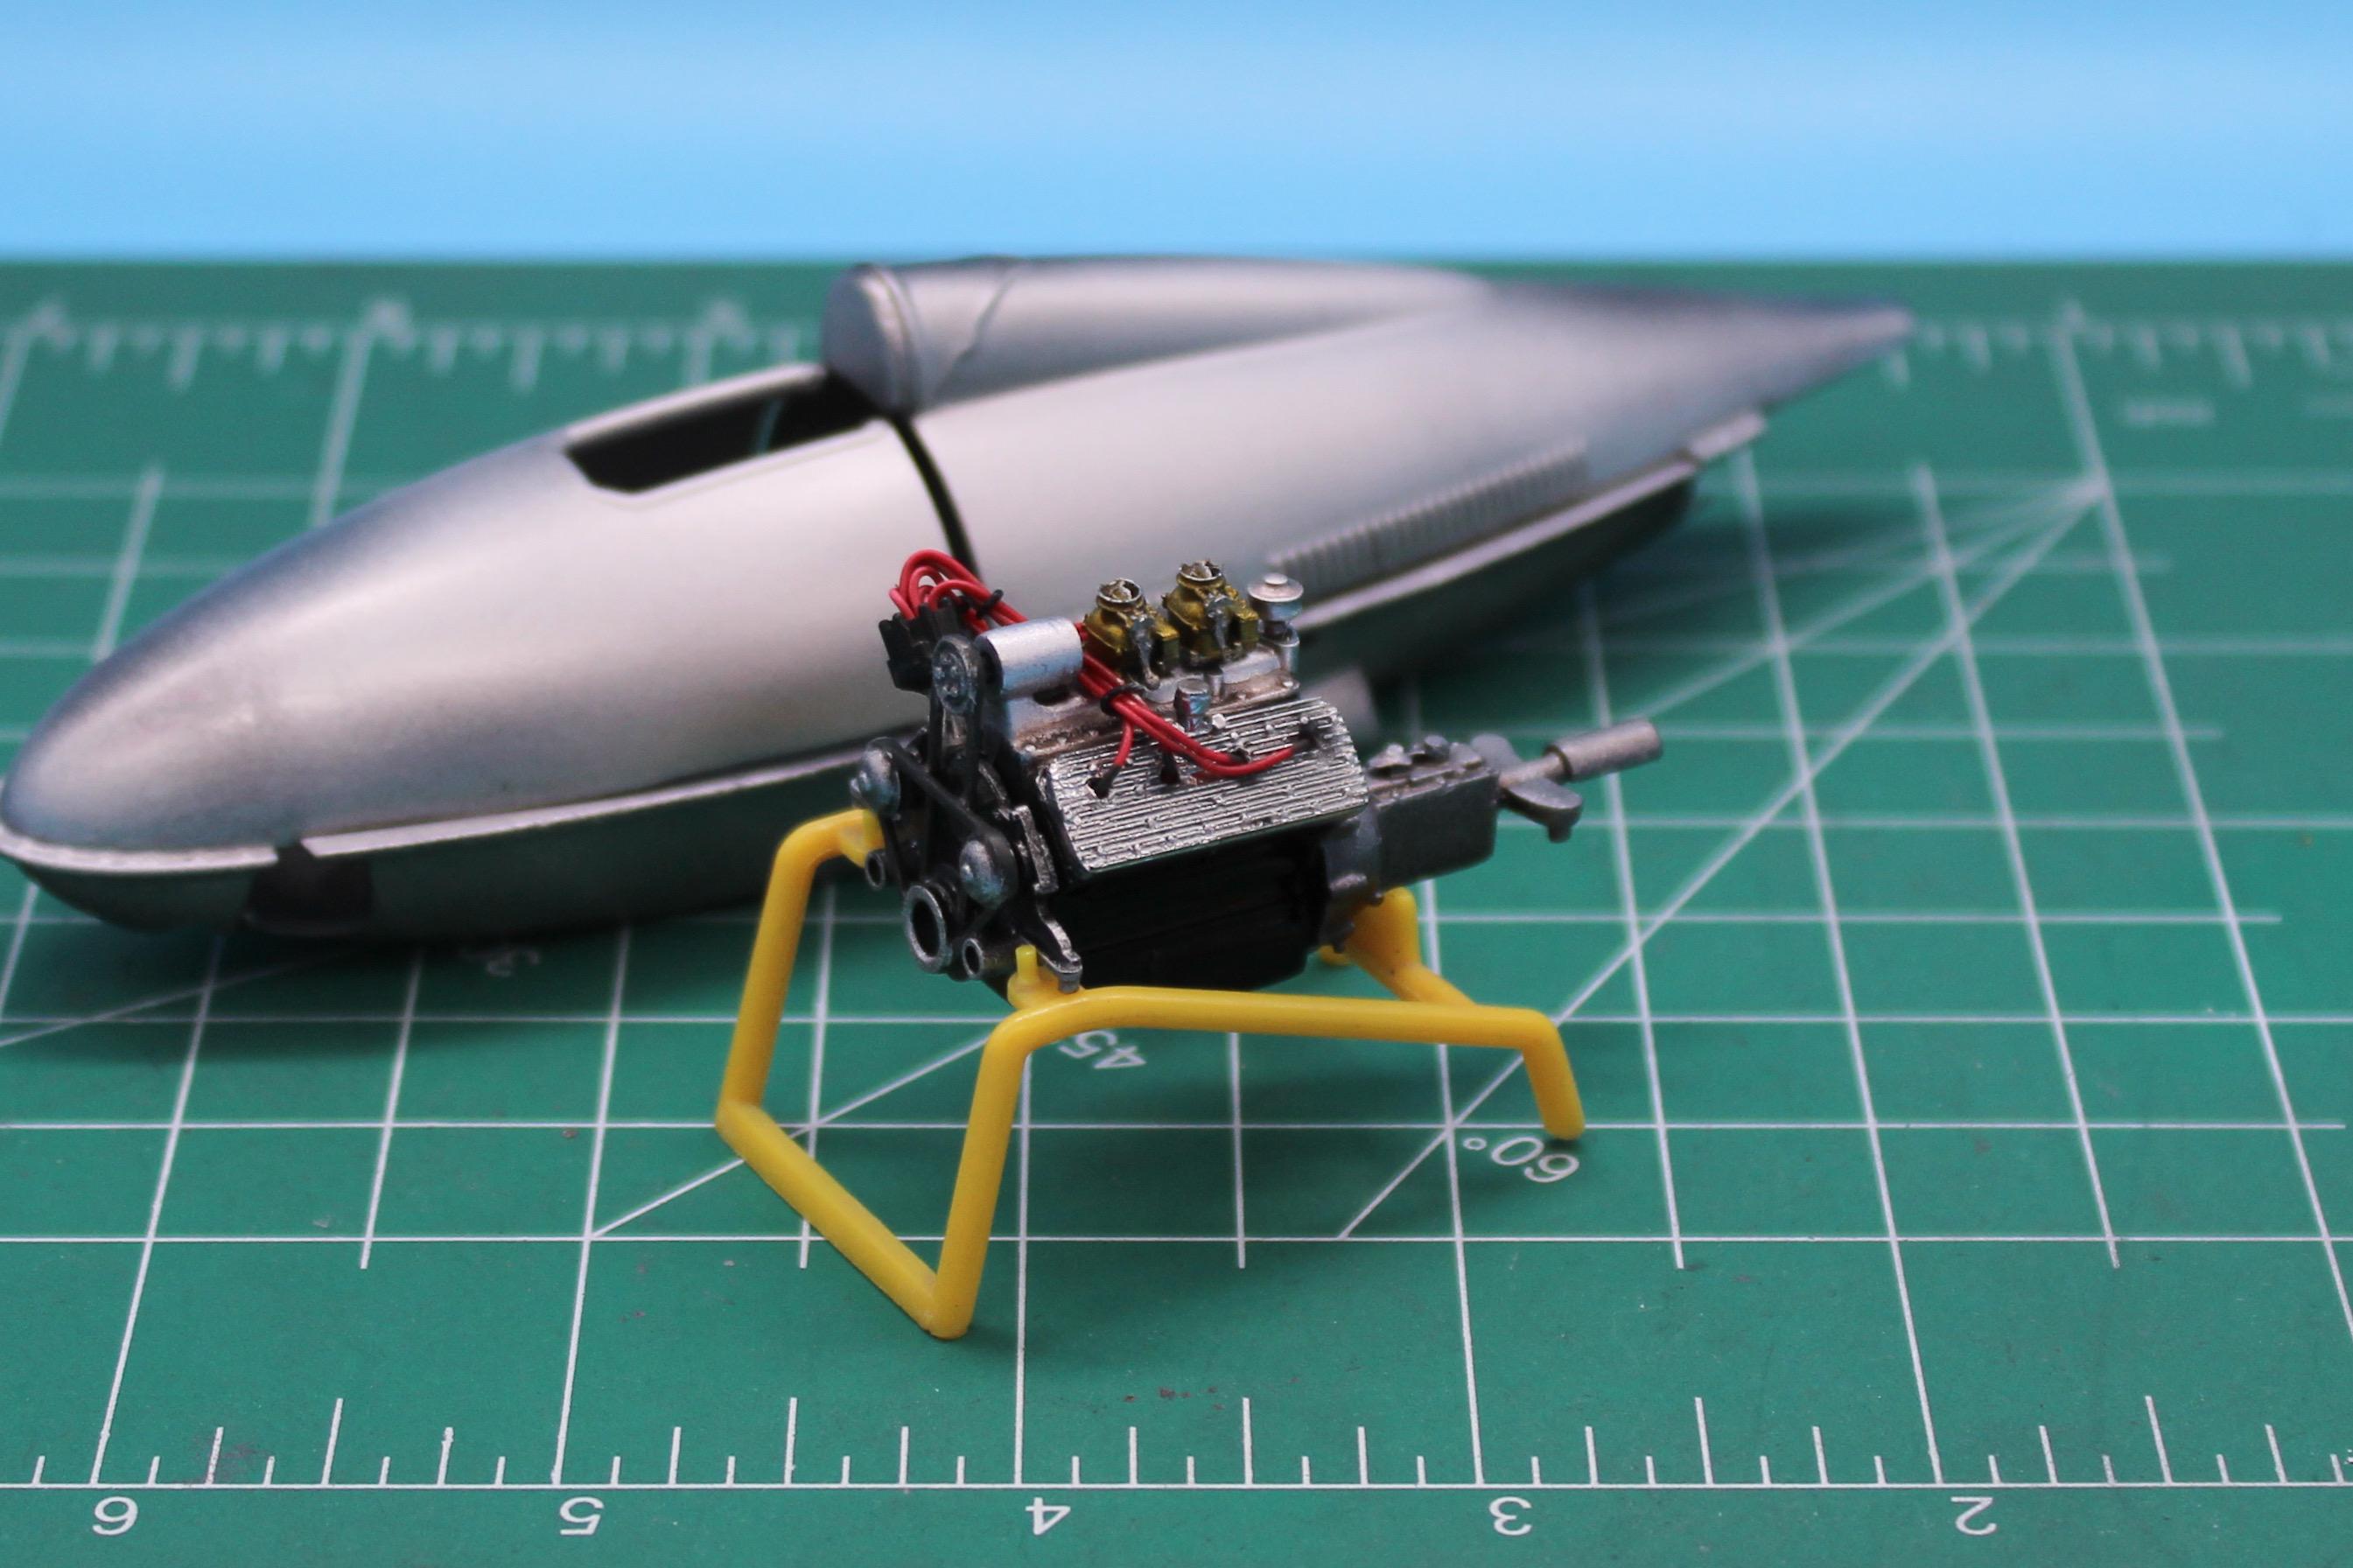
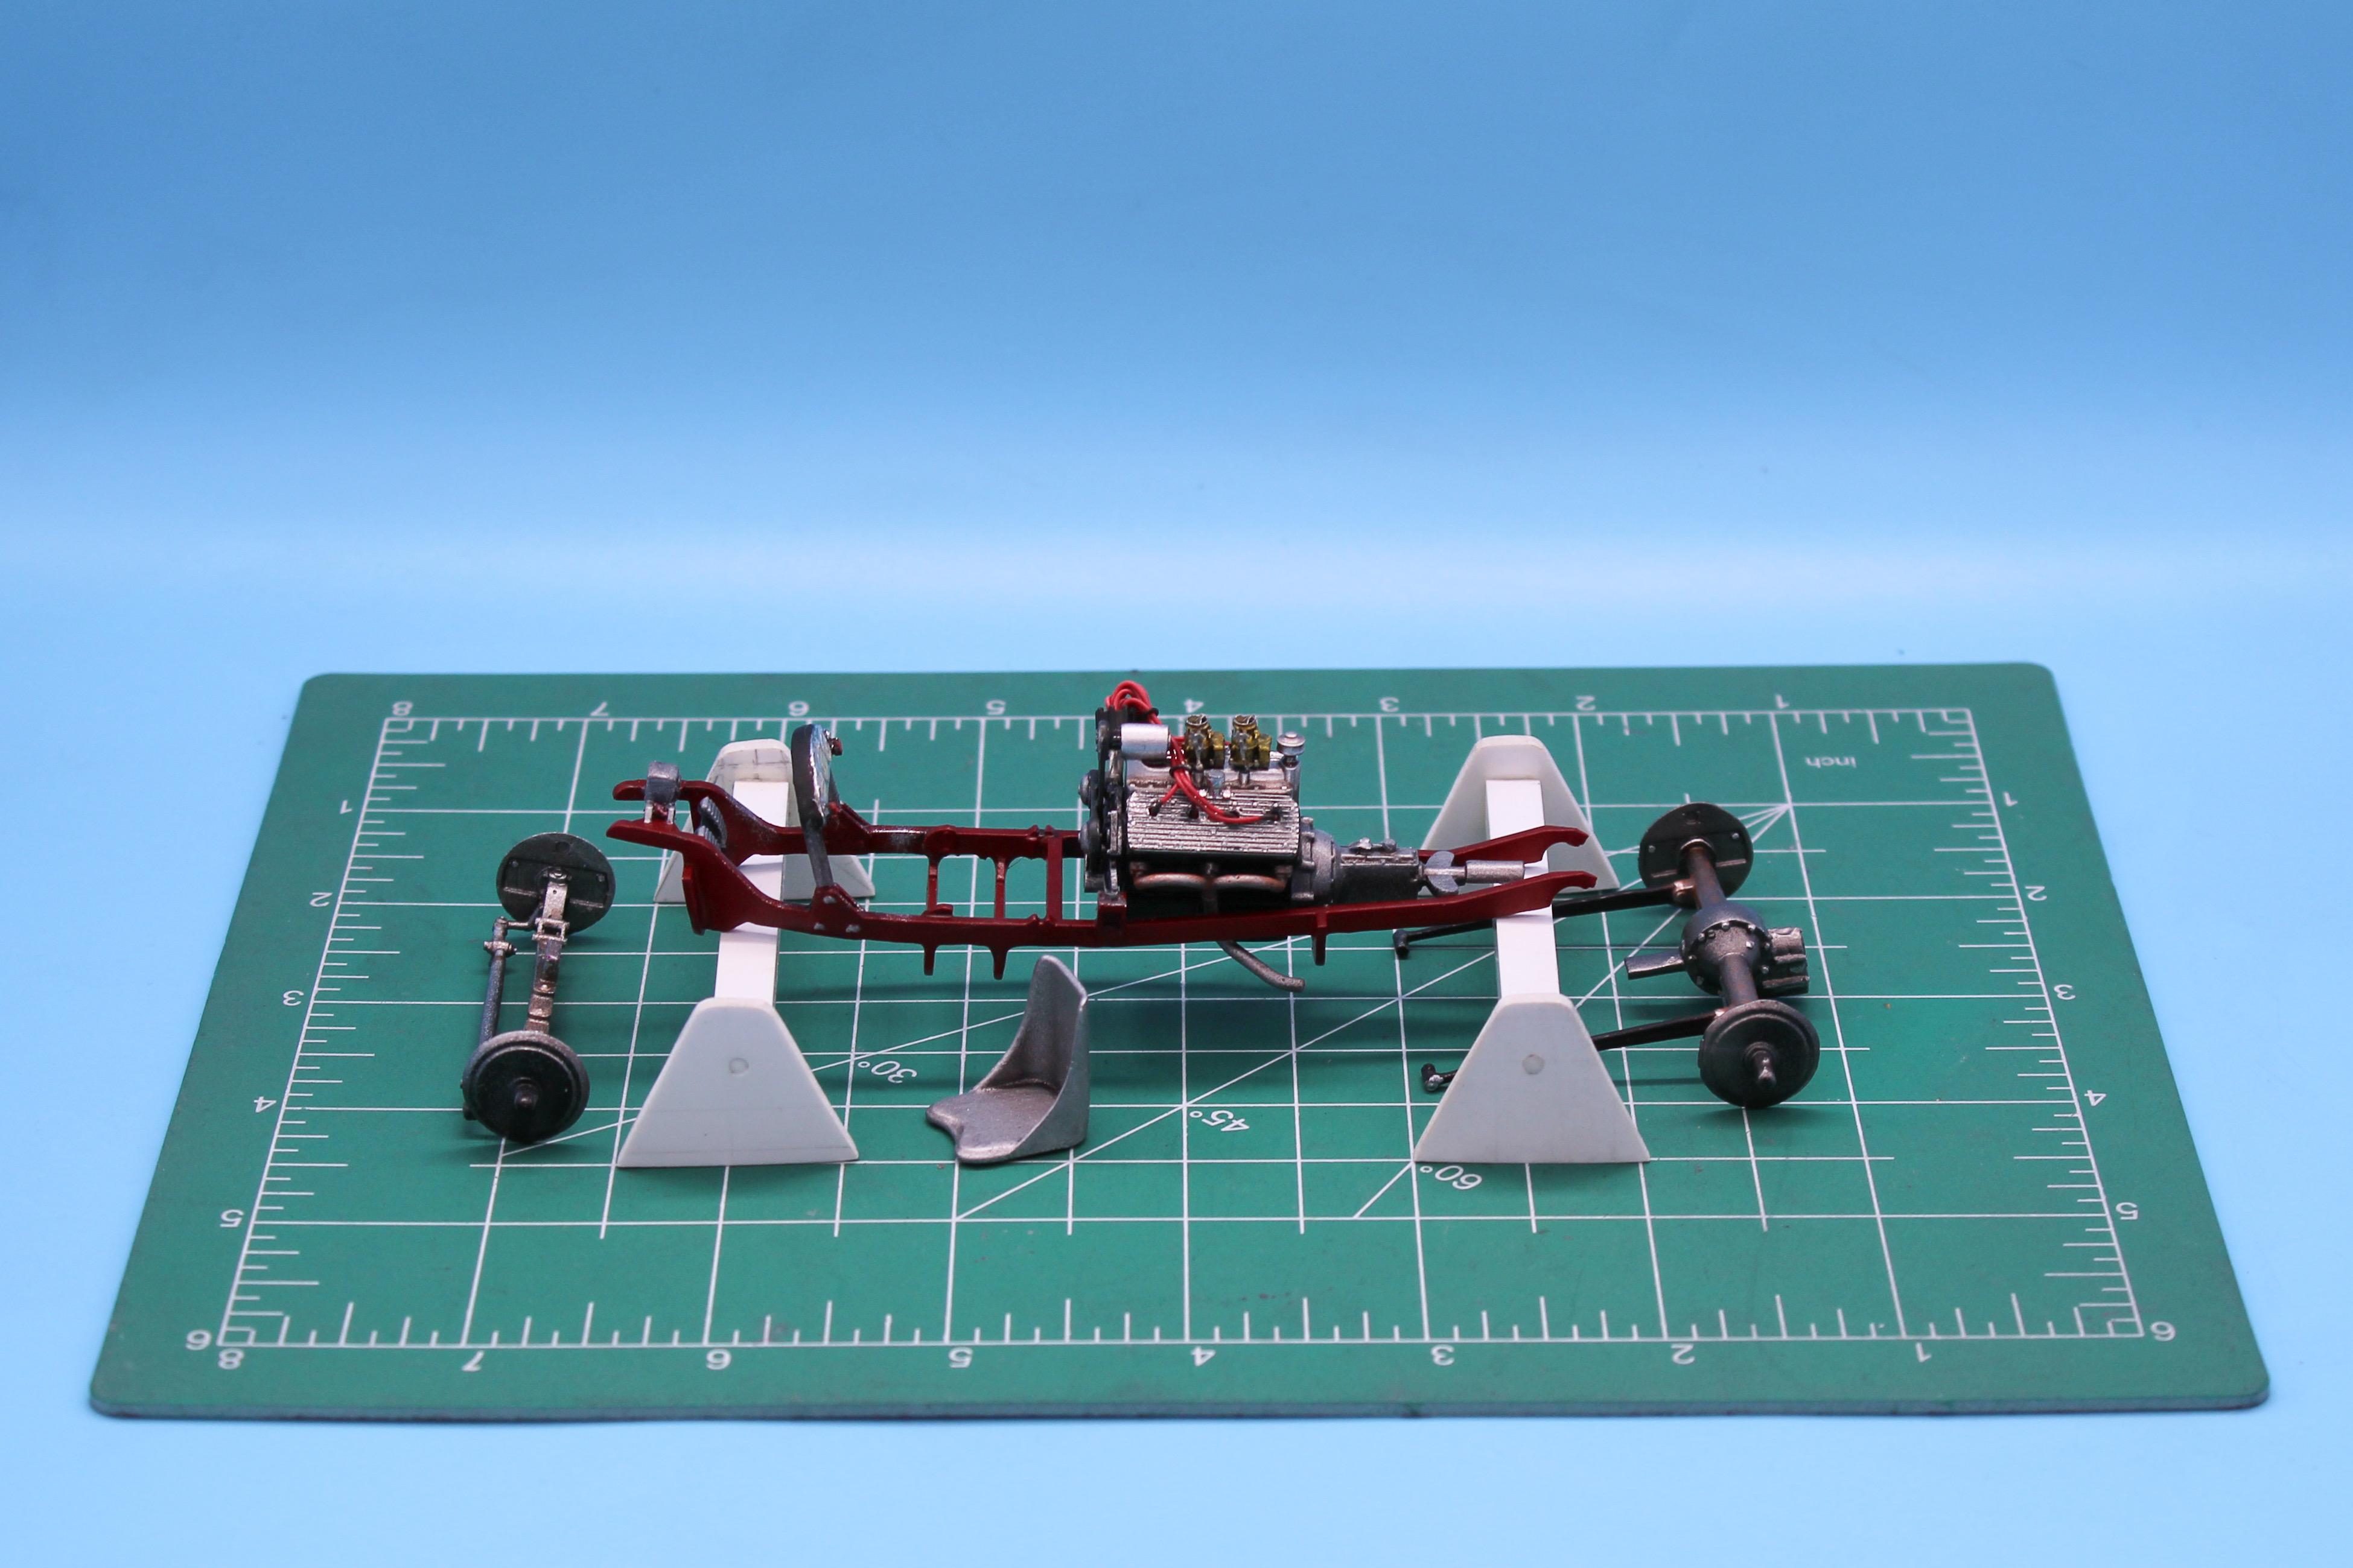
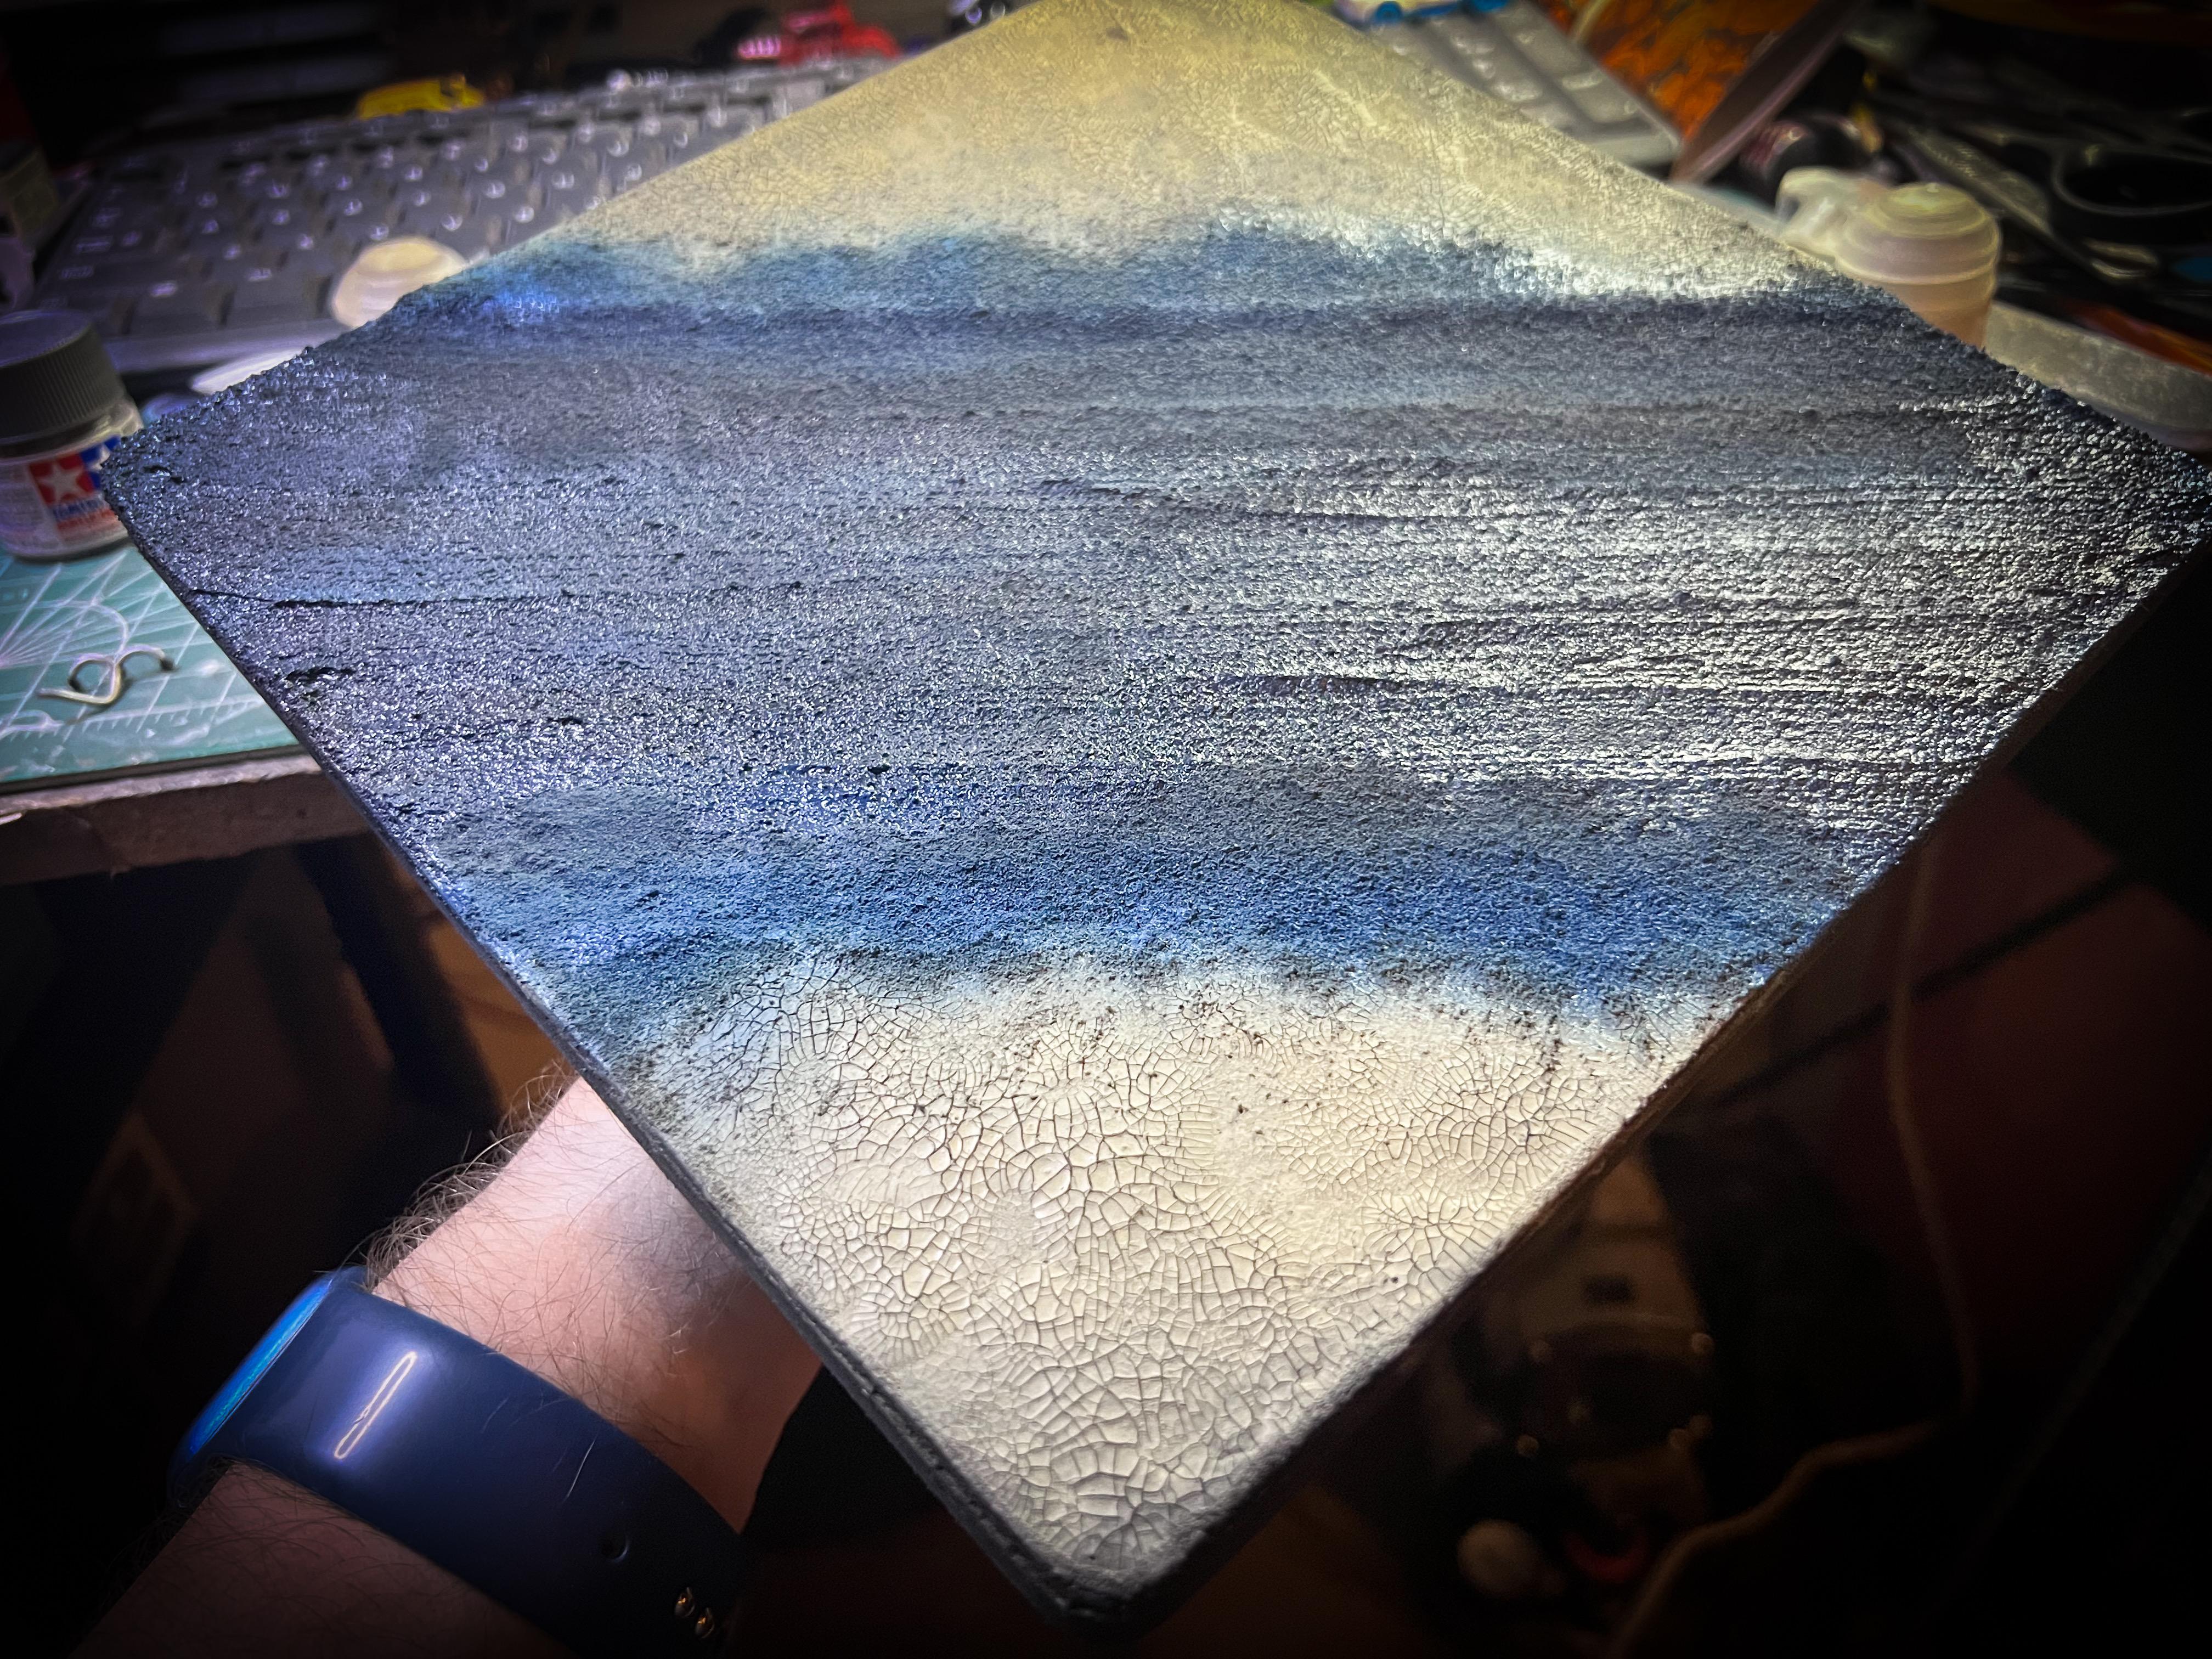
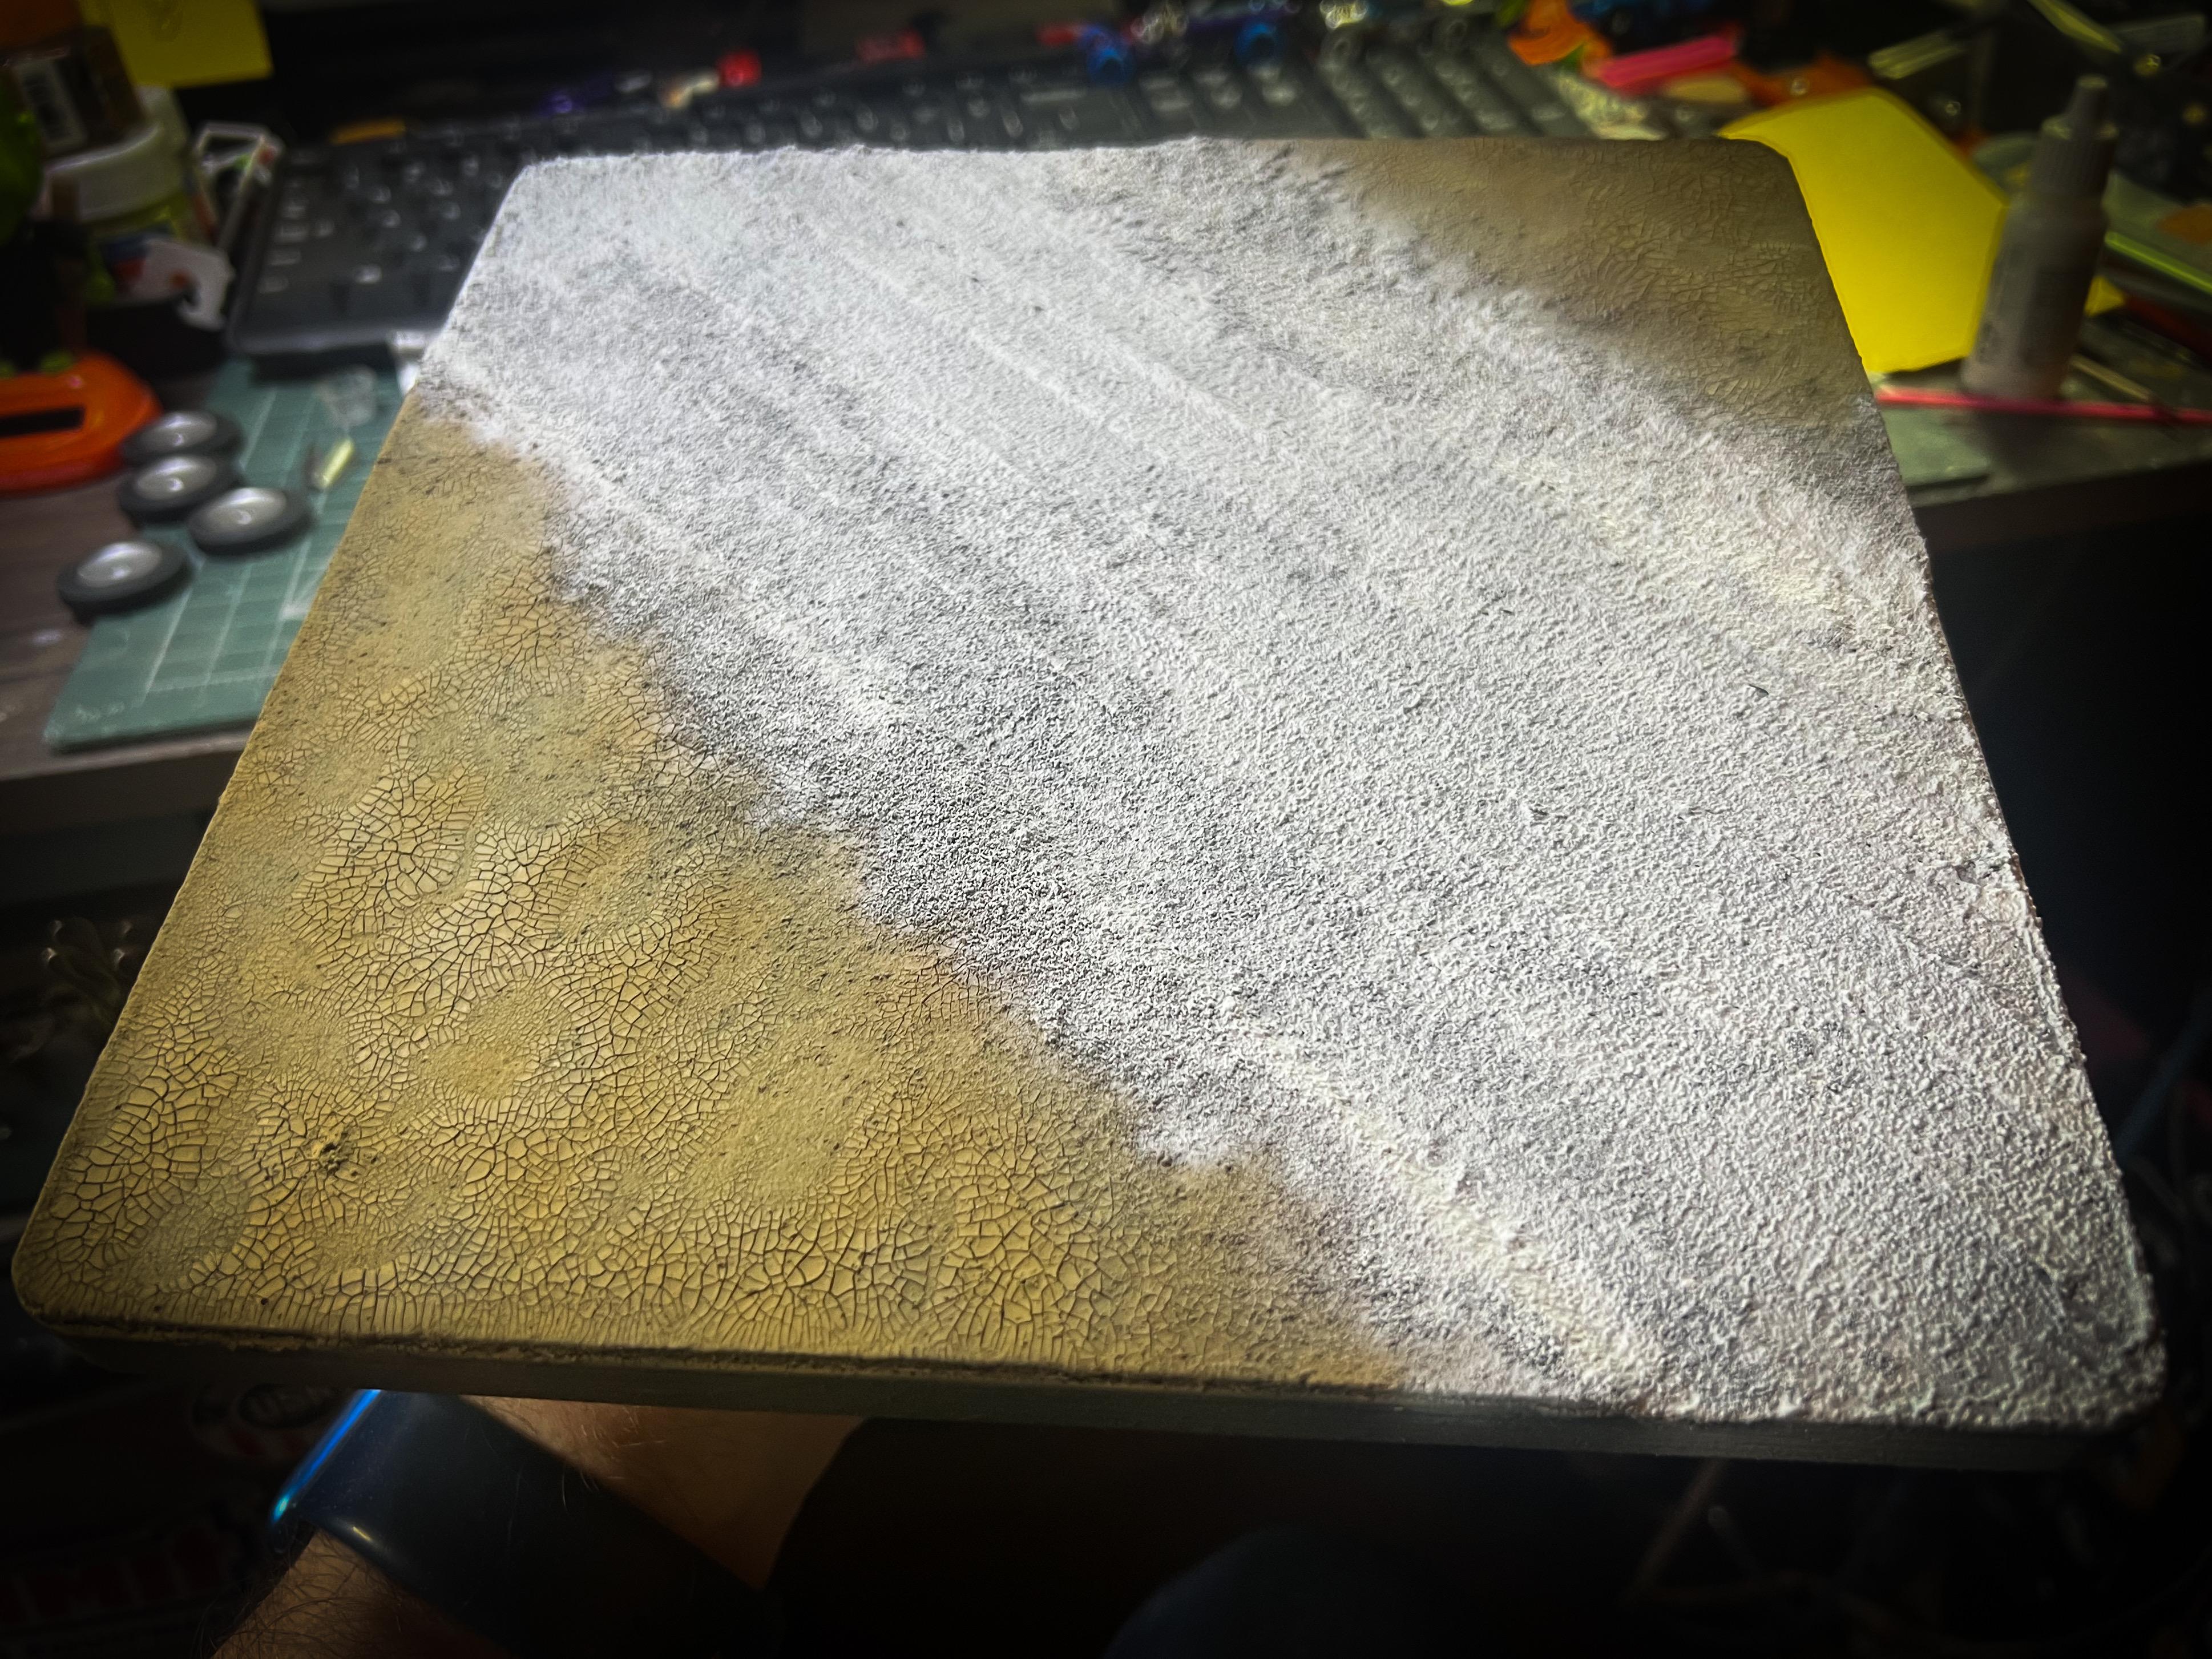
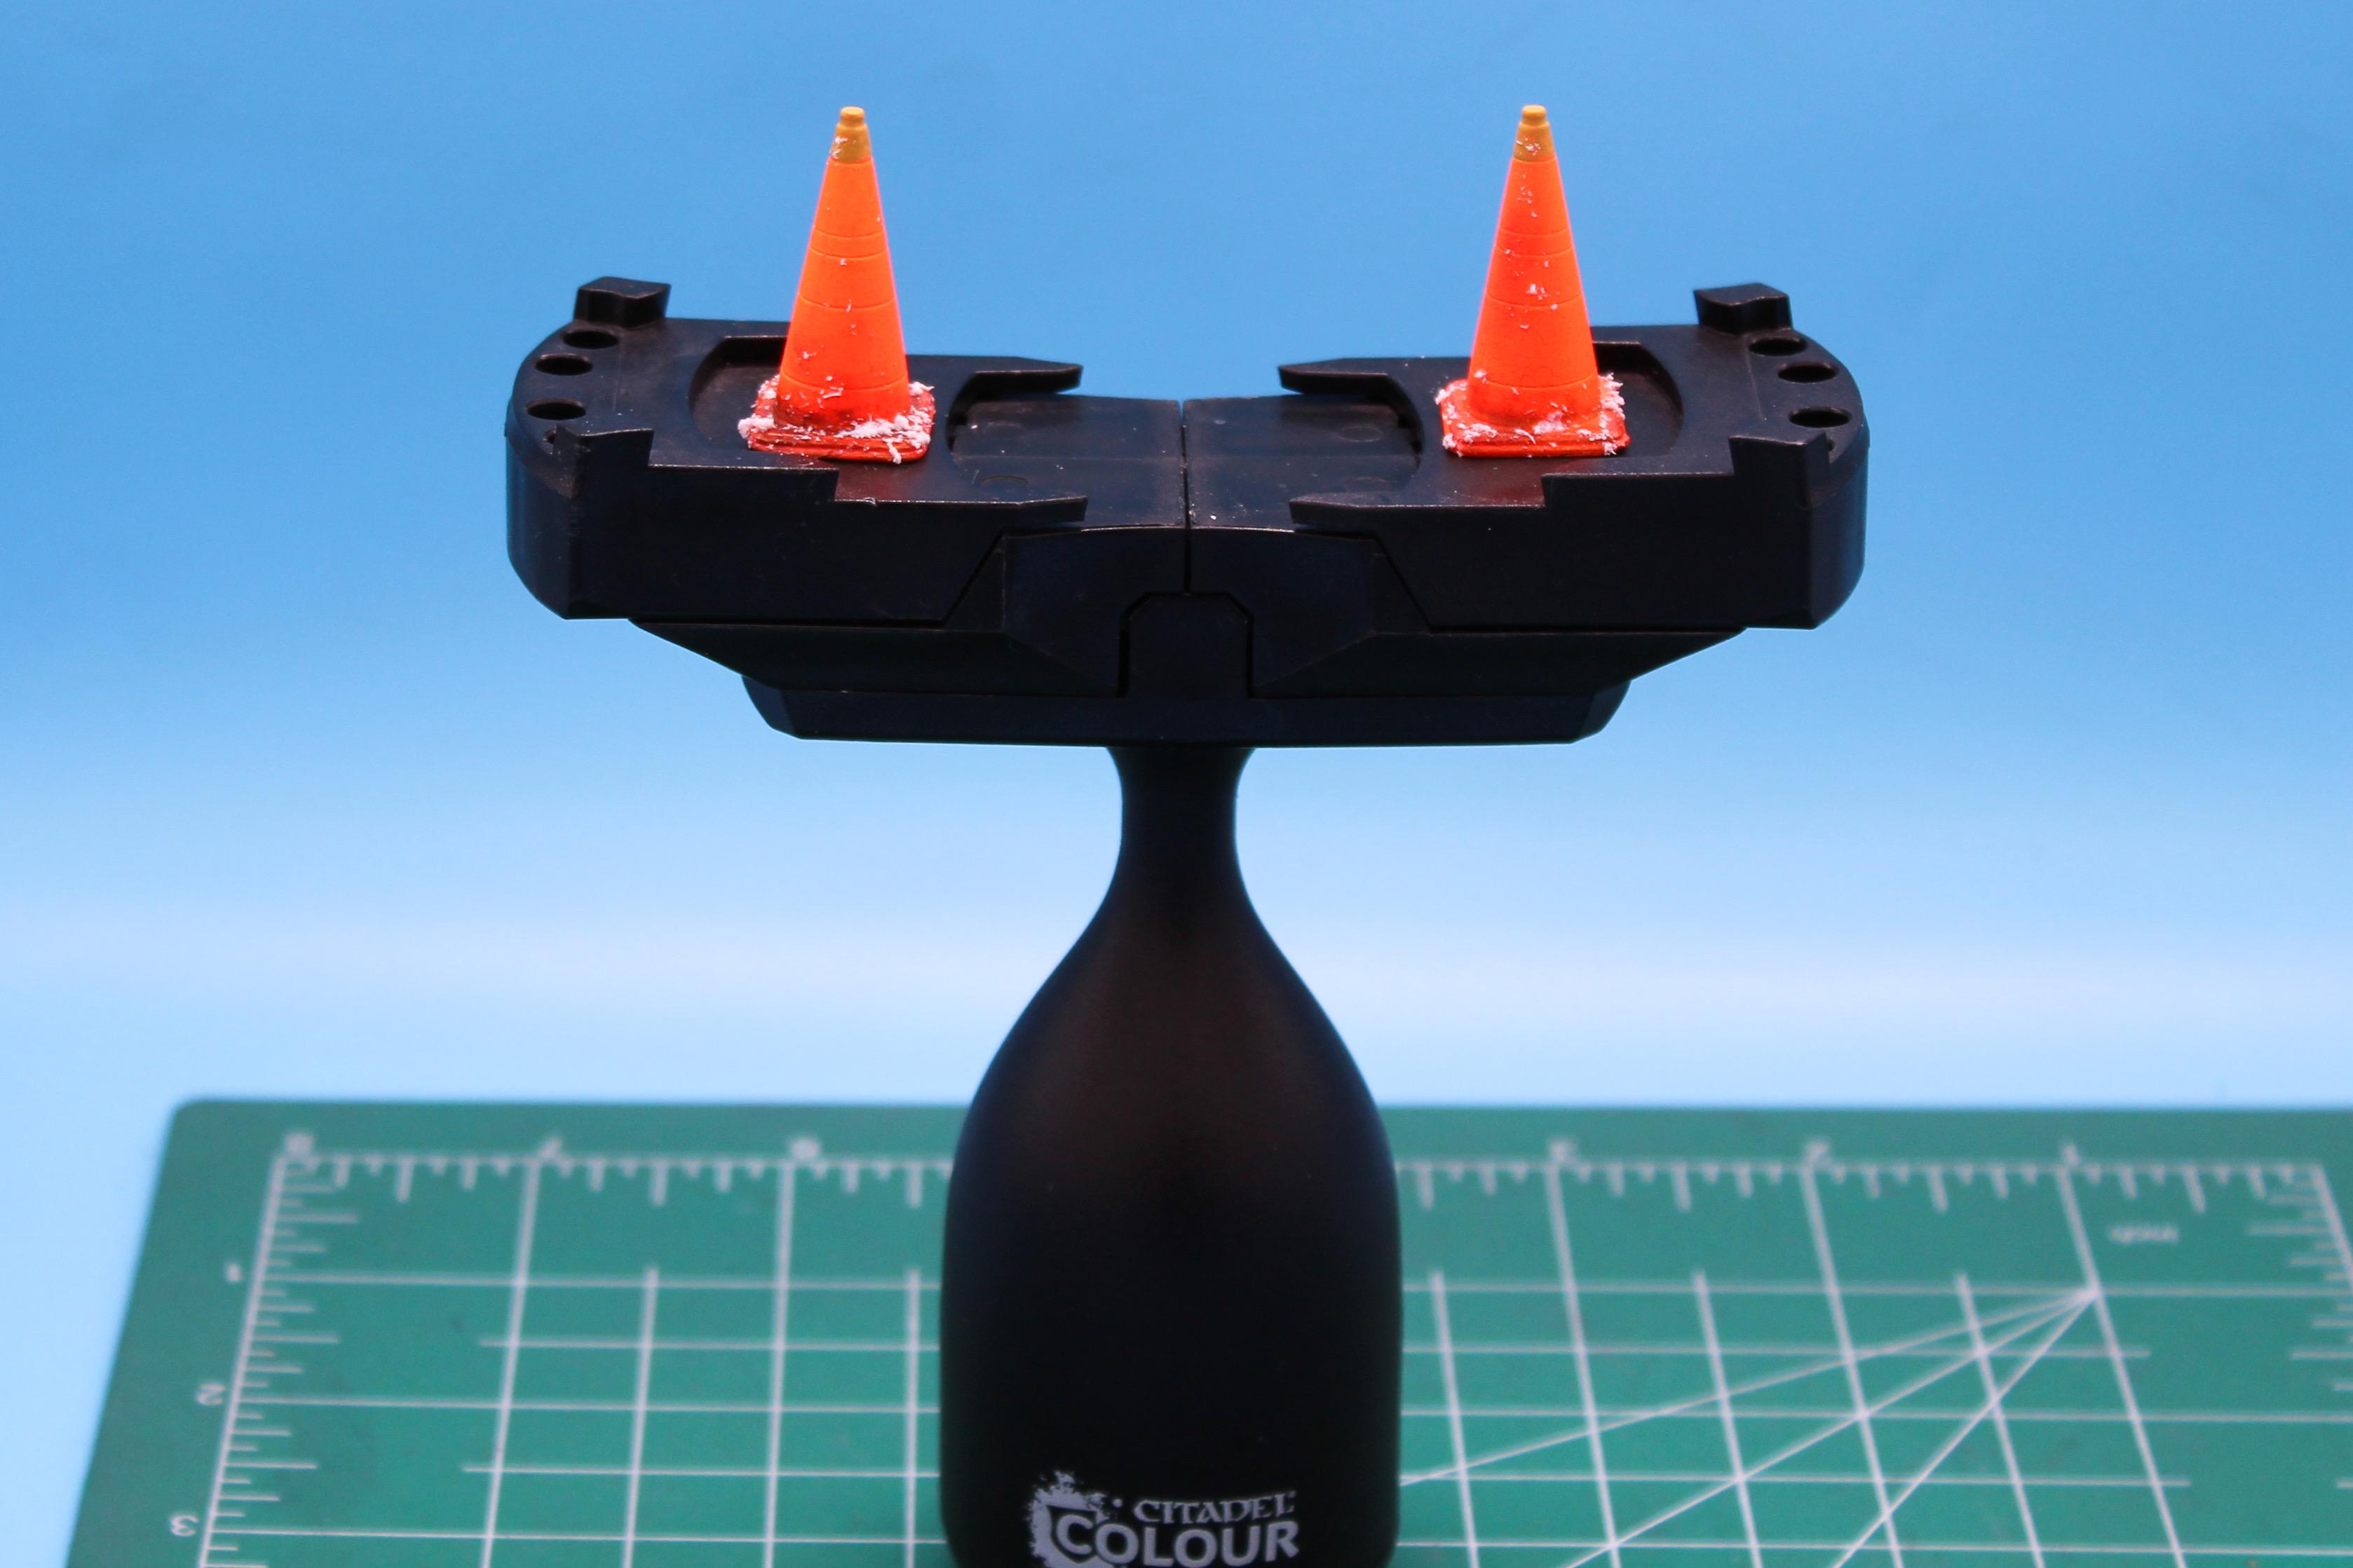
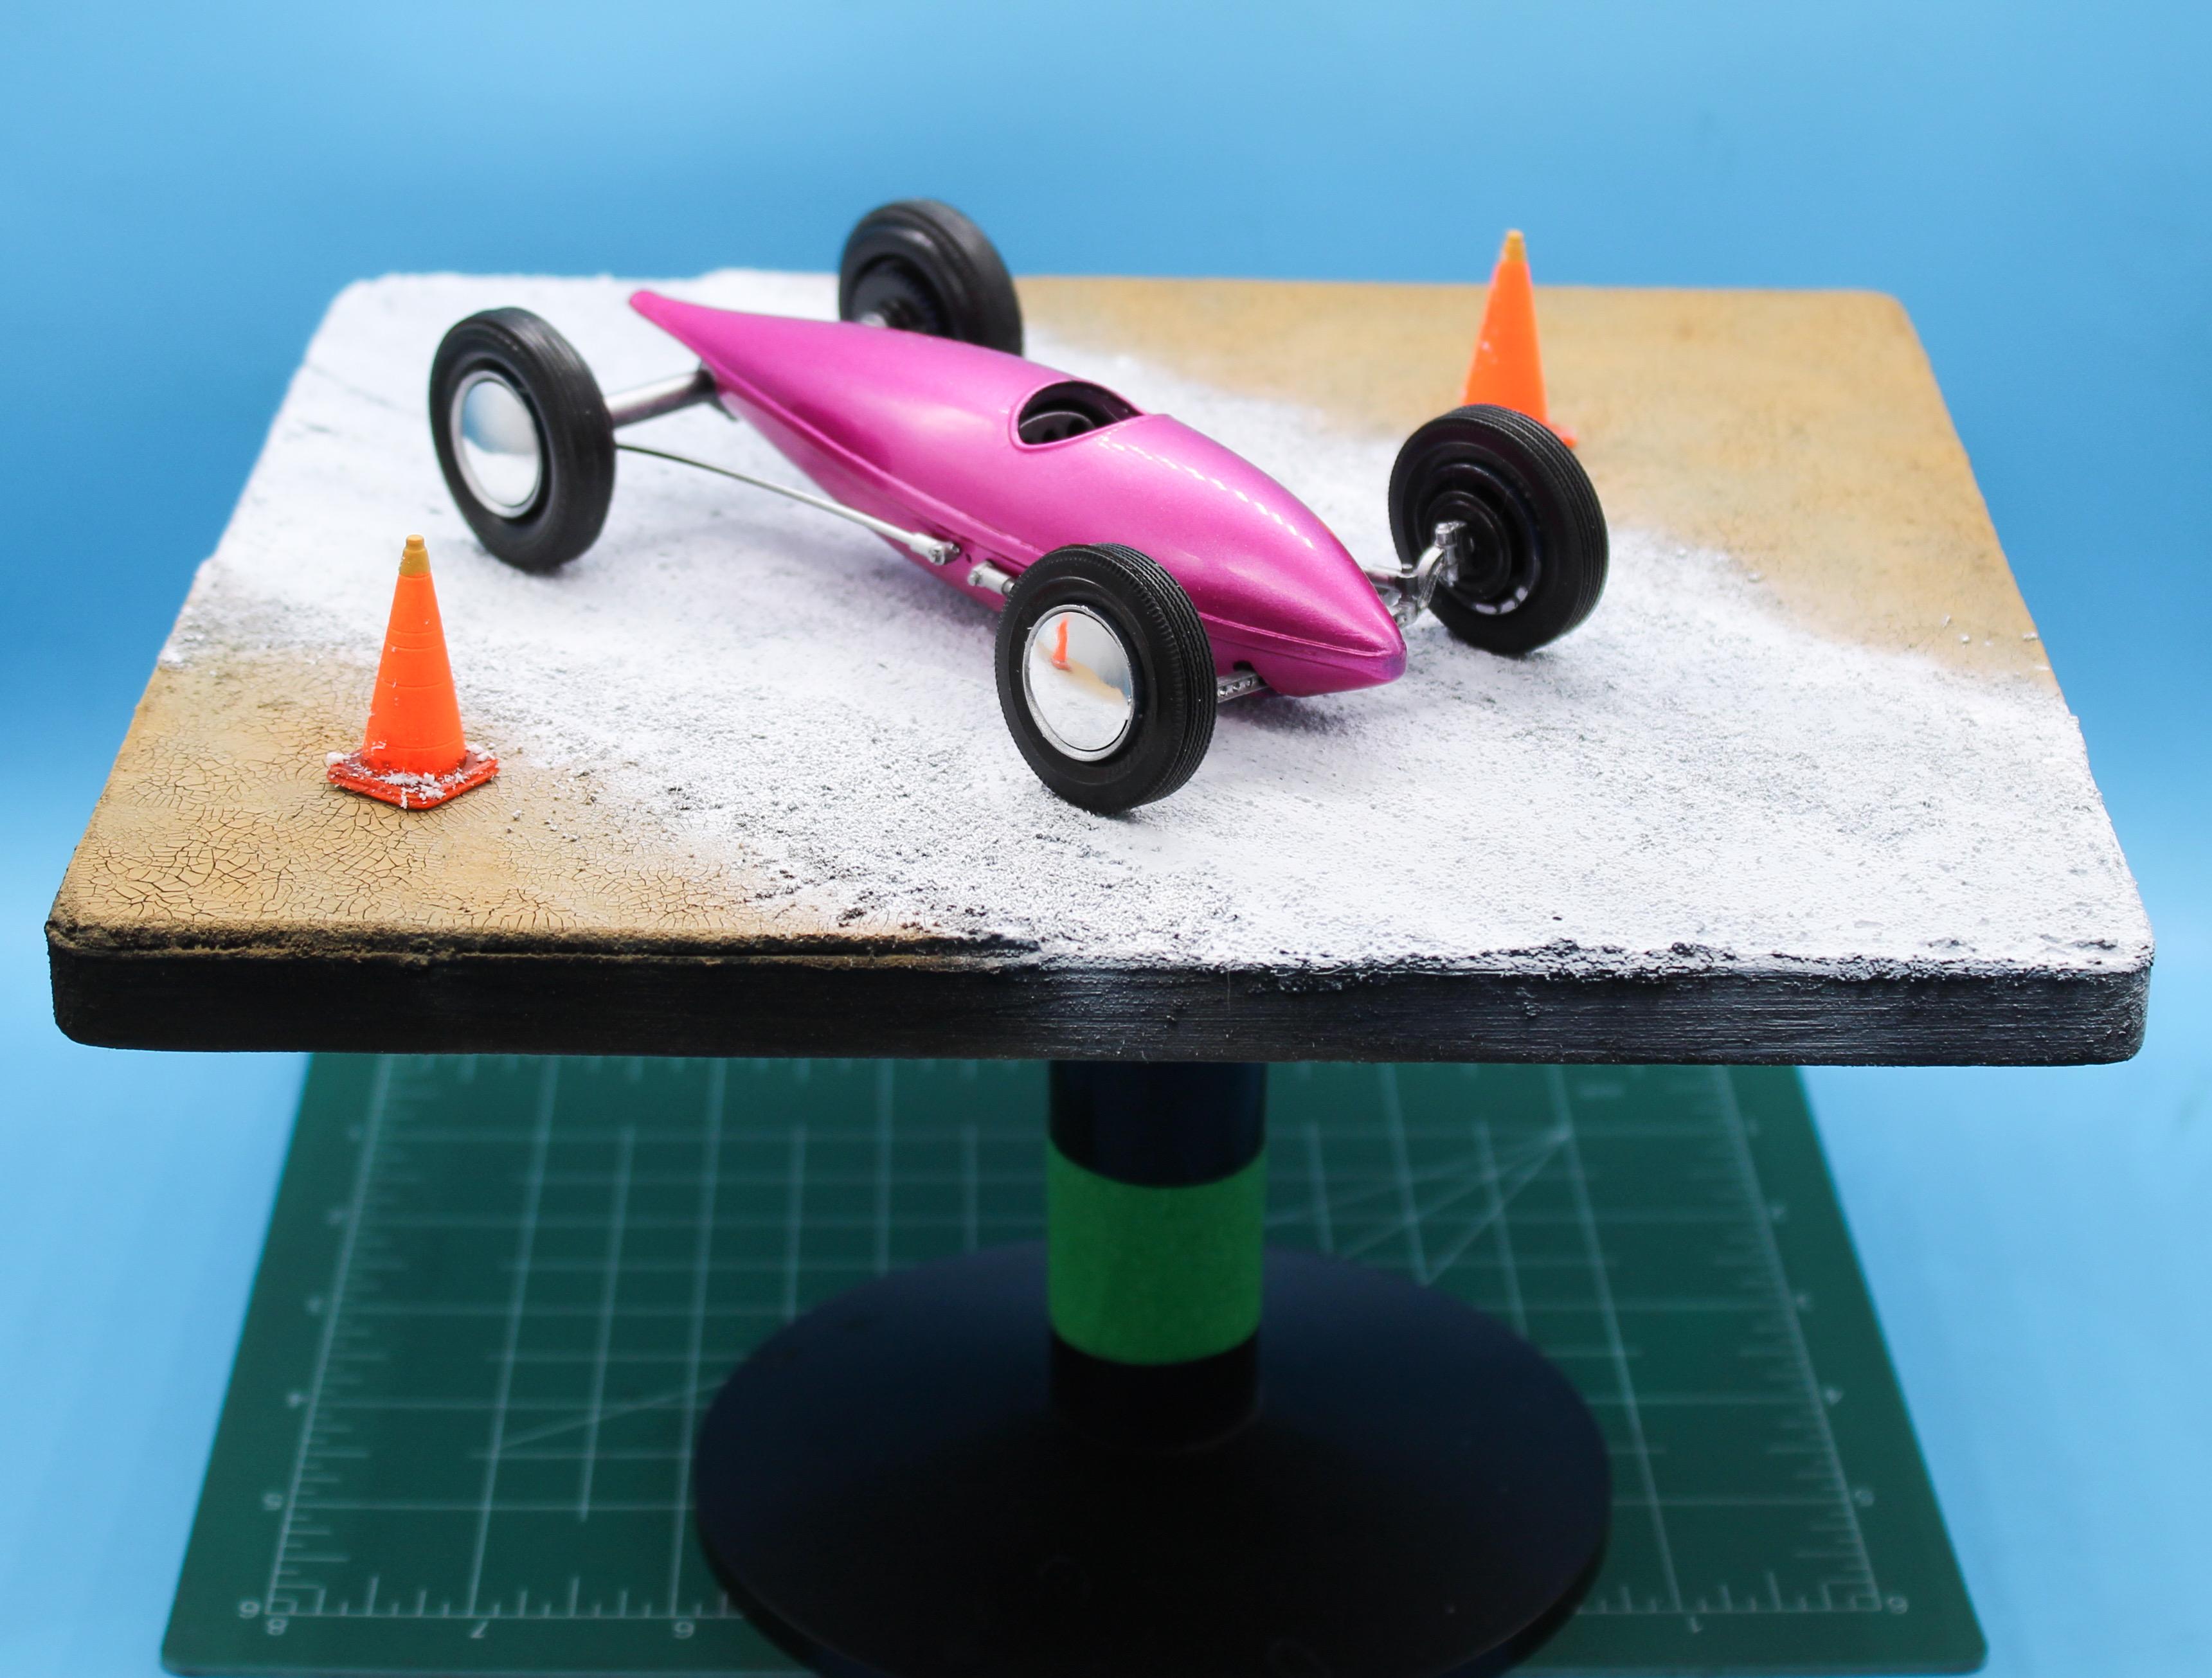
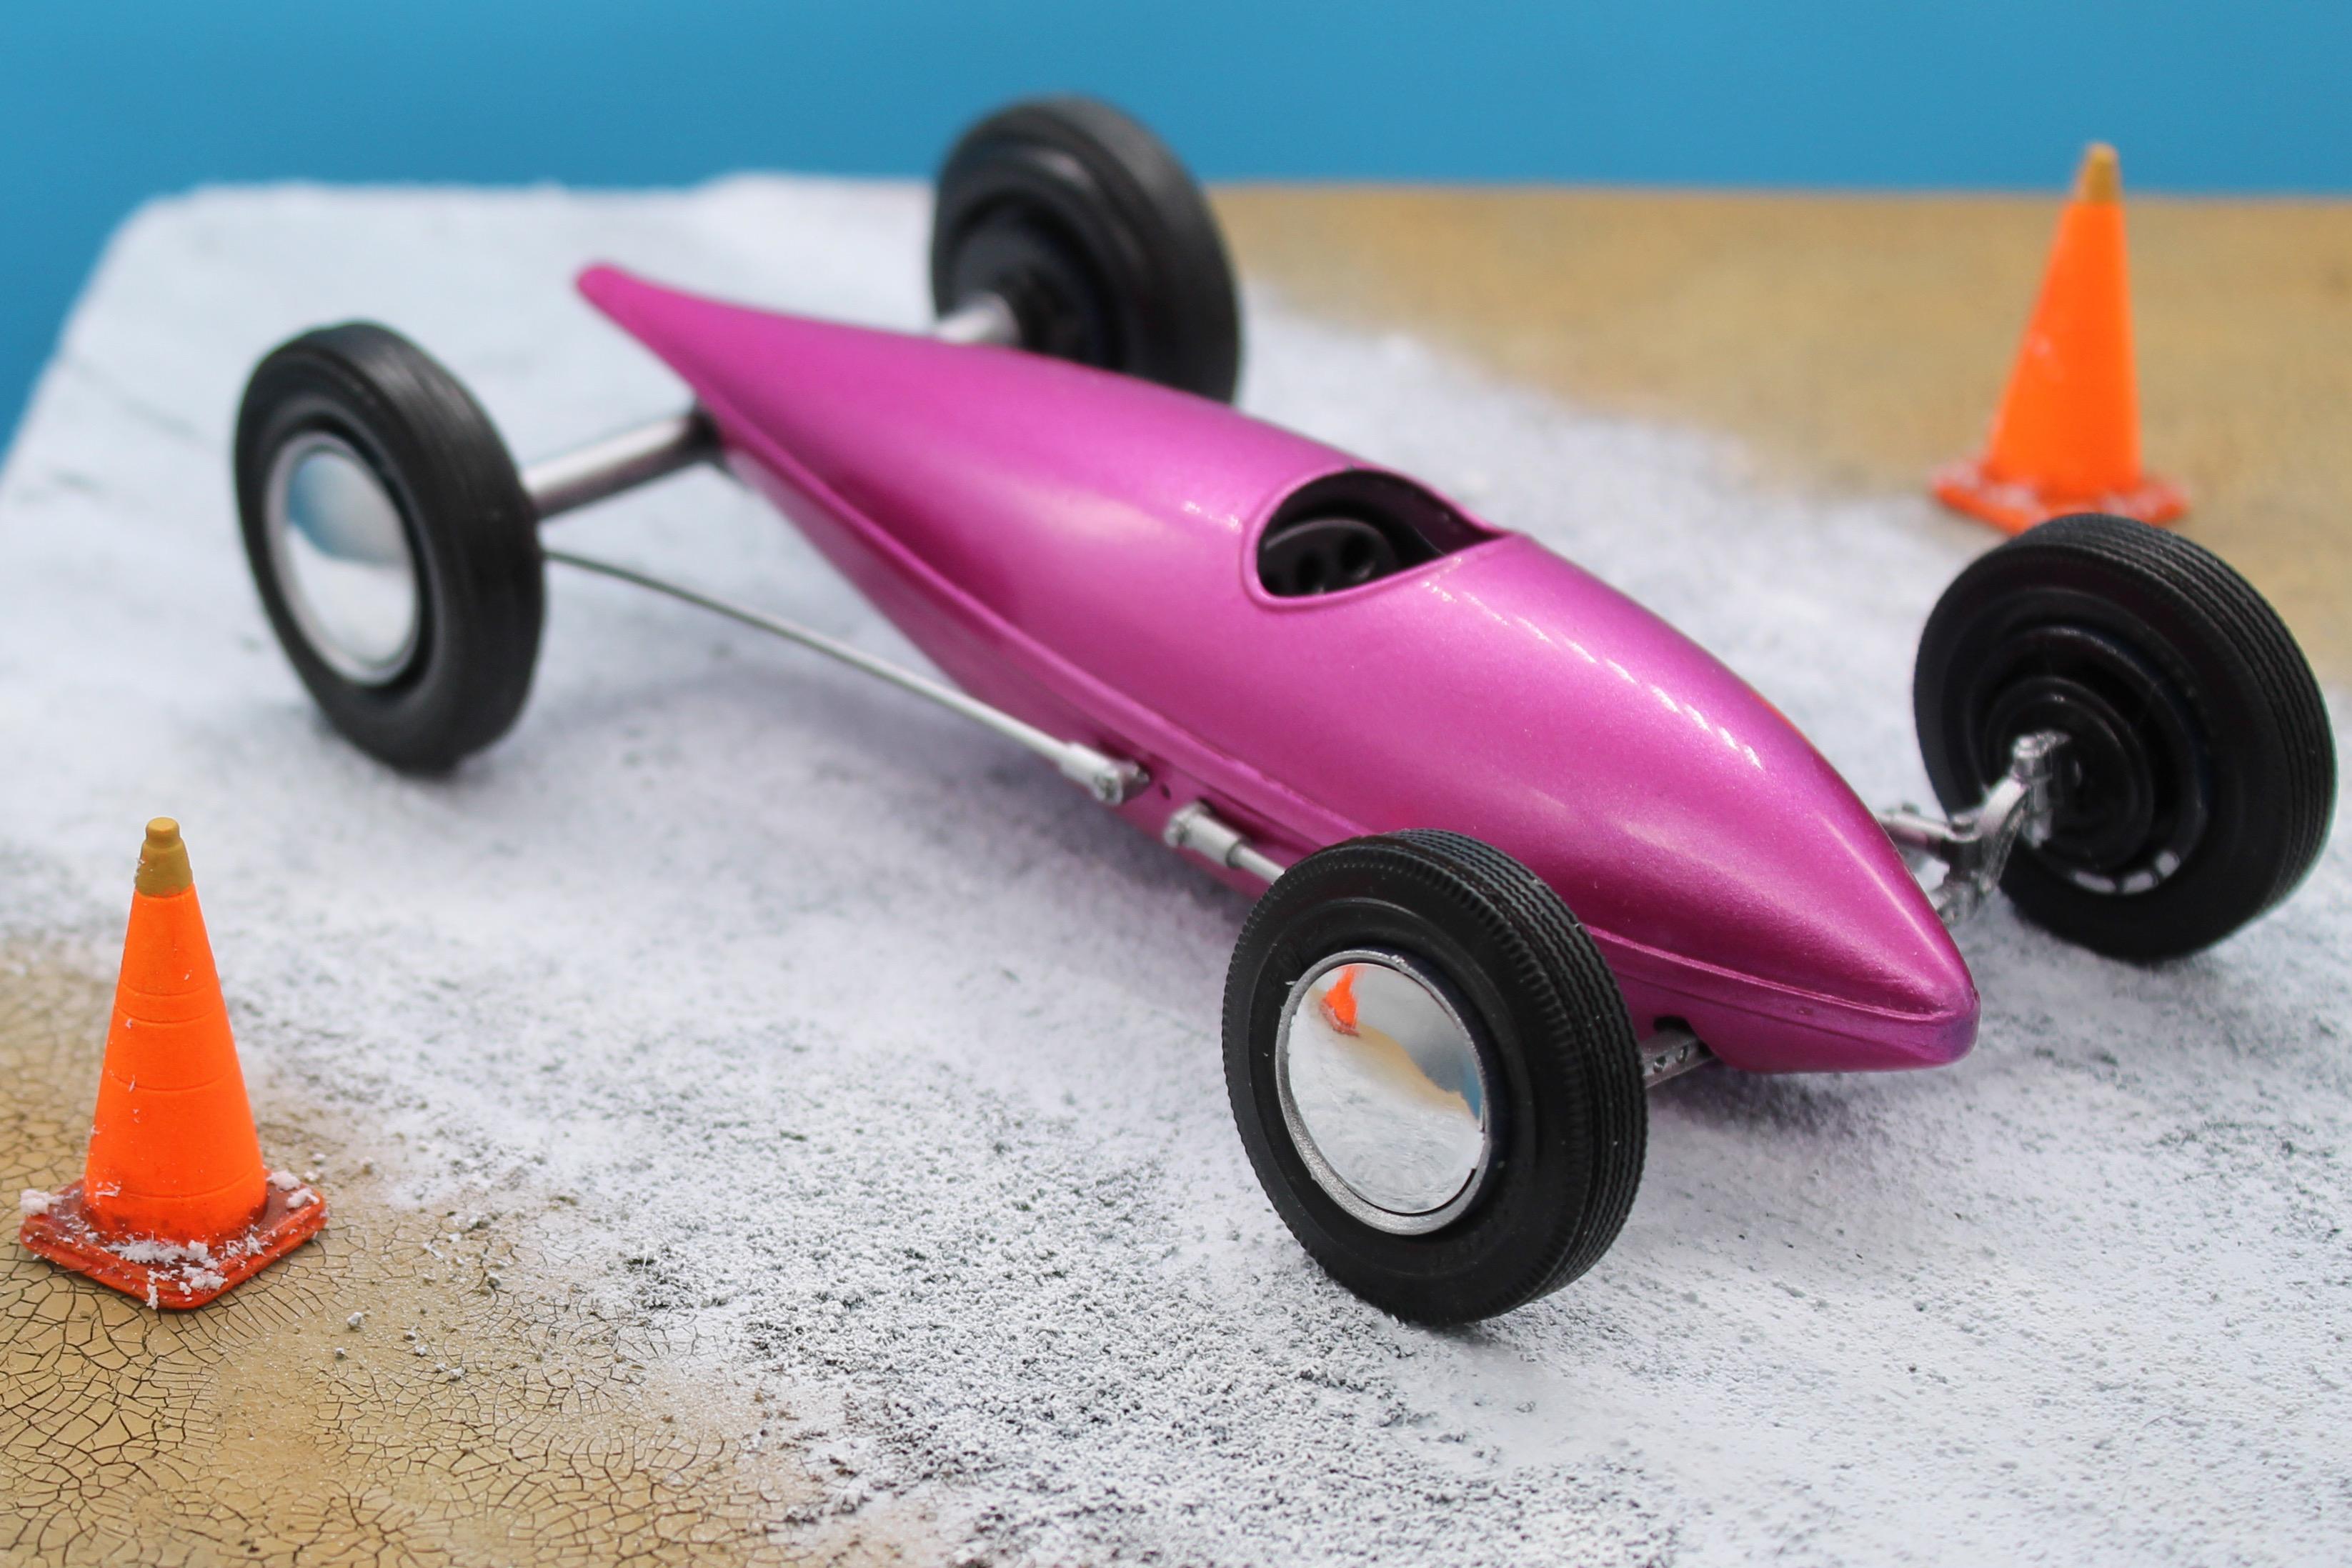
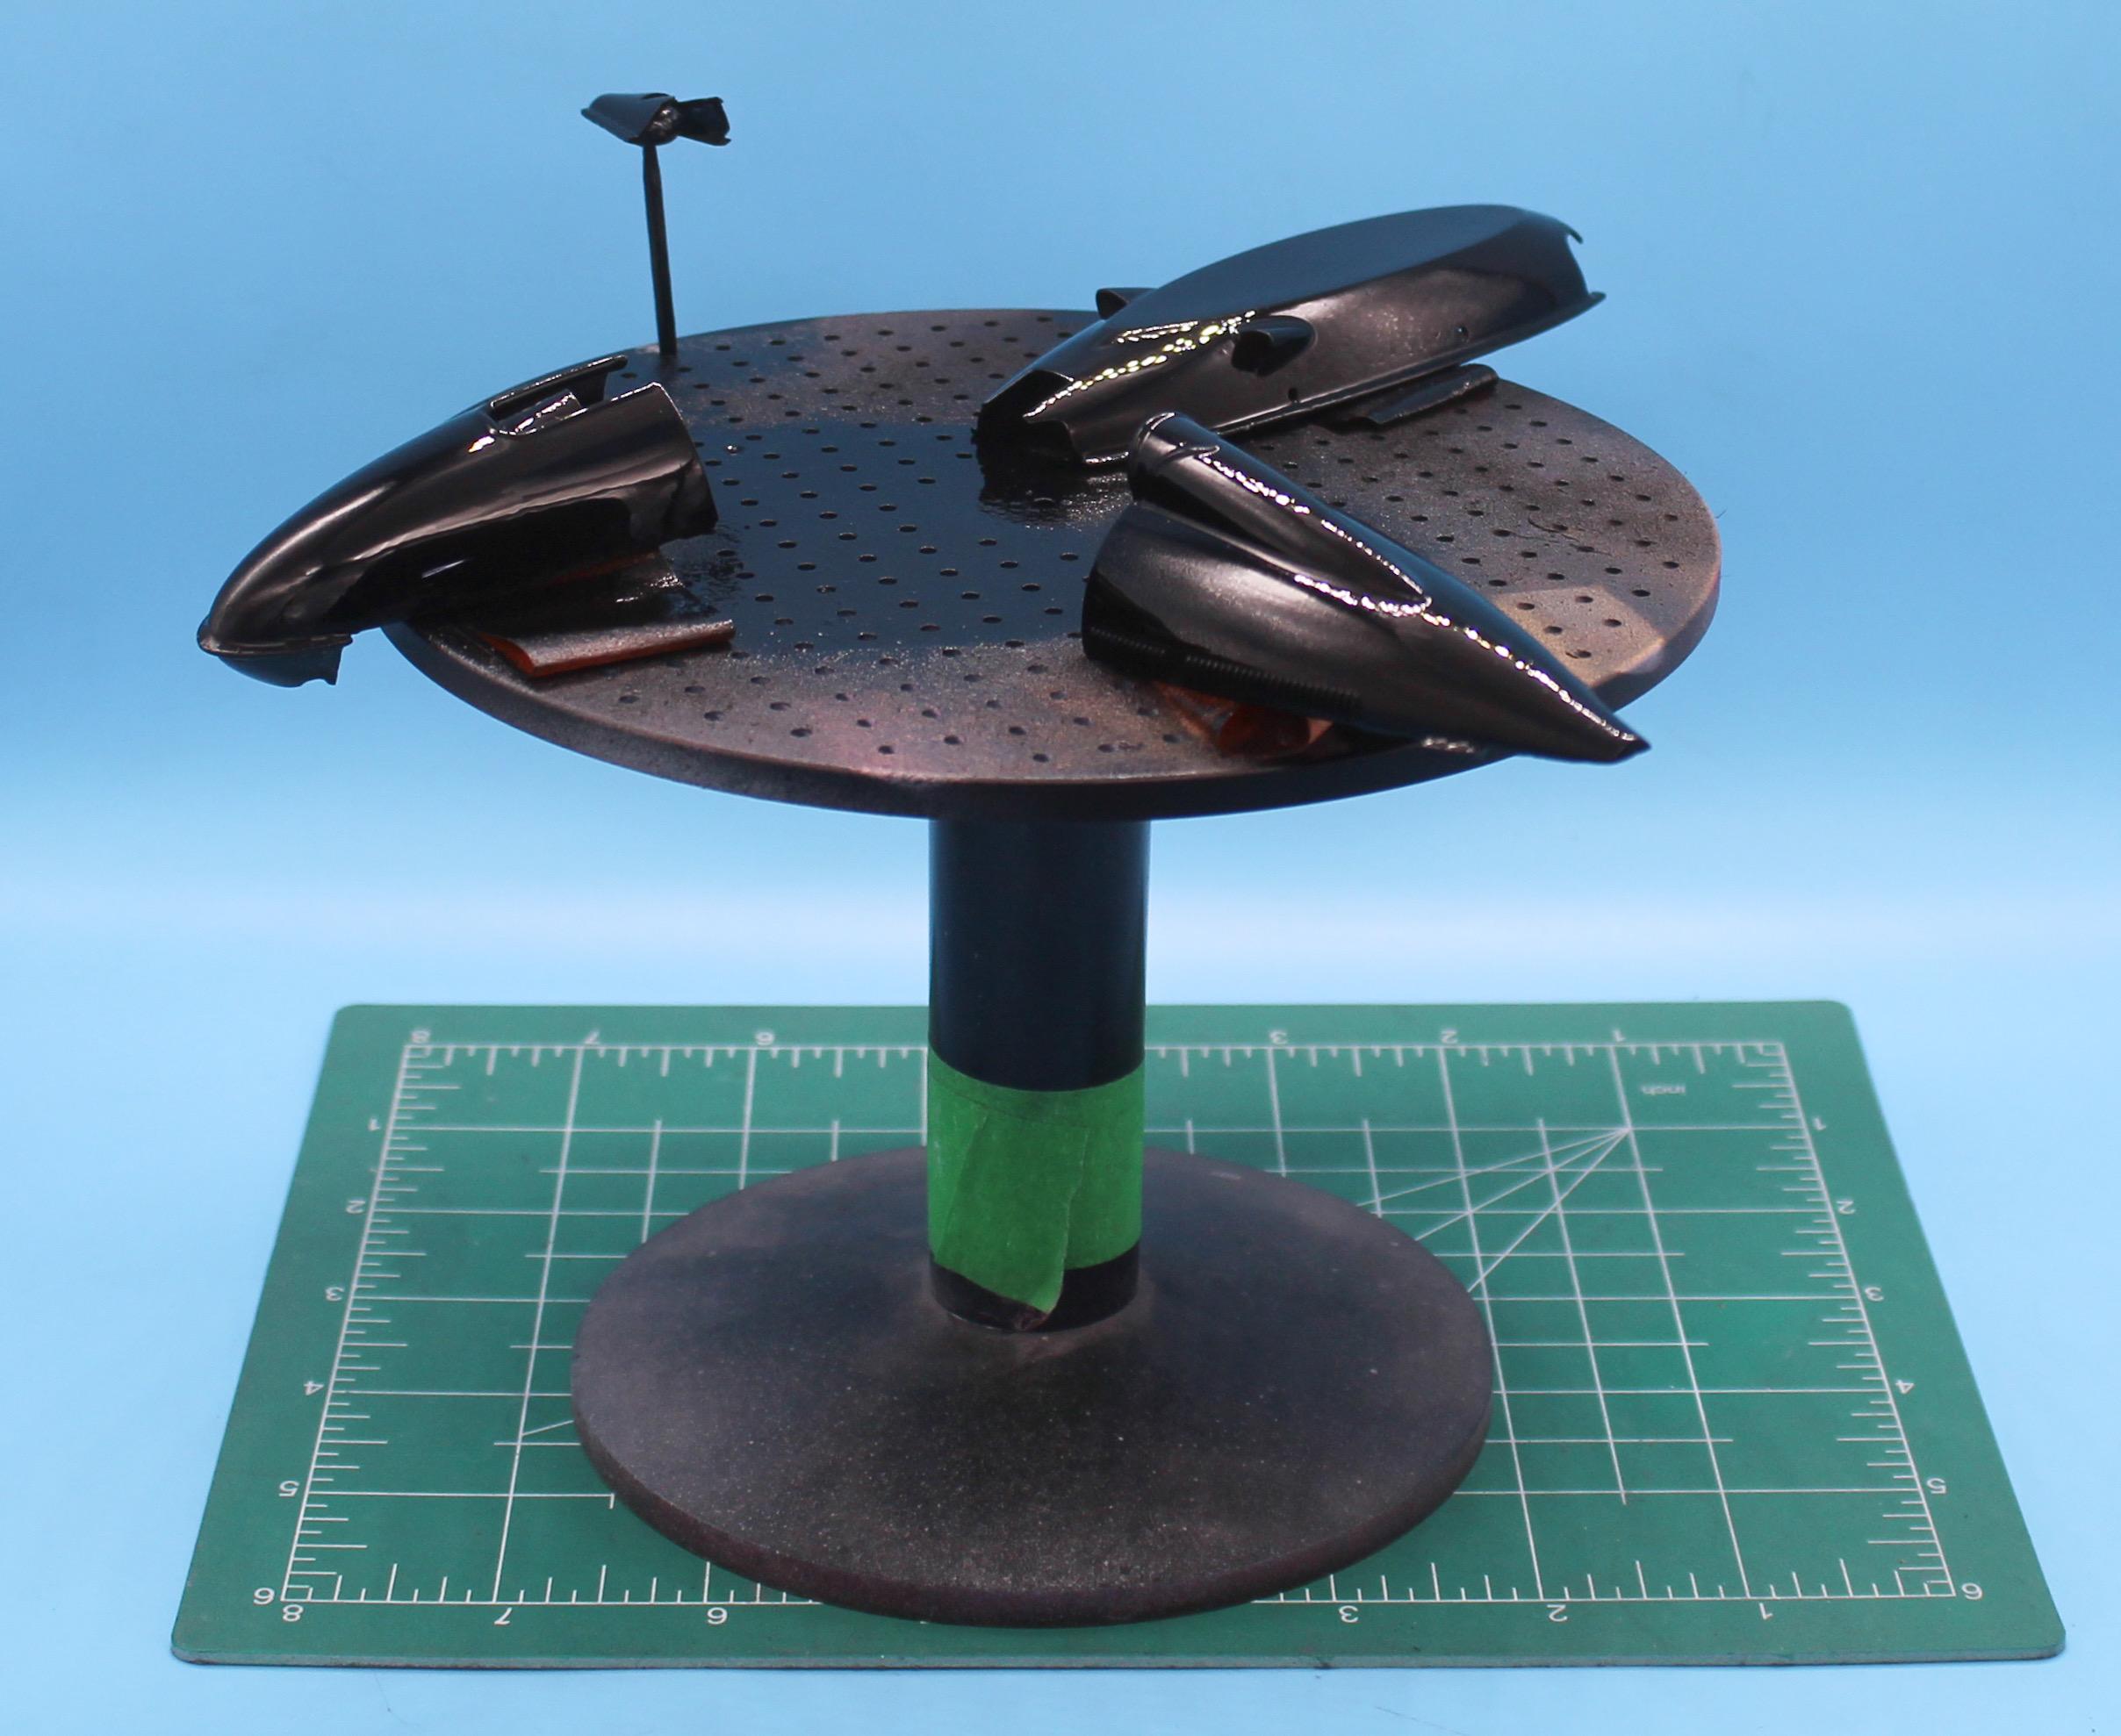
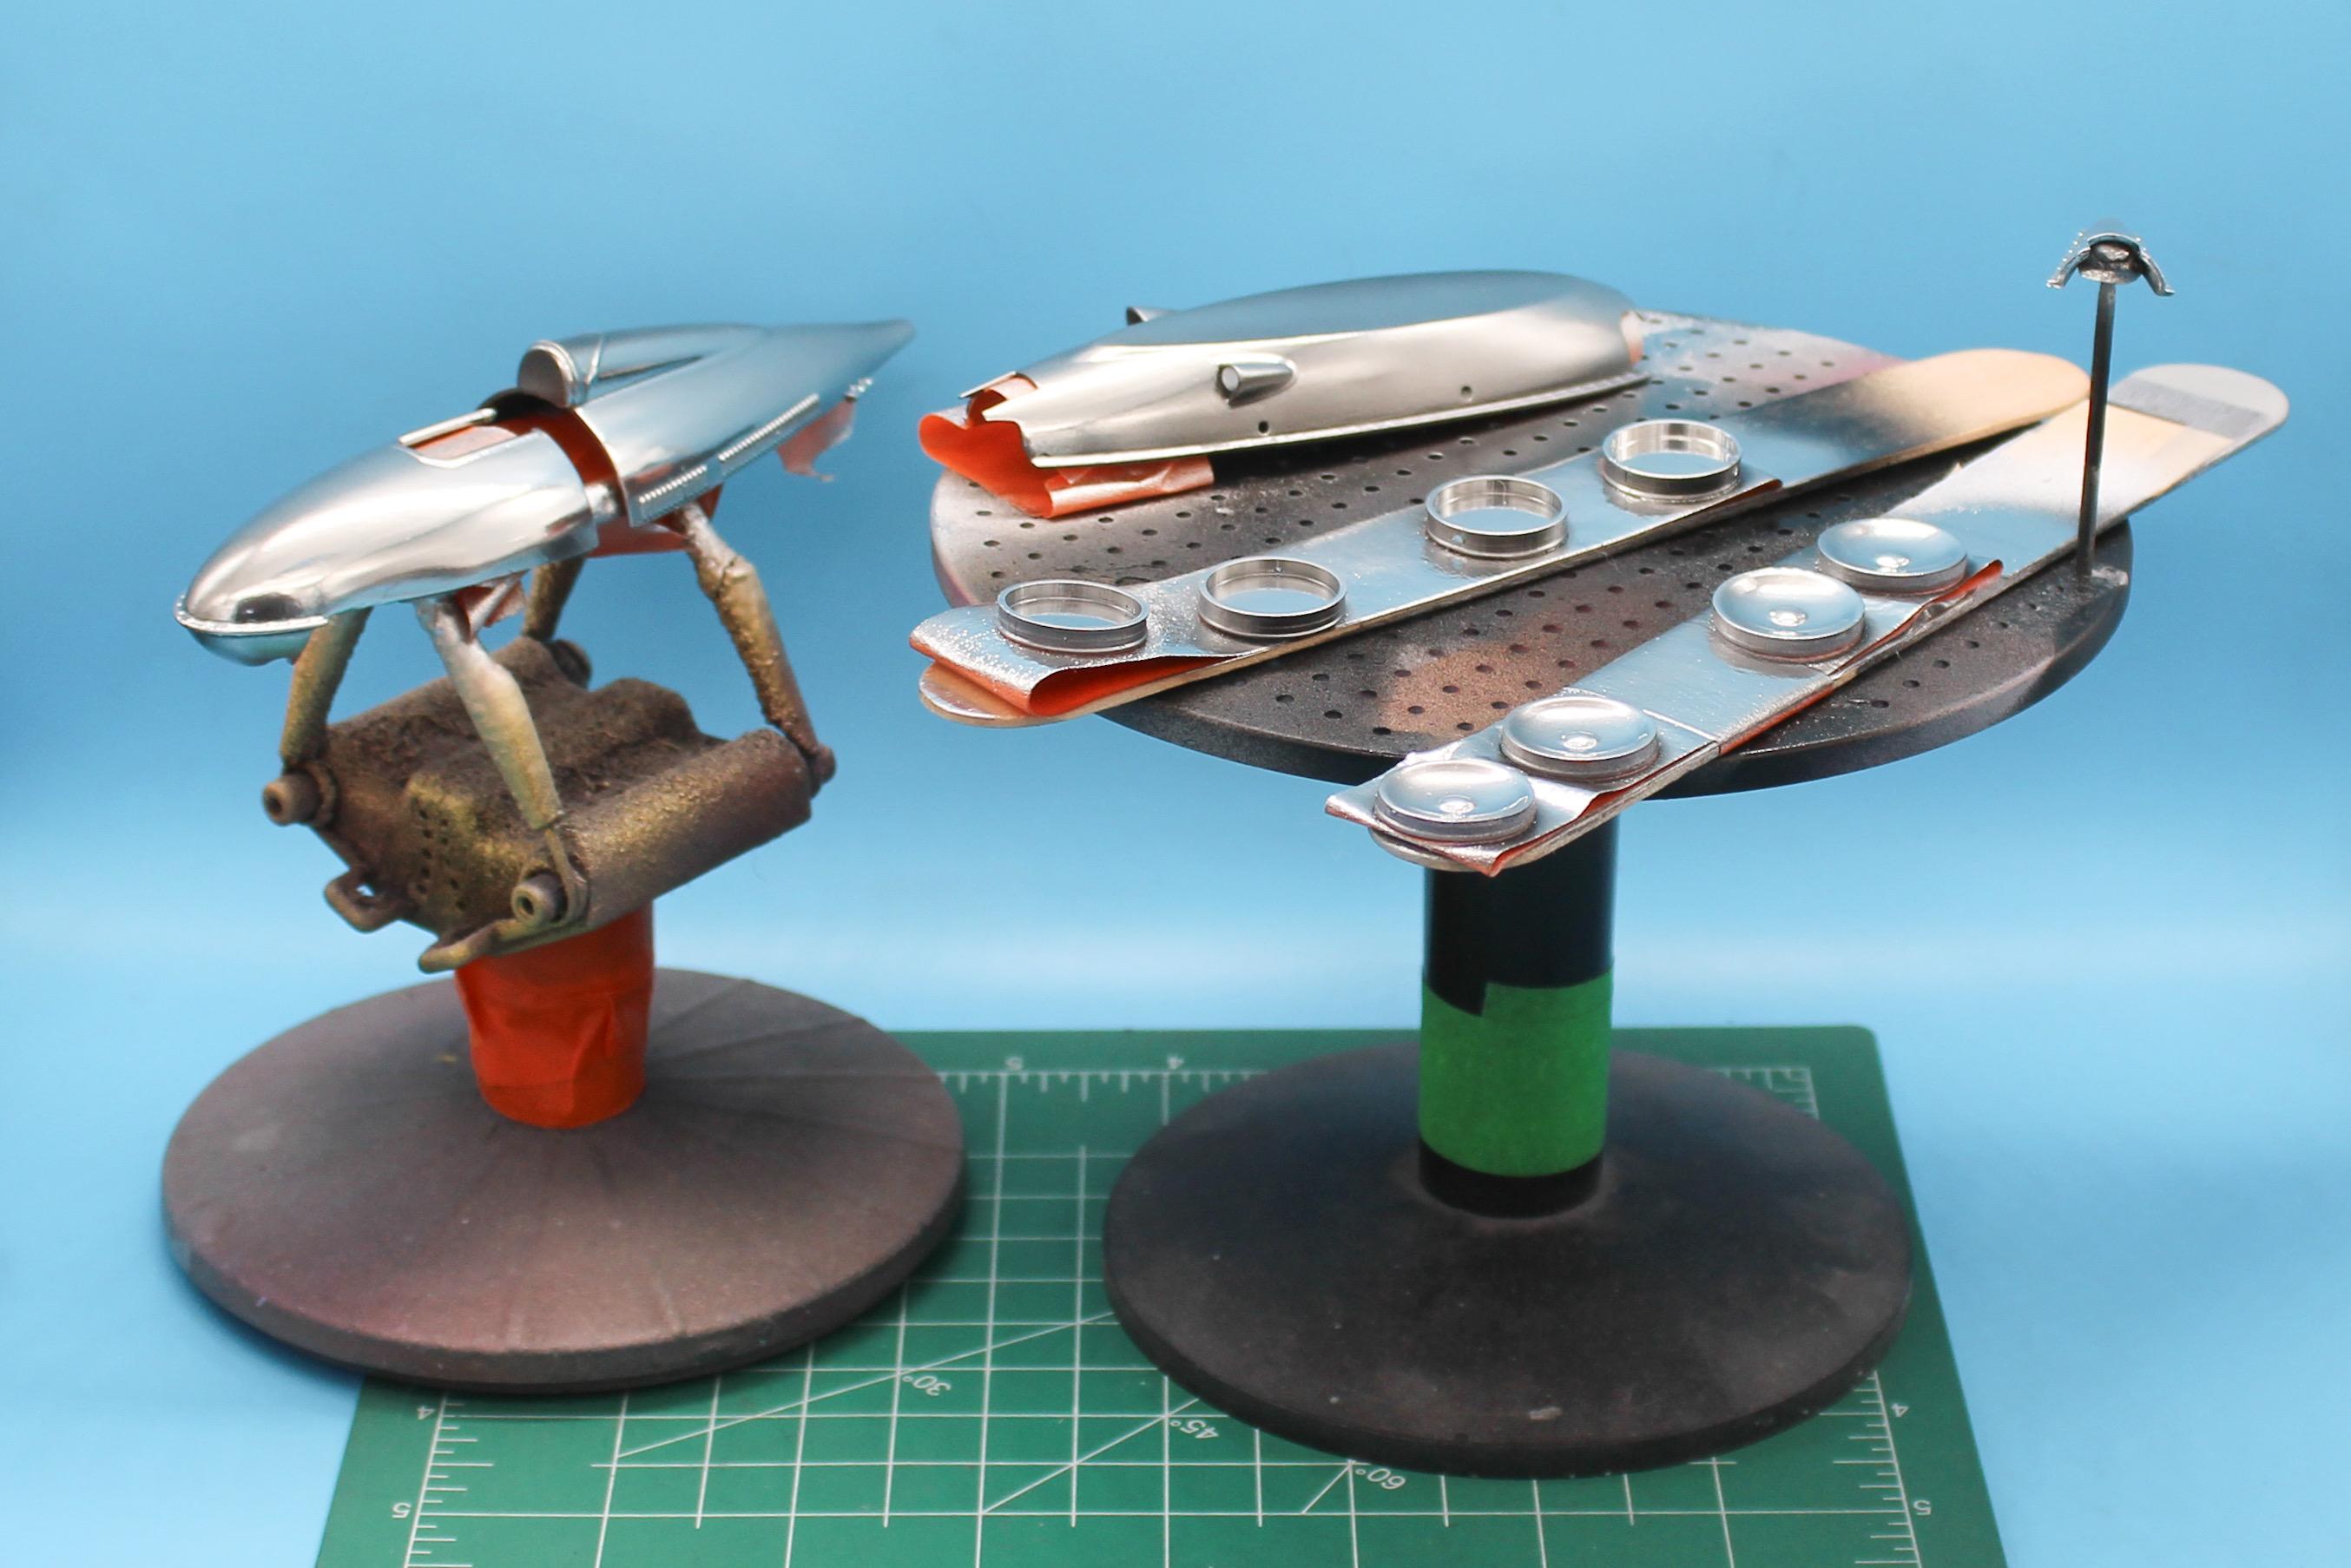
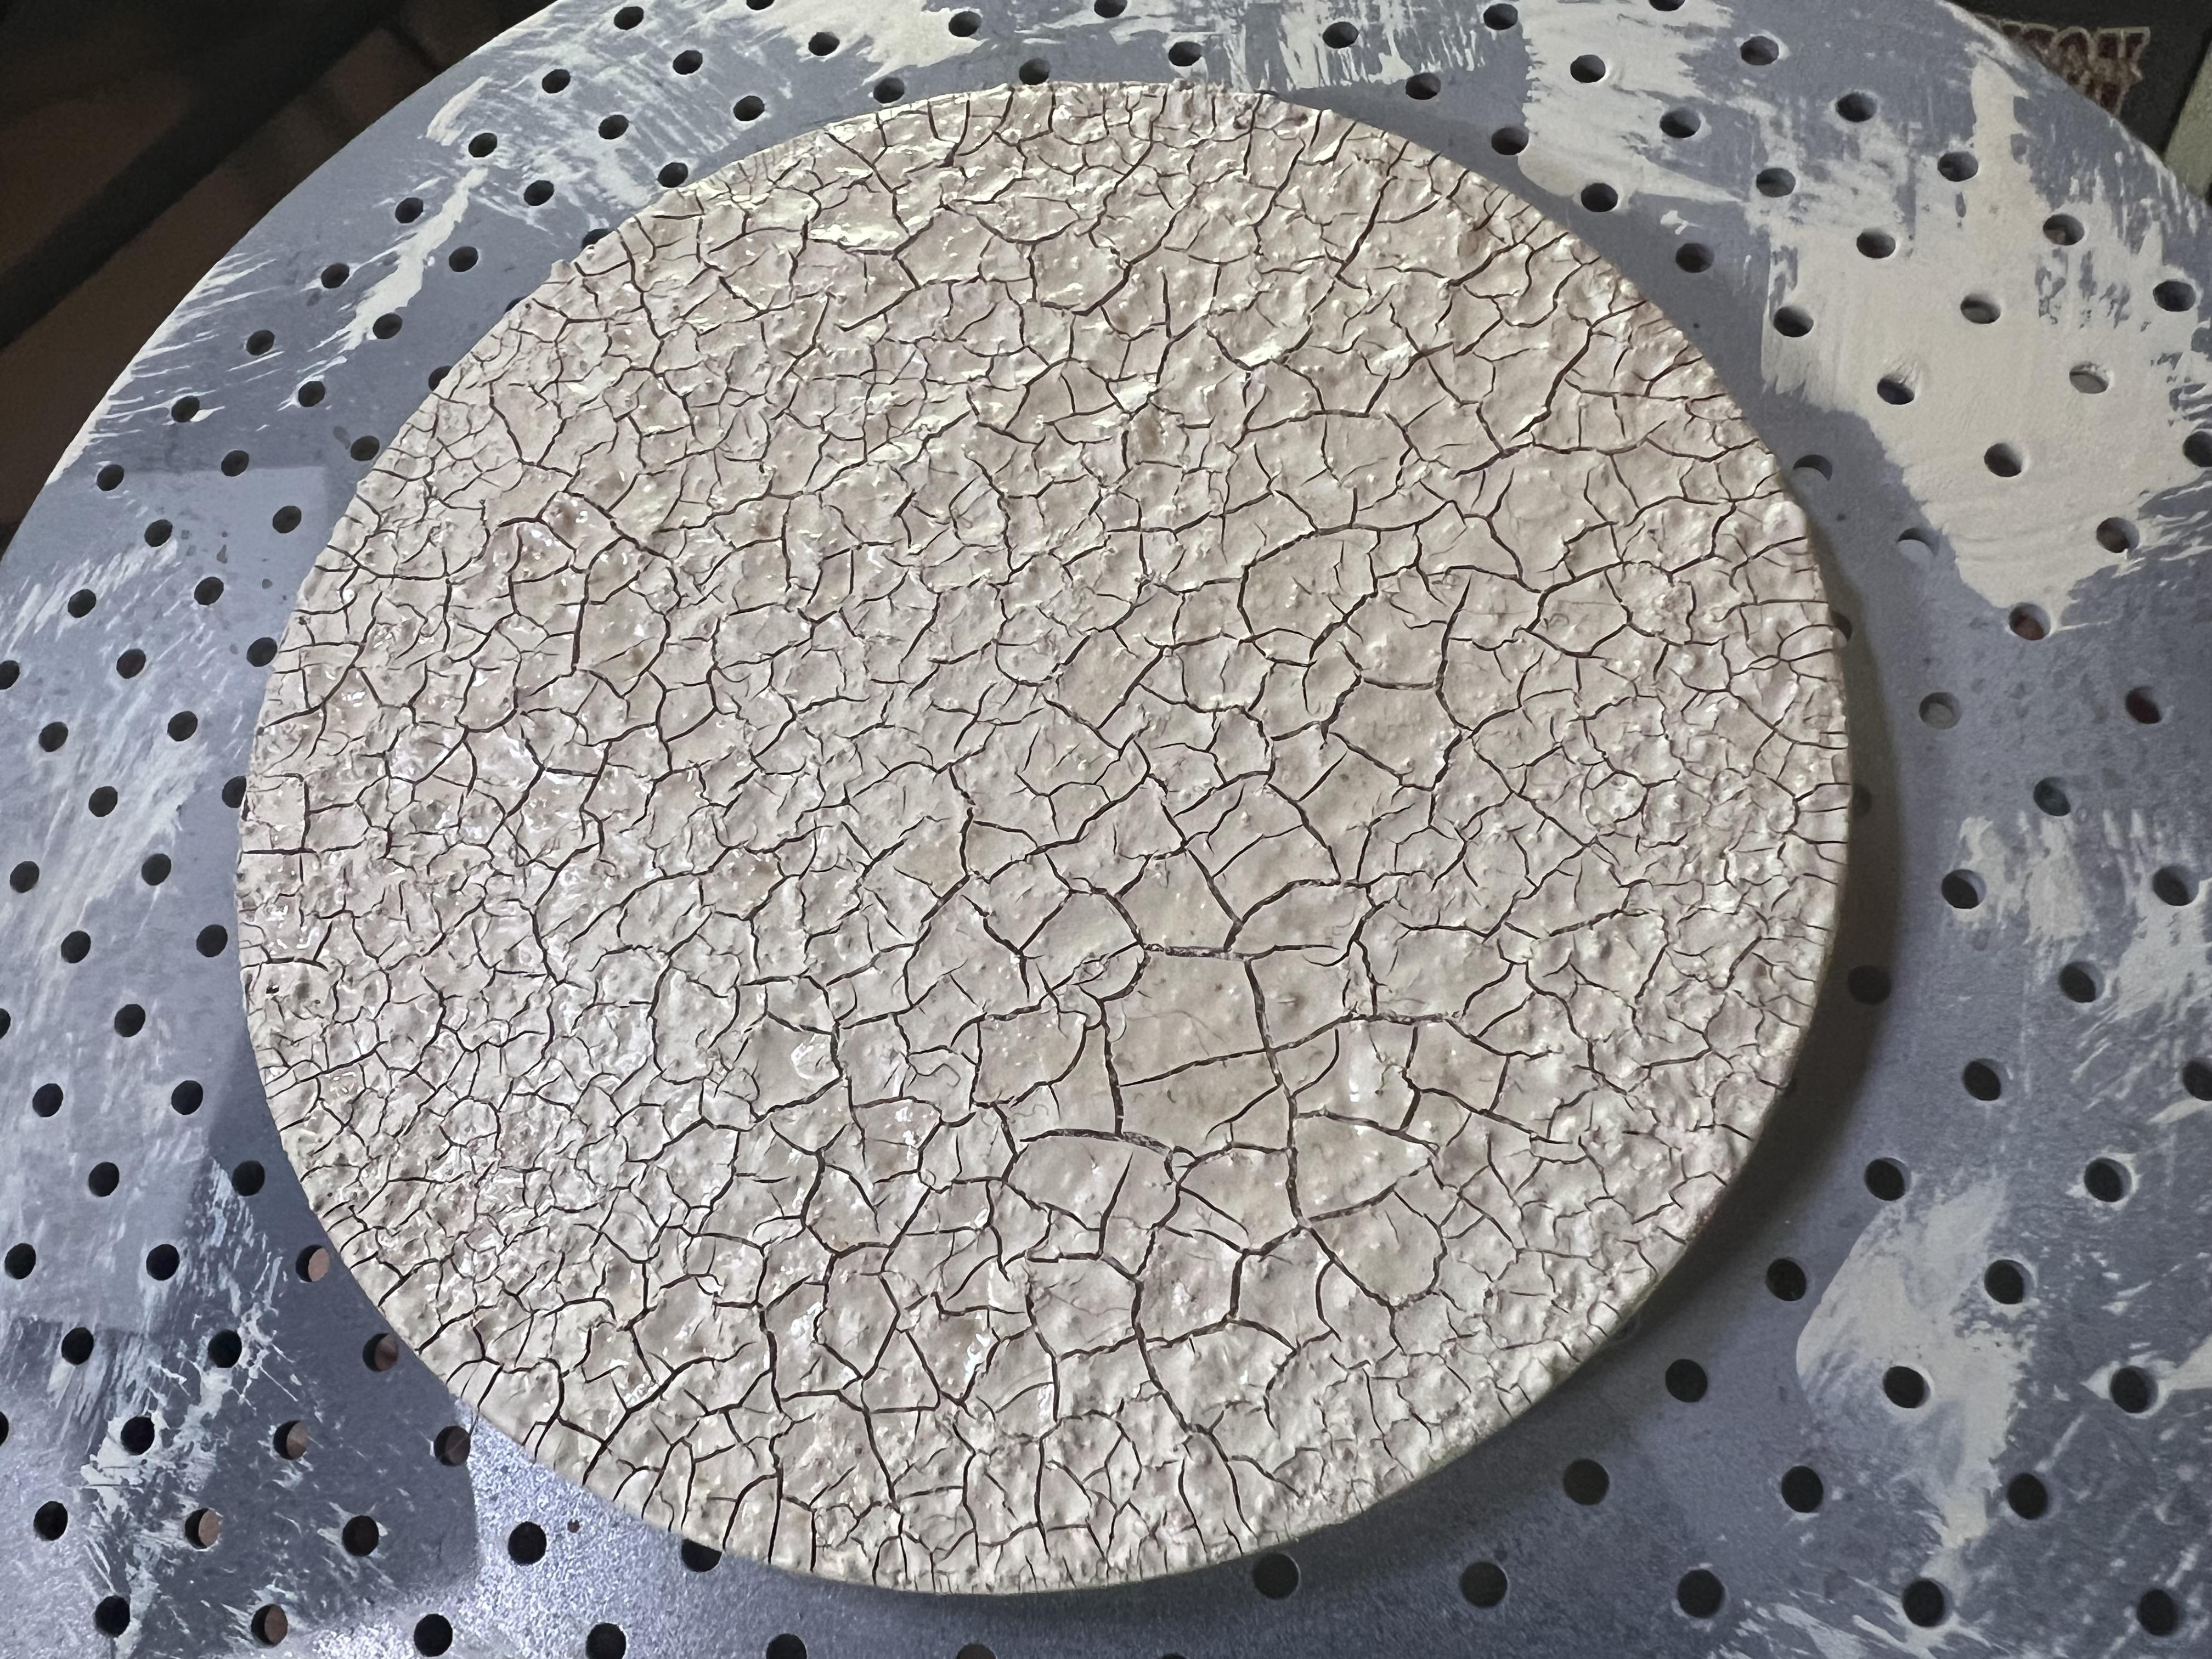
Yeah - I could’ve picked an easier subject than something such an organic shape with all the layer lines. In this case tho, I’m only really using the chrome base to layer acrylic metal finishes over…but it might be fun to do an actual all-polished body at some point. Thanks for the comments! Speaking of those metal finishes, here’s this weekend’s little update…so my goal with the body was a bare metal finish with some visual interest - not really patina’d and worn, but not chrome-polished either. I used a combination of different Vallejo acrylics and just gently built layers until I had in front of me what I had in mind originally: I went super-thin on some spots to let that chrome look show through (the highlights on the nose show the effect) to give hopefully a more realistic looking metal finish than I would’ve got with just straight acrylic over a black base. I’m not totally done yet, but it’s about what I had in mind… Got the engine mostly assembled - it’s REALLY low parts-count but also really well detailed, so there was a little detail painting to be done on this one, but nothing too hard: Got the wheels and tires painted and mated…these will get some salt-accumulation before this build is done, plus some little knock-offs that I’ll add right at the end so I dont…well…knock them off… Did a little paint detailing to the frame, plus some washes and some chipping and some light detailing like that…I’m still not awesome at brush painting little details like this thing needed, but I’m getting slightly better, slowly… And in between working on all that stuff I was working on my little display base; I took the version I had in my last post, shot it all black and then started building up layers of color to simulate my fantasy Bonneville scene of a loose salty track running through the dry cracked-salt-and-mud. Black, followed by tan for the cracked portion and dark blue for the salt: Then a bunch of layers and stippling with the airbrush to slowly bring the colors to where I imagined them being… …it looks a mess but it’s getting closer… Still not done here, but it’s definitely heading in the right direction. Fun fact - upon researching the cones they use at Bonneville some of them have a tan/yellow band painted on top. Why? I have no idea, but I used some reference pics and painted some cones I had in stock to match the images I found online: And a quick mock-up of my still-to-be-weathered pink car, the base and my cones: I started individually brush-painting some of the little flicks of salt (you can see a coupla three of them next to the cone up front there) but there’s a lot of them and I ran out of time…but more soon! Thanks for looking!
-
Building the AMT Double Dragster Streamliner (again…)
OldNYJim replied to OldNYJim's topic in WIP: Drag Racing Models
That’s an awesome tip too - thanks Alan!! -
It is?!? Where did you see that? 😍
-
Model builds and AI..........
OldNYJim replied to Dave Van's topic in General Automotive Talk (Trucks and Cars)
That’s cool! I tried the opposite - fed it a picture of my 1:1 and told it to make it into a model kit:
-
Anyone here tried gloss black primer?
OldNYJim replied to Monty's topic in Model Building Questions and Answers
The gloss primer is designed for overlaying metallics - silvers and metal tones and stuff like that that NEED a black base to give the best effect. For those applications, it’s super useful - I’ll use it when I know a part is going to end up some kind of metal shade, and I don’t feel like doing regular primer, THEN gloss black, then a metal shade. For most other applications though, regular primer will give better paint adhesion and would probably be a better choice -
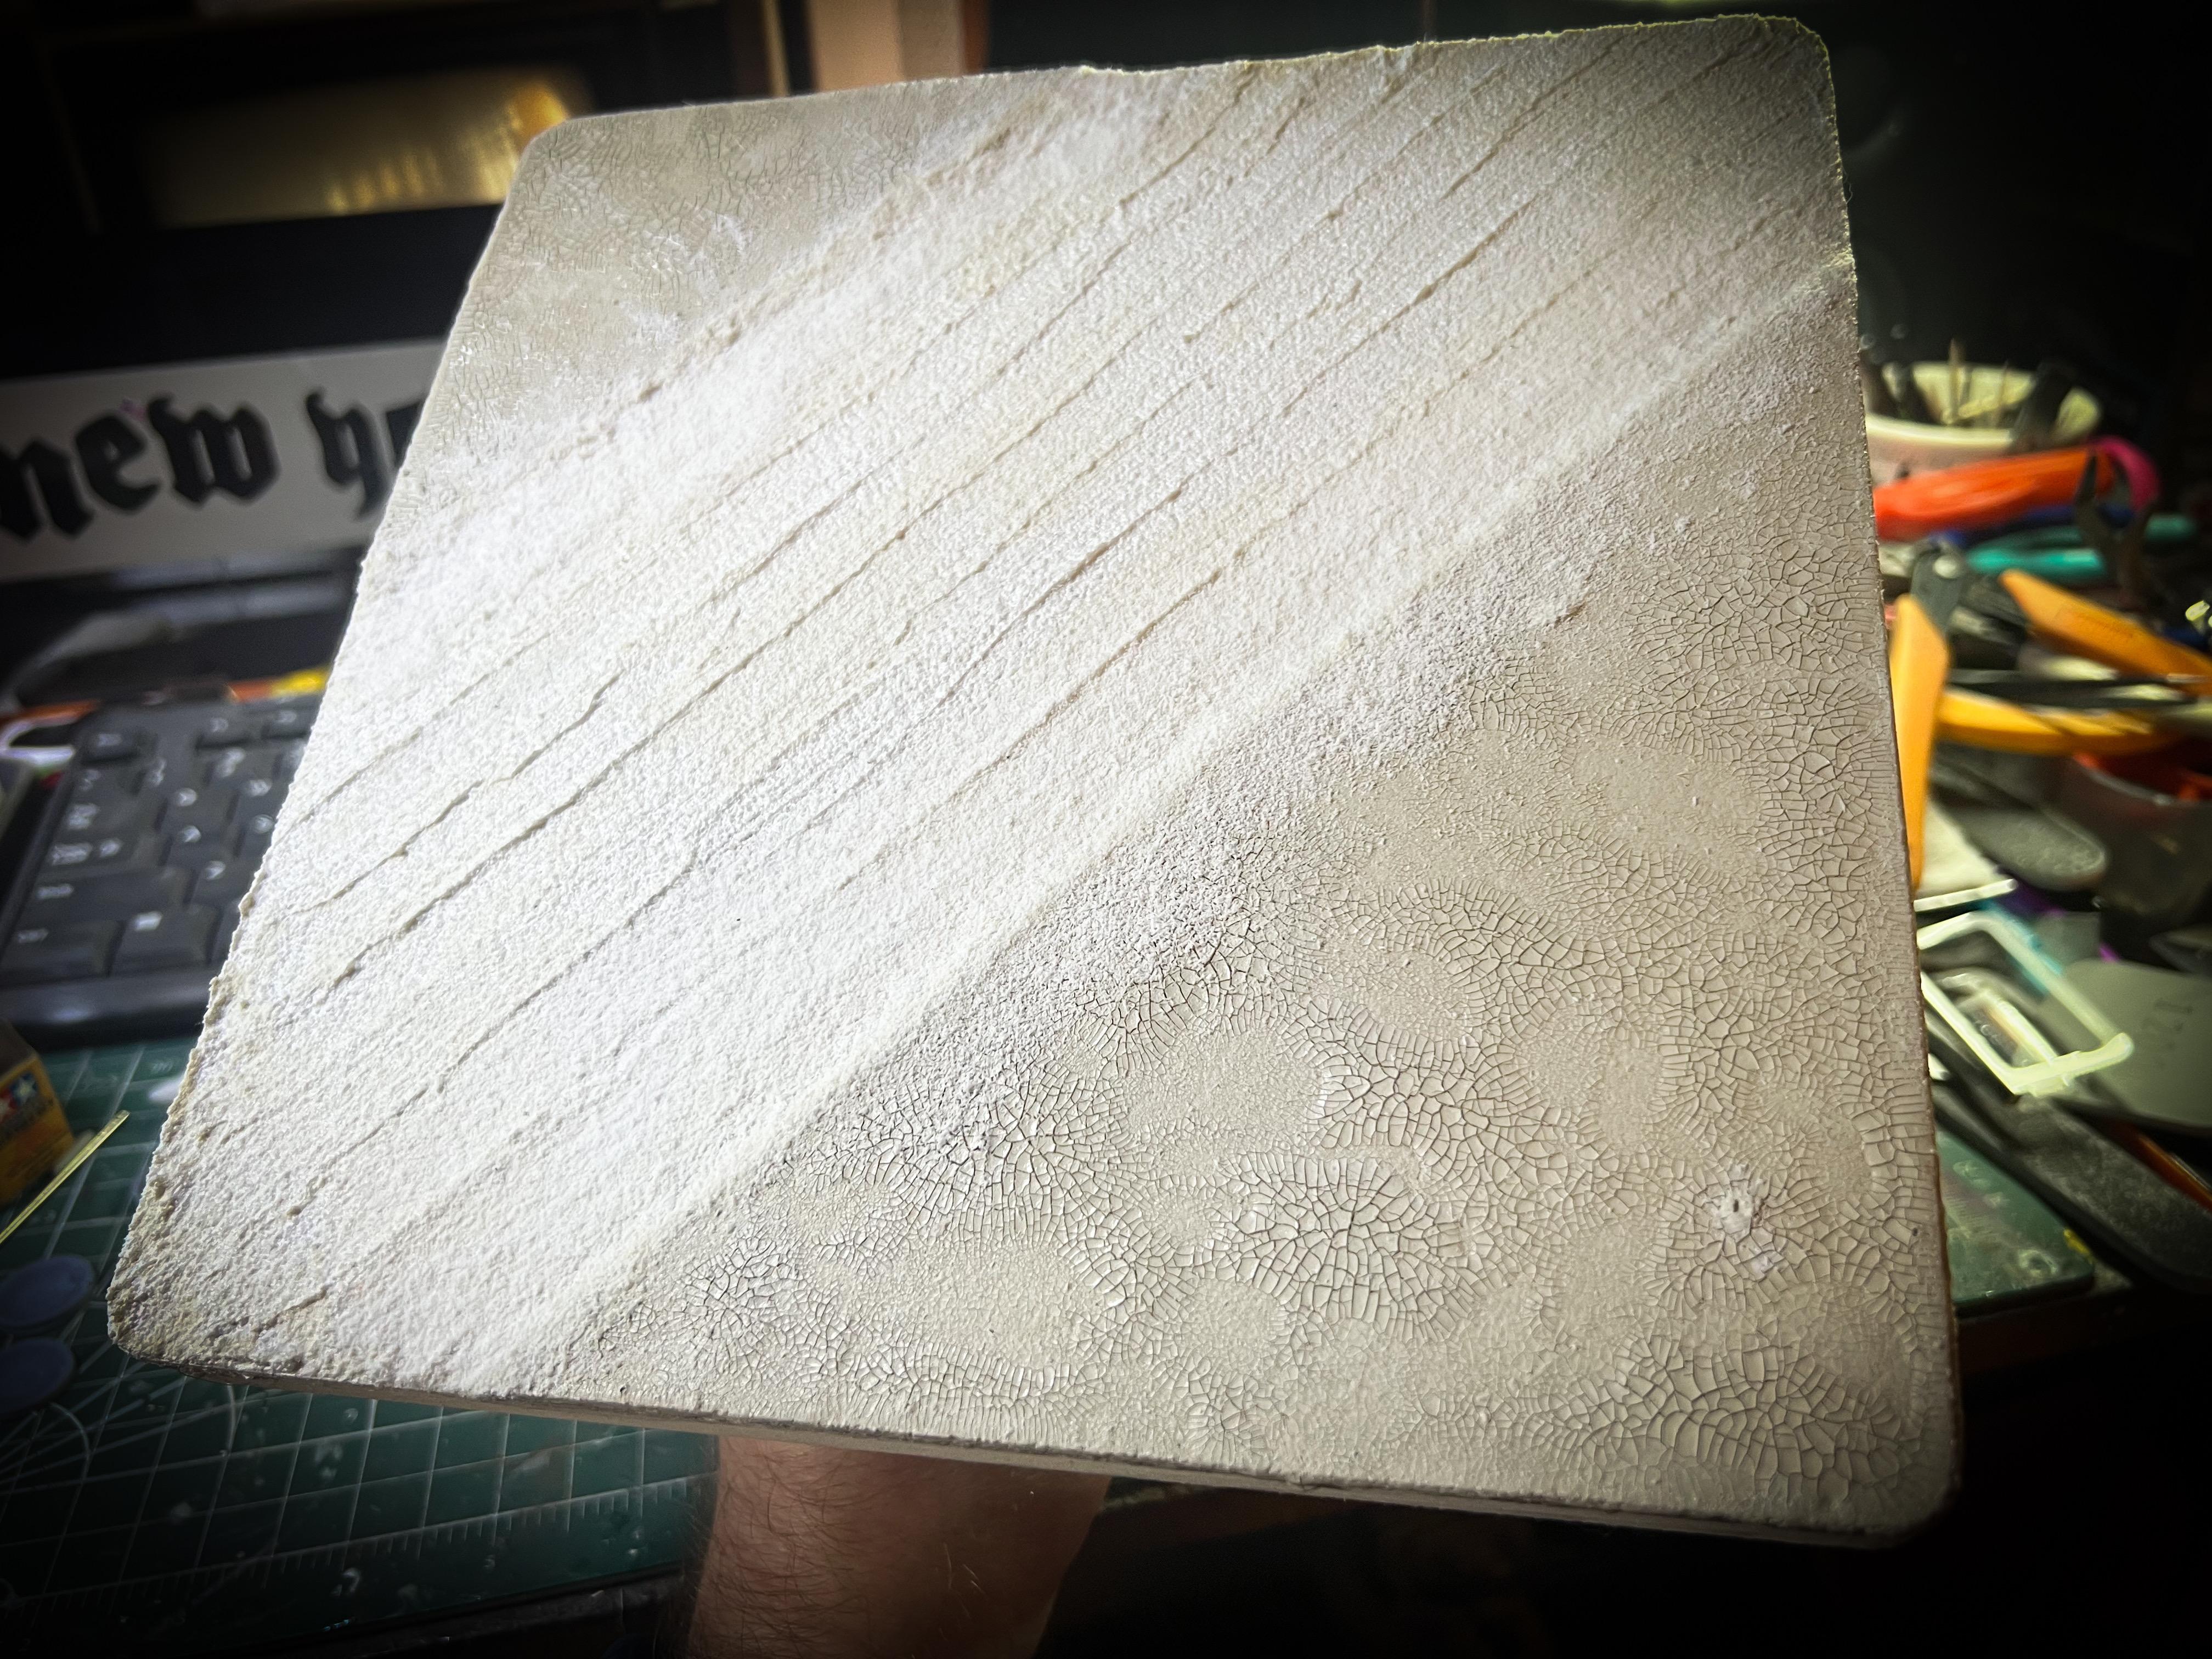
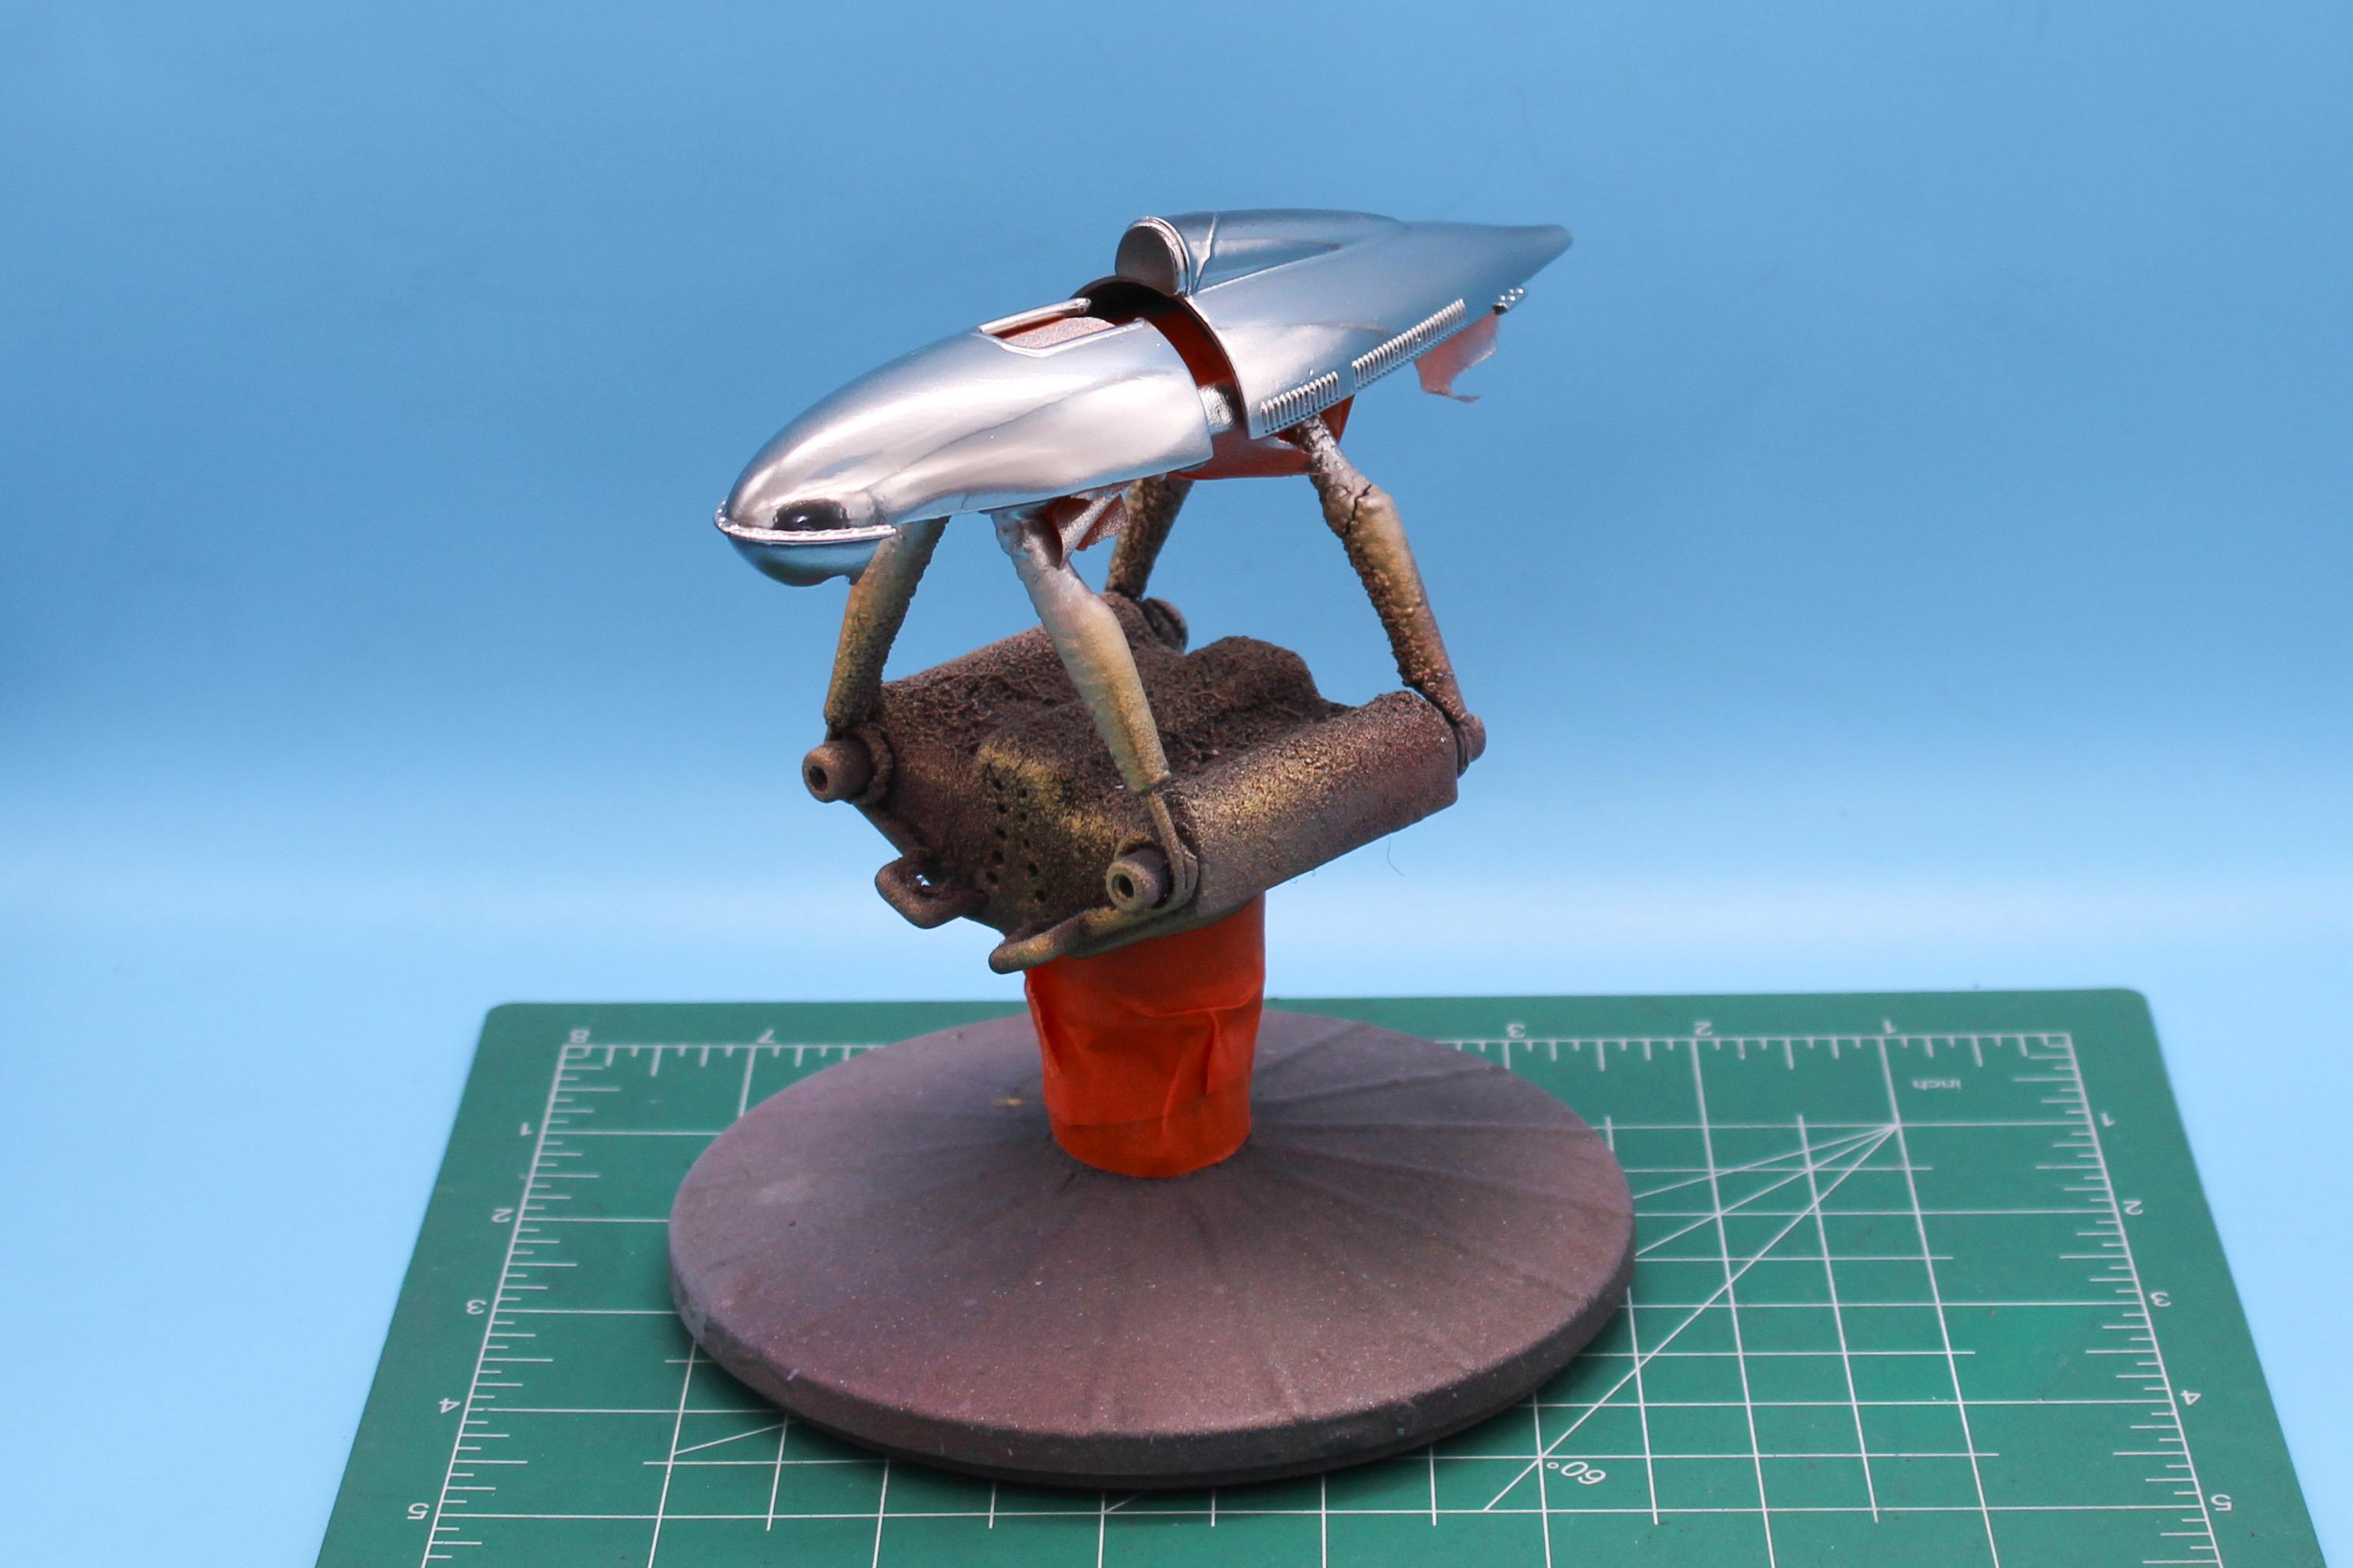
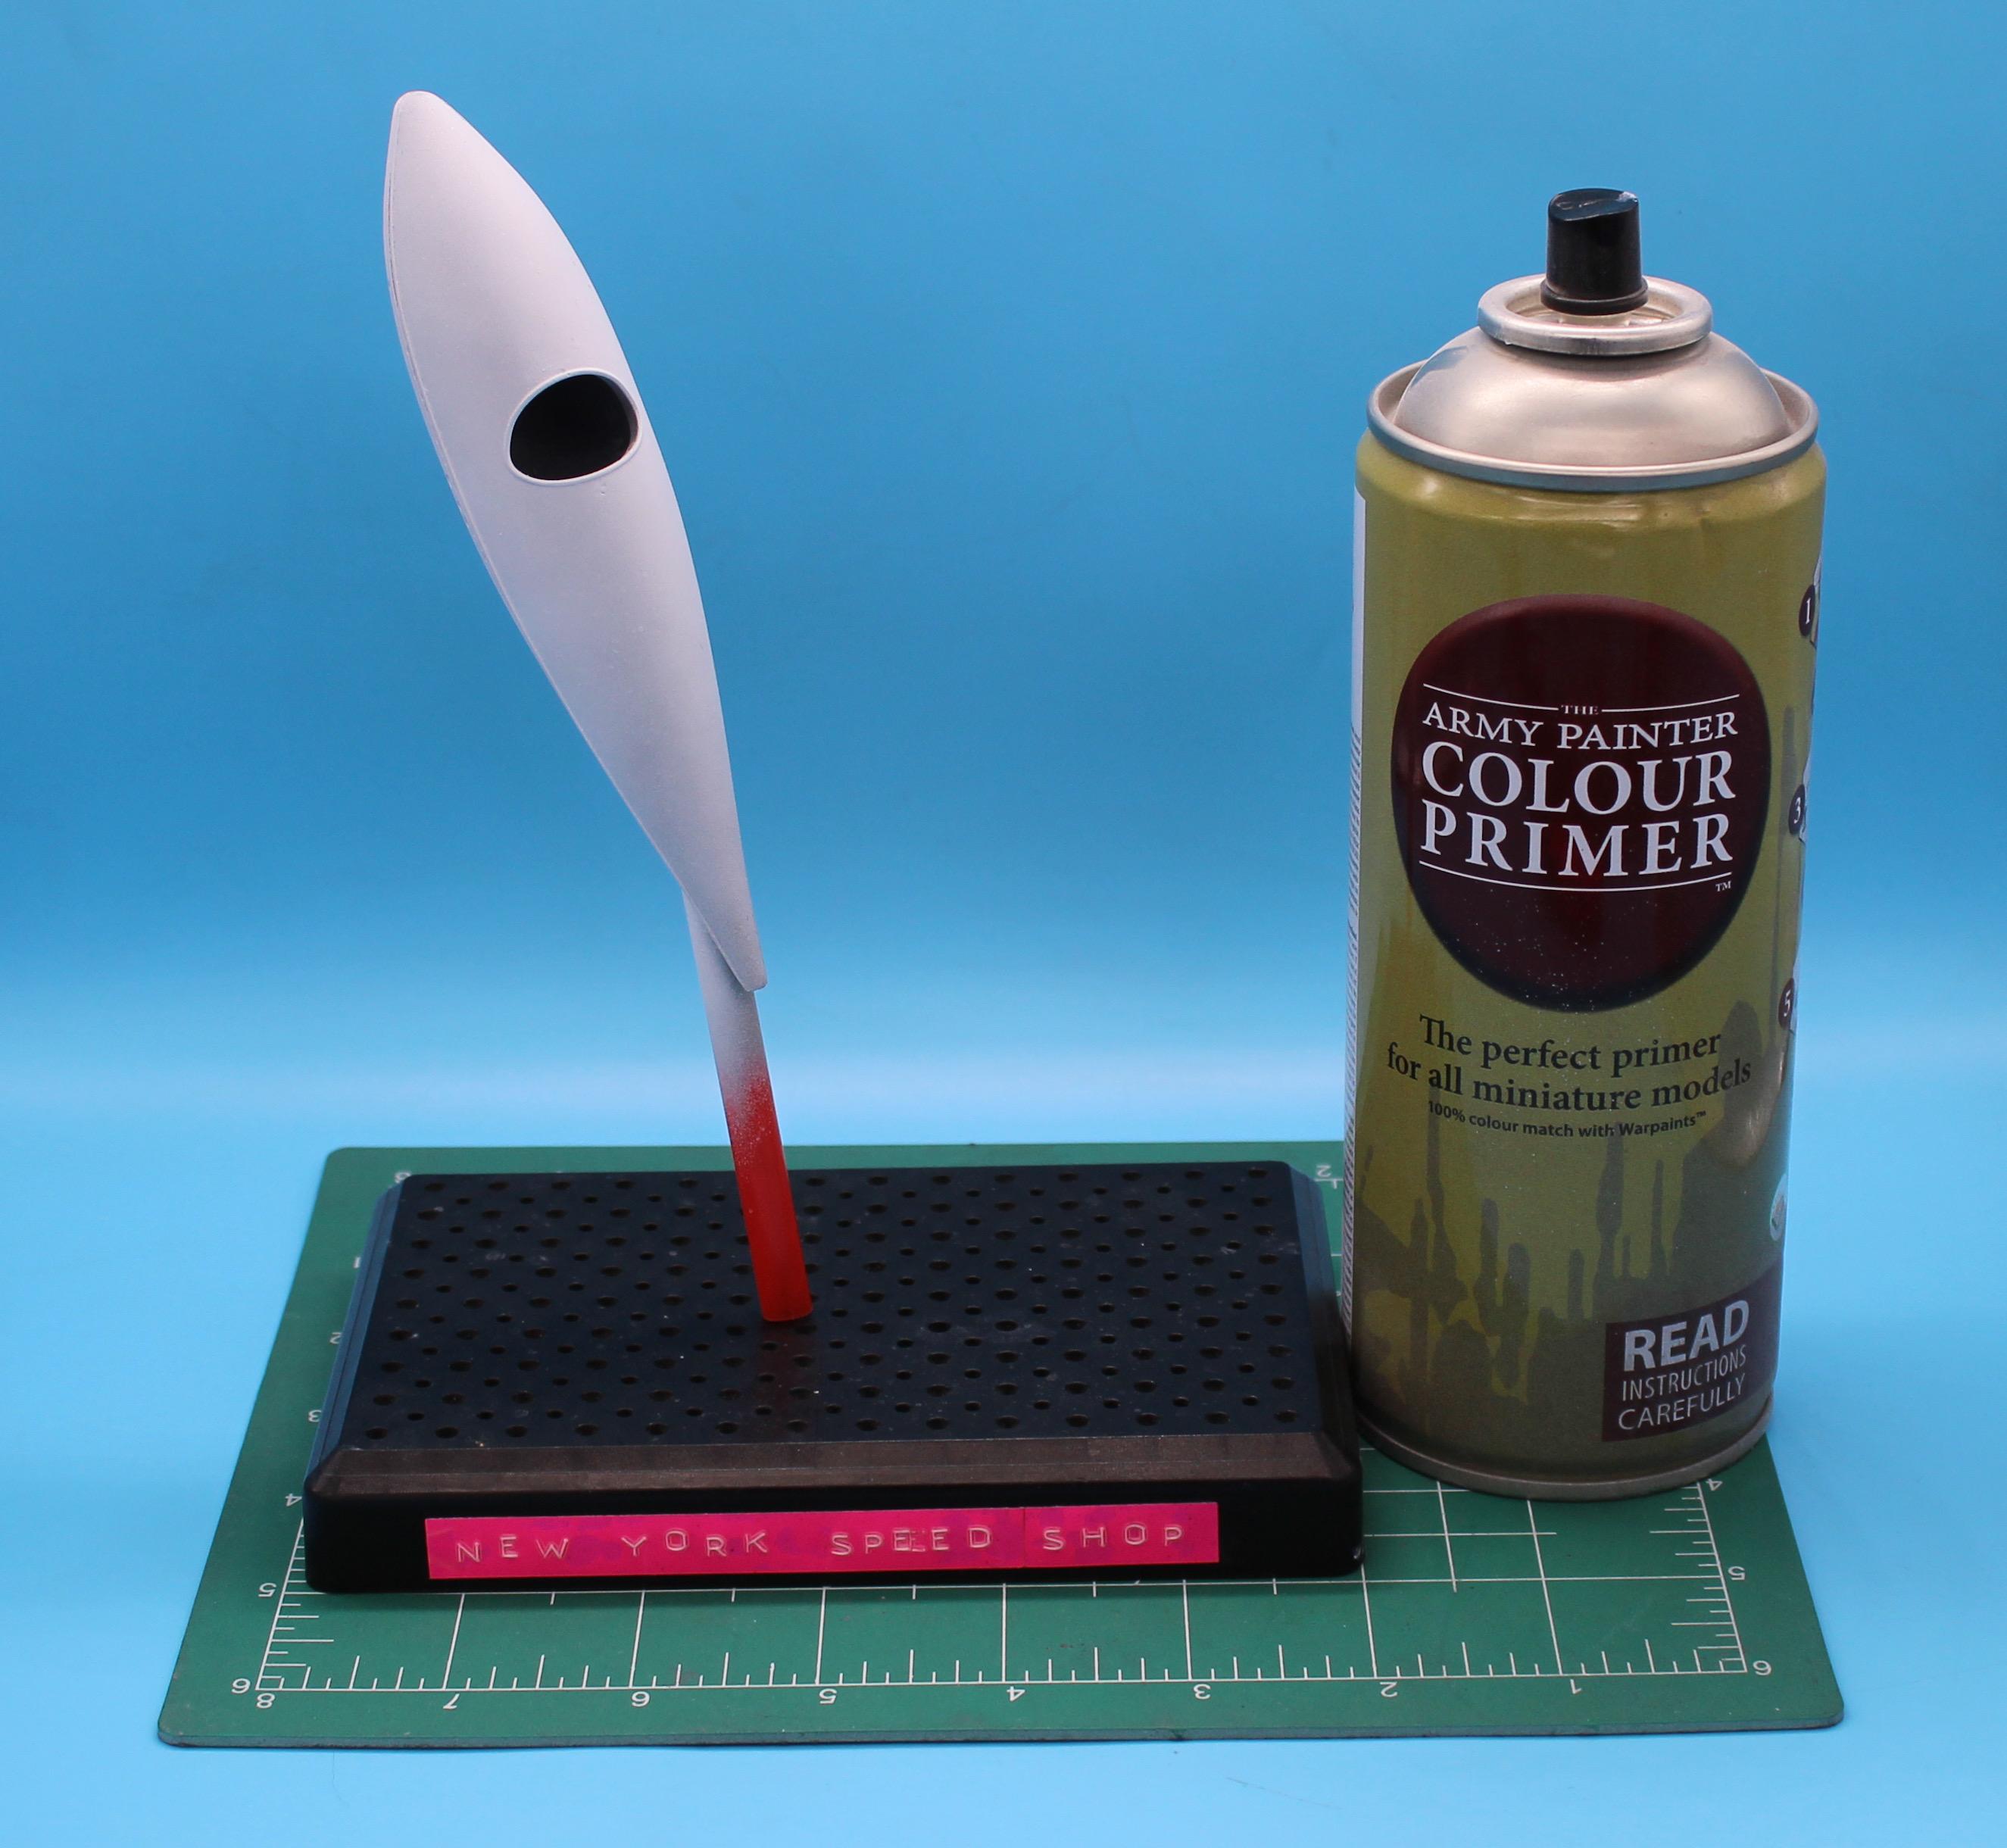
Thanks fellas! I made a TINY bit more progress this evening… My crackle medium came out pretty well - captured the dried-cracked-salt look of the salt flats, I think (at least in texture…I’ll be painting this entire base anyway so the color doesn’t worry me…) Also laid down some snow medium and applied some dusted snow medium (all products made for diorama guys - and luckily I’m not smart enough to know the difference between snow and salt) to my base…I wanted to capture both the dried-cracked-salt look AND the powdery loose salt on this little stand, although I’m no diorama expert so we’ll see how successful I am… Painted some cones too - more on them when I get there… Back on the car - got the body nice and smooth and shot some nice glossy black base on the bodywork: And tonight, laid down a little chrome: Then I broke the little brass tip on my airbrush, so that was the end of my evening’s fun for one night…but I like seeing those parts in mirror finish… Thanks for looking - more soon, soon as I’ve done more!
-
Who doesn't love a mock-up? Let's see yours!
OldNYJim replied to Belairconvertable's topic in WIP: Model Cars
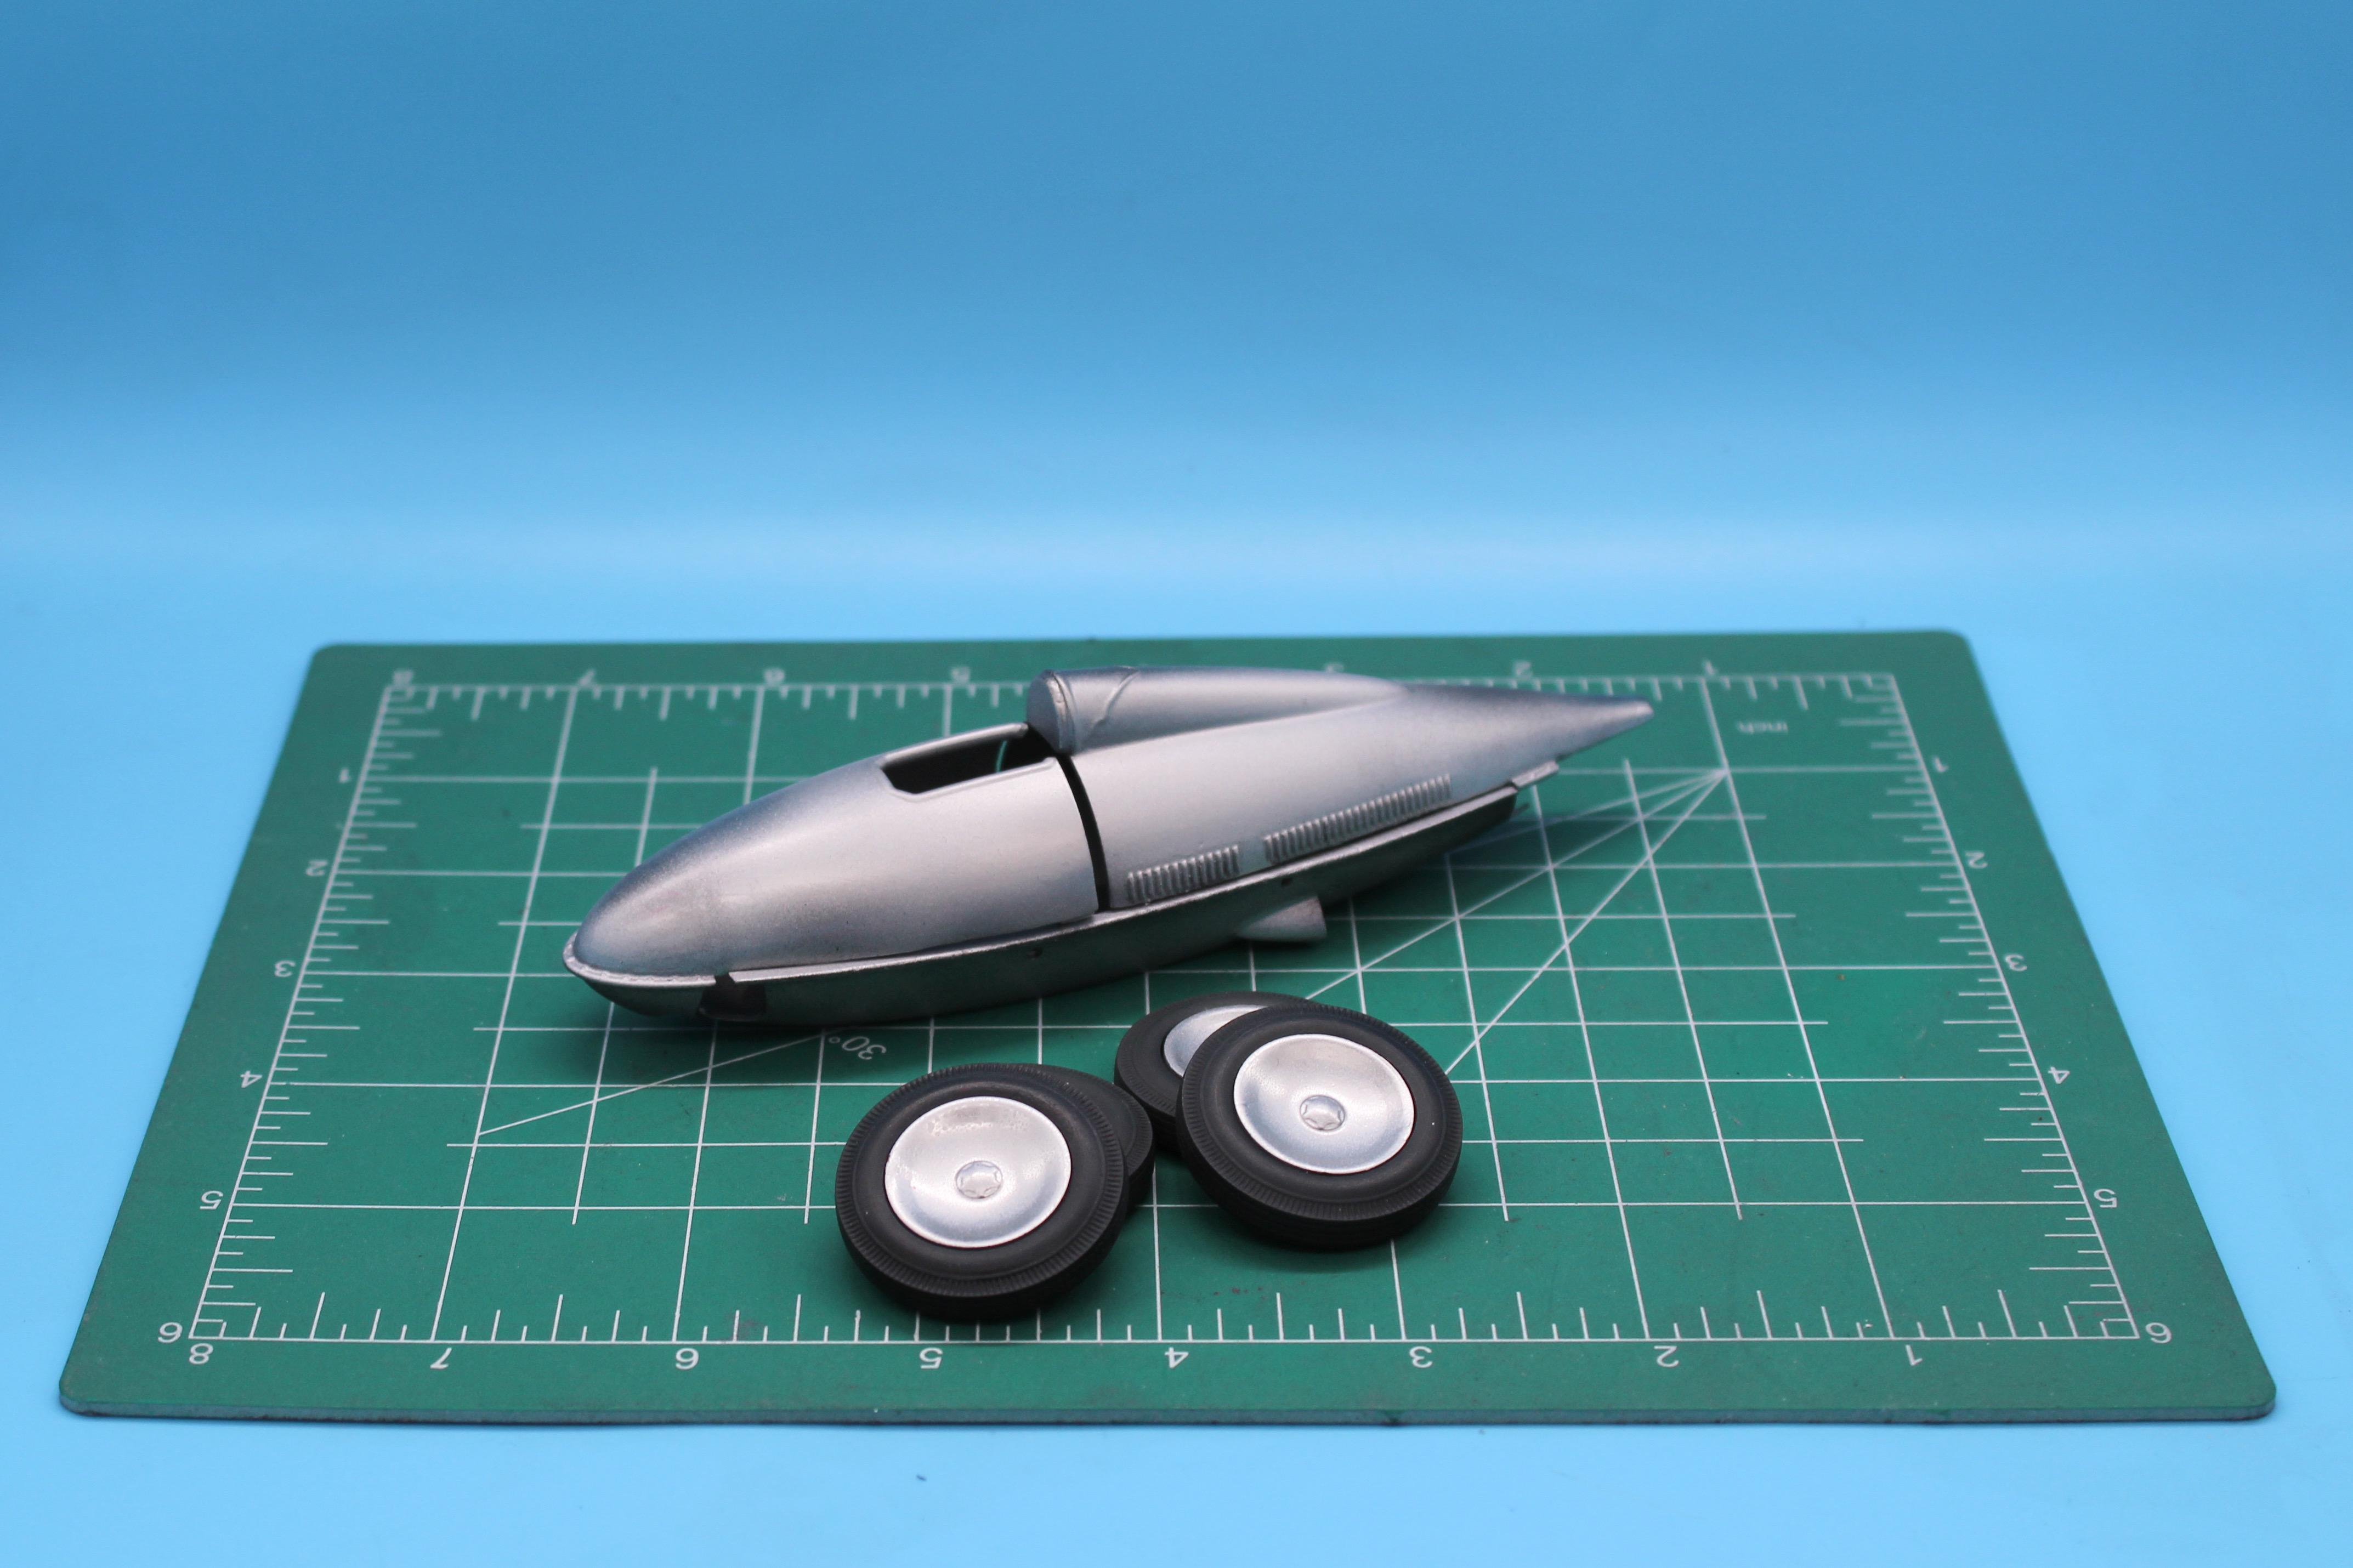
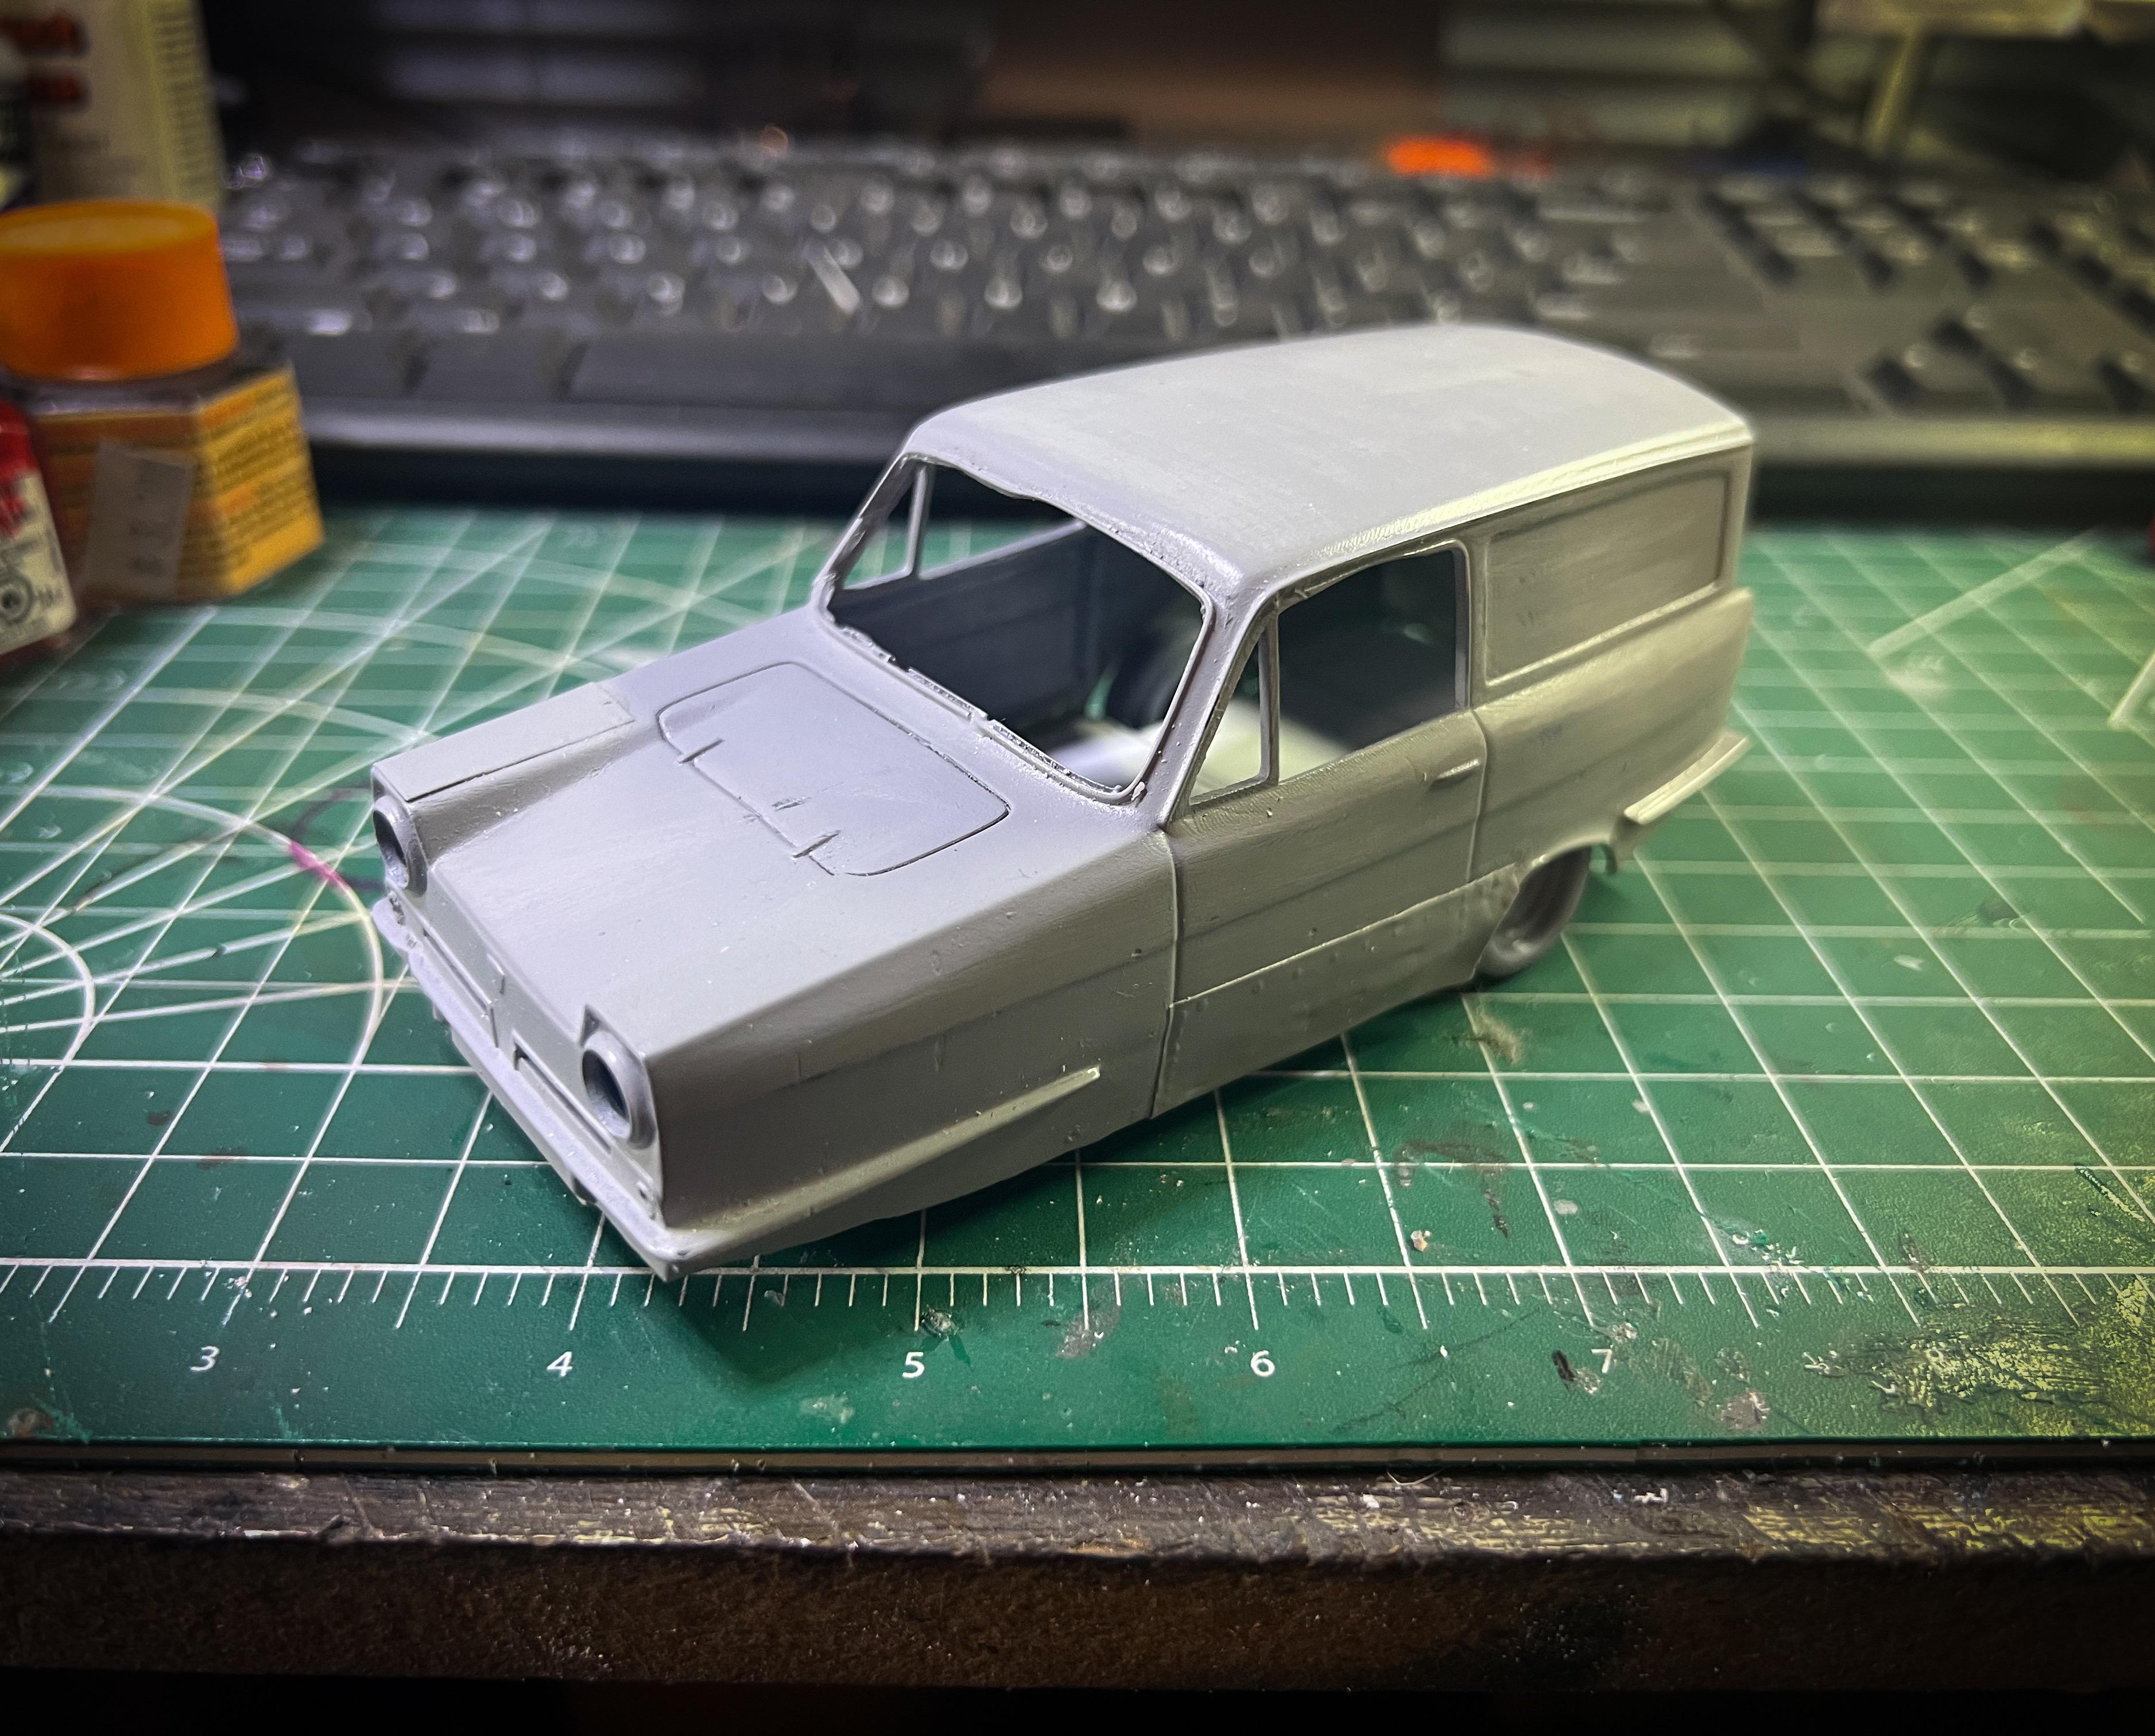
Just so we can actually have some mockups in the mockup thread again, here’s my printed Reliant three wheeled oval racing van: Google “Reliant oval racing” - they’re a blast! This particular one will probably be a curbside, but I’ve been drawing up the plans for a frame for a full-detail version…need to figure out plans for the engine next…
-
Atlantis rolls out 1/24 scale Tom Daniels Red Baron.
OldNYJim replied to John M.'s topic in Car Kit News & Reviews
I wonder if it’ll include the little plane that Monogram included too? -
Heller 1/24 BMW 328 Roadster - Road Version
OldNYJim replied to Junkman's topic in Car Kit News & Reviews
I would think that the fourth quarter of the year would be the same everywhere…unless they have metric time in Europe or something... -
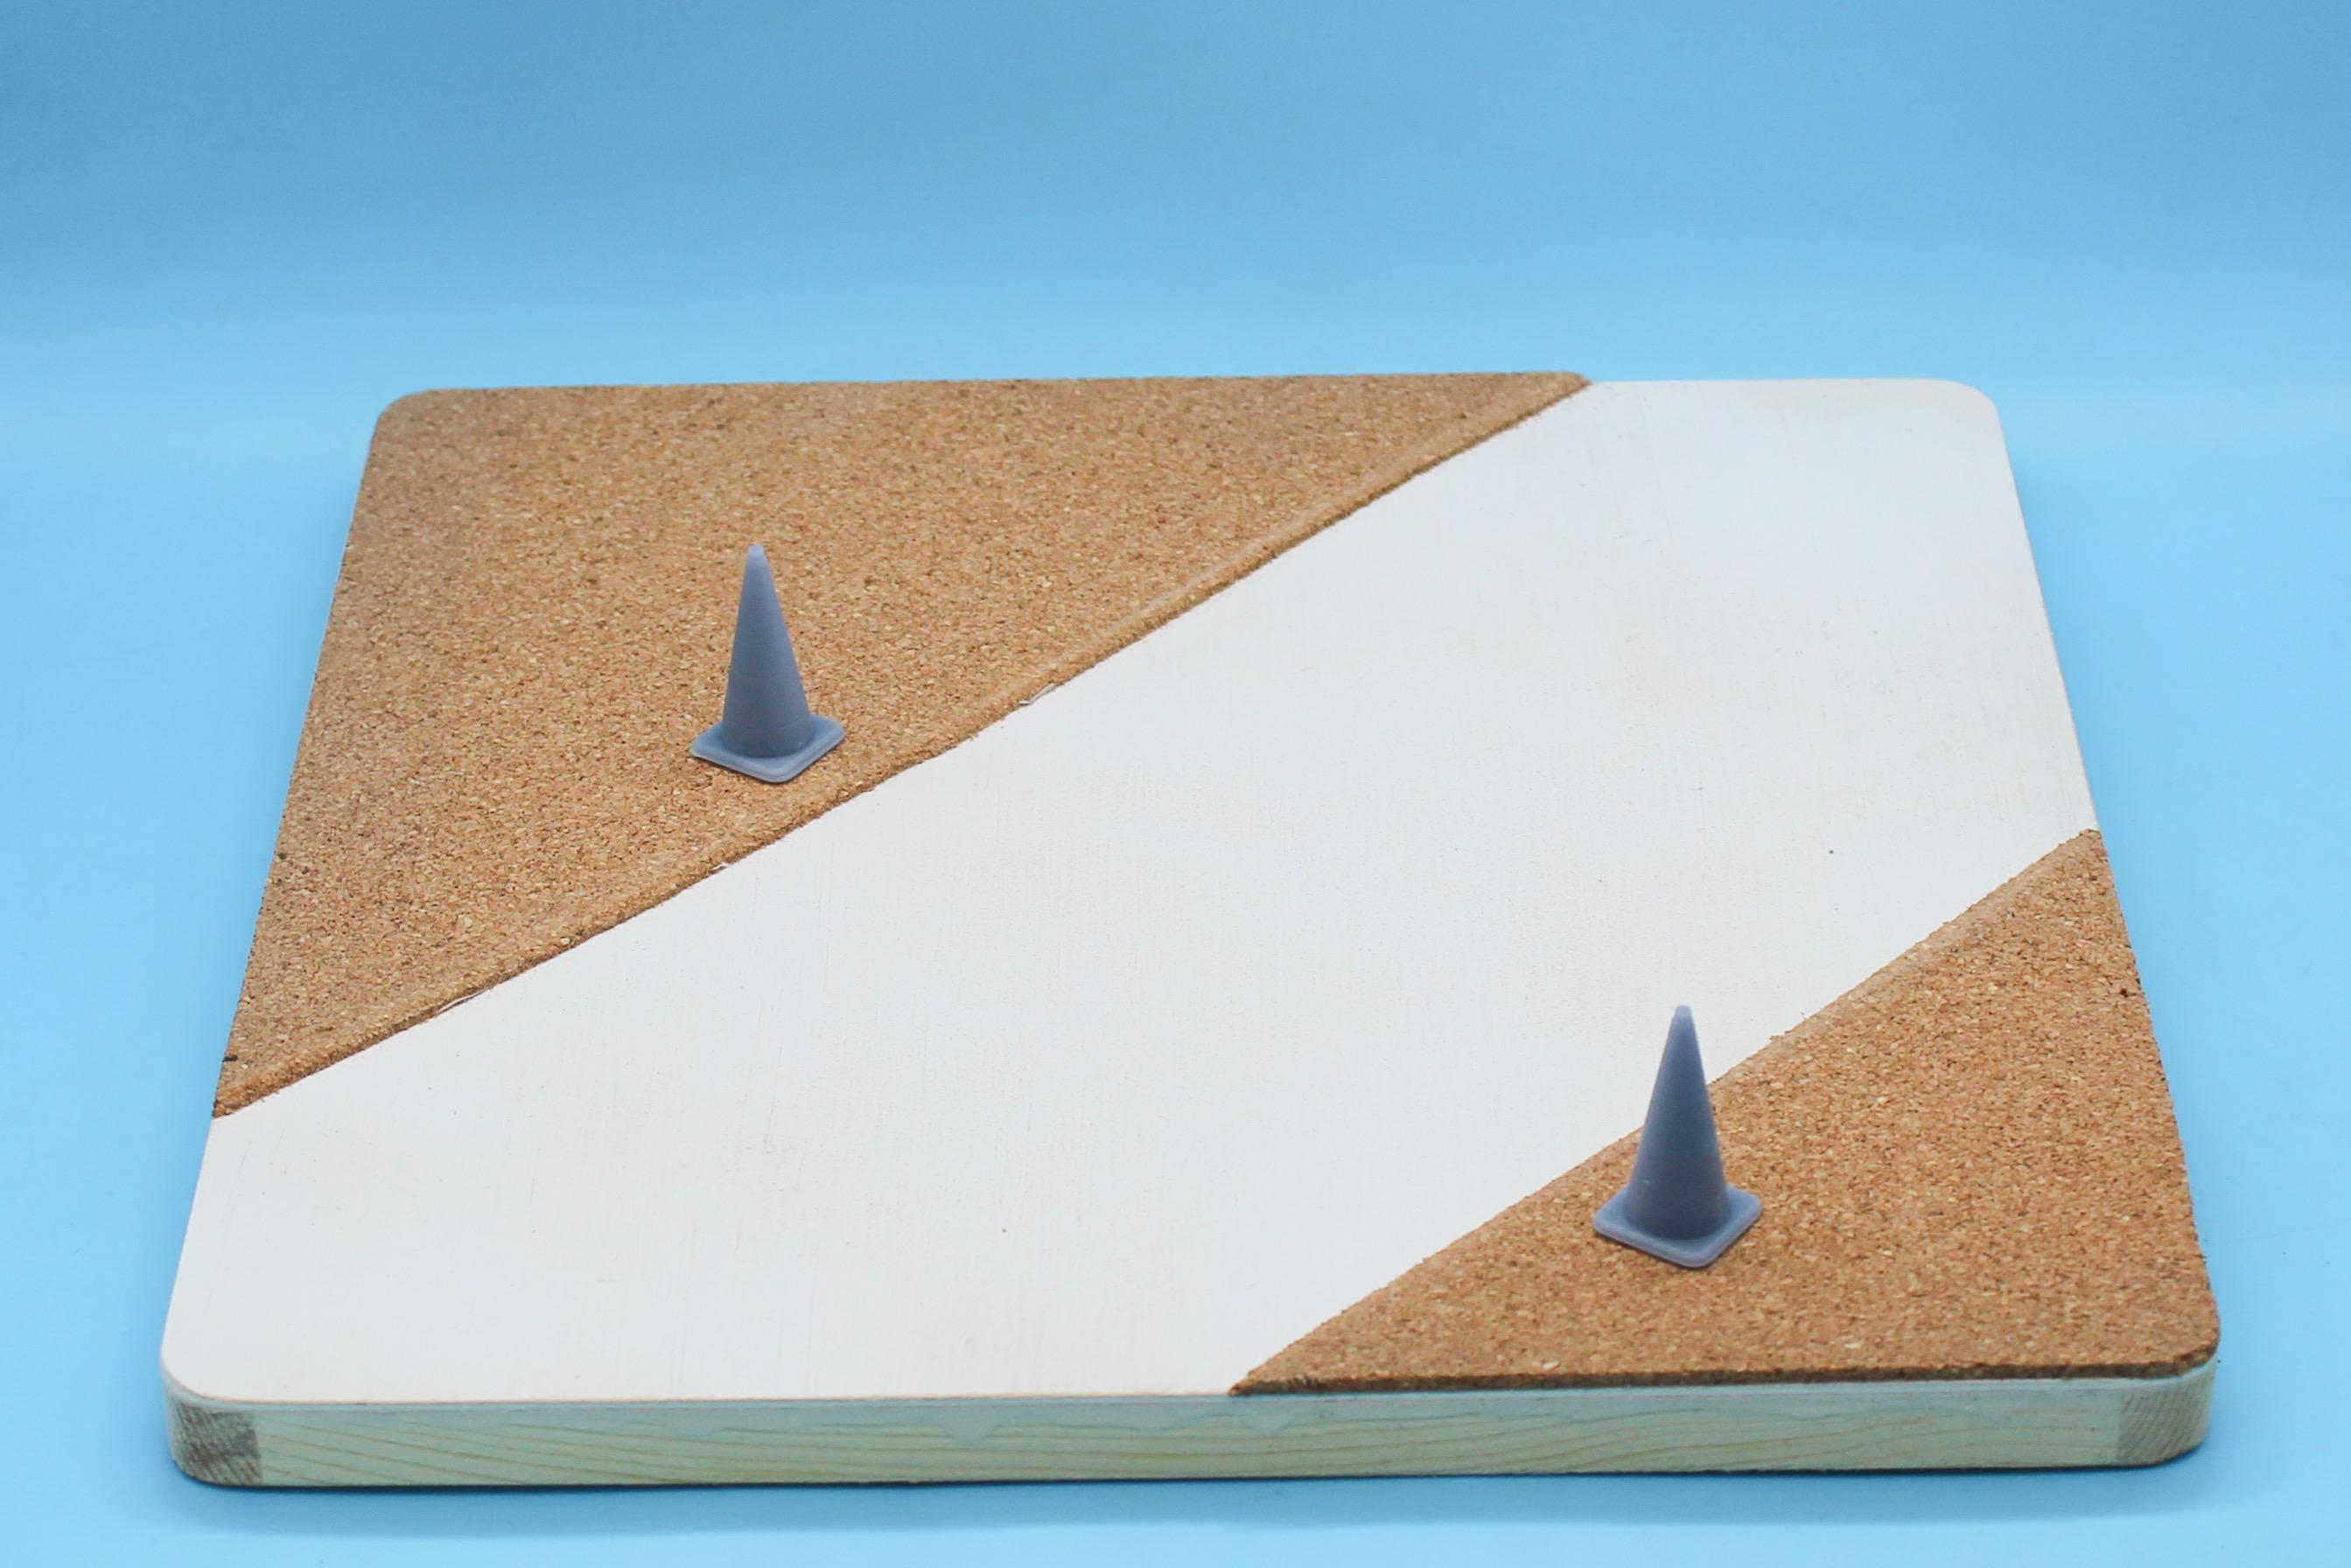
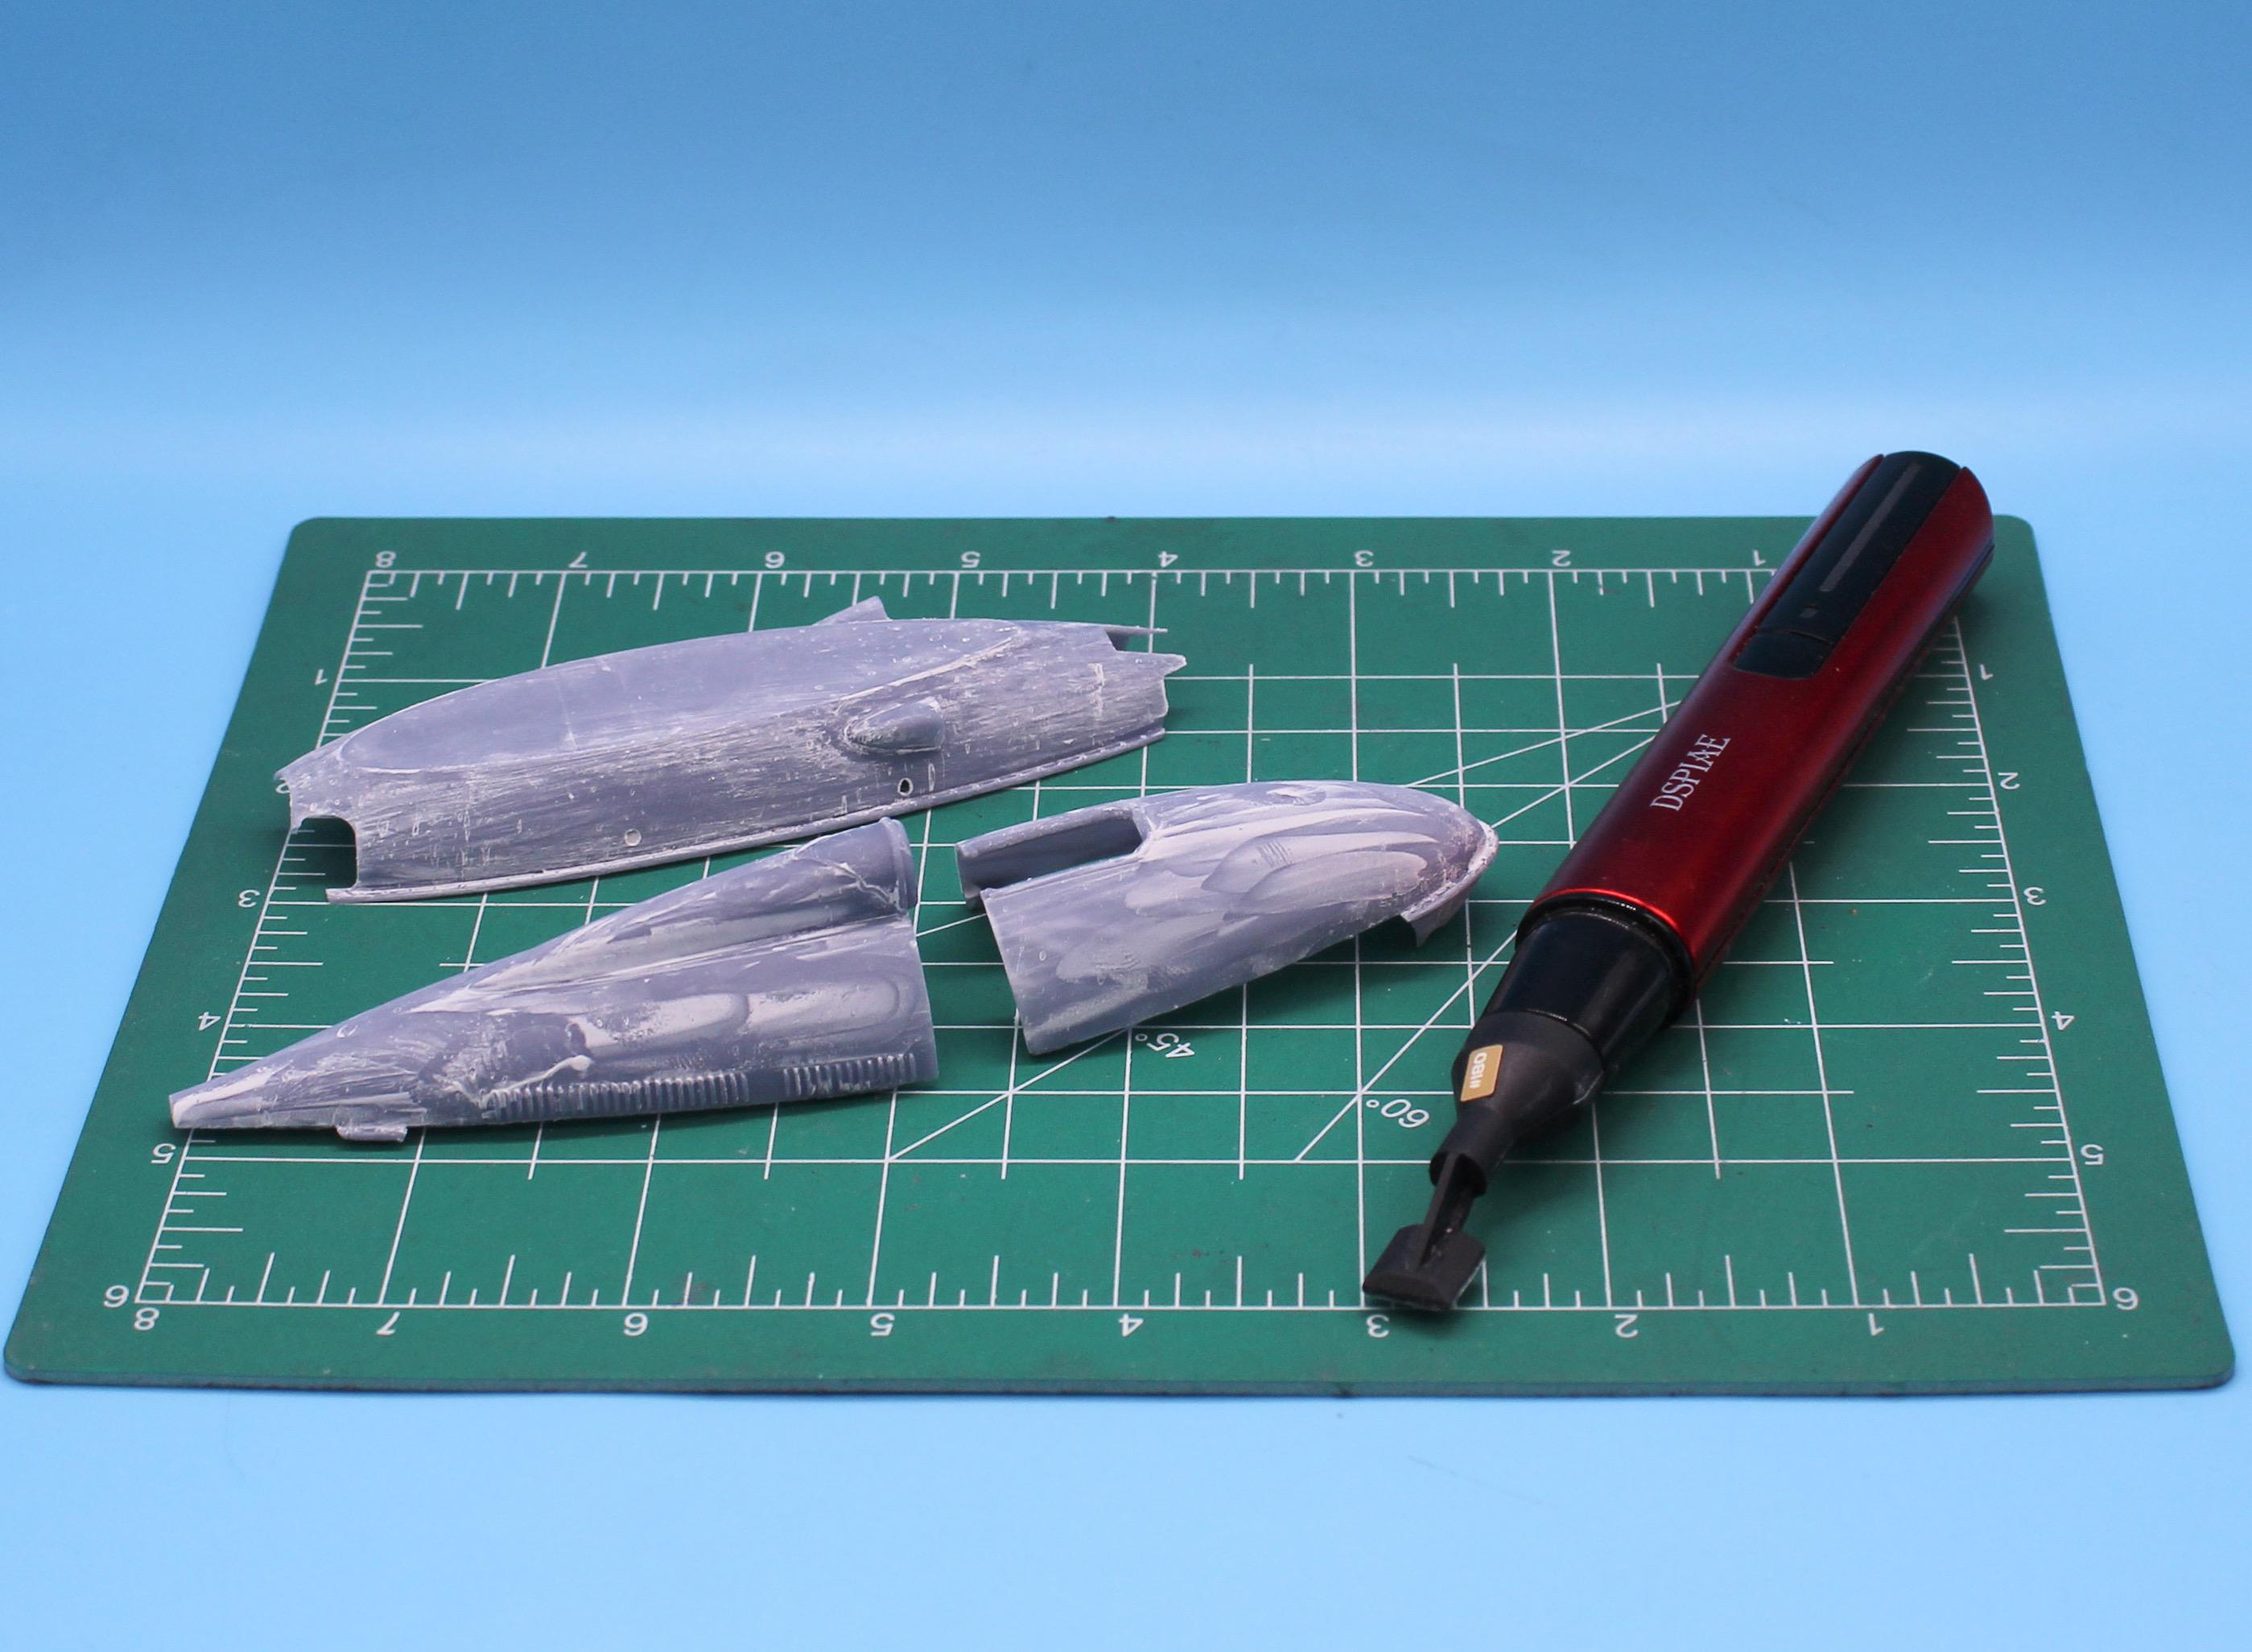
So…spent the week painting a BUNCH of parts - I’ve been playing with acrylic metal finishes lately as an alternate to Alclad…didn’t master them yet but I do enjoy working with them… Most of the assemblies on the printed full-detail car are low-parts-count but high detail so I’m working with some washes and detail painting slowly to bring that detail out. More on that when I actually finish something 🤪 Meanwhile, got clearcoat and paint on almost all the parts for the little curbside project I was working on: It’s just a fun little shelf model, nothing too nuts - wanted to see a 60s pink paintjob on a belly tank, was all…plus I have some weathering techniques to practice … Back on the ‘main’ car…started getting some flaws fixed on the body that I had sanded smooth previously - had a few sinks and pinholes and dips and stuff that were pretty minor, but that I wanted to fix anyway: And while I’m on the primer/sand cycle on those pieces, I stated working on a display base - nothing too crazy because there isn’t much out there at Bonneville besides salt and cones and some painted lines: I was interested to research and see that there’s a big difference between the look of the salt when it’s all dried up and cracked compared to the smooth sandy surface that’s better for racing on…I’m playing with this cracked-earth medium to represent the latter on the slightly raised areas on my mock-up there - here’s a test piece: And brushing copious quantities on my base: We’ll see how it looks dried out tomorrow…I made it kinda lumpy and uneven in places hoping for a good variation in the crackle effect, but this stuff seems to layer up just fine if I don’t like it and need to make it smoother… The center lane that I didn’t paint yet will be more representative of the racing surface - more of a standard salt look, hopefully, and I have some other fun diorama products to try for that this weekend And that’s it for now - thanks for looking…more soon!
-
This is a great looking build…I too loved that time in the 90s where people seemed to be pro-streeting almost anything. The gray tweed interior is going to be a perfect touch for this build too!
-
Building the AMT Double Dragster Streamliner (again…)
OldNYJim replied to OldNYJim's topic in WIP: Drag Racing Models
Thank you! I’m really a hack at painting, but I DO like the Createx paints. I don’t do anything too special - I thin a touch with Createx’s thinner (just a tiny drop, usually) and shoot at probably 25psi through my cheap 0.3mm Badger-clone $15 airbrush that Amazon sells…I think the larger nozzle size is what saves me having too many problems. Their paints don’t seem to mind being laid down a little thicker than you would spray a lacquer - I probably have them mixed to more like the consistency of a Testor’s enamel, if that’s a helpful reference… Their own thinner definitely makes things easier though! -
Your painting skills are awesome - the roll especially caught my eye. Have you painted a lot of armor?
-
These were $18 on Amazon prime this past week, so I grabbed one: And they had these at $14…I’ve had a build in mind for one of these for a while so I grabbed that too: And Michael’s got a kit restock AND had a 40%-off voucher AND they sent me a $5 coupon so this followed me home for somewhere around $10:
- 39,060 replies
-
- 5
-

-
- johan
- glue bombs
- (and 1 more)
-
I wonder if there’s any difference between the Tiger Shark and the Python? Love the HW box art! I’m in for a Stogie or two too!
-
'63 Vette NASCAR Modified WIP
OldNYJim replied to bobss396's topic in WIP: Stock Cars (NASCAR, Super Stock, Late Model, etc.)
Love that color! -
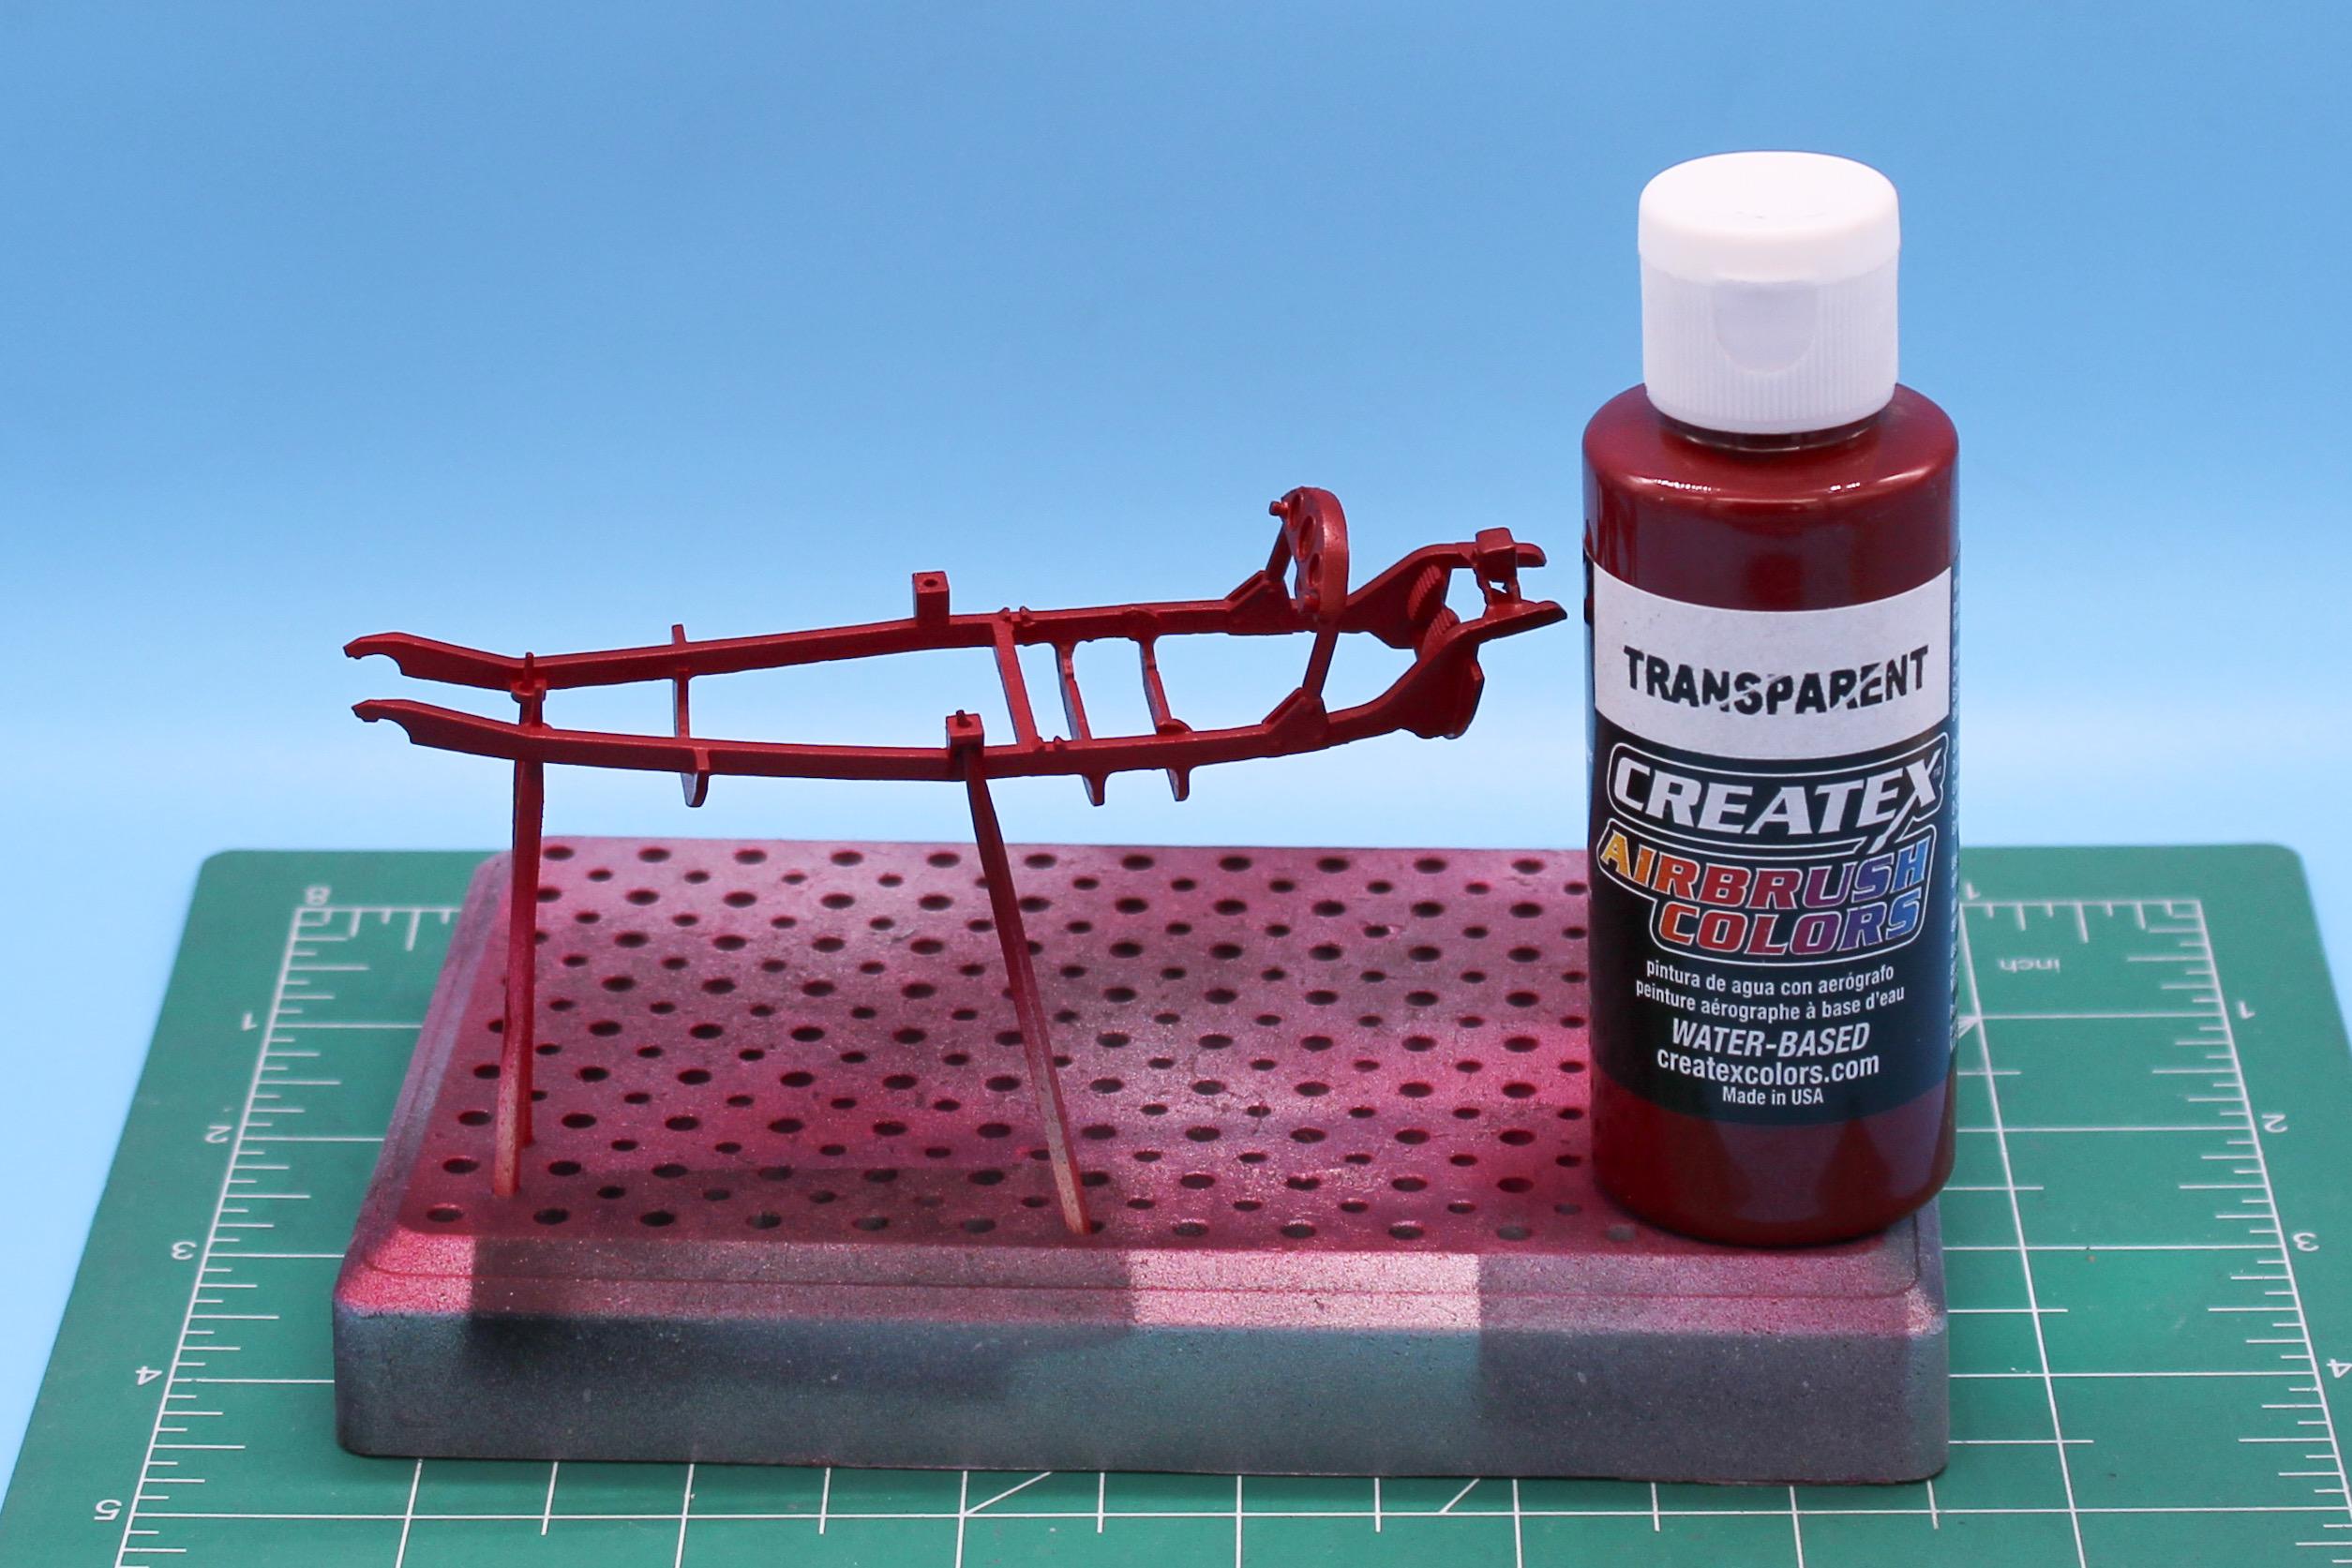
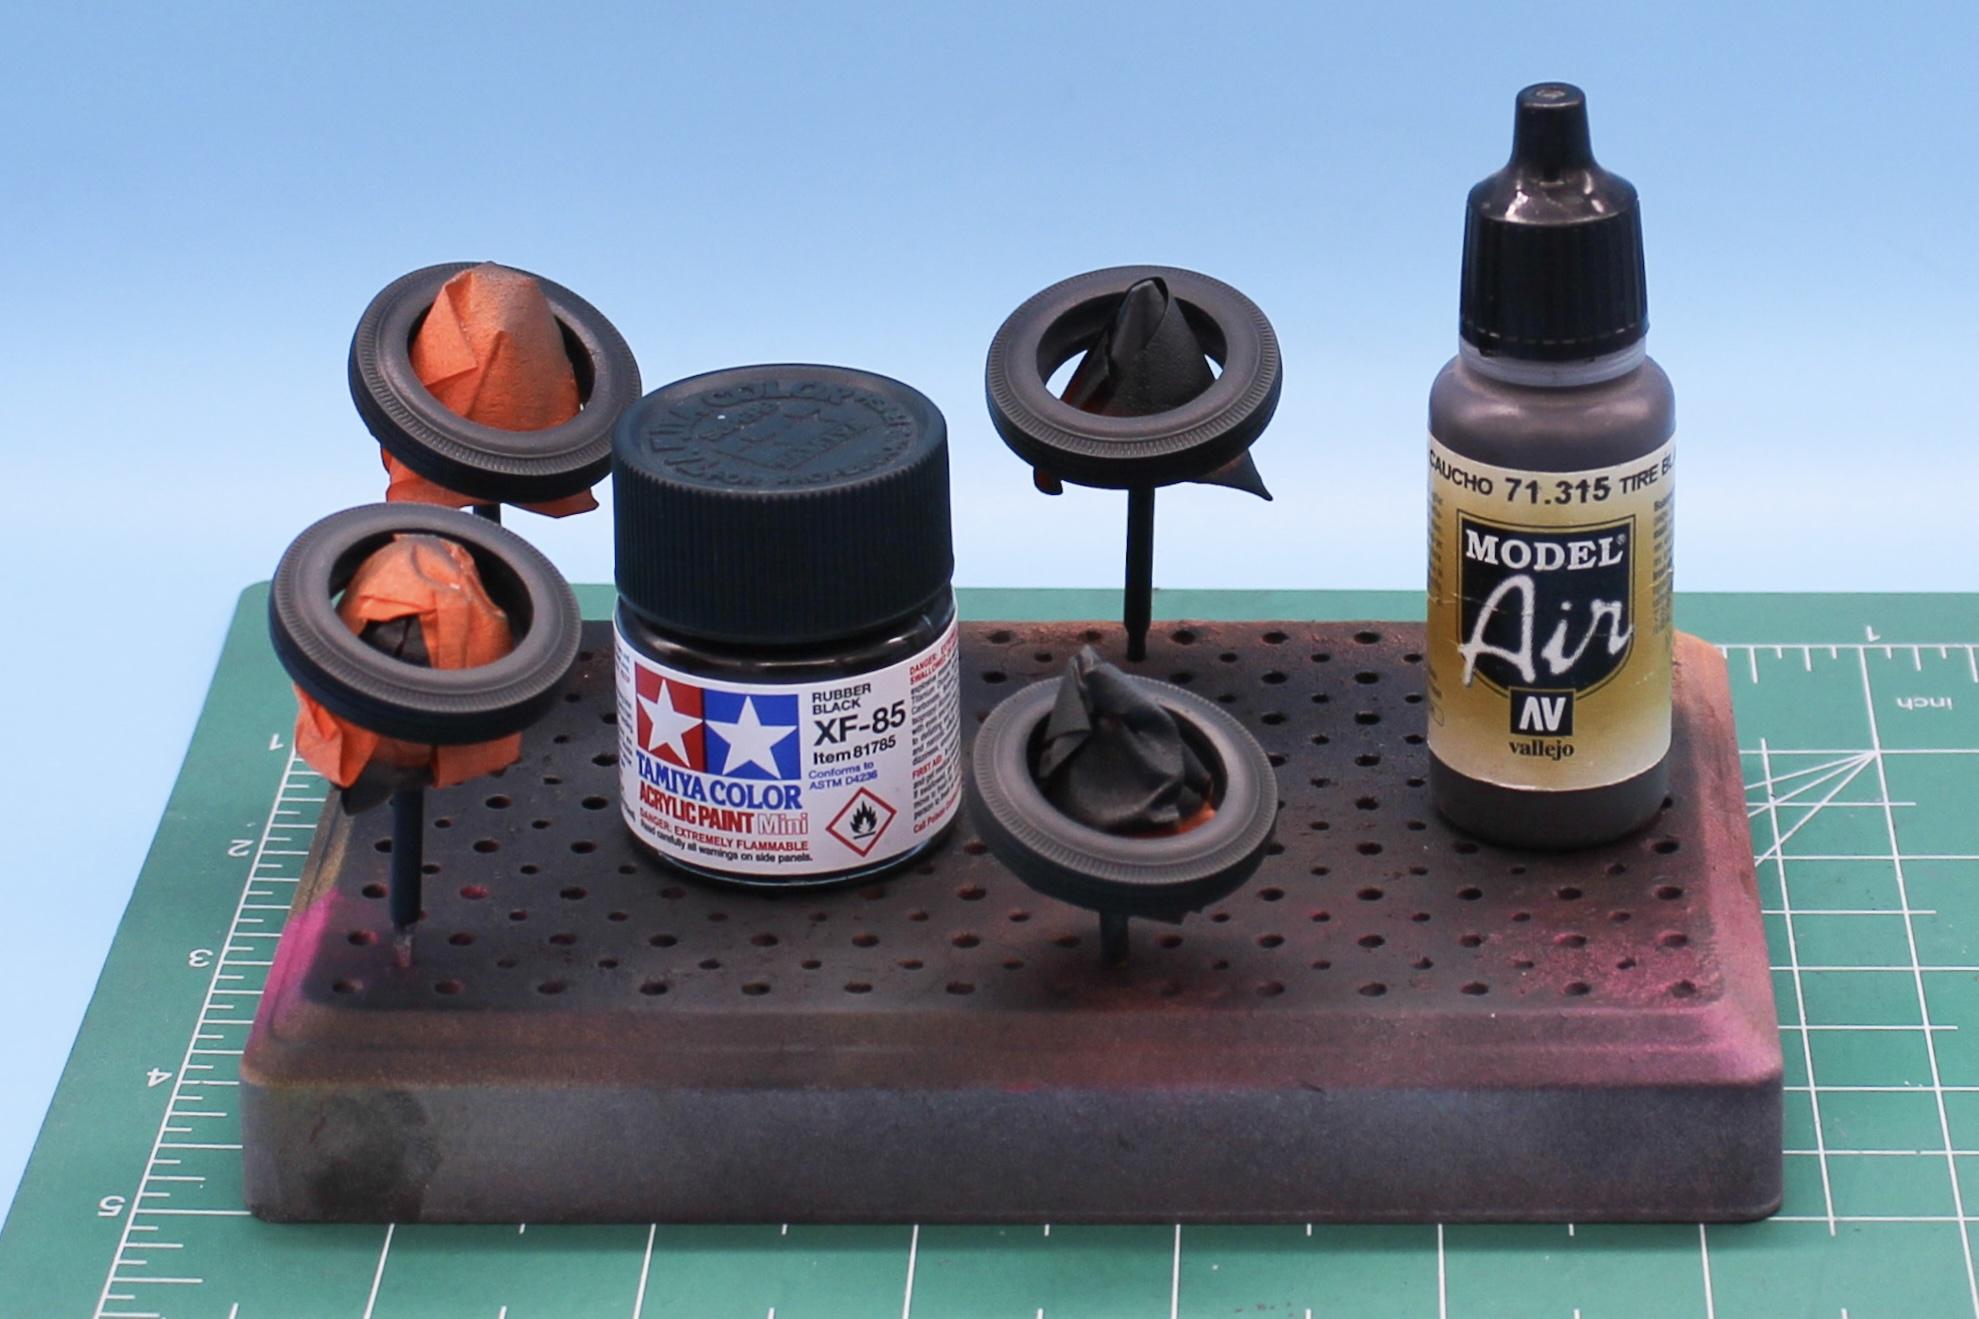
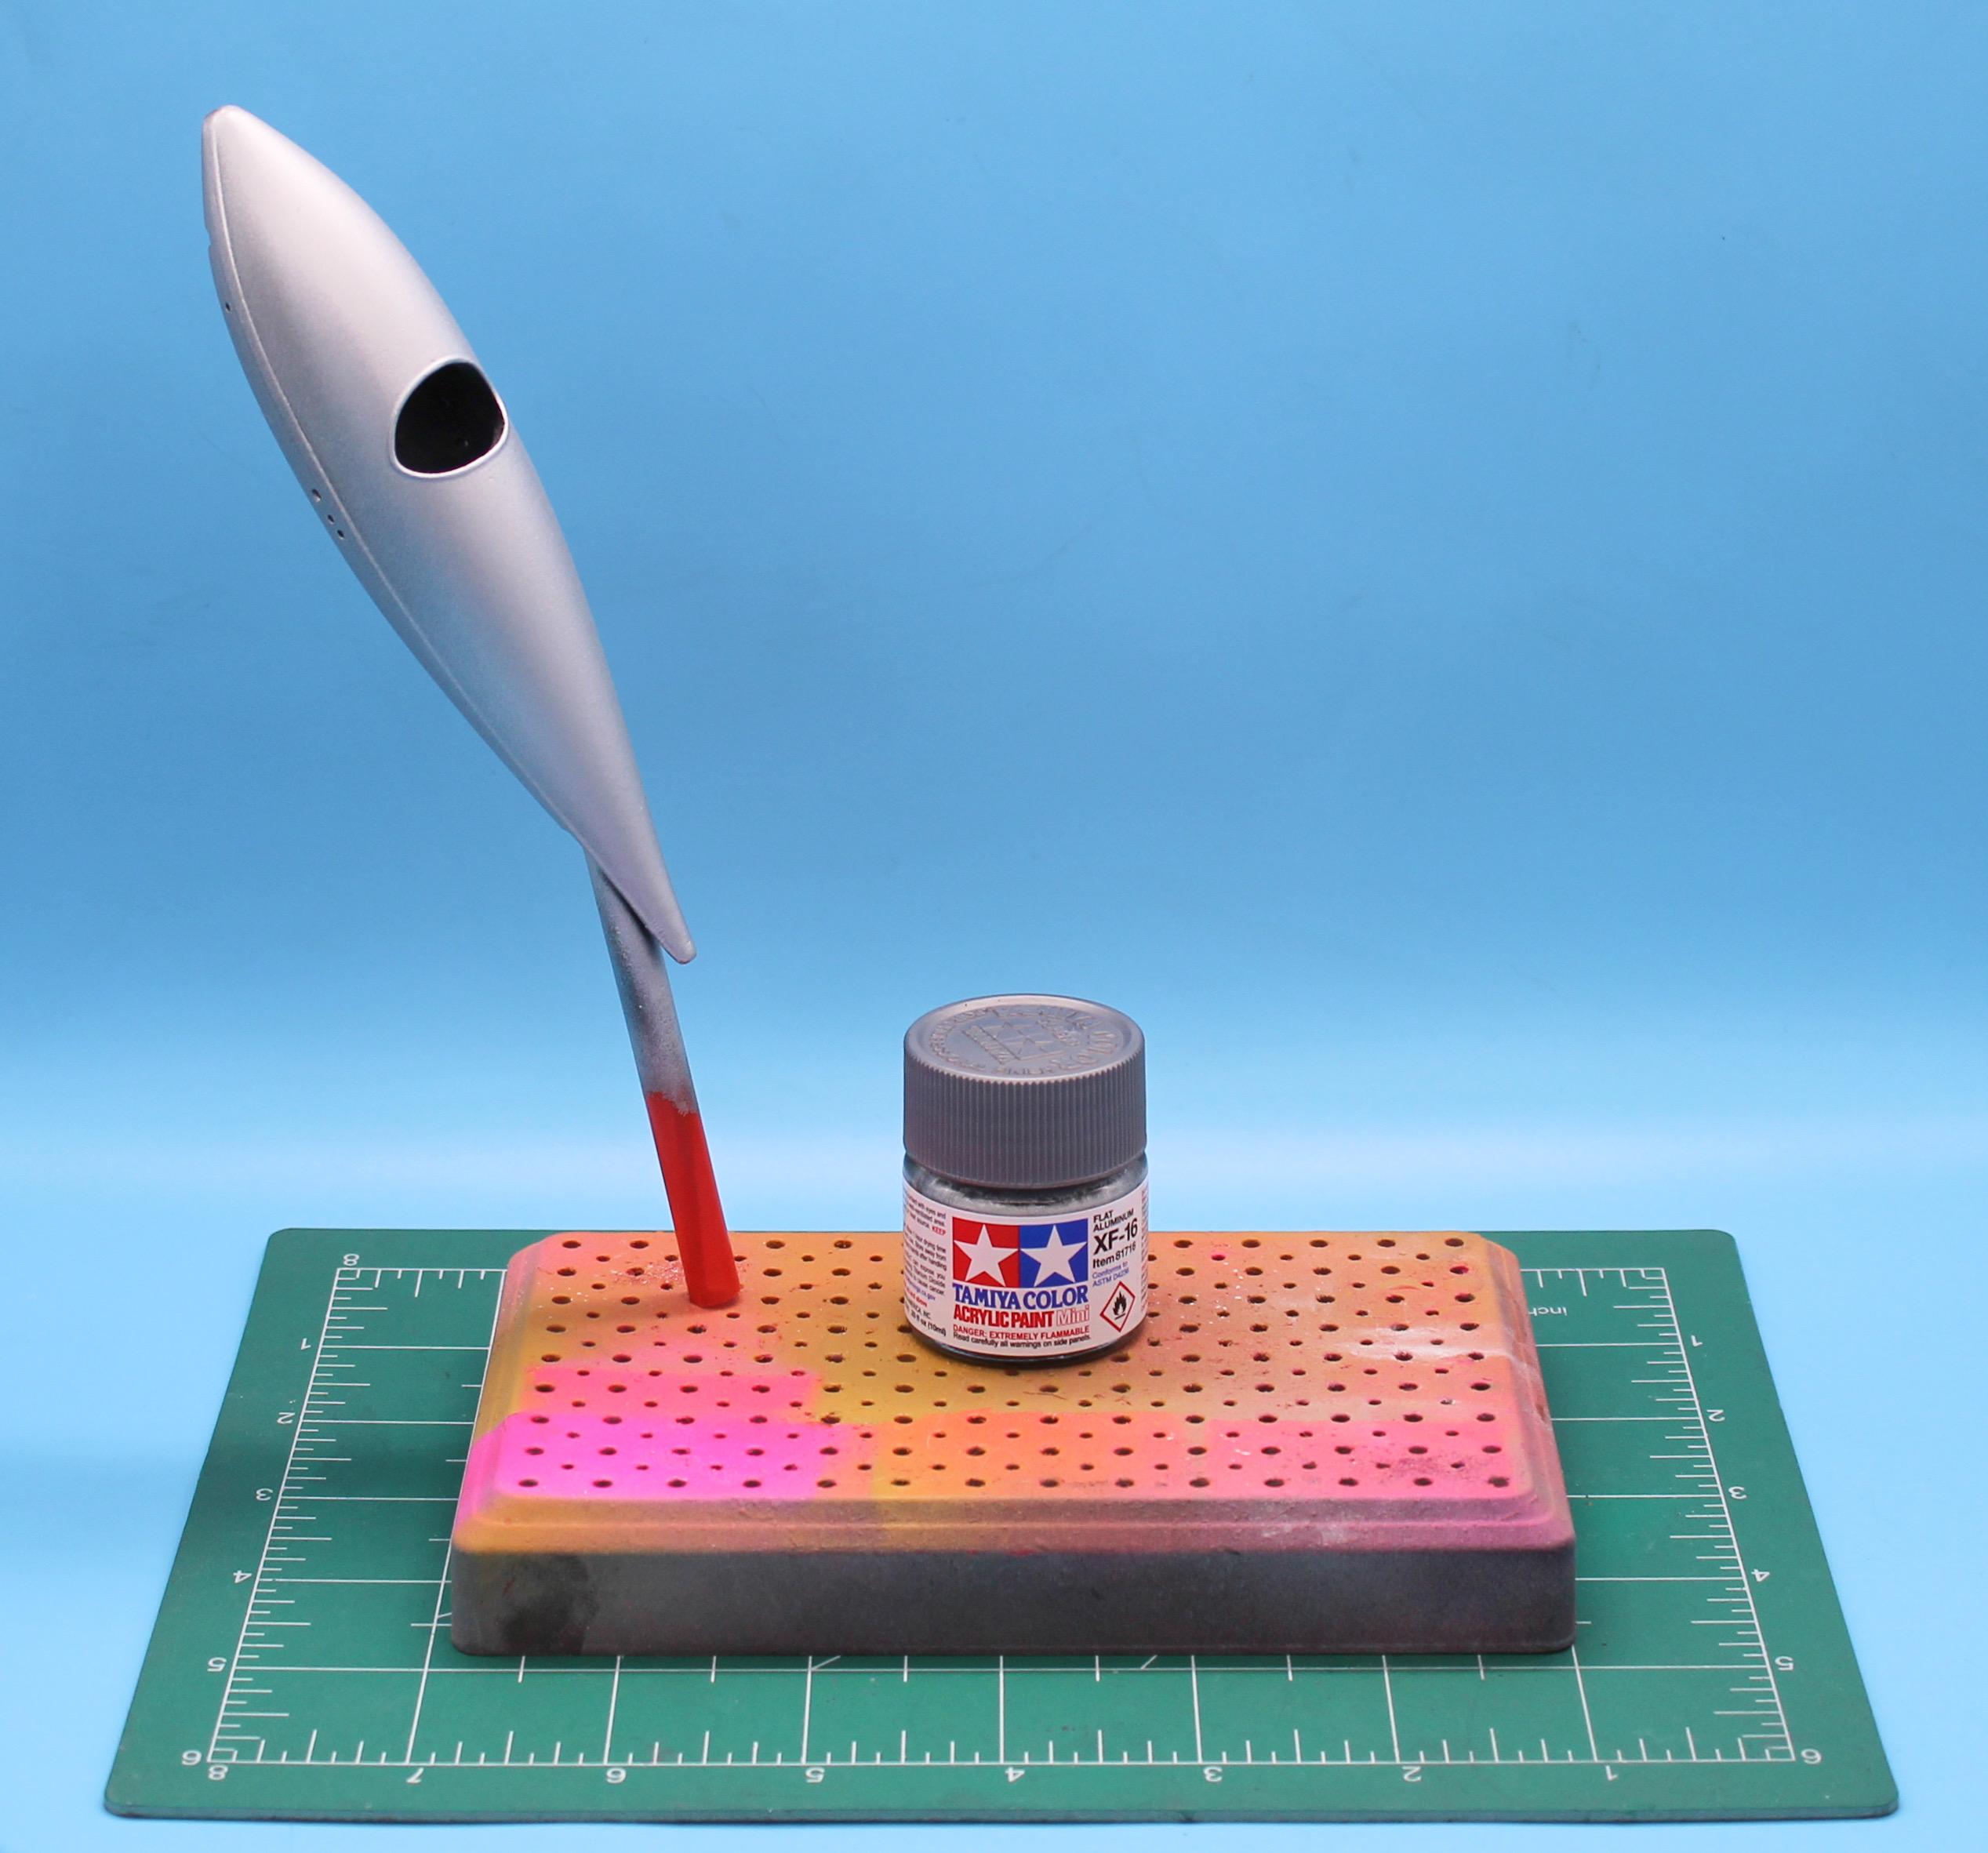
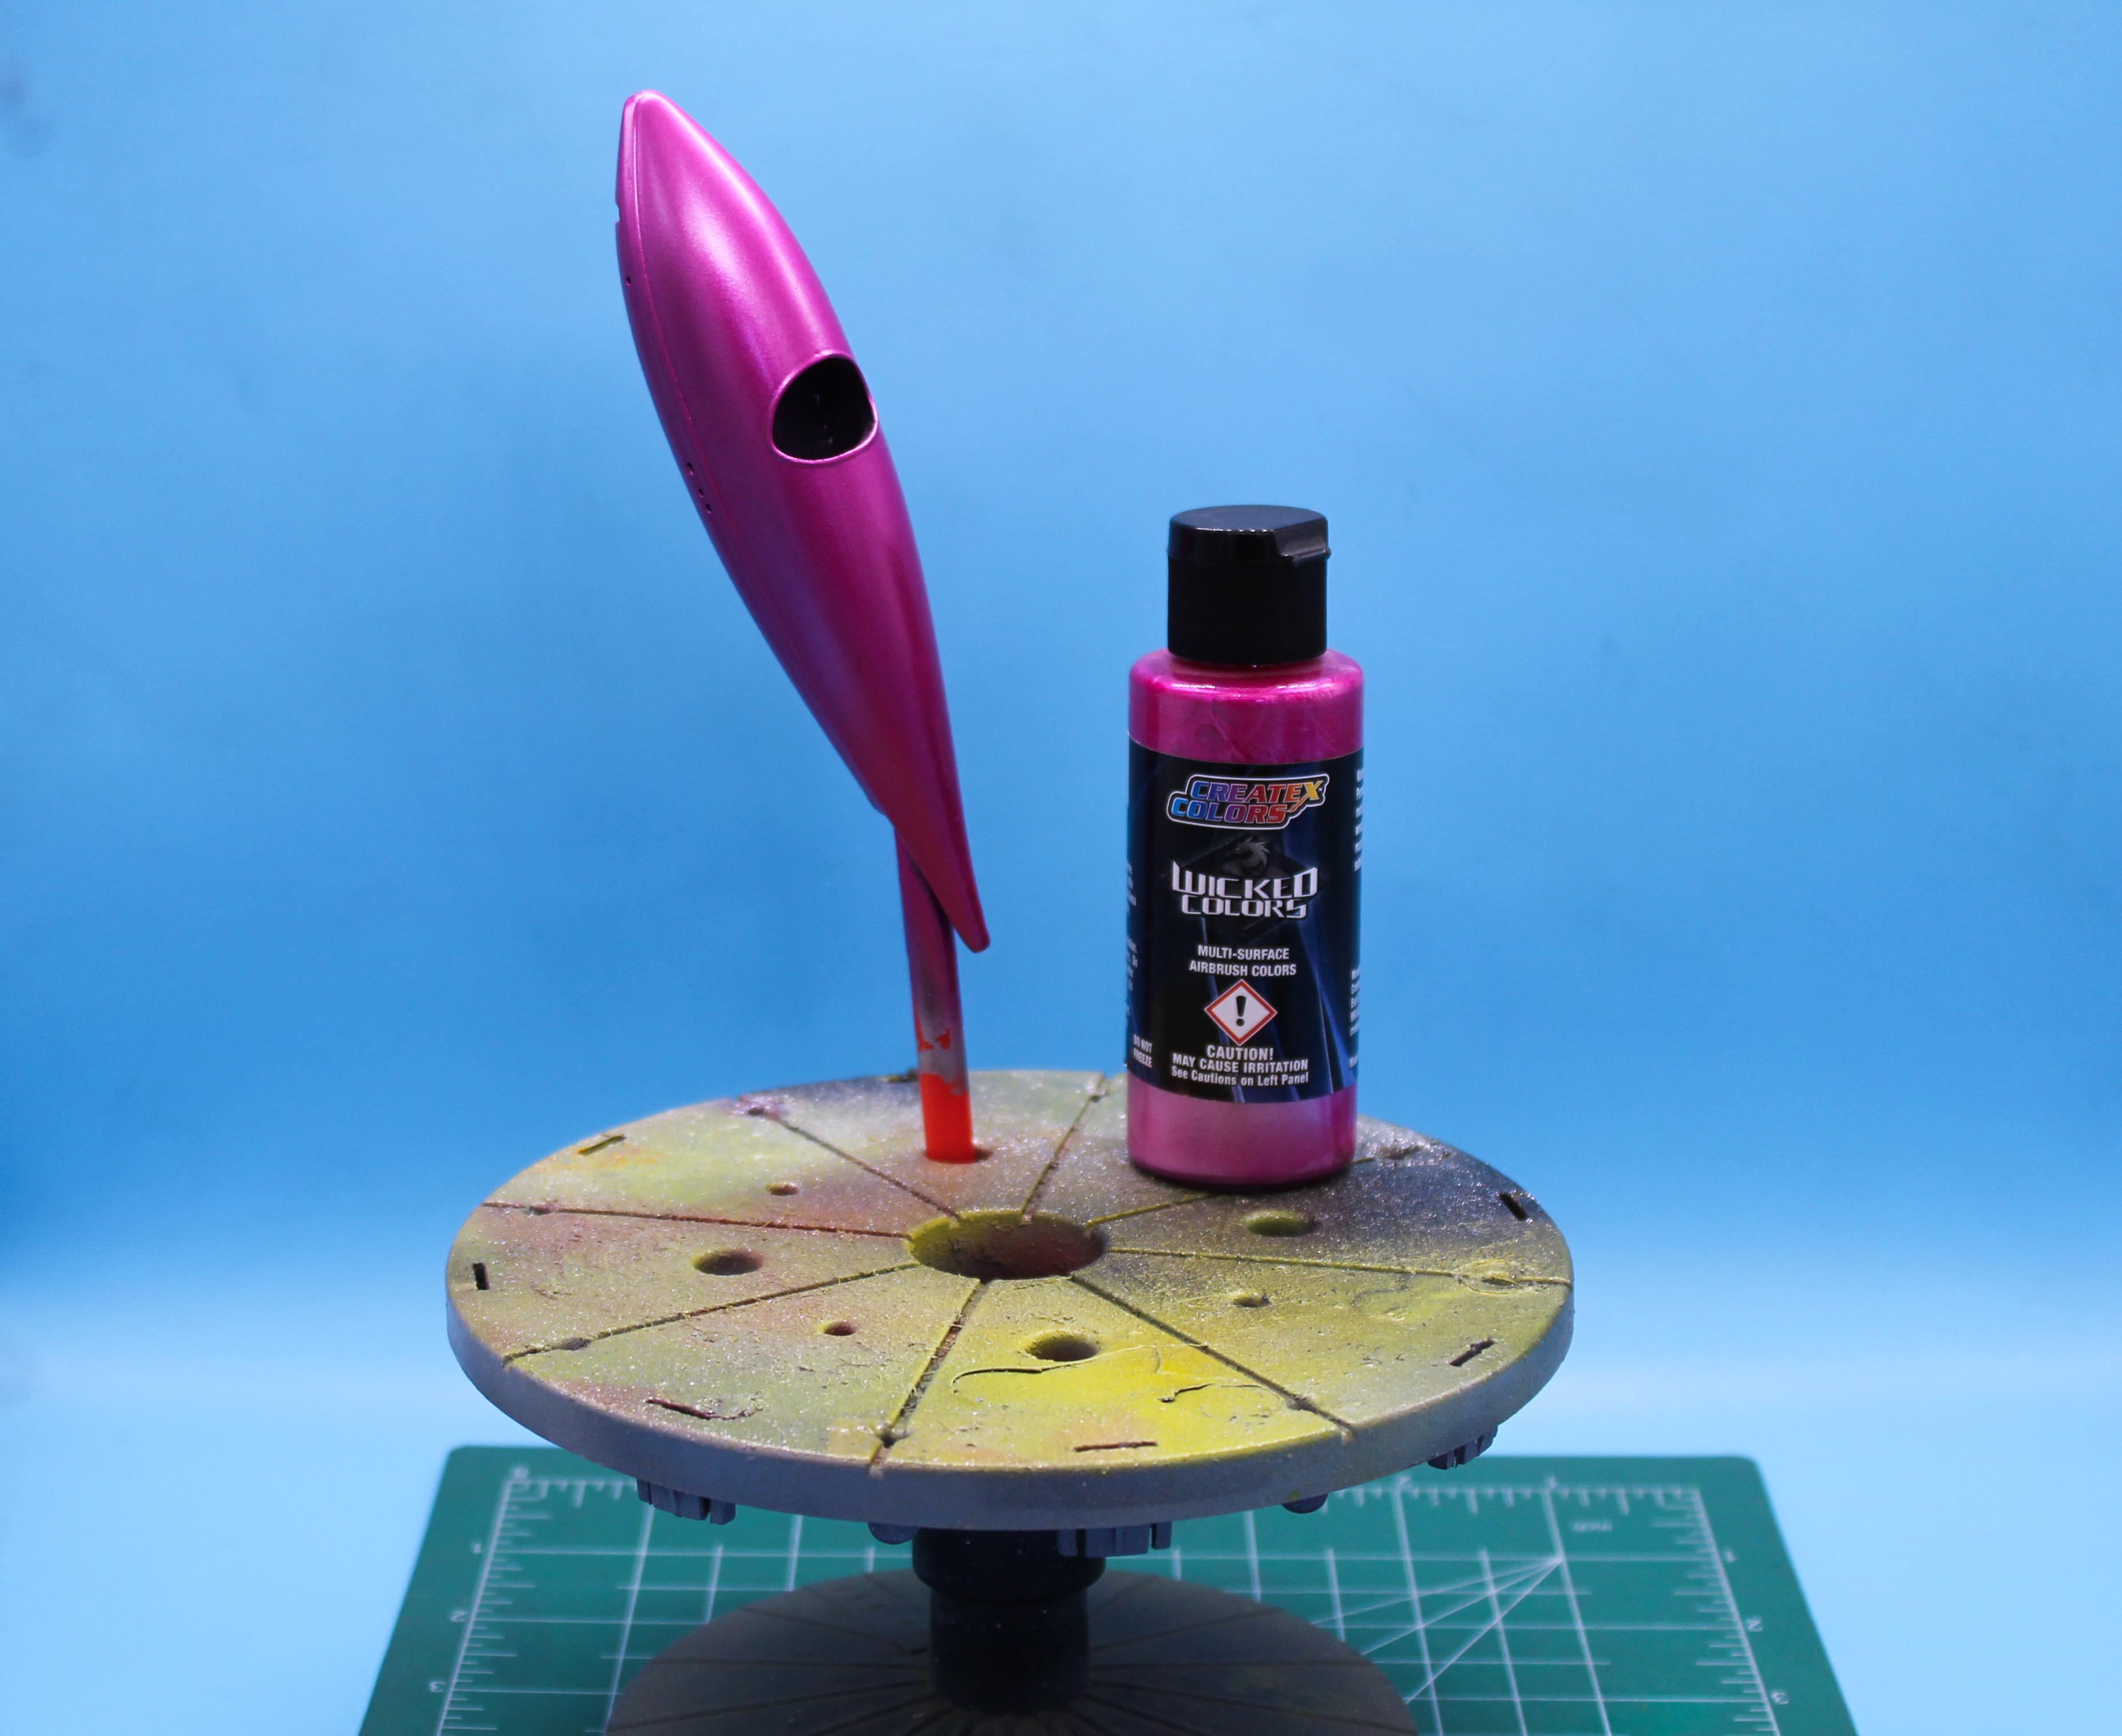
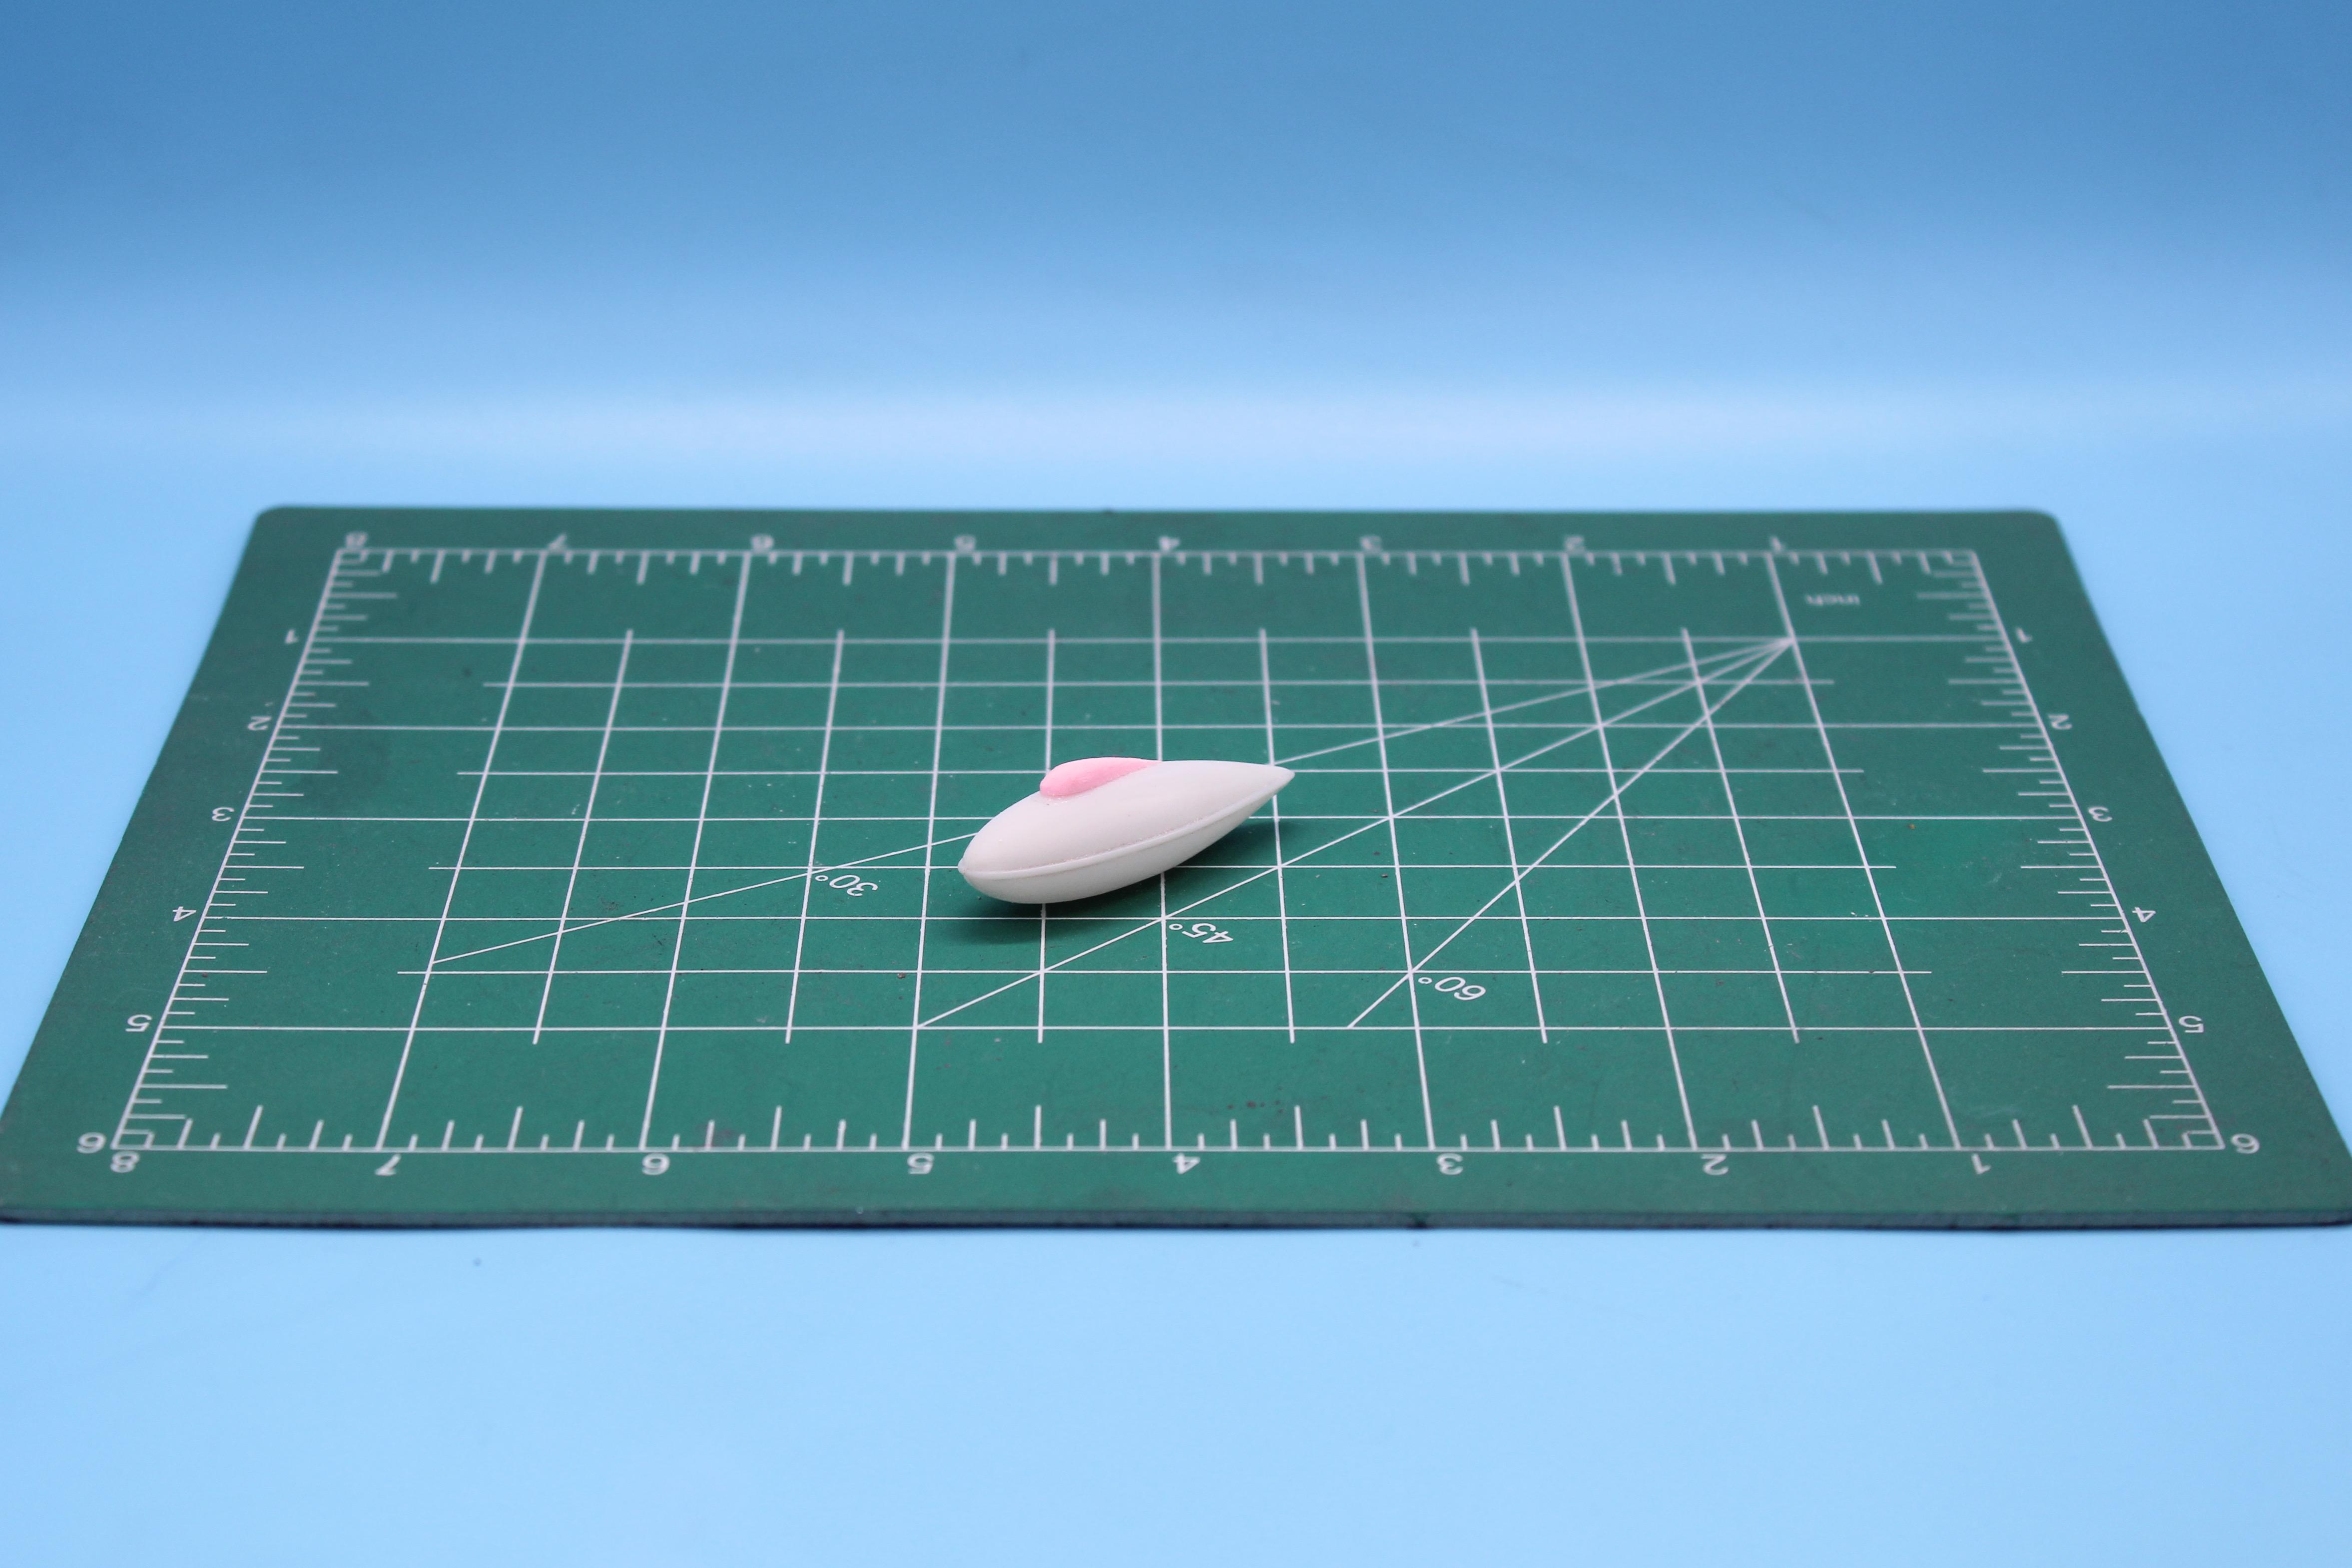
Coupla little updates to keep this train rolling, especially during priming-parts-hell-week… Got the frame of the full-detail car into color - I’d been waiting for a project where this nice vintage-looking burgundy would be a good fit, and I think this is a good use for it… Painted the tires - my favorite combination for printed or cast tires lately is black primer then Tamiya rubber on the sidewalls and Vallejo tire black on the treads: I’ll follow up with some washes and further detailing, but getting base colors on everything is my main project this week. If I don’t sand or fix any layer lines for a while after this all-printed kit I’ll be ok with that… The curbside car I’m building is mainly an exercise so I can see a belly tank in a particular color…first up silver… …then the particular color I was thinking - pretty unusual choice for a belly tank, but I’m thinking late 60s Hot Wheels Spectraflame kinda look…just something I wanted to see on my shelf… And as if two weren’t enough…found this 1/72 scale drop tank in my stash…used some prototyping block to make a canopy…would be a fun challenge to make a REALLY tiny one…need to figure out what to do for wheels and axles… This weekend will be painting a bunch of metal finishes - thanks for looking - more soon, soon as I’ve done more!
-
Ideas For Detailing White Painted Wheels
OldNYJim replied to oldcarfan's topic in Model Building Questions and Answers
I agree - black would be too much, but a wash of gray would add a lot! -
FORUM CHANGES THREAD
OldNYJim replied to iamsuperdan's topic in General Automotive Talk (Trucks and Cars)
I’ll admit, I wasn’t sure where to put a build thread I posted recently for a belly tank car…it IS a salt flats car…but then the description under the drag forum says… It DOES go in a straight line…so I posted it there 🤪. I won’t be upset if it gets moved though…
-
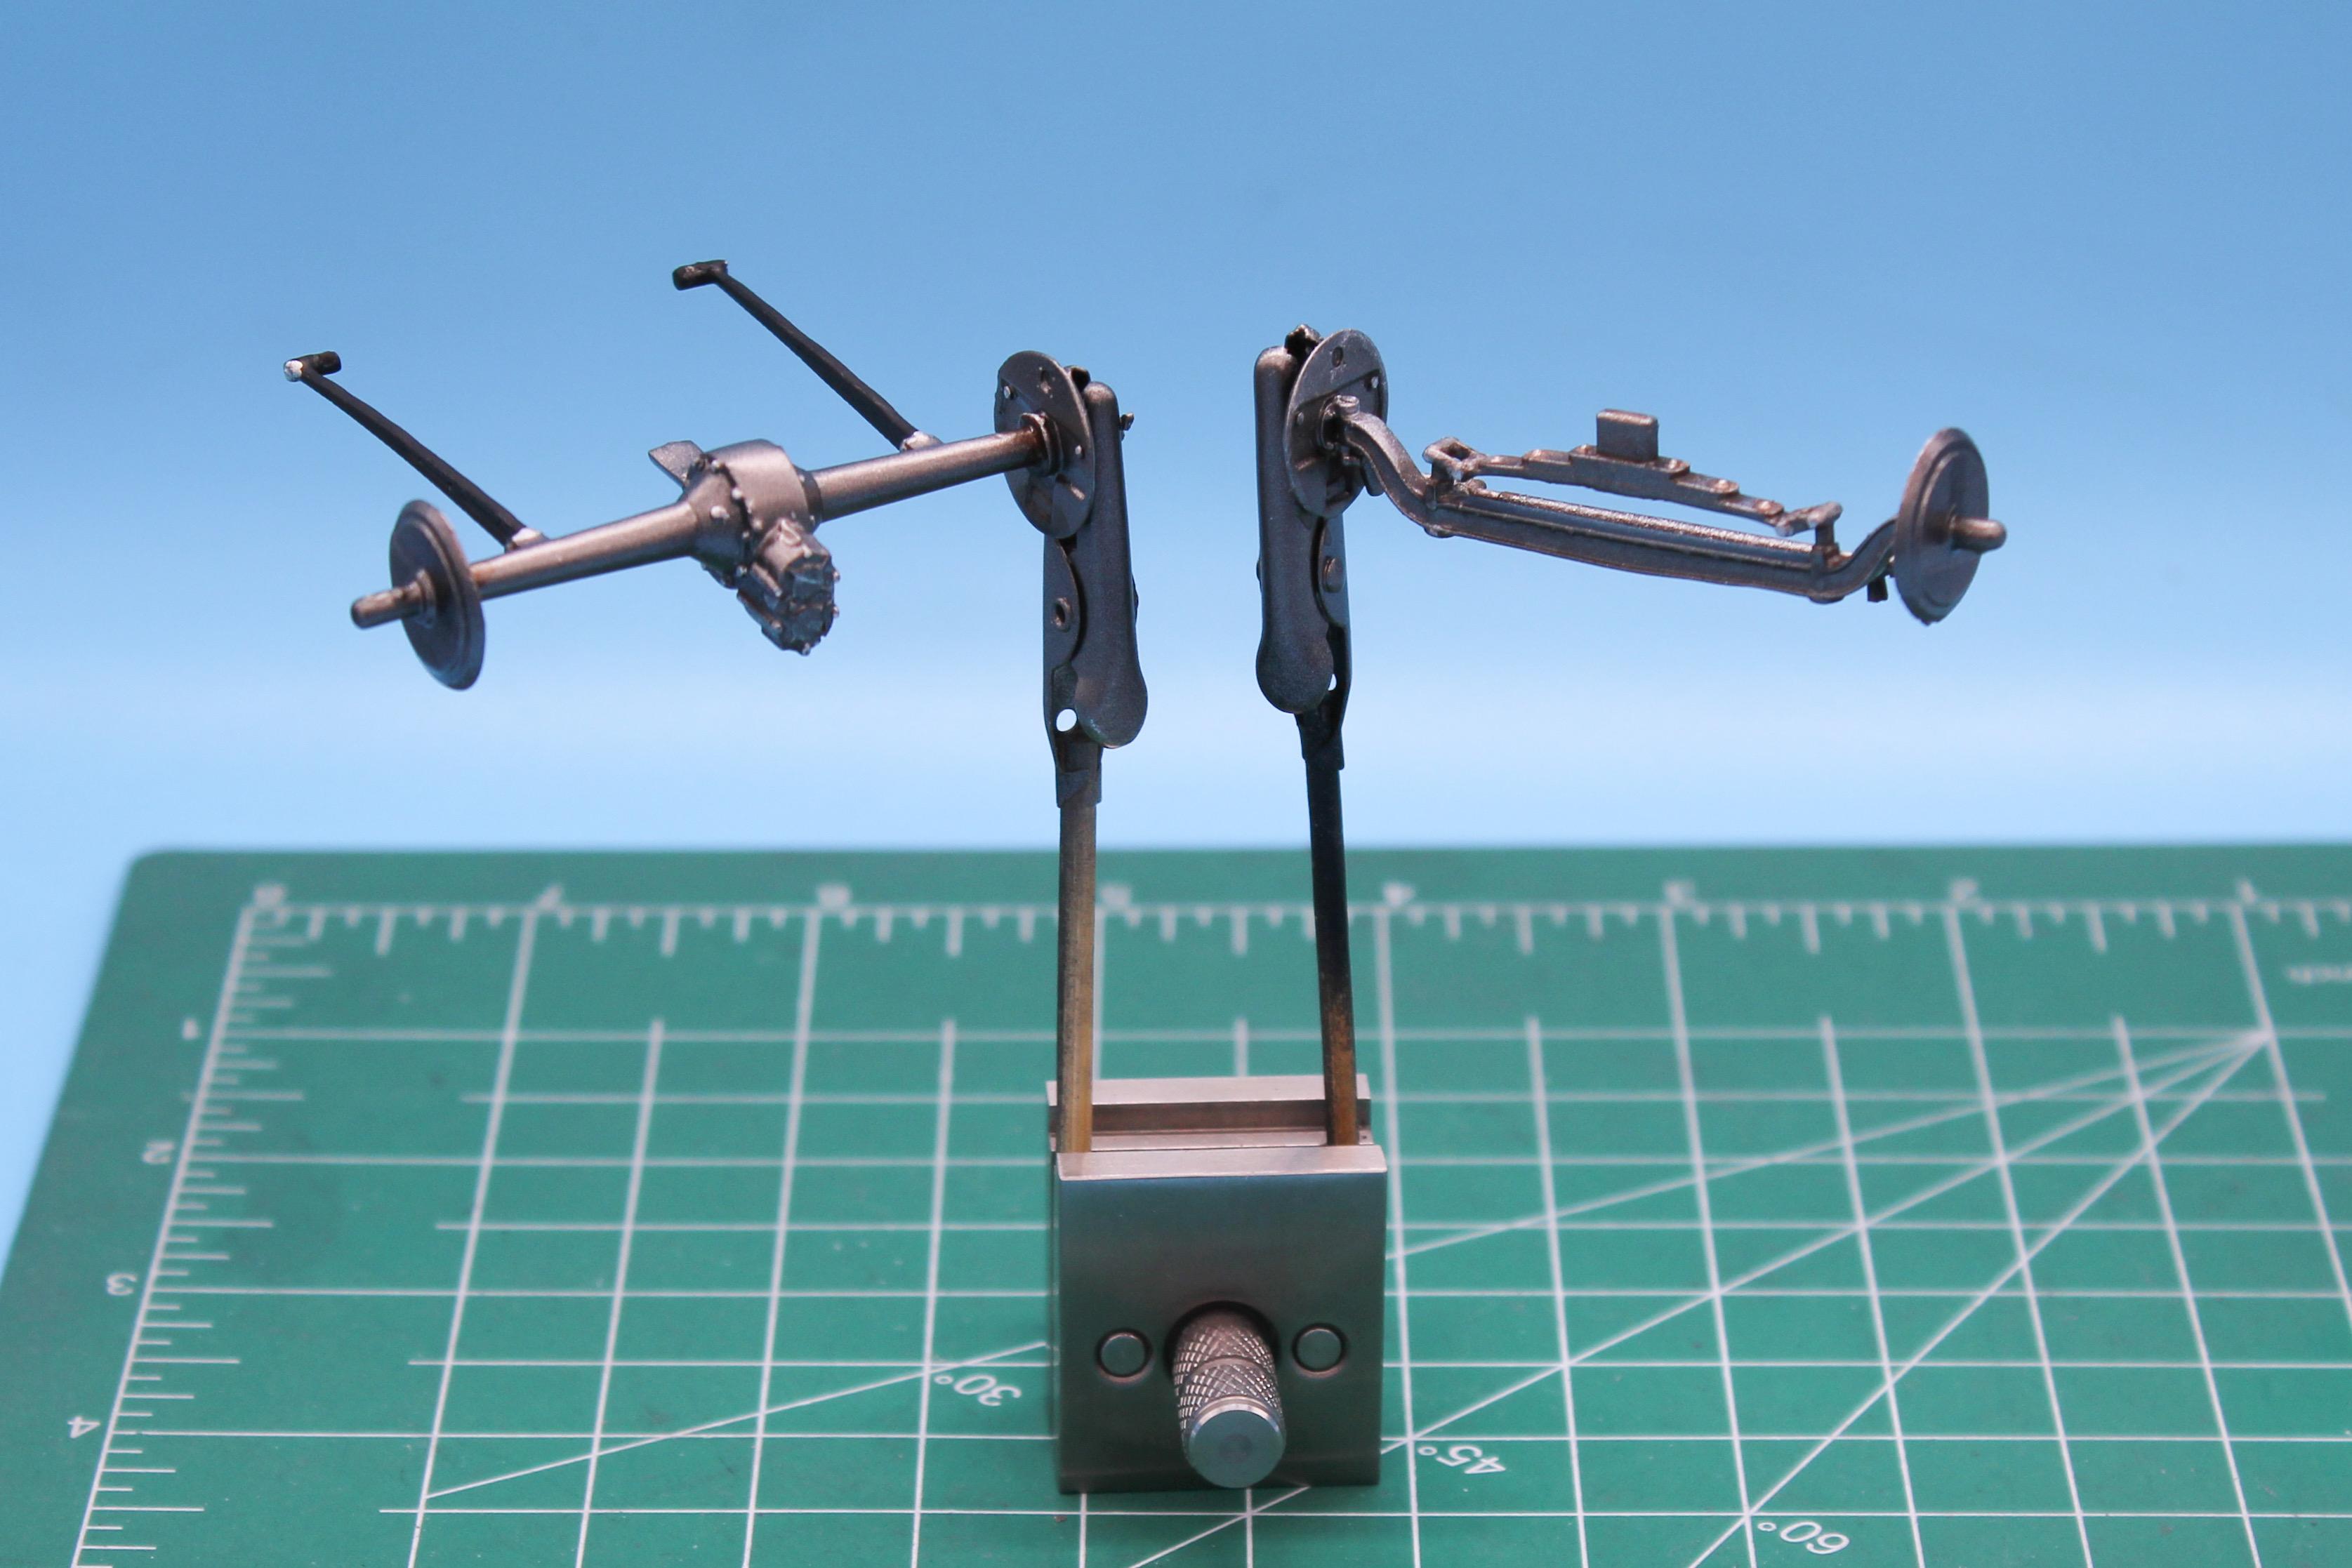
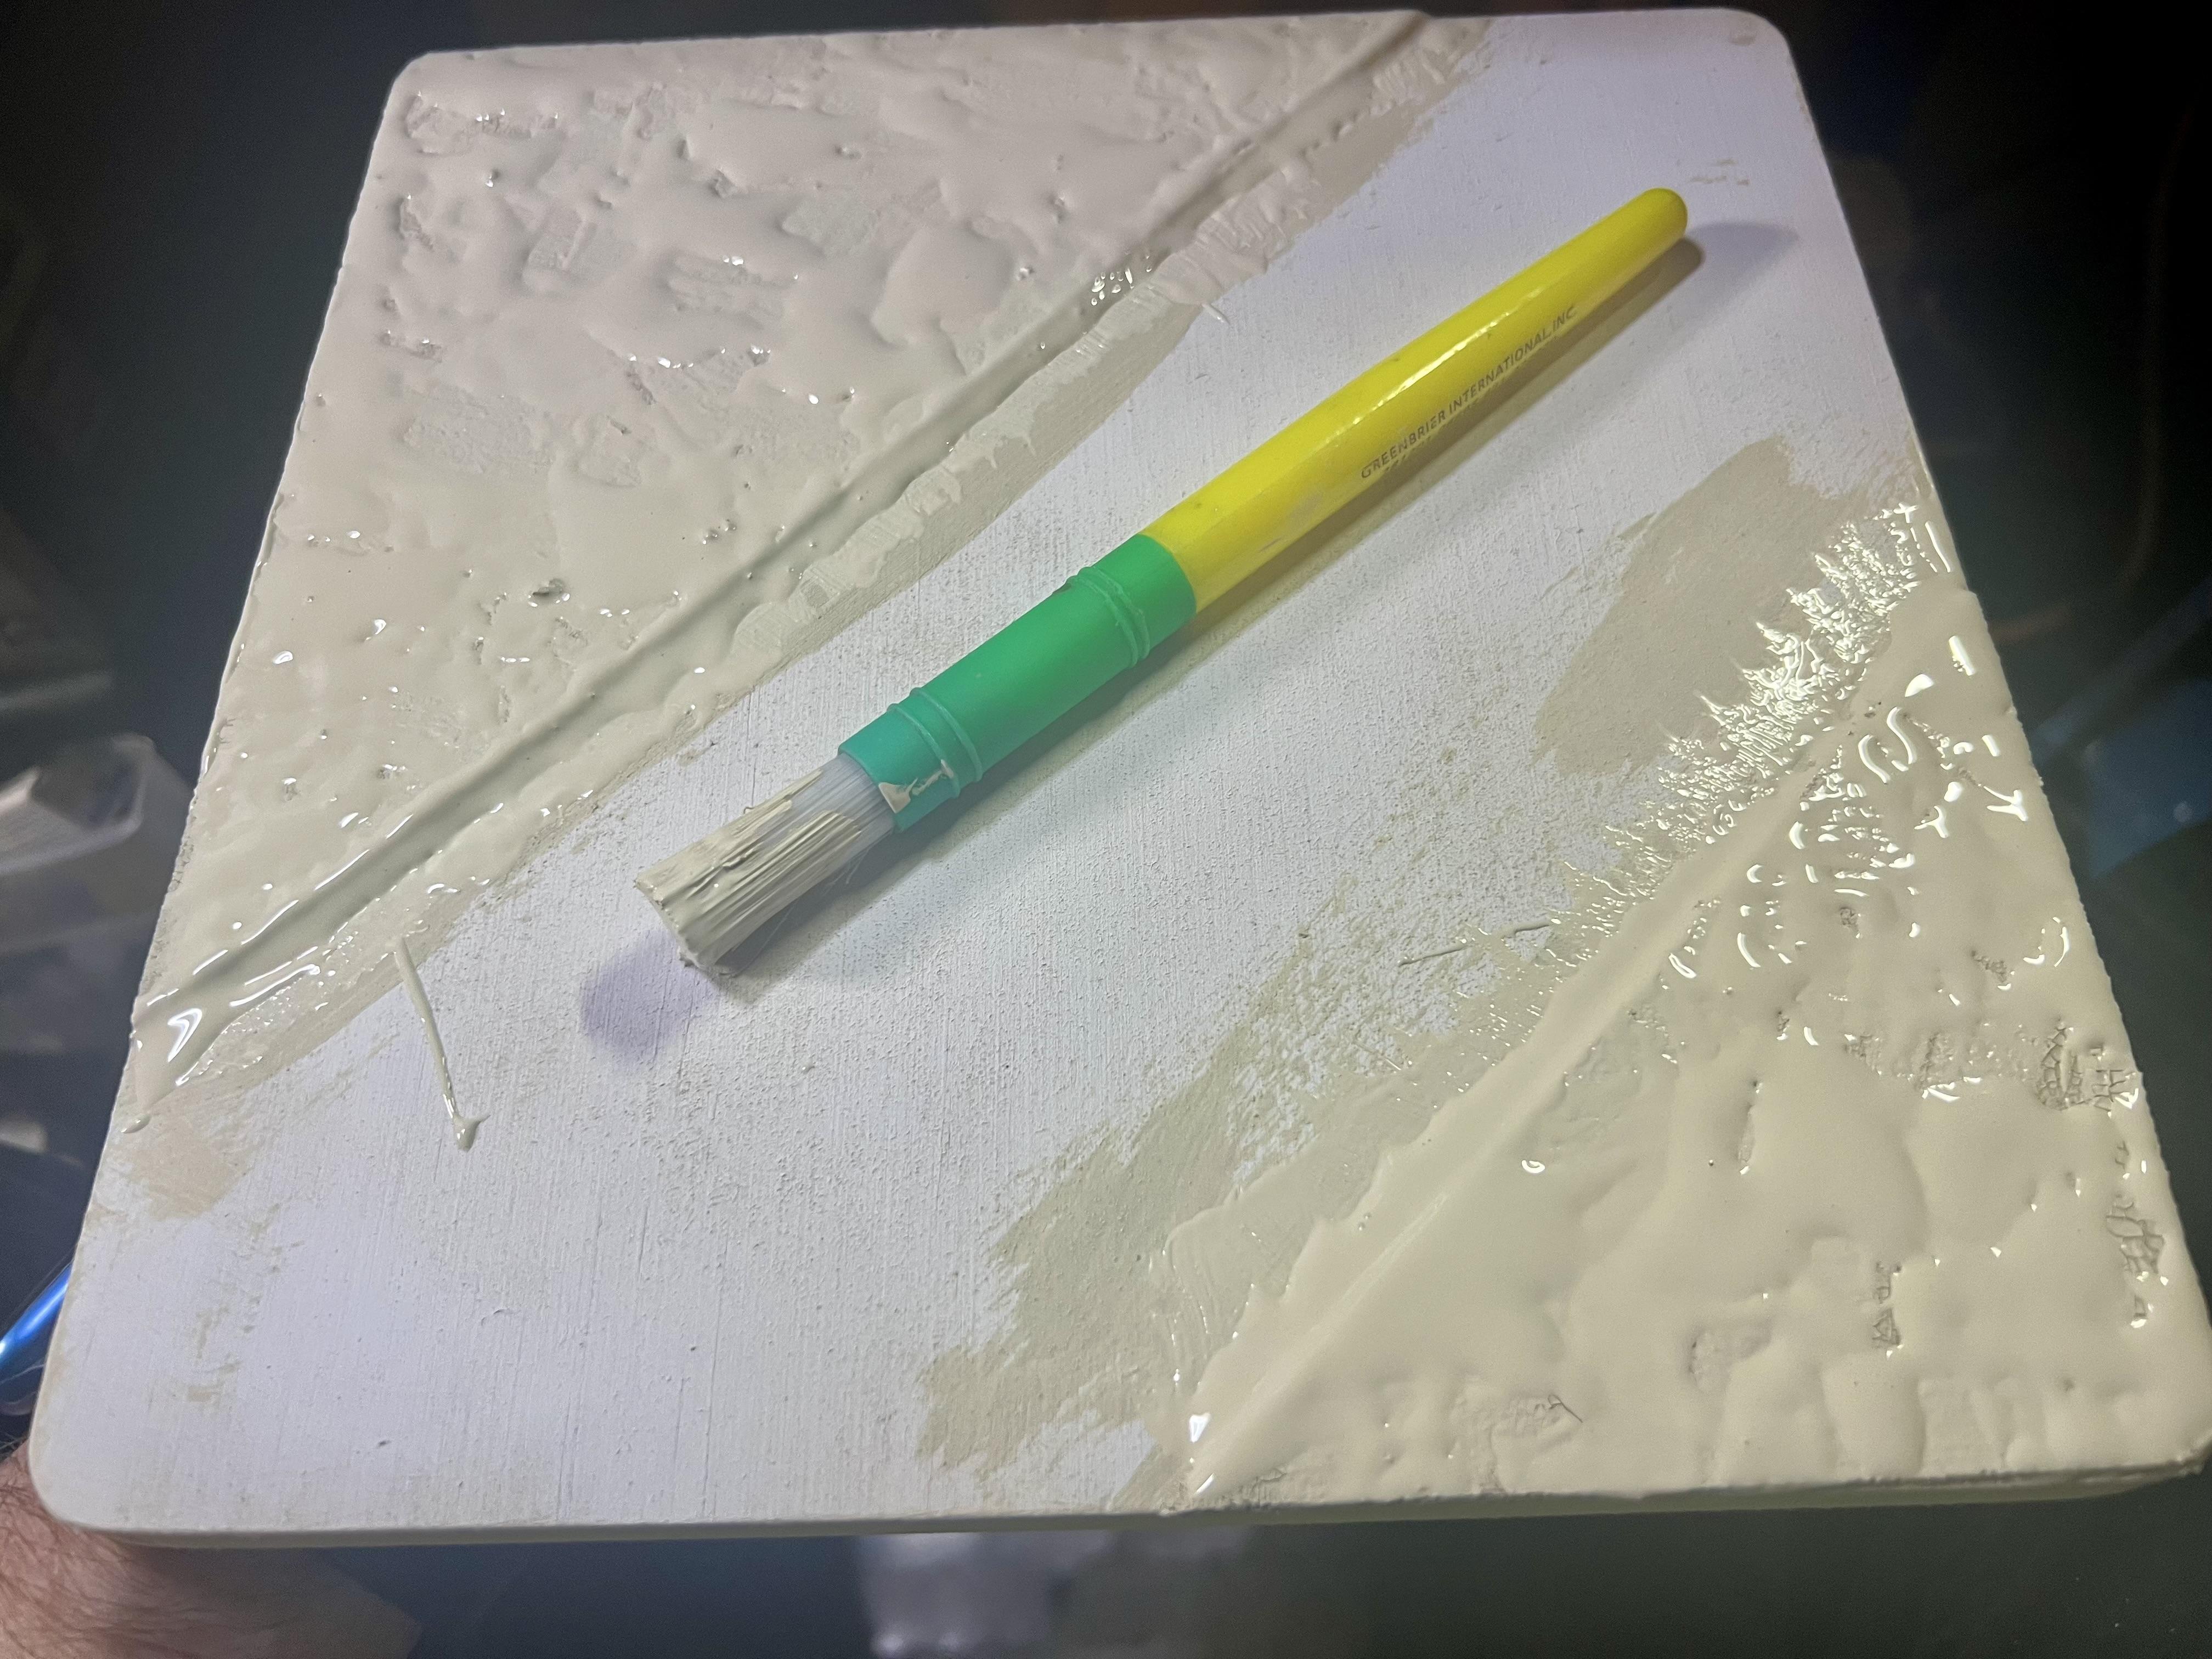
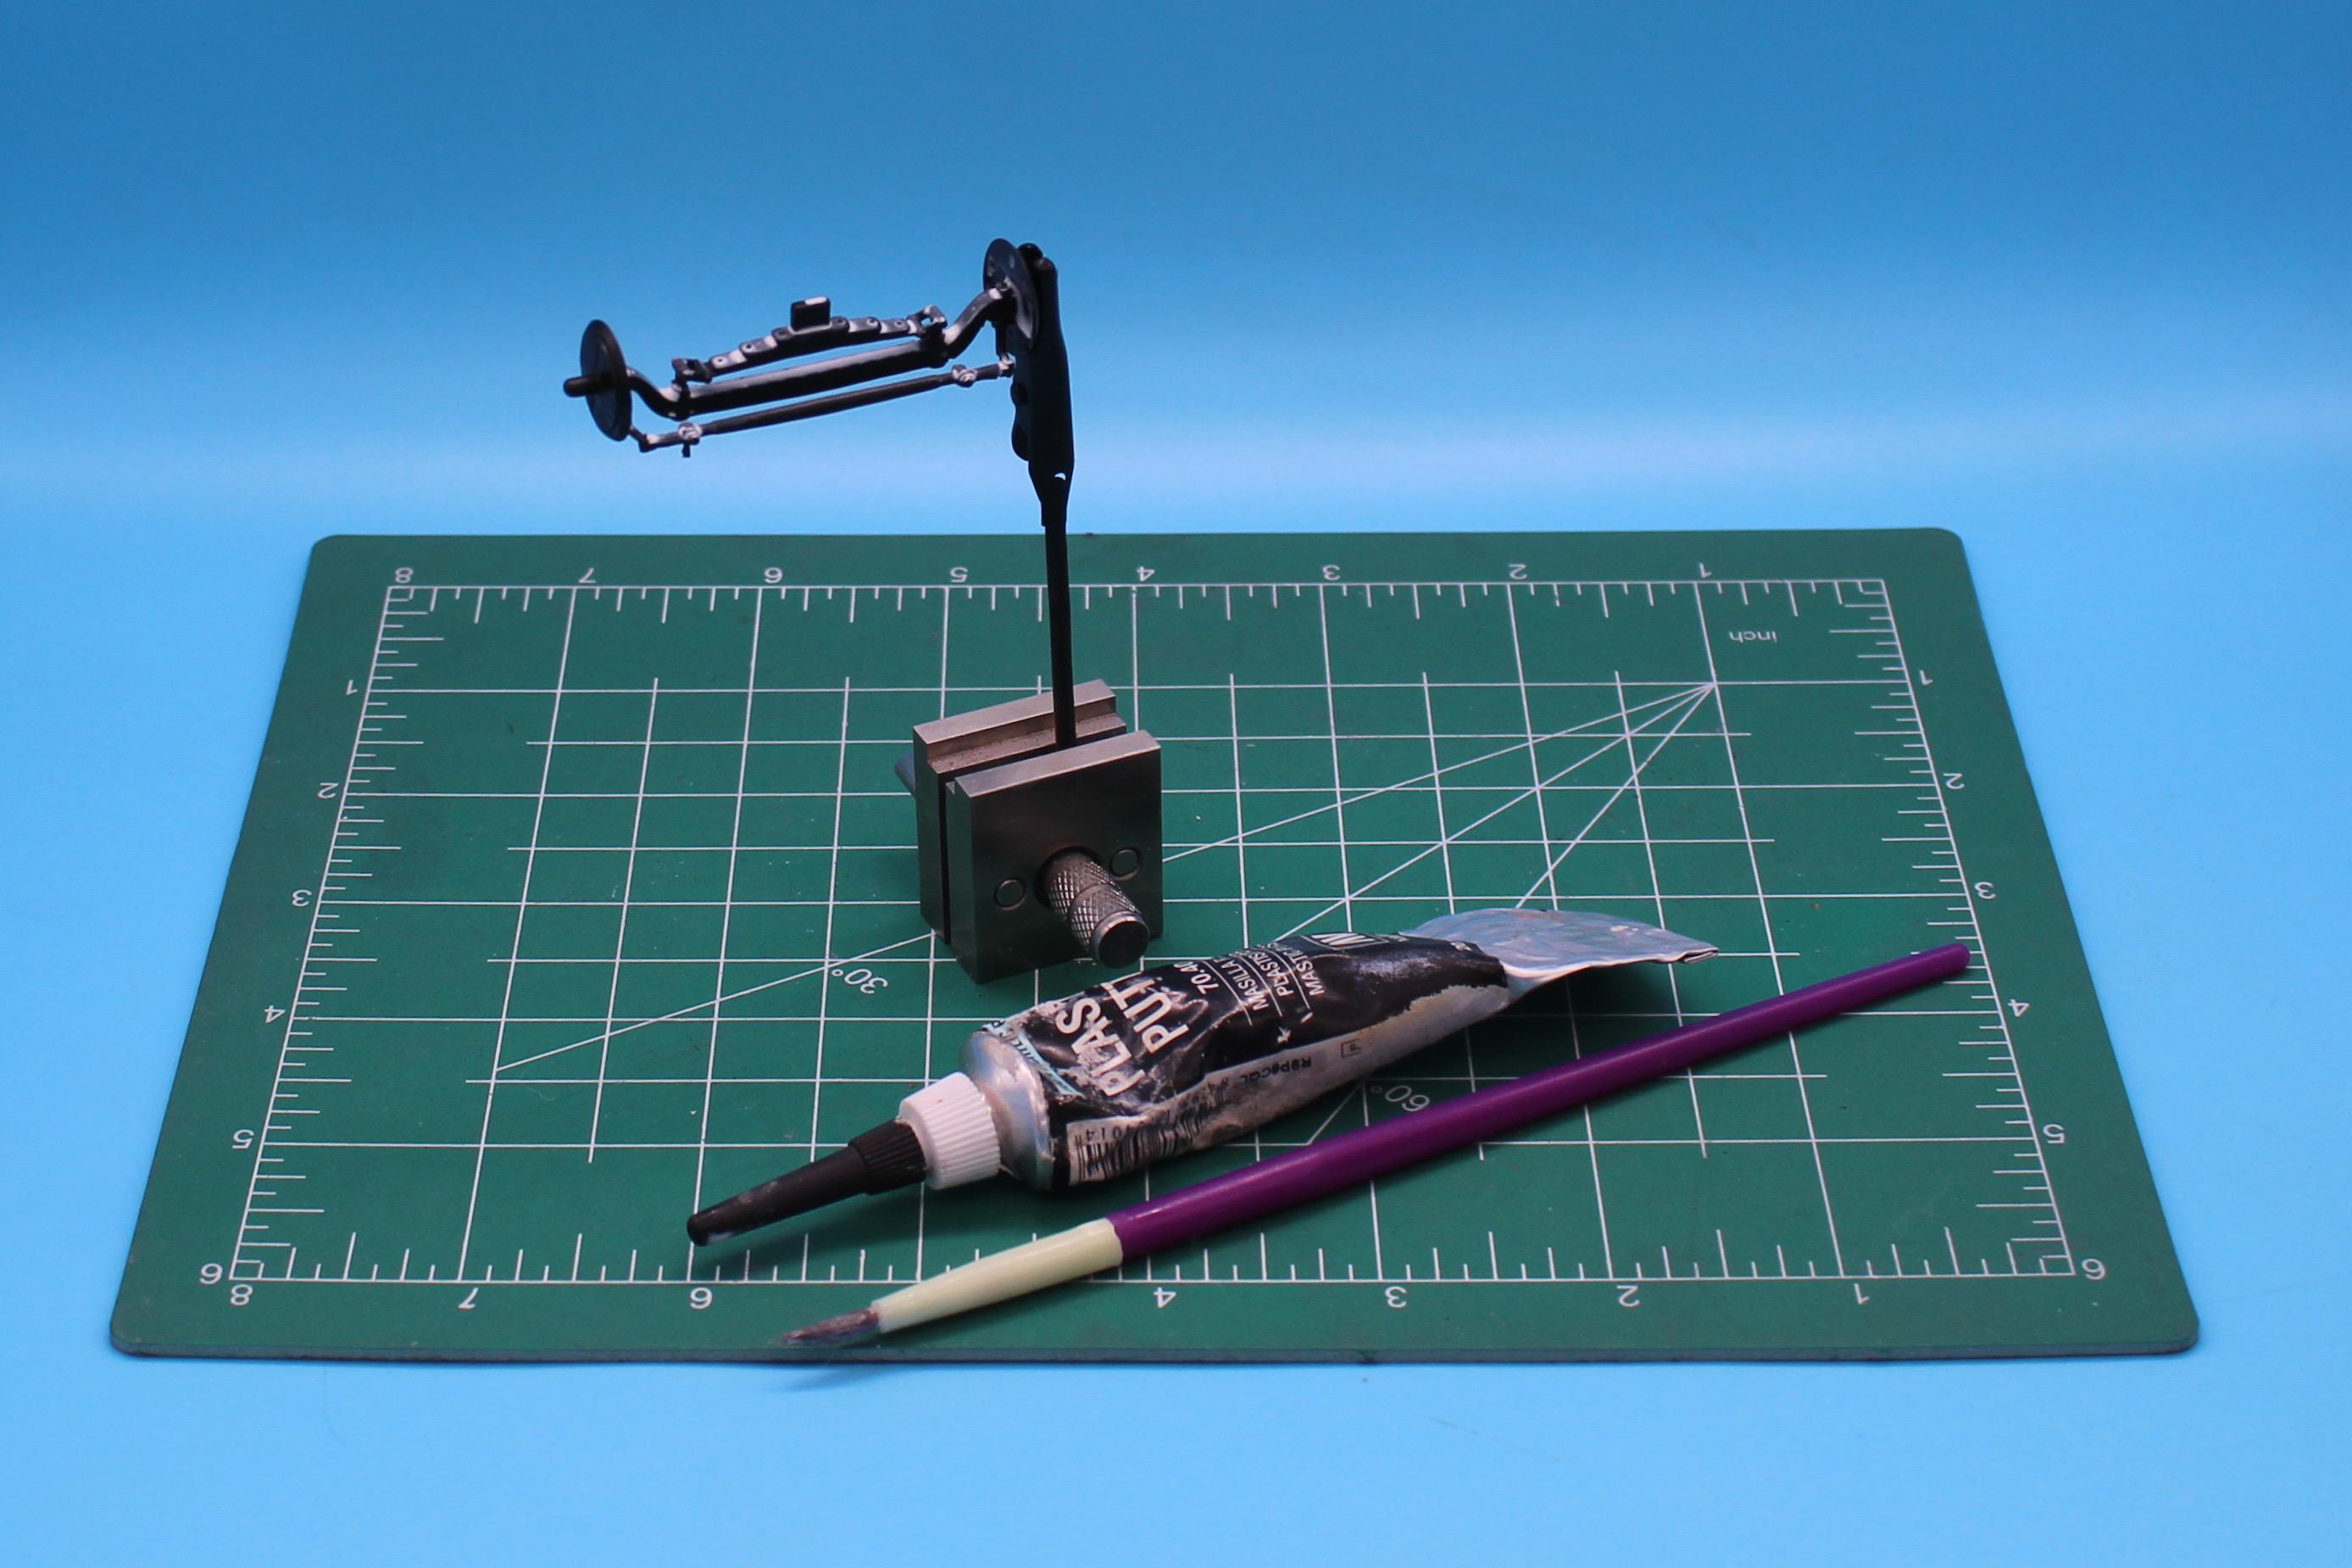
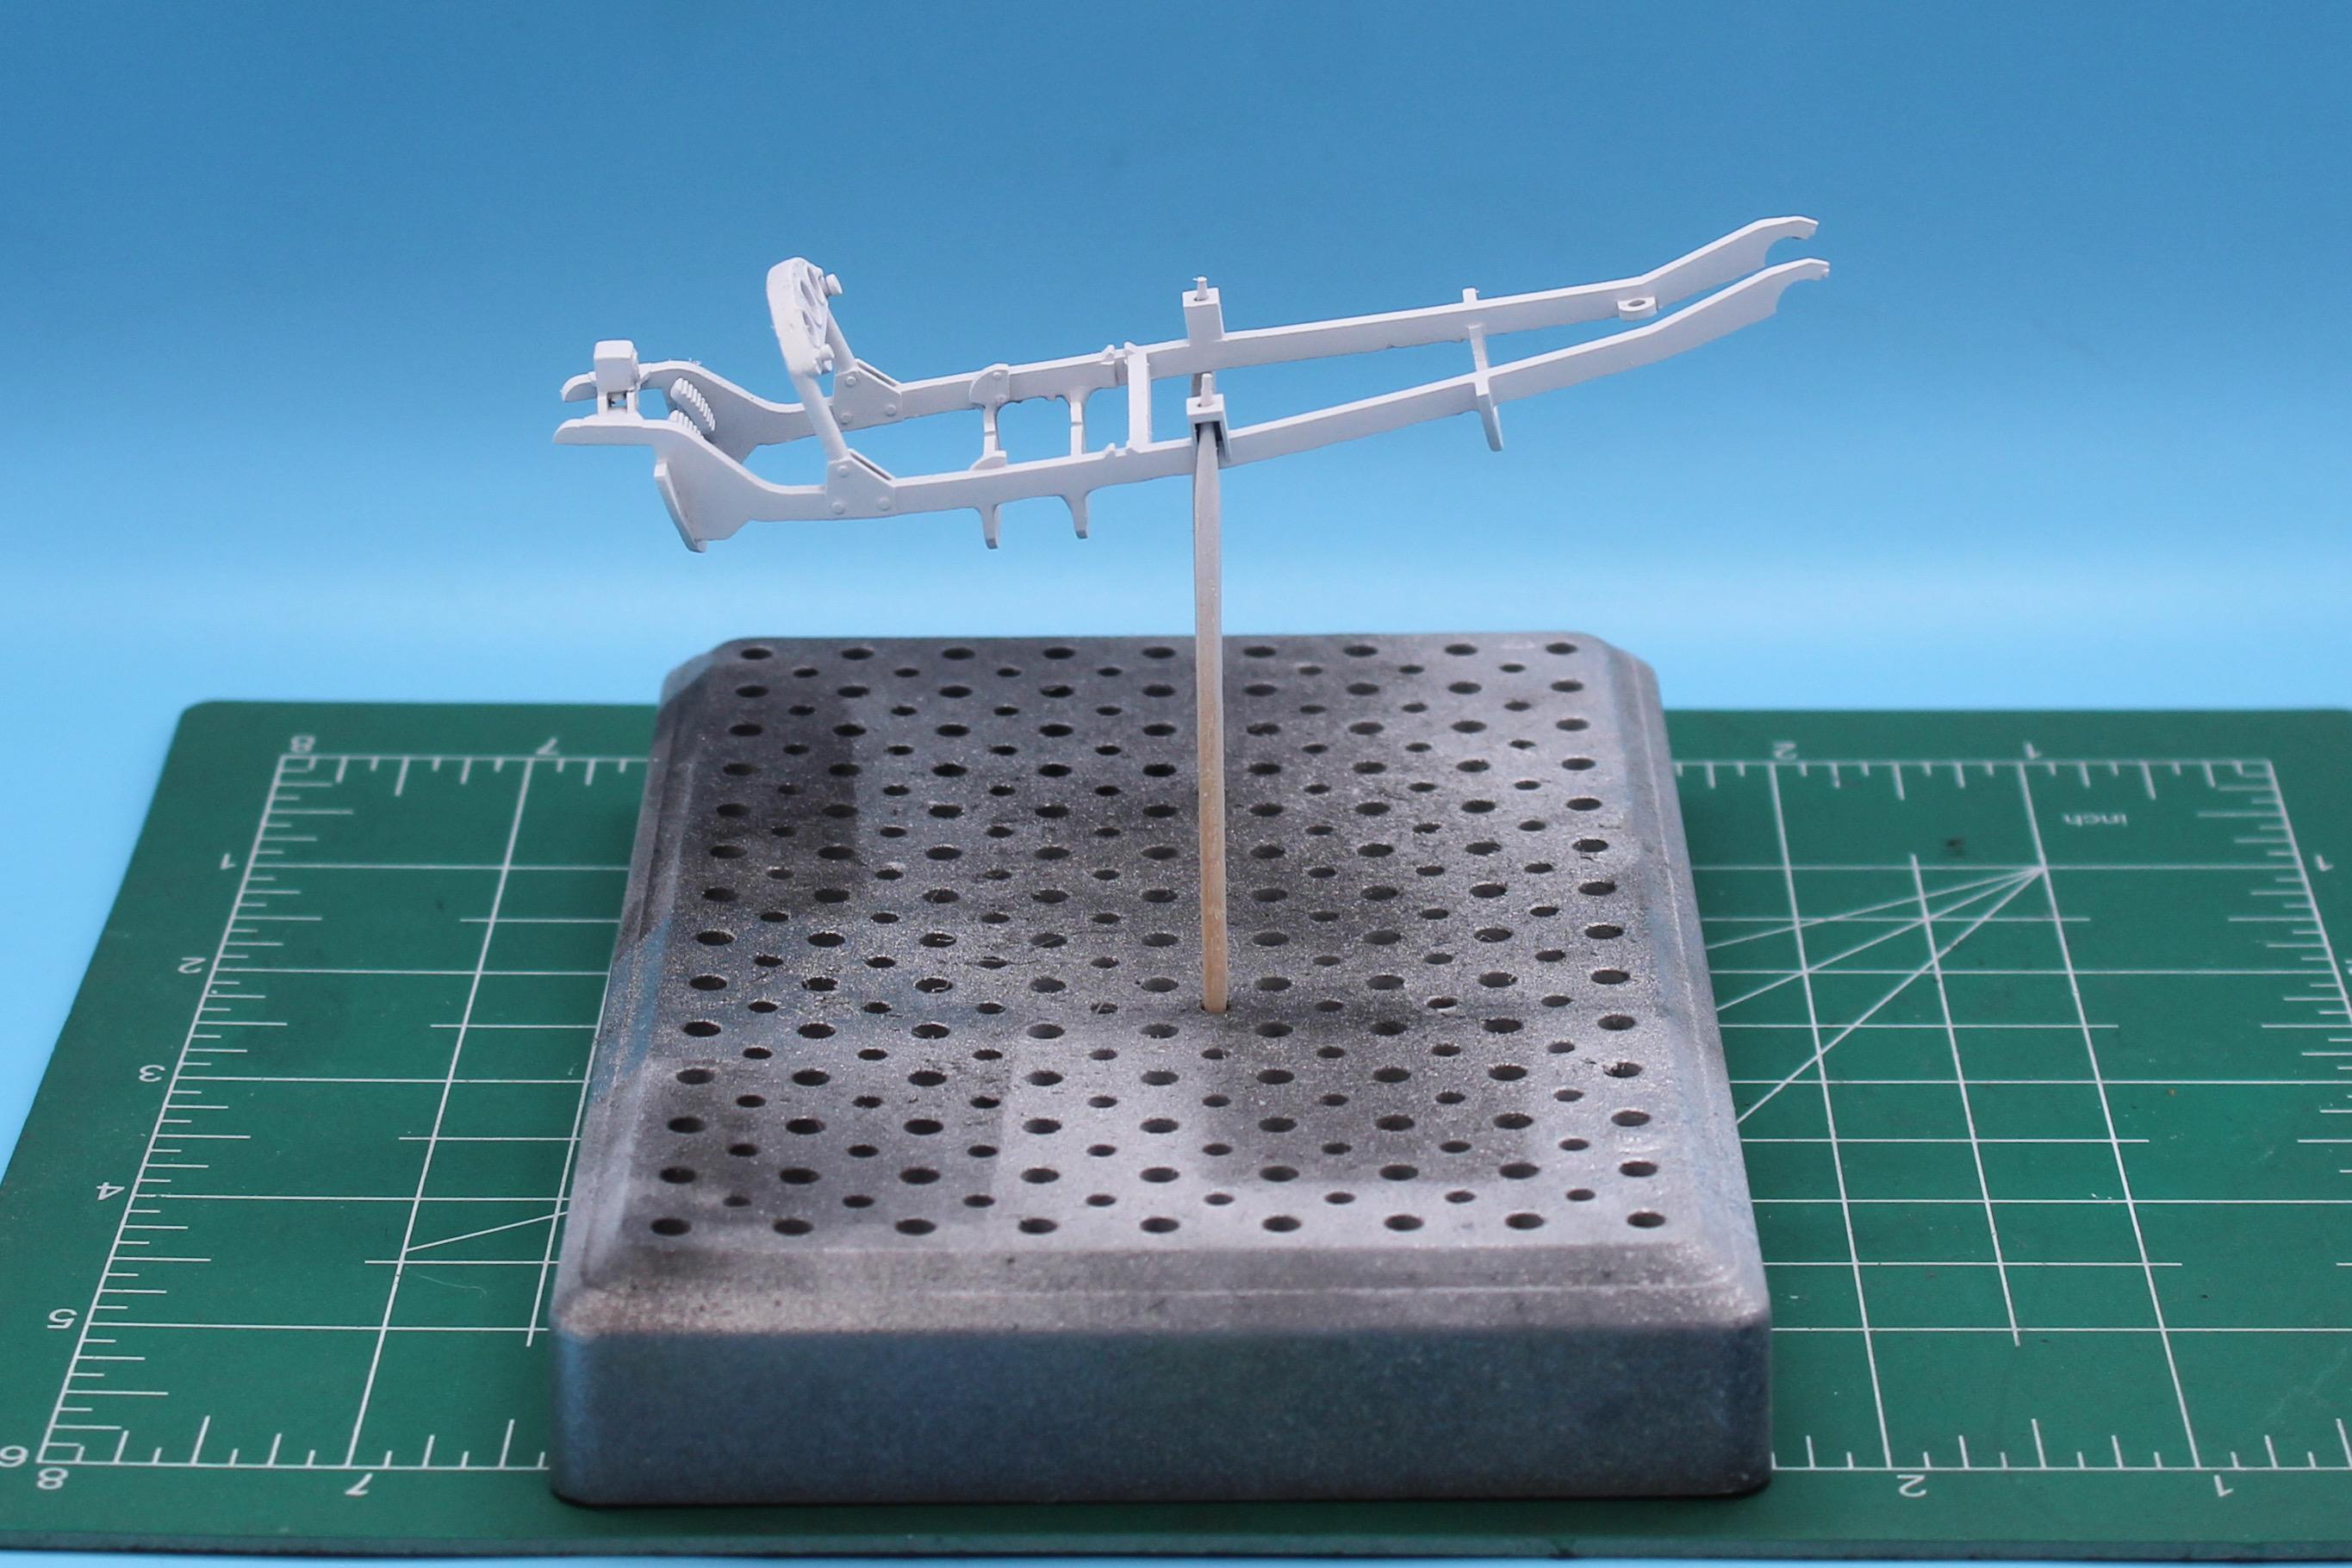
I had not heard of the Star Models kit before - thanks for making me aware of that one! I think so, yes! Nice work! Have you got files for that one for sale anywhere? Looks awesome! Tiny bit of progress this past few days - I’ve been mostly cleaning up print lines from all the parts so I can get them into primer. I’ve been wetsanding larger printed parts lately - keeps the nasty dust down to a minimum: And if you’re feeling lazy, or have areas that can’t easily be sanded, Vallejo plastic putty mixed with 99% alcohol makes an awesome brushable filler that gets in the recesses and fixes them really easily…and can be cleaned up with water afterwards if you get any in the wrong spot: Got the body of the first car shown above mostly smoothed out and ready for paint: And on the full-detail build I think the frame is almost ready for color too: Just a small update, but sanding and priming isn’t very exciting…more interesting stuff soon! Thanks for looking!