OldNYJim
-
Posts
247 -
Joined
-
Last visited
Content Type
Profiles
Forums
Events
Gallery
Everything posted by OldNYJim
-

Anyone got a Mattel Power Shop?
OldNYJim replied to OldNYJim's topic in General Automotive Talk (Trucks and Cars)
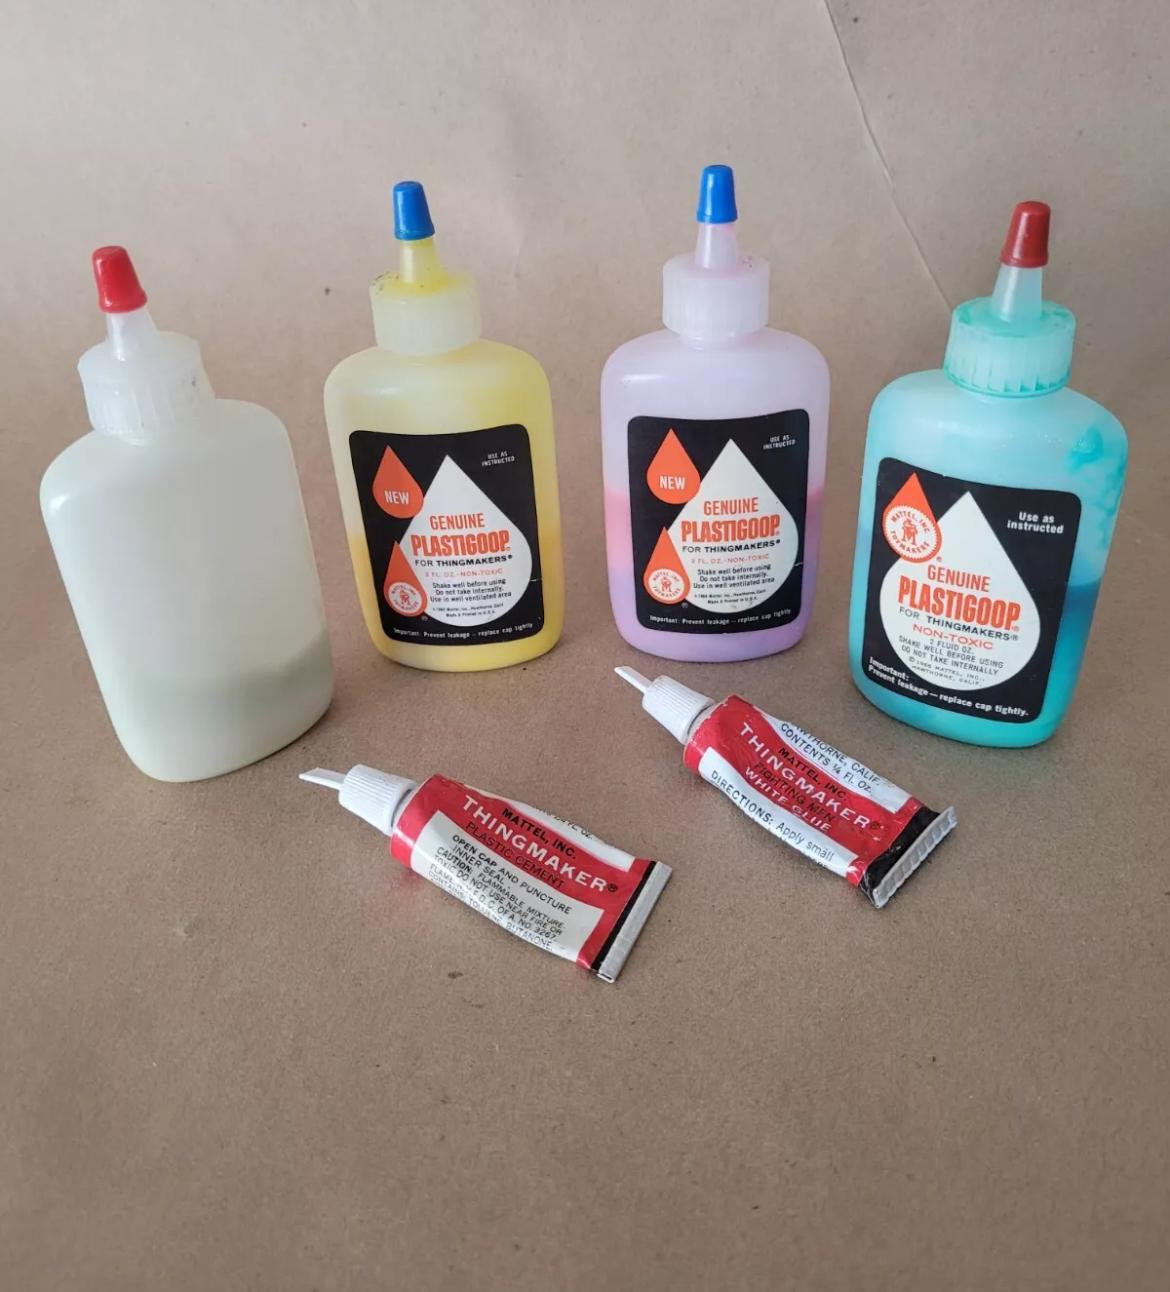
Yep, correct - Plastigoop! Not a super useful tool for car guys, but I WOULD like to get to play with one anyway…
-
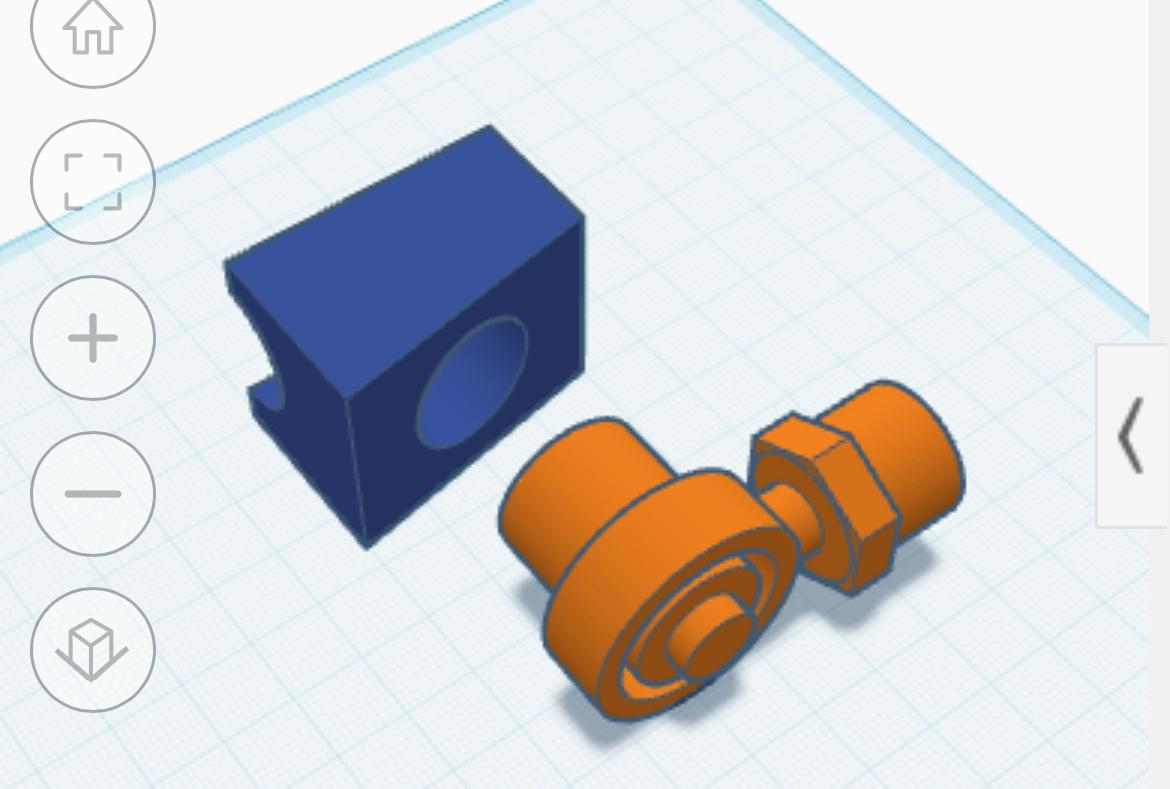
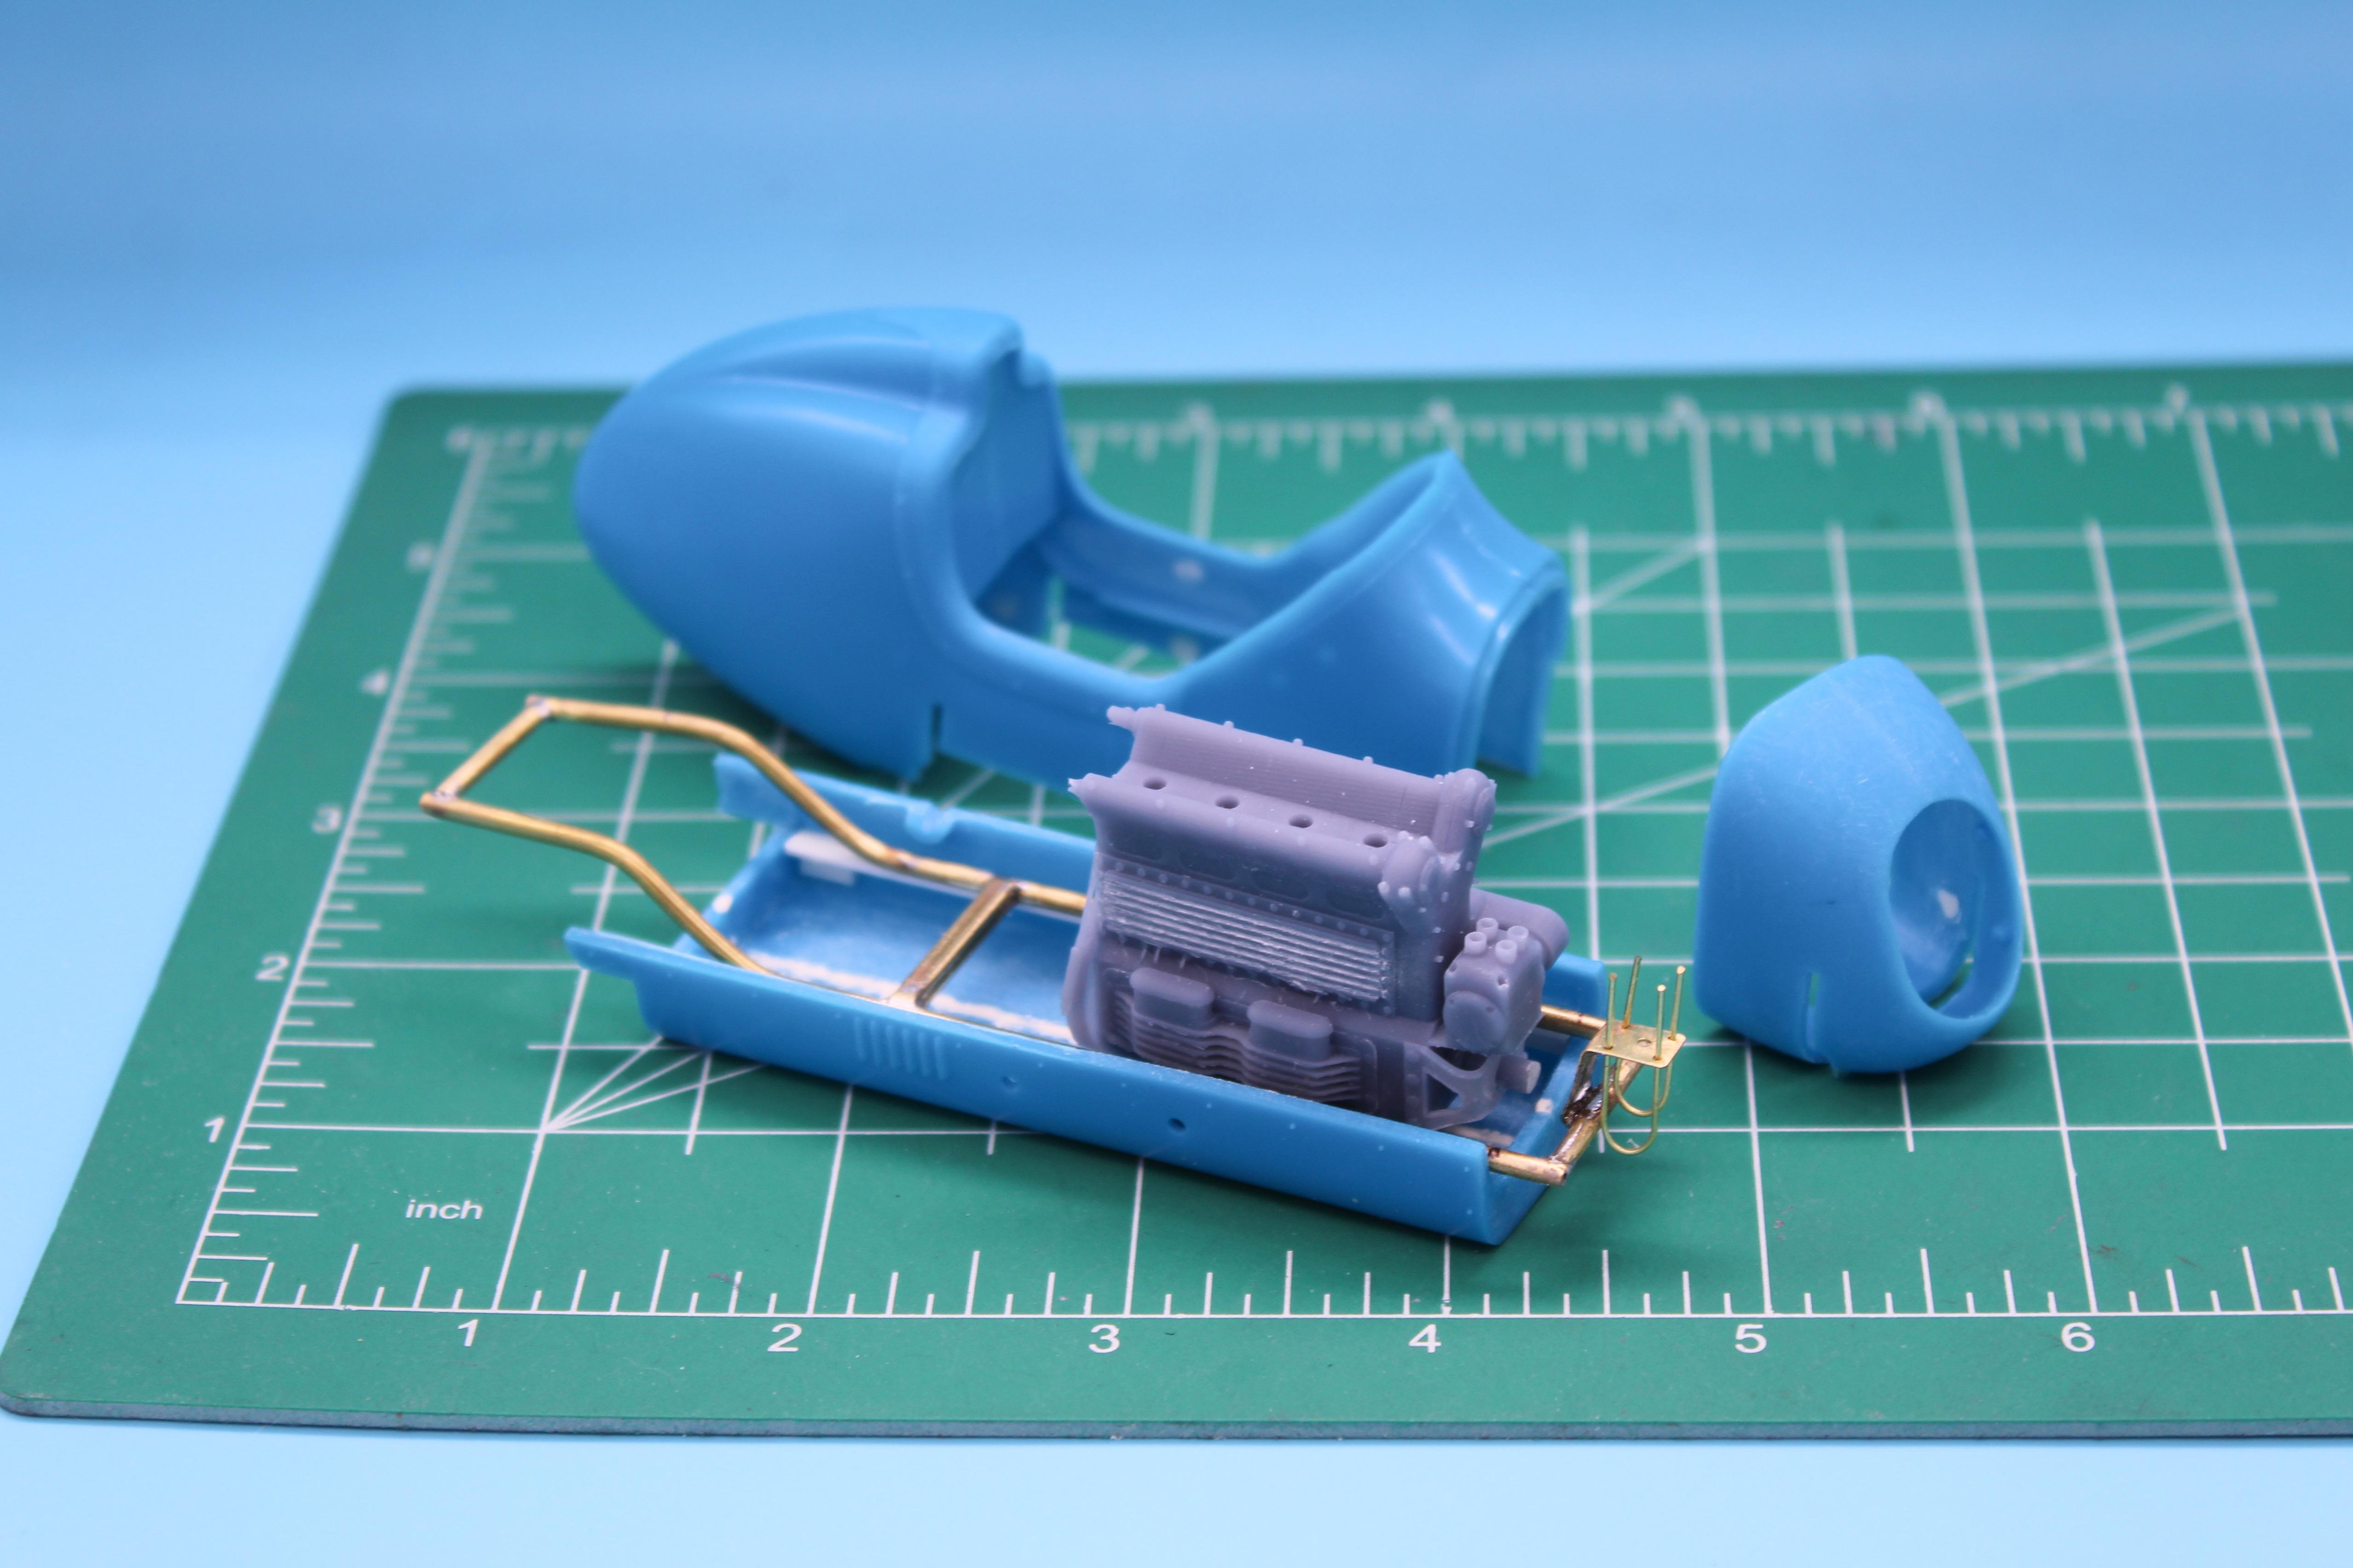
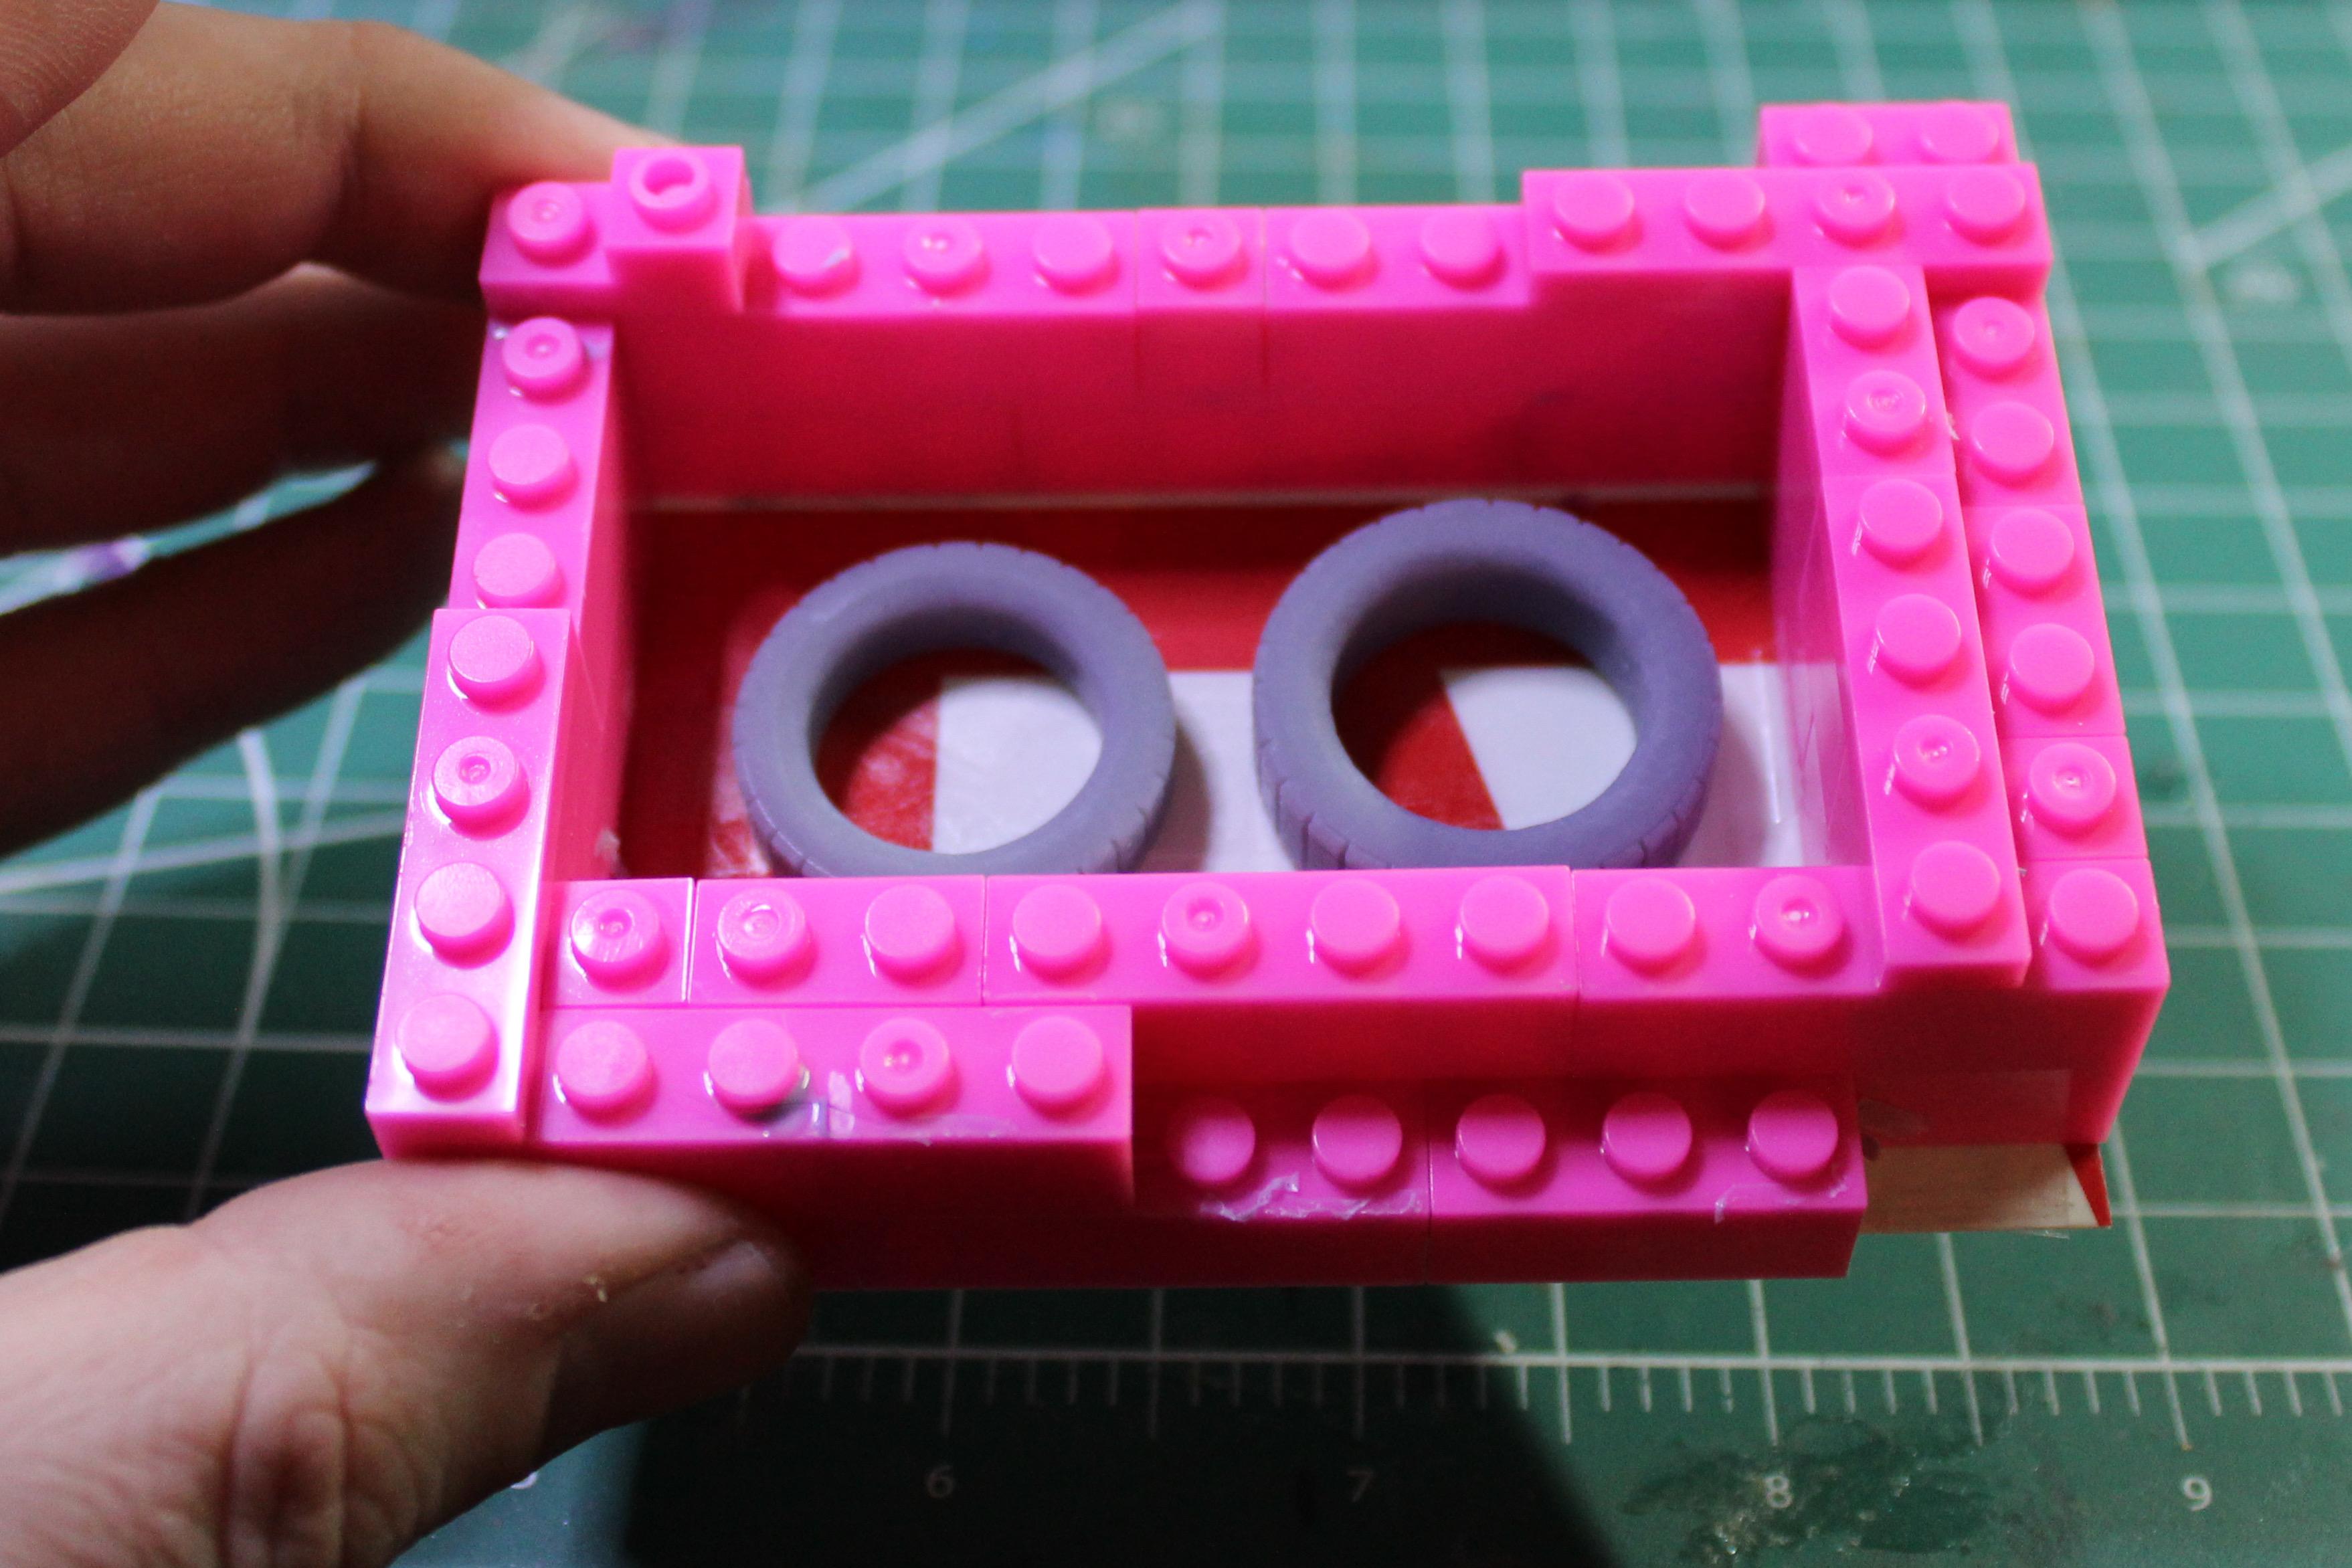
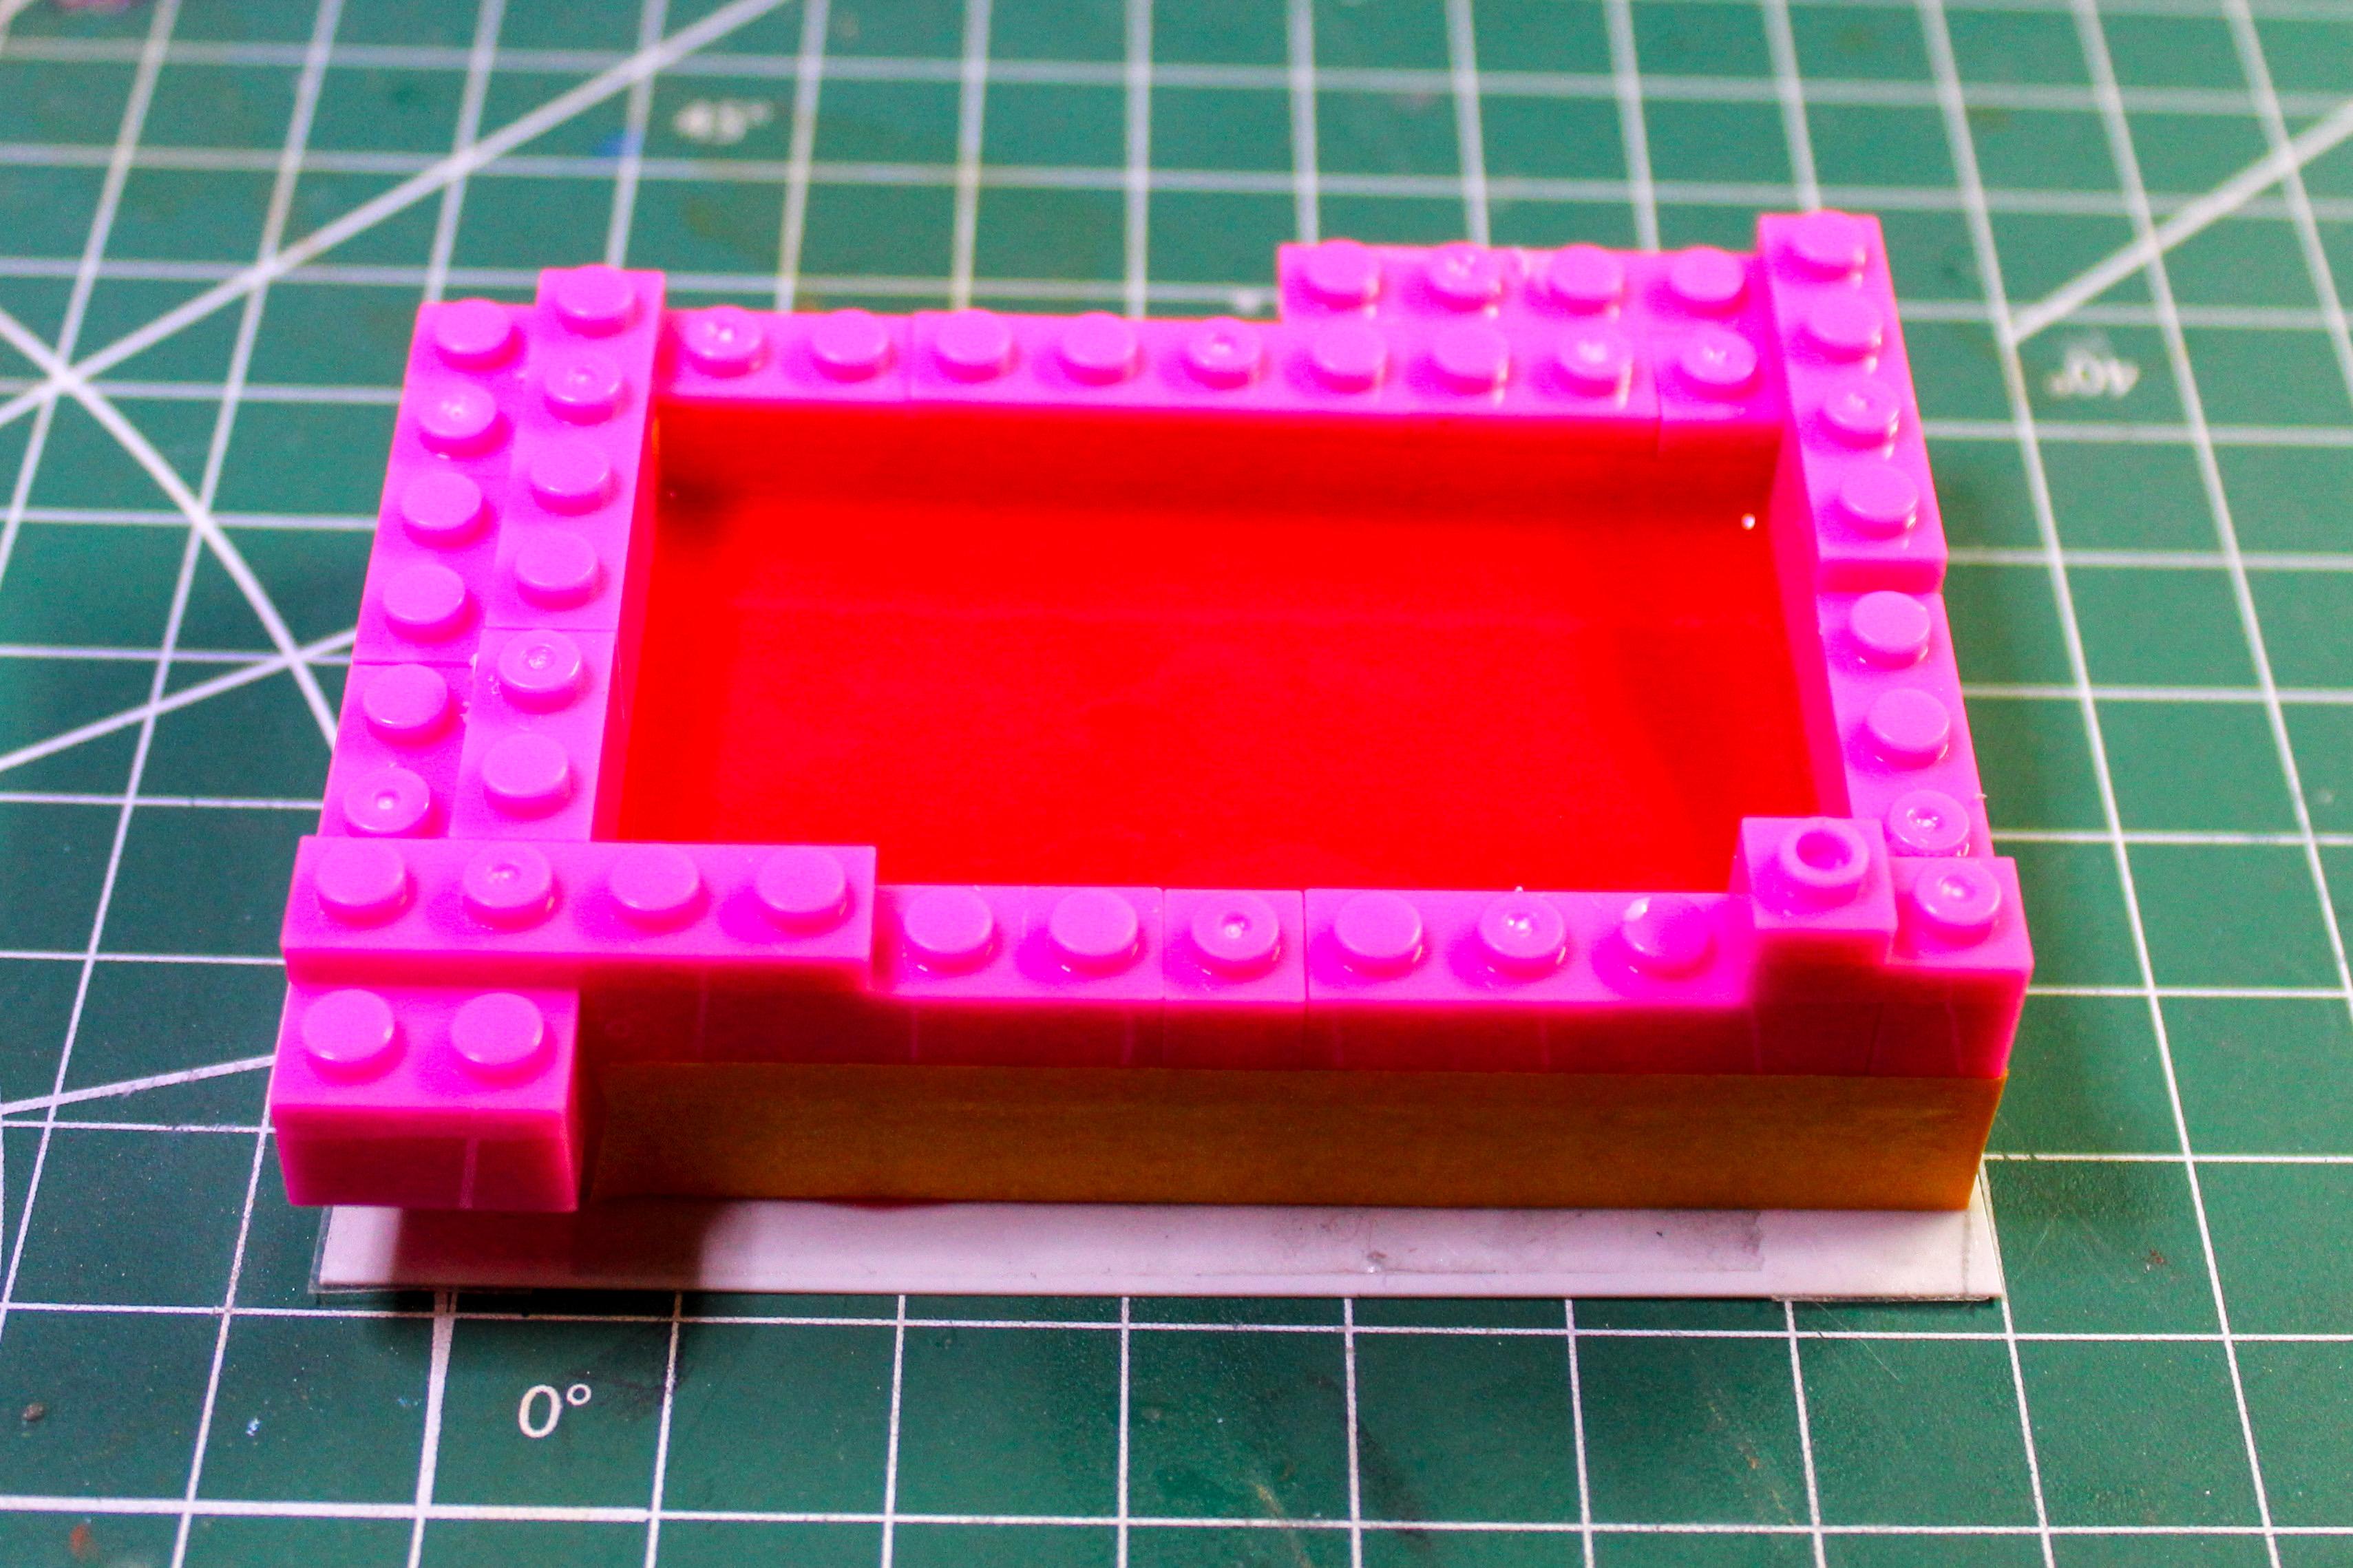
Happy Sunday y’all! Another couple of hours at the bench… First job today was to lay out a rod end to match some reference pics that I had collected, plus a tab for it to lock into like the 1:1 frame shown in the post above. I felt a LITTLE like I should’ve made these out of brass, but with the tools I’ve got in my little home shop it would’ve taken more effort than it was worth for no real benefit when the build is done…. 3D model of the parts: 2 hours later, the parts: Now, before can lock those little trapezoid blocks onto the frame, I need to lock the frame to the body so I can make sure the front axle will line up right. BUT, I’ll need to modify the tracknose for it to fit, so I separated that from the body as a whole… …and then, so I don’t have to play ship-in-a-bottle come assembly time, I removed the belly pan and made it it’s own piece also: Plan is to make mounts for the belly pan so the frame mounts to it easily and repeatably, then everything else around it: Sure is taking me a long time to build this 15-part kit 🤪 Thanks for looking - more soon, soon as I’ve done more!
-
Anyone got a Mattel Power Shop?
OldNYJim replied to OldNYJim's topic in General Automotive Talk (Trucks and Cars)
Interesting! I assumed they were probably made FOR this machine, but yes, that’s true…that probably would make it easier to find replacements at least -
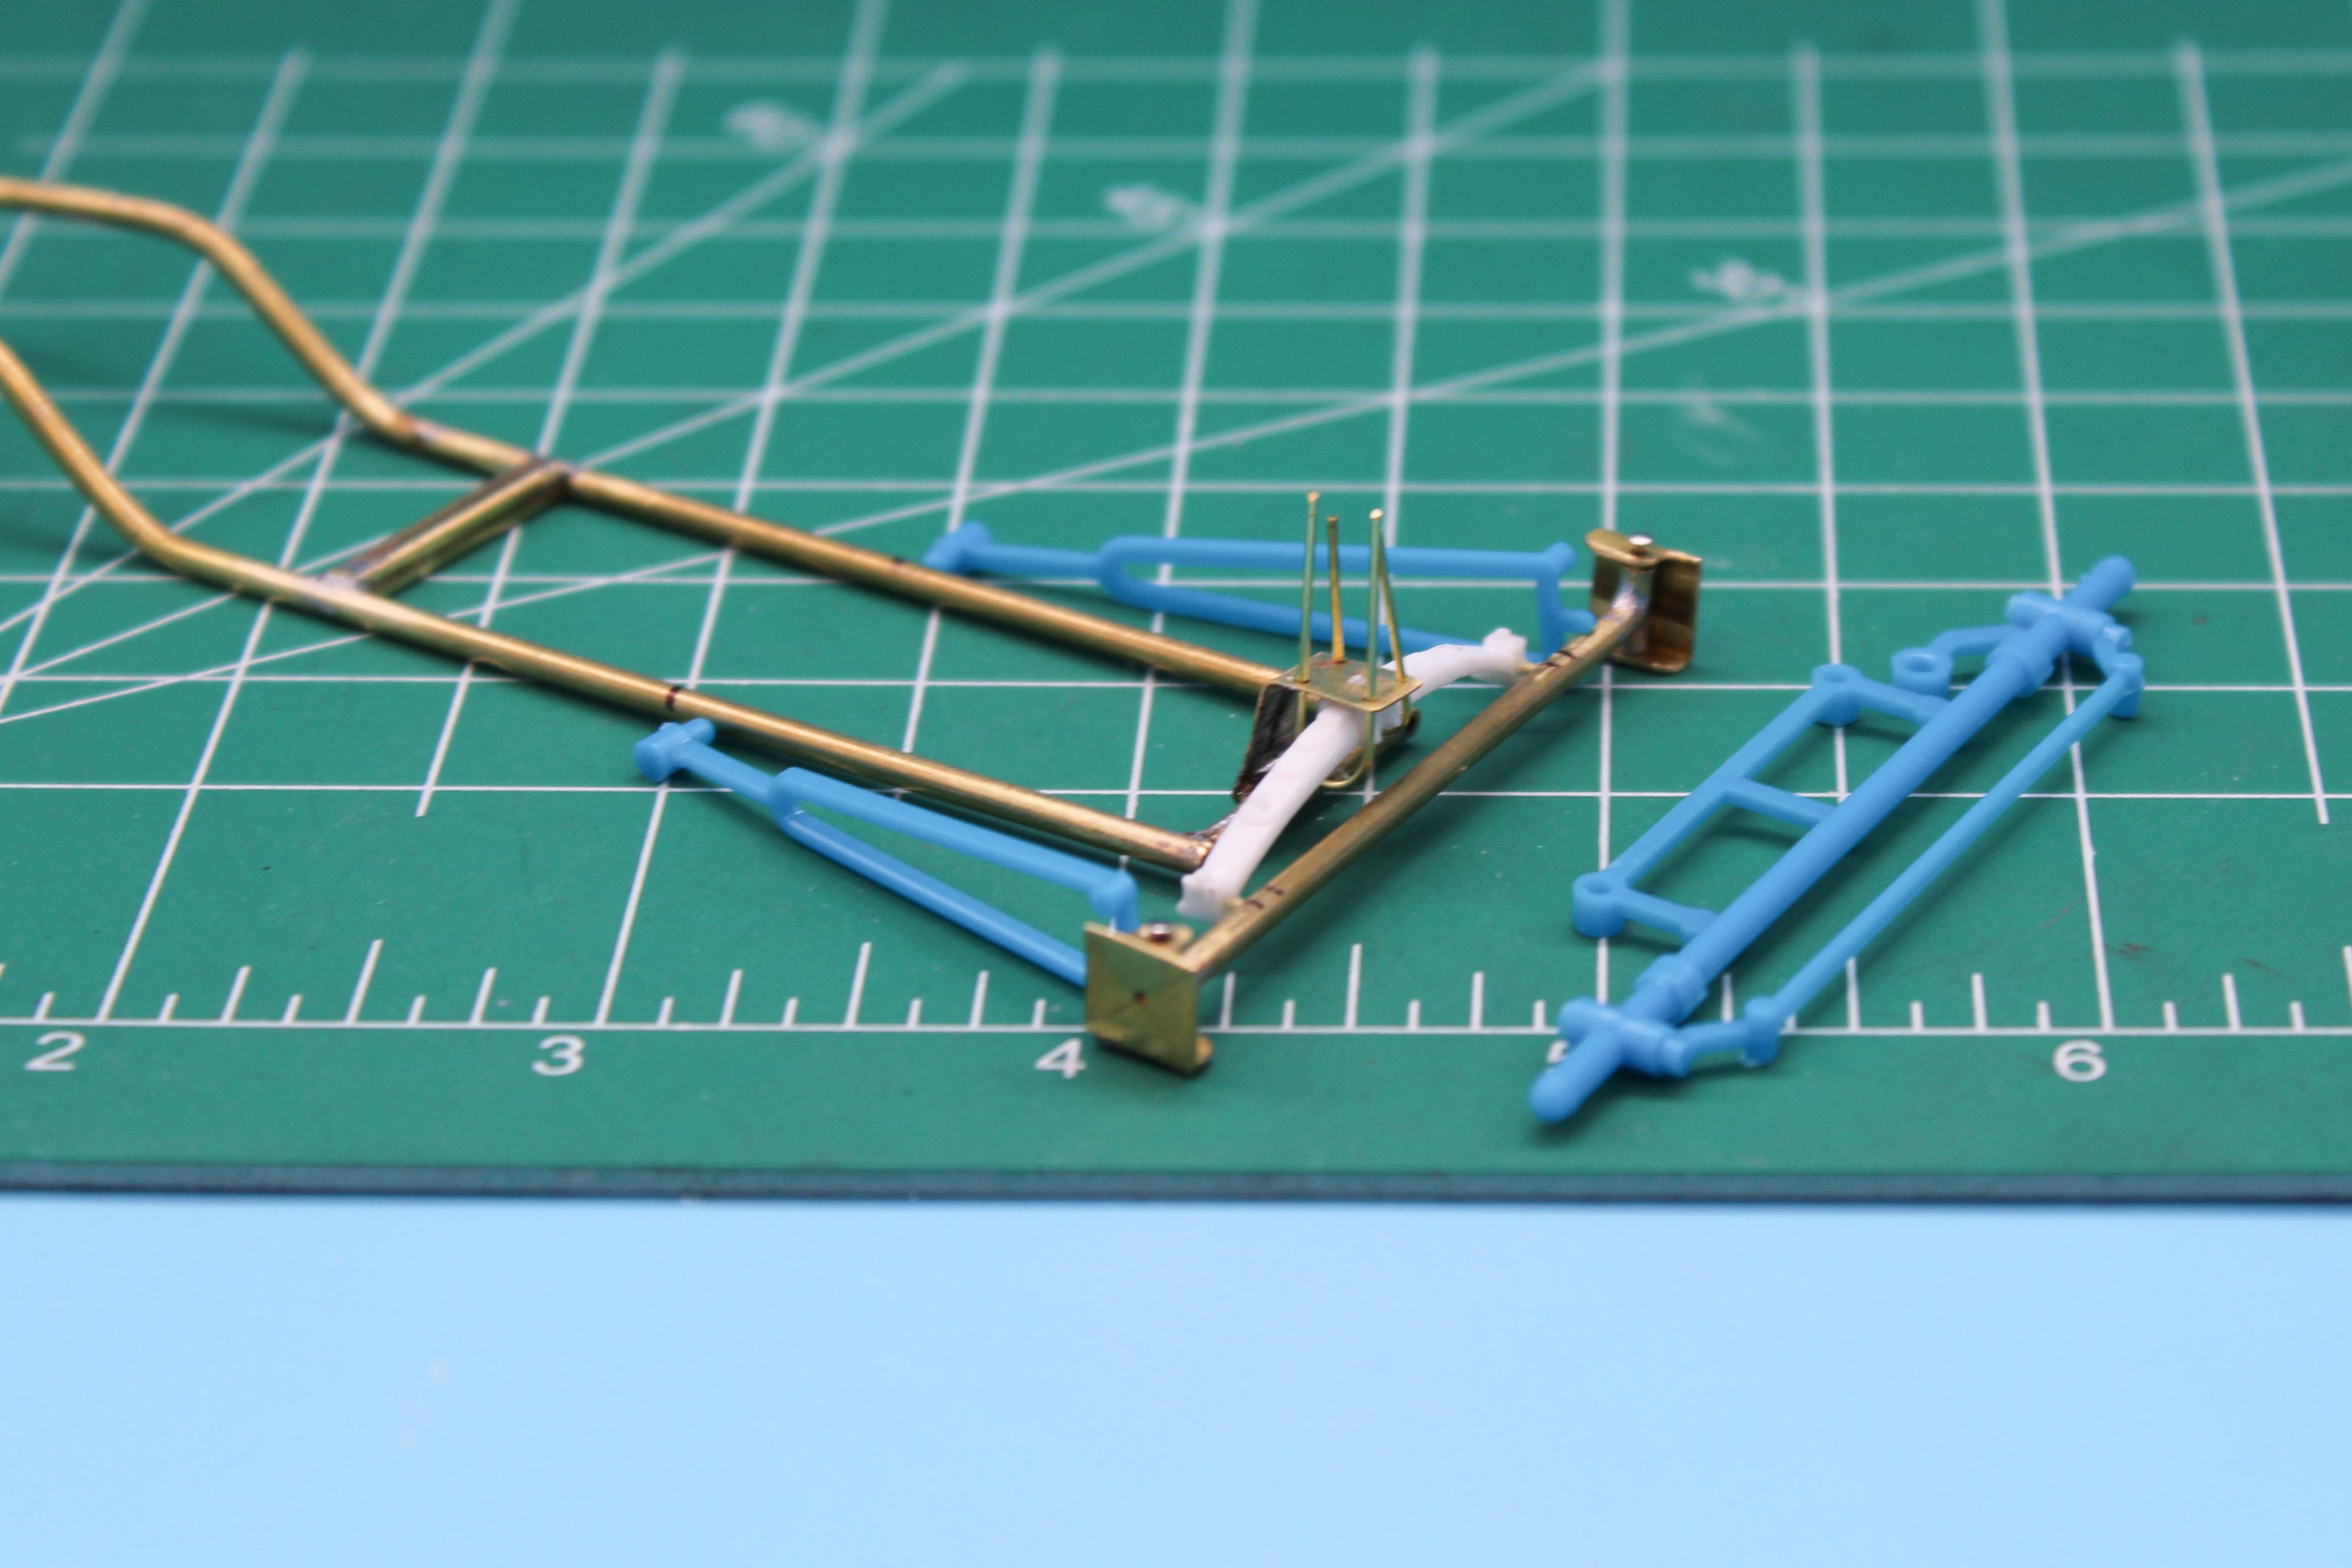
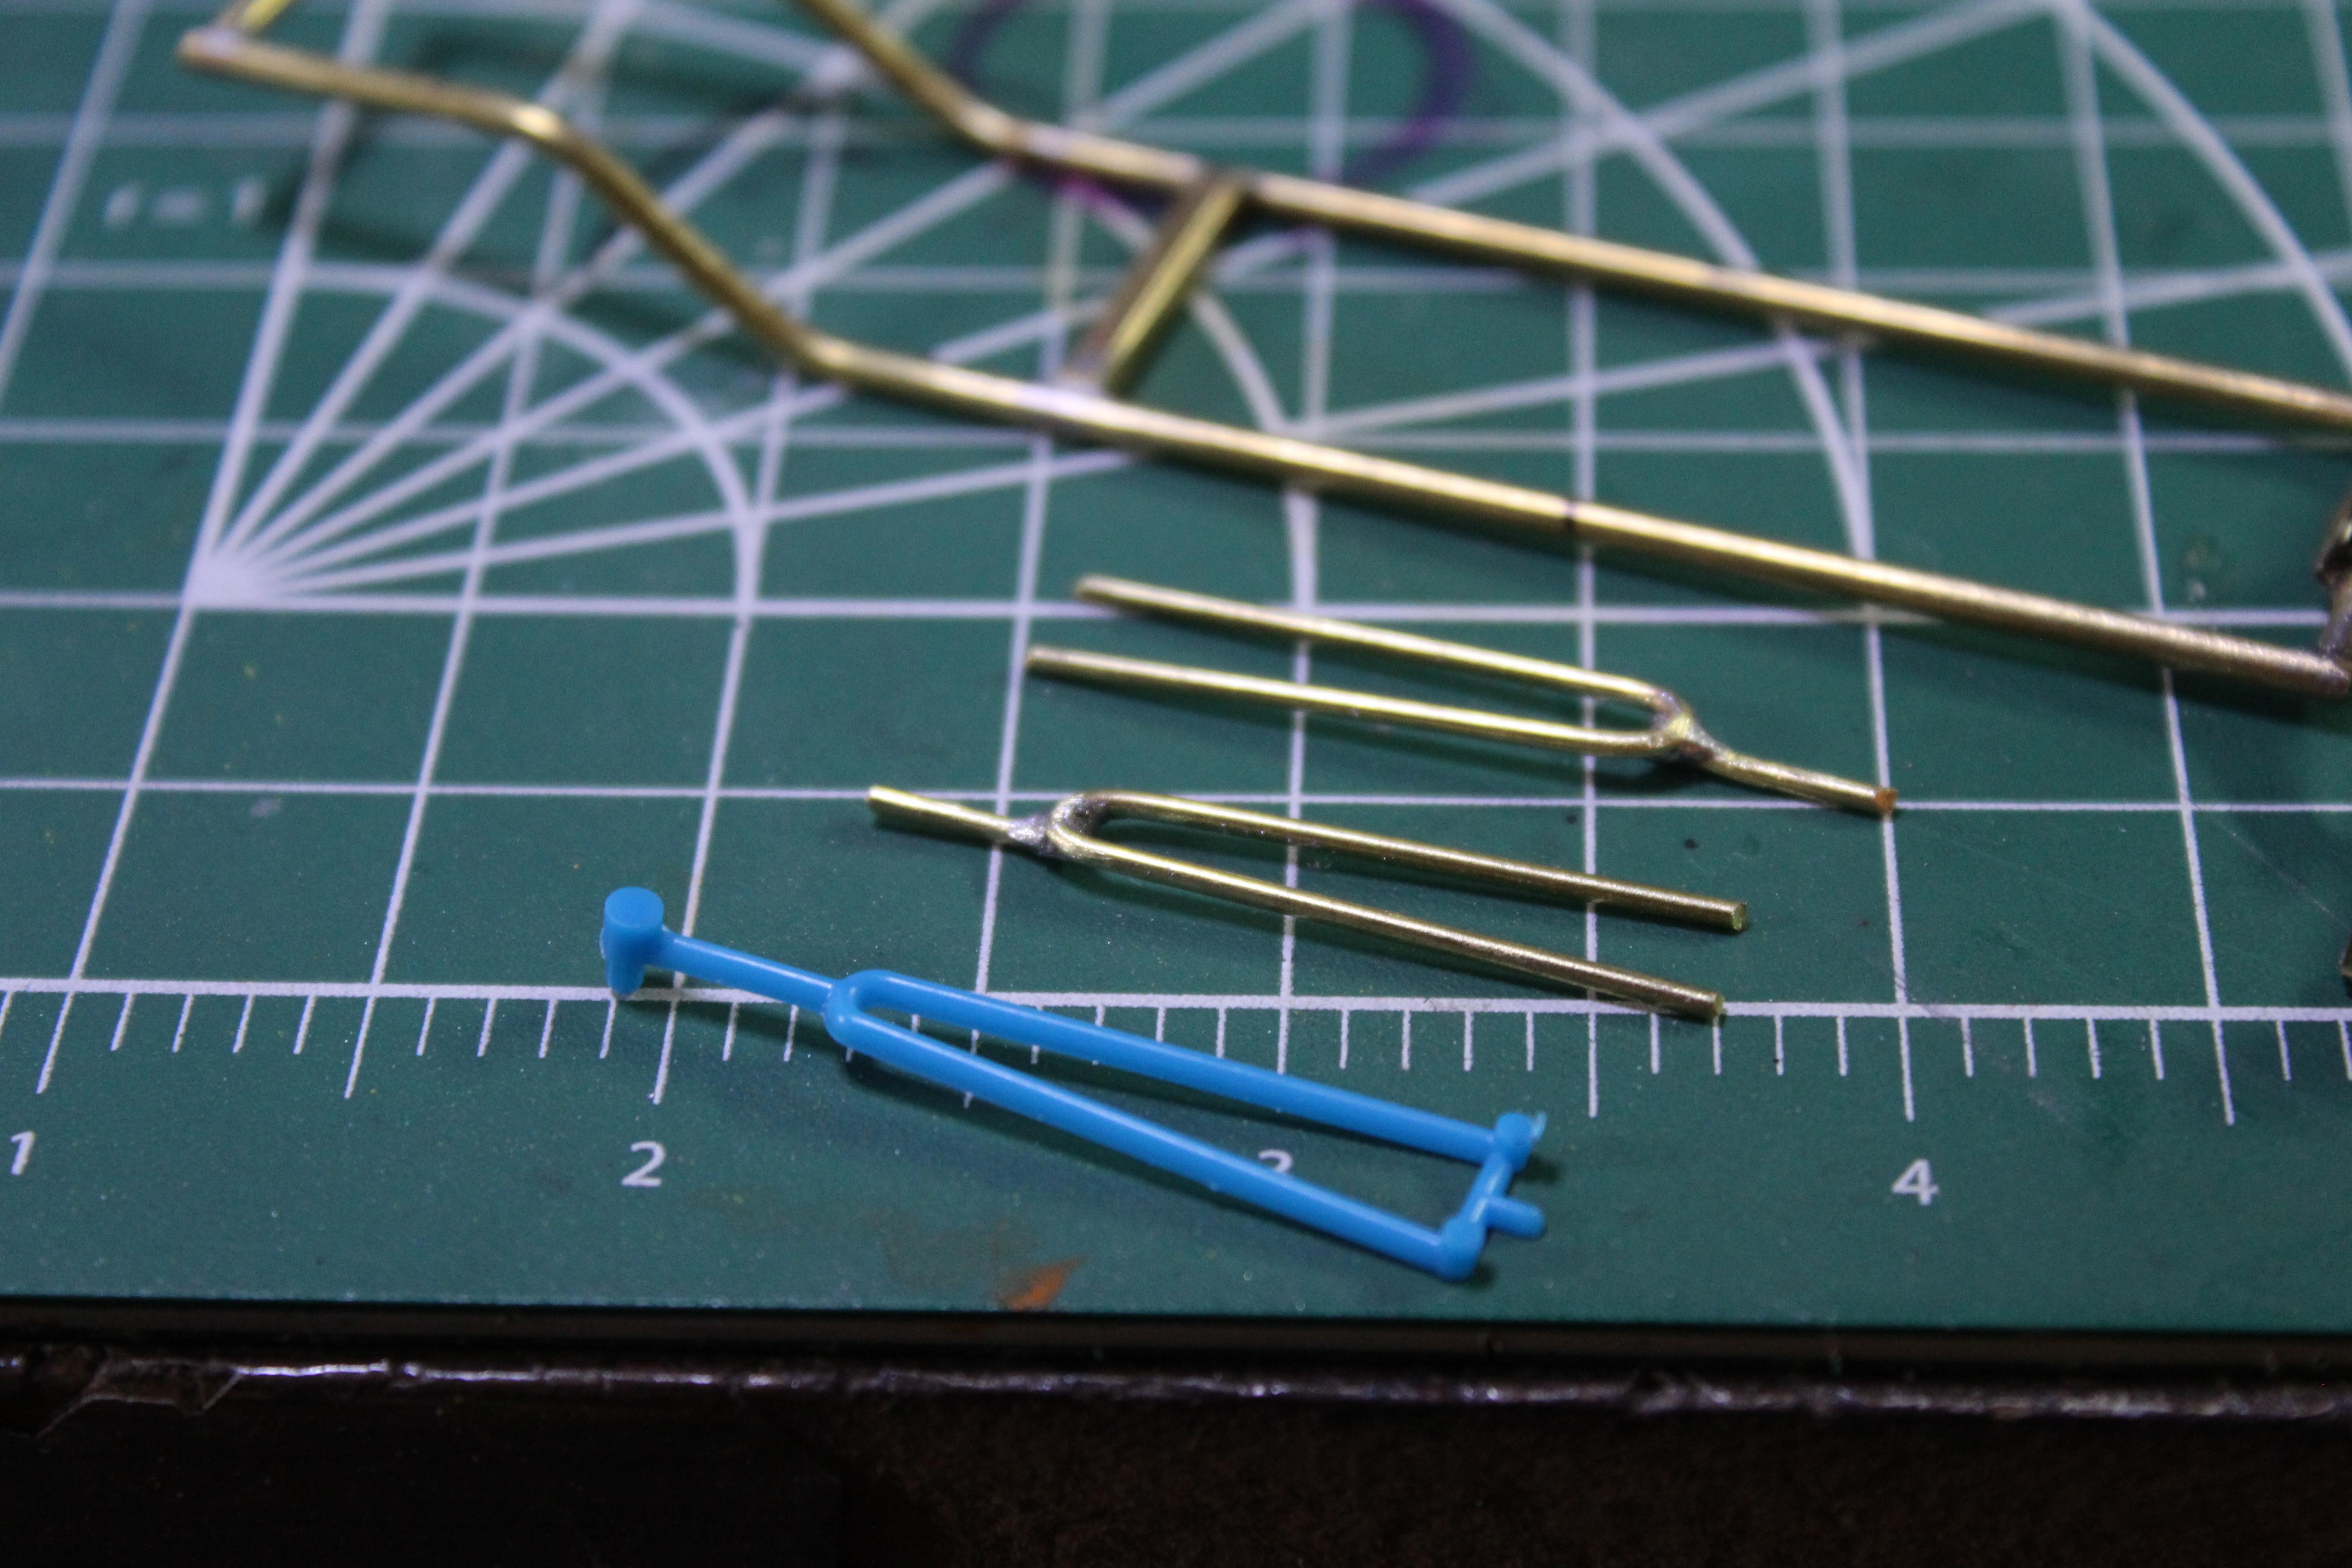
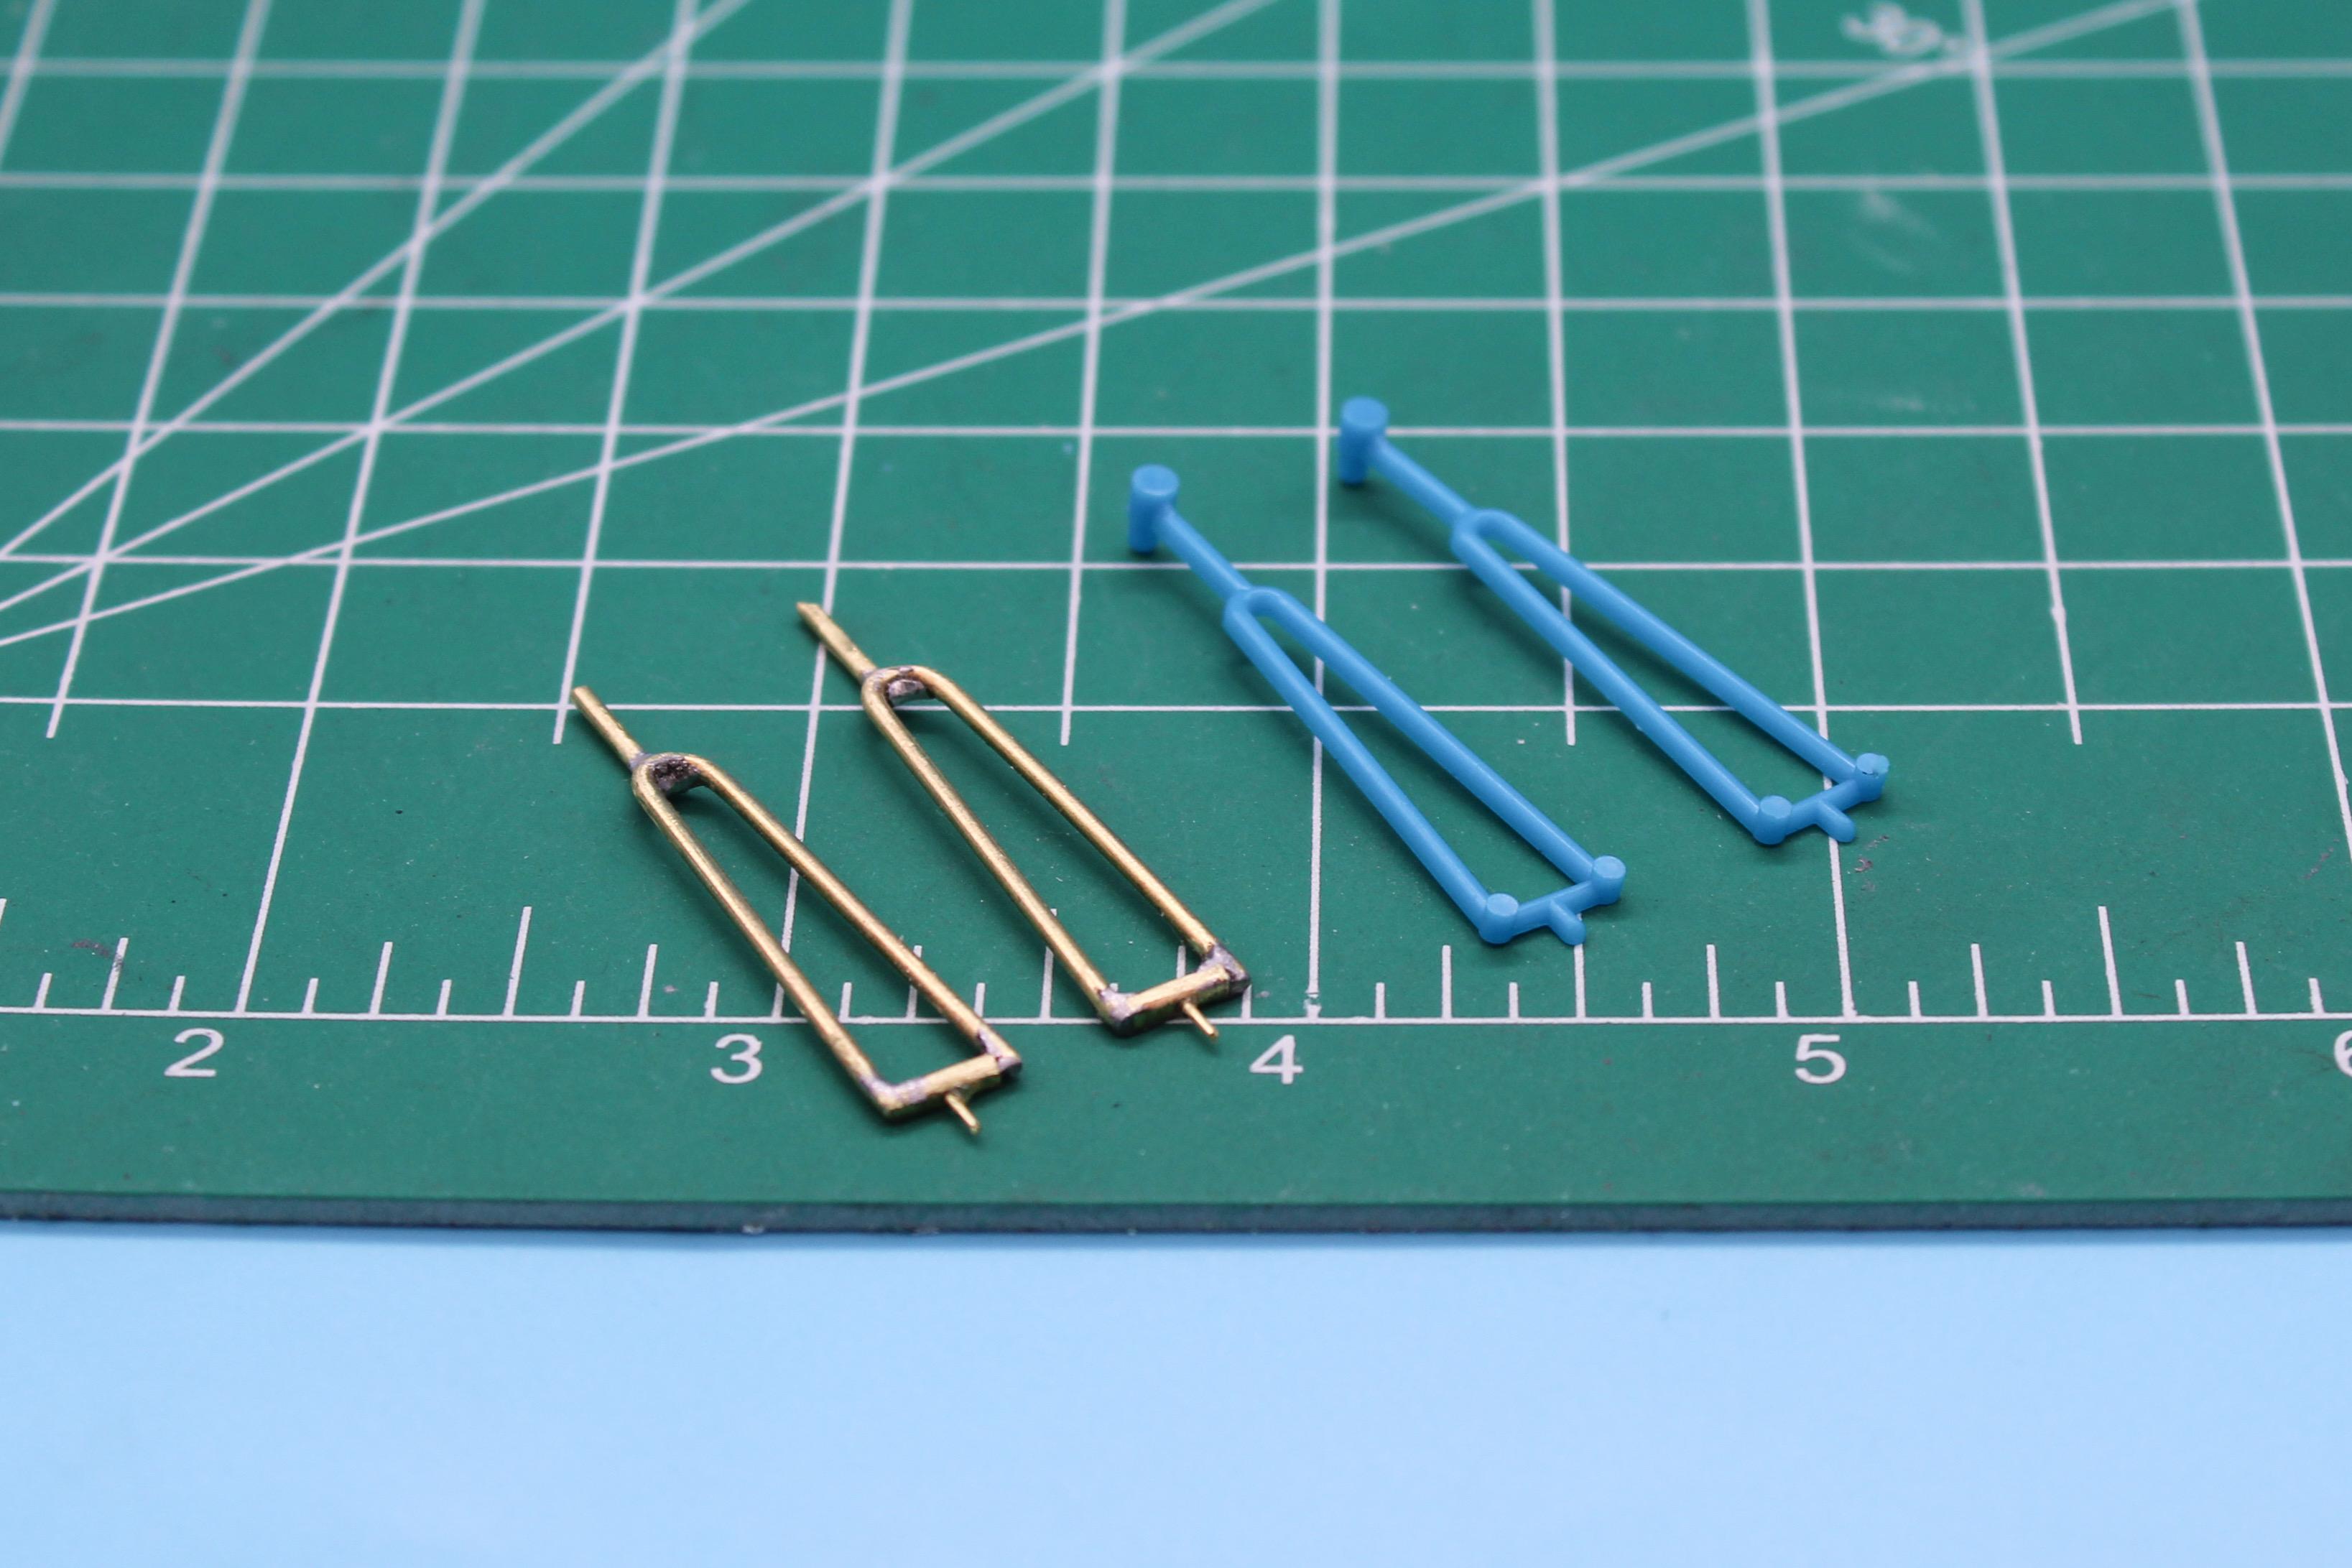
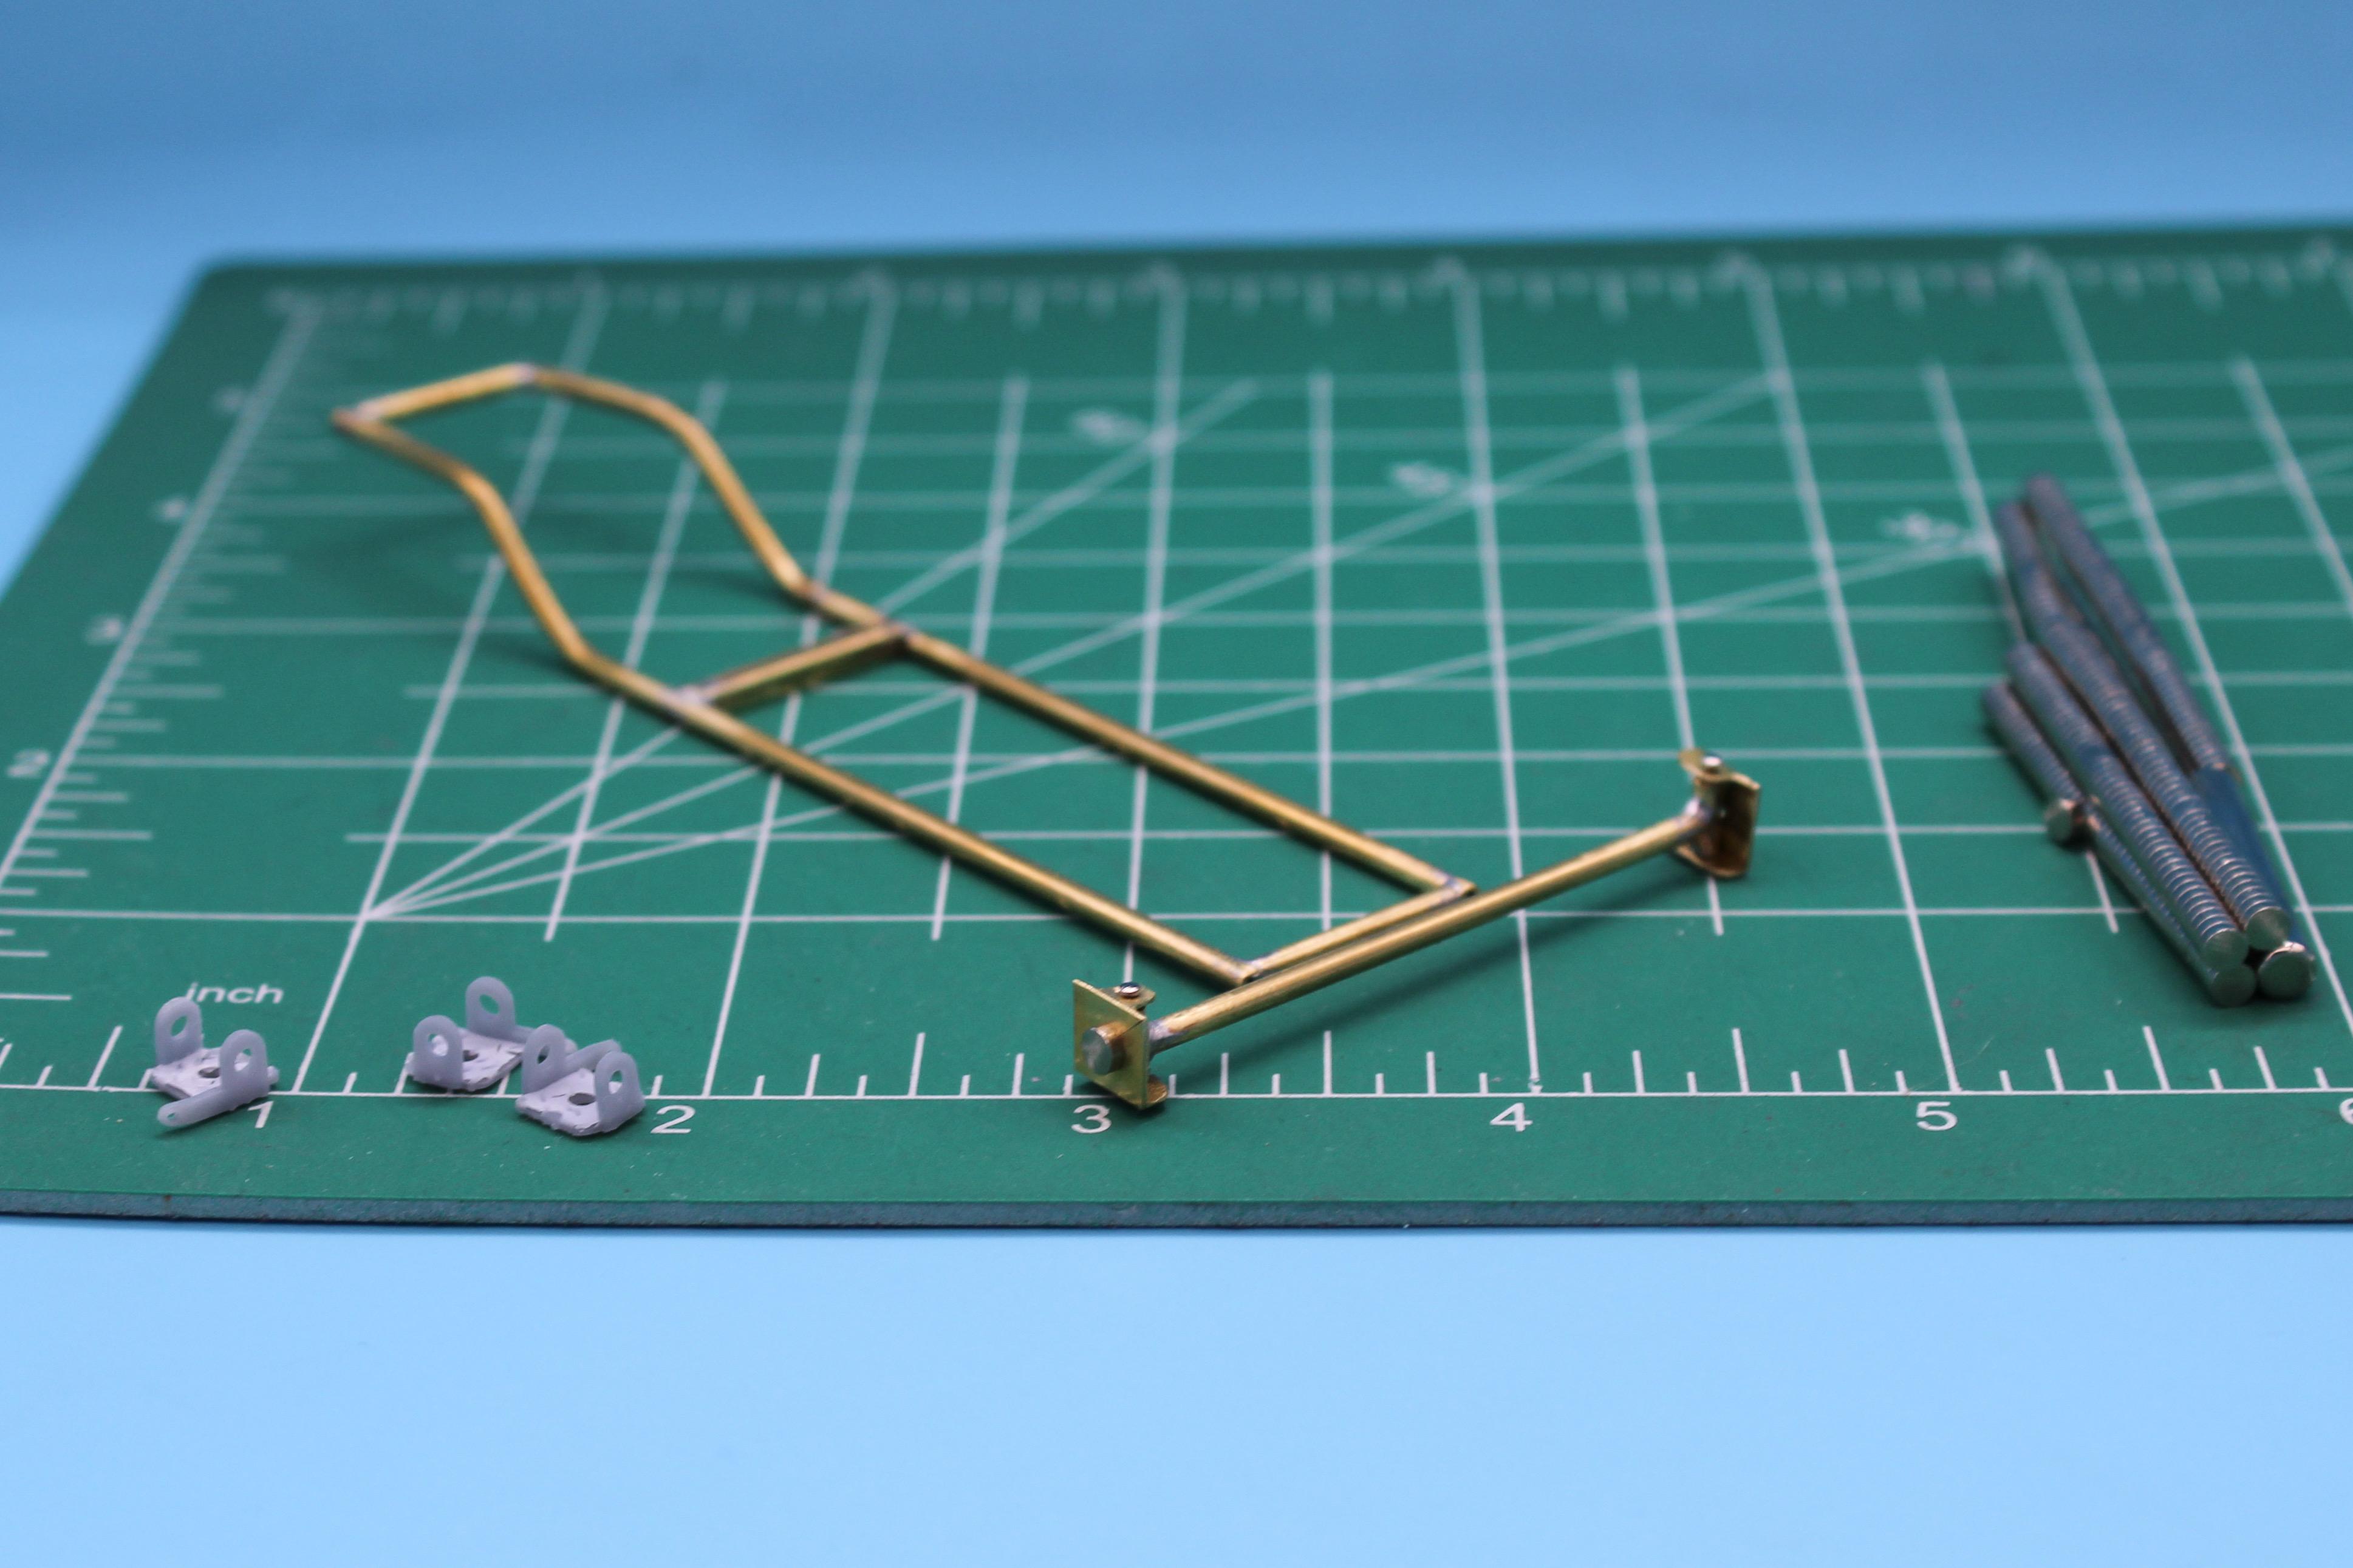
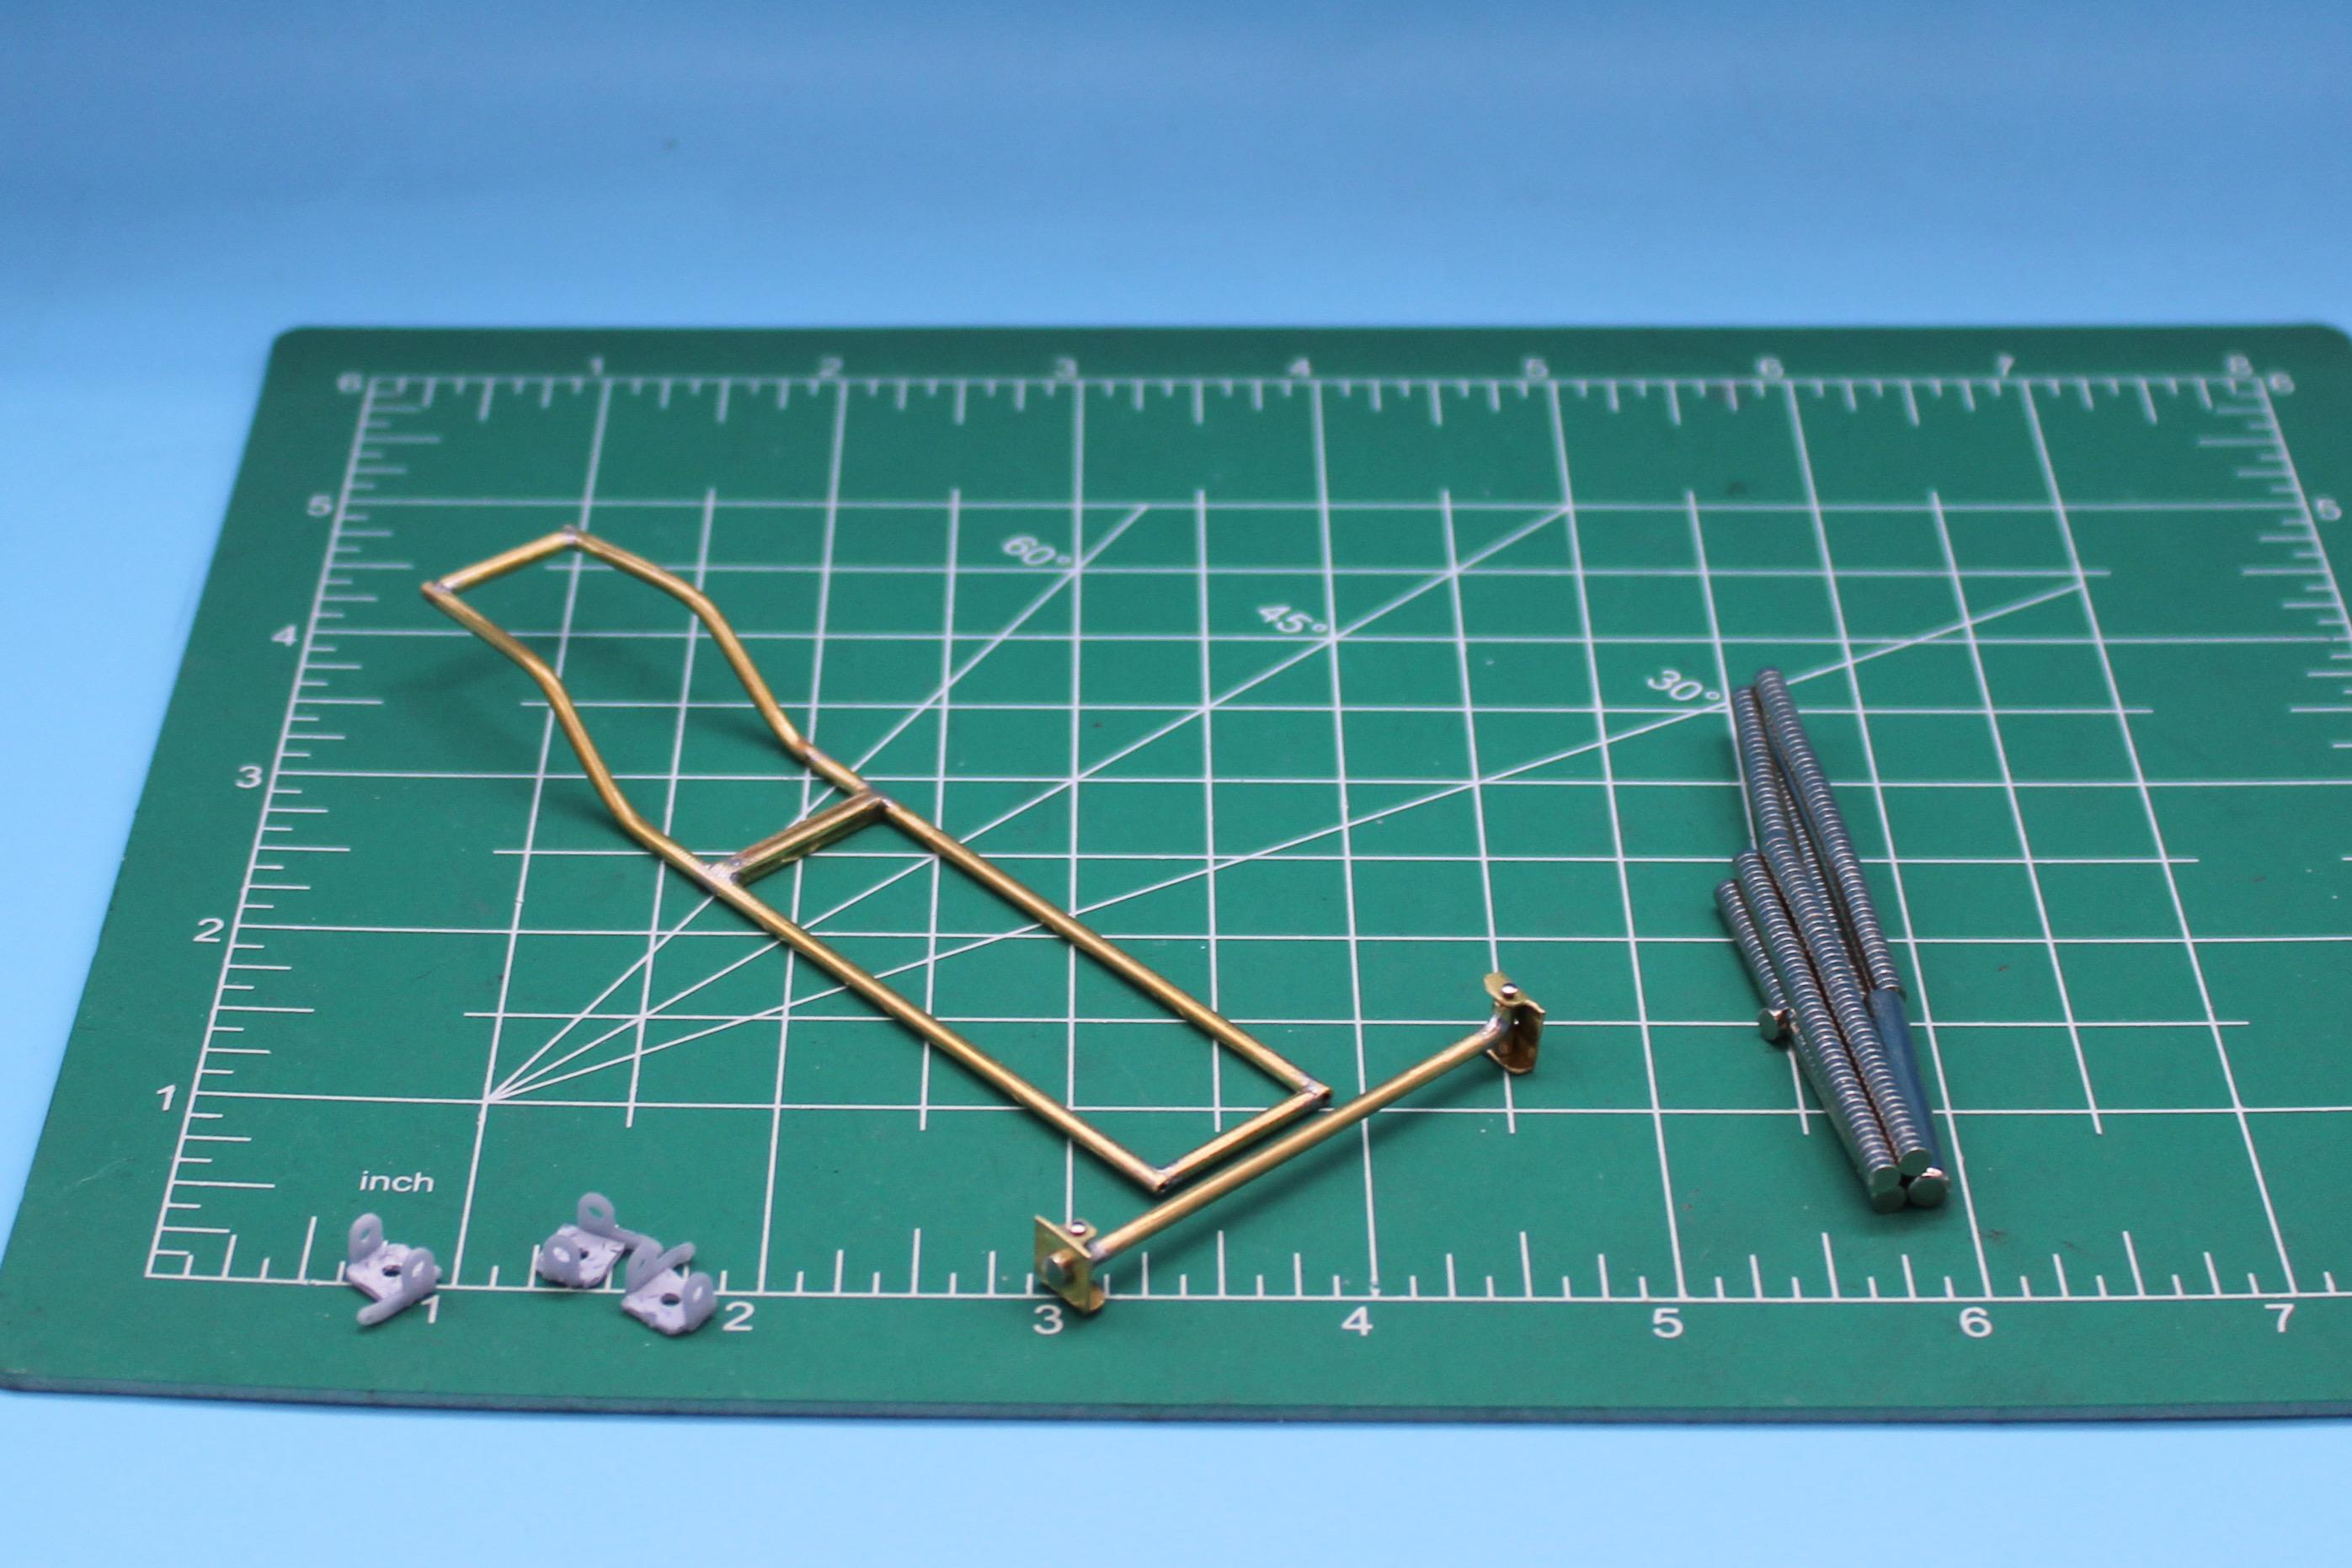
Ok, a little more progress… Fabbed up a mount for leaf spring and got it attached to the frame, and then decided a 3d printed spring wasn’t as cool as masking one: Had two or three tries at getting a leaf spring fabricated from brass, and my efforts were kinda ok-ish, but I was looking at some Revell Parts Pack springs in my stash and liked the look of those better. Even in 1/20, it’s tough to get the scale fidelity as nice as a well done pantographed kit part. Obviously, those Revell parts packs are 1/25, but a Midget is pretty small and the part scaled right out to the size I would’ve made one: Problem is, now those hairpins look kinda clunky - plus they’re half-round, presumably due to limitations in injection molding at the time, possibly because they didn’t think that some guy 70 years in the future would be nit-picking the accuracy of their very first kit apart…but here we are 🤪 Made some brass ones instead: Next job on these is to fabricate the trapezoidal brackets that a real Kurtis frame has to mount the hairpins to: And as you can see from the zoomed-out plans, I’ve still got plenty to do on the frame to make it look like a real one: Thanks for looking - more soon, soon as I’ve done more!
-
Anyone got a Mattel Power Shop?
OldNYJim replied to OldNYJim's topic in General Automotive Talk (Trucks and Cars)
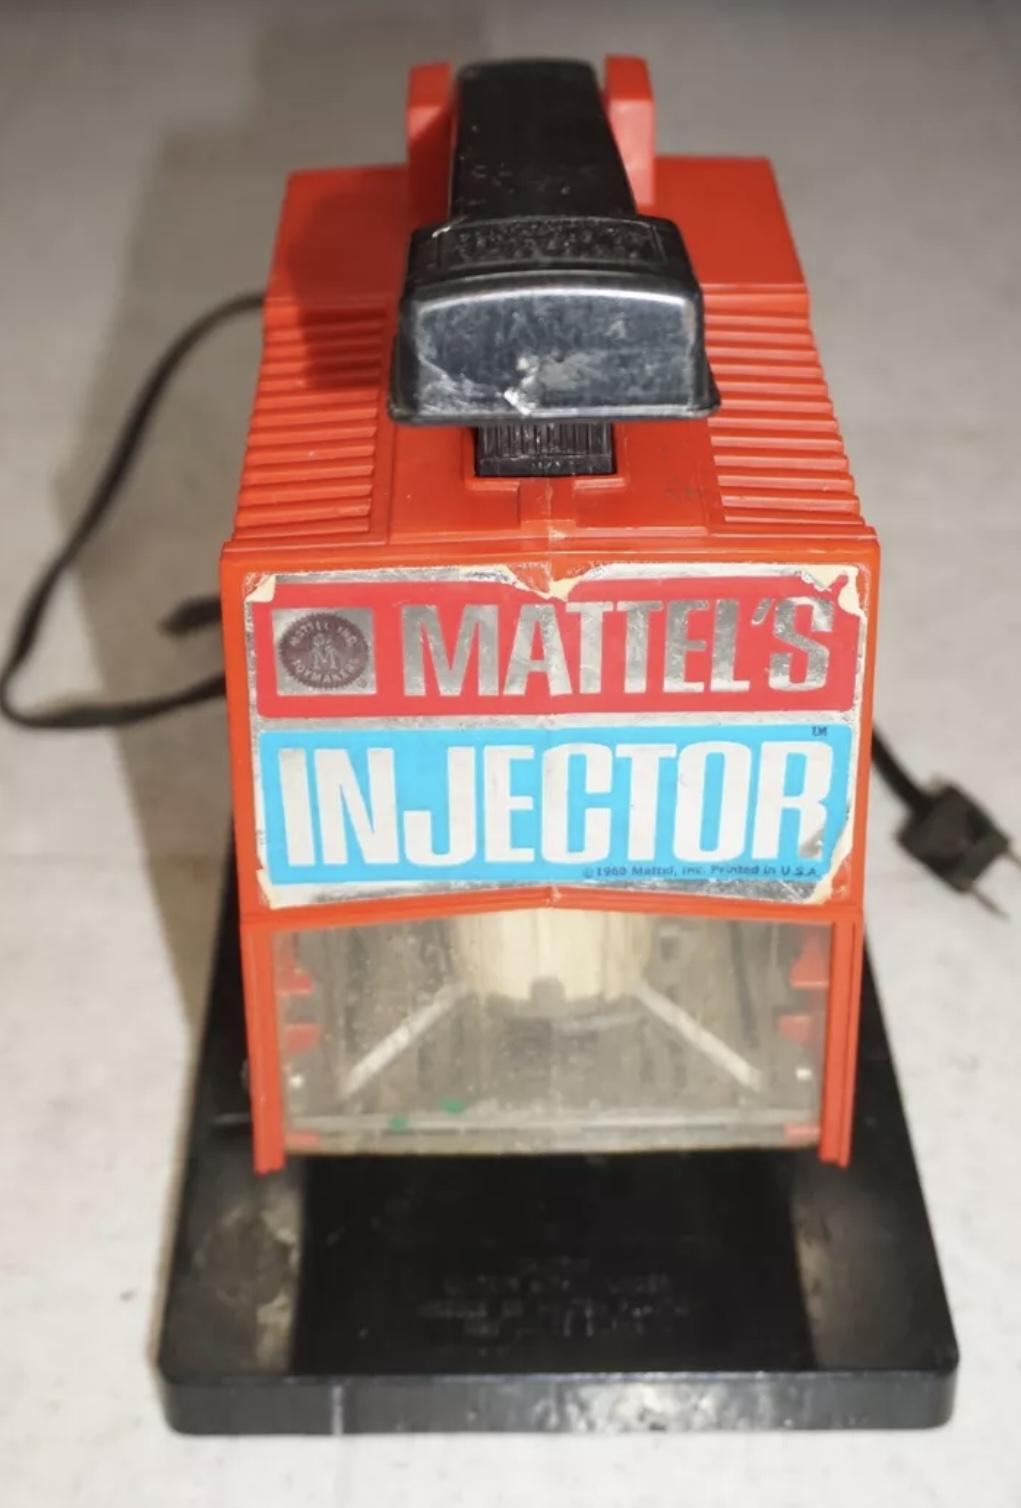
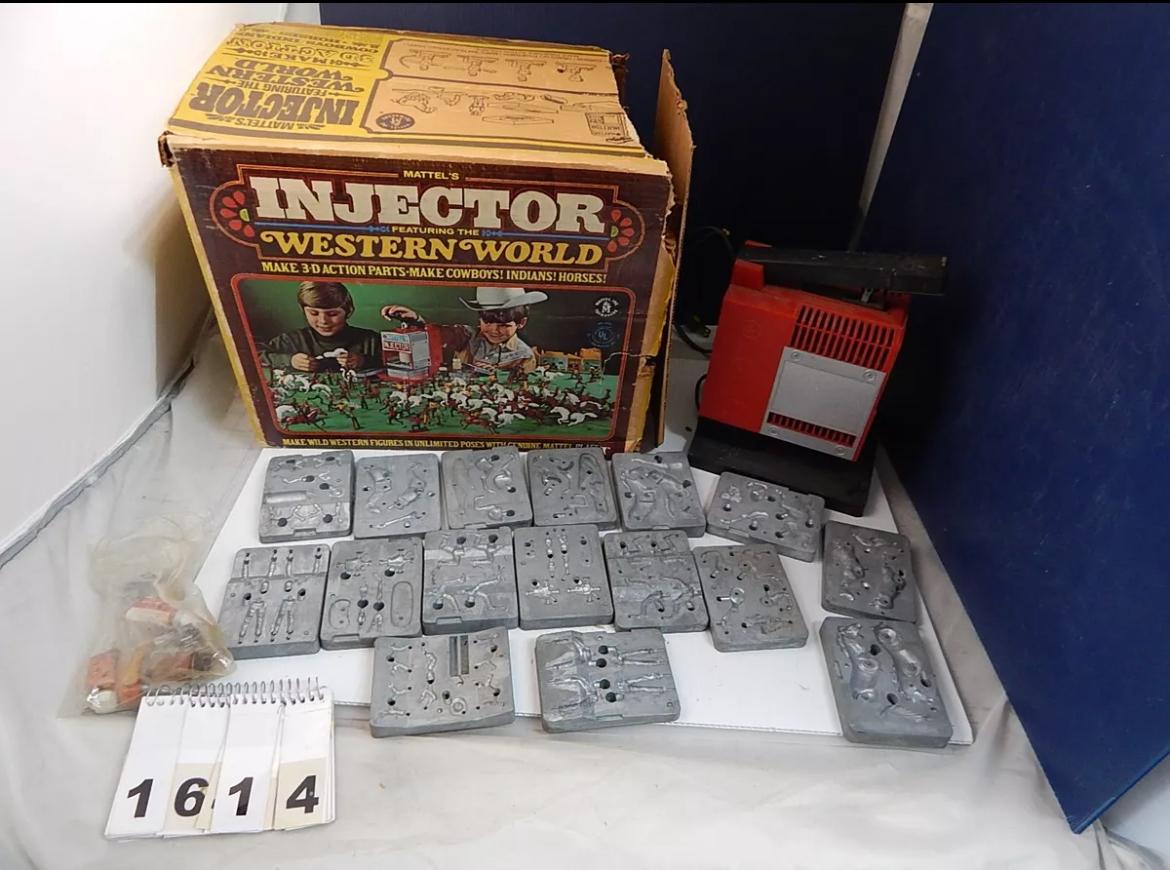
Oh, and if you guys like these…here’s a cool thing I spotted online this weekend - Mattel toy injection molder!
-
Anyone got a Mattel Power Shop?
OldNYJim replied to OldNYJim's topic in General Automotive Talk (Trucks and Cars)
Yep, my bad, you’re absolutely right! I would be interested to see what that plate looks like on yours! I THINK the original part was plastic. This was a test to see if the 3d printed resin would hold up…only did a couple of tests so far but A-OK so far! There’s a guy on eBay who does an upgrade/conversion service on these, and that’s part of what he does. I think I want to keep this one stock-ish though - I like the self-contained simplicity… -
Actually, that whole CHANNEL is GOLD when it comes to Midget stuff that’s hard to find online…I only dug into a couple of these this evening (and the accents are a little tough in places) but there’s all kinds of useful reference in those videos that I hadn’t found elsewhere. THANK YOU! I didn’t know that each Kurtis Kraft build had a little brass plaque on the dash with a serial number, for example - and there’s some great shots of the in-out box that will be helpful in trying to replicate that. What a goldmine of useful info! I researched these a tiny bit in my lunch break today - looks a very similar parts layout to this kit (probably unsurprisingly): I’m sure one of these will end up on my shelf before too long - thanks for the heads up on these kits! I almost want to get one now so I can see that trans in more detail, just to see how it looks… Barely any progress tonight - my first evening working on this one with a couple of failures. First project was drawing up a front spring in CAD; something I did for those hubs I was working on this week too. The goal of the CAD part isn’t always because I’m planning on printing it, but to figure out the measurements and whatnot when I’m trying to copy a part from photos. Then, my plan was to replicate that part in brass, but I was having a tough time getting individual leafs that were as nice as I was happy with. I need to go check the local Ace to see if they stock any K&S brass strip that I can work with (which would be easier than trying to cut strips from the sheet I have - I don’t have the best tools here for working with metal compared to styrene)…of course, I could just print some from the 3D model I made already but that’s too easy 🤪 I also did a little research into nickel plating - I would be interesting in a nice beginner-friendly process to turn these brass parts that I’m making to something shiny and silver rather than Alclading them. It LOOKS like it would be in my capabilities, but I guess until I try I wont know… Finally this evening I decided I needed to achieve SOMETHING, so I spun up some 3/4” apparently-styrene rod (which I think actually is ABS) that I got from Amazon on the lathe and found some aluminum rod in my stash ready to start piecing together a rear axle. I think the kit part is supposed to represent a banjo rear end? As usual, more research required… And that’s my no-progress for today - more soon, soon as I’ve done something! Ha! Thanks for looking!
-
Oh, I forgot to ask - @Ace-Garageguy - are your earliest examples of this kit molded in red, or yellow? I’ve seen conflicting reports on which color the very first run was molded in. I’m 90% certain I want to paint this one red anyway, to match the original box art, but a yellow version would probably look cool too…
-
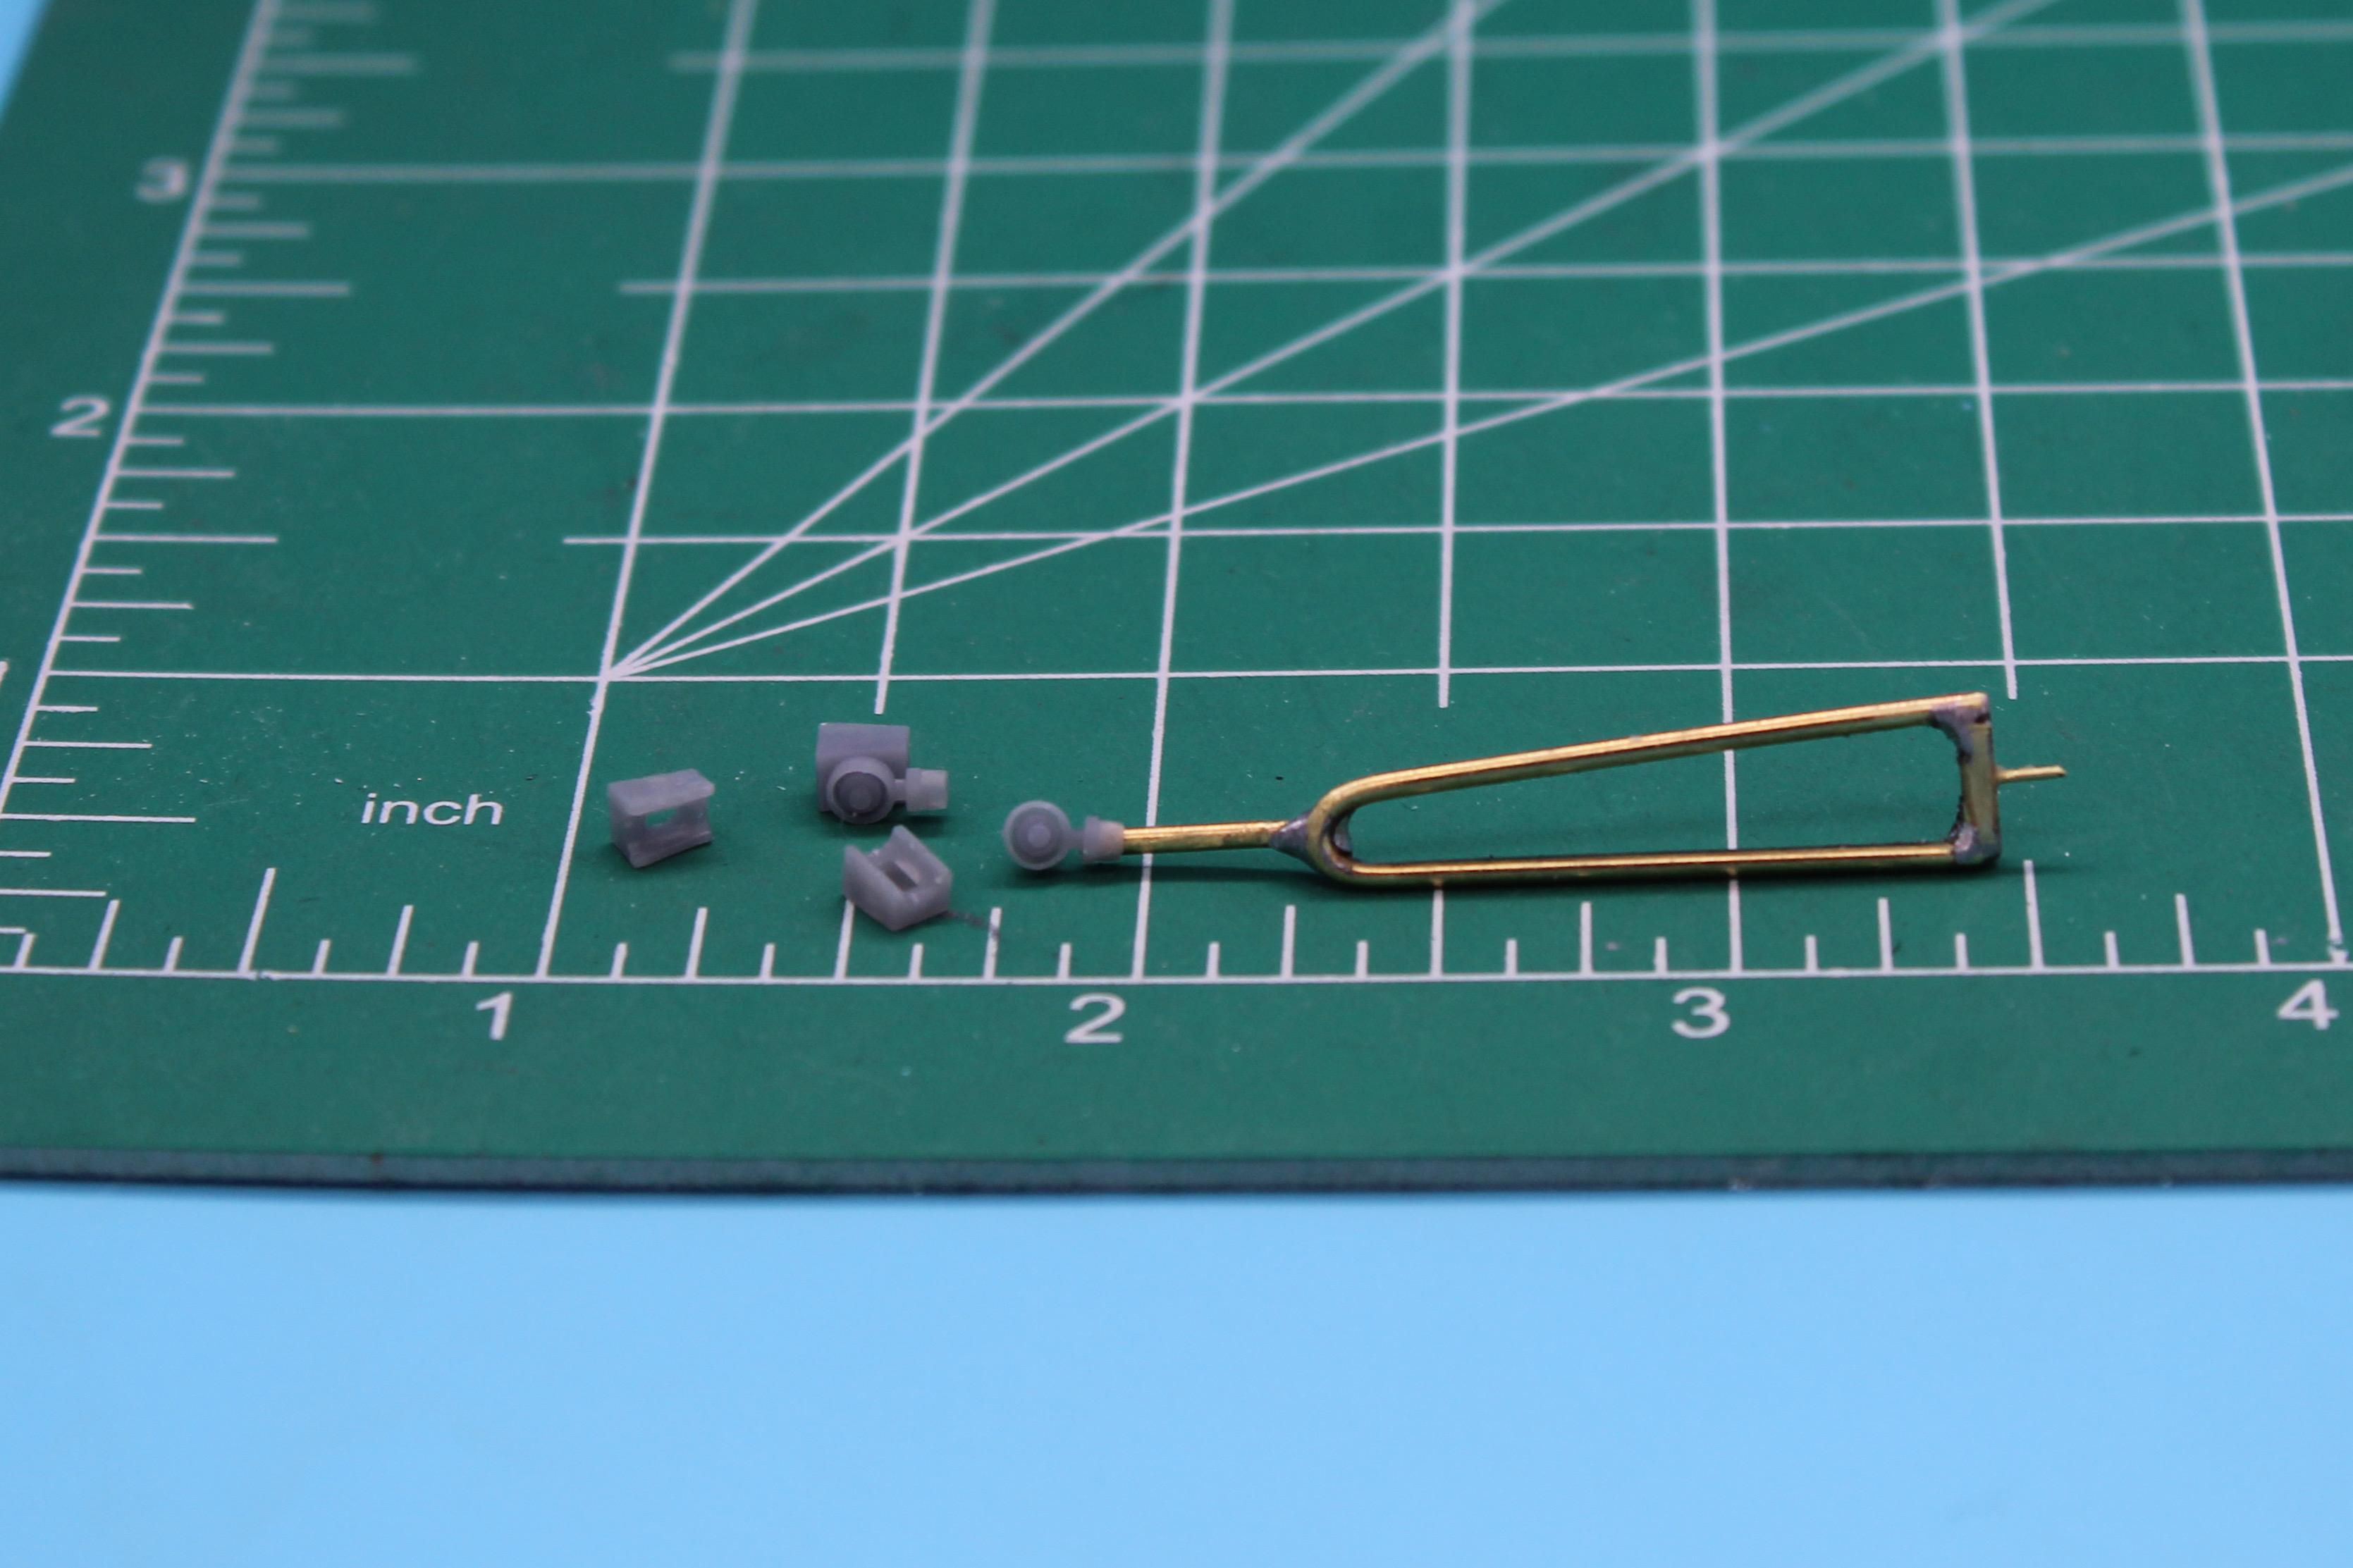
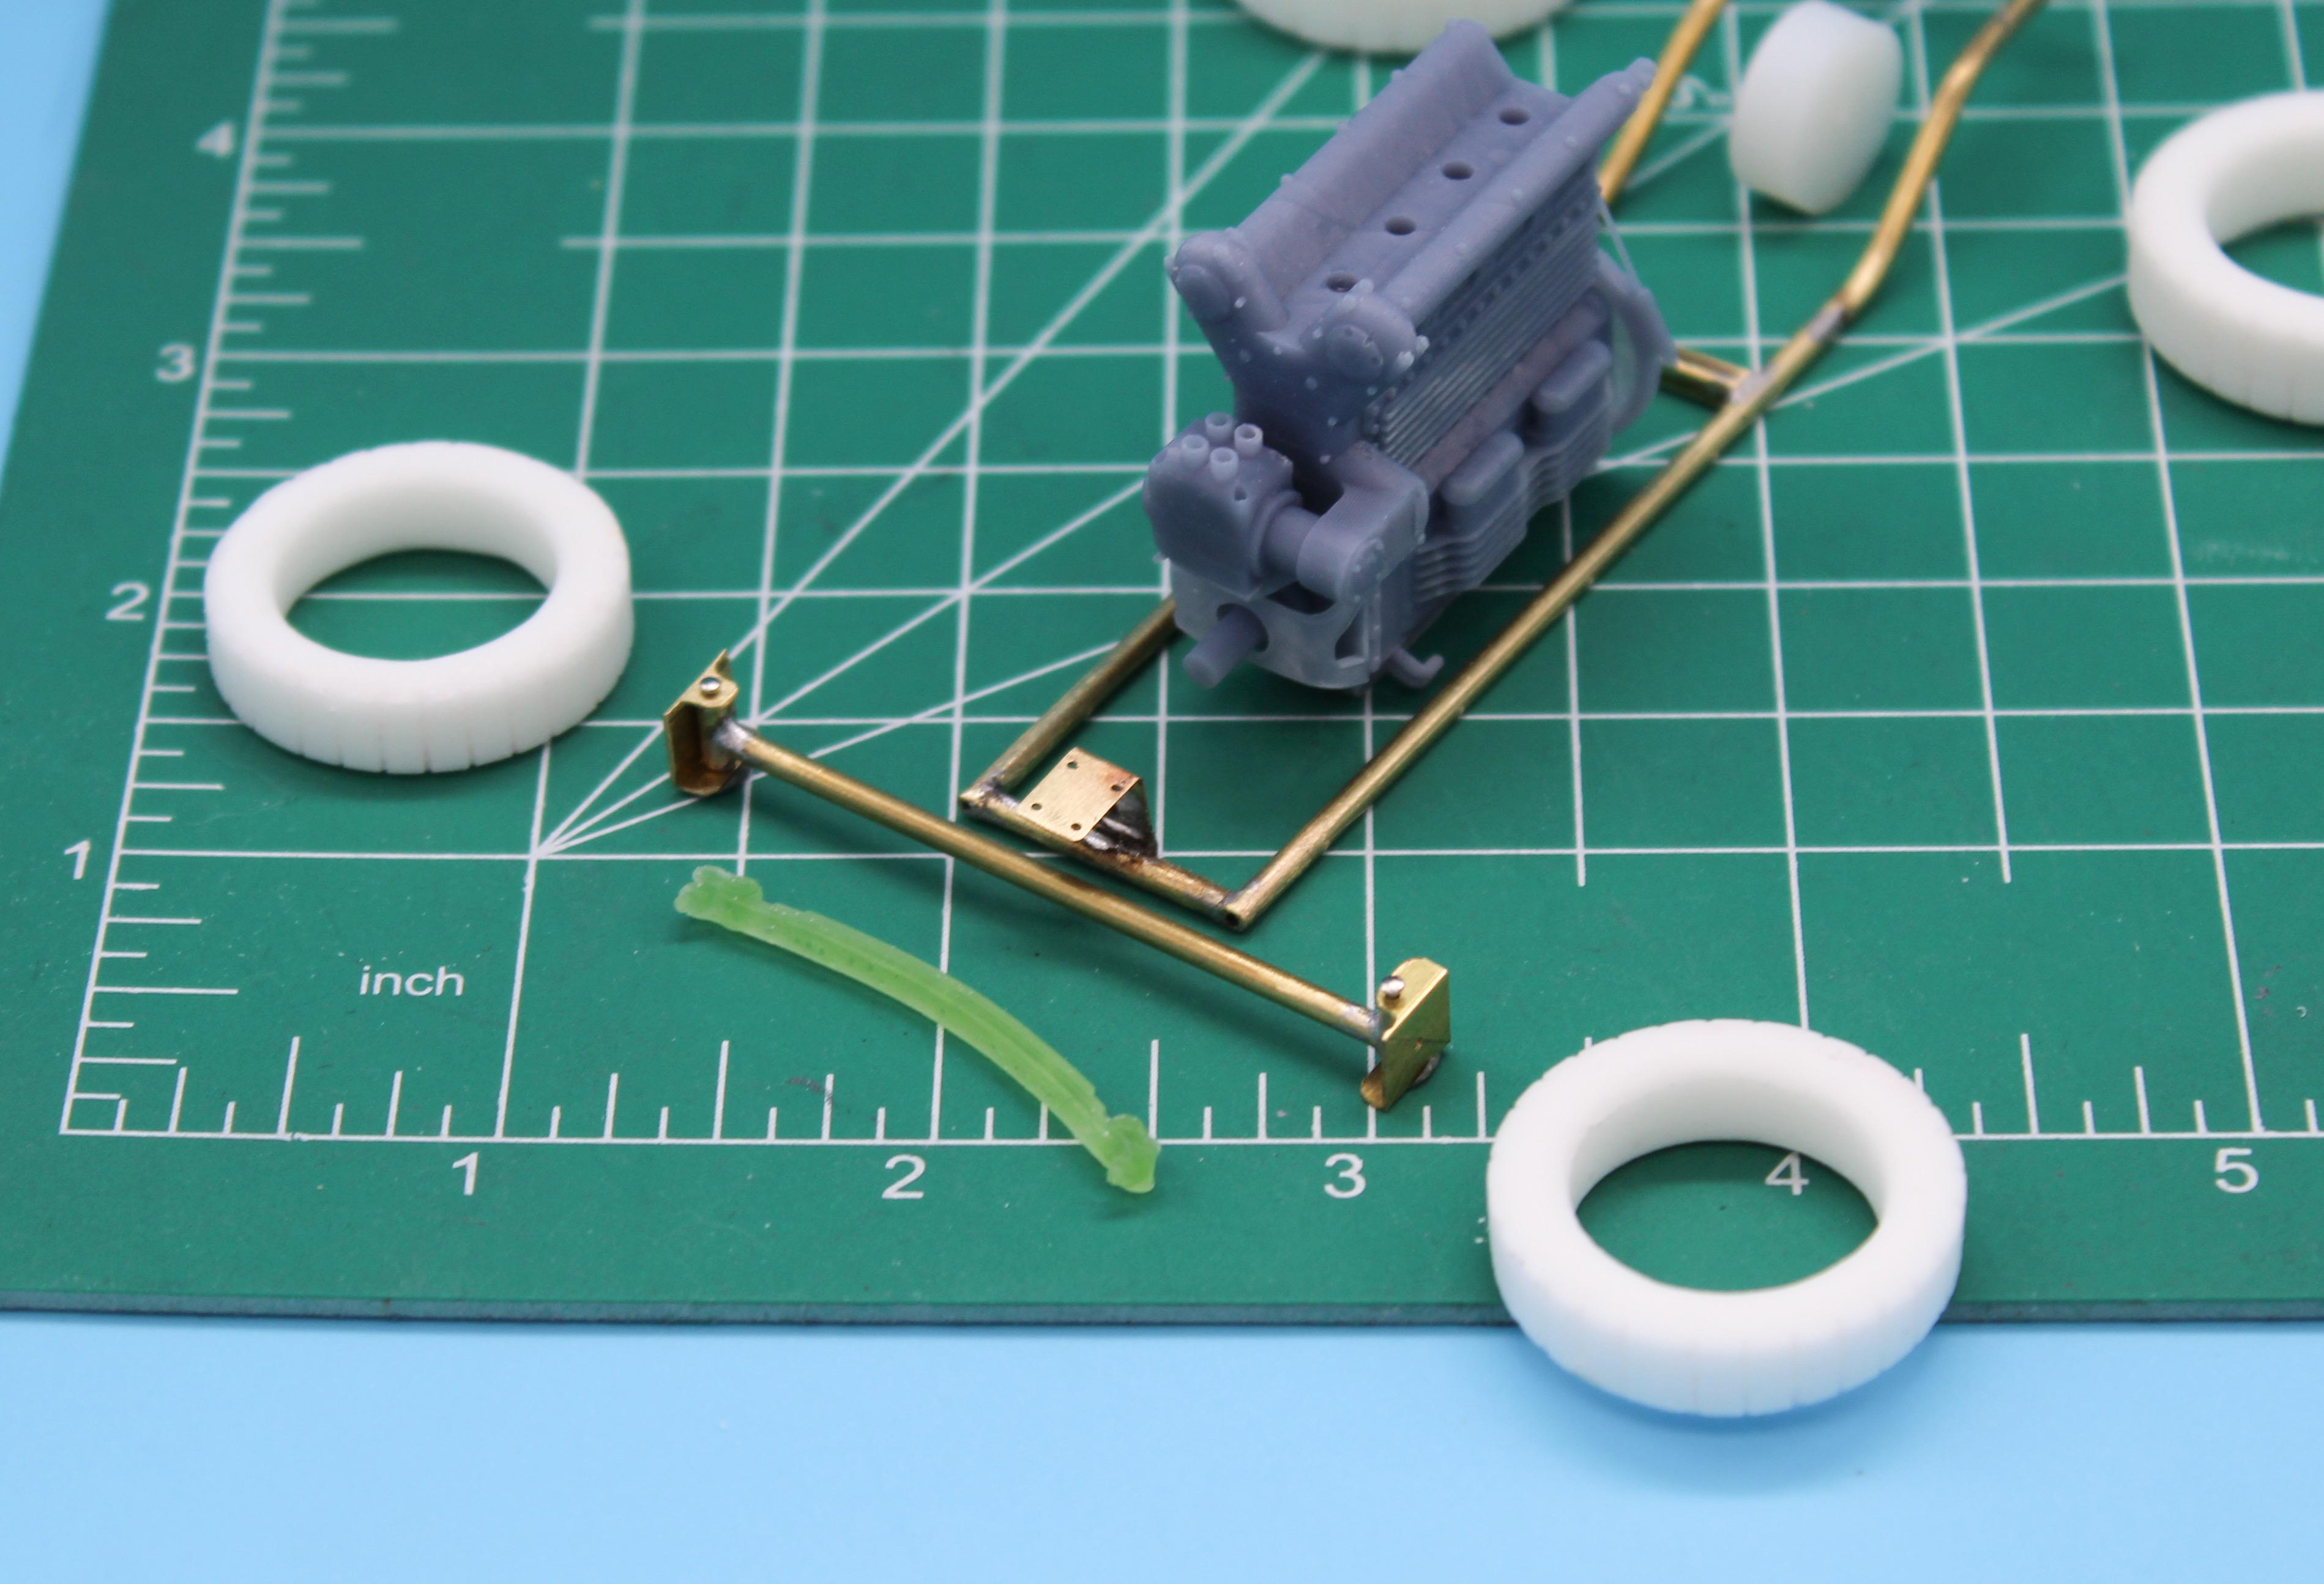
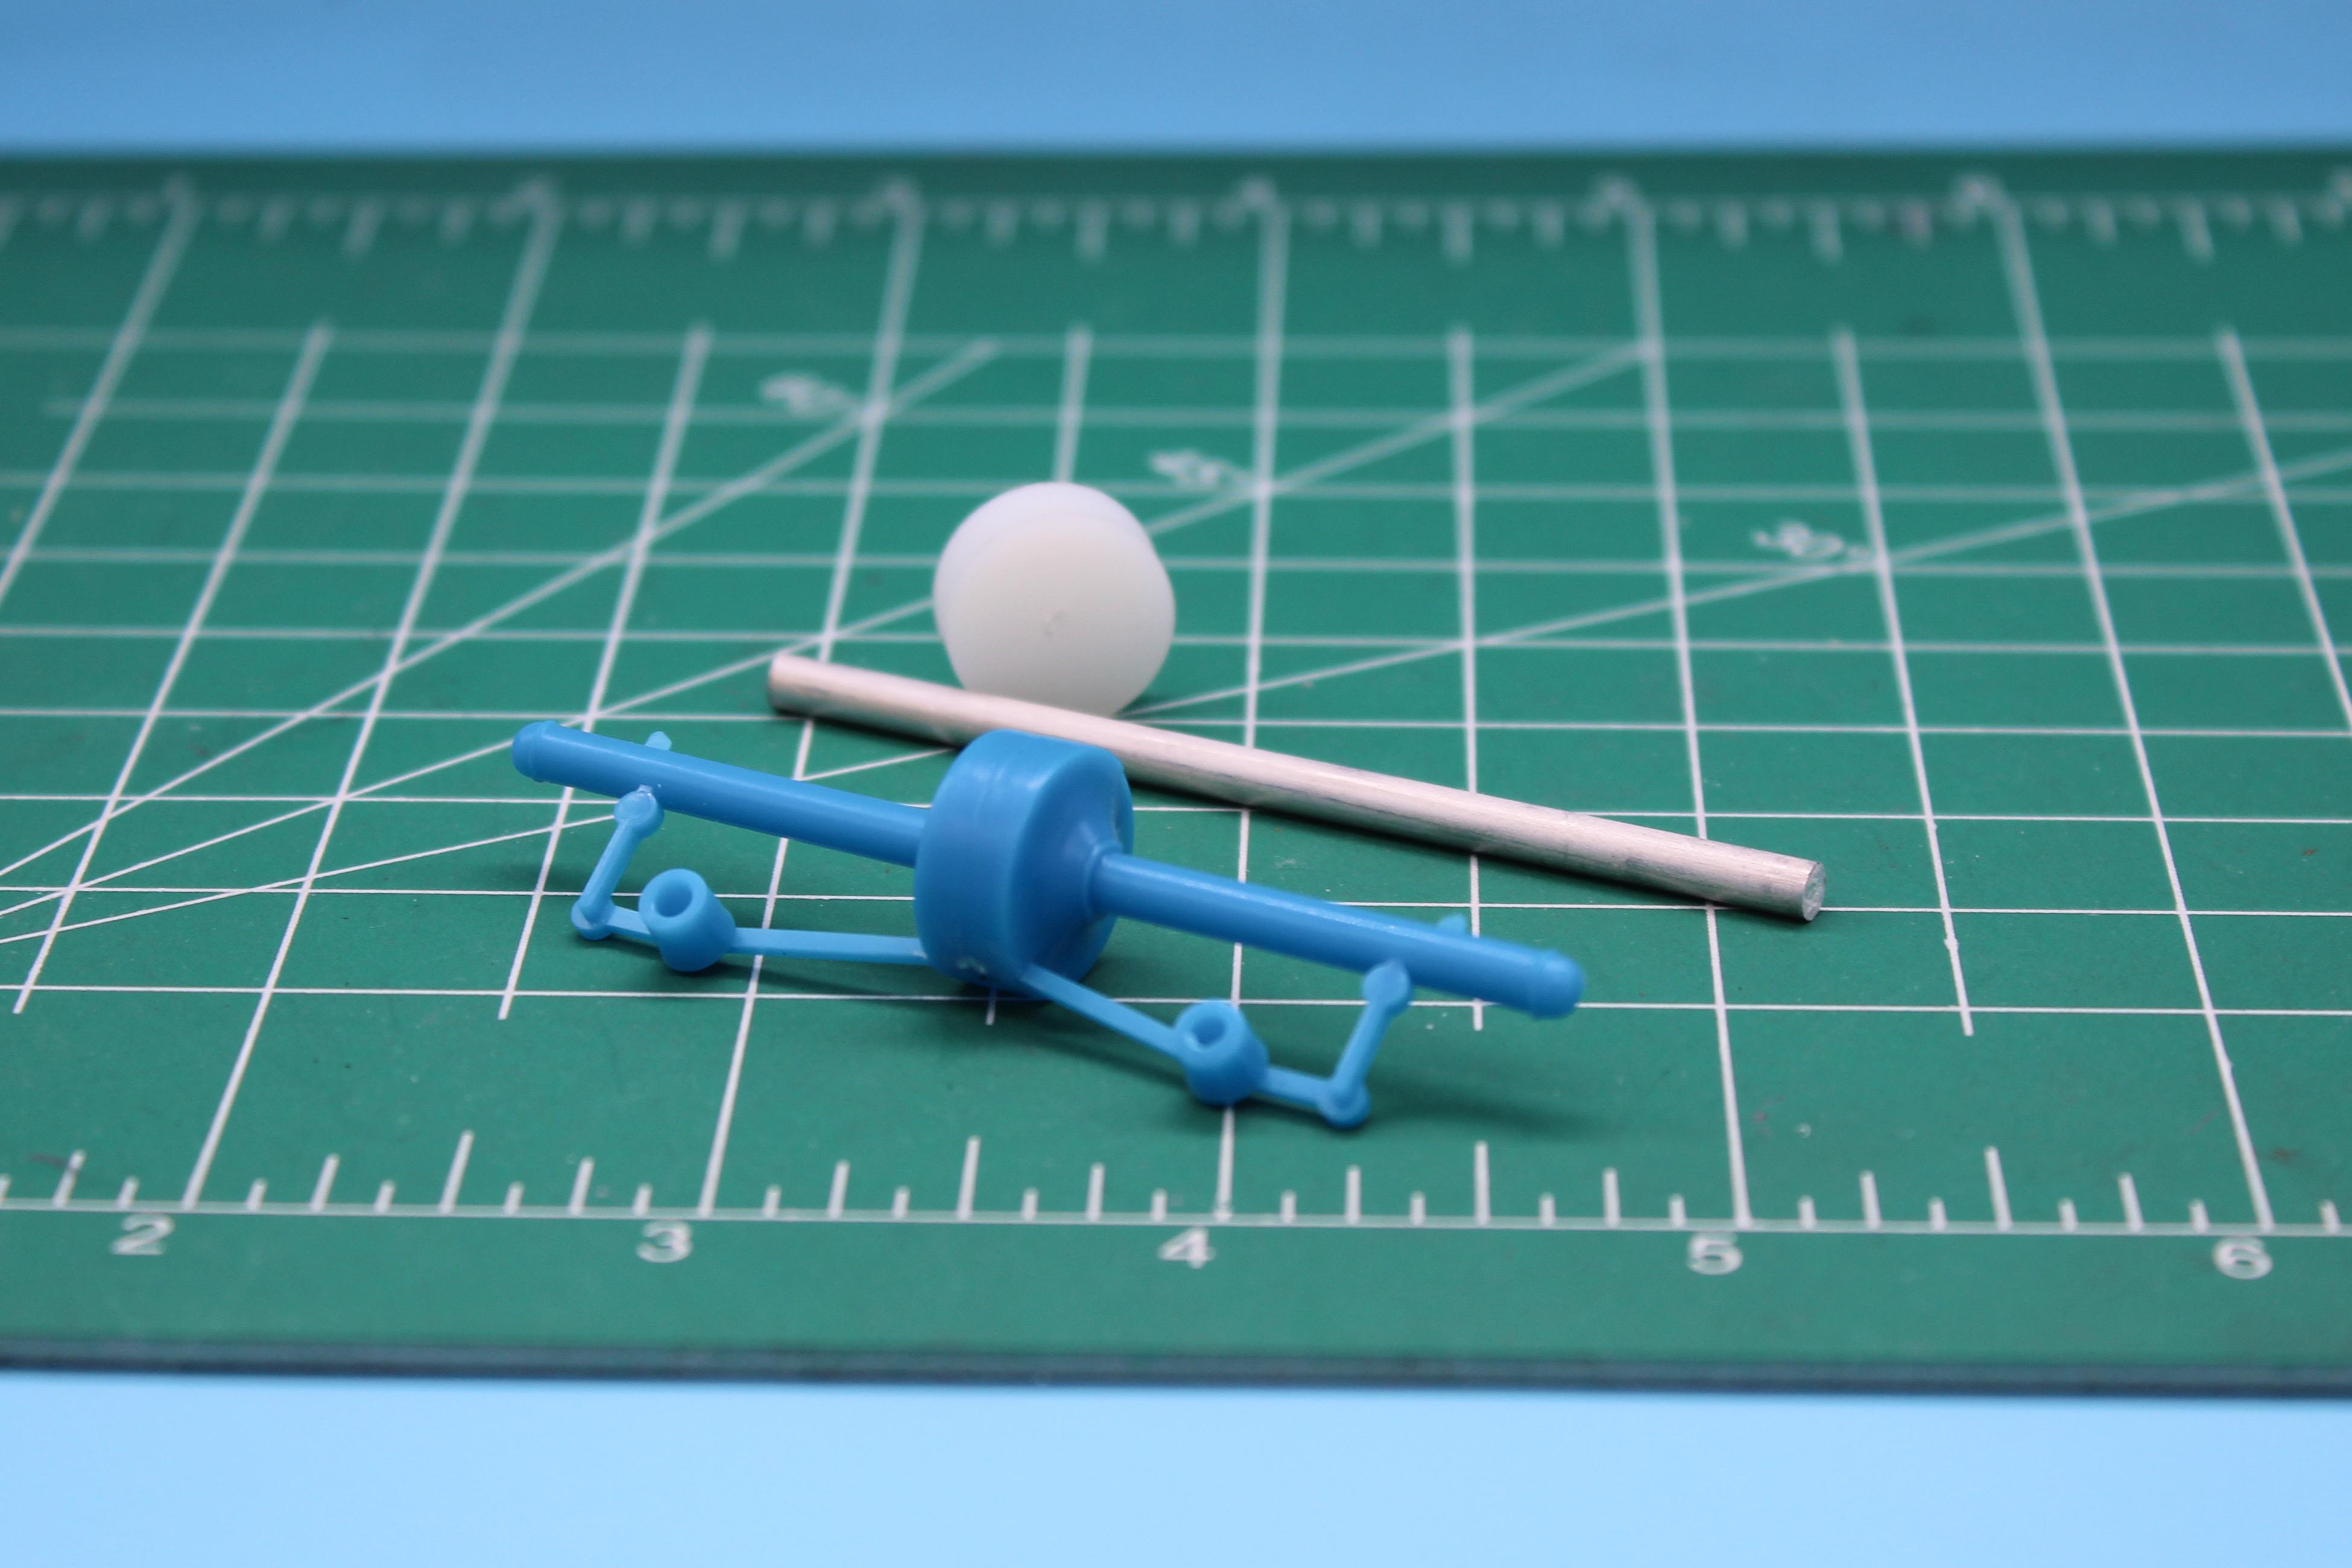
I’m not familiar with that particular kit…but it would be a fun follow-up to this one! Thanks for the heads up that it exists! Sounds like the kind of tooling Atlantis could have in their stash, if it made it long enough to end up with them… That’s about what I figured, thank you sir! It’s hard to tell with some of these older parts if they’re supposed to represent something from way back that I can’t find a photo of…or if they just aren’t a very accurate representation! I got lucky on the engine, what with having a good printer file for it, but a 50s in-out box in 1/20 scale is going to be a scratchbuilding project I think. Need to find some good reference photos so I can tackle that. Thanks for the info shared - incredibly helpful as always! Tiny bit of progress this evening - a little work on the swingarms for the front axle. Yesterday I checked my design (which was based on some 1:1 reference pics) with some quickie prints, and it seemed like I got my numbers right, so today I made the parts themselves out of some brass square tube. I had ONE tiny piece of this particular size of tube in stock, and was hoping I didn’t mess either side up and end my own fun for the evening, but I got lucky: Need to make the steering arms and linkages soon as I find some nice thick (but narrow, maybe 1/16”) brass strip to bend up, but it functions like it should and will allow possible steering. The stack of round things to the right is some tiny magnets I found on Amazon - I’d like to have at least a couple of removable wheels on this project, and I THINK these are strong enough to hold everything together when they need to, but allow the wheels to be easily removable. I need to experiment, but they seem like they’ll do the trick ok, and be small enough to hide inside the hubs that I’ll make without being visible. And that’s it for another hour at the bench - more baby-steps tomorrow! Thanks for looking!
-
Anyone got a Mattel Power Shop?
OldNYJim replied to OldNYJim's topic in General Automotive Talk (Trucks and Cars)
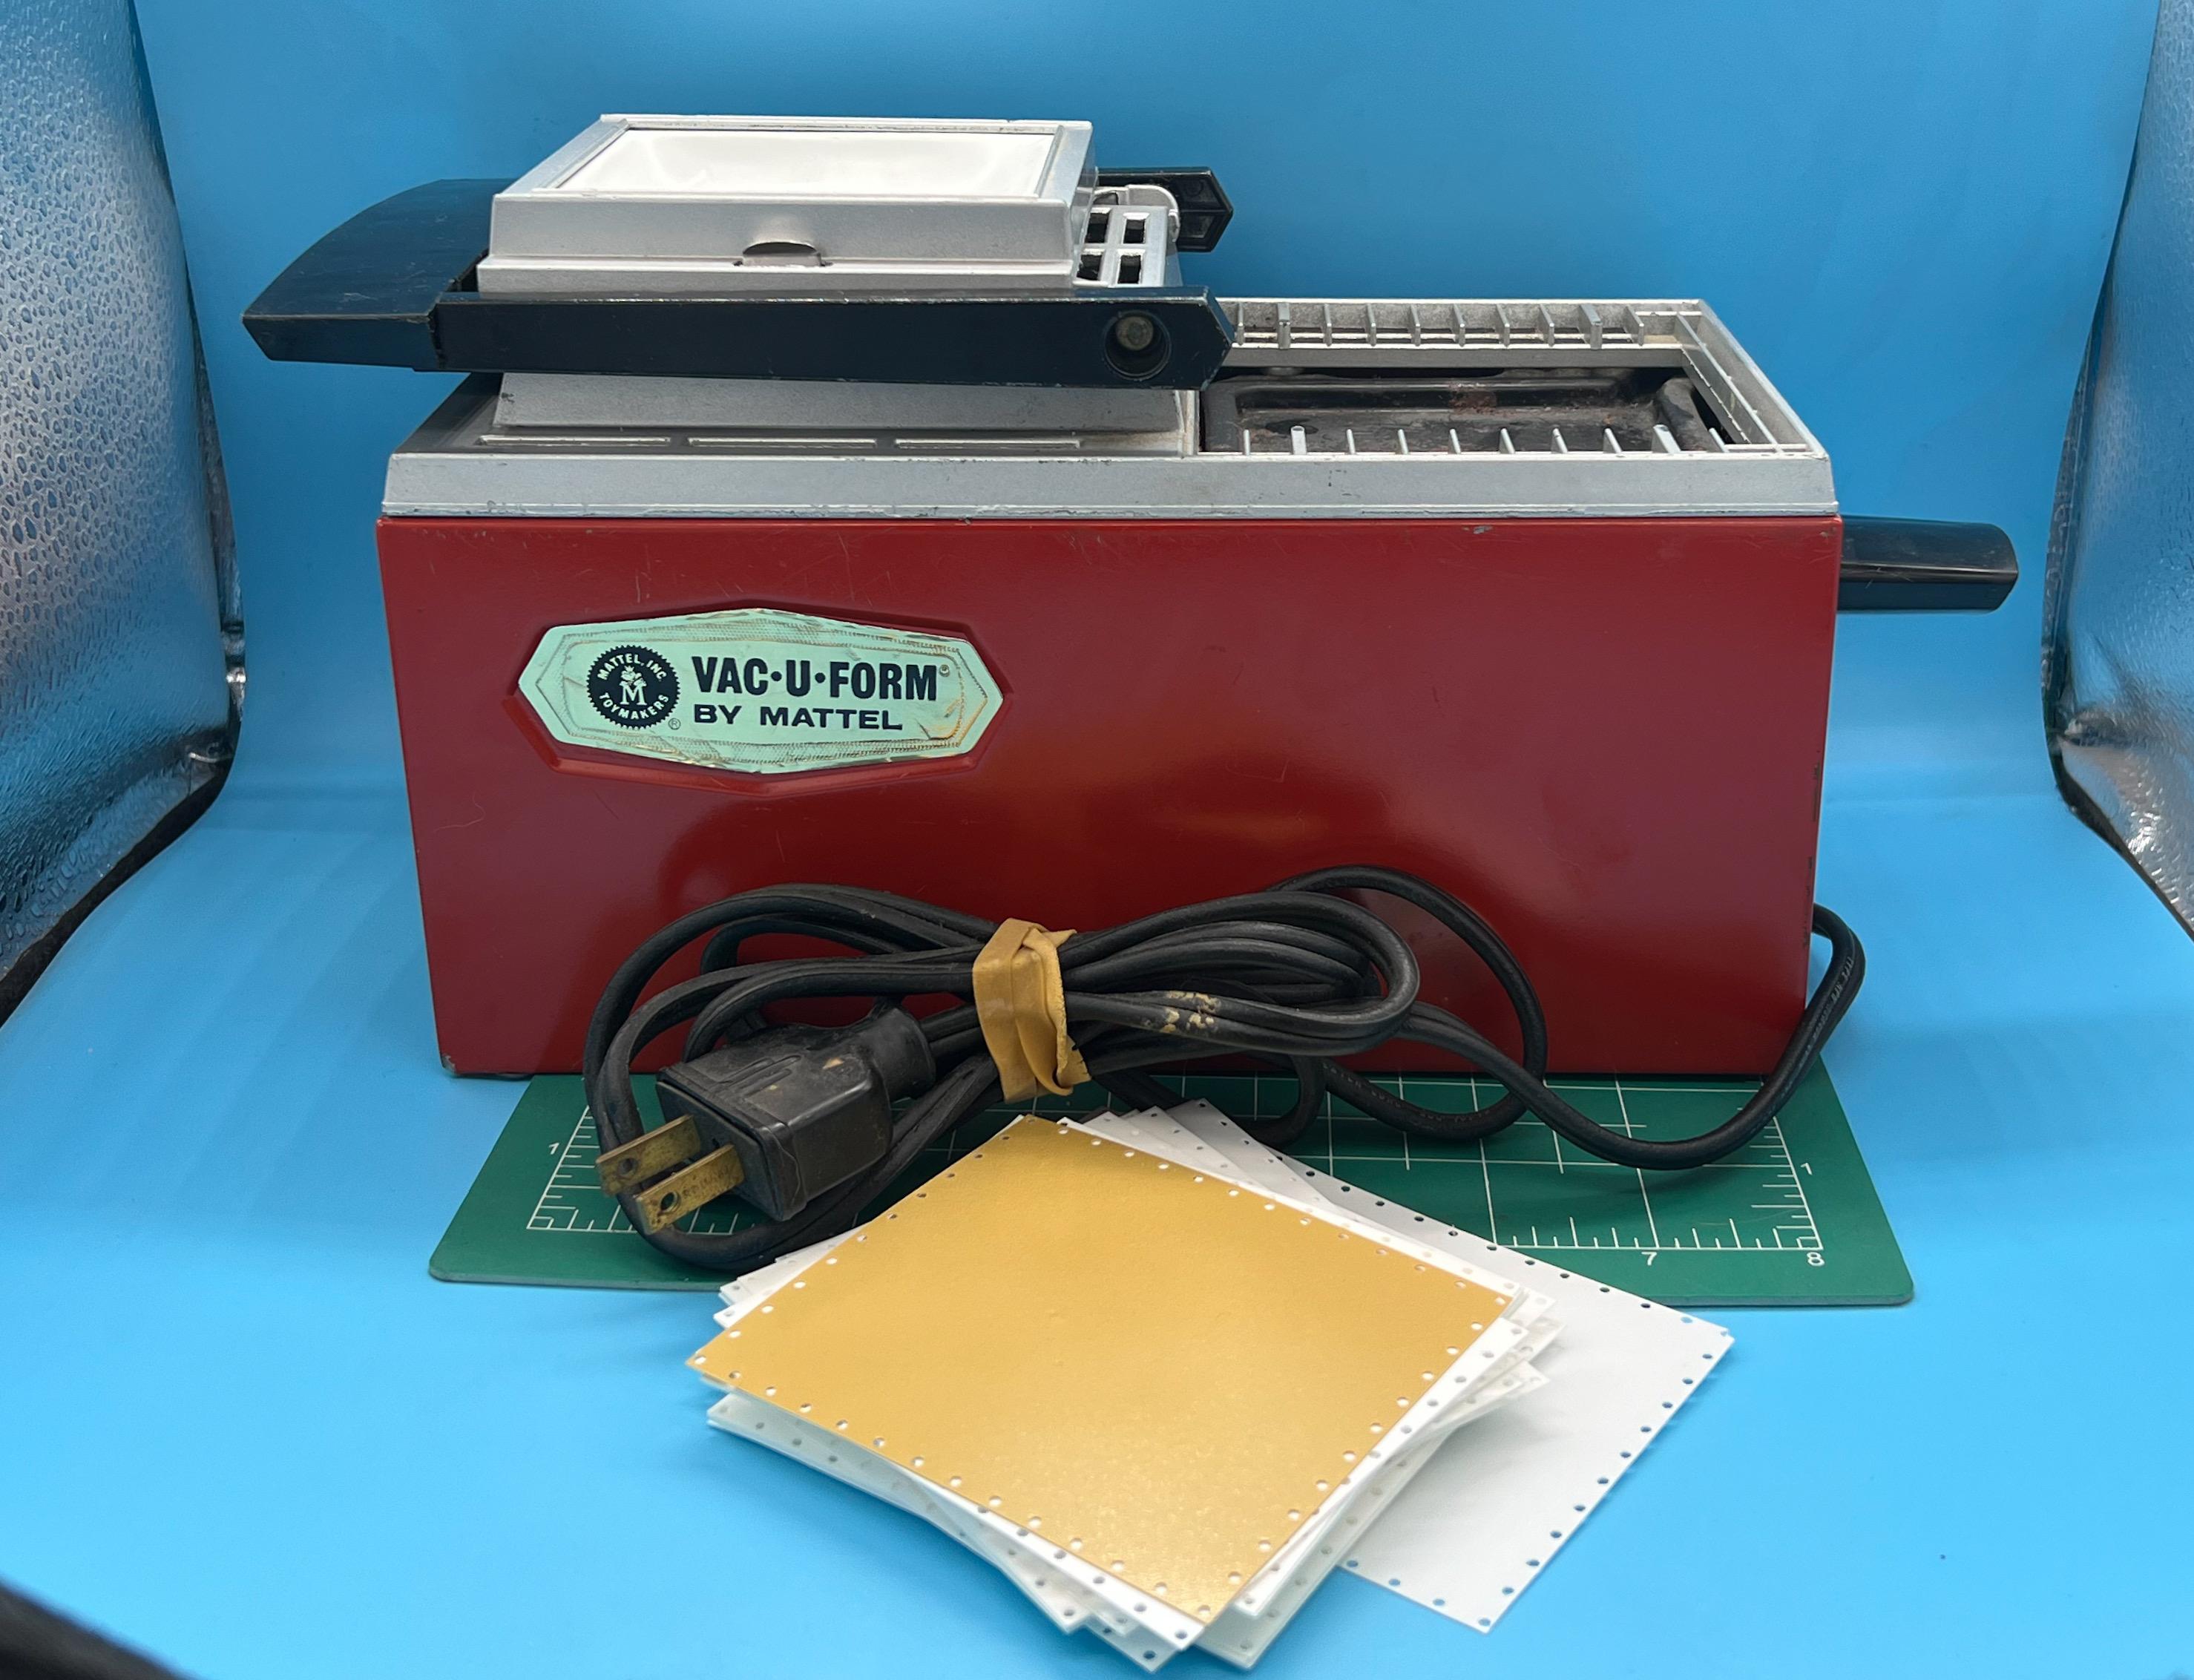
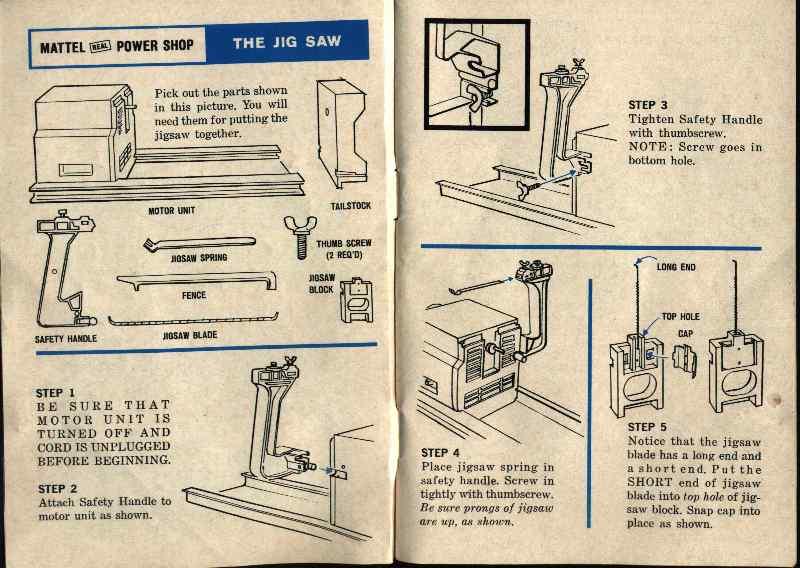
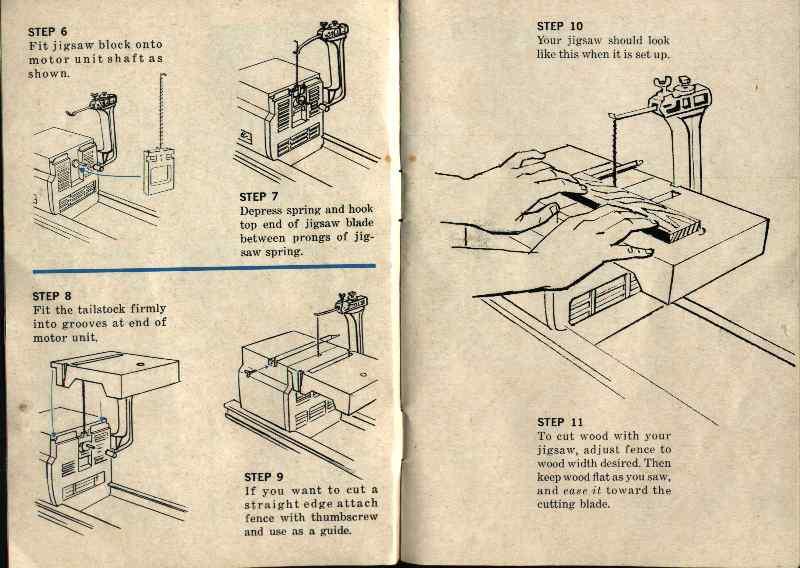
So, the output on the motor has a little metal hoop that makes it act like a cam, and then you bolt on a clamp, secure it with a wingnut, and the cam drives the saw blade up and down: I don’t actually HAVE those pieces yet - this was a super-cheap purchase but was missing a lot of the parts…but luckily the parts are really plentiful on eBay and it doesn’t seem like there’s anything unobtanium with these. I bet consumables like the saw blades are probably the hardest to find, but I’ve seen even those come up for sale frequently and inexpensively… I picked up my Vac-U-Form recently, but it was missing the plastic bed that the parts sit on…but a little CAD and some printing later and I have something that I think will work: I used the sanding function on the Power Shop to smooth off the bottom edge to remove all roughness where the supports were on the print - it made super easy work of that resin! I think the vacuum on mine isn’t as good as it could be - I’m going to take a better look at it and find a good sealant to see how good I can get this little thing. I don’t really NEED it to work wonders - I have access to a 12x24 machine, but I WOULD like this little fella to reach his full potential and to find a good project for him to work on…
-
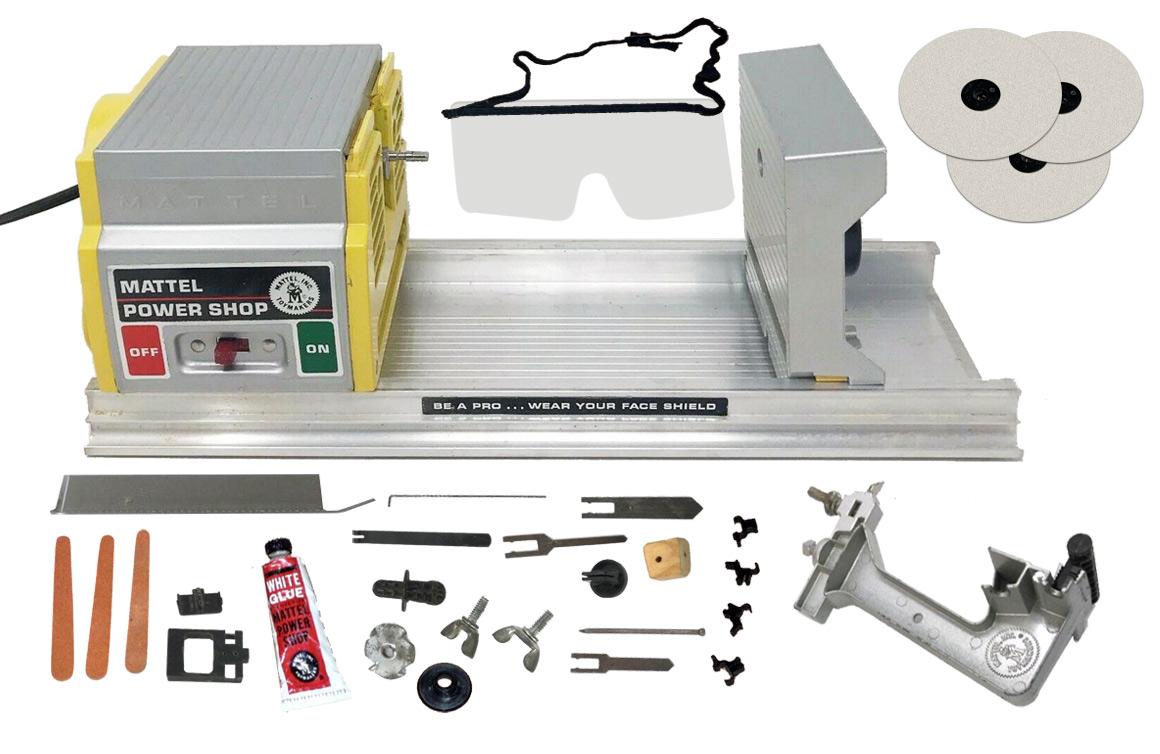
Anyone got a Mattel Power Shop?
OldNYJim posted a topic in General Automotive Talk (Trucks and Cars)
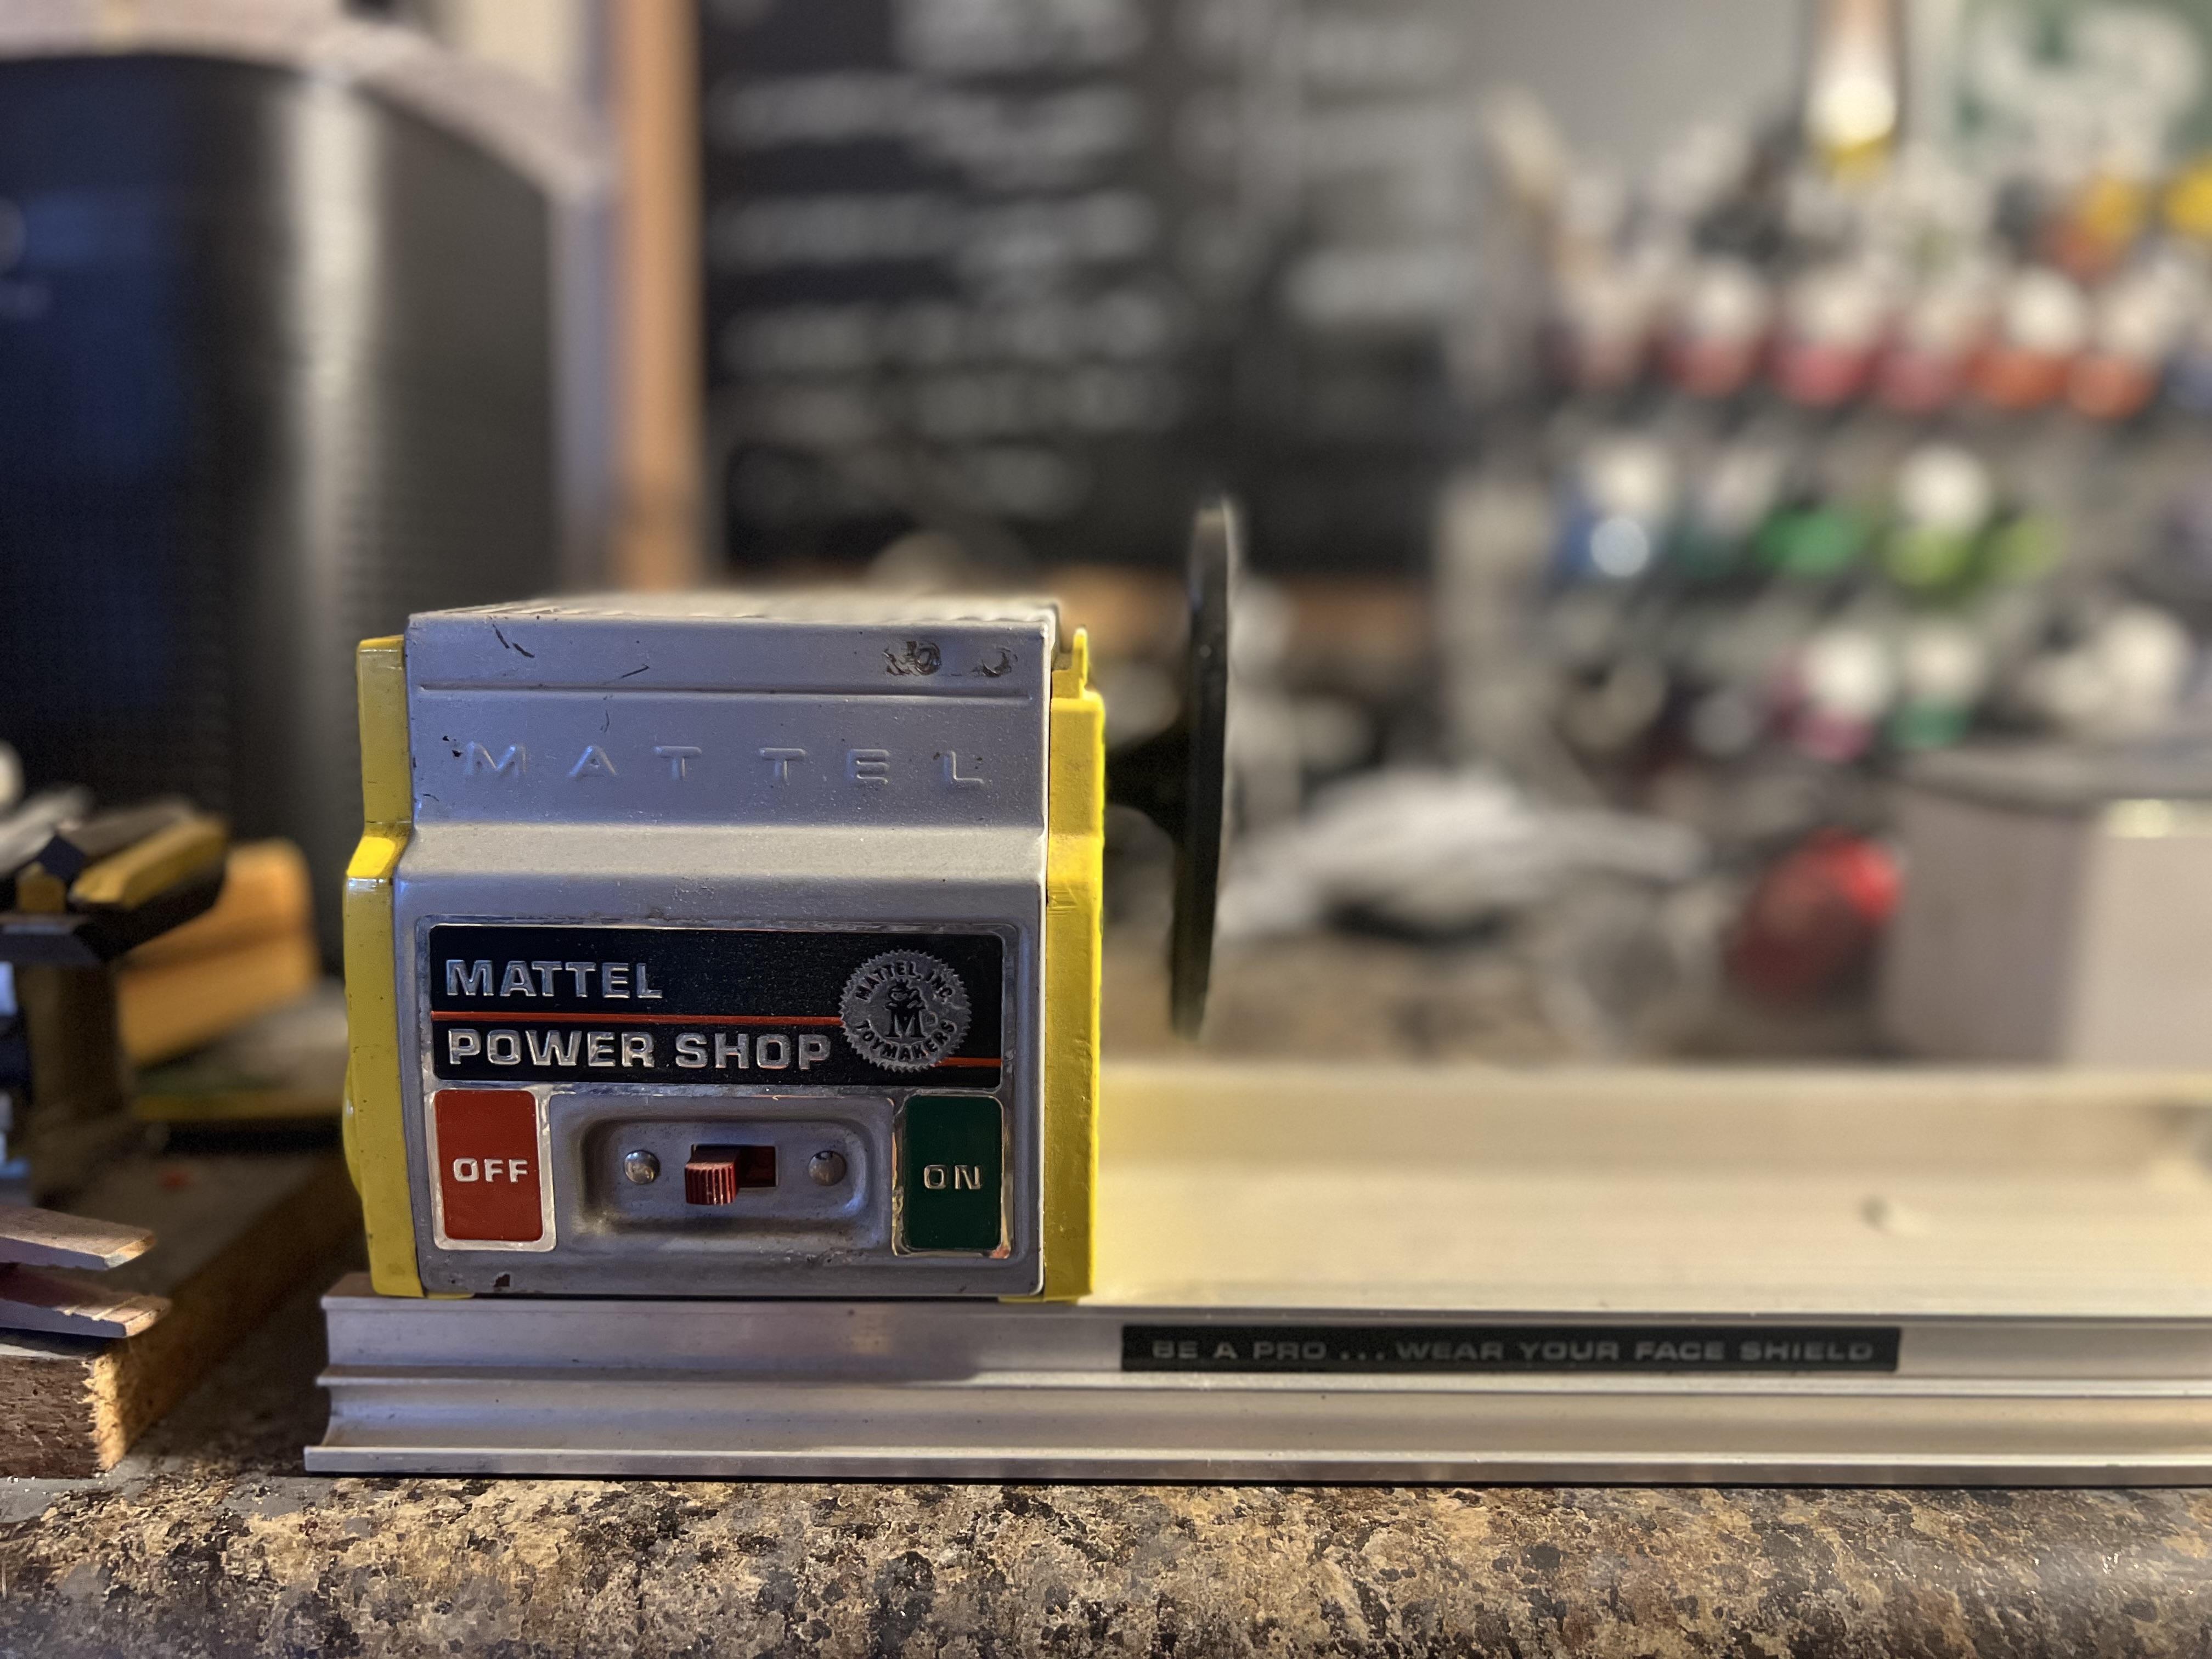
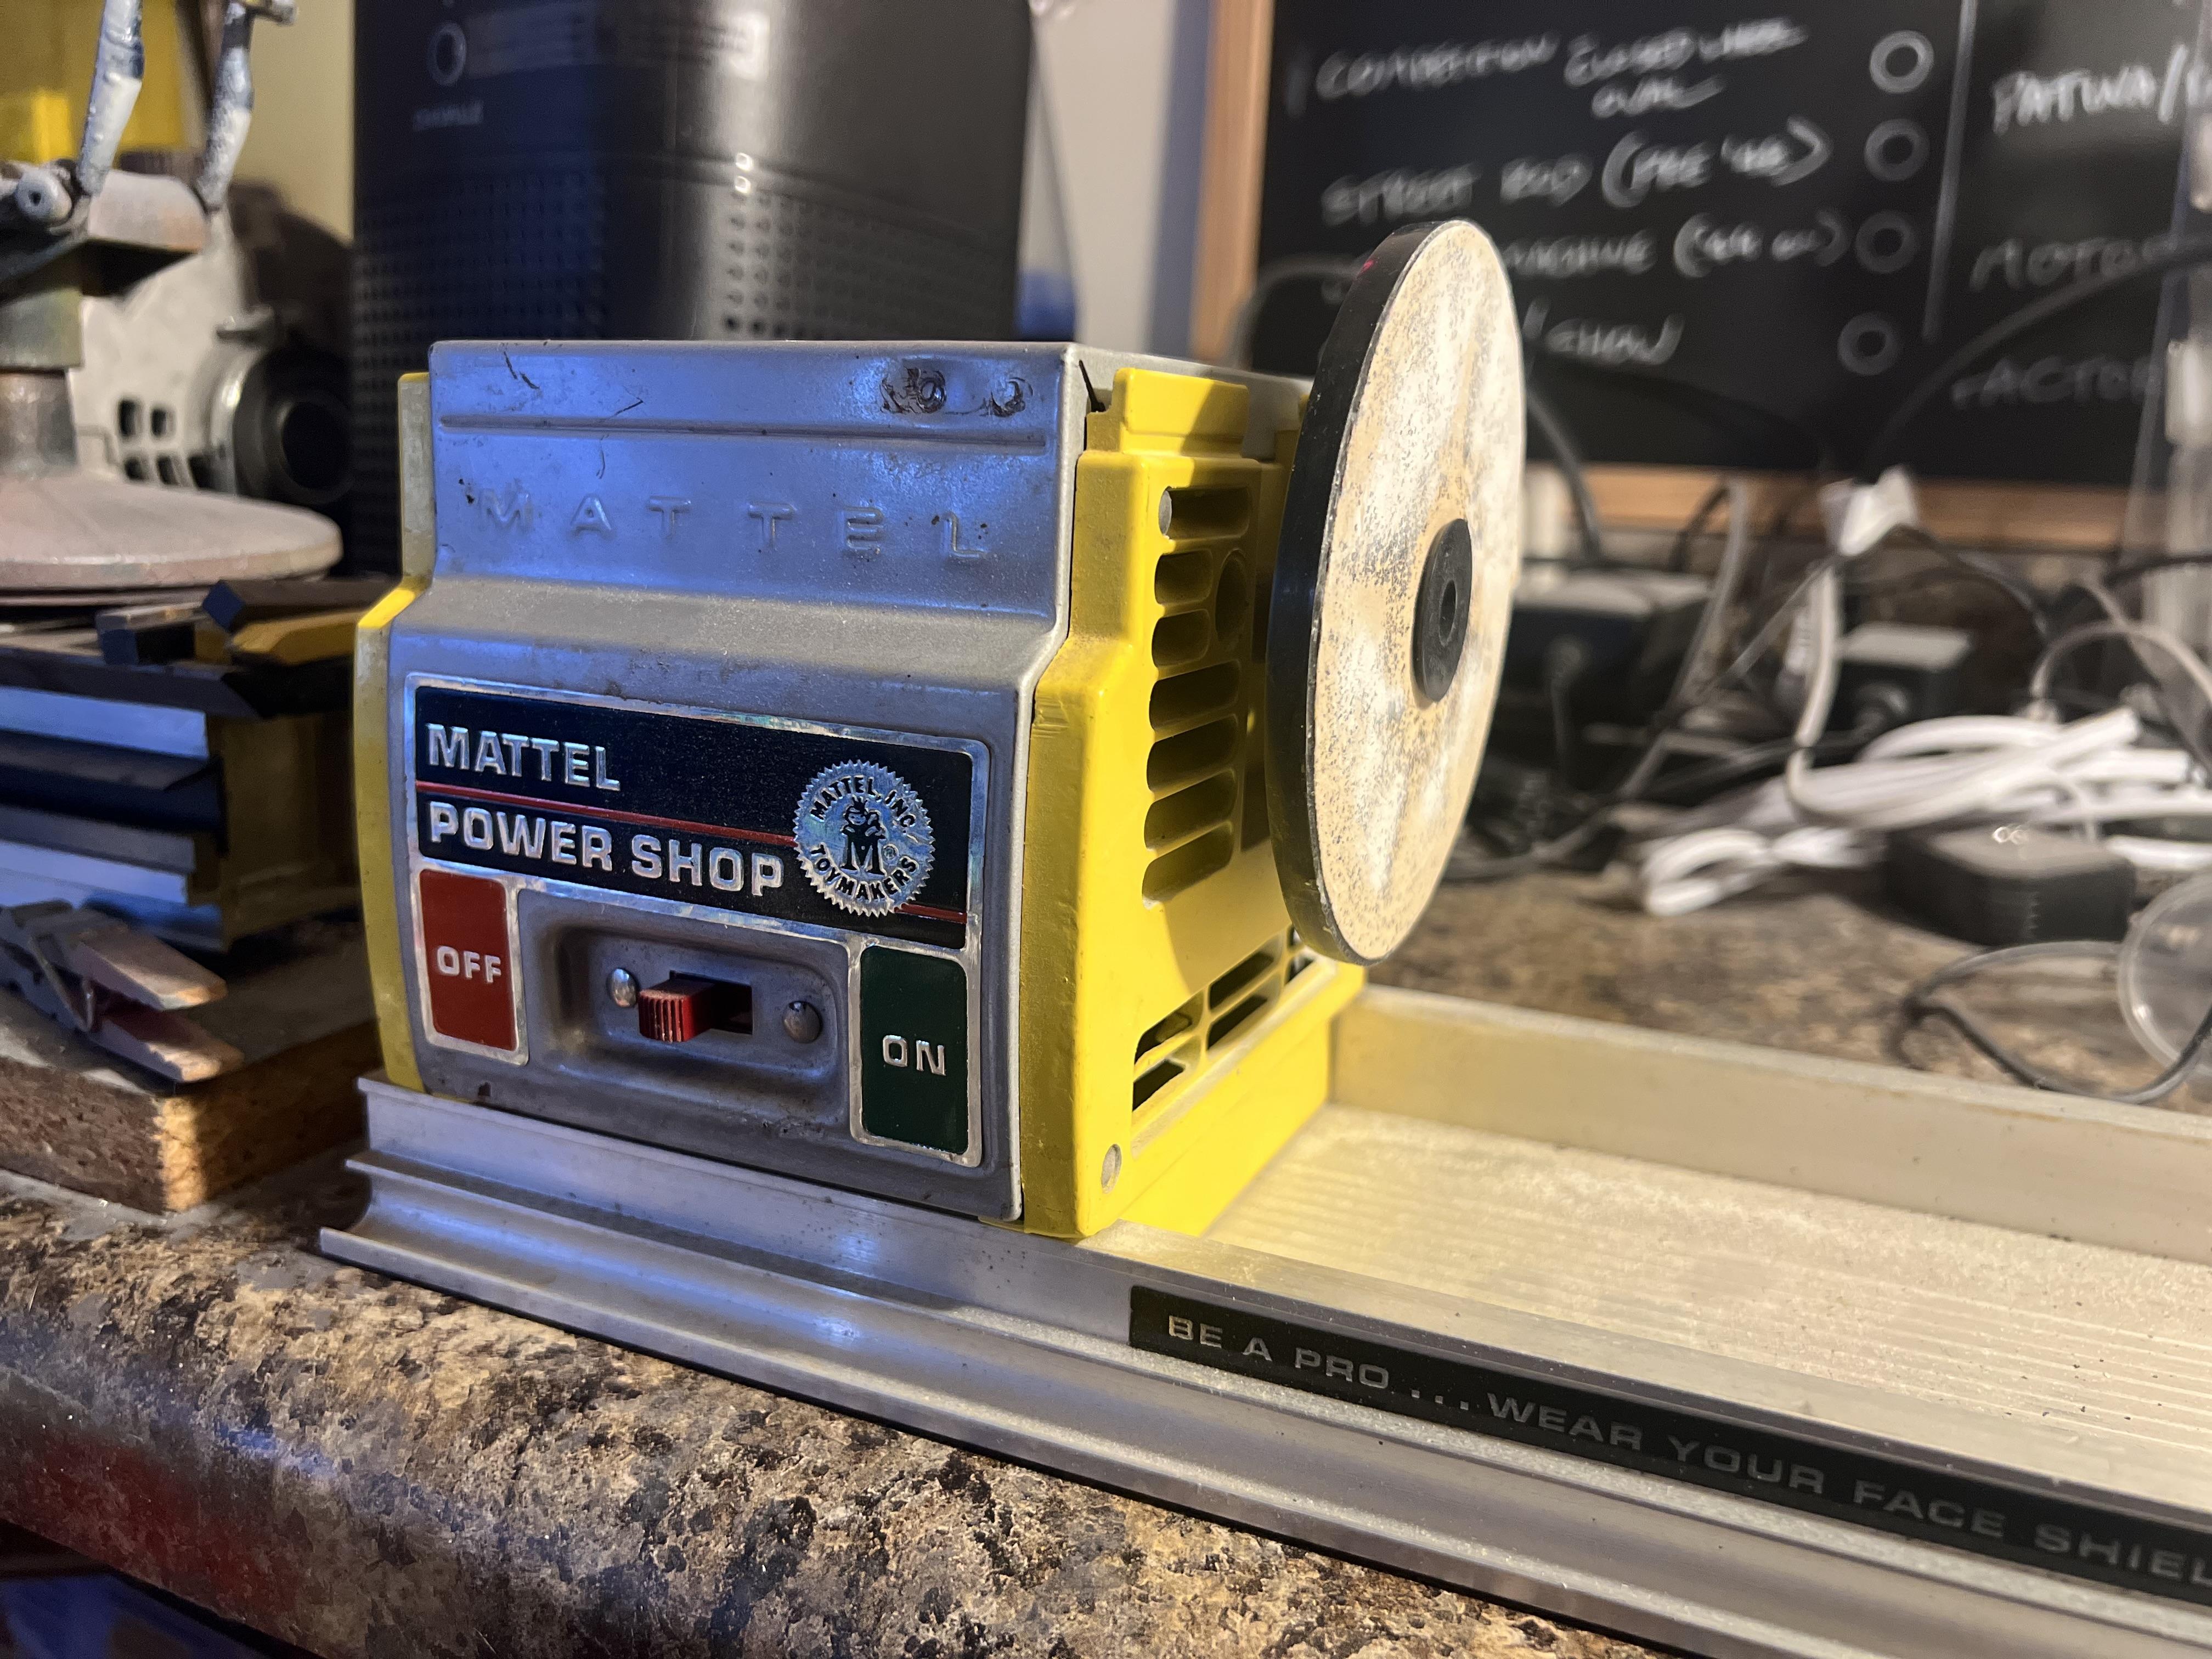
It’s the latest and greatest new toy from 1964… It works as a bench sander, a lathe, a drill…even a bandsaw! I’m certain a lot of us have ‘real’ versions of all these tools already…but I still REALLY wanted one for my shop: I already used it to sand a part I made for my little Mattel Vac-U-Form (ironically - one Mattel toy fixing another) but this is actually a surprisingly decently powered tool, considering it was aimed at kids. Motor is decently torque-y, and definitely good enough for a lot of what we do. Mine was missing a bunch of attachments, which I need to pick up, but it’ll definitely get put to work on occasion in my shop. I love the idea of using an old vintage tool to work on similar-era kits. Anyone else still using one of these for anything?
-
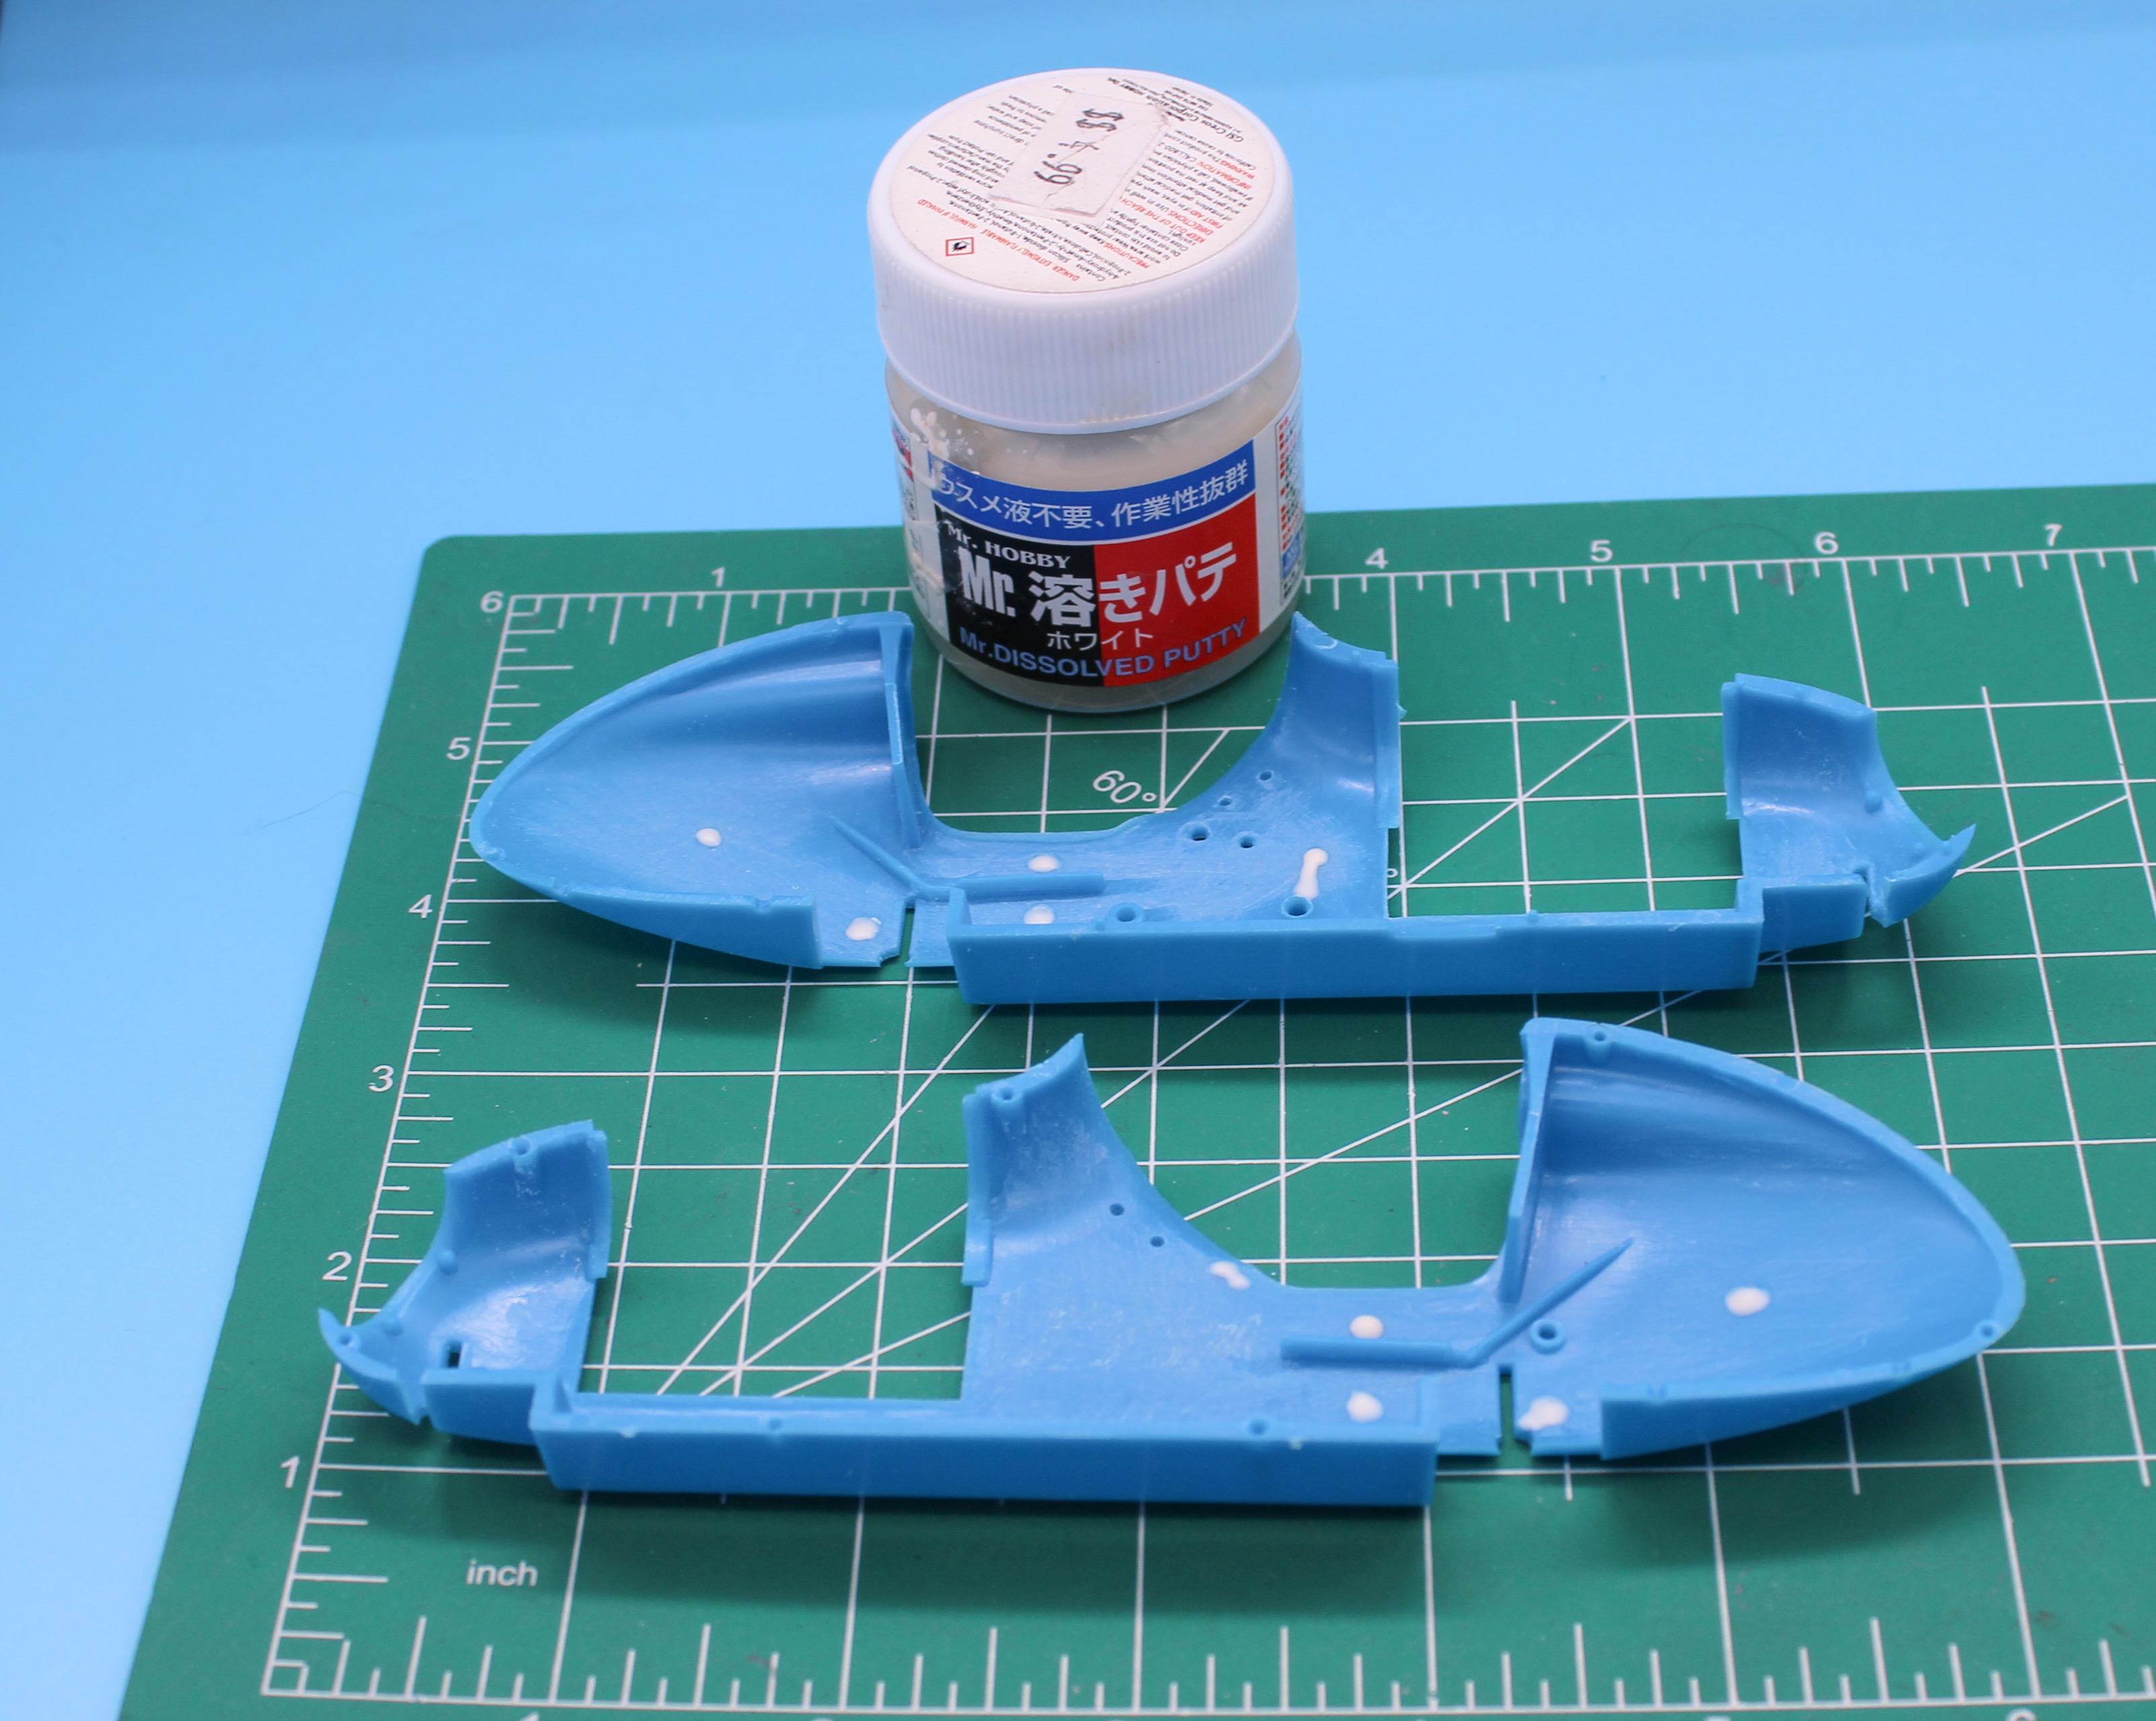
Interesting! Thanks for the info! The one bottle I picked up was actually LESS than 15 cents, because I had a $5 reward voucher they sent me 😂. Still walked out of there 80 bucks lighter though.. Tiny bit of progress tonight - and I’m posting regularly because if I save up all these little mini in-progress projects until they’re done it’ll be 2 months later and I won’t be able to find all the photos on my phone… Modified one of my tire chucks that I use on my lathe so I could spin the blobby surface of the tires I cast nice and flat where it’s supposed to be. I tested with a couple of the rougher resin casts that either had an air-bubble or a slight short-shot and then wondered if some sprue goo will work well to fix flaws in resin. I figure it’ll sand about the same - and if it sticks ok then I discovered a new trick. If it doesn’t work, I’m still trying to cast a perfect set with no ‘post processing’ anyway so no great loss. Did some work smoothing out the inside of the body, while it’s still two pieces and easy to sand: And then started some very early fab work on a front axle. I drew it up in CAD, mixing the appearance of the kit part and some 1:1 reference pictures then started cutting and soldering brass rod to get this thing started. The spindles are some prints right out of my CAD model… I think I’d like to make these out of brass also, but it was going to be helpful to have some to hold in my hands and play with to check fit before messing with brass and trying to vertical-mill stuff on my lathe… Thanks for looking - more disjointed confusing progress tomorrow, hopefully! 🤞
-
New shop toy… It sands, it’s a lathe, it band-saws, it drills (soon as I get the rest of the attachments…) - every young kid should have one! I don’t really NEED this (in fact, it’s sitting next to much more serious tools on the bench that do this stuff better) but I love the idea of using an old (and surprisingly competent) kid’s toy to work on kits from this same era
- 38,867 replies
-
- 7
-

-
- johan
- glue bombs
- (and 1 more)
-
HPI Guy, 1982 DeLorean DMC-12 1/24 Scale Model Kit Aoshima
OldNYJim replied to Bill Eh?'s topic in Car Kit News & Reviews
I haven’t tried it on a Delorean, but I have a few BTTF kits in the stash so I’ve been messing with that exact technique - see this post here for an example: I didn’t quite master it yet, but I’m getting closer… -
Oh, and before I forget…great news - turns out my Testor’s enamels are a period-correct choice! Not sure how the 1954 version of their red compares to the 2025 version that I got in Michael’s…but I’d like to think it’s not TOO dissimilar…
-
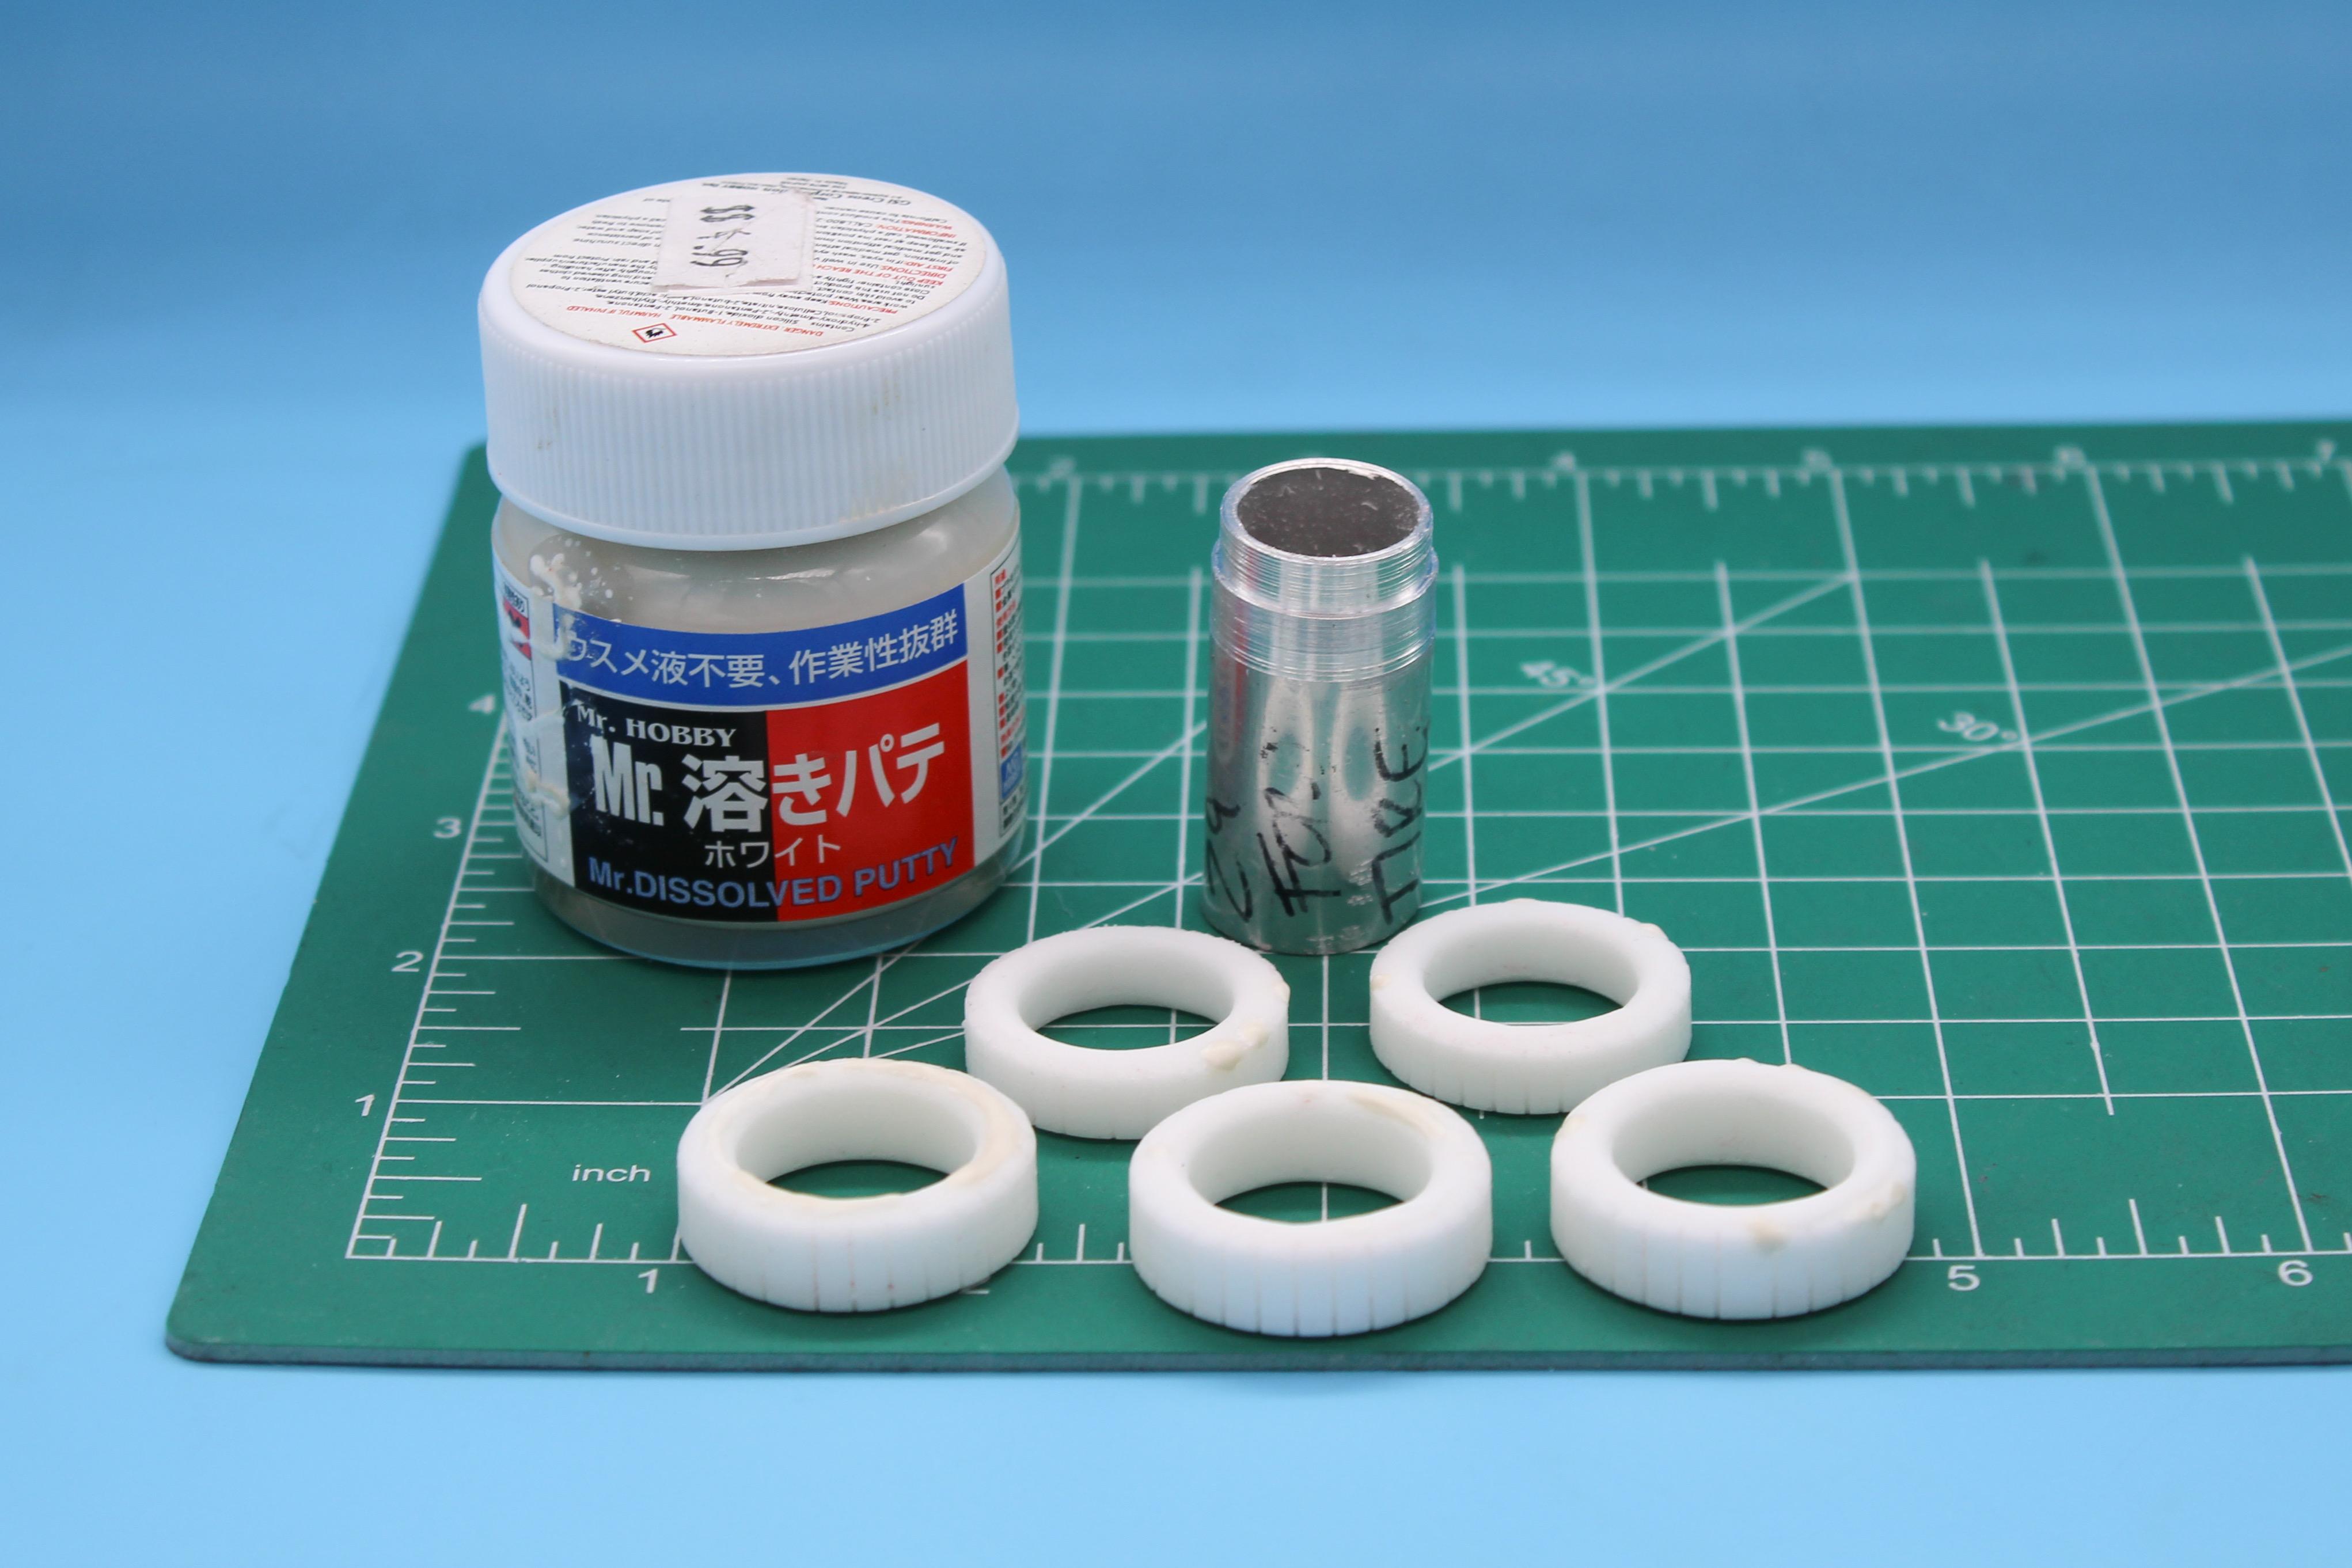
Another day, another hour of bench-time…got some resin casting done this evening. Let my mold set overnight - was over-cautious with this material that I haven’t worked with before, but it was just fine and dandy: I was originally going to flip the mold and pour a second layer with some inlets, but I’m not sure I’ll need to…I tried to mount these things so the narrowest flat portion was on the base hoping I could get away with a one-part mold, and I think that’ll work for these. This particular Alumilite resin kicks REALLY fast - way faster than other resins I’ve worked with previously…I didn’t believe the instructions when it said 1-2 minutes, but I guess they weren’t kidding - got 1.875 tires filled first time around before it catalyzed: Pretty sloppy molding technique here, where it caught me unawares - didn’t get time to level out the mold on the left before it kicked, and the one on the right is a slight short-shot. Second try was better, but still a little sloppy - worked fast to make sure the molds were filled and air bubbles worked out of there before it kicked but I’ll have a little sanding to do to get these ones perfect… Overall tho, and I know it’s hard to see in the pic, I’m pleased with how these improved parts look - just need to get a perfect set and I can move onto the wheels. I WAS considering finding a good black flexible resin…but I think if the kit tires were solid I’d feel like I was cheating a little if I didn’t have to paint these too…just the weird way my brain makes me jump through hoops to feel like I did the work the right way… Thanks for looking - more soon, soon as I’ve done more!
-
The full-detail has a nice representation of (I think?) a Morrison chassis. The detail is a little blobular, but it’s not bad…
- 38,867 replies
-
- 1
-
-
- johan
- glue bombs
- (and 1 more)
-
Huh! I had seen the roadster sports-car from this range but not the coupe…thanks for sharing!
-
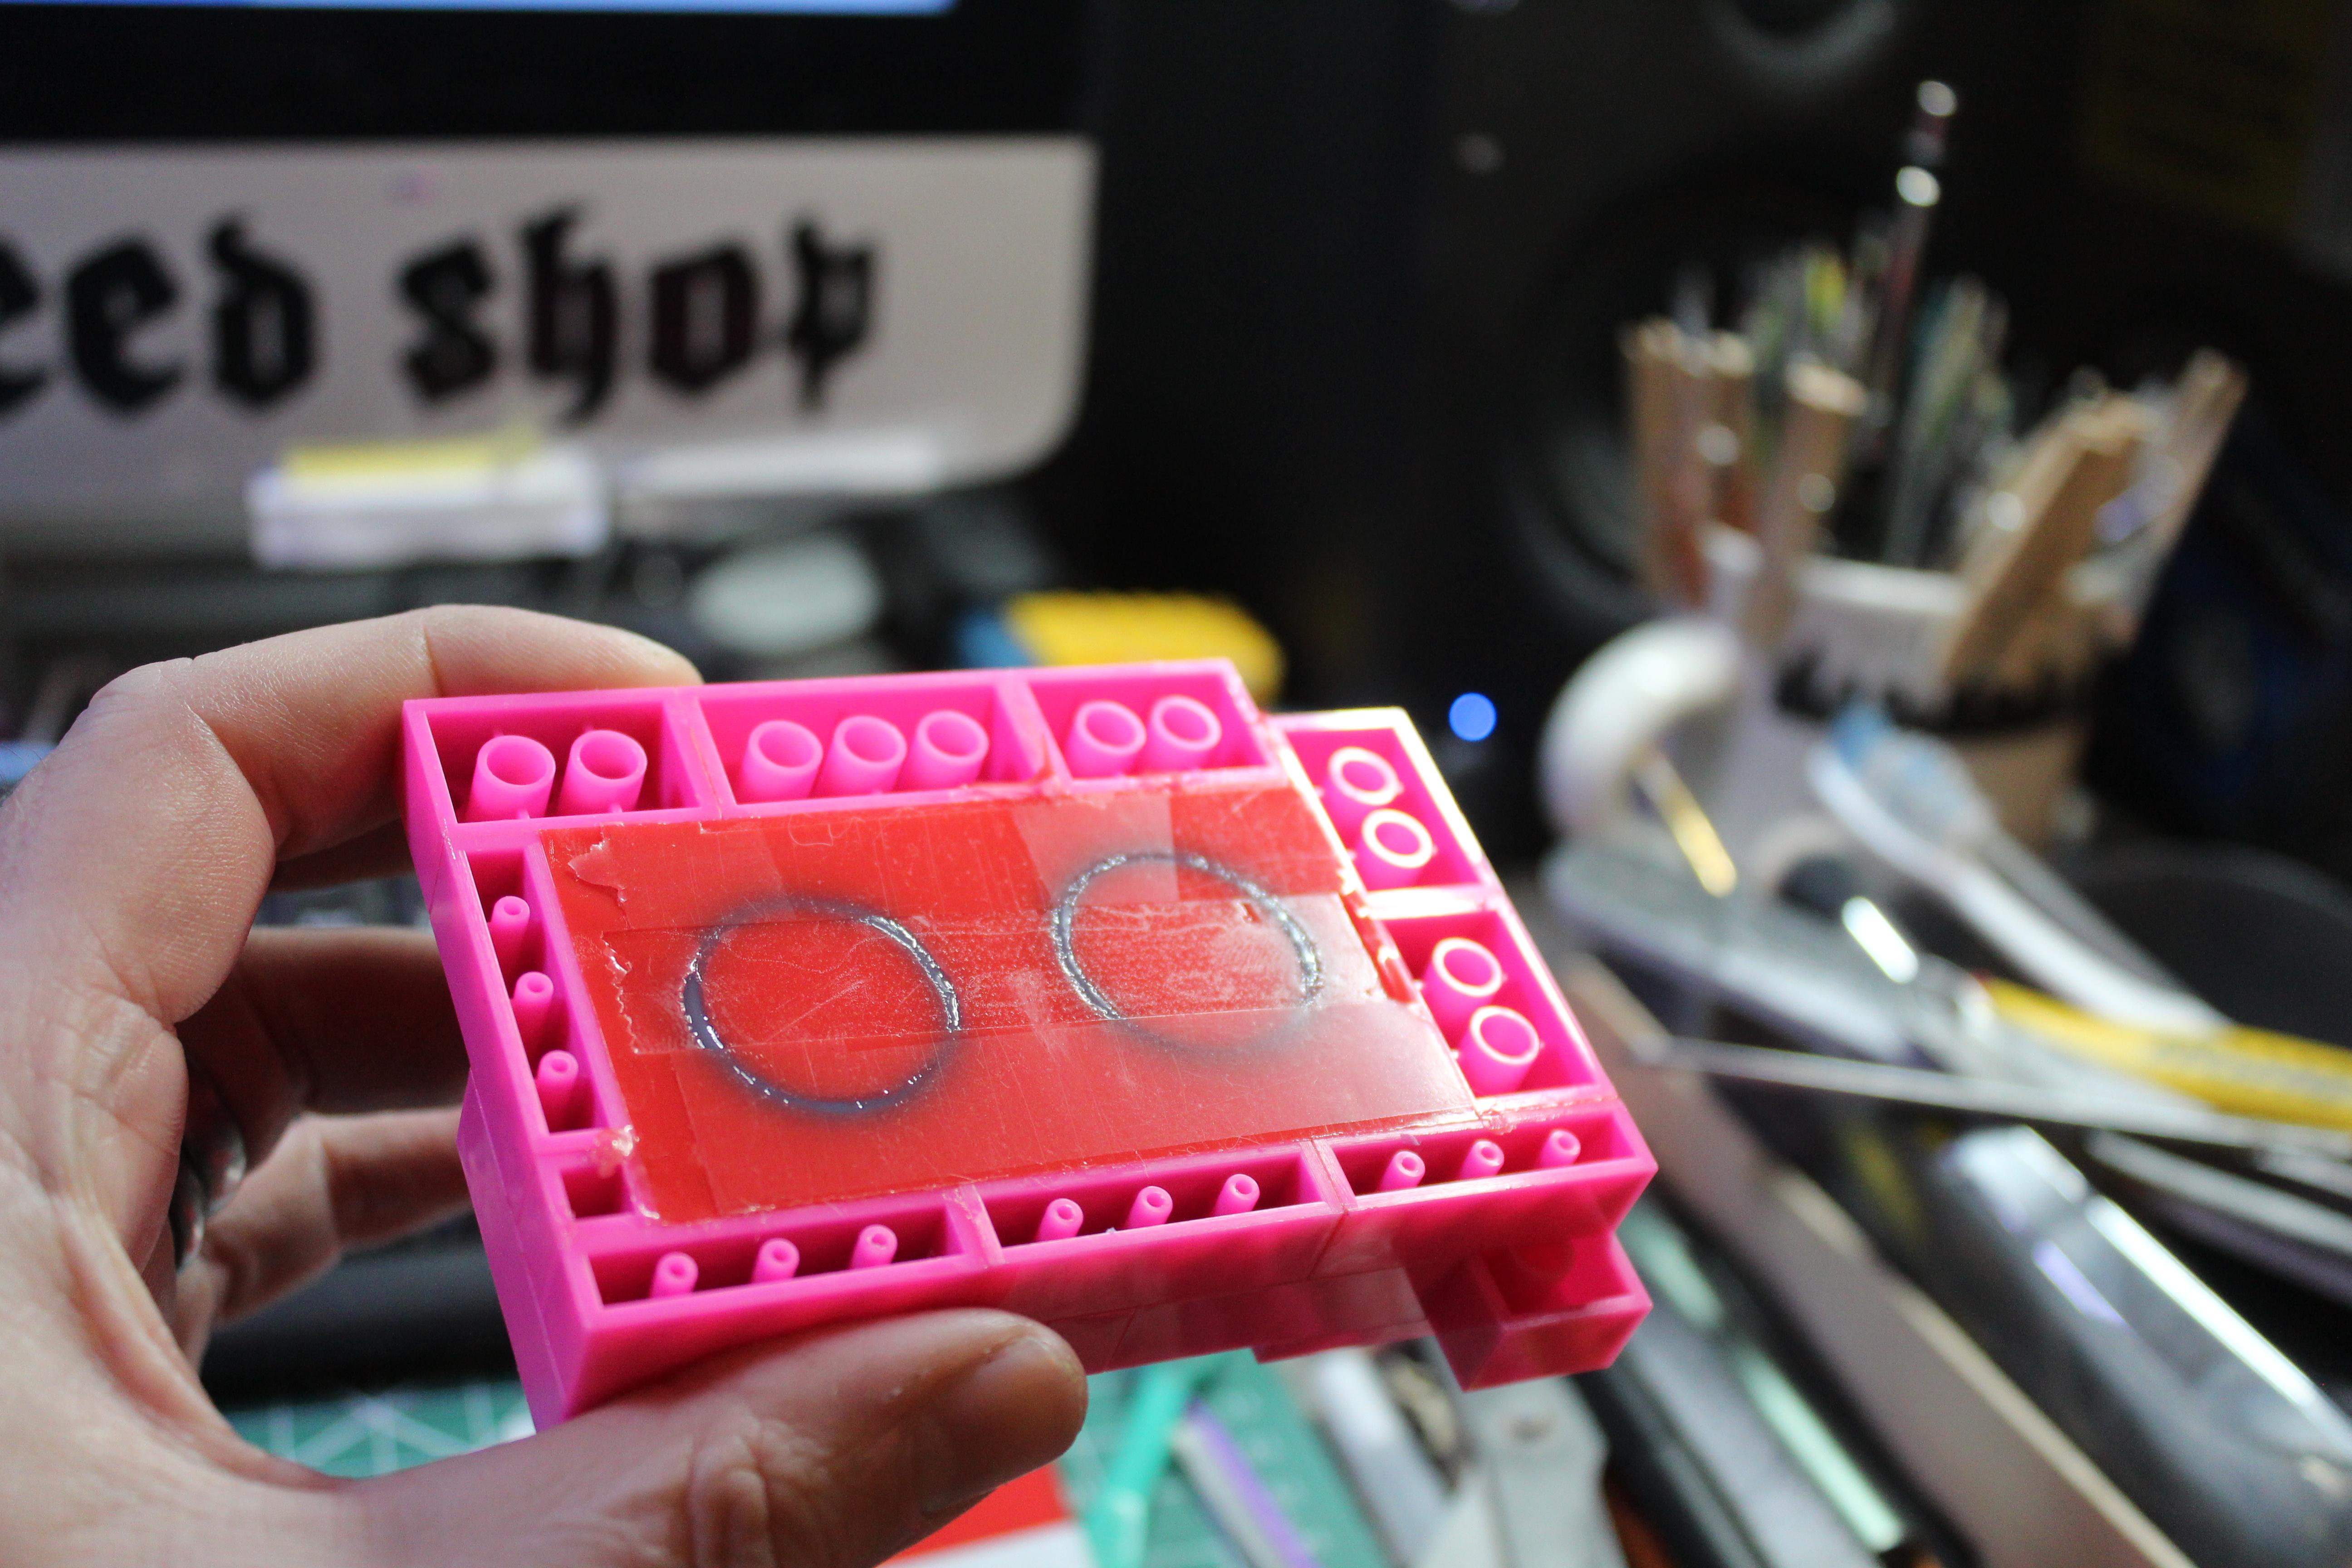
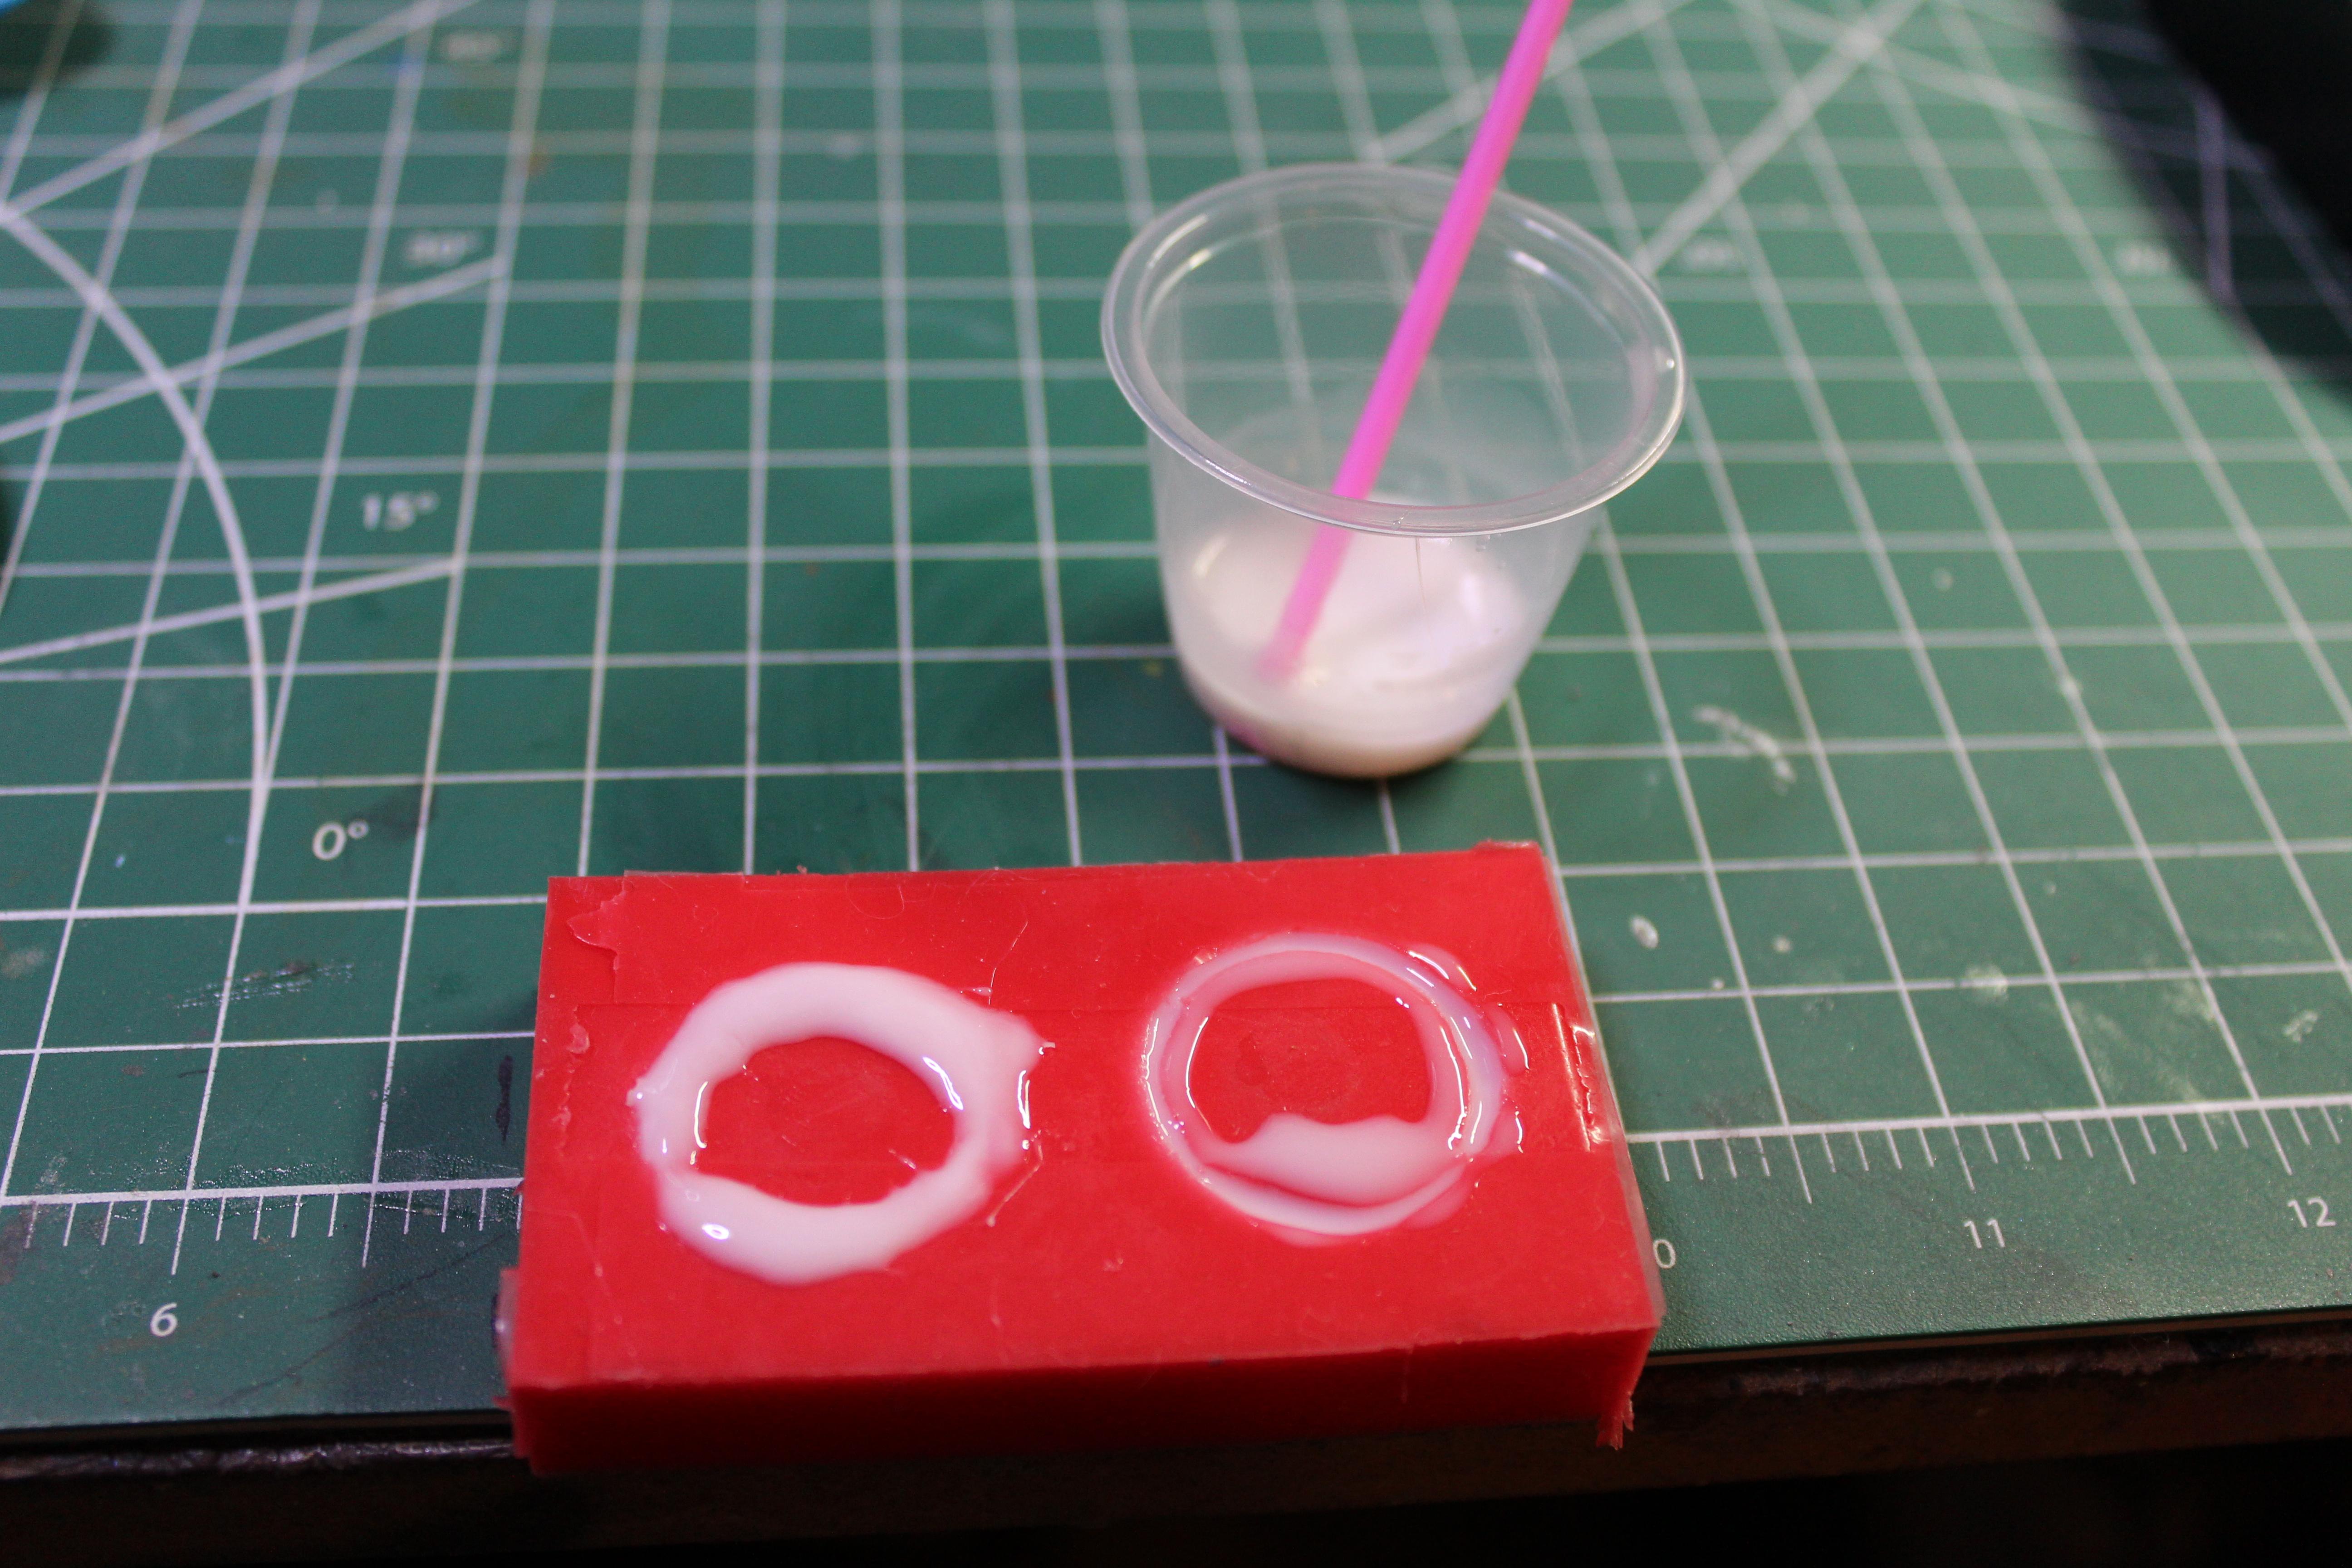
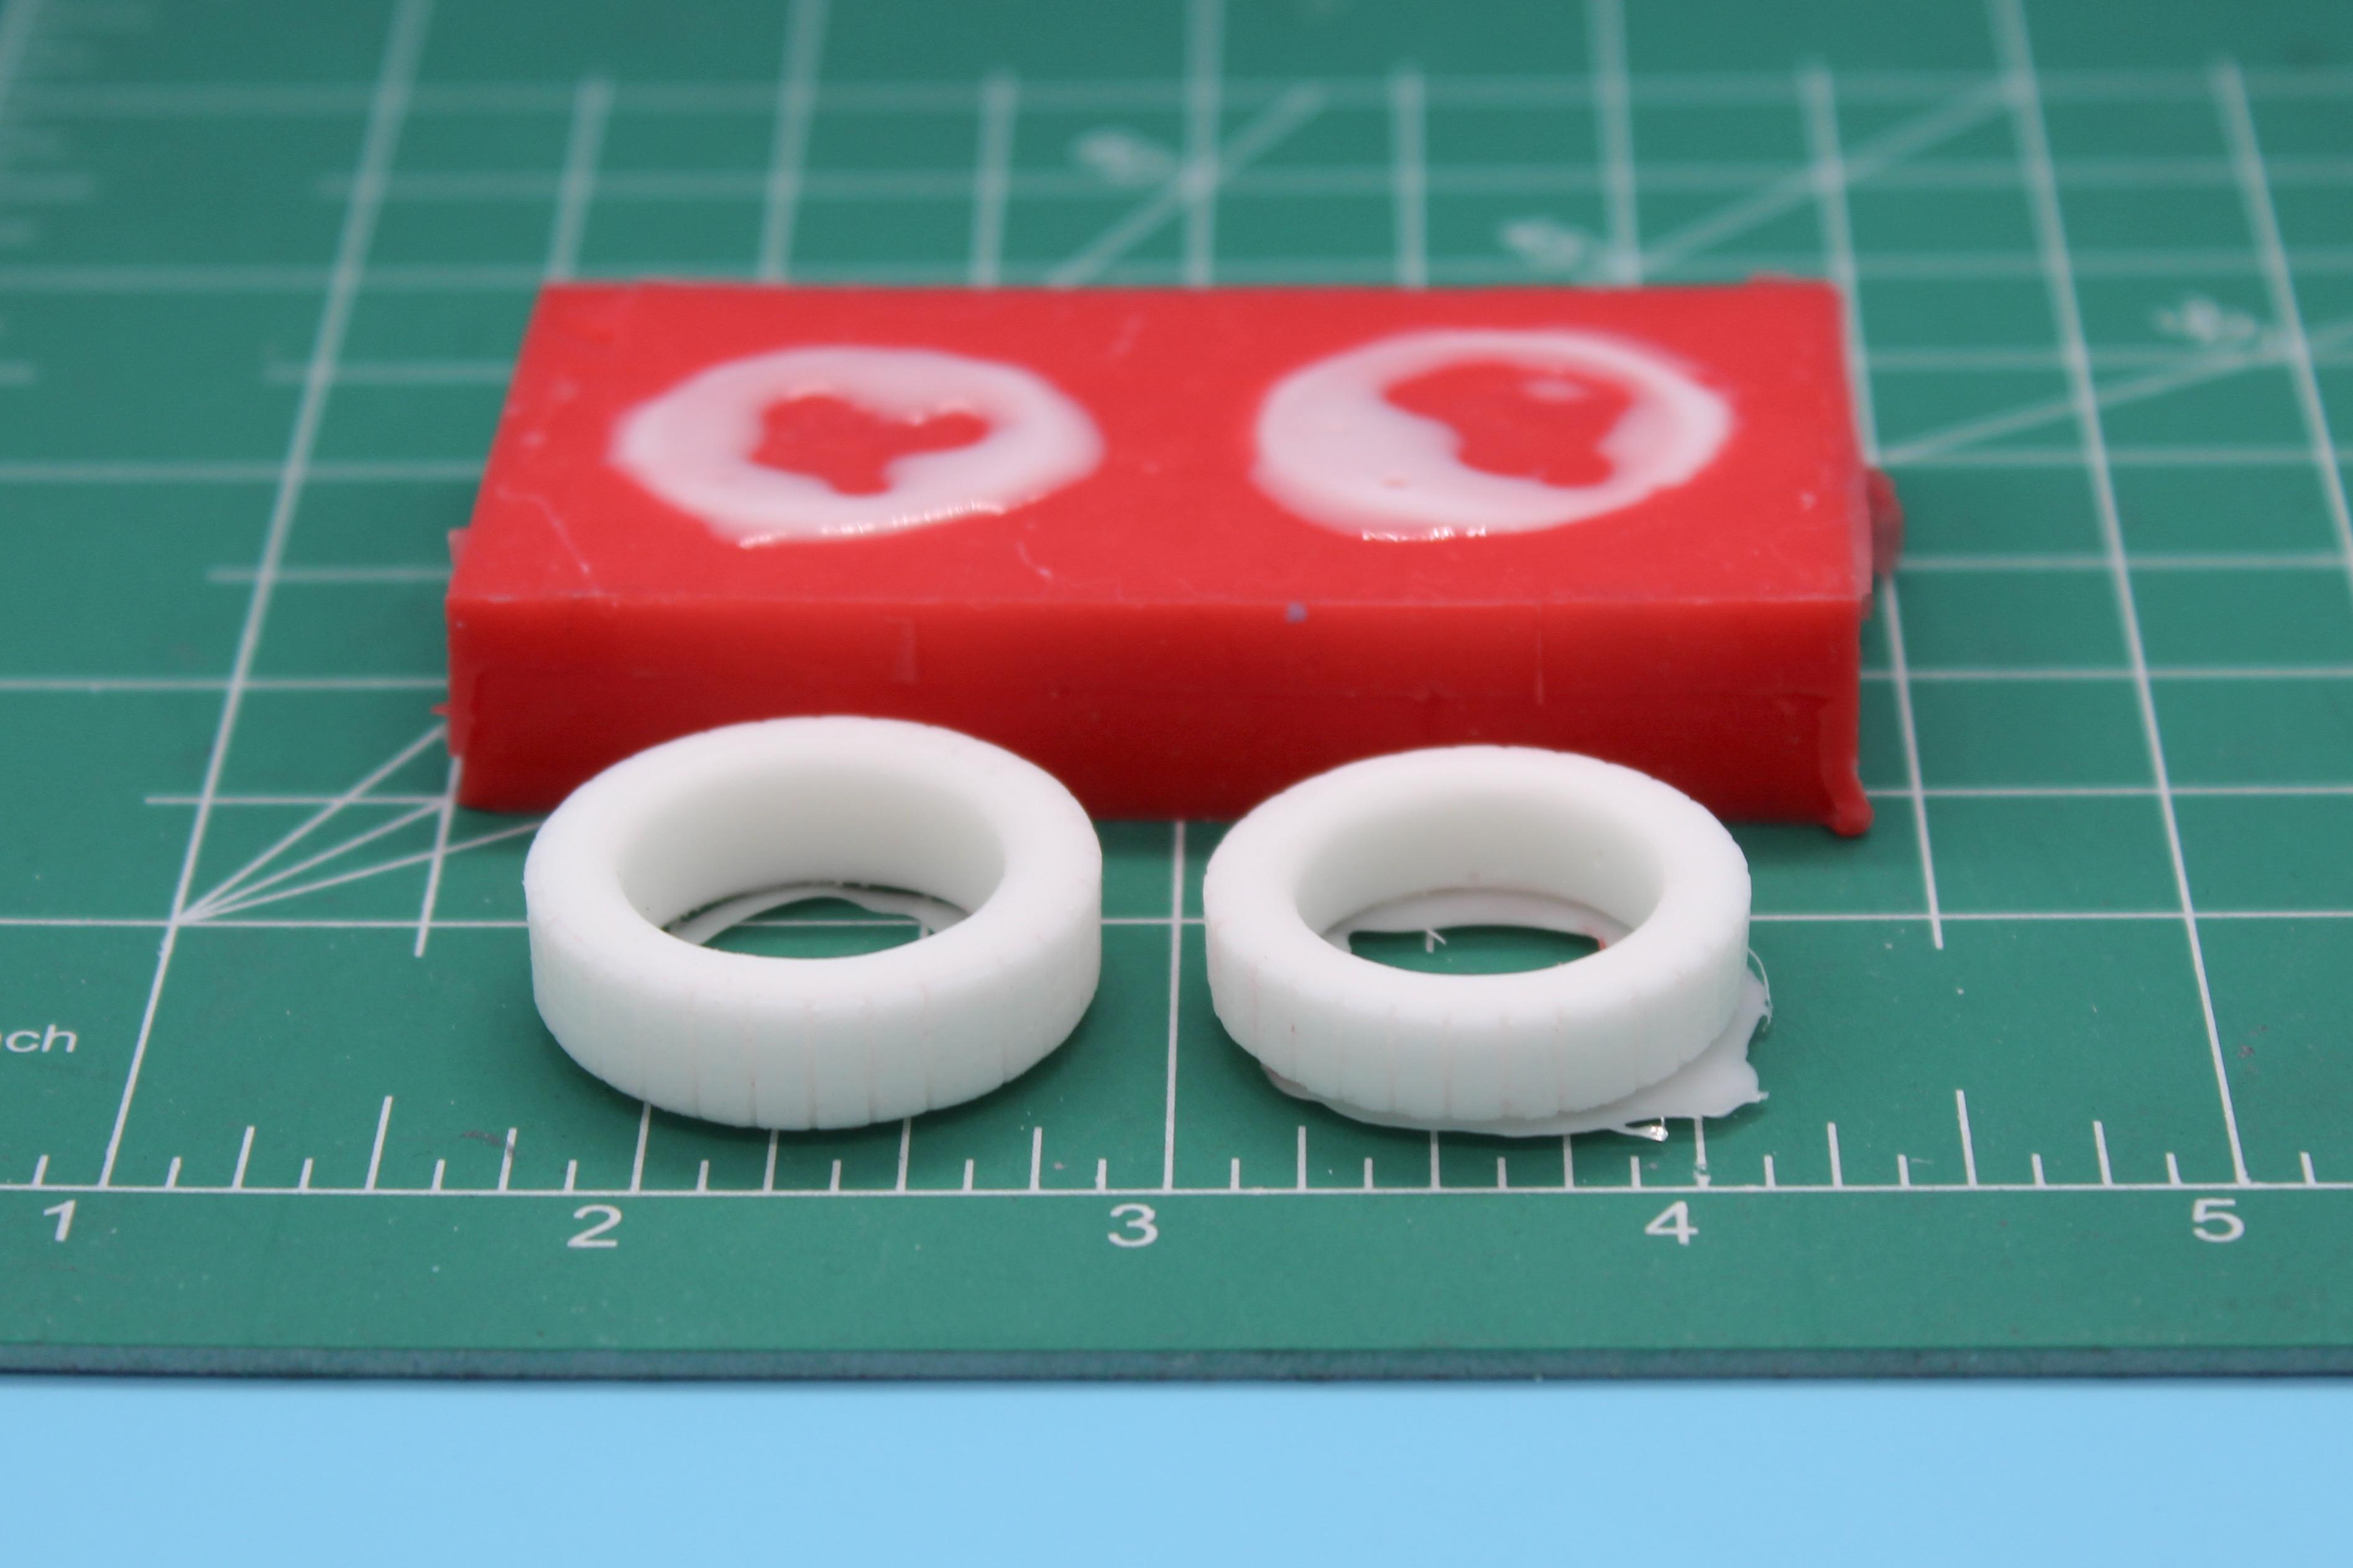
Thank you! Continuing on yesterday’s progress, although I didn’t get much bench-time today… Sanded and shaped my printed tires until I was happy with them (happier than I was with the kit parts anyway…) and broke out my hot-pink dollar-store boot-Legos to cast copies of them: I’m trying a different RTV rubber to the one I have used previously - this is the bright red stuff that Michael’s sells…going to let it set-up overnight then see where we’re at: Interesting thing I noticed with this stuff that I don’t recall with other brands that I’ve used before - as it was starting to kick and set-up I could see little micro-bubbles forming on the surface…my pouring technique is usually pretty good and it’s rare that I get an air-bubble in a mold so I guess (hope) that’s just whatever chemical process happens with this stuff… While that was going on, ran a test print of a 1/20 Offie…still didn’t research why this looks so different to the kit parts anyway, but I ran a print anyway so I can hold one on my hands: And finally, I want to get the two body halves glued together so I can start separating the various parts that I want separate, but first I did future-me a favor and cleaned up the copyright info and filled a few ejector pin marks with my current favorite filler: I feel like it’s going to take a little while to get everything made to get this thing on it’s wheels, and then it’ll all start to come together quickly…hopefully anyway…next project is a brass front axle and I’ll need to keep adding to the frame as I build more components and need to attach them. Thanks for looking - more soon, soon as I’ve done more!
-
Who was building in the 60s?
OldNYJim replied to OldNYJim's topic in Model Building Questions and Answers
Love hearing stories like this - thank you for sharing (and for your service!) -
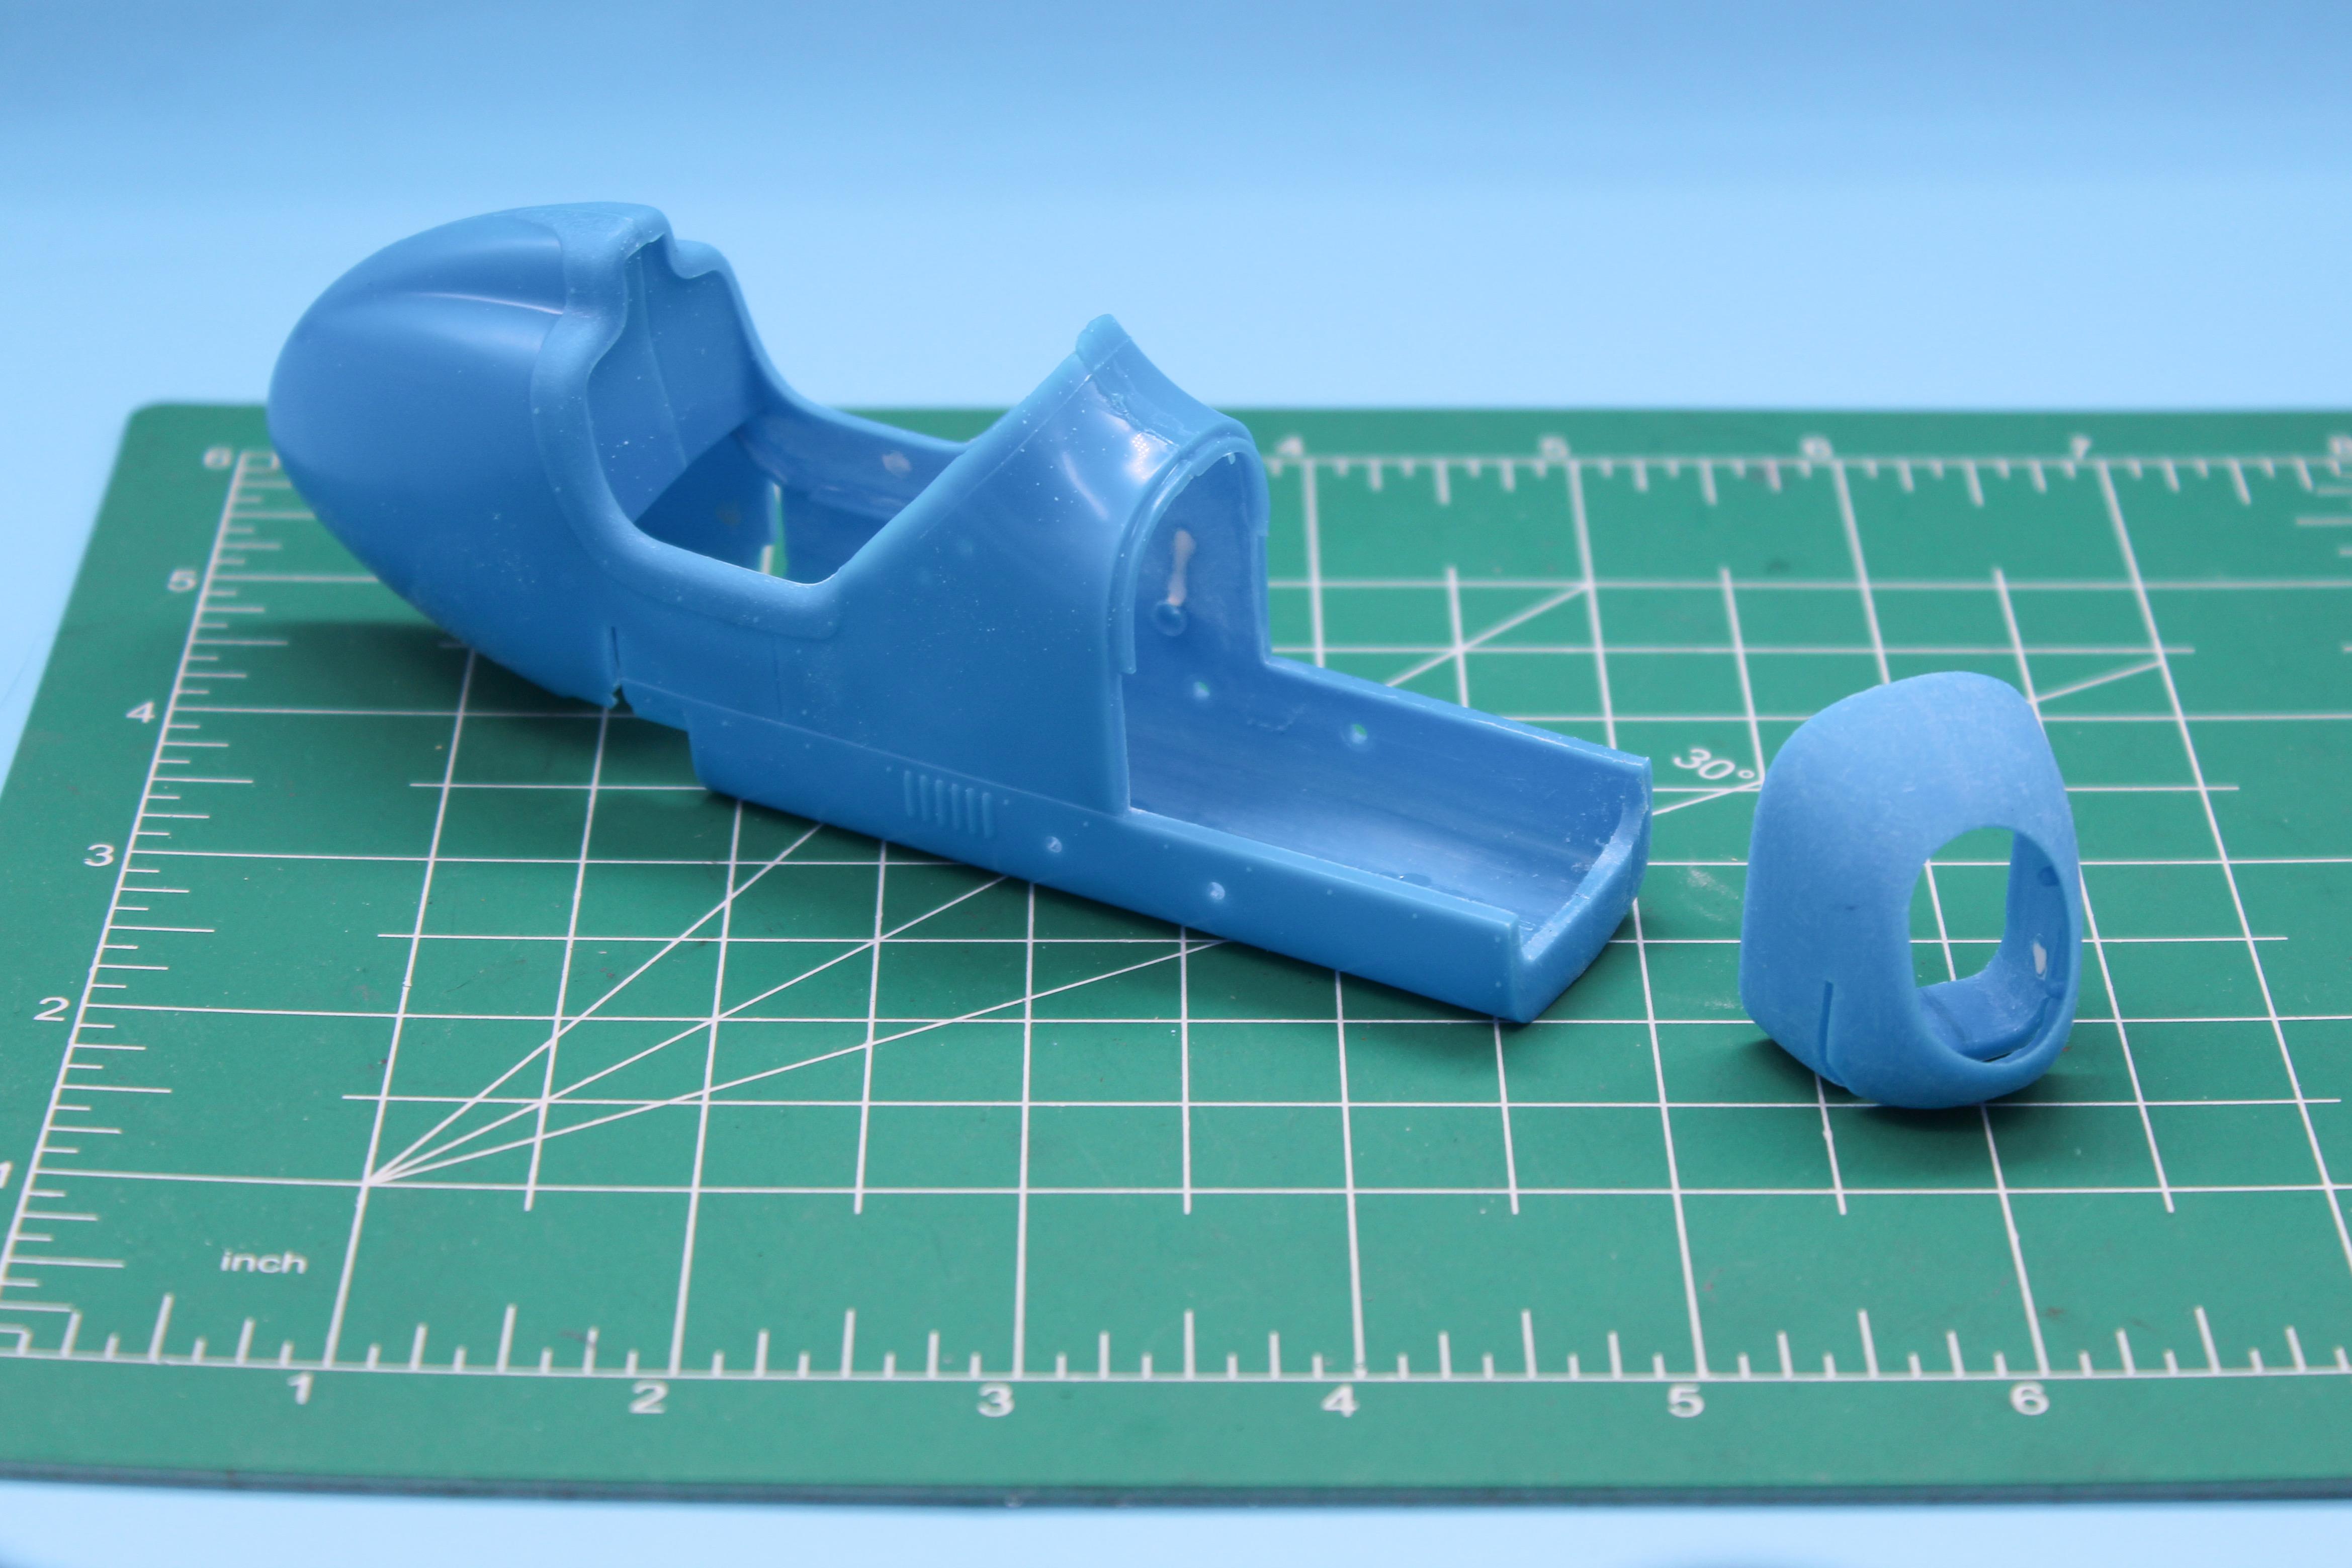
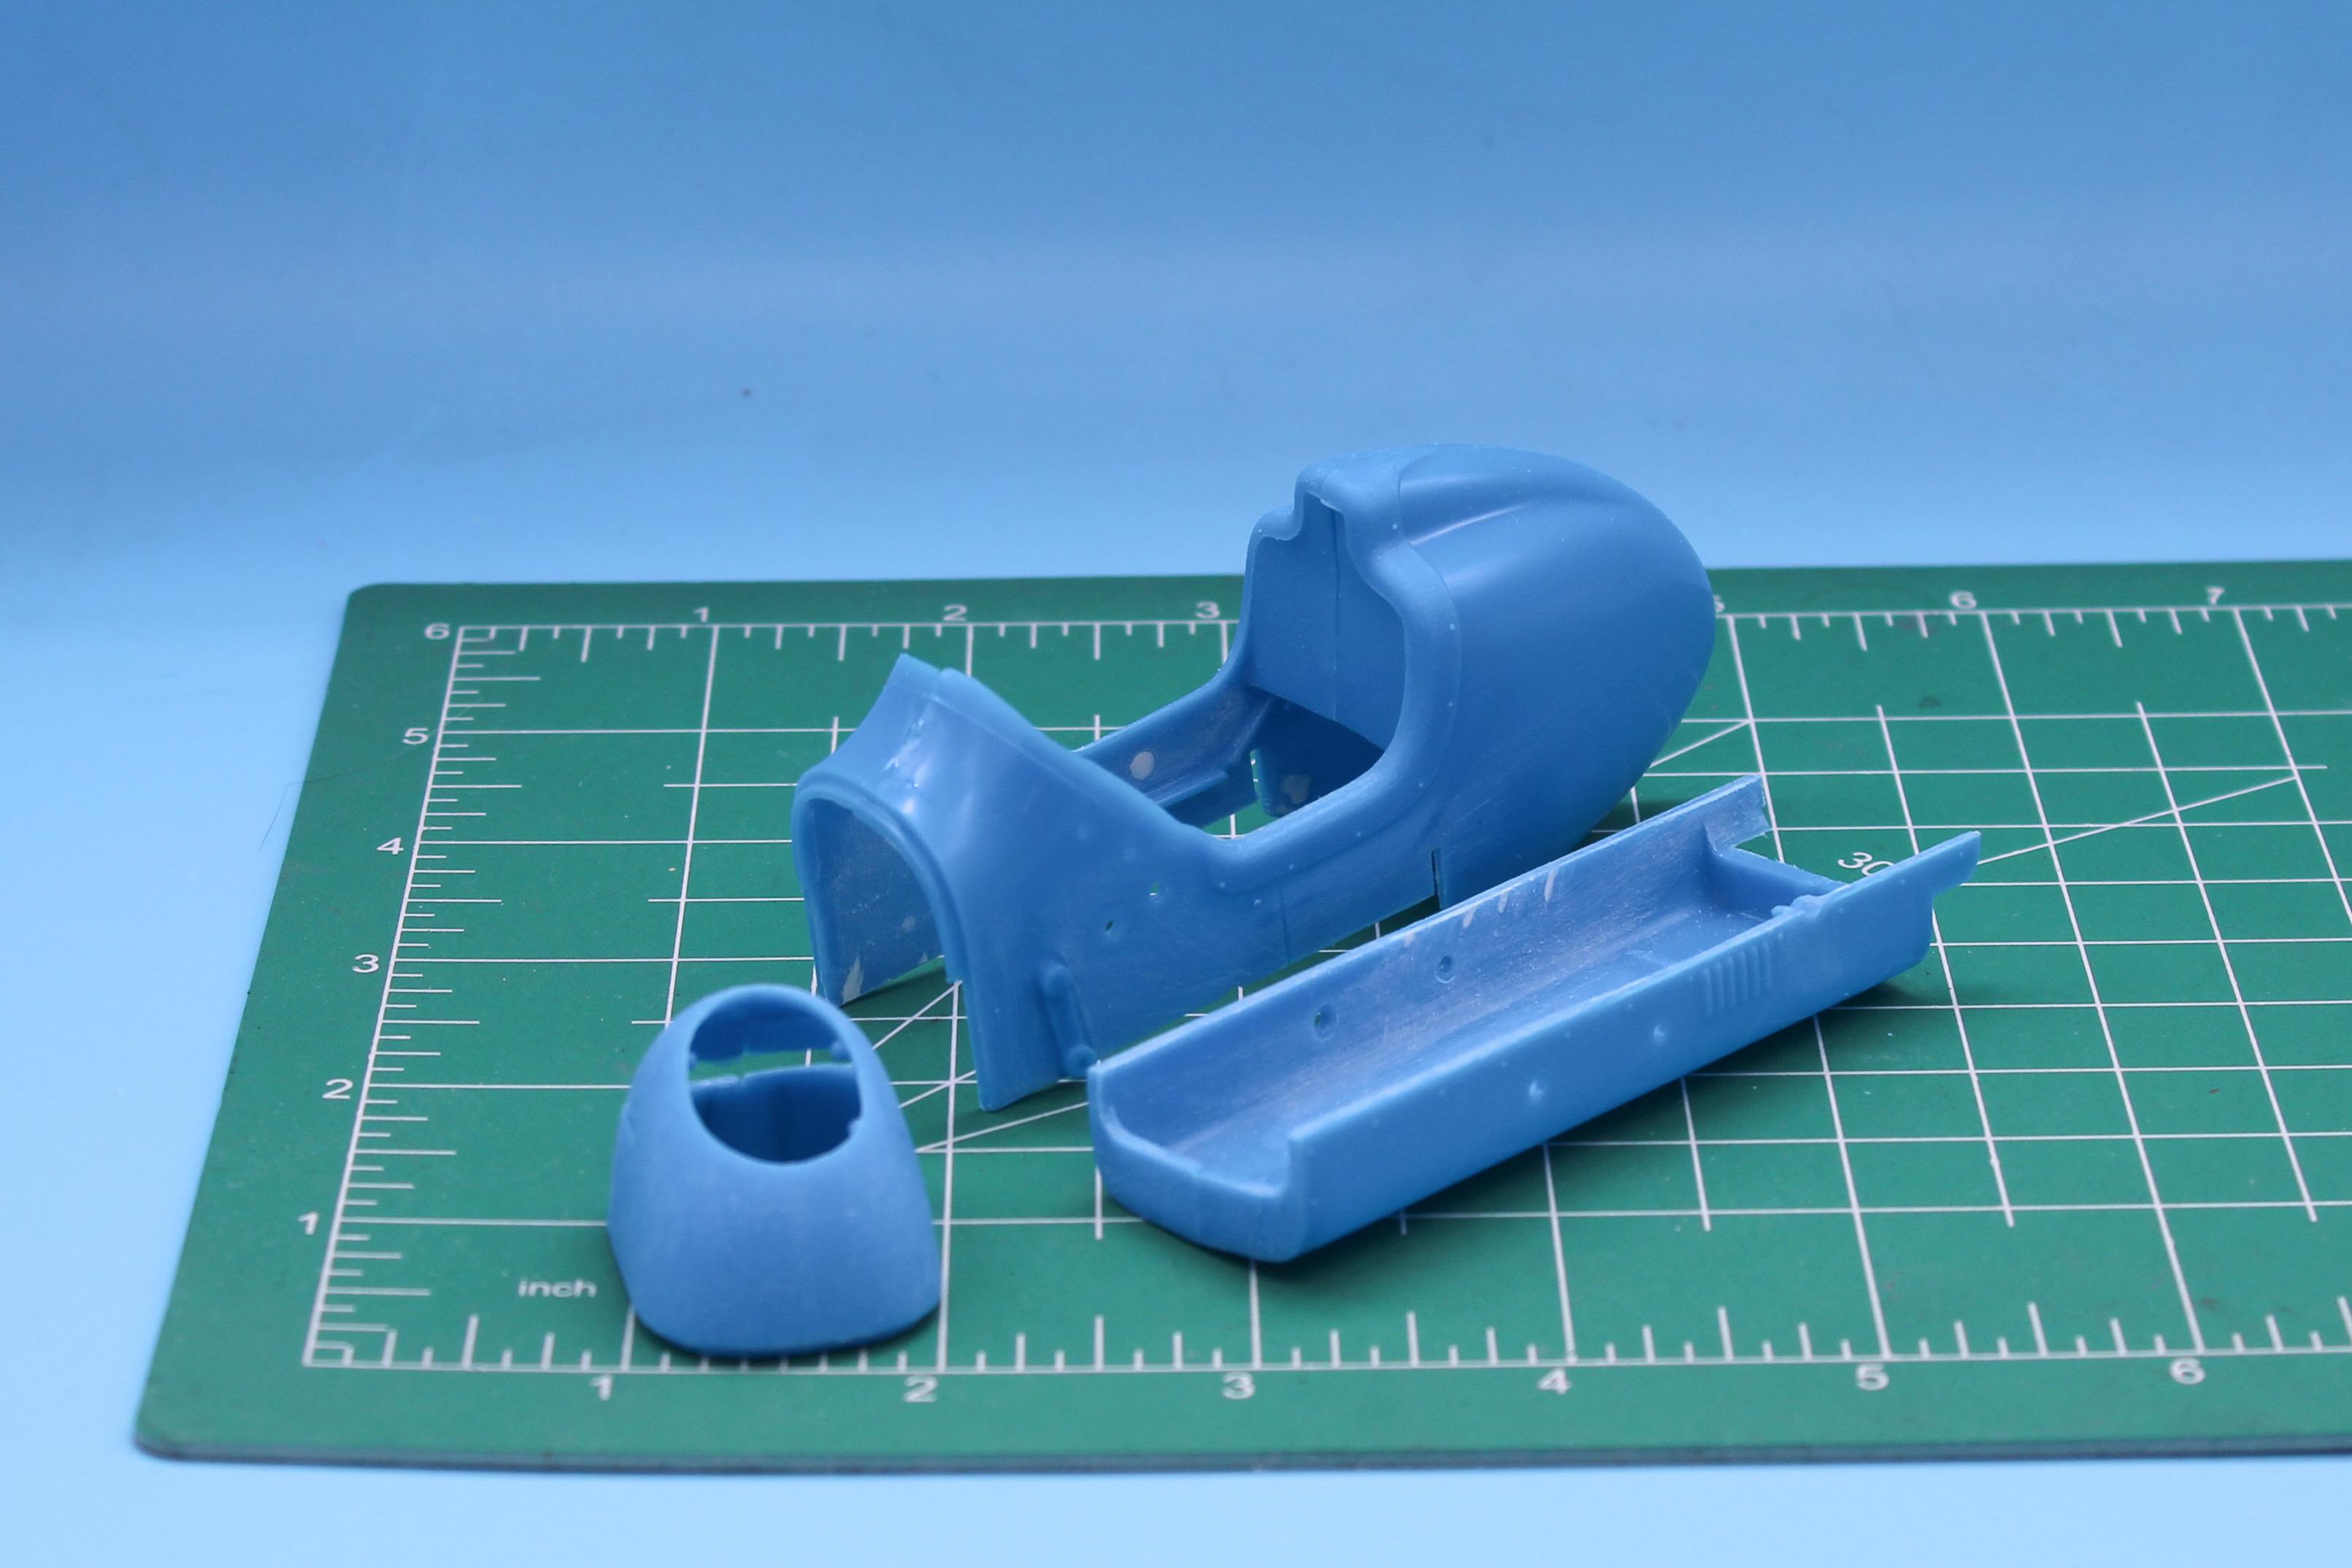
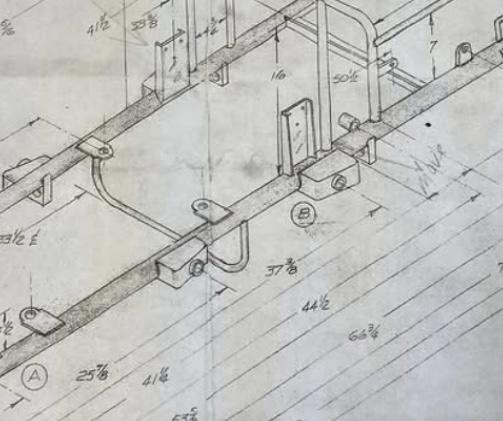
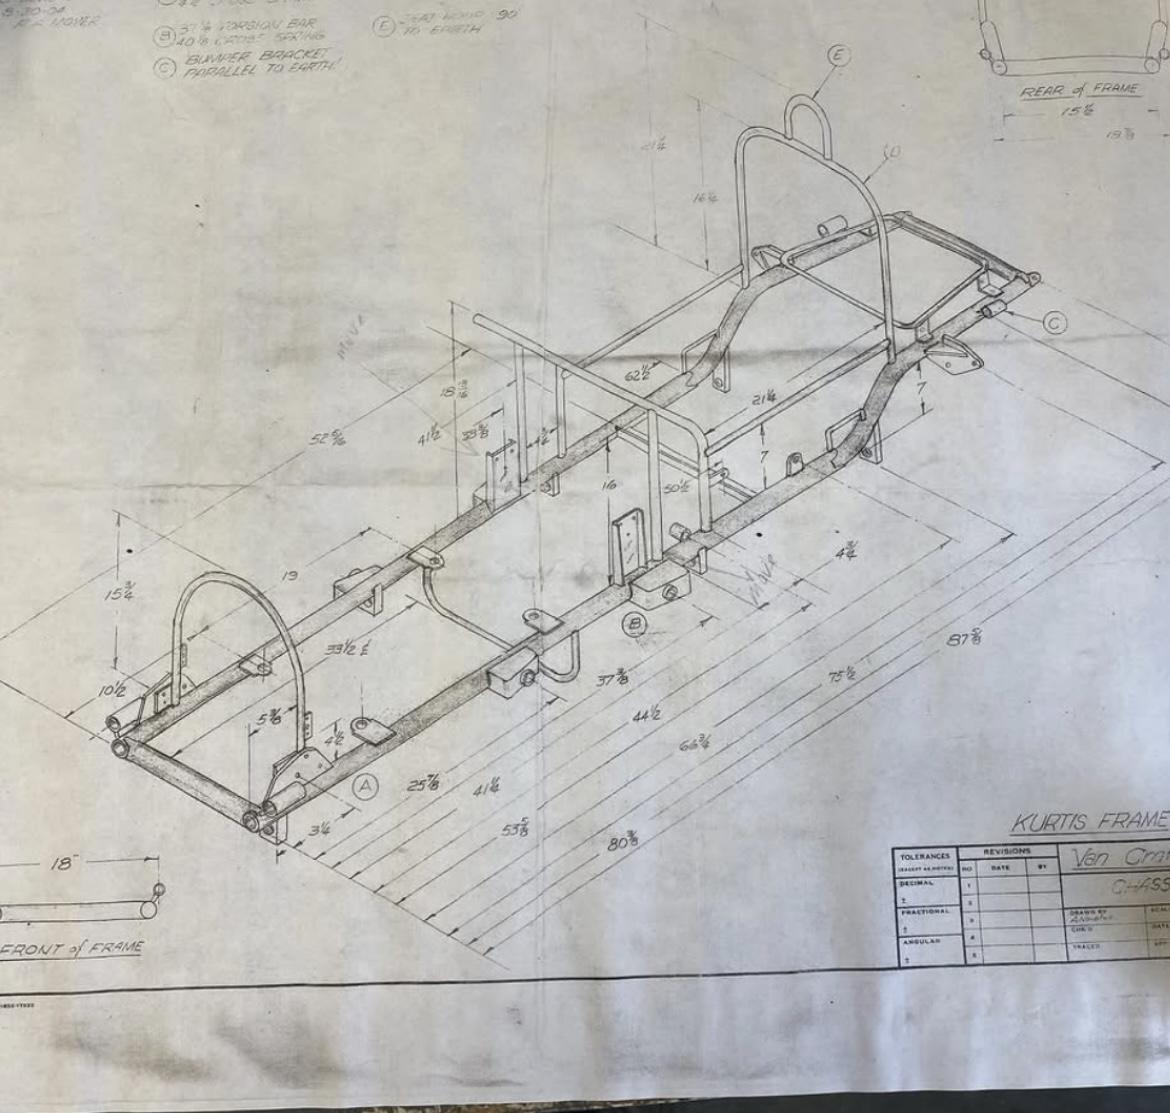
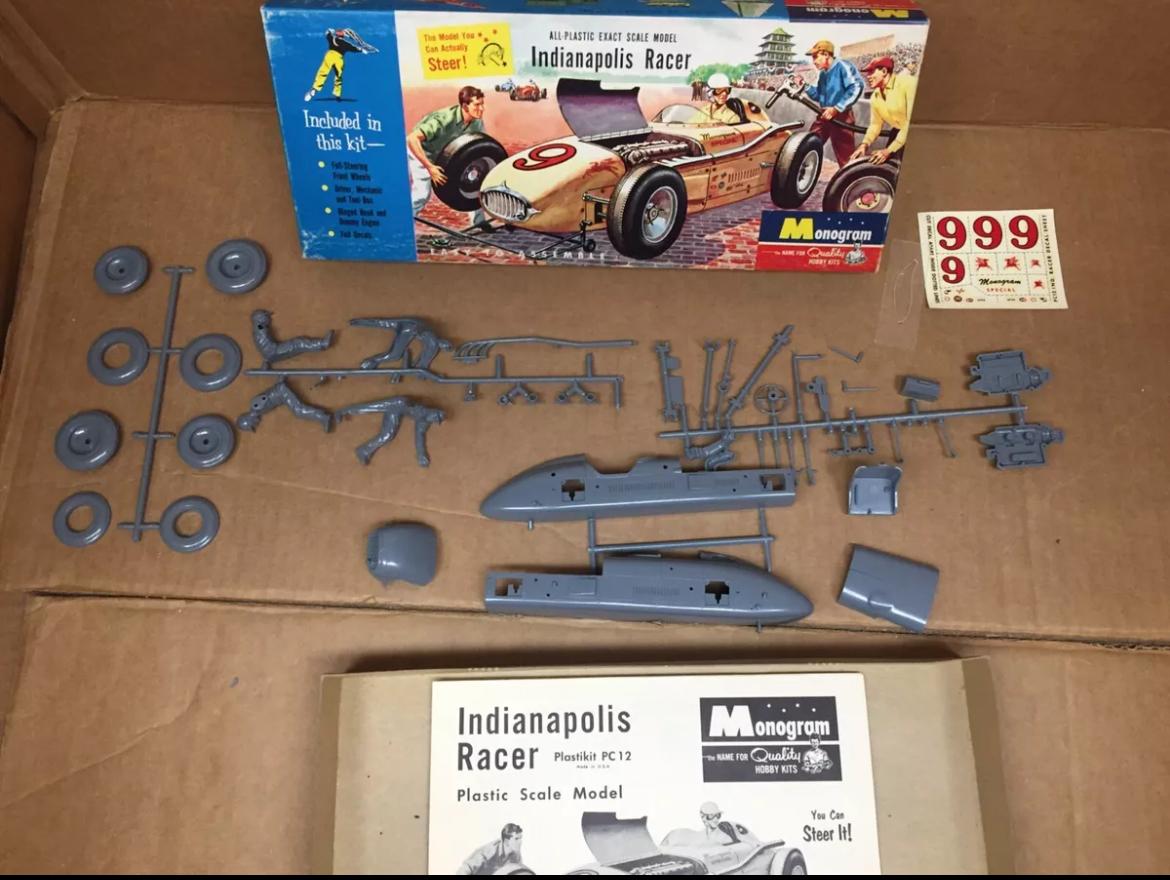
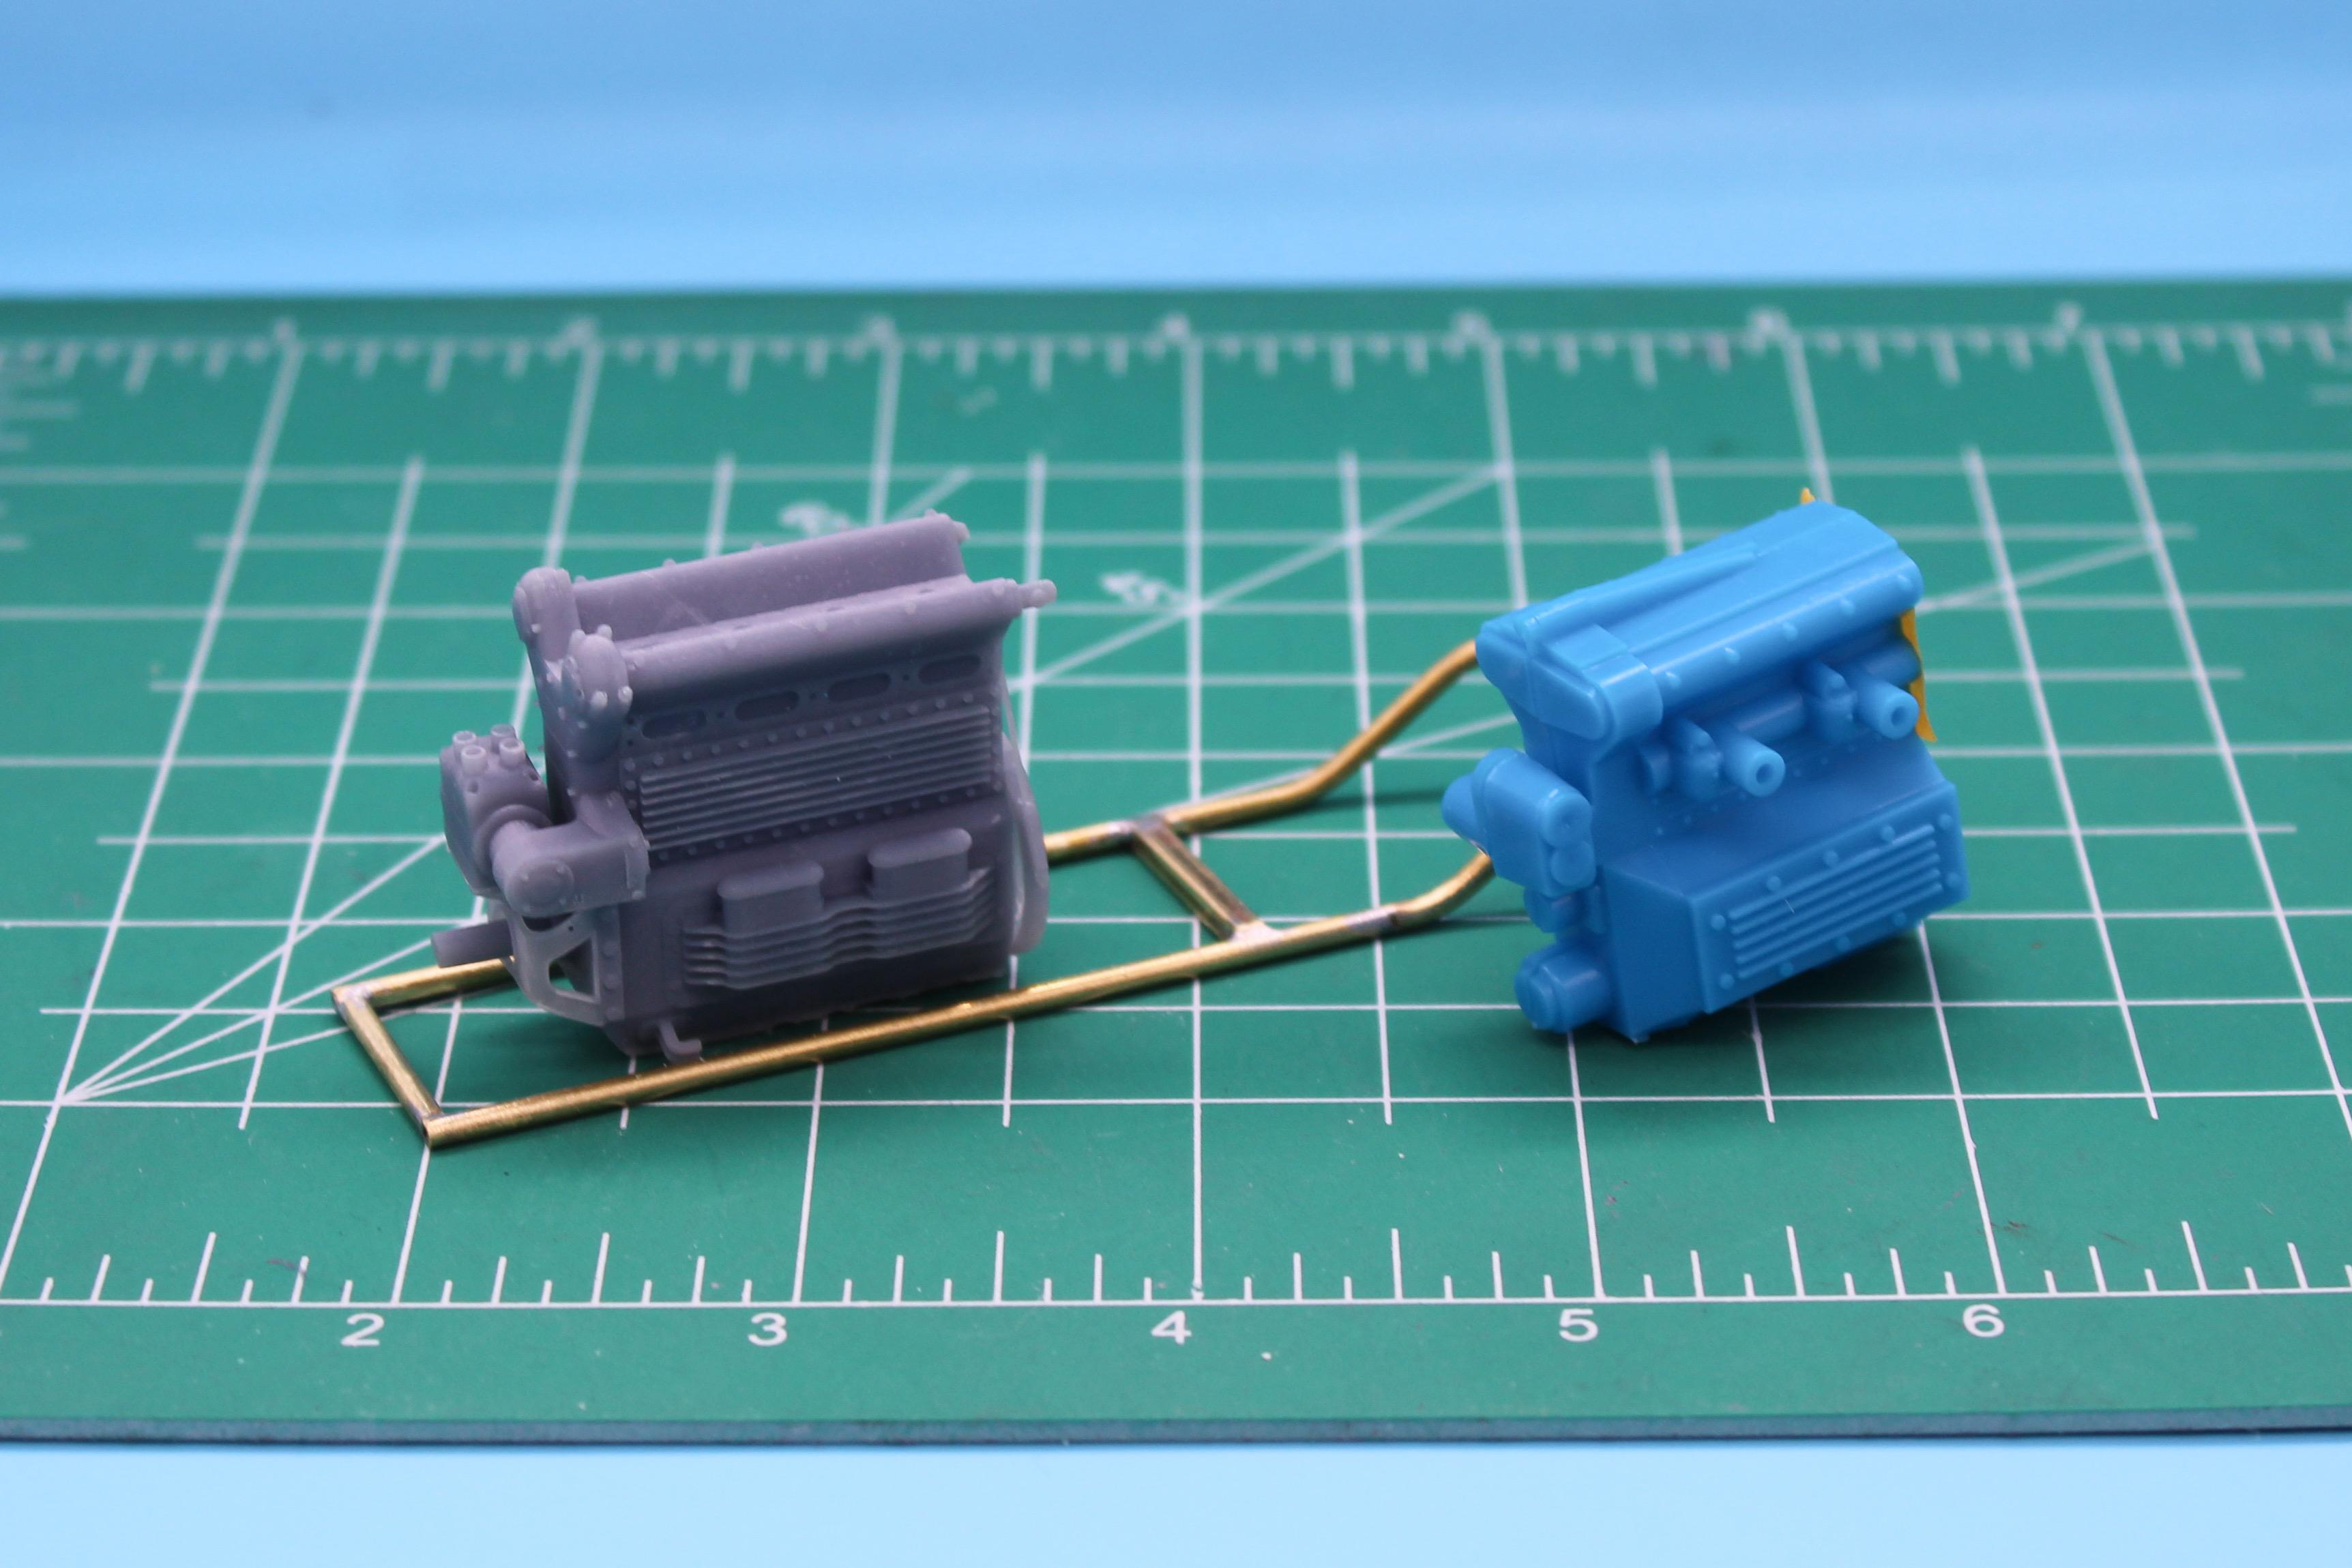
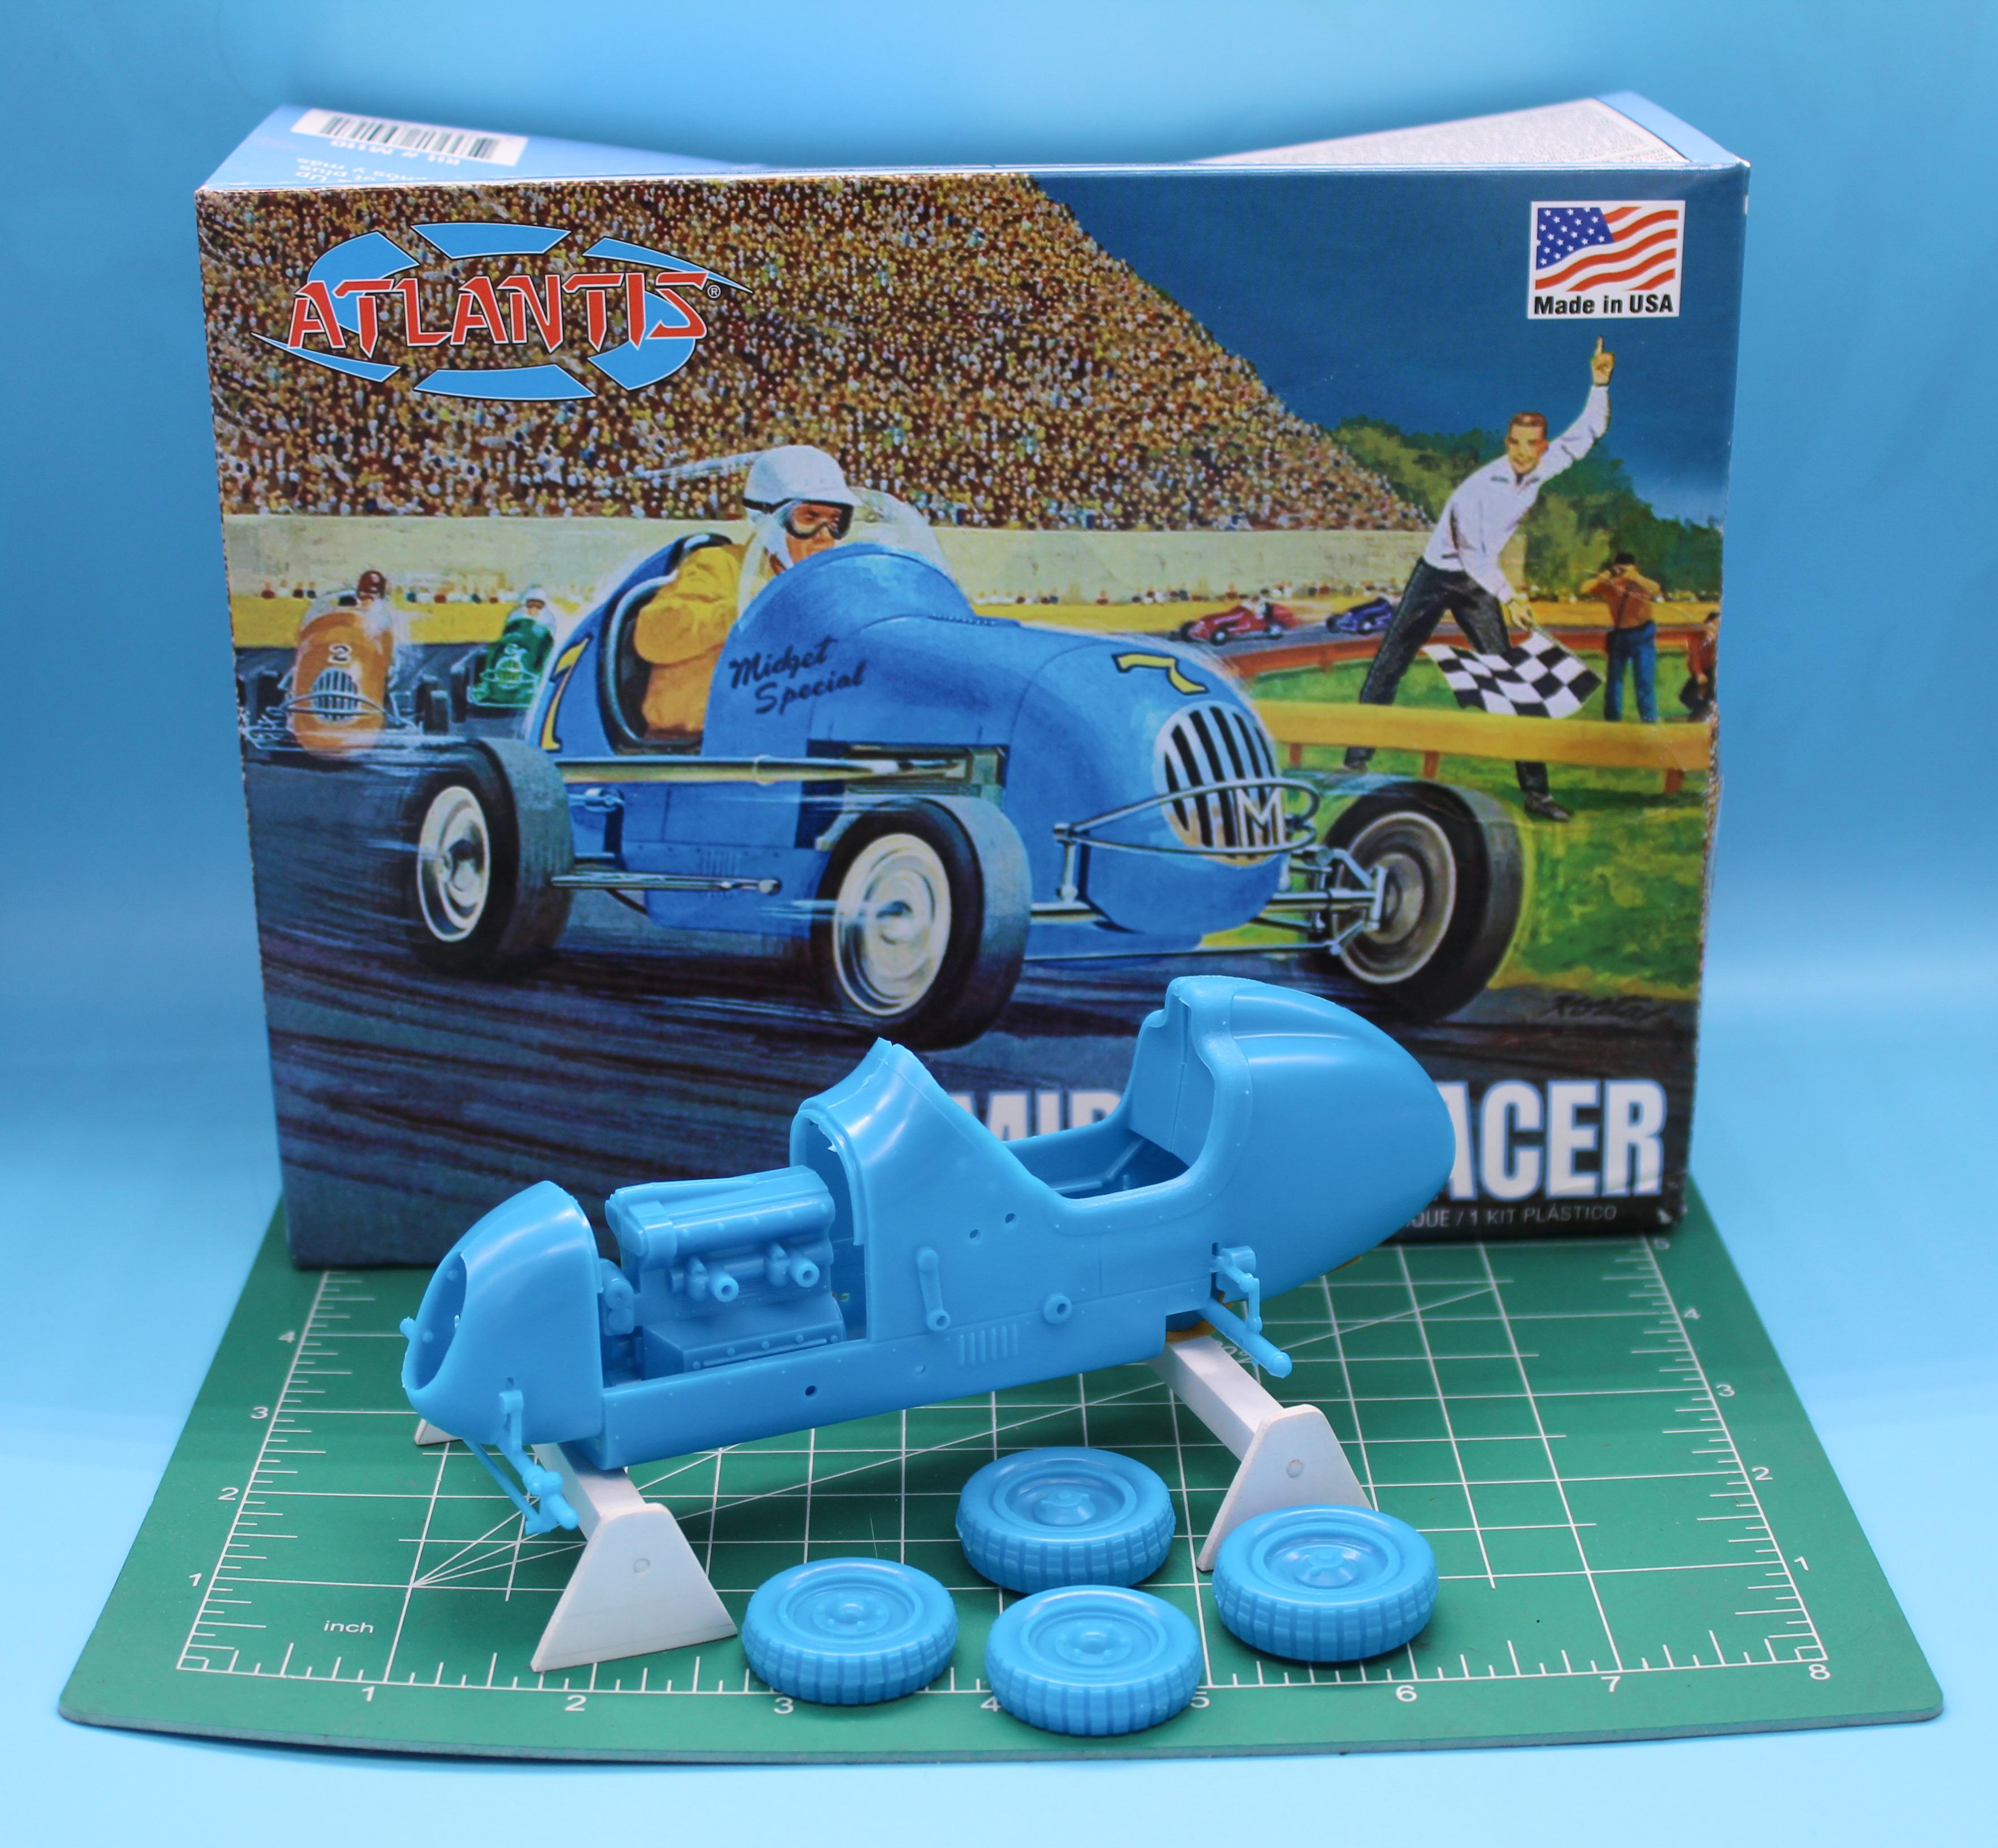
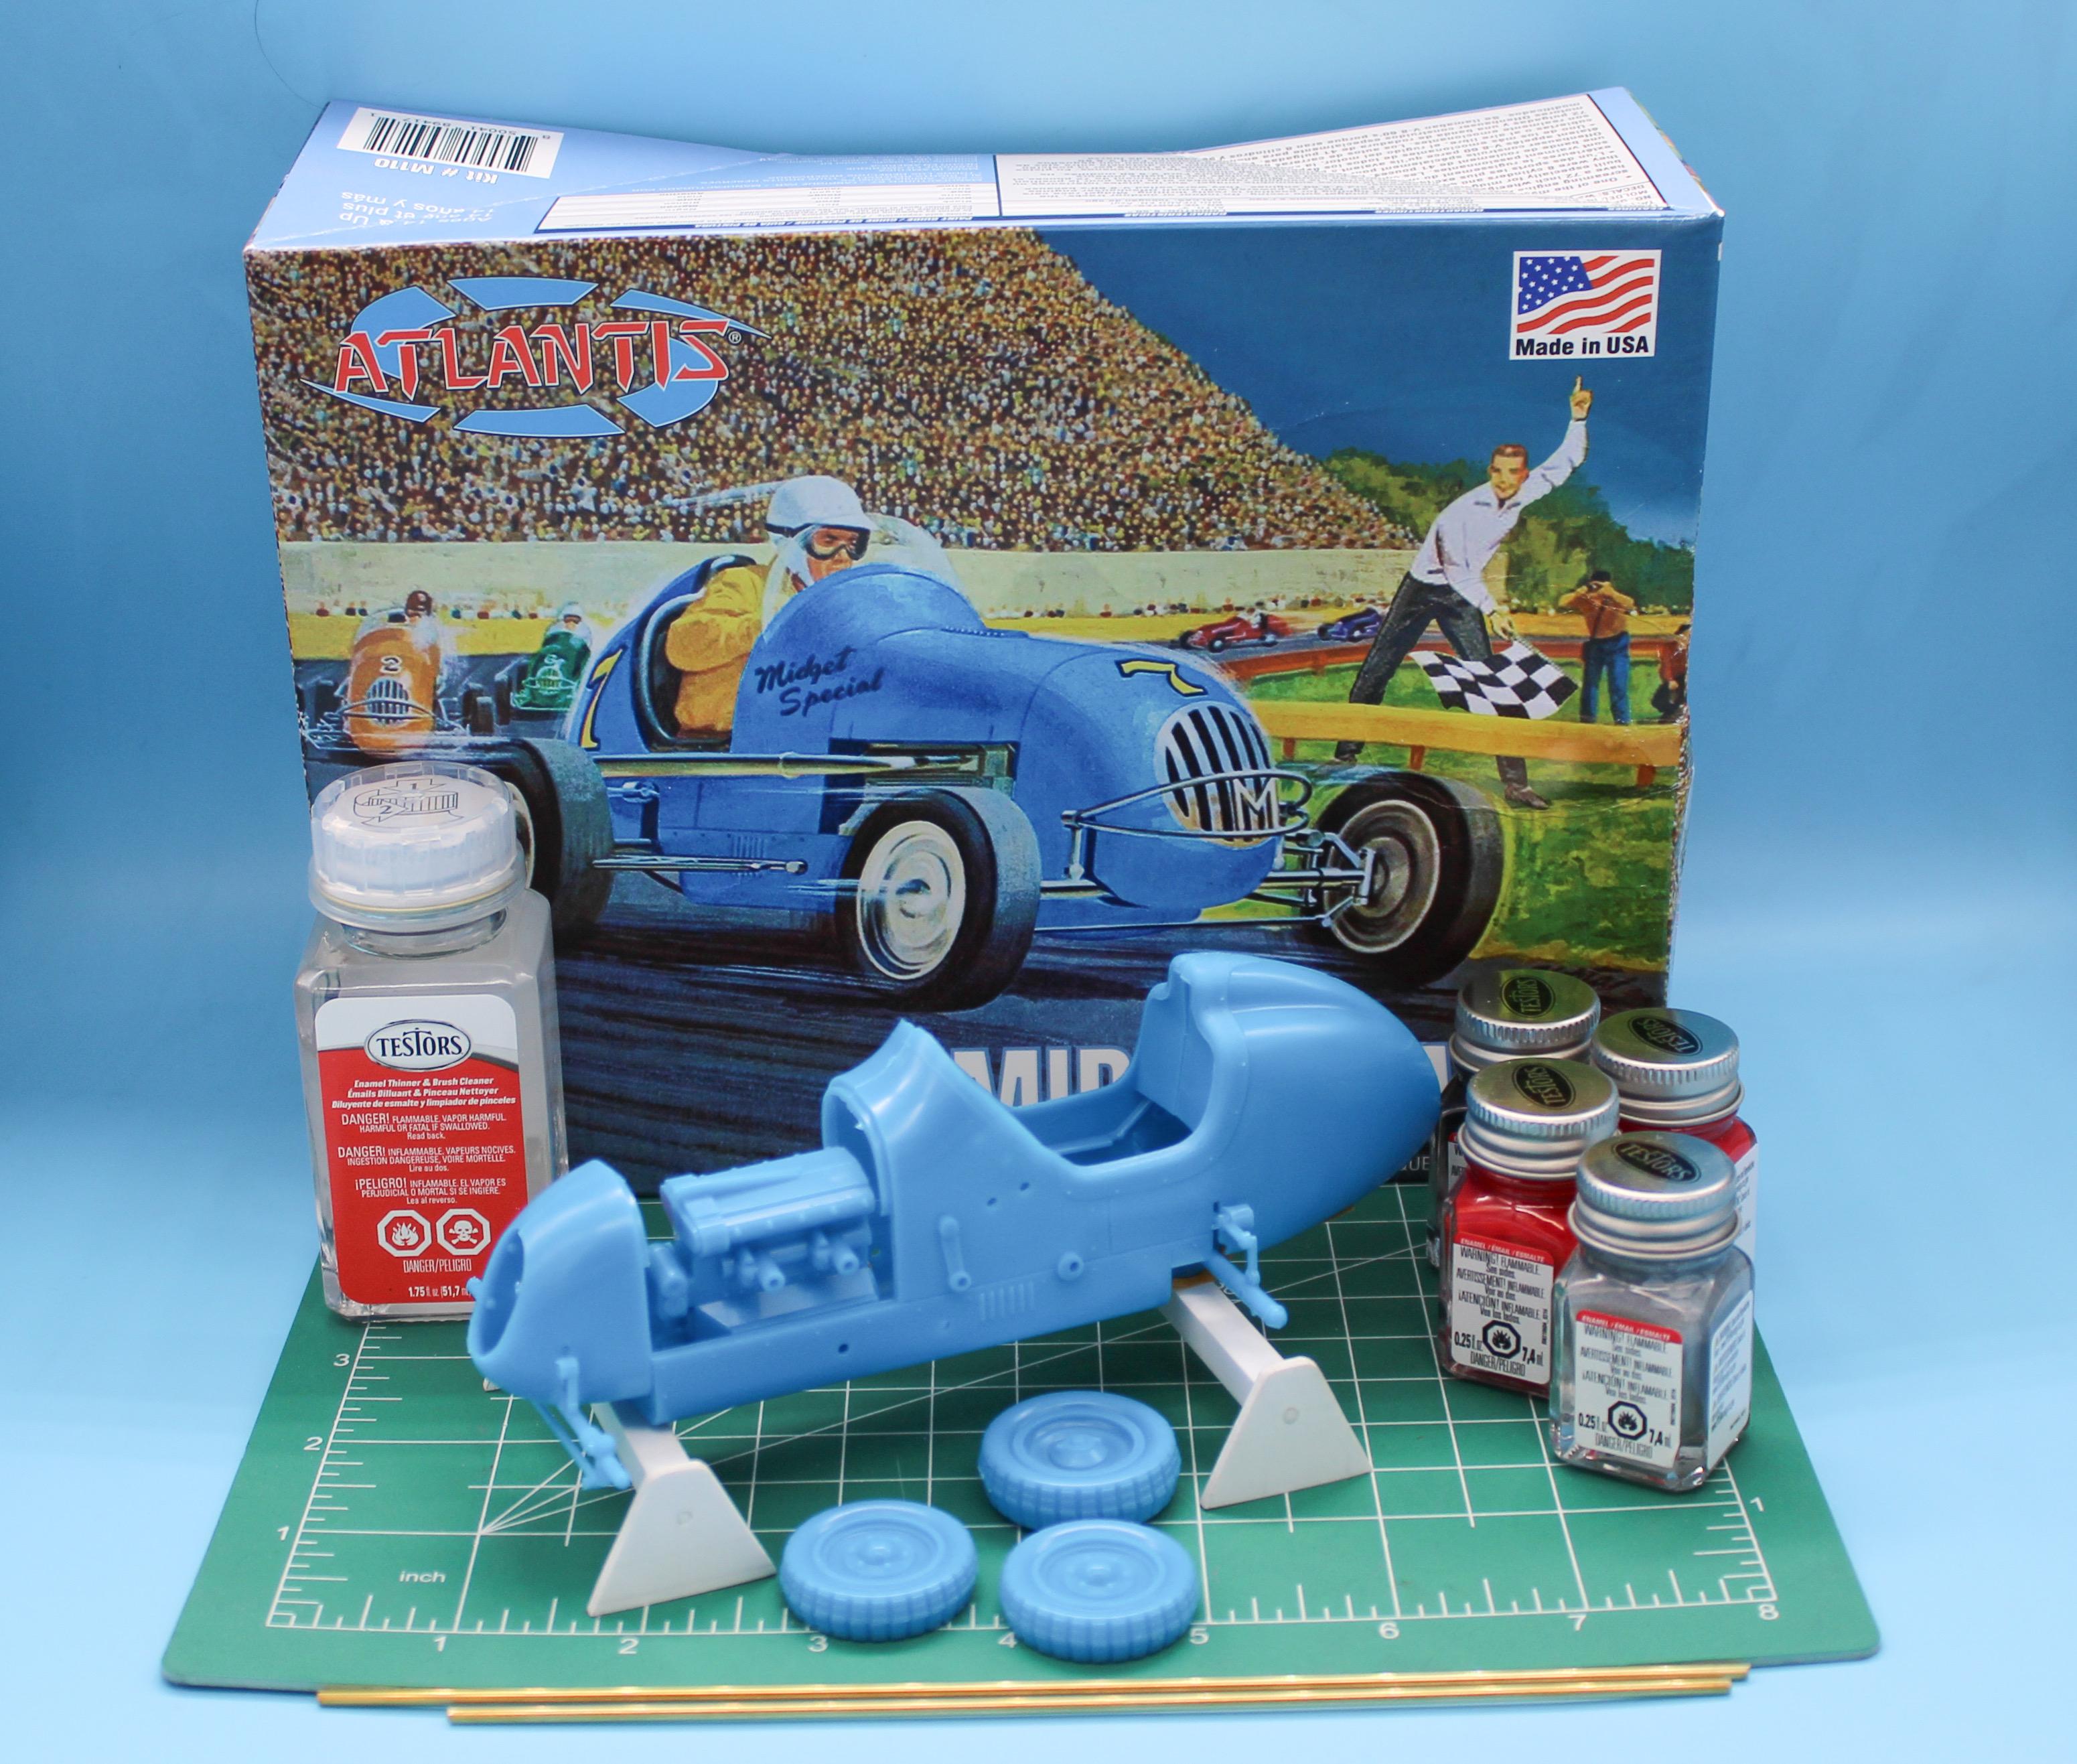
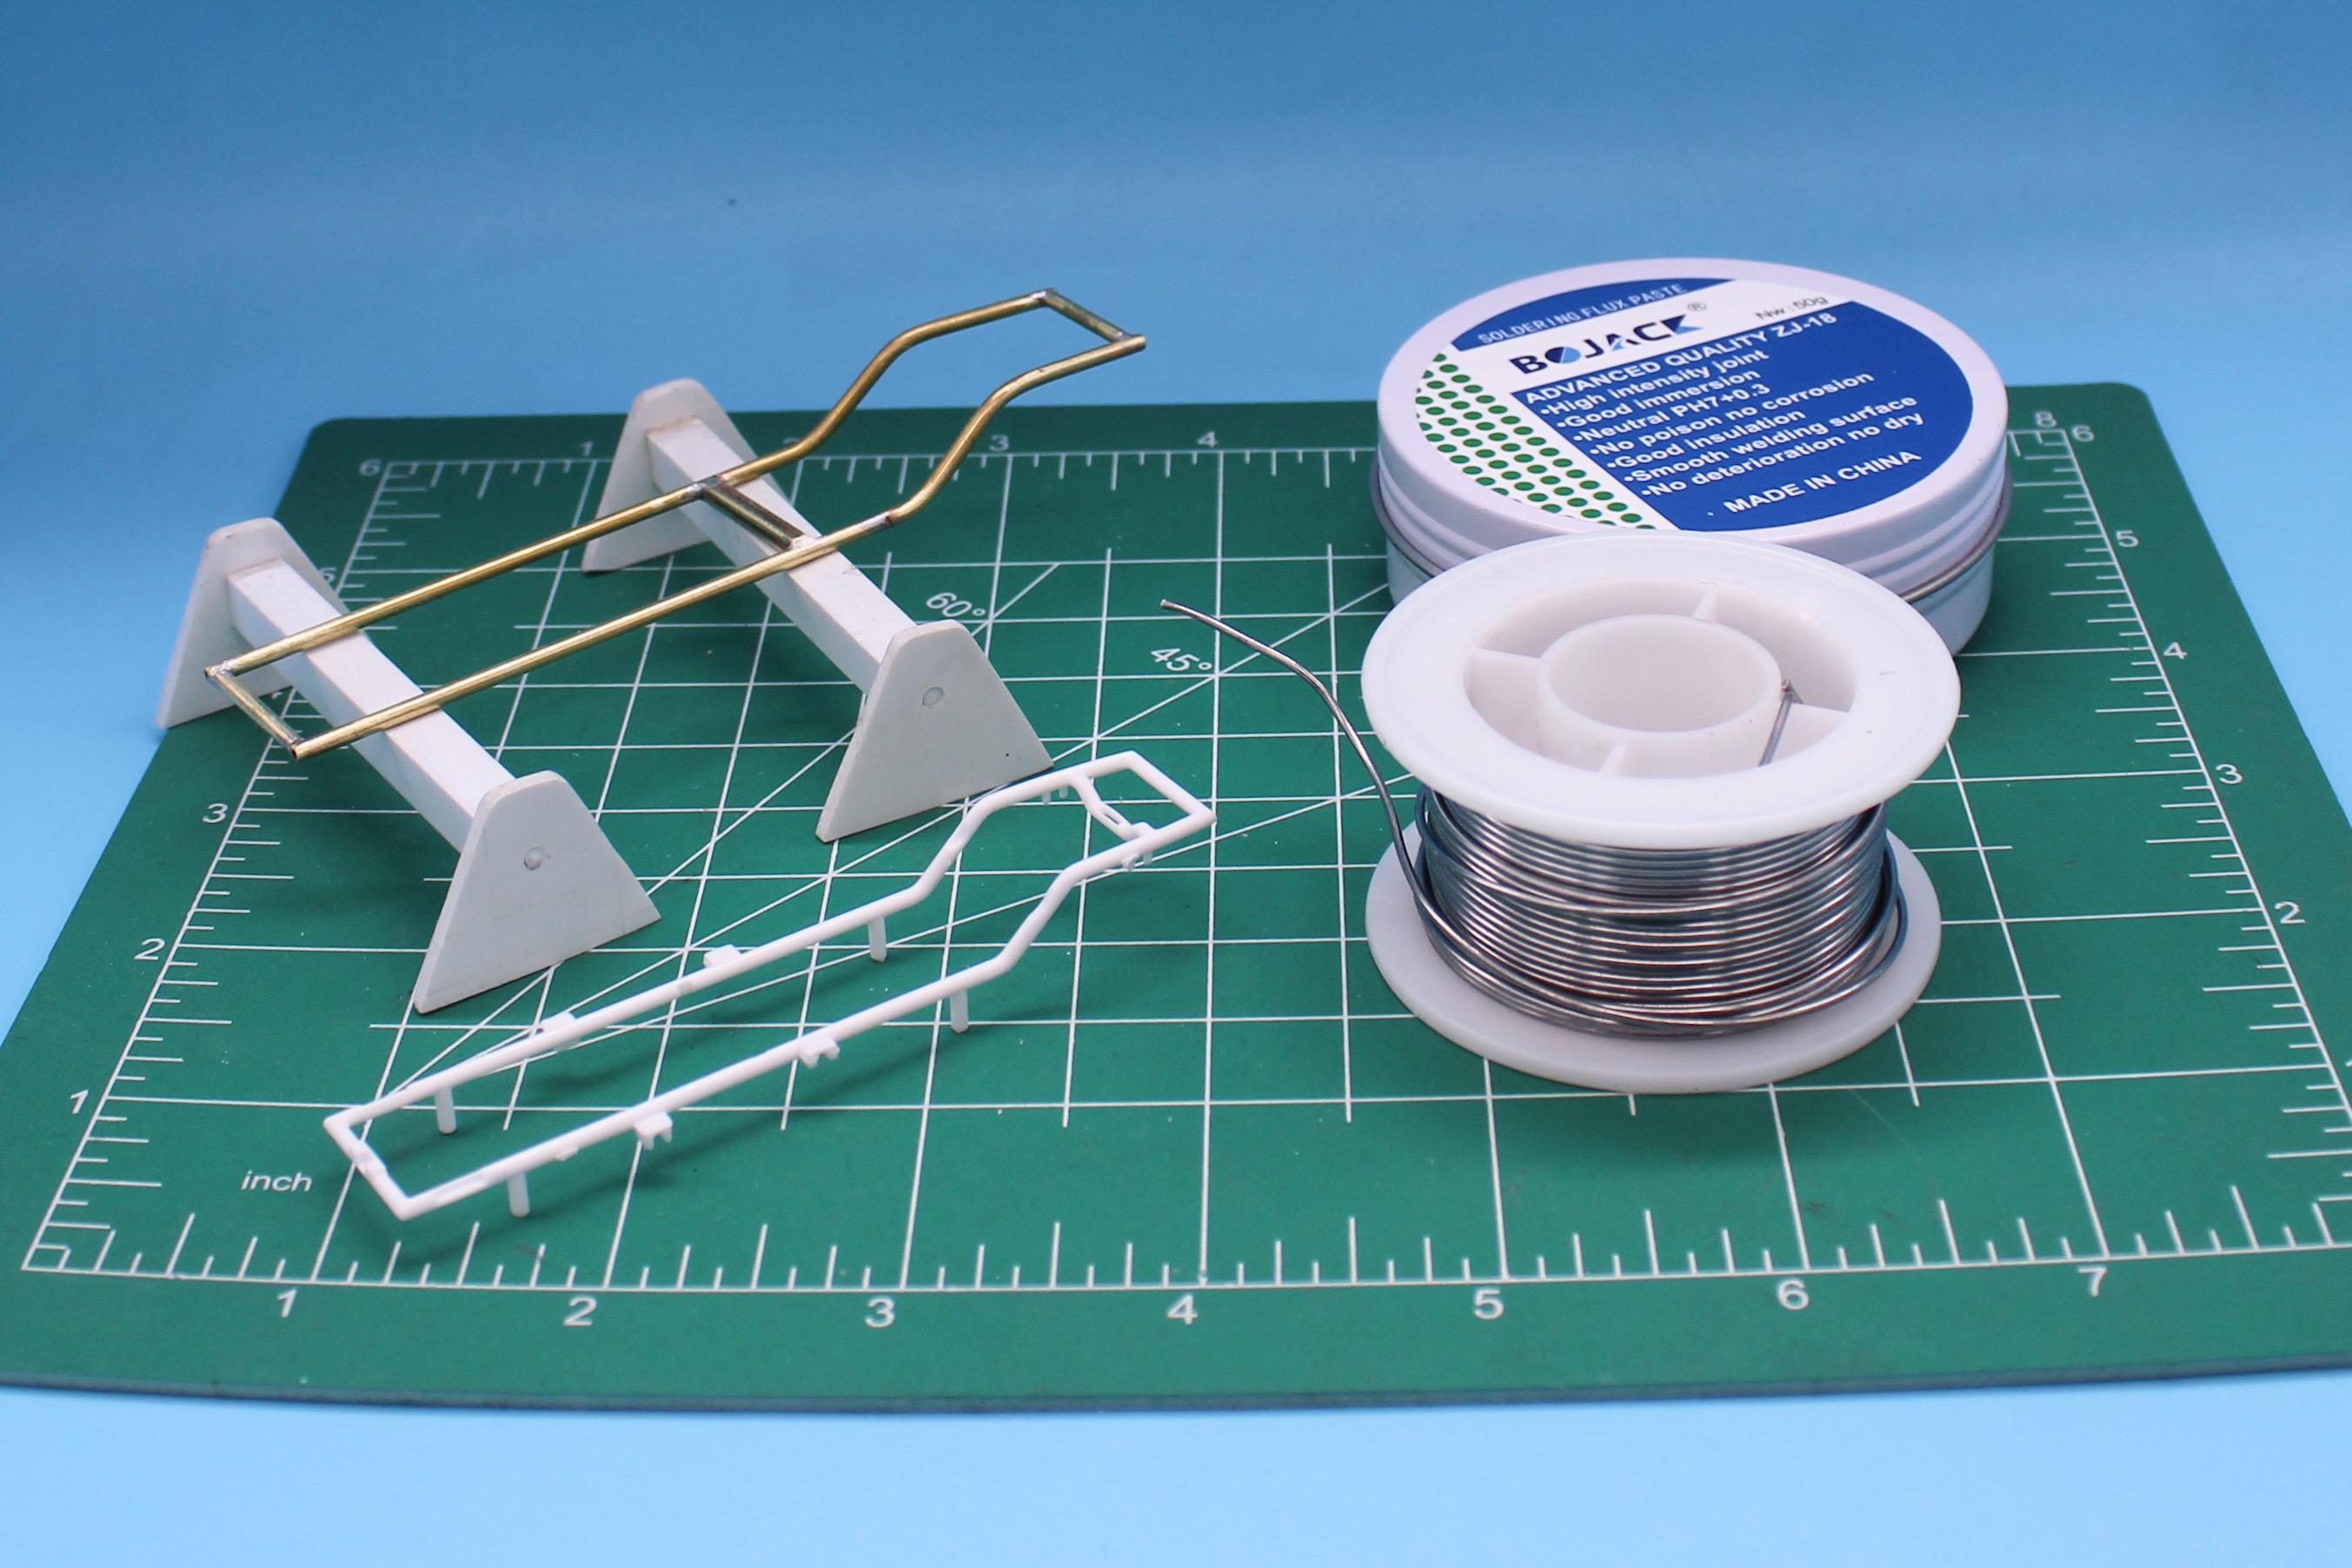
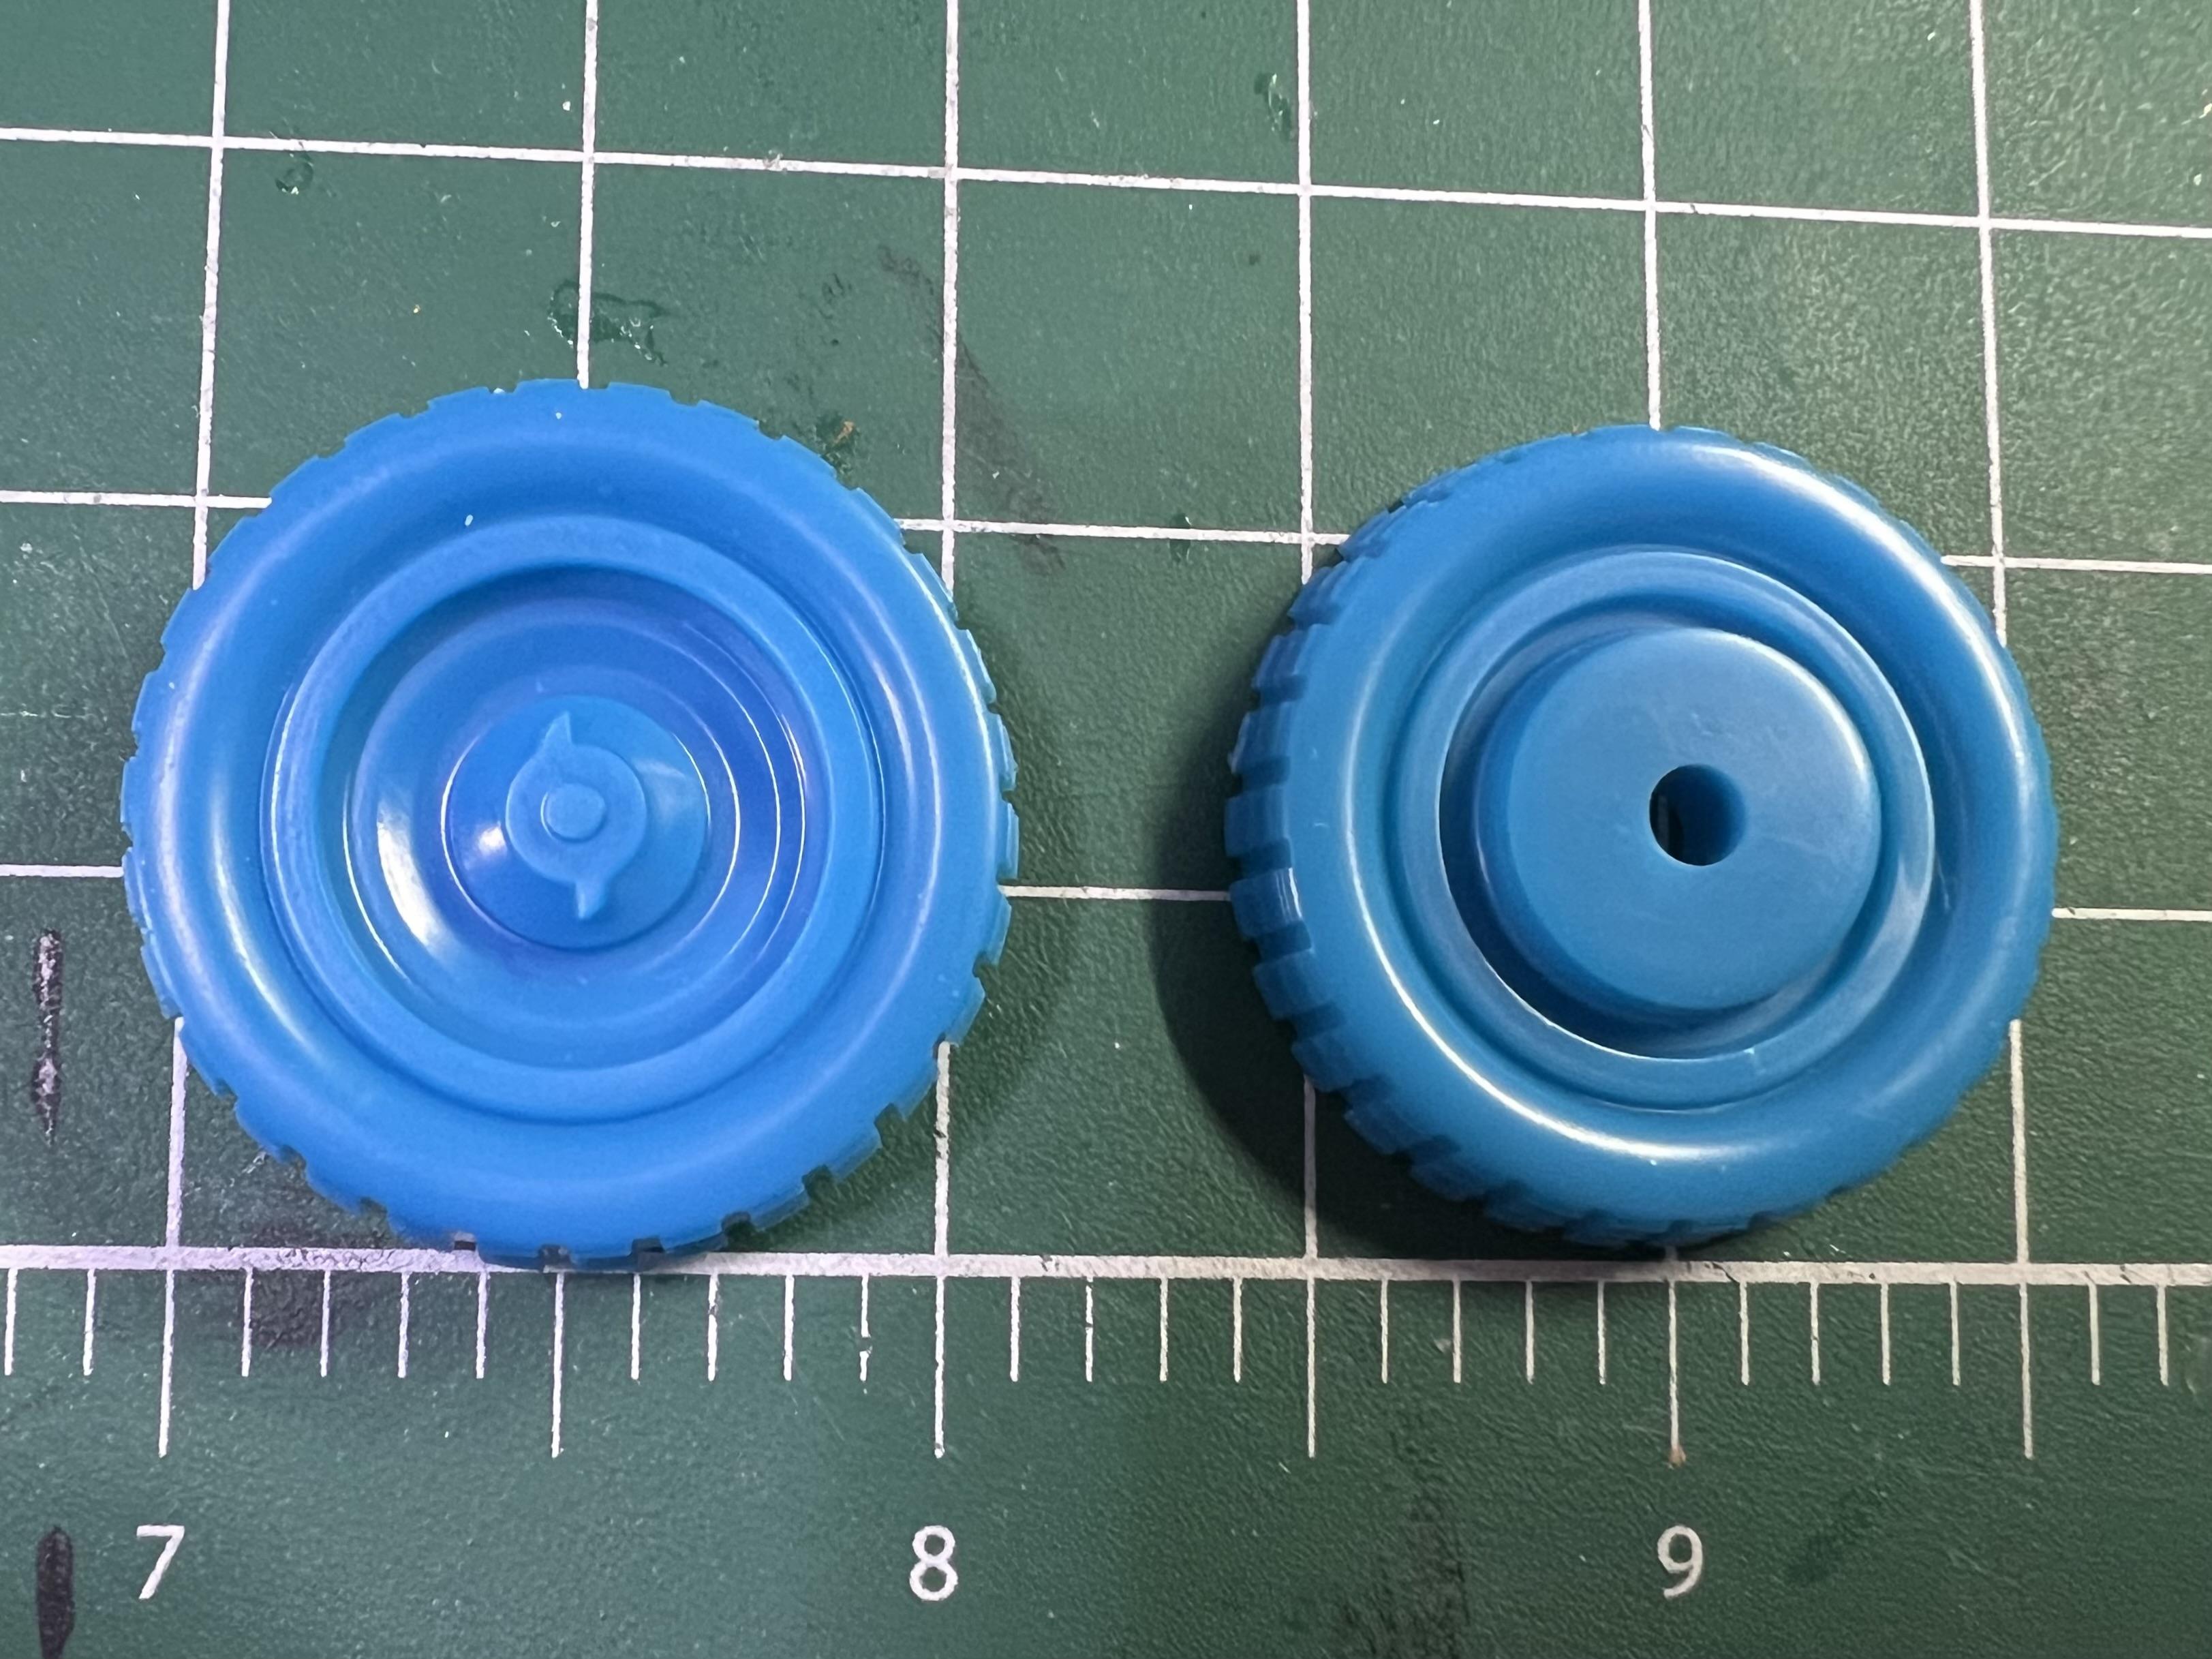
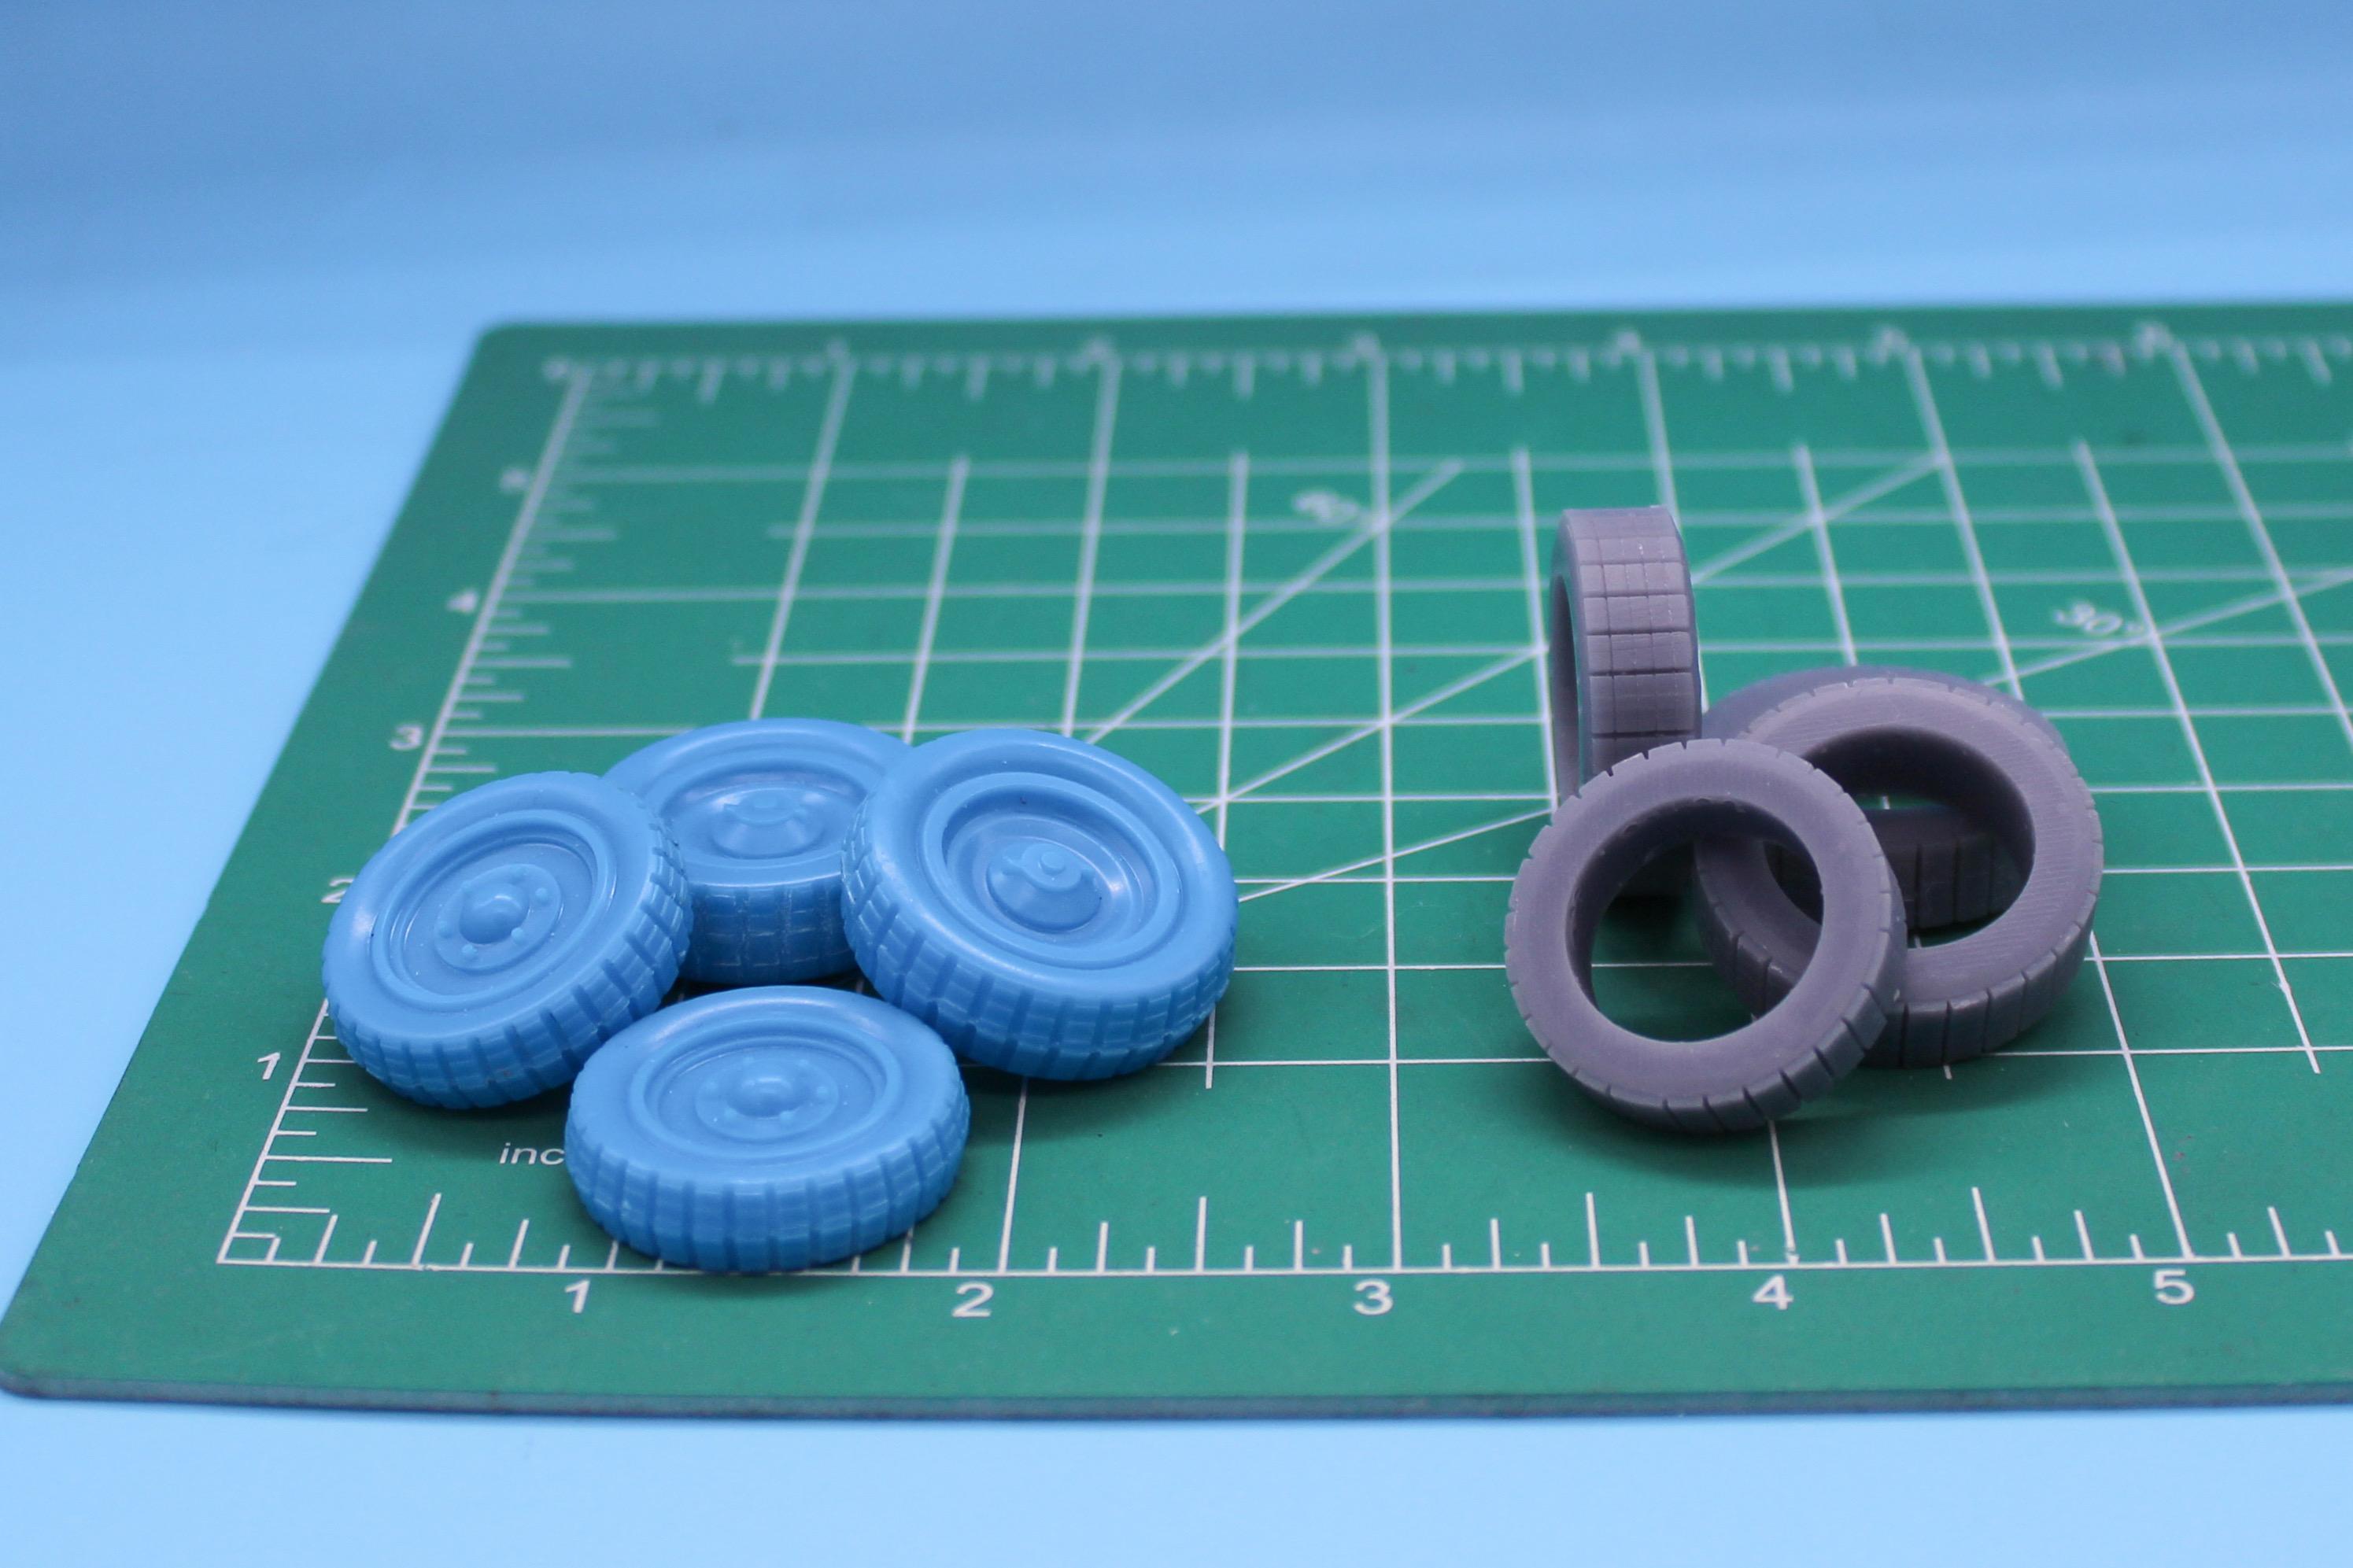
I’ve wanted to build a Midget for a while; I’ve got the really nice Revell kits with the trailers from a few years back, resin kits, 3d printed kits - but this is the first…Monogram‘s very first car kit, product number PC-1, recently reissued by Atlantis: It’s a pretty basic kit as kits go - engine detail but no frame, axle detail but one part wheels and tires, driver figure but no seat - definitely super simplified, as you’d expect for a kit issued in 1954 that was also given away by Kellogg’s at the same time as some kind of Corn Flakes promotion. If this was an original 70-something year old kit I’d feel a LITTLE obliged to just build it as it was molded and not hack it all apart and change everything…but lucky for me this one is available in Joann fabrics right now for under $20 That said, I don’t want this thing to lose the SPIRIT of the original kit - I want to keep the ‘feel’ of the kit and not just change all the parts for printed stuff and shoot it with 2k. So, first step, gathering supplies… Pactra enamels for models were available when this kit was first issued, and while I don’t have good access to those I did pick up some Testor’s gloss red, aluminum and flat black - figure it would be cool to use some period-correct finishes on this one… First up though, biggest omission in this kit is the lack of a frame, and I figured brass is a more ‘correct’ way to go about making one for this build than just printing one. Spent a straight week trying to find plans for a Kurtis Midget frame online, failed, draw a set using photos and a 1/25 Revell frame as reference and bent some rod and got a starting point together: Then, the very same evening I finished the first round of soldering, photos of a set of Kurtis plans for sale showed up online. Luckily, I was pretty close to right with my basic dimensions and now I have some decent info for all the brackets and bars and whatnots I need to add to this still…more on that as I get to it. Other major thing I want to address on this build is the one-part wheels and tires. I like the distinctive blocky tread pattern in particular, but I’d like to add some detail to the wheels and make them separate pieces… My original plan was to glue the halves, clean them up, make a mold, make a little metal-tube dam and resin cast just the tires and just the wheels and paint and detail accordingly. Unfortunately, and I’m not sure if this is only true of the recent issue of the kit or older versions too, the distinctive square-block tread pattern doesn’t QUITE line up right when you mate the two wheel halves, no matter what you do. I messed with the parts I have from 3 of these kits for a couple of hours and picked the ones the seemed to work best but I never got a PERFECT set…then I tried re-scribing the tread pattern into one of them and it wasn’t really coming together. SOOOOO, first instance of non-period-correct building techniques was to model some ‘blanks’ of the tires and print a bunch: Now, I’m not ANTI using modern tricks on this build at all - I don’t want to not use the best tool in my arsenal if that’s the best route…my plan is to use these kinda blocky too-square tires as a starting point to sand in the natural bulges and curves that the kit parts have and then use THOSE as a master for casting a set. I COULD model those bulging sidewalls and tapered treads in 3D, but I think it’s going to be way faster and easier to do it by hand with some good old fashioned sanding… And…that’s about as far as I got so far - I did pull out a 3D printed (and much better detailed) 1/25 Offie to compare to the kit motor - there’s some fairly obvious differences. Anyone know if the printed example would be correct for early to mid fifties? More research needed… Thanks for looking - more soon, soon as I’ve done more!
-
Before you strip it, I would check what Competition Resins suggest for removing paint from their products. Some resin will be ruined by paint stripping methods that are just fine for styrene…
-
Who was building in the 60s?
OldNYJim replied to OldNYJim's topic in Model Building Questions and Answers
What use did the army have for airbrushing, out of curiosity? -
I can’t believe it’s two years already. I was a fan of Roger’s work, and this is a fine tribute! Really nice idea
-
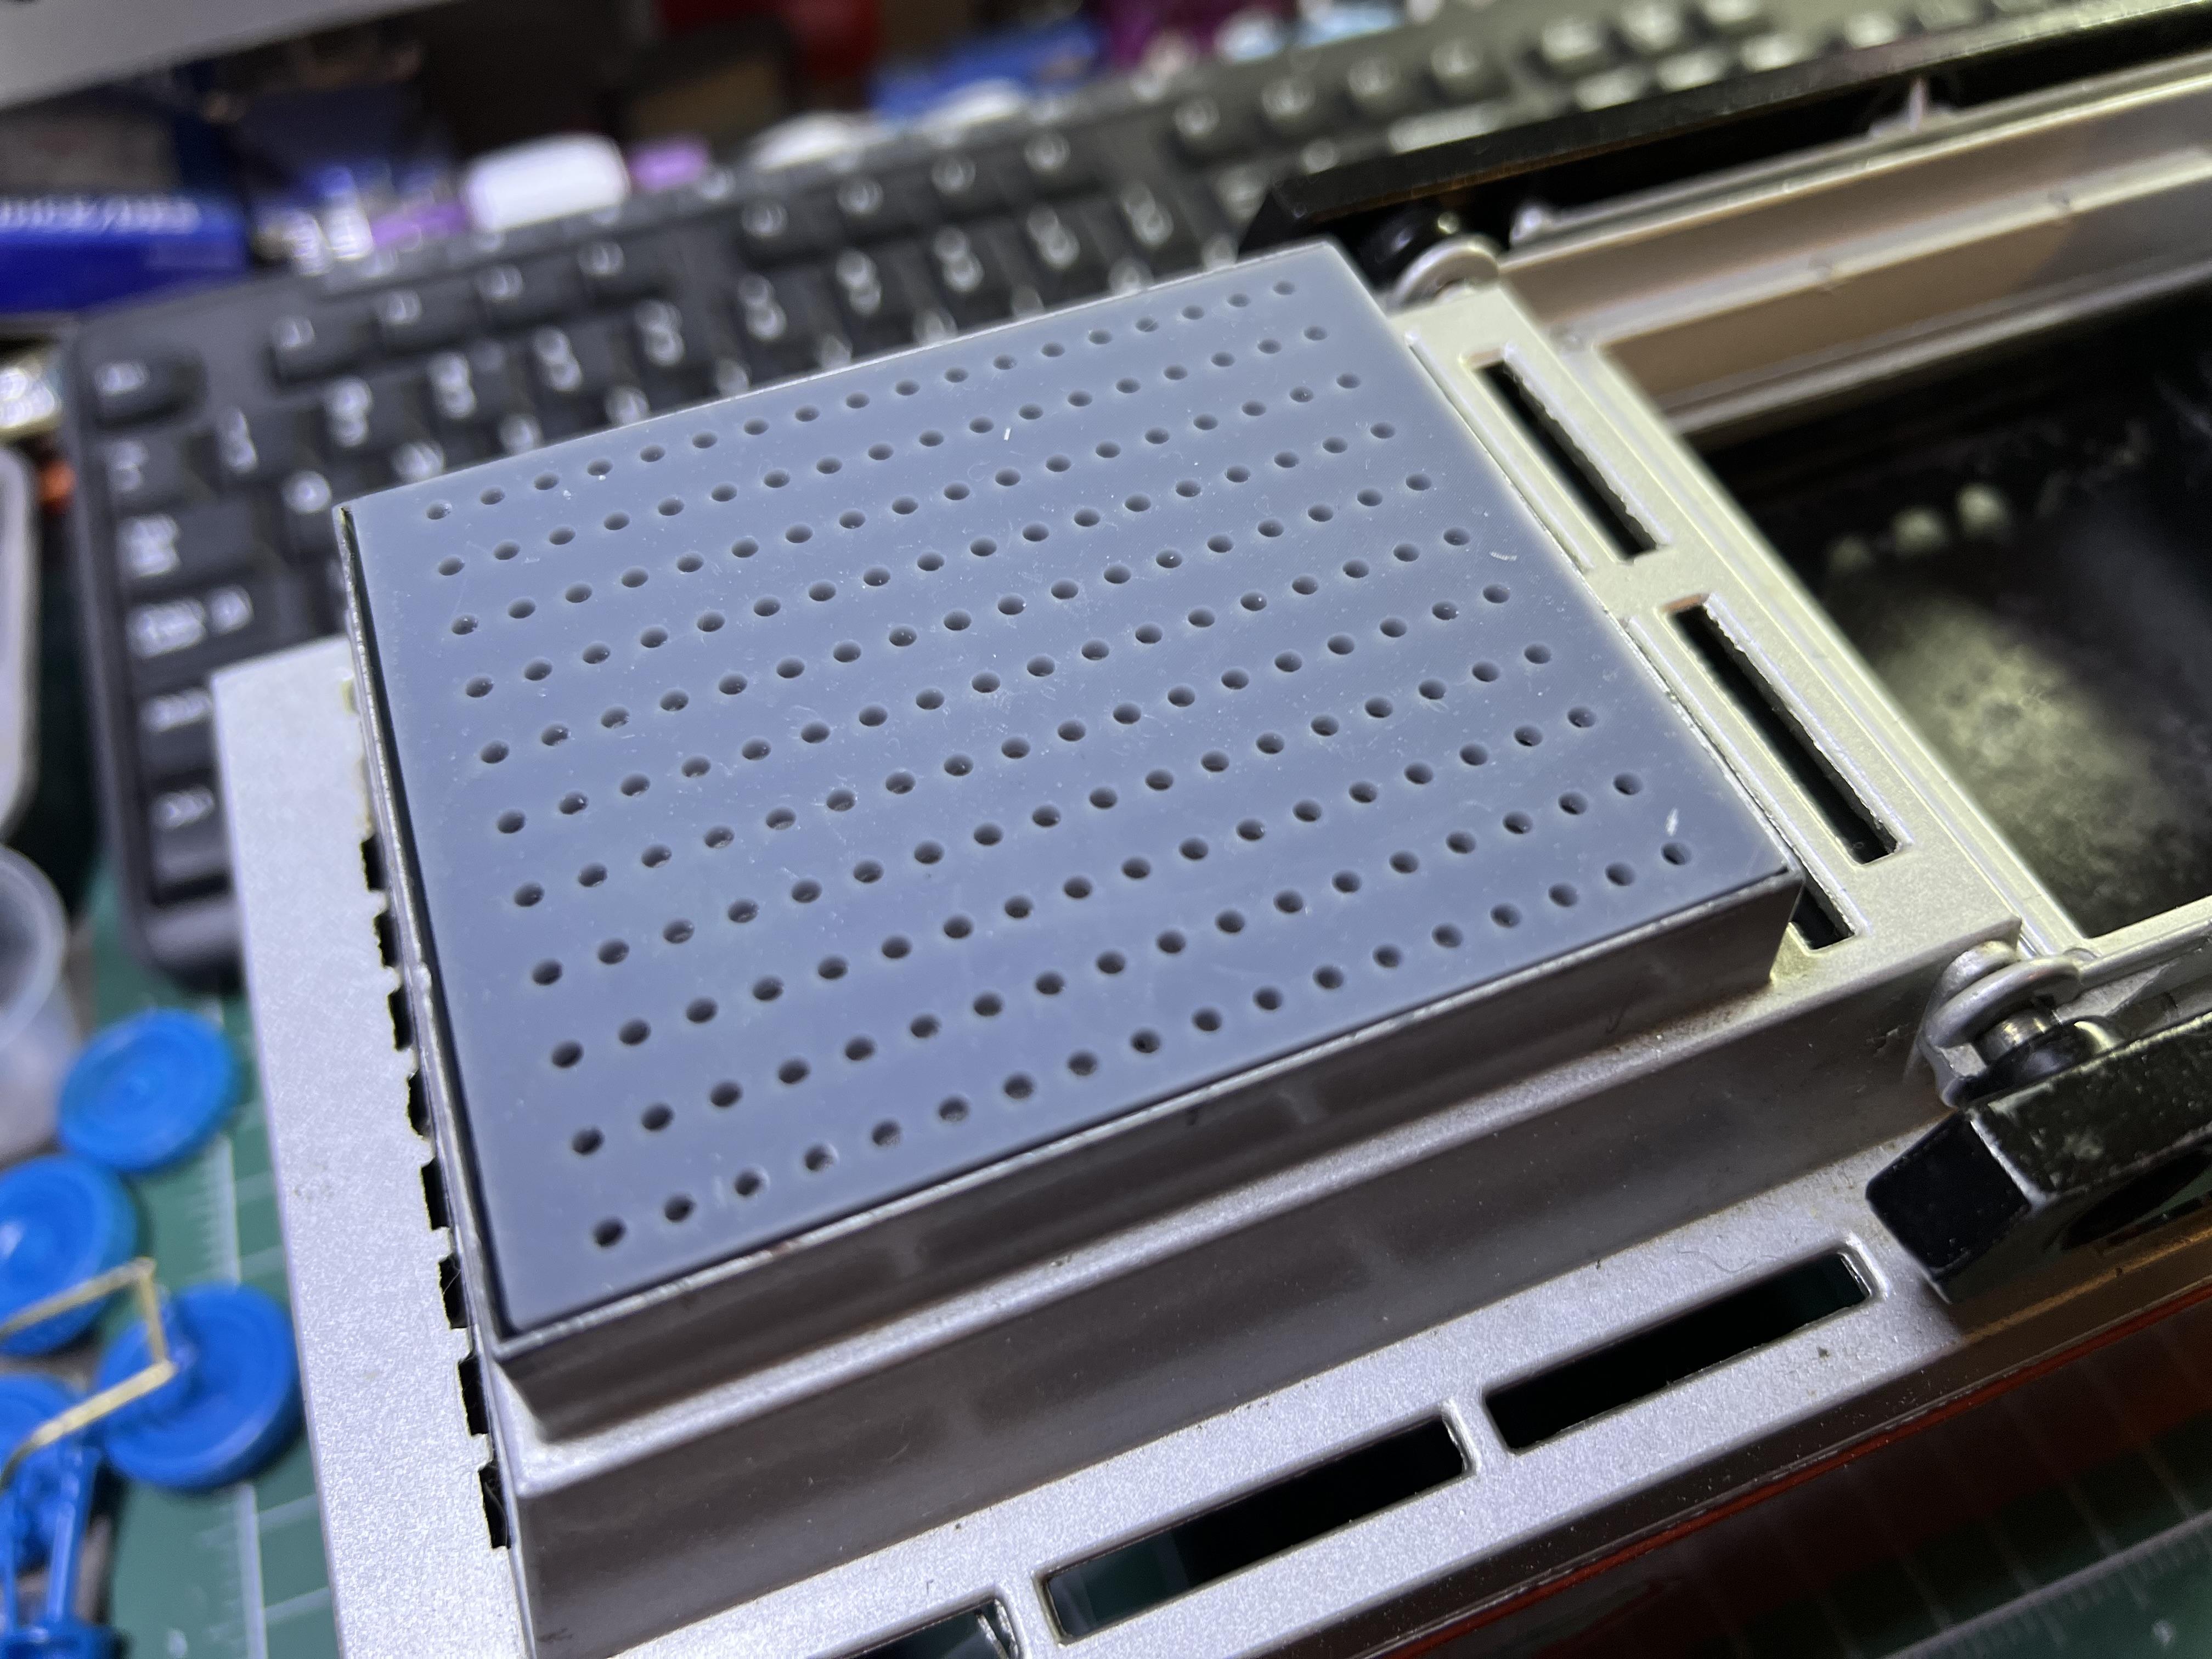
Bringing this old thread, and post, back from the dead…I found a working machine with good suction SUPER SUPER cheap…but, no black plate for the platform. Does anyone happen to have a decent picture of this commonly-missing plate, by chance? I’m wondering if I can 3D print something to work (and do a service to other people with the same issue by putting the file up online somewhere…) I could fab something out of metal easy enough, but I’m curious what the kit part looked like top and bottom…