OldNYJim
-
Posts
246 -
Joined
-
Last visited
Content Type
Profiles
Forums
Events
Gallery
Everything posted by OldNYJim
-
Wonder if this will get a ‘regular’ box release too? I don’t NEED the tin box, but I’d pick up the kit - love this era of drag car. How is this kit? Anyone built one?
-
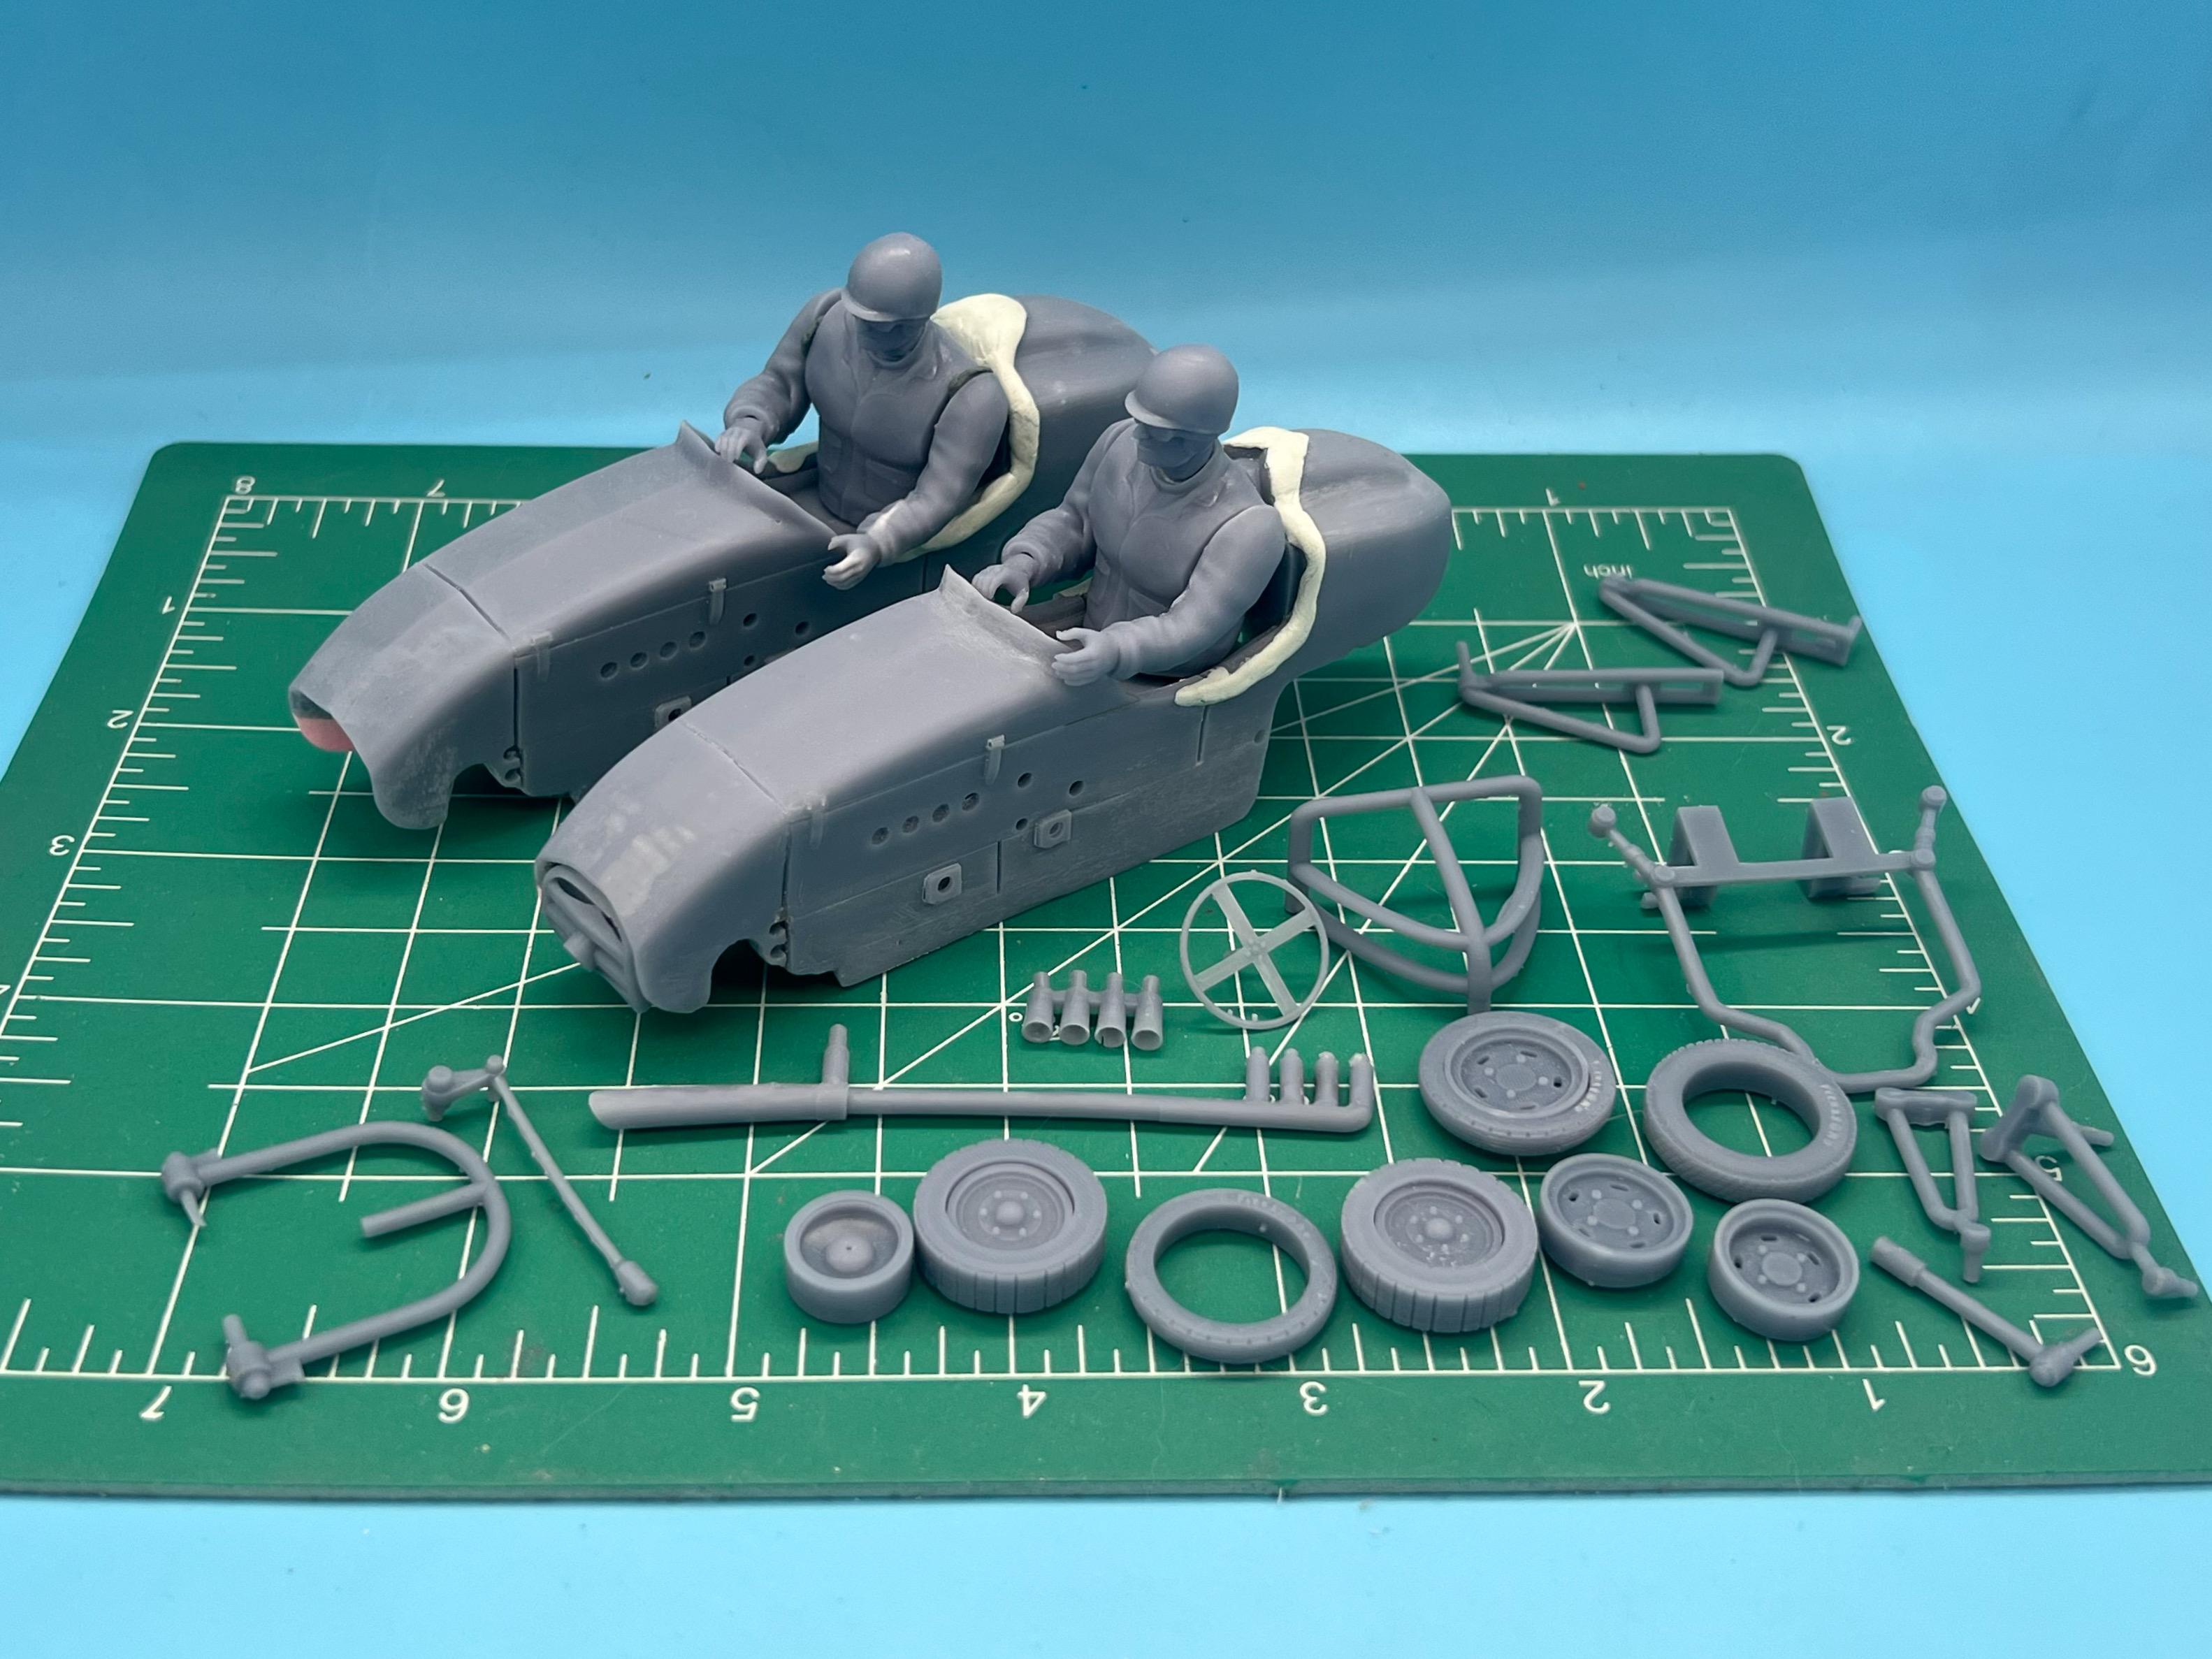
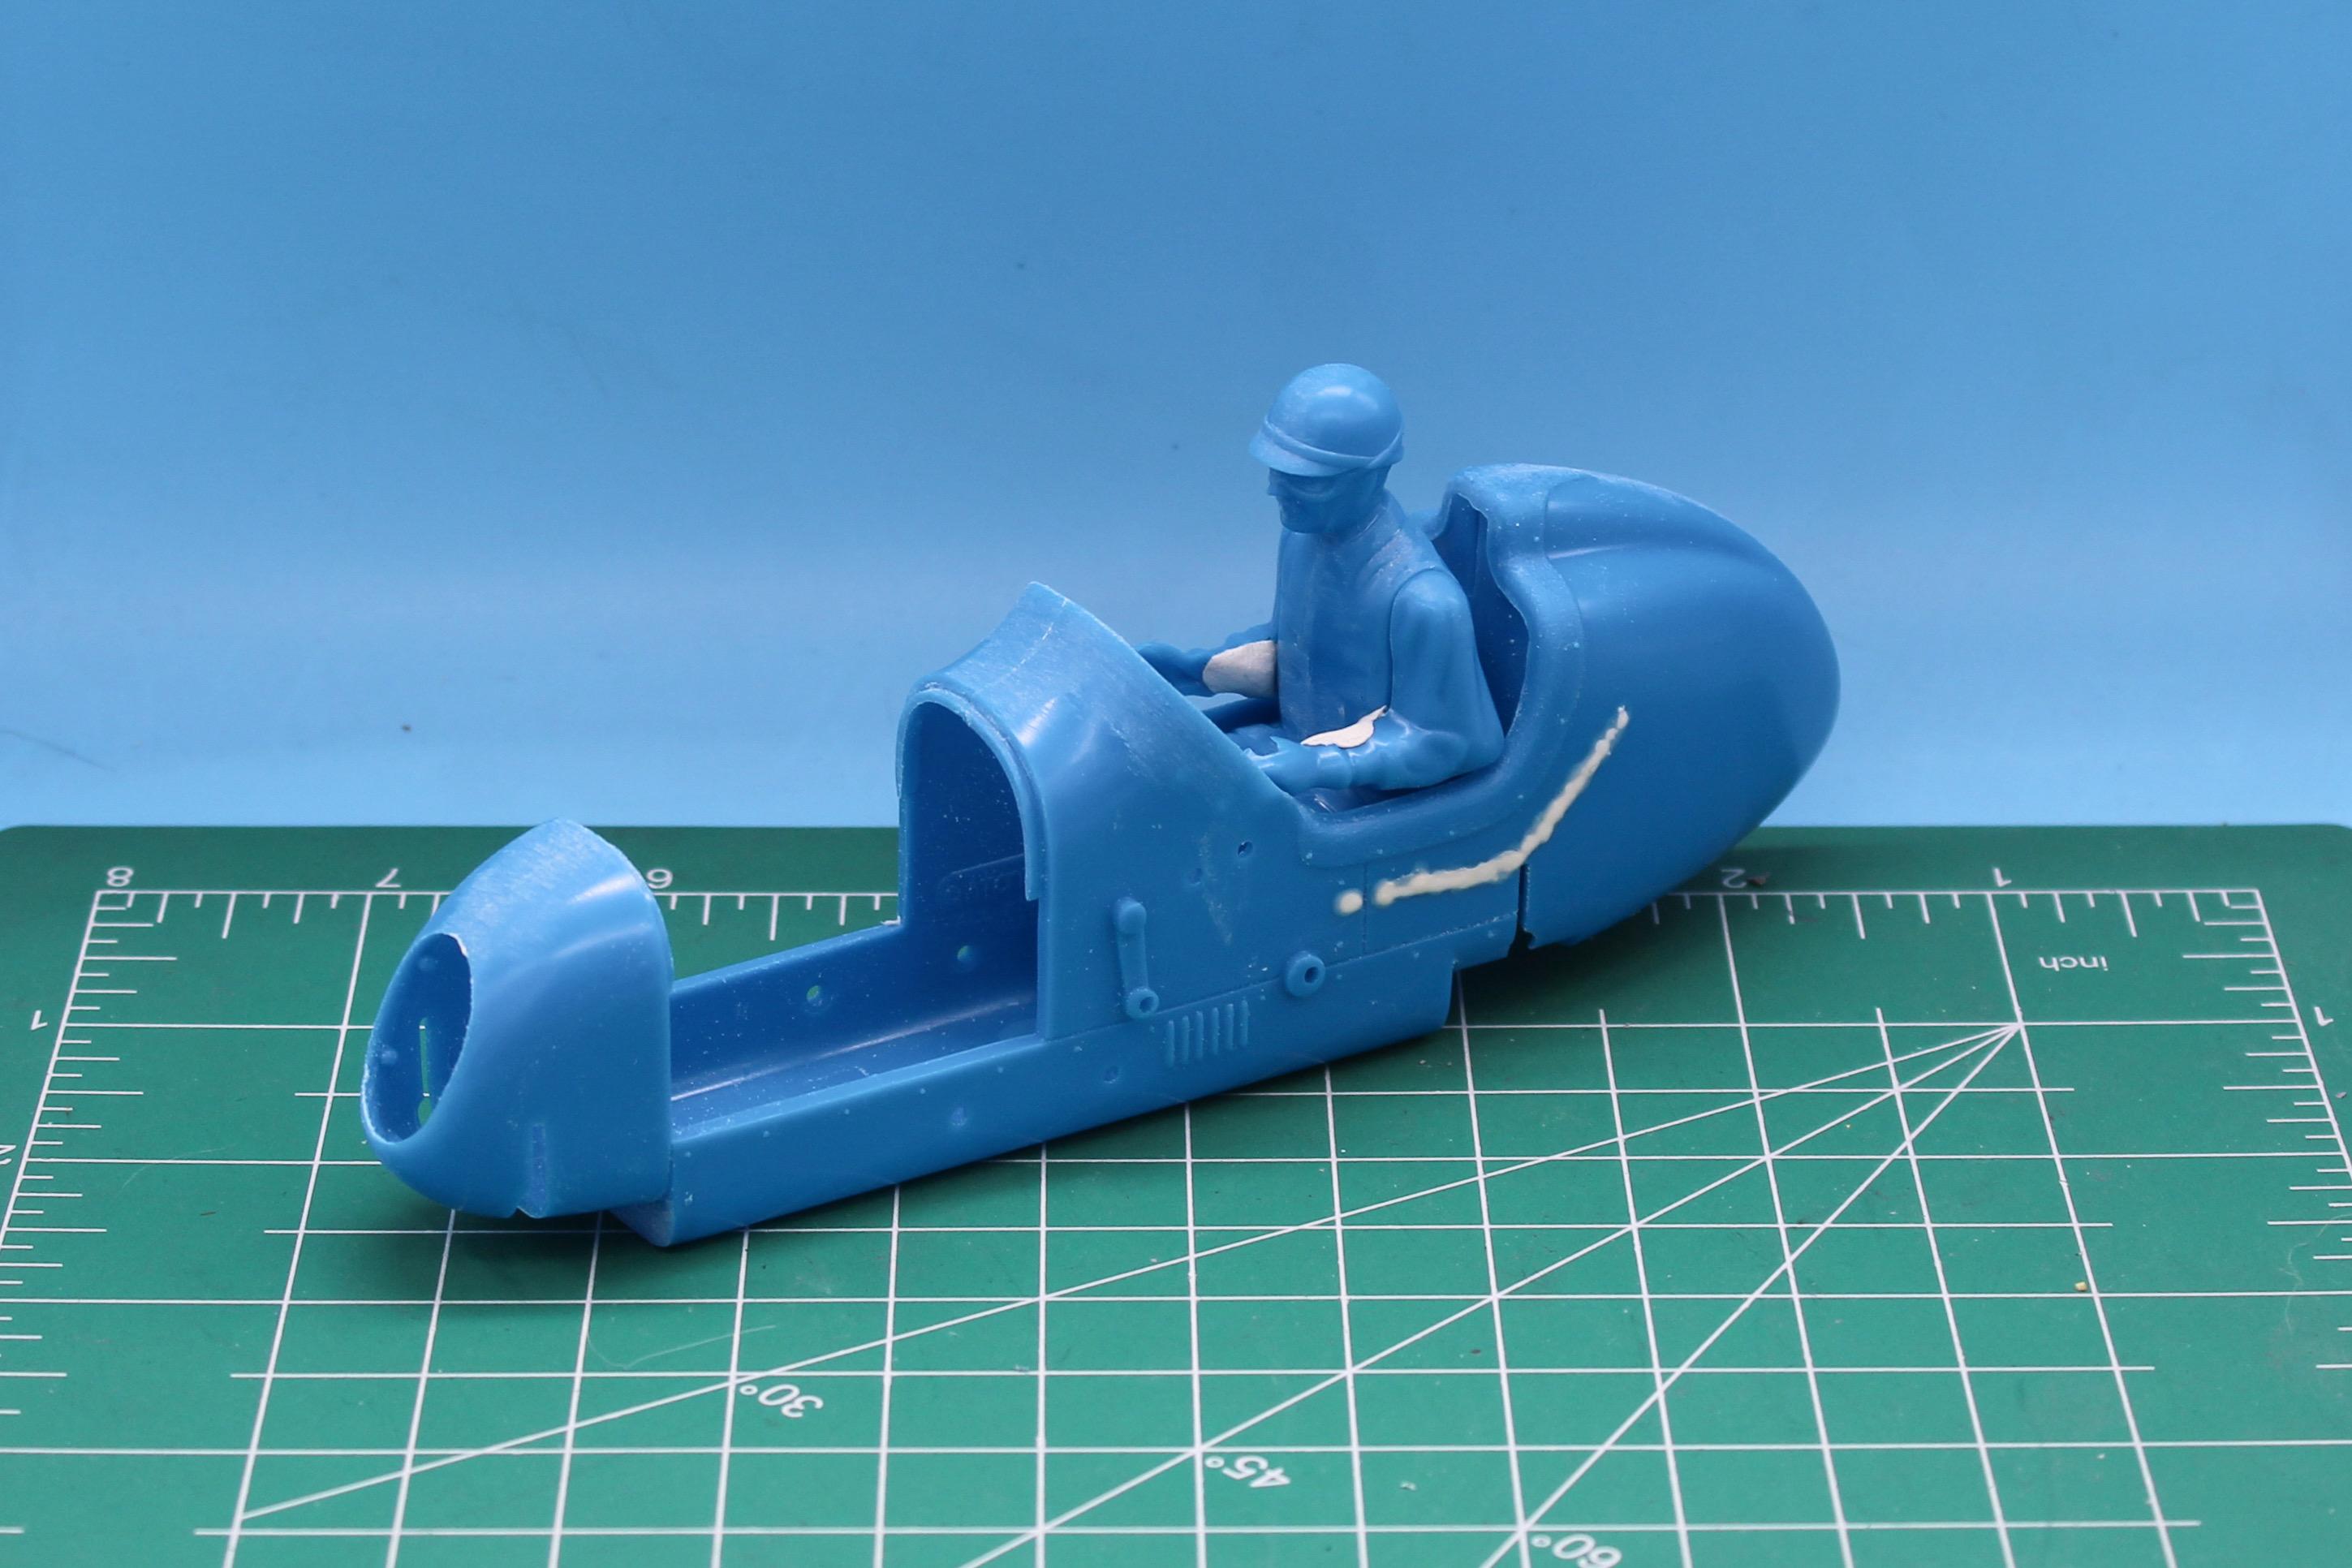
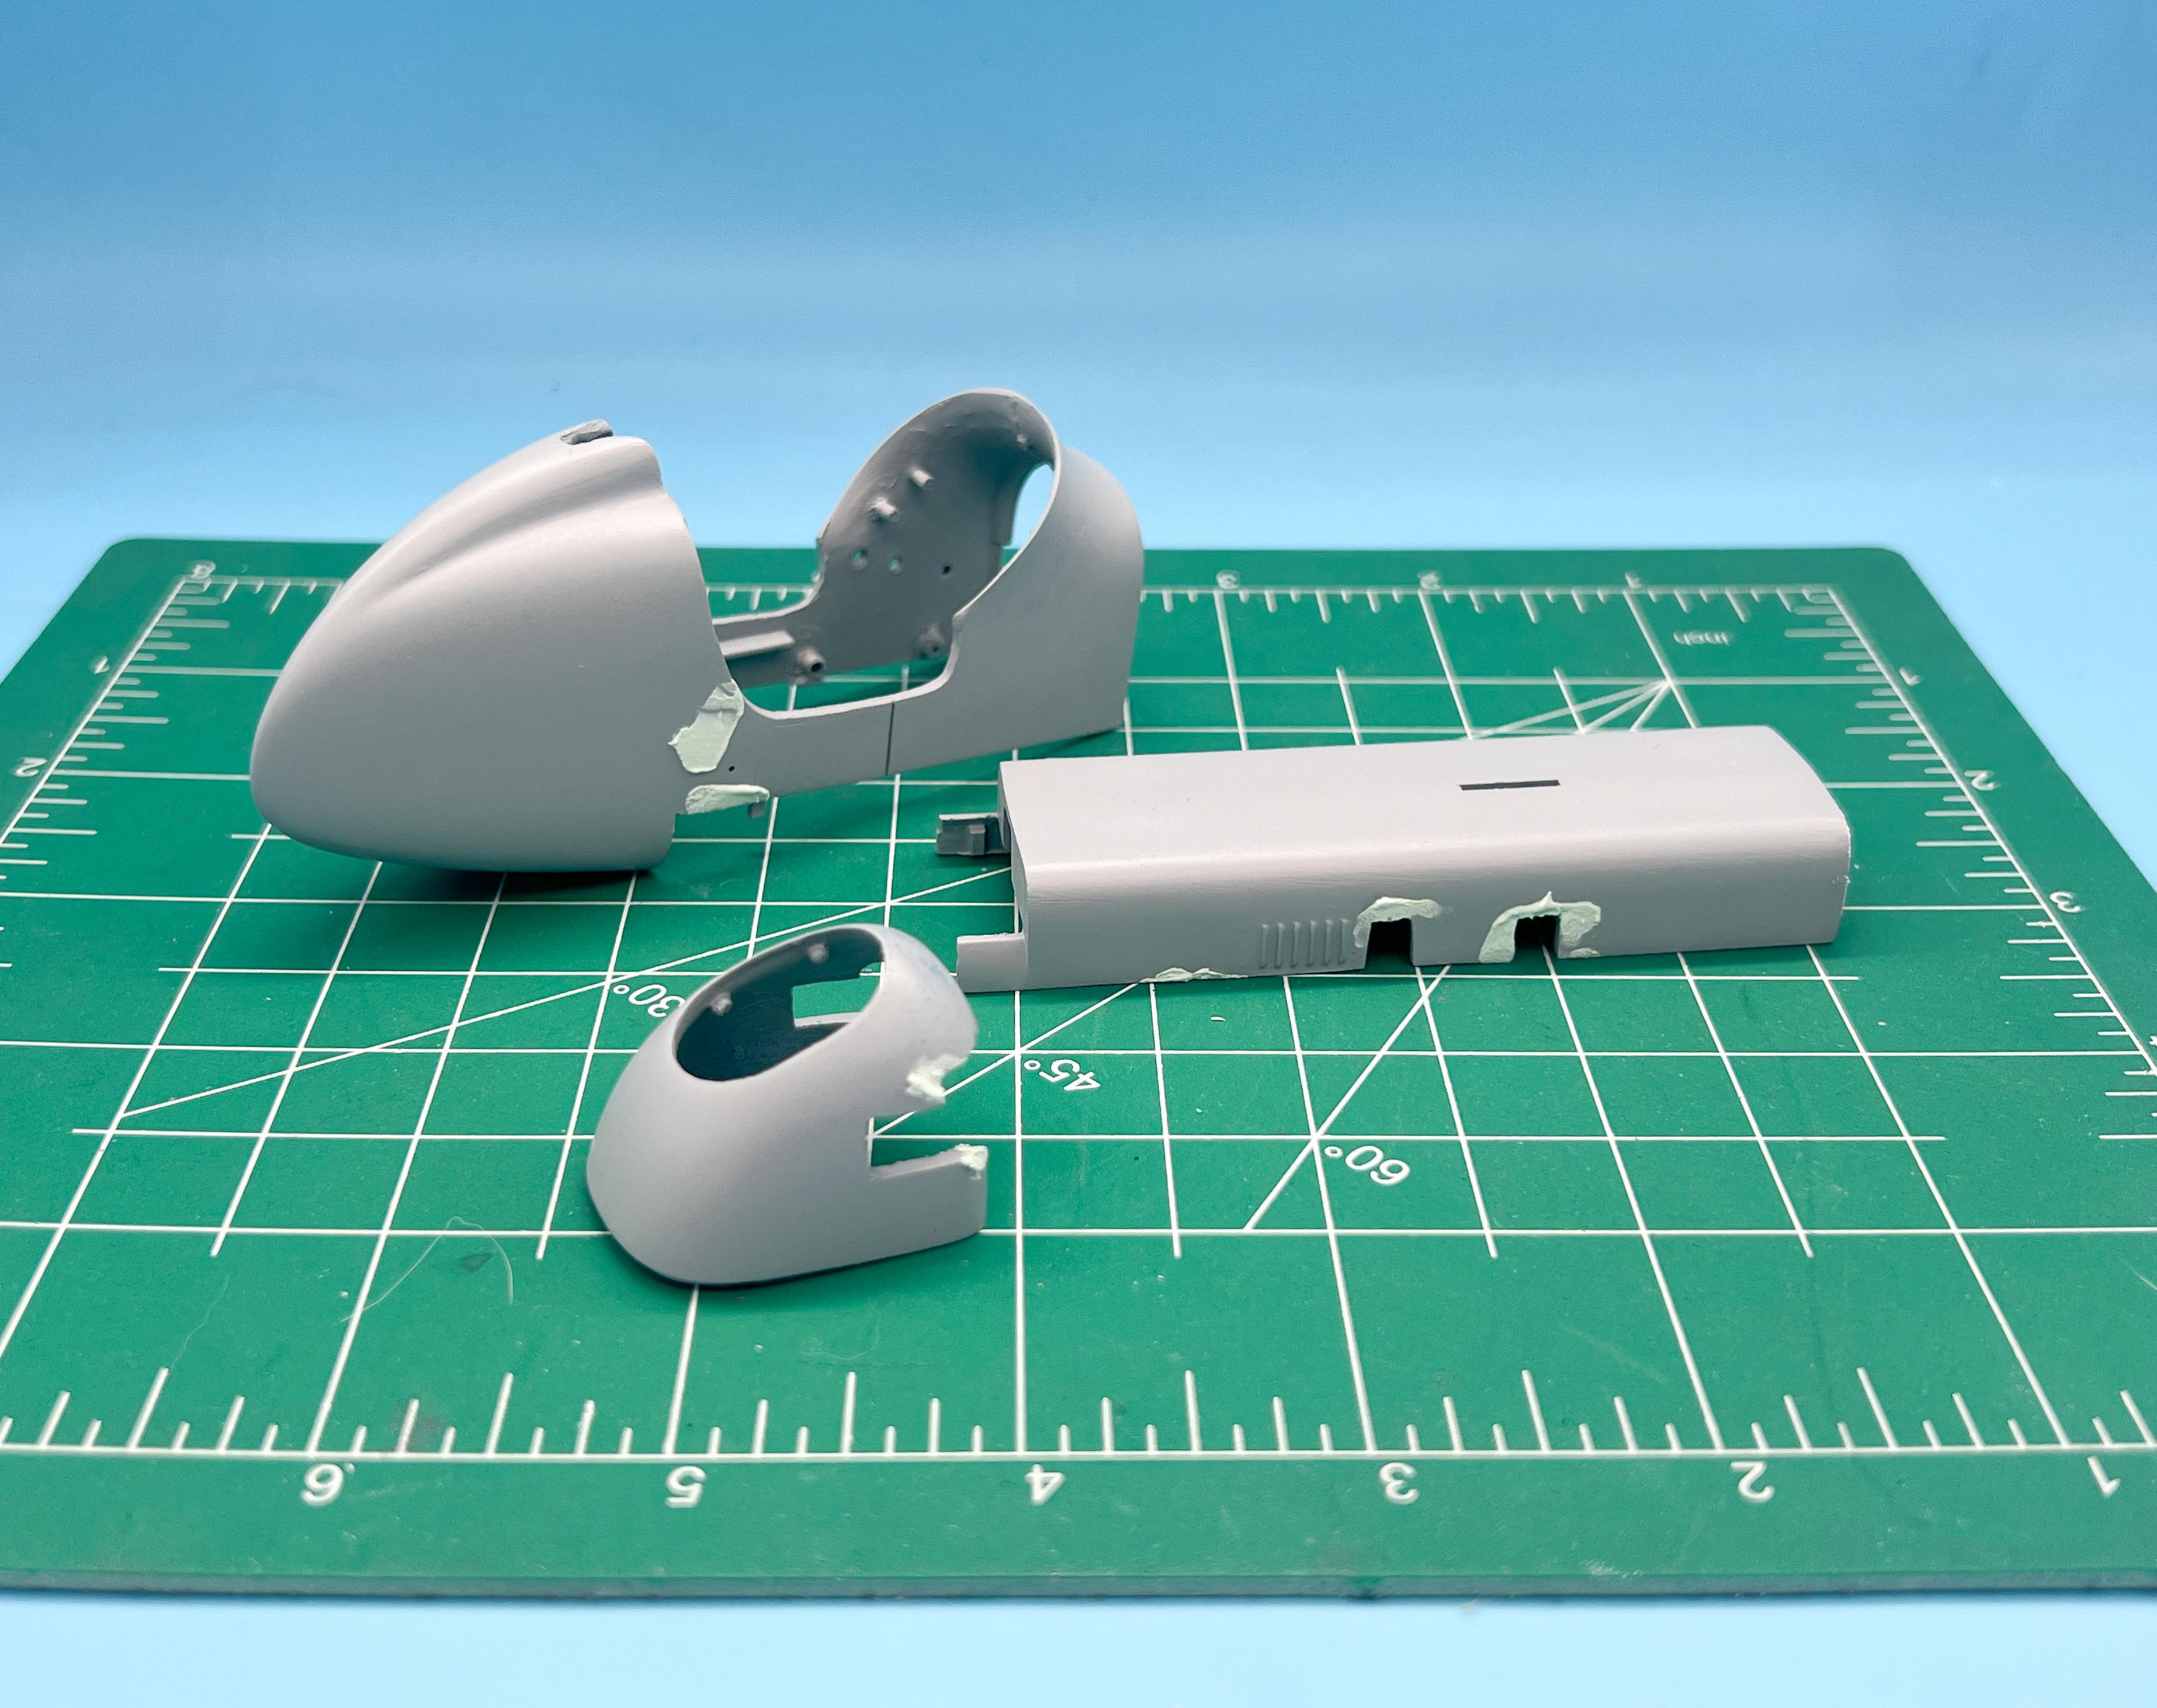
 Been gradually working on printing parts for a couple of Revell Midget replicas. Kinda replicas anyway, the body isn’t a perfect match to the original, and I had to do some good old fashioned sculpting with epoxy around the cockpit…these will be a fun little low-stress build though:
-
I’m envious - I have a replica of this box art on my to-build list! What color plastic is yours molded in?
-
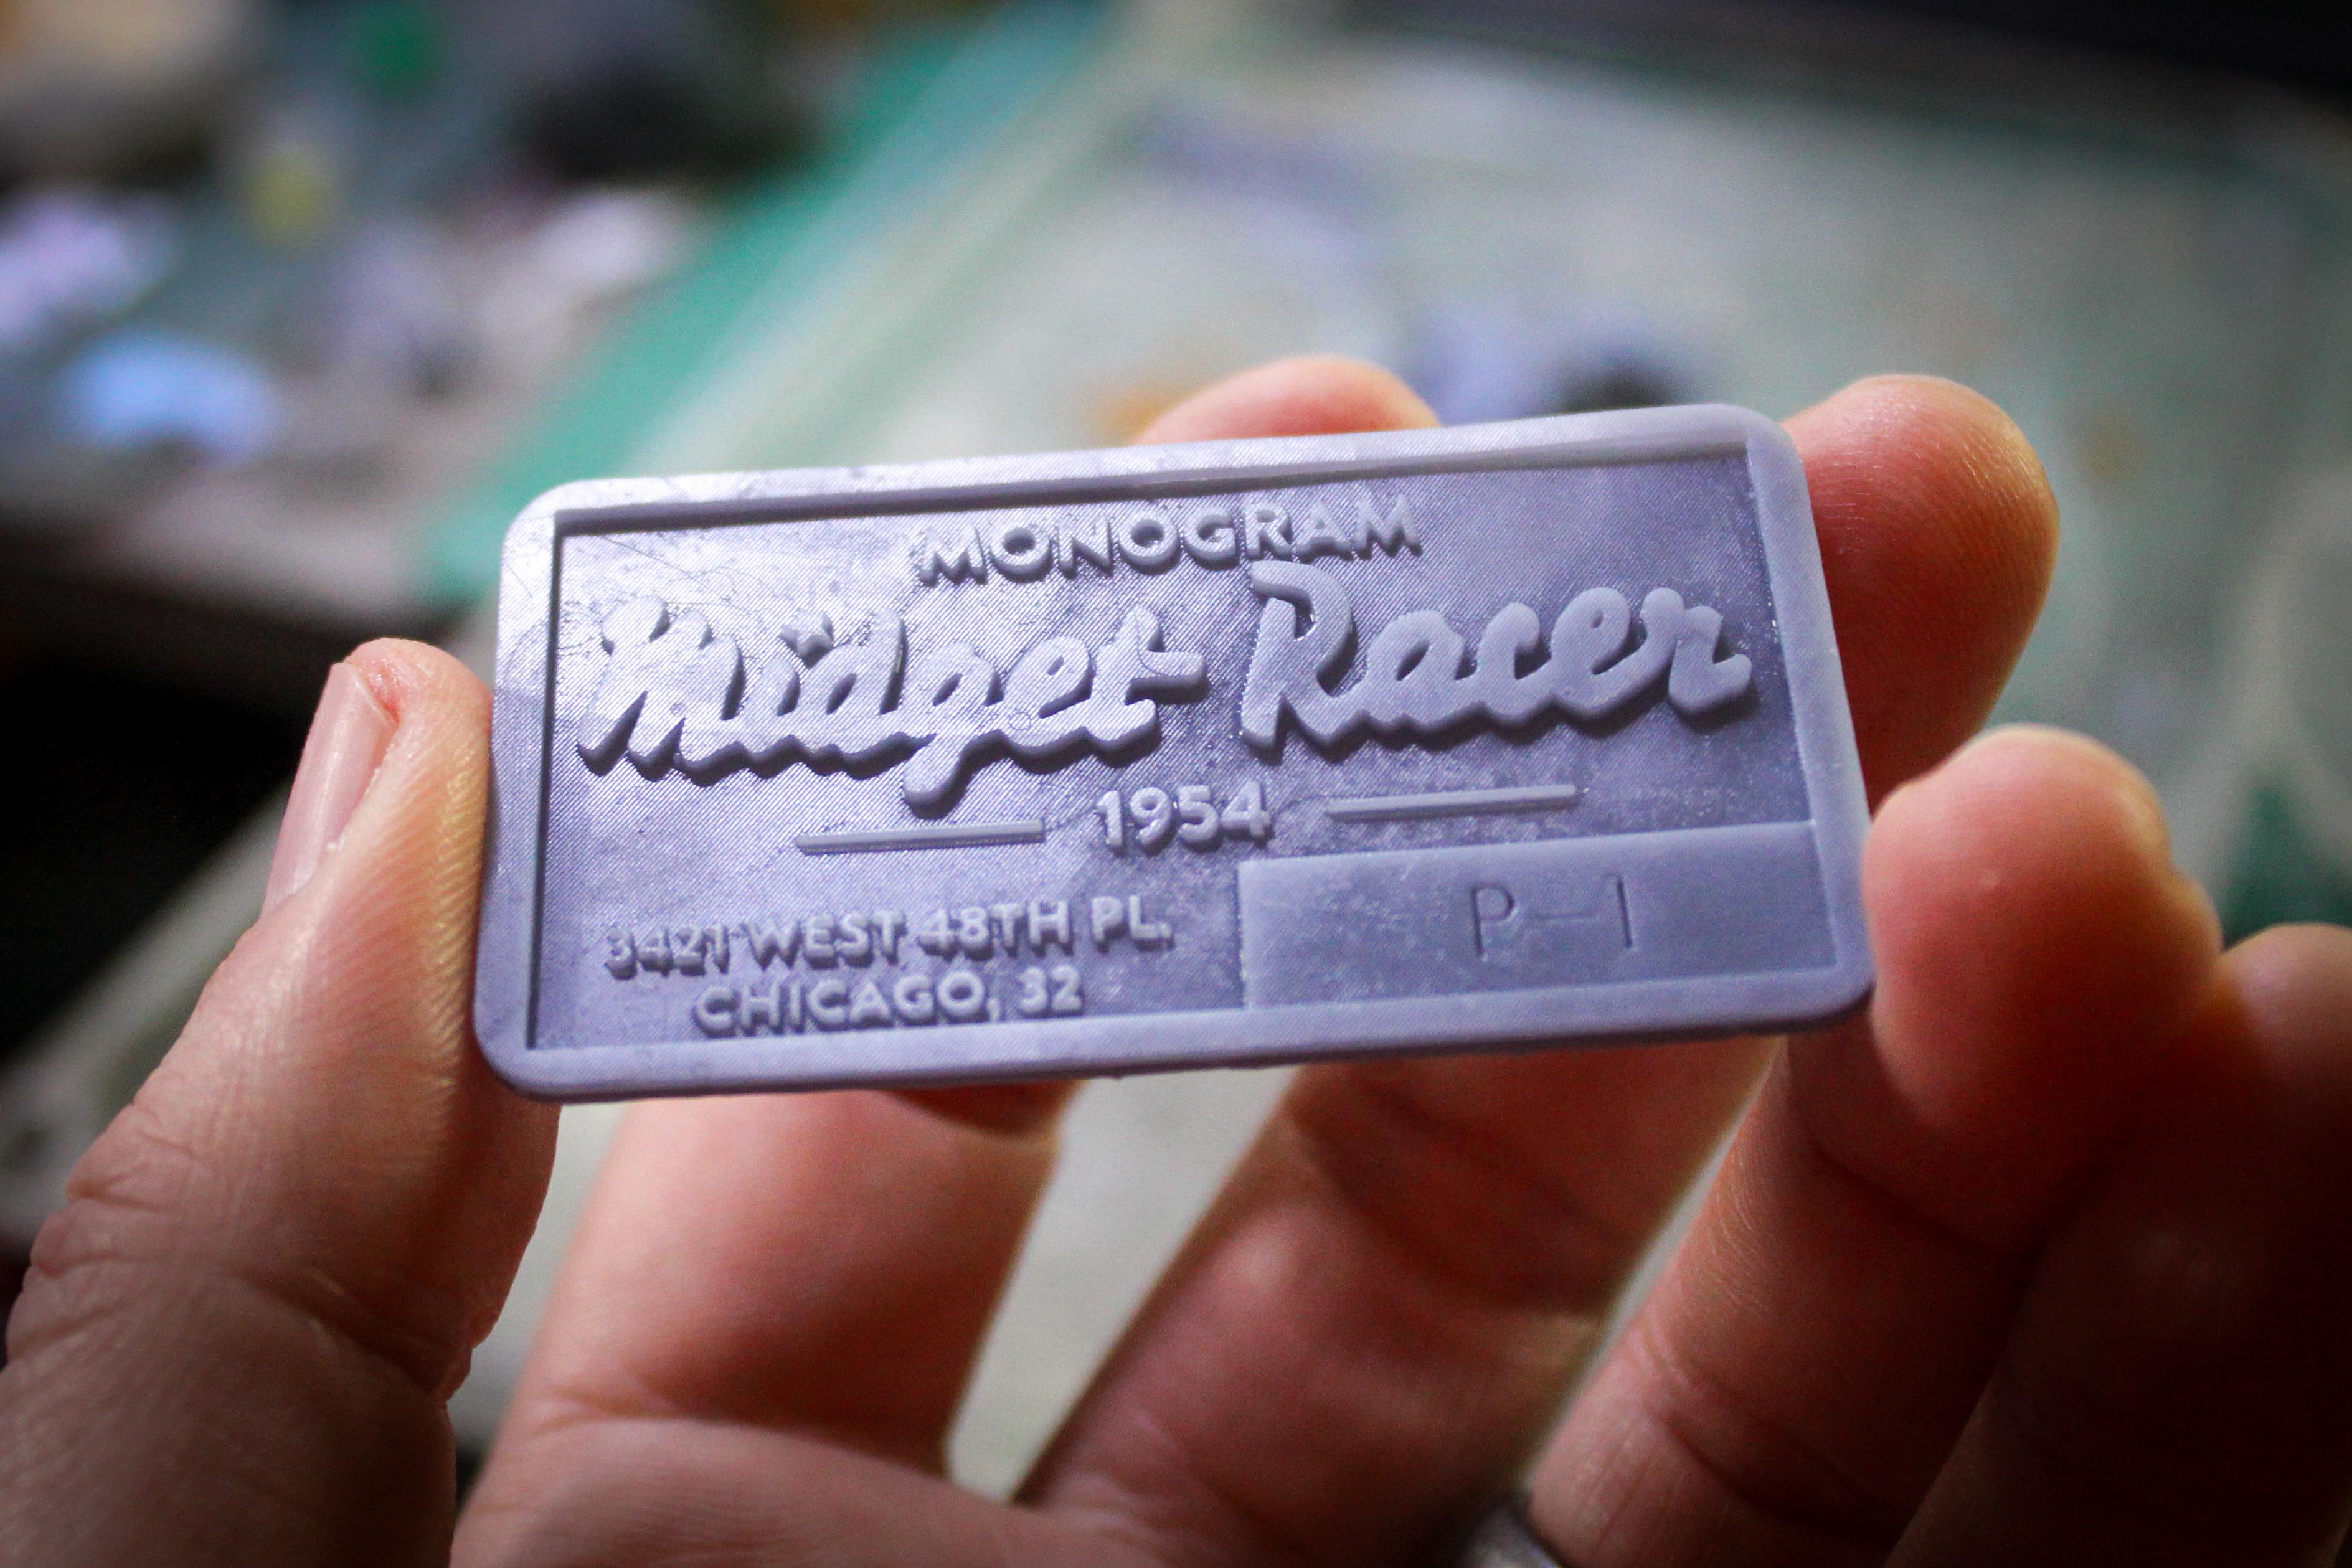
Huh! Interesting! I’ve been building their ‘P-1’ Midget kit recently, but I didn’t realize they had made something before that in plastic. The ‘P-1’ was meant to represent, well, plastic kit number one…wasn’t aware of the ‘Maxwell’. Thanks for posting about that…fun rabbit hole of research for me to go down! EDIT: duh, my flu-addled NyQuil powered brain didn’t make the distinction between Revell and Monogram. MONOGRAM’s first plastic kit was the Midget, Revell was a different company then. As you were!
-
Looks like a good start! What’s the cream colored filler you used on the floor? Tamiya?
-
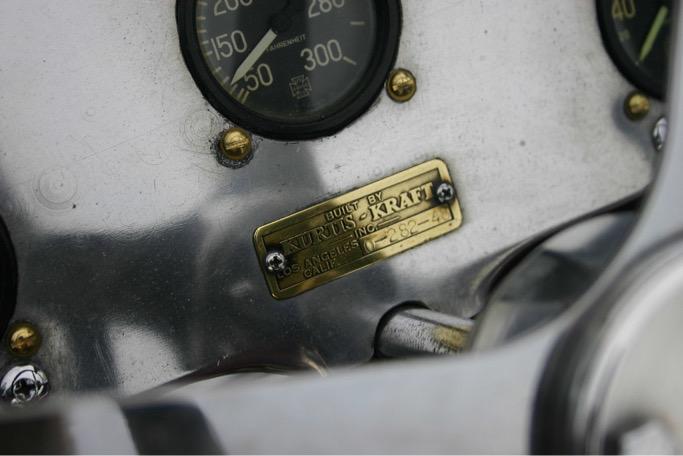
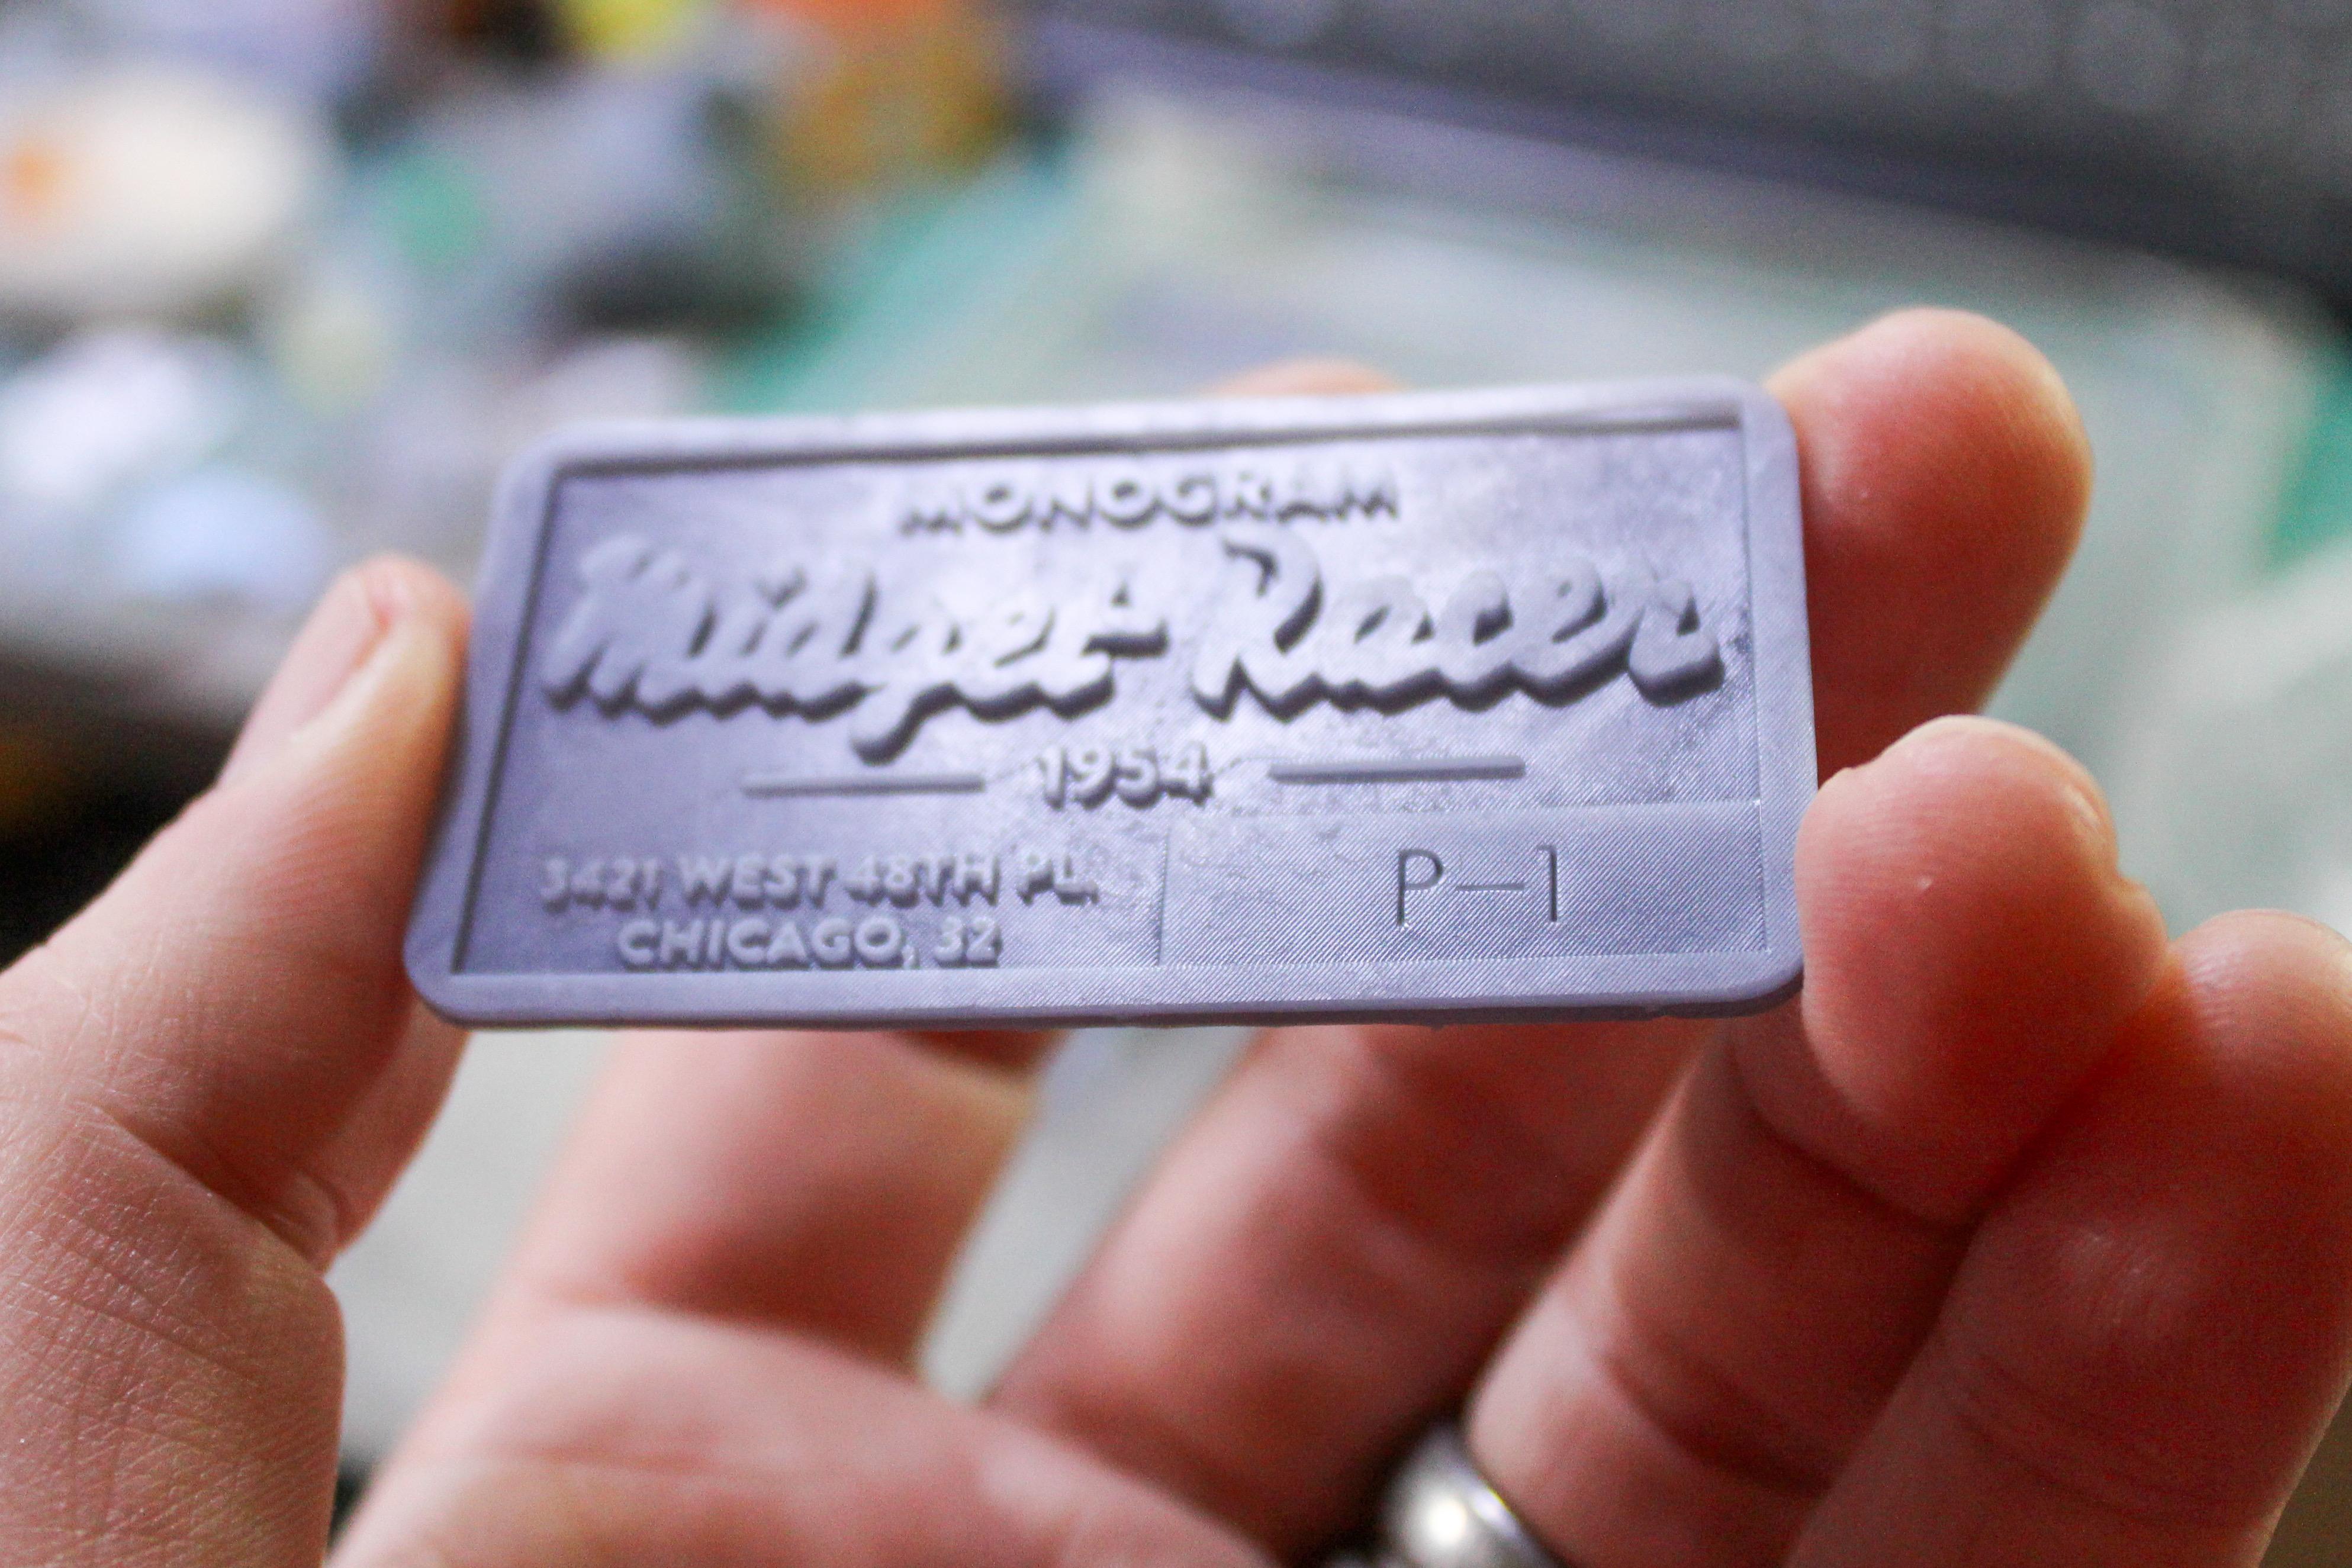
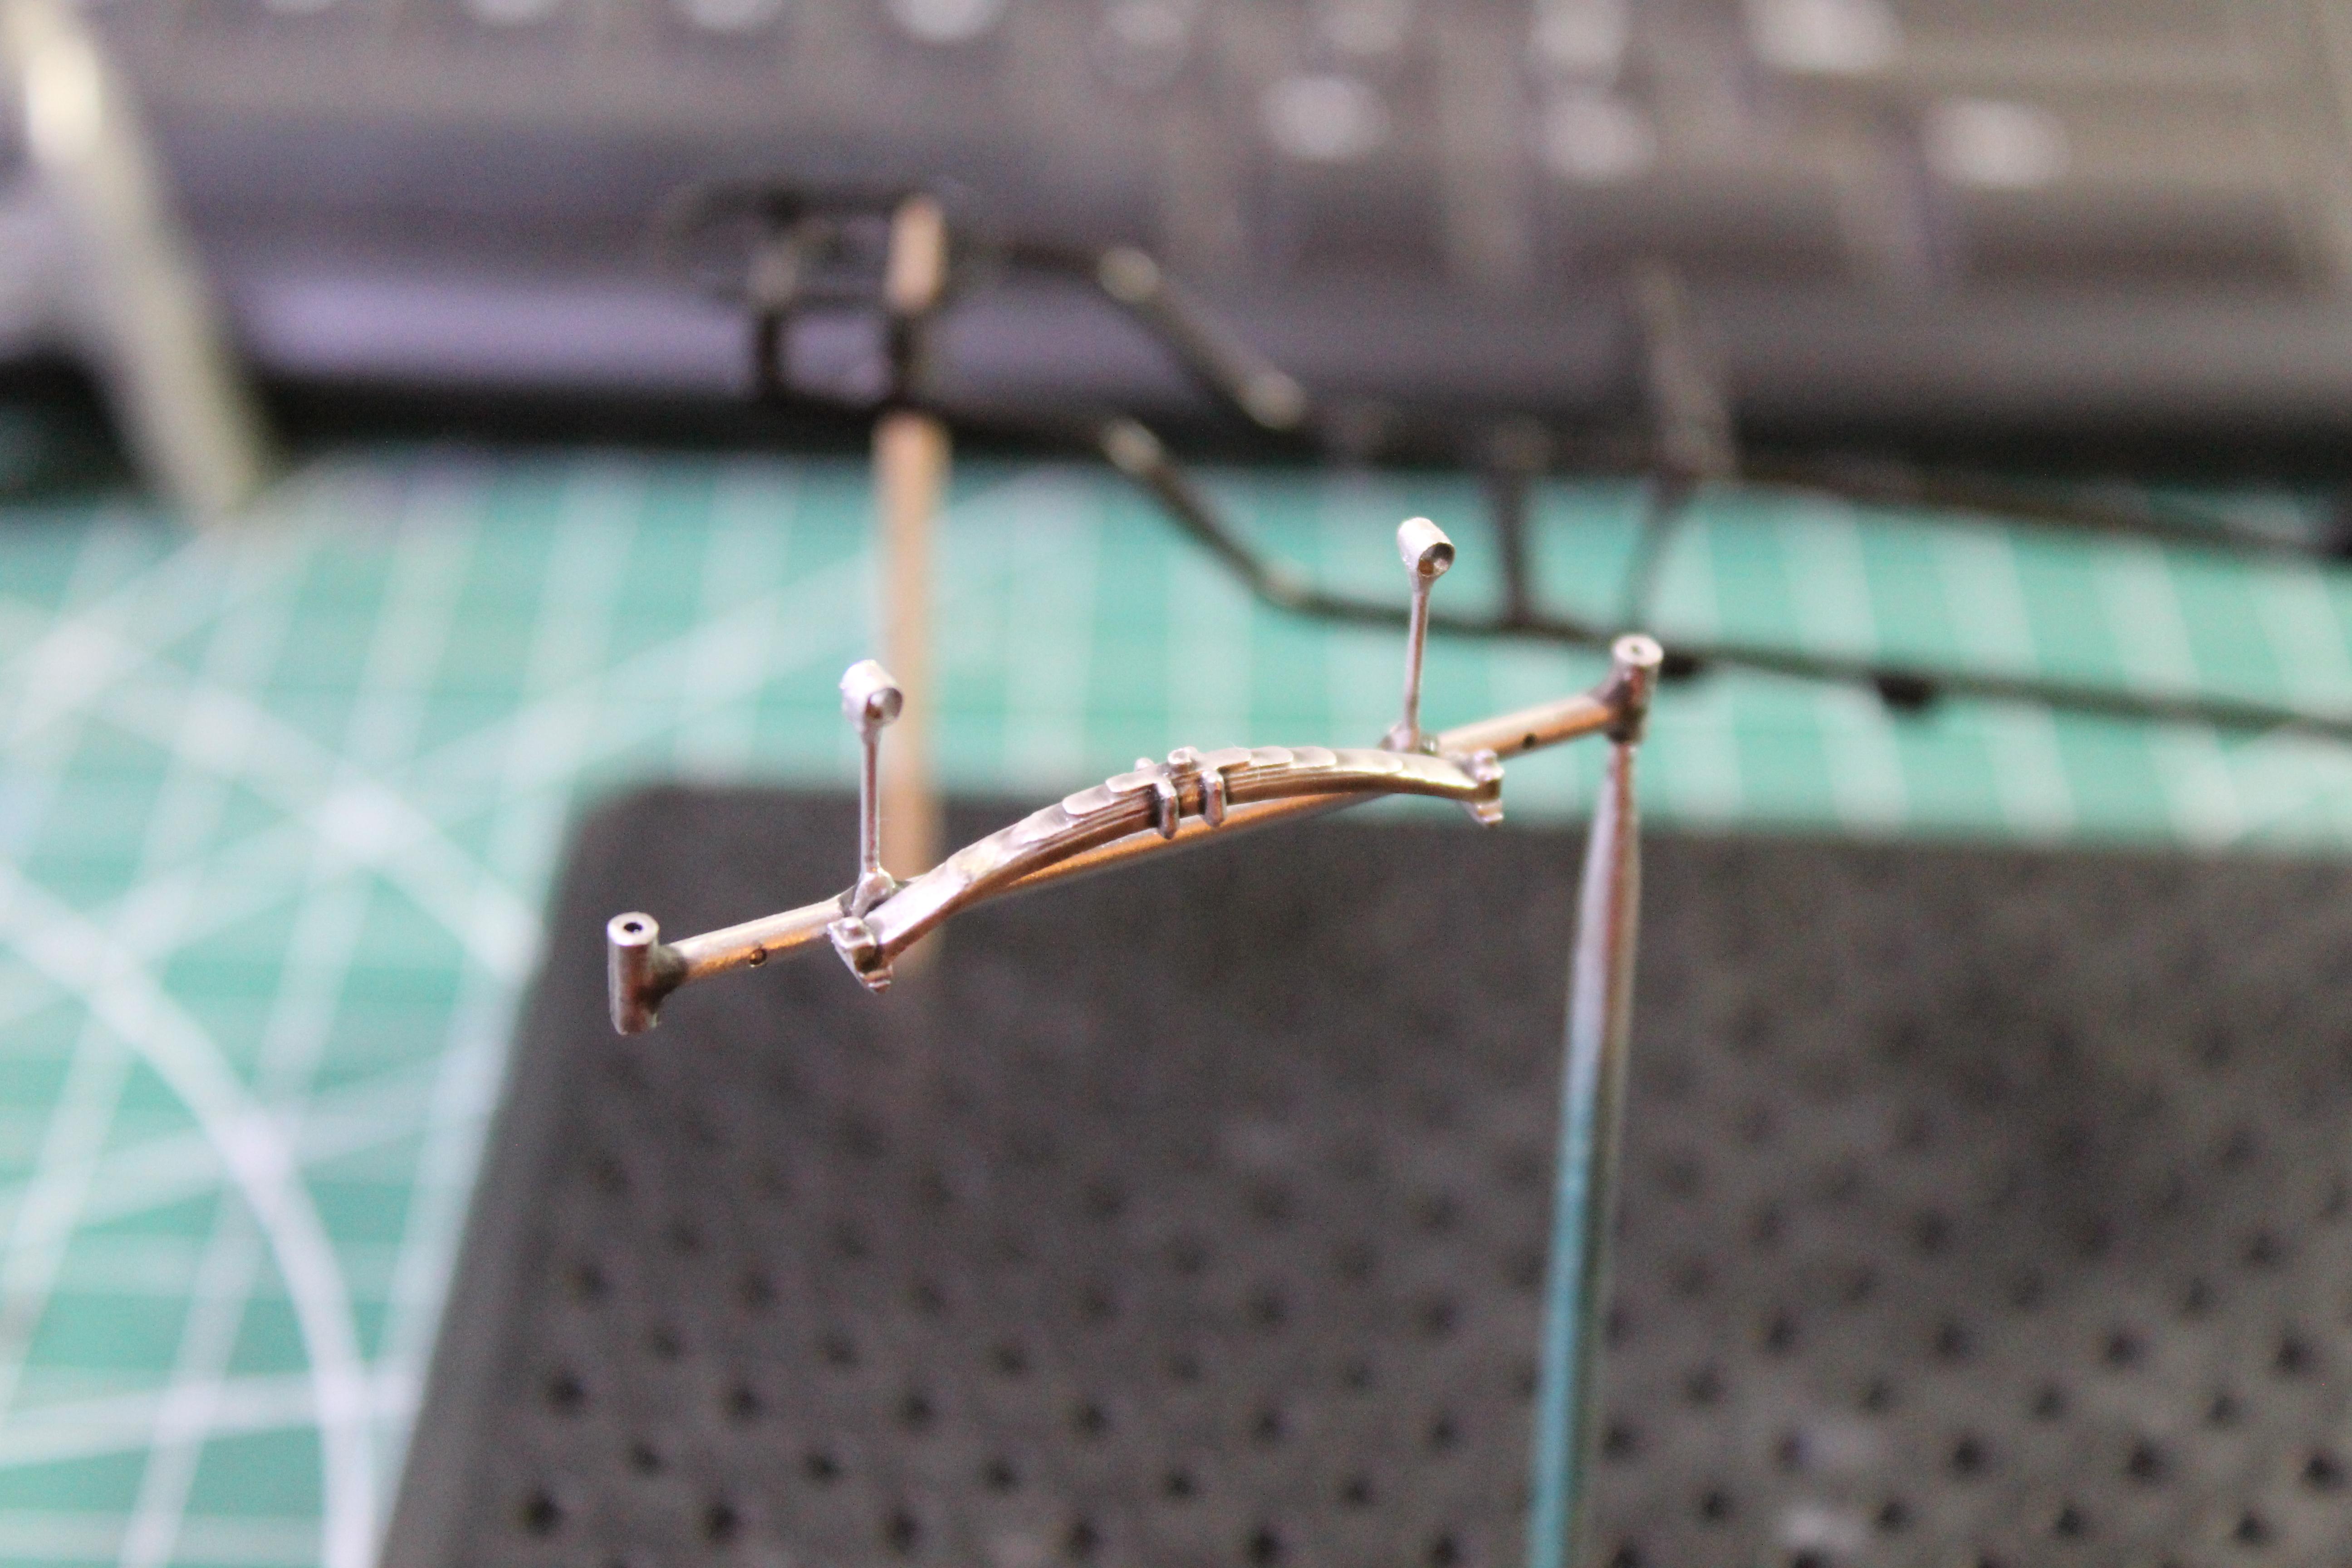
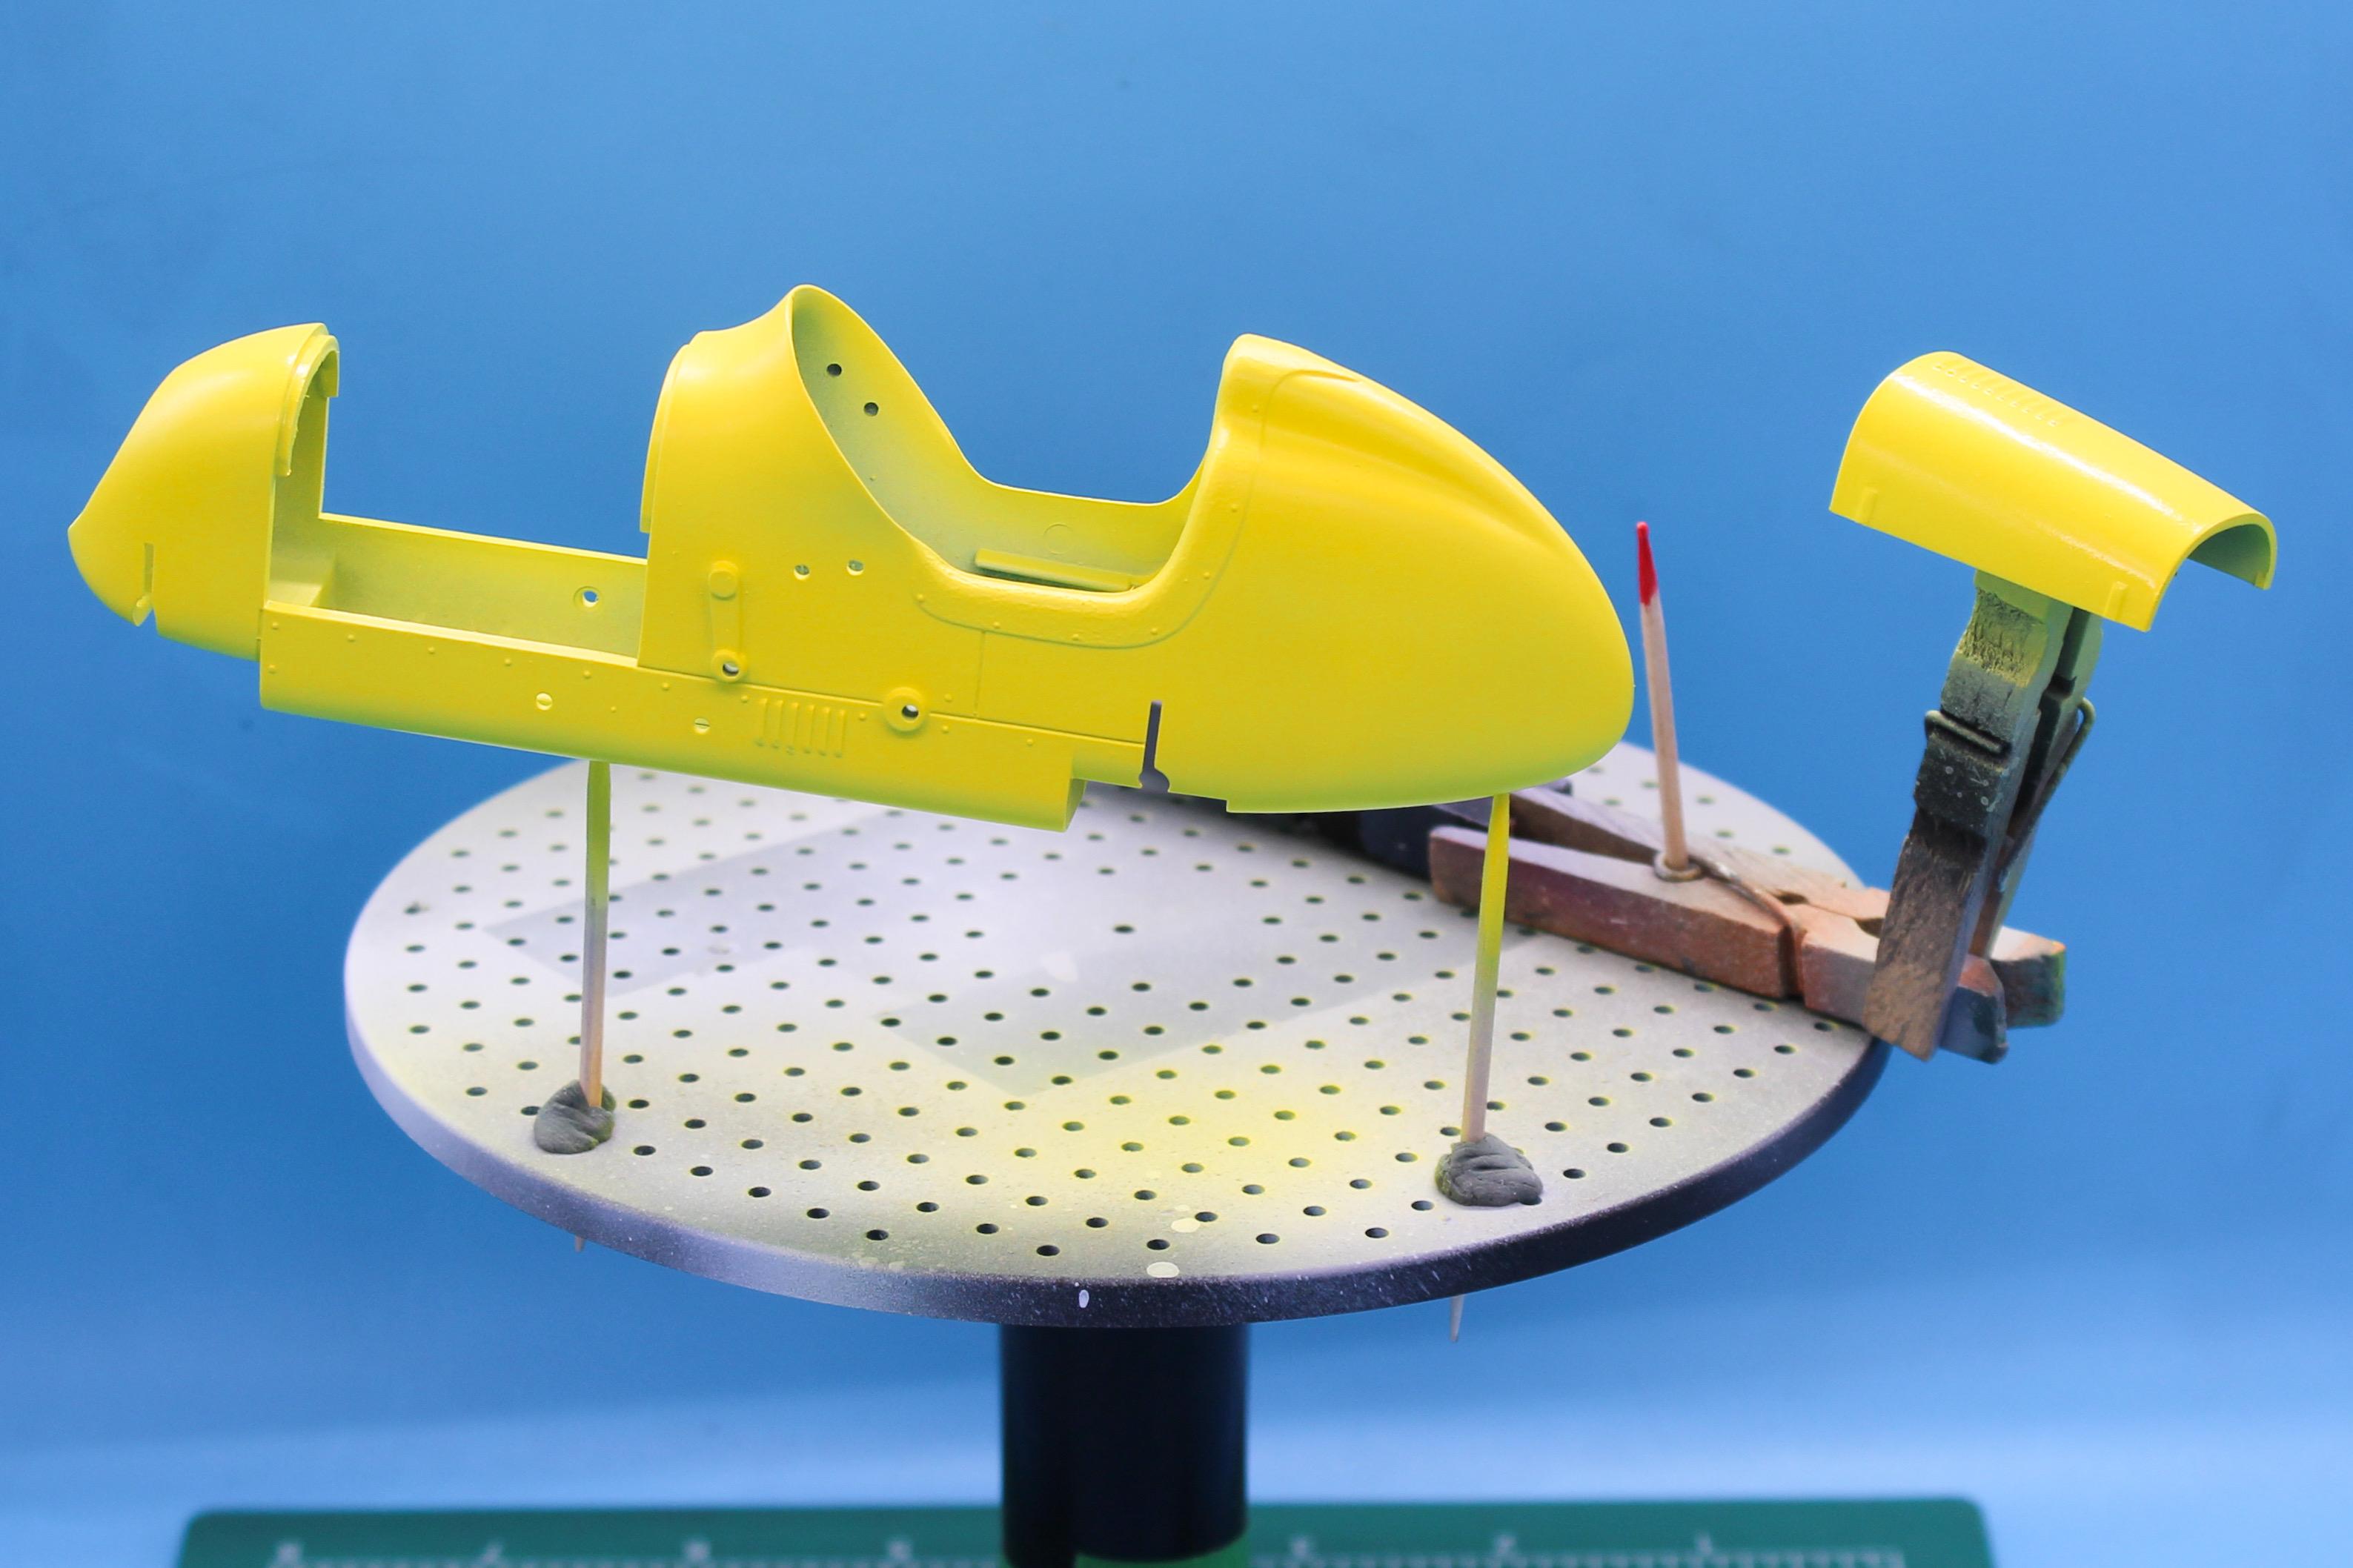
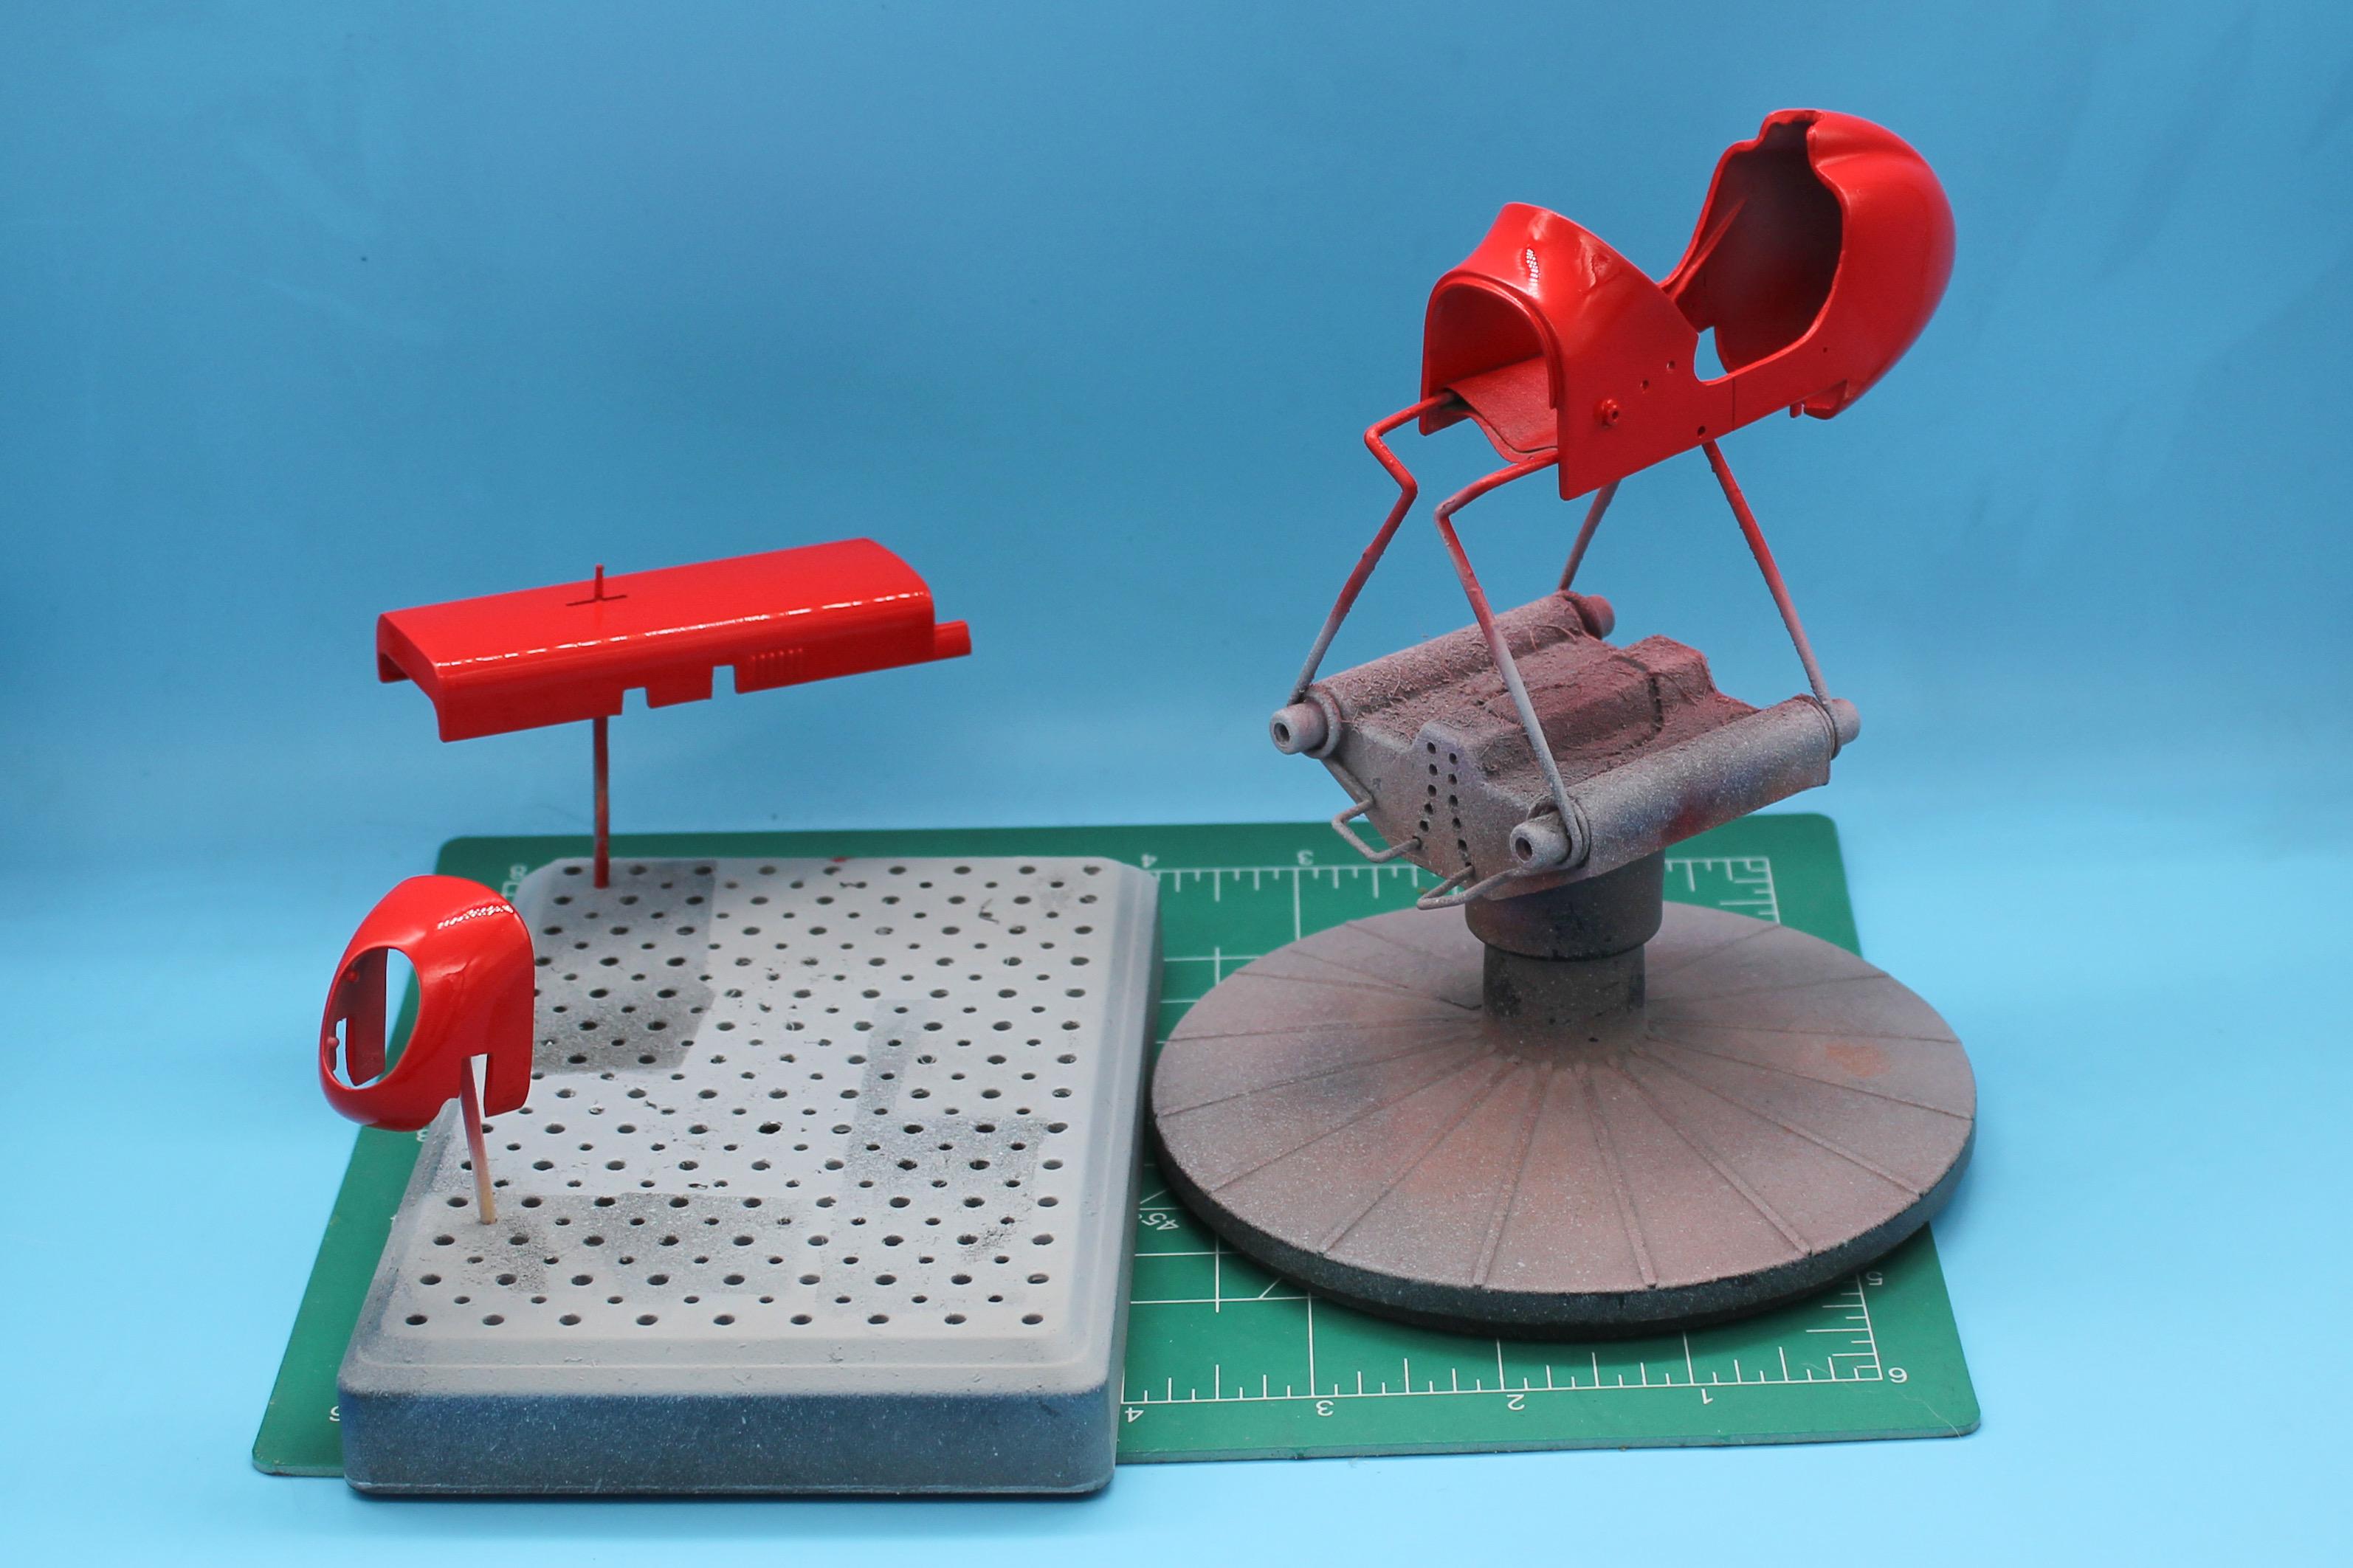
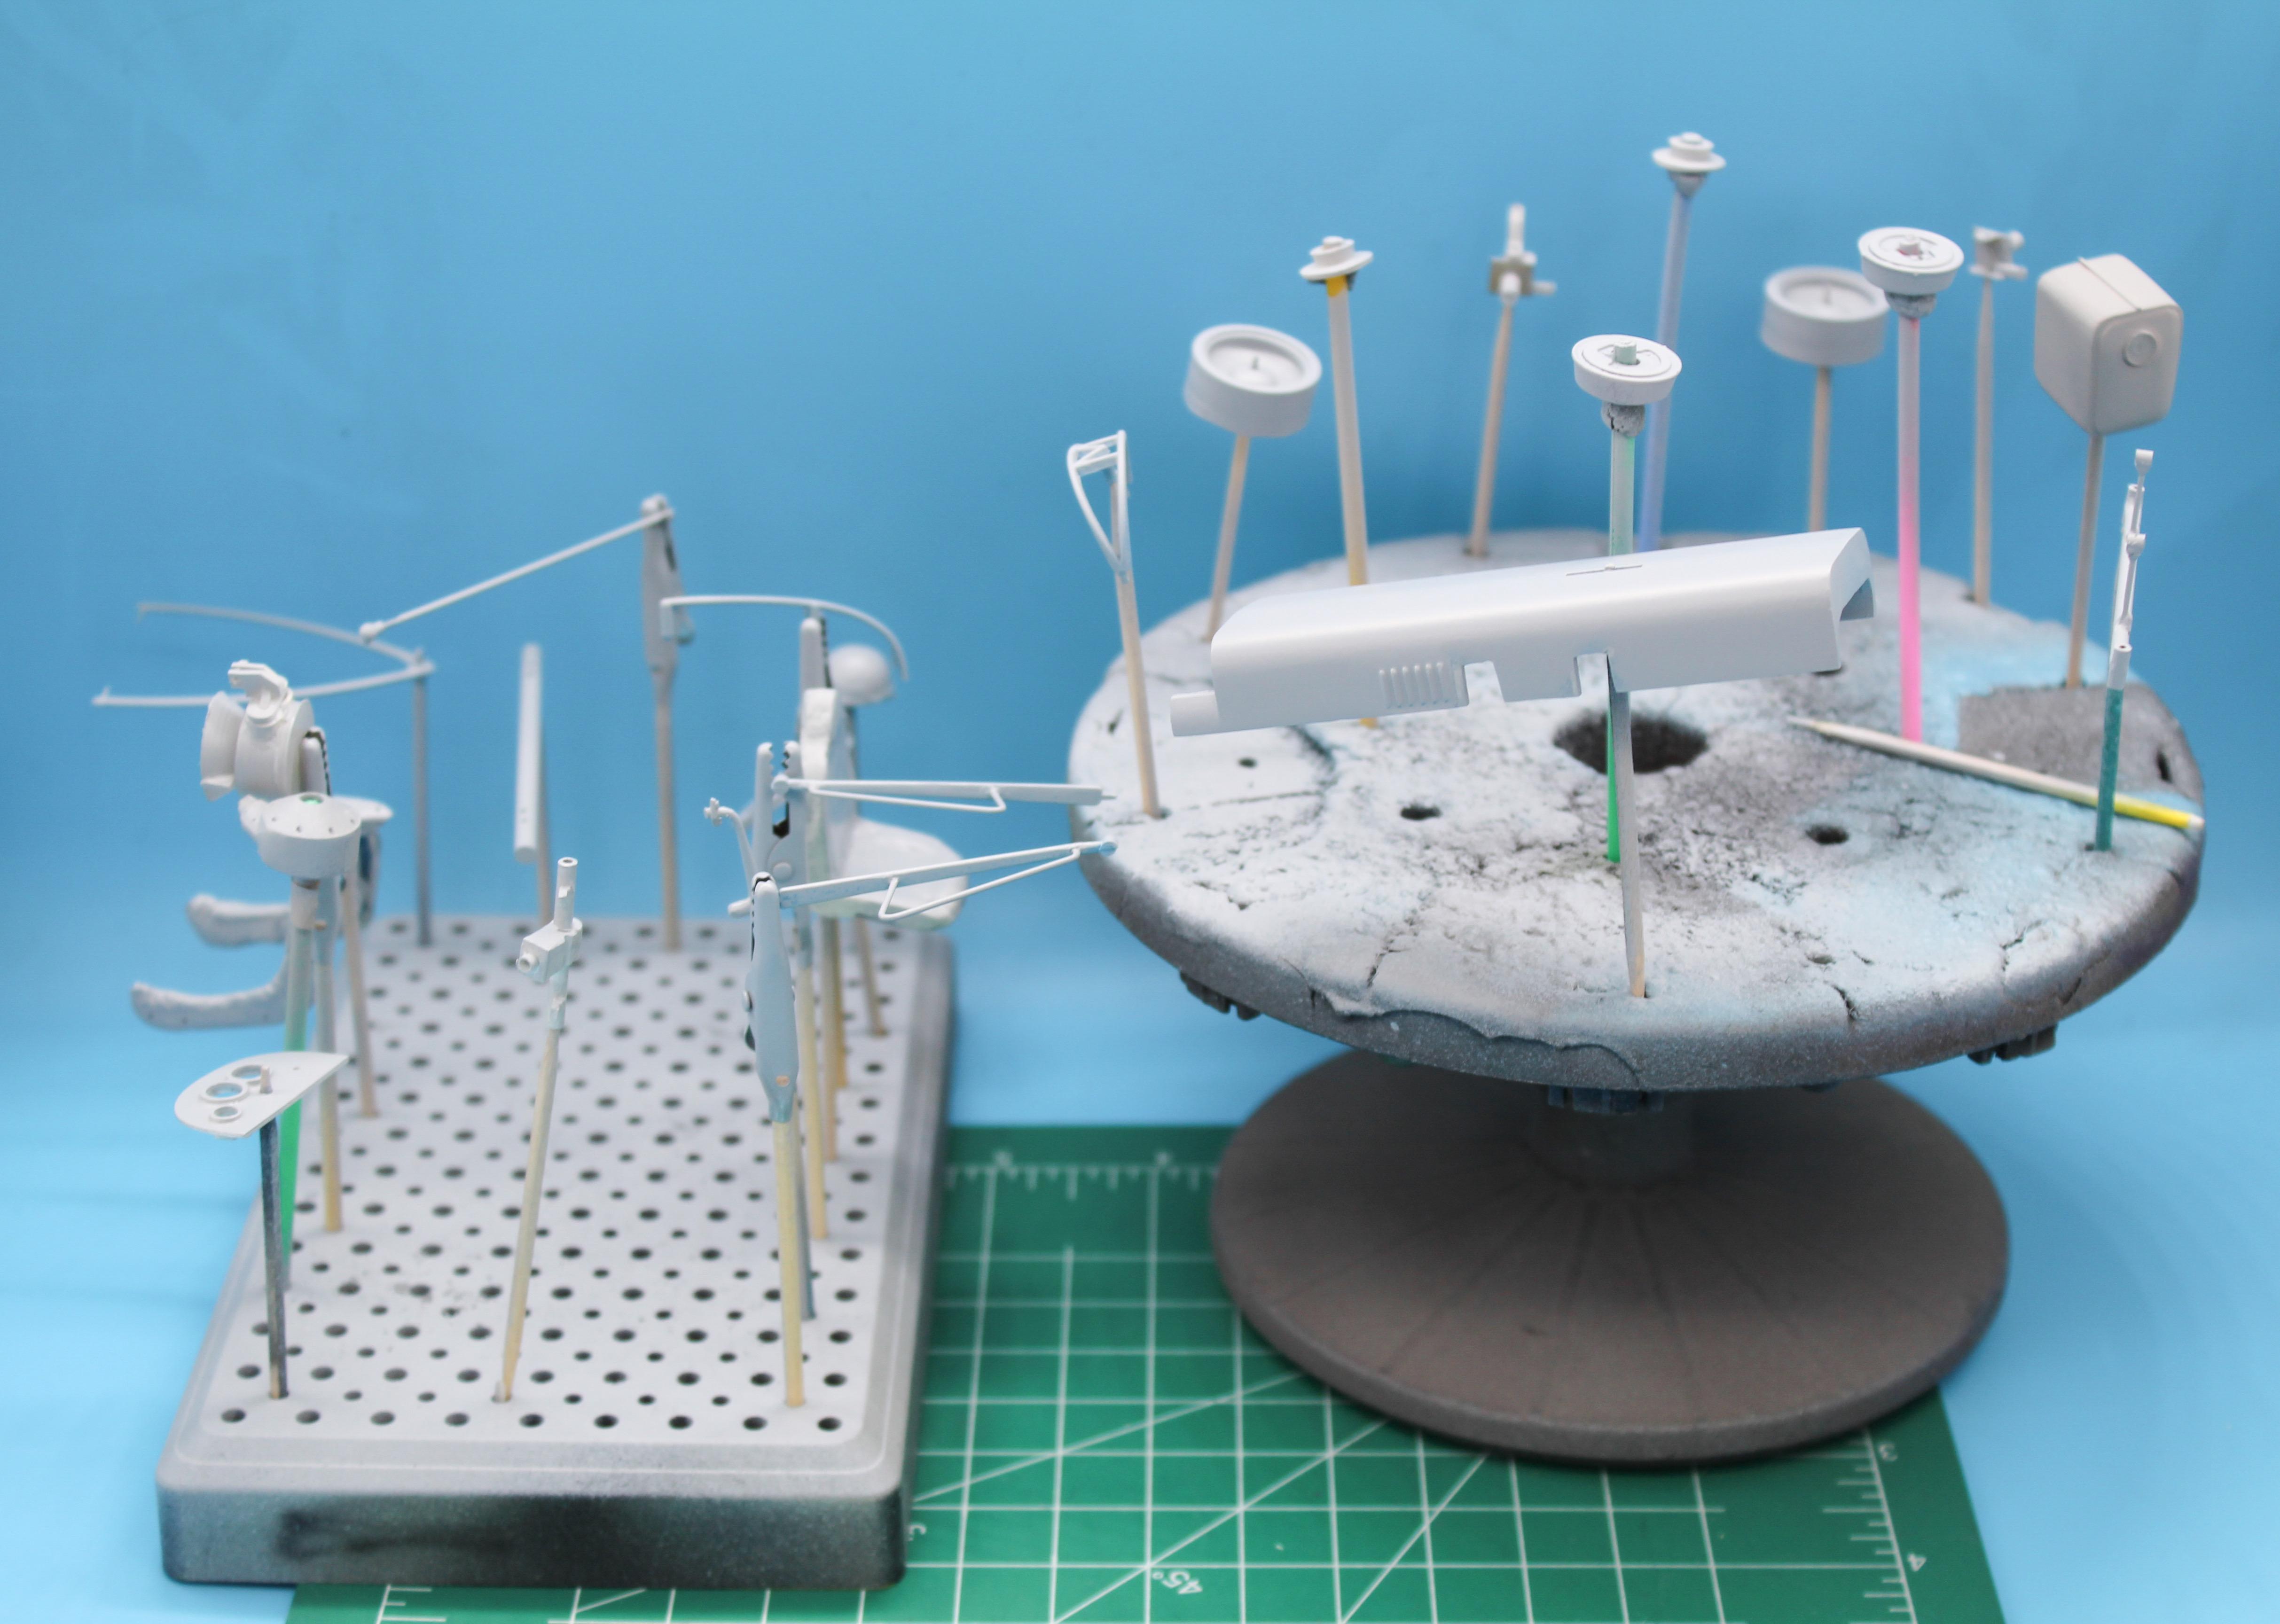
Another busy week of painting - nothing super interesting to report besides having MOST of this build painted and ready for assembly now. I’m pleased with how the (relatively few) different finishes look together - but most of these have further detail painting and shading or washes to be added: Couple of parts are getting a redo where there’s some little details I wasn’t happy with, but mostly pleased with the progress I made, even if it felt like it took forever… Small side project; I’ll be putting this thing on a little wooden base when it’s done, and was going to have a little plaque engraved to mount on there, but then I thought back the little stamped tags the Kurtis cars had (often mounted on the dash, it seems like): Made something inspired-by the look of those, but utilizing the hand-drawn ‘Midget Racer’ script that was on the original Monogram boxes: P1 references this kit’s Monogram serial number - plastic kit number 1, and the address is Monograms factory in 1954: Finally, started adding some glazes to some of the metal parts - a glaze is something used more in figure modeling than the stuff we do, but it’s a useful technique - it’s basically a wash, but with thicker clear medium so that you have more control. I did a few of the metal parts for the front end…nice thing is, the acrylic glaze won’t bite into the enamel underneath too much, so if I decide any of it is OVER done I can easily remove or tweak it: Just a small update - polishing out the body this coming week, then starting some assembly…more soon, soon as I’ve done more!
-
Kits with Open face helmets
OldNYJim replied to gtx6970's topic in Model Building Questions and Answers
That’s a cool idea…are the straps FOR a military helmet, or something else? -
This is really impressive work - just the kind of thing I come here to see! Love all these little changes that will add up to an impressive final product with that cool ‘it’s different but I can’t tell HOW’ factor. Keep going!
-
'29 Ford Sedan Delivery & Tudor Sedan Look-A-Like
OldNYJim replied to Kit Karson's topic in WIP: Model Cars
Ohhh, this’ll be good! -
Looking for custom 3D printing
OldNYJim replied to 58 Impala's topic in Model Building Questions and Answers
Ditto what Les said - Nahuel is awesome, and does nice work: https://cults3d.com/en/users/ditomaso147/comments -
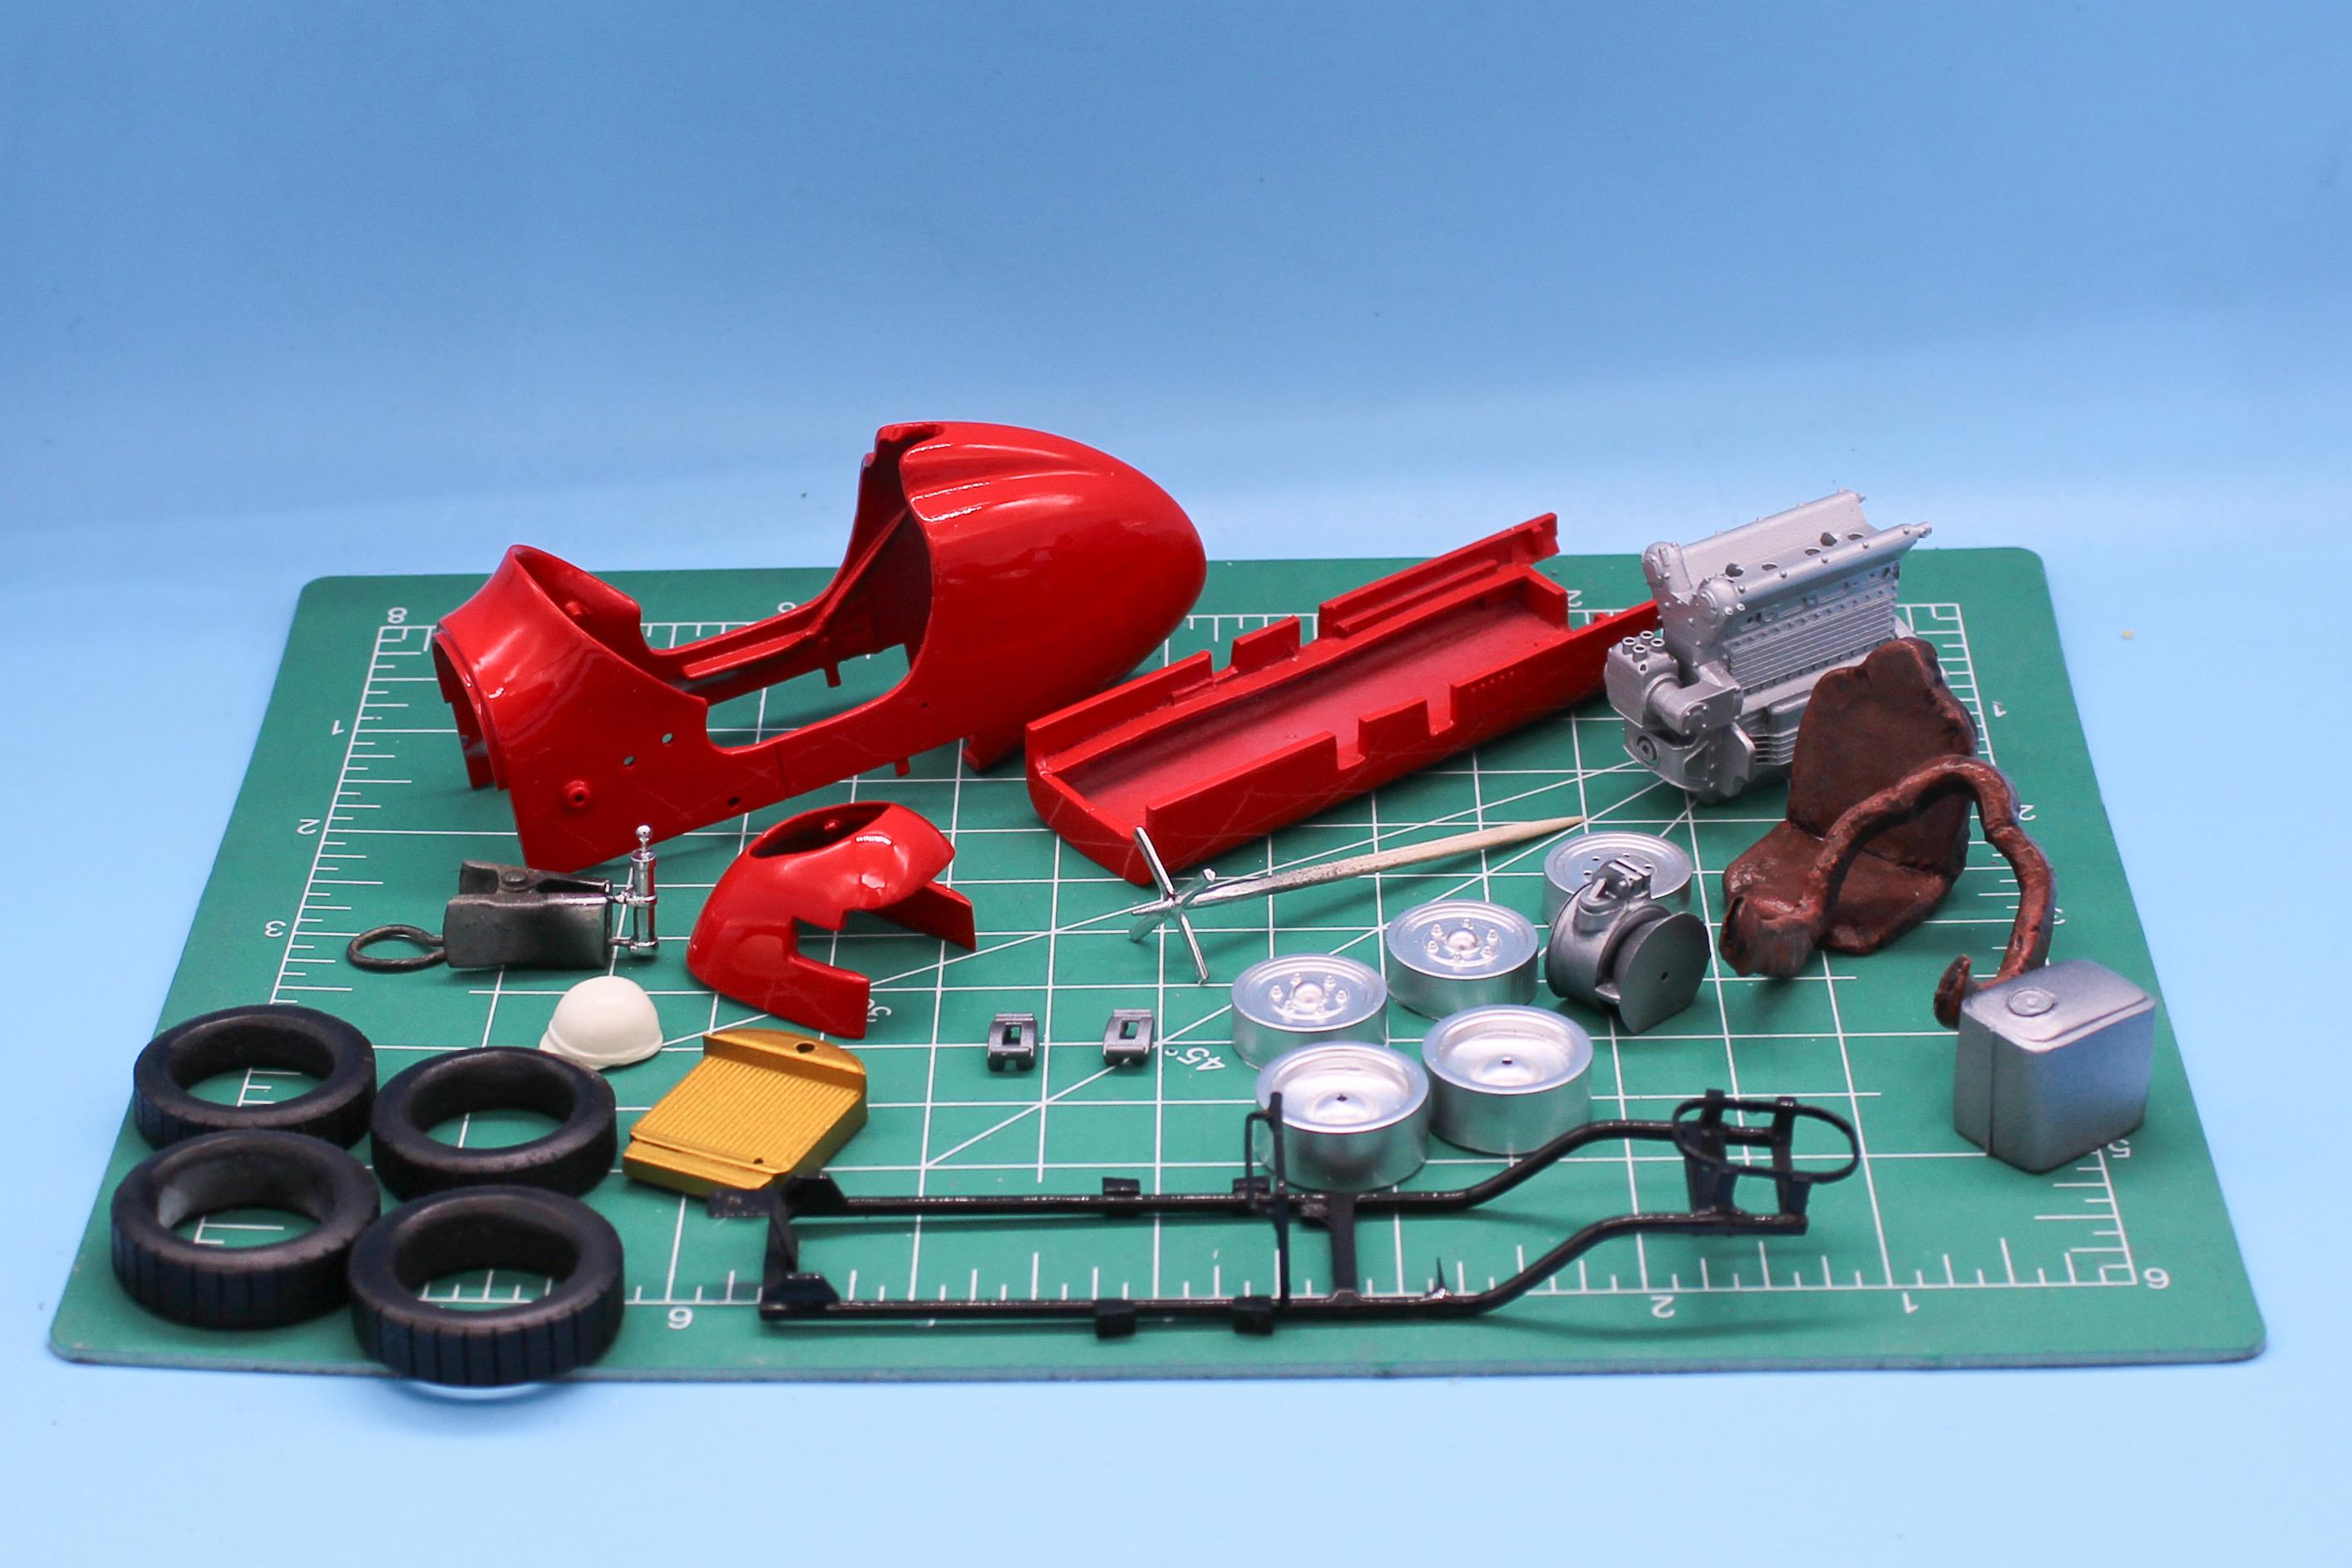
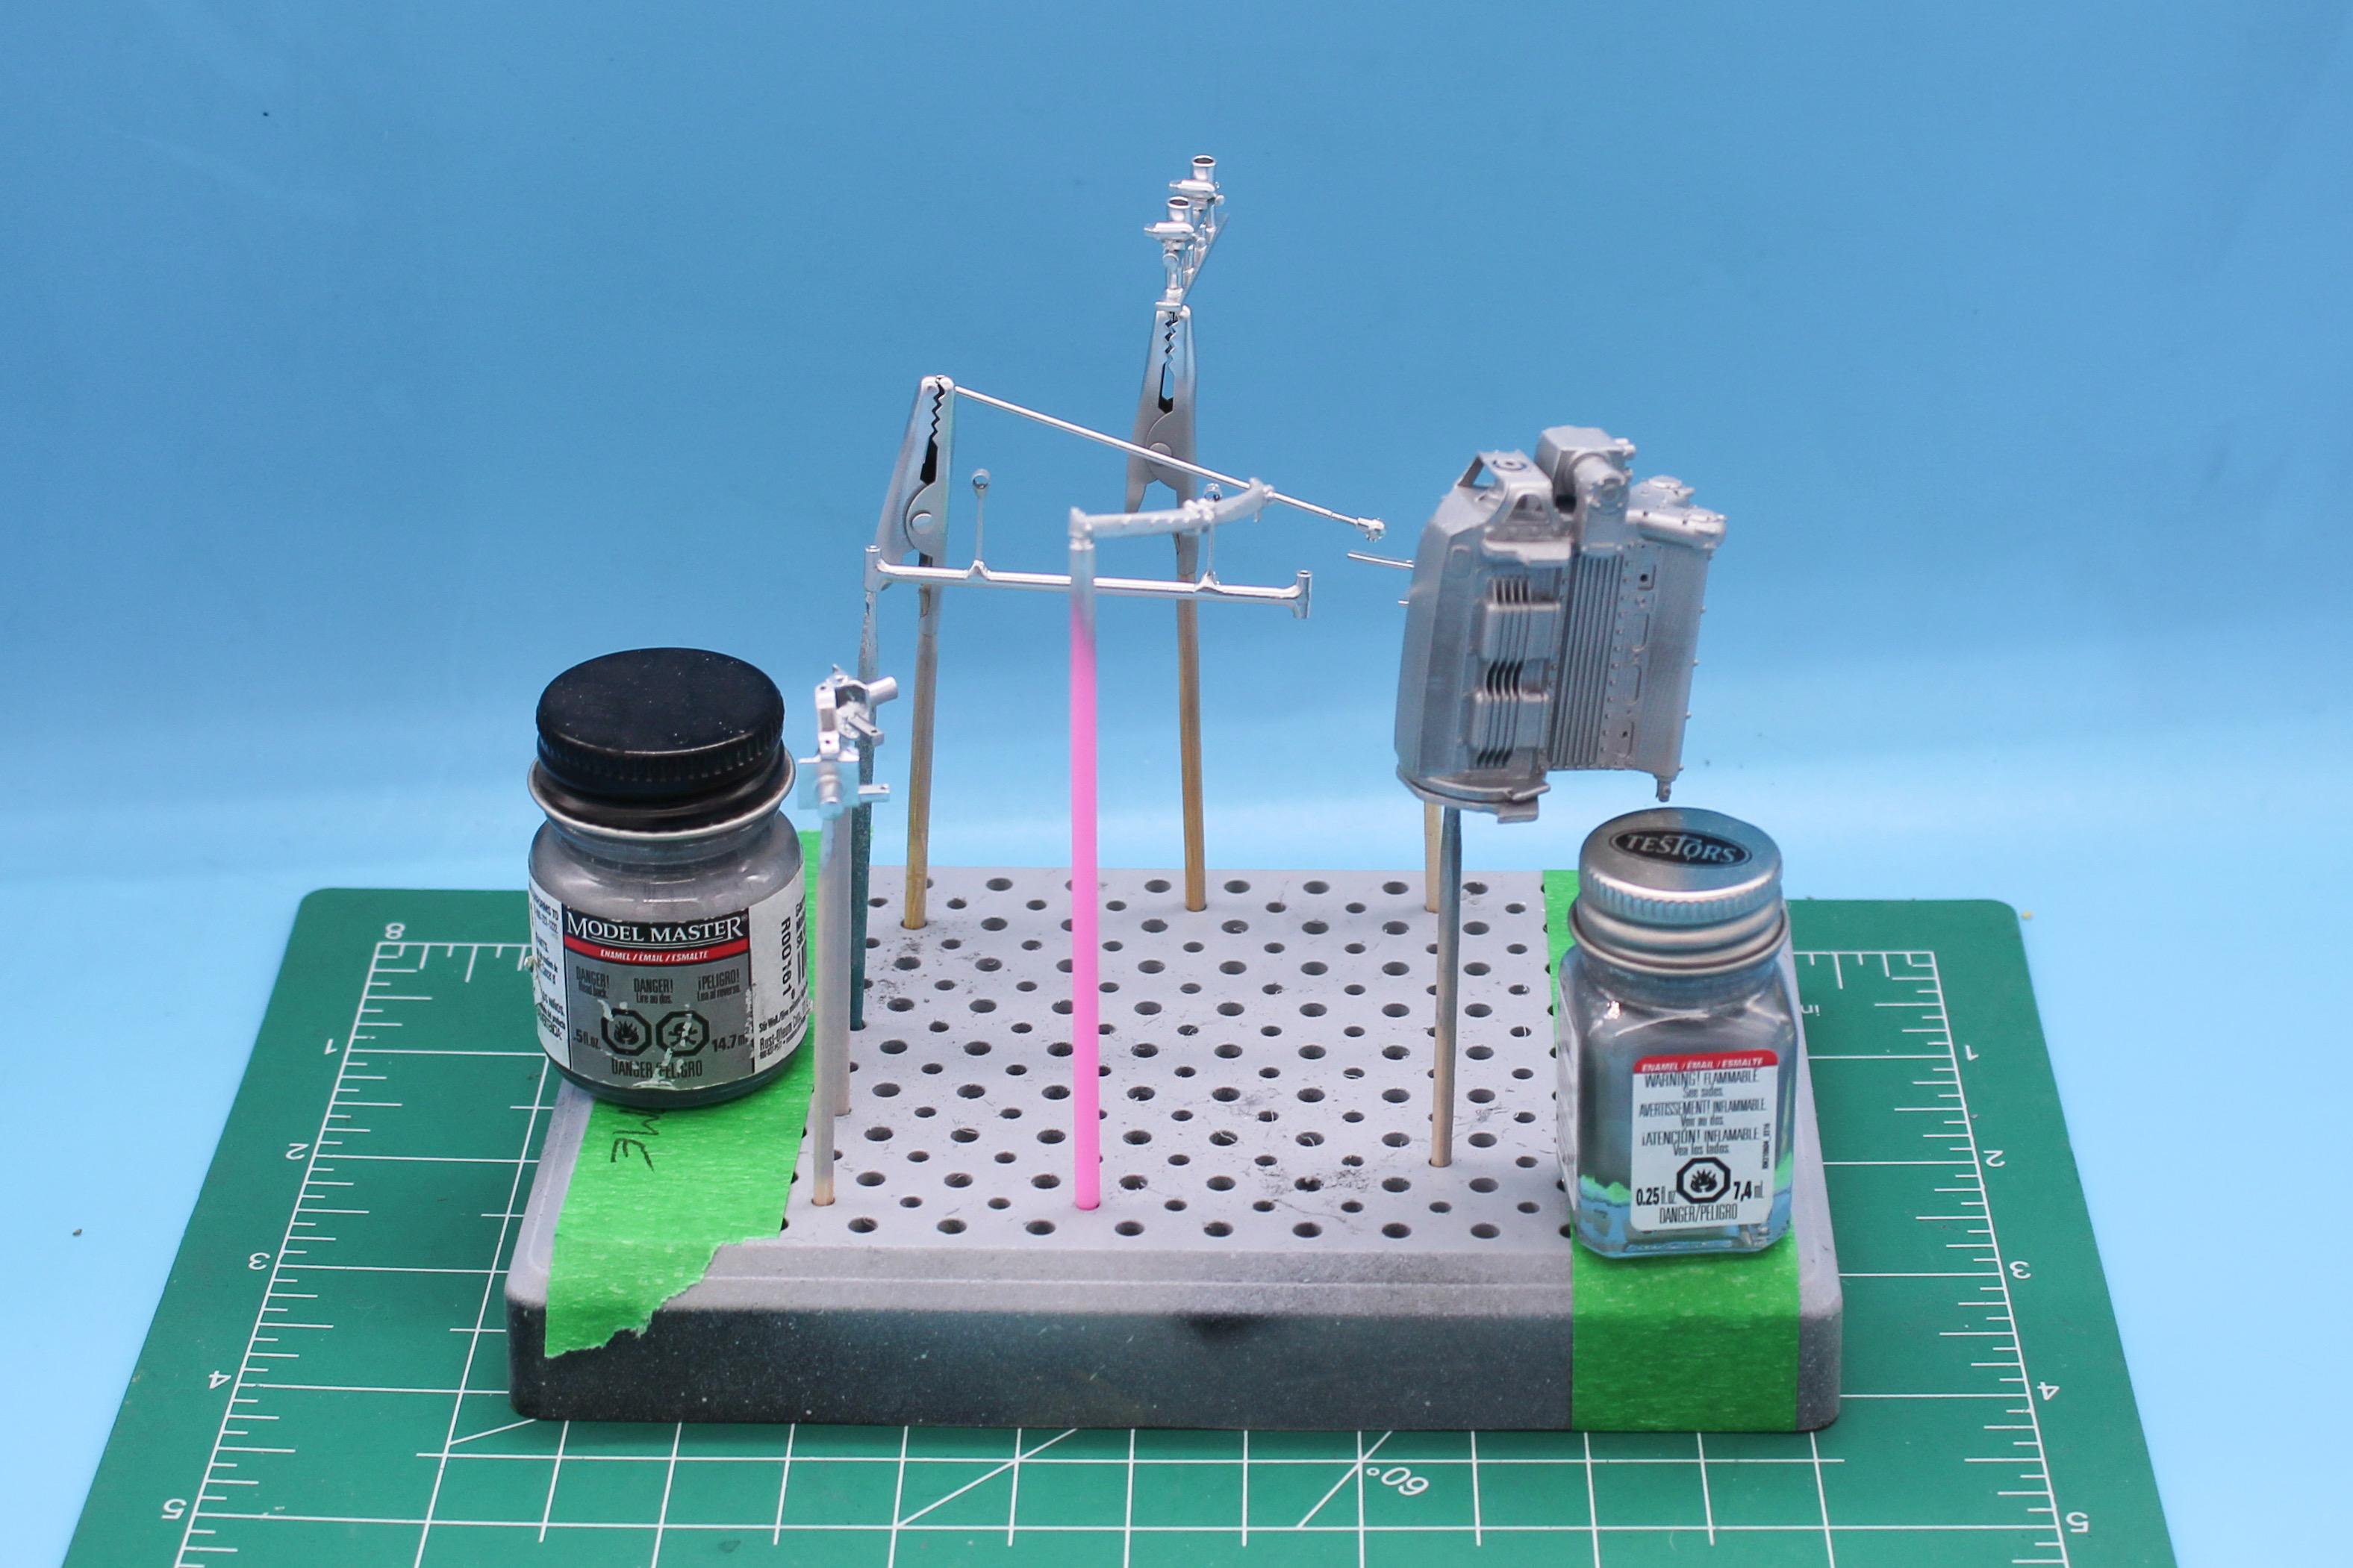
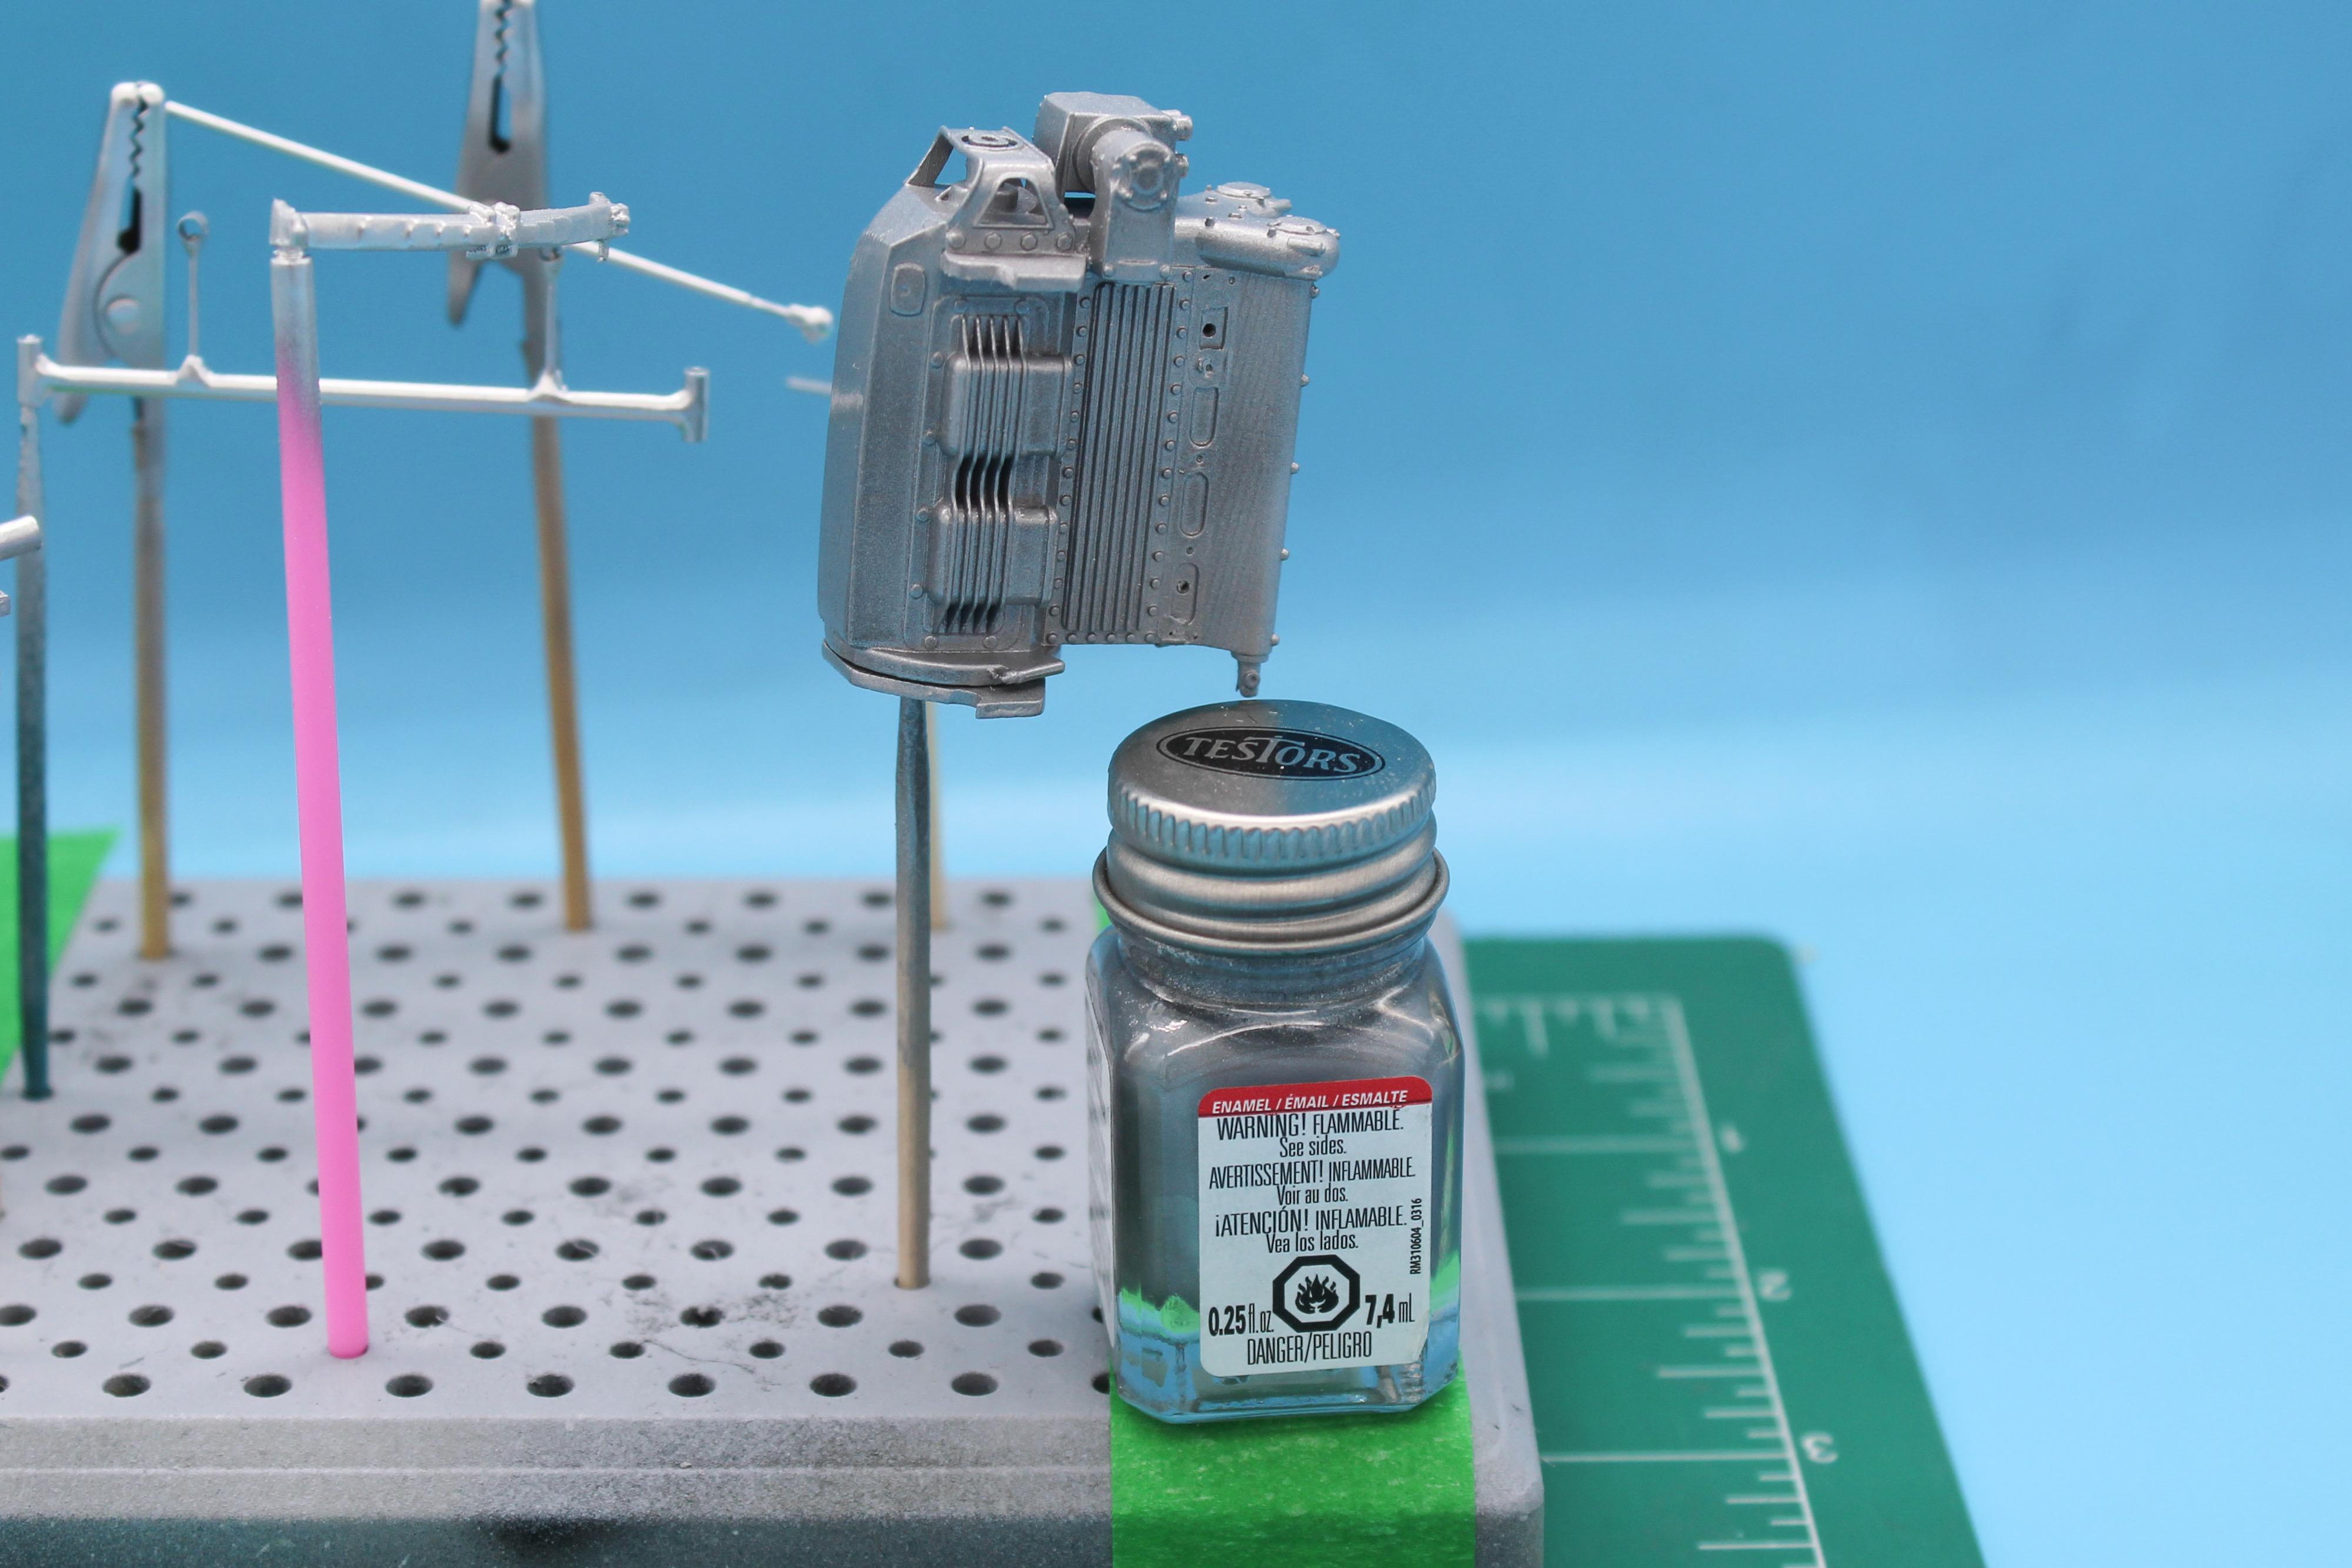
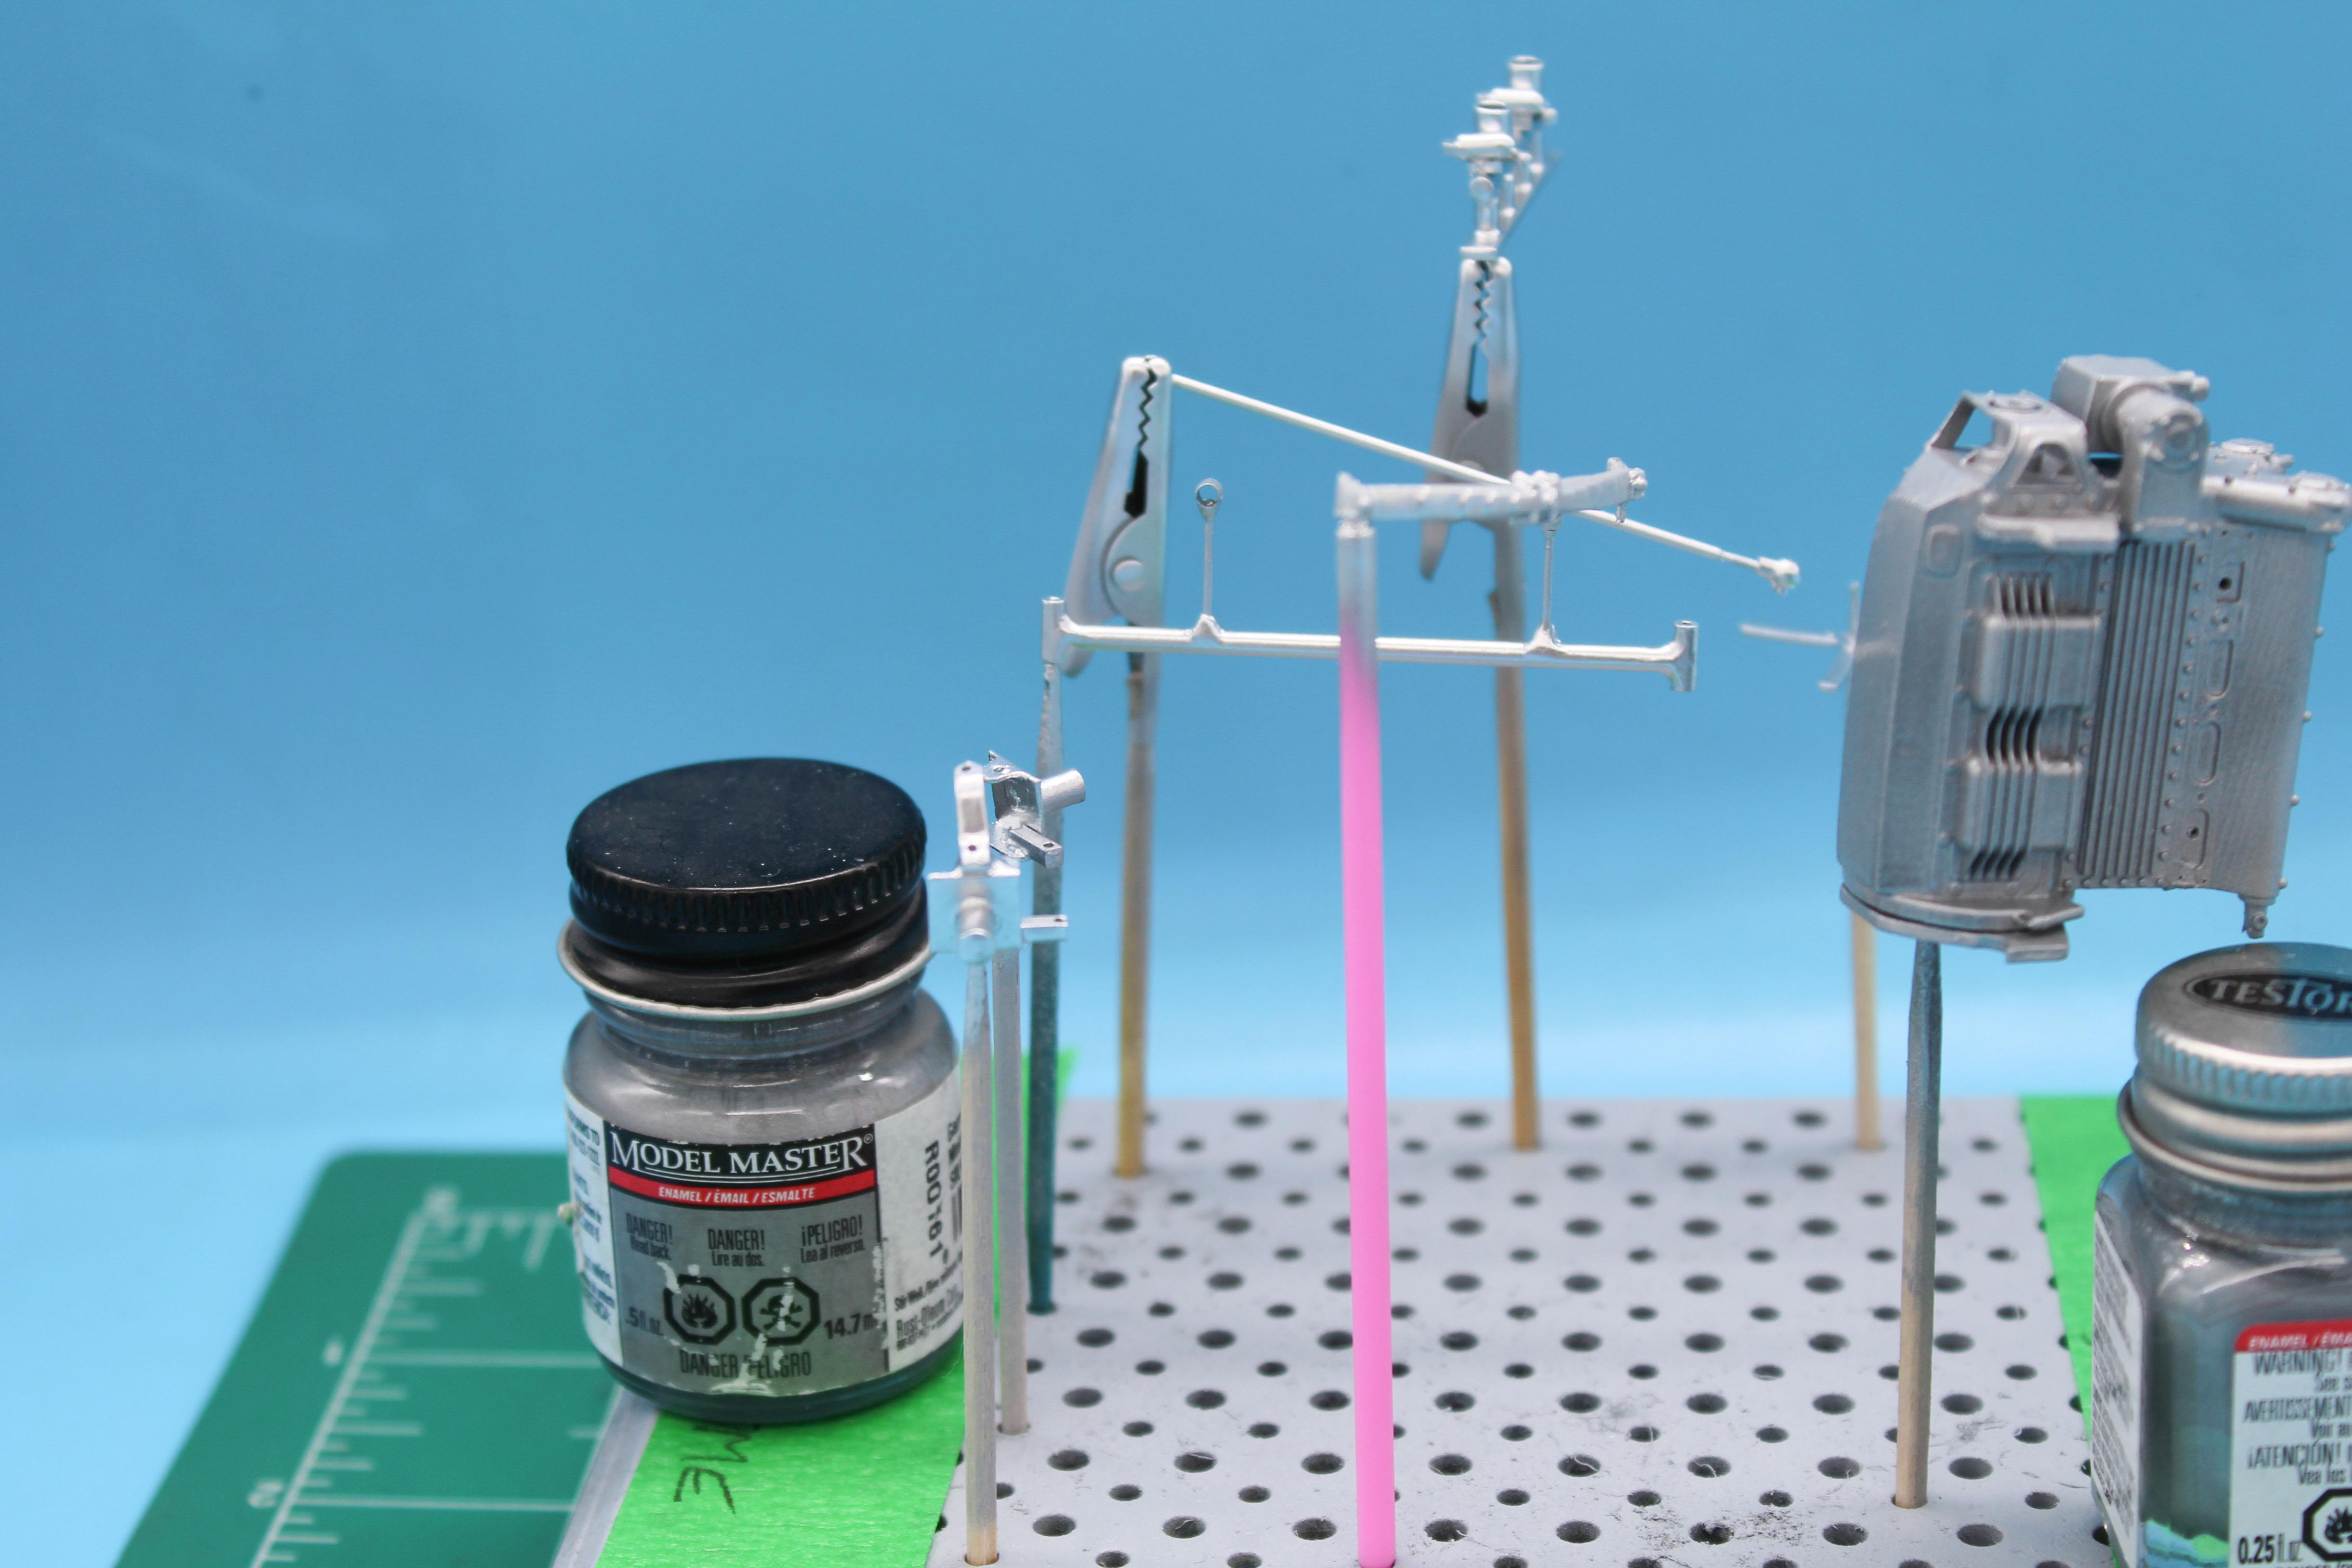
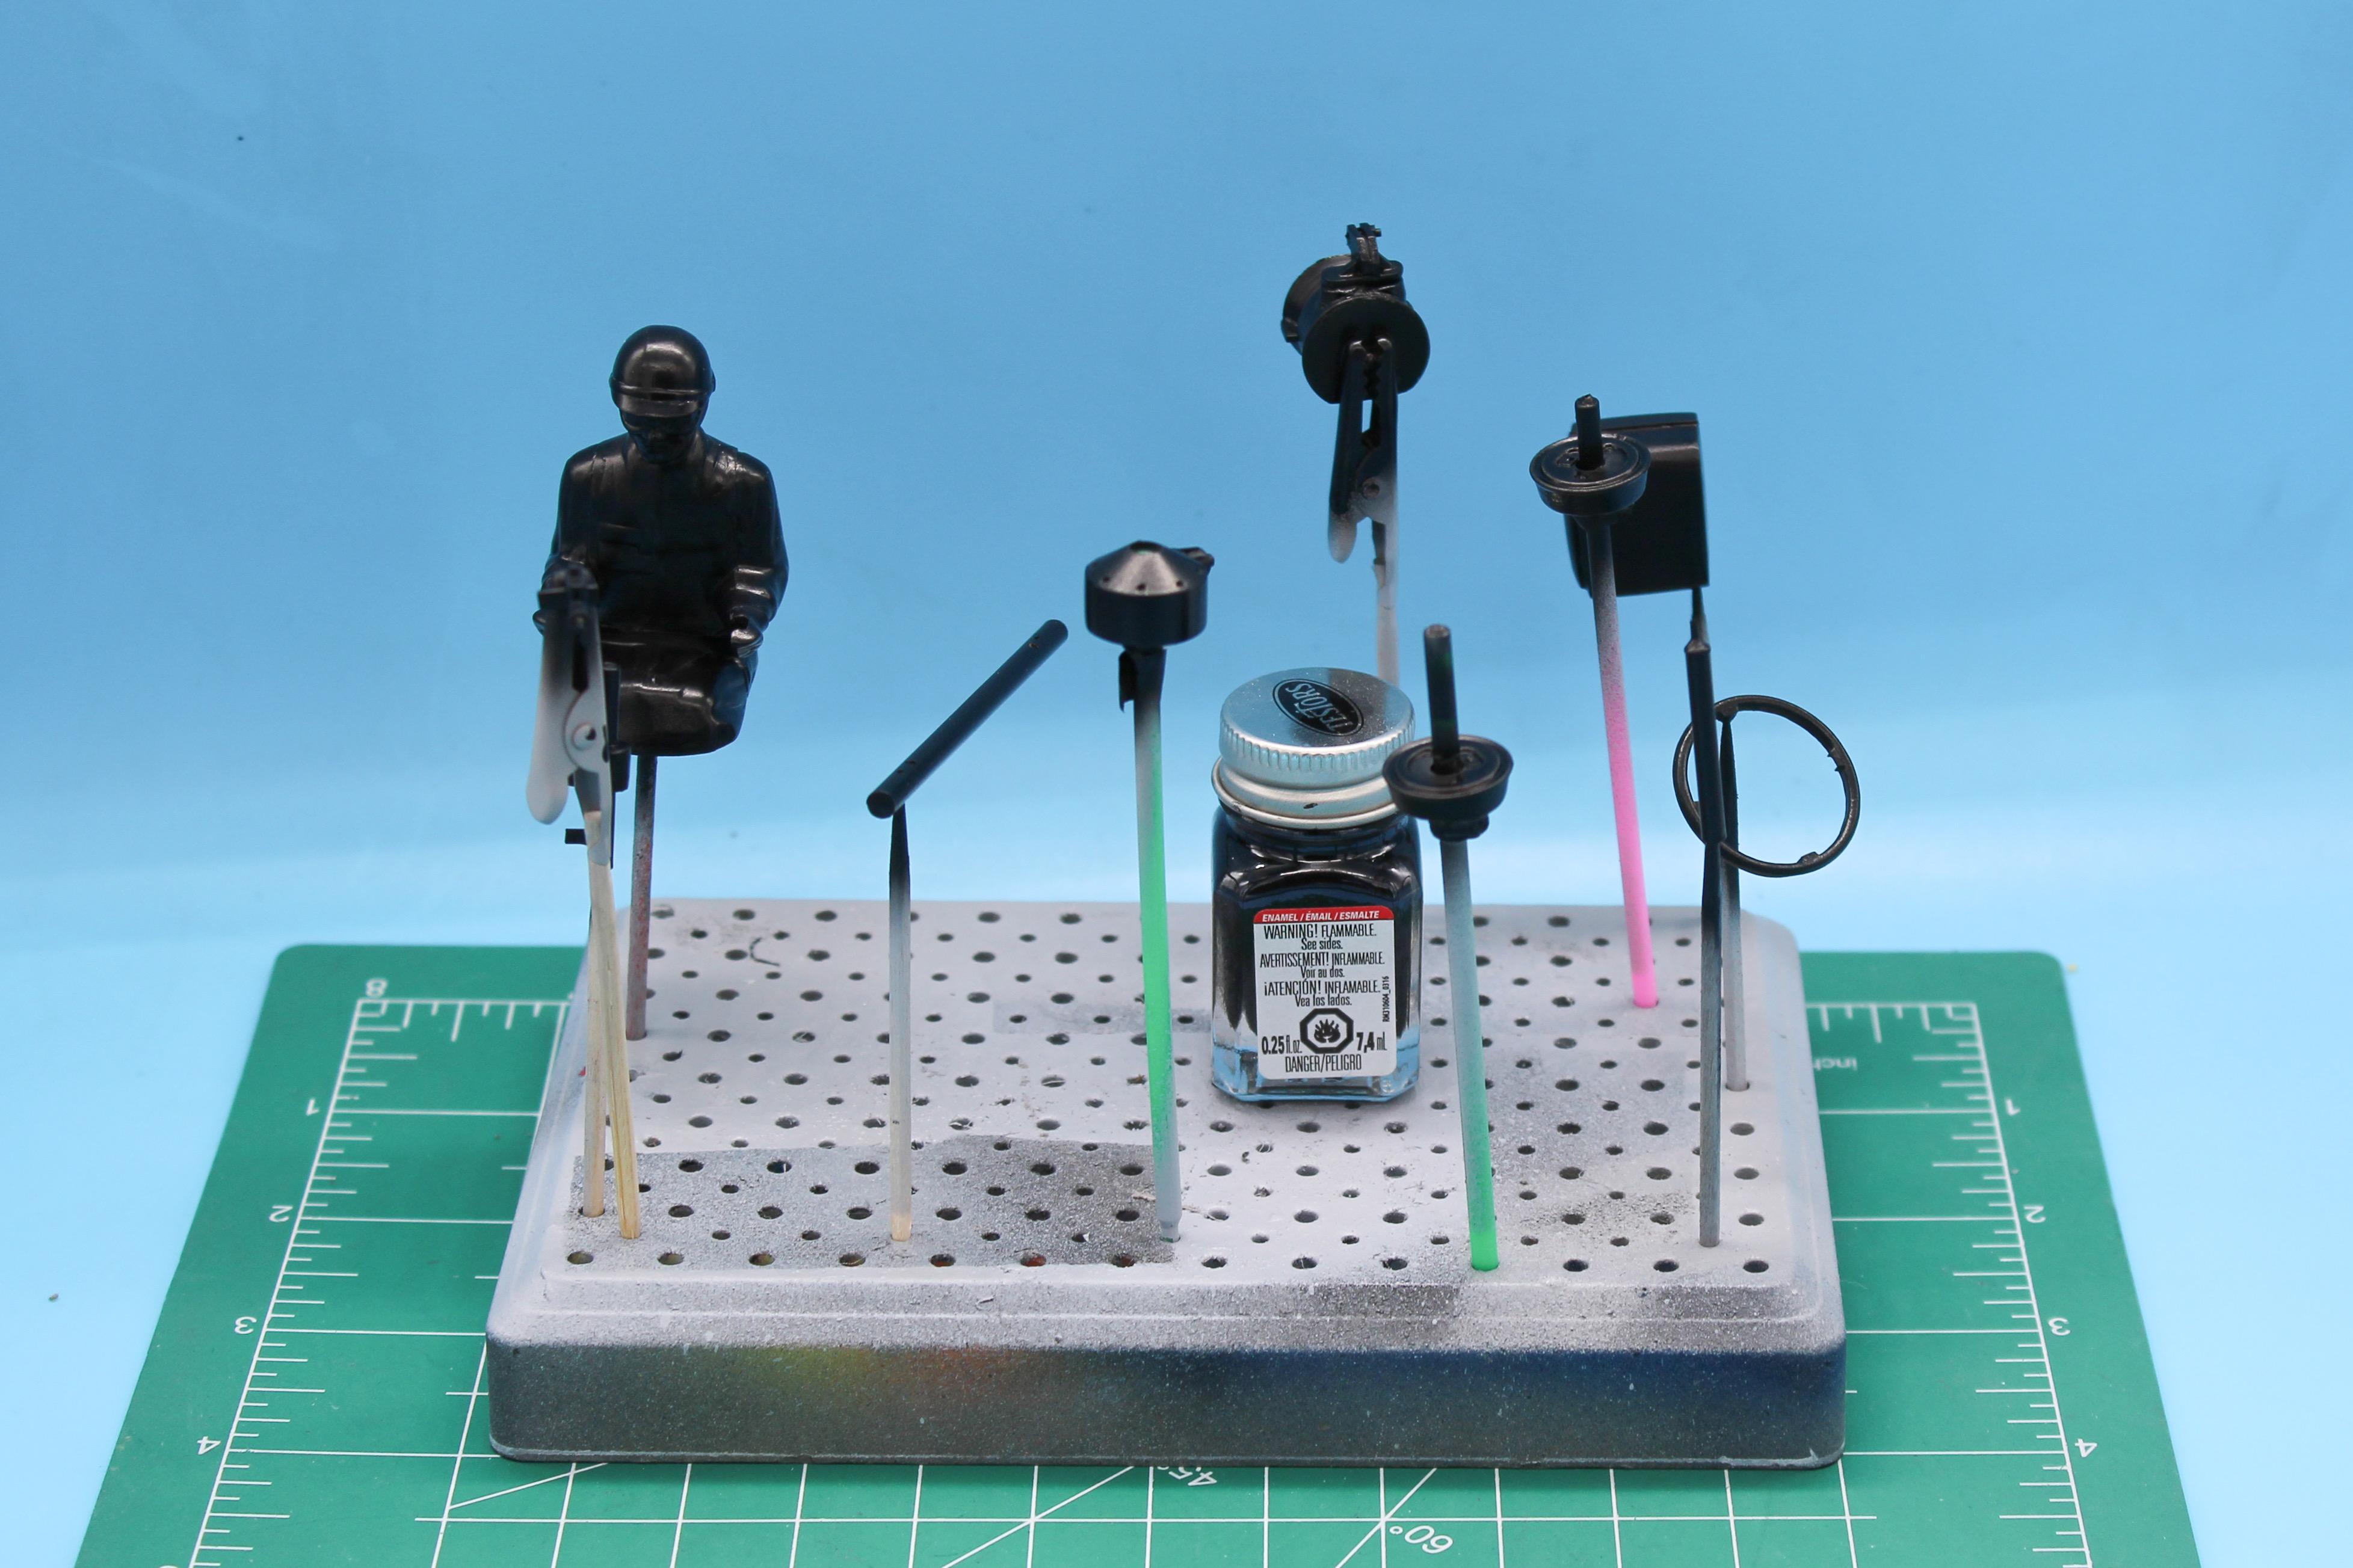
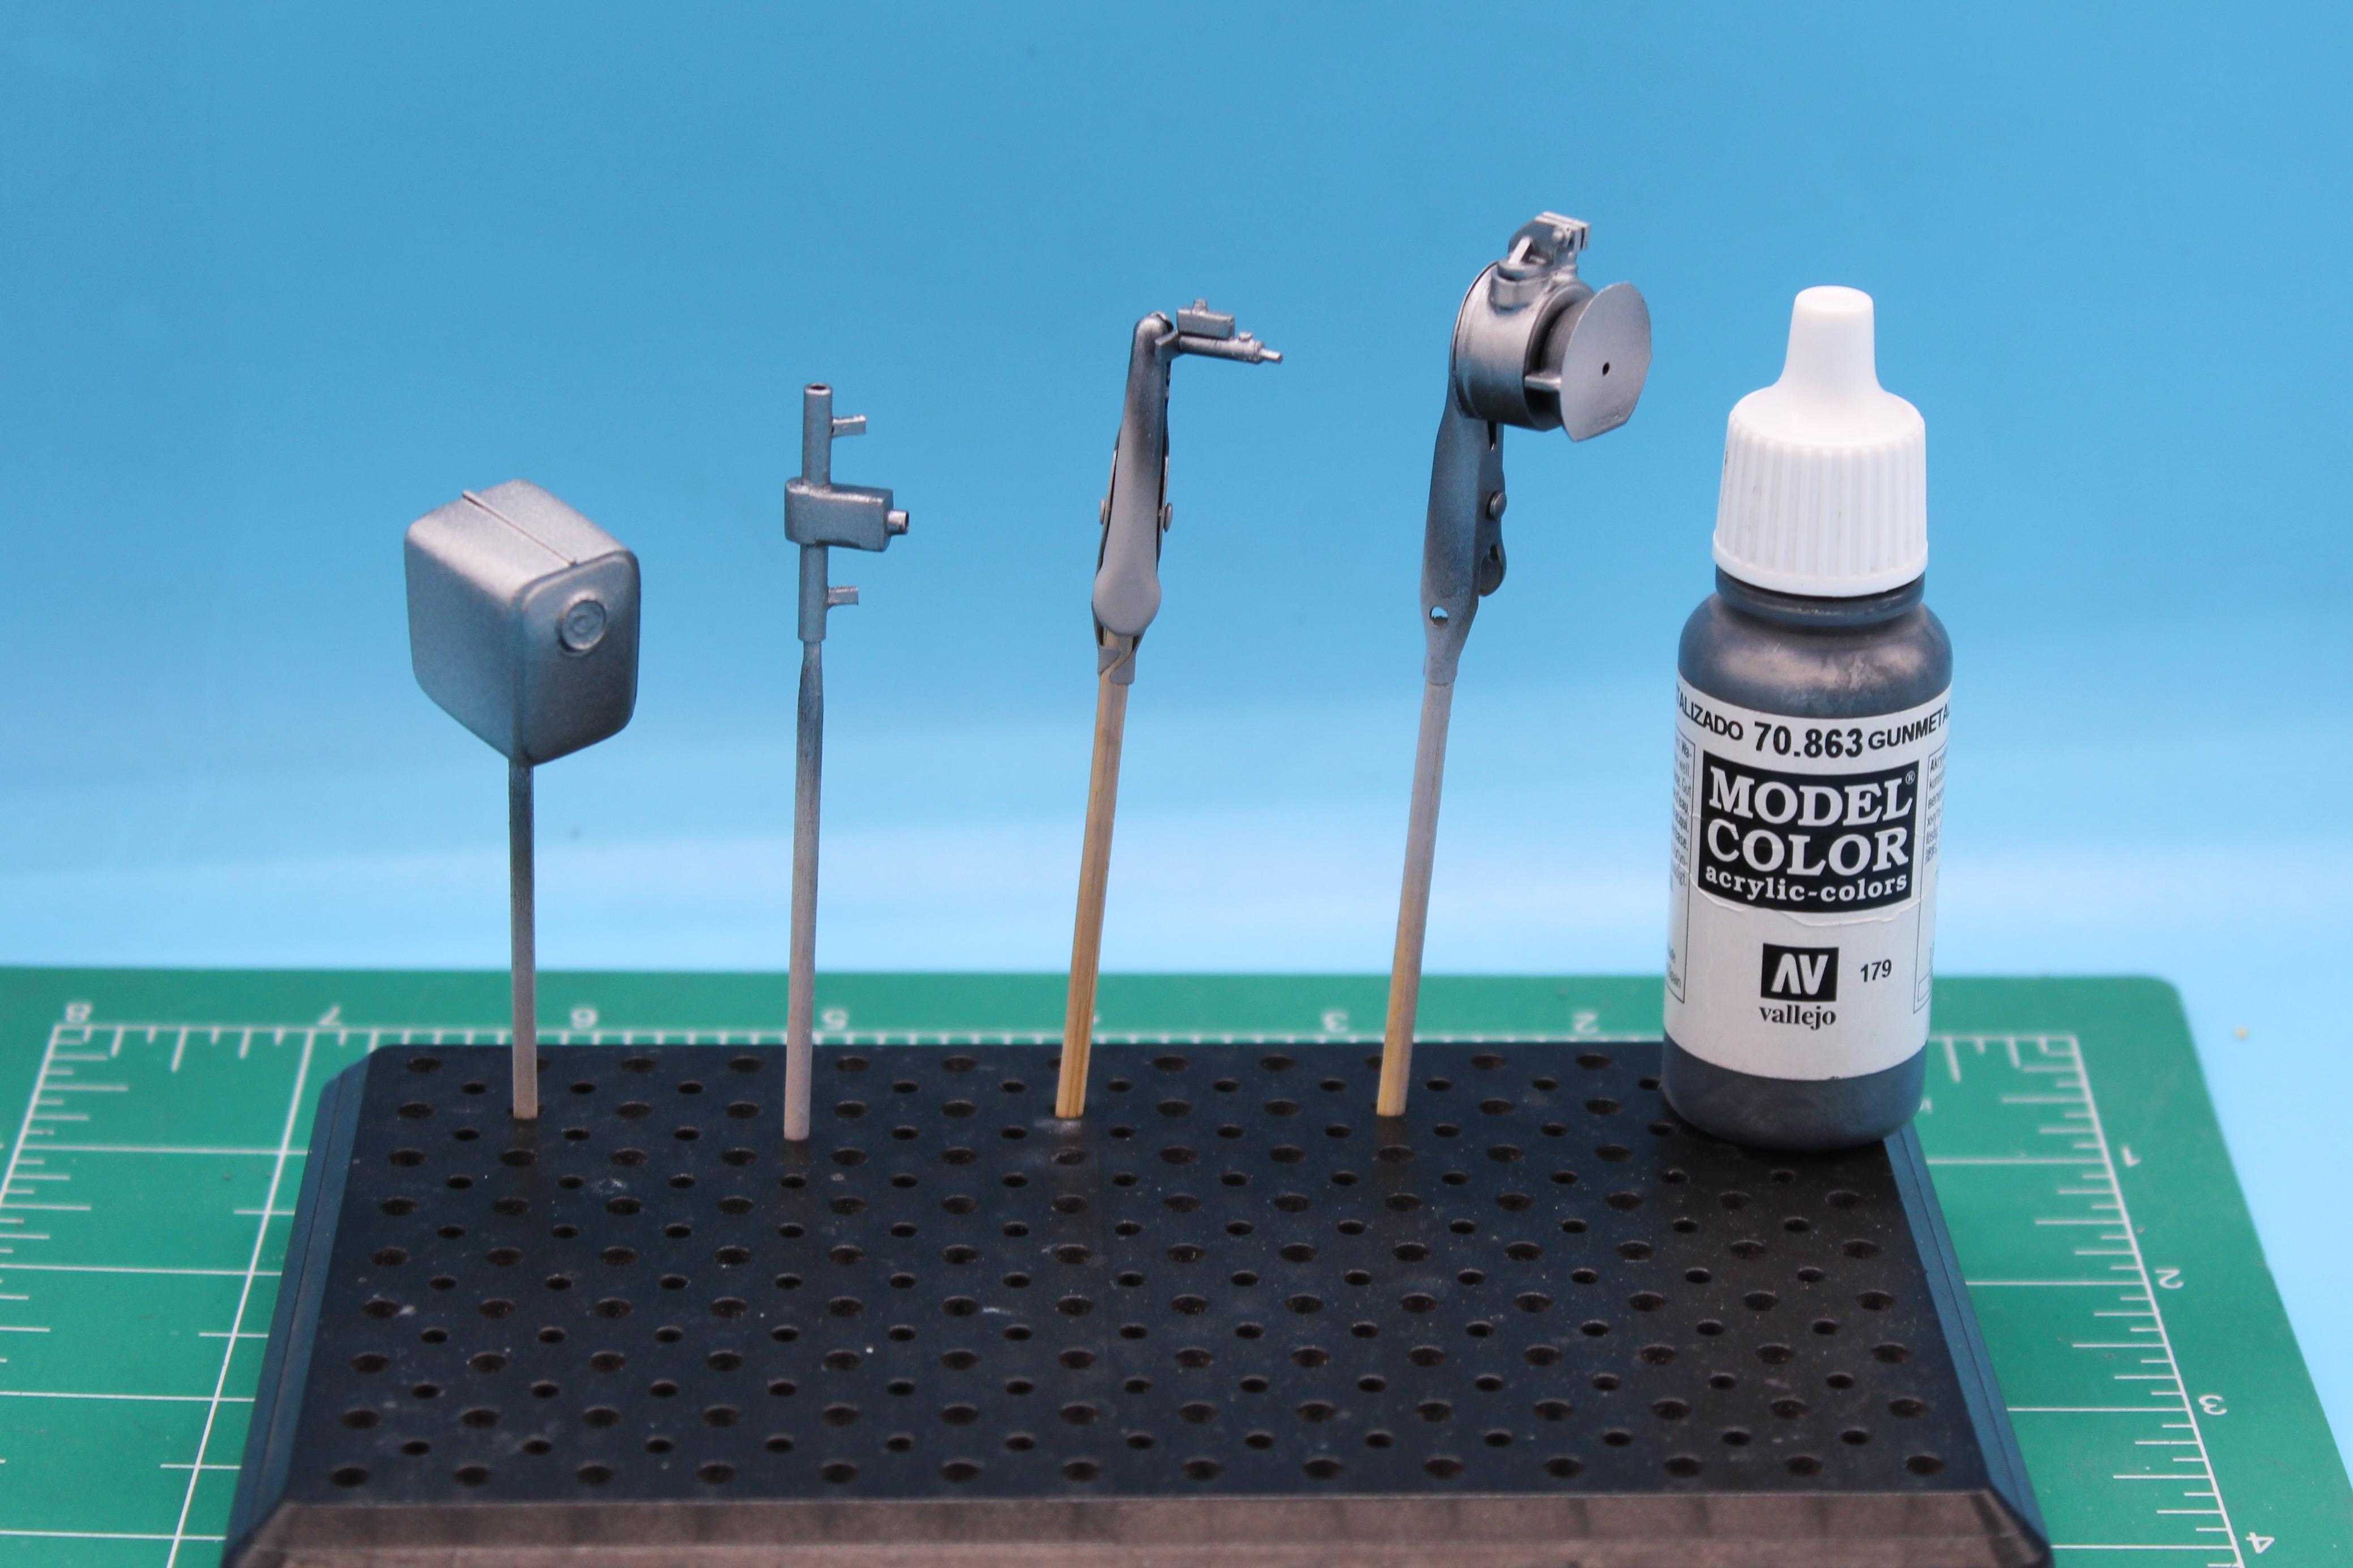
Thank you!! I’m still practicing with that technique, but it’s getting better… This week I put in a tonne of hours on this thing and have barely anything to show for it…a LOT of prepping parts for paint, laying down primer, tweaking and fixing, laying down more primer and so on. Got a BUNCH of the metal parts prepped and into paint though: Trying to use enamels where I can, particularly if they were ones available 70 years back when this kit was first released…seems like the aluminum Testor’s WAS around then, so that was a natural choice for the block: I was actually impressed at how easy a passable aluminum finish was to get with this…WAY simpler than my usual process with acrylics - maybe I learned a trick there… I can’t figure out when the Testor’s chrome was first available, but I know it was around the in the 60s, at least, so I went with that for a lot of the shinier metal parts: All of these will get additional stages of paint detailing before I’m done, but these being enamels I need to give them a few days to harden up… Plus shot a few more parts with the Testor’s semi gloss black: And used that as a base for some metal different metal tones (which, again, I’ll be further paint-detailing before they’re done): I don’t know why, but it didn’t occur to me that Testor’s probably makes a steel finish enamel (which they do) so I went with a Vallejo acrylic on these - d’oh! Actually, I used the gunmetal as a base and then added some highlights in various lighter tones for the parts above to give a little more depth and realism, but I wish I’d used enamels now. Oh well… By the way, that creepy shadowy figure on the paint rack there is for my box-stock companion piece to this build, which I’ve been working away on in the background…got the body straight and into primer this weekend: Then shot it with the brightest yellow I could find… I went with modern acrylic for this one…I’ve got some signwriting that I want to put on this one and it’s just easier to use the process that I’m used to to get the result I want…painting the driver is a fun new challenge - never did one of those before. WAY harder than a glossy body… Thanks for looking - more soon, soon as I’ve done more!!
-
Goo Gone in the orange bottle will handle that - spray it on, let it soak, remove the label
- 38,863 replies
-
- 1
-

-
- johan
- glue bombs
- (and 1 more)
-
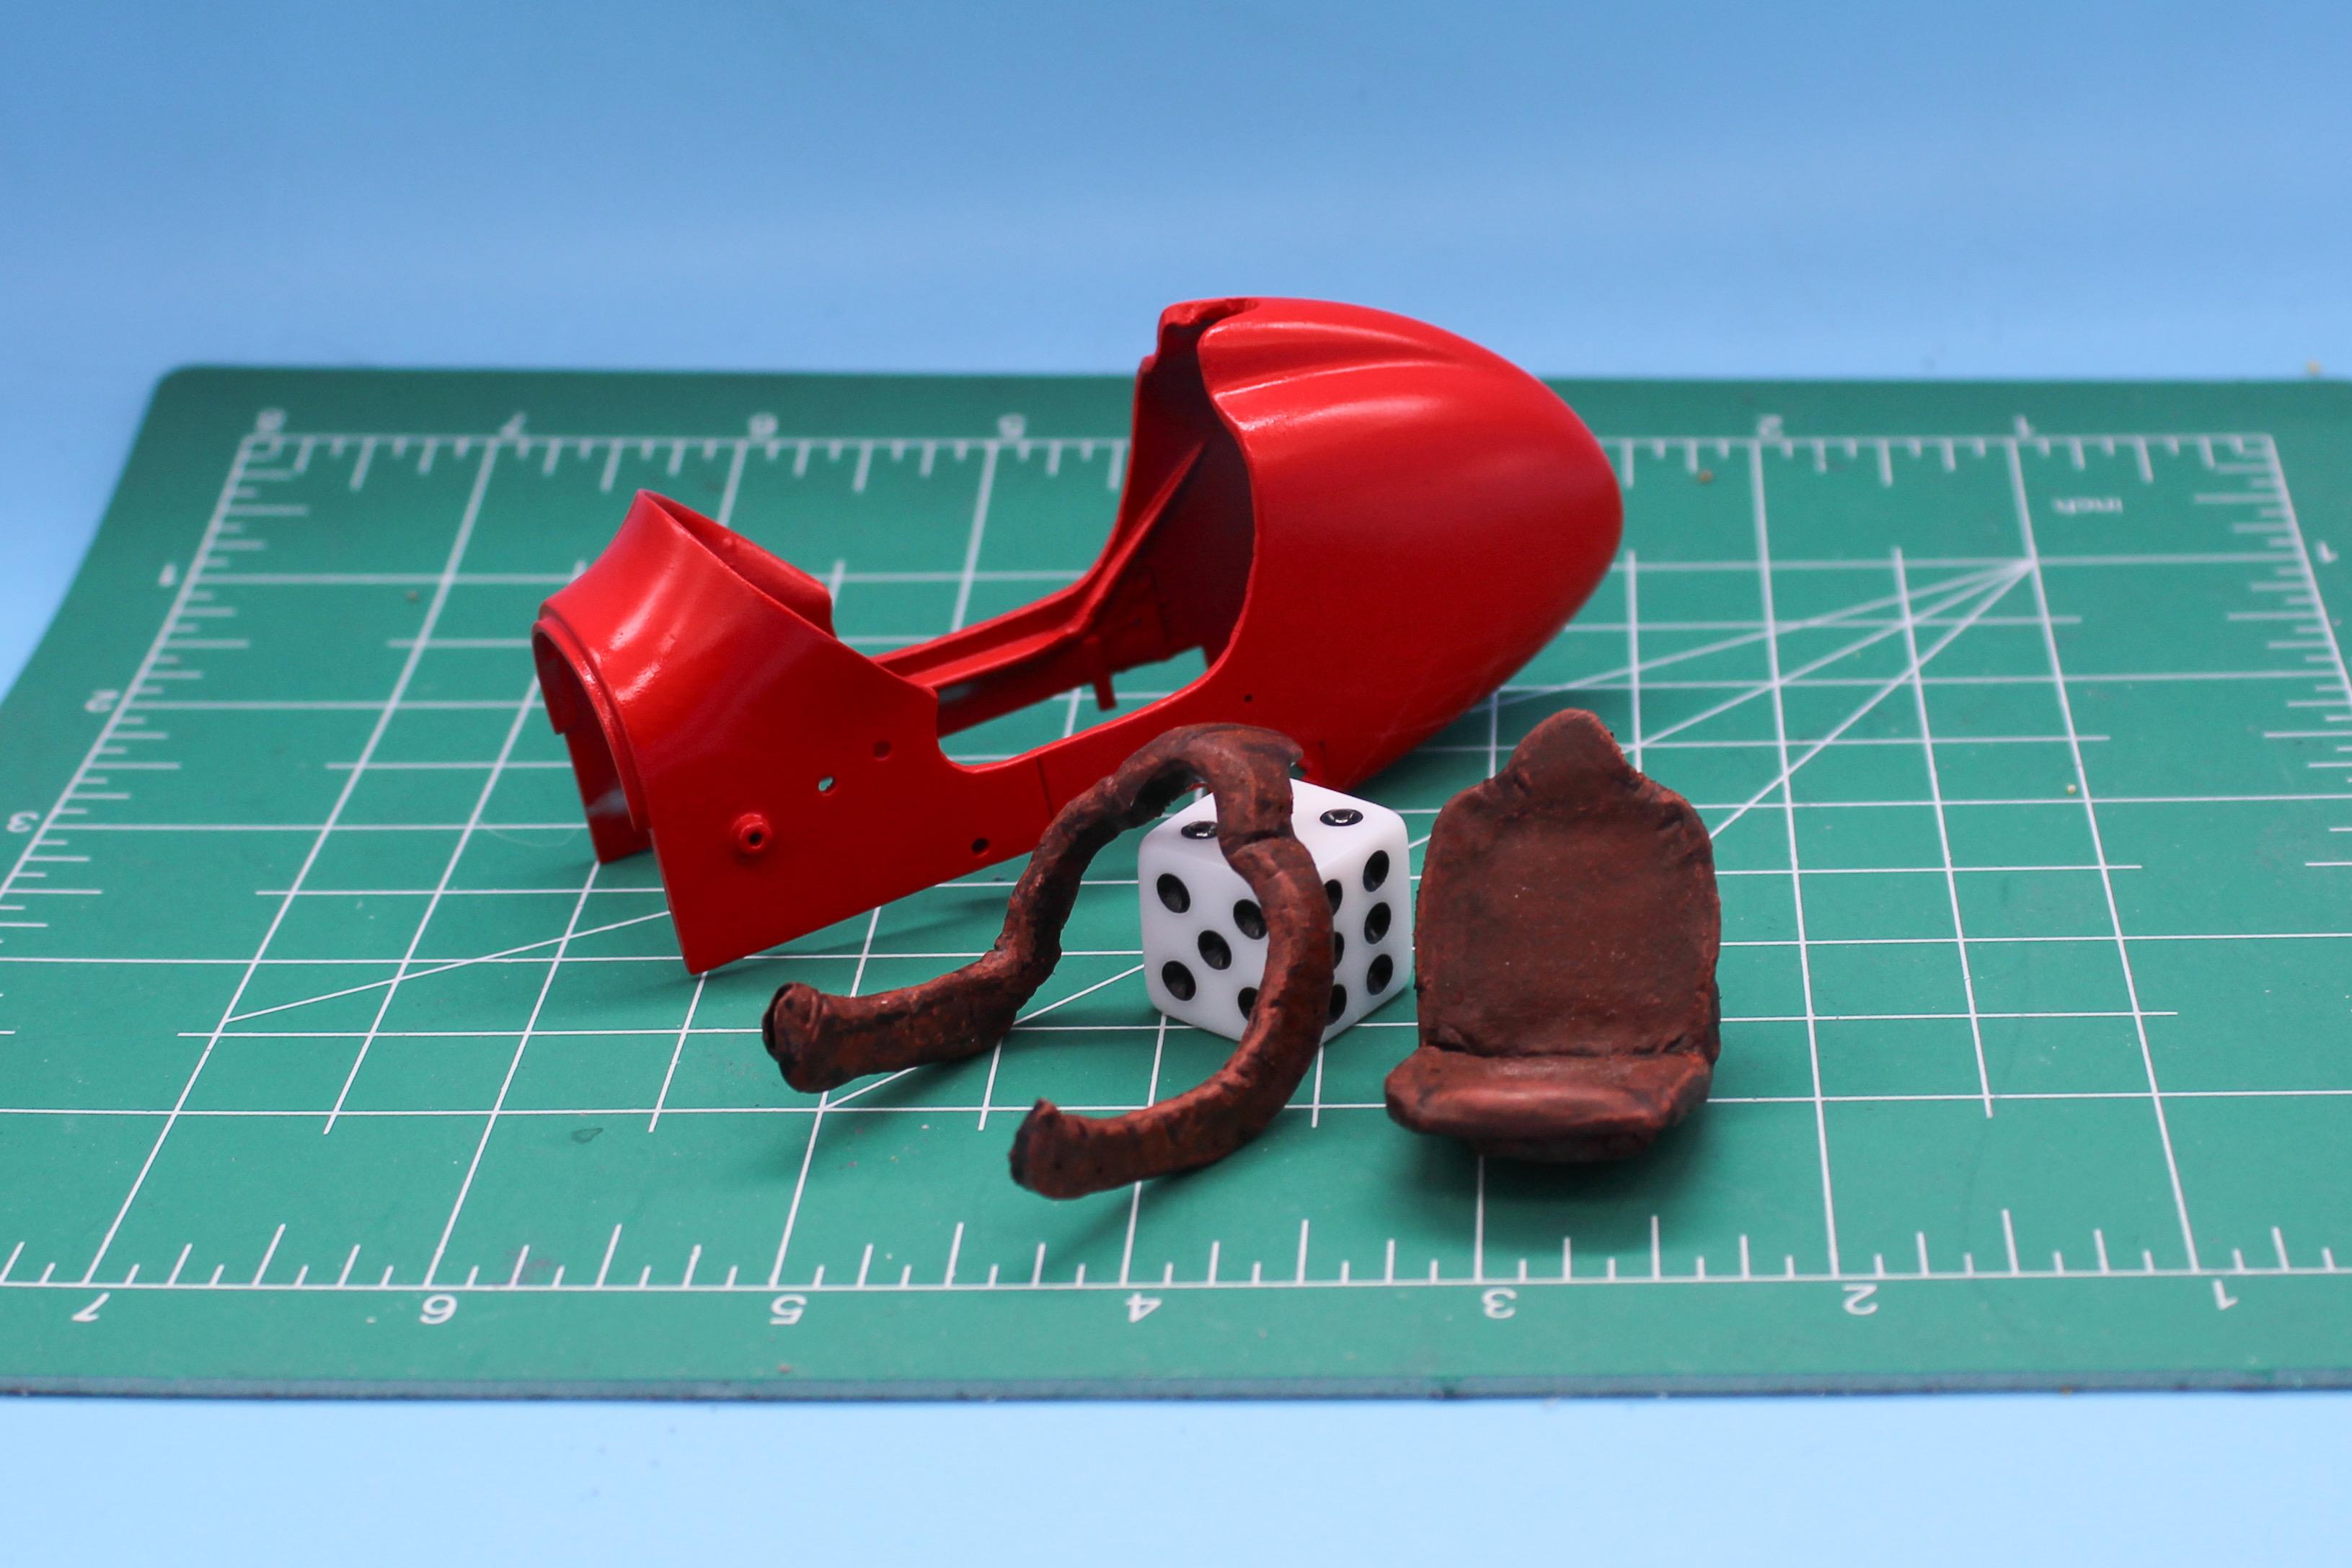
I printed this a little while back and have been slowly messing with it…this will be a curbside build, but I’m drawing up plans for a full-detail version too - fibreglass three-wheeled oval racer! They race as a contact class in the UK, hence the patch panels and some damage that I’ve been working into it slowly…need to figure out interior stuff (square tube rollcage, seat, gas tank, and so on) but every time I watch a video of them race these things I get motivated and work on it a little more
-
Beautiful work Pierre!
-
Yep, bingo, that must be it! It’s a cool old piece that someone did a nice job of anyway - it’ll get a gentle restoration at some point, soon as I find a windshield frame for it… Thanks fellas!
-
Largest kit box ever?
OldNYJim replied to OldNYJim's topic in General Automotive Talk (Trucks and Cars)
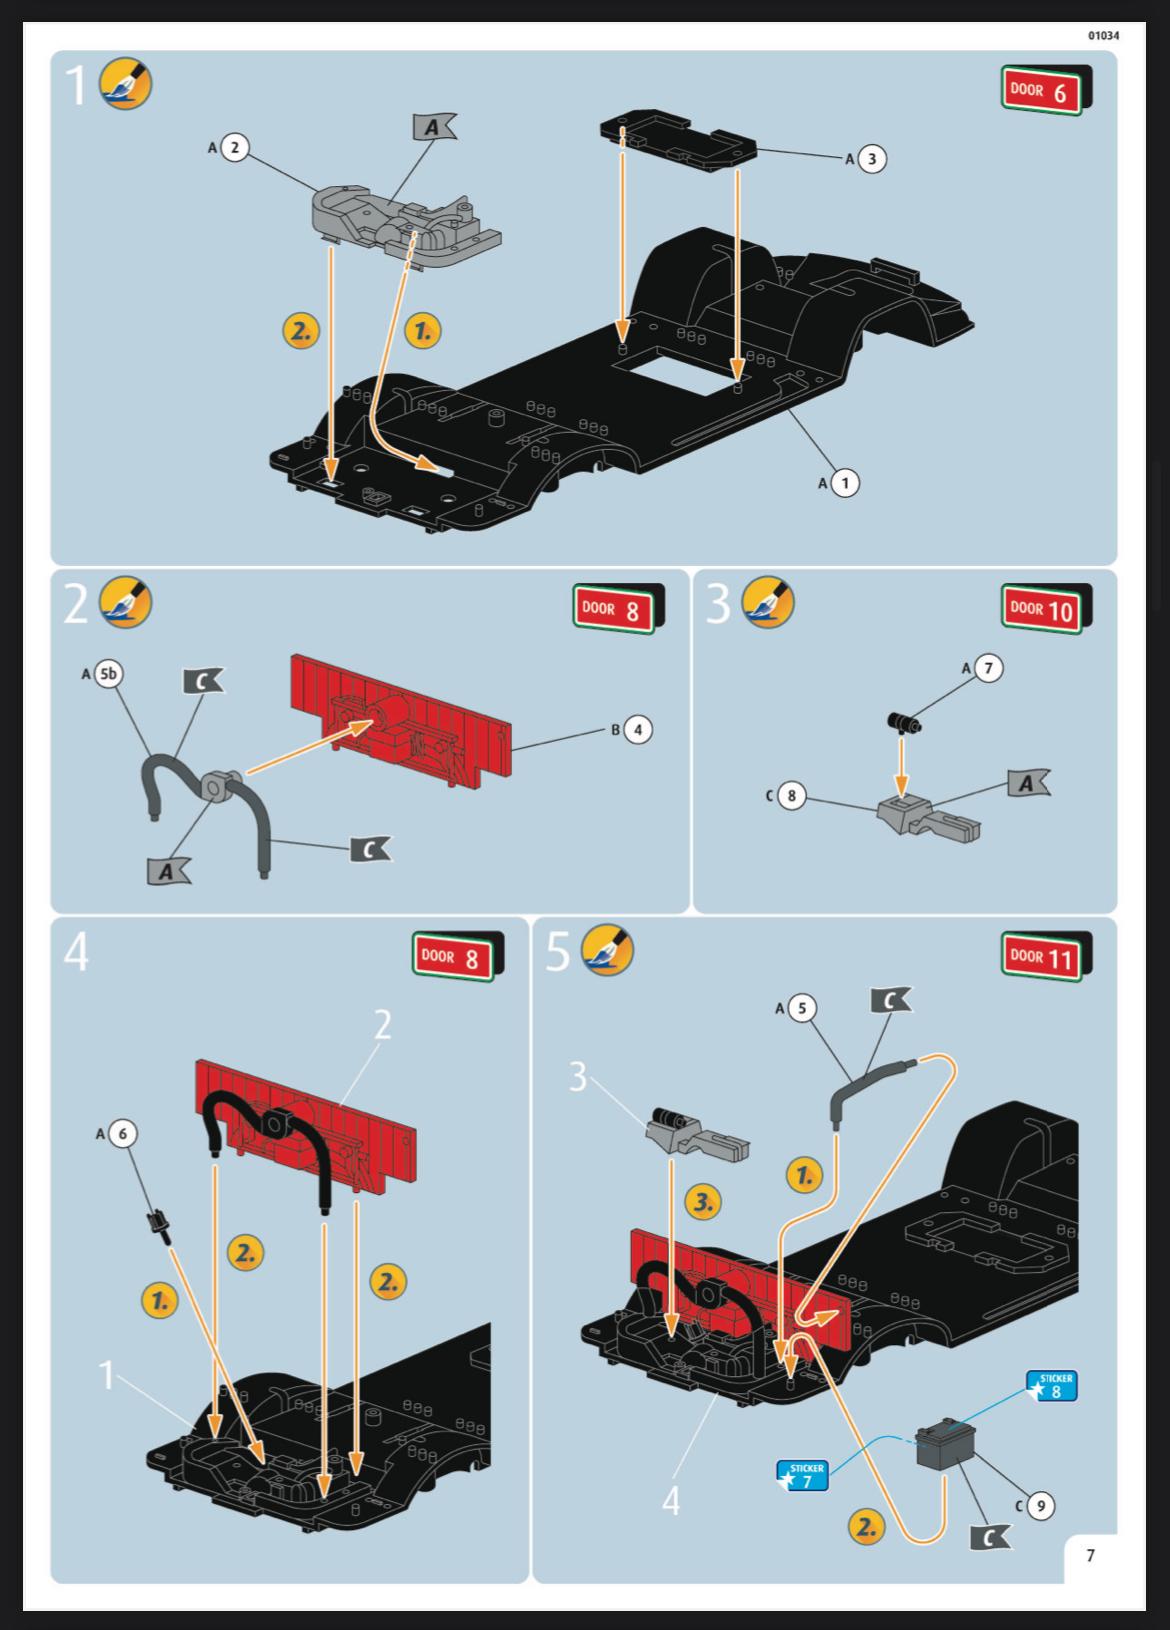
I think the box IS the advent calendar, although the instructions reference ‘doors’ to open each day: Maybe I need to dig into this further…
-
Largest kit box ever?
OldNYJim replied to OldNYJim's topic in General Automotive Talk (Trucks and Cars)
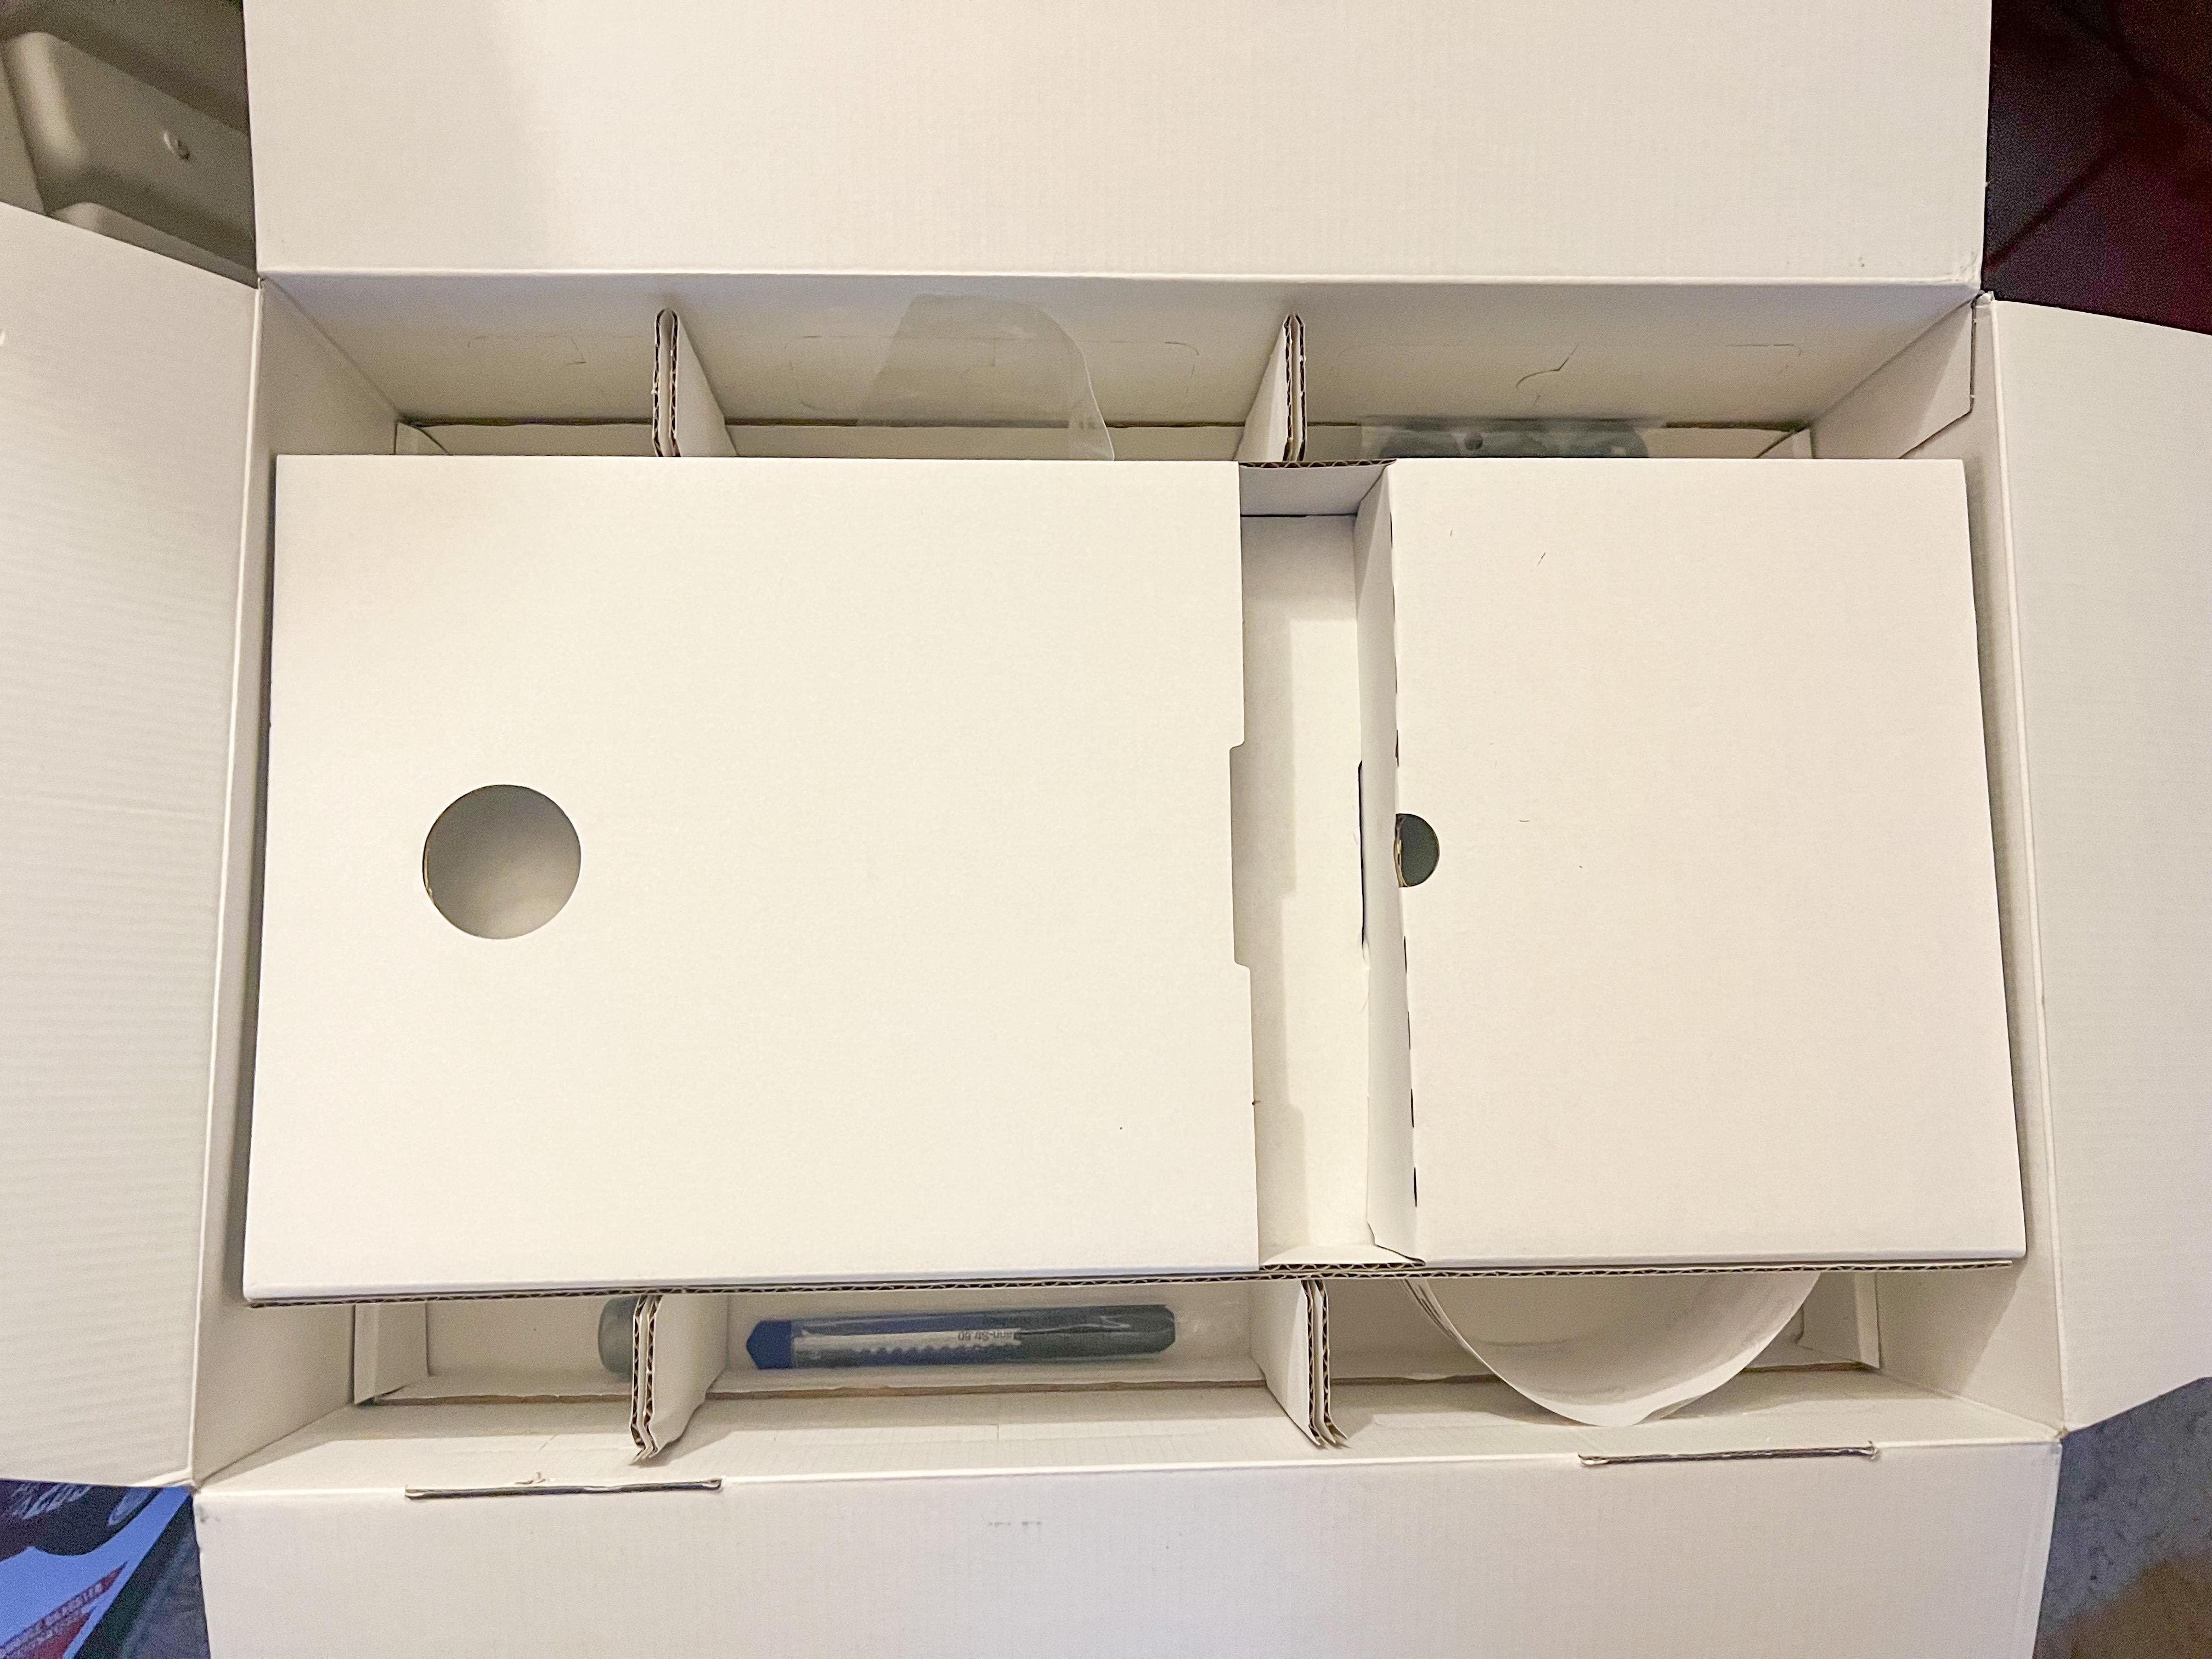
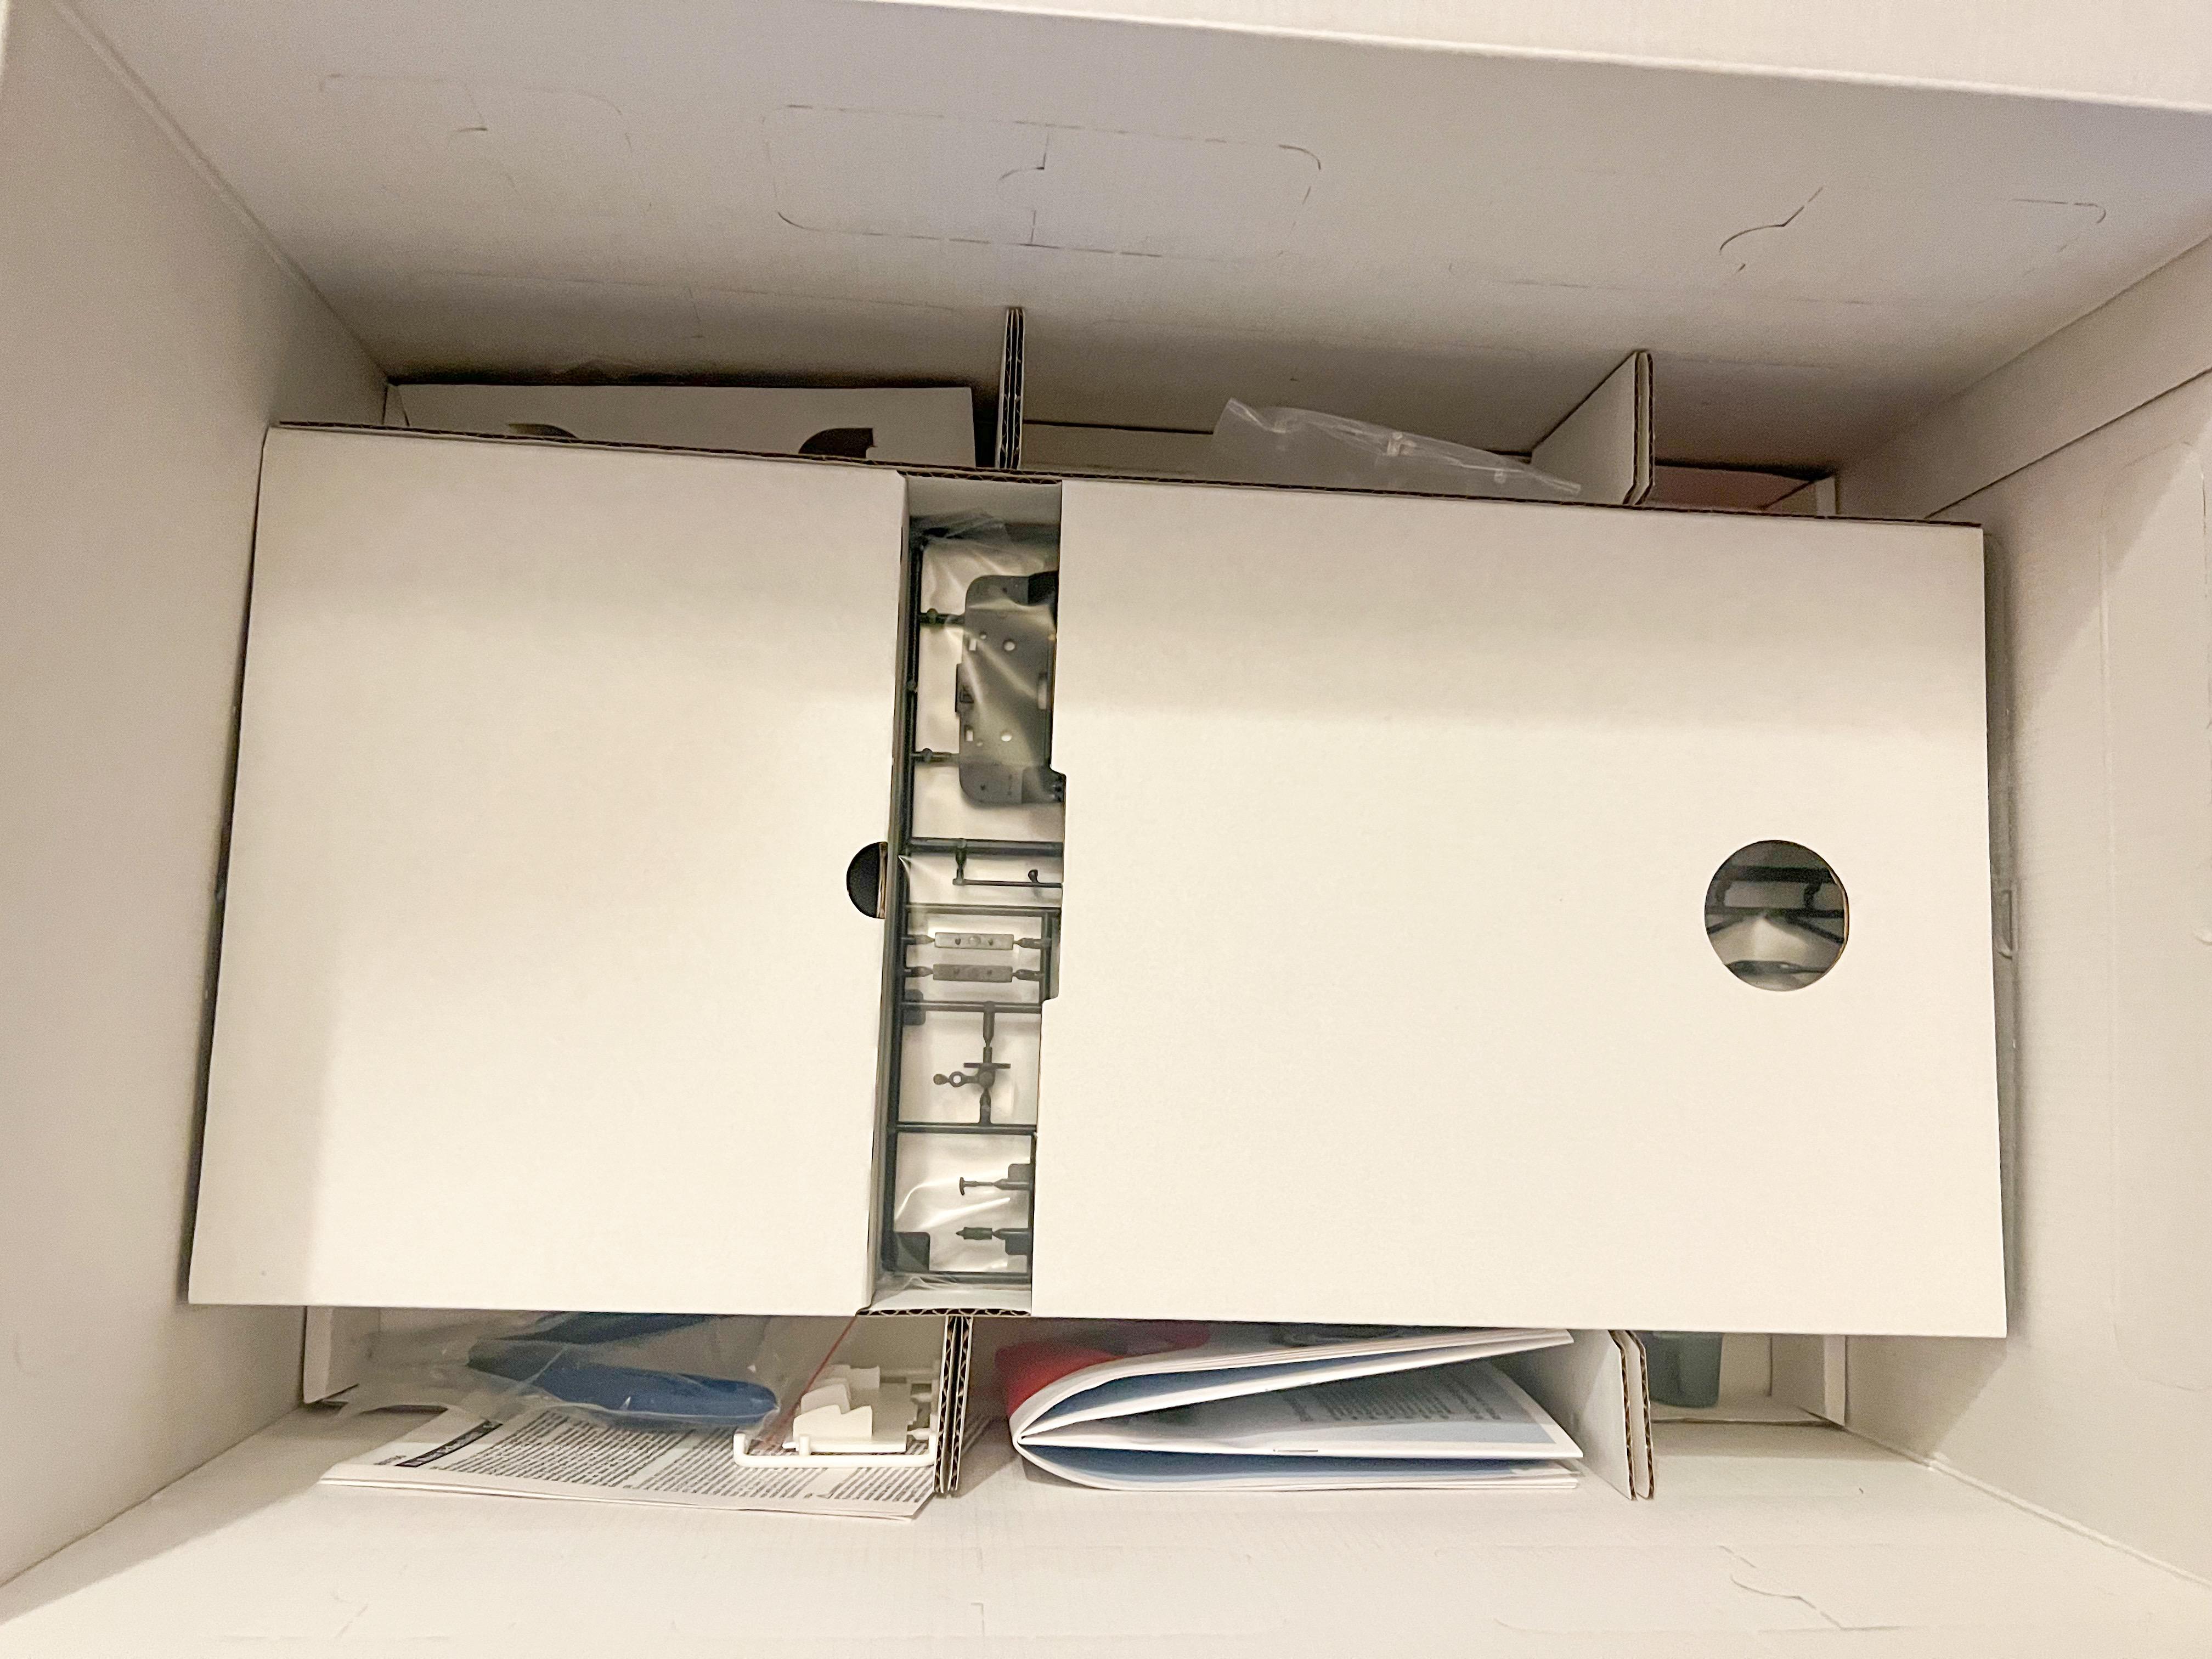
A whole of of empty box, haha! First layer: Some tires, a ‘decal’ sheet (actually vinyl stickers) and some of those useless acrylic paints that you always find in starter sets… Second layer: Instruction manual, some nippers, clear parts, and first peek at a sprue… I didn’t wanna unpack it further yet in case I’m ruining some big surprise for myself… Here it is with a standard-ish kit box though for more context…
-
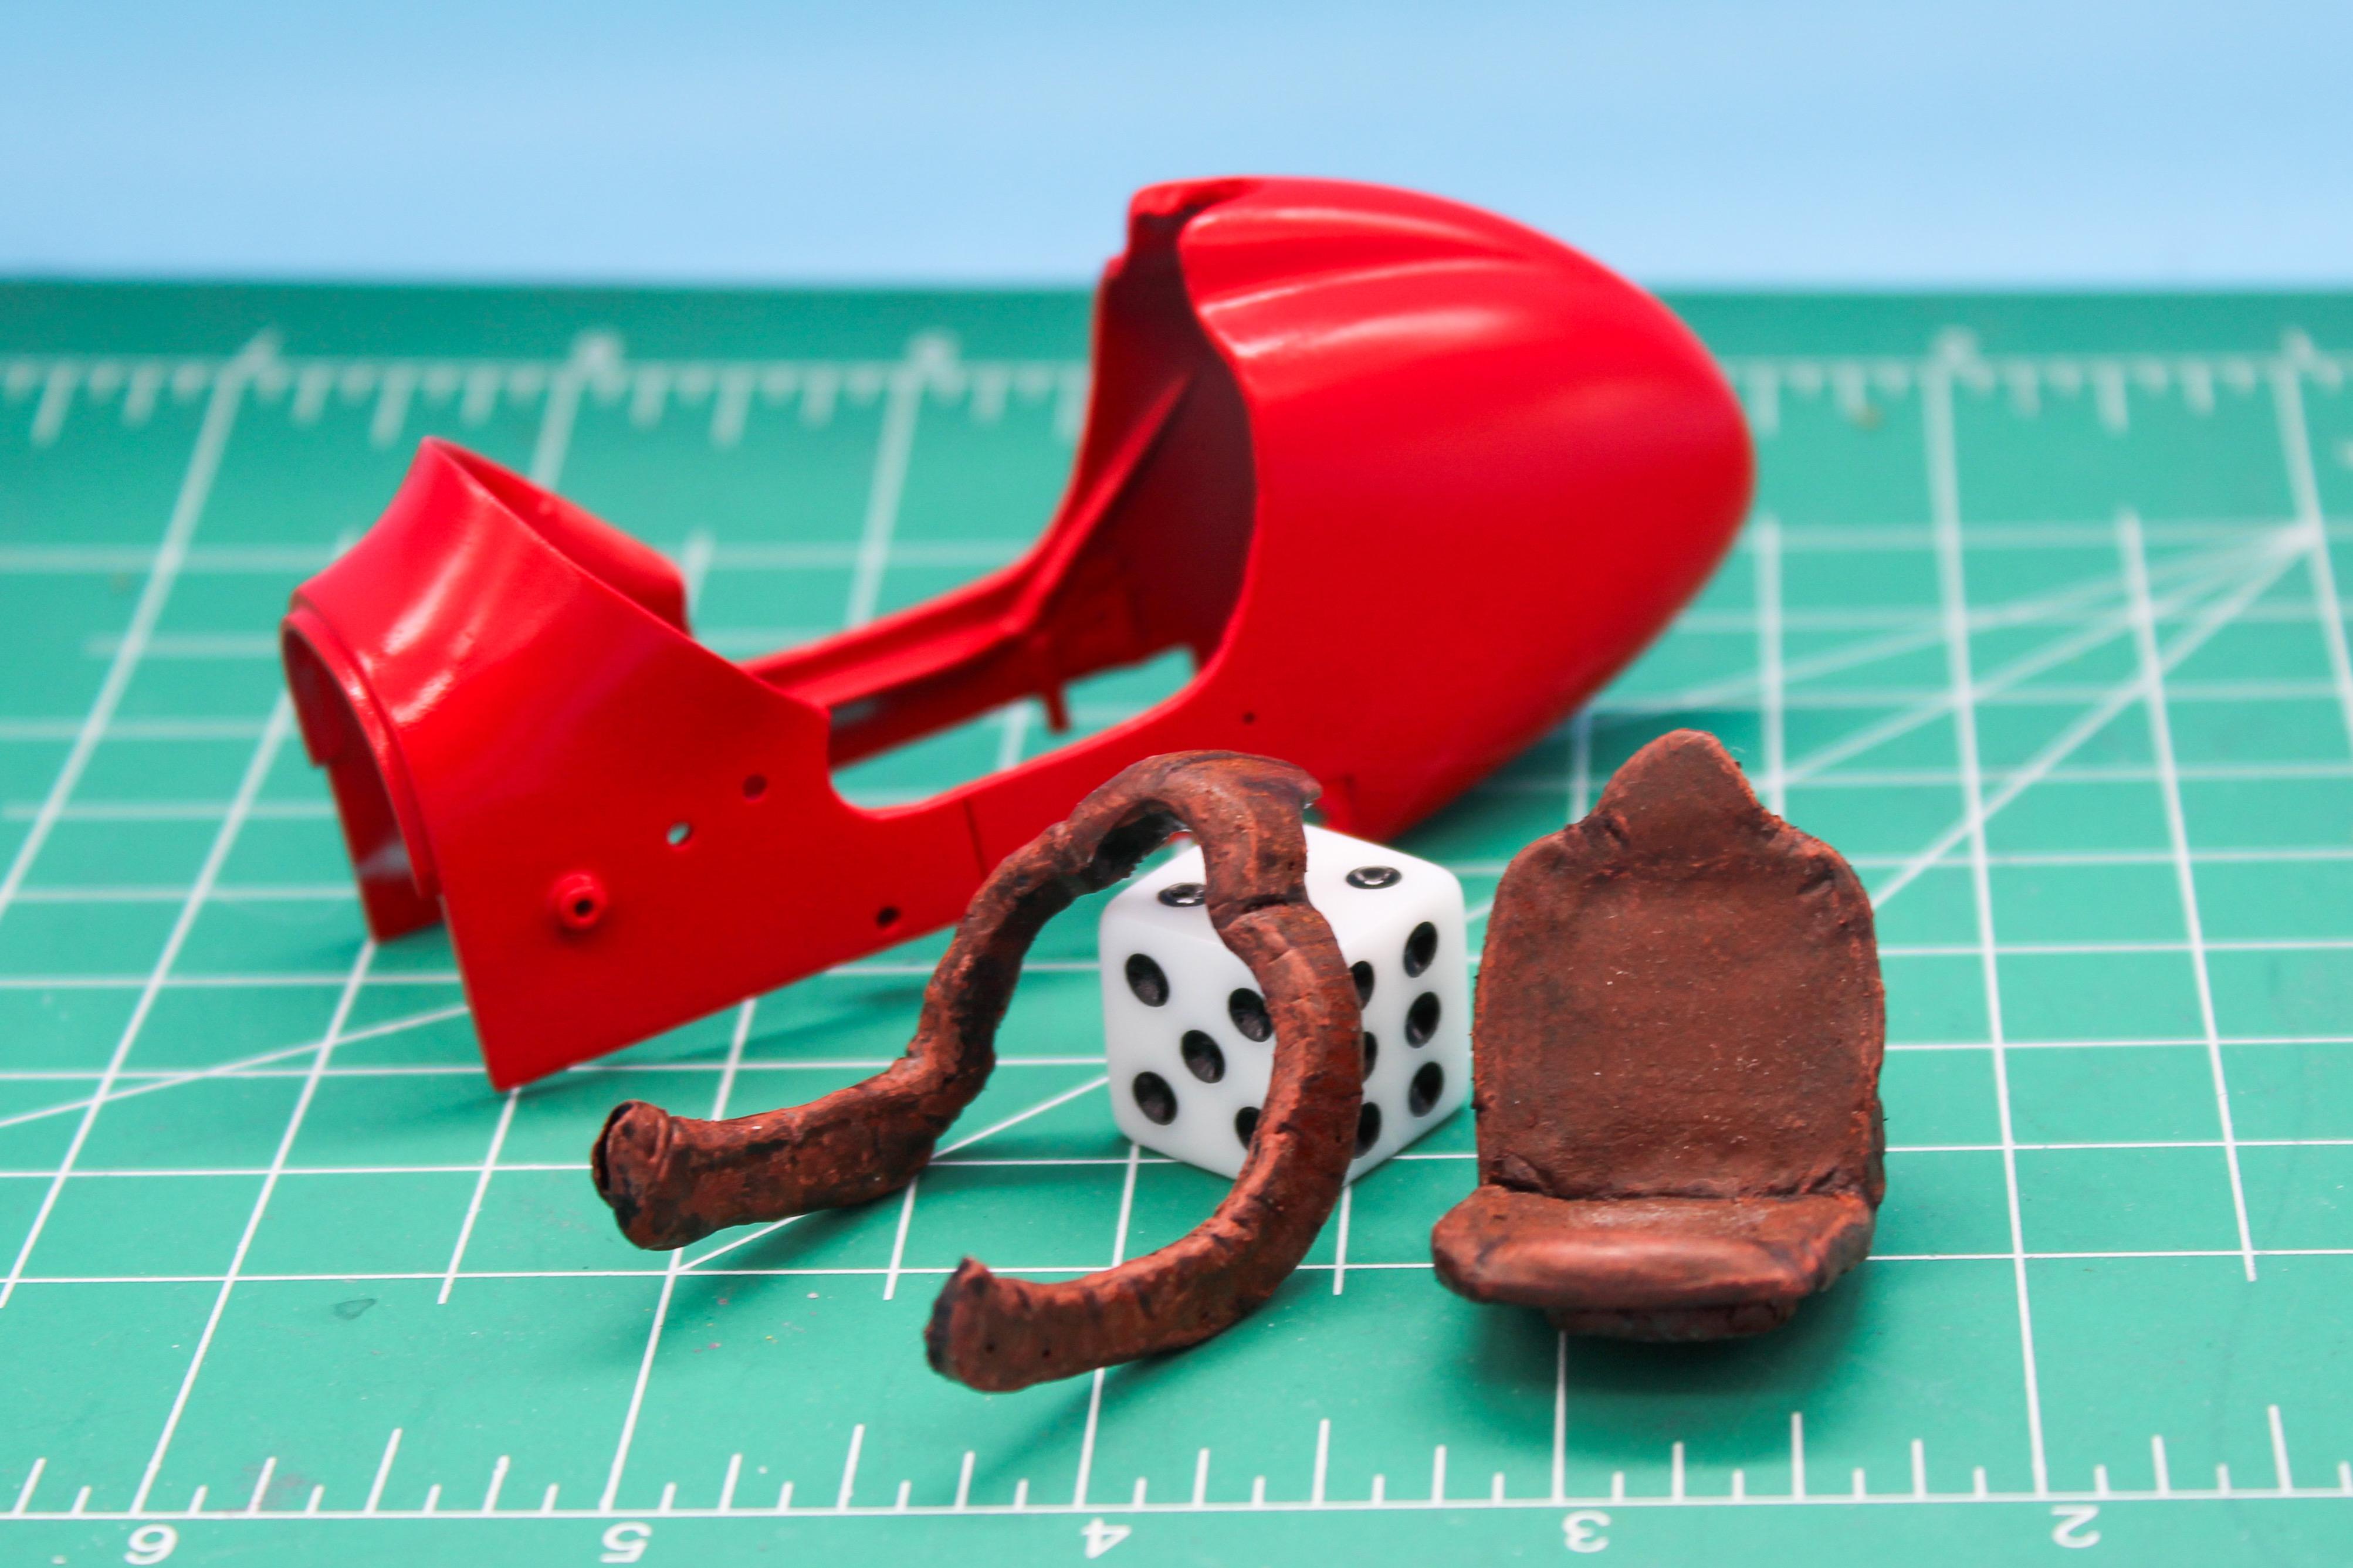
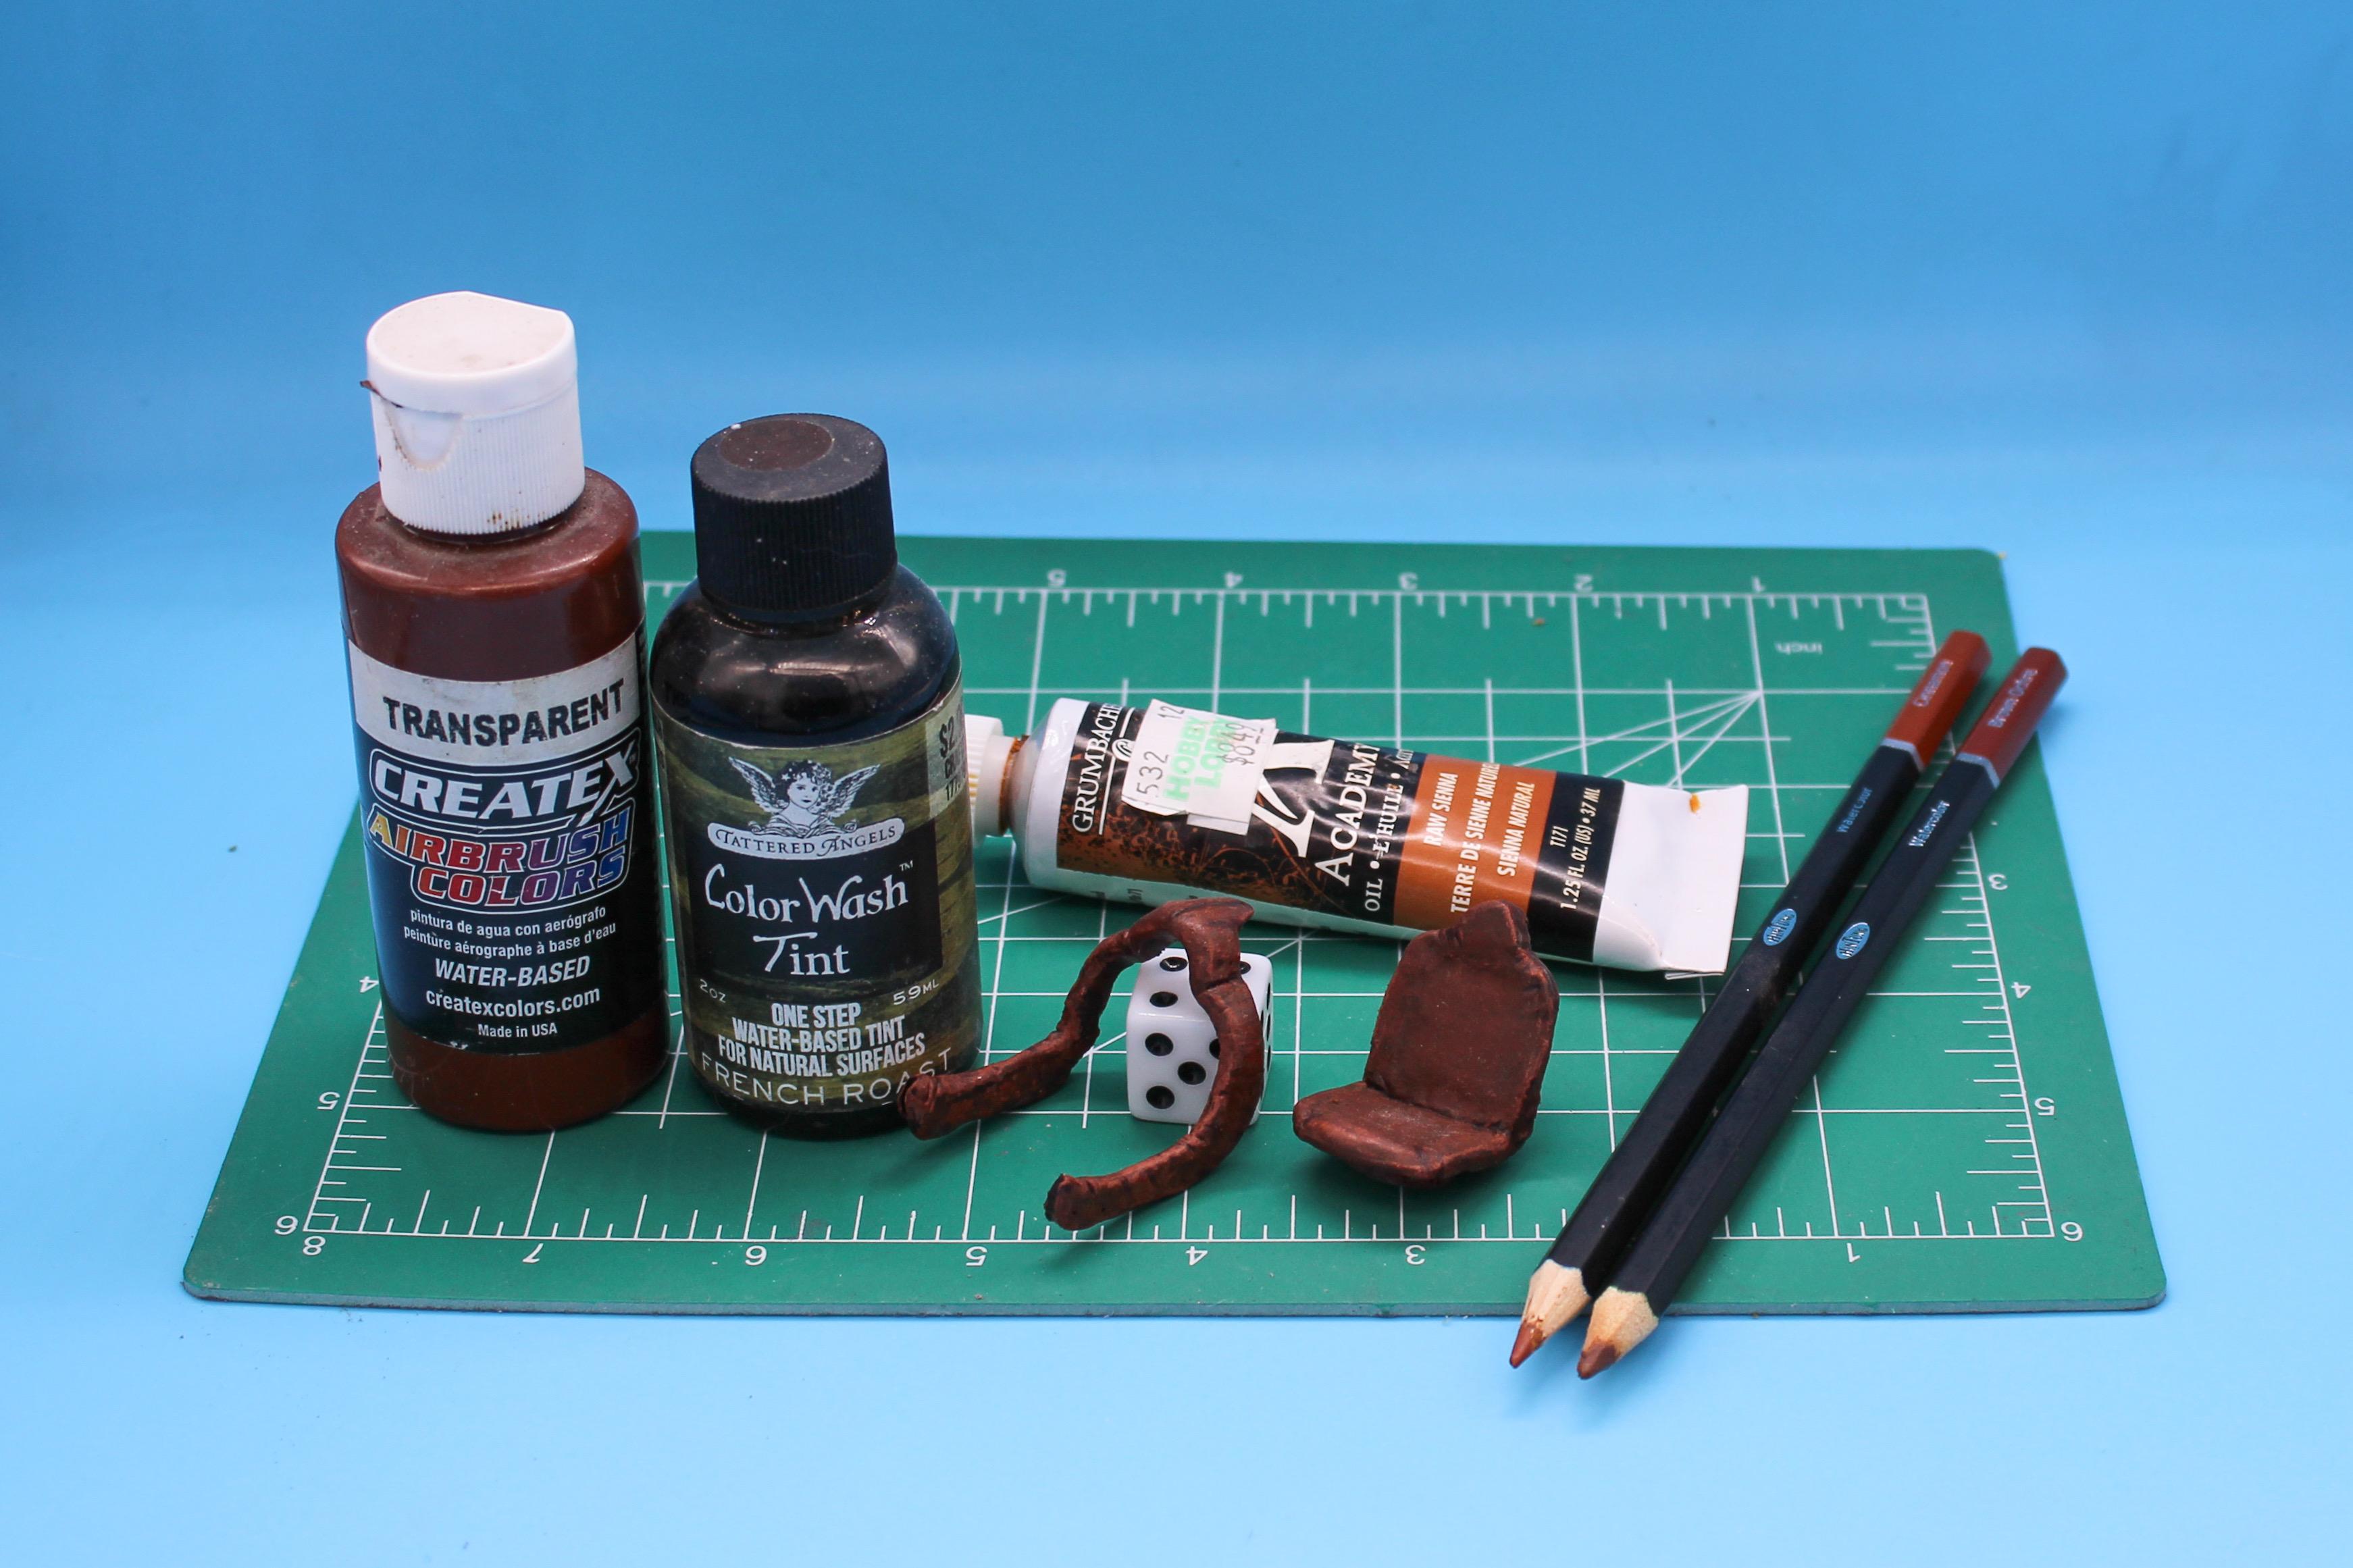
Thank you sir! Little more progress the last couple of days…actually I’ve been messing with this since Sunday because there were various painted layers to deal with and let dry…the leatherwork! Started with a Createx brown base and locked it in with a couple of spritzes of clear lacquer. Next up, I dabbed on some really subtle texture with a little artist’s oil paint - a much lighter shade to add some color variation on the high spots. Next up, I used a watercolor pencil to add some darker shading in the low spots, then a lighter pencil to get some night highlights on the edges and anywhere the leather would stretch. Finally, I added a really delicate wash of brown ink just in the creases to give them some extra depth and realism: I’m still learning techniques for getting really good leather finishes, and I’m a long way from where I’d like to be, but I’m getting better I think…like all this stuff though, still plenty to learn. Can’t wait to add the little metal poppers to the leather surround and figure out a lap belt to make these bits really pop…might do that next. Thanks for looking! More soon, soon as I’ve done more!
-
Removing Layering from 3D Printed Bodies.
OldNYJim replied to Kayma367's topic in Model Building Questions and Answers
Reminds me of this, from the news recently: https://nypost.com/2025/03/02/us-news/new-york-strip-steak-would-be-renamed-after-texas-in-move-that-could-spark-interstate-beef/ -
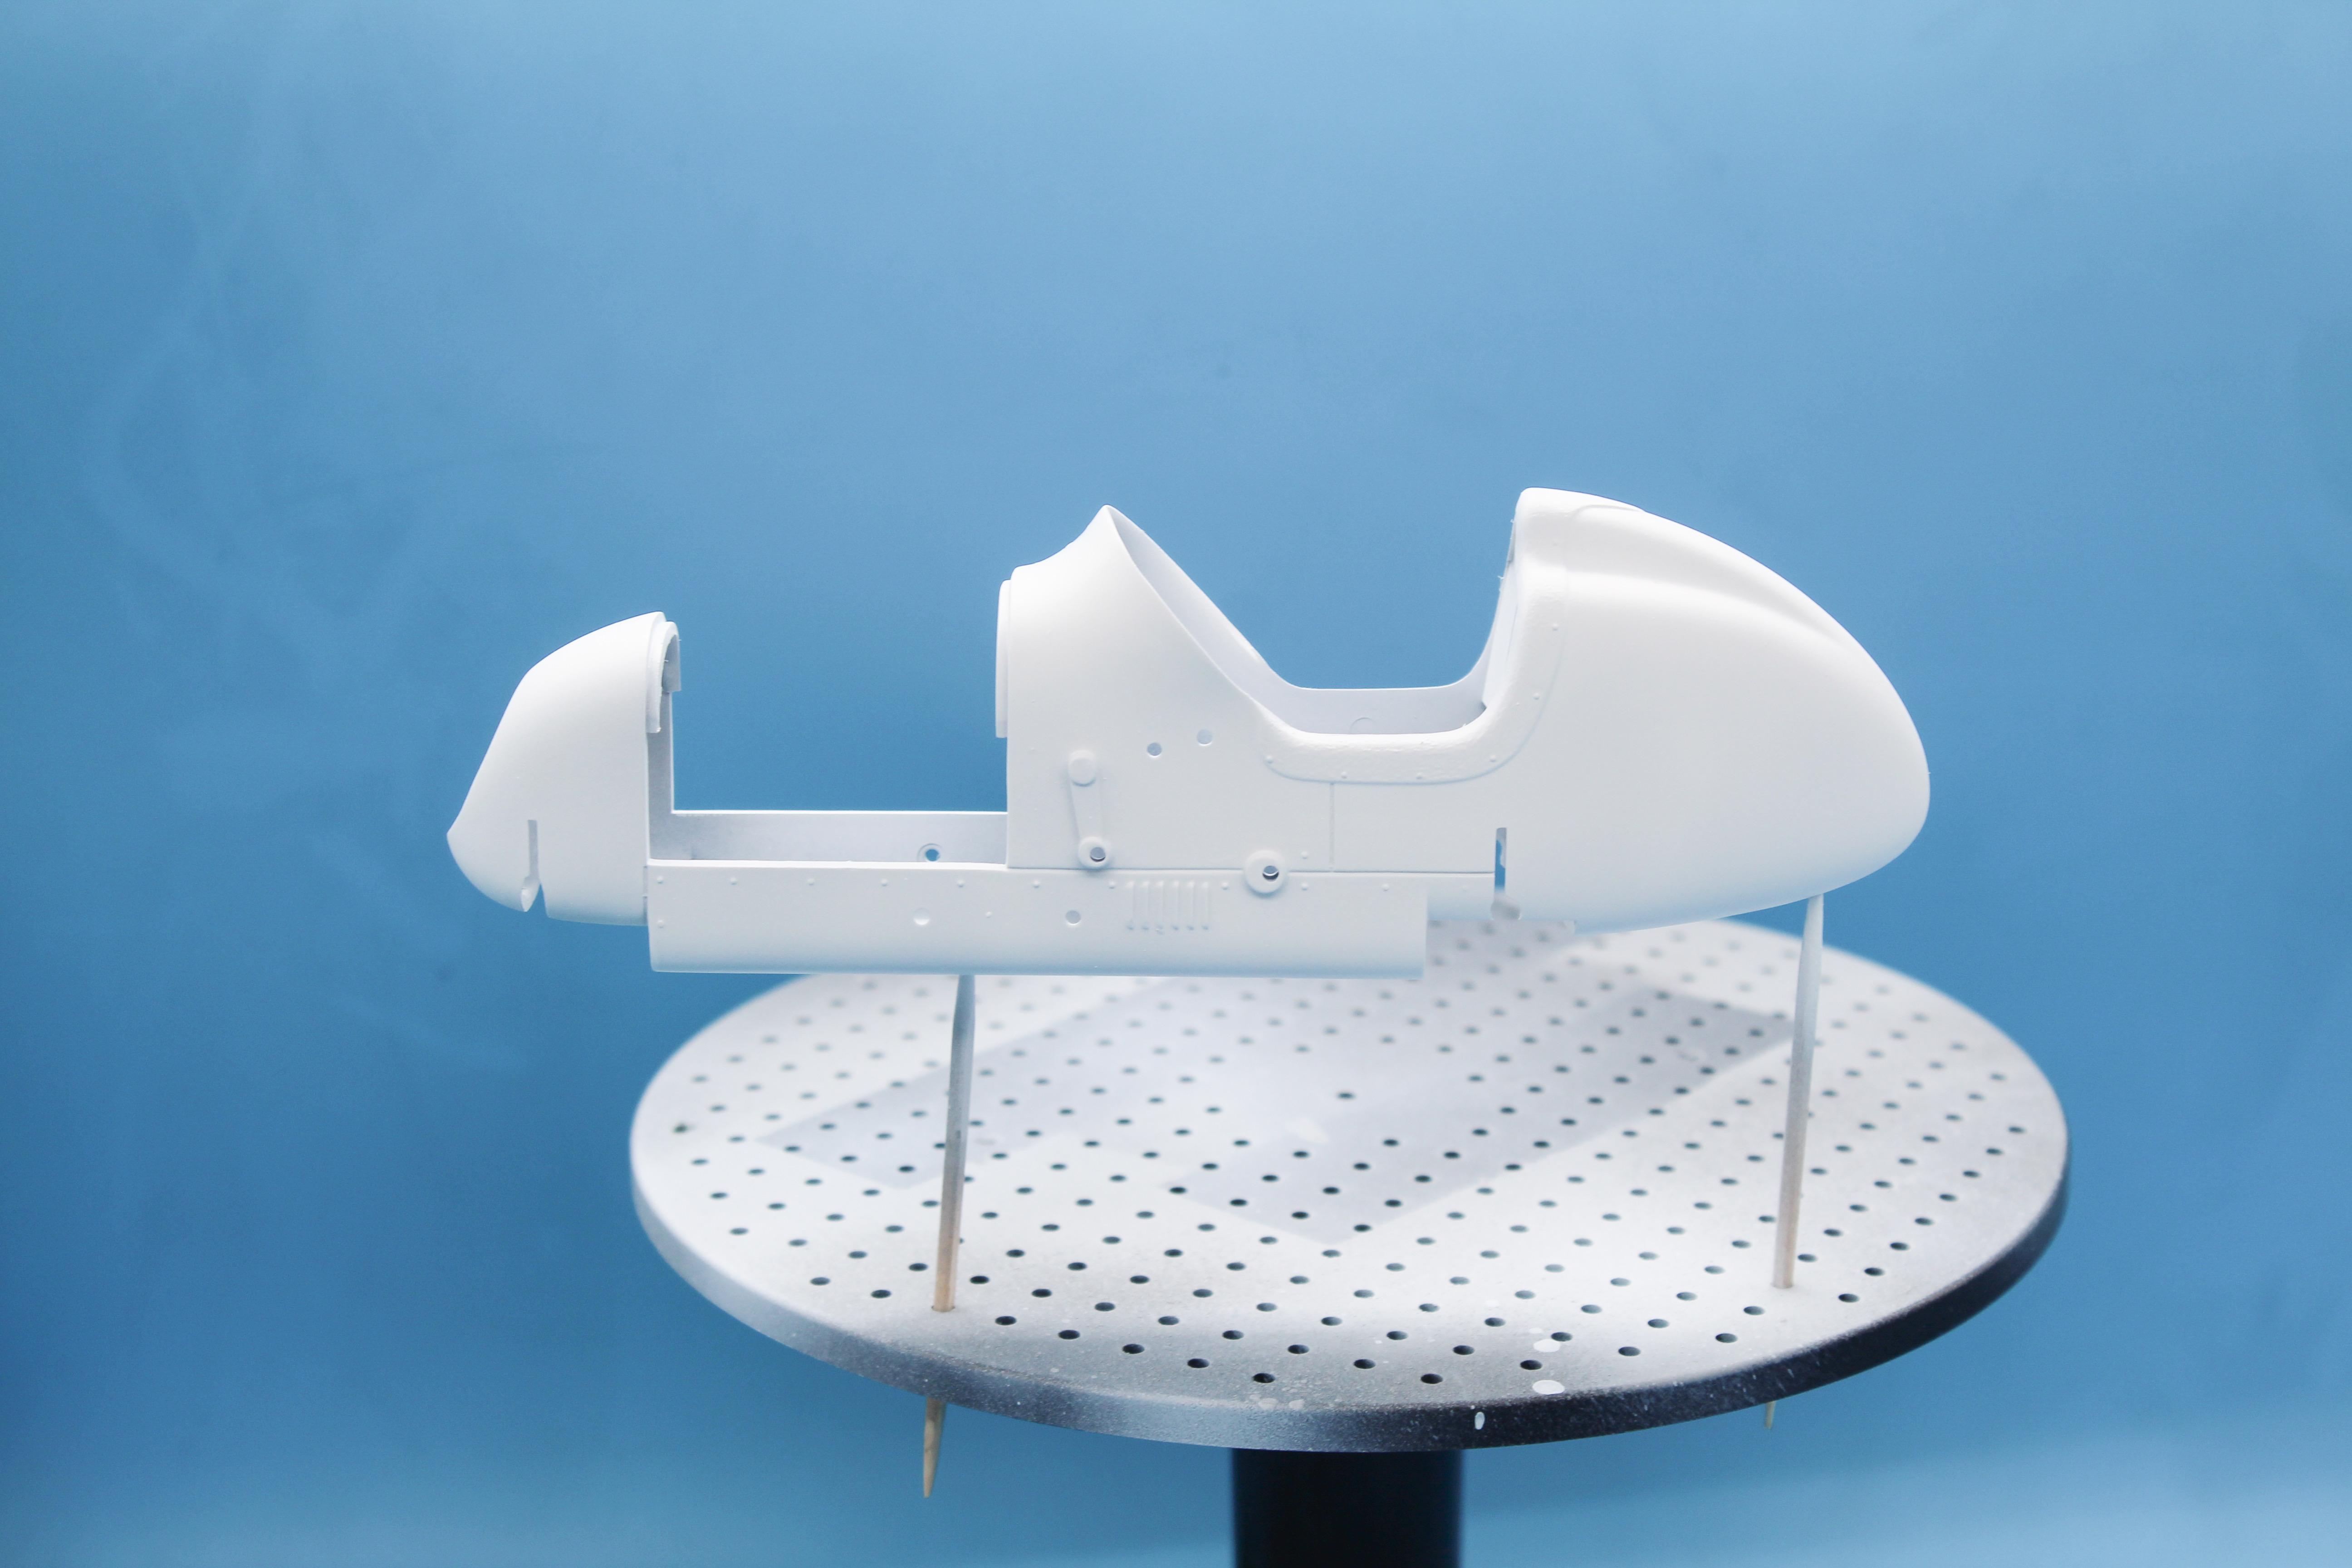
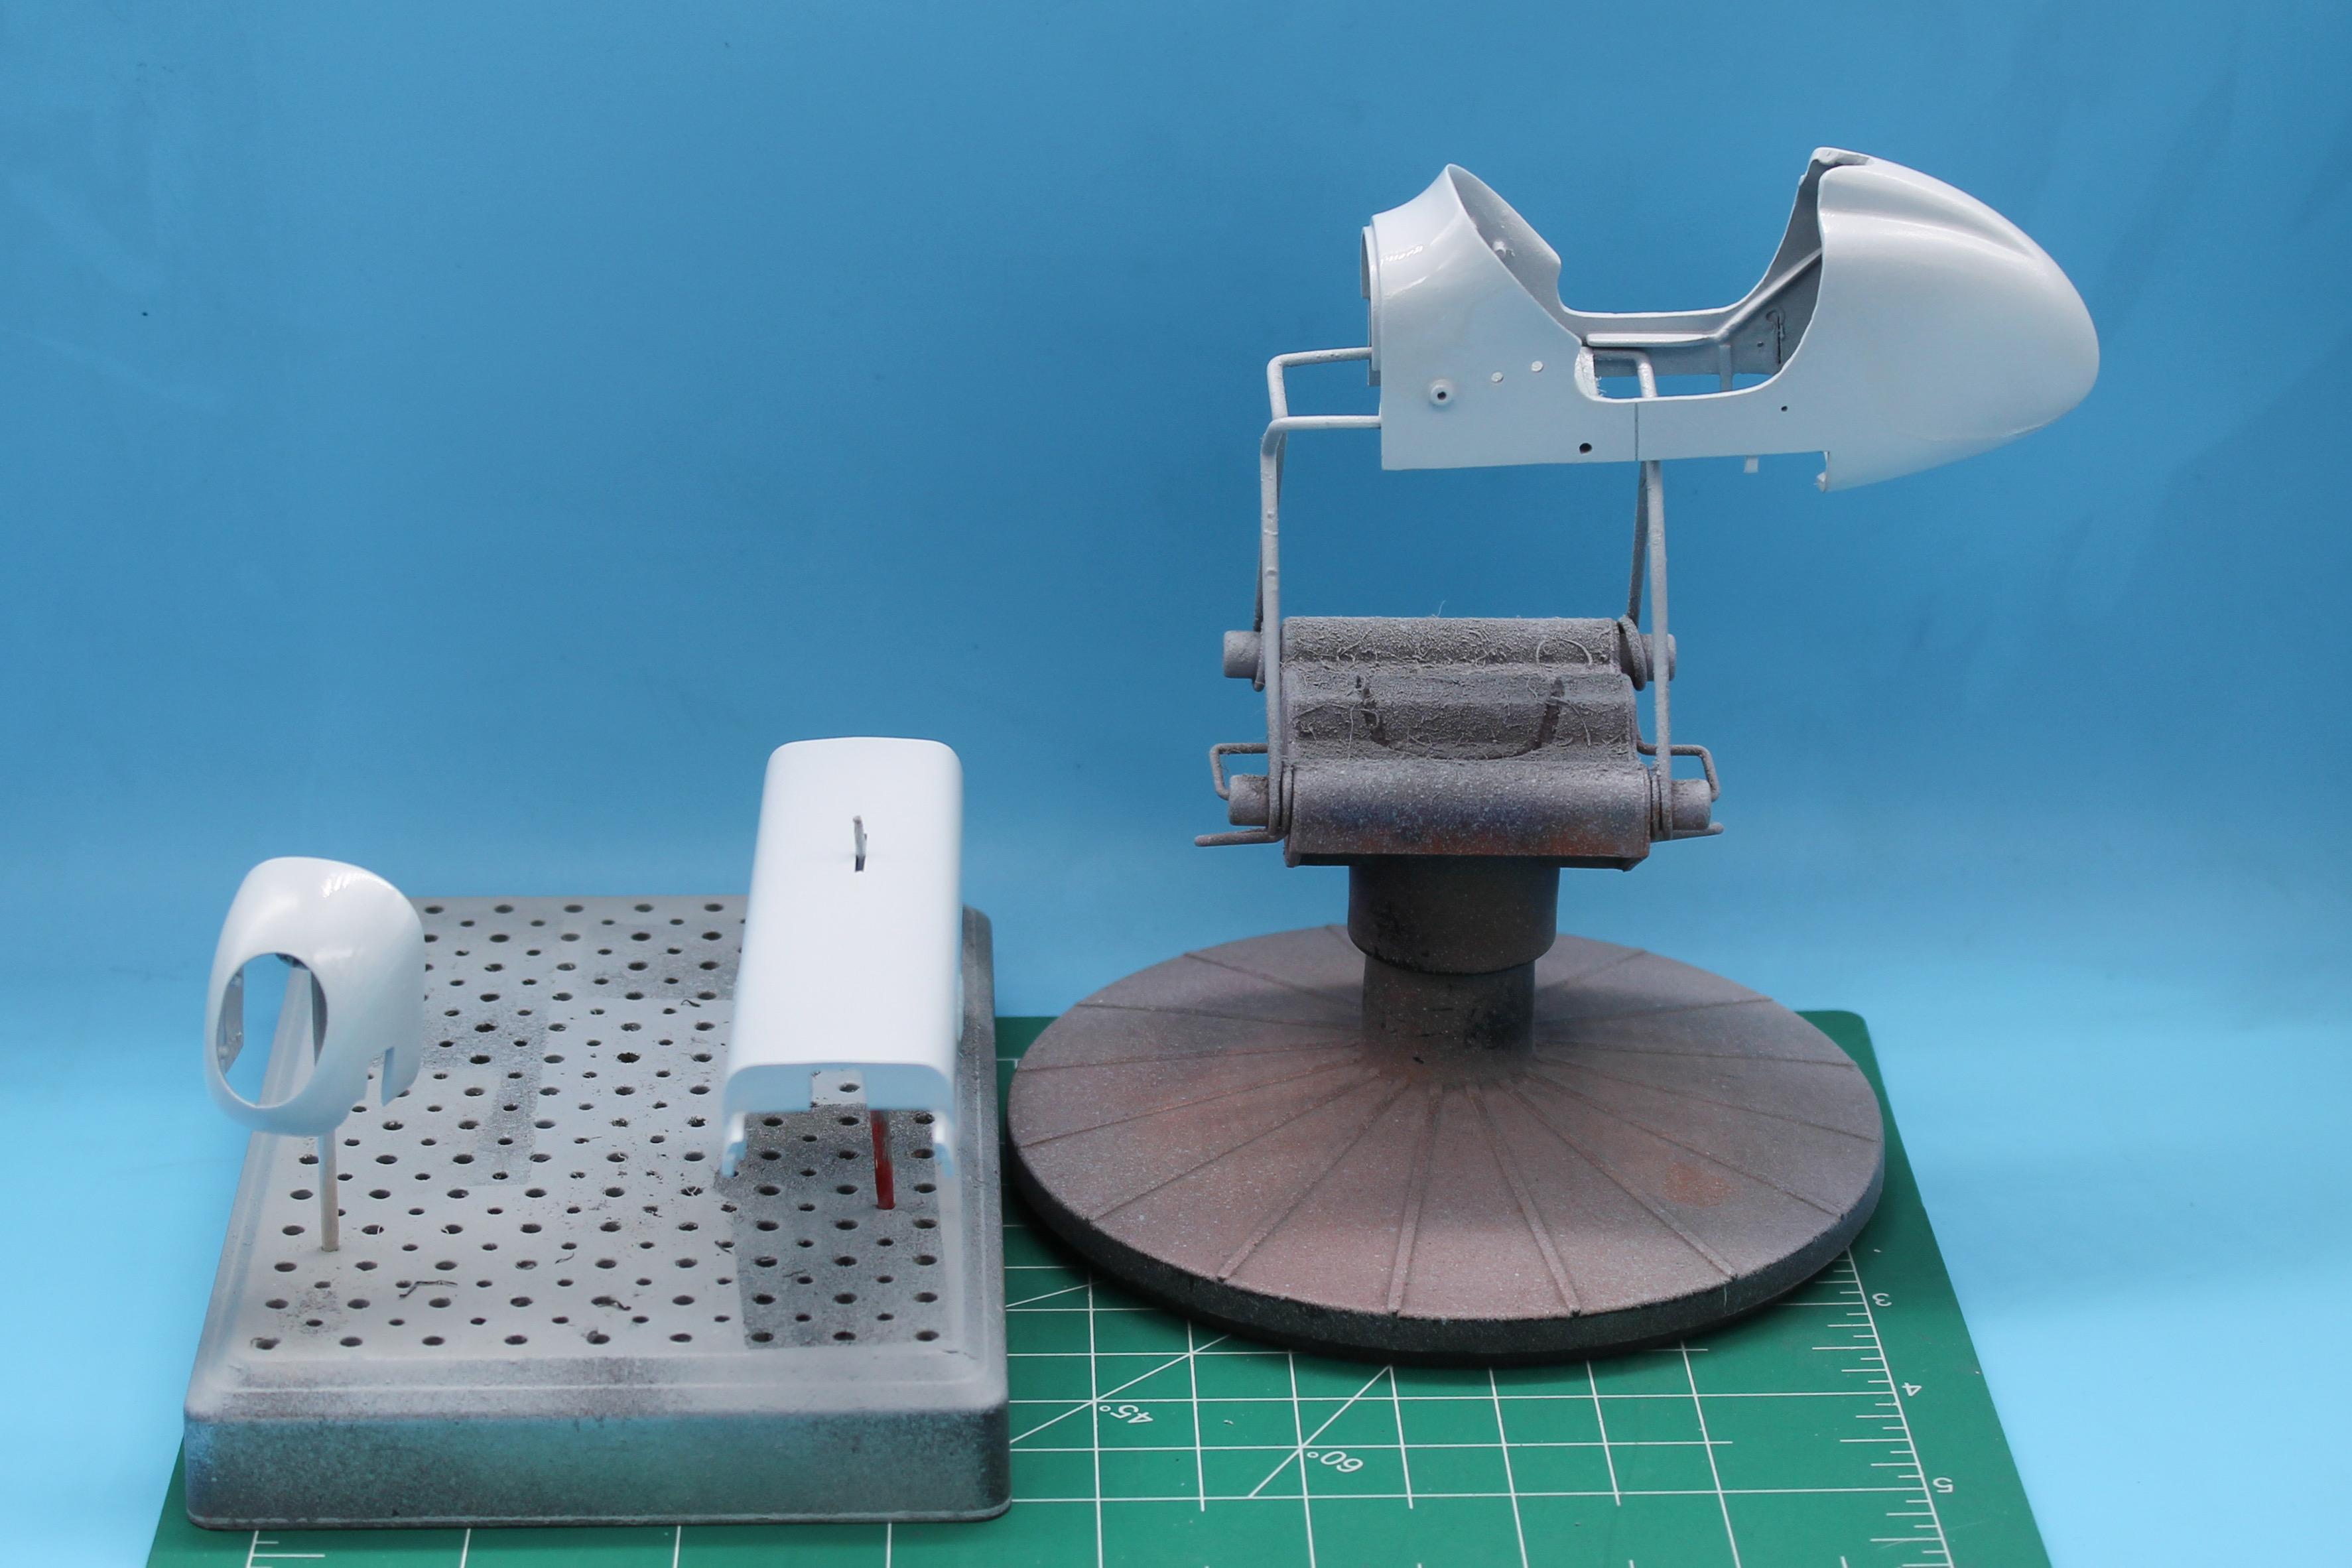
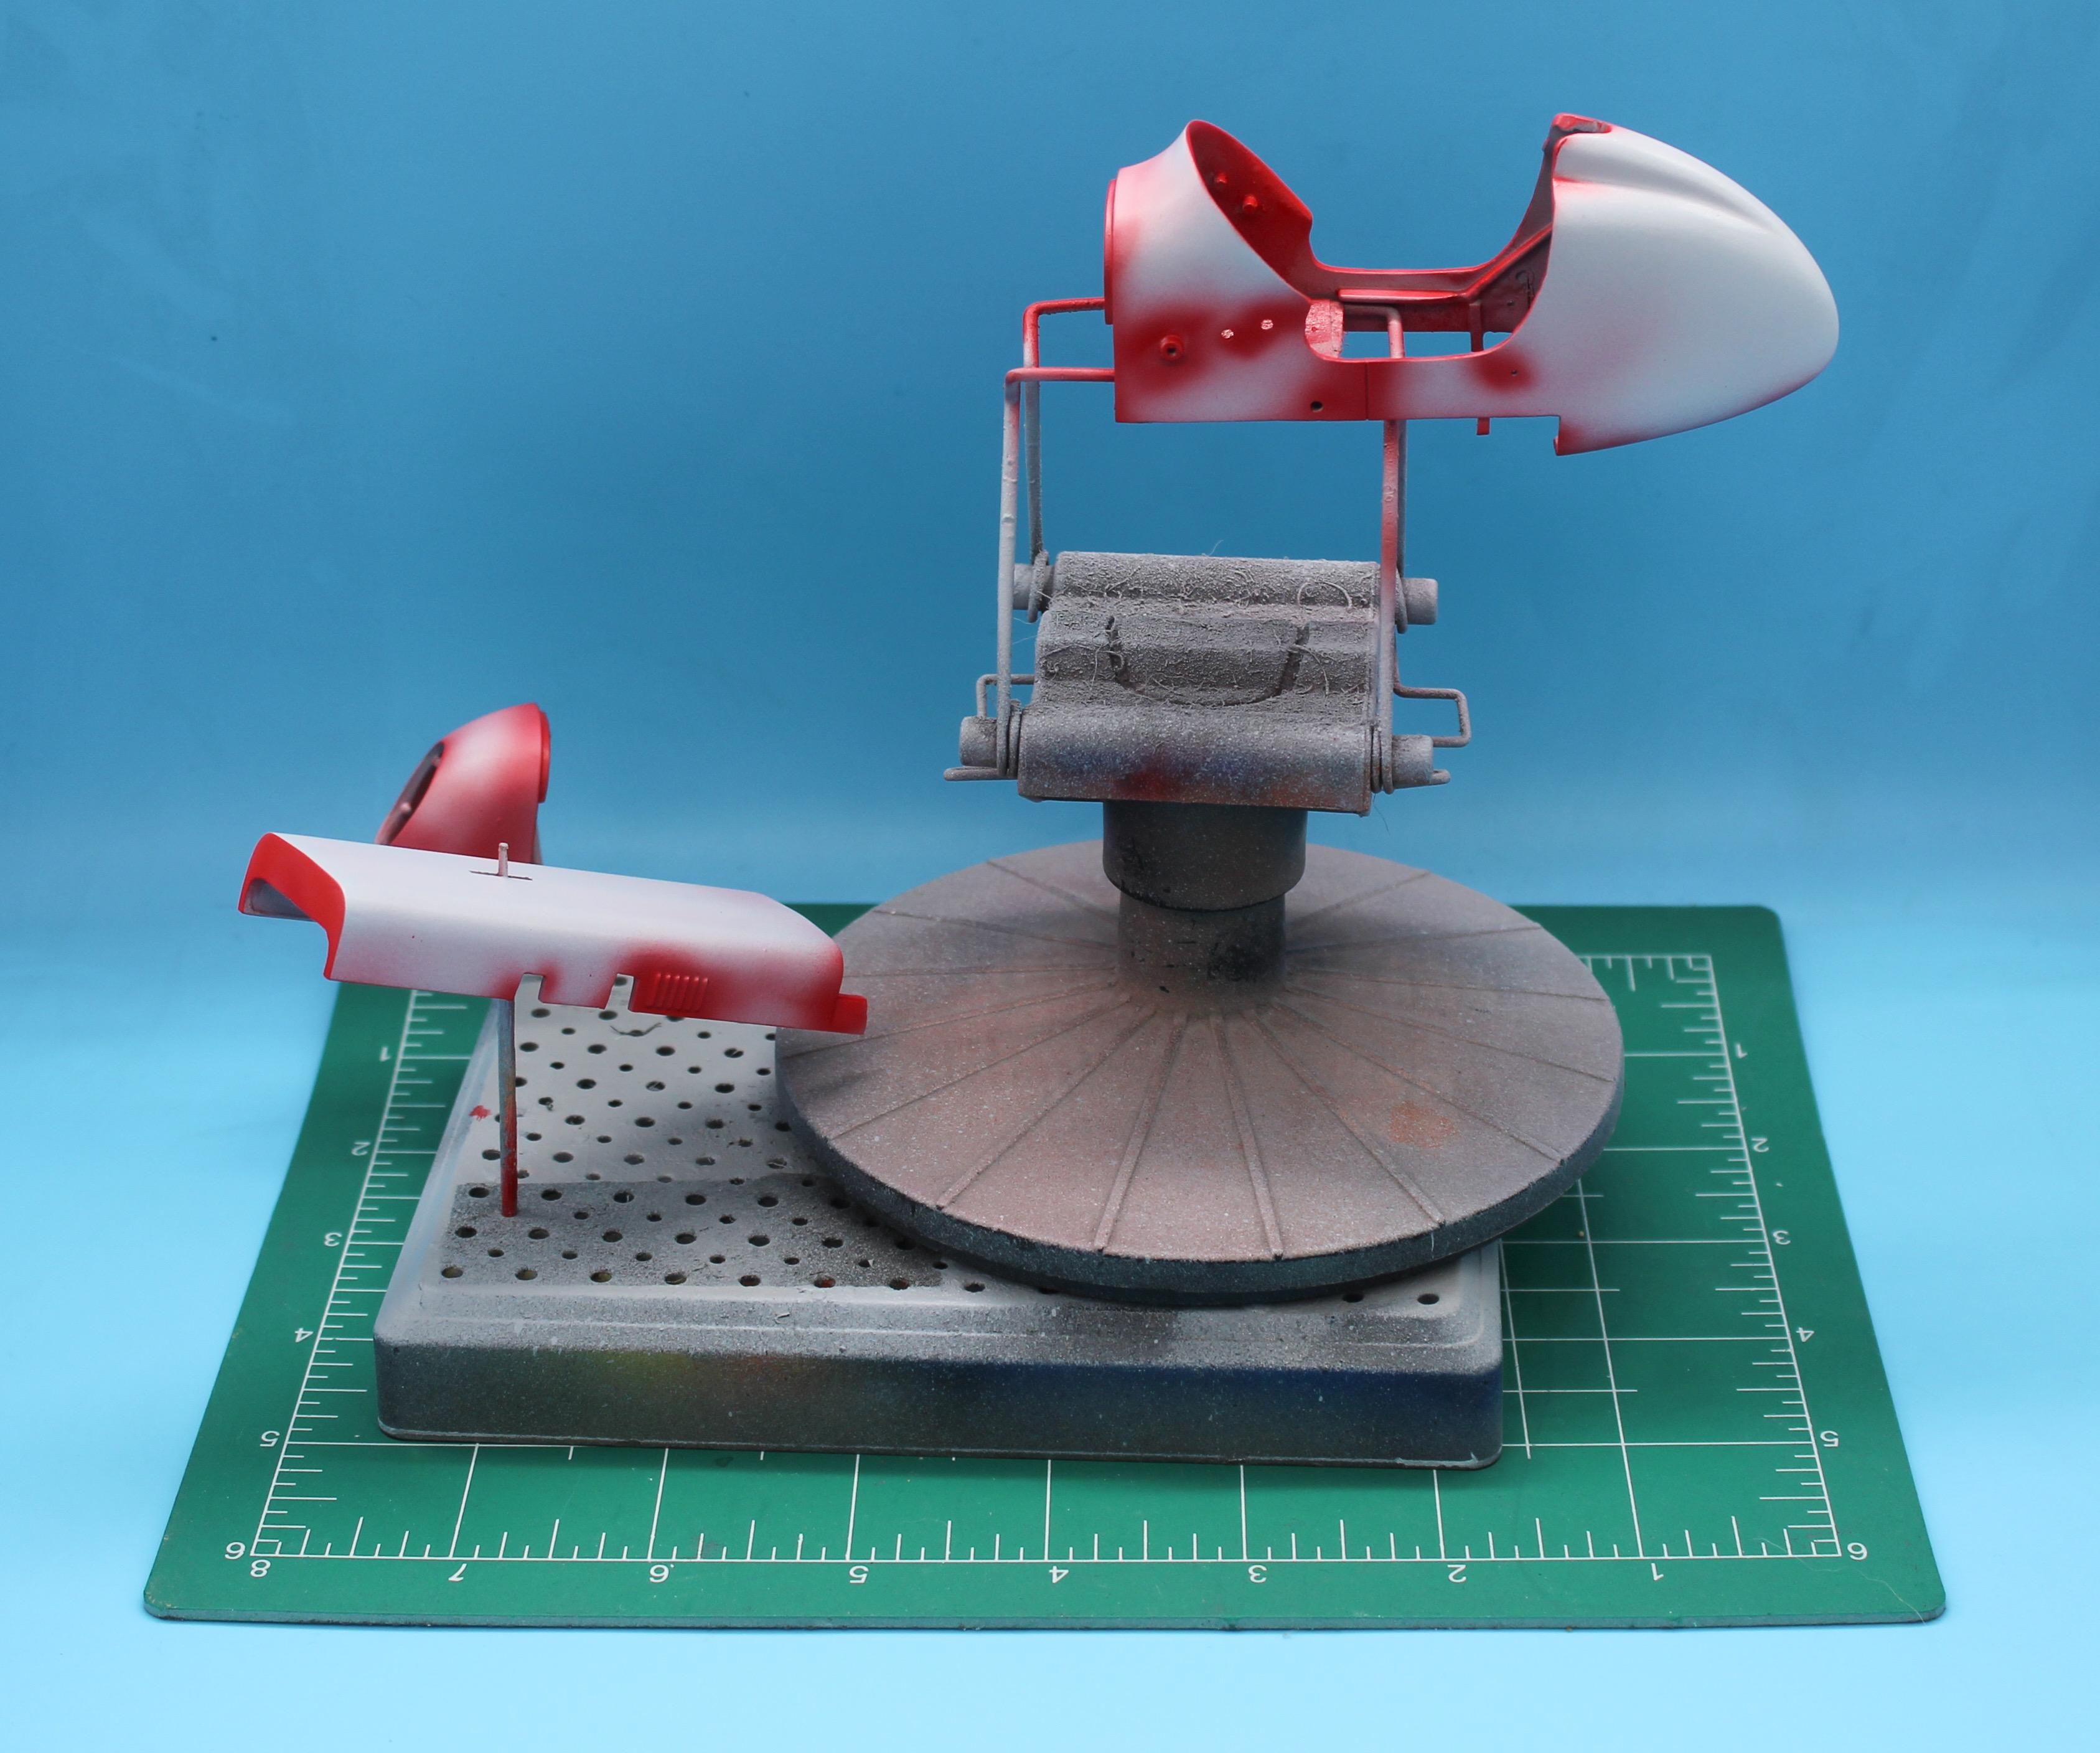
And…finally…paint day for the body! I’ve been excited to get to this stage - and a little nervous. I’ve got my REGULAR paint system pretty well dialed in with acrylics and lacquers but I haven’t shot a body with enamels for a little while. BUT, I wanted to use old-school Testor’s enamel for this rather than a more modern paint system so here goes nothing… Got the gray primered body into white primer. Used Duplicolor white, which I rate a 1 out of 10 for being a product I like: It laid down nice and smooth, soon as I got the can to stop spraying paint worms… Then, mixed up a little of the Testor’s red with just a drop of thinner so I could shoot any spots that would be hard to reach, or where I want to make sure I don’t get thin spots later: Then, after an hour in the dehydrator I mixed up some more of the enamel, but thinned a LOT more. My goal was multiple light coats, hoping to avoid a sticky enamel-y mess that takes until I’m 100 to dry. Just eased it on there gently, being cautious of drips, and gently built up probably 8 coats through the day: Sure is a lot more work doing multiple cleans of the airbrush with thinner compared to my usual deal of rinsing it in the sink like I do with acrylics for most stuff now…I’m getting lazy, ha! I’m thoroughly expecting this to not hold the shine once it has a couple of days in the dehydrator - I thinned the paint a LOT and I think that’ll take a lot of the gloss out of it, but I can deal with that - I have old stock enamel clear here ready to shoot, and I’m not going for SUPER glossy showcar finish anyway. Not all orange peely and lumpy, but not dipped in syrup either - just a nice smooth gloss enamel paintjob. Oh, and I started cleaning up a second body as a box-stock companion…filled some sink marks and added some putty to the driver’s arms so they weren’t hollow: Thanks for looking - more soon, soon as I’ve done more!
-
Removing Layering from 3D Printed Bodies.
OldNYJim replied to Kayma367's topic in Model Building Questions and Answers
What term does he suggest we use? -
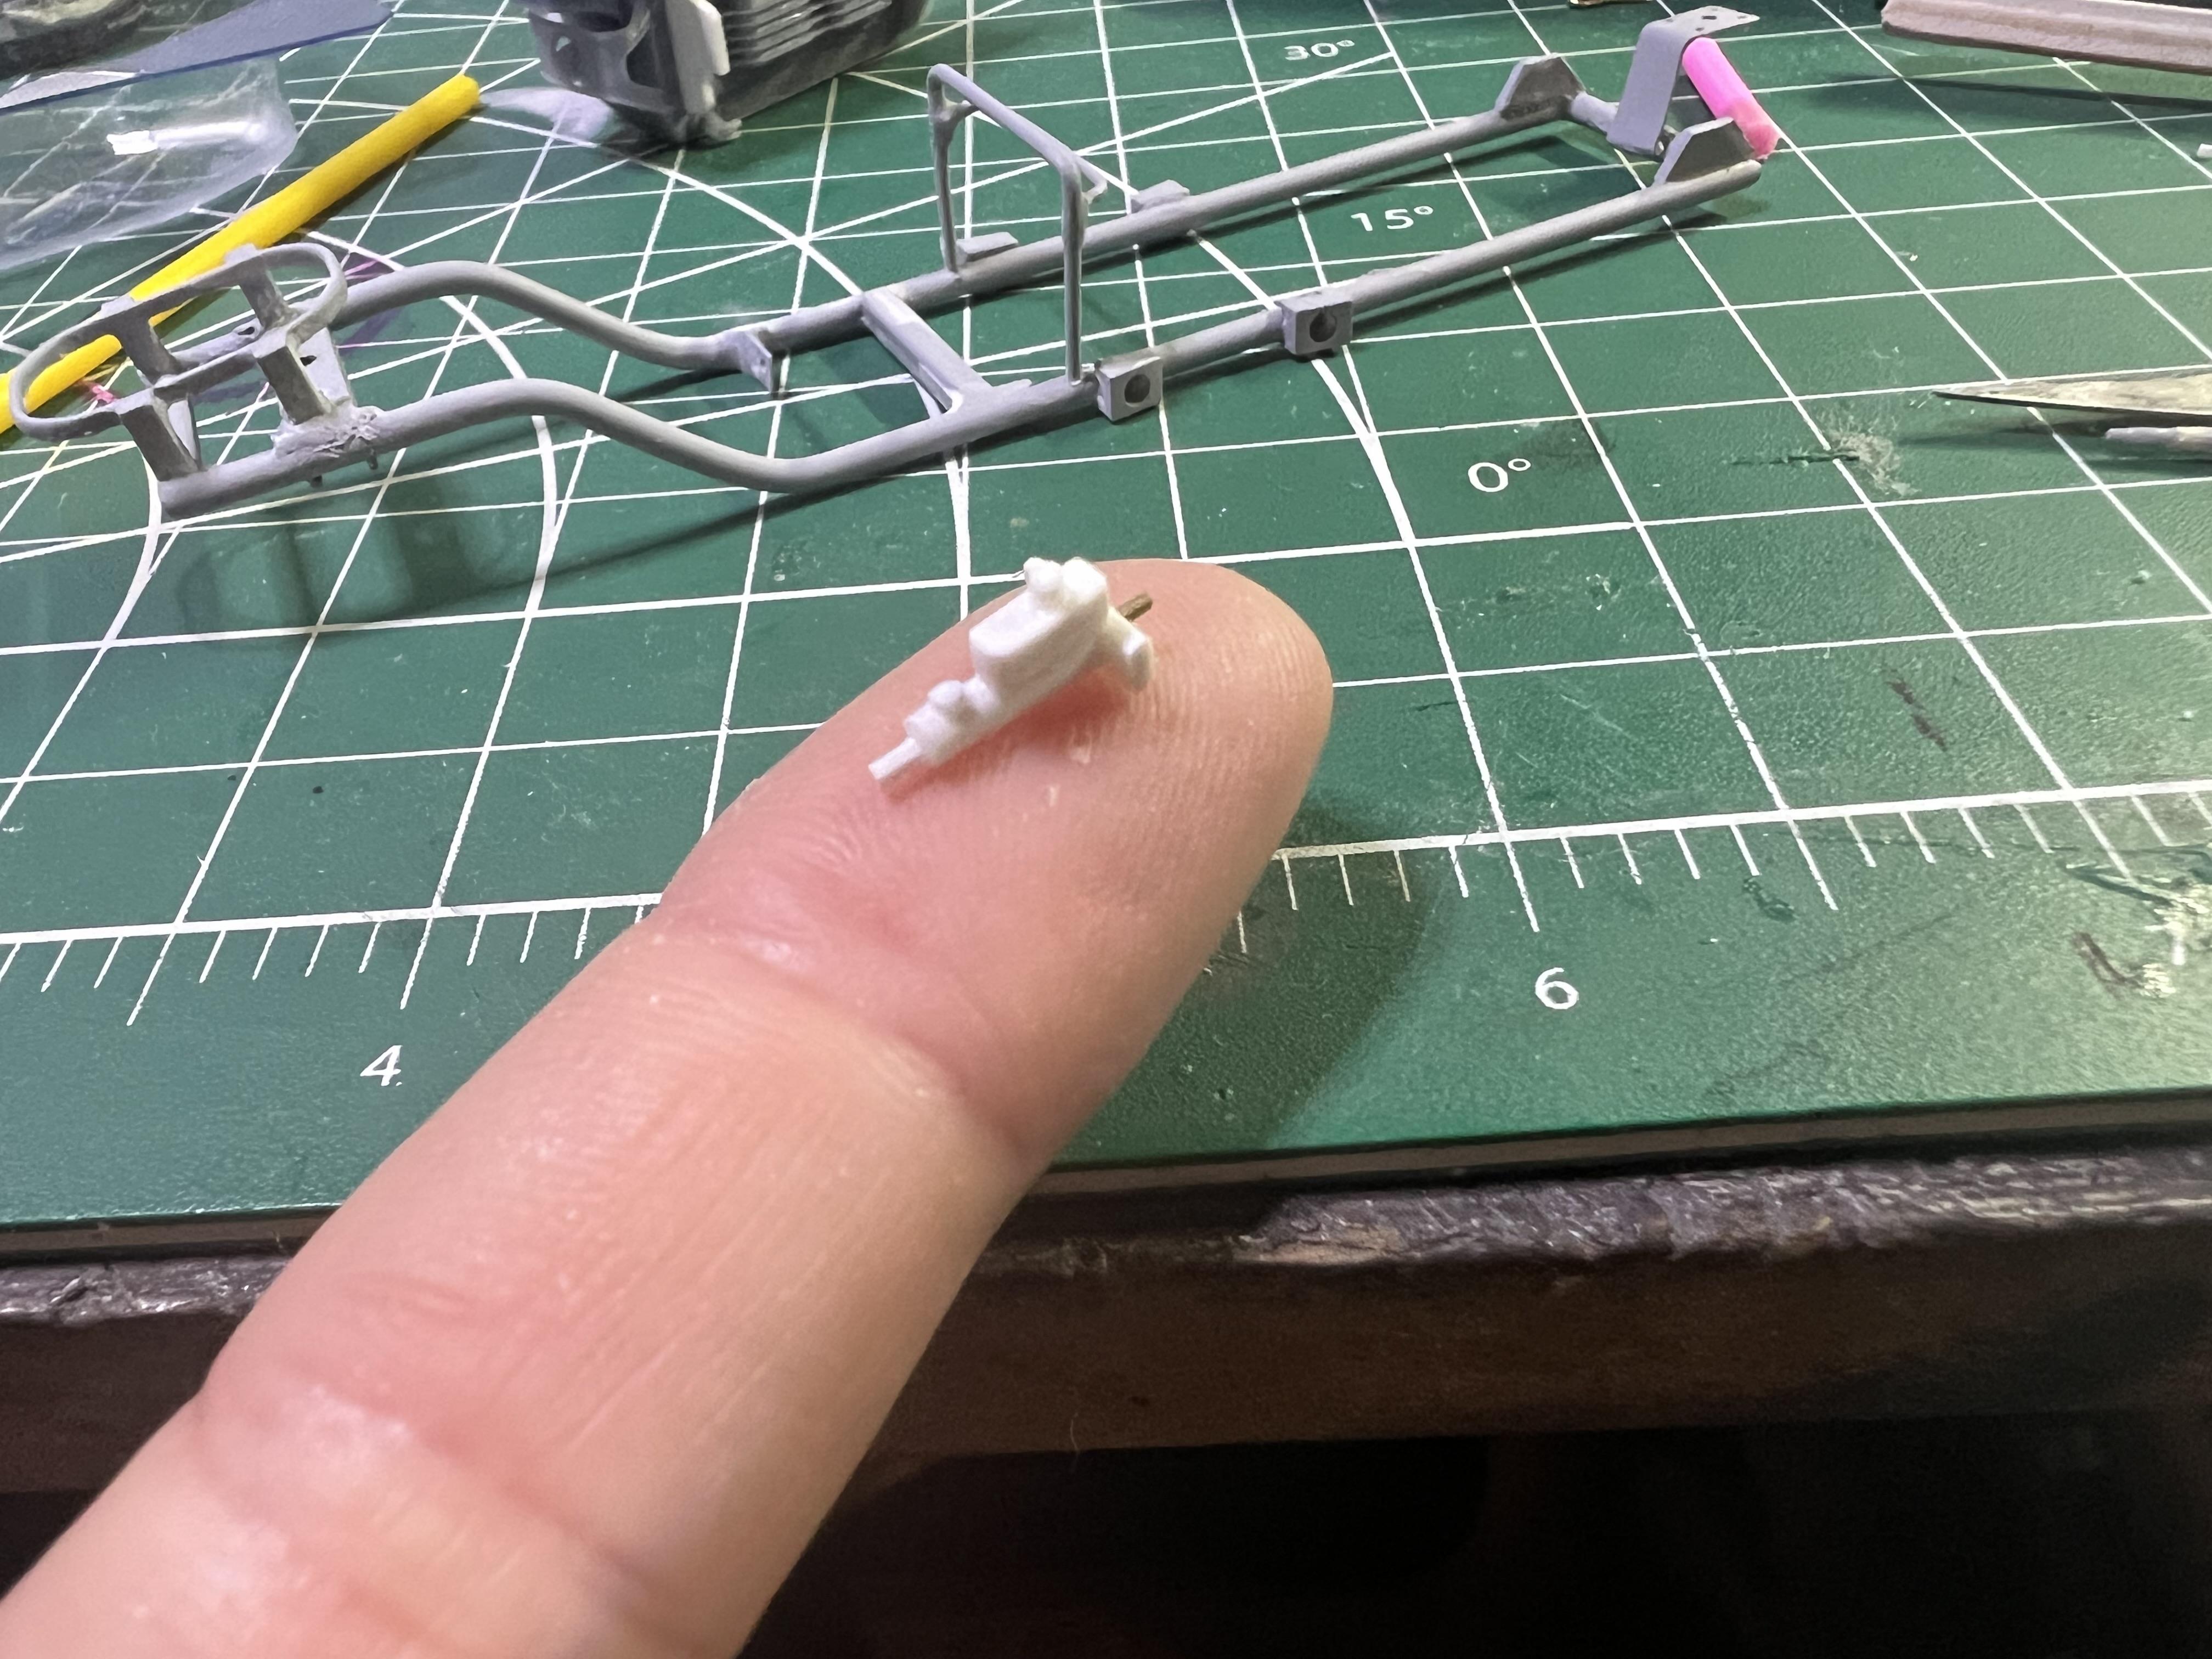
Thank you sir! Me either! Ha! And, actually, that’s what I’ve been working on all week…getting as many parts prepped and cleaned up and into primer as I can so I can lay some color down. I’ll be making extensive use of enamels on this one, so I’m trying to get some major components painted to allow for some decent drying times… Body needed a couple of little fixes where I had messed with stuff, but a little 2-part filler fixes the flaws that are too small to fix with styrene: And a BUNCH of other stuff has been in the booth: Whilst that was happening, Dennis Lacy reached out to me and was like “dude, that master cylinder is WAY too modern for this build…which I wasn’t SUPER surprised at, but I couldn’t figure out what WOULD be correct. Luckily, he knew, and recommended one of these: So I started work on replicating the bones of one of those in styrene: And then today, finally got some paint on the first parts! Exciting! Testor’s semi gloss enamel as a base on the frame, radiator and tires - I over-reduced it with Testor’s own enamel thinner and it shot nice…needed three or four light coats to completely cover but I didn’t want to build up a bunch of paint that would take until Christmas to dry…now those bits are in the dehydrator with the exception of the radiator which already had some drying time and then it’s MAIN color, Vallejo brass: Now, I know I said I’m trying to use period-correct paints where I can (eg: mostly Testor’s enamels) but NOT at the expense of the build being as good as it can be…and Testor’s brass enamel has a pretty obvious flake in it and a more muddy brown color that I don’t like as much as this, so…broke my own rule already! More rule breaking to come…thanks for looking!
-
Hobby Lobby Inventory reduction sale
OldNYJim replied to magicmustang's topic in General Automotive Talk (Trucks and Cars)
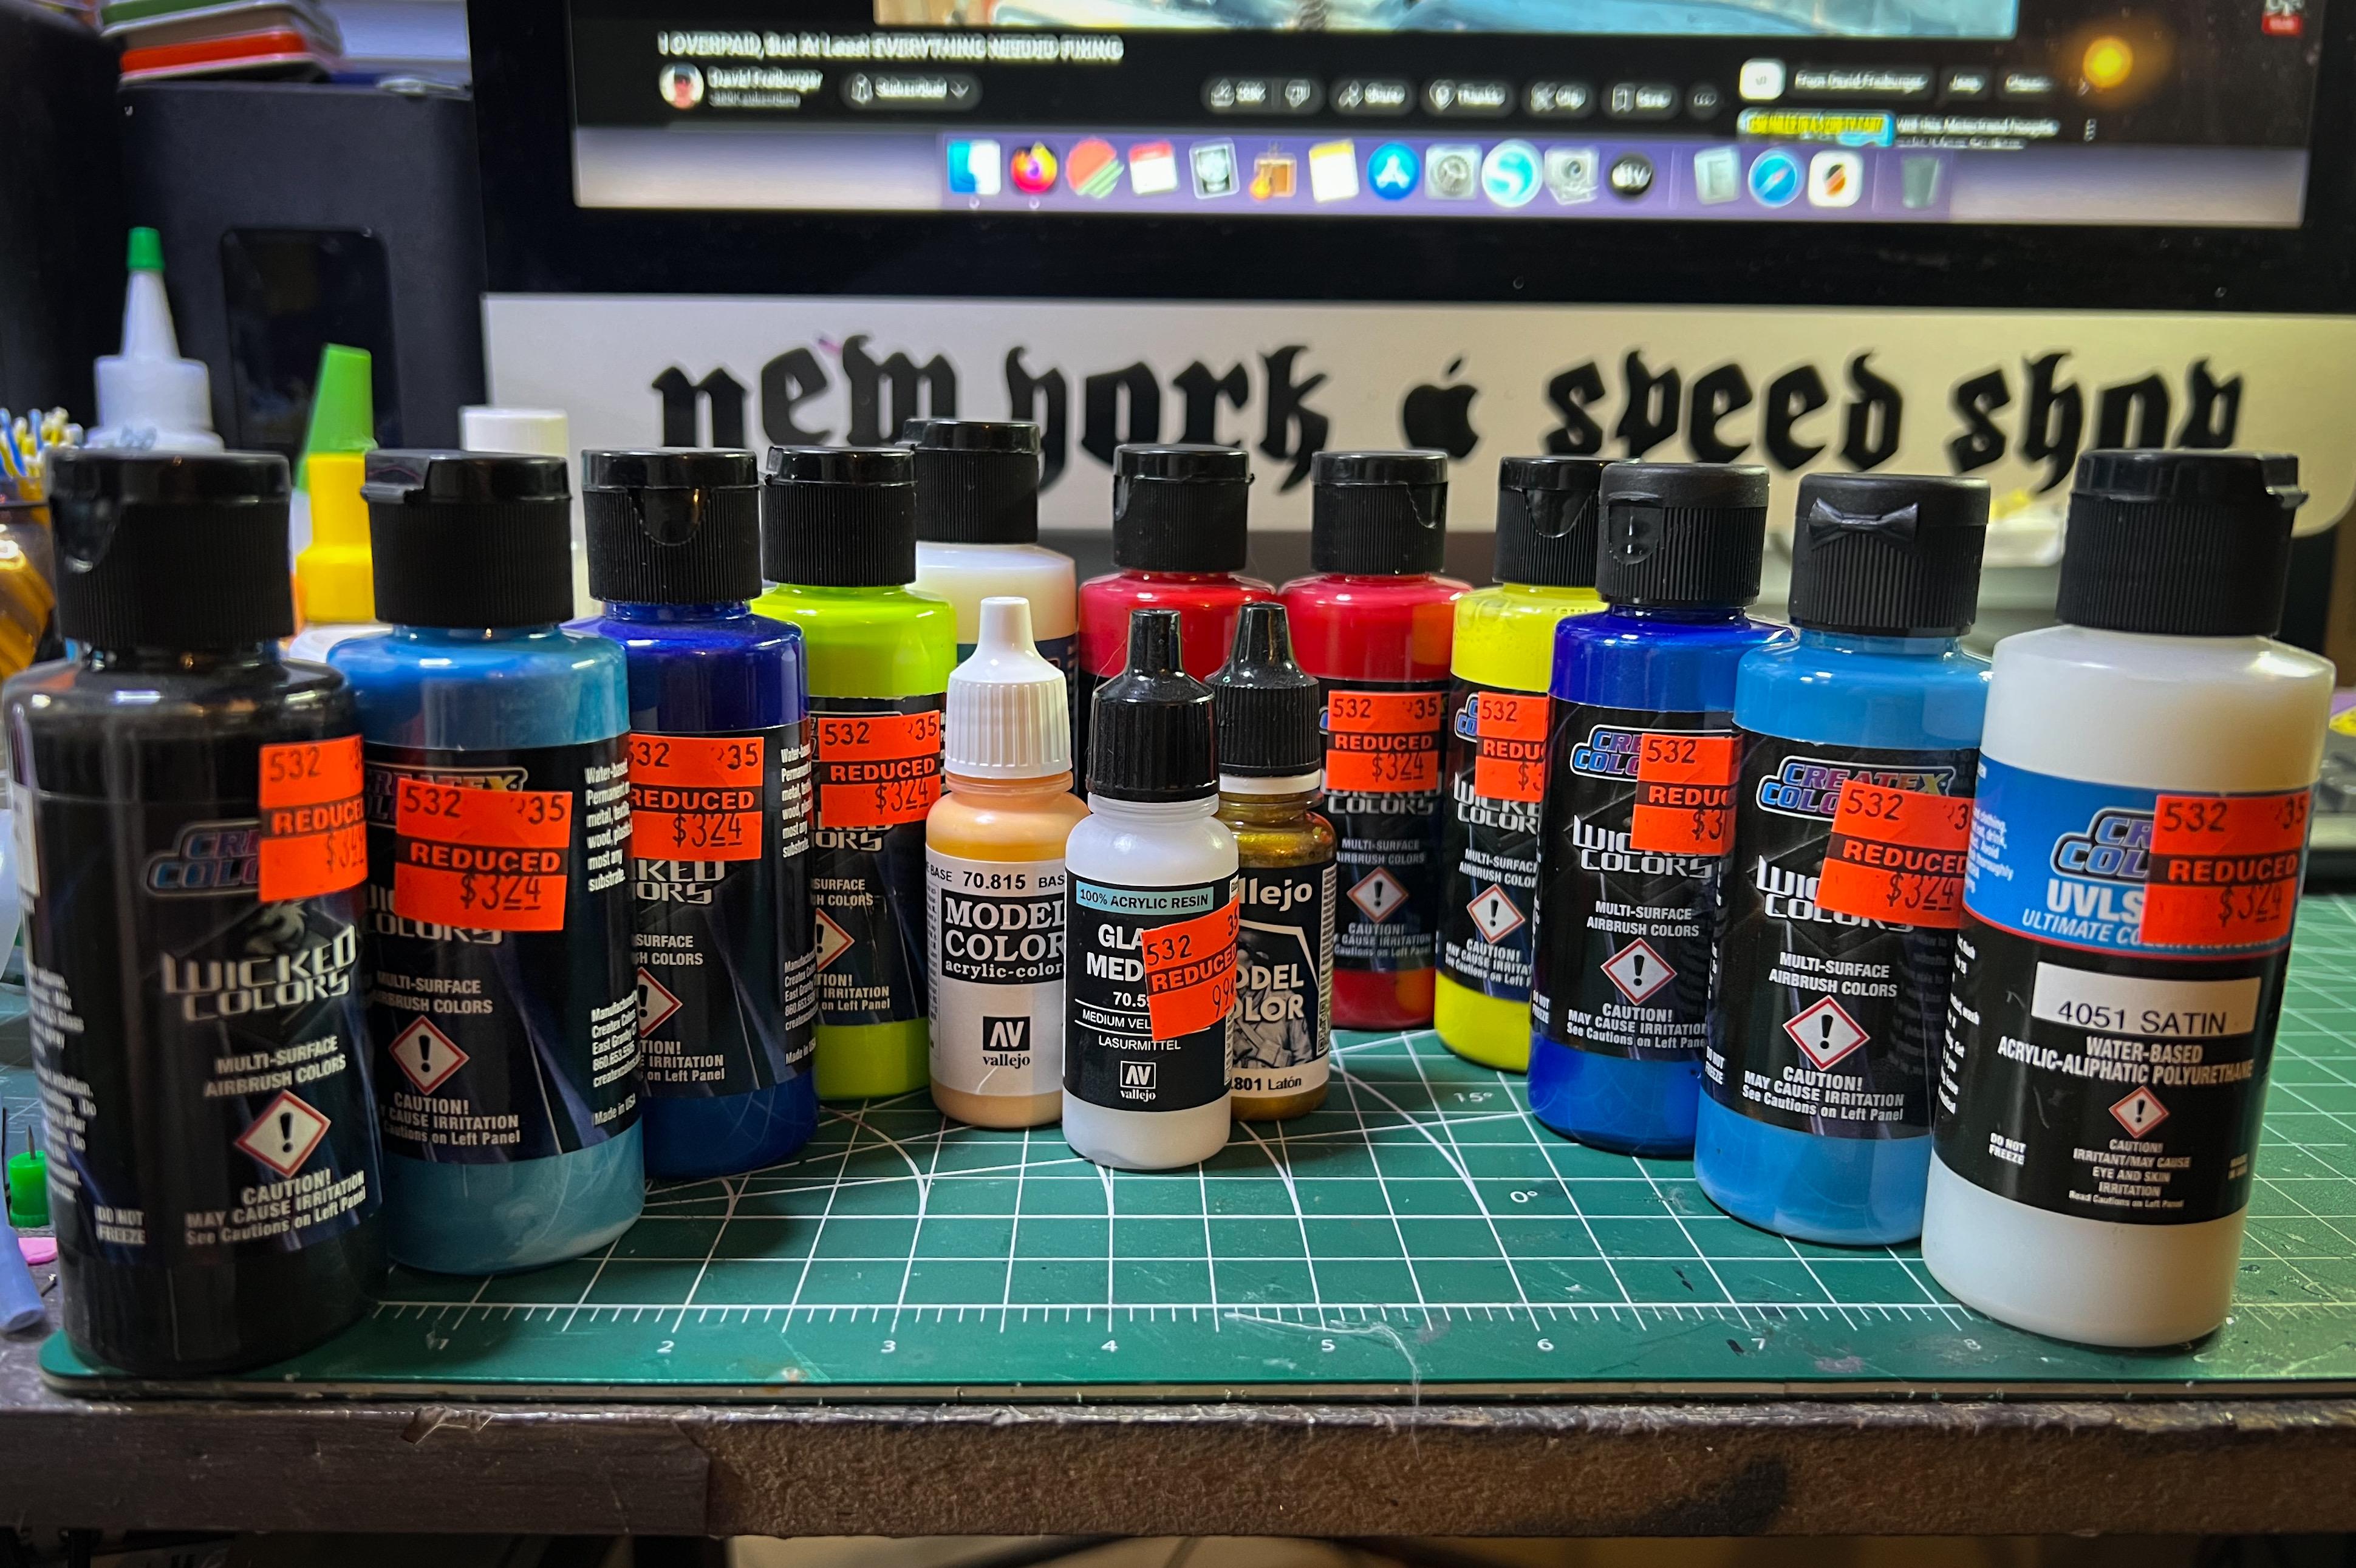
Some (not all) Createx, Wicked and Vallejo paints reduced at my local store also:
-
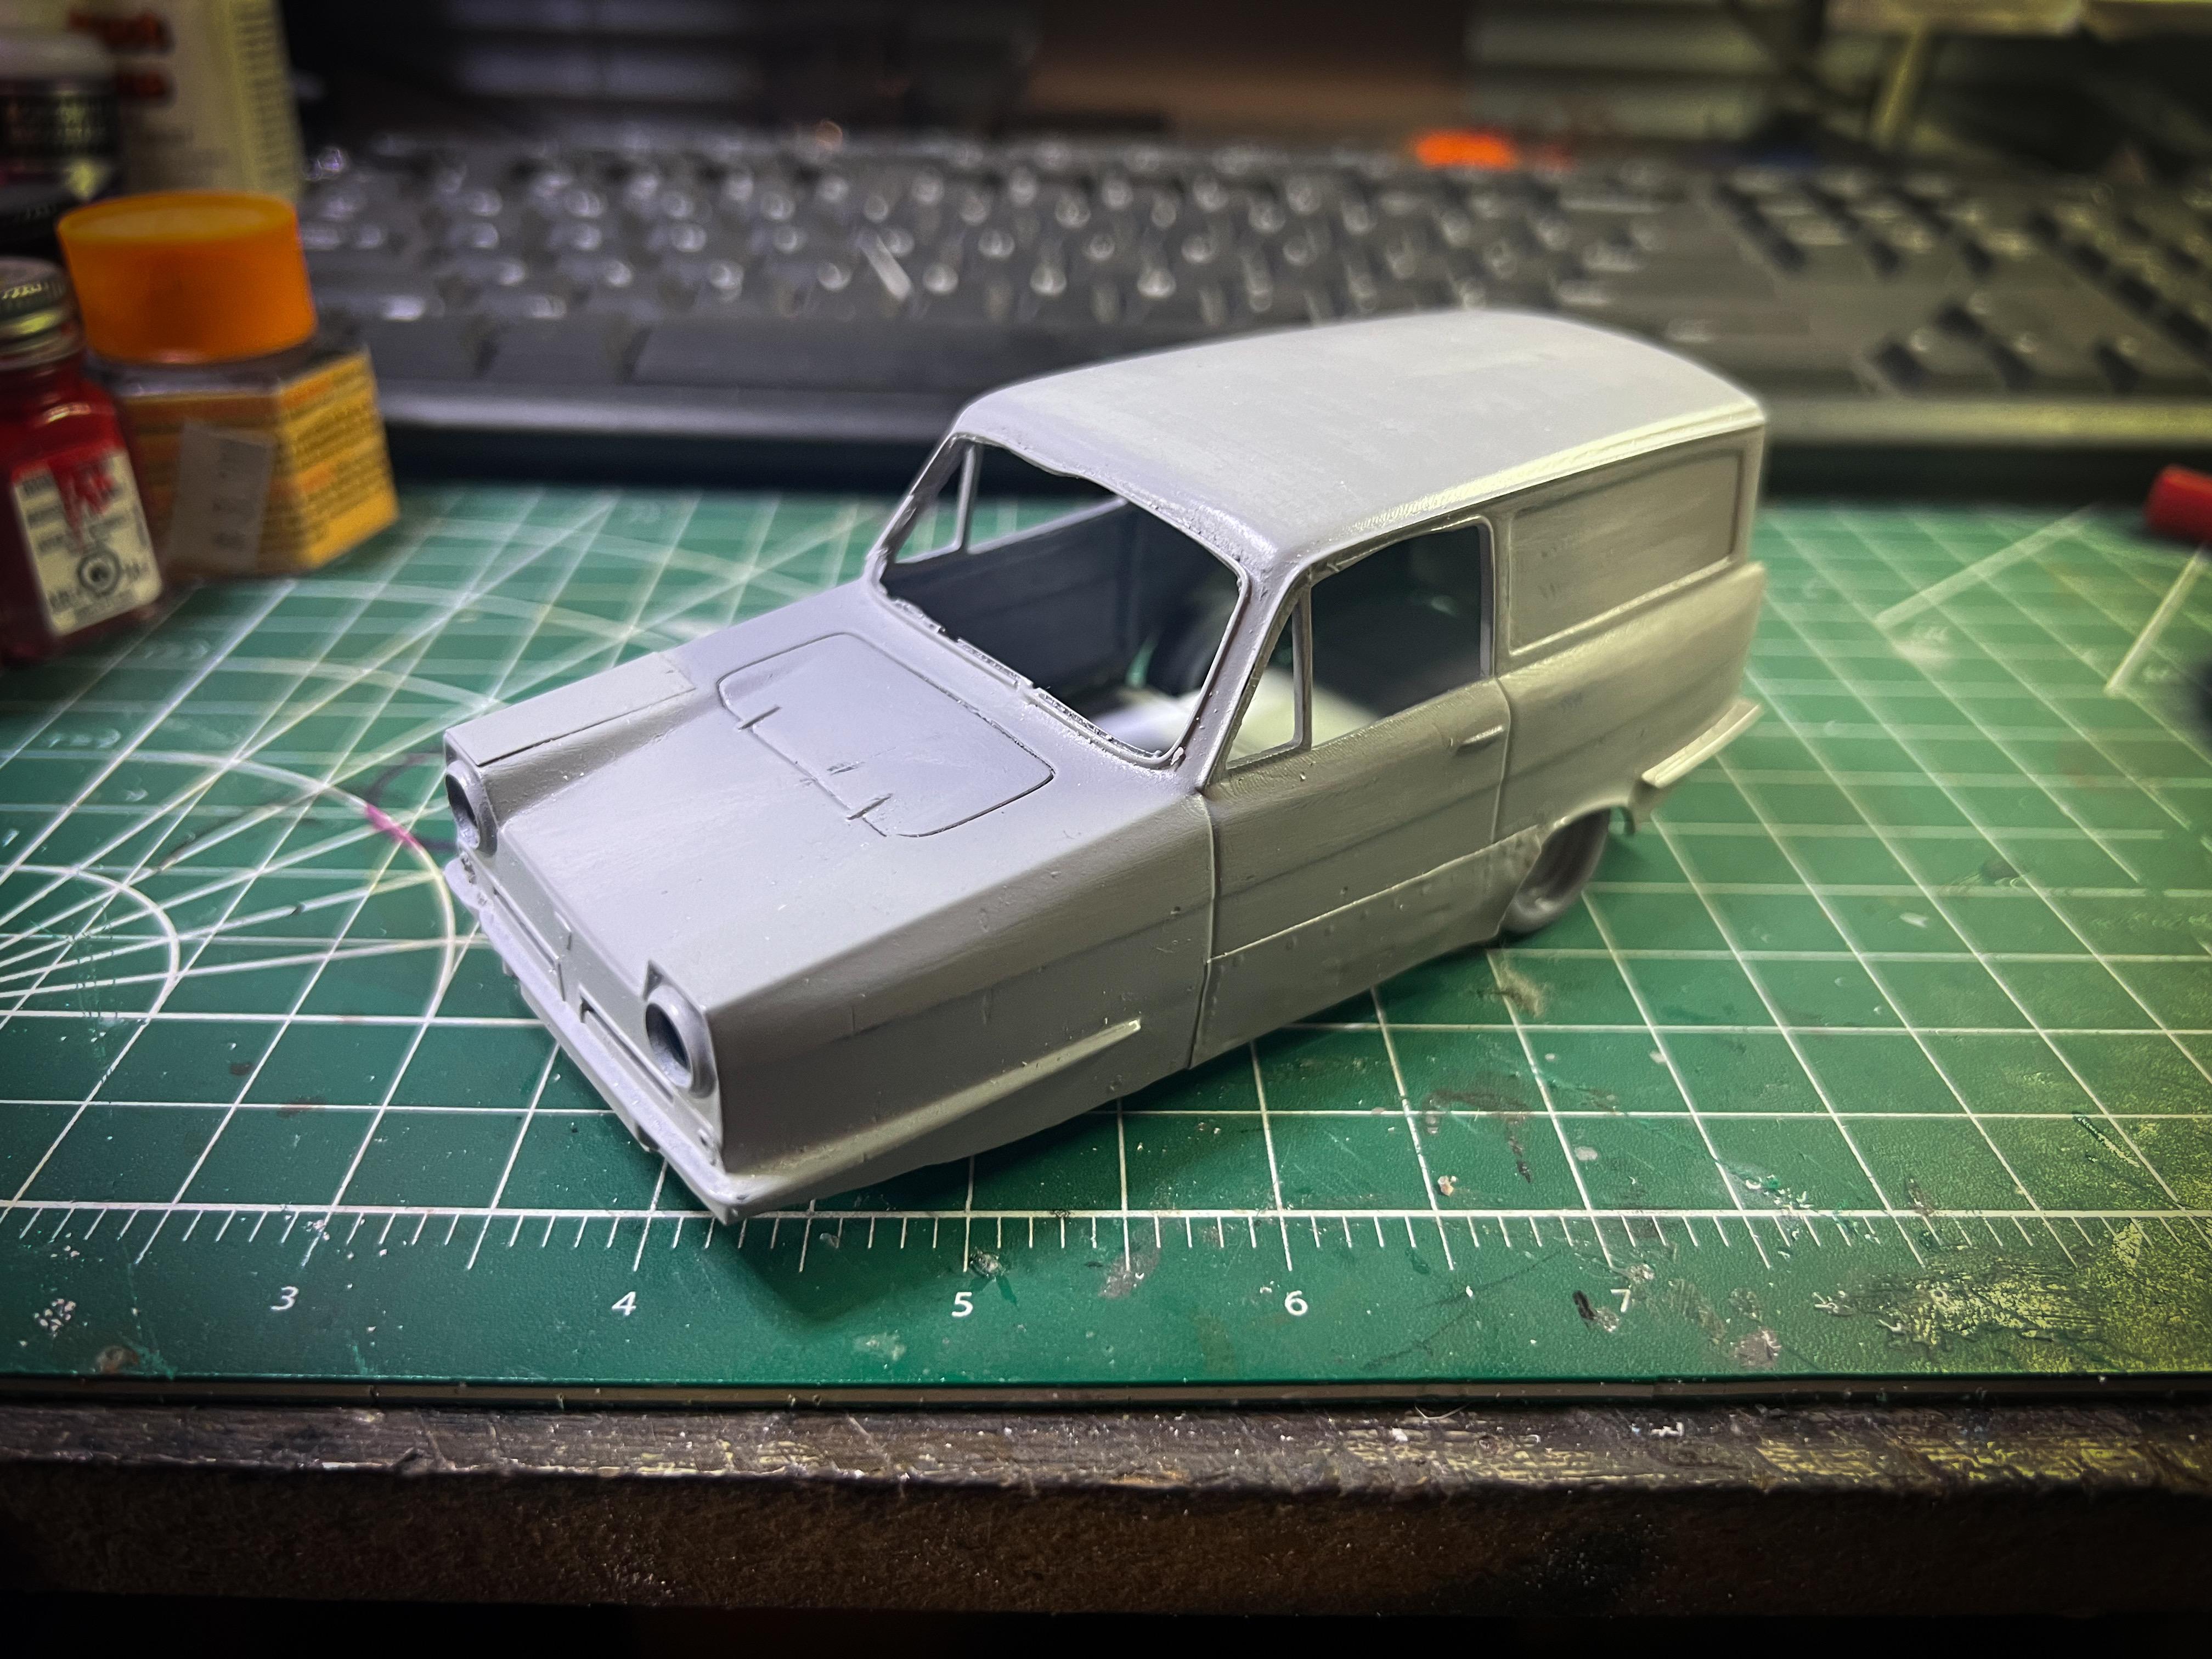
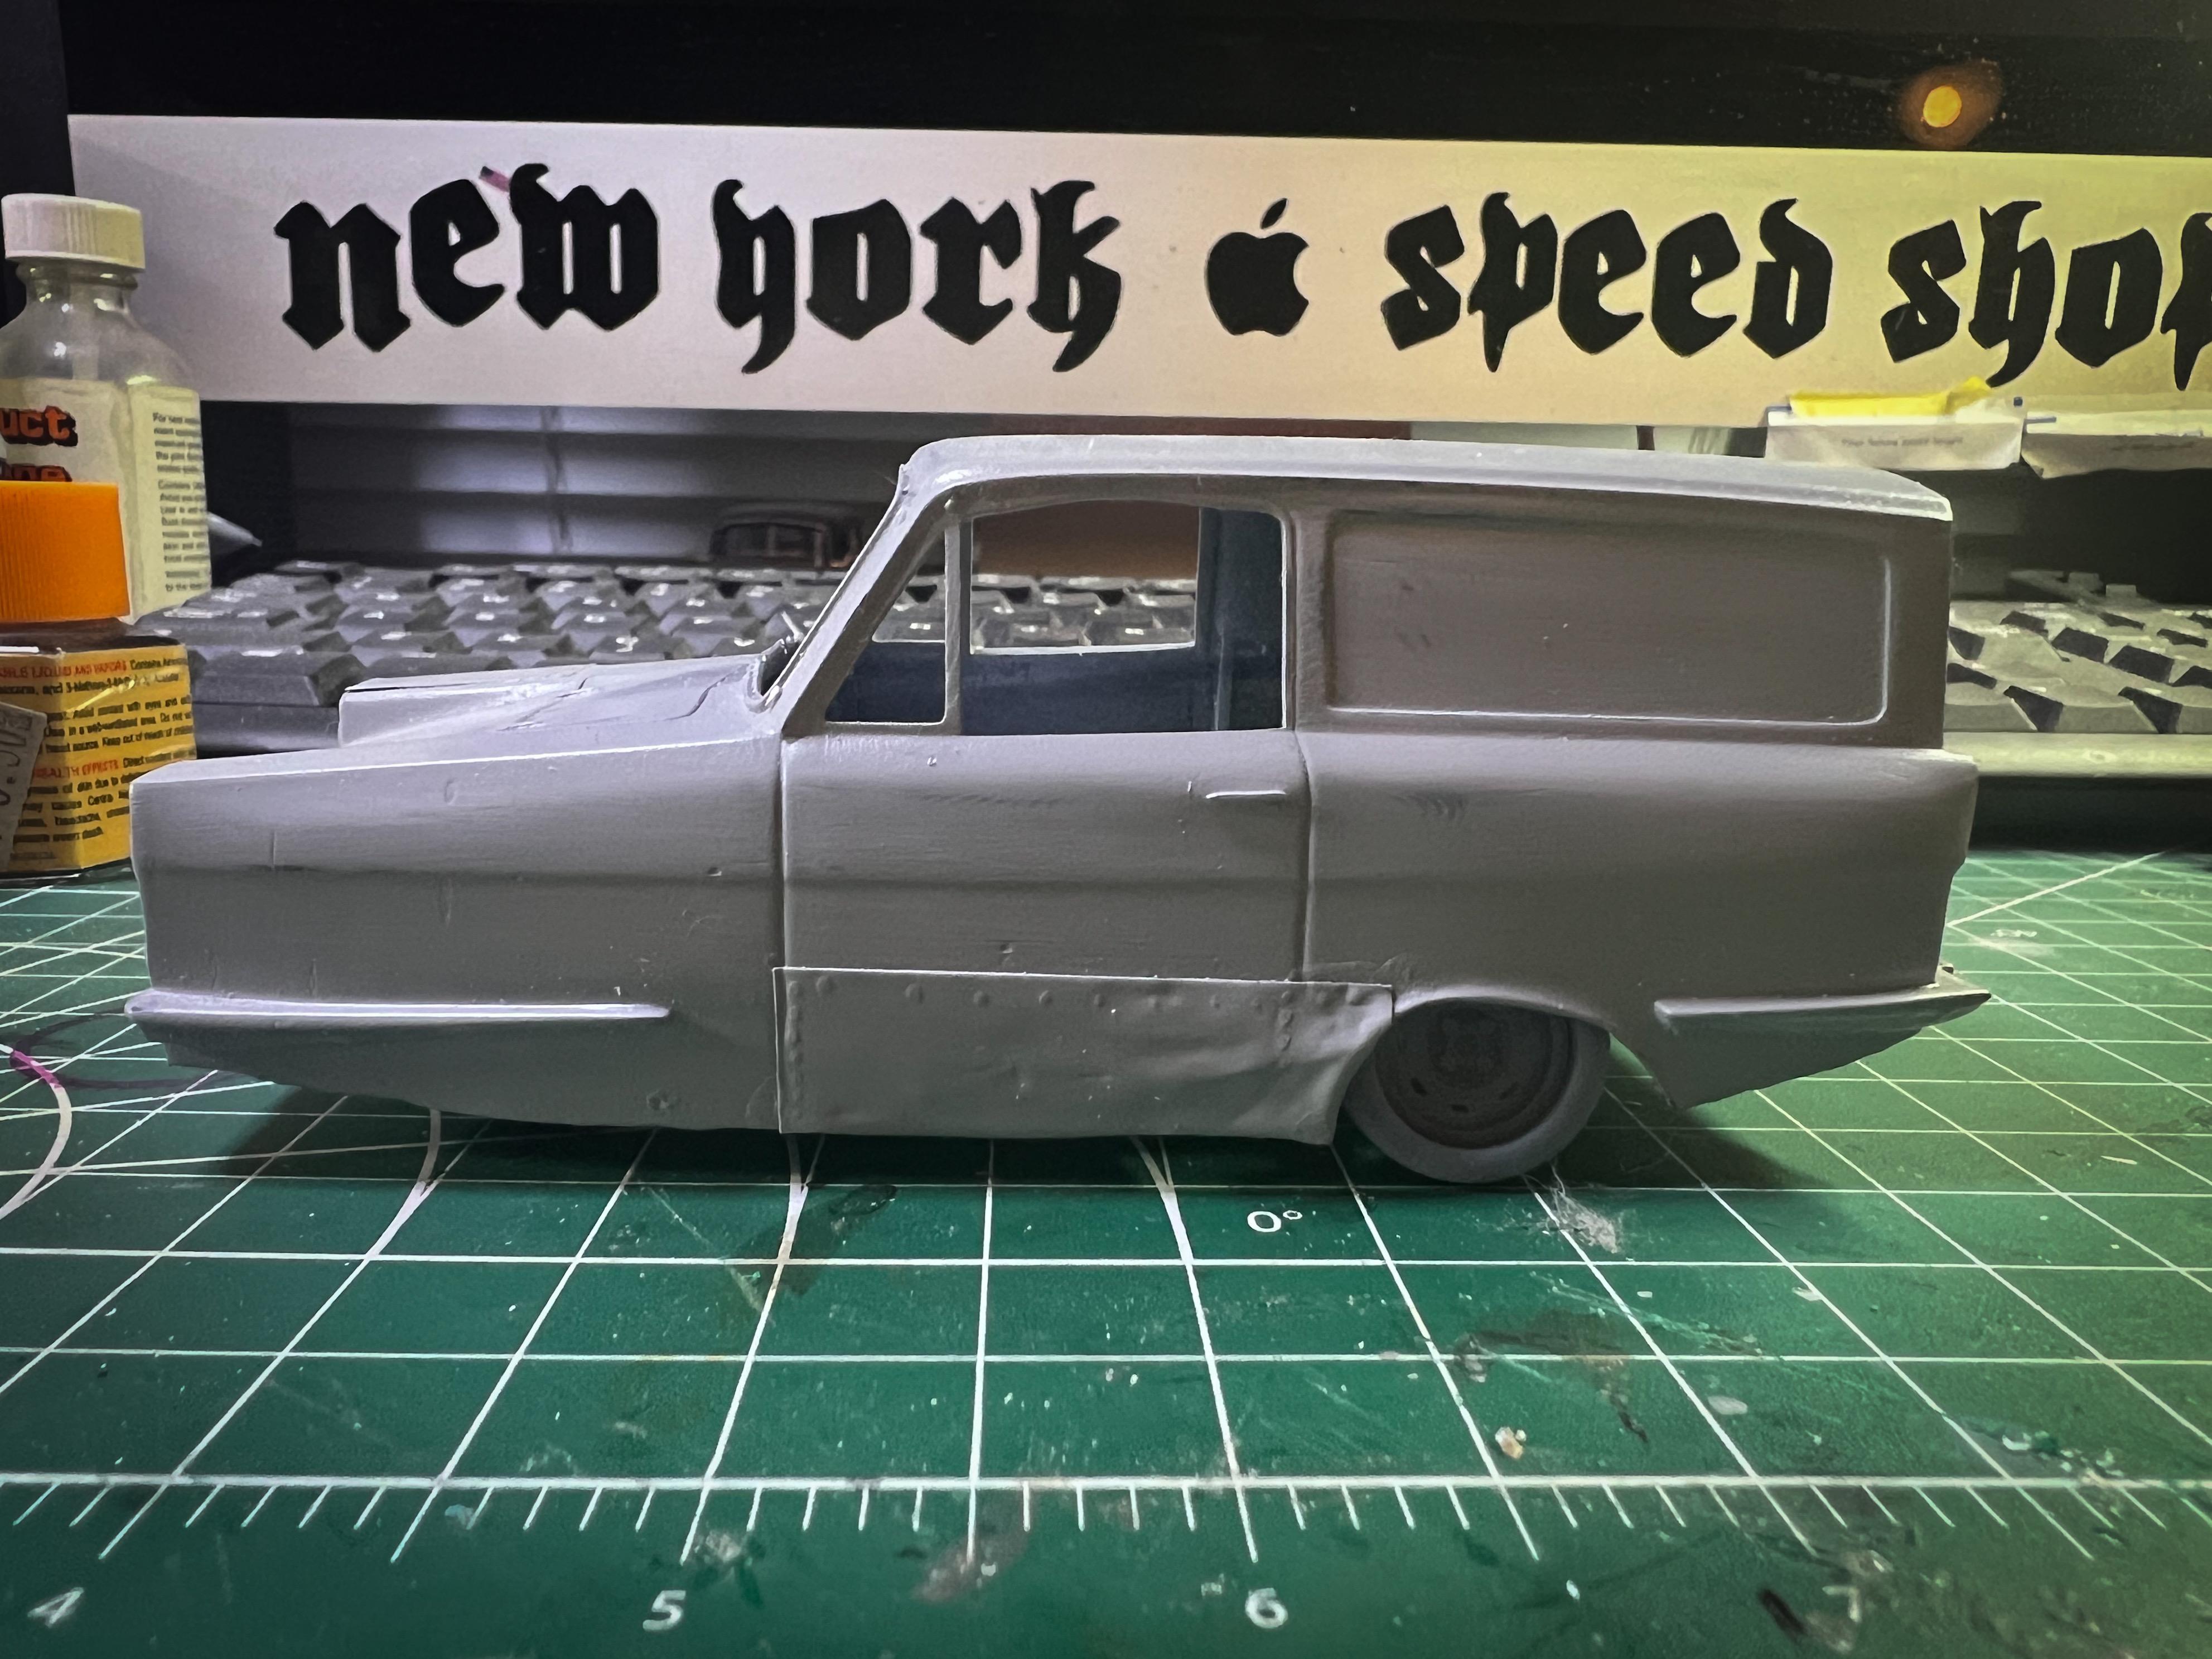
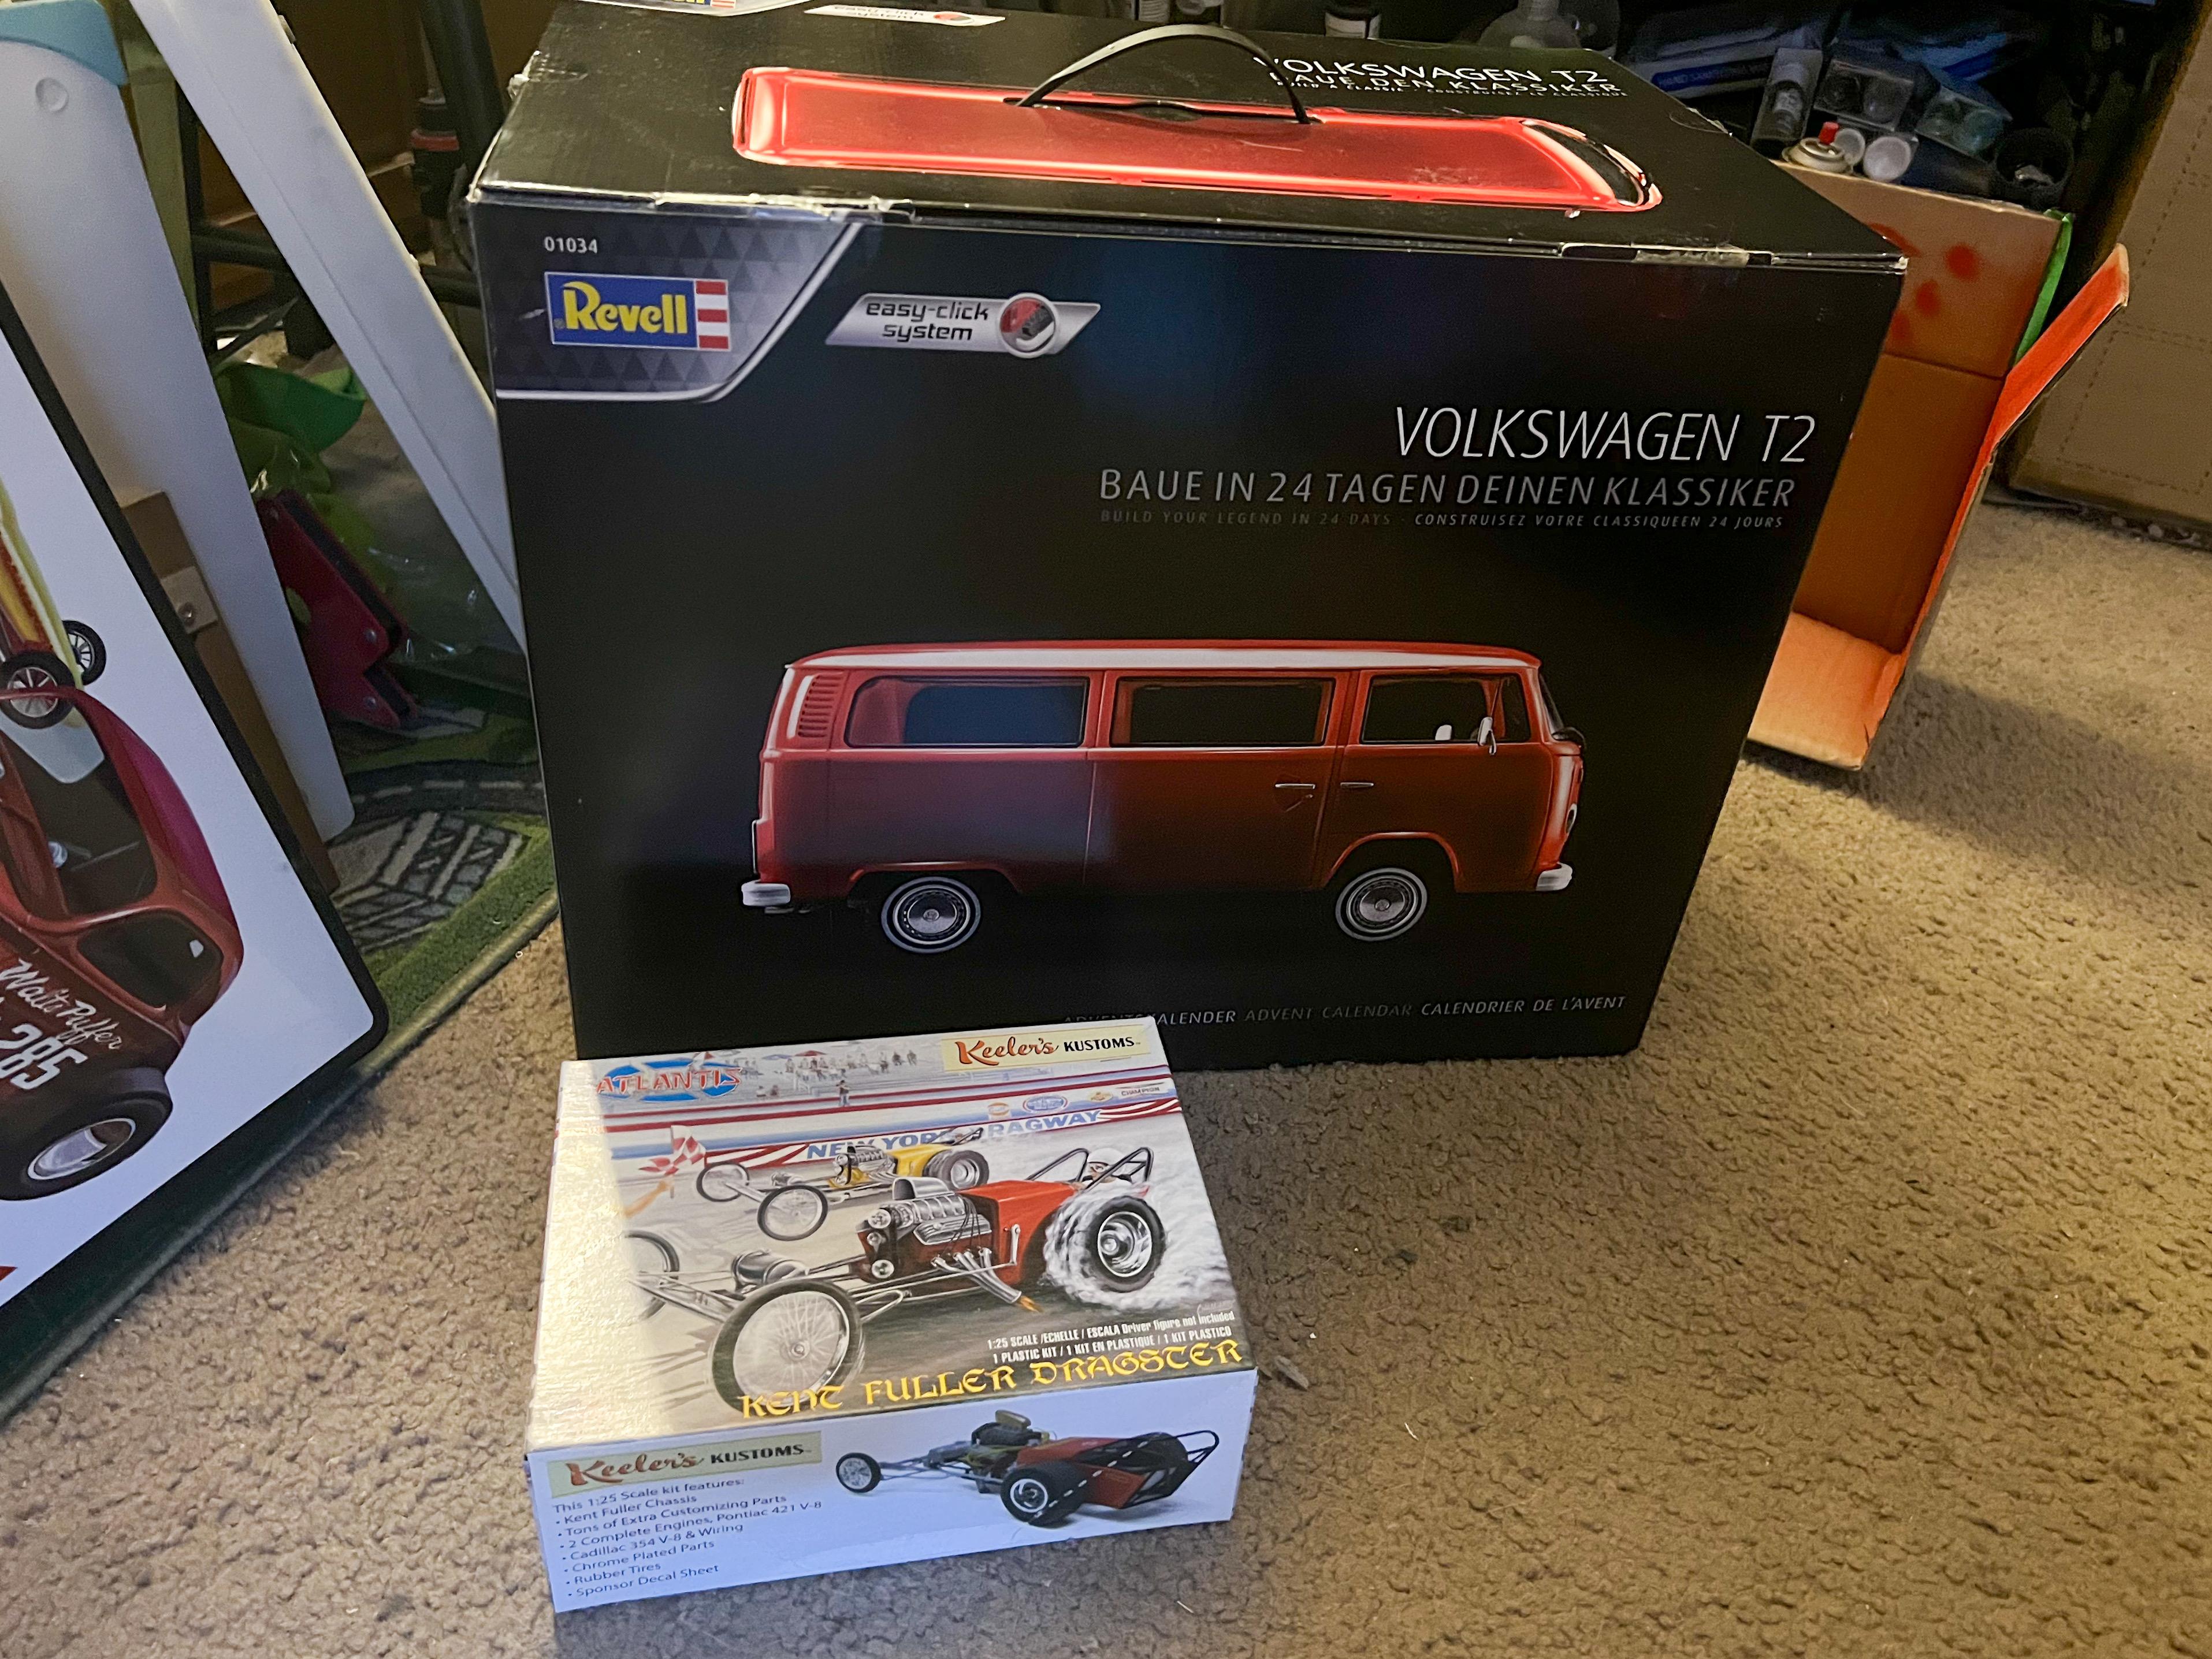
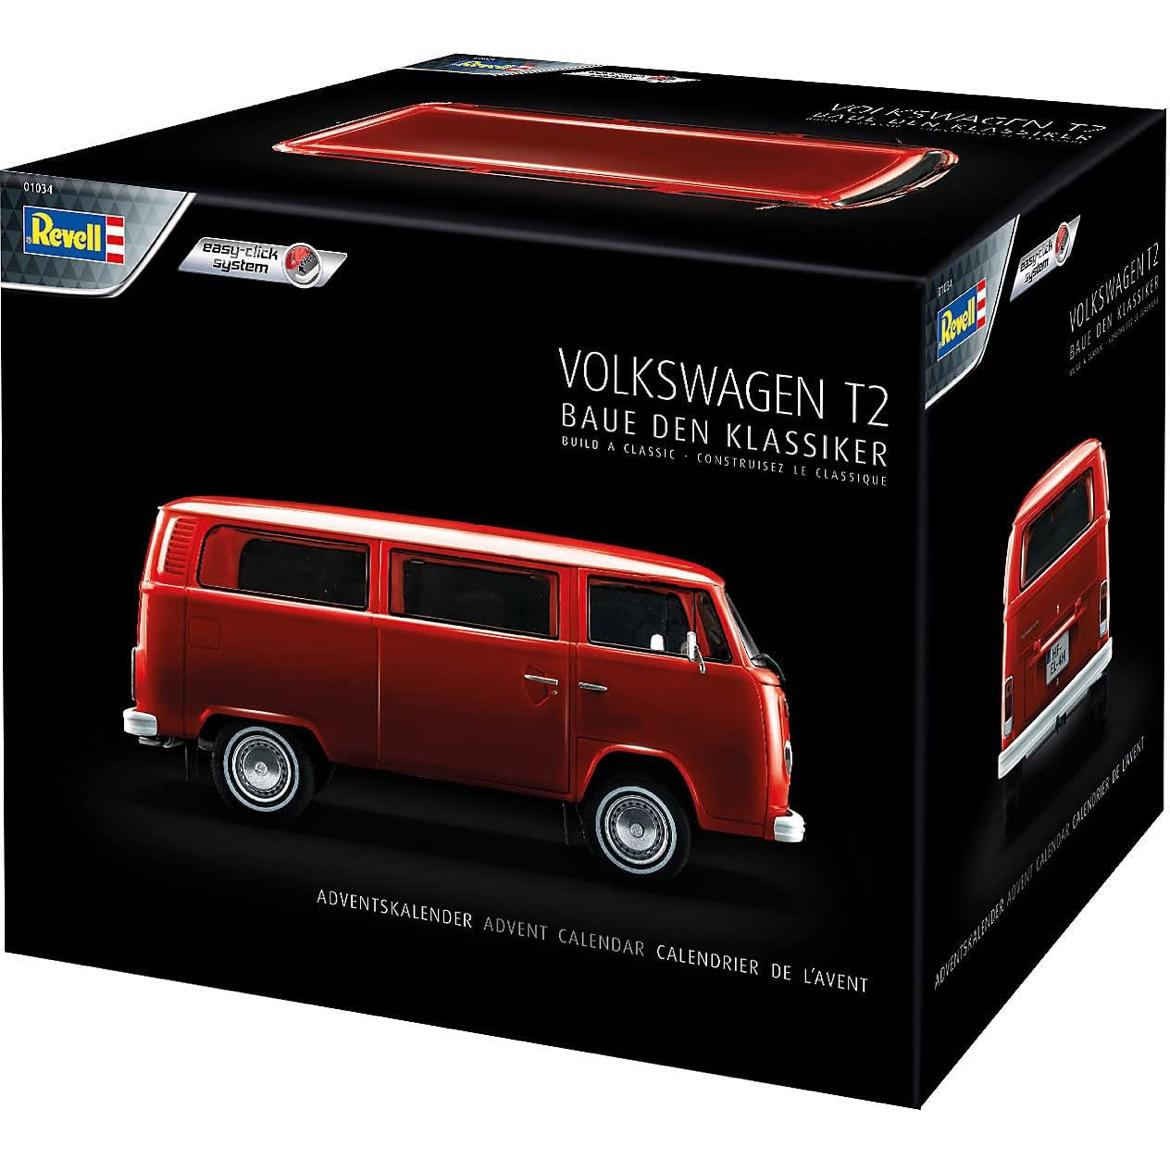
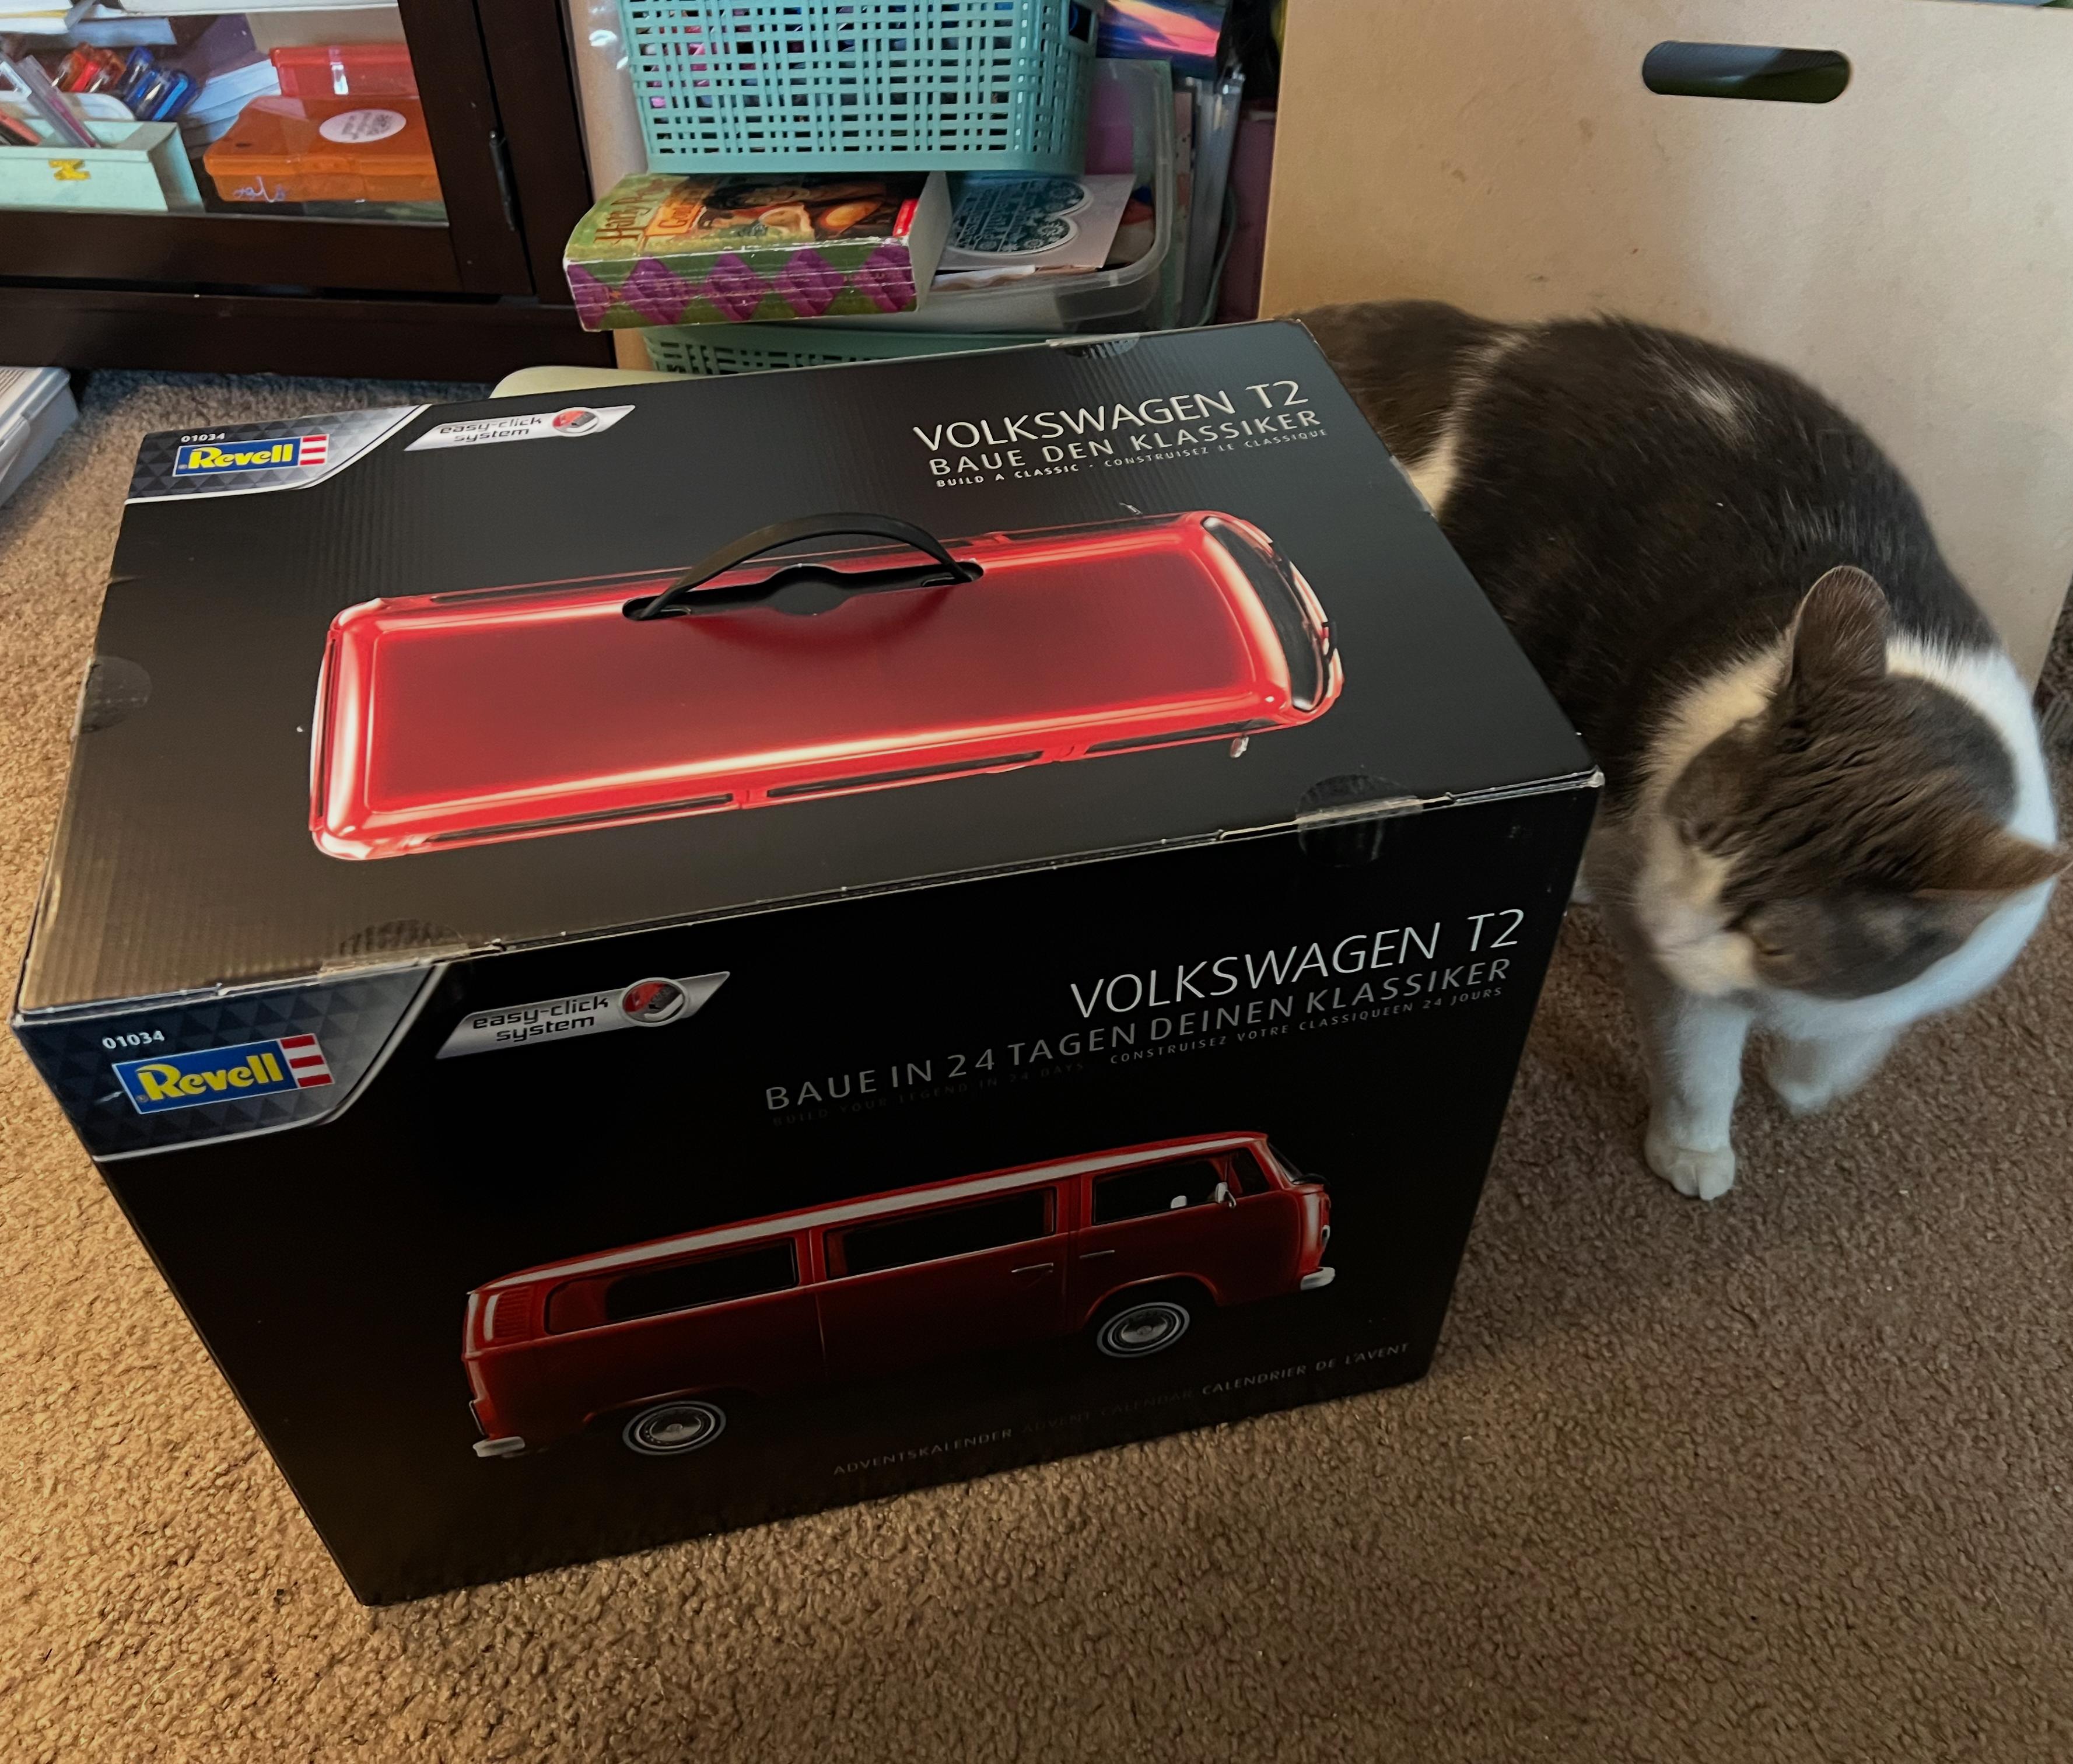
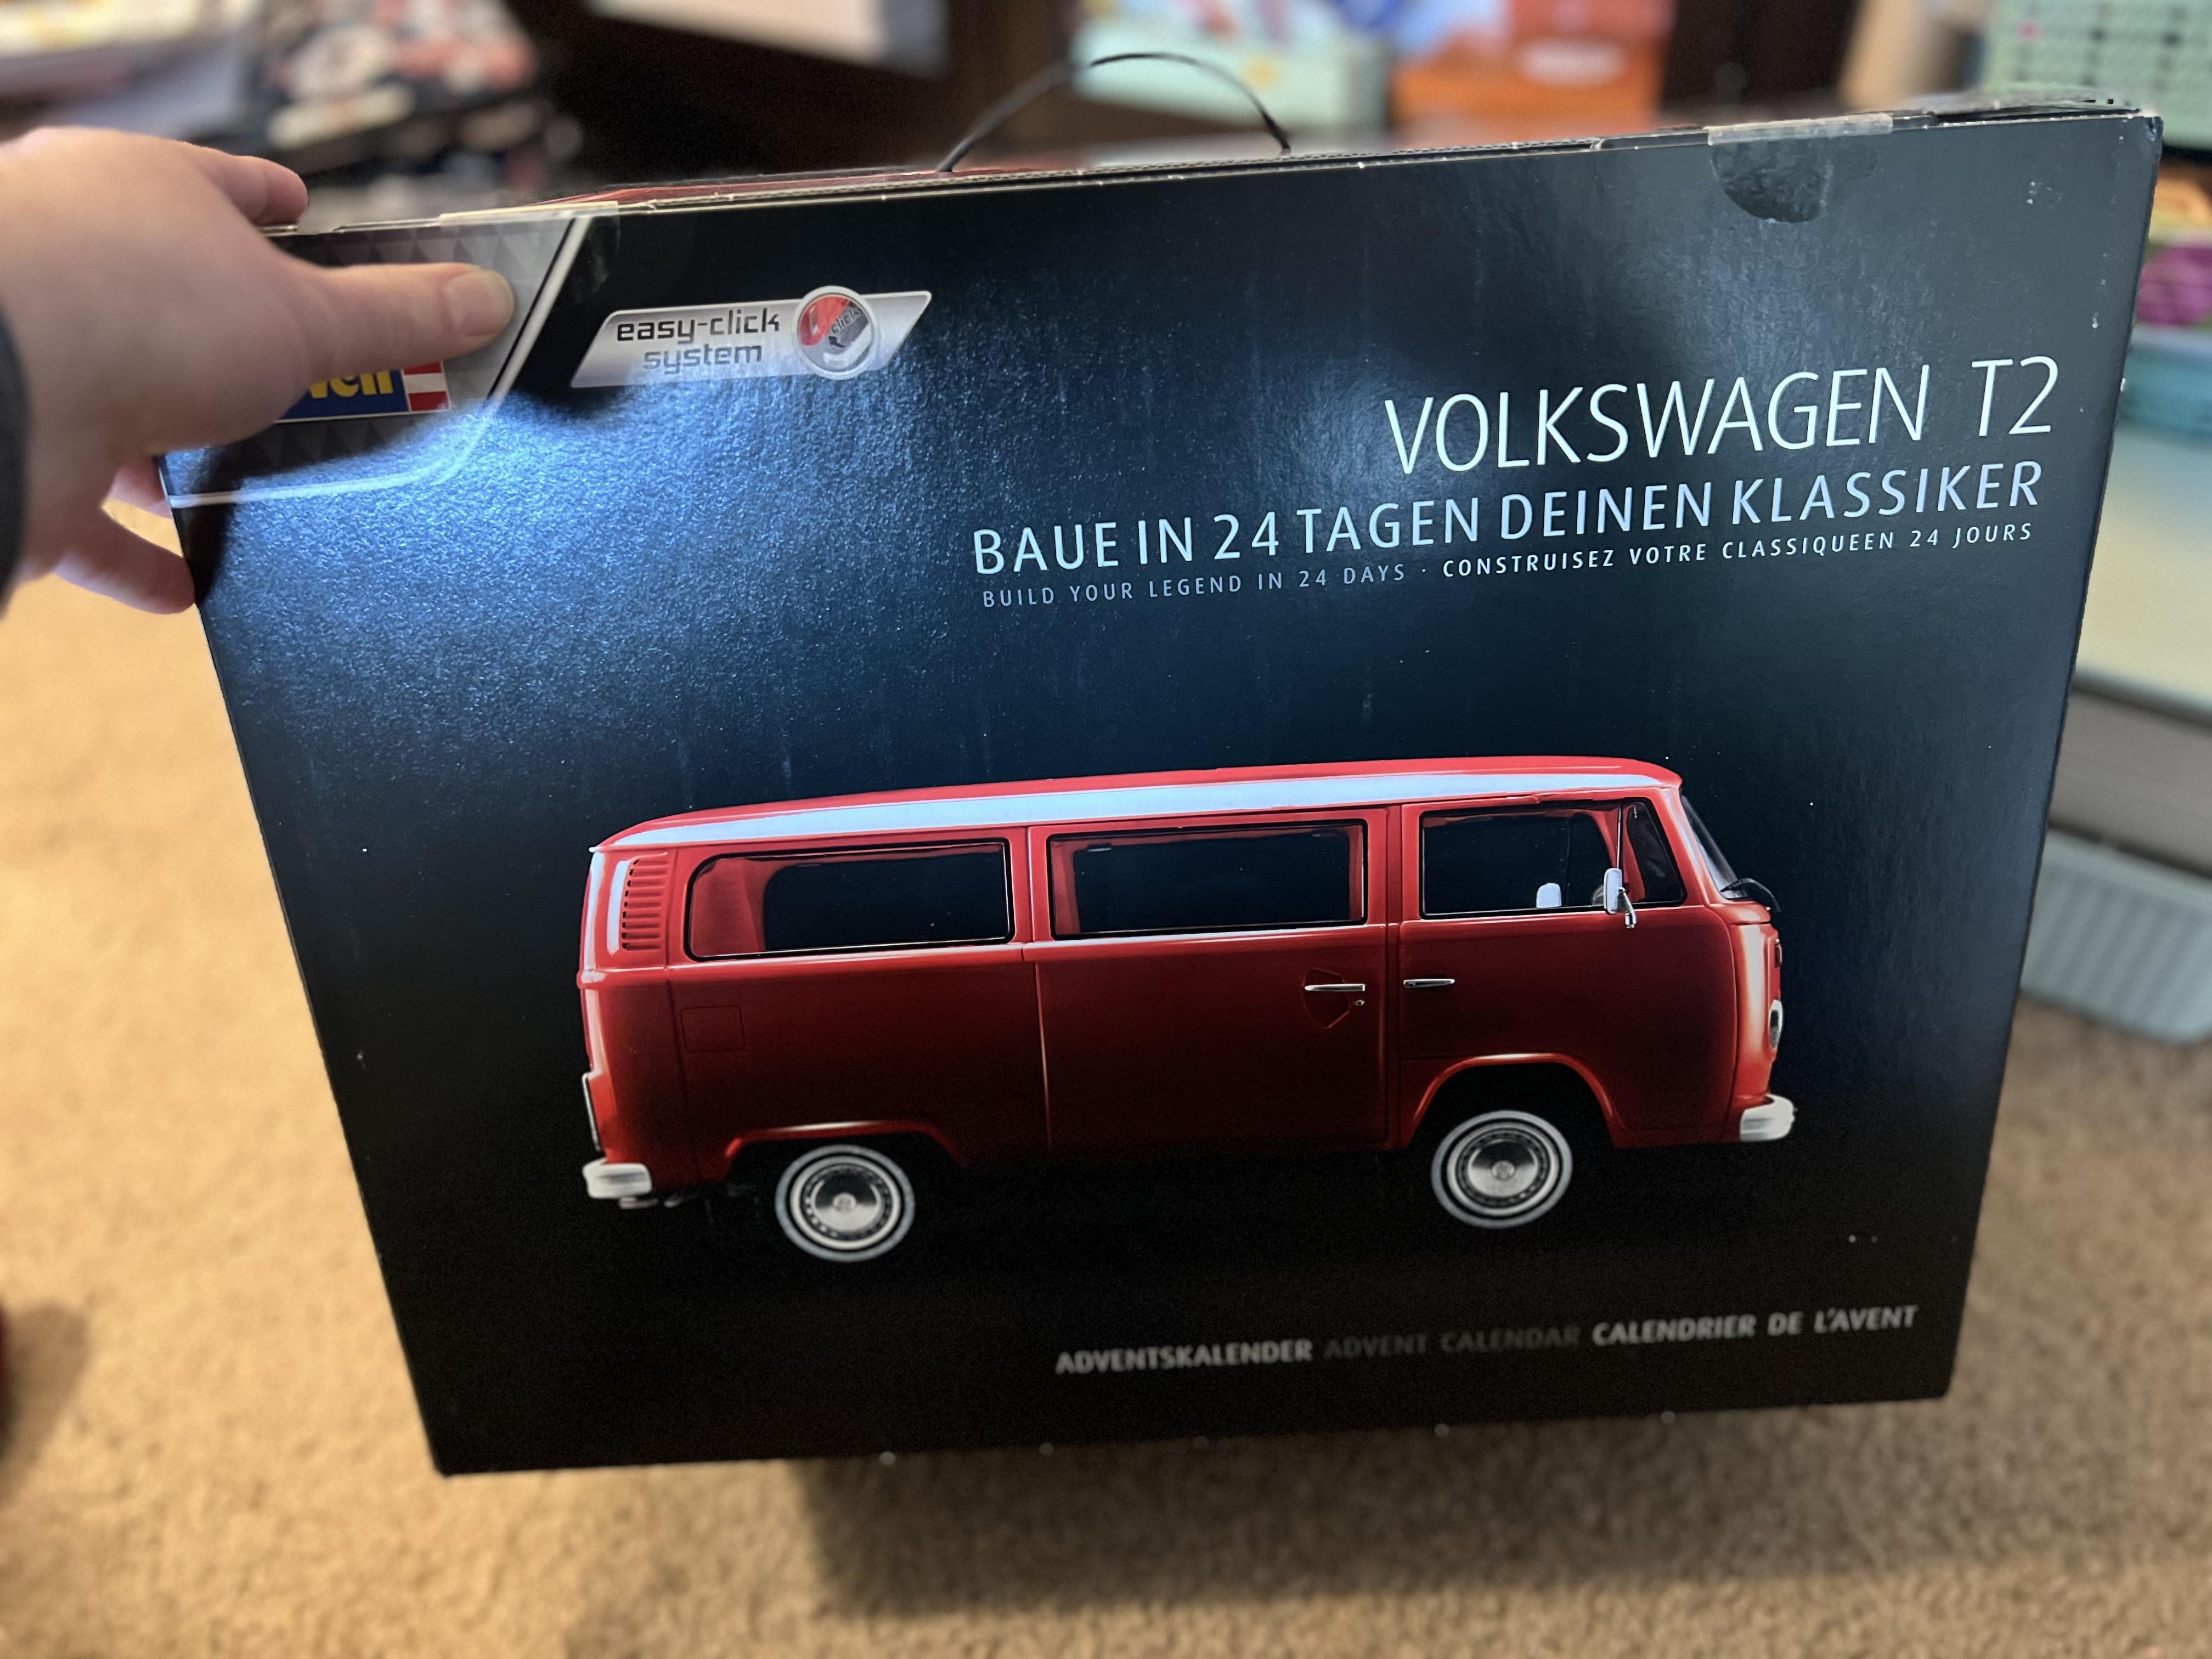
So, I’ve had this kit on my to-buy list for a couple of years - it’s a special release of the Revell VW Bus, but packaged for Christmas time. Every day in December you follow a step, and end up worth a build by Christmas Day. Now, I know this kit is pretty easily available in non-seasonal form, but I really wanted to pick one up and complete it one year. Problem was, the shipping was always crazy expensive on them, and I never found one until recently at a decent price. ONE of them popped up on Amazon last week at $30, with Prime delivery, so I jumped at the chance. When it arrived, I found out why most places were charging $80 just to deliver the thing…fully grown cat for scale here: It’s HUGE! I was certain that they’d either accidentally sent a whole case of them, or they sent the wrong item, but nope…just a RIDICULOUSLY oversized box. Is a 17” x 11” x 11” box the largest that a 1/25 kit has ever been packaged in? This has to be in the running for the largest ever…
-
Actually, googling 50s Ford hubcaps to see what they were was on my to-do list this evening - ha! I was going to figure out what those were - thanks Steve!