
charlie8575
-
Posts
9,102 -
Joined
-
Last visited
Content Type
Profiles
Forums
Events
Gallery
Everything posted by charlie8575
-
Interesting, it appears that the Euro-spec car allows a no-sunroof order. I wonder if it could special-ordered like that here. Very nice-looking build. I may pick one of these up myself. Charlie Larkin
-
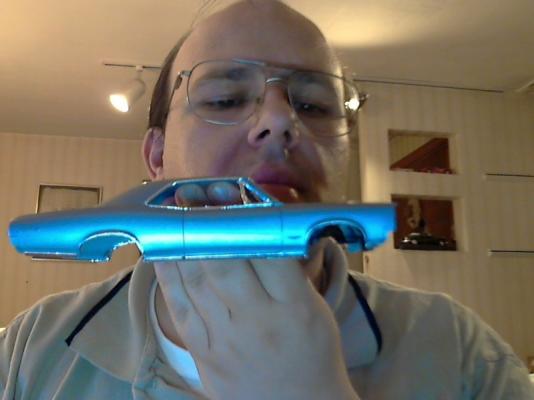
Well....I thought I'd never see this. Especially in this point in my life. I've finished two models in less than a week. For getting back in, they came out decent, too. Not great, but acceptable to me. Sometimes, you have to accept "okay." This subject in question is a Revell 1966 Pontiac GTO. Pros: VERY accurate. Lots of details, looks really nice when it's done. Cons: Locator pins don't work well for a lot of the parts I found, too many separate details with no secure anchoring, some things that were molded separarely could probably have been done as one piece with little or sacrifice (the side-view mirror coming to mind.) The biggest headaches I encountered: 1. One tailpipe won't stay glued with any type of adhesive. 2. The rear suspension locater tabs are near-useless if you paint the suspension and chassis-plate. However, failure to do so prior to assembly renders painting an impossibility. 3. The front bumper/grille asembly was warped slightly, and no amount of coaxing could gain total conformity. Despite that, I'd definitely buy another one of these kits, and this has a GREAT chassis that would be useful under a lot of 1964-'67 A-body builds. Without further adieu, and with the Caprice as the stand for outside pictures.... I'll try and do one or two more tomorrow in brighter light. I'm also trying to get the hang of this little digital camera my dad has. For giggles, I might do one or two inside as well for a little extra light. Charlie Larkin
-
The hinges have been glued to the hood. The rear window wouldn't stay in until I ran a bead of tube cement down the intersection of it and the package-shelf. It's attached to the interior tub now, but is at the right angle. The chassis fits so tightly in the body, that glue isn't necessary. There's really nowhere to glue it, anyway. The hoses and battery are now in-place. About ten minutes ago, I attached the door handles and wipers. This model is now done. See under-glass. Charlie Larkin
-
Lovely work, Juergen. It's nice to see you back at work. The bed technique you used was quite good and works beautifully. Your limits on English not withstanding, your work is understood in any language. Charlie Larkin
-
Looks good, Joe. Bring it along to the meeting next month. Charlie Larkin
-
Looks like GM green. Very nice job on this. Charlie Larkin
-
Mike, the maroon plates were 1964-'65. Green was the last year of the issued every year or two plates. In 1967, they issued the white with blue lettering that was used until 1973 or so, before phasing in the original red and white plate, as opposed to the ugly thing they have now. I have a few more pictures. The grille assembly categorically refuses to fit properly, so I've simply done the best I can with it. It appears to be slightly warped, and as we know, straightening plated parts is not advised. I also wish Revell had simply made the side-view mirror in one piece. While the kit part is gorgeous, I'd gladly give up a small amount of detail for less fiddly-poke. It started to get to the point where this build was not fun anymore for tonight, so I stopped. Here are some additional progress photos. Charlie Larkin
-

After Stroke - Building Again, good therapy
charlie8575 replied to Dave Mikrut's topic in WIP: Model Cars
Dave, that you're doing this at all speaks volumes about you. Keep at it, your abilities and skills will return with time. You CAN do it! Charlie Larkin -
Having been sidelined the last couple of days with this rather nasty little cold, and as result, not able to be of good mind enough to actually do school-work, I decided to build and get some of that caught up. I glued the windows into the GTO, using plain old Elmer's Glue-All. The lenses for the headlights have been secured, and I painted the turn-signal lenses amber, as for some reason, I remember them being amber. In any event, amber paint for lenses was an auto parts store staple at the time, so it's still within prototypical reason to do it that way. I decaled the tires with the redlines; I noticed those decals, even after setting solution, really don't like to snuggle down. Oh well, hopefully they'll stay on and even out with time. I also glued some homemade license plates onto the bumpers. These are 1966 Massachusetts issue. I used liceneplates.tv blanks and Open Office.org's Draw to resize the plates to 1/25. With some degree of luck, I'll have this one done within the next week or two, as it's getting very close now. Enjoy. Charlie Larkin
-
1970 Challenger Convertible, Slant 6 Build
charlie8575 replied to ian ashton's topic in WIP: Model Cars
Fantastic! Charlie Larkin -
20Th Century Cars into Kits
charlie8575 replied to davyou5's topic in General Automotive Talk (Trucks and Cars)
Lots of good stuff called for here. Here's my additions. 1977-90 full-size Chevy sedan. Use photo-etch and separate interior panels, header and rear panels to enable building an accurate Caprice Classic or Impala. 1977-90 Full-size GM wagon. They're all Chevies from the cowl back. The front clips could be molded separately to build a Pontiac, Olds or Buick. The only difficult part might be the interiors, as those were fairly distinct from one car to the next, with detail changes frequent in-between model years. 1977-79 Caprice/Impala Coupe. 1942 De Soto. A La Salle of some kind. 1930s-'40s Buick/Olds/Pontiacs. A shark-nosed Graham. More independents of any description. Studebakers, Hudsons, Nashes, Ramblers, Grahams, Huppmobiles, non-capital "C" classic Packards (e.g., 110/120,) both pre- and post-war. How about a Marmon V-16 for something totally different? Or a Franklin Olympic? 1953 Olds Fiesta/Buick Skylark/Cadillac Eldorado. 1949 Olds 88. A Corvair Lakewood, Greenbrier or Rampside. Why "or?" do all of the above. 1965-70-ish Chevy/GMC van. 1981-'87 Olds Cutlass Supreme, with an accurate small-block Olds/200-4R, or 200-C if pre-1984. Brass-era cars. Charlie Larkin -
Many happy returns, Ed. Charlie Larkin
-
Very nice job, Brandon. Charlie Larkin
-
Sounds really cool, let's see what we get with it! Make it a real sleeper and paint it Spinnaker Blue or some other muted pastel....looks tame unti all you see are taillights. Charlie Larkin
-
I like the overall execution, Lyle. I love the little irony of using a lighter body for a gas tank. Charlie Larkin
-
Mike, Probably the easiest way to do this would be to go hit one of the wreckers out there, or see if spot a G-Series van on the road, used car lot, etc., and measure up the door-handle recesses. Fortunately, these van because of their high production, are still fairly common both on the road and in junkyards. Once home, using a ruler and compass, draw a more-or-less rectangle approximately where the recesses are. Then, using a compass with a long leg so you can point the pointer on cork or whatever substrate you have handy, use the compass to radius the corners slightly. If you feel adventurous, you could try it free-hand. Once the layout is completed, if you have a Yankee twist-drill or a pin-vise, drill a series of holes around the perimeter using as small a bit as you have, especially at the corners to help keep them rounded slightly. Use one of the razor saw blades that attach into a #1 X-Acto handle and cut of the plug. If you feel ambitious, you lightly file the edges to both smooth them, and done properly, suggest the slight curvature. Back these holes with thin plastic sheet, and give the body one final coat of paint. Charlie Larkin
-
I agree with Ed's suggestion. That aside, really nice job. Charlie Larkin
-
I like it. Where did you get the hood from? Charlie Larkin
-
Now this looks great! I like the orange and black, and the setting of the picture almost makes it look like a brochure shot. Very, very nicely done. Charlie Larkin
-
"90" Cadillac Fleetwood Brougham d'Elegance Coupe
charlie8575 replied to Ron Hamilton's topic in Model Cars
I like this! I've thought of doing something very similar with one of these, or possibly just converting it into a Brougham, fill in the sunroof,and do a "if I had ordered it" car. Great build, and something that really does look like a car GM should've built. Where exactly did you come across the wheels? Also, is the chassis set up so it can be made stock ride-height or did you have to modify it? Charlie Larkin -
Looks great! Charlie Larkin
-
Nice work, Michael. The color looks great, and all the details are spot-on. Fantastic main-streamer. Charlie Larkin
-
This thing looks great Mike. It's so nice to see one of the B-body coupes done in something other than a bright, screaming color. That blue is fantastic. The interior is coming out nice, too, especially the instrument panel. Charlie Larkin
-
Life has a funny way of interfering with your plans. For this reason, while I've buying models, poking at, and keeping up with modeling consistently for many years, I've haven't had time or other factors go to the point where I could actually get something done. This AMT '32 Ford is about 99% done. The molding on it was horrid, more RC2 "quality control." If this gets issued again, I'll buy another one because I'll know the pitfalls and can adjust accordingly. I need to paint the oval on the radiator shell blue and re-attach the molded-in upper radiator hose. The window didn't fit with the vent-wings, and from what I can determine, they weren't supposed to be there. The window fit poorly at best. I may re-cut it from acetate. In any event, enjoy the first completed project in somewhere in the range of twenty years. Charlie Larkin
-
Those red-line decals can be rather problematic, I speak from experience. That came out very nicely. Great job. Charlie Larkin