
customsrus
-
Posts
927 -
Joined
-
Last visited
Content Type
Profiles
Forums
Events
Gallery
Everything posted by customsrus
-
 After shaping and sanding...
 -
Next i added some bondo to areas that needed it.
-
Ok here are a couple of new pictures of this build. After I soaked the body in some very warm water for a long long time, I got the body pretty straight (I hope). Anyway I added some plastic rod to the fender lips and across the bottom sides of the truck. This should make the fender lip more pronounce.
-
Ok I know it has been awhile since I last updated this build. But for those of you that might be interested I believe I have the warped body problem solved, I will post pictures as soon as I can recharge the batteries in my camera. Thanks
-
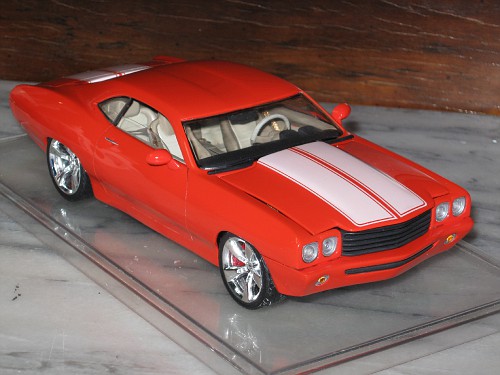
the single tail lights do make it look more like a chevelle. hard decision to make...
-
I was looking at this picture of the back end of the chevelle . kinda reminds me of an 67 impala, may have to lose those center tail lights what do you think??
-
thanks everyone for your comments.
-
looks good to me, paint looks awesome, now hurry up and finish it.
-
Well I did a little work, not much but a little. I redid the exhaust tips and made them square. I hope you guys like them. They may have to grow on me. I put a picture of the round exhaust to to compare. I also added a lip to the lower valance. Thanks for looking.
-
great lookng chevelle 2 door wagon. very clean build.
-
Teresi: "Dyno Drags" Semi-Truck
customsrus replied to John Teresi's topic in Model Trucks: Big Rigs and Heavy Equipment
I vote real !!!!!!!!!!! oh wait that is another thread but this could sure pass for the real thing if we didnt know it was a model. Great build John, whats next???????? -
Thanks Ira, Hedgehog, hotrod59f100, and rmvw guy for your comments. I am hoping to get some work done as soon as I get off this 3-11 shift.,
-
Well finally got to do alittle work today. I got to work on the exhaust. Used the camaro exhaust pipes and added round tubing to the ends. Made some exhaust cutouts in the rear valance. Dont know if I like the round exhaust may change them to square tubing for a more modern look.
-
I found dozens of these little things. And they all look the same. Pinpointing the year is going to be hard.
-
I put the camaro units in backwards so they would flow with the original arch of the rear bumper. I hope that the lenses will fit, if not I will make some new ones.
-
Some more pictures. Still needs a litle more filler and I thinks its good to go.
-
Well I started looking at the hood on this build and it looks bad ( look at the first picture). Tried to fix but just looked worse to me. So I found another camaro hood and modified it to fit the chevelle body. I did use the front corners off the old hood, also had to add material to the sides for a better fit.
-
I started working on the under hood area of the chevelle. I used the insert from the camaro and modified it to fit in the chevelle body using some sheet plastic.
-
While I am waiting on the putty to cure I began working on the interior tub and the chassis. I had to move the floor of the camaro interior up slightly to get a better fit. I had to add material to the front and rear portions of the camaro chassis to fit the chevelle body.
-
who is going to the KC Slammers show sunday june 10th?
customsrus replied to route66modeler's topic in Contests and Shows
I hope I get to go... -
Also added new rocker panels.Started to mud in body work.
-
Panel lines scibed into body. Also added material to the front bumper and scribed panel lines.
-
Started on the rear bumper, removed the Chevelle tail lights and will replace them with camaro units, may end up losing one of the tail lights. Glued the bumper to the body and ten added some material to the bottom edge of bumper. Scribed panel lines to the bumper and body. Bumpers will be body color.
-
Thanks to everyone that has made a comment on this build. Stay tuned for more..
-
In the last pictures you can see that I already started on the hood Here are a couple of pictures of the progress.