

Chillyb1
-
Posts
895 -
Joined
-
Last visited
Content Type
Profiles
Forums
Events
Gallery
Everything posted by Chillyb1
-
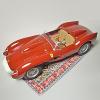
This was my first time using X-22 as a final clear on a body: It went on really beautifully and is super glossy. I recall thinking that it was just about perfect in ease of application and in the final result. I did have a couple of spots where it ran because I sprayed too much, but overall it came out great.
-
Excellent project. I can't wait to see your progress.
-
Making real wire wheels in all scales
Chillyb1 replied to Plastheniker's topic in Tips, Tricks, and Tutorials
Geben uns mehr, bitte! -
Okay, enough about the car. Please, please tell us how you made those wheels! They are spectacular and I'd love to make some if it is possible to do without a complete machine shop.
-
Great progress but sorry to hear about the hood. The wheels look magnificent. Are the headlight covers the clear parts that came with the kit? If so, did they fit that well or did you have to shape them? I've built this kit a couple times and didn't have the foresight to test fit those covers and then found they did not fit and didn't bother using them.
-
That is one cool conversion. I love the welded doors. And everything else, for that matter. Sorry you had to injure yourself but the results are worth it!
-
I love that car and I love that kit. Looks like you've done a great job with it. I'd like some pictures that show better detail, especially of the engine and the interior.
-
Anyone use SMS carbon fiber decals?
Chillyb1 replied to Mike Kucaba's topic in Model Building Questions and Answers
My experience with SMS carbon fiber decals has been uniformly positive. The only templated set I've used was for the Carrera GT and I think they were all accurate; that is, I can't remember any problems. If you have recent decals sheets from them, then you have their best stuff to date. I've bought some older sheets both at stores and online that were next to useless: they simply disintegrated when in the water or as soon as you remove them from water. Some of these were partially salvageable with Microscale's liquid decal film and some clear coat. As I mentioned, recent decals (in the last three or four years, that is) have surpassed their earlier excellent composite fiber decals in ease of use, durability, and adhesion. That said, I prefer the KA Models cf decals though their range is much narrower and they don't have templated sets. -
Thanks for clearing that up. I was actually going to accuse you of making that mistake but was a little confused myself. The KA set is excellent and has two steering wheel options. It also has great instrument panel details including keys and keychains! For future reference (I'm assuming you'll build this again at some point), the Hobby Design photoetch set is probably the best one available. It isn't very expensive and includes lots of stuff not included in other sets. For one, it includes the wire wheel spokes, which is a much cheaper option than buying either the KA wheel set or the Hasegawa one [you have to modify the kit wheels to accept the pe parts, but the results are great looking wheels]. It also includes parts to create that electronics panel under the dash--yes, every one of those tiny little components needs to be folded and attached to the circuit board! Anyway, that color scheme is spectacular. i'm glad you went with the French blue. I've been thinking about doing my next one in that yellow with a green scallop, imagining some Brazilian driver's private vintage racer.
-
I've built a couple of these and have several more in the stash. And now you've ruined that paint scheme for me! Not really, though I had something like that in mind. I was also envisioning privately owned ones because they offer the opportunity to come up with paint schemes like yours. I love that color combo and the way the scallop narrows all the way back. For my next one i'd planned on doing the front as you have but keeping the stripe the same width back to the tail. Anyway, very nice work. I used the KA Models photoetch on one build and don't remember anything like your seatbelts included. Were those from another source? Is there a reason you didn't use the photoetch steering wheel?
-
I had trouble getting the chassis plate to properly under the body when I built that kit. As much as I love the look of the 959, I'll never build that kit again.
-
This is a great kit and a great car. You can, of course, build it anyway you want with any colors you choose. I have a building tip for you: Do not install part #E6 in step five, as the instructions say; instead, wait until you have mated the body to the chassisto install it. This means you can't install the seat backs in step 8, but you can install both E6 and the seat backs after the body is in place. This makes it much easier to get the body on the chassis without as much stress as is required if you put E6 in place earlier in the build. Does that make sense? Here are two I've built:
-
Just spectacular. I can hardly believe my eyes. I am always pleased that modelers are willing to undertake such projects because I never will.
-
"Hudsonero...pulling a Midget"
Chillyb1 replied to curt raitz's topic in Model Trucks: Pickups, Vans, SUVs, Light Commercial
I want bigger pictures! This is too cool but I can barely see the cars. -
question on paints
Chillyb1 replied to ohioelcamino's topic in General Automotive Talk (Trucks and Cars)
The term is imprecise. Or at least confusing. What most car modelers mean by acrylic is not the same as what most manufacturers mean by acrylic enamel. I've found most paints described as acrylic enamel to be very hot and often dangerous to plastic. Maybe more information as to brand and conveyance might help answer your questions. Also, just experimenting for yourself on some scrap plastic would help you sort it out. -
Hasegawa sells a set for this kit and I used it on my previous 250TR build (the photo in my avatar). KA Models makes a beautiful pe set for this kit but I've not see their wheel set in person. I have the Hobby Design pe set (x2), which is very nice but it requires that you adapt the kit wheels to accommodate the wire pe parts.
-
Saving my political azz , 'til the government does me, Diorama's!
Chillyb1 replied to UncleRonsBarn's topic in WIP: Dioramas
I don't get the title. Am I missing something? -
Thanks for the response. They look great and in scale. I've found belt material with an adhesive back to be difficult to work with (I'm thinking of Studio 27's belts). Was it a challenge to get the photoetch buckles where you wanted them on the belts?
-
Bugatti Royale roadster Esders 1/24 conversion
Chillyb1 replied to debaronFR's topic in WIP: Model Cars
Formidable, what a project. I am looking forward to seeing your progress on this build. I love Bugattis but have never built a model of one. -
What did you do for the seatbelts?
-
1/24 Tamiya Jagermeister Porsche RSR Turbo Type 934
Chillyb1 replied to Brett Barrow's topic in Car Kit News & Reviews
Very cool. I'm interested in one of these. -
The color scheme is invented. I bought the paint and didn't have any particular project in mind for it, but really loved it. It came to me in a flash of inspiration to use it on this Ferrari. I do think it looks quite period correct even if it wasn't ever used in reality.
-
I'm happy to see that you got it together without smashing it! You are right about the precision, which I really appreciate in a kit and that's why I love Tamiya so much. Once the chassis is in, it ain't going nowhere! I think the first time I built this kit I didn't follow the instructions faithfully because I thought it would be better to install the windshield and rear window before mating body to chassis! NOT. And the second one I built, which was the Monte Carlo rallye version, I put all the decals on before mating and, luckily, I didn't ruin any in the process. Anyway, congratulations. That color is beautiful on the car. I wish more modelers here had an interest in cars like this one.
-
That's exactly what I was going for: a period look without copying a specific example. I love that color and really wanted it to work. Fortunately, it does. It does deserve it, but I didn't have a set. I do have wire wheel sets for the other kits in my stash but wanted to do this one mostly box stock. Hasegawa did a great job on the wheels and I wanted to build at least one of these just to see if the kit wheels were passable; I think they are.
-
I love that car and that kit. I've built it several times. Be prepared for frustration and aggravation when you try to get the chassis to seat properly under the body. It is a very tight squeeze and you'll feel like it is about to break before it actually gets in place. Keep a knife blade (chisel tip is probably best) handy to use as a lever between the front wheel wells and the body. Good luck.