

Chillyb1
-
Posts
895 -
Joined
-
Last visited
Content Type
Profiles
Forums
Events
Gallery
Everything posted by Chillyb1
-
I think that is probably correct but I no longer have the can near at hand. Thanks for the kind words, folks. I really like this kit and am very pleased with how this one came out. It went almost flawlessly from conception to realization. I have several more of these in the stash and am already looking forward to the next one. I highly recommend the kit to any and all modelers with any interest in classic Ferraris or just European sports cars in general.
-
 Can we get some pictures of this? I love the 1/24 Carrera GT and have built several, with more in the stash. I'll probably never get this 1/12 scale version but would love to see what you get in the box.
 -
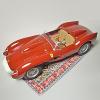
I just finished this one up. I really like this kit and love this car. I was imagining an Argentine privateer racing this one. For some reason that's what this color scheme makes me think of. The color is a Tamiya AS series paint but I can't remember which one. The white on the nose is Tamiya's TS-7 Racing White. I've added some photoetch stuff that was leftover from a previous 250 TR build.
-
Apoc Pajero
Chillyb1 replied to DanielG's topic in WIP: Model Trucks: Pickups, Vans, SUVs, Light Commercial
This is what I was looking for: -
Apoc Pajero
Chillyb1 replied to DanielG's topic in WIP: Model Trucks: Pickups, Vans, SUVs, Light Commercial
I love what you've done with the front end. The cuts, the welds, the dents all look fantastic. Now I'm going over to your Photobucket to check out more pictures. -
Welcome to the forum. Where in Ohio? I grew up in Sandusky.
-
A serious question about posting factual information
Chillyb1 replied to Ace-Garageguy's topic in The Off-Topic Lounge
There is no evidence to support either one of these claims. Or rather, there is no empirical evidence or experimentally reproducible data to support those assertions. Anecdotal evidence, perhaps, but we all know what that's worth. -
What a cool project. I'll be watching this one.
-
New off-topic area
Chillyb1 replied to Harry P.'s topic in General Automotive Talk (Trucks and Cars)
But we're still supposed to pose general questions in the "Tips, Tricks, and Tutorials" section, right? -
Nice bunch of cars. I'm jealous.
-
Very sharp little build of a cool little car. Your detail painting of the engine and exhaust really brings the model alive. Is your windshield inserted all the way? It looks like it is coming out of its groove. I bult one of these and recall that tight engineering you mention.
-
Recommend a pin vise please
Chillyb1 replied to Jantrix's topic in Model Building Questions and Answers
Mine is made by Commando and it is spectacularly well engineered and manufactured. I'll post a picture later. -
I think the wires look out of scale. To my eyes they appear too large.
-
This has been my dream since I got back into modeling about ten years ago. And the gorgeousness of the DS is not just a matter of your opinion or mine. It is a scientifically proven fact that the DS is the most beautiful mass-produced automobile ever!
-
I'm jealous. Can't wait to get a few of these for the stash.
-
Tamiya Alpine Renault A110 -- Phantom Rally Livery
Chillyb1 replied to Chillyb1's topic in Model Cars
It is the stock engine. This shot makes the engine look even bigger: -
Paint job's not shiny enough! I love that interior color. It is exactly how I remember my dad's Type III.
-
Simon, I know I've said it before, but I don't know how you can do such great detail work in such a small scale. Very nice. Good luck at the GSL. I know you'll take home some awards.
-
Here's my latest, another build of the Tamiya Alpine Renault A110, this time as a phantom rally car. The livery is based on some works cars i've seen. I like the look and tried to recreate it though without any modification to the car itself (the cars that sported this look are radically different from this version). Paint Tamiya TS in French blue, pure white, and bright red, cleared with Tamiya acrylic. I used some decals from the Monte Carlo version and others from unknown sources. I didn't add much: some photoetch grille and radiator face, seatbelts, plug wires. A fun build and my first completion since I moved back in January from Illinois to Oregon.
-
Use primer on everything in the kit?
Chillyb1 replied to clovis's topic in Model Building Questions and Answers
I'll add to the consensus. I prime everything except clear parts (duh!). I use Tamiya primer on bodies and inexpensive Colorplace primer on other parts. The Colorplace primer goes on in a very light, thin coat, which is ideal in my opinion for all those little parts. It won't cover up any details and dries very quickly. Just a quick spray is all you need. -
I agree that you should use lacquer thinner with enamels because it does indeed help with drying time. I think a little more thinner and a little more pressure with solve the problem for you. Too bad you had the problem in the first place. Those molded in windows are annoying. In fact, I'll never get near that kit again. Stick with the 956 kits, which are outstanding. That kit is a disappointment but it can turn out to look pretty good:
-
Masking and painting gas tanks
Chillyb1 replied to Monty's topic in Model Building Questions and Answers
To create a sharp, crisp delineation between the Silly Putty and the base of the gas tank, I use a guitar pick. Put the Silly Putty in place all around the tank, then use the wide edge of the pick (or similar tool) push the putty back away from the tank. That is, insert the pick parallel to the side of the tank until you hit the chassis and then angle the pick away from the tank to push the putty back. Does that make any sense? And you can use Testors Metalizer Sealer over the buffing steel to get that galvanized look, after doing that tissue thing Greg mentioned. -
Masking and painting gas tanks
Chillyb1 replied to Monty's topic in Model Building Questions and Answers
Mike is right about the Silly Putty. That stuff in combination with some masking tape is the best thing for the job. And for the bonus question: Testors/Model Master Steel Metalizer! -
This is exactly what I've done. I use poster putty inside the lens and then jam a toothpick into the putty to hold the lens. I cut the tip off of the toothpick first because if you use a pointed one there's a good chance the taillight will fall off (ask me how I know that!). I've tried liquid mask and tape and both have their drawbacks. They are both difficult to get them exactly where you want them, but I've found it easier to remove the tape. This will take plenty of patience, by the way.
-
Get the Tamiya kit and save yourself from disappointment.