

alan barton
-
Posts
2,105 -
Joined
-
Last visited
Content Type
Profiles
Forums
Events
Gallery
Everything posted by alan barton
-
Triple Nickel inspired '29 Ford Roadster drag car
alan barton replied to Bernard Kron's topic in WIP: Drag Racing Models
I like this one a lot, Bernard! The chassis details are perfect and the colour scheme fits the era beautifully.I am very familiar with this type of car as many years ago I built a replica of the famed Tony Nancy 22Jr roadster, the tube framed, Nailhead powered, second generation car, as distinct from the Deuce framed flathead version. There are a lot of similarities between your chassis and mine, especially in the roll cage construction. The way I got around the tonneau cover issue was to blank off the interior opening of a spare body with a piece of plastic taped tightly in place. I then filled it with plaster of paris. When it was nice and dry, I removed the plastic tarp and used the plaster filled body as a mould for a vacformed piece. It turned out a treat and literally clicks in place. One day when I run out of AMT roadster bodies I will dig the plaster out and use it but in the meantime it is handy if I need to make more. Thanks for sharing this beauty with us all. Cheers Alan -
Two great reasons right there! I did the Sedan Delivery about 200 years ago and used an AMT 32 gas tank - I at the time I thought it looked OK. The fact that the inside edge of the rear fenders is a bit abbreviated means that they require a bit of work first. If you can get a look at any other AMT, Revell or Monogram Deuce models, maybe a friend has one, you would get a clear idea of what is required to fix the old MPC model. Another thought, if you could get hold of some high density plastic foam or a tight grained wood like jelutong, it would be a relatively straight forward operation to carve a new tank. You could simply use balsa but I would recommend a generous coat of automotive body putty over the whole unit that you could sand down to size and contour. Otherwise you will send forever trying to seal and smooth the very open grain inherent with balsa. Hope that helps Alan
-
Excellent! I have been following your diorama for a long time - I must have missed a few pages! I will go and check it out now. What impresses me about your whole diorama is that you have hit a happy medium between surgically immaculate and completely trashed, the two ends of the scale that most people seem to achieve when doing a workshop. Yours reminds of any of a thousand workshops out there where the job is to get things done efficiently without going all Hollywood. I like it a lot! Cheers Alan
-
Wow, Landman, is that English Wheel I see in the background made from a small G clamp? If so, kudos, sir, what a beautifully simple idea! Also, where do you get the guy with the wrench in his hand. I have a large collection of figures but have never seen this one before. He has a very natural pose. Cheers Alan
-
Glad to be of help, Mattias and Craig. I'm sure that everyone on this forum has had at least one "Now why didn't I think of that ?" moment while browsing these posts. Happy to be the guy providing the inspiration for once! Taking it a step further ( and I haven't yet) I guess you could graft the 36 door tops to the 34 cabriolet cowl top and with a bit of filling and sanding you would get the correct door shape plus a positive fit for the hood. So many ideas, so little time! Cheers Alan
-
They made it! When you think that these parts were made in Mt Clements Michigan, were then shipped to Sydney on the East coast of Australia, then trucked to Perth on the West Coast of Australia, where I bought the kit from K Mart as a 14 year old, then moved to the remote mining town of Paraburdoo for two years, approximately a 2000 mile return trip and then posted them to Britain a few weeks ago - these grilles have seen more of the world than some of us modellers! Unfortunately for David, back in my teen years, I thought the inner ends of the grilles could be cut off and turned into hod scoops! Never did finish that project and I am convinced I still have the ends somewhere but they haven't turned up yet. I will keep looking! As they are, they would have stayed in my stash until I clocked off so I am pleased that they are finally going on a Pontiac. Good luck with your project David, I hope the grilles will help you reach your goals. Cheers Alan
-
What can I use for a gas tank
alan barton replied to junkyardjeff's topic in Model Building Questions and Answers
Jeff, I believe this model was originally the MPC 32 Switchers kit, regardless of what box art logos may have come with it now. When I built my version about 35 years ago I added the top of a AMT 32 roadster fuel tank. I typically use the cover of a Wilkinson Sword disposable razor to make the bottom of the fuel tank - have a look at the supermarket next time you are shopping and see if there is something close ( I have had my little stash for at least 30 years! Otherwise, hit up a local modeller who has channelled a Monogram, AMT or Revell Deuce because he will have a spare tank somewhere! You will still have a bit of work ahead of you because MPC chopped off the inner edge of the rear fenders rather crudely which means the gap between the inner surfaces is somewhat wider than stock! Hope that helps Cheers Alan -
I'll have to check that when I get home. Didn't strike me as unworkable at the time. Cheers Alan
-
But getting back to Stuarts roadster, if that thing was any tougher it would rust! This is very inspirational because I have an unbuilt Phantom Vicky in the stash as well as a built one on the shelf so I could see producing a model inspired by yours and then swapping the stock cowl and windshield back onto the donor Vicky for a totally different look. Your wheel and tyre selection is to die for - man, that is an evil looking roadster. This is a look you would normally associate with a 3 window but it just flat works for me. Thanks for sharing! Cheers Alan
-
Wow, I thought it was just me!!! How many times does that happen when you bring the fenders and body of a pre-48 together? AMT 40 fords are shocker for it. My Revell 37 Delivery - I never did get the hood , fenders and cowl to match up just right but it never showed up while I was test fitting! I just finished a rough old AMT 32 roadster that I did as a 3 window coupe based on a Tim Boyd article in Street Rodder magazine and I suffered from the same gap you got here. Just drives you crazy! I am currently close to finishing a long term project in the form of a tribute build of the Buttera 29 roadster, the white one. Even with everything pinned, I keep seeing the gaps changing. Yep, I feel your pain and I guess most other hot rod modellers do as well. Cheers Alan
-
Casey, I can tell you in about two weeks as I have both the XR6 and the parts pack but unfortunately won't be able to access the parts until then. Hope someone else can help you in the meantime. Cheers Alan
-
Michael, this is going from strength to strength. A Ridler winner forsure! Cheers Alan
-
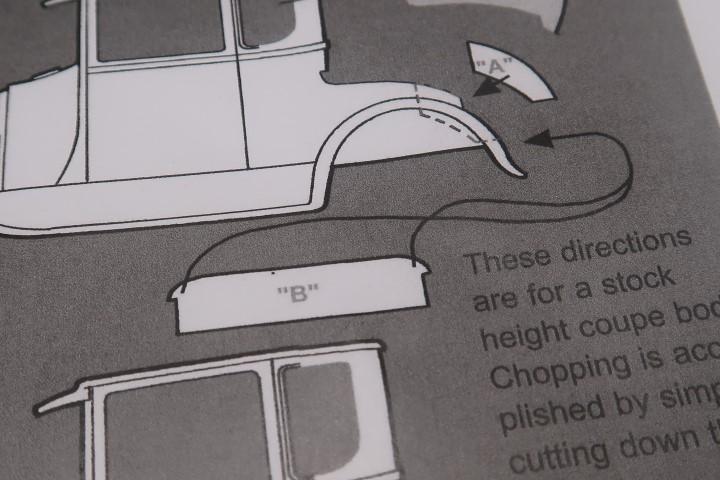
Mate, is was a copy of Model Cars Magazine and while it was by Jairus, it wasn't a normal sketchpad type article. It was two pages, not double but back to back with very clear line diagrams to explain the conversion. Unfortunately I am not at home right now to be able to tell you exactly what issue it was in. I would estimate it was around 10 years ago but that is a wild guess. One thing I did not follow from the article was in regard to the shape of the rear side window opening. Jairus advised to add some extra plastic to the inside of the lower rear corner to make a more sweeping radius but all my research both on the net and with real cars shows the radius on the coupe window to be pretty darn close to the Tudor, if not identical. Now Jairus is no fool and his artwork is alive with beautifully accurate detail so I am not sure where this disparity has occurred but I went for the stock Tudor curve and am happy with the results. Cheers Alan
-
I've seen a few demo models before but none as accurate as this one. The bumpers are incredible! Cheers Alan
-
You never see this model built! I have two but unstarted to this day! Nice to see how you approached yours, i especially like that smooth red paint. Cheers Alan
-
Lookin' good, and definitely a nod to the eighties, in a good way. I am getting close to finishing a long term project in a similar vein - a replica (with a few tweeks) of the first "billet" car, Lil John's white Model A hiboy rollerskate.) they would look good parked side by side! Cheers Alan
-
We're on the home stretch now. The first coat of primer revealed a few small flaws around the reworked mouldings which will take a few hours of fill-sand-prime-repeat. Overall, I am very happy with the look of my conversion. I still have a trunk lid to fabricate and I think i will scratchbuild one using the same vacform that I used for the whole rear of the gold coupe. At this stage my plans call for an early sixties look with short slicks hanging out the rear fenders, no hole or small hole Halibrands and an injected nailhead. Maybe metallic Rootbeer. But that's for another day. I hope these photos will help you tackle your own conversion, or maybe a similar but different one. I was pleasantly surprised about just how smoothly this want, taking maybe a week of evenings to get to this stage. That's fun modelling in my book! Cheers Alan

-
-
It's starting to look like a coupe! Using the remains of the tub, I made a filler piece for the panel below the trunk lid. After it was all glued in place, while rechecking photos I realised that I had made it way too tall so I had to trim it down about 2mm. Frustrating but at least it had a gentle curve it in as per the original and I was recycling and saving the planet! No waste at my place! You can also see where I took those bulkheads and glued them in place to the body, the floor and the rear panel. This thing is going to be solid as a rock. Various strips of plastic were then cut and fitted to the gaps you see her to start to flesh out the quarter panels. Unfortunately I was in the zone and forgot to take photos of this step.
-
In preparation for the construction of the trunk area, I traced the profile of the wheel arches onto a piece of styrene and cut two pieces to shape and put them aside. In the Model Cars Magazine article there was a template for a floor extension so I created one of those from 1mm styrene and then glued it to the rear of the body I then used magnets to hold everything to my metal alignment plate and let it glue up nice and solid and straight. Next, I cut the quarter panels away from the rear section and then used a set of wide, smooth jawed pliers to gently coerce the original 90 degree bend into a flatter curve to replica the contours of a coupe. From this photo, you can also see where I used my finger and thumb to gently bend the rear quarters towards the centre line of the car. Tudor bodies flair out to the rear while coupe bodies ever so slightly taper in. I used photos of the joint between the fender and the wheel arch to determine just how far I had to squeeze them I then eyeballed the shape of the contour of the rear deck, using photos on the net for reference, and made a cardboard template that was then trial and error fitted to the body. When it looked right I copied two bulkheads from styrene. These two pieces would help me shape up the rear of the car.
-
Here is where I made a major change in the process. I elected to glue the floor pan to the body. I could see things getting very floppy before long and me and floppy don't play nice! It does mean that I will have to build the interior ship-in-a-bottle style but I don't think that will be insurmountable. Next, I marked up about 6mm from the bottom of the tub and sliced off the panel above it.
-
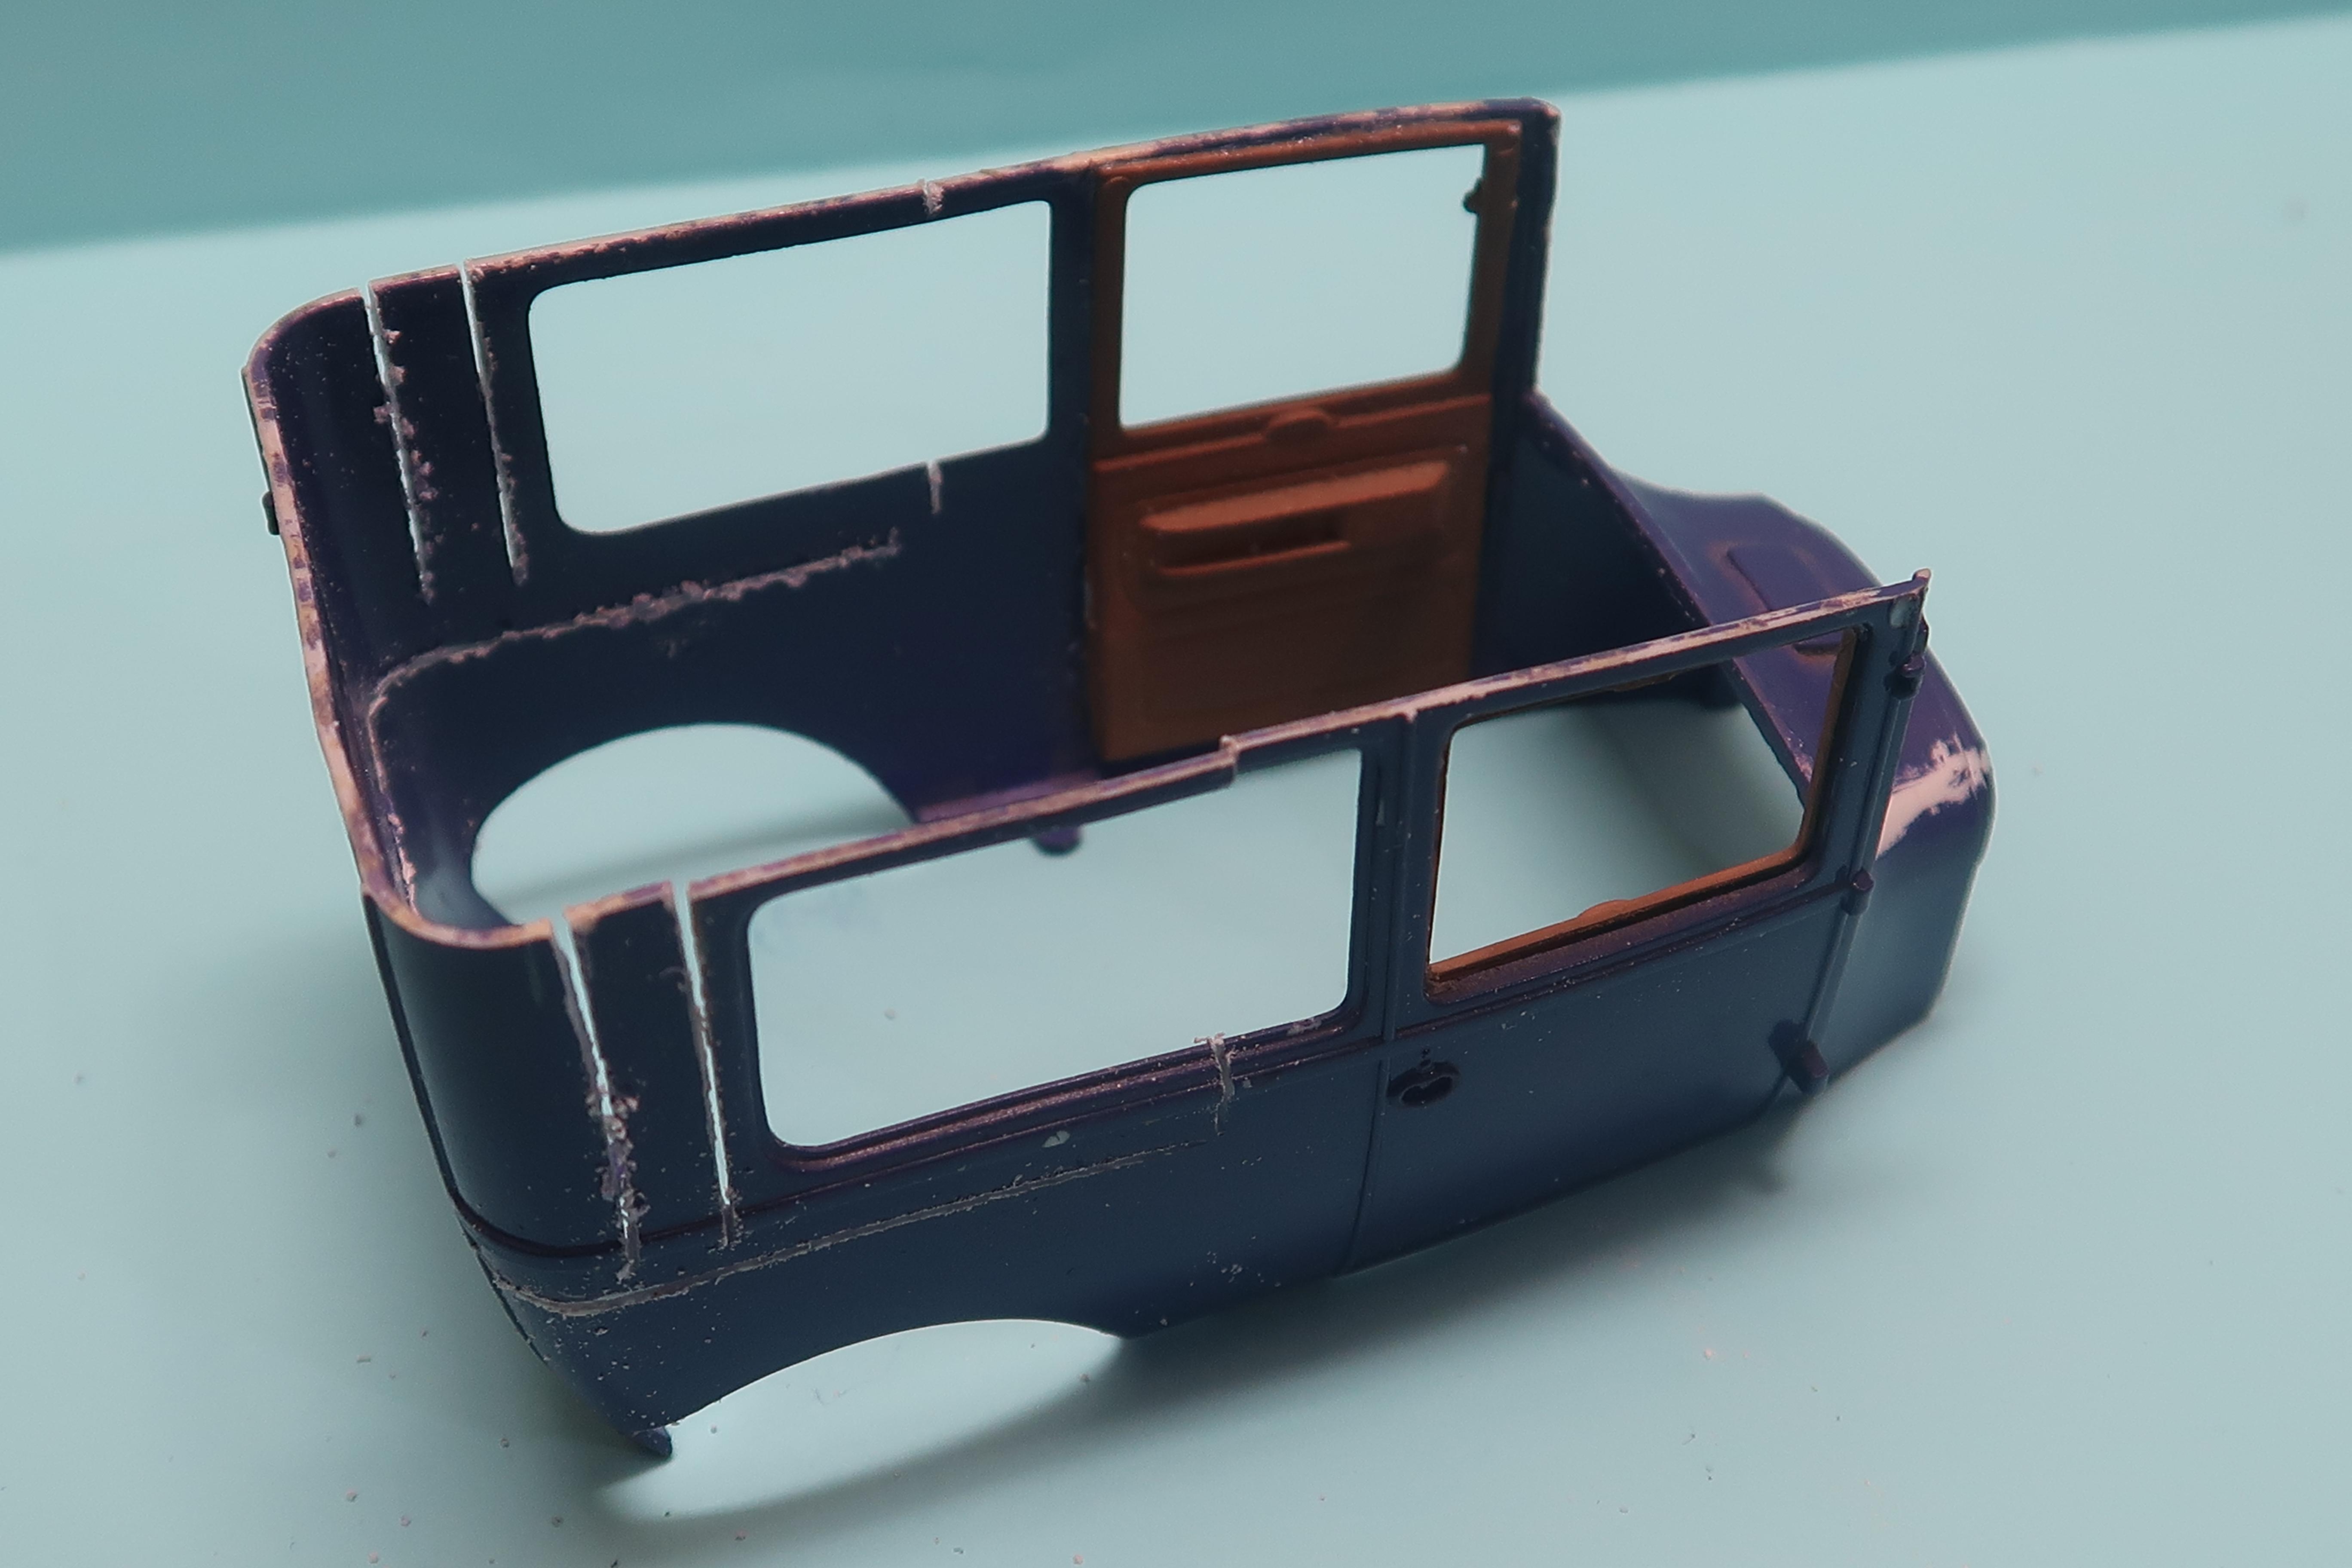
After trial fitting the position of the roof, I worked out the best place to cut the window frames. At this point it was time to strip the body. I have never had any success stripping Tamiya acrylic . My favourite, caustic soda, wont touch it and neither will brake fluid. I had read on the net that you could use Dettol antiseptic liquid. Turns out it works! Only thing is, it is very icky and sticky and cleanup takes some extra effort. We can't get Super Clean here in Australia. After reading about it here, many years ago, I rang Castrol Australia and asked where I could buy it. The guy put me on hold and went off to find out. When he came back, he said that if Castrol were to import that into Australia, they would all be locked up in jail! Must be good stuff!!!! In the article, Jairus pointed out that a coupe rear window is 1 inch narrower than a Tudor. I didn't know that when I built the gold coupe and it really didn't show so rather than turn this model into a bigger jigsaw puzzle than it already was, I elected not to narrow the panel. I'm still comfortable with that decision, it is only a milimetre inch difference in scale after all and reduces the risk of wonky window moulds and swage lines. Finally, I rejoined the back of the roof to the C pillar. Here's the bit that drives me crazy. Despite all my measure twice, cut once procedures, it still came out a bit on the wonk. Even with constant checking with my pre-shortened roof, it didn't get my attention until it was glued in place. Some days I wonder why I am allowed to use sharp tools - after all, it's not my first rodeo! Nothing to do but re severe the join on the left hand side, use needle files to create a bit of a tapered gap, and try again We got there eventually.
-
To aid in working out where to cut the side windows and also to aid in aligning the reassembly of the back of the roof I then began to shorten the roof. I still had a protoype f the roof insert used on Ben's coupe so I used that as a guide. I could have simply cut off one end of the Tudor roof but I wanted retain the rebate around the edge to help in gluing later. You can see in Ben's model that I didn't quite nail the roof to body joint and I wanted to improve on that. You can see from the NNL East ruler (thanks, Tom!) that it ended up being sectioned about 23 mm.
-
Once I was happy with the marking out, I began cutting. My cuts did not exactly follow Jairus' ideas as I had a few of my own. Particularly, I wanted to use as much of the original T body as possible to ensure alignment of each side and squareness, something I have struggled with in the past. I also very carefully sawed in such a manner that the whole body stayed intact until i was ready to separate everything - this made it easier to see what I was doing and also avoided the problems associated with cutting very small pieces of plastic with a razor saw - anyone gotta Band-Aid? Before separating the top from the body I also cut some thin slices of styrene to glue into the body to make up for the plastic lost by the saw kerf. This was superglued to the bottom half of the body only for now, to minimise filling and sanding later on
-
To start with, I used some of the dimensions in Jairus Watson's excellent article in our favourite and sadly missed journal, Model Cars Magazine. I did take some liberties with Jairus' info but it was a great help. The body was already painted in Tamiya Purple acrylic but I didn't strip it right away so that I could see where I was marking and cutting - my eyesight ain't what it used to be! I covered most of the car with masking tape to assist with my marking out but also used the edge of the tape in some cases to help guide my razor saw. You need to remove 7mm from the middle of the C pillar
.JPG.29e298ae1ba922f893b4f7d33cddf26b.JPG)
.JPG.8360c83aeaabeecf708533bf84e478e1.JPG)
.JPG.6387ab4fc5b25d3773d396e5d403334f.JPG)
.JPG.181b2b9f5bca085b1de8181ec1278d3c.JPG)
.JPG.7f6670603f7abf4a046a444c22145897.JPG)
.JPG.e7549115fc37ebe81be8a2708d2cd115.JPG)
.JPG.2af27618efdbc4ee978bd6e419f996ef.JPG)
.JPG.90d06d4c735f6de1c2b2a98a9b06b979.JPG)
.JPG.2e59ab05466b5755d0d1f61932be93b9.JPG)
.JPG.51e3918afb013e5902cefd9924206d94.JPG)
.JPG.c956553e5839d873959f5db670ea3752.JPG)
.JPG.993ec0ce344634eba2fd9cc7b2b23015.JPG)
.JPG.7b6b518481e4c4133f89871ce16da778.JPG)
.JPG.b59719253db6edf402e6fd3baaffa315.JPG)
.JPG.59906efcf334fe9d12eecfd5c6e9a440.JPG)
.JPG.f39821614a7031a93c602ad73b5773c0.JPG)
.JPG.455c9ca974ebd90340e67d11ce3bf513.JPG)
.JPG.5a53c4c72b9131cdae1e8ef578149e0a.JPG)
.JPG.6935d5472a2c9041a2055c4b0811517e.JPG)
.JPG.0e9df0d75aca2f4645f017e89a16131b.JPG)

.JPG.9f5804afdee7bff1f38be4d509dd6a5f.JPG)
.JPG.cb90c6e9ce42b597cef6abfc8a683680.JPG)
.JPG.86da308836f7afe83328f8fd0d6d033d.JPG)
.JPG.975603ebb3b50fd3dd1b32eb7b10a86e.JPG)
.JPG.1d14918cbd236774539d827e43c1c470.JPG)