alan barton
-
Posts
2,105 -
Joined
-
Last visited
Content Type
Profiles
Forums
Events
Gallery
Everything posted by alan barton
-
Drag City Casting Chopped '32 Ford 5-Window Coupe!
alan barton replied to Dennis Lacy's topic in Model Cars
If Doyle Gammel had built a 5 window instead of a three window ............... this would have been it! Beautiful work Dennis, everything just flows with no one feature overshadowing any other feature. A great rod. Cheers Alan -
Vintage FED, 1966, 1:25, FINAL
alan barton replied to Mike Williams's topic in WIP: Drag Racing Models
It is models like these that make this such a great site to visit. Thank you for sharing your amazing workmanship with us all, Mike, and thank you for building such a cool subject! Both of them actually! We had an FED here in Australia that ran an injected Hemi and driven by John Maher.back in the early seventies and this model sure brings back memories. Cheers Alan -
Save Or Restore?
alan barton replied to Plowboy's topic in General Automotive Talk (Trucks and Cars)
Just to be the devil's advocate, while this is a reasonable build, it is not an exciting build. It's a typical paint and glue job from a careful builder back in the day but doesn't tell you anything about the builder. If it had been a radical custom or a nice shop truck with a trailer hitched up or a rear engined funnycar with a forward tilting body (hey, it could have happened!) then I might leave it alone. But as a basic, kinda funky looking old red Ranchero, and considering your desire to have one in your collection, I would call it a ripe candidate for rebuilding. But like Snake said, if you are as busy with other projects as most of us are, why not leave it to smell the roses for six months or so and then have another look at it. Either way, it is great that you finally found one. I have one of each, chopped and stock, but have begun unchopping the chopped one because it just isn't pretty. It uses an unstretched roof "lid" the same as the stock one so the rest of the chop really suffers as a result. The unchopped version you have is definitely the one to chase! Cheers Alan -
Firstly, thanks to everyone, JC and Mike in particular, for some great ideas here. I build a lot of racecars and scratchbuilt rollcages just go with the territory. One idea I gleaned from another site many years ago was to determine where the cage is going to touch the floor of your car and then drill four holes at those locations to match the size of the Evergreen 222 ( my favourite as well!). You then start construction by first inserting oversize lengths of styrene through those holes. As you cage takes shape, you can pop the body onto the chassis and push the cage structure up as tight as it will go into the roof, then put drops of glue at the floor junction. When it's all nice and dry, snip off the excess lengths below the floor, sand and paint! This technique gives you a solid foundation to work - it is as if the floor is your jig! It also guarantees that you won't finish up with the dreaded "rollcage half way through the driver's window" look. It makes me groan every time I see a model where this has happened.
-
The issues with scratch building
alan barton replied to IbuildScaleModels's topic in Tips, Tricks, and Tutorials
I am a big fan of K&S aluminium tubing and especially the fact that it telescopes inside each successive size. Driveshafts, exhaust systems and mufflers, fully detailed steering columns are a doddle with K&S. And then, to hang say a steering column or exhaust, you just use a small bit of styrene with a hole drilled through it to attach the aluminium to the plastic model. I couldn't scratchbuild without this stuff. As for issues, trying to hold tiny parts is my biggest issue - oh yeah, and seeing them in the first place! Cheers Alan -
Custom grille for rat rod or 60's show rod
alan barton replied to alan barton's topic in Tips, Tricks, and Tutorials
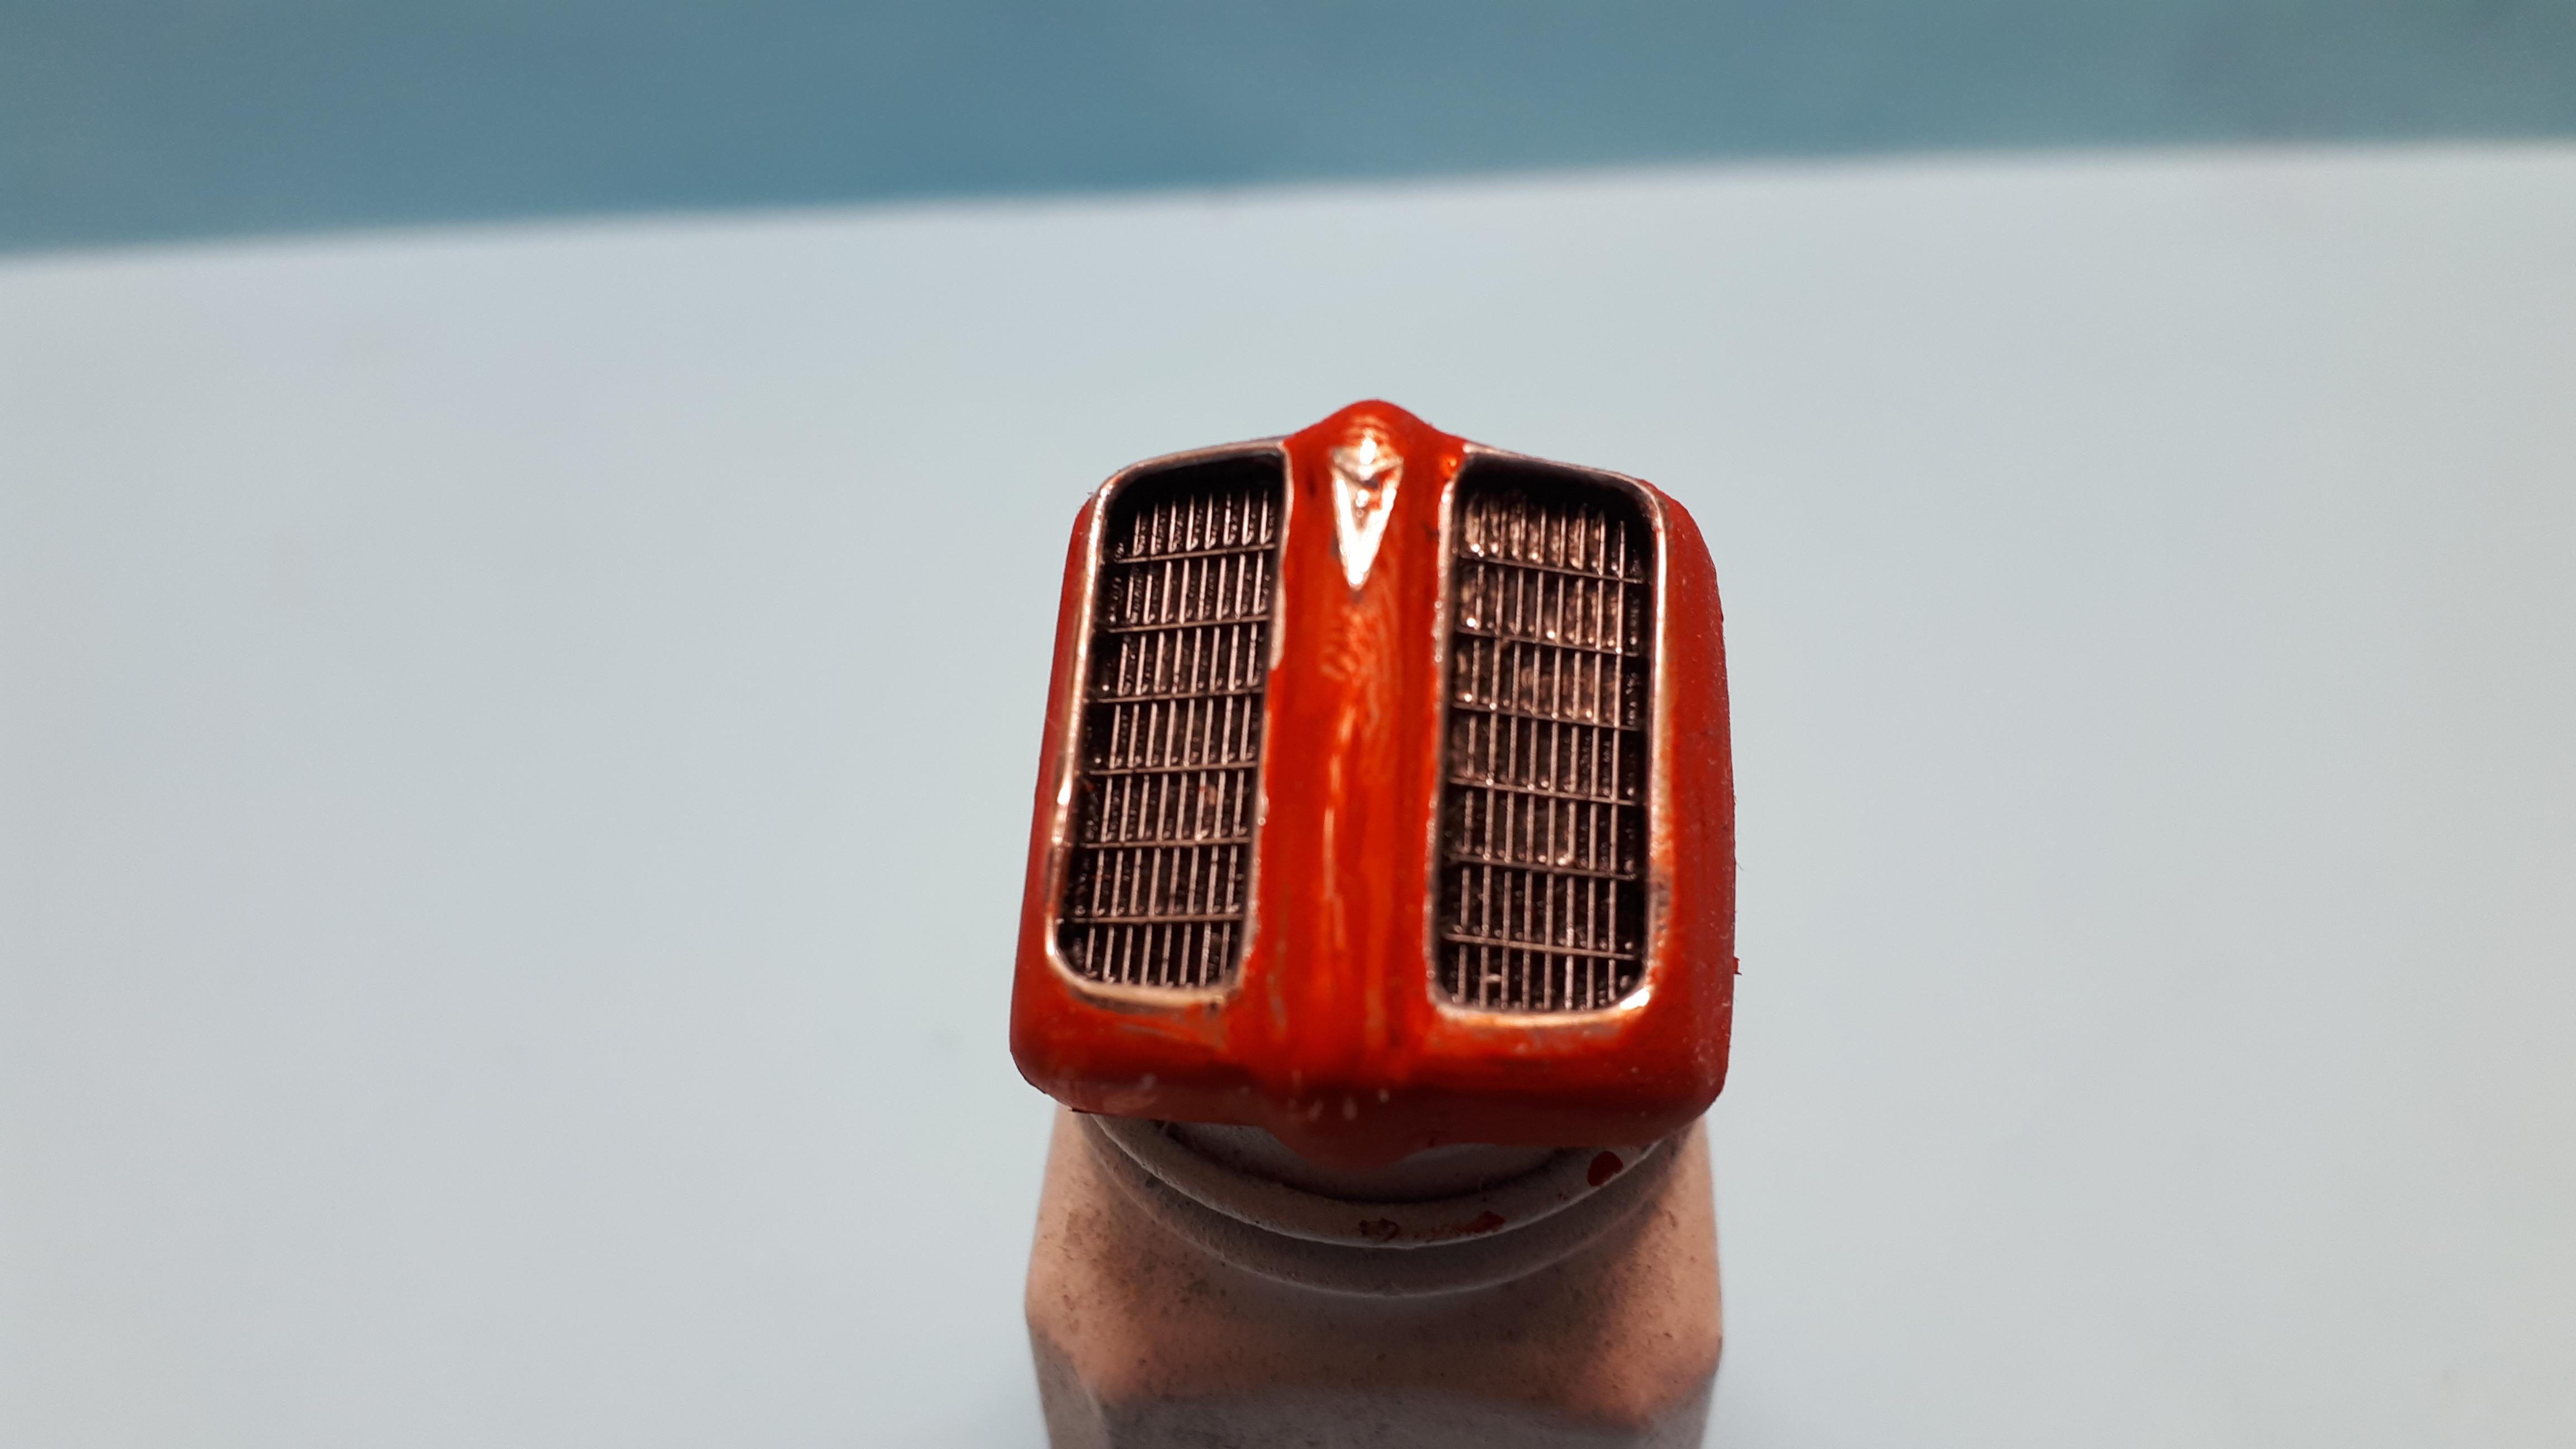
Thanks David, good to know someone from the Pontiac camp is OK with it. Cheers Alan -
To cut a classic 40 coupe up that much and still retain eye-pleasing proportions takes some serious talent! The white firewall works well with the whitewall tyres and I am in awe of how cleanly you painted them! Cheers Alan
-
Custom grille for rat rod or 60's show rod
alan barton replied to alan barton's topic in Tips, Tricks, and Tutorials
Glad you appreciated it for what it is, guys. Yeah Chris, I have thick skin! I am doing the 70 Bonneville as the El Camino version and have grafted the custom grill surrounds form a 69 Bonneville with the custom grilles from a 69 GTO. I'm trying to get an Alexander Bros or Winfield custom vibe happening. I just can't believe that a bunch of highly skilled and highly paid designers sketched up the 70 front end and went, "yeah, nailed it!" Cheers Alan -
Leroi "Tex" Smith's Fiat Street Rod
alan barton replied to Snake45's topic in General Automotive Talk (Trucks and Cars)
Was Street rod Pictorial 2 the one with the red bucket on the cover? -
Leroi "Tex" Smith's Fiat Street Rod
alan barton replied to Snake45's topic in General Automotive Talk (Trucks and Cars)
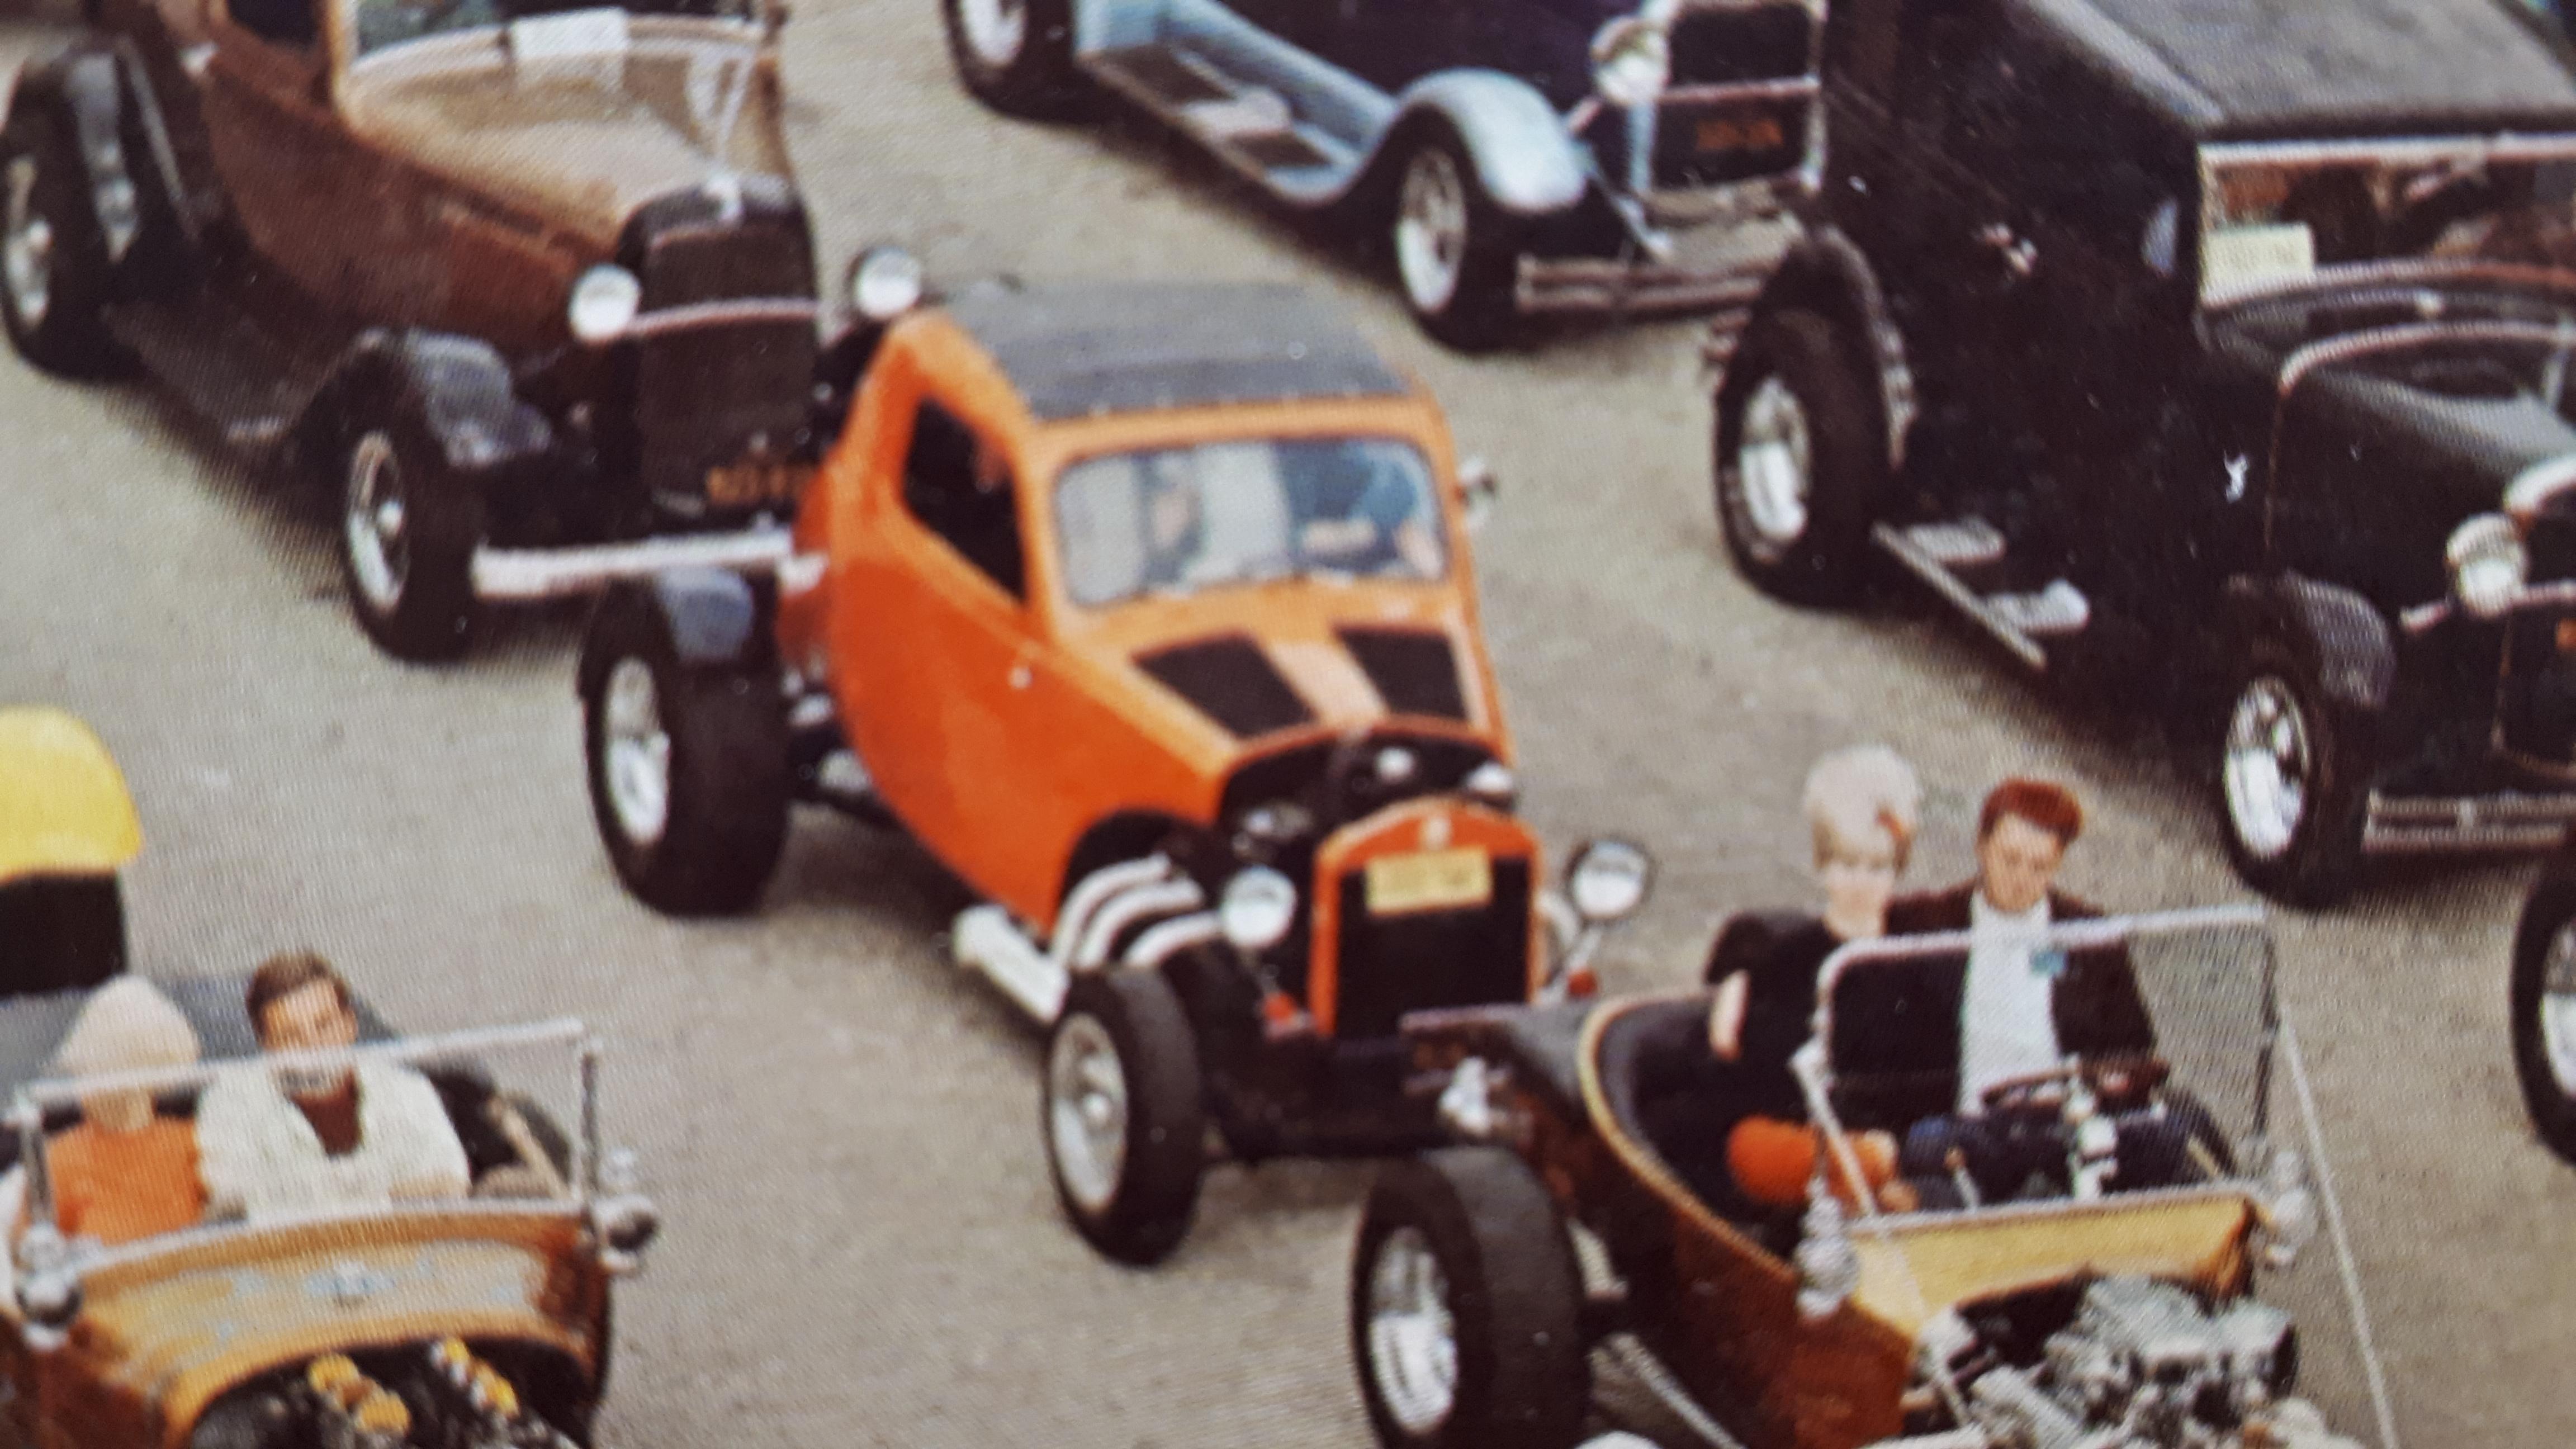
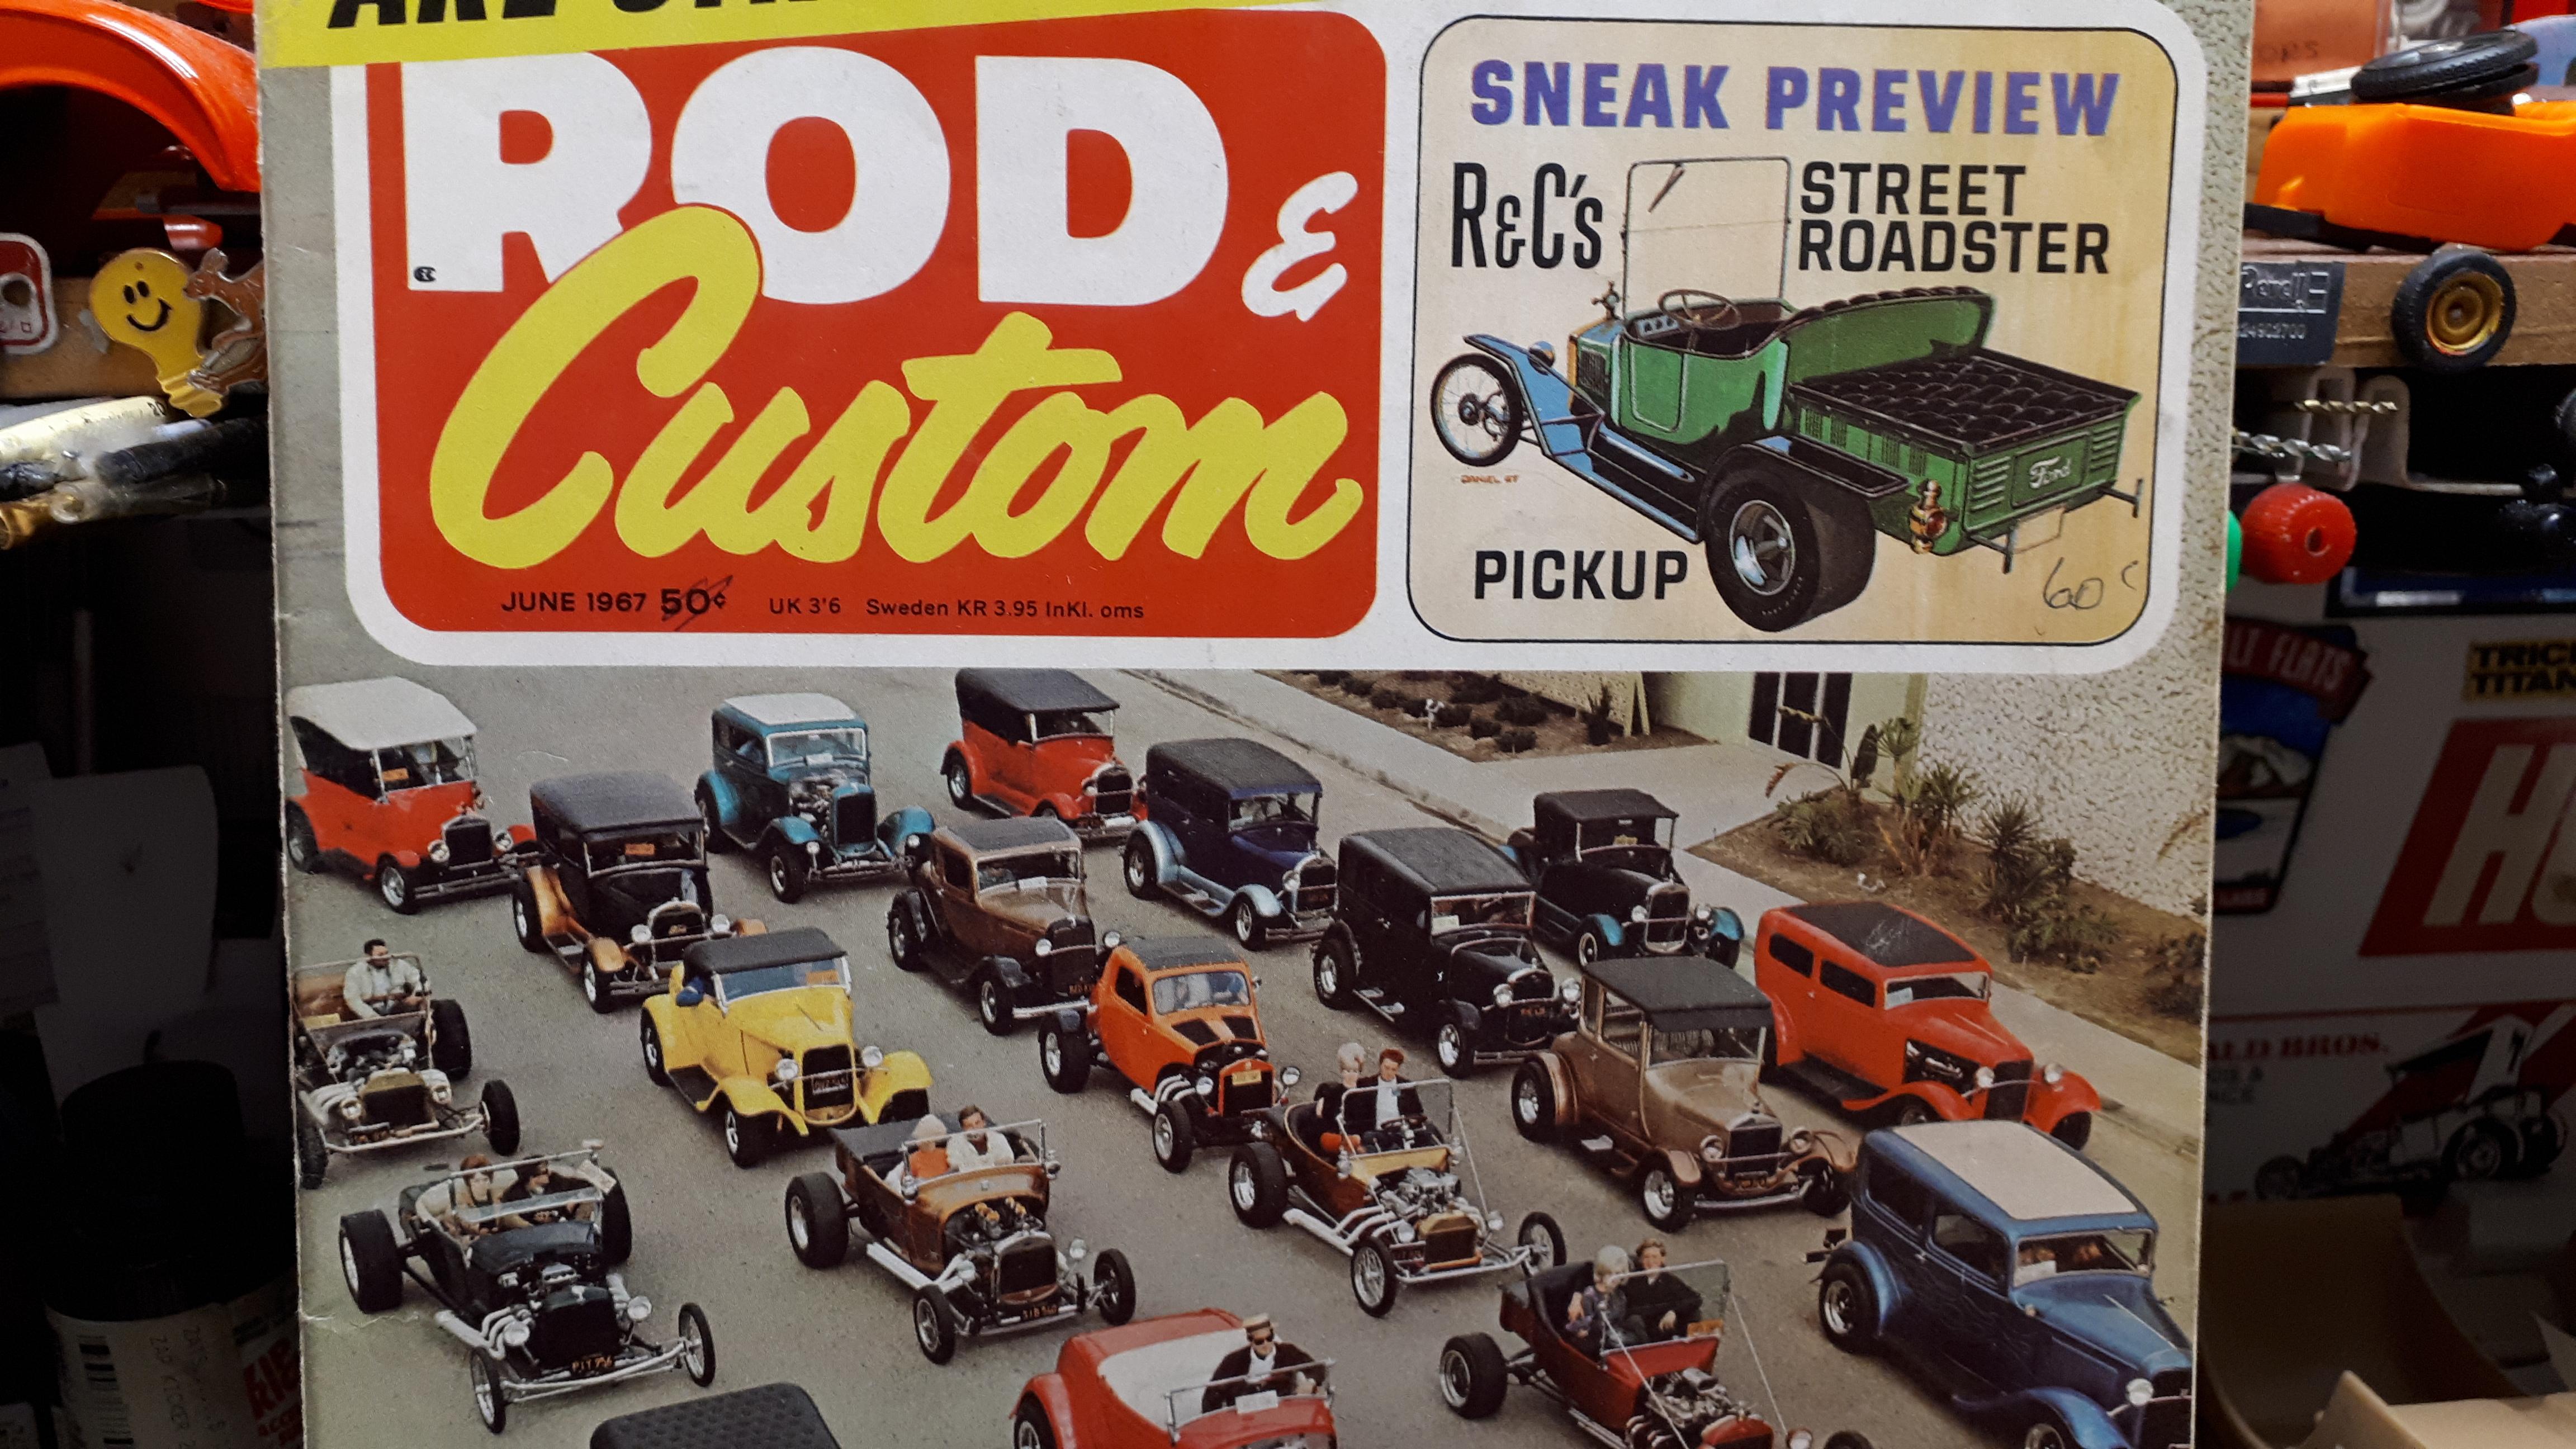
Found it!!! Cover of June 1967 Rod and Custom magazine. The front cover photo is of an Early Times club gathering ( not LA Roadsters as I said earlier) and although there is a three page article on the club inside, there are no further photos of the Fiat. I am sure there are other shots somewhere but at least now we no what time slot we are looking for! It's after 11p.m. here so I am heading for bed! I'll expect to see a mockup of the model when I get on here in 8 or 9 hours or so. Time for some Snake-fu! Cheers Alan
-
Leroi "Tex" Smith's Fiat Street Rod
alan barton replied to Snake45's topic in General Automotive Talk (Trucks and Cars)
i'm not saying it's not his, Snake, just have no memory of it being his. I once had the wonderful, once-in - a - lifetime opportunity to host him at my house for about four days when he attended a hot rod show over here on the West Coast. What a gentleman and what a mine of information. He was there at the start of the SCTA, the start of the NHRA, the start of the NSRA etc etc etc. And a really sharp sense of humour to boot. I am proud to have a photo of me and him standing in my model room holding my model of his XR-6. Boy, the stories he told about THAT one! Meanwhile you've really got me going trying to find that photo of the Fiat. I have found all my Petersen pictorials, catalogued in their correct box, except the one with a very cool candy red T bucket on the front. Thing is, I only saw it about a week ago and thought It was time I took another look at it! Two more things I remember about it, it had a black vinyl roof insert and the sort Fiat hood didn't quite reach the T grille shell, and I am pretty sure it had dark grey or black spoke Americans, on the rear at least. I'm not giving up, I am going to find that sucker but I am lucky to have a huge book and magazine library so it might take a while! Cheers Alan -
AMT 34 Ford 2 door sedan
alan barton replied to junkyardjeff's topic in General Automotive Talk (Trucks and Cars)
No Jeff, it is not as bad, especially considering that it has a very usable chassis. The interior is excellent and the running gear is nicely detailed. If you use the independent front end that came in the red street rod version of the kit, I suggest you toss the add-on IFS front crossmember and file notches into the frame to receive the lower A-arms. Of course, if you like street rods with a 4x4 stance you can use the crossmember but I like my rods low and this one definitely needs massaging. Both bodies have some slight proportion issues - I have built them both and you need to squint a little to catch them at their best. The Switchers 32 delivery is a fraction tall and a bit too narrow at the back but is otherwise fine. The lack of a fuel tank at the rear means you have to modify something else or live without it. The 34 Sedan has pretty good proportions but it seems a little square compared to a real one, especially around the top corners of the doors and the curves at the rear of the roof. Also, the fenders appear to be a little narrow. I painted my Tudor a very dark Testors Metallic Green and I do think the dark colour helps hide some of its issues. Like the Switchers Delivery they are the only game in town so you have three choices 1. Live with the issues 2. Correct the issues 3. Go without! Hope that helps - for my money, the AMT Tudor is worth the effort. Cheers Alan -
Stock 64 Fairlane hood
alan barton replied to junkyardjeff's topic in General Automotive Talk (Trucks and Cars)
Jeff, the most recent reissue had a stock hood. Cheers Alan -
Leroi "Tex" Smith's Fiat Street Rod
alan barton replied to Snake45's topic in General Automotive Talk (Trucks and Cars)
Just looked through Tex Smith's autobiography - it's not in there either! I will keep looking! -
Leroi "Tex" Smith's Fiat Street Rod
alan barton replied to Snake45's topic in General Automotive Talk (Trucks and Cars)
Nope, not in Pat's photos but I'm sure I have photos of this car - I will go see what I can find. I ahve a model from my childhoos that was loosely inspired by that very car so I must have a photo somewhere because there was no internet in the seventies! Cheers Alan -
Leroi "Tex" Smith's Fiat Street Rod
alan barton replied to Snake45's topic in General Automotive Talk (Trucks and Cars)
Snake, I'm digging deep here but the little voices in my head tell me that Fiat used to be visible in the iconic overhead shot of about twenty of the LA Roadsters cars in a parking lot. Pat Ganahl just had some of those photos in his blog - I will go and check. I know exactly the car you mean, you described it exactly as I remember it though I didn't know it was Tex's. Cheers Alan -
Wing or foil shaped styrene rod
alan barton replied to Scott Colmer's topic in Model Building Questions and Answers
I bought the type of styrene aerofoil section you are talking of over 20 years ago from a company called Contrail. it was for model aeroplane builders in a light to medium grey. Maybe an ebay search might find some. It was quite small - I used it for aerofoil struts on a 1/25th Fiat Topolino. Come to think of it, what about the rear wing struts from a Revell Top Fuel dragster? Surely someone on here has some manky old frames that they could cut some struts off of? That might be your least painful solution. Cheers Alan -
Custom grille for rat rod or 60's show rod
alan barton posted a topic in Tips, Tricks, and Tutorials
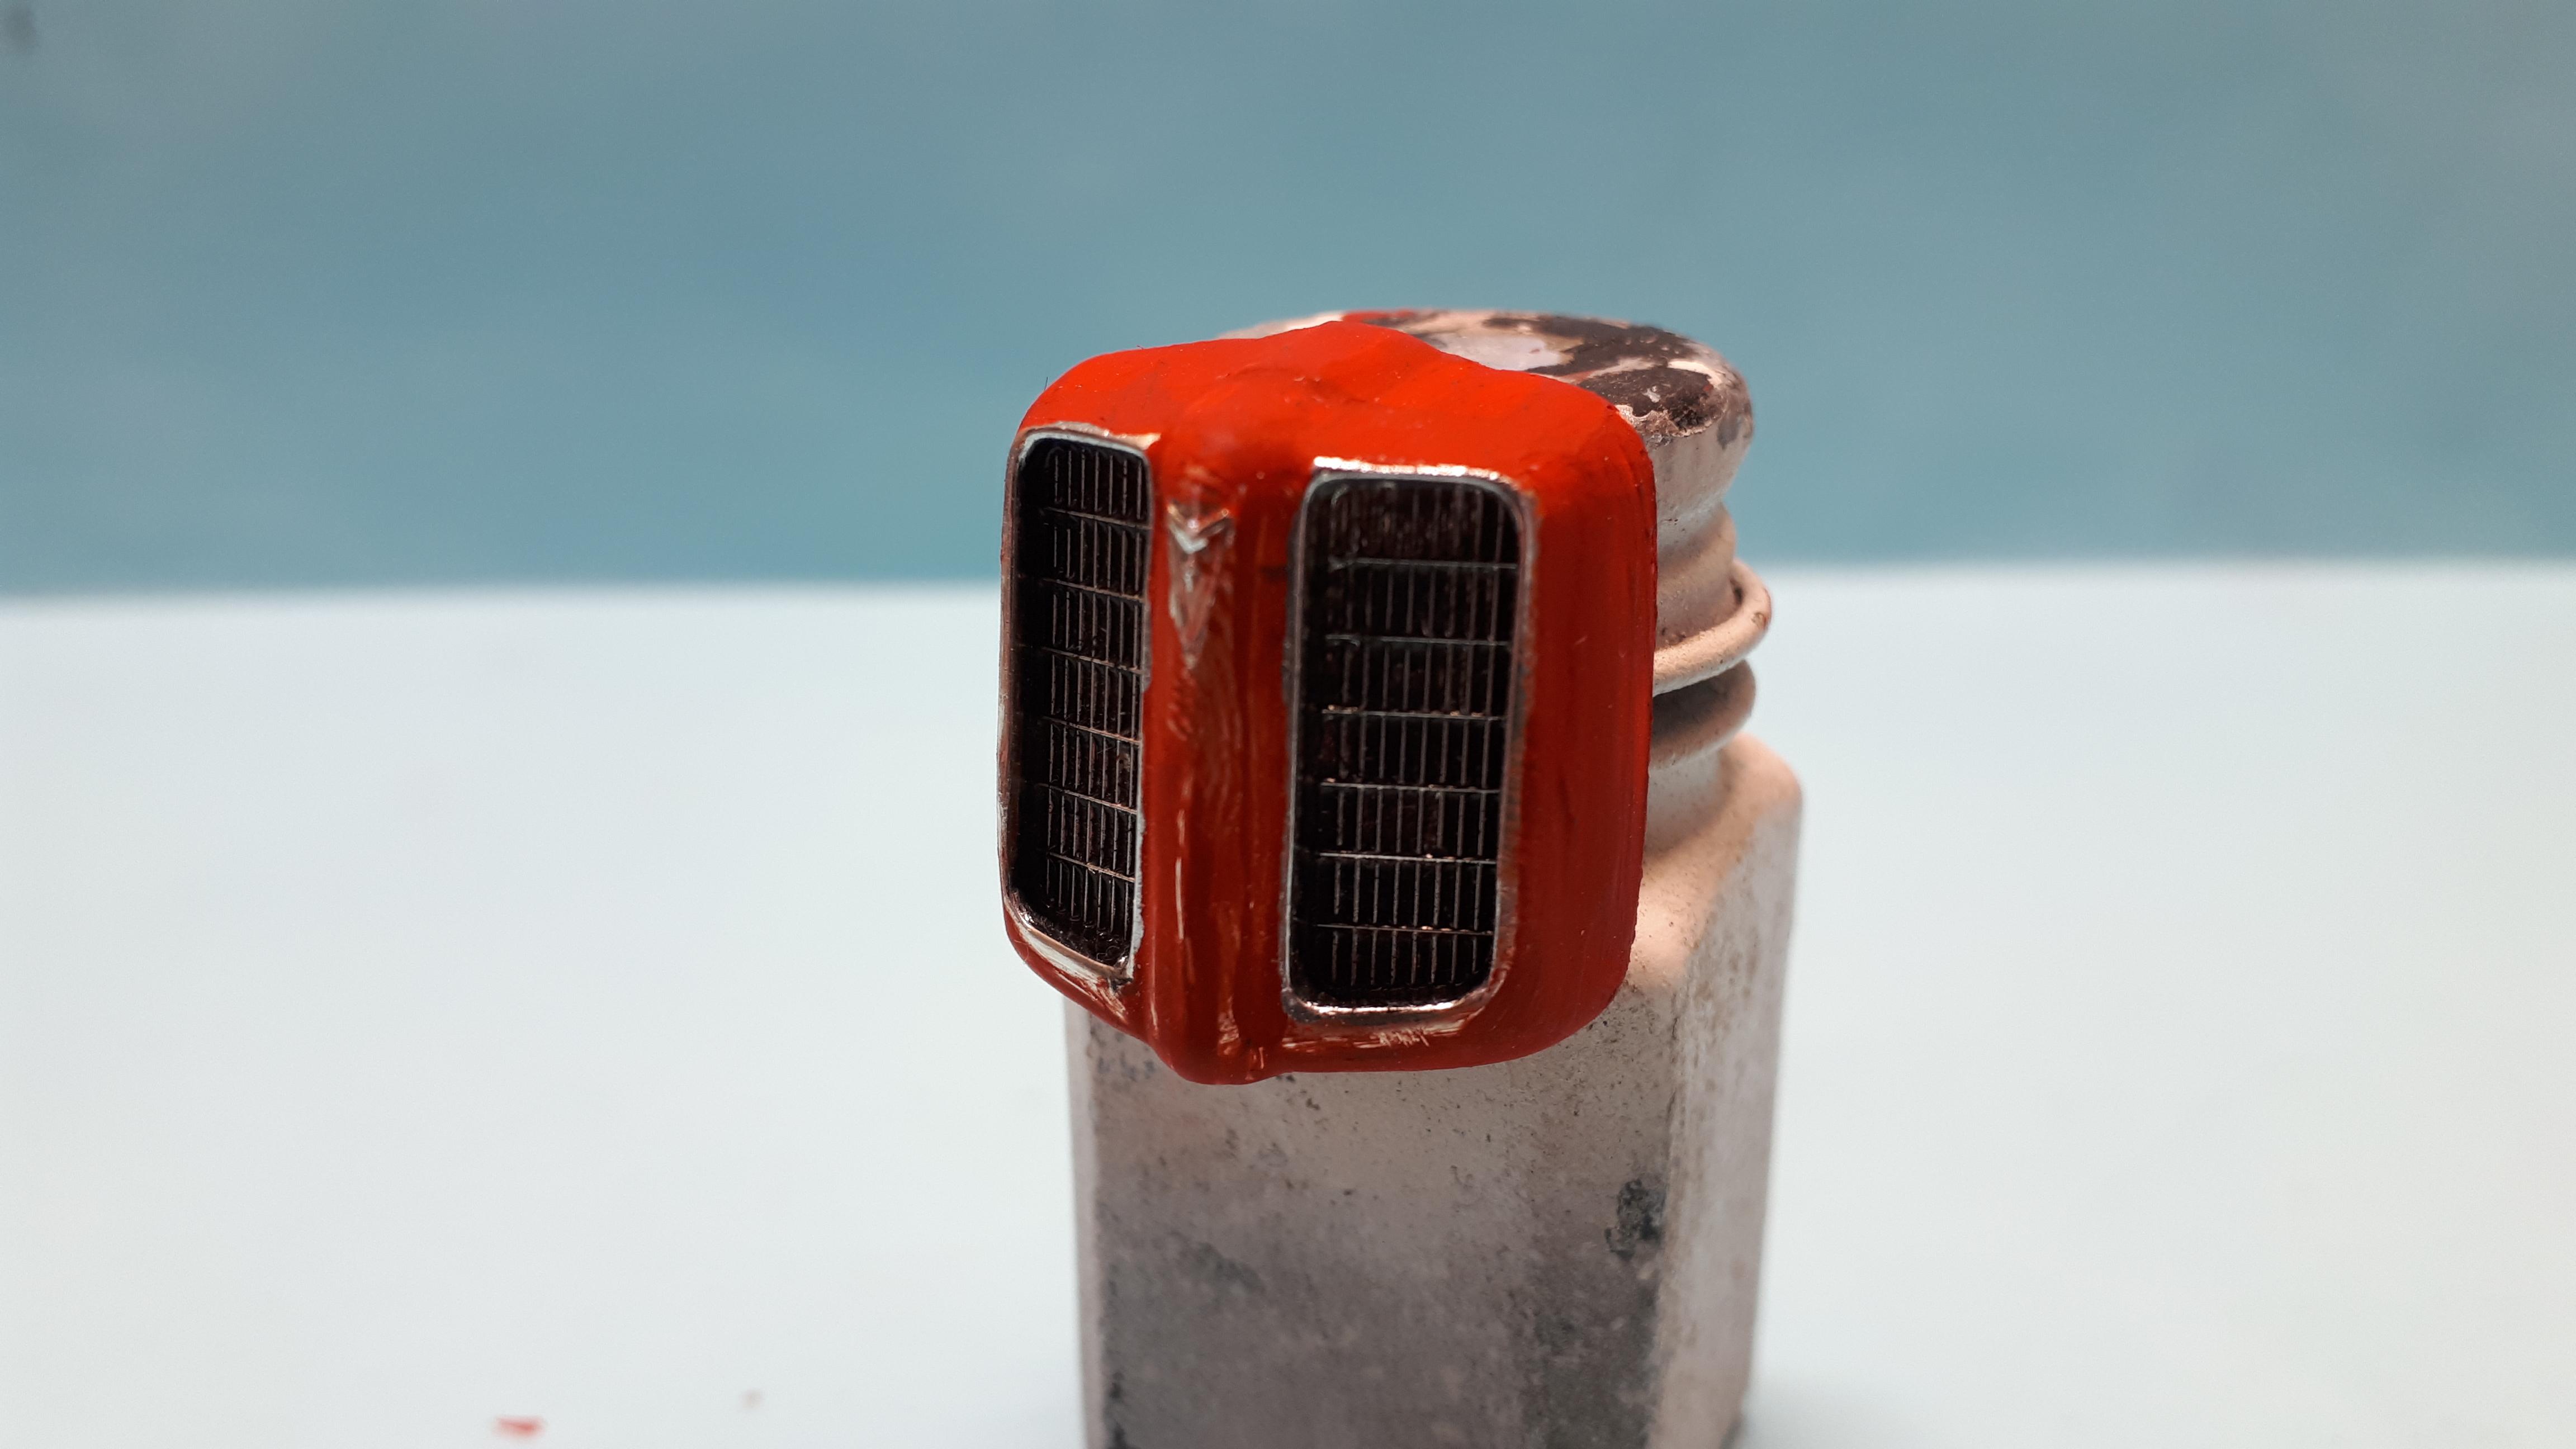
I'm really not a rat rod kinda guy but sometimes when you are deep in a project you get distracted by some parts lying on the bench and before you know it....... I cannot take credit for this idea - my mad mate Tony came up with it and as I had the part required I just massaged the idea a little. It doesn't have a home right now - it's really just garage art but one day a model will yell out for it and I will be ready. And no, it's not the prettiest hot rod grille in history but often times, a rat rod or show rod grille isn't that aesthetically pleasing, as long as it is different. This is different! You could use this as is on a rat rod as it has that tractor grille kinda look but I am already wondering what it would look like with a set of canted quad headlights moulded to the sides - a tuff guy version of the Ala Kart or Chilli Catallo coupe grille. Currently I just slapped a bit of flat red brush paint on it to see how it was going but it could use a little more sanding and filling before it goes on a model. Before I tell you what it is I want you to guess. All I will say is that it is off the ugliest land yacht in U.S. history, in my humble opinion! Cheers Alan
-
Reworking Door Panels.
alan barton replied to StevenGuthmiller's topic in Tips, Tricks, and Tutorials
This is really interesting and useful stuff, Steve. Though I am a died in the wool hot rodder and cut things up with reckless abandon, I read every detail of every car you build because they are just so beautiful the way you do them. A few years ago at the Toledo Toy Fair I managed to snag an AMT 64 Chevelle wagon, mint in box. It wasn't cheap but I had one as a young teenager and customised it to death. Some years ago I extensively reworked the sorry remains into a half decent Bonneville racer. I want the new kit to become a tow car for the racer and before I start it, maybe later this year, I am going to binge read pretty much everything you have done over the last few years to get my head in the right space. i'm thinking along the lines of your Day 2 Plymouth you finished recently. I want to really do this car justice and if it comes out anything like your work I will be over the moon. Thanks for years of inspiration and outstanding instructional tips. Cheers Alan -
Nice one Snake. I've got some projects that will need exactly that type of repair, or even fabrication from scratch when I think about it. Great tip!. Cheers Alan
-
Nice work - you have shown to everyone that despite its age, the AMT Model A is still a pretty good kit that has passed the test of time. I like the Revell also, they both have their pluses and minuses. I particularly enjoyed the photo with the top up - that takes it right back to the fifties! Cheers Alan
-
Hi Dennis, another great project coming along here. Really enjoying your efforts to nail the proportions and stance. The setback Pontiac is a great look. I will be interested to see your approach in blending the swage lines from the hood to the cowl. I have an AMT 32 Vicky converted to fit the Revell Deuce platform but still haven't tackled the hood graft. For what it's worth, a narrowed 49 or 50 Ford dash would go nice in this car. I will finish today my first Revell 30 coupe, a totally different look to yours but I grinned when I saw that I had put my seat locating blocks in exactly the same location of yours. I created some issues for myself by using the full pleated interior with the channelled chassis. The floor will fit but you have to pop it up into the body and then drop down into place. The kit seat was then too high but the channelled seat from the 29 roadster was perfect but couldn't be installed til after the floor was glued in place - thus the need for blocks! Cheers Alan
-
Stunningly realistic as evidenced by your beautiful photos. This car is right on the money for current trends. If I could respectively suggest two small items that would make it even better? Grab a small brush and add a touch of black paint to the bracket in between the four bars - this is almost always part of the chassis and therefore would not be chrome plated.. And add two straight pins for radiator support rods from the firewall to the radiator.. This will help highlight that beautiful Arden. I cant get over how perfectly draped your plug leads are! Cheers Alan
-
I love doing restos like this, Erik. That is coming along nicely. Do you have Dettol in the USA? it is a liquid disinfectant about the same colour as beer, that you can buy from supermarkets or pharmacies.. You use it 50-50 thinned with water. It has become my go to for stripping paint that nothing else will touch. I bit stinky and needs a good scrub in soapy water afterwards but it works. I reckon it would fix your interior.. Cheers Alan
-
Black '32 Ford Highboy Roadster Street Rod
alan barton replied to Bernard Kron's topic in Model Cars
You make it look simple, Bernard. You've brought together a great selection of parts to produce a rod that would look right at home at Pleasanton. I'm going to have to look at my Orange Crate box to see if I have any spare wheels! Cheers Alan