alan barton
-
Posts
2,105 -
Joined
-
Last visited
Content Type
Profiles
Forums
Events
Gallery
Everything posted by alan barton
-
Although I am a died in the wool hot rodder, the 64/65 wagon/El Caminos are among my favourite kits. I have two Elkies built and two wagons, another four waiting in the wings. I do like the way you have captured a factory feel to your interior vinyl. Cheers Alan
-
Now I really have to start one of these. What an amazing looking race car! I still think I will be doing the style with the steeply raked wing over the top but your WIP has given me heaps of information to make a start. Congratulations on building a style of model that you very rarely see! You have really captured the precision and the outrageous styling of these rocket ships! Cheers Alan
-
Brian, did you notice that the Argentinian Ranchero is actually based on an Aussie Ute? They had a whole range of cars based on the Aussie Falcons and then continued updating them with contemporary grille styling and interiors for many many years. If you study your photo you will see it has a four door front door and the reduced overhang of the Aussie ute. We didn't do the crew cab conversion, however. Cheers Alan
-
Tom, I can't believe you didn't snag it first! I reckon every kid that ever built this was hoping it would look as good as Ron's version. What a wonderful nostalgic flashback! Cheers Alan
-
I too prefer shiny to rusty but the proportions on this coupe are fantastic and I am in awe of your rust effects - you have achieved a rust colour that I have been unsuccessful at replicating. Did you use real rust or a custom paint mix? Cheers Alan
-
It's always good to save a model that had fallen from grace! This came back together really well. I would also run a bit of a wash on that grille - maybe while you are waiting for something else to dry, and you could absolutely nail that eighties monochromatic look if you could drop the front end of, hog out the top of the front crossmember and get her sniffing the bitumen a bit more. Still, I know all about getting something done and just wanting to step away so that's a perfectly OK option also! Cheers Alan
-
Phil, I love all three but the convertible is really doing it for me. You nailed the proportions and colour combo on that one! Cheers Alan
-
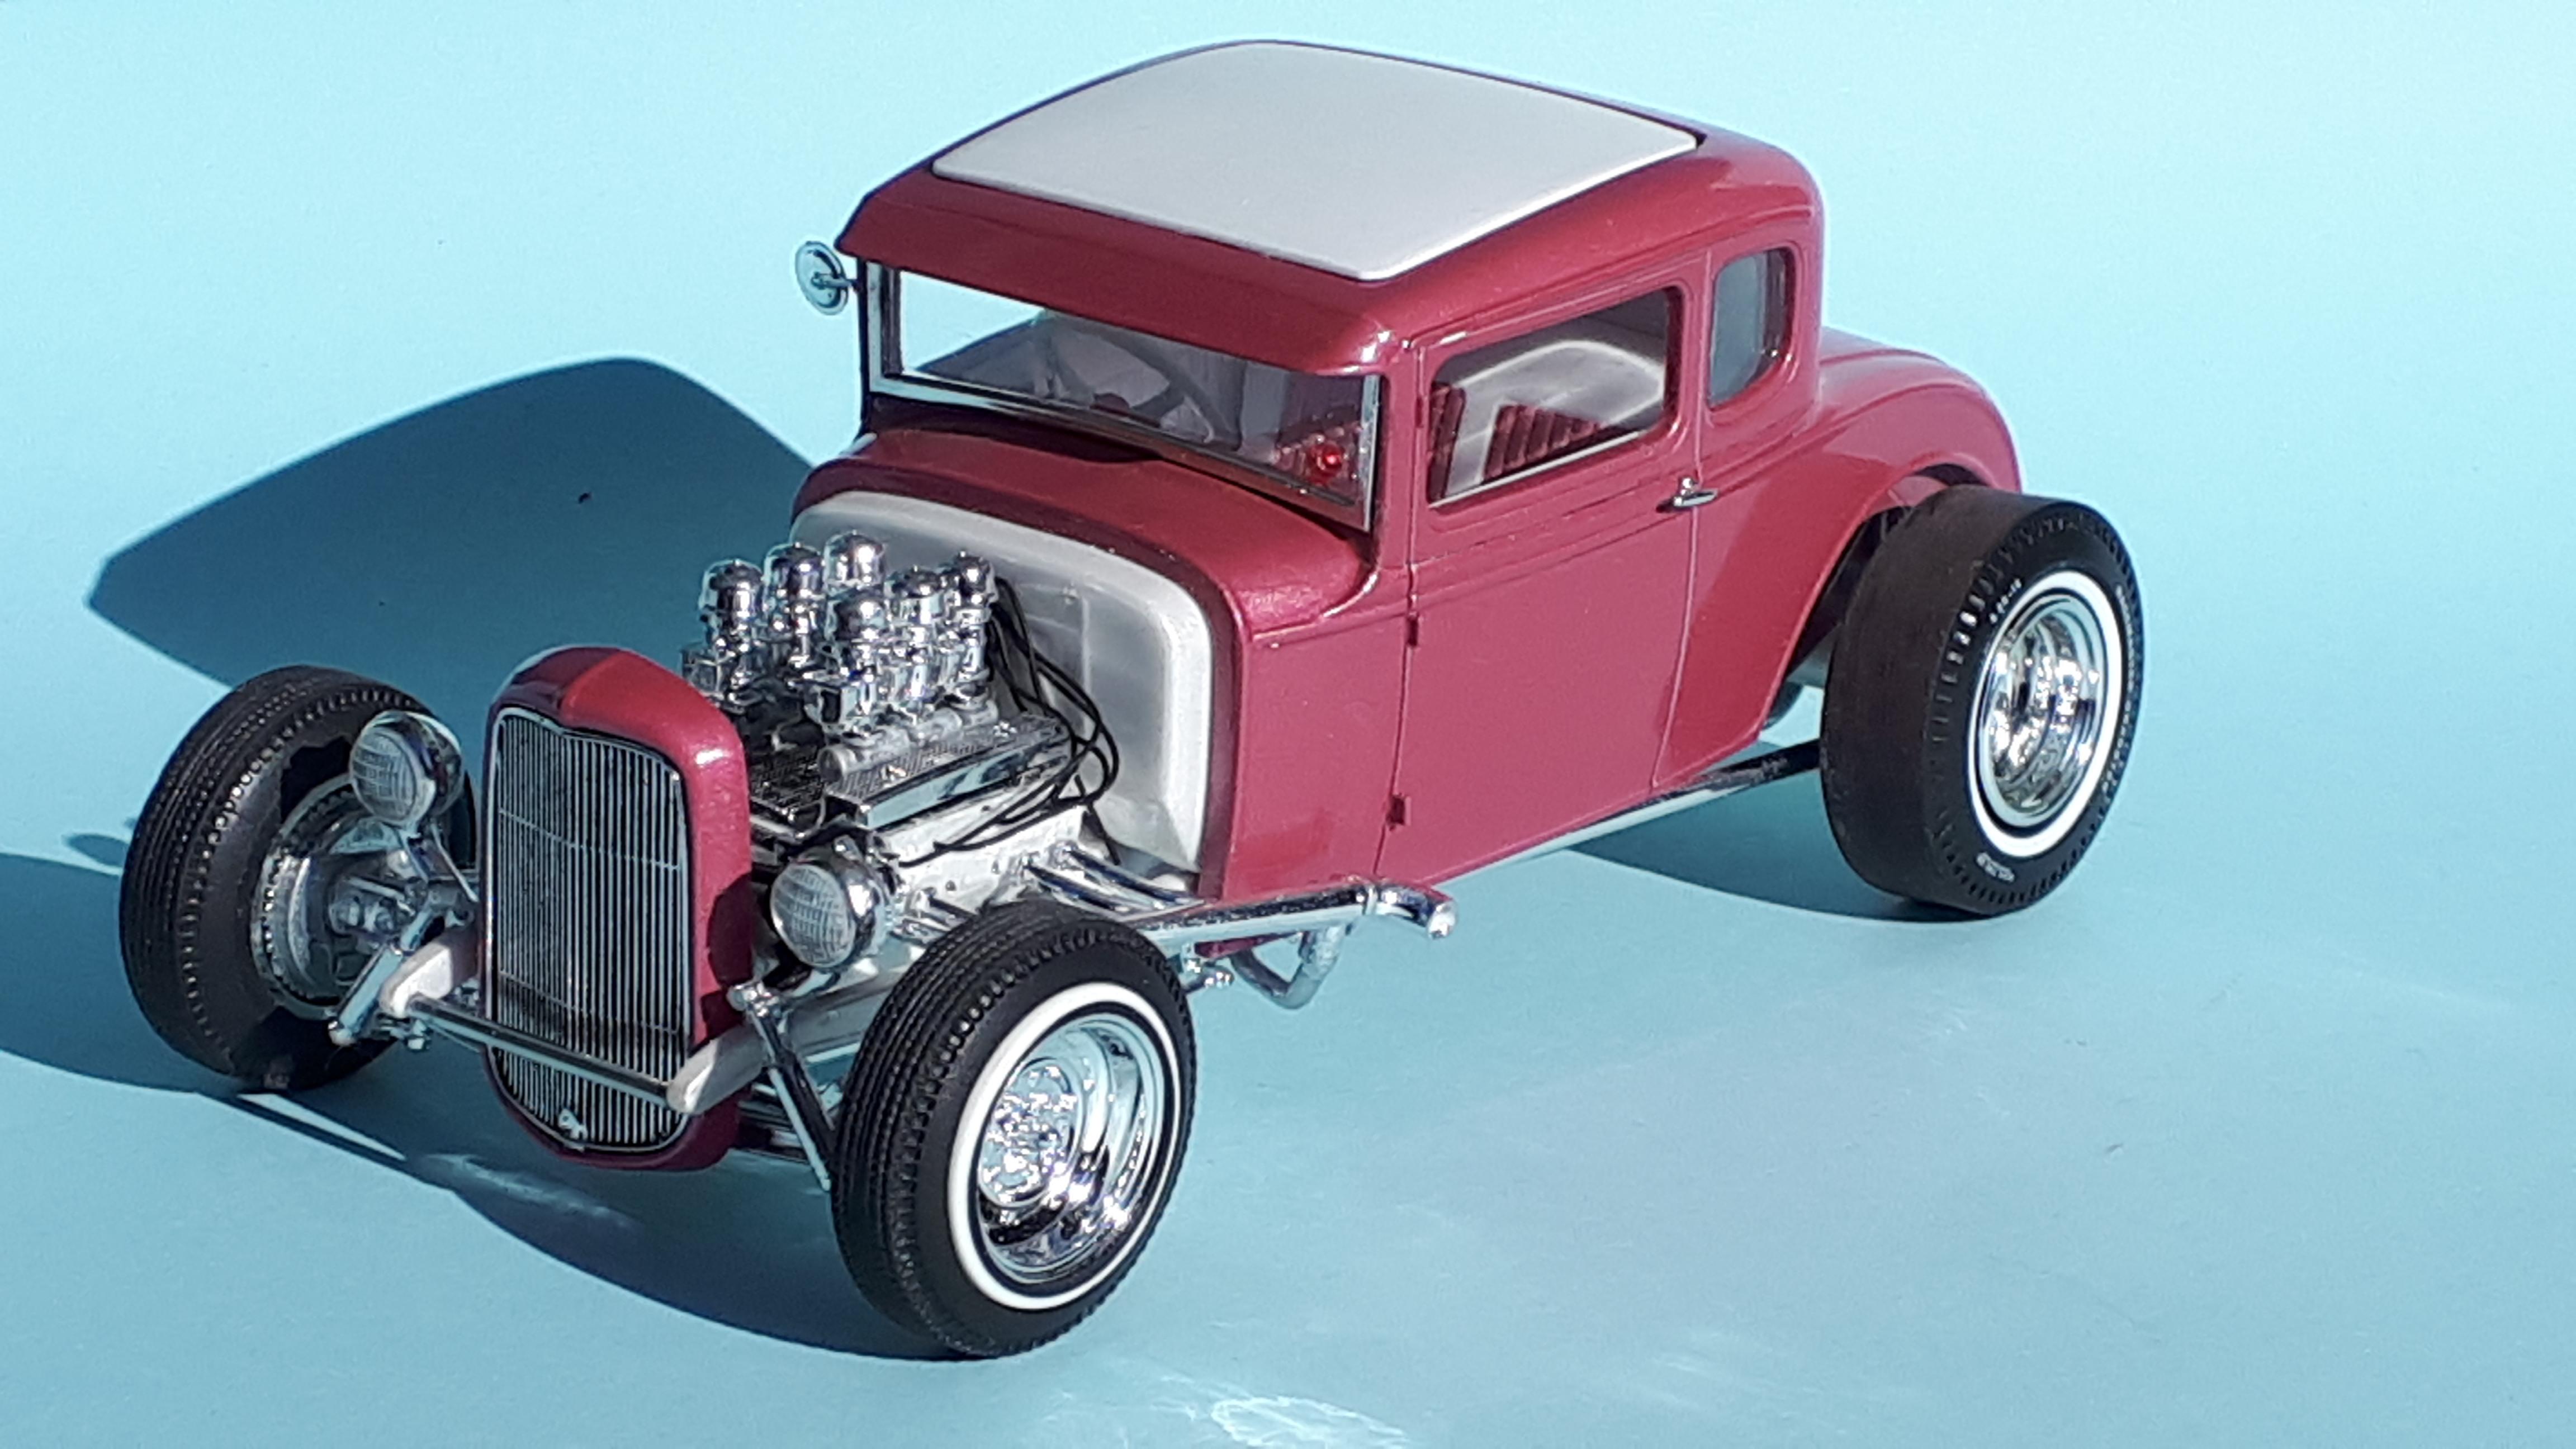
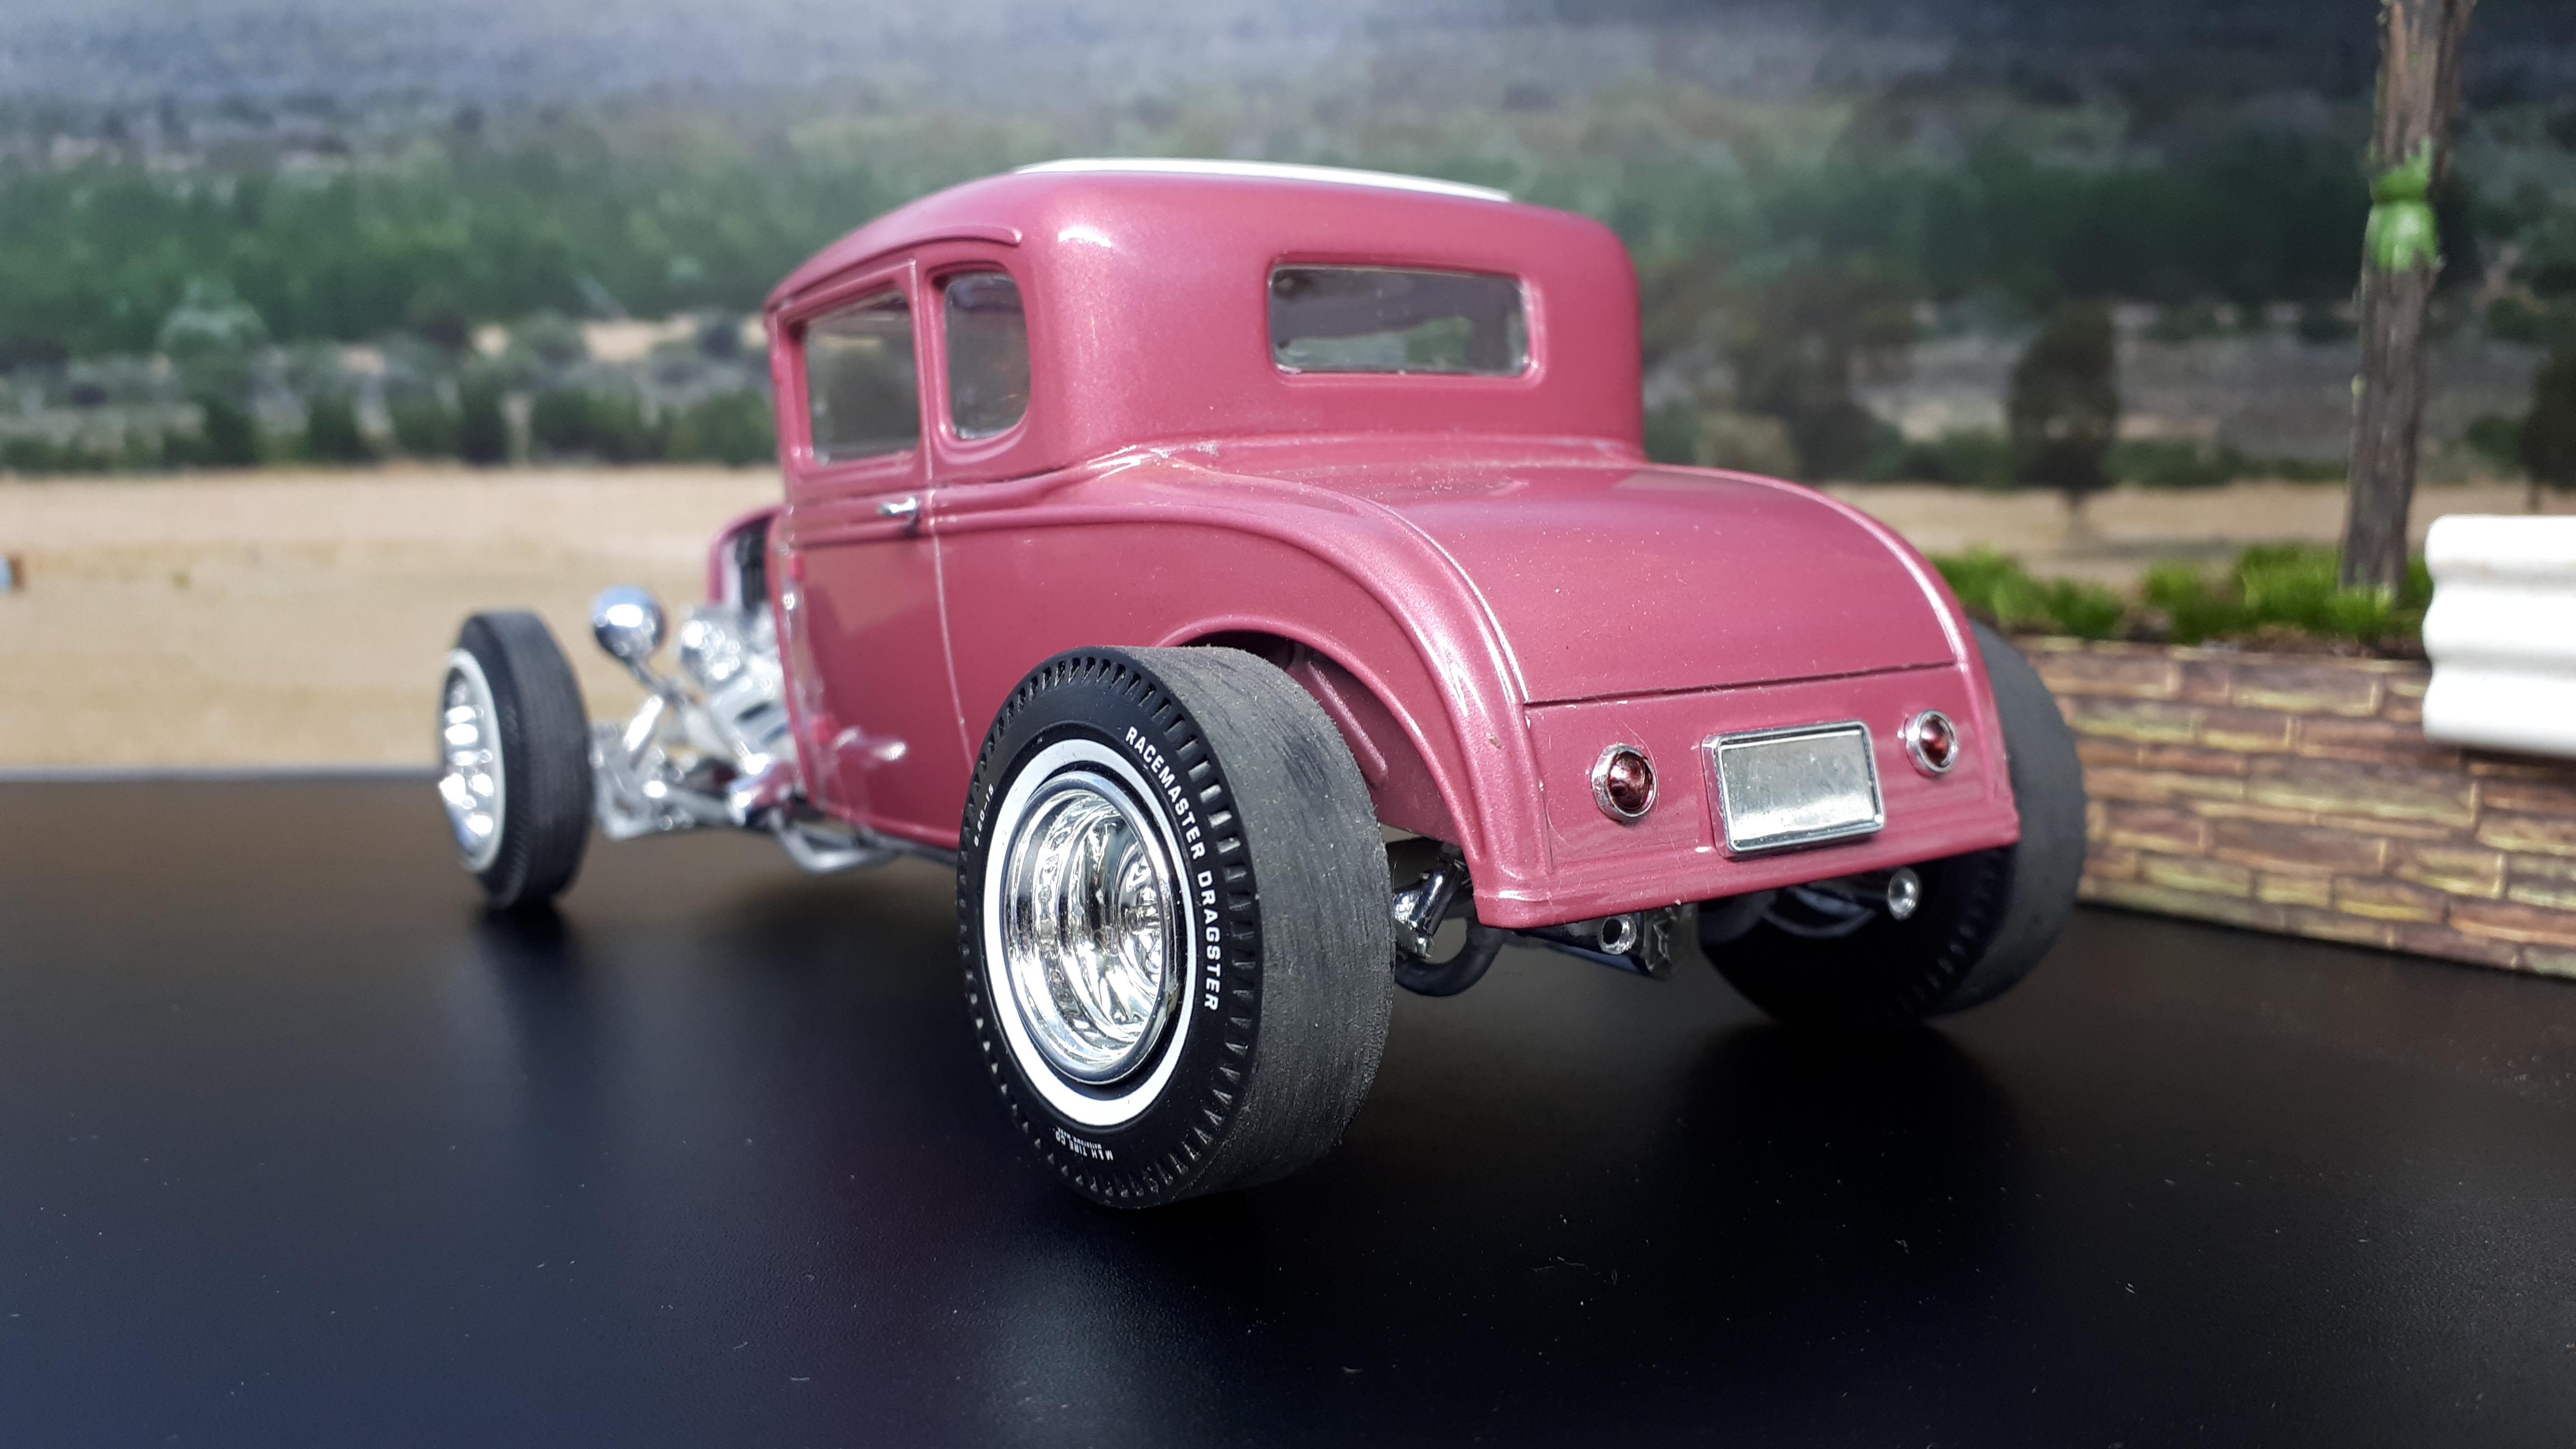
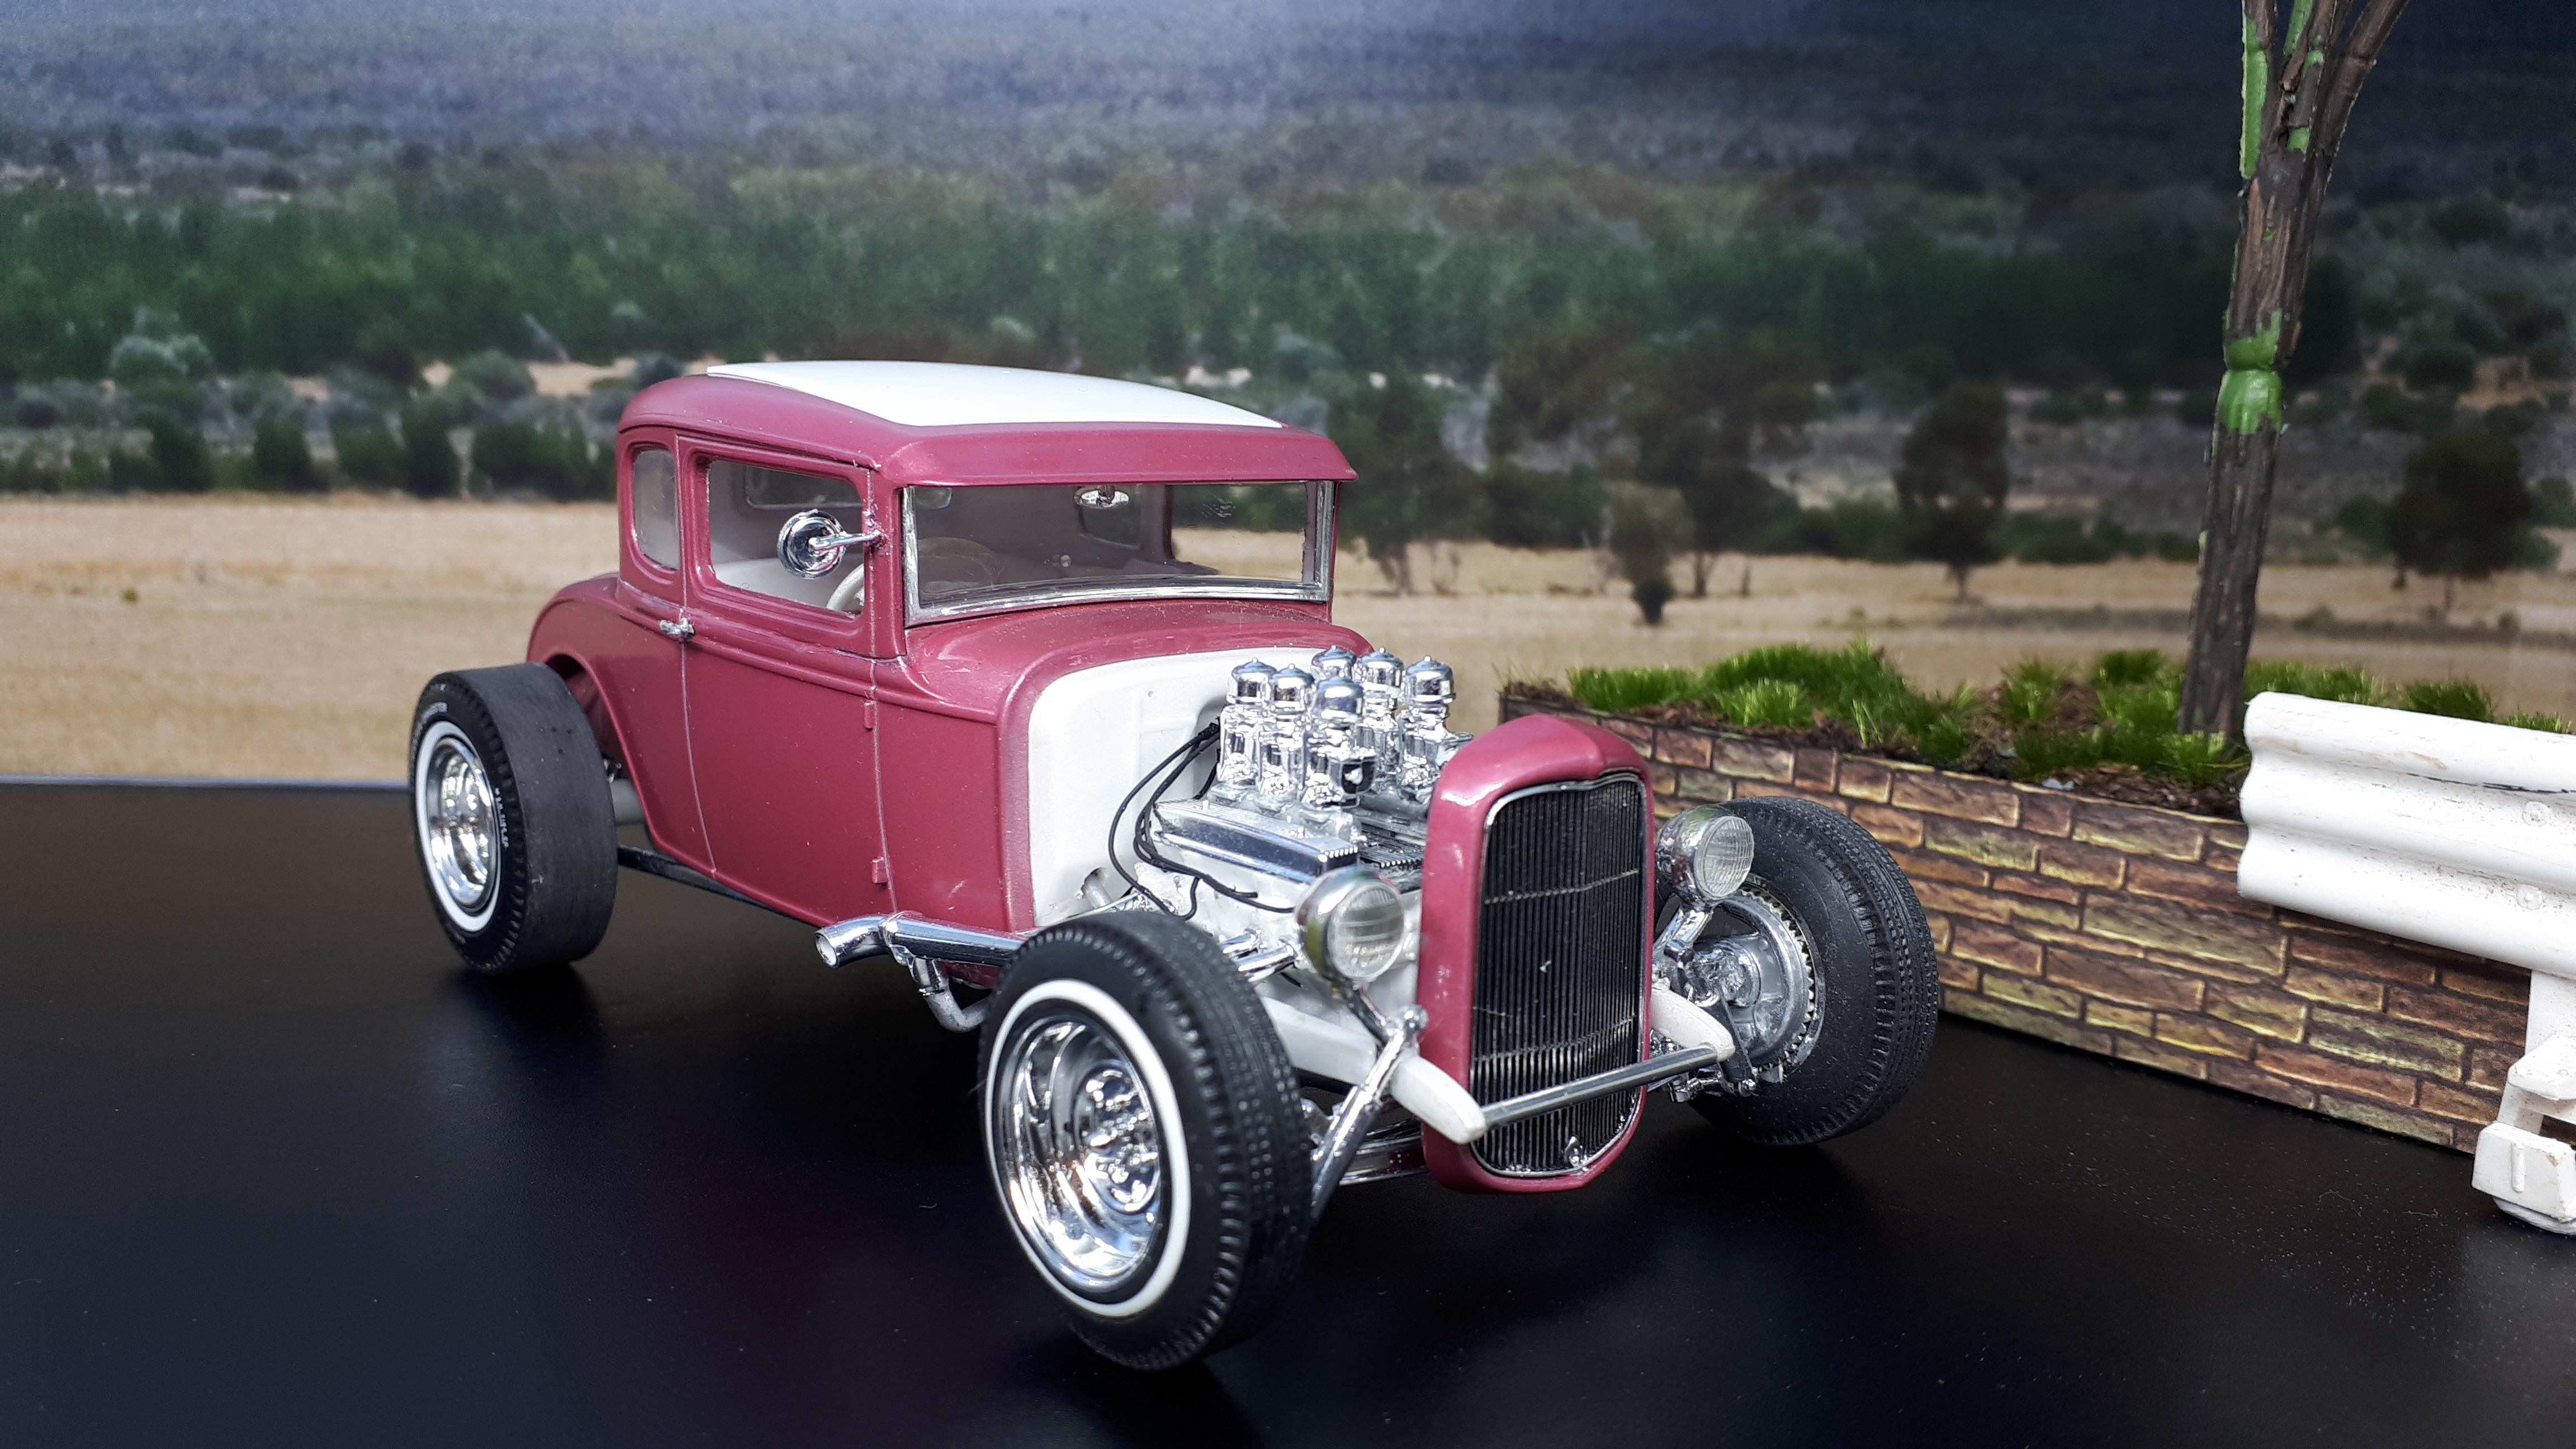
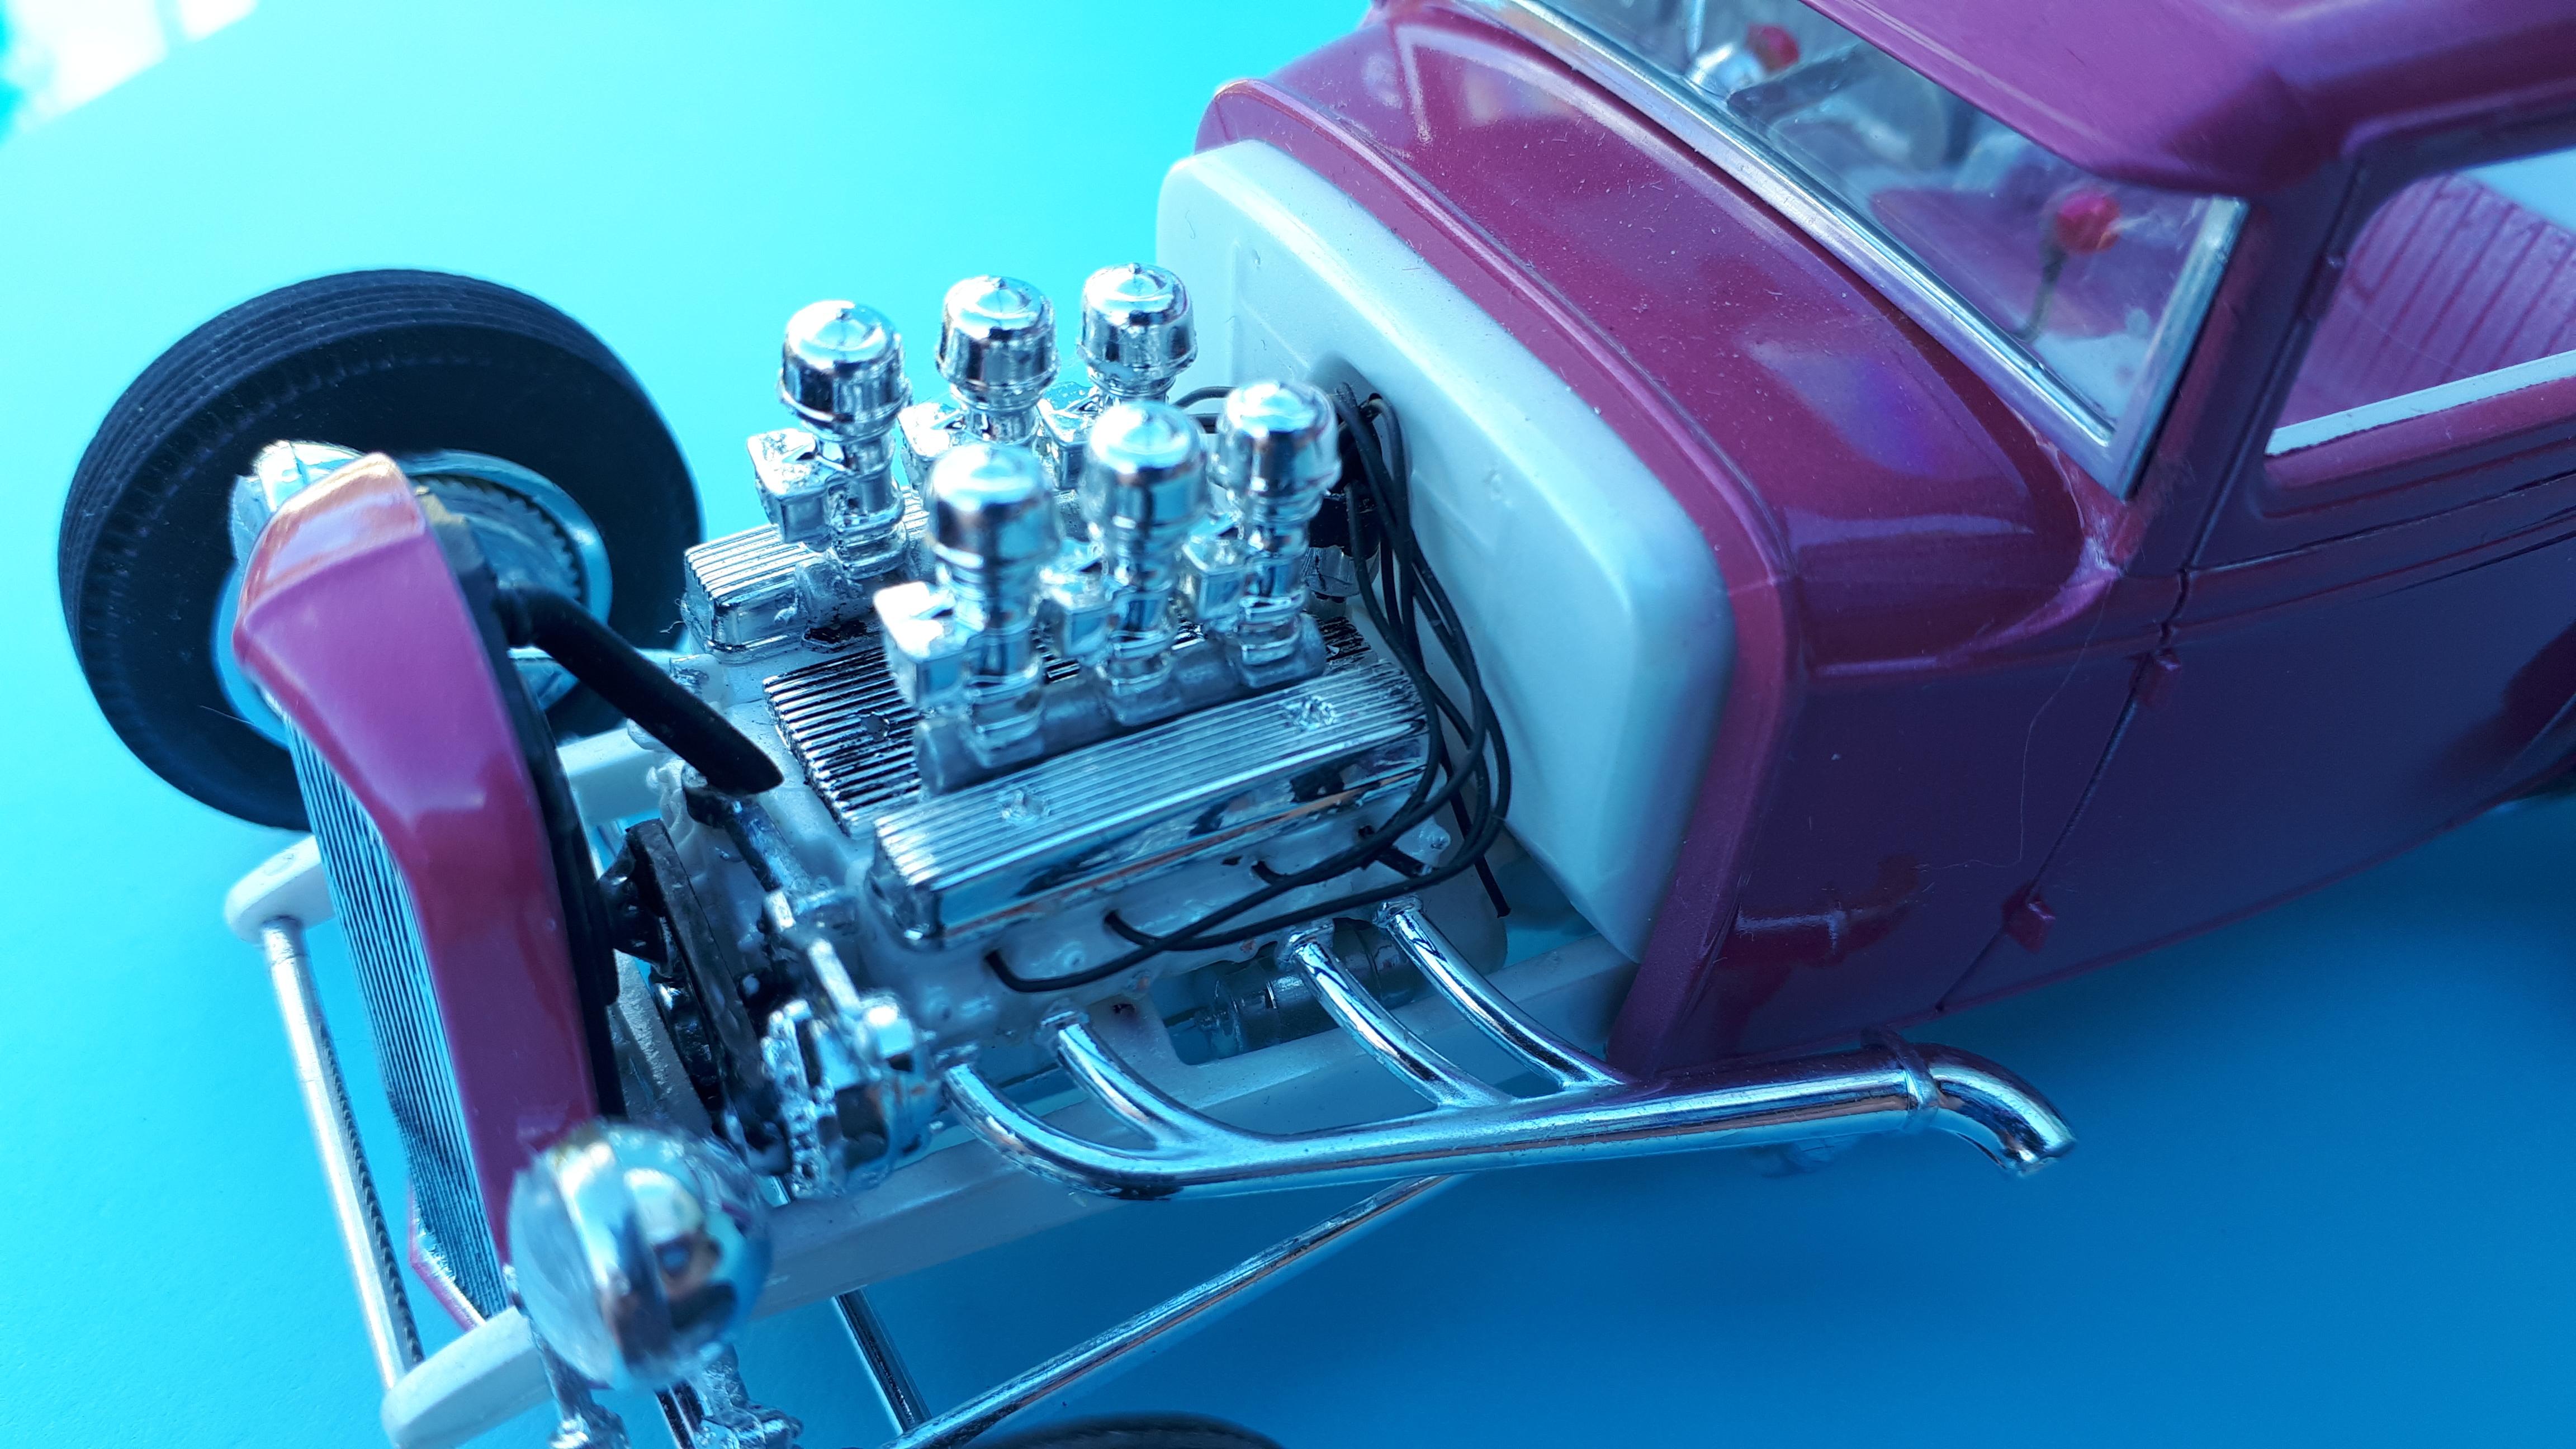
Thanks again, everyone, the colour seems to be a real hit. As I was completing the car I found an article in Rod and Custom (R.I.P.) that was near identical except that it was unchopped and used black and white rather than pink and white for the interior. It was photographed in front of a woodpile. Maybe I was subconsciously channelling this car ( that's spiritual channelling, not hot rod channelling!). It is a while since I put a model on the shelf and went "yeah, nailed it!" It has a few small flaws - fortunately that wiggle in the body/roof seam on the right hand door is not nearly as glaring in real life - but it gives me a nice warm feeling anyway. Ace, I'm glad you noticed the "visual mass", I was keen to get the headlights correctly filling the space between the tyres and the grille, the long rear radius rods are all about closing up the gap under the sills that all channelled Model A's suffer from and just picking the right seat and its location helped the interior. Oh, and there are four different radiators for the two Revell Model A kits - turns up #15 was the sweet spot for this puppy. And overlooking the effect of using the pleated interior gave me no excuse not to adjust the height of the frame at the rear to get things a little closer to the ground. Amazing how much difference a millimetre can make! Tim, I can only assume I am doing a reasonable job with my column because I don't get many complaints! On the other hand, I have had a little reader feedback on some columns in the past but none on this one so far. The feedback on here, however, has been very satisfying! Cheers Alan
-
Organizing Evergreen strip stock. Super easy
alan barton replied to LDO's topic in Tips, Tricks, and Tutorials
No photo right now but mine are in a cheap stainless steel pasta container that sits on the floor beside my chair. Tall enough to support the packets but the label sits above the rim to be easily read! Cheers Alan -
This a very interesting post for me as I have a smattering of parts from one of these and hope to salvage it like you did. You have opened my eyes to some parts in my stash that I did not know belonged to this kit, the rear axle and the engine front plate to be exact. My relic is in much worse condition than yours but with the help of your photos I think I have a fighting chance of getting it back on the shelf. I really appreciate that you have saved this piece of our modelling history - there are far better examples of T buckets out there ( by pretty much every other manufacturer) but you stayed true and got this back to the way it was intended by Aurora and that is an achievement in itself! Cheers Alan
-
Thanks everyone, very nice to hear such positive comments. Like I said, it's a great kit to build and I really enjoyed it. Have one more to build and will be buying some re-issues when they happen. Plowboy, it is a tough colour to photograph but the outside shots are close. The colour reminds of one used here by GM in the early seventies called Orchid. Cheers Alan
-
Supermodified
alan barton replied to Brianl's topic in WIP: Other Racing: Road Racing, Land Speed Racers
This is an outstanding build. I have often thought of building one and this gives me an encyclopaedia of ideas. I particularly like the ones with a huge sprint car style wing and an upswept rear deck but I can use a lot of your ideas. Way too may projects on the bench right now but I will be coming back to this one when the time is right! Cheers Alan -
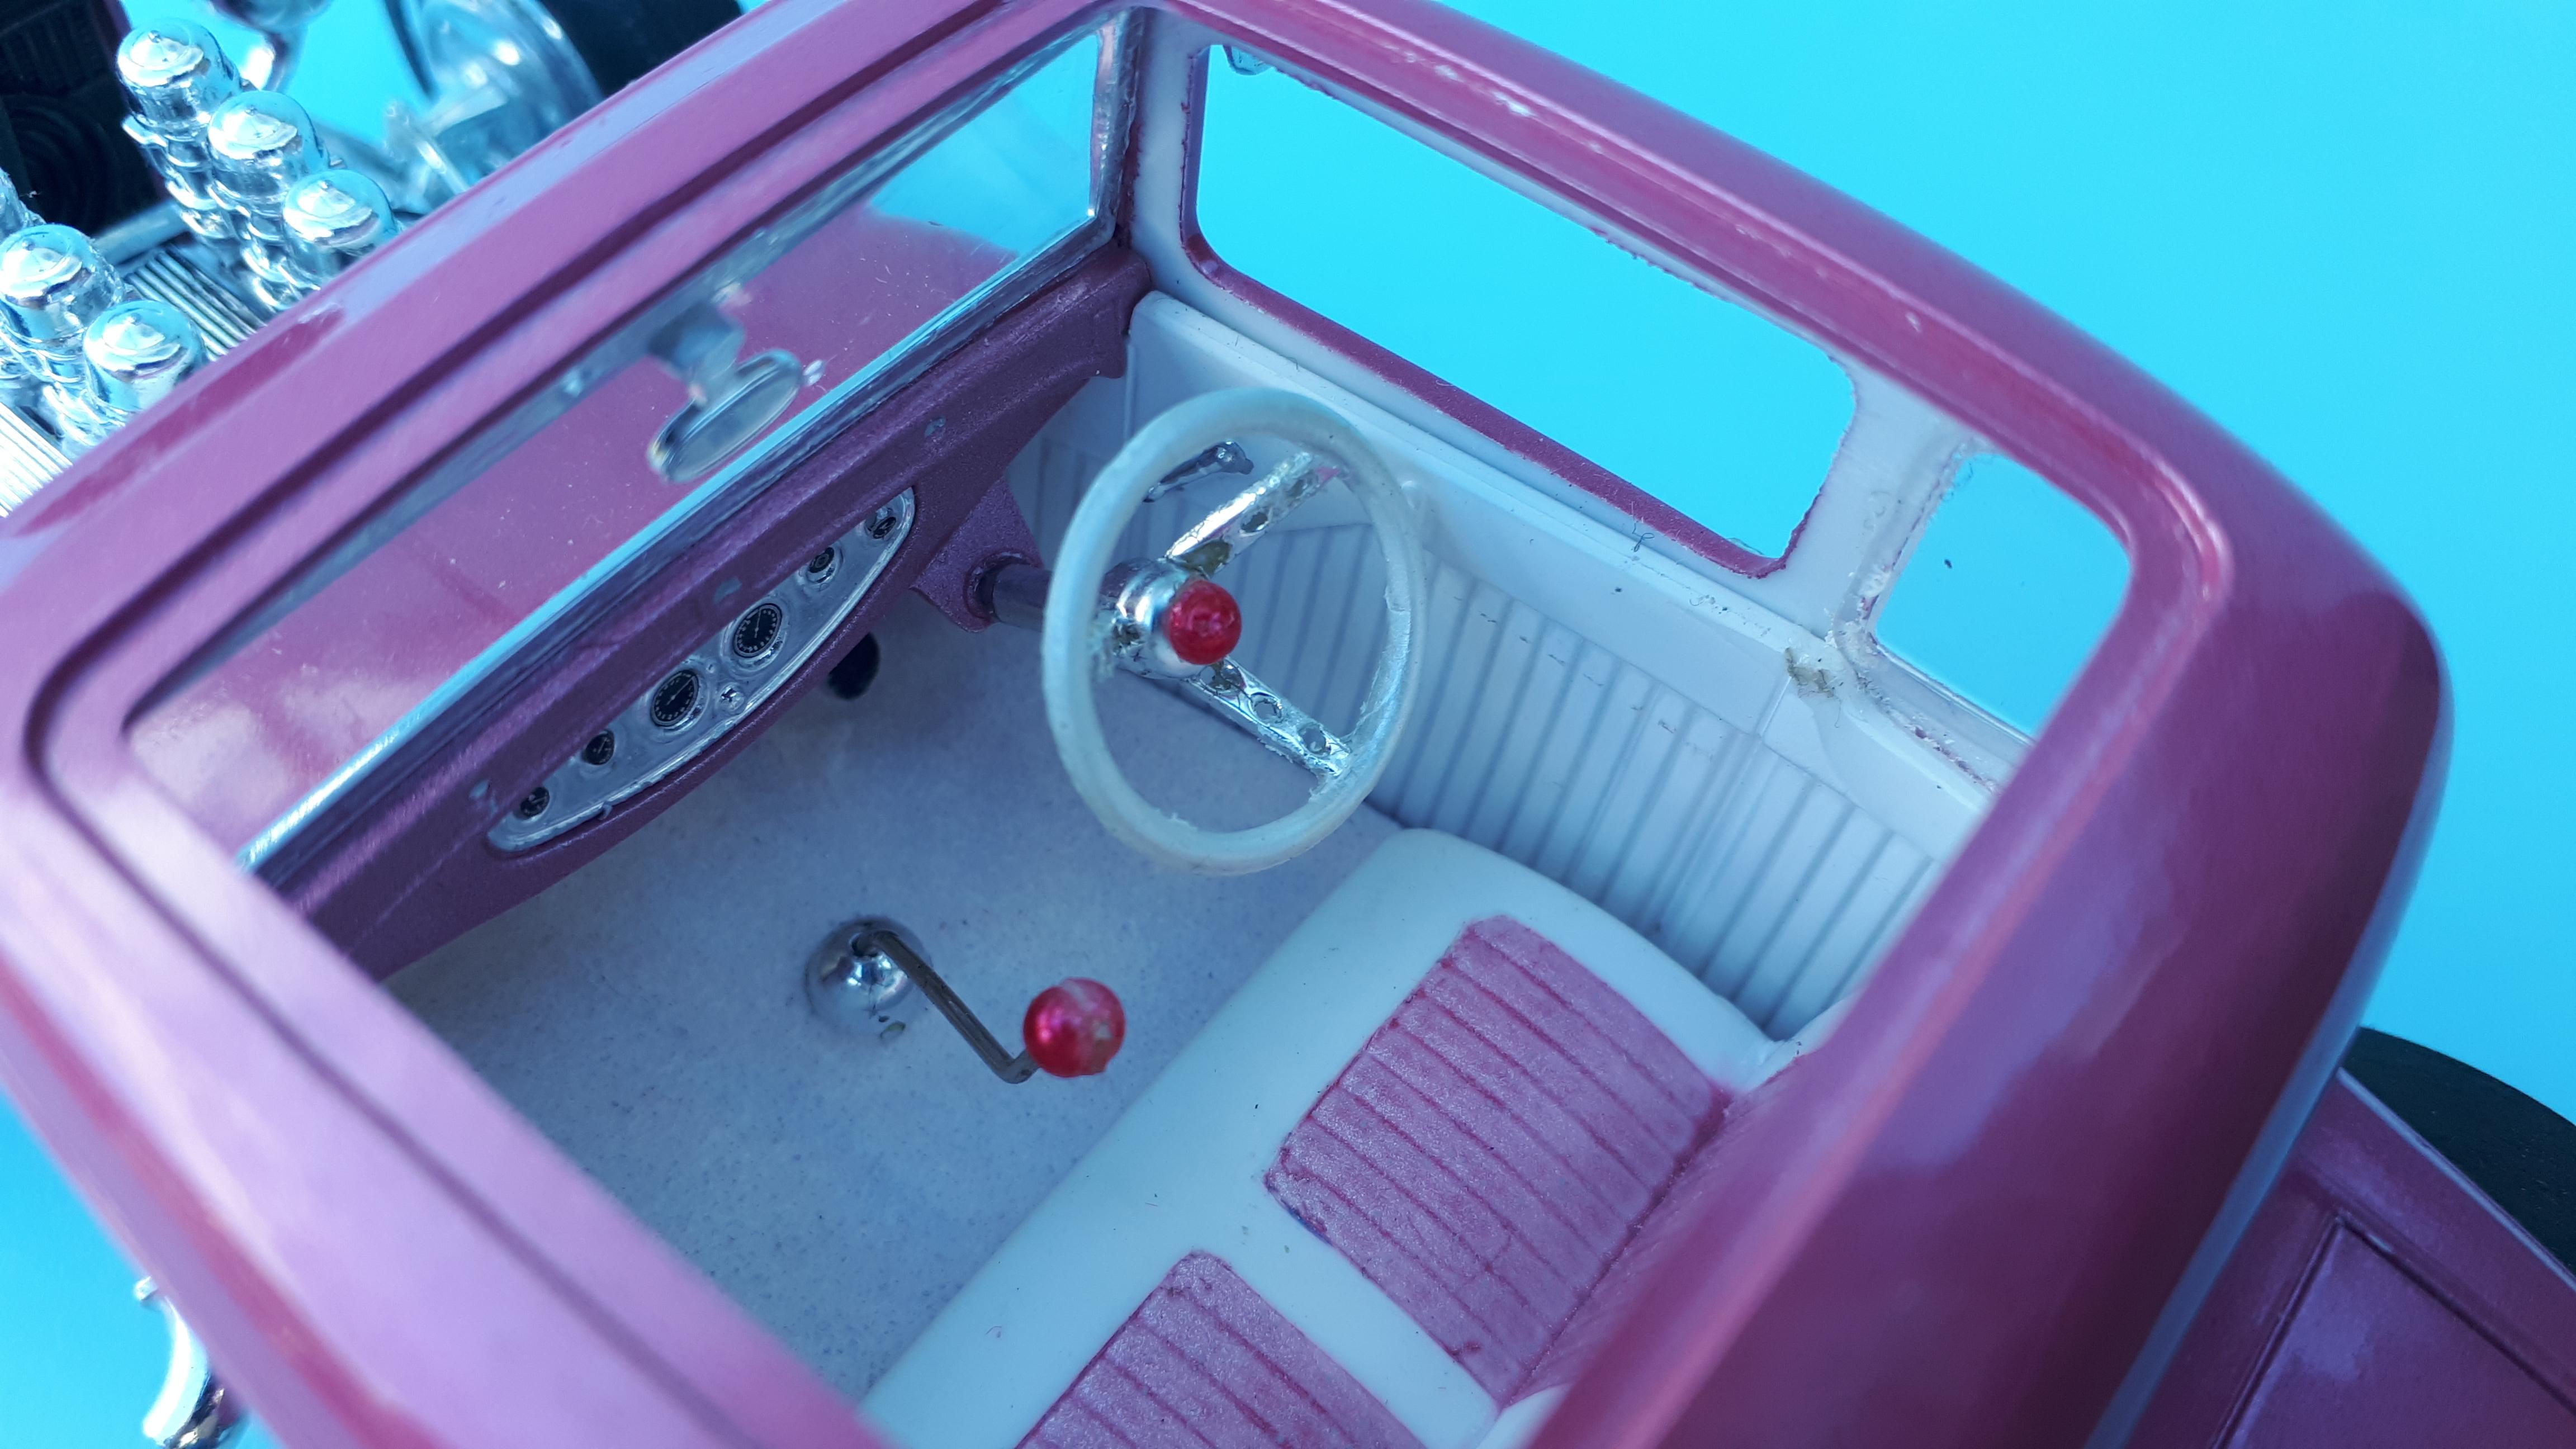
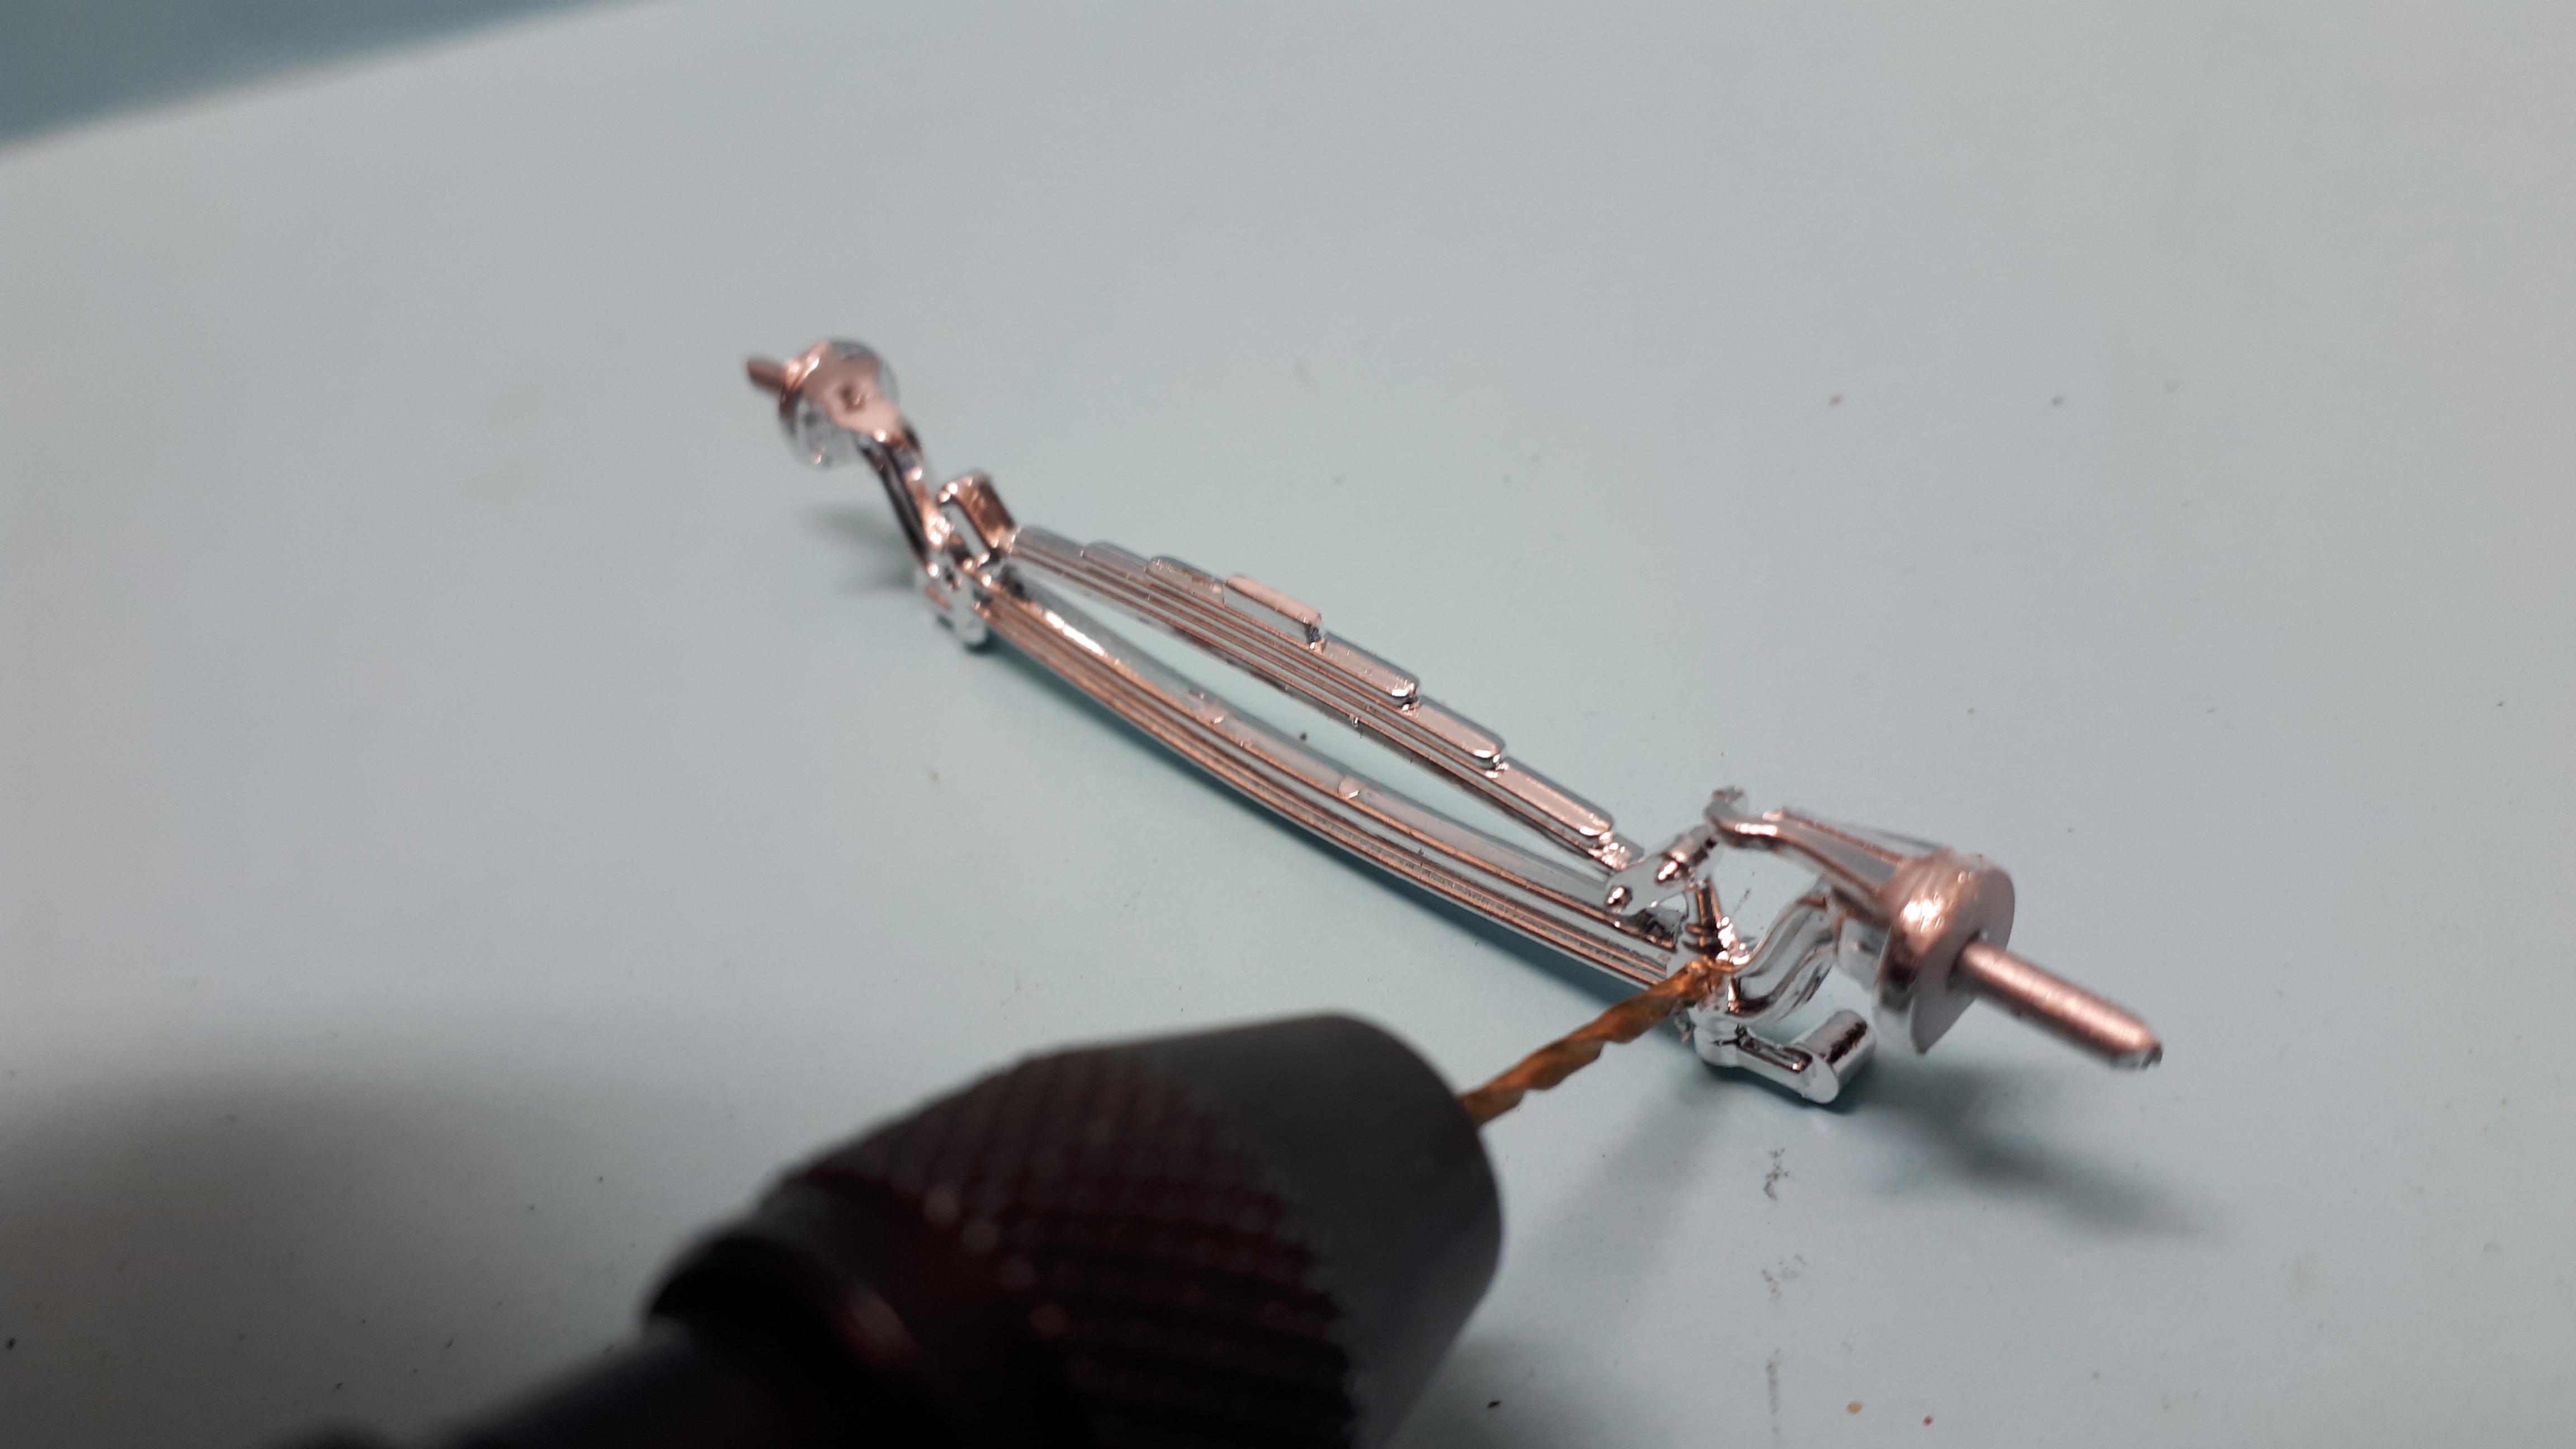
Here is the final product that I was showing in the WIP thread yesterday. Final components are as follows. Body, frame , radiator, grille, interior front suspension - Revell 30 Model A coupe Buick Nailhead, front seat - Revell 29 Roadster Paint is Tamiya Pearl white on the frame and firewall, Tamiya Light Red with Tamiya Gloss Clear on the body and grille, and Tamiya flat white primer on the interior roof insert. Rear Axle, rear radius rods, headlights and headlight mounts - AMT 25 T Front wheels and tyre - Pegasus chromies and thin whitewalls Rear wheels and tyres - AMT Parts pack whitewall slicks on AMT 57 Chev rear wheels ( I think) Scratchbuilt rear section of frame. Steering wheel - no idea! My wife who is very supportive of my modelling efforts gave me some pink beads for scrapbooking which I used on the horn button and shifter knob. I inverted parts of the kit exhaust system, mainly to get it past the rear end. Even though I tripped myself up a few times on this one, it was a very enjoyable build. There is a small dark smudge on the right hand interior panel near the door jamb that I only discovered in the photos and have since painted over to restore the area. I think it could probably be an East coast car or a West coast car - an unchopped top would be a stronger indicator of an East Coast car in my mind. The pink and white colour scheme made Coconut Ice the perfect moniker for this rod. Comments and criticisms welcome. Cheers Alan

-
I wonder if that has been cast off the undersized AMT 34 Ford coupe? I have one at home and will have to check on my return. It's really got me thinking about doing something similar with the Revell miniature coupe body - Ive got a spare plus the Double Dragster frame in my stash! Cheers Alan
-
Even here in Australia, I was influenced by the Car Model Funny car contest. I immediately started building a 69 Coronet funnycar which lowers the definition of "crude" to subterranean. I've still got a block somewhere that I tried to drill full of holes and fit the 49 mercury pistons to. But boy, was I impressed by those models. I got to meet Jim at his home in 1992 and he told me some amazing stories, and then got to meet Tim in 1996 after corresponding with him on and off since 1981. Only in recent years did I realise that I had been reading about Tim's funnycar back in high school! And as Tim said much earlier in this thread, the history of model cars is every bit as interesting as the history of their full sized counterparts. One of the great things about this forum is that from time to time we get to take these trips down a styrene memory lane. Cheers Alan
-
Coconut Ice - another take on the Revell 30 A coupe.
alan barton replied to alan barton's topic in WIP: Model Cars
Thanks for the kind comments guys, unfortunately I omitted to take photos of the rolling chassis before completion. Just heading off to work so I will post Under Glass later today. Cheers Alan -
Coconut Ice - another take on the Revell 30 A coupe.
alan barton replied to alan barton's topic in WIP: Model Cars
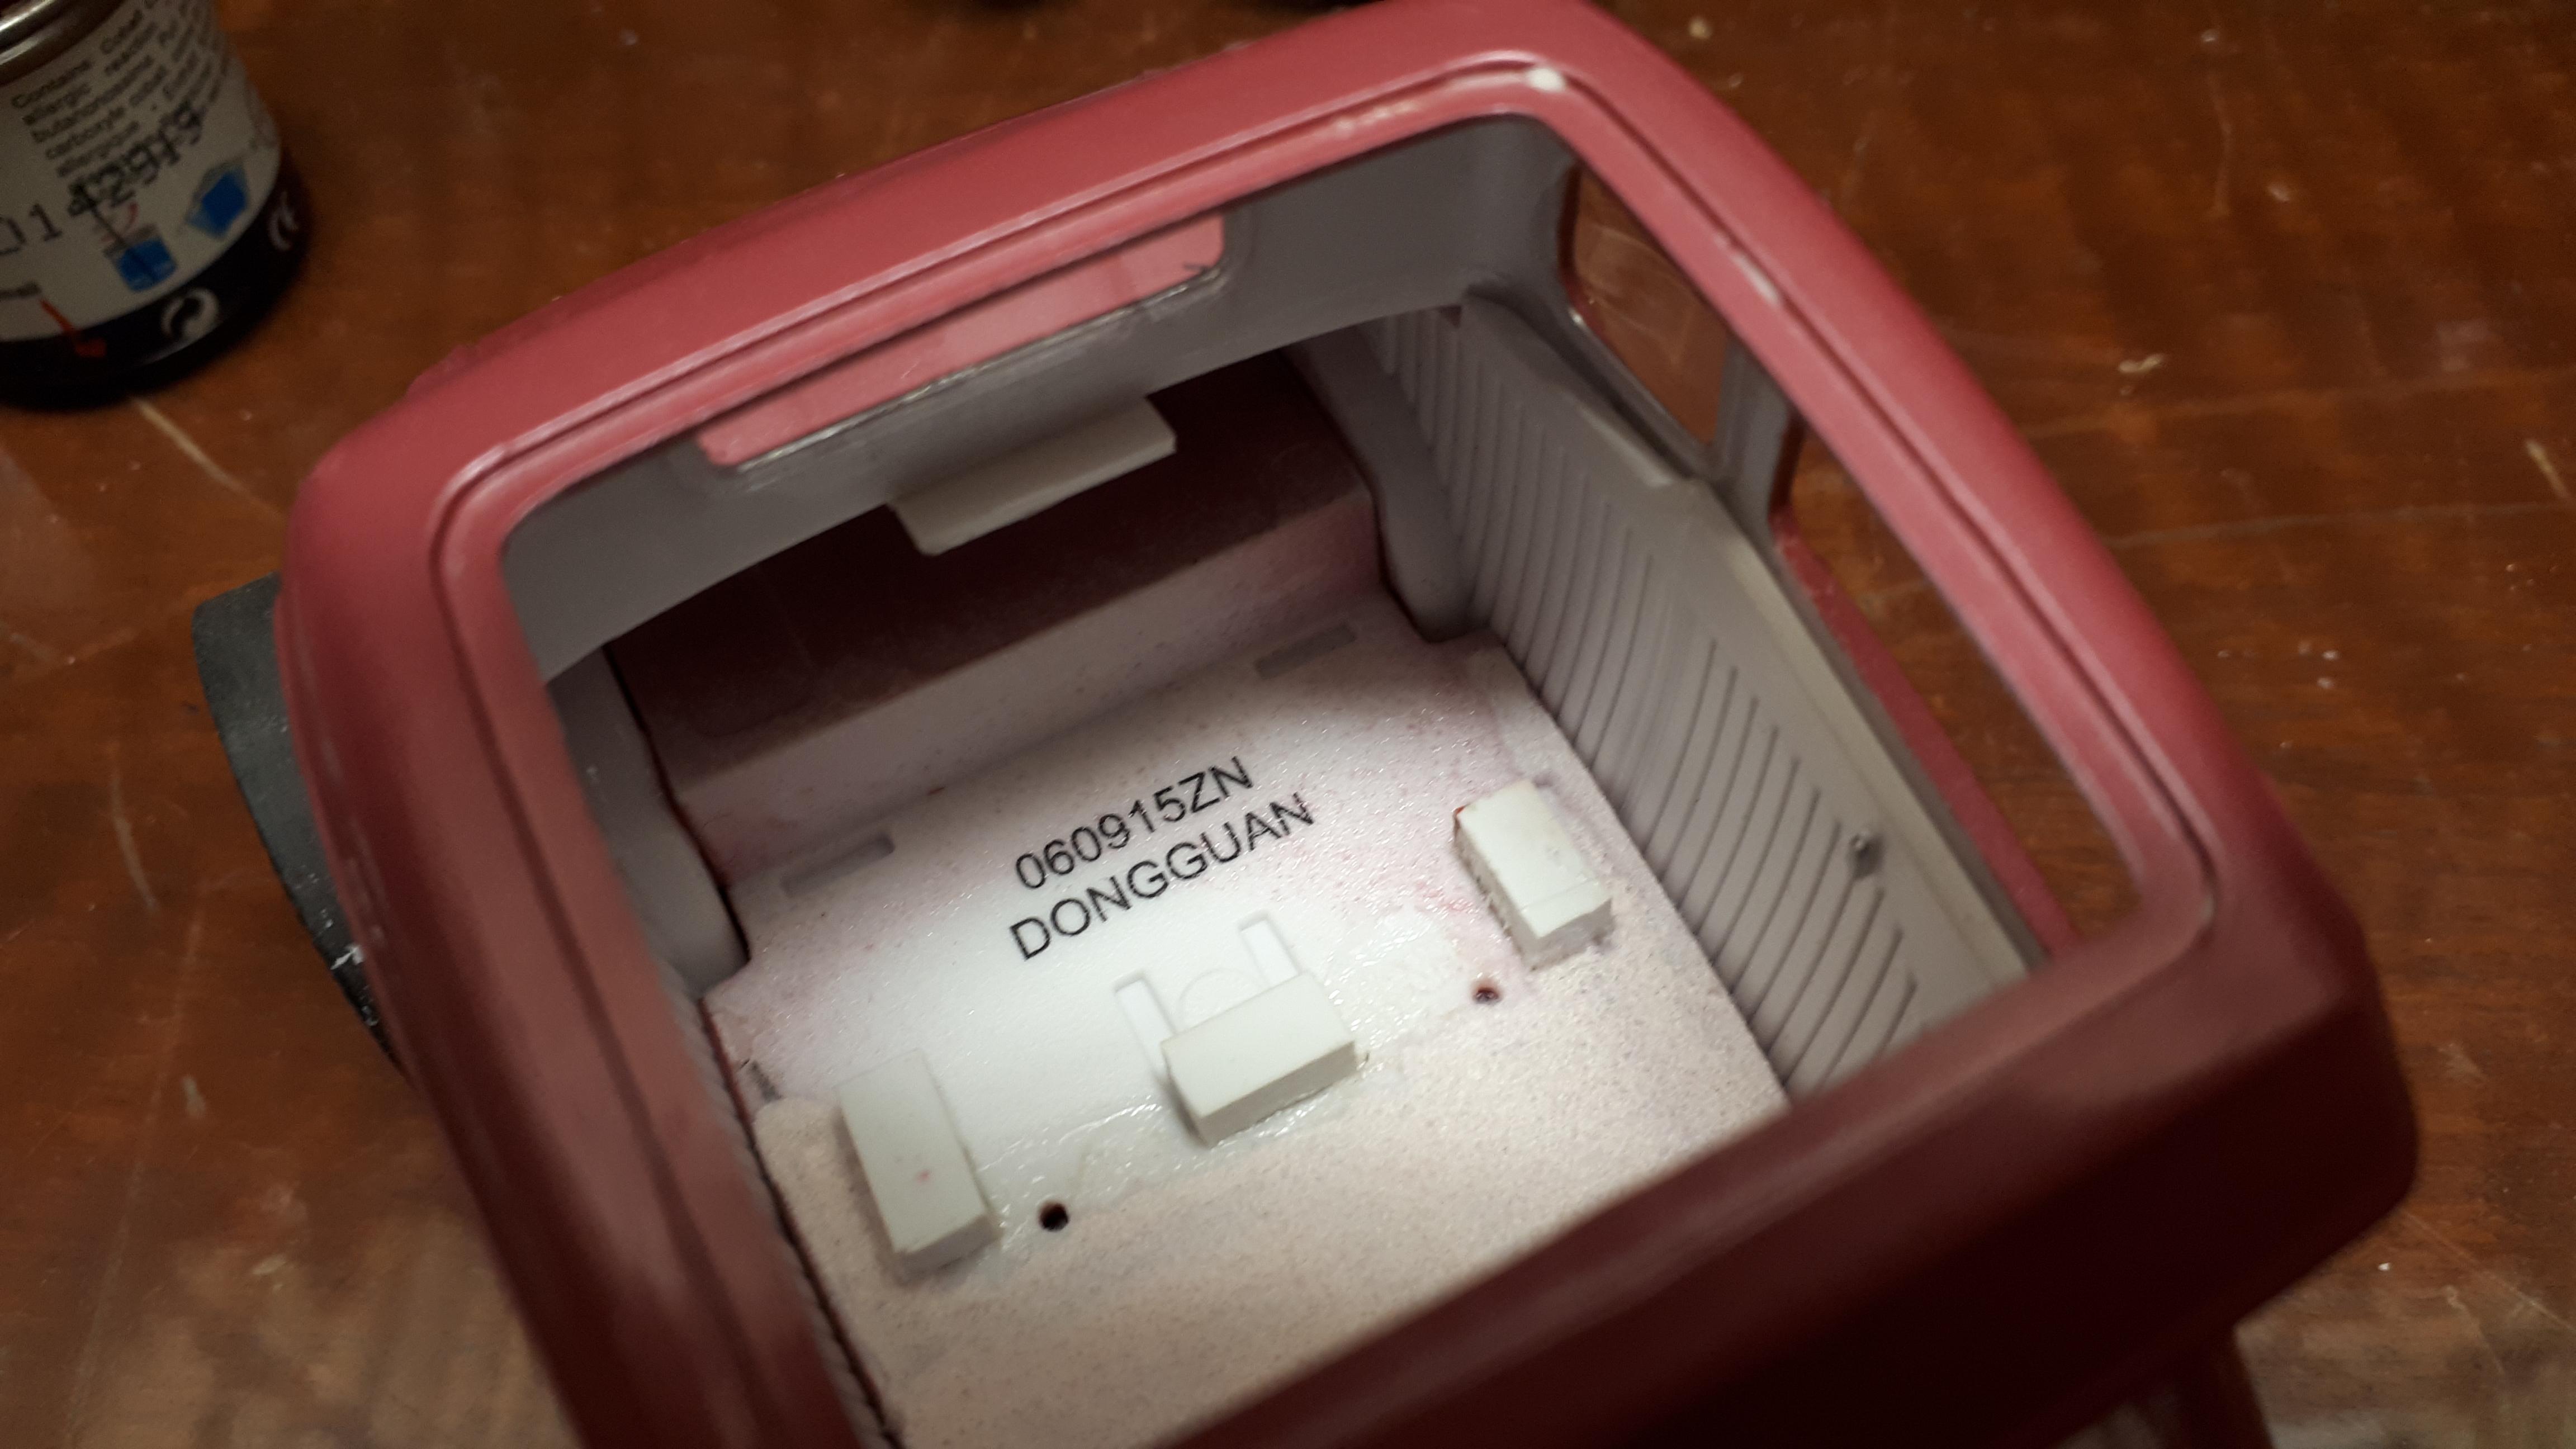
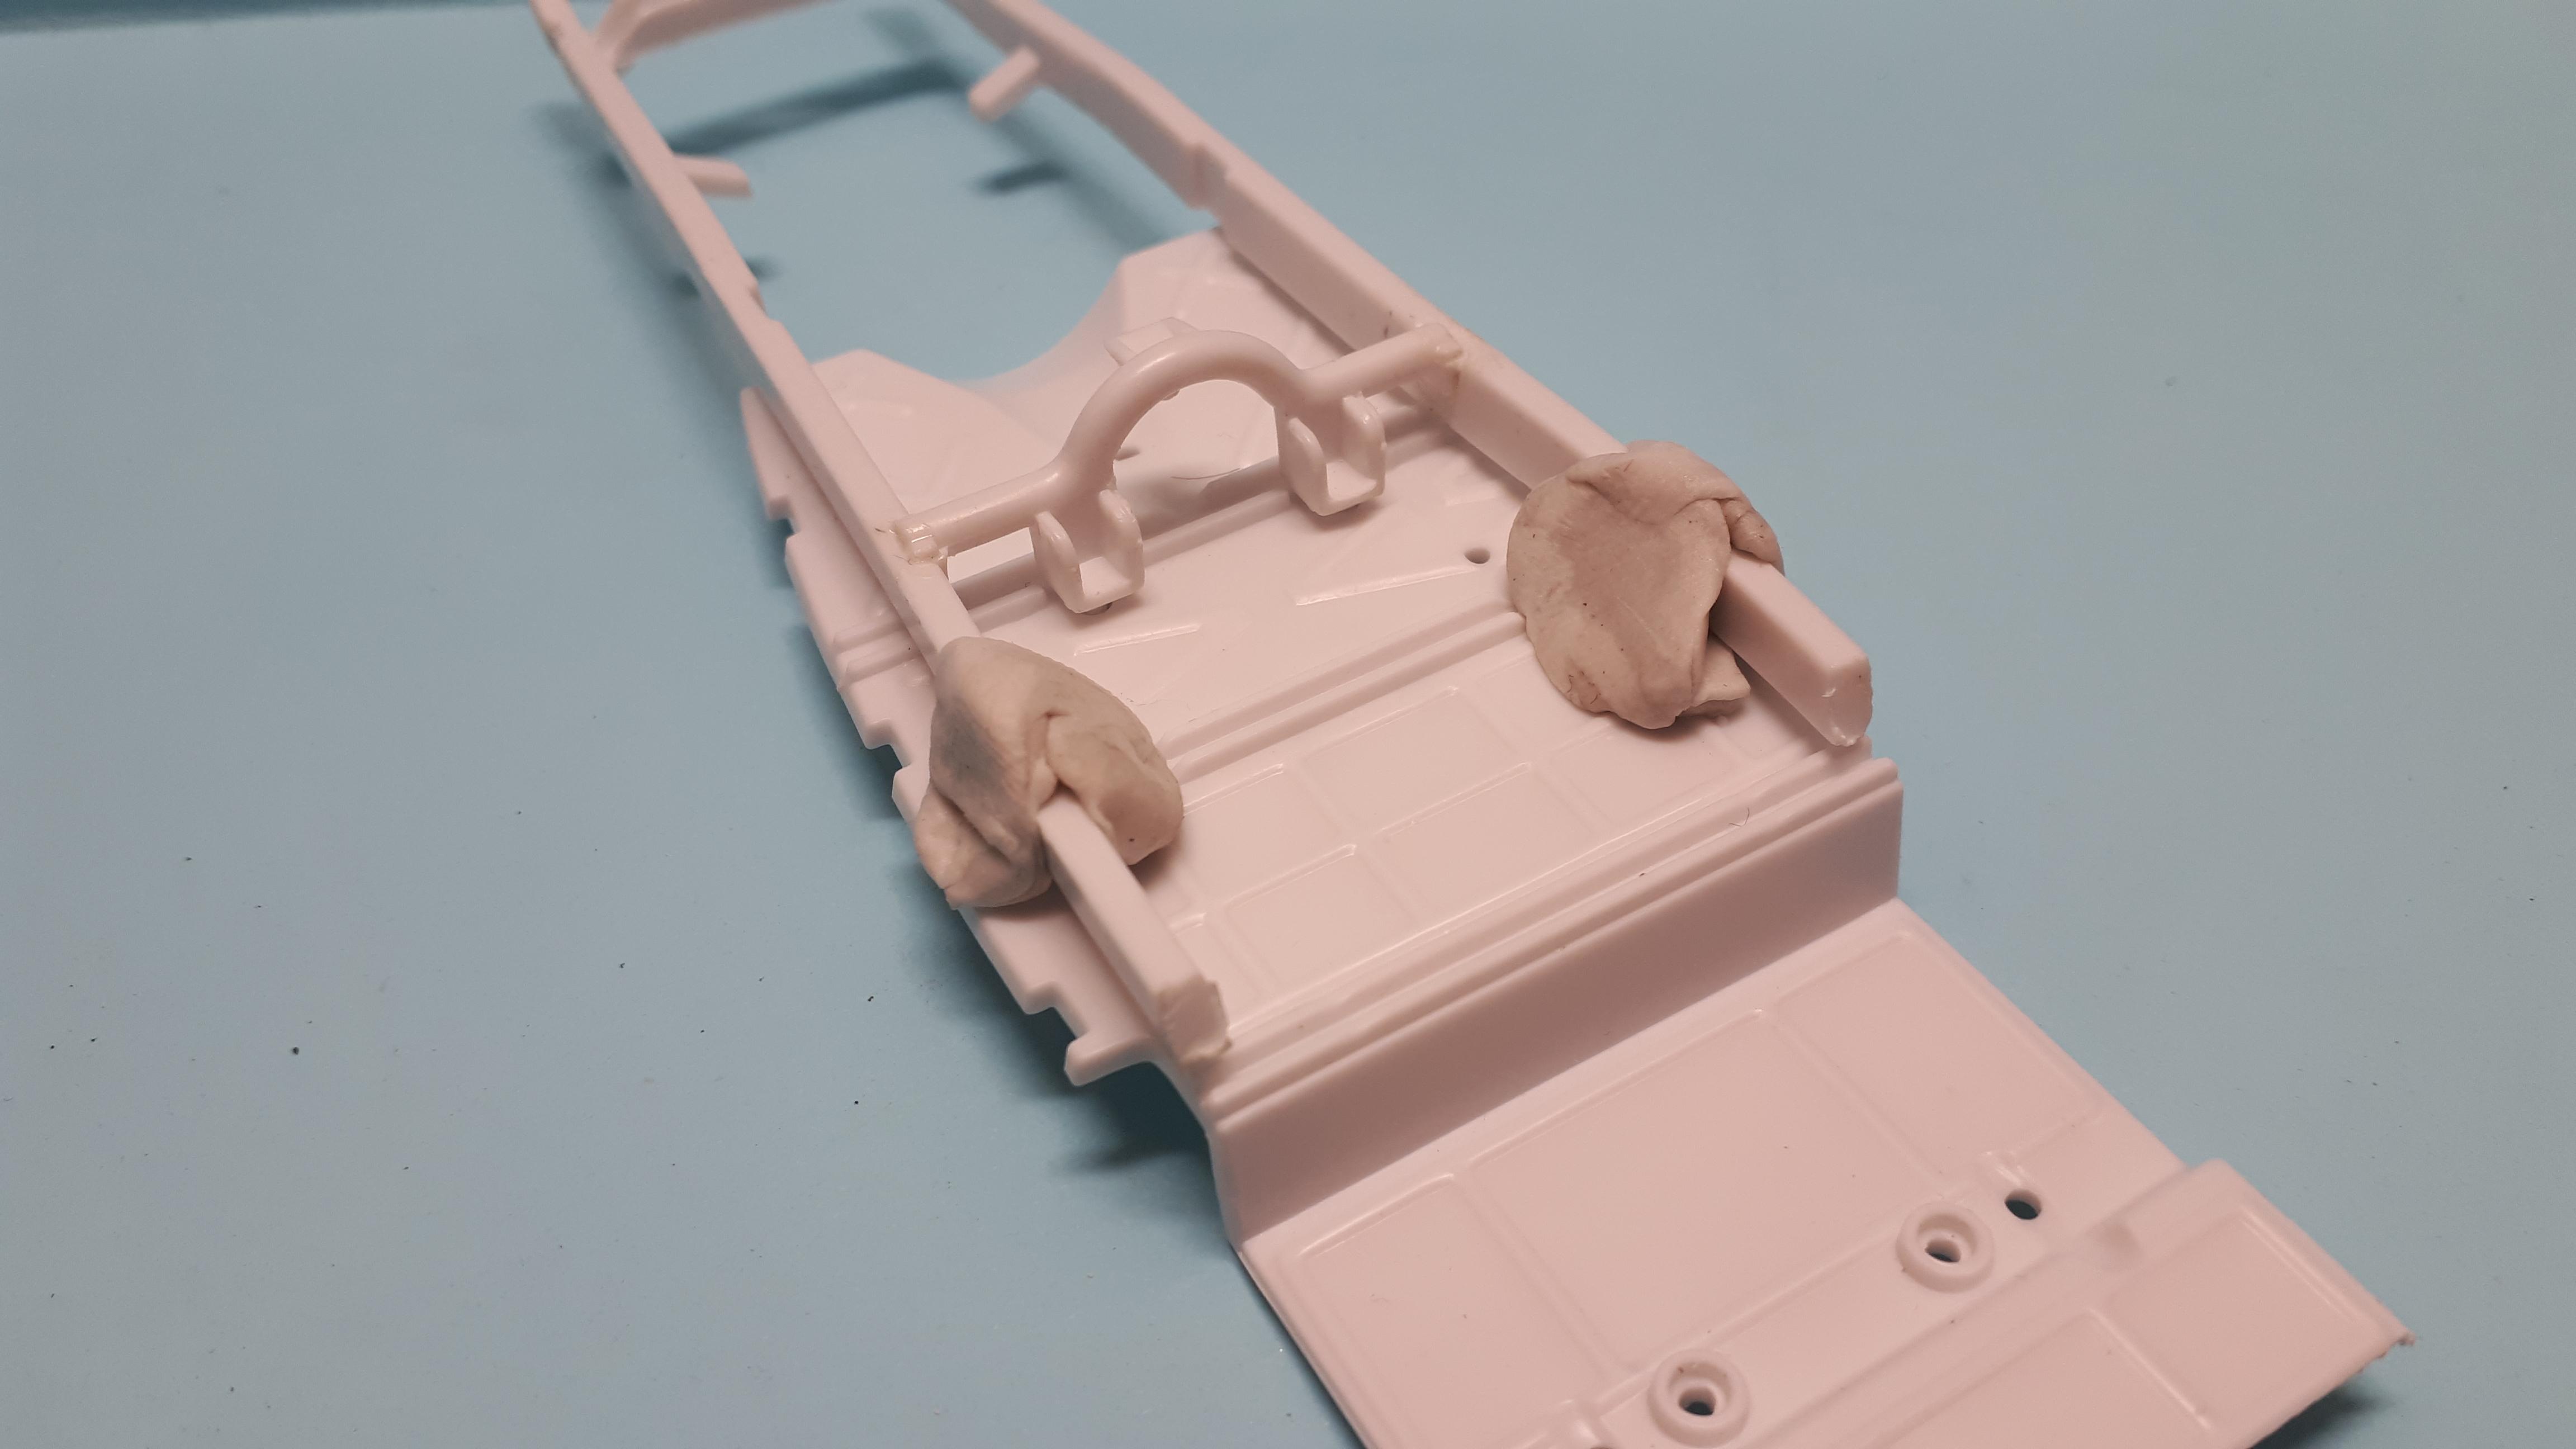
So the last bit of construction I need to show you affects the seat installation. Because of using the tall interior, the floor could not be glued to the frame first. Instead it had to be pushed up through the bottom of the body at an angle and then gently lowered back into its original location. This precluded gluing the seat in place because it would prevent you from tilting the floor to get it in. Initially I was going to trim down the bench seat from the coupe but then I realised I would be better off using the channelled roadster seat. You can see here where I glued a few blocks of plastic to the floor to give a precise location. I also glued a small tab under the rear edge of the roof so that the seat wouldn't fall away spreading glue all over the place. You can also see how I used white embossing powder for carpet and tried different base coats underneath to get a very subtle pink shade. So that's about it for the construction phase of this model. After the cut and shuts were complete, it was simply a matter of painting and assembly, which is just plain fun on a model of this quality. Kudos, Revell, this is a great model I hope you sell a zillion of them when they come out again.
-
Coconut Ice - another take on the Revell 30 A coupe.
alan barton replied to alan barton's topic in WIP: Model Cars
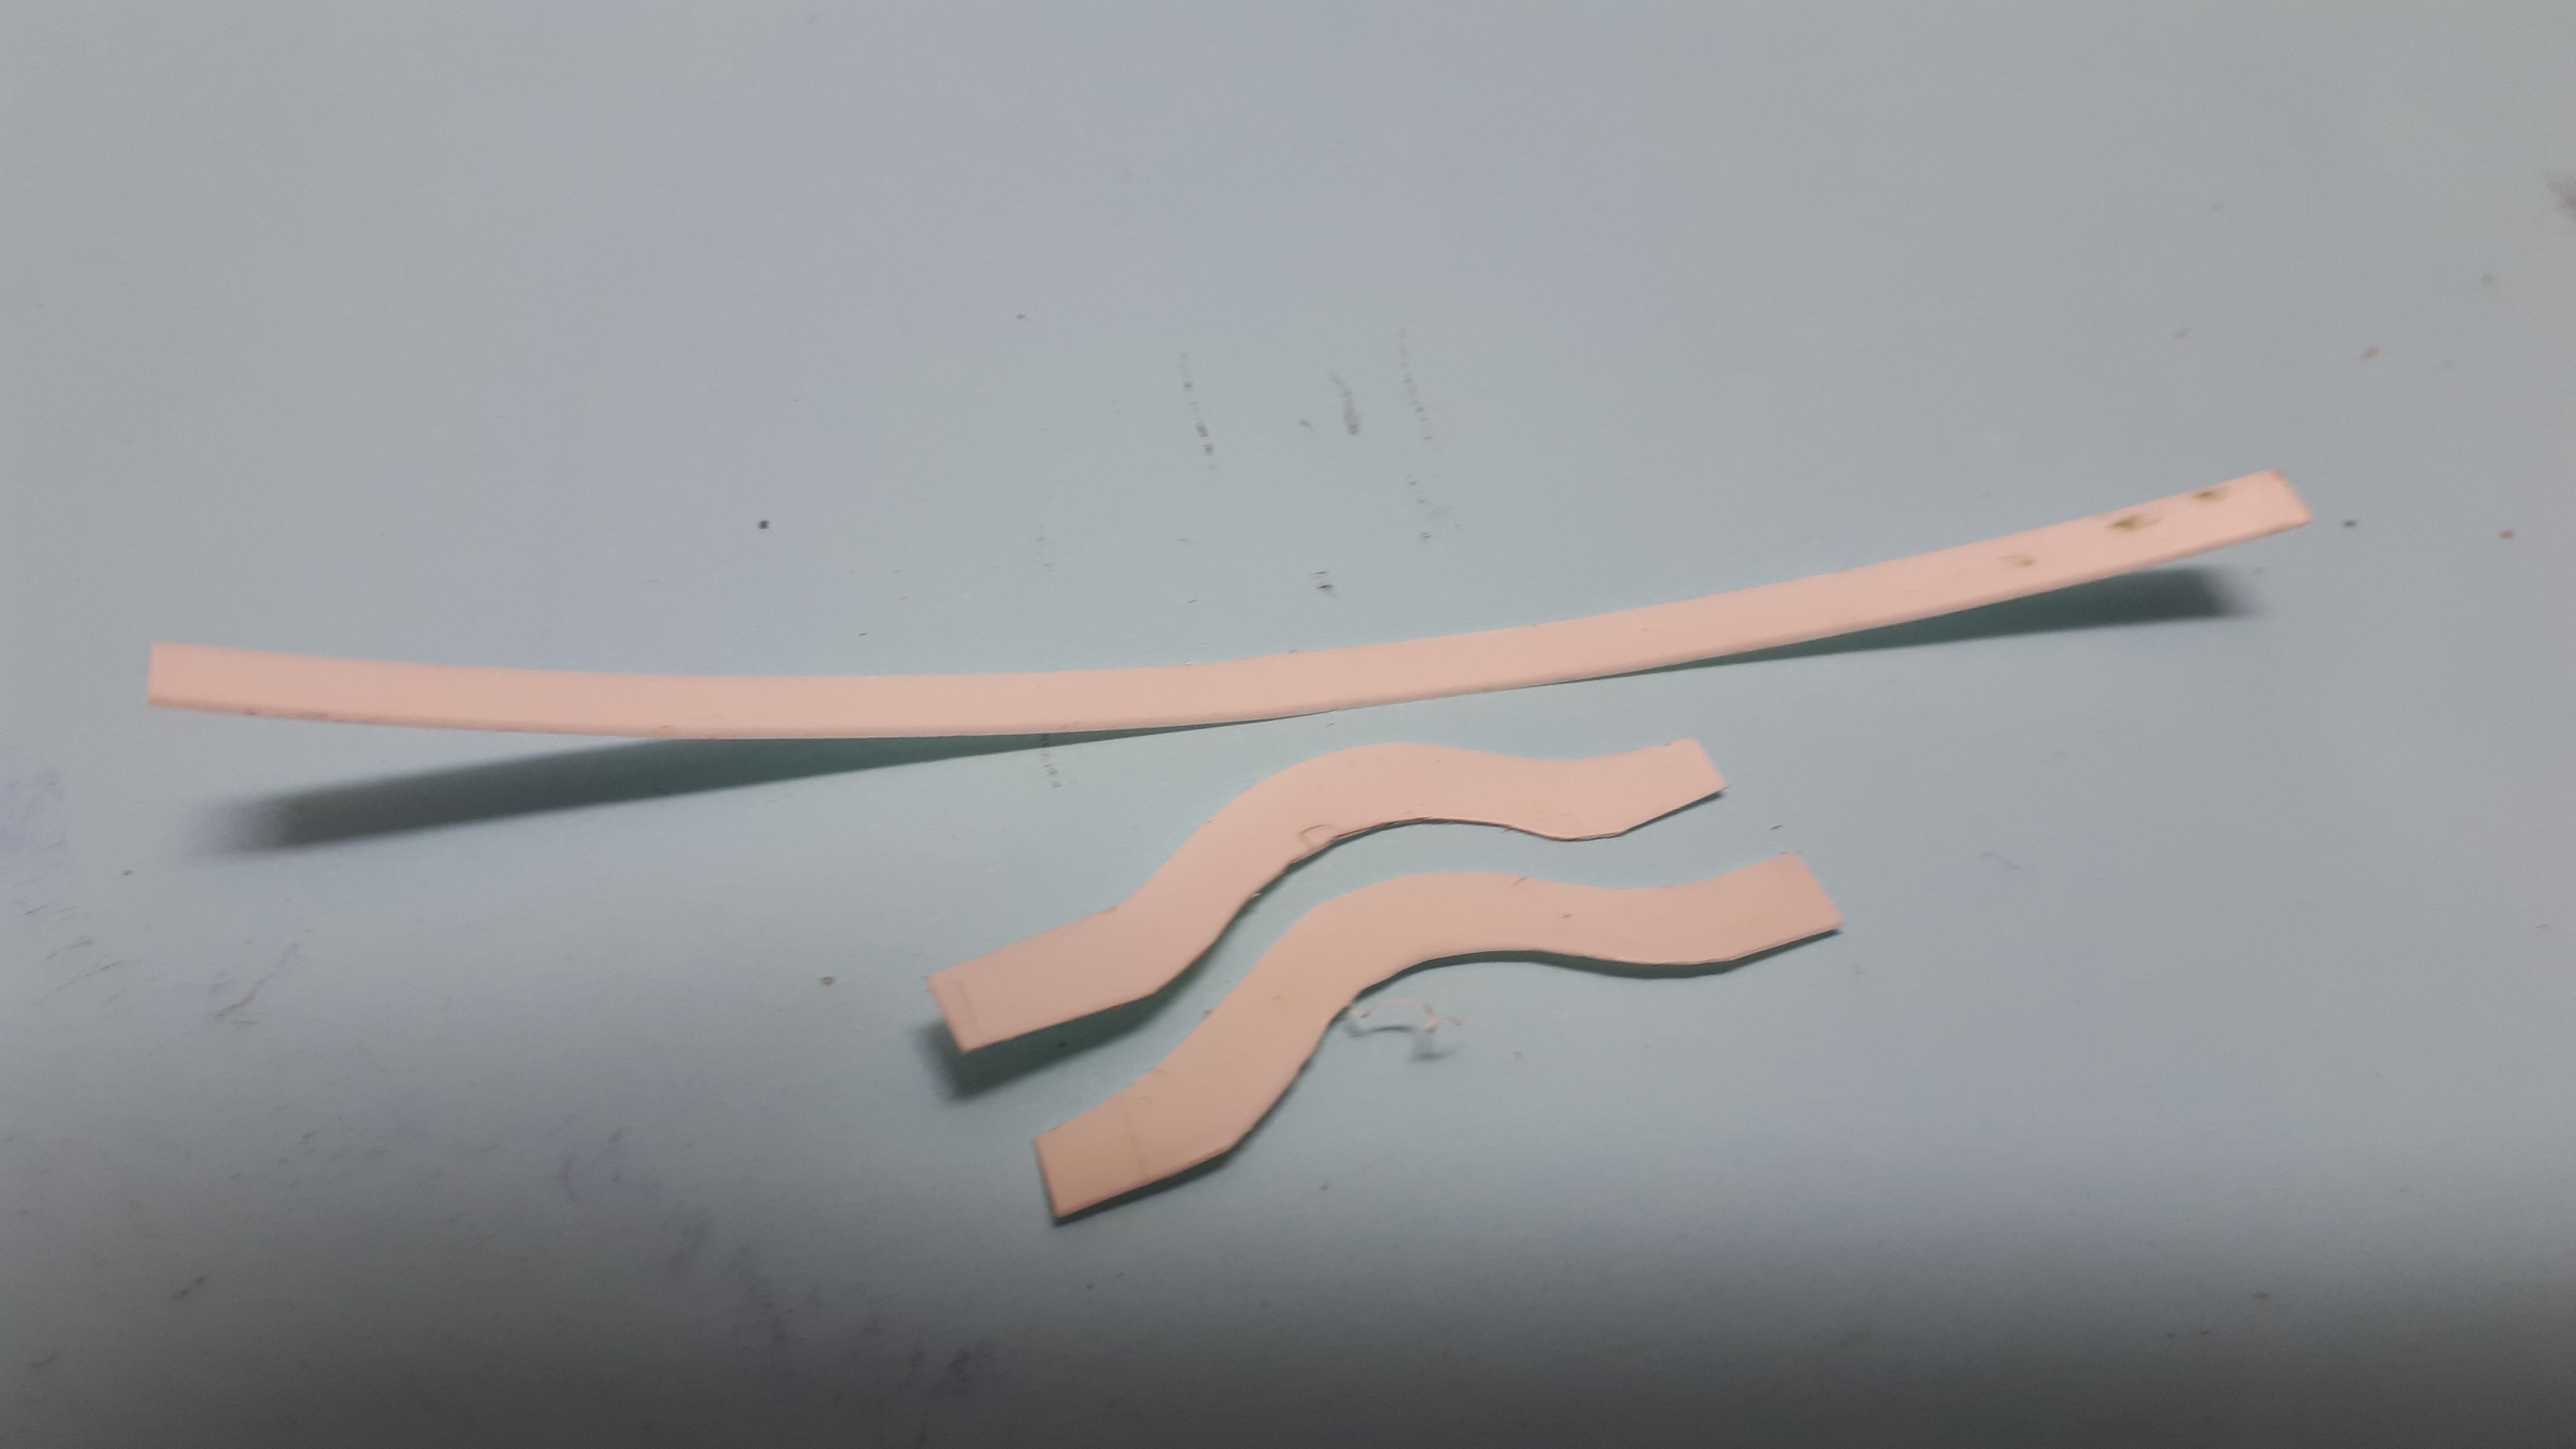
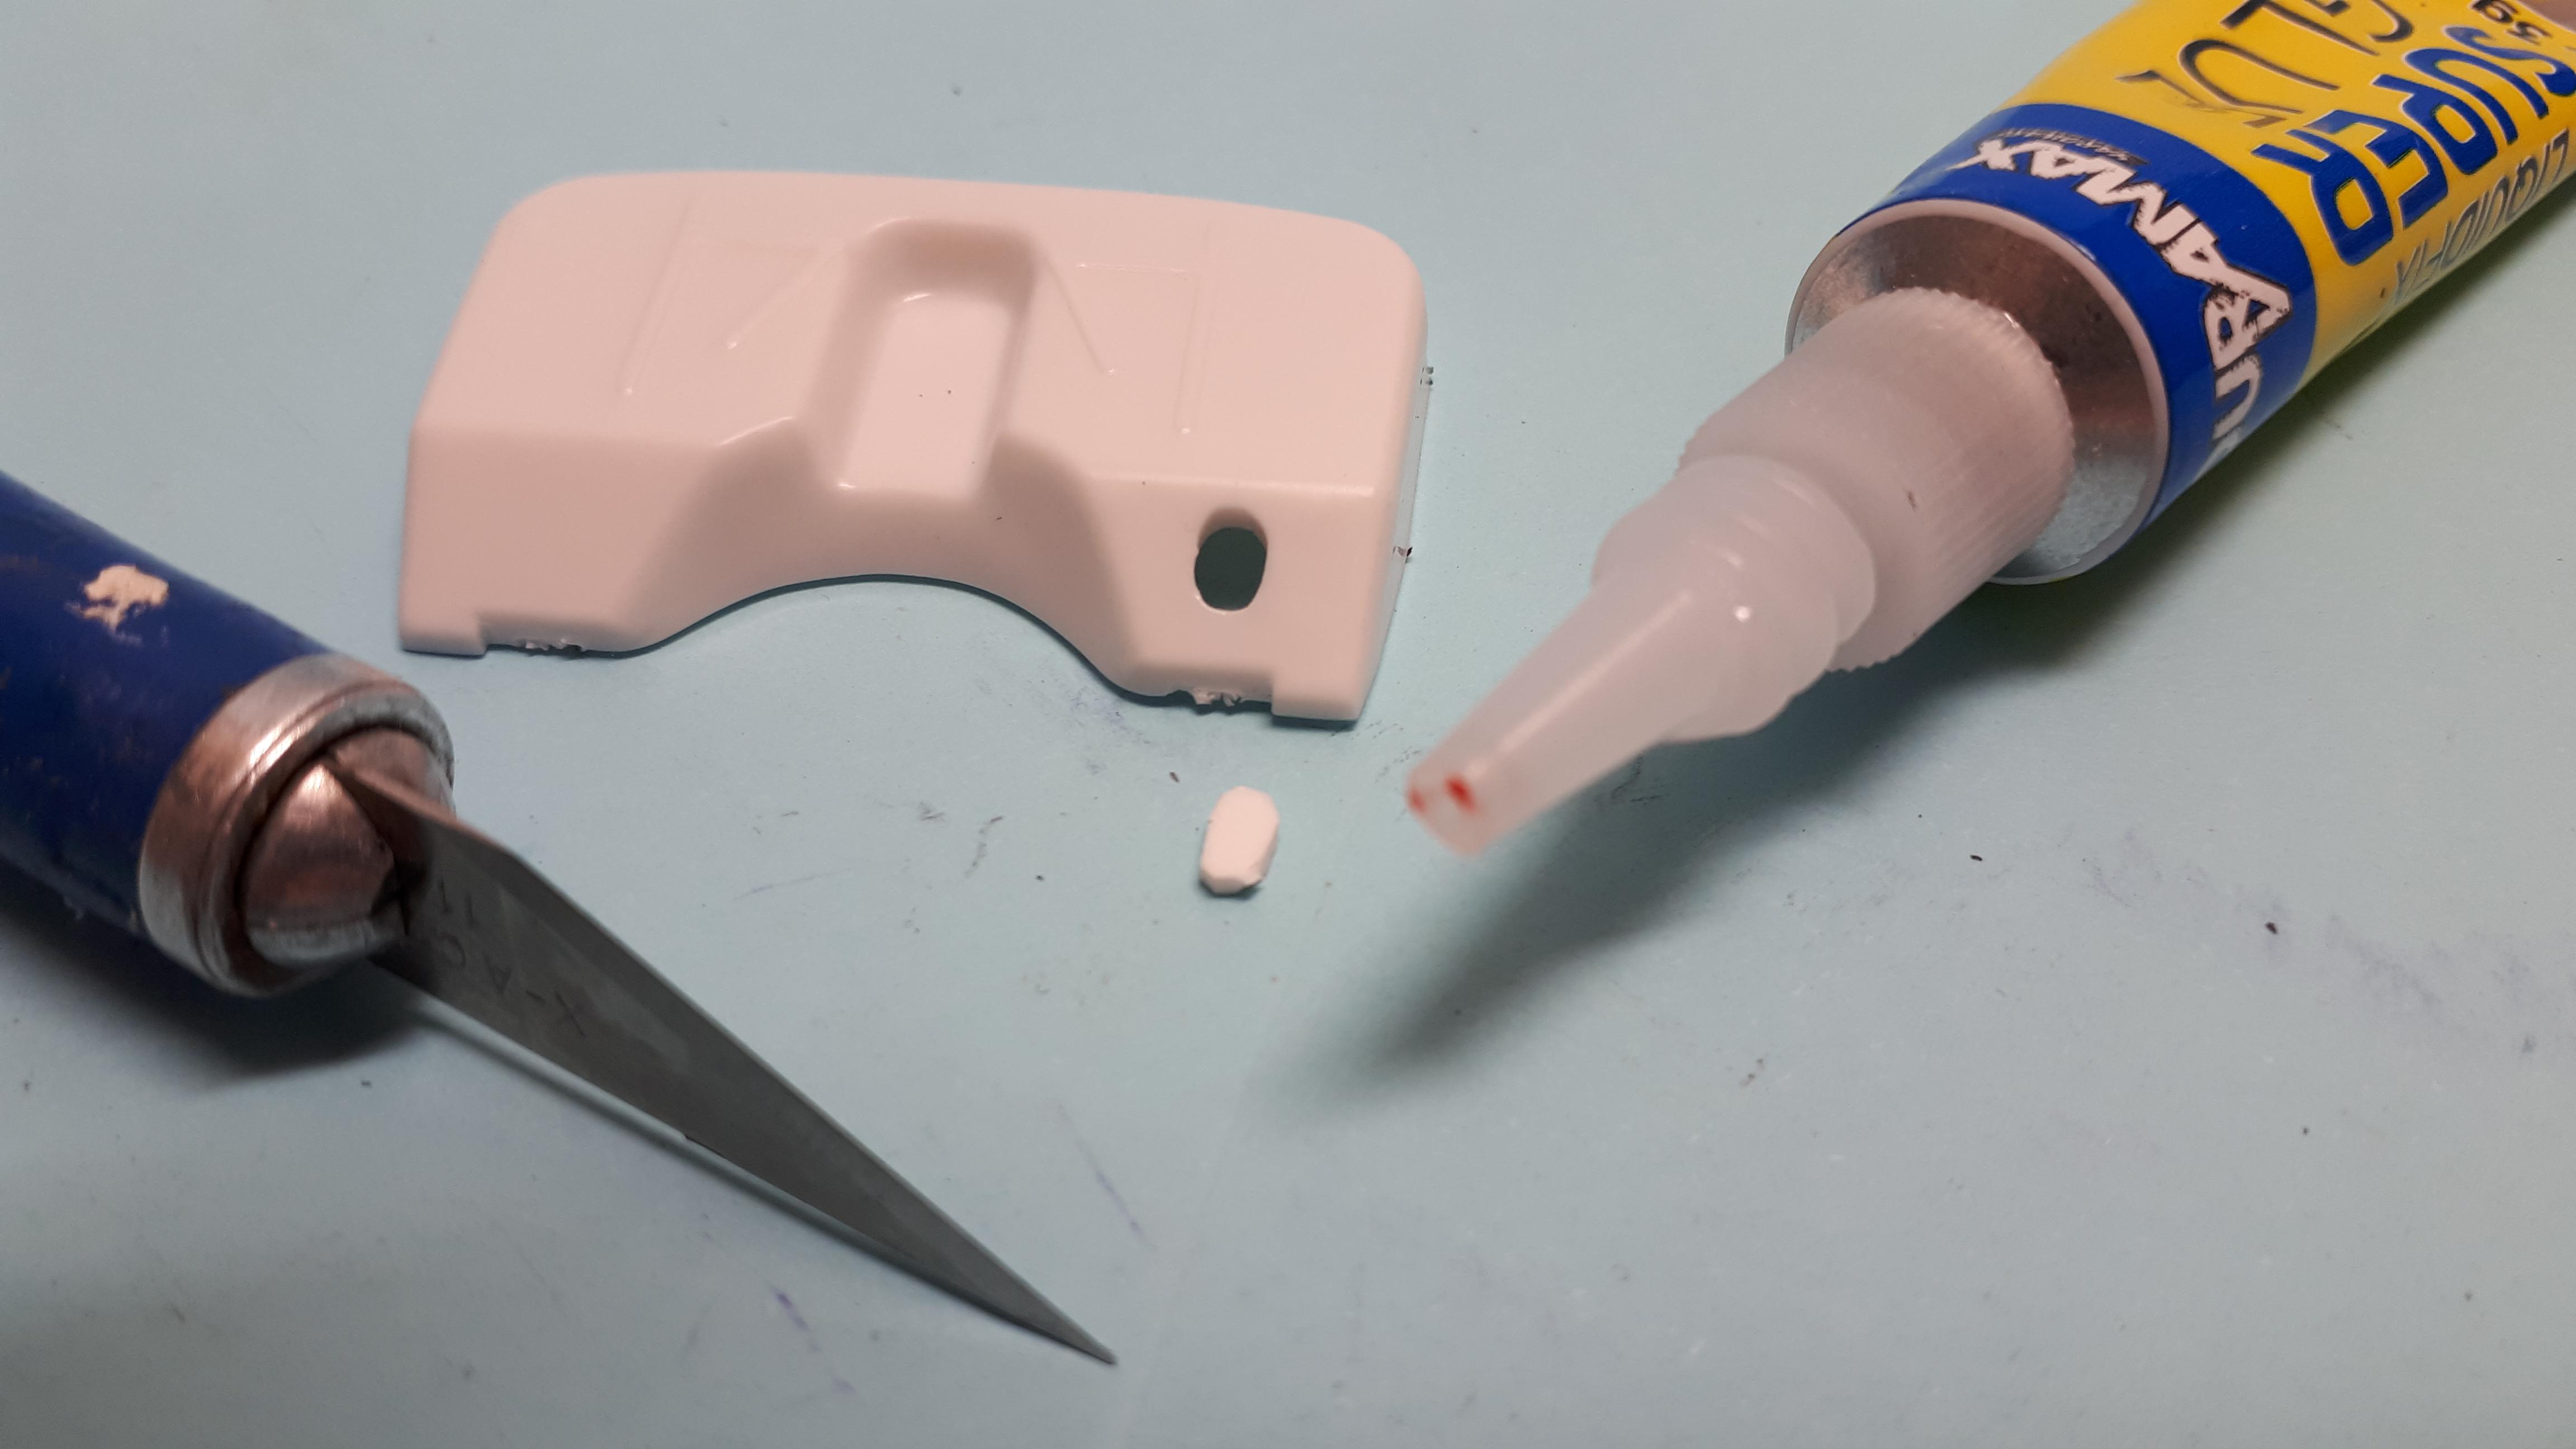
I trimmed the rear radius rod mounts because they weren't being used anymore but I didn't want to re-invent the body mounts. After mocking up the rear end assembly I was able to make some very simple radius rod mounts, just behind the locations for the kits front radius rod brackets. The other thing I thought about in advance, for once, was the floor. It has some notches in it designed to join to the lower edge of the of the interior panels but I had already filed them off. This would leave some ugly rectangular gaps along the edge of the floor. I cut some little filler pieces, superglued them in place , slightly proud, and then filed everything smooth. Easy peasy and the work was invisible when painted. In the last shots you may have noticed I had already drilled and filed through the top of the front crossmember to make sure I could get the front down far enough - it is pretty much a given in any early Ford hot rod. Having built two roadsters already I also learned that it pays to use a small drill in clean out the inside of the holes in the front axle to ensure I get a solid joint when I attach the radius rods. While I was at it, I filed down the top edges of the spring - every millimetre counts!
-
Coconut Ice - another take on the Revell 30 A coupe.
alan barton replied to alan barton's topic in WIP: Model Cars
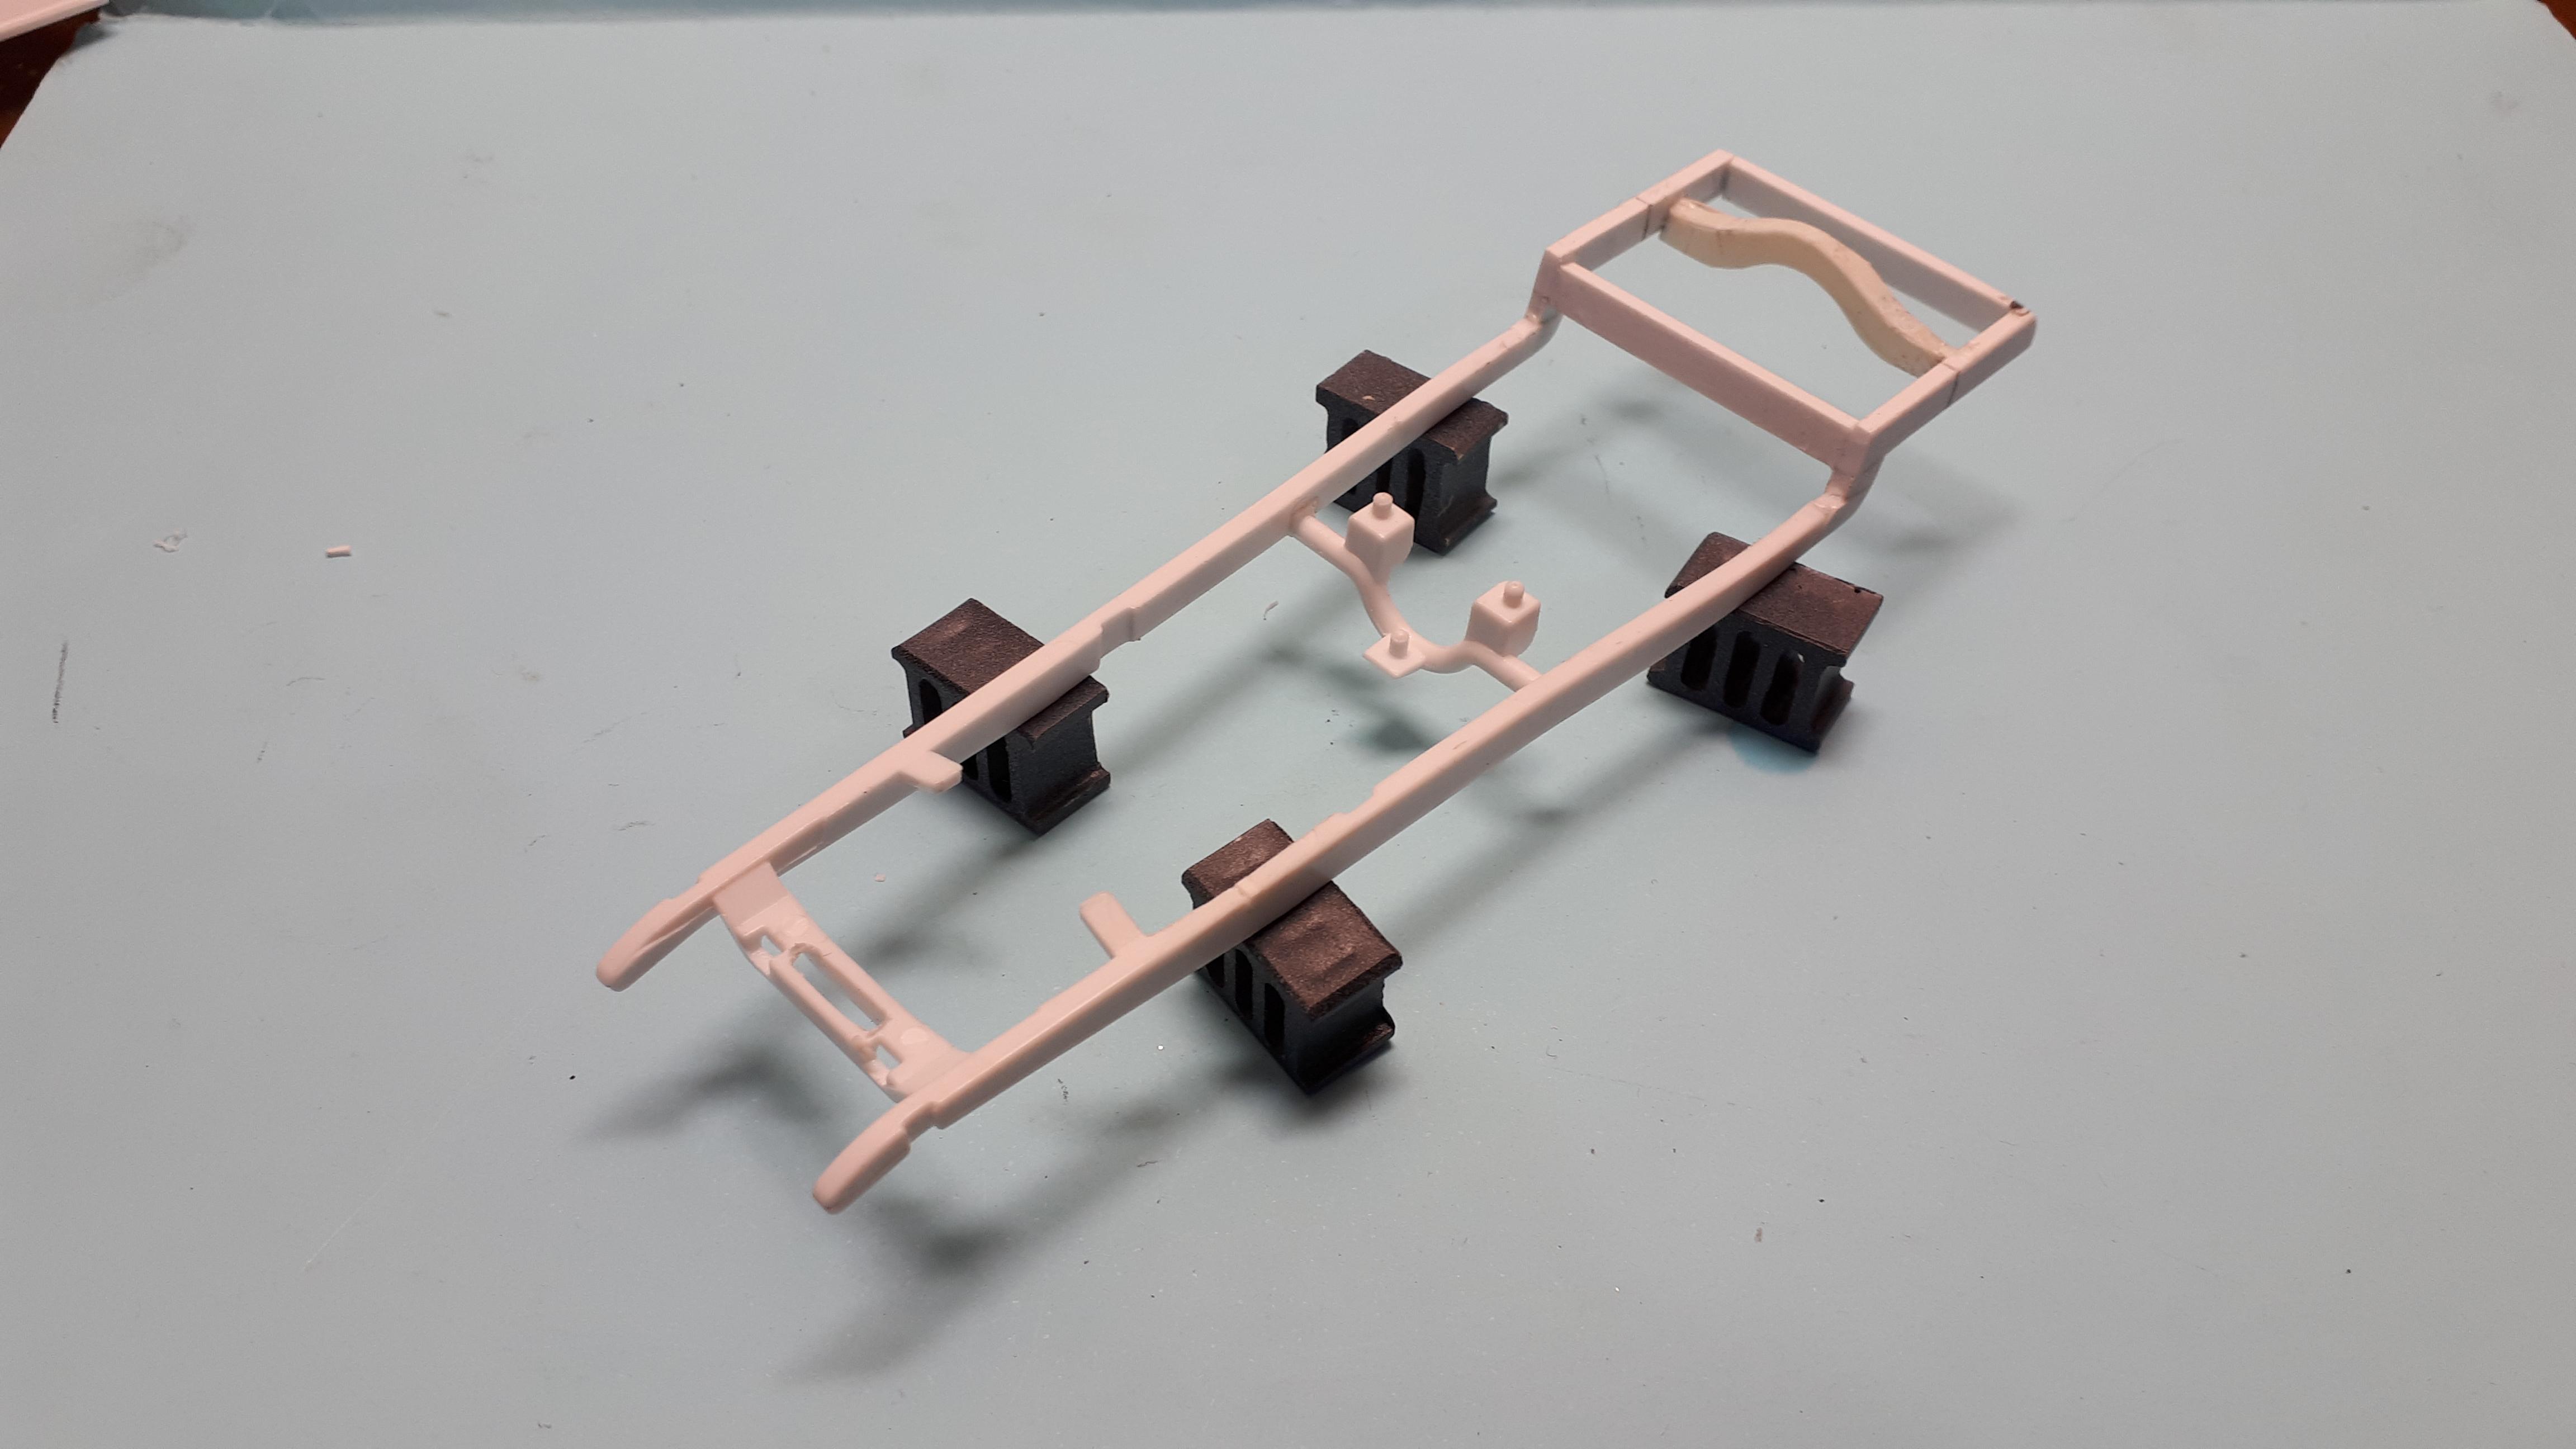
Just got the dreaded 200 error so I had to drop a few pictures from the last post. This was the very overcomplicationitis I was trying to avoid but it only took a few nights to fix and was definitely worthwhile. A bit of filing and sanding, almost no filler and I had a snug fitting frame ready for a period correct rear axle assembly.
-
Coconut Ice - another take on the Revell 30 A coupe.
alan barton replied to alan barton's topic in WIP: Model Cars
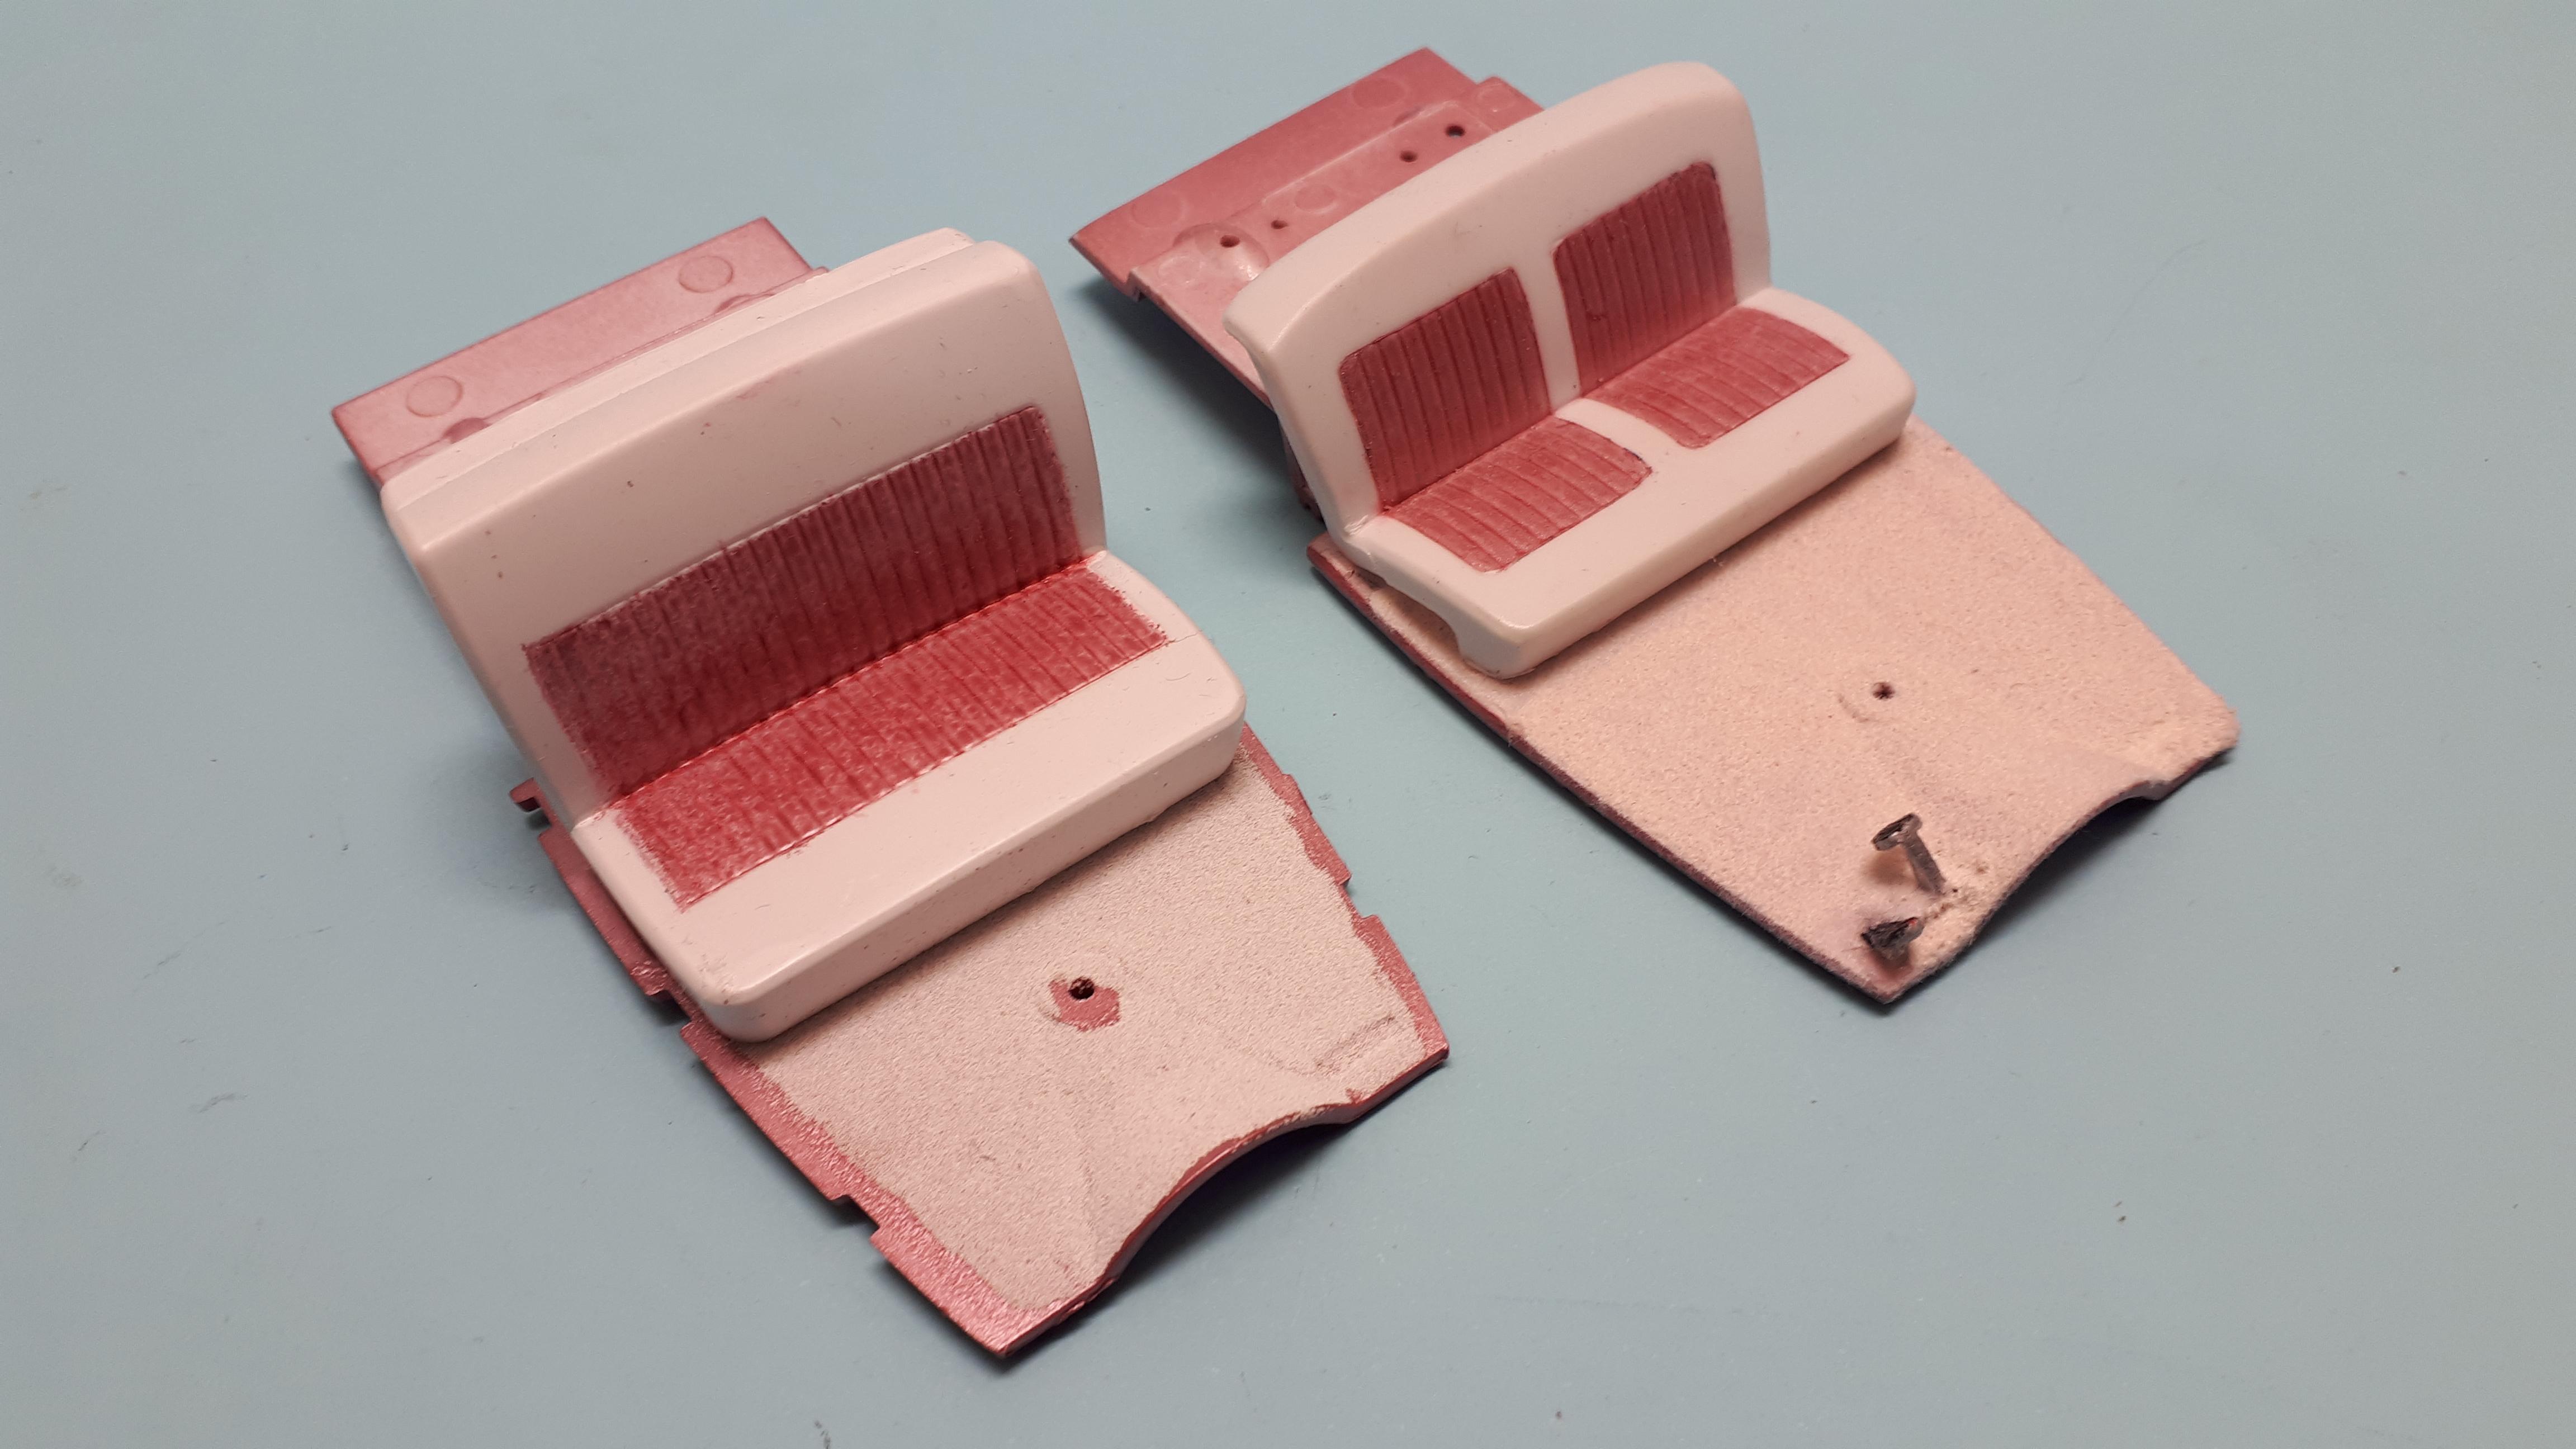
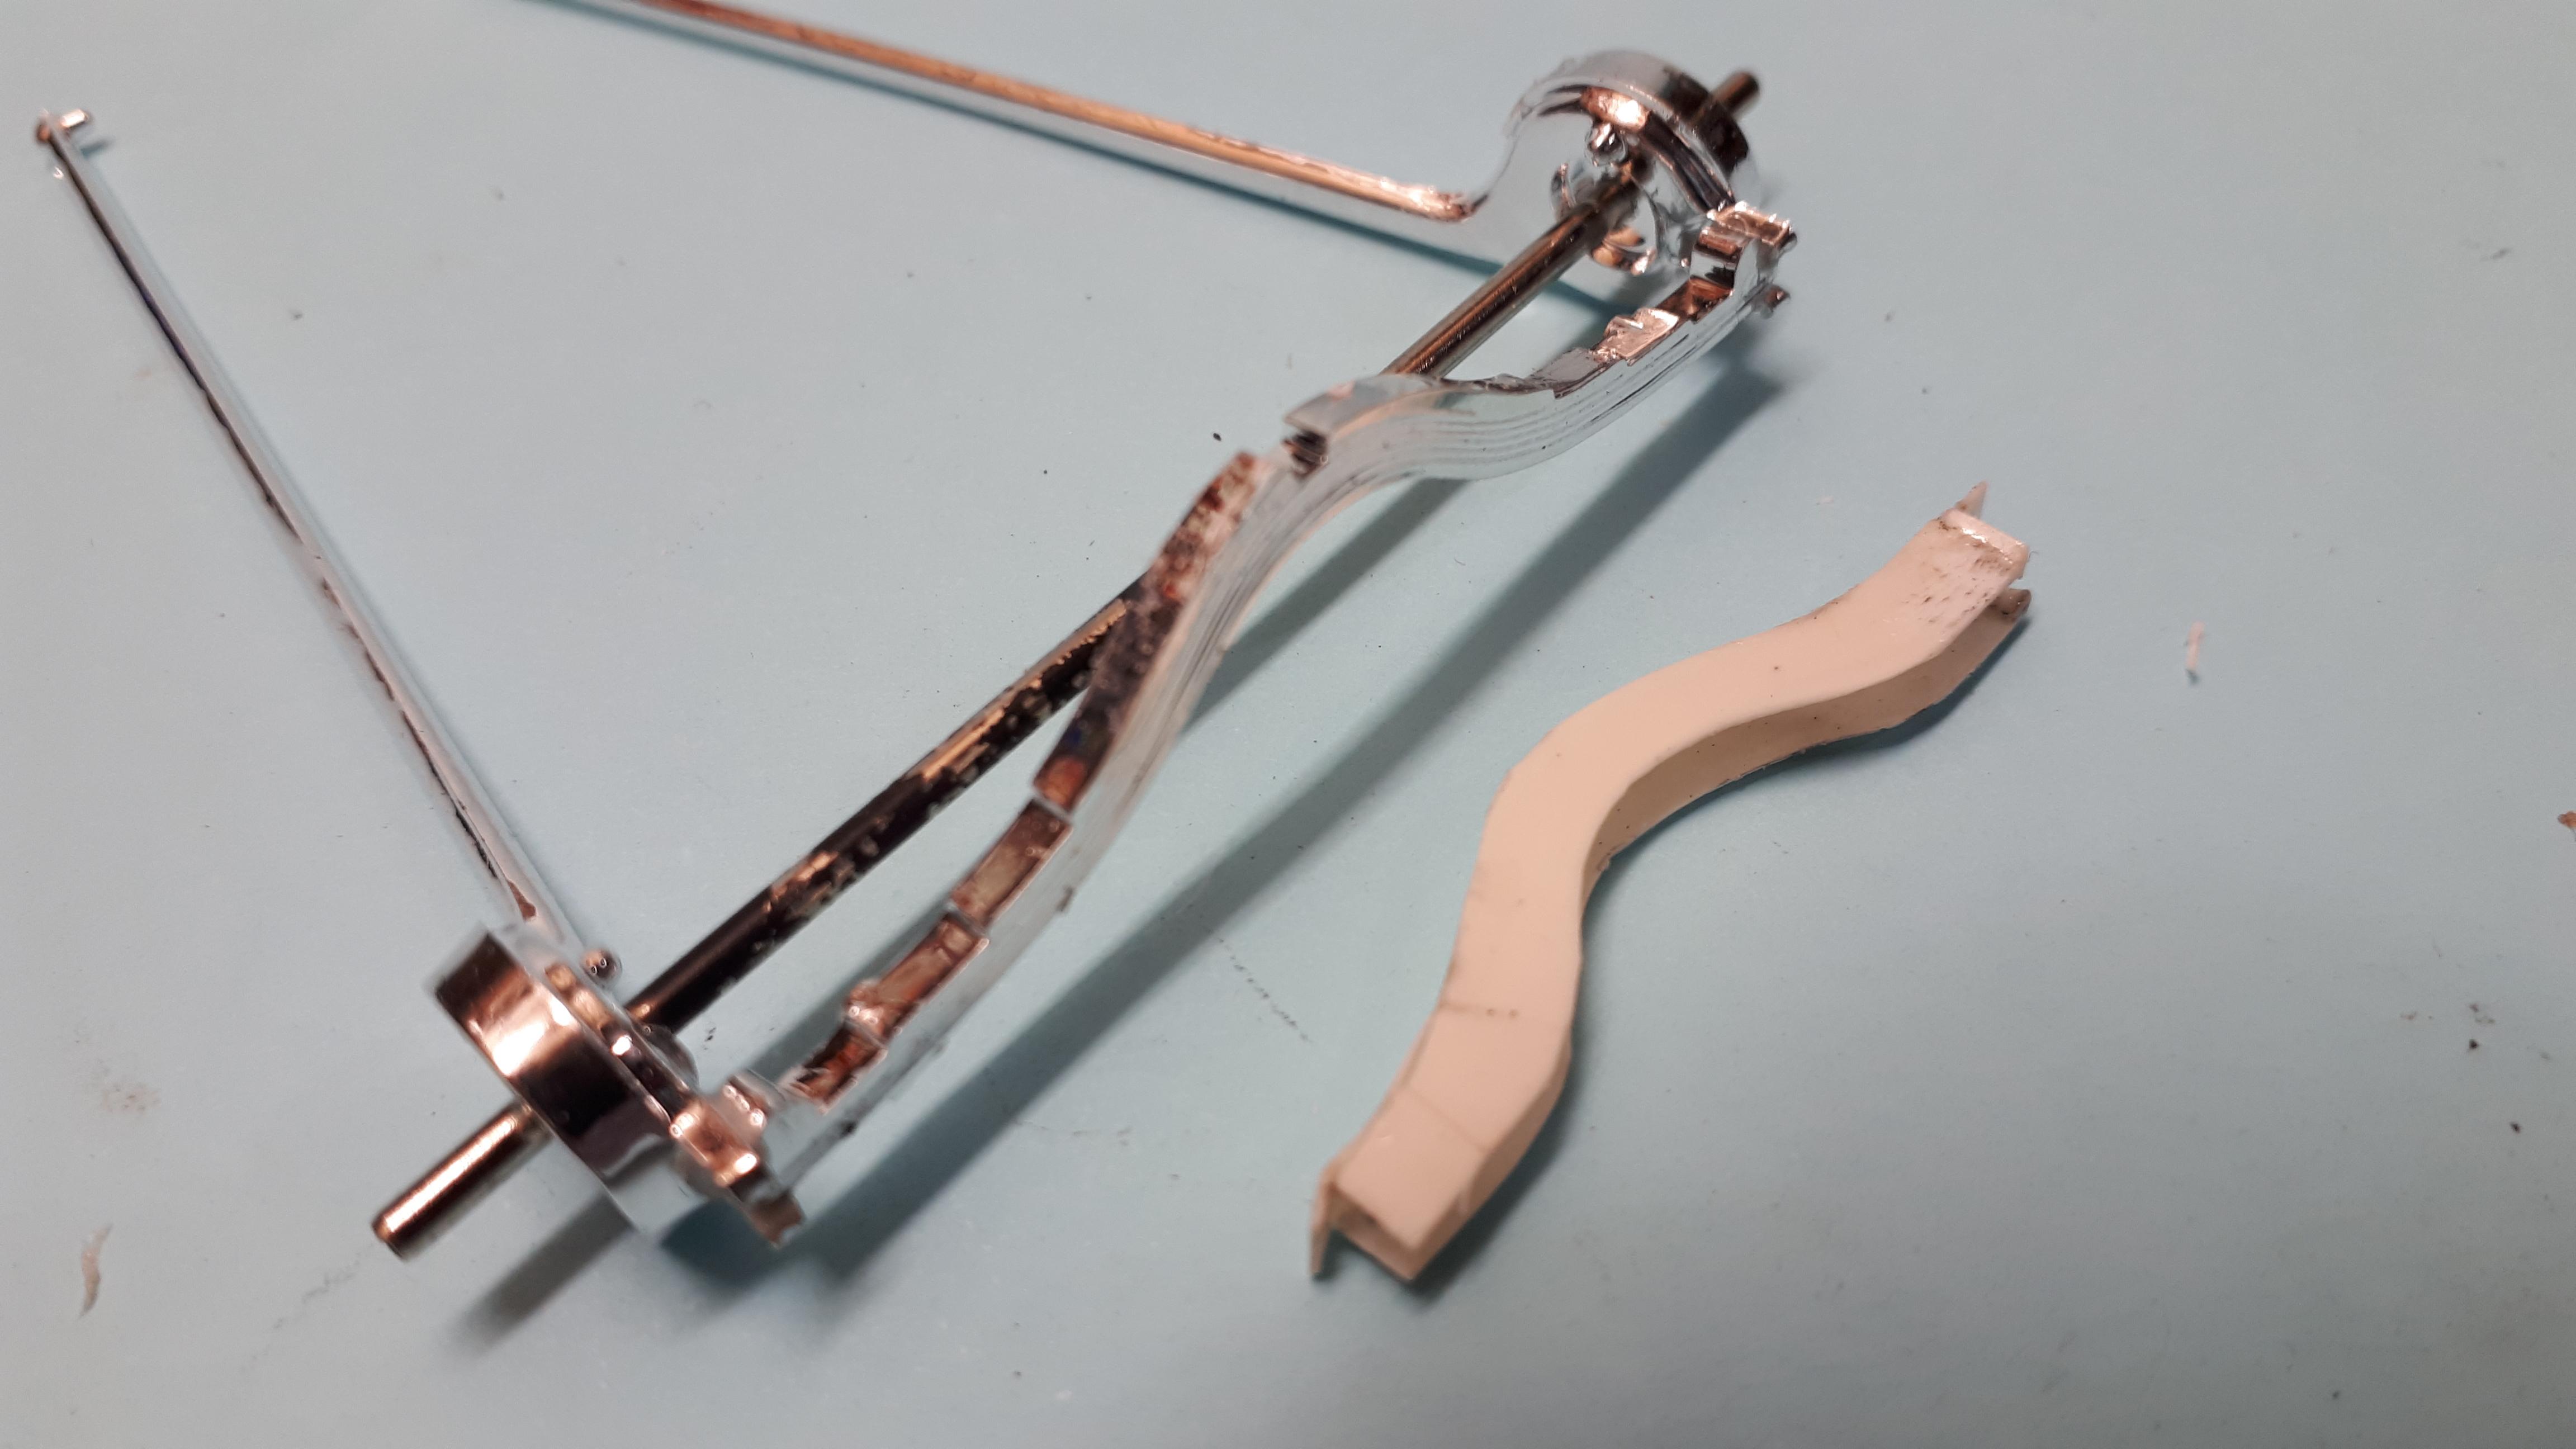
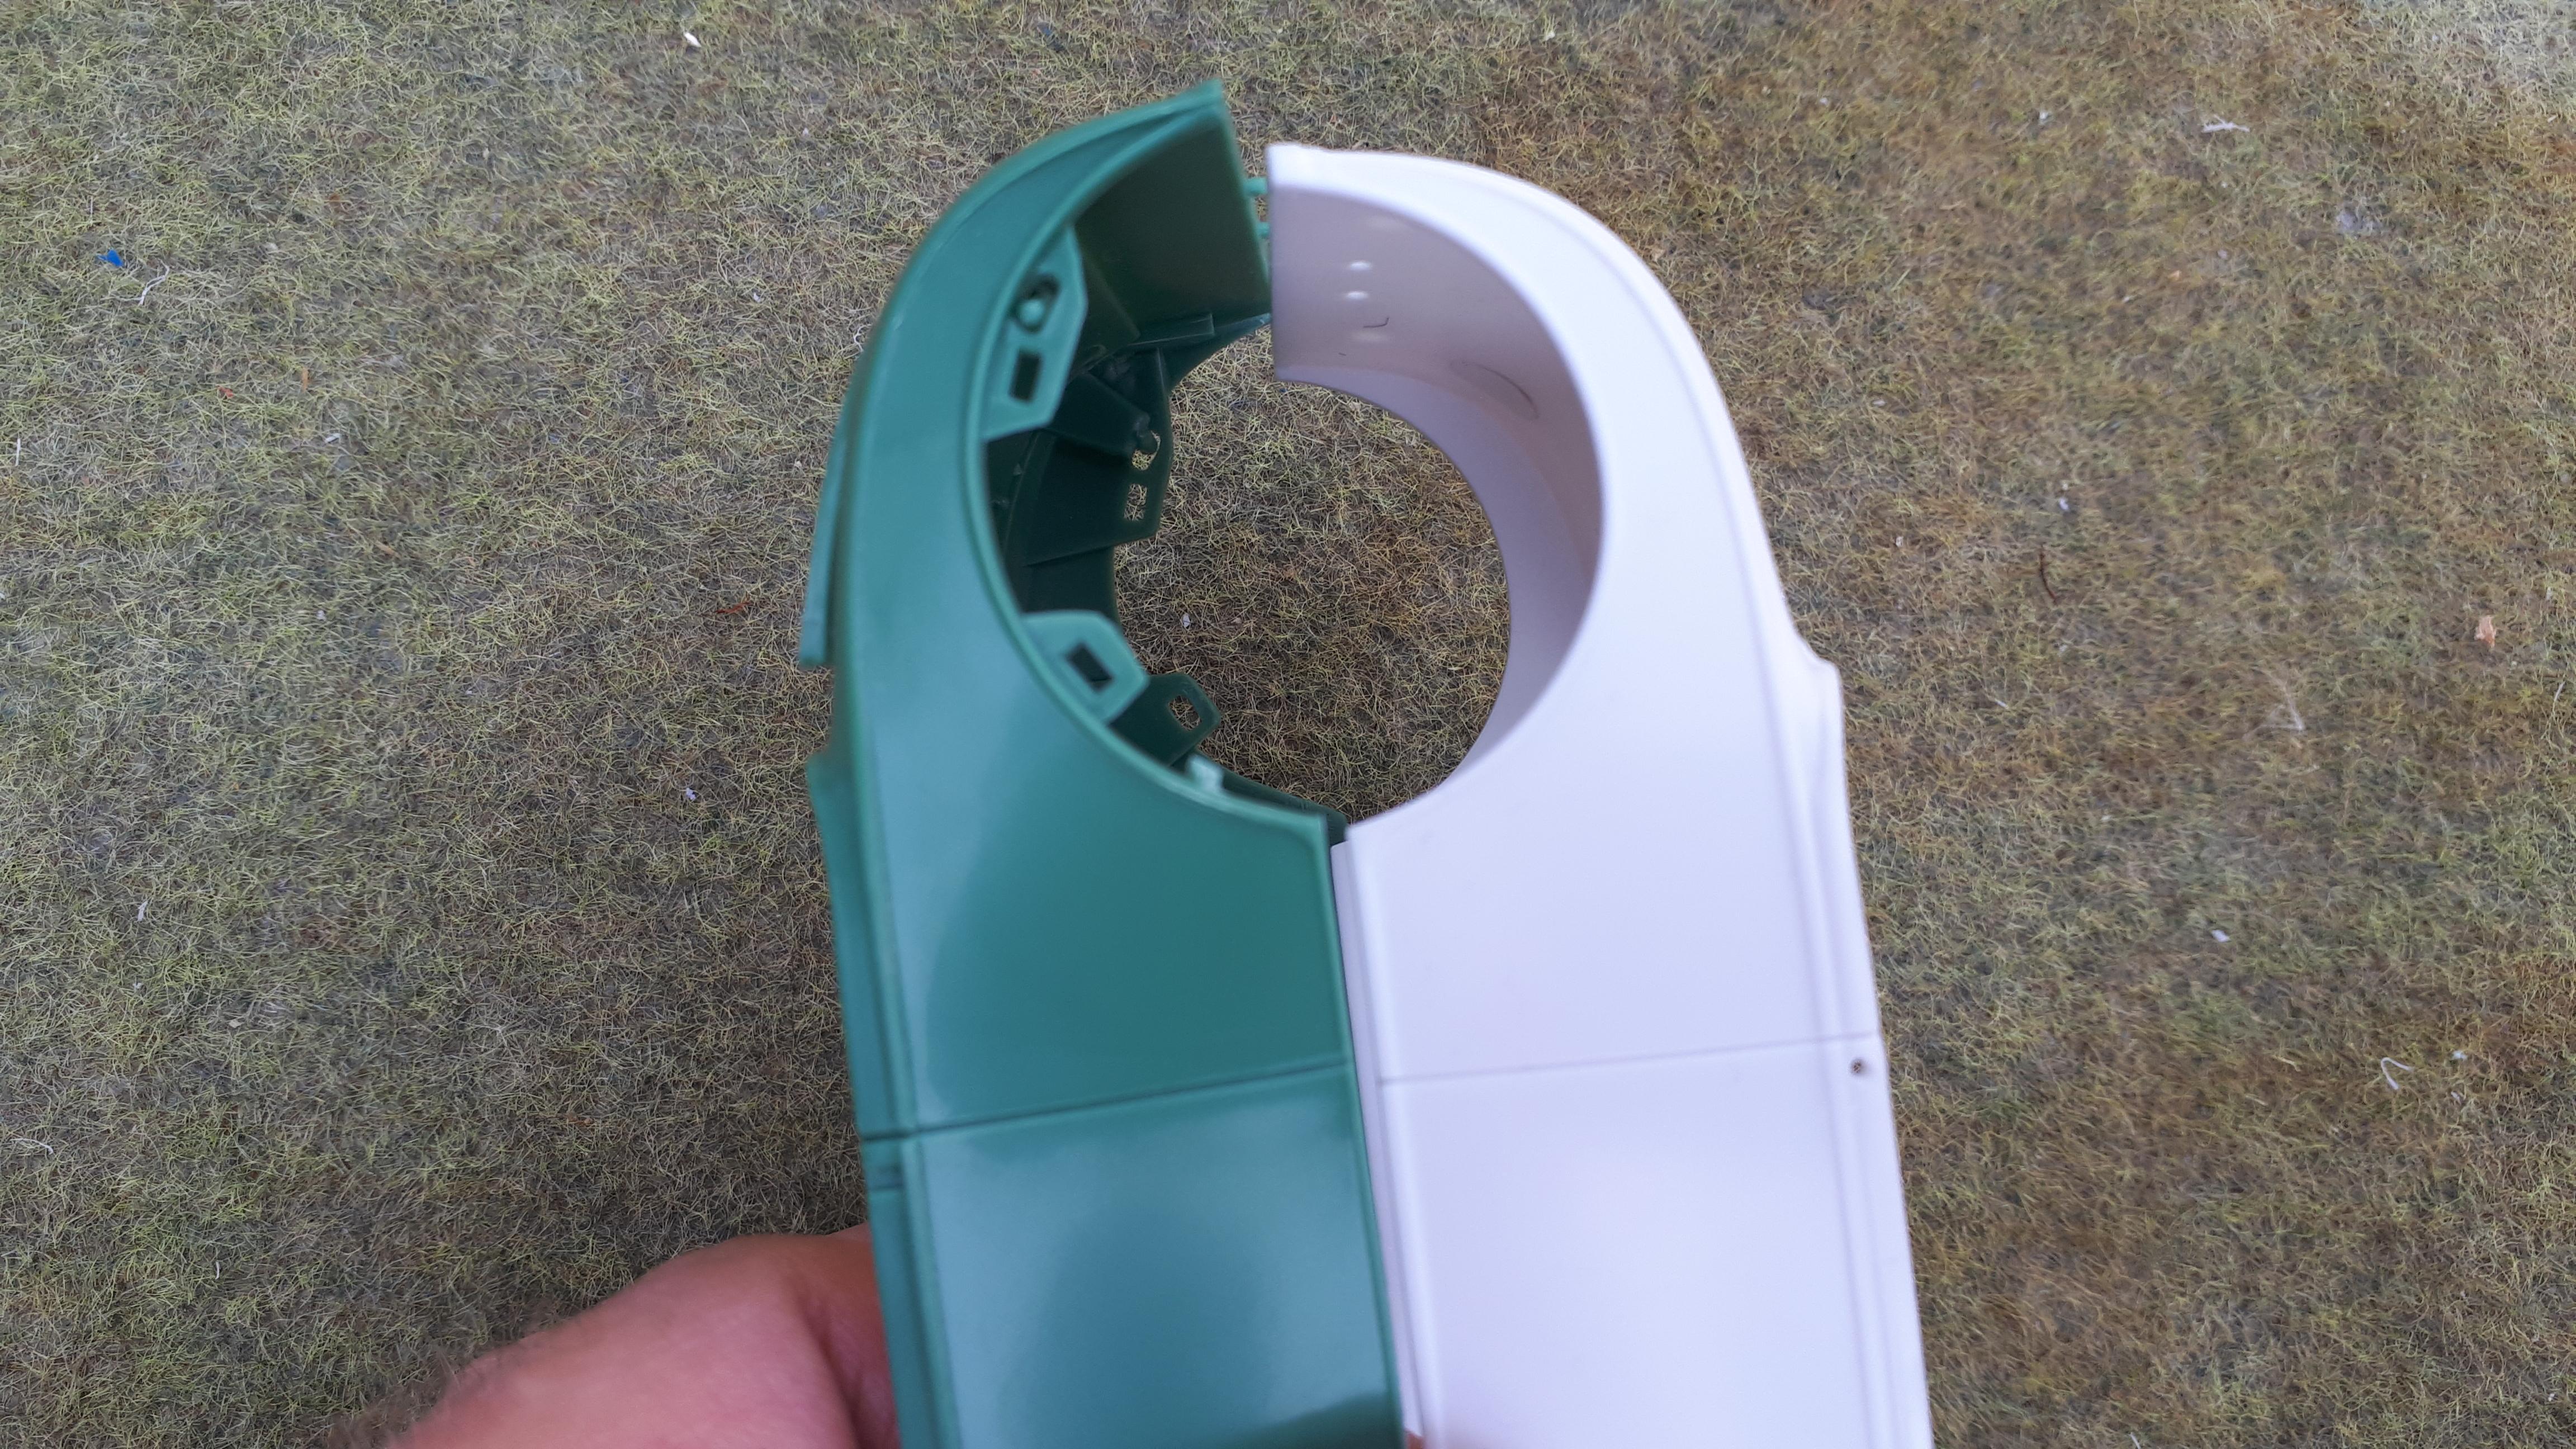
I think everyone should fess up to their mistakes and honestly, I could just about have built two cars with the results of mine. First of all, I initially painted the stock height firewall instead of the channelled on. Had a forehead slapping moment but then realised that the firewall would look better white than pink anyway. So I grabbed my second one and sprayed it white. With the body painted, I inserted the painted stock height interior into the body and glued it with superglue to avoid any risk of glue melting through to the outside surface of the body - learnt that trick years ago! I then offered up the painted floor only to realise I had a grabbed a roadster one instead of a coupe and they are not the same, trust me! But wait , there's more. Having solidly attached the full height interior to a channelled body, I found out that the rear of the chassis doesn't clear the channelled wheel wells. I can't believe I was making so many rookie mistakes but fortunately, having five roadsters and two coupes I had lots of spares so it wasn't too bad - just made me focus a bit more from now on! Realising that I was now going to have to modify the frame rather than dismantle what I had already done, I decided that I may as well swap out the coil sprung nine inch and add something more period correct. Just like Bill, Ace Garage Guy, I am loath to chop up good frames BUT as I had already used the rear kickup of the another channelled frame, it was a natural to use this abbreviated job to custom fit it to the body A hunt though my stash lead me to the AMT 25 T kit. It has a very early style Halibrand quick change with a transverse spring. It also has cool long radius rods that would fit the bill. Rather than chop up the T frame, I fabricated a Model A style crossmember from very thin styrene sheet. It was easy and quick to do and looses the chunkiness of typical kit crossmembers. I extended the previously cut frame with Evergreen rectangular section styrene, carefully aligning it to make it a neat fit between the wheel arches. I have a jig made of a flat piece of 2mm steel scribed with in a 10 mm grid. I use magnets from a pack I got at the big green shed (a well known "big box" Aussie hardware store) This makes it a lot easier to keep this sort of construction true and square.
-
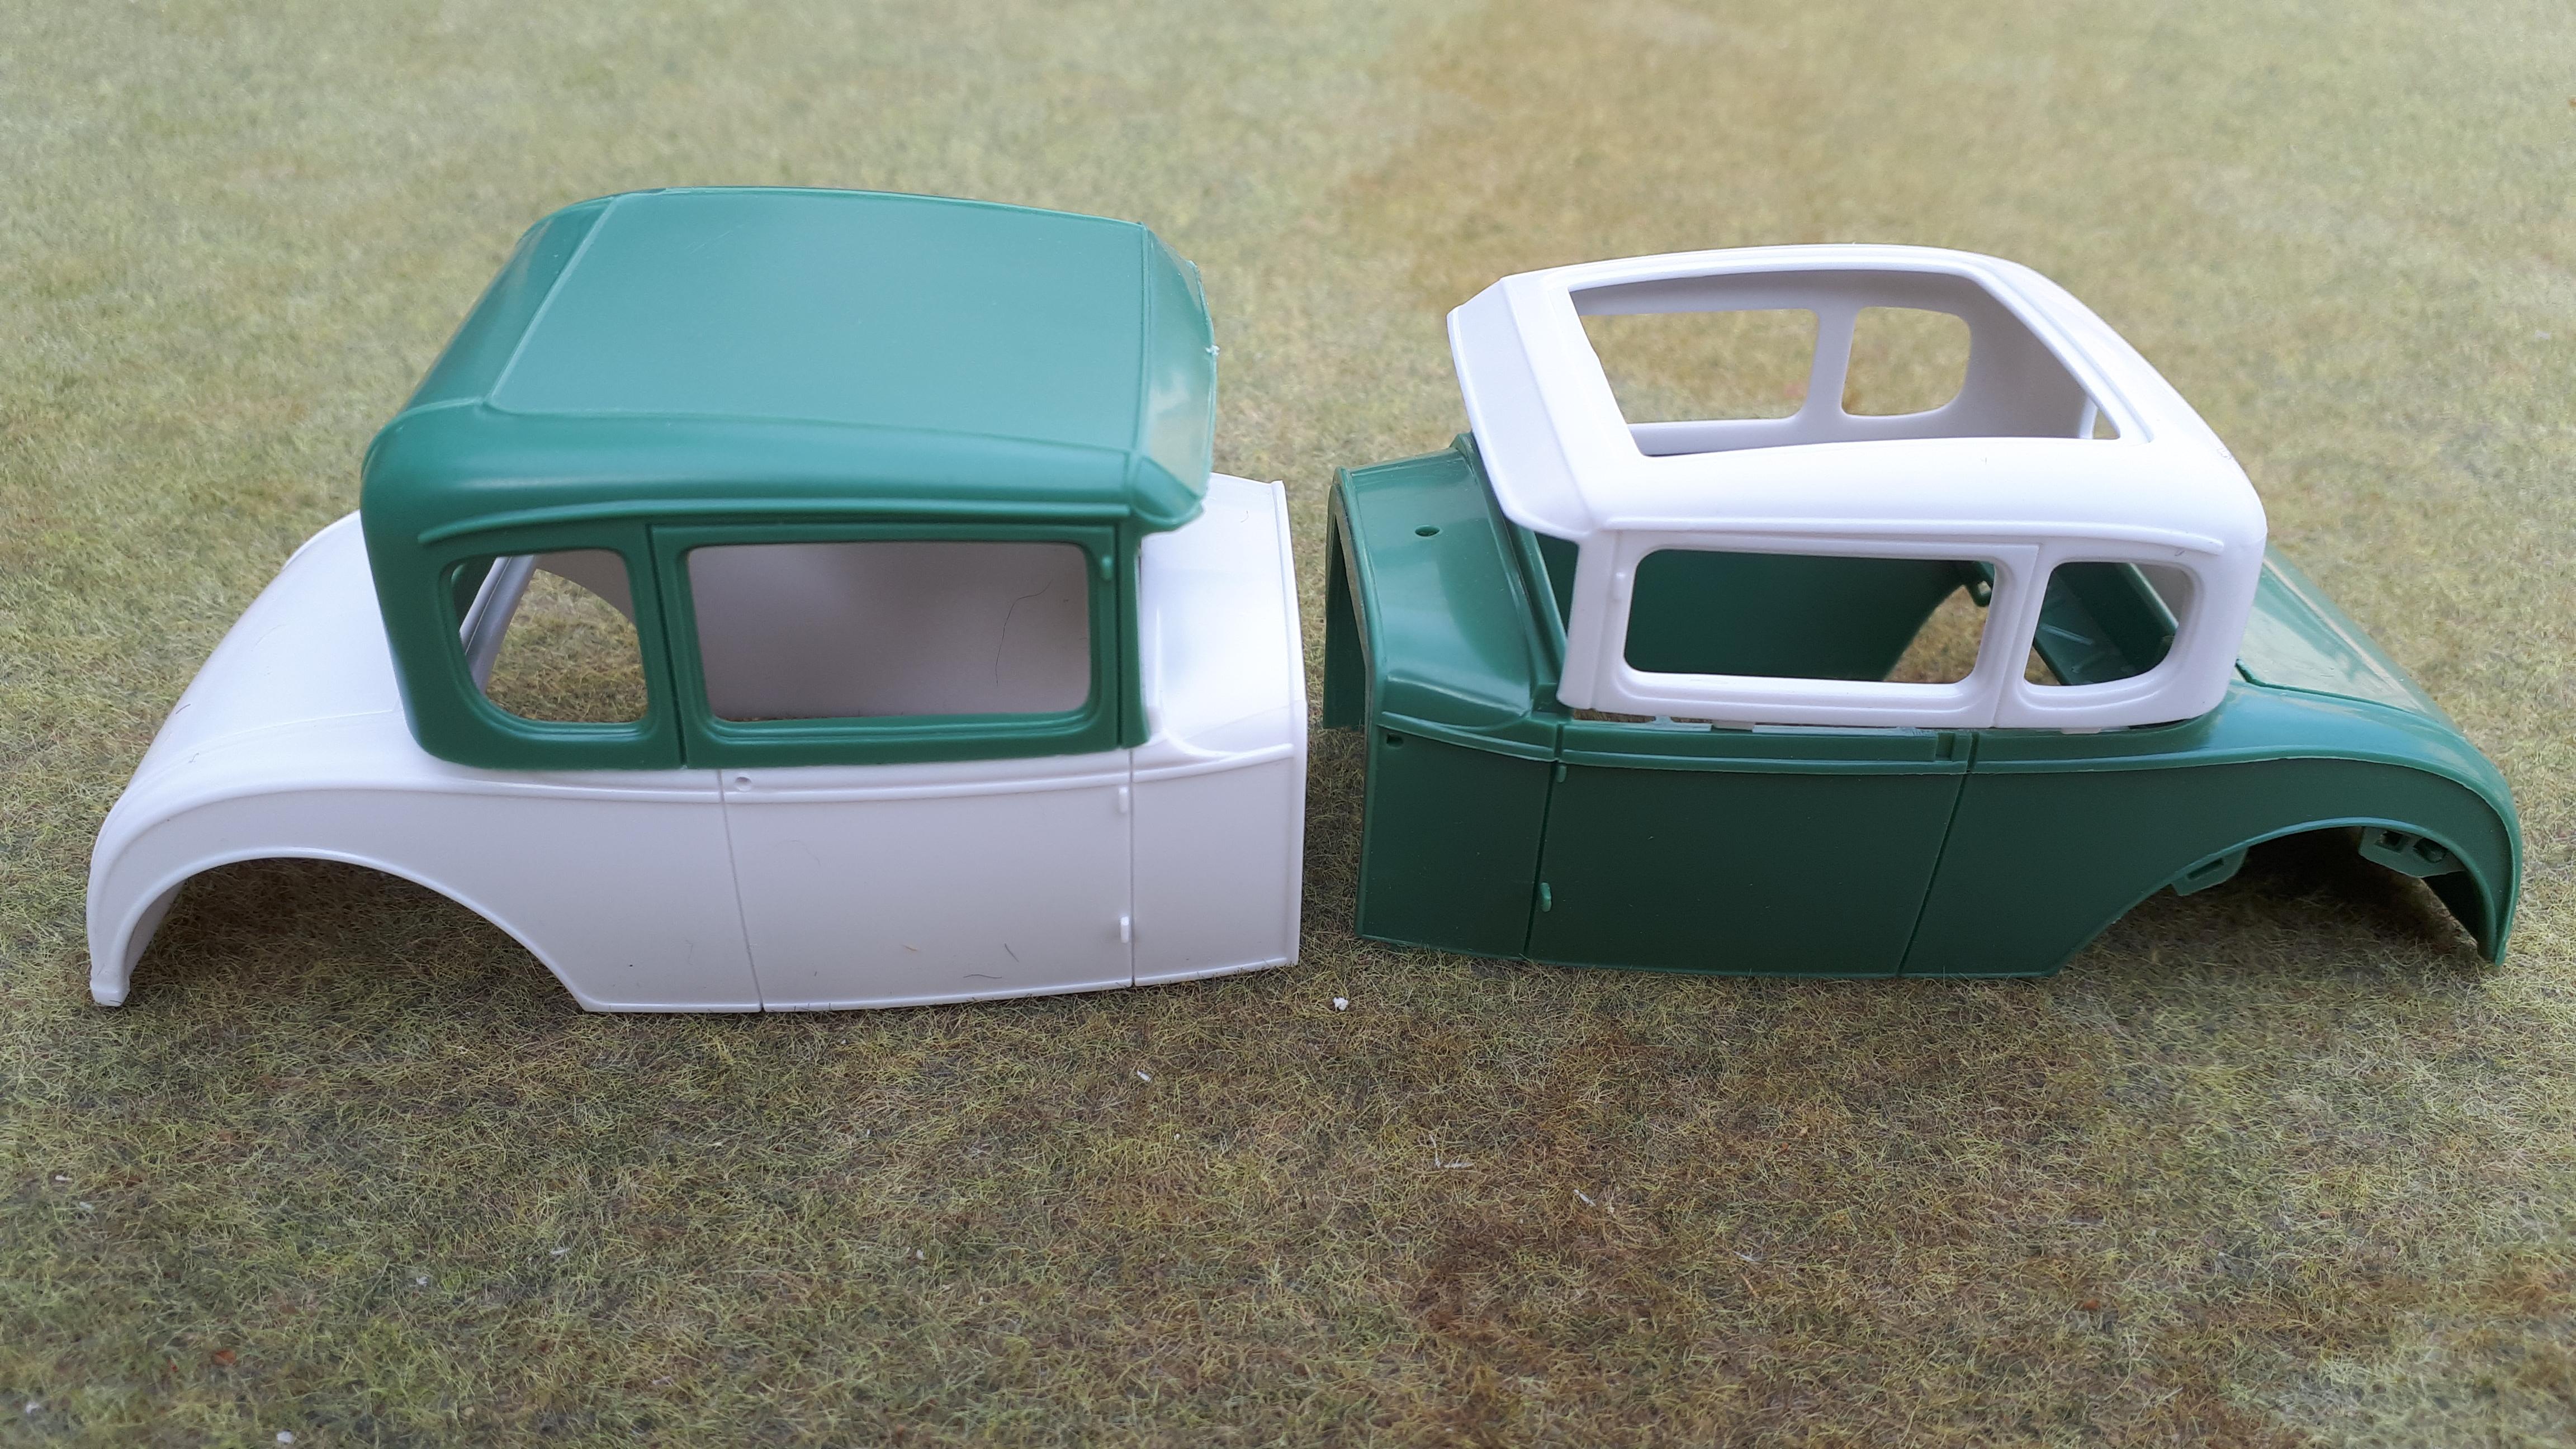
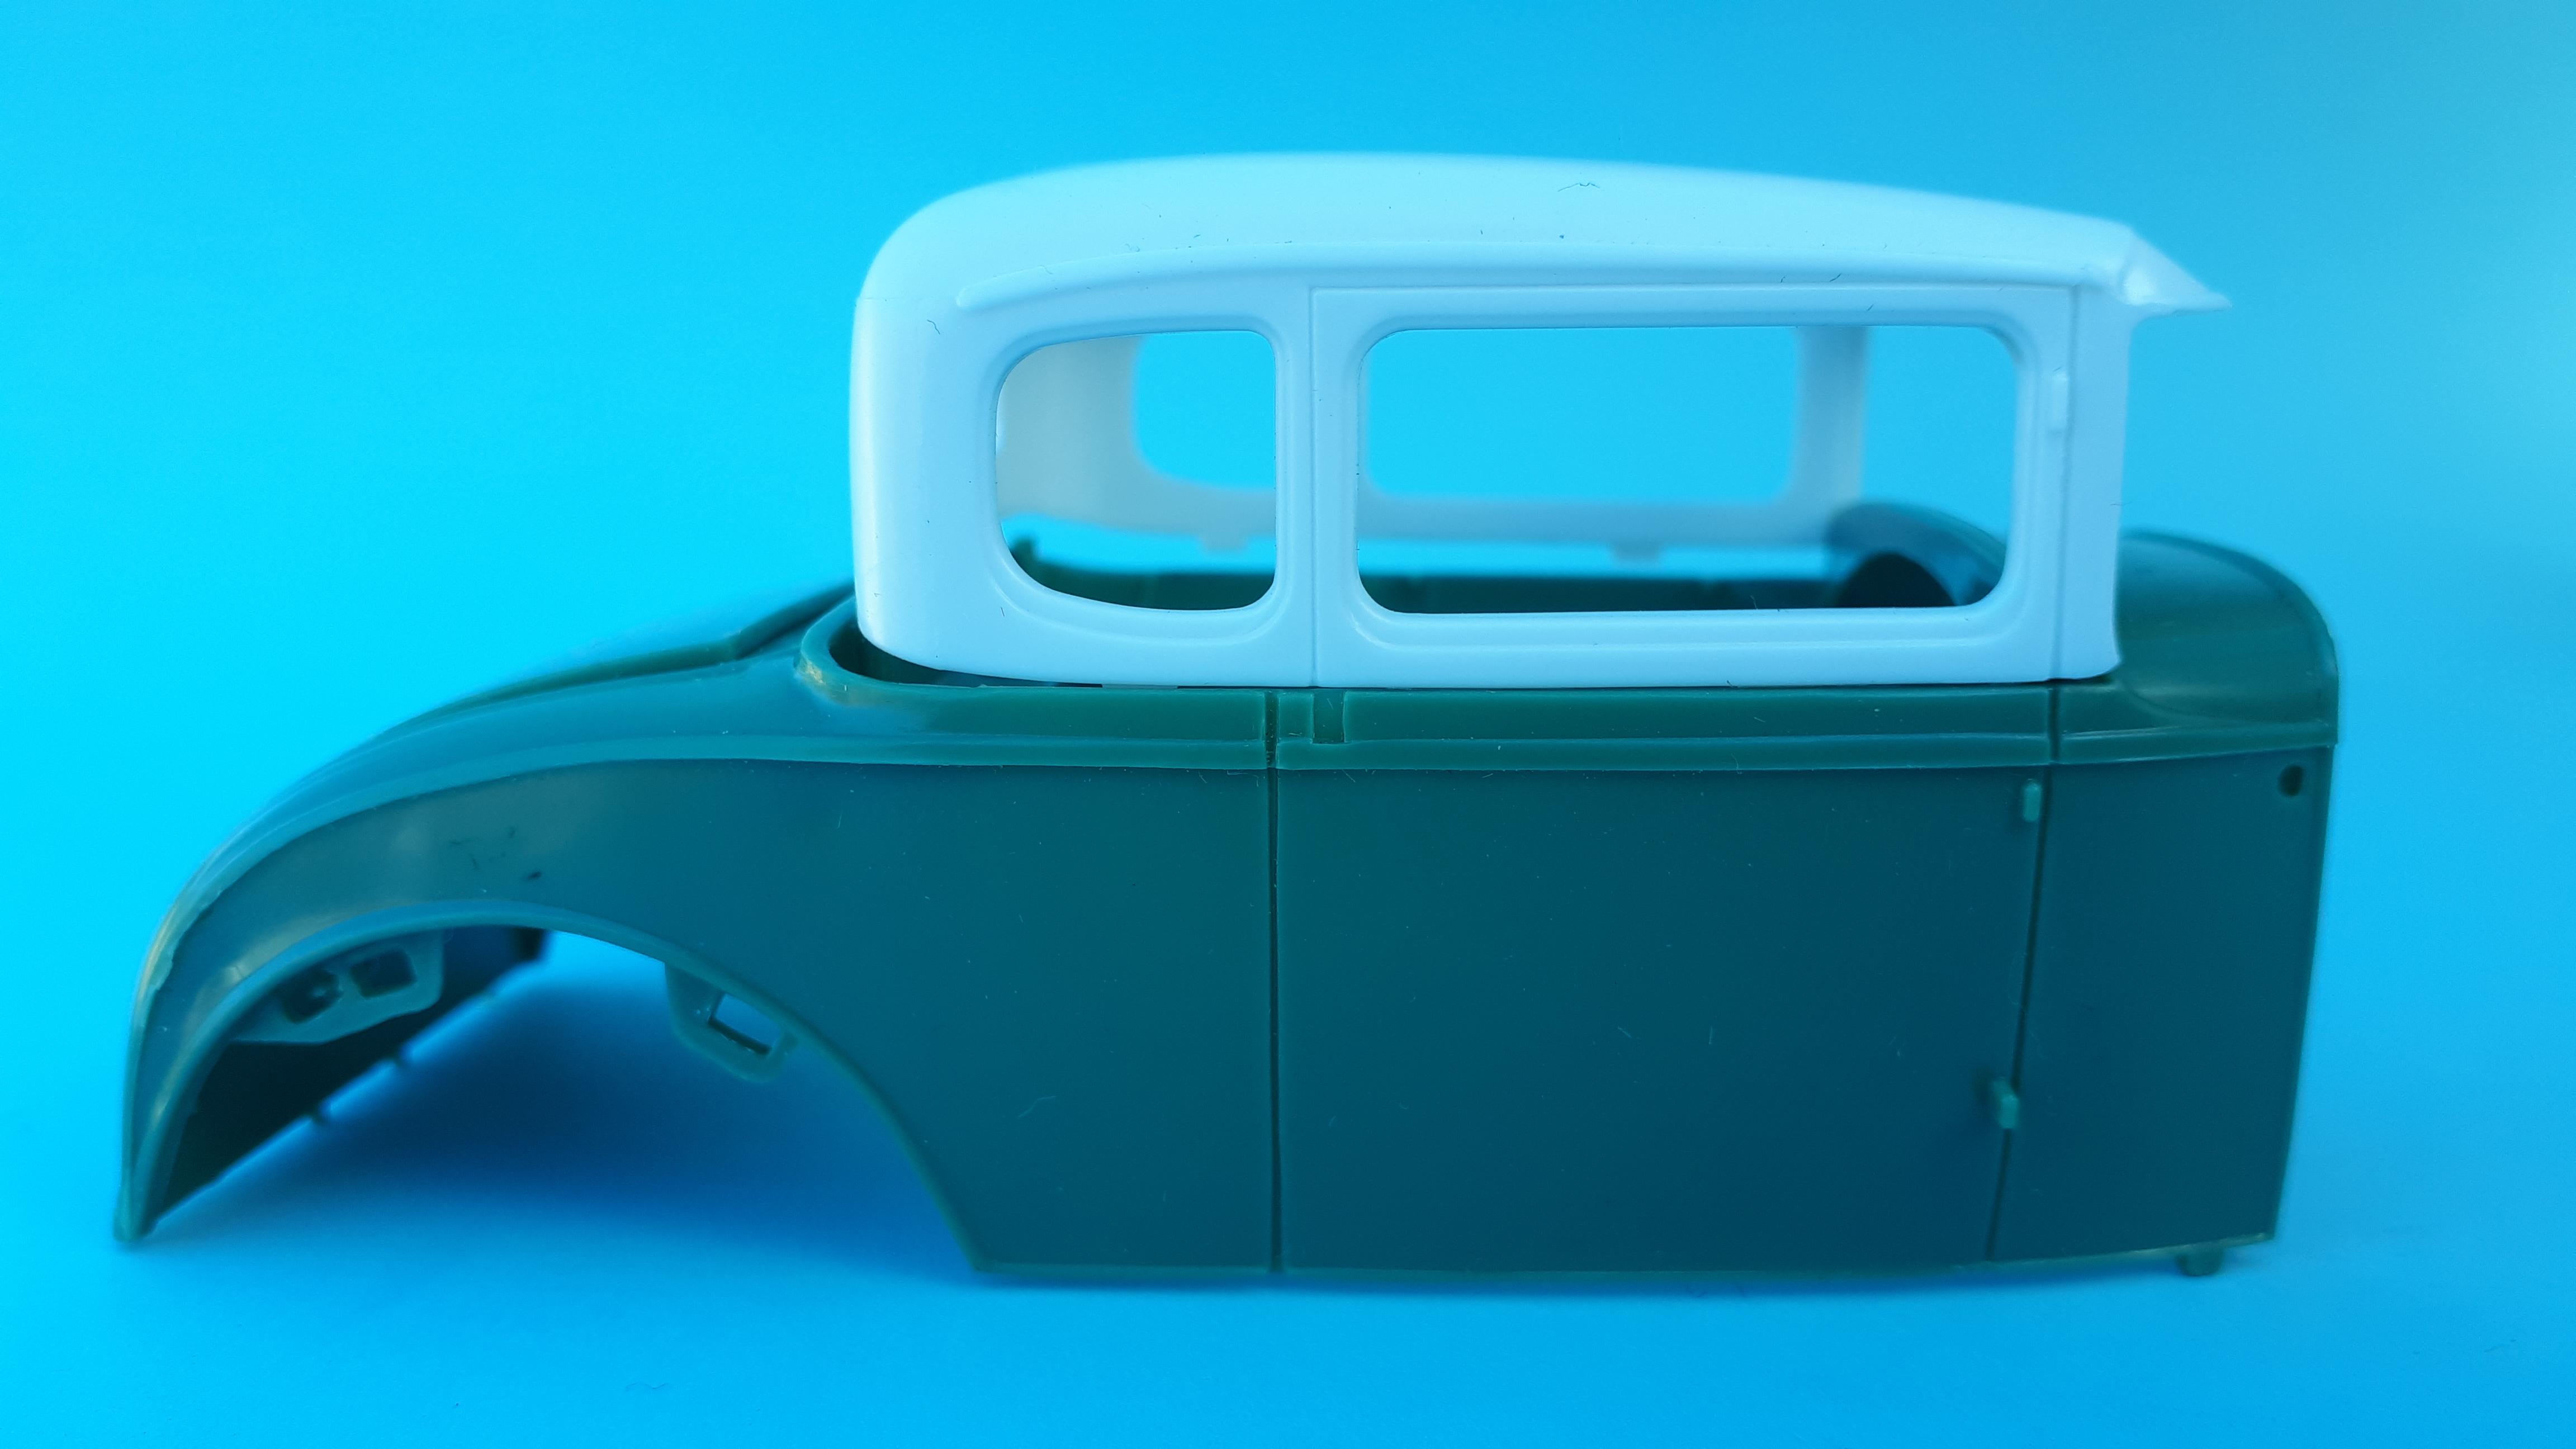
Hi all, this is my build post for my recently completed Revell Model A coupe. I wanted this one to be a circa 62-63 East Coast style showcar. Yeas, it would have been more period correct if it had a stock height roof but I wanted to steer clear of overcomplicationitis on this one. Speaking of roofs, if you have been wondering, here is how the Monogram stock height roof compares to the Revell chopped roof. Can you swap them over - sorta. Should you swap them over, nah, it would be a lot simpler to just chop a Monogram model and you are on your own if you want to unchop the Revell. The chopped roof is so different in every dimension to the Monogram body that it would be a nightmare to fix. If you were to fit the Monogram roof to the Revell body, you might get away with it IF you painted it a dark colour and IF you weren't fussy about door lines lining up. If I had countless spare Revell coupes I might try it just for giggles but I have two and they are both under construction so it won't happen. Oh yeah, the Revell body wont match up to the monogram fender unit either. My recipe for this car is as follows. Revell 30 Chopped coupe on the channelled Model A frame Pleated interior from the unchannelled version Nailhead Buick from the 29 roadster kit Rear end spring and radius rods form the AMT 25 T Pegasus front wheels and tyres AMT Parts Pack white wall slicks with deep chromies that I THINK were from the AMT 57 Chevy but I can't be sure. 32 Grille and radiator First step was to convert the channelled height firewall to RHD. A little trick I used to minimise glue squeezing through the roof seam was to use about four small drops of tube glue to locate the roof on the body and as I brought the two pieces together, starting on one side, I used Revell Professional in the blue bottle with the needle to wick between the two parts as they came together. I did get a tiny bit of glue damage on the right hand door but the seam is completely filled and the second one I did came out near perfect.
-
I love your contrasting finishes on the suspension and wheels. I have been a chrome junky all my life and struggle to strip the stuff - I had a chrome-less childhood, building monochromatic Airfix, Lindberg, Pyro and Aurora models and once I got my first AMT, well lets just say that over fifty years later I am still reluctant to "sacrifice" it! A psychiatrist would have a field day with that little gem of information! So everytime I see this sort of combination done so masterfully , I'm saying to myself, "C'mon, Al, strip it and hit with the flat metallics!" I'm about to upload my 30 coupe - when you see it you will understand what I am saying! Cheers Alan
-
If they come to Australia I will be getting a couple! Good to see a rather international approach to the styling. About the only thing I would foresee modifying is the long skirt on one girl - not something we would normally see around our streets. Everything else is very contemporary and the phone, as much as I hate to say it, is "on-trend" and the sort of thing that a non -modeller will get a big kick out of when they see it in your diorama. Cheers Alan
-
I've bought two of the Coke kits so far - the ex Switchers 32 delivery and the Vending machine, purely because I wanted to build the model. On the other hand, I don't NEED another early Ranchero but those Coke crates and the cooler are sooooooo nice! So RC2's devious plans are working. I really don't get the angst about the Coke branding - there is a perfectly workable kit inside every box, the quality of the decals is superb and so usable in a hundred applications, I just look at them as a bonus. It's not like they did a "Modified Stocker" on the kits or anything. Live and let live, I say. As many have wisely said, if RC2 sells more kits as a result, we get closer to getting new subjects - who knows, maybe they will do a long overdue 34 Chevy something or other - but that is an entirely different thread! In the words of the eminent Mr Snake, Drink up and Model On! Cheers Alan
-
Hi Rodney, I think you have really nailed the feel and atmosphere on this one - not a monstrous sterile surgical theatre, not a run down, falling over, totally decrepit barn, just your average guy's garage with the tools he needs to keep the roadster going and a few of the cool things he's collected over the years! I feel very comfortable and right at home taking in the scene. If I could respectively offer one small bit of constructive criticism, because it is the norm to take closeup photos of dioramas (and it is human nature to look for faults!), some things can stand out in a diorama. It relates to the two doors against the wall. I can see the Model A door is a Revell 31 and we know they are very thin and fragile which suits this diorama perfectly. On the other hand, the AMT 40 delivery door is a bit on the chunky side. If you scraped the edges back to an almost razor edge, it would just take one little speedbump out of the scene. One thing you really got right that so many people miss is that you drilled out the lug nuts on the wheel in the bin. Years ago I remember seeing a rally garage diorama by the famed Francois Verlinden himself, master of all things diorama and there on a shelf was a race wheel with all the lug nuts and dust cap. Maybe its just me, but he may as well have painted them fluoro orange! I have a large commercial rod shop diorama on my shelf but have been collecting parts for some time to do a home garage just like this one - thanks for the inspiration to get it happening! Cheers Alan