alan barton
-
Posts
2,105 -
Joined
-
Last visited
Content Type
Profiles
Forums
Events
Gallery
Everything posted by alan barton
-
With the parts you selected, you came up with a very believable version of the Kookie Kar, even if it isn't a 100% replica. That rear three quarter view really sells it for me. When you get your flames added to the blue paint it will cause instant recognition for most people. Like you, i am a fan of vintage rods but must confess to chickening out on this one. I stumbled upon the Danbury Mint version in a collectable diecast store, I had money in my pocket and it spoke to me! No regrets at all as I still have plenty of other models of this era to tackle - the Dick Flint roadster for one. If I had built the Koolkie Kar, I would have been very happy if it came out as nice as yours! Cheers Alan
-
Modified (sort of)
alan barton replied to TonyK's topic in Other Racing: Road Racing, Salt Flat Racers
Talk about thinking outside the square. Tom Daniel himself wouldn't have come up with this one! The neat thing is, it is such a natural! It is very easy to imagine this running around a dirt track somewhere - in fact, it is a lot better looking than some of the body styles out there! Love it! Cheers Alan -
Wow, Claude, this might be your best salty yet! The detail throughout the chassis is not only beautifully crafted but extremely believable. Anyone who has visited Bonneville will know that a lot of the race cars there are "busy" - there are components stuck wherever they fit and then plumbed accordingly. Not all of them are as attractive as this one! And your graphics - they are laser sharp! Those Challenger wheels were the perfect choice - I have just one and I think it is time I had it resin copied! Cheers Alan .
-
Barris Villa Riviera
alan barton replied to Snake45's topic in General Automotive Talk (Trucks and Cars)
Nice photos Ace. The styling on that car was definitely one of his better efforts but how do you reckon she would steer with those piecrust slicks on the front? Ol' George, he never let function get in the way of bad looks! I recall there was also an Oakland AMBR winner with slicks on the front around that time also. Cheers Alan -
And I'm pretty sure the Vern Luce coupe ( The Candyman?) now resides in Australia! Cheers Alan
-
That chassis would like nice sitting in a workshop diorama exactly as it stands now! Cheers Alan
-
Lucas, you can use pretty much anything that will fit your particular wheels. For example, normal carpentry nails from a hardware store, spokes from a push bike wheel, axles from old toys or AMT model kits. There is no right or wrong and I doubt very much whether you will be able to buy something specifically called "metal axle for a model kit" You are simply looking for something that is straight, strong and round. Other sources could include the K&S metal rack at a hobby shop ( if you have one near where you live) the struts out of an old umbrella, or metal out of an old grille such as those used in BBQs or a fridge shelf. It really is a matter of finding something that will fit the size of the wheel hubs you are using. You will need a good strong pair of sidecutter pliers to cut most of this material - cheap tools from a discount store will probably be useless! Either that or a junior hacksaw with a sharp fine toothed blade. Remember, you may also need to drill some holes through where the plastic axles or stubs attached to the frame of the original model and it may be convenient to drill a slightly larger hole in your wheel hub to suit the size of the metal that you have found. Hope that helps Cheers Alan
-
I wonder if anyone has ever thought about fixing the broken roof on that wagon? If someone like Foose or Trepanier got hold of it, I bet they would swoop the roof all the way to the rear pillar, kinda like a 50's version of a Magnum wagon. When AMC "stuck" the wagon extension onto the back of the sedan, they really didn't make any effort to hide their handiwork? Cheers Alan
-
Beautiful photographs of a stunningly detailed model. Just the shop rag on the blower is worth the price of admission! everything on this car looks right - really, really nice! Cheers Alan
-
I finished a much more sedate version about forty years ago, using a hoped up OHV 4 banger and like yours, I changed the hood to a lift off design. One thing that gave me fits was attaching the trunk lid. Revell used small lugs on the trunk floor/frame section that means that the alignment of your trunk lid is entirely dependent on the final location of the frame. Next time ( I am planning an accurate Skippers Critter replica similar to the one Tim Boyd did in a magazine feature years ago) I will be hinging the trunk lid to the body as it should be and adjusting the trunk floor to suit. I think you have achieved a very tough stance with your work so far. Cheers Alan
-
Yeah, me too! I have used the Silver leaf before but not with the flat finish. That would look awesome on a salt car. I love the way it takes the 'prettiness" out of the bright blue paint and gives the coupe some attitude. Looking forward to the final reveal! I'm thinking, with all these cool coupes popping up lately, maybe we should start a Group 30 thread like the Group 29 thread? Cheers Alan
-
That is amazing! And now you have to go and build a replica of the current version to complete the set! The accuracy of your decals is sensational - did you draw and/or print them yourself? Cheers Alan
-
A beautiful period correct custom, Phil, and oh boy, how good do those sombreros look? This is a magnificent model. Cheers Alan
-
Every time I see one of your builds, it blows me away that you get the look so "right" when absolutely none of us know what "right" looks like! Your Chevy is totally believable even though it is unbelievable that such a thing could ever exist. You, sir, have a very special talent! Cheers Alan
-
One of the nicest builds I've seen of this kit. Must get my pair done! Particularly like your engine detailing. Cheers Alan
-
I can only repeat what everyone else has said - these are fantastic! The stance, the detail, the perfect colour choices - who wouldn't love to have these on their shelf? My favourite so far is the T-Bird but I can't wait to see you 32 Vicky! Cheers Alan
-
Group 29 - the thread for everyone's '29 Ford Roadster builds
alan barton replied to Phildaupho's topic in Model Cars
What's not to love about a black and red 29 Hiboy? The knockout for me is the frenched taillights - they look great! Cheeers Alan -
Excellent! I'm like you, it's tough to build box stock but on the other hand, you don't have to do much to make these Revell Model As look great. I really have to work on my masking skills as I would love to be able to do flames like yours! Nice job Jim. Don't forget to put a shot of it over in the Group 29 thread. Cheers Alan
-
Just might be the nicest masked and airbrushed flames I've ever seen on a model! i don't get to hung up on the axle receptors - I cut them off my first Revell chassis but have left them on the next three I"ve built and they are pretty much invisible even on a light coloured frame. Considering that Revell forgot to put a panhard bar on the rear axle, the receptors do help ensure the rigidity of the rear end assembly. Looking forward to seeing the finished rod hit the scale highway! Cheers Alan
-
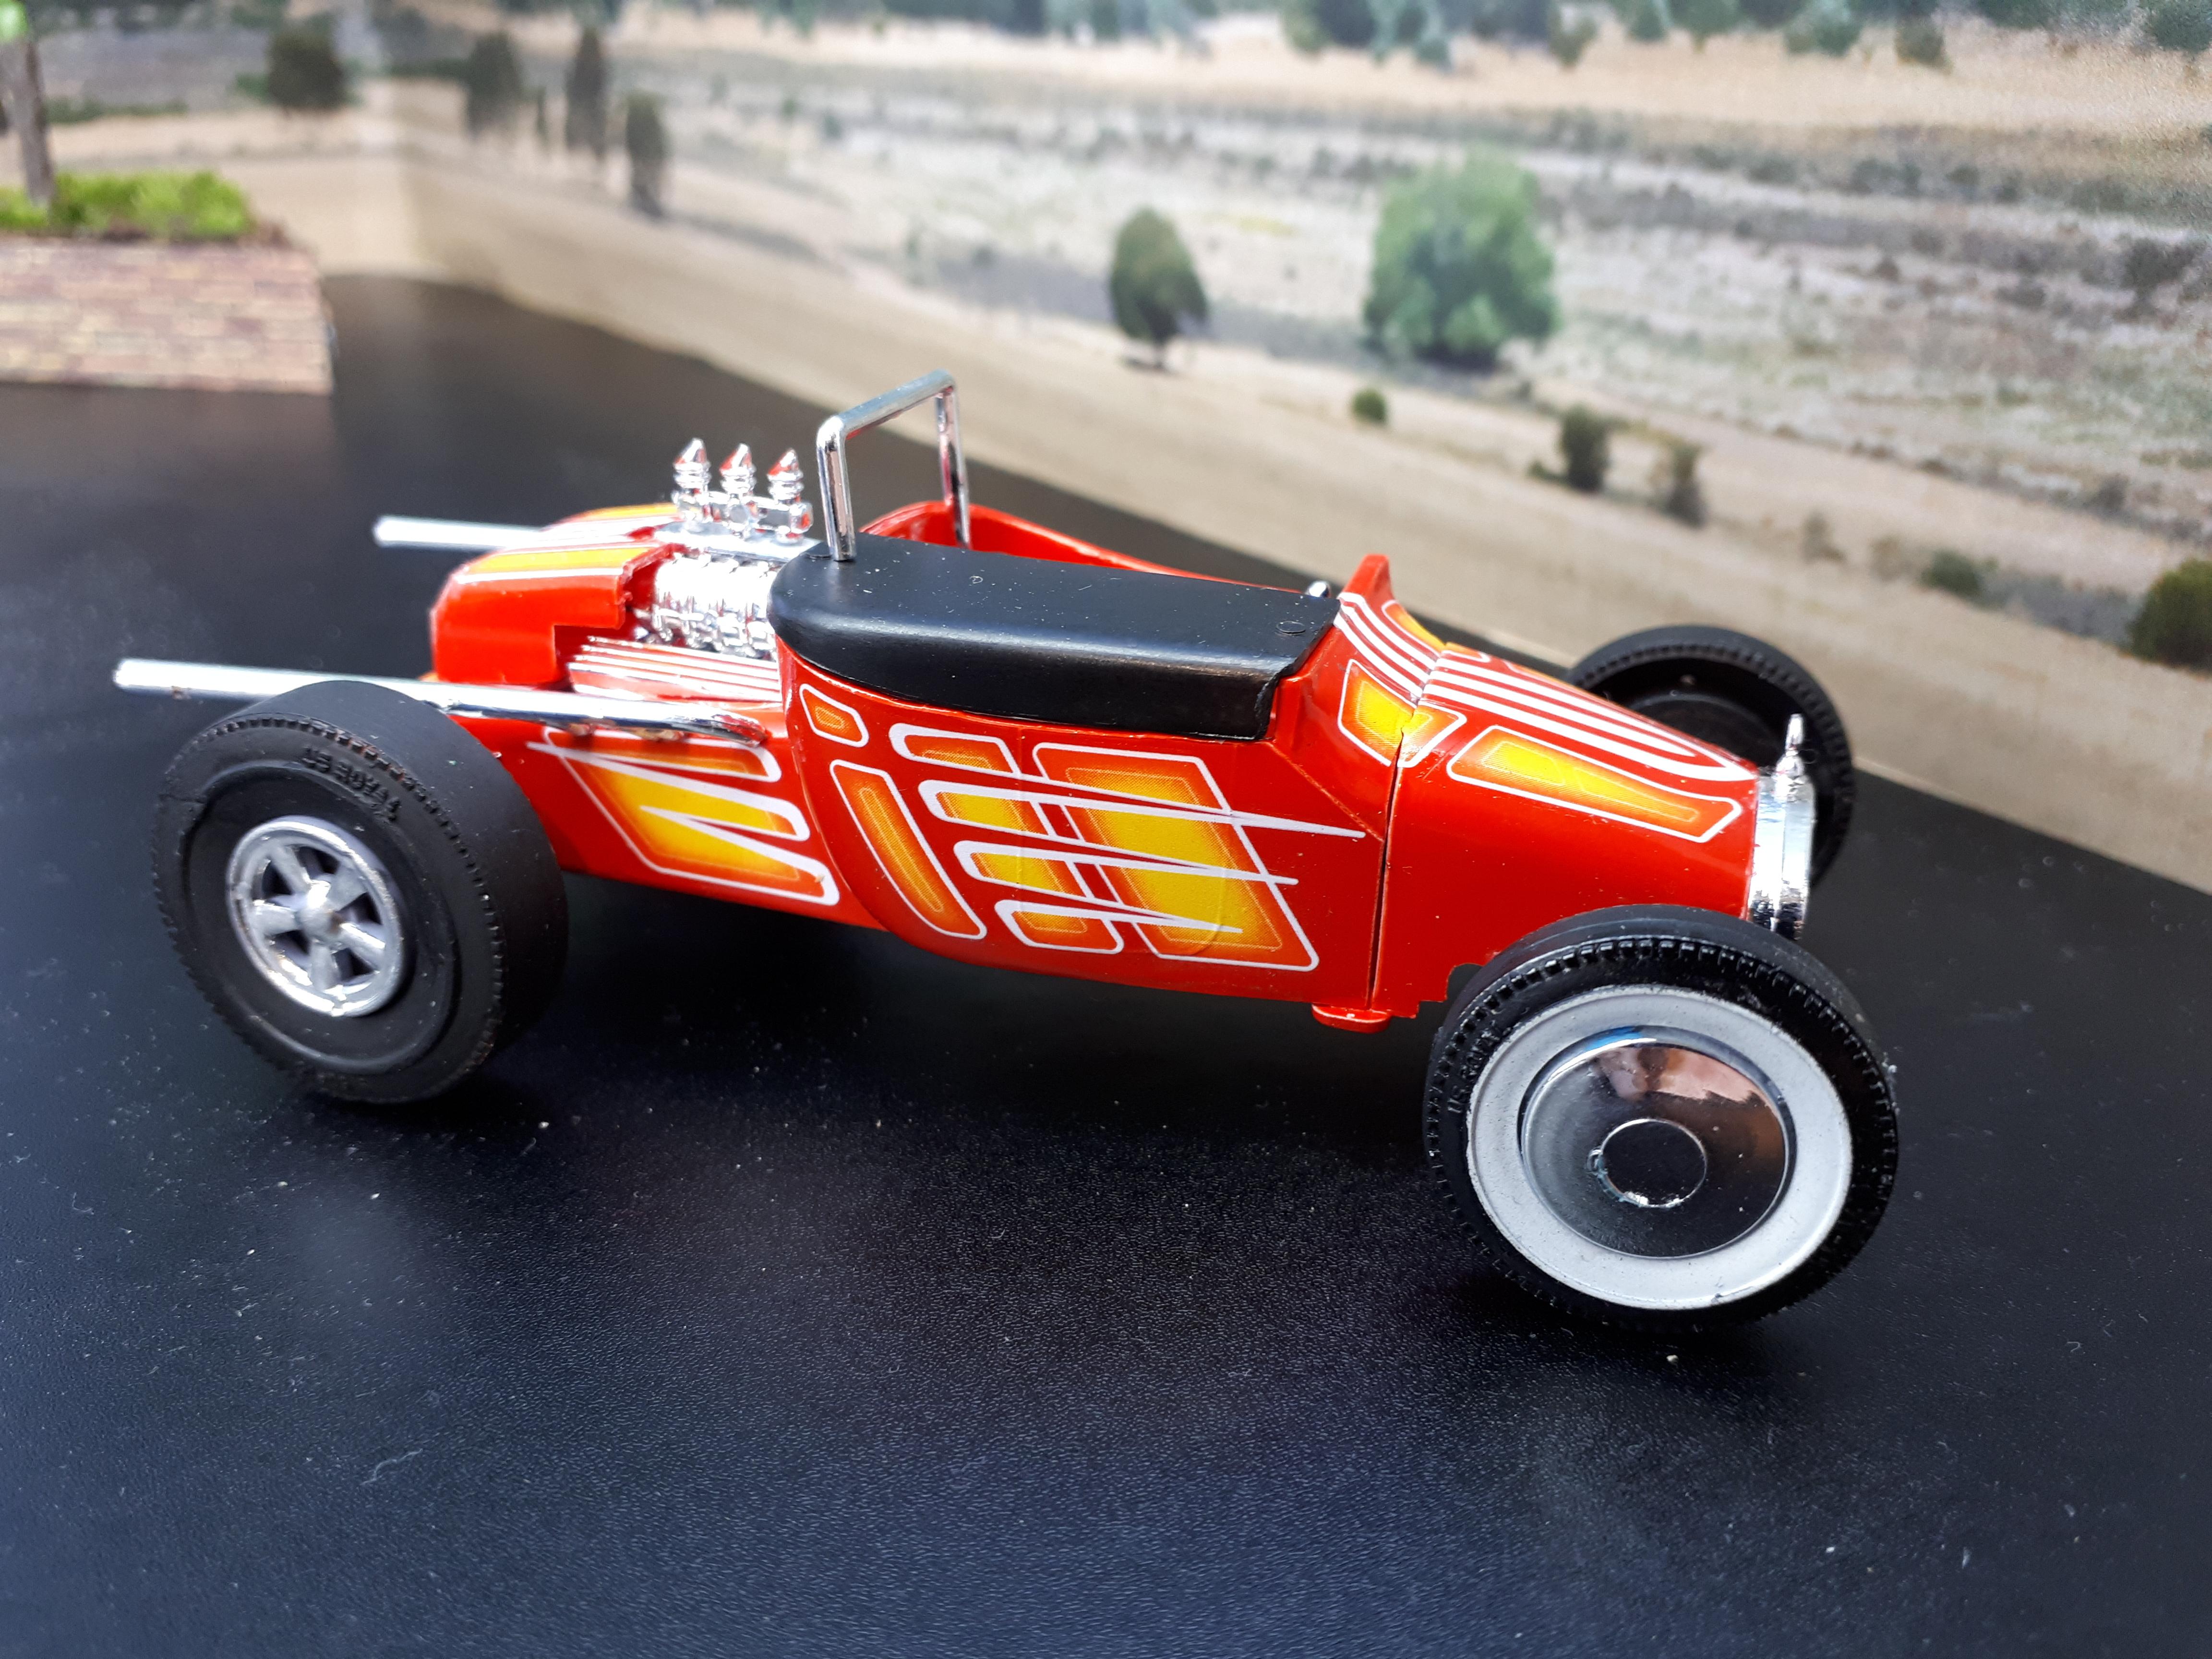
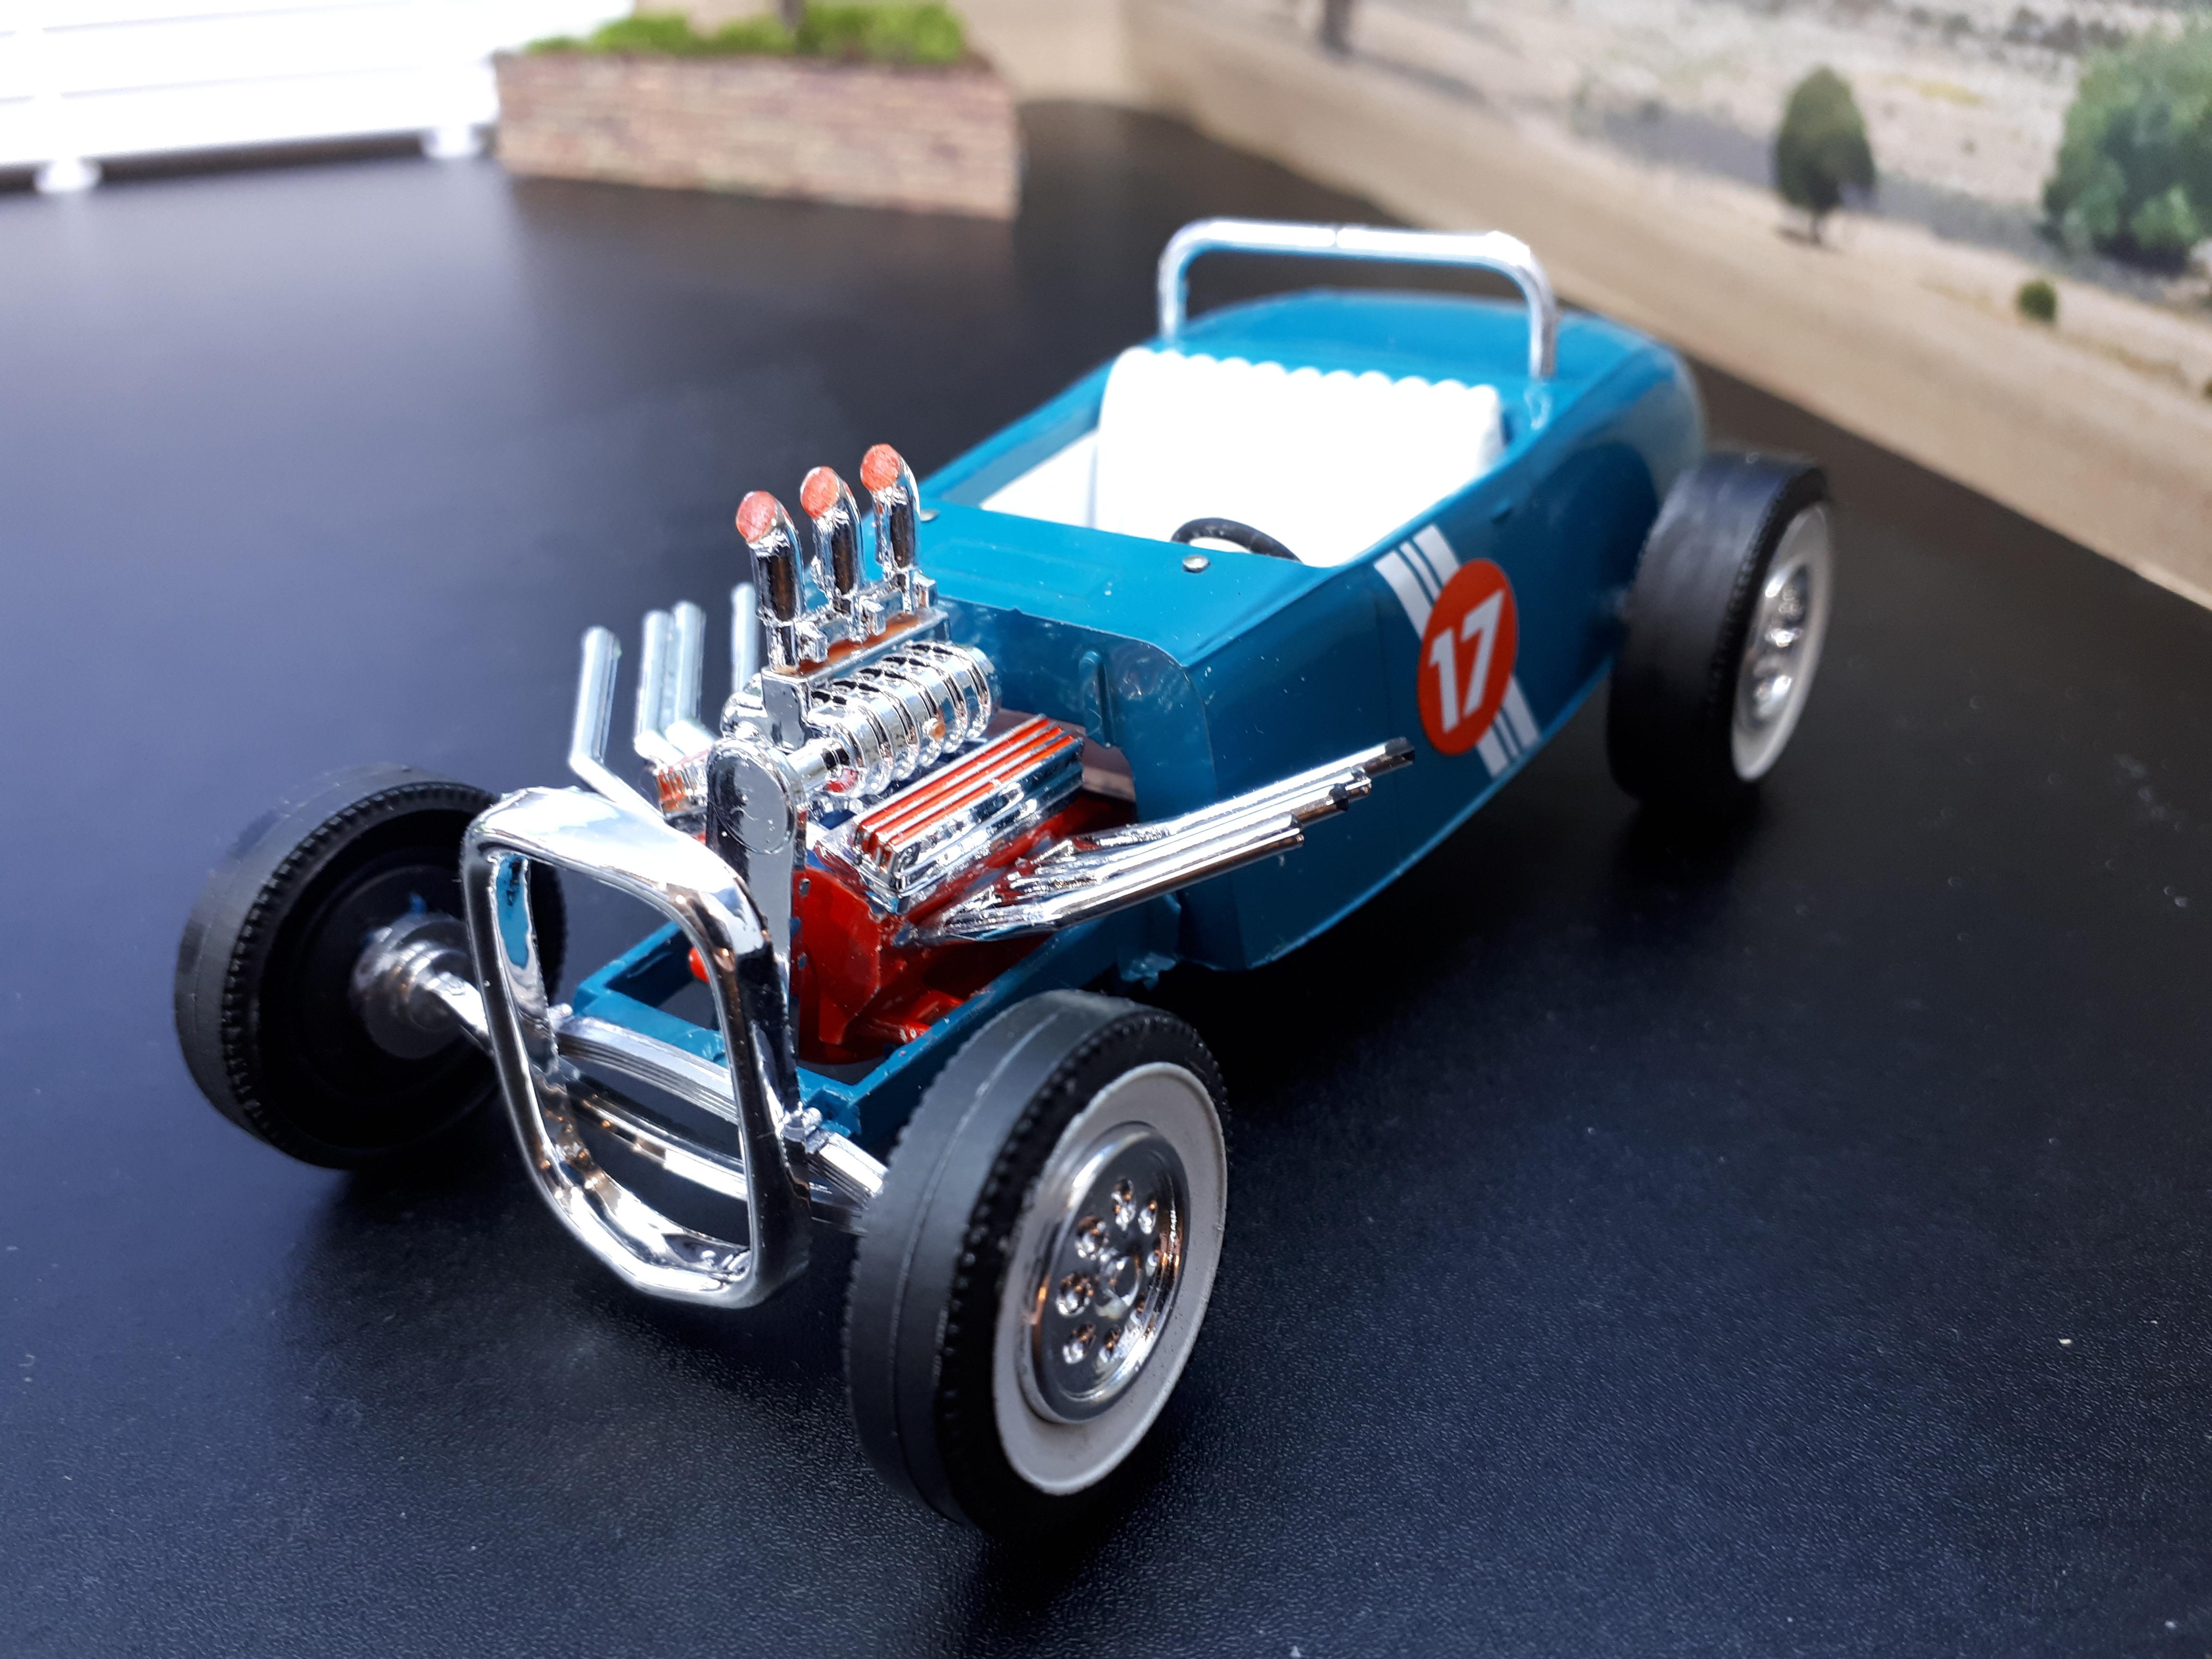
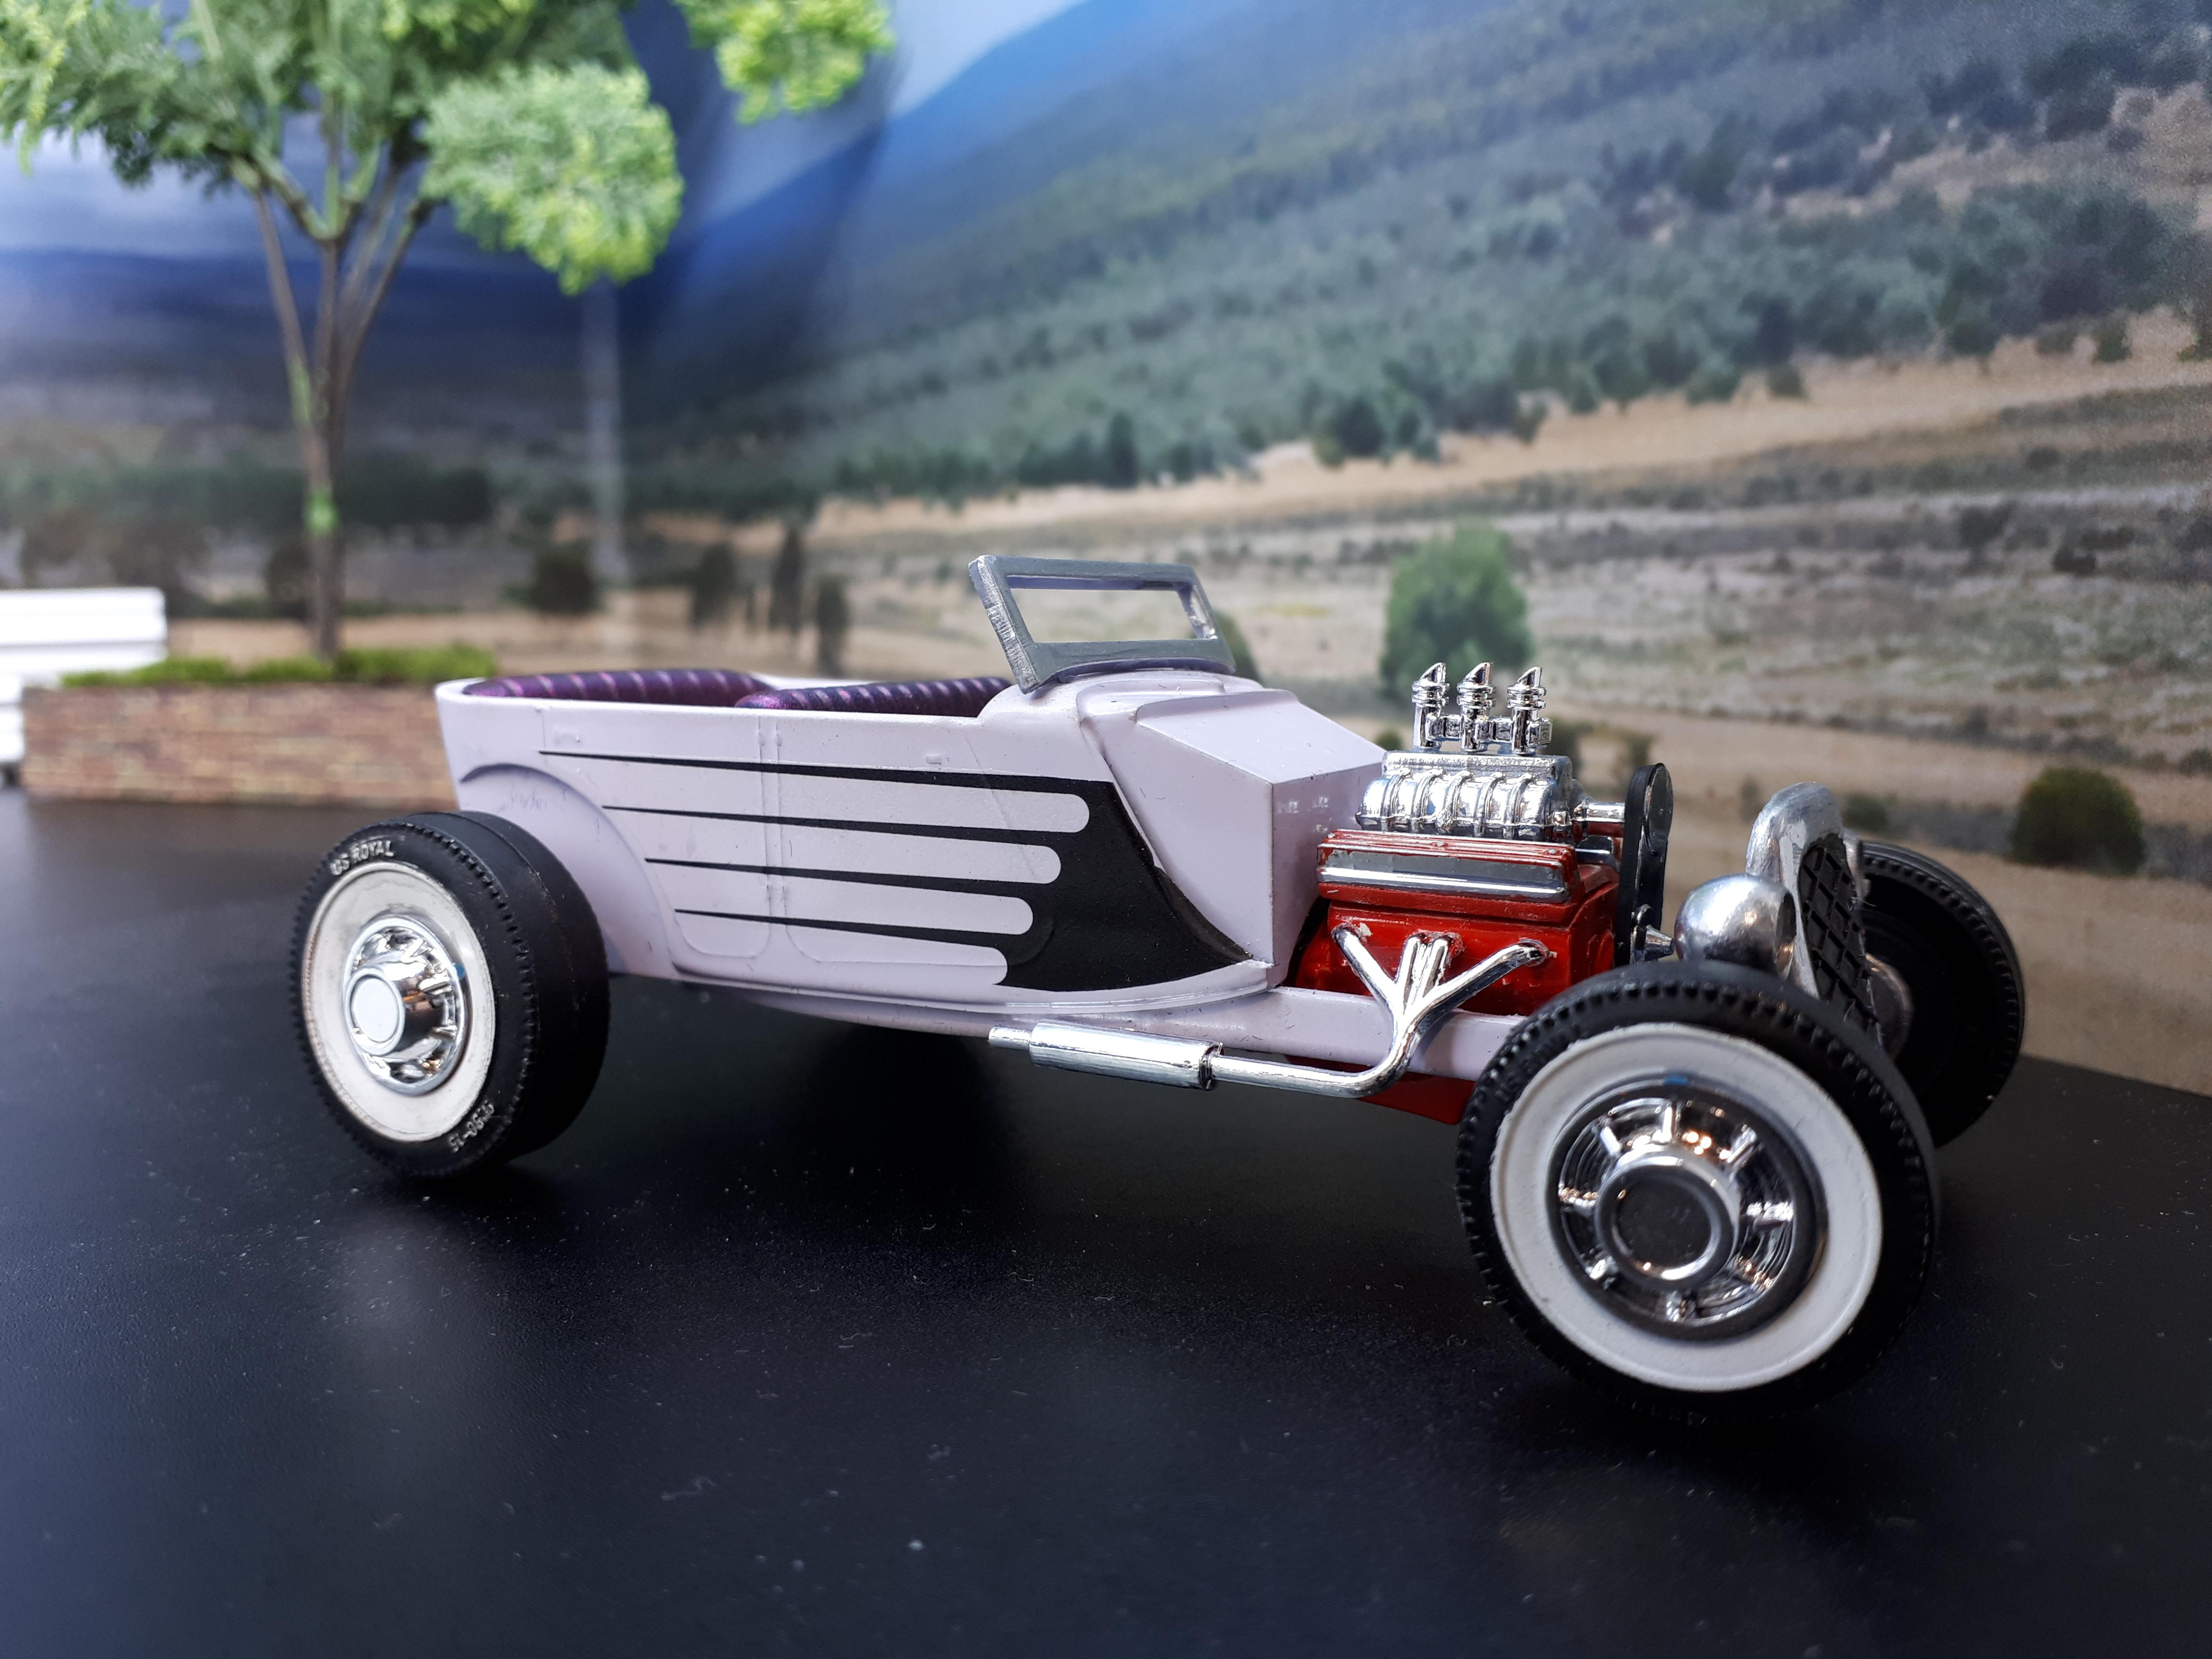
Yep, the show rods. Here are my two plus some of the other finished ones - it will give you an idea of the ports that are available. The chrome is particularly high quality, something you would not have previously associated with Lindberg! The graphics n the first three photos are from the Showrods kit.

-
Mike, an unlikely source for some nice 1/32 scale parts is the Round 2 1/32 Lindberg double hot rod kit. It has oodles of parts and options in it including chromies and five spoke mags. I used them to build both the models in the box as well as to complete two very unfinished examples I already had. They also have probably the best graphics ever put on a 1/32nd scale decal sheet! I have over forty 1/32 scale hot rods in my collection and as you say, finding parts, especially wheels, tyres and engines, is a challenge. Another source is cheap 1/43 or 1/32 scale diecasts in your local toy department (or weekend market or garage sale). Sometimes a 20 inch or so rim in 1/43 doesn't look too bad under a larger 1/32 scale model. I love what you are doing with the Comet. With adult levels of painting and assembly skills, these simple little puppies can look pretty cool, even if they never match the detail we expect in larger scales. I've definitely used those undersized parts you speak of - the dreaded AMT Ala Kart baby hemi fits like a dream in my Aurora Scat Cat Bonneville roadster! Cheers Alan
-
I have similar intentions for this kit myself! I have quite a few spare ones in the stash and my first one was done when the kit first came up so it is very billetated! Right down to being Tamiya pastel pink with ZZTop graphics! You might say it is "Oh billeterated"! Groooooooaaaaan! This is looking good already. Another simple solution for the nineties chassis ( which is a lovely piece in its own right) is to swap in the Monogram 40 Ford pickup chassis. It drops in like it was made for it. And as I swapped the 37 sedan chassis into the Revell 37 Panel delivery with no dramas, I'm guessing that the stock and nicely detailed frame from the pickup or panel will also drop into the Tudor. Still, I like your approach of using up stuff in your stash. And the purists will go nuts but, with the small block being buried so deep inside those fat fenders, you could drop on a pair of Y block rocker covers and exhaust manifolds from a 56 or 57 Ford kit and most people would never spot the deception! Cheers Alan
-
1/24 Australian Supercars Mustang Conversion w/ Tamiya kit
alan barton replied to Calvin Sallee's topic in WIP: Model Cars
That's exactly what I was talking about Ron - it's even more than I thought I knew! Thanks for posting the link. Cheers Alan -
Pink is the new black! It certainly works on this neat little rod! Re-purposing the original Revell centre crossmember is a classic "Now why didn't I think of that ?" moment! I reworked the one on my pink coupe but seeing it used your way is a natural - and I have no shortage of them! I think your back story works pretty well. i wonder if a guy going to the trouble of that upgrade might have stepped up for some cool taillights - maybe the single one in the centre is a throw back to the original build? The engine detailing is a real credit to you - again, you nail that raw metallic finish on components in different shades that look soooo correct - I love it! I swear I am going to try that on my next retro rod. I just have to overcome my chrome addiction! Great model Dennis, and again proves what a great blank canvas Revell gave us with this kit. Cheers Alan
-
1/24 Australian Supercars Mustang Conversion w/ Tamiya kit
alan barton replied to Calvin Sallee's topic in WIP: Model Cars
Some great work there. I don't know if you are aware of just how far the Mustang was massaged for Supercar racing but there is a lot to it. Put it this way, park a Supercar next to a road going Mustang and you would be struggling to tell them as being from the same mother! Basically, when Penske/DJR started building the first prototype, they virtually designed it with the body on the ground, rather like channelling a hot rod roadster over the frame. They then went to AVESCO and said, "Oh, look, the roof won't fit now, you will have to let us lower the rollcage!" But AVESCO went, "No, you'll have to raise the roof!" If you look again at the photos of the Shell car, you will see just how bubble topped it is compared to a real Mustang. They actually use a very wide windshield sunscreen stripe panel ( no idea what it is really called) to try and hide the raised height of the windshield. As a result it looks more like a Nissan Z car than a Ford! Personally, I think your model will look much better if you leave the roof exactly where Henry Ford intended it to be. But if you want to be 100% accurate, you have a lot of work ahead of you! Either way, I am sure you will find plenty of Aussie customers for your resin conversion! Cheers Alan