

alan barton
-
Posts
2,105 -
Joined
-
Last visited
Content Type
Profiles
Forums
Events
Gallery
Everything posted by alan barton
-
You're dead right there, Rick! Two things that the purists might fail to realise is that a) 1:1 rodders have a massive variety of tyres to choose from whereas most model tyres are 15" and are remarkably similar profile and b) real cars have fenders that are barely a millimetre thick while models have fenders that might be up to 2 inches thick in scale! I would much rather sacrifice scale accuracy by slicing a tyre rather than having it sitting up in the air like a monster truck! I often take a small slice off the bottom of the tyre as well. Sure, the tread disappears from that spot and you can see it when you turn the model upside down but for the rest of the time, the model sits on its tyres with some realistic "weight". And, you get a little closer to the ground again! Thanks for the hints on practising, Mark. I must admit, I had never practised on flock because until this build I had never had any problems with it! I always wondered why people had issues when I had been using it since I was fourteen years old and it always gave a good result. Lesson learned I guess. I must say that thepartsbox.com flock worked extremely well and achieved the results I was after. Cheers Alan
-
Rodney, that is the first example of this kit that I have ever seen built and it certainly looks way better than the box art. Your rework on the AMT chassis looks excellent and would help that Jag rear to work properly. You got the body sitting perfect on that chassis. Really, really nice! Cheers Alan
-
Mickey Thompson 69 Mustang Mach 1 Funnycar x 2!
alan barton replied to alan barton's topic in WIP: Drag Racing Models
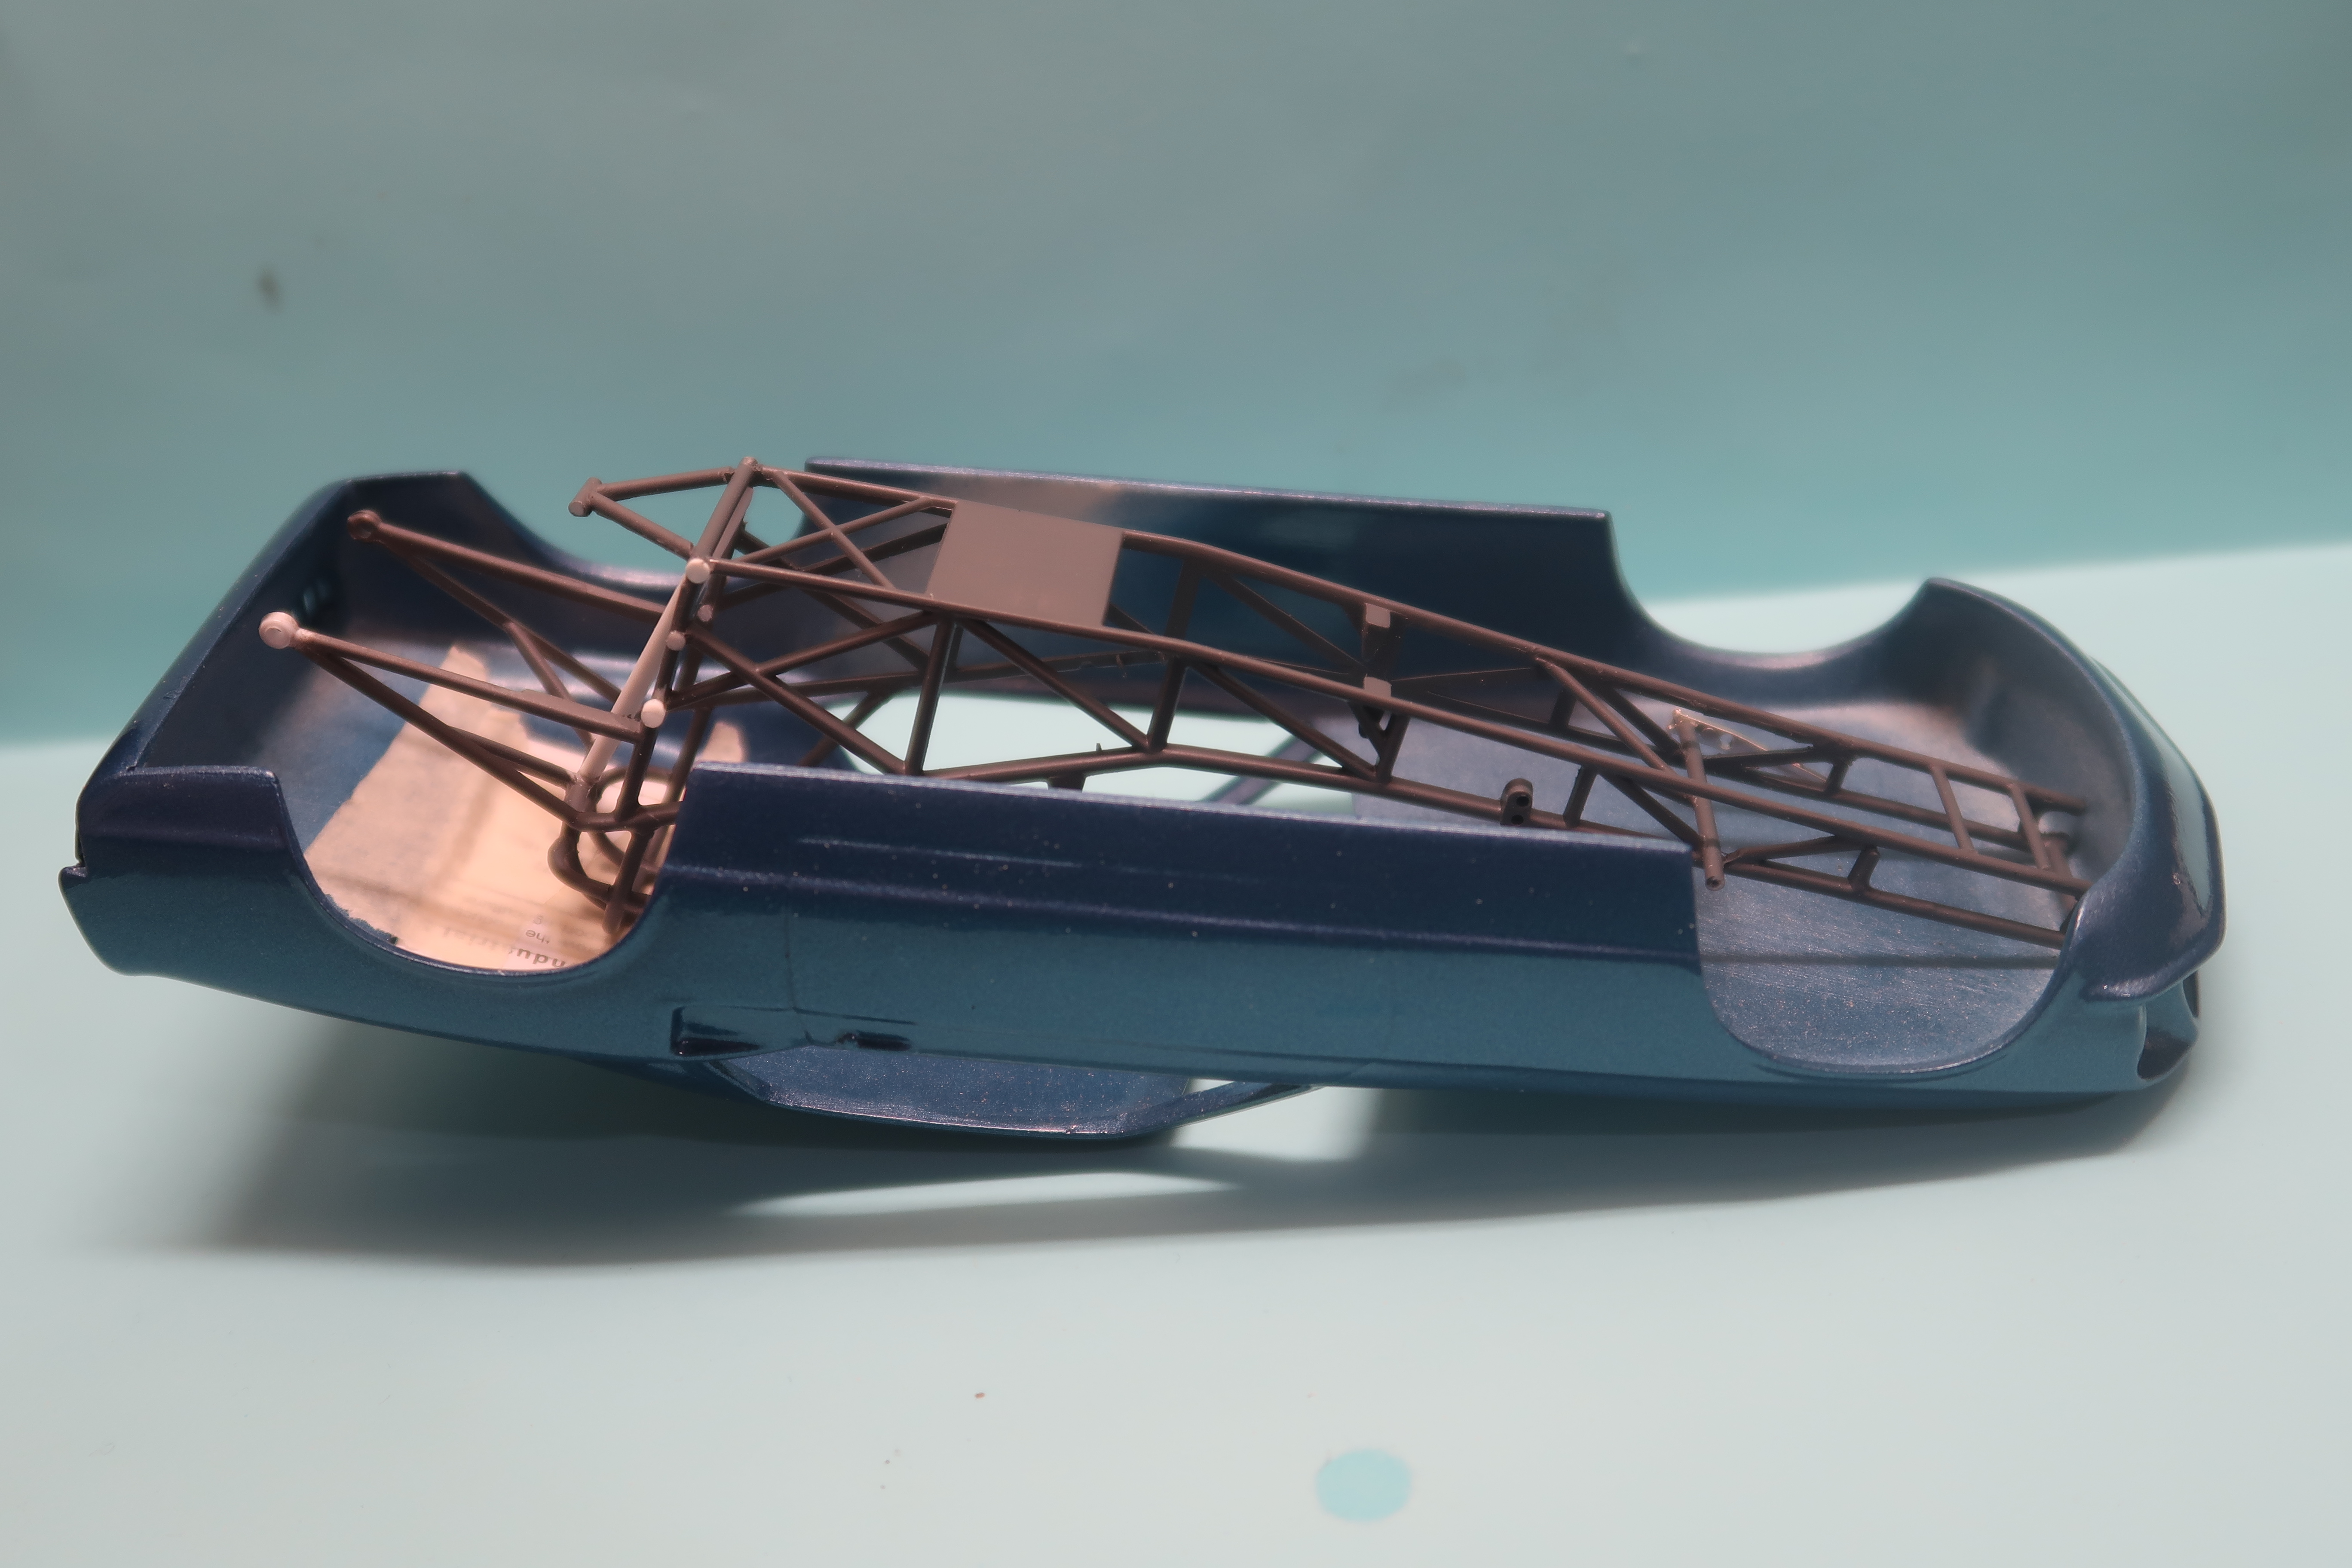
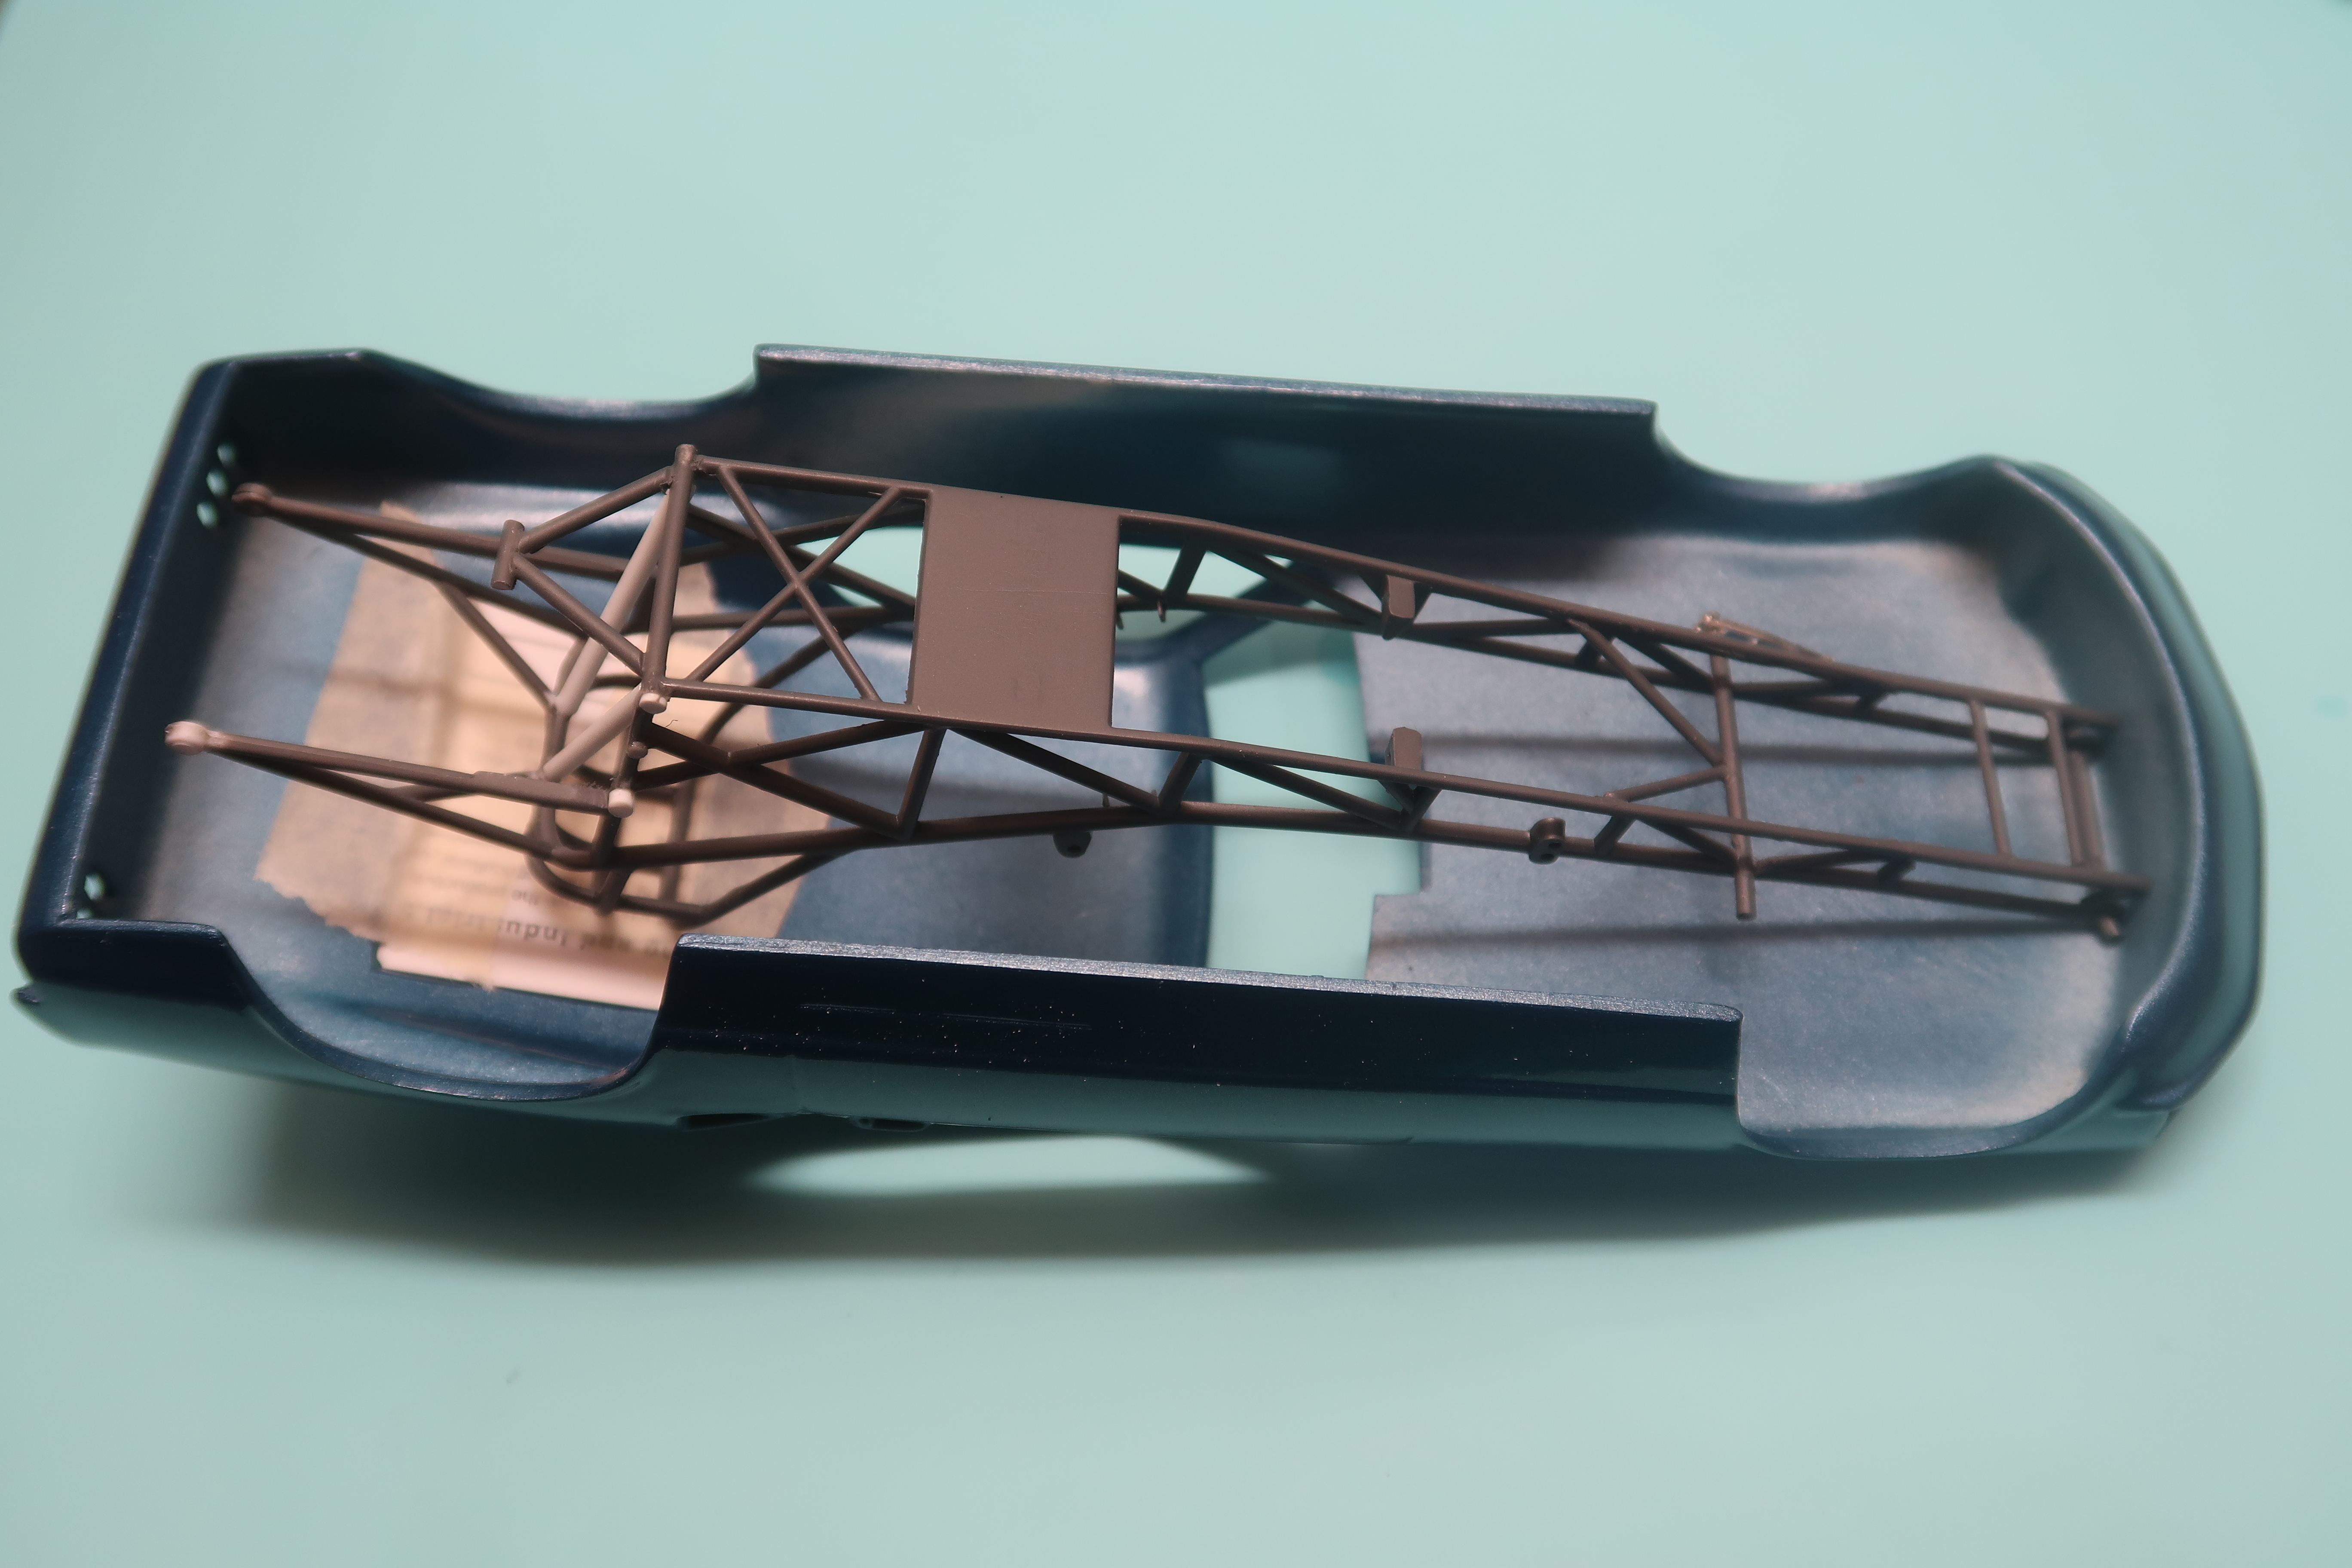
As I was thinking about all the work ahead of me, I came across this assembled frame and and realised it could be a better fit with less work, but still work! First step was to shorten the frame until it fitted inside the Mustang body. First mockup looks like I am on the right track.
-
Mickey Thompson 69 Mustang Mach 1 Funnycar x 2!
alan barton replied to alan barton's topic in WIP: Drag Racing Models
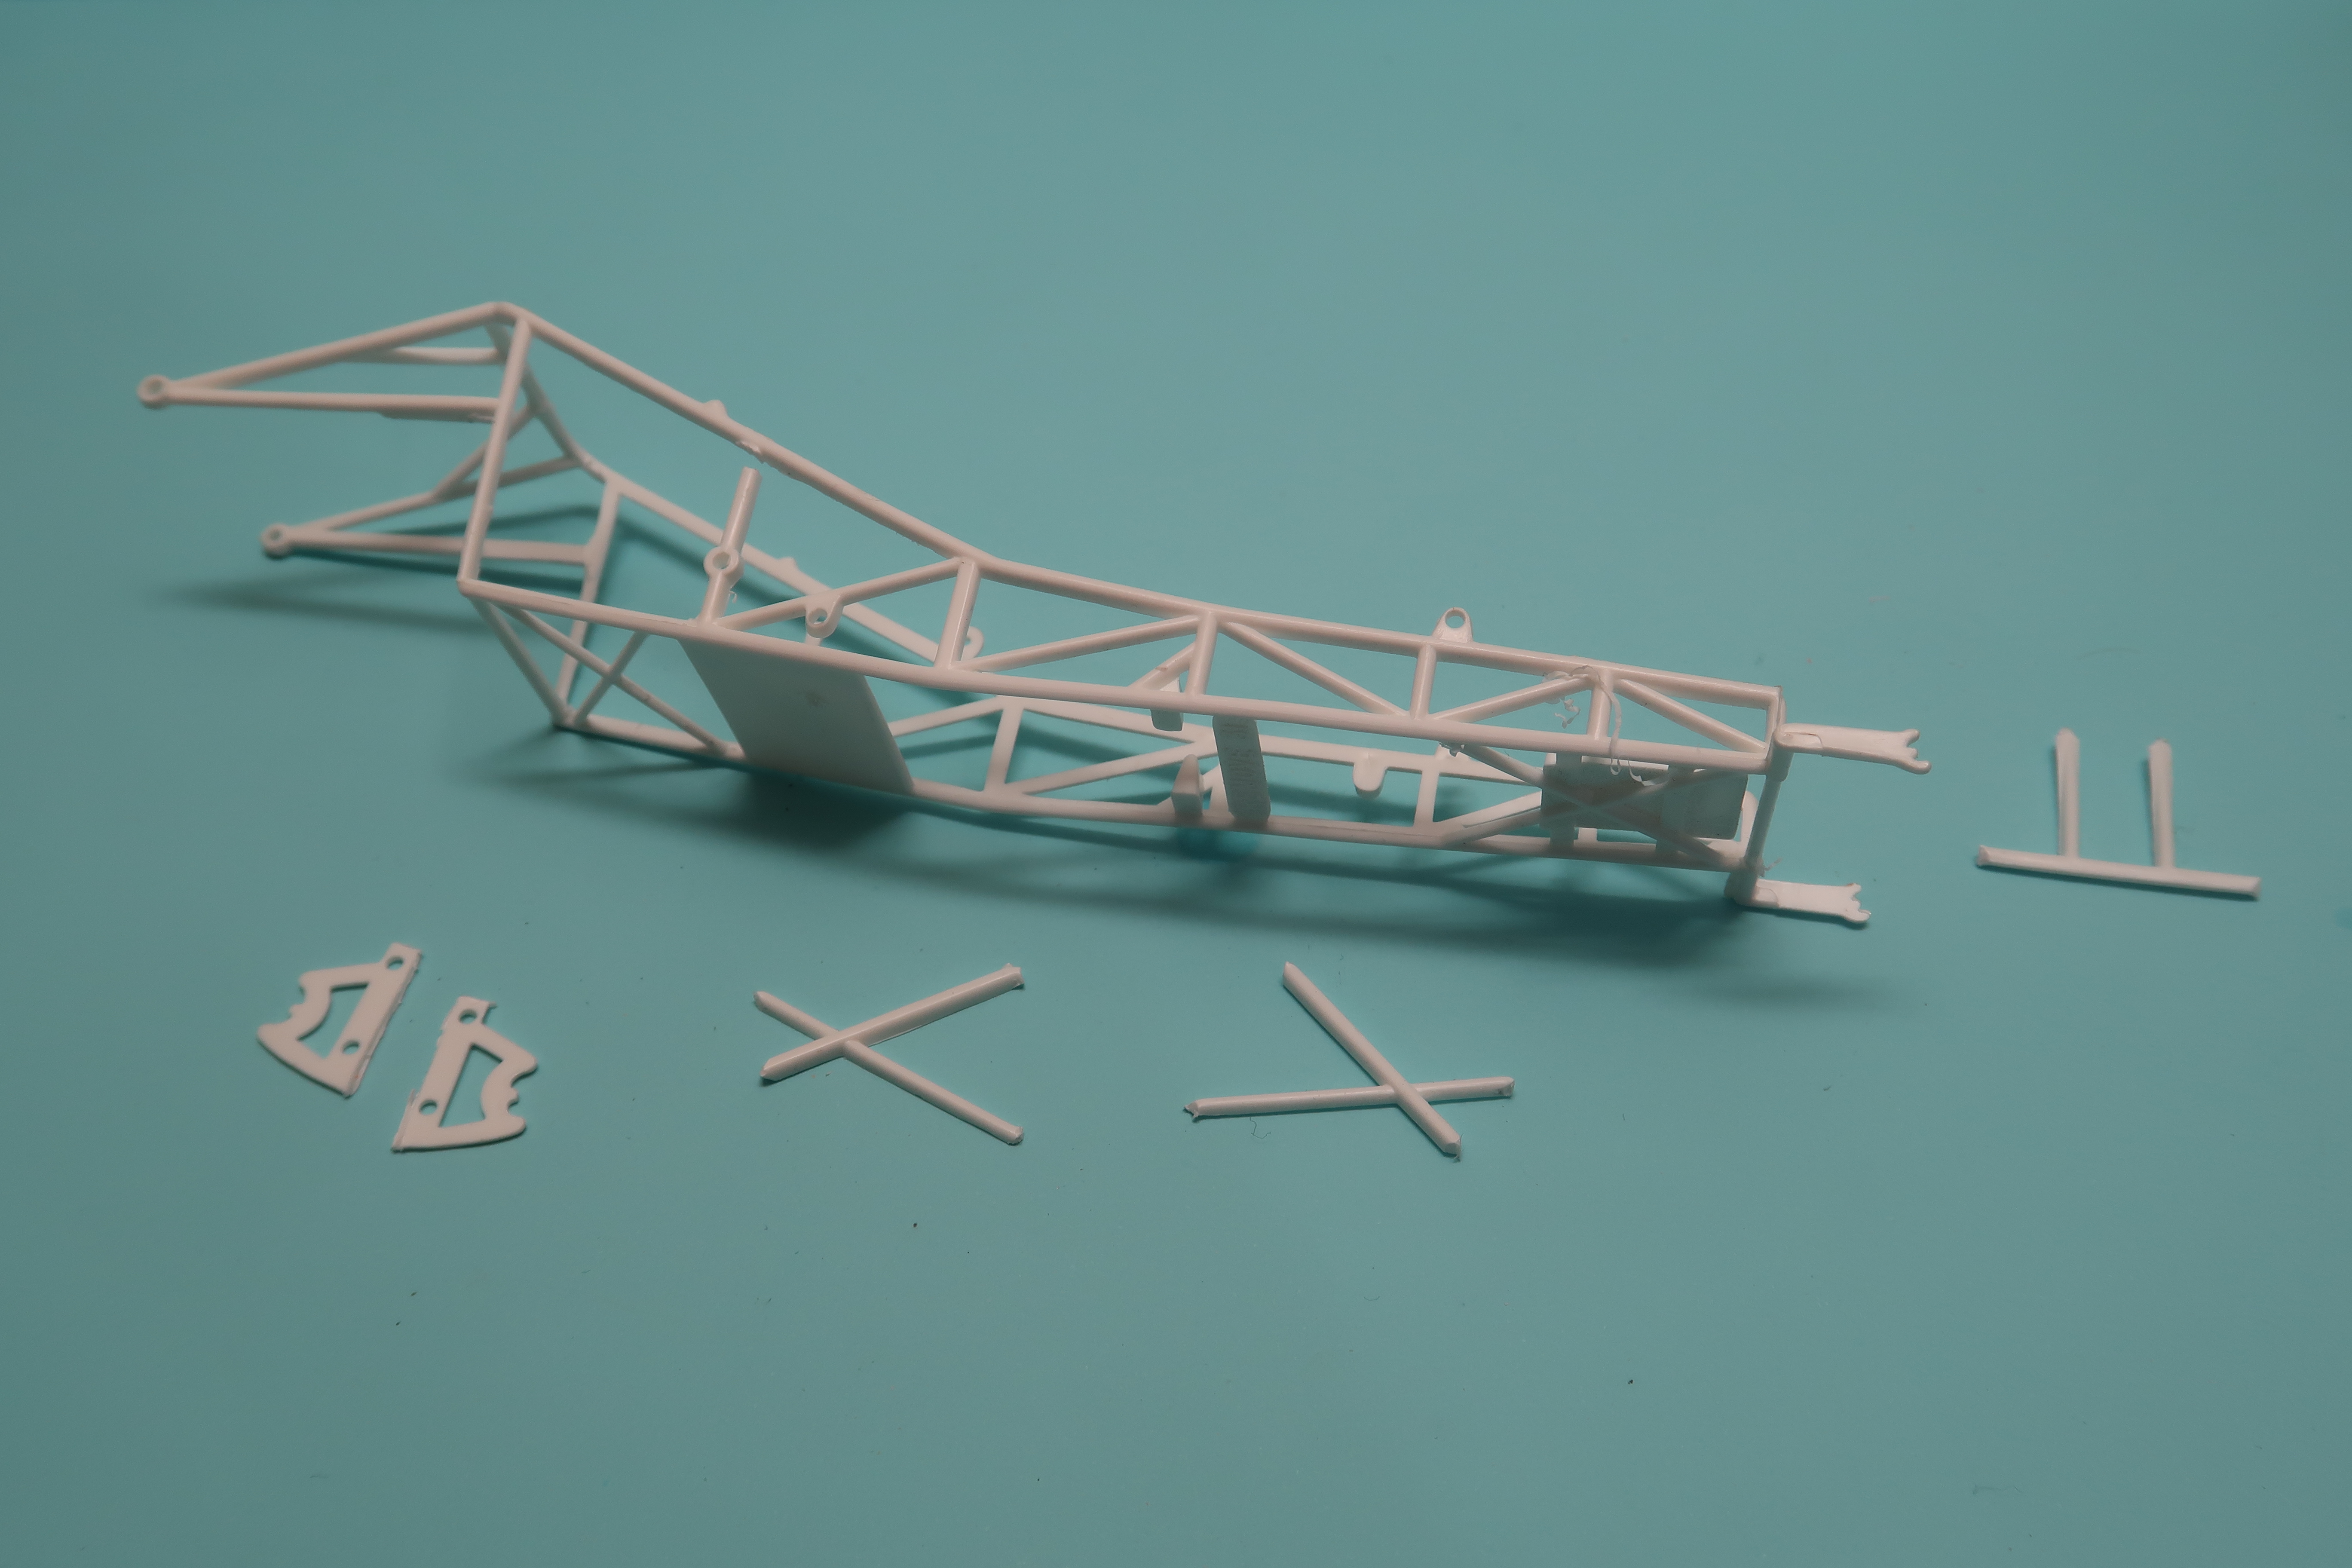
So here's what went wrong. The rollcage rested on my cardboard rear window long before the bottom of the frame got close to the rocker panels. In turn, that meant the engine and exhausts would be miles away and the injectors would never have reached the hood. I then cut the rear uprights of the frame and trimmed the legs of the rollcage and gained close to 10mm over my first one. I then started to look at the changes I needed to the side intrusion bars alongside the seat, something I hadn't looked at on the first frame. I would also need to modify and lengthen the frame at the front, once again.
-
Mickey Thompson 69 Mustang Mach 1 Funnycar x 2!
alan barton replied to alan barton's topic in WIP: Drag Racing Models
Hi everyone, I know there has been a long wait but I really did lose my way on this one. I had begun by modifying a Revell Jungle Jim Vega chassis . Things seemed to be going well until I tried to position the front and rear axles. No matter what I did, it looked like it was going to ahve the stance of a monster truck, and that simply wouldn't do. I have been working on other projects on and off for a while but this thing needs to get finished so last night I made a new front axle, reworked the rear end and still it was hopeless. Then I started looking at the frame again and decided I was going to have to lose some height out of the chassis and rollcage if I was ever going to get this thing packaged. SO today, I grabbed a spare frame and cut away some of the bars in the cockpit area, plus cut a chunk out of the rollcage uprights and I 'found" about 10mm. Suddenly the fit was a whole lot better. Problem was, the rear axle was still going to be tough to get accurate . While looking for some more parts, I stumbled upon a "late model Revellogram chassis, the Mongoose 57 Chevy actually, and I couldn't believe my eyes, it was a hundred times more accurate than what I had already achieved.. Sure, it will still need some more reworking but it has dawned on me that as I said at the start of this thread, the car was built with John Buttera's first funnycar chassis and the restoration was completed with his LAST chassis. I had completely overlooked the significance of that fact. So, I have had to go quite a way backwards to go forwards but overall this is the first time I have felt positive about this build for quite a while. I should ahve some new photos soon! Cheers Alan -
All those early Monogram hot rod kits are great and I love the treatment you have given your tub. Colour combo is righteous! Cheers Alan
-
Sounds like it would be worth it just fro the decals! did the custom 42 style grille come with this kit or only the stock 48?
-
That's giving ,me some ideas. I have a box stock one on the shelf but there is an untouched one in the stash waiting for inspiration! Cheers Alan
-
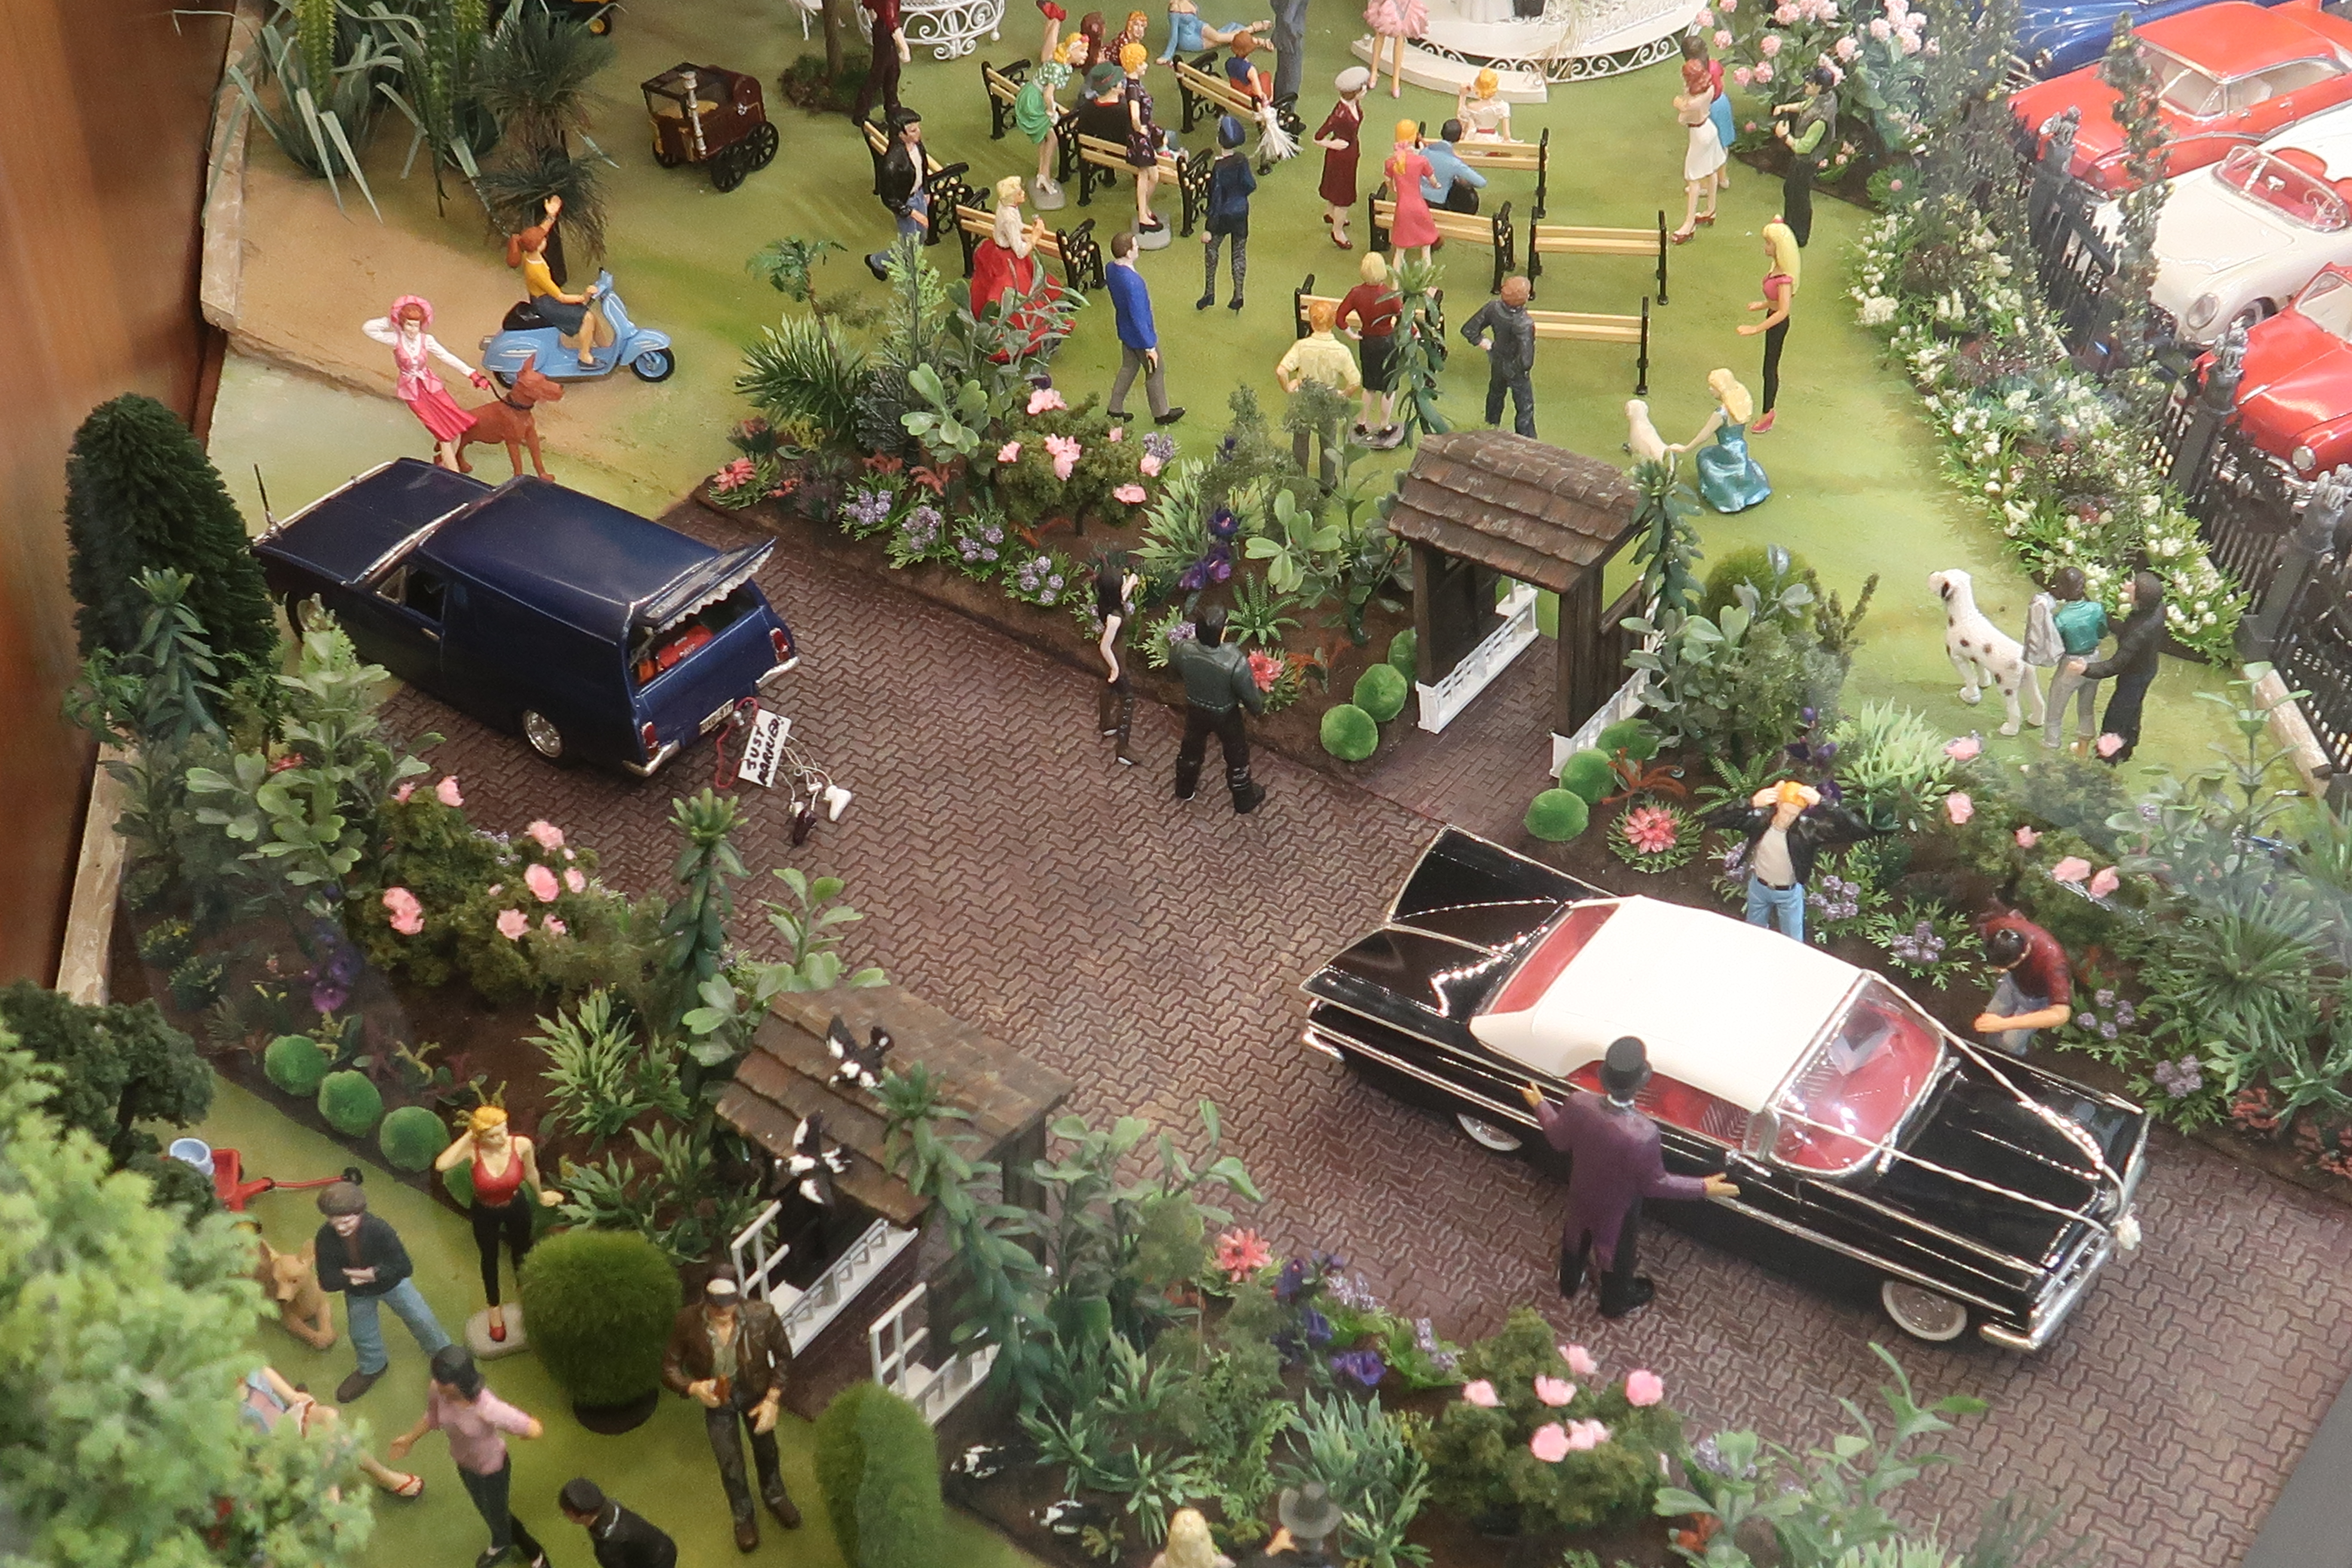
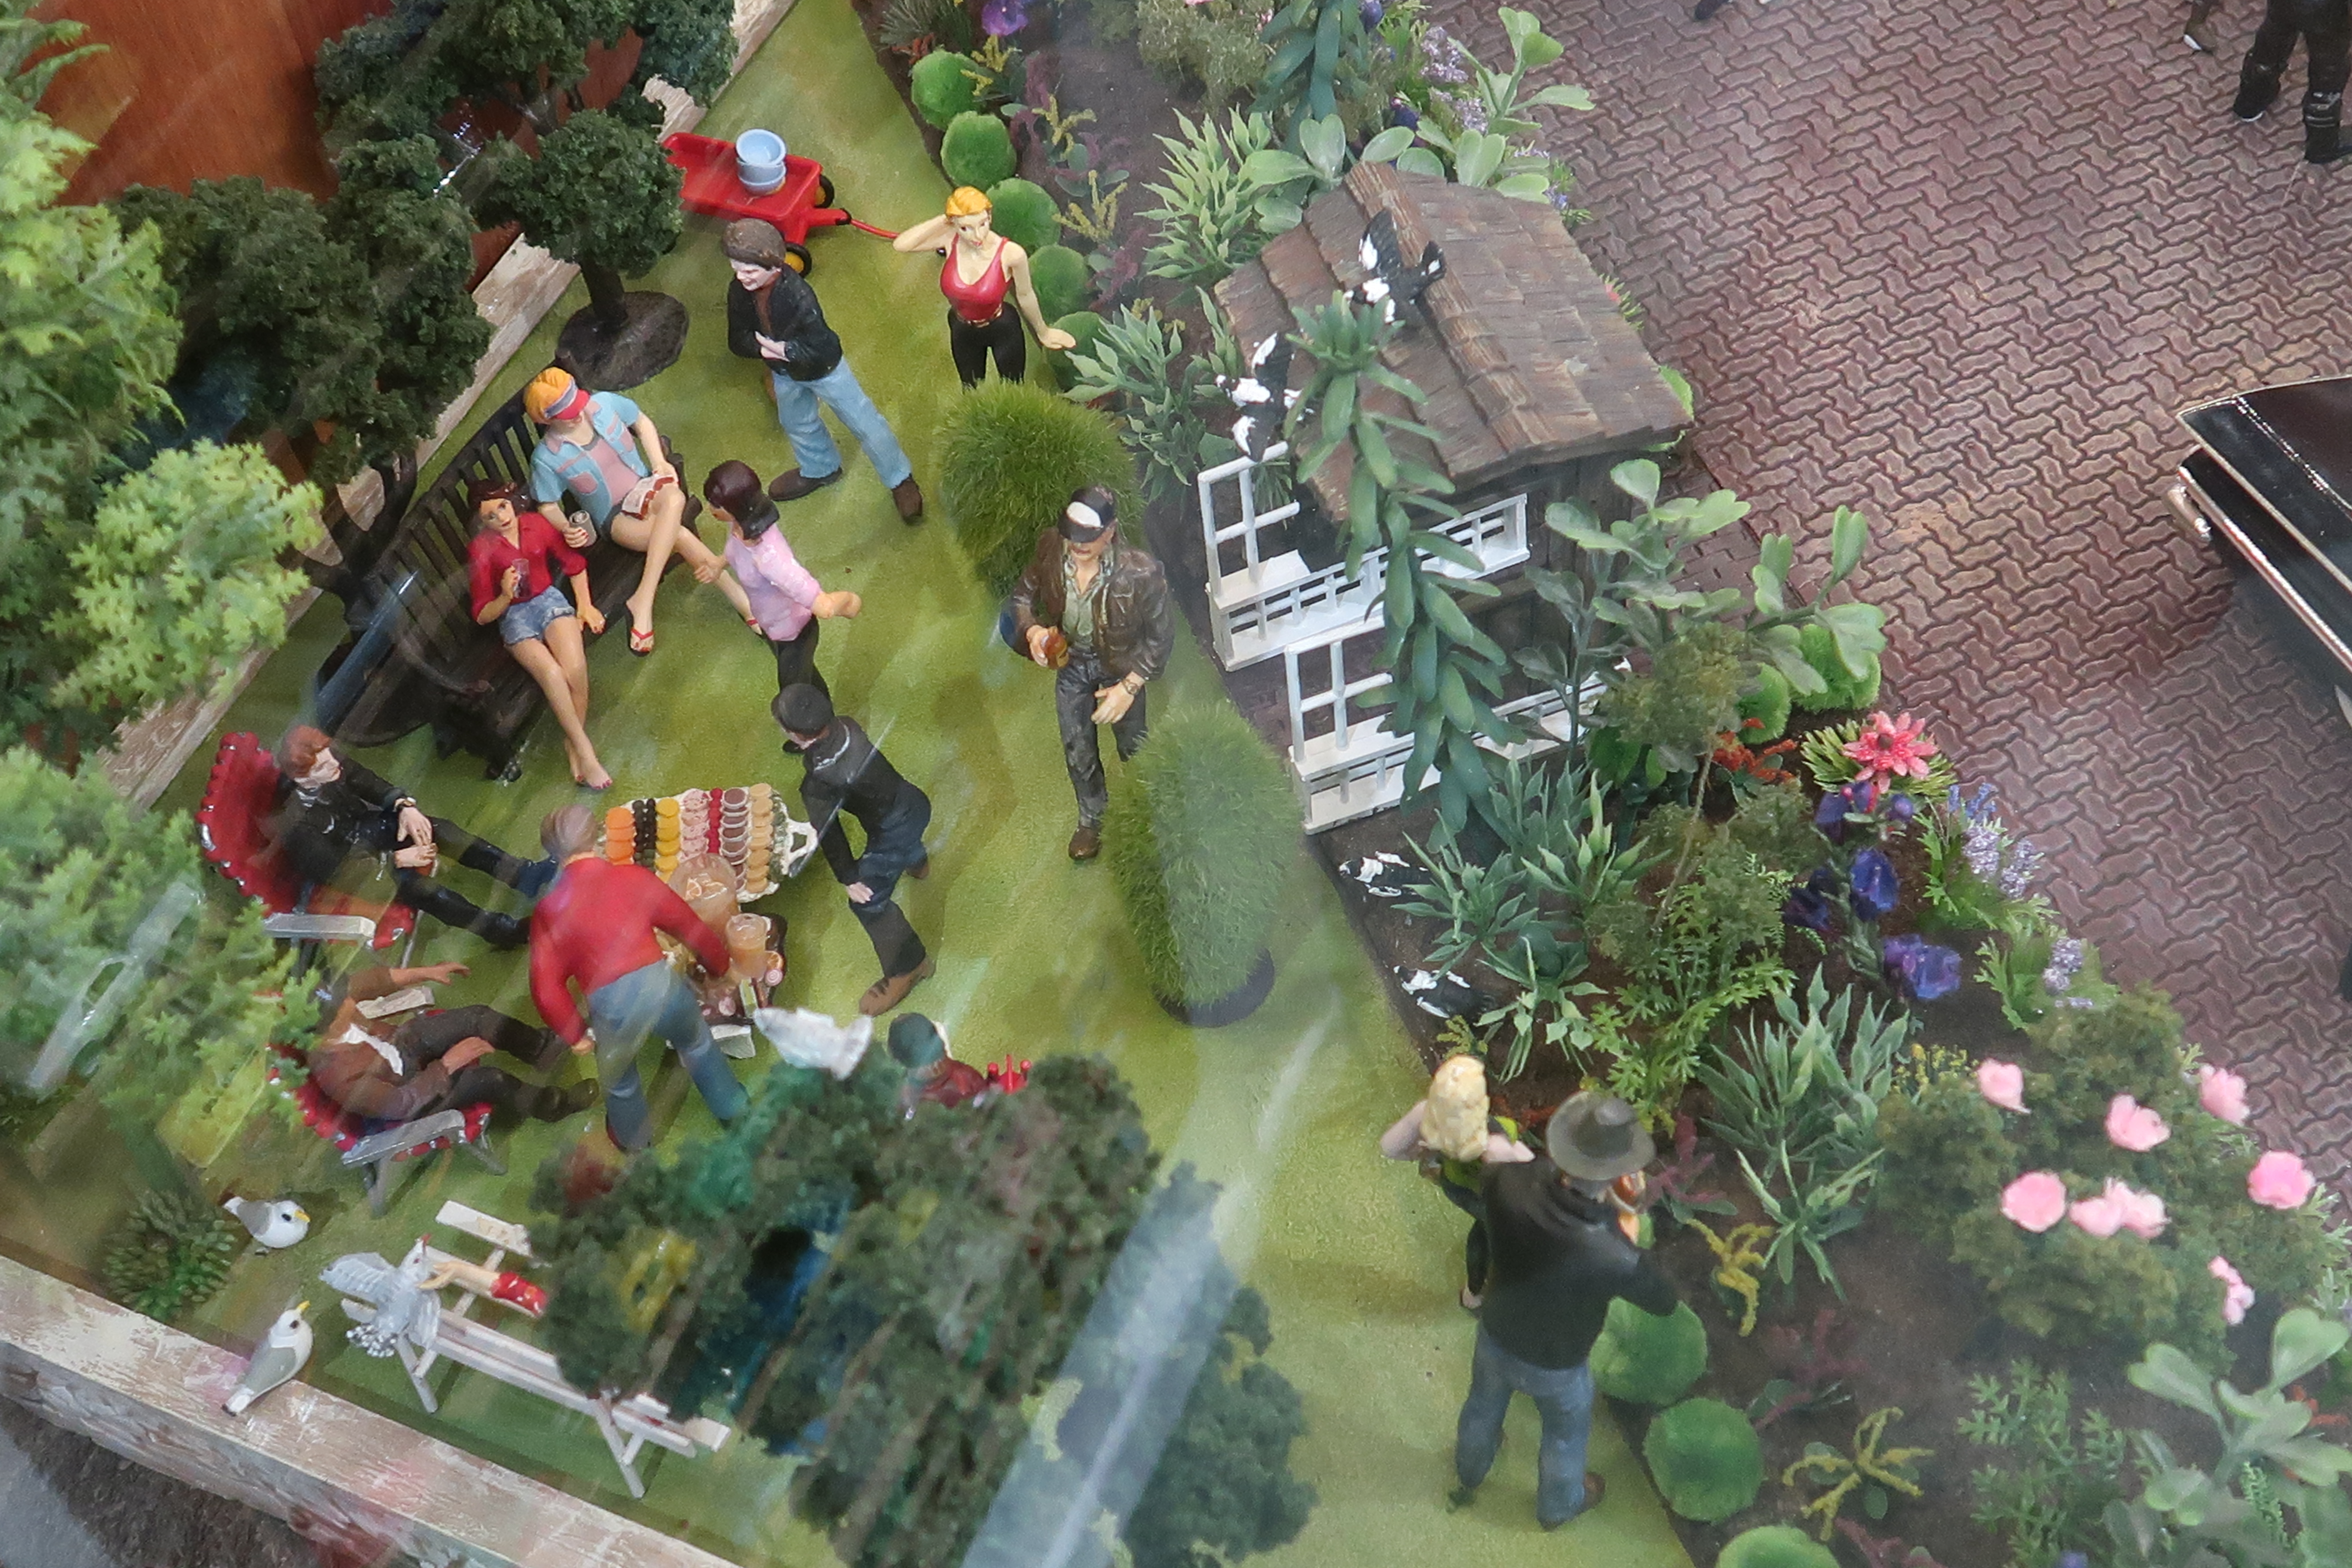
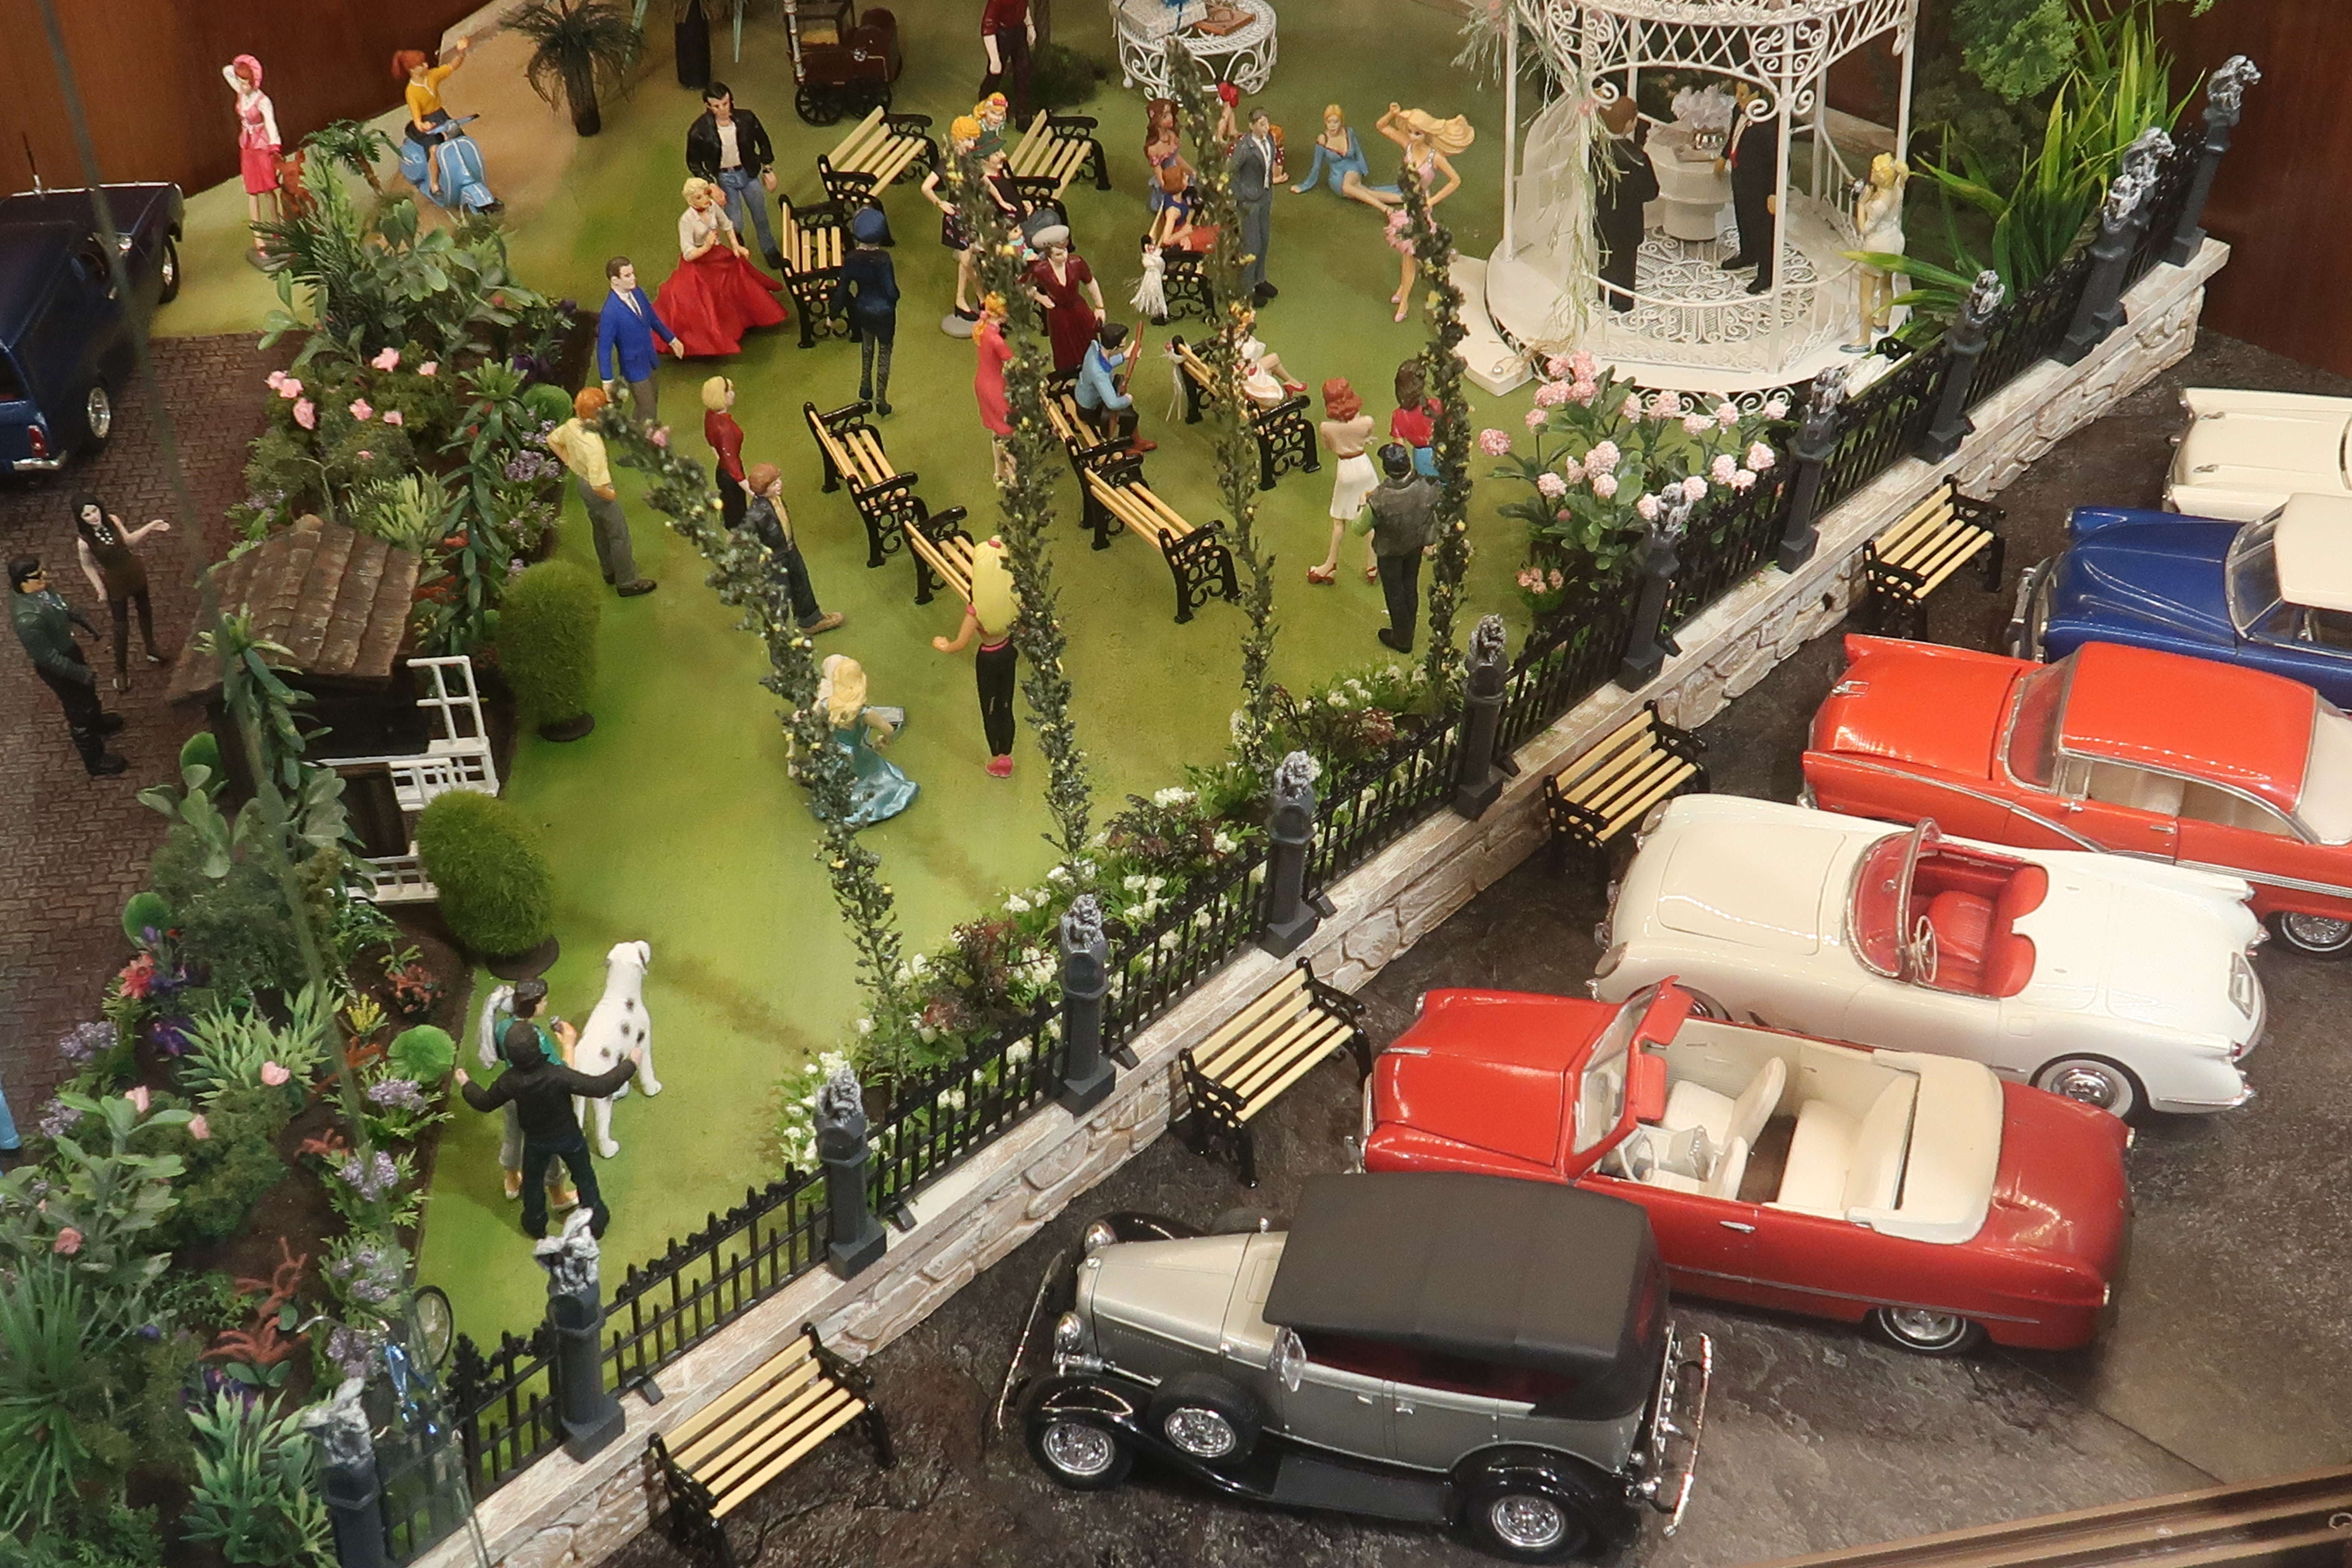
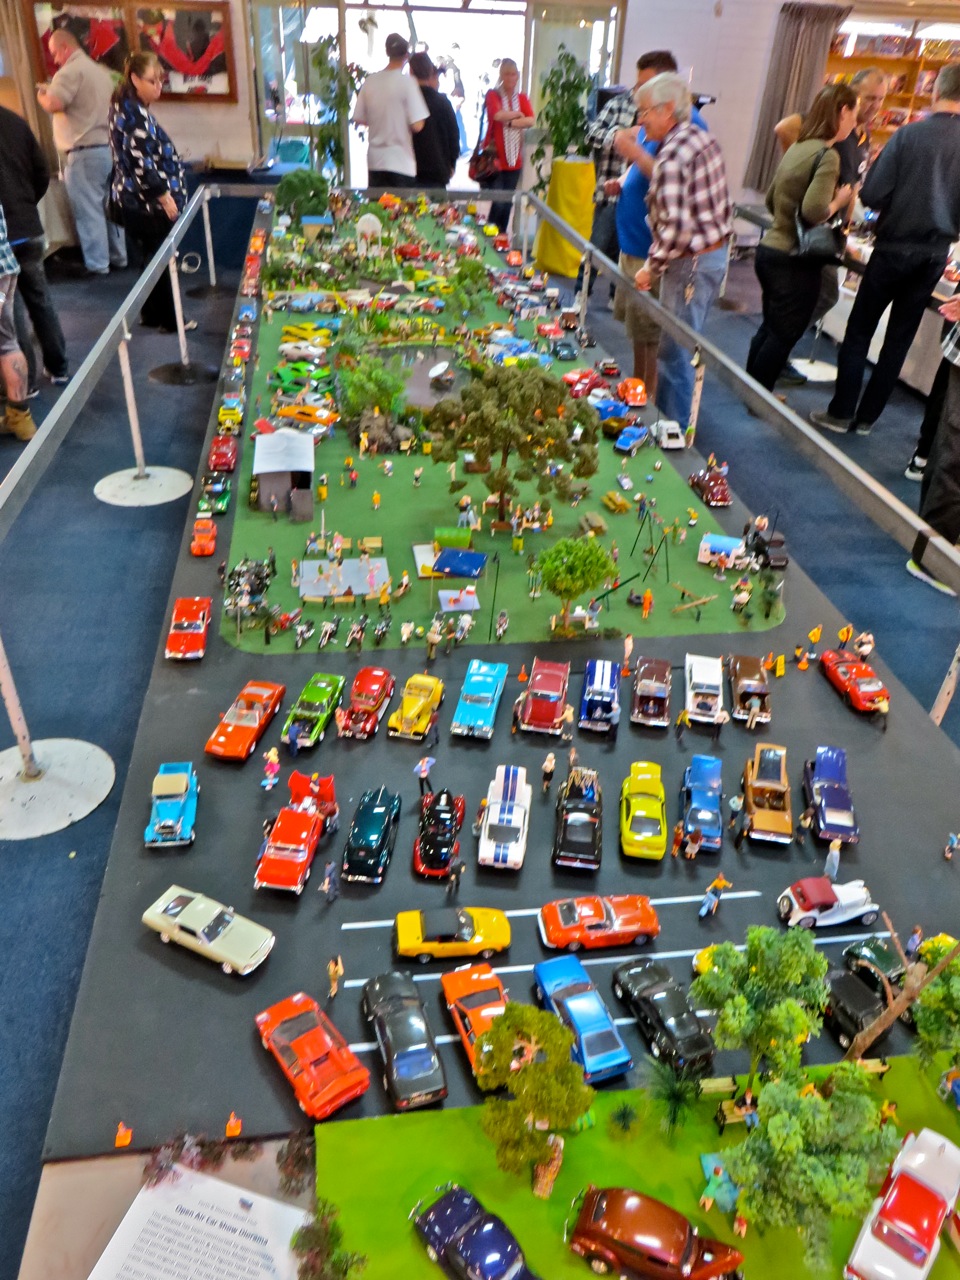
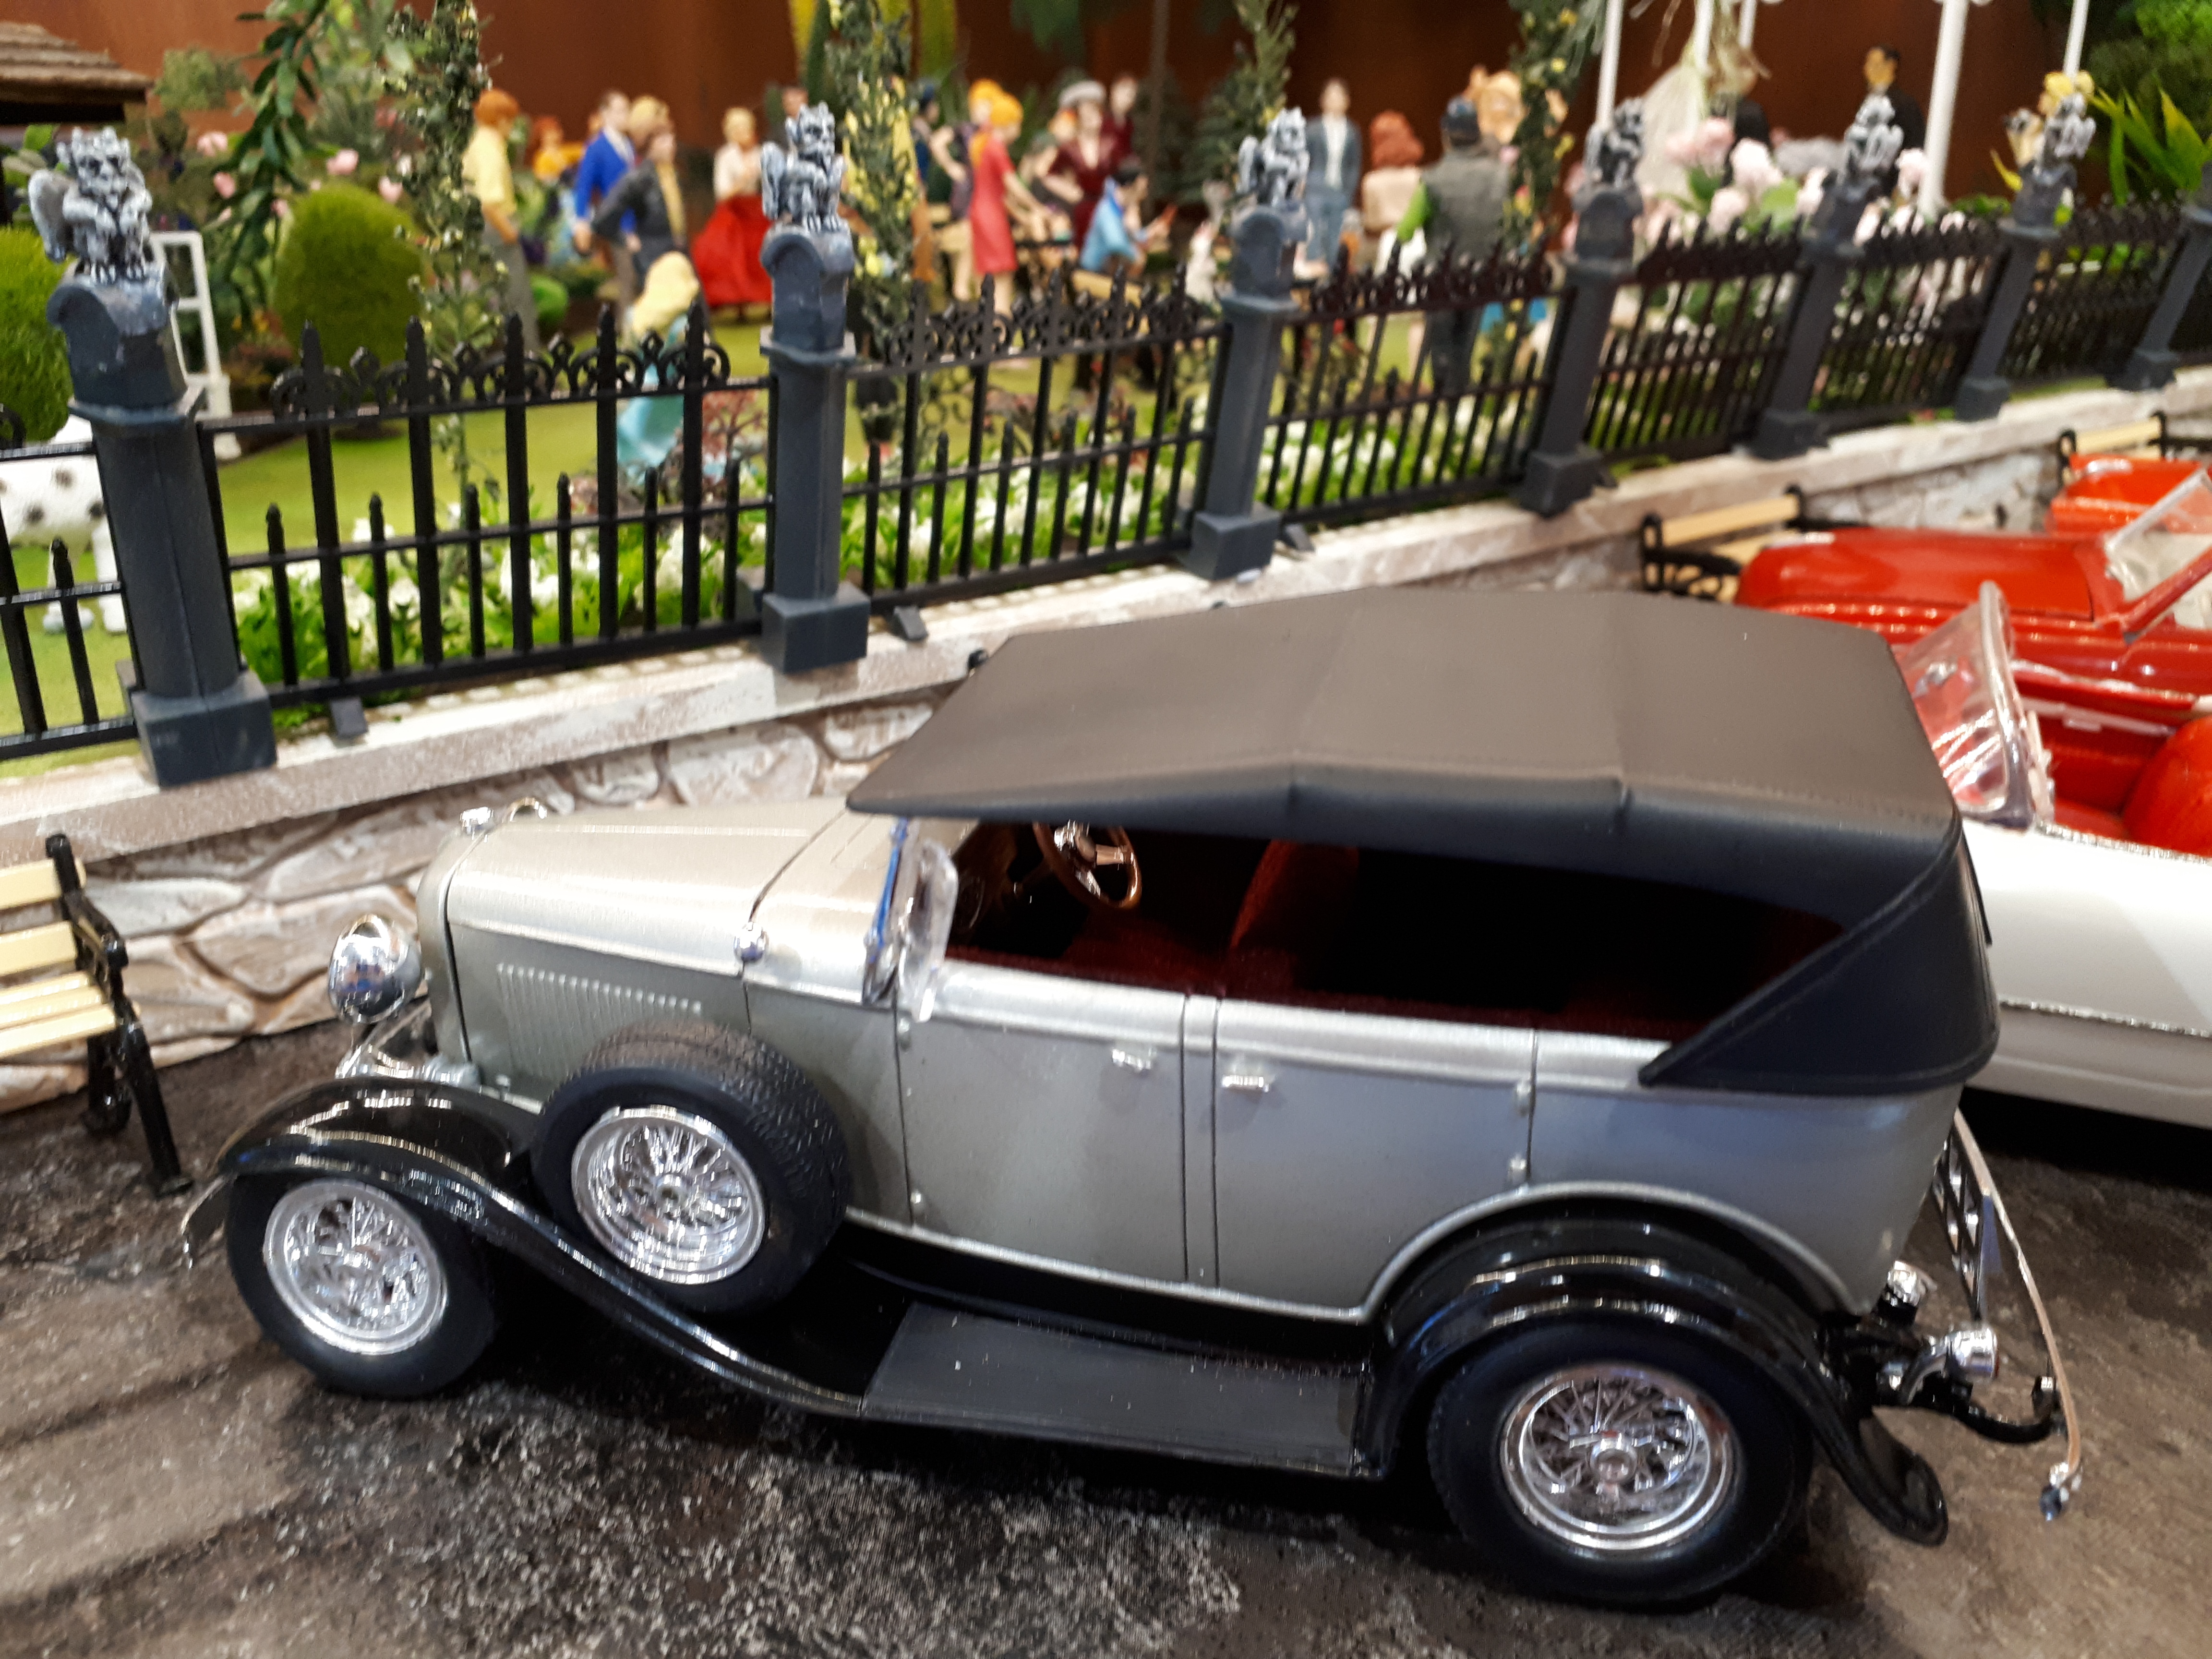
Thanks guys. Here are some more shots giving a more complete view of the entire module. On the opposite side of the driveway to the wedding you can see a group of friends having a picnic. Some of the food items are dolls house pieces - though they are intended as 1/12 scale, they don't look out of place. The girls are sitting on the old log seat from the back of the Beverley Hillbillies' Oldsmobile. We found the front fence in a Halloween store during a vacation in the USA many years ago. A fellow club member, Rob, found the park benches on eBay. Cheers Alan
-
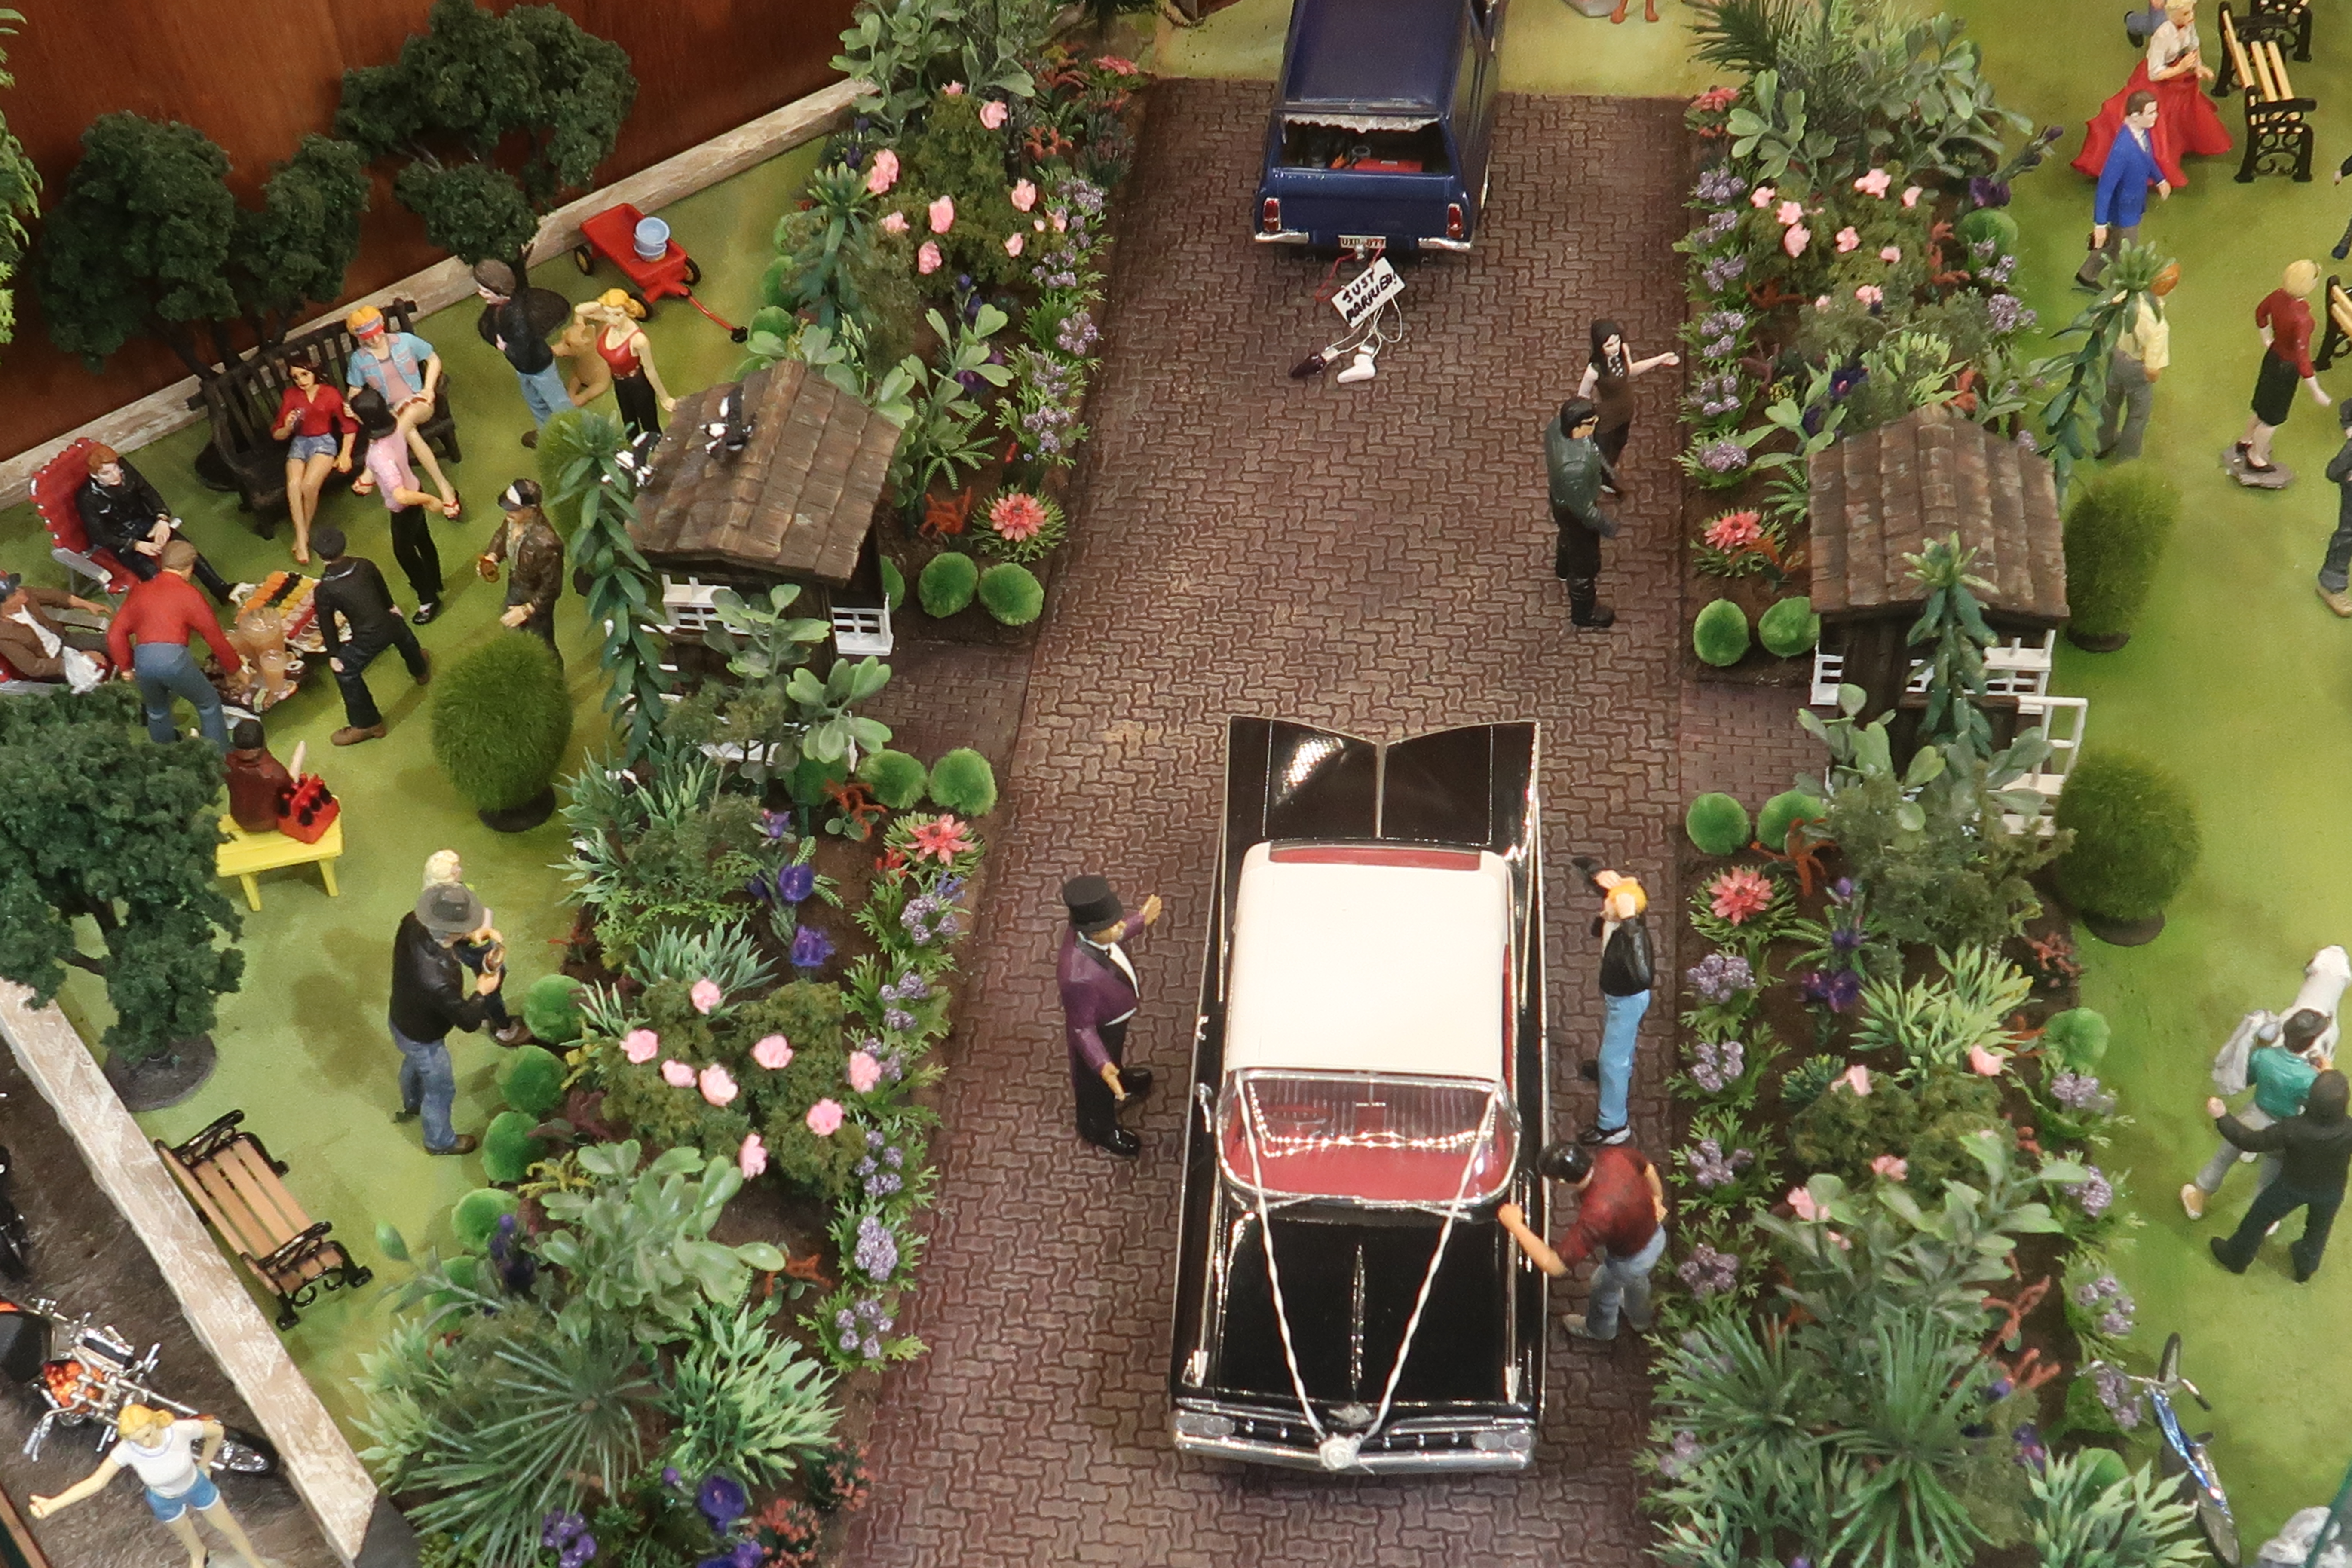
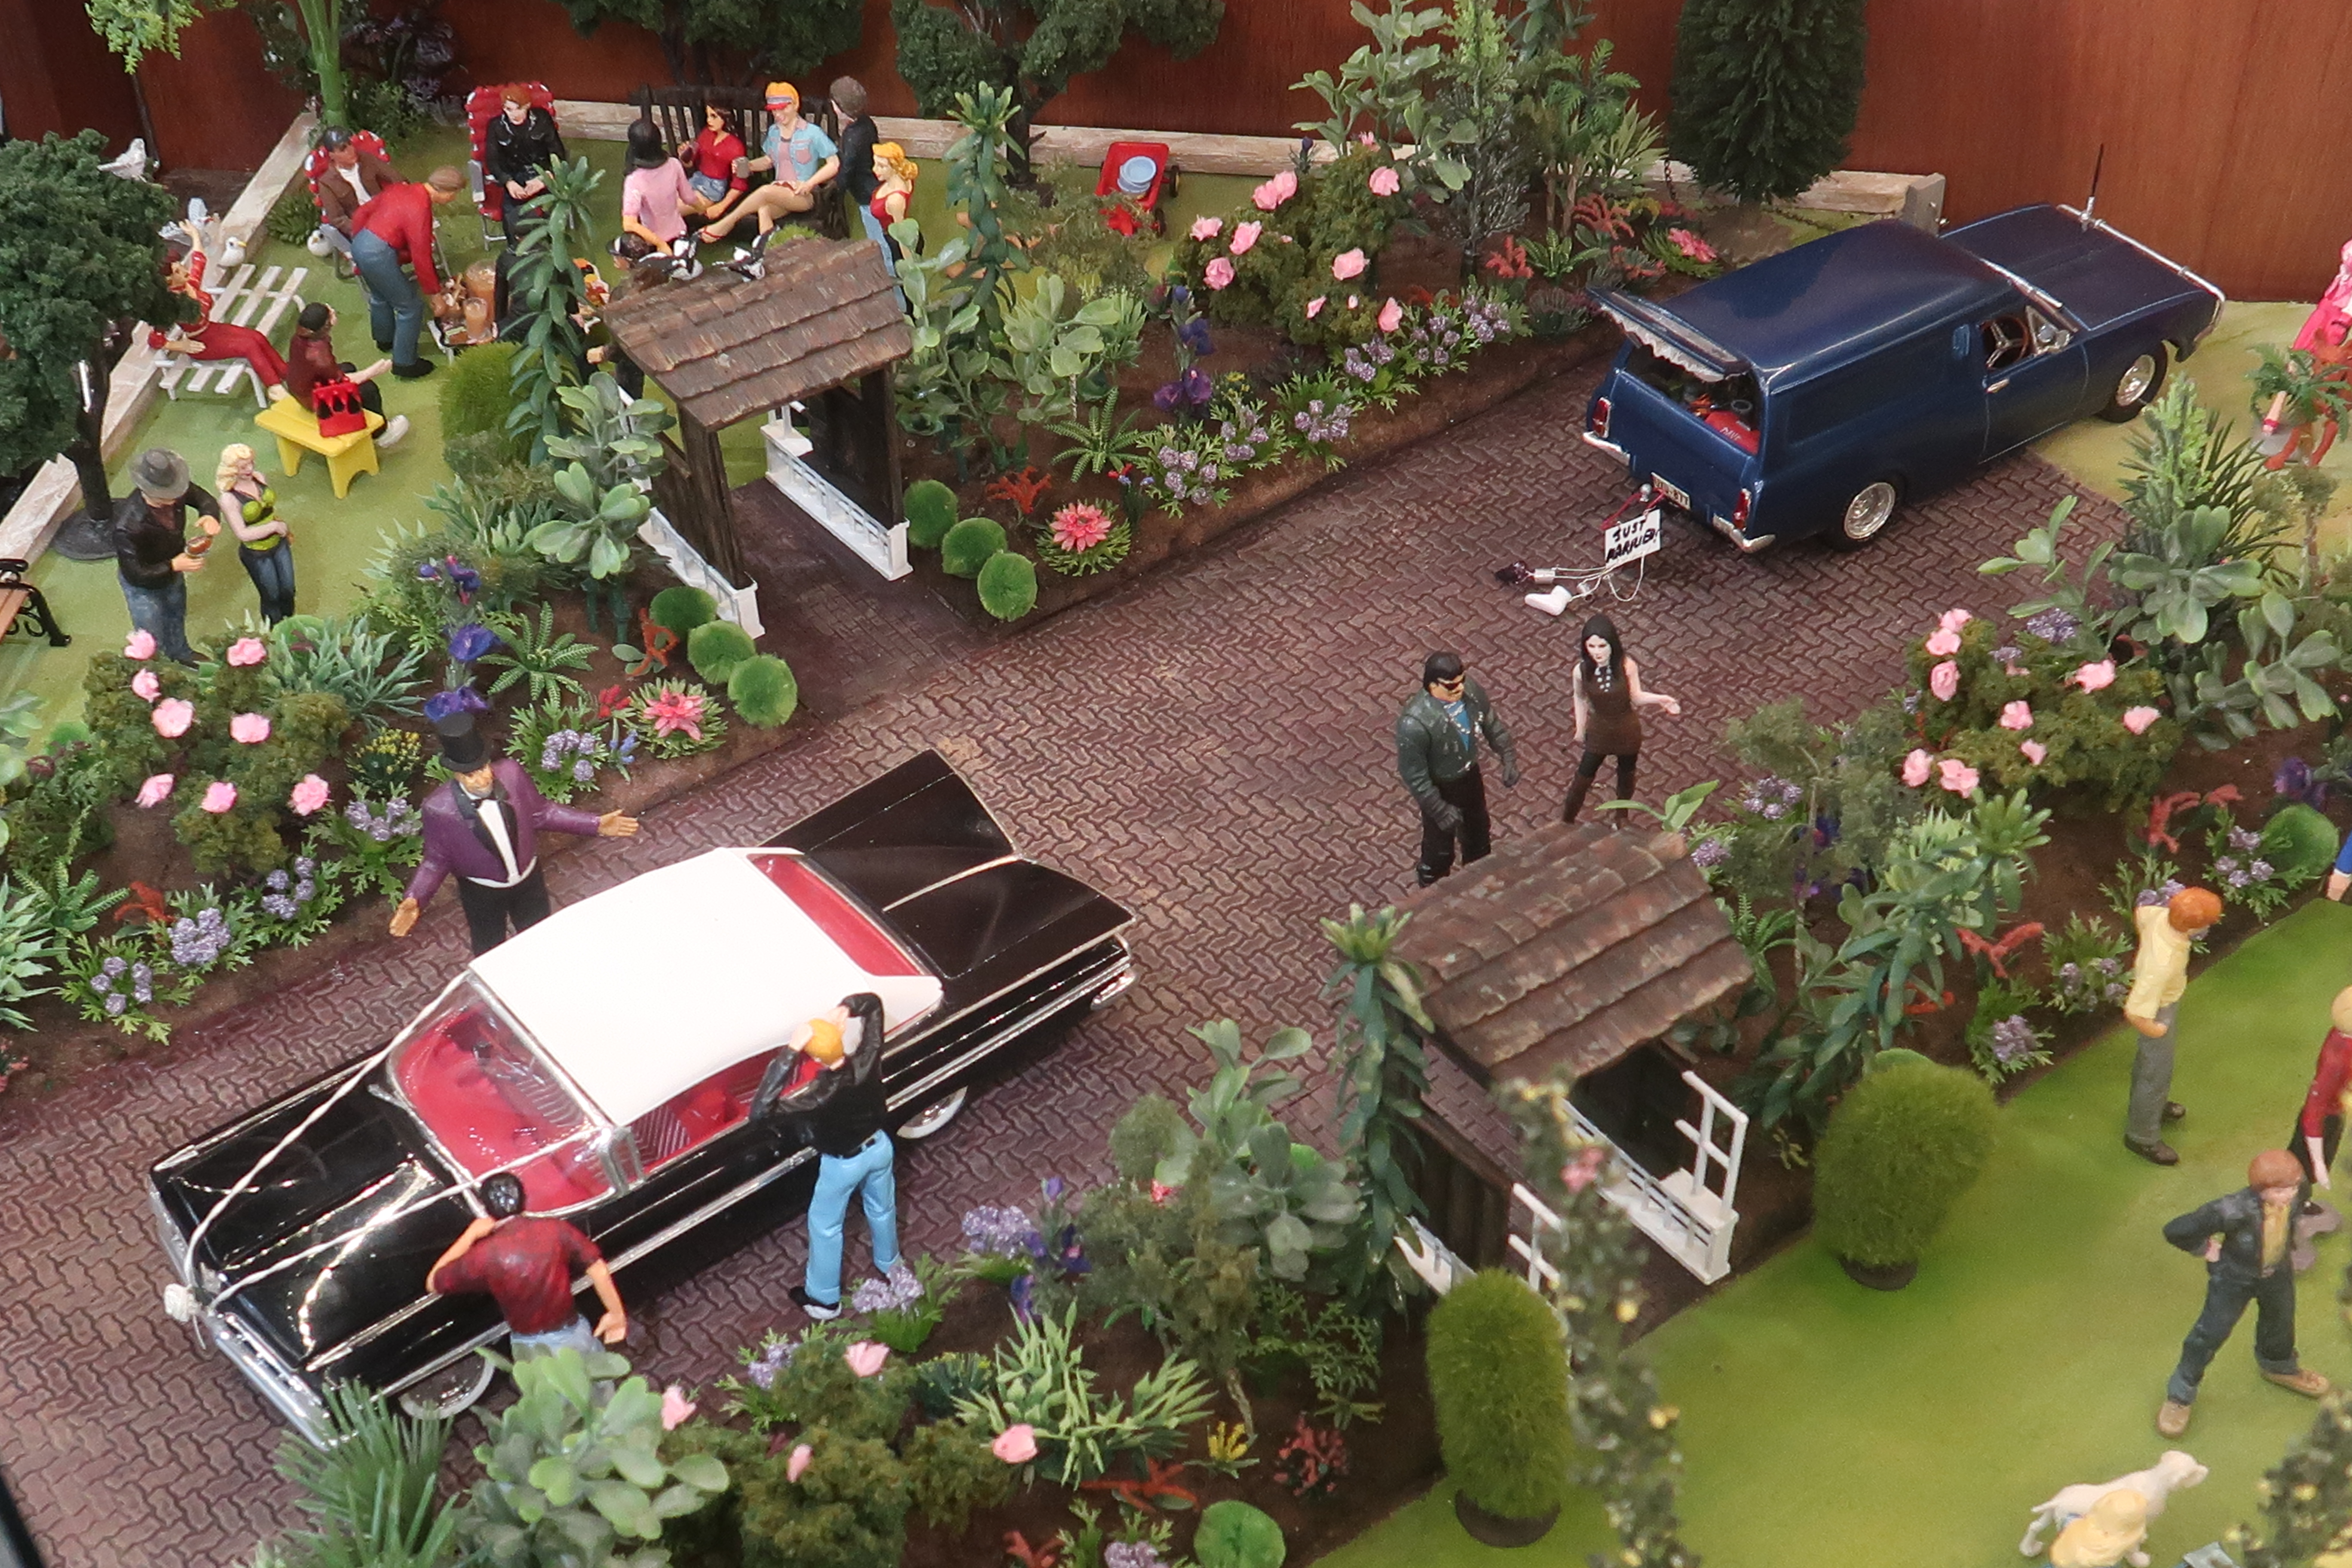
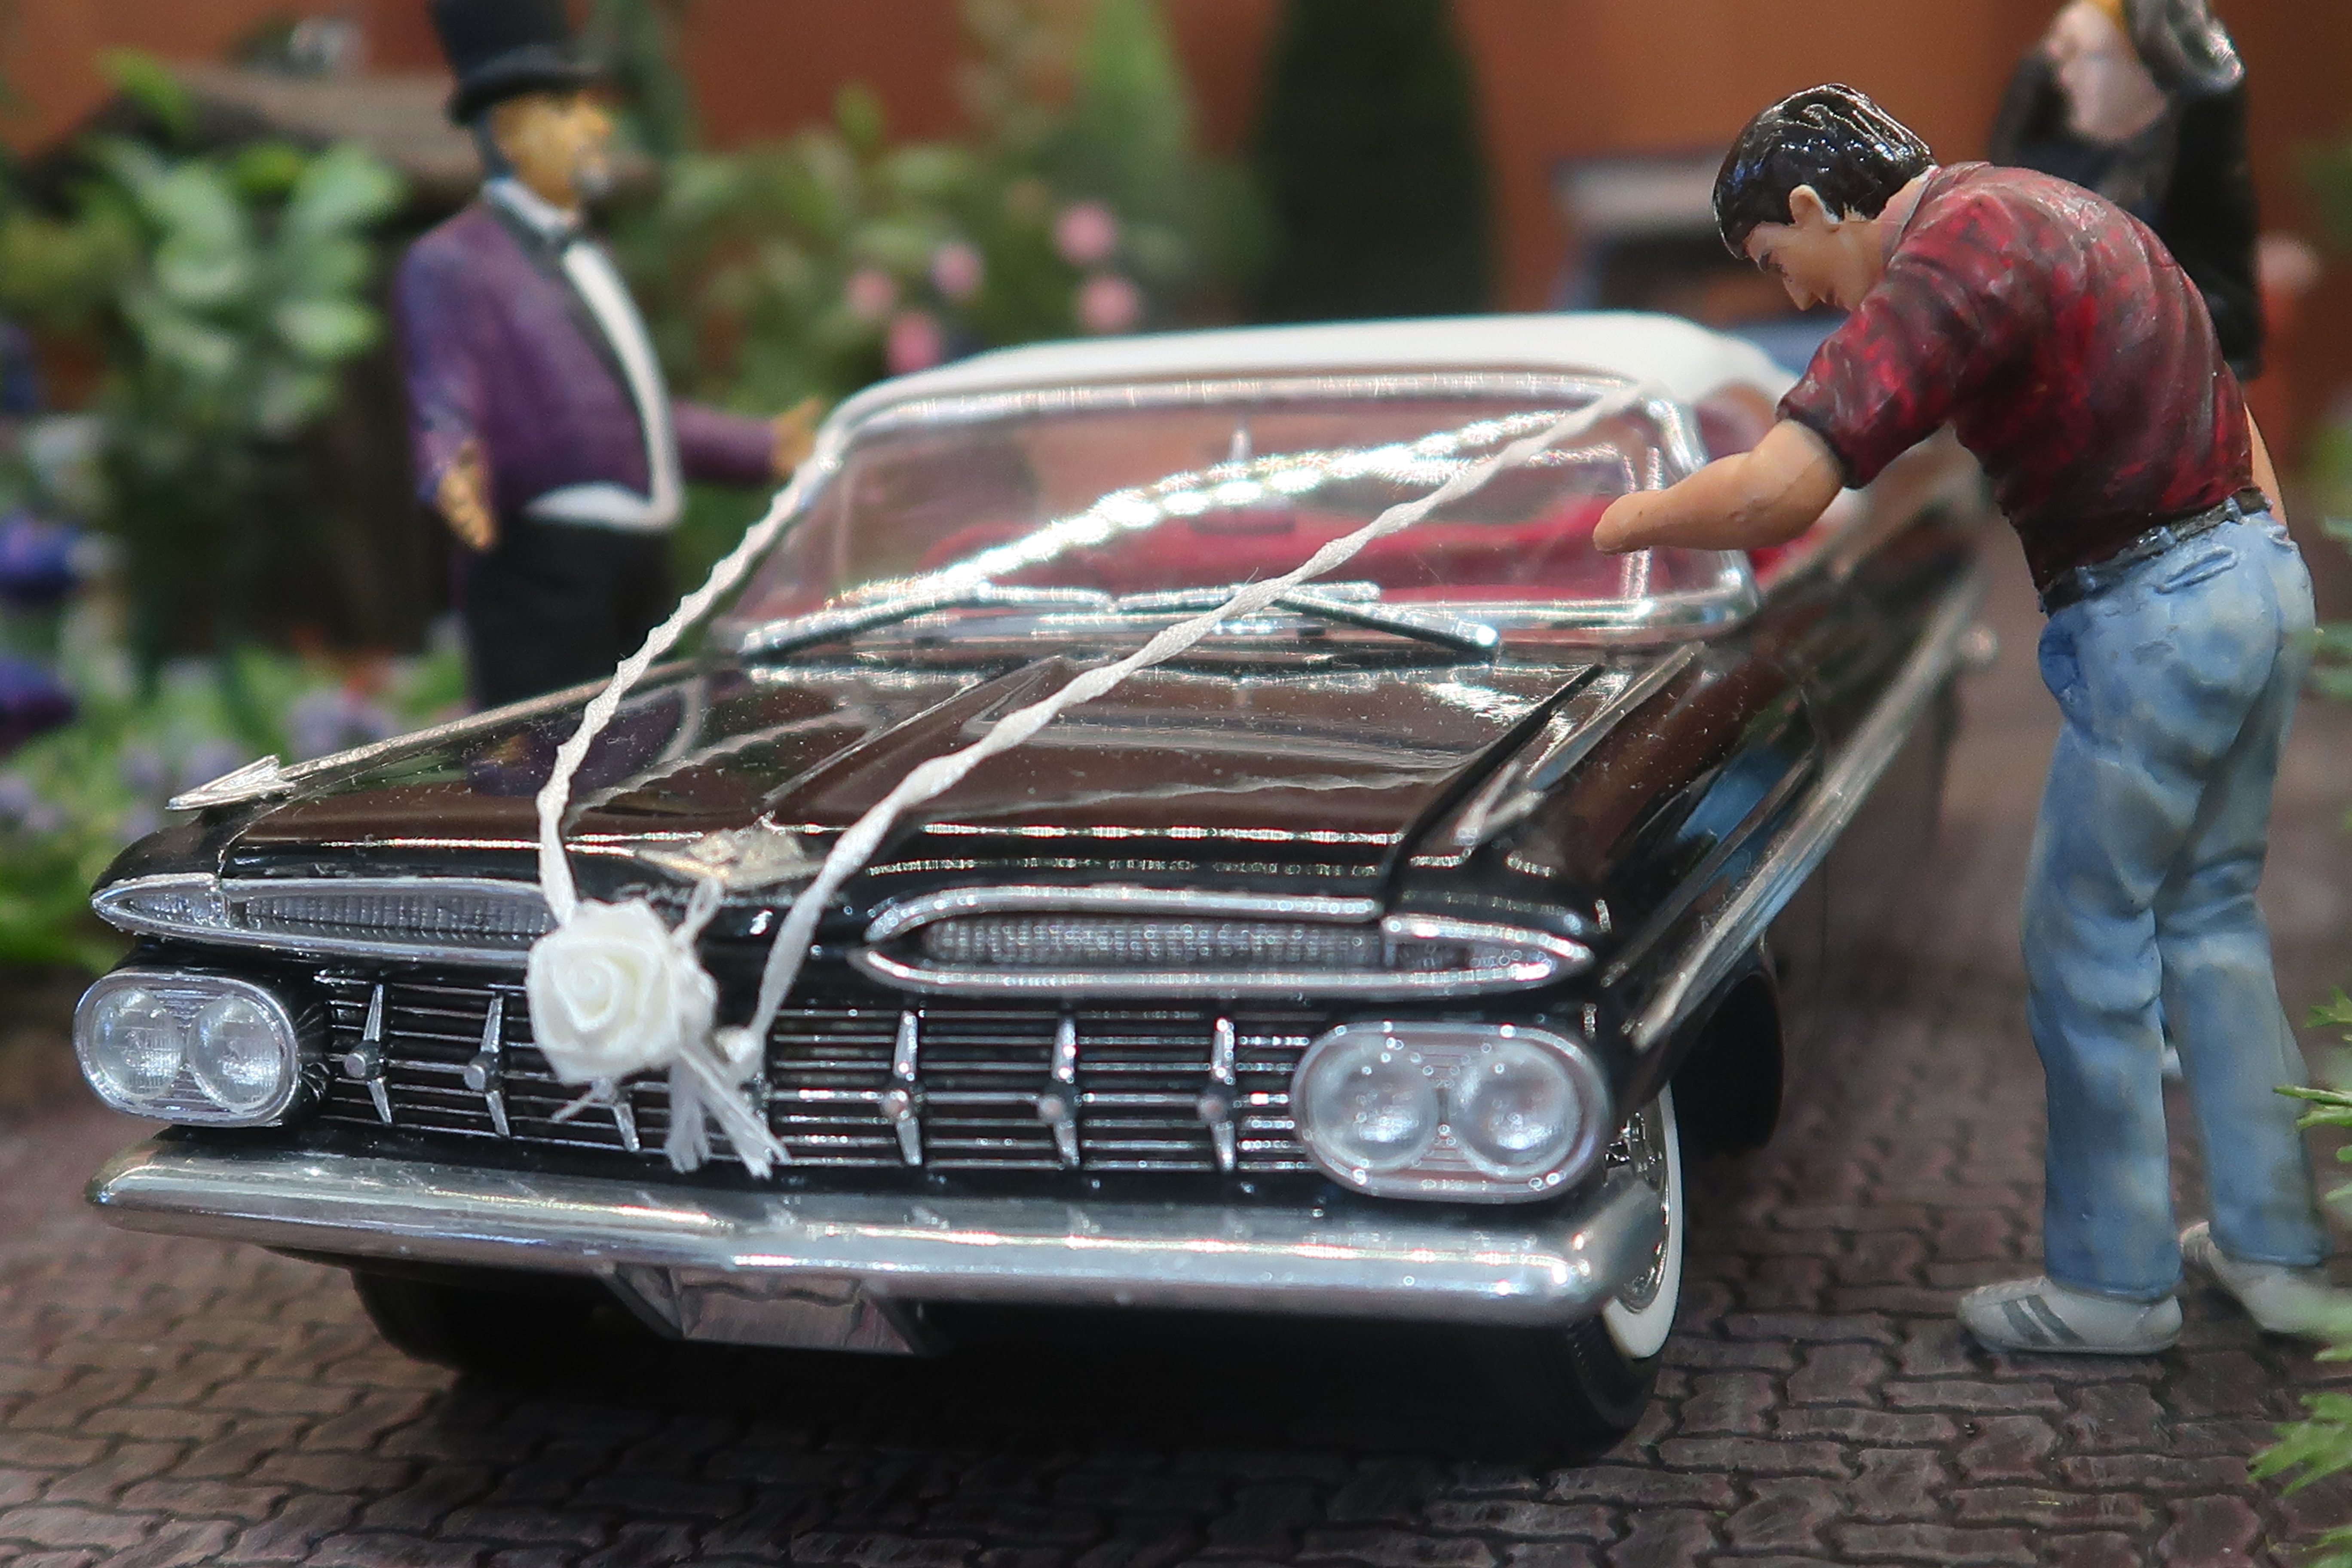
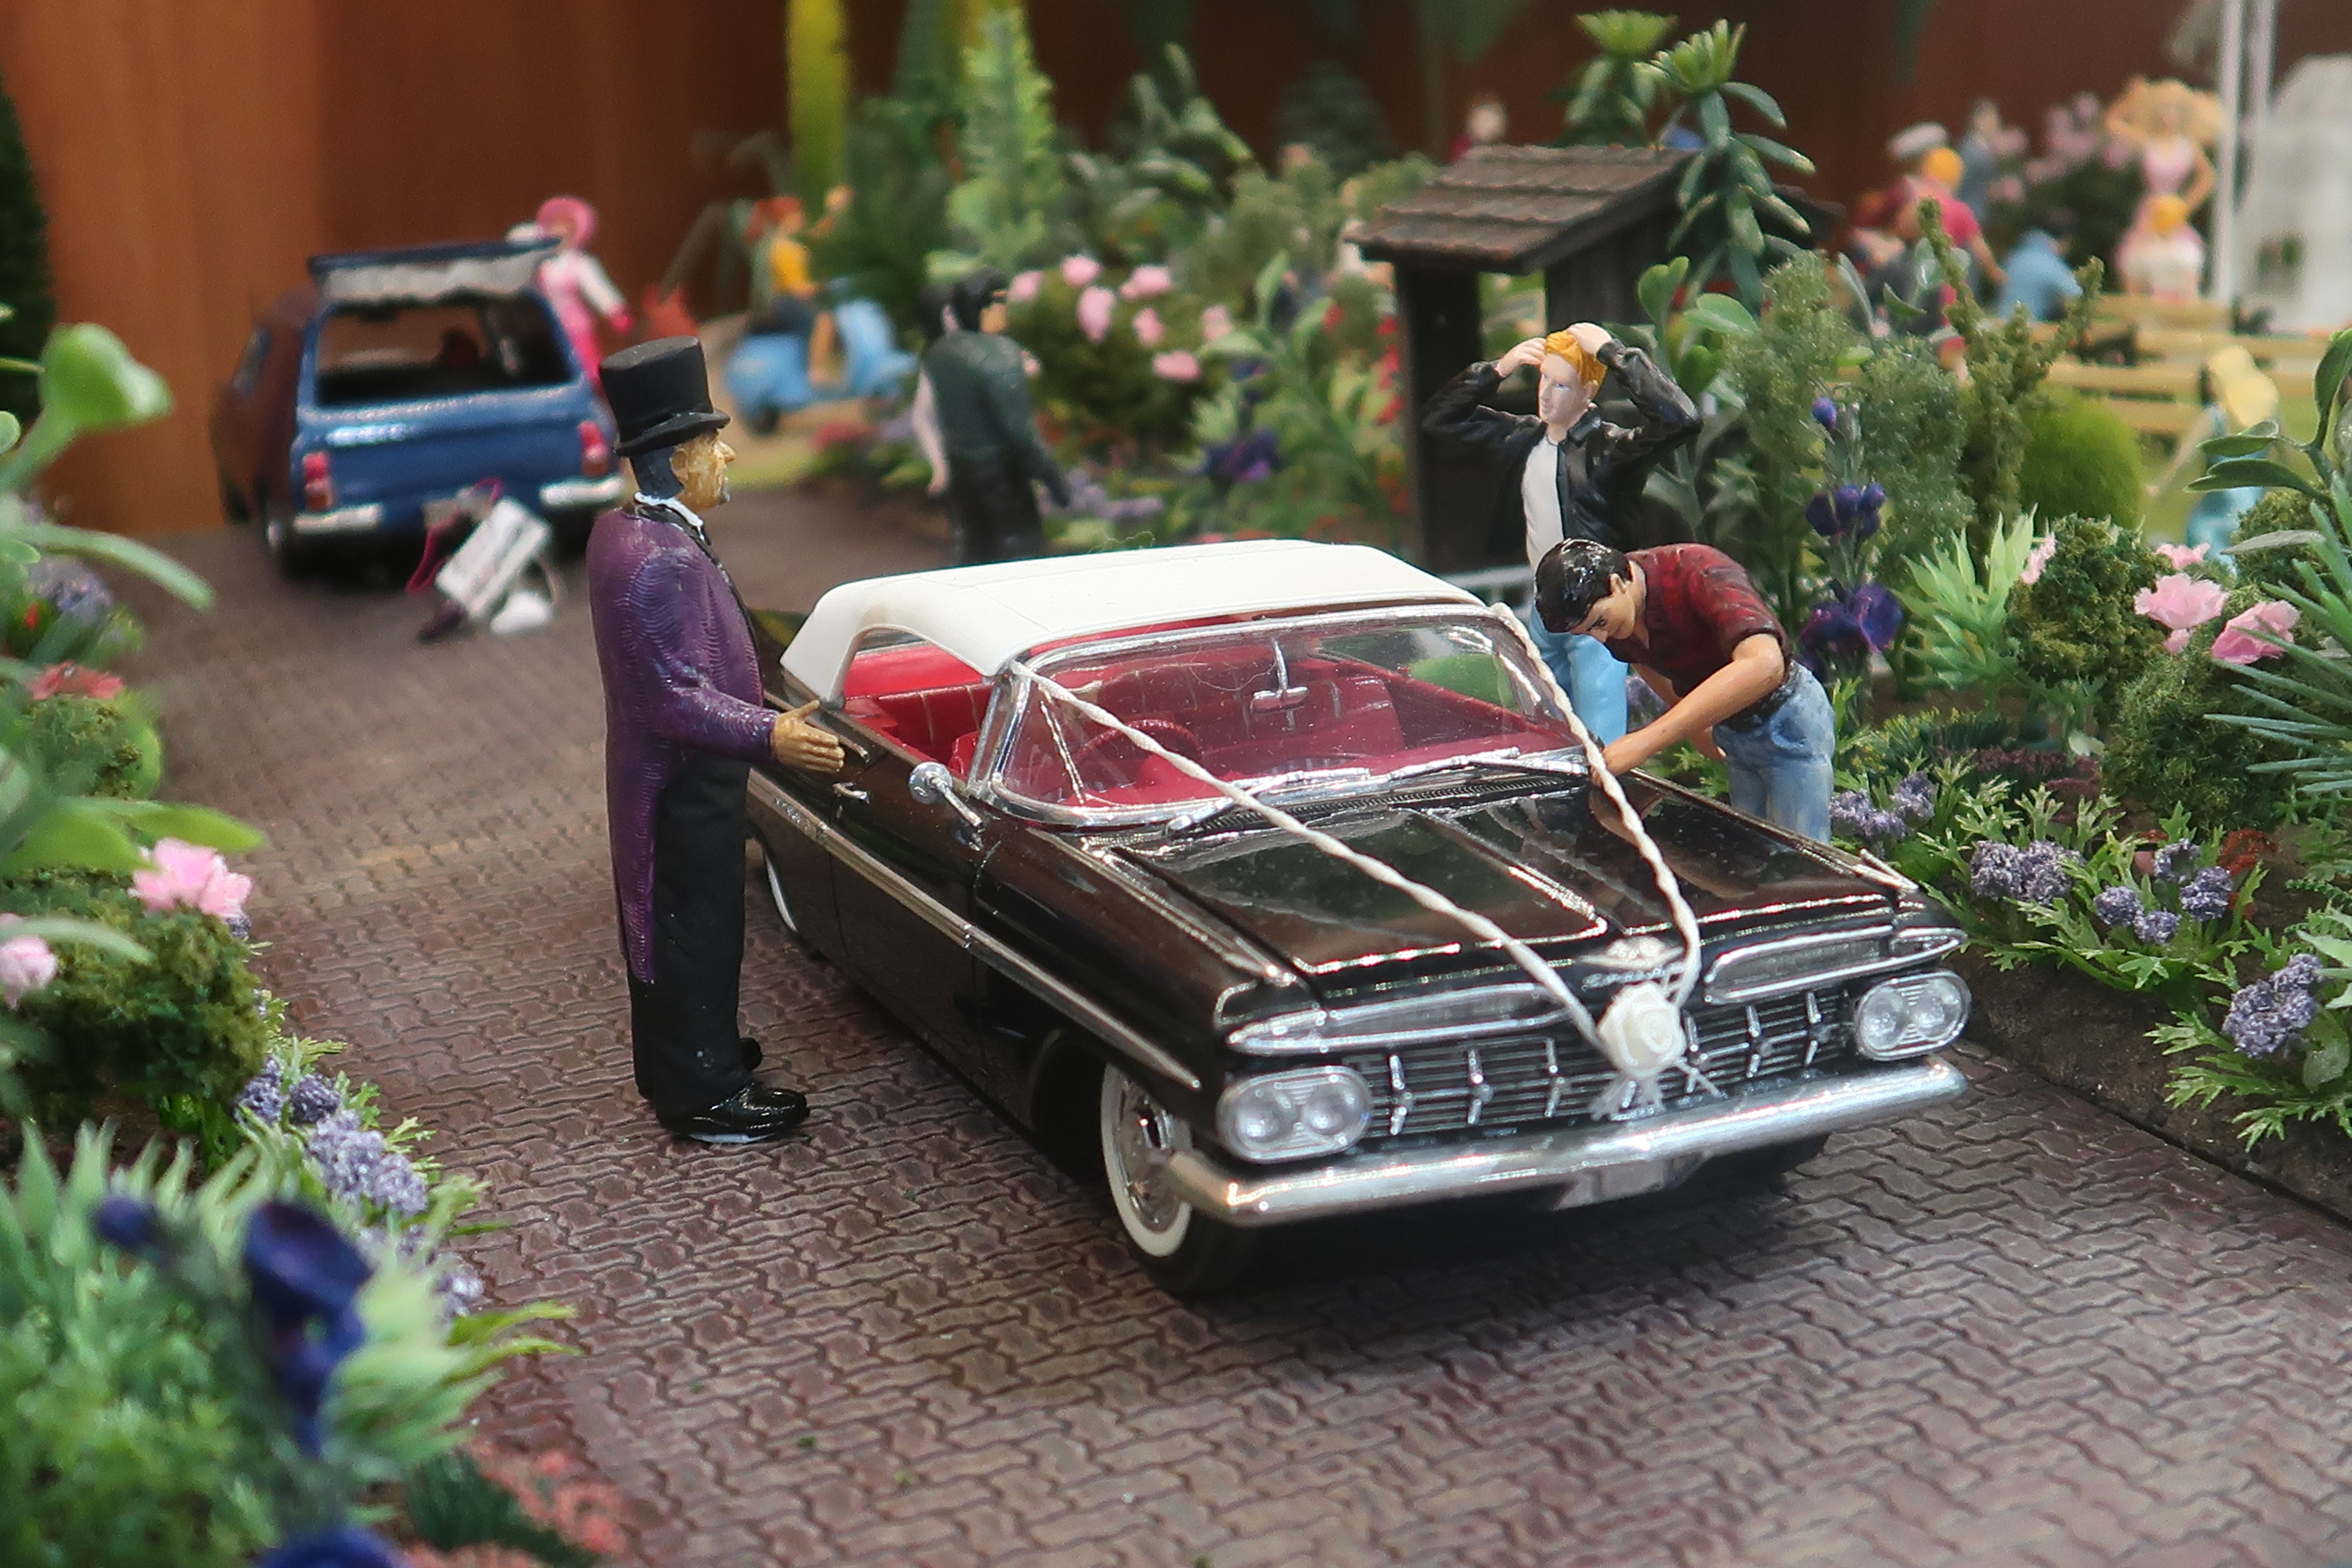
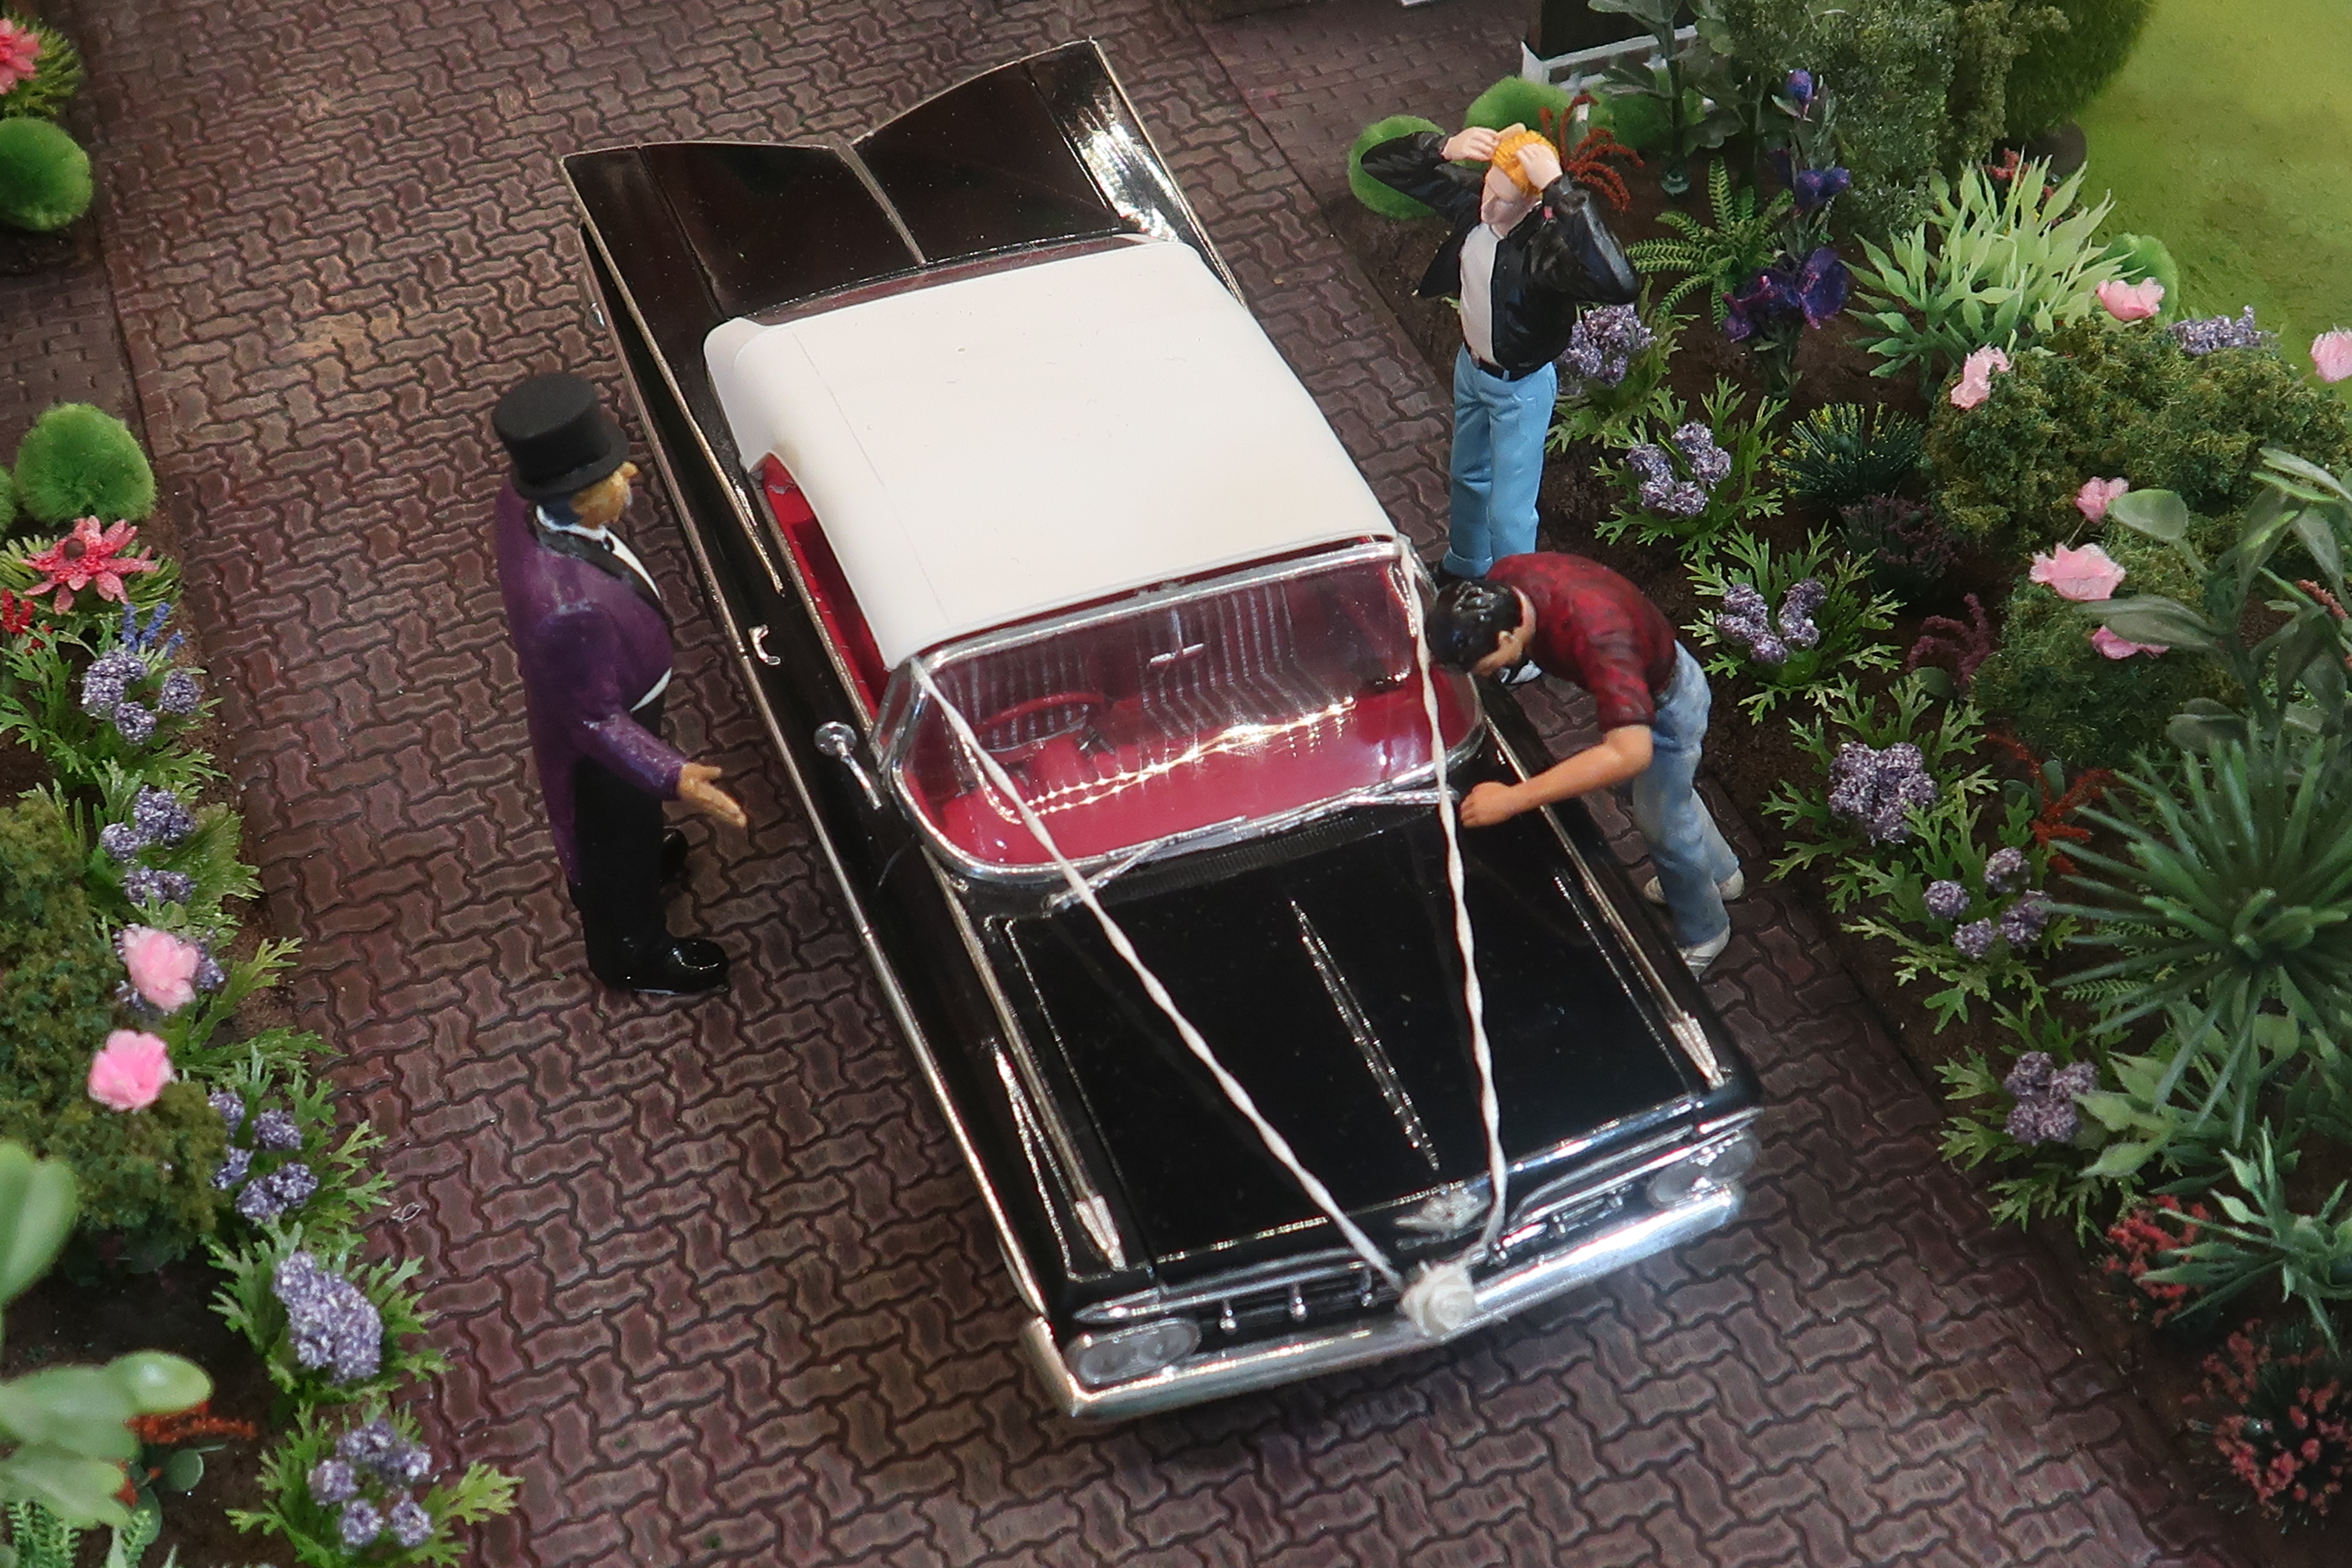
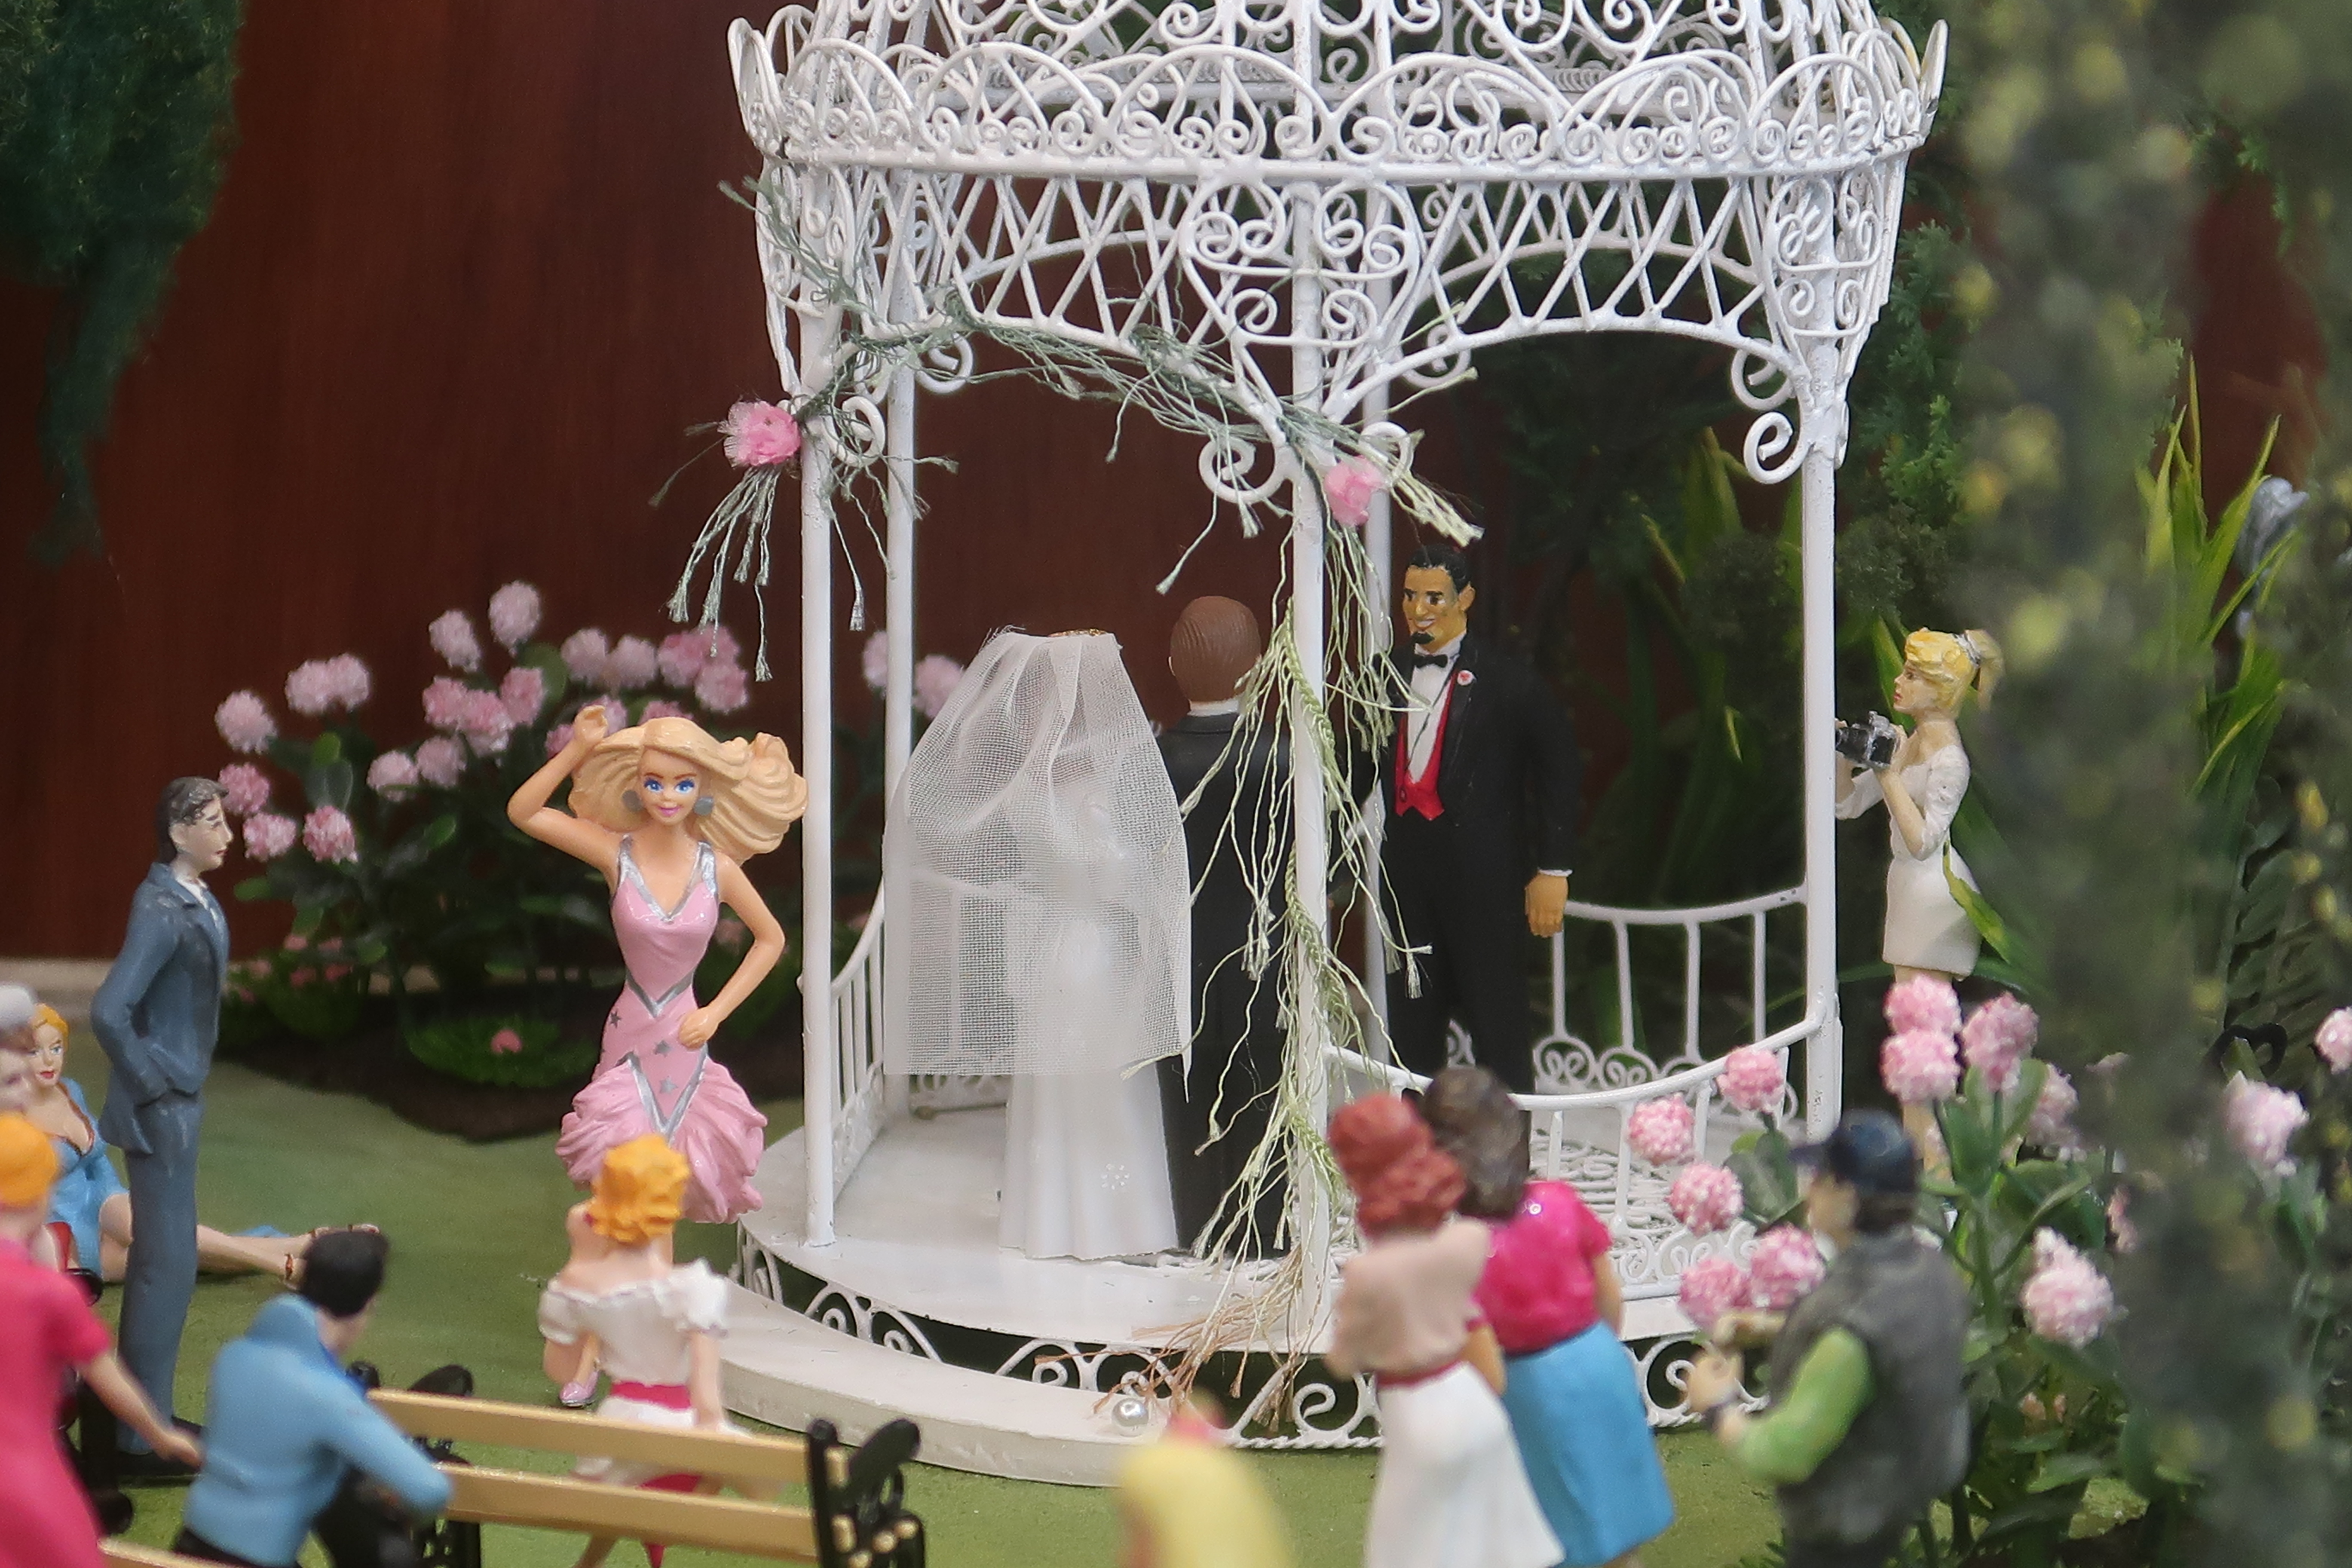
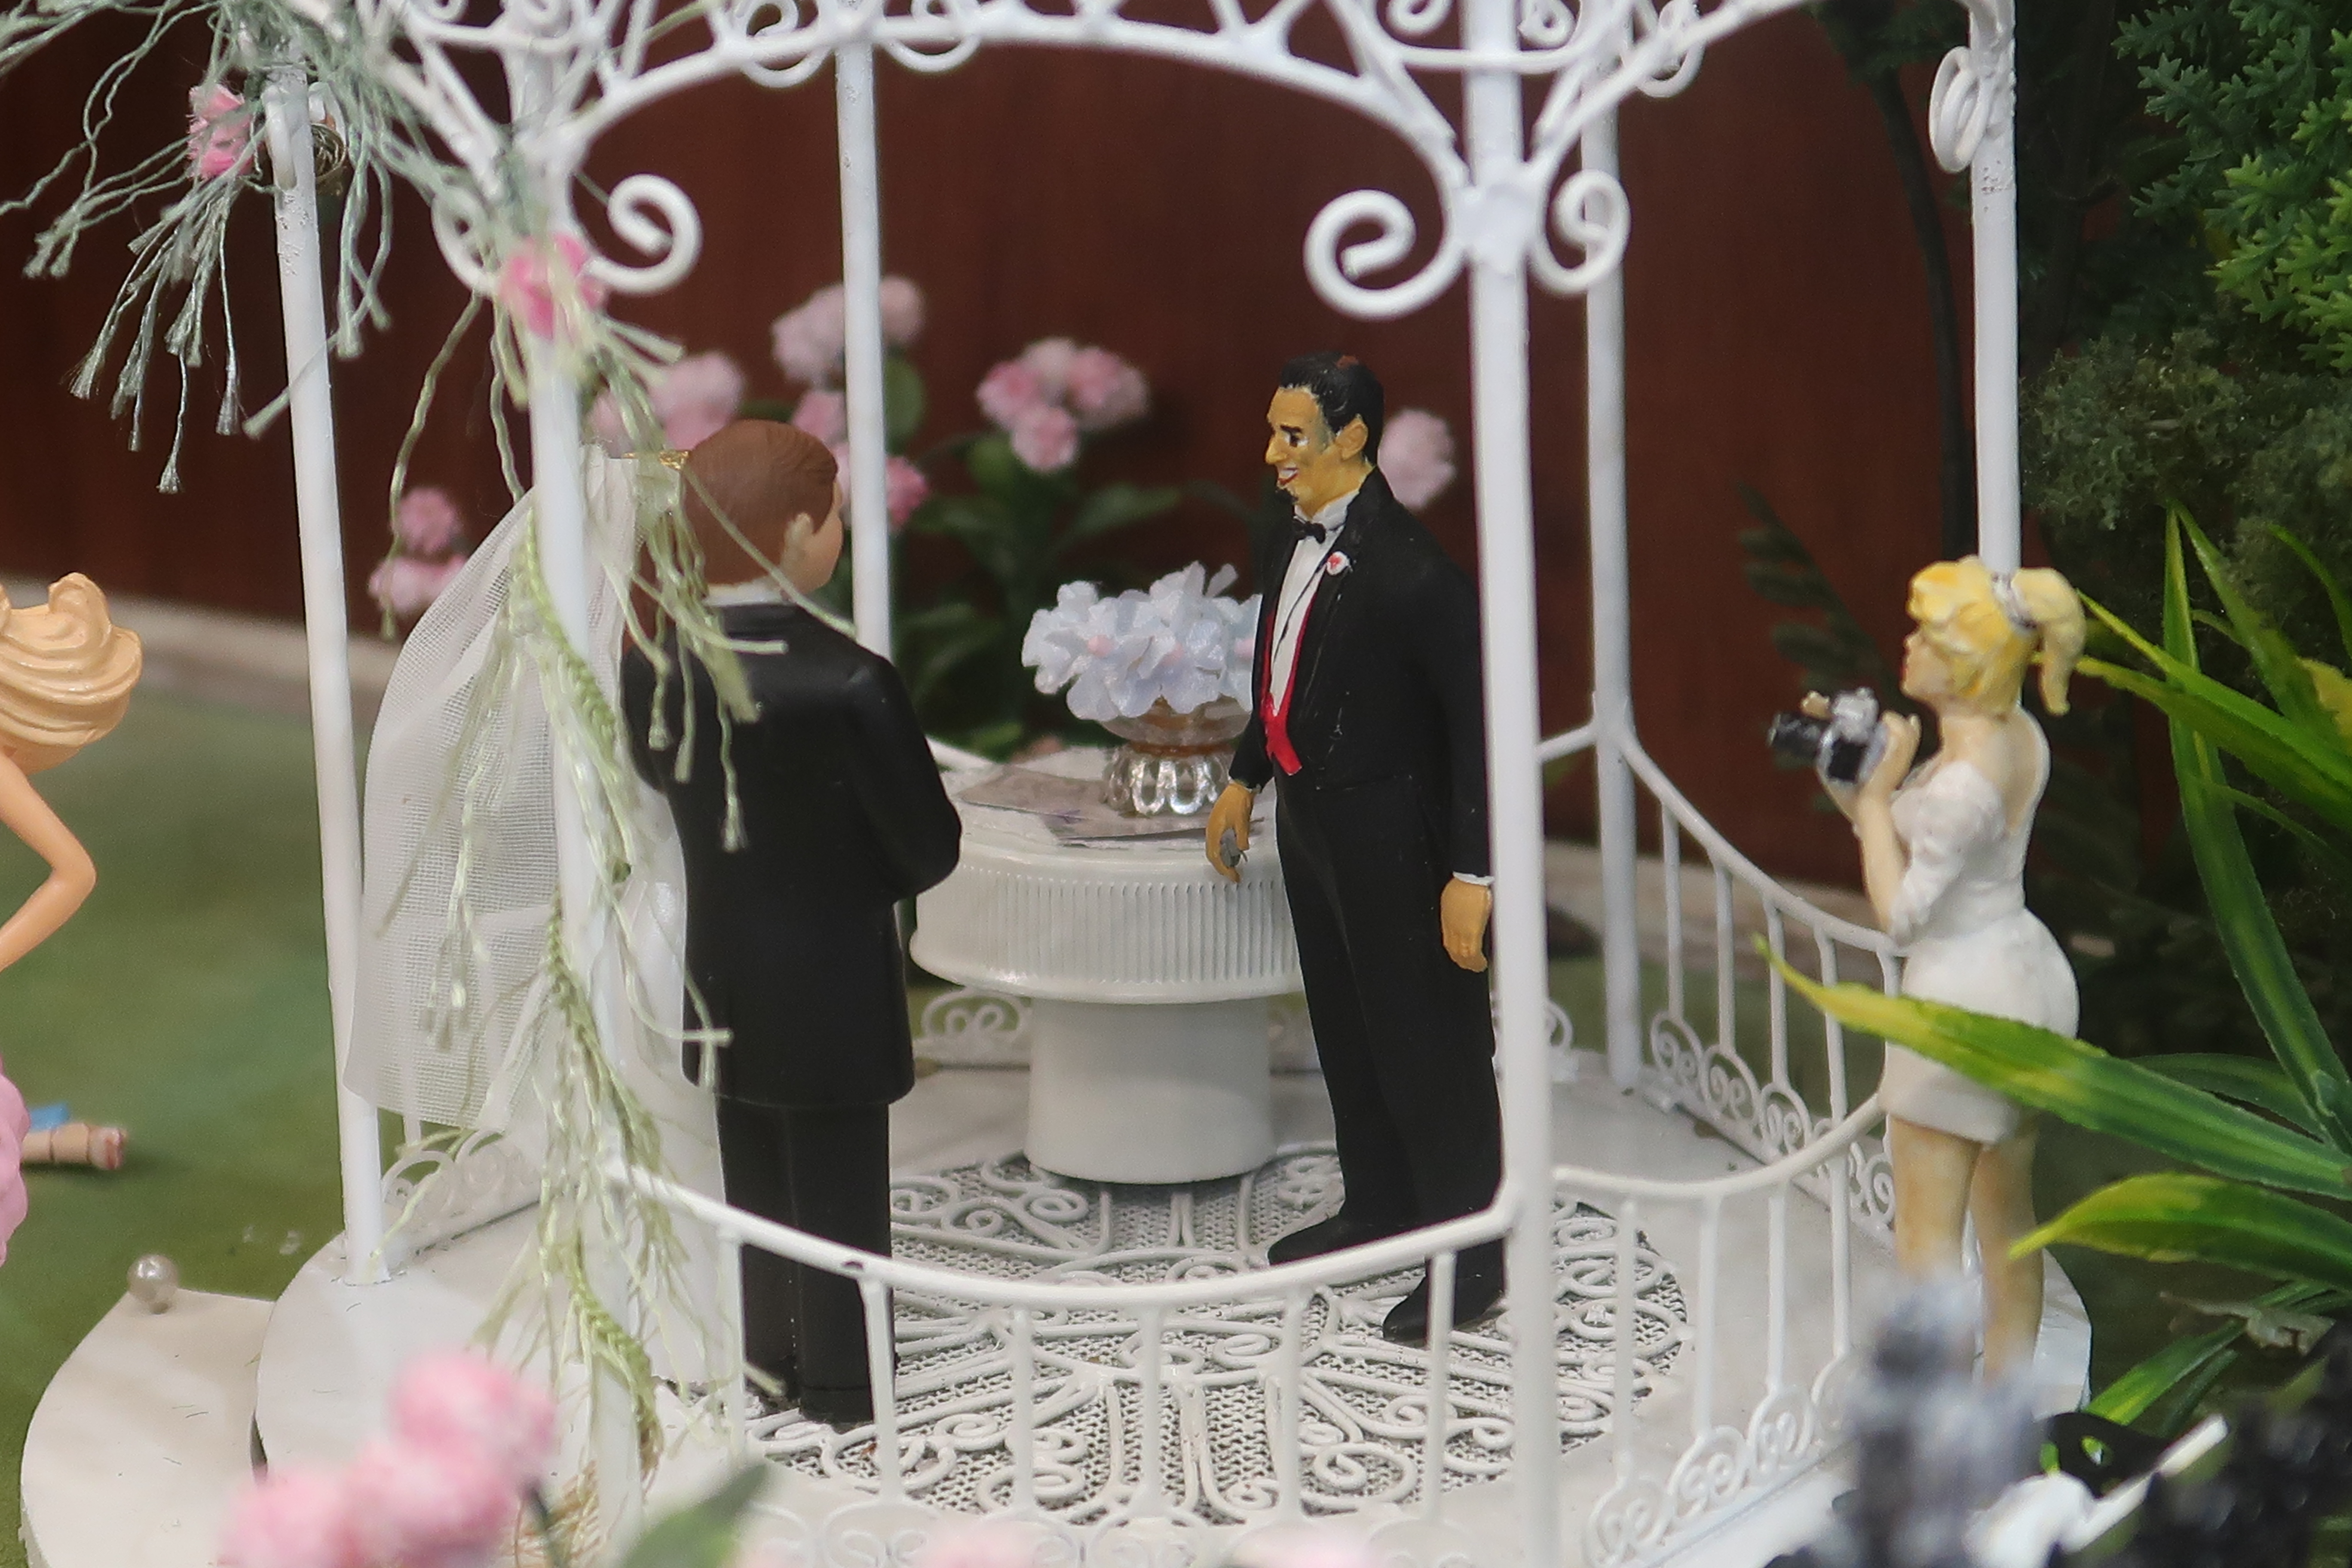
Thanks Cobra man, thanks Tom. For me, it was amazing to see this design come together. Trust me, Ute did not follow the normal path that a modeller would follow, and just look at the result!!!! It was also nice to see so much stuff get used up that I had been saving for decades. Ute and I had prepared about 120 figures over the years but they only came out of the box for public displays so it is terrific to now have a lot of them on display. The wedding car is a Revell 1959 Chevy convertible that I built just after it came out. The only mod I made was to convert the dash to RHD and believe me , that is as close as I ever get to box stock! Ute twisted up some fine ribbon to make the wedding ribbons as well as adding a small bouquet to the grill. We would like to have had the traditional bridal doll on the hood but can you imagine how small that would have been? Of course, some of the guys are far more interested in the car that the matrimonial proceedings!
-
Hi David, I've built a bunch of these and you are right, they have their challenges! I like how you handled the front axle - I can't remember how I got around that issue. Don't be surprised if you run into similar issues with the rear end. I recall that the little V shaped track rod or Jacobs ladder isn't real keen abut locating to the intended points either. I also noticed that you painted the shock mounts black. If your final chassis colour is the white you see here, could I suggest that after gluing the shock mounts to the frame, you carefully fill and sand the joint and then paint the mounts white also? In this sort of frame construction you would not expect those little ears to be added separately to the frame - they would have been welded on prior to paint. I never bought the 40 Ford coupe version so will be interested to see how your finished short tracker looks. Cheers Alan
-
Thanks, everyone for your kind comments. I'm glad you liked my tub. No Ray, it's not your tired old eyes! I spent so long planning the suspension on this project that I kinda let the exhaust just "happen" and that has left me with some issues. I have found some solder that looks to be the correct diameter so I hope to get the pipes all hooked up shortly. And Dennis, you are so right! The only thing I left off is the greyhound - and it may still happen! I'm much more into hot rods these days but I think one of the worst things you can do to any rod is change horses mid stream - you just end up with a confused mish- mash of ideas. It was meant to be a resto rod so I finished it as a resto rod. I have since acquired another AMT tub that I plan to graft onto a Revell roadster front half and with that car I will look at , in your words, a neo- traditional tub, with a factory style dark paint scheme but light coloured steelies and very low. Won't happen for a while as I have way too many UFOs on the bench already. Cheers Alan
-
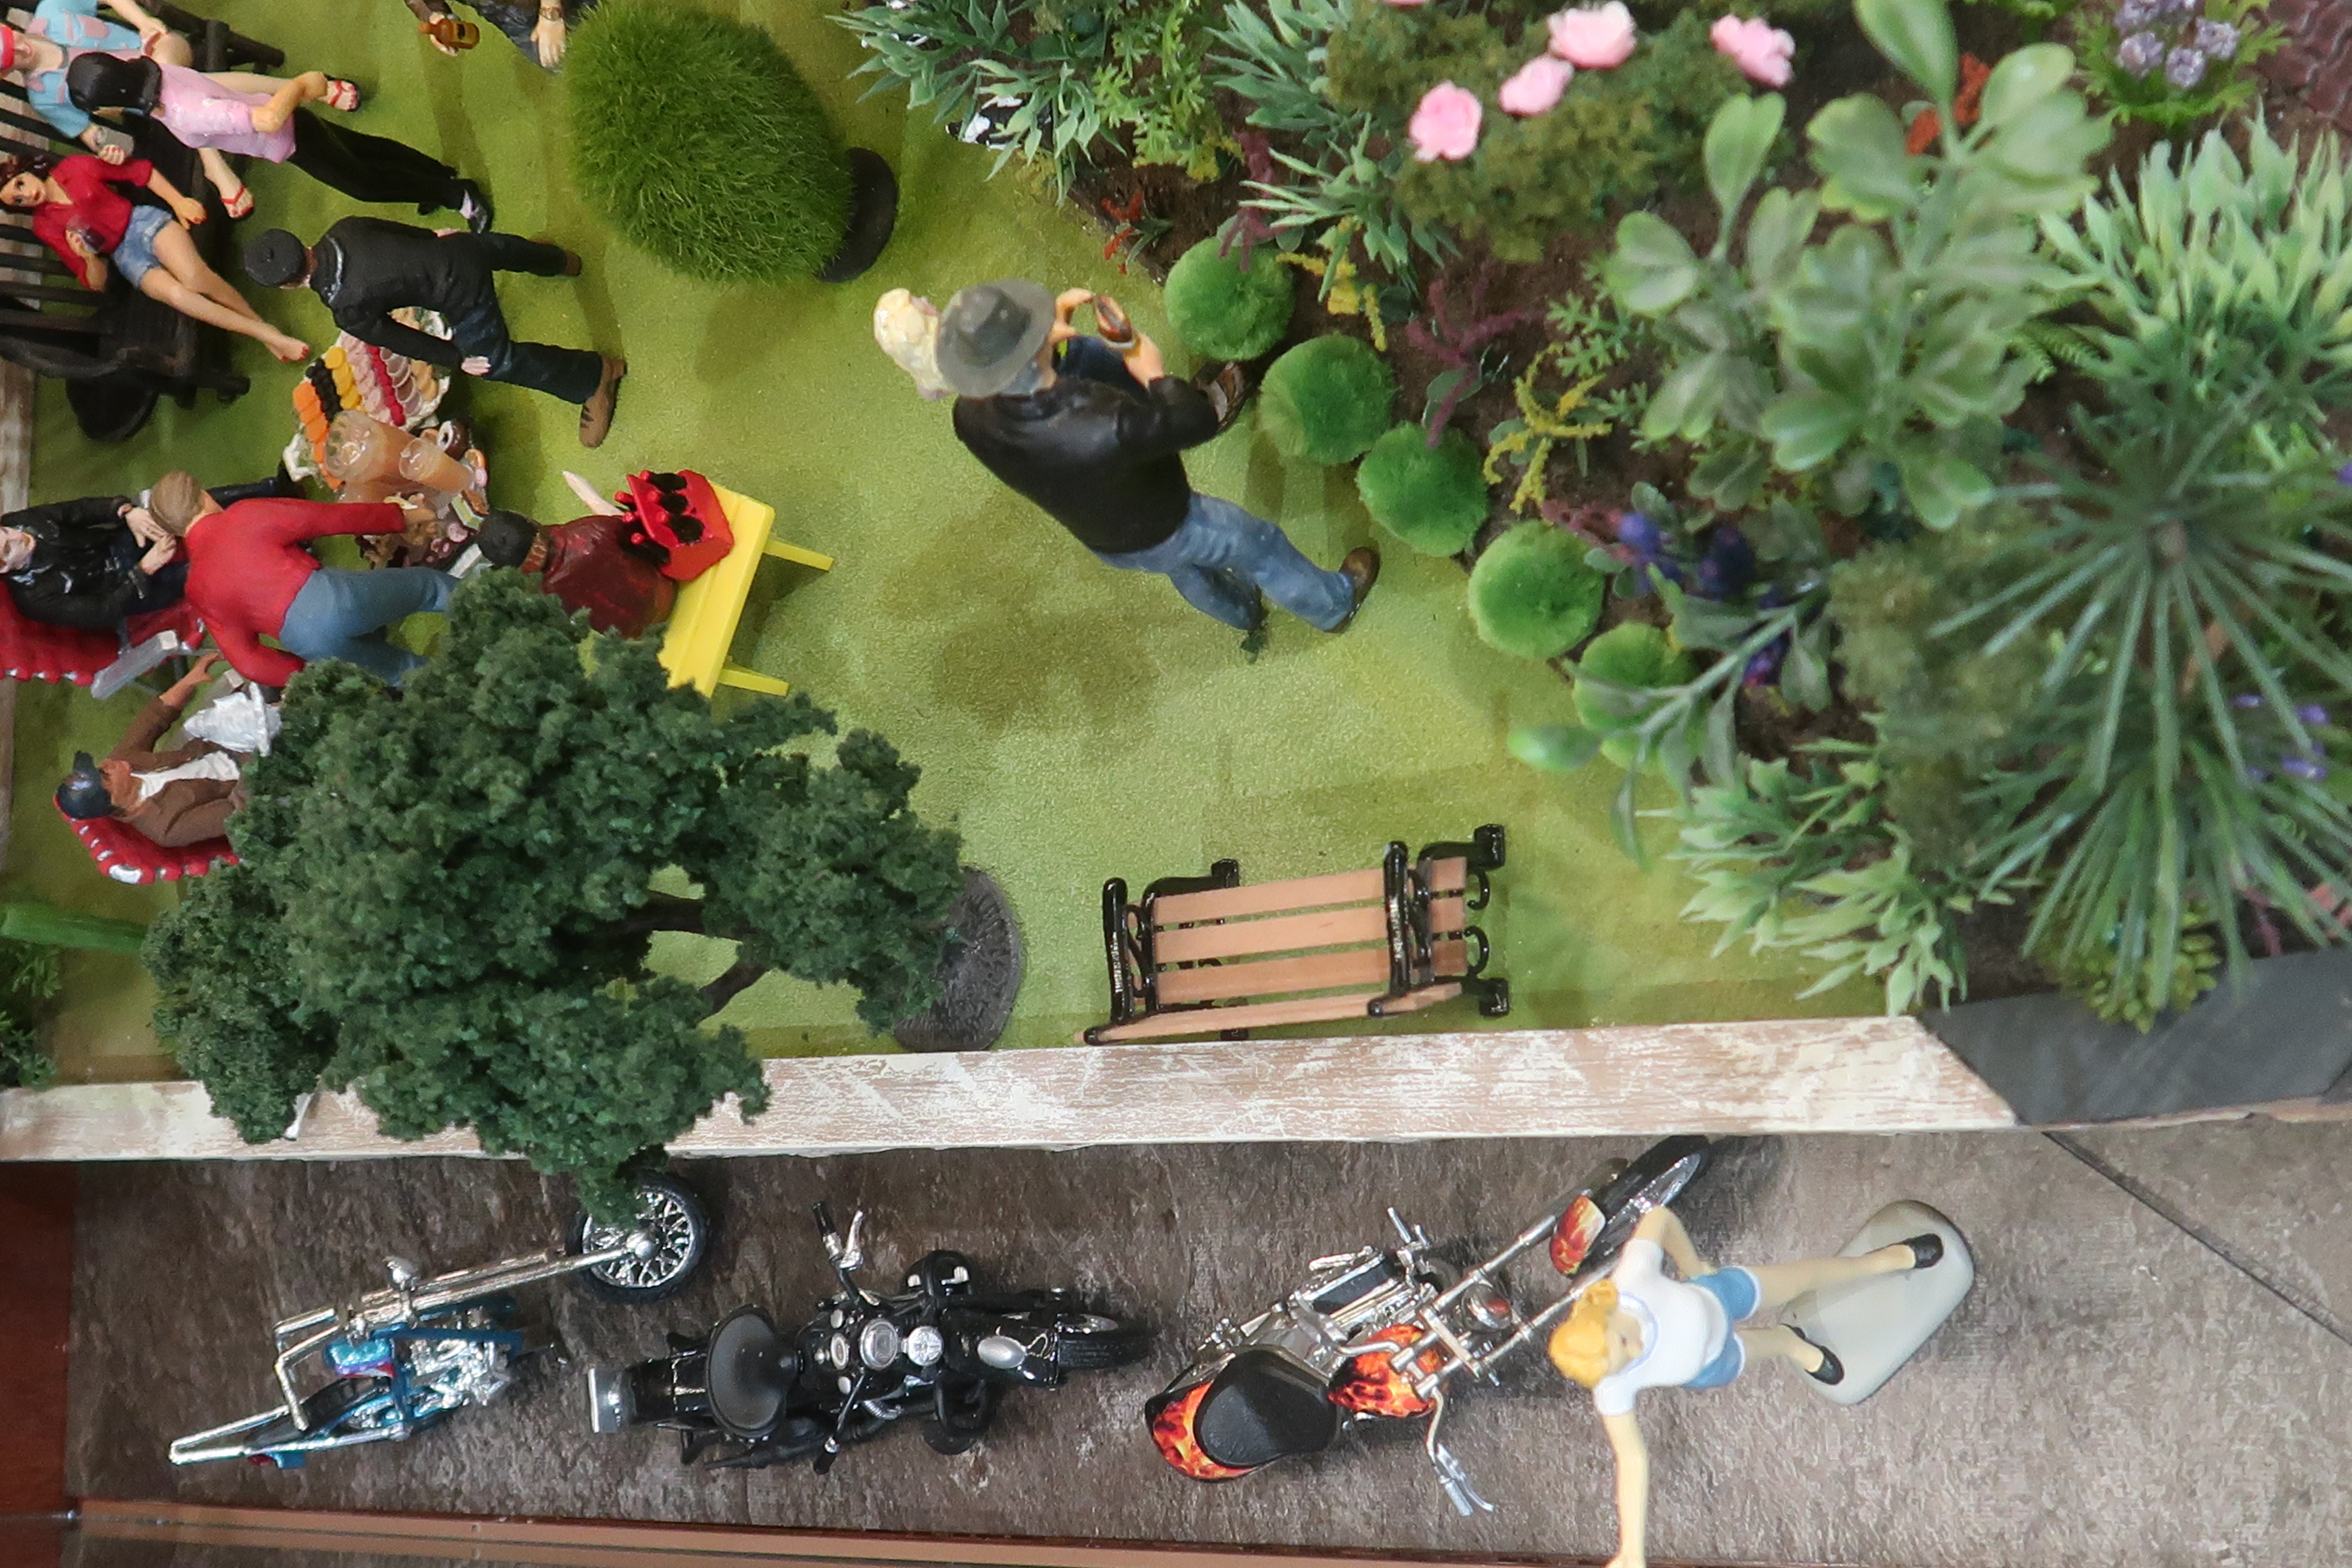
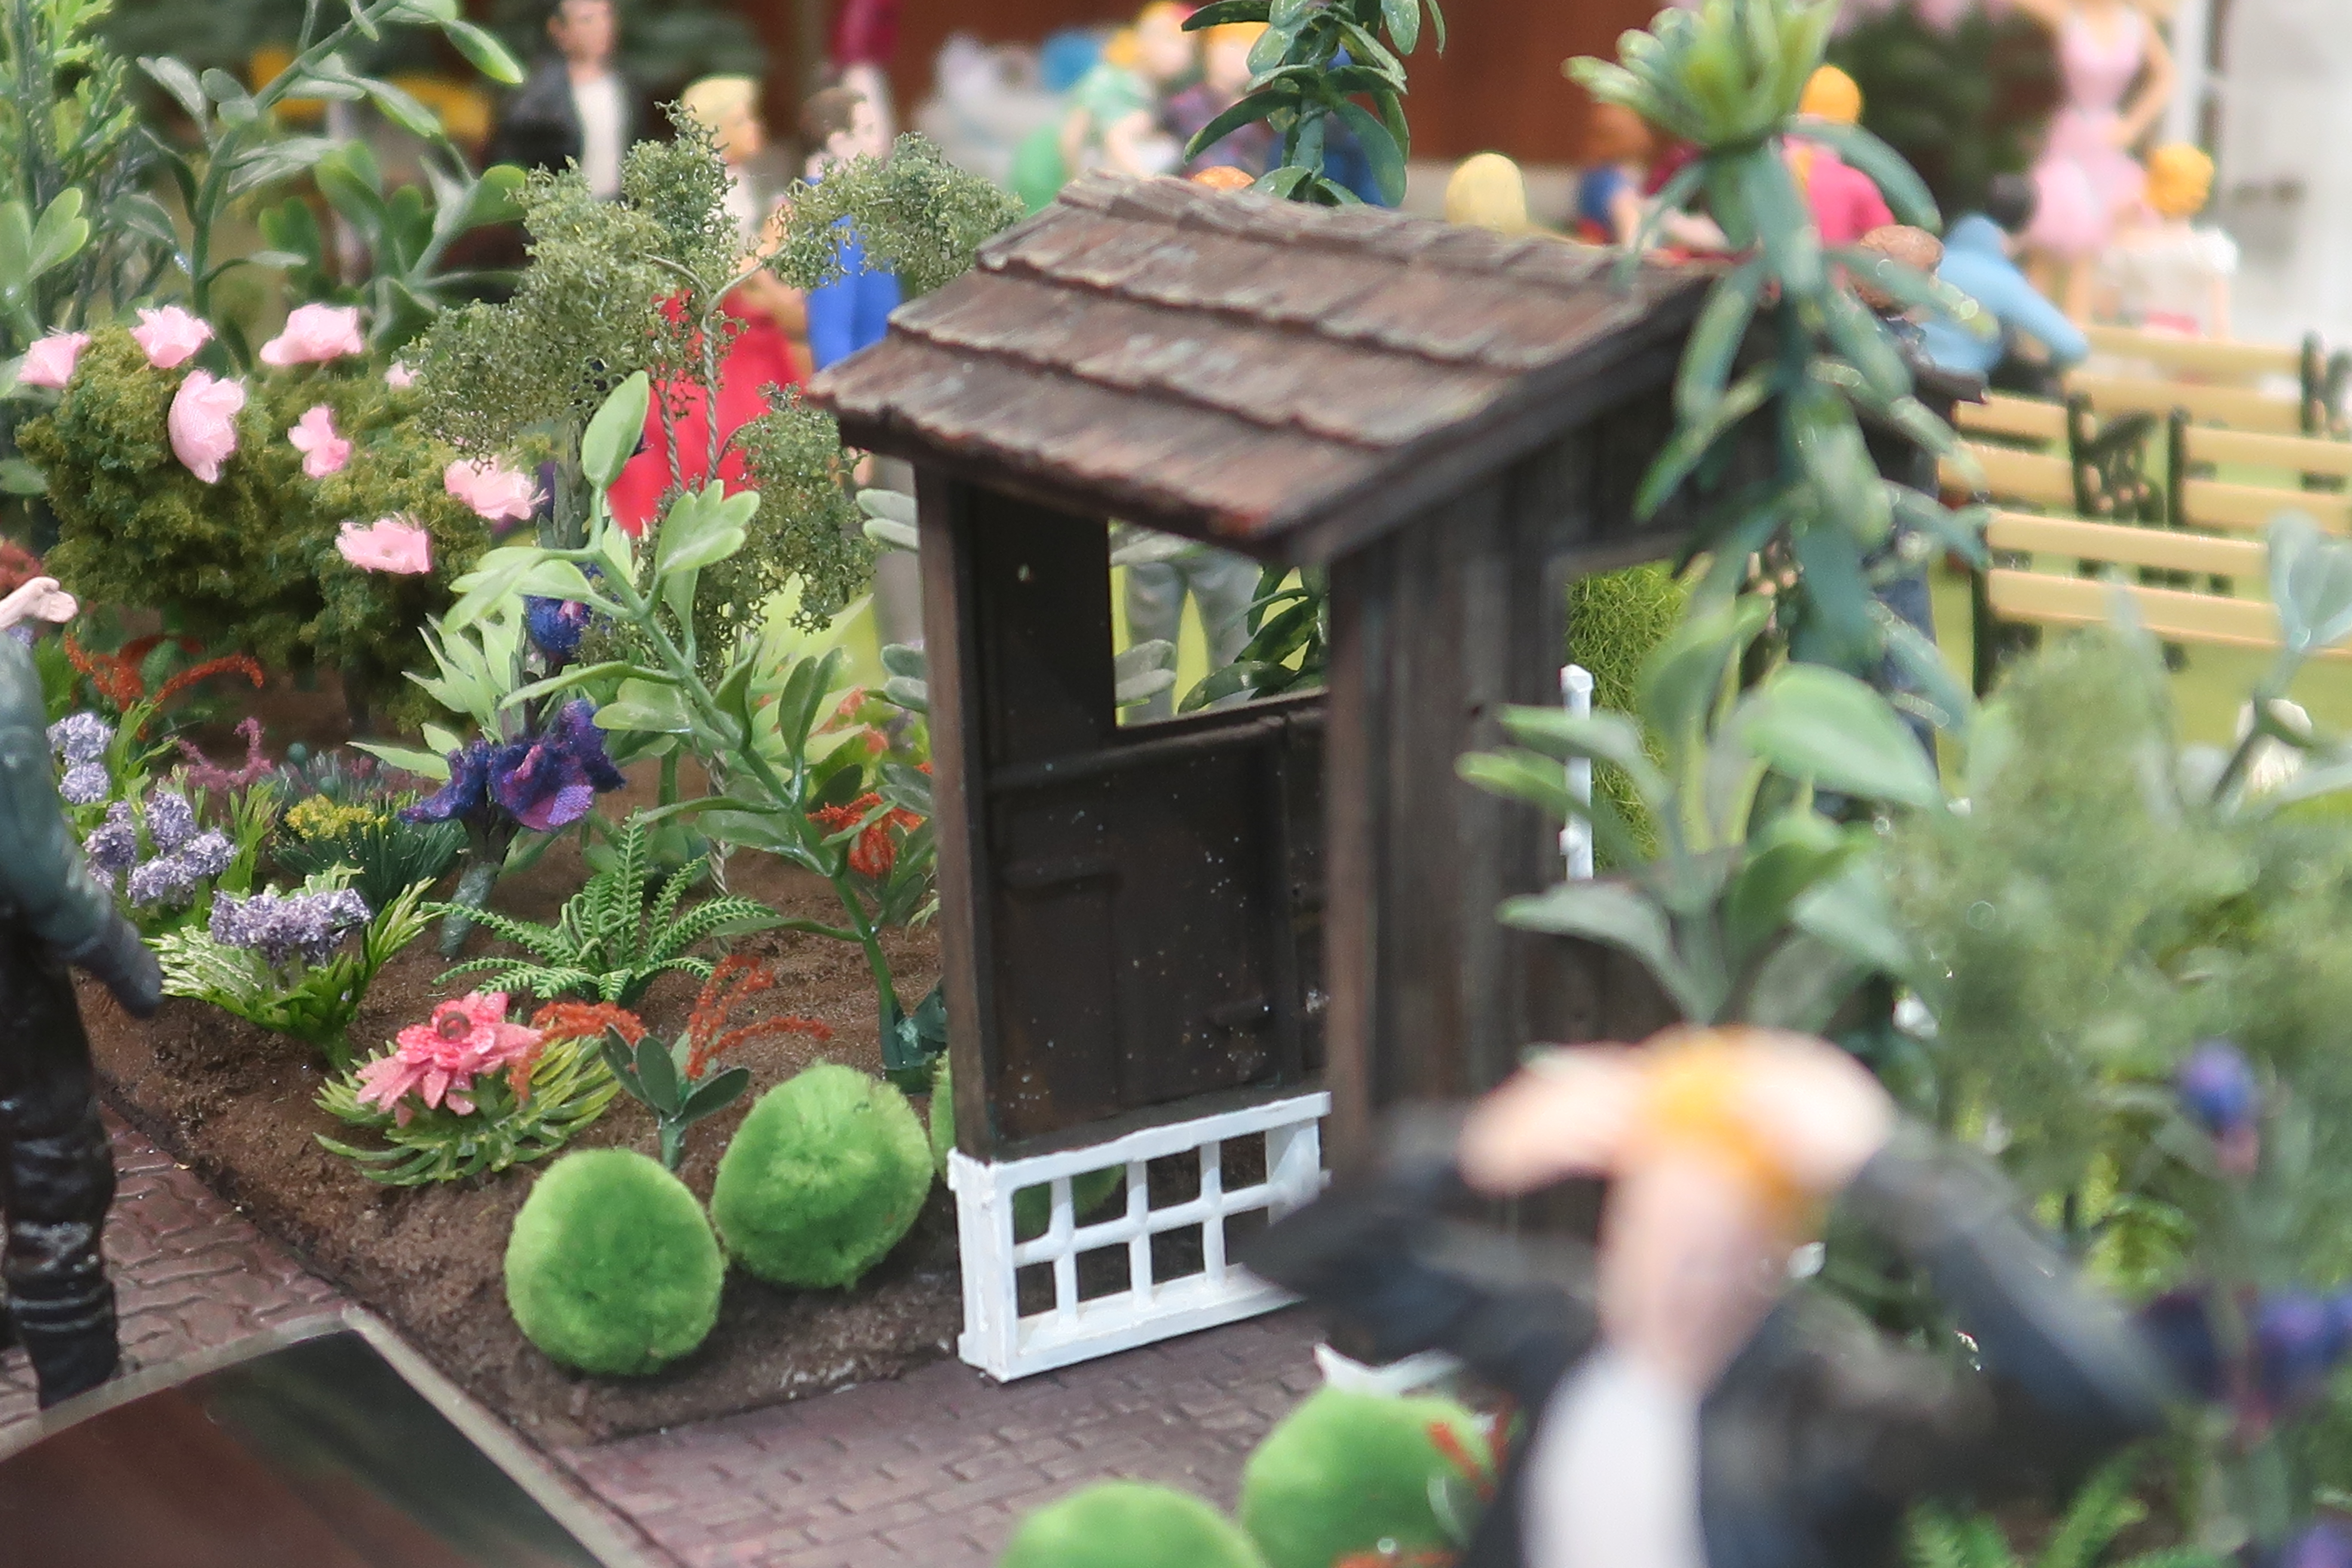
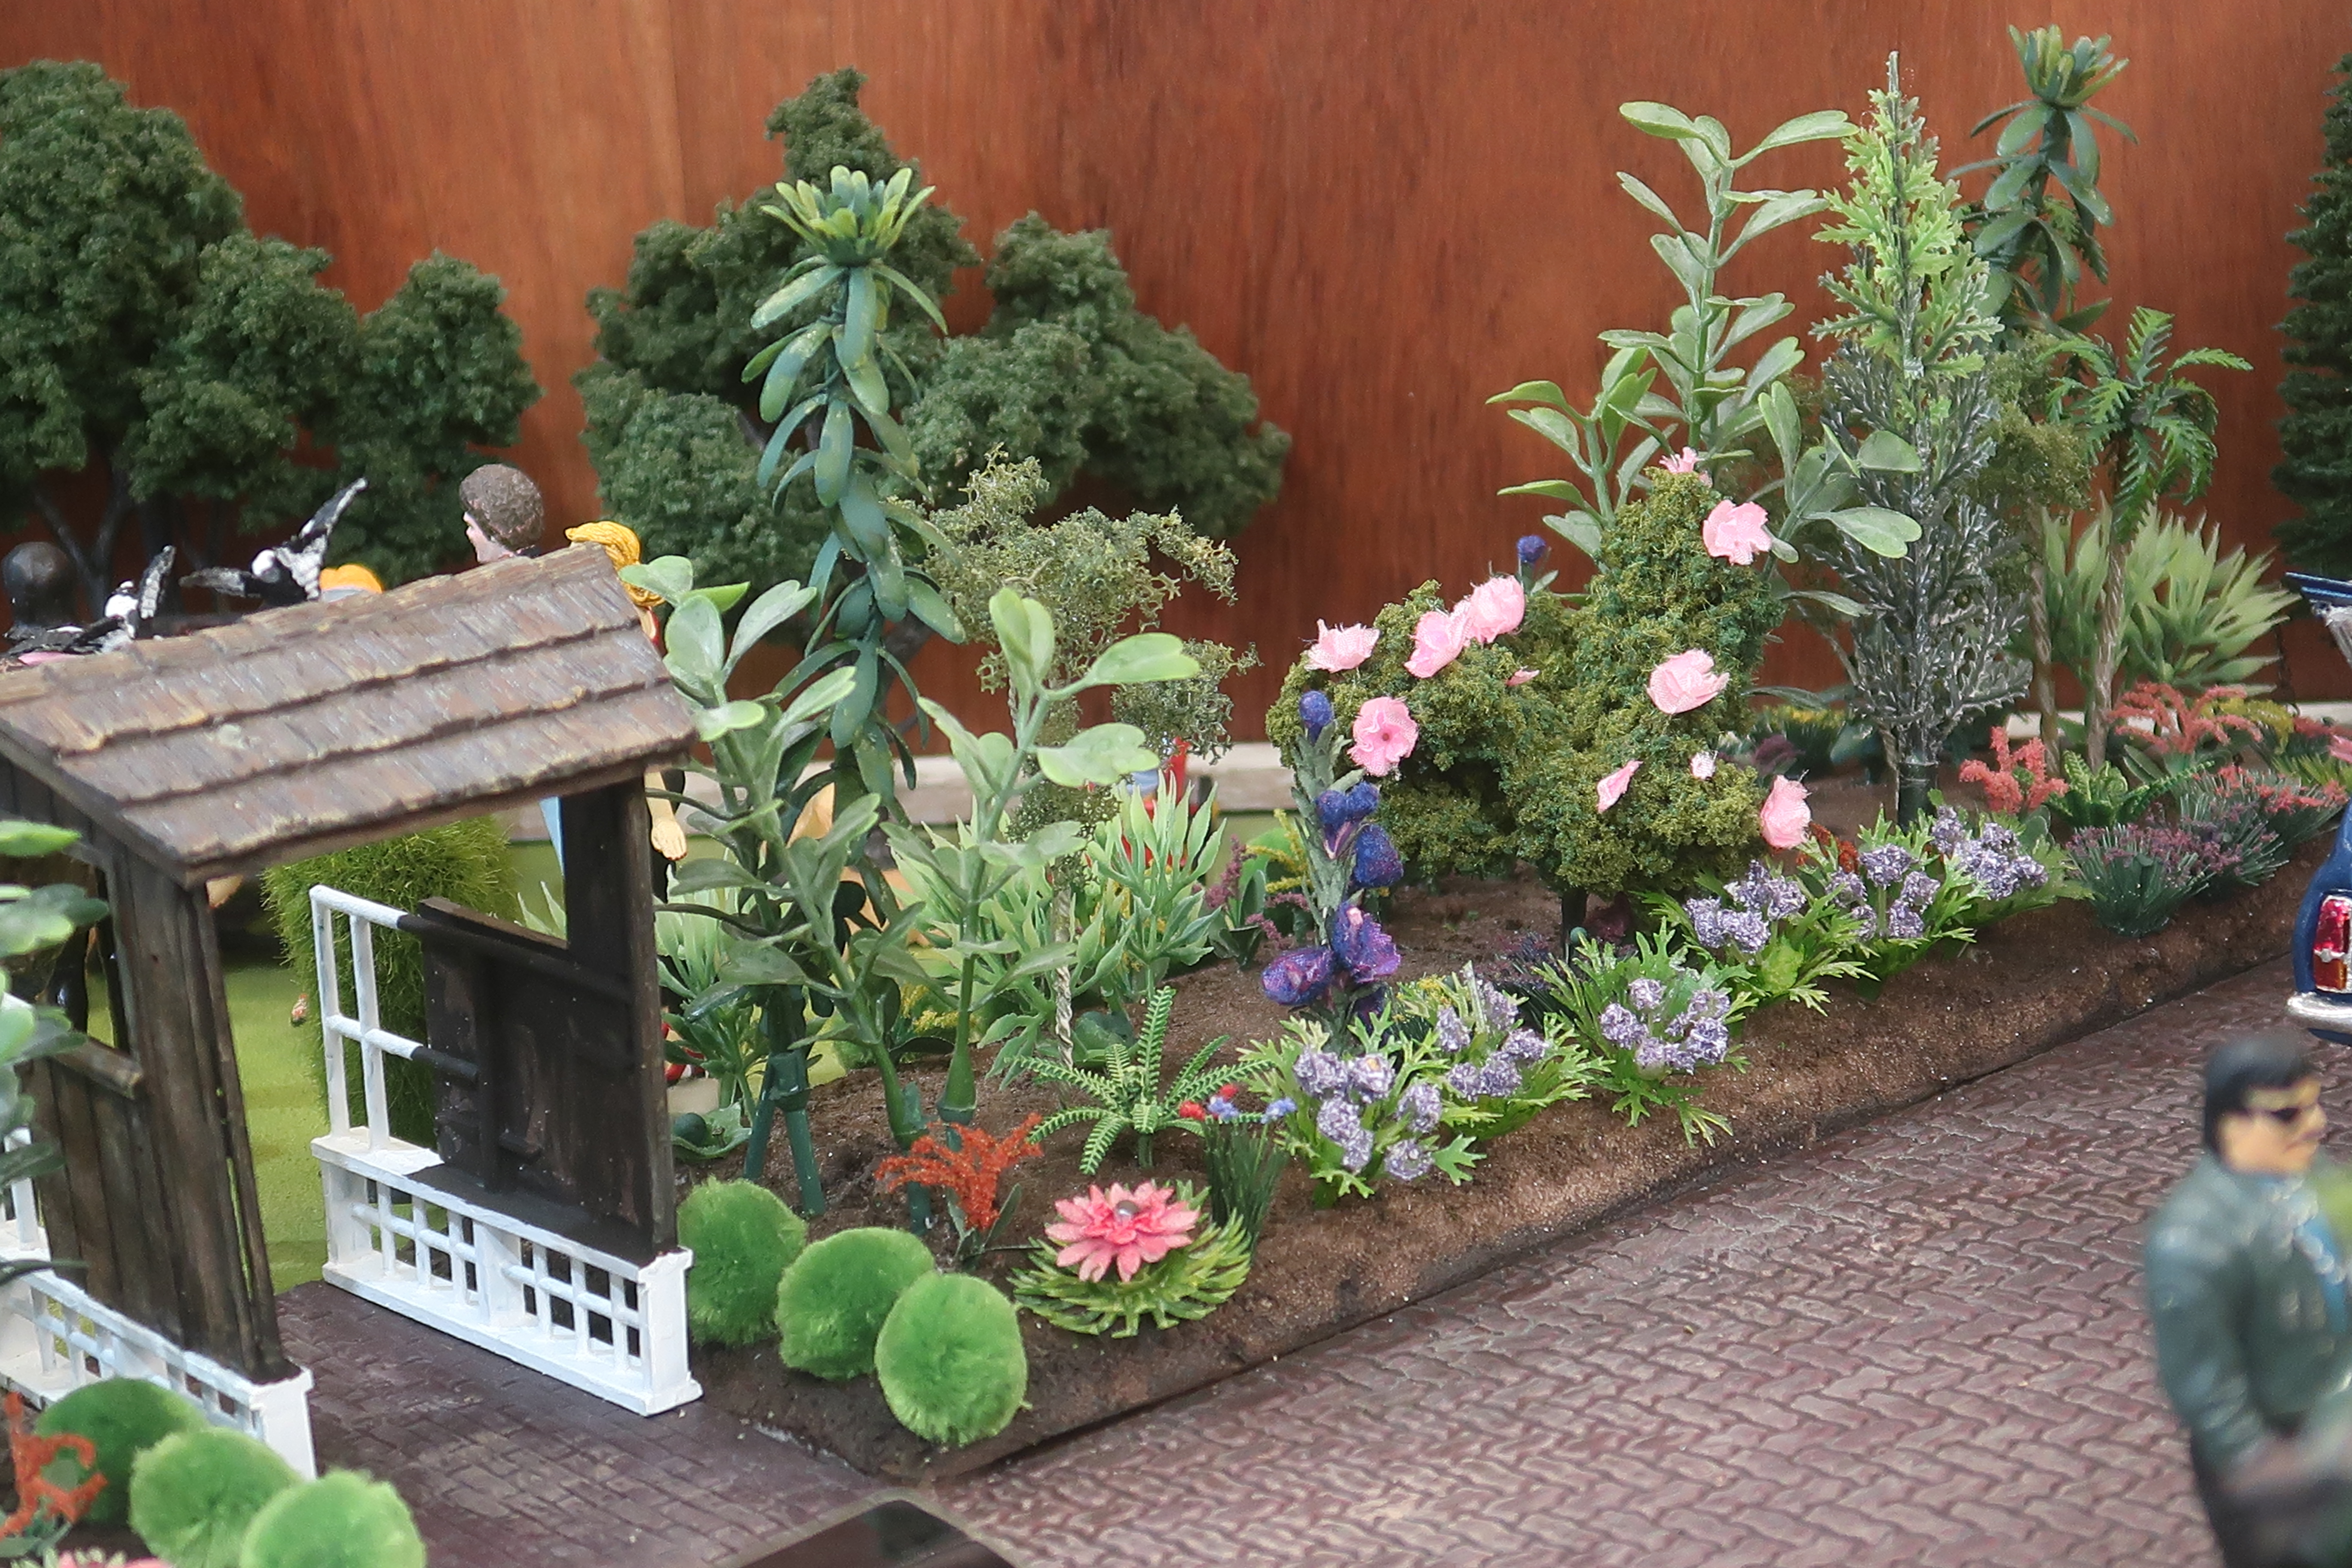
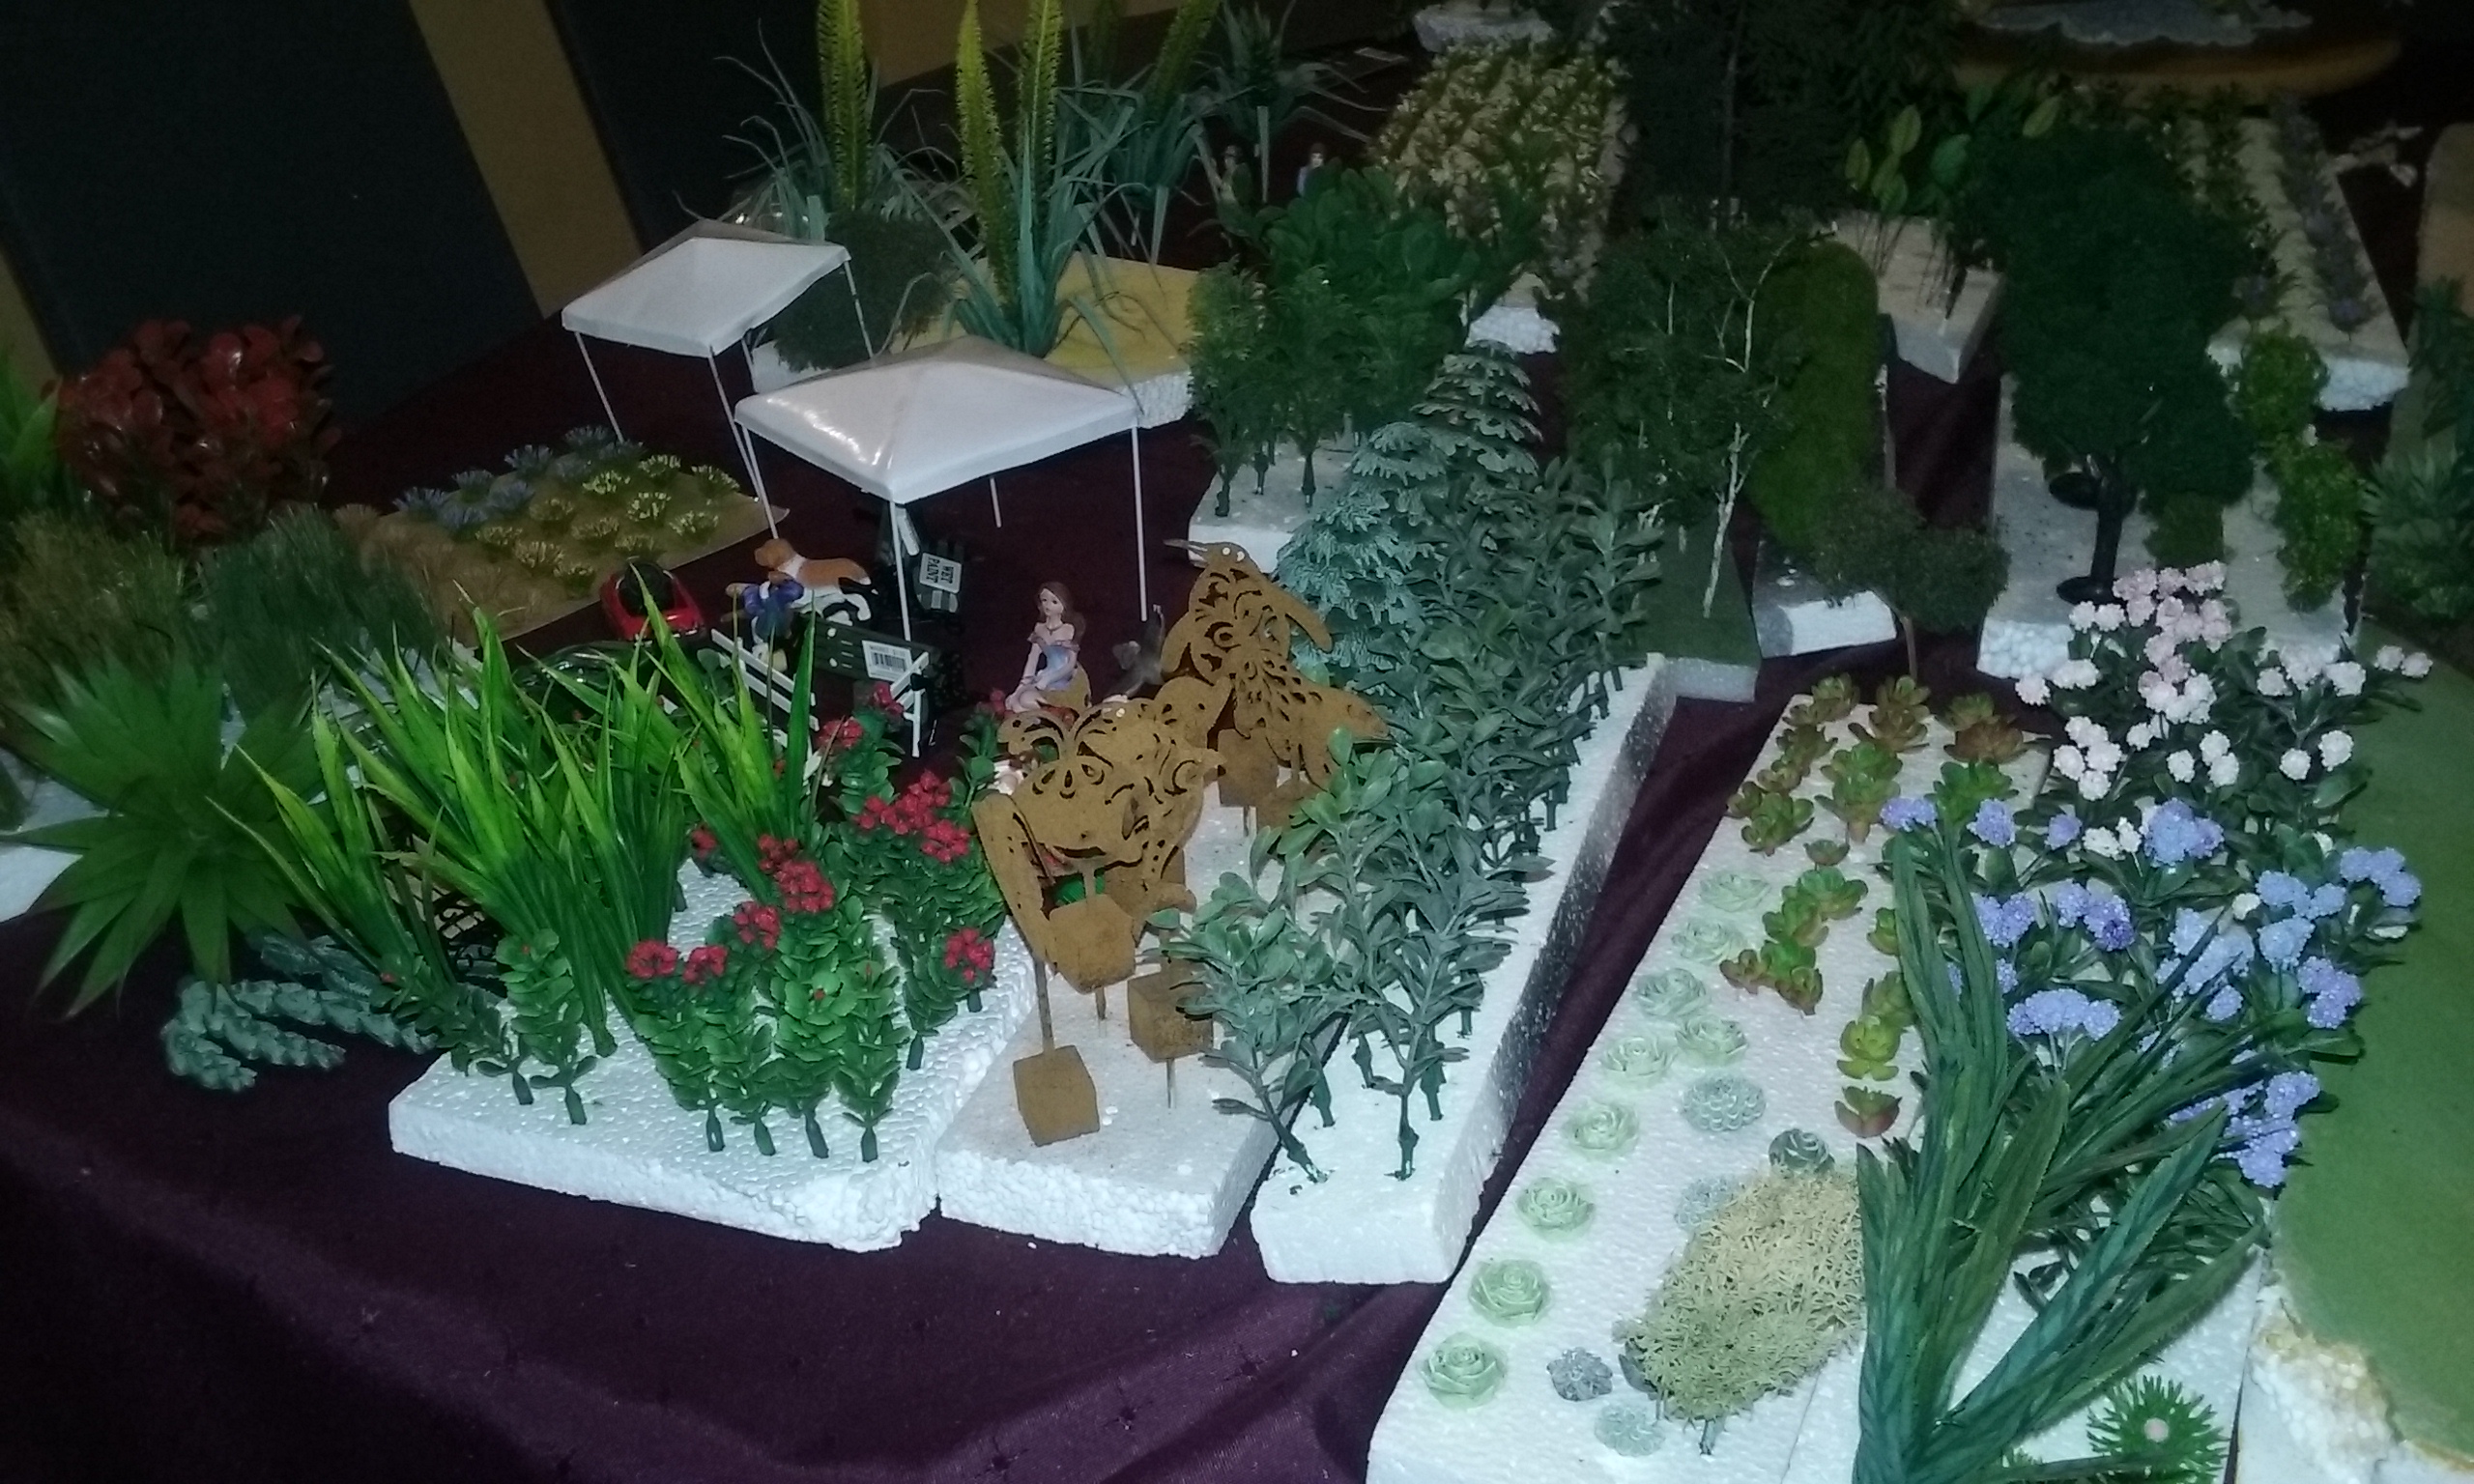
The small round green shrubs came from a fancy edge strip from a fabric store. Some of the plants have been drybrushed with craft paint to remove the plasticy sheen. Most of the garden plants have been attached with dressmaking pins or nails pushed straight through into the foam. This gives a lot of freedom to alter the layout and avoids the mess and time delays of using adhesives. In the first two photos you can also see the foam core garden beds which are raised up slightly from the roadway. They say a good diorama should tell a story and this scene has a whole range of vignettes within, with separate groupings of people adding their own stories. You have to peruse the scene as a whole and then in detail to spot all the little scenarios being played out. Can you guess the origins of the entry buildings into the two sides of the park? If you are into show rods you might have an advantage over others! The gazebo where the wedding is taking place was a white wire piece that we gave my late mother for her miniature collection. Along with the food at the picnic on the left, I am sure she would be delighted to see her pieces in such a beautiful setting. The bride and groom are modified wedding cake figures. I had bought two or three of these over the years and with a bit of plastic surgery they were ready to tie the knot. They were well proportioned and detailed but would have scaled out at about 71/2 feet high till I took a razor saw to them! Ute added a small bouquet. There are also hand made floral arrangements on the gazebo and some of the seats in the park. An Ed Roth figure from a Revell kit is the wedding celebrant and you can see a Revell Truckers figure of a girl that Ute converted into a photographer standing off to their right. Apart from a few pre-painted commercially available figures, Ute has painted them all with a combination of Jo Sonja acrylics and Humbrol enamels. Some were especially made for this diorama while others were painted previously for some of my dioramas. The table started life as the cap from a plastic bottle.
-
For about 10 years the members of Perth and Districts Model Club have joined forces to build substantial dioramas that are then displayed at our annual hot rod show and two local model shows. A few years ago the decision was made to produce our biggest production yet, a huge open air car show. The initial planning and setup was done in our garage and my wife Ute (pronounced Oo-Tee) decided to join in the fun by producing not one but two complete modules for the project. One was a large lake and the other was the one shown here, an open air wedding. Ute is not a model builder per se but all her life she has been a highly creative and talented person , as a painter in many different mediums and for the last twenty years as a spectacular patchwork quilter. As Ute got deep into this project, she looked at things with a different eye than your average model builder. This is the result of about three months work. We recently discovered that, quite by accident the diorama would fit unaltered into one of our display cabinets so it is now on permanent display in our home. I couldn’t be prouder. Pretty much everything you see in this diorama with the exception of the cars and the gazebo has been made or enhanced by Ute. I thought you might enjoy seeing her work. Ute used a large rectangular scrap of packaging foam to form the base of the scene. After laying out the main elements of the road and the gardens we went digging through our stash of diorama materials and found we had a lot of bits that would be perfectly suited. Some of the plastic trees, for example, I had kept from our family slot car track in my teenage years! The roadway is formed from vacformed styrene brickwork from a local hobby shop. As with much of the colouring throughout the diorama, Ute used Jo Sonja acrylic craft paint to get the tones she was after. The garden beds were made from foam core board with one plastic side of the sandwich sliced off. Ute used a Stanley knife to cut the surface to the desired contours and then painted them an earthy brown. The foam was then coated in ceramic tile adhesive, leftover from the ceramic tiles that Ute laid in our front entryway. After smoothing this out and letting it dry, she used a variety of green and brown tons to get a lawn colour. The tile adhesive gives a texture that is more to scale than the model railway grass products that are often used for this work. I had collected a variety of shrubs, bushes, trees and flowers over the years for diorama projects and these were a good start but Ute had grand designs for her gardens and the local hobby shops did not have what she had in mind. Instead, she hit Spotlight, a chain similar to Hobby Lobby, for artificial greenery for plants with foliage that would work in scale. Ute also found a cheap range of fake aquarium plants in a local dollar store and these proved to be perfect for the job. The photos below show the wedding module as part of the P.D.M.C display and also part of the array of plants that Ute assembled. In the full length photo of the display, you can just make out the white gazebo sticking up at the far end of the display table.
-
AMT/Lindberg '34 pick up Question ?
alan barton replied to Greg Myers's topic in Model Building Questions and Answers
Not only that, Joe, but the 34 commercial grille is larger and blockier than the 32 passenger car and 32 commercial car items. The 32 commercial grille is very similar to a passenger car unit dimensionally, with no slant, but has the grille bars stamped as part of the shell like the 34 unit as distinct from a separate grille on the passenger car unit. -
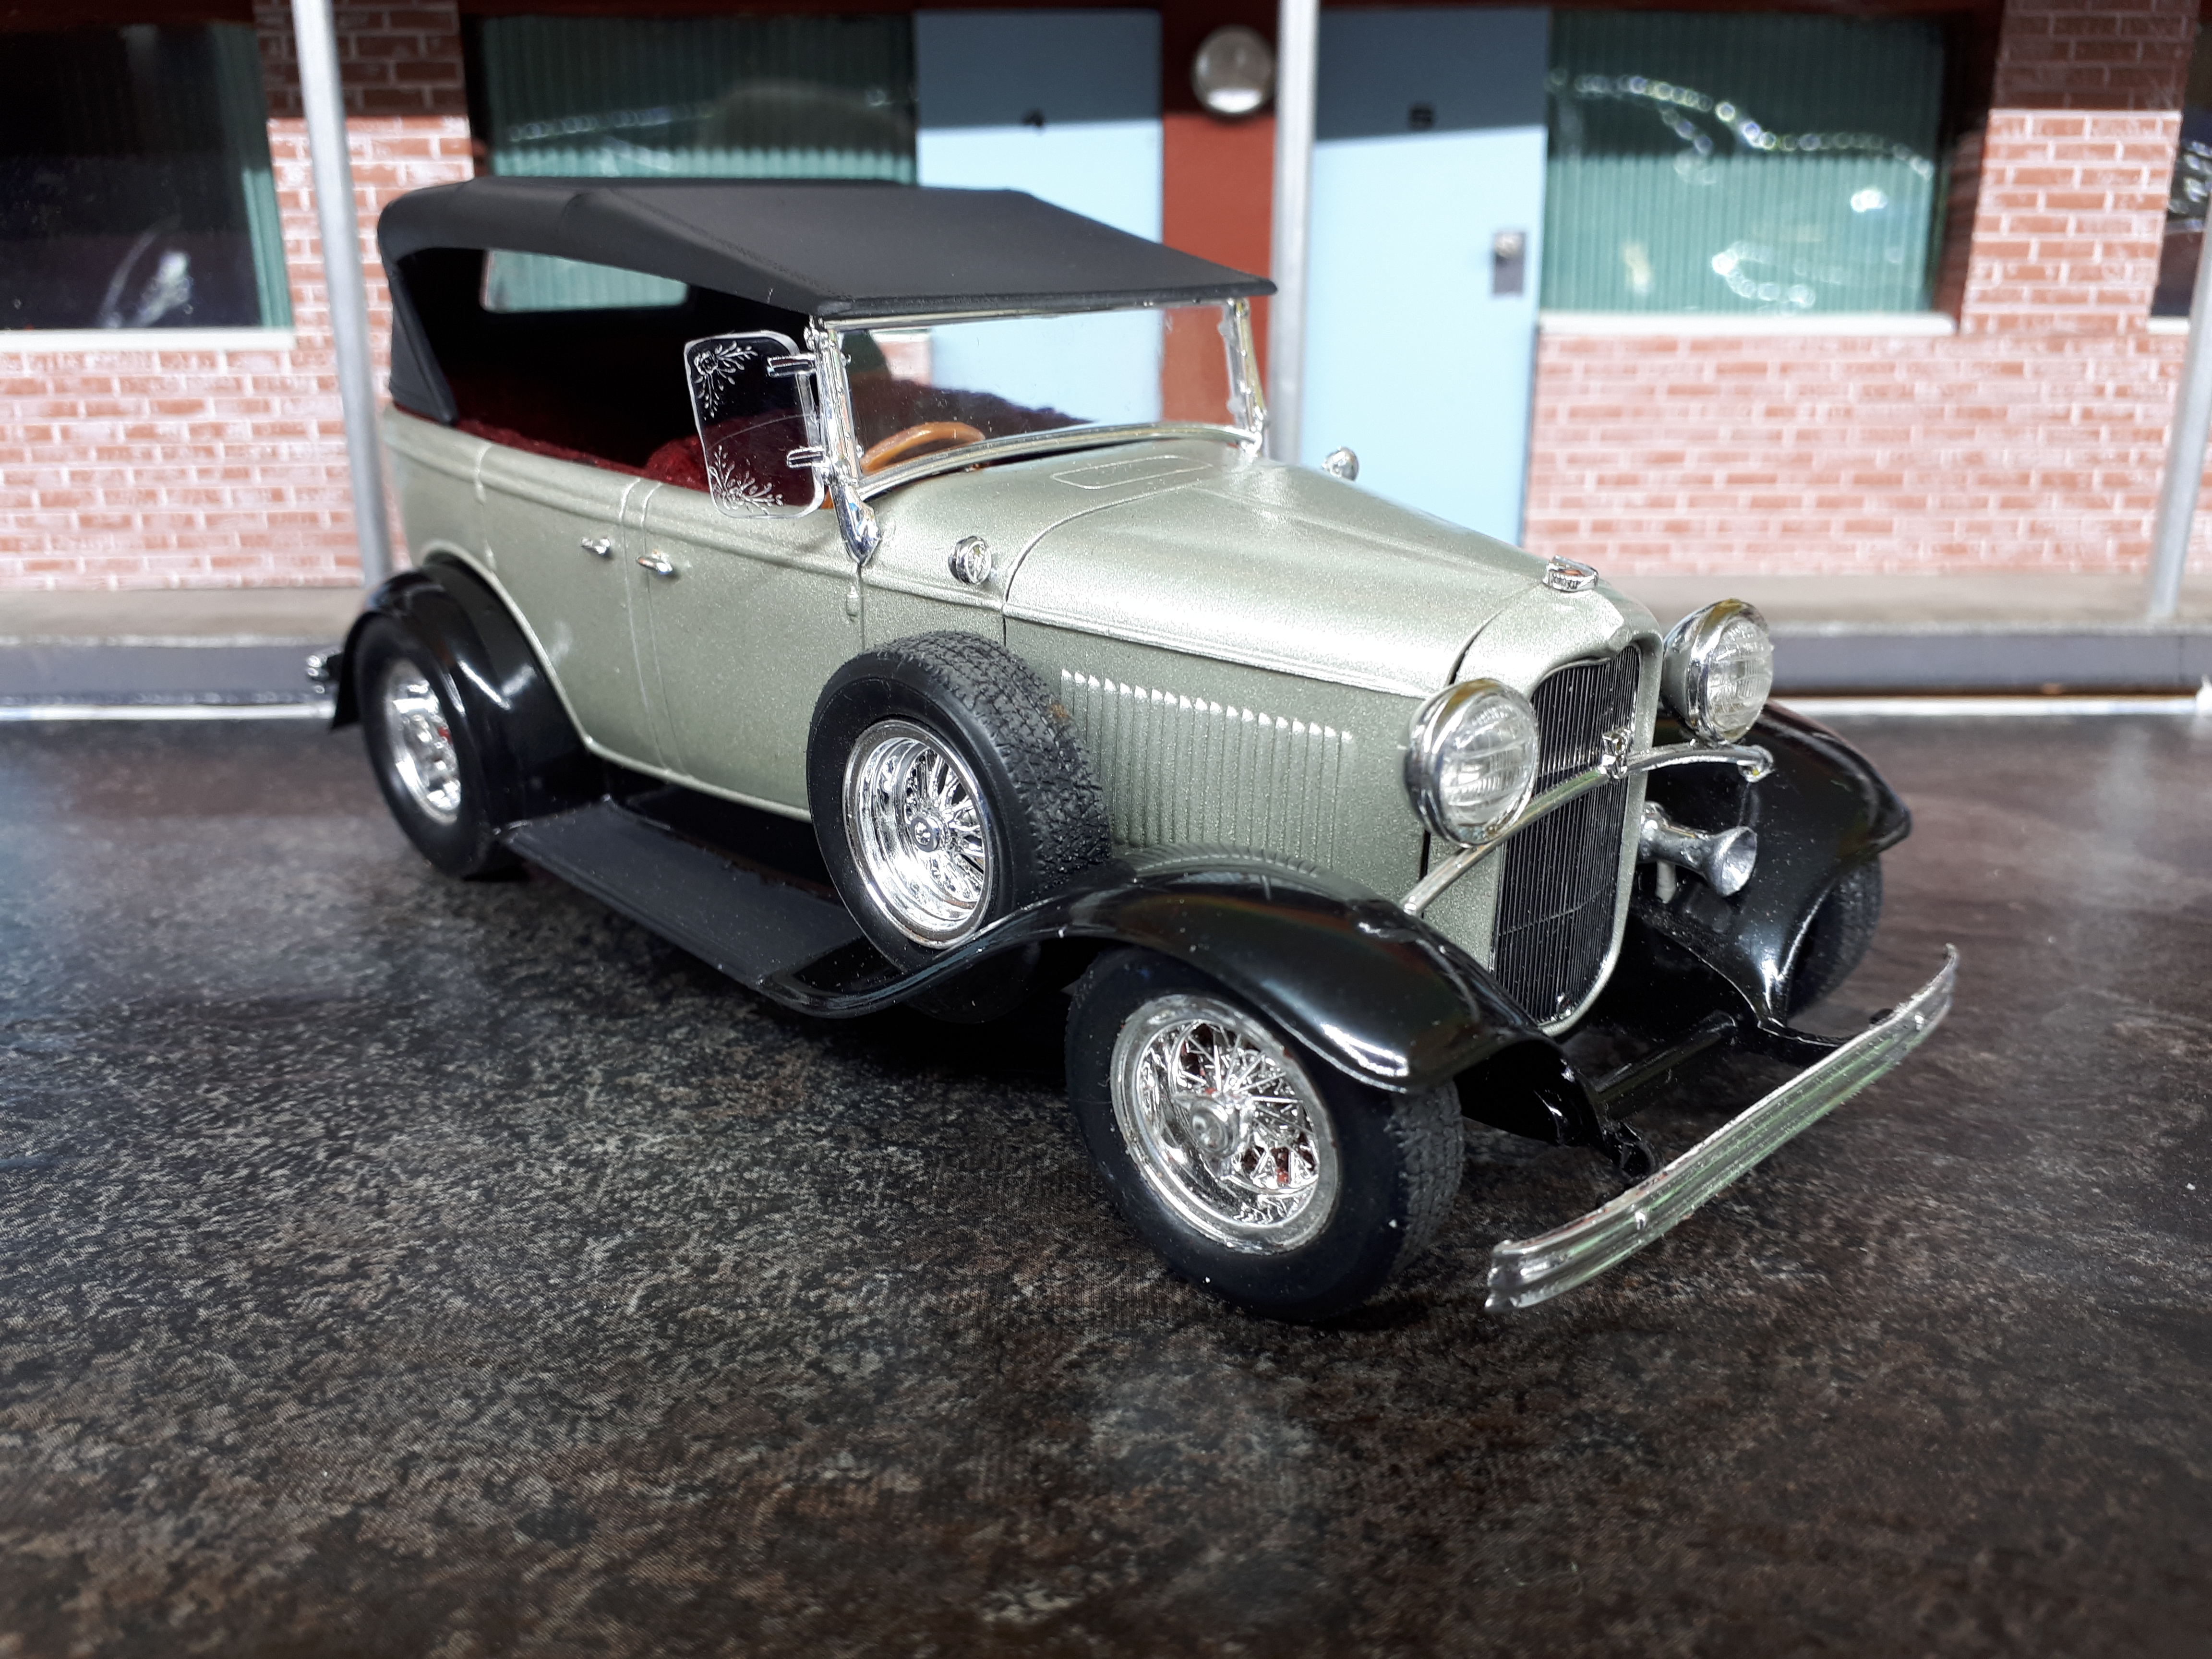
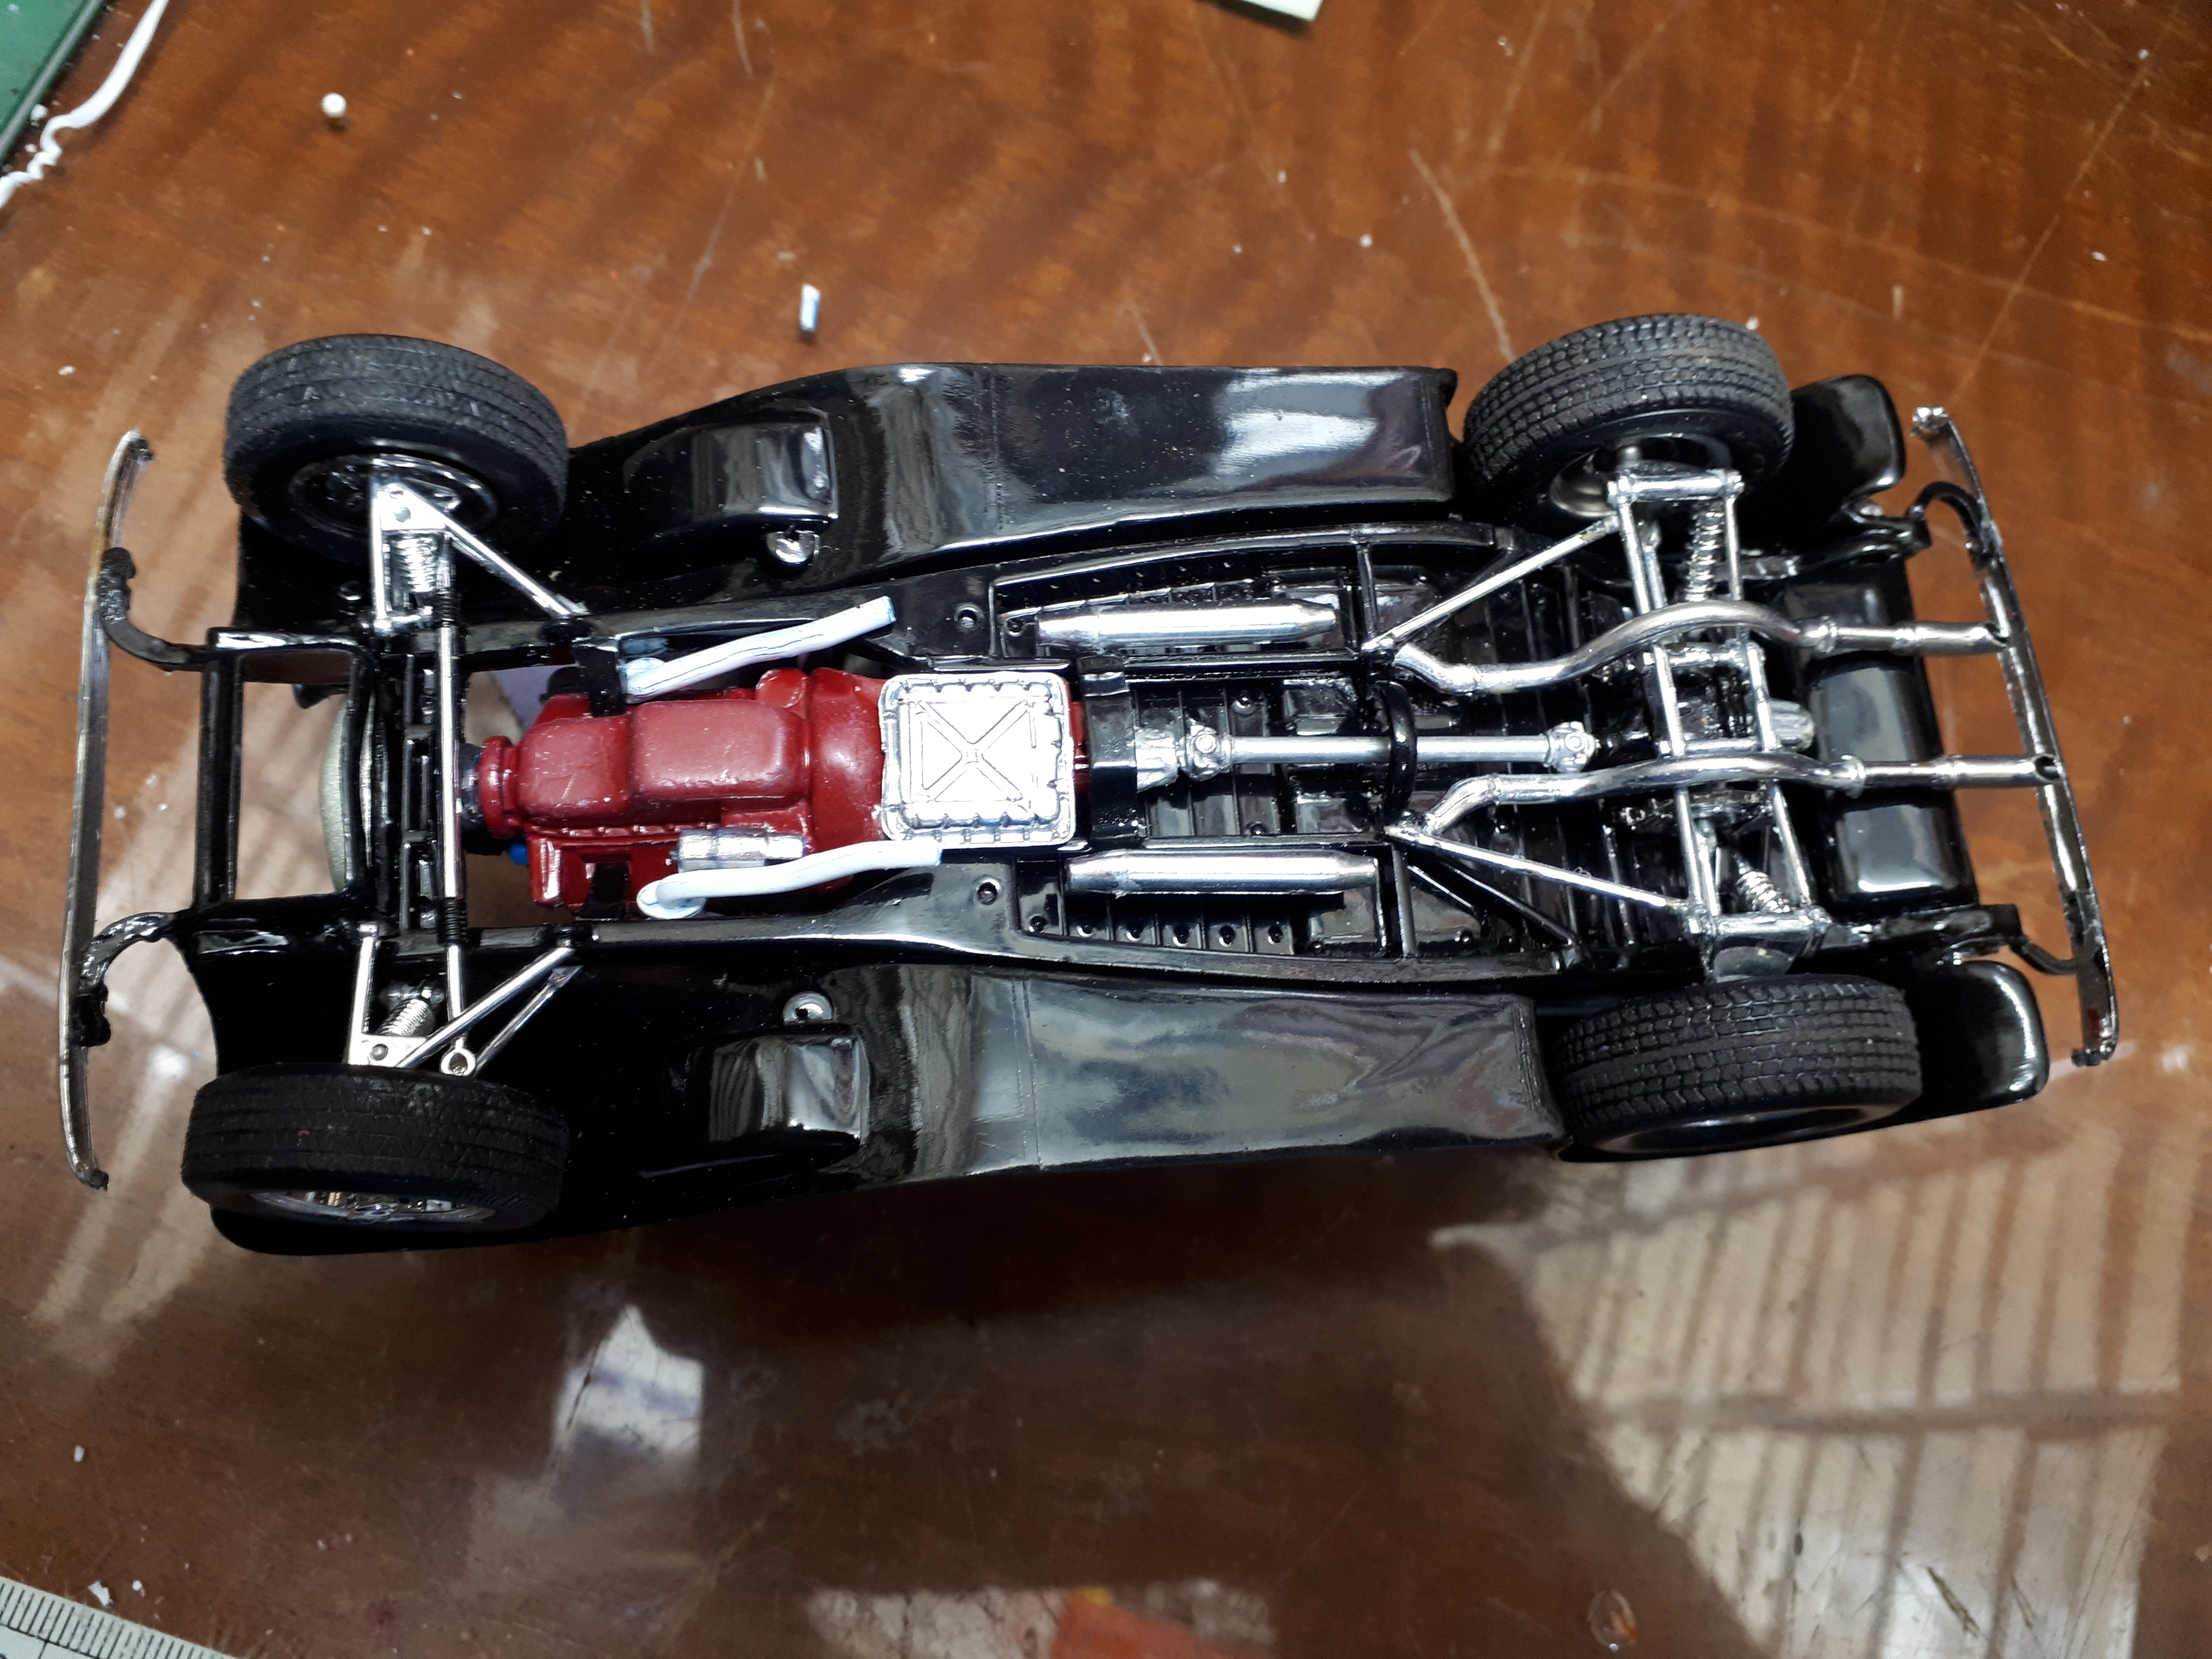
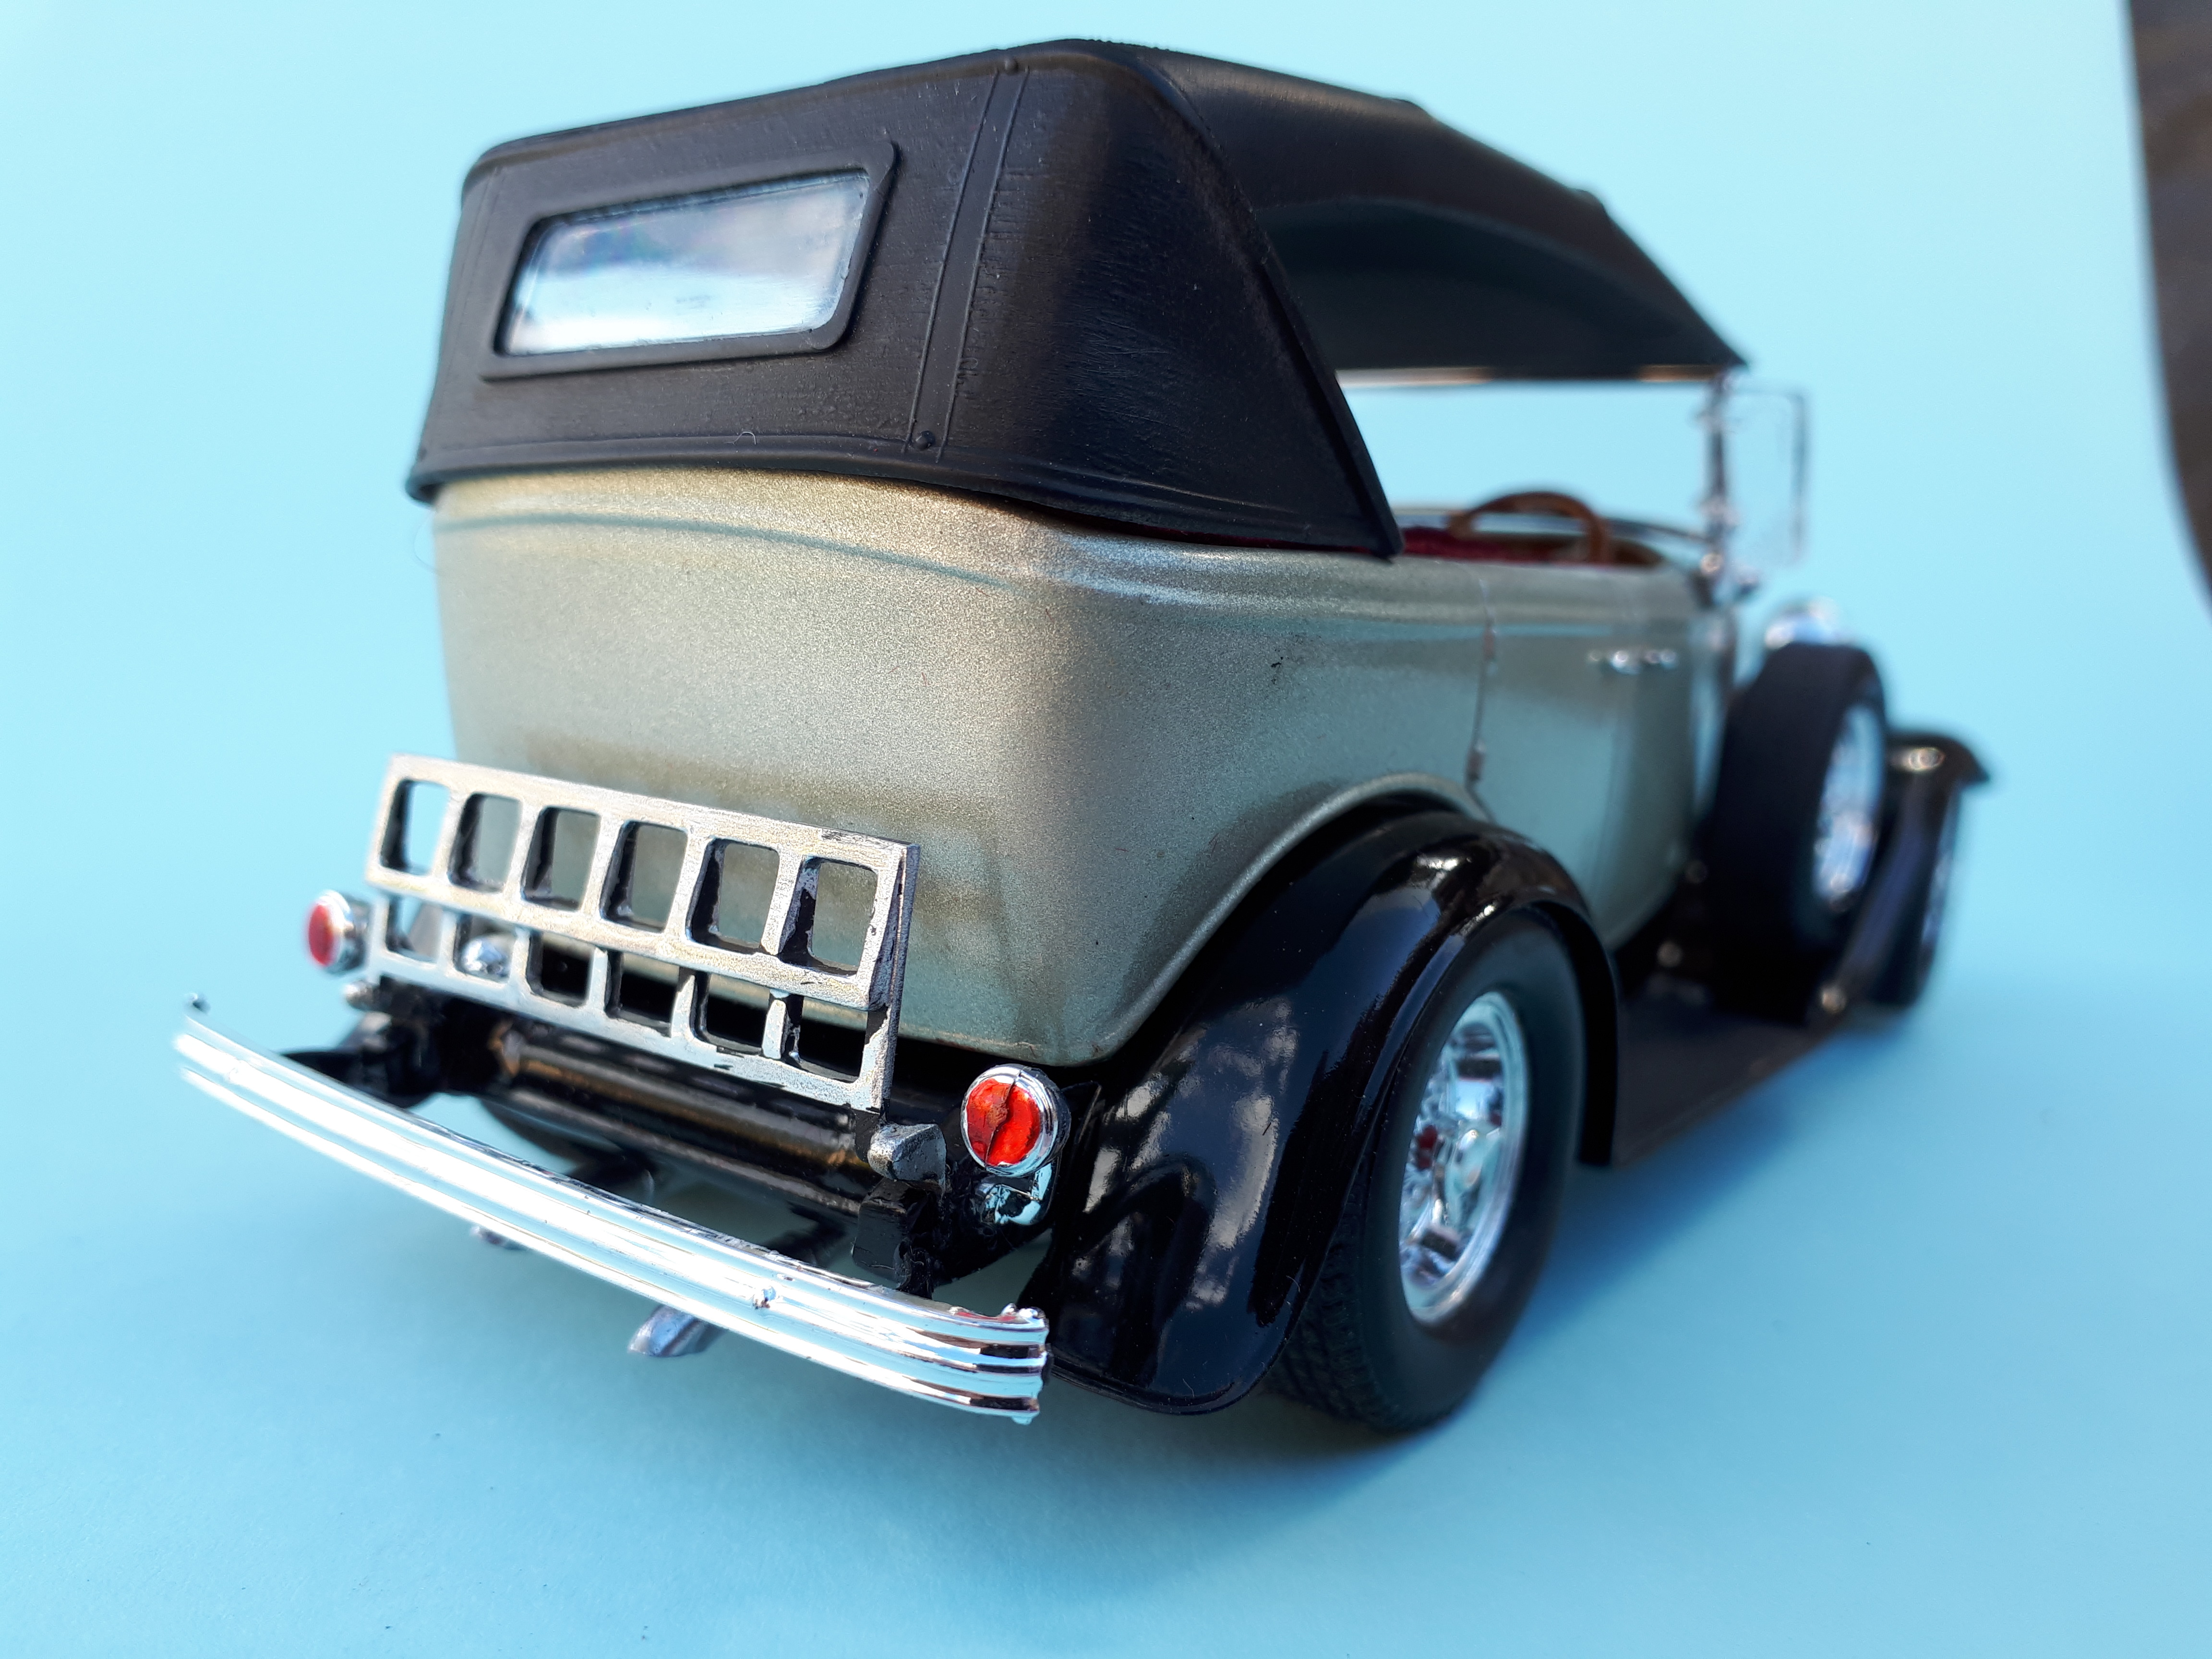
Not my longest build duration ever but certainly up there. This was my attempt to emulate the accessory laden resto rod style of the mid seventies. Cowl lights, etched wind wings, luggage racks, wire wheels and sidemount spares, it was a time when you could be forgiven for wondering whether you were at a rod run or a restorer's gathering! Anyhow, that was what was trendy at the time and it probably saved a lot of cool cars from being butchered beyond recognition! And who knows, maybe we need another one before all the rat rodders lay a 12 inch chop on every last remaining 30 Tudor or 5 window coupe!!! It's always nice to get a long stalled project finished (if I had thought about it advance it could have gone in Snake's Bring out Your Dead thread!). I still have some exhaust system issues to address and the left hand front wheel could do with a camber adjustment. I was pleased that I was able to massage the fit between the body, hood and grille and I do find that the side mounts tend to soften the effect of AMT's section job on the cowl. So here is the recipe. AMT 32 Ford Phaeton body, hood, grill, interior and frame. Resin copy of Rat Roaster firewall AMT 32 Ford Sports Roadster dual side mount fender unit and luggage rack Monogram 37 Tudor SBC and T350 Monogram 37 Ford modified exhausts Monogram Street Stalker Camaro Borrani style wheels Monogram 32 roadster windshield, frame and posts, and tailights. Also Deuce billet rocker covers and air cleaners. Plus Tru-spoke style wires in fender mounts. Revell Buttera 27 T suspension Testors German silver body Testors Classic black fenders and frame - all spray can finishes. thepartsbox.com maroon flock.
-
1932 Ford Sedan: Chopped, Channeled & Olds Powered!
alan barton replied to Dennis Lacy's topic in Model Cars
Didn't I just see that one in Rodder's Journal? Wow Dennis, simply a beautiful hot rod. The channel job works well (and you rarely see a Tudor channelled!) and I love the fitment of the rear tyres in the wheel arches. The Olds looks right at home there and the grey wheel centres tie everything together. You continue to set targets for all us hot rod modellers to meet! Cheers Alan -
When I painted this decades ago I was just going to use the standard AMT windshield frame and posts. Problem is, they are very toylike and don't compare well to the real thing. Monogram did a far better job on the screen on its 1/24 roadster but I figured that unit would be too big. Turns out, it's not! The fit isn't perfect but it reads way better than AMT's effort. Next time I would make some slight modifications to the cowl to make a perfect fit but I didn't want to have yet another shelving of this project so I continued on. I used Micro Liquitape to attach it without risking the paint. That's it for construction - I will ow post the finished job in Under Glass. Thanks for watching! Cheers Alan
-
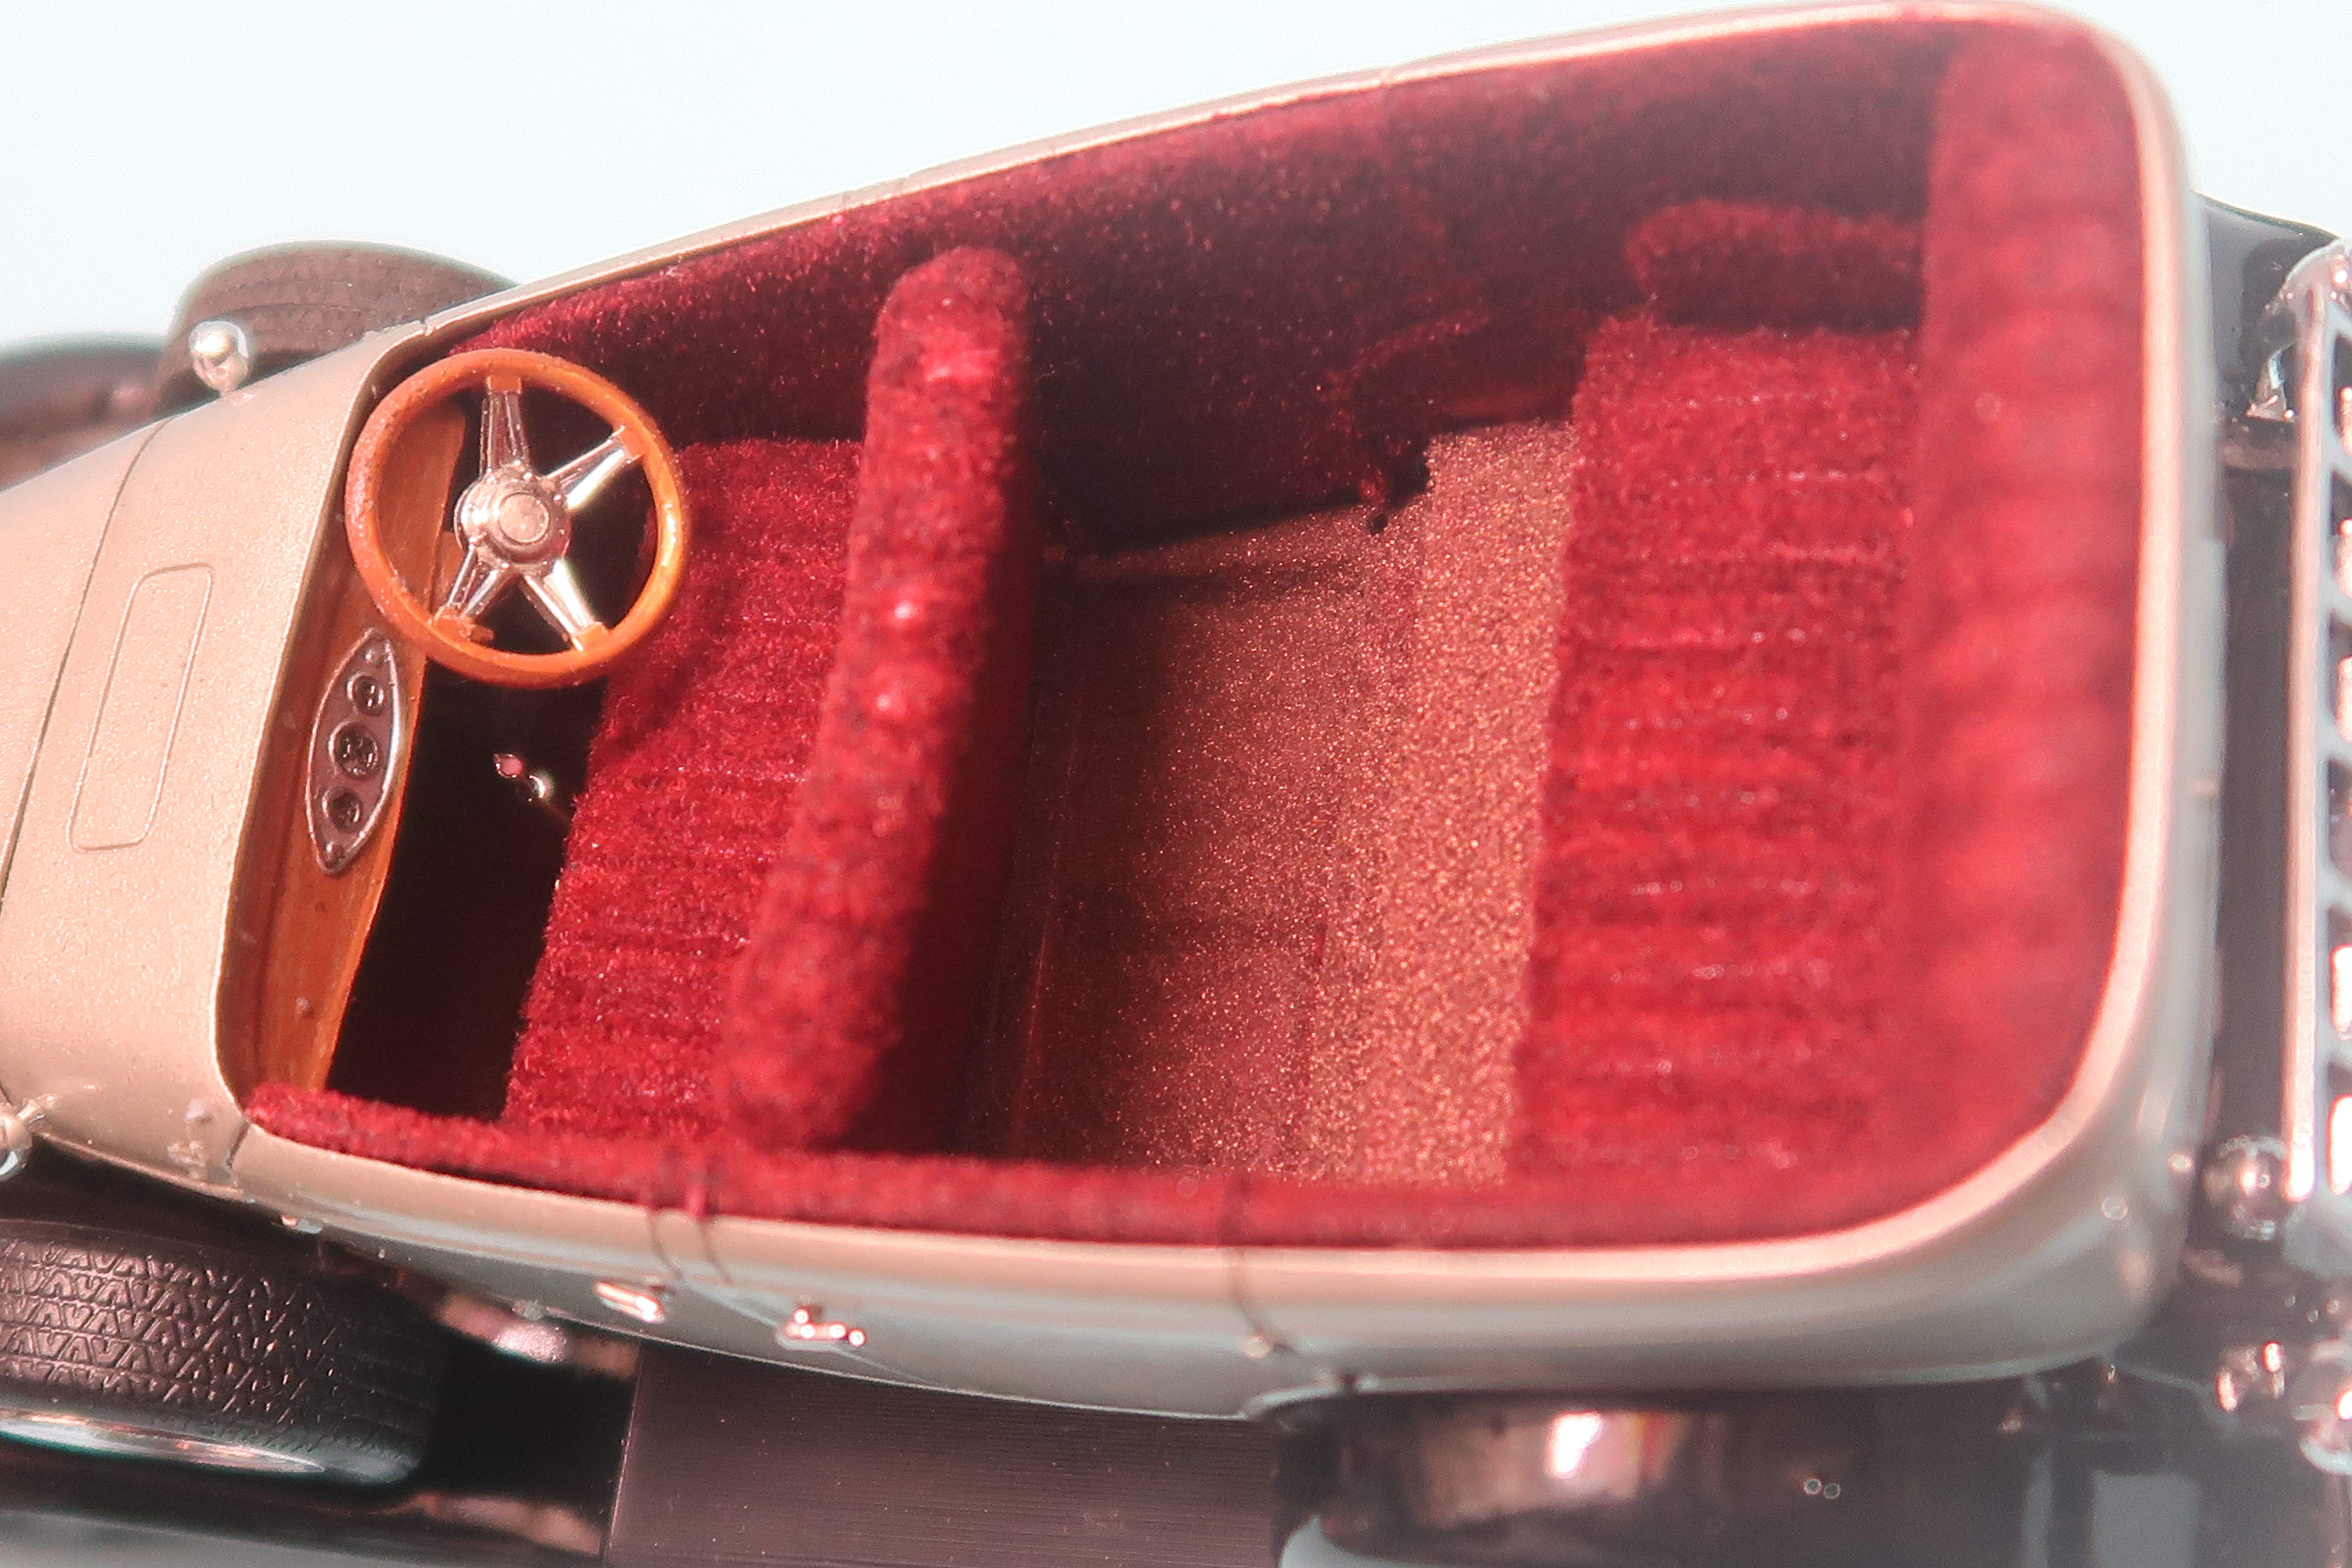
After my dramas with the U.S. sourced flocking material I obtained some here in Oz from Jason and Michelle at thepartsbox.com. This worked a treat. I simply slopped on a thick wet coat of Humbrol maroon paint and dropped the tub into a takeaway container with a lid. I sprinkled some flock over the whole thing, did the shake and bake trick for a few minutes and then set the tub aside to dry. The carpet is a bronze shade of embossing powder. I'm not great at colour combos but it does the job and with the roof on all the time I doubt whether many people will even see it! Cheers Alan
-
This is scratch-building at its finest! What a great achievement to get it this far. Keep up the good work! Cheers Alan
-
DECO-DENT, LFA-Powered Auburn Speedster Hardtop
alan barton replied to FrozenPlastik49's topic in WIP: Model Cars
Looks great, mate, a very adventurous project and looks like it will be a winner! Cheers Alan -
1928 Ford Sedan B/Altered "Bad News" - Finished and Final Photos!
alan barton replied to Dennis Lacy's topic in Drag Racing
I love when someone creates a period perfect model and yet no one piece seems to be a replica of an existing or well known car. Dennis, it just shows how strong your understanding of cars from this era is. I wouldn't change a thing . It makes me realise how I really must get one of my Tudors out of the stash and get on with it! Thanks for sharing it with us all. Cheers Alan -
Thanks Phil, those photos are so fantastic and inspiring that I might have to include it in my next overseas holiday plans. Looks like the ultimate place for a rod run! Cheers Alan
-
Looks like the photos came out in the wrong order but you get the picture.
-
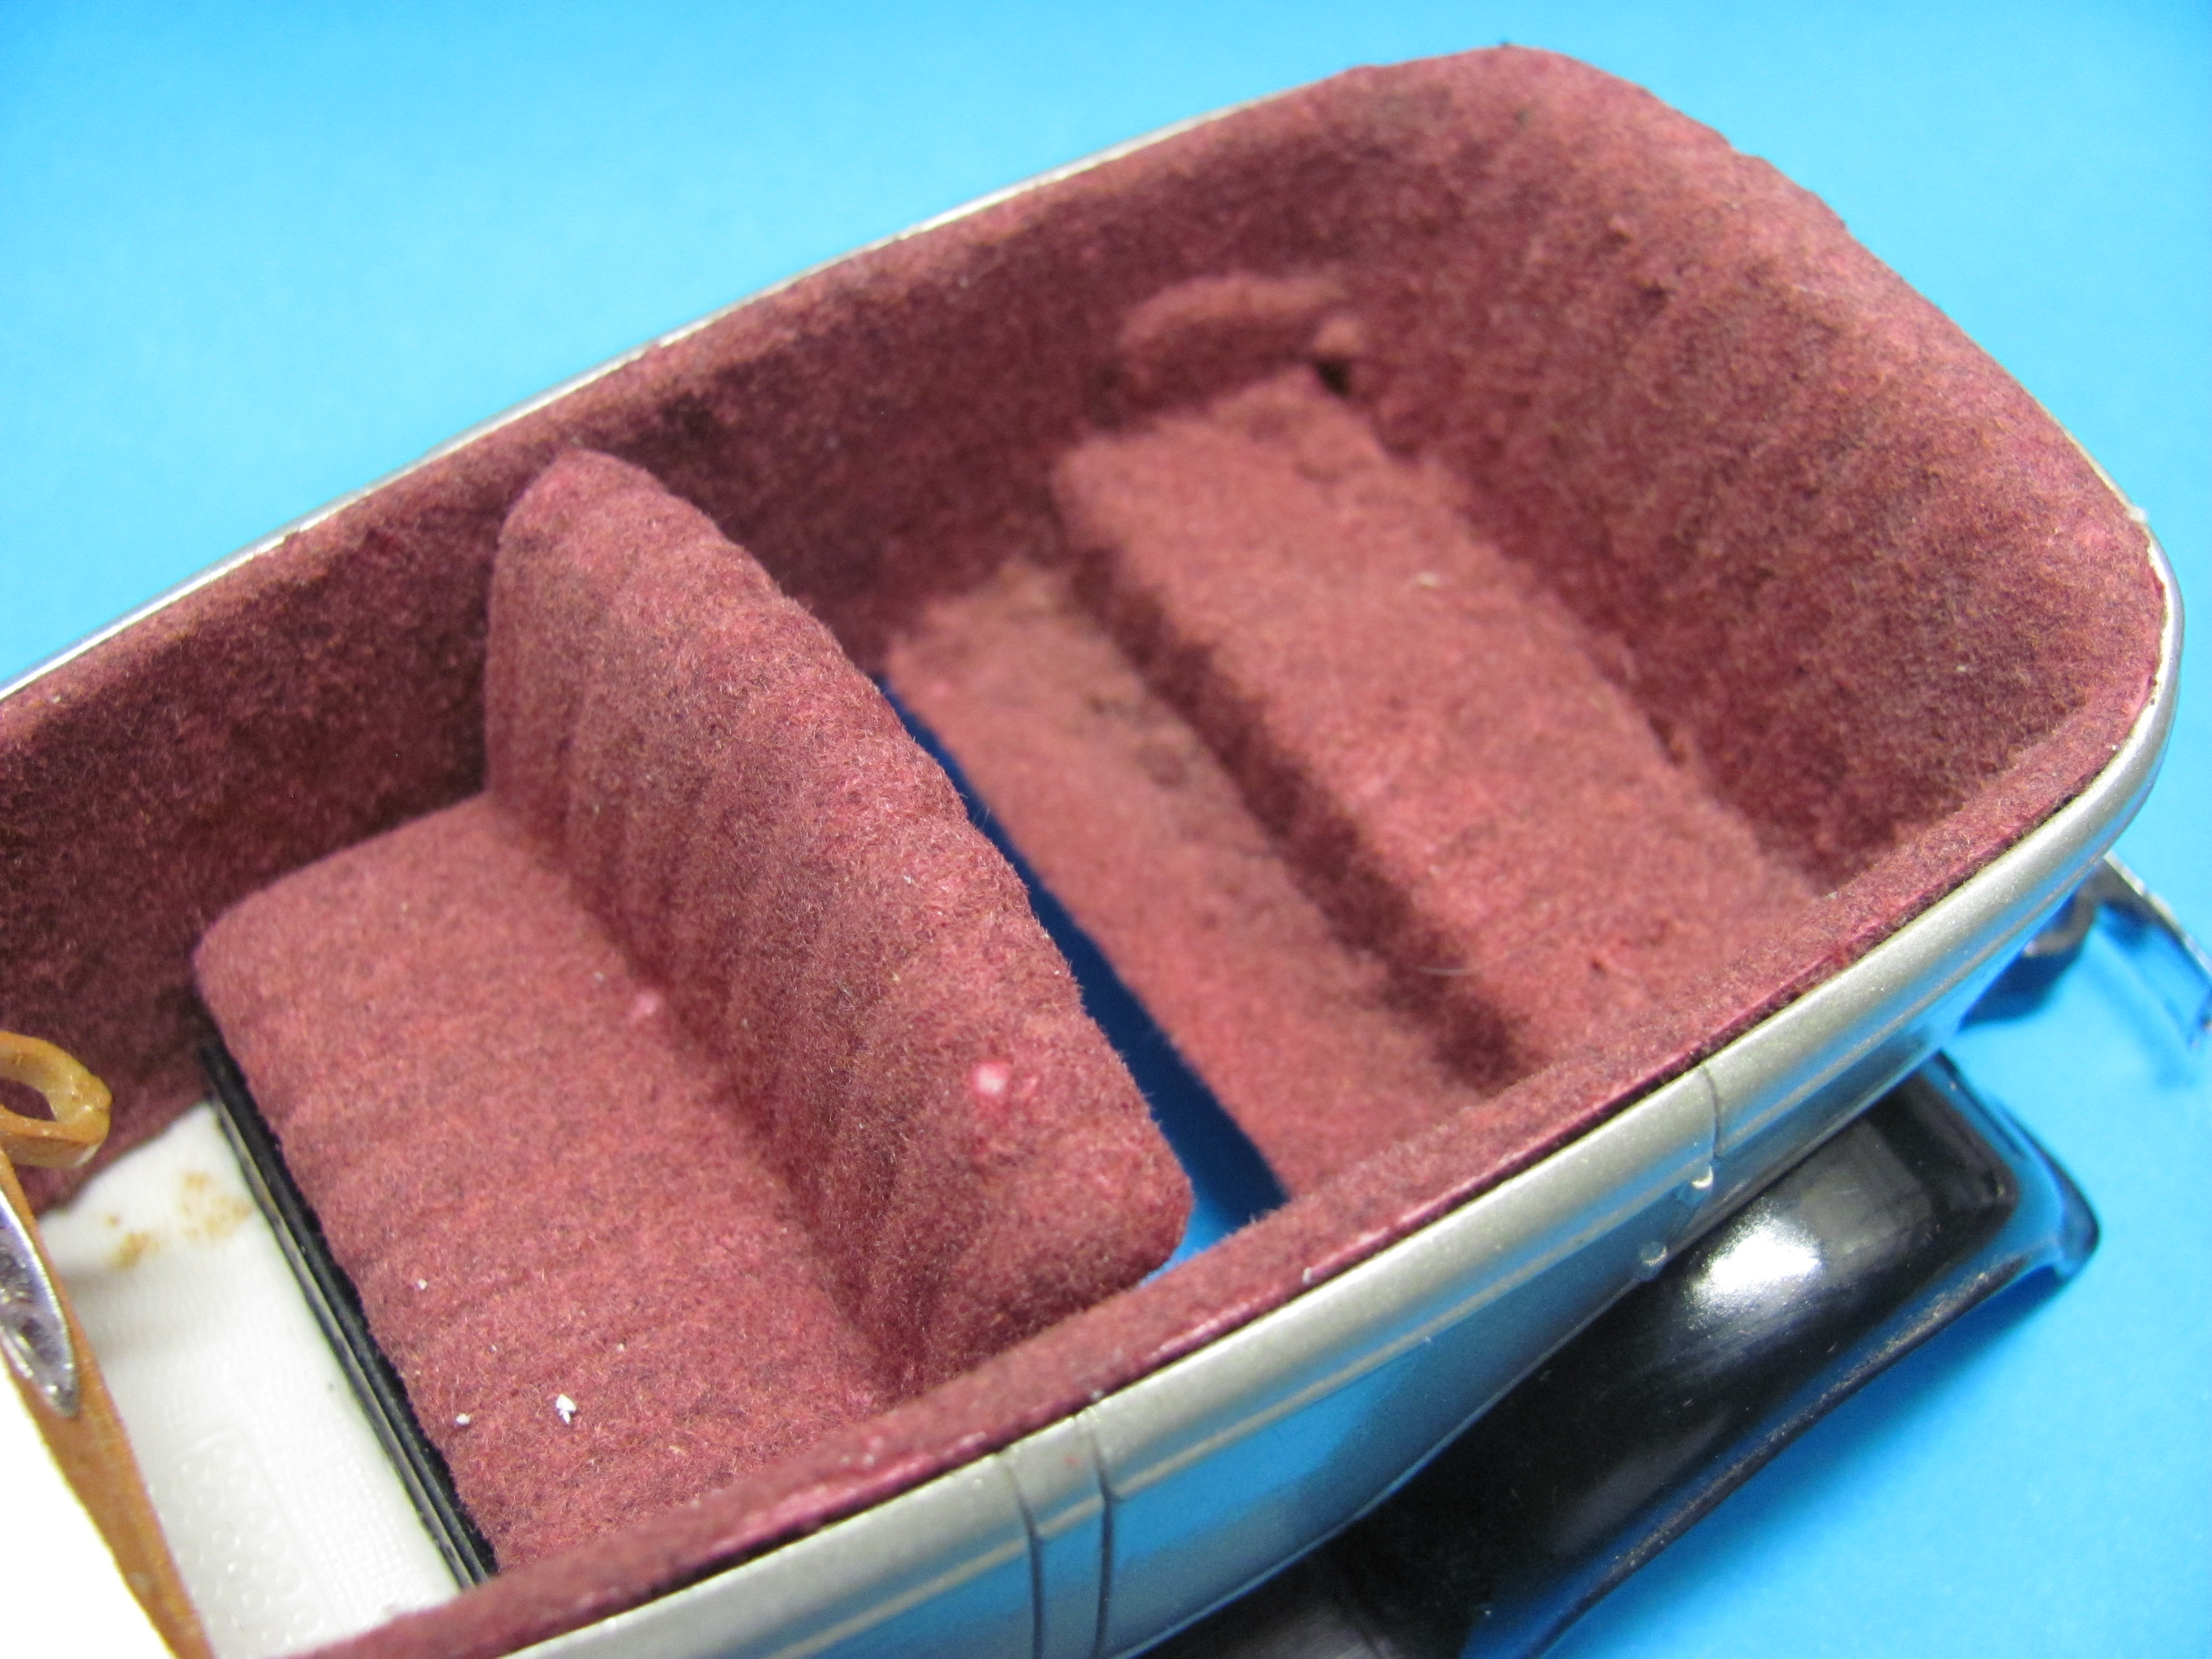
Thanks Mark! Yeah, I guess it is easy to fall into the trap of thinking that you are the only one who makes mistakes when we could probably all write a book on them. But at the end of the day, the only person who has to be happy is the guy who built it and I'm pretty happy with most of my builds. I know where the faults are but if it looks good on the shelf I'm happy and I'll just try to improve a bit more next time. Speaking of errors, the horrible mess below was my first attempt at flocking this interior. I wanted a mohair look for this car but the attempt you see here was done using flock by a wellknown aftermarket detail supplier. Now I'm sure his resin and photo-etch is great, I've got plenty of it, but there was something seriously wrong with his flock. His instructions said do a section at a time, put a decent coat of flock on and tamp it down and then let everything dry and dust off the excess next day. That gave me a bigger collection of furballs than I have ever seen under a bed. I then brushed off as much of the ugliness as I could and tried my way, which is to cover everything with paint and then put the tub in a sealed container and do the old 'shake and bake" trick. AS you can see below, it didn't do much better! So recently realising I couldn't live with the attack of the fuzzy monsters I chucked the interior into a caustic soda solution and left it overnight. The old Humbrol paint I had used came off easy peasy and I had a fresh interior to start again. While I was at it, I added some Evergreen strips to give some indication of the door openings.


.jpg.c4aa584b78ca92cf0e9bbd8e19cf86ca.jpg)


.jpg.2bf64b2546e6ee7e7cb23ed6ae5d041f.jpg)