Alan Barton
-
Posts
2,128 -
Joined
-
Last visited
Content Type
Profiles
Forums
Events
Gallery
Everything posted by Alan Barton
-
Auctual "Barn Find" Hubley Ford.
Alan Barton replied to ranma's topic in General Automotive Talk (Trucks and Cars)
I only just stumbled onto Hubley cars a few years ago and have all the Model A's, the hot rod, a 32 Chevy 5 window and a cool channelled Chevy hot rod that I won off eBay. You might be interested to know that the Model A clubs in Australia race Hubleys as well! They probably go faster than a real one! Cheers Alan -
Revell '29 Roadster, Late '50s Style
Alan Barton replied to Richard Bartrop's topic in WIP: Model Cars
This is one case where having the radiussed wheel arches actually helps because a lot of channelled cars with fenders had them welded up higher on the body. I can't wait to see how it looks with the trimmed fenders - this is a style I have had in mind ever since I bought the Revell kits. Yeah, just a smidge is all it needs at the back. Cheers Alan -
Easily the best build I have ever seen of this kit. I have a twenty -year-stalled project of one of these - this inspires me to have another look at it. Like John said, the head and tail light detail transforms it. Simply superb! Cheers Alan
-
Amazing - I was working on exactly the same model last night. Mine is based on the last re-issue in white plastic and I have gone for a reddy orange but otherwise the concept is the same - using some original parts and decals to backdate a more recent re-issue. One big advantage of this is that the first two versions, Little Deuce and Son of Ford, had the headlight bar mounts a couple of mm too far forward, leaving a huge space between the headlight bar and the grille. All versions since had the holes set back in the correct position. Your paintwork is magnificent and the assembly is very clean and crisp. Congratulations on recreating a little bit of modelling history. Cheers Alan
-
You know Phil, I have never understood why there are so many magazine and Internet photos of built up AMT roadsters and so few of the Monogram. Your model here proves my point - they are simply a better looking model all around. I currently have five on my shelf and another four in the build and they are easily my favourite hot rod model. Notice I didn't say they are the best hot rod model, just my favourite. I do like both versions of your Deuce but the second one is simply beautiful and very contemporary.. I especially like the impact of those shiny Halibrands. And as far as the frame being part of the fenders, you can't build the AMT as a decent hiboy anyway because the frame and the body are soooooooo mis-shapen. I have built three hiboys and one channelled car out of the Monogram kit and whilst there is some work involved in thickening up the outside of the front of the frame and the inside of the middle section of the frame, it comes out really nice and is only bettered by the new tool Revell (which is now over twenty years old!) Thanks for sharing this with us here - it is an inspirational model. Cheers Alan
-
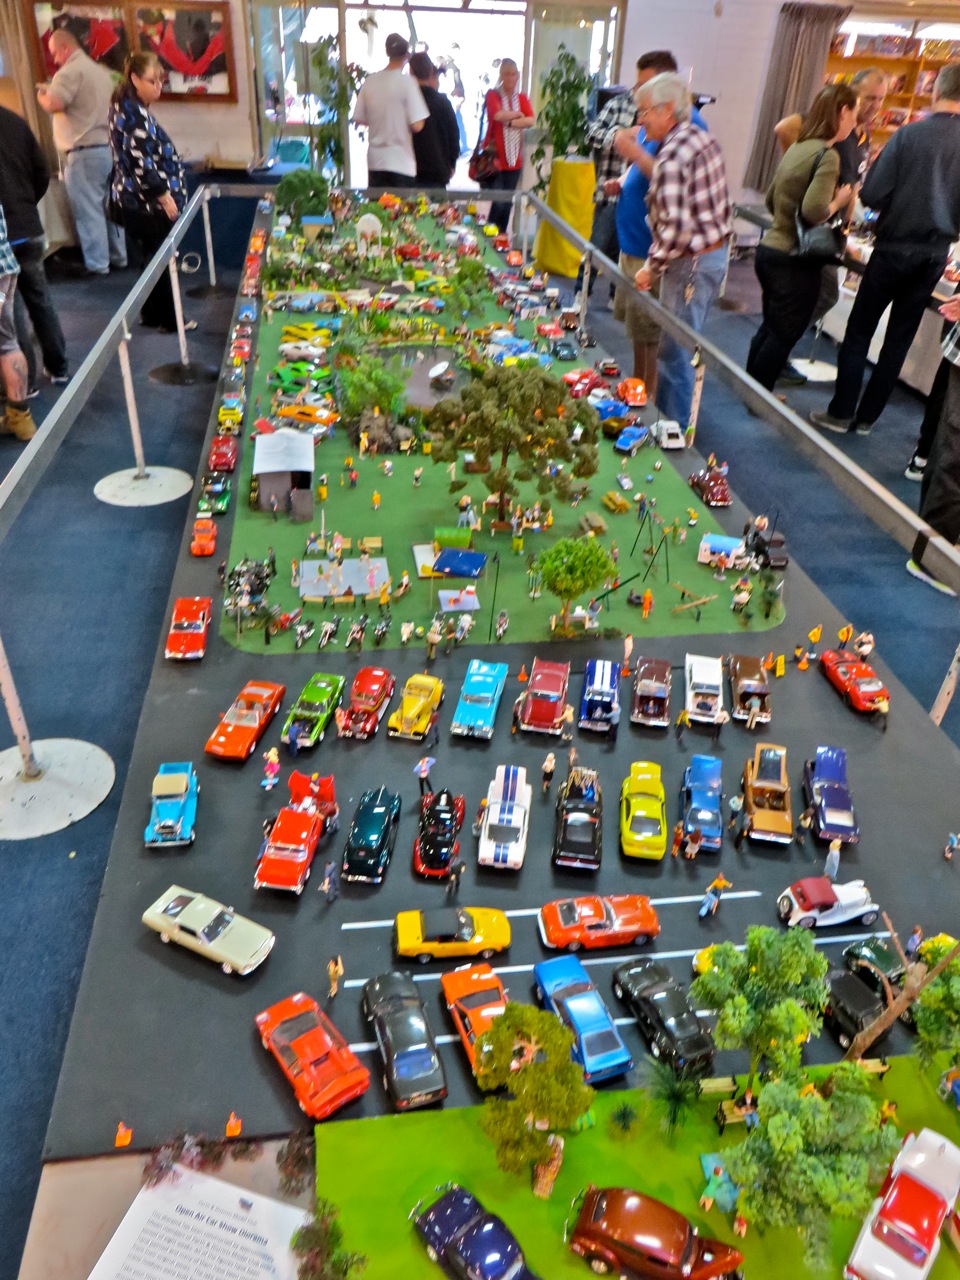
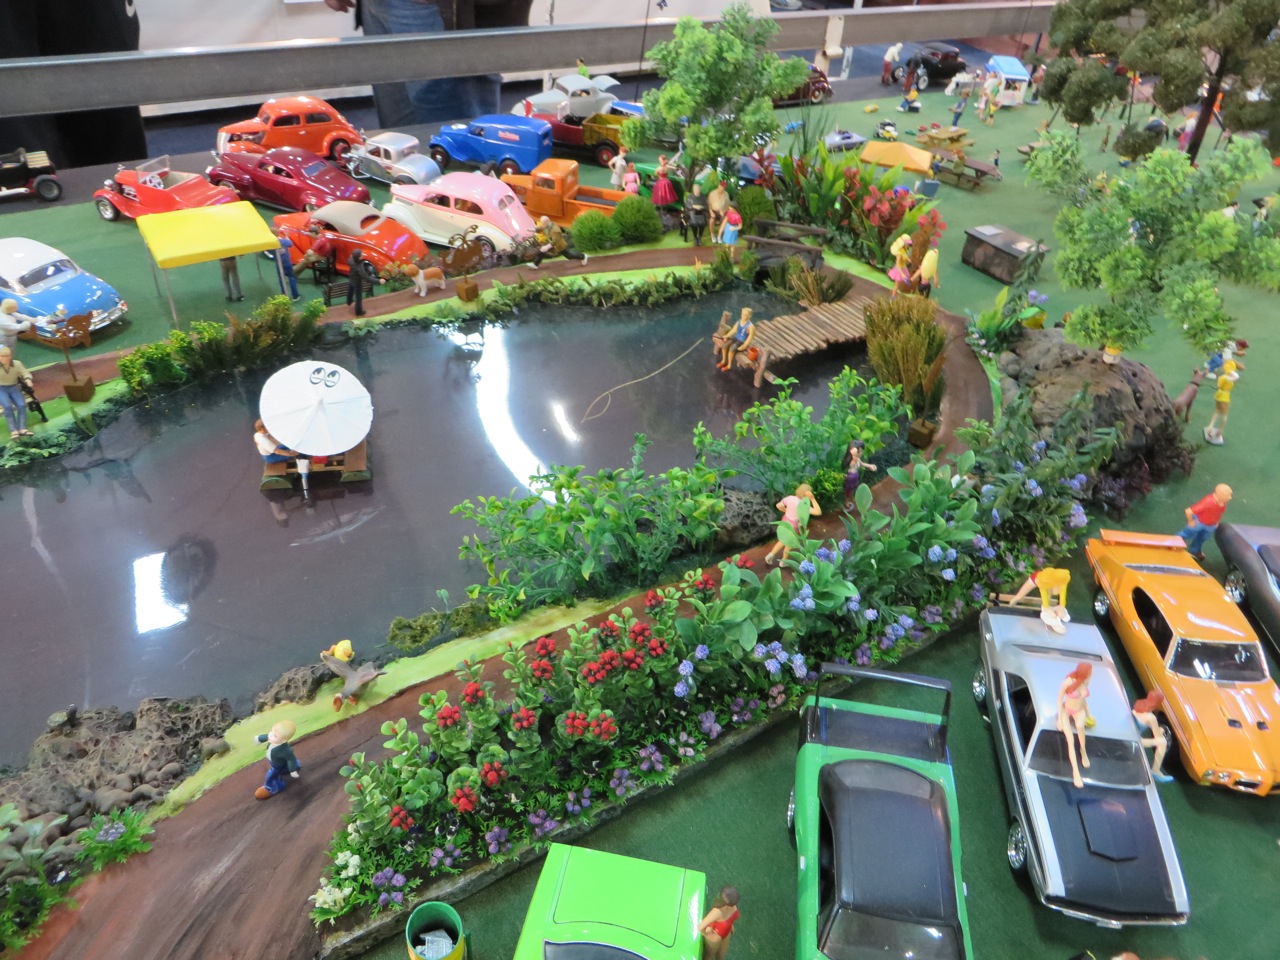
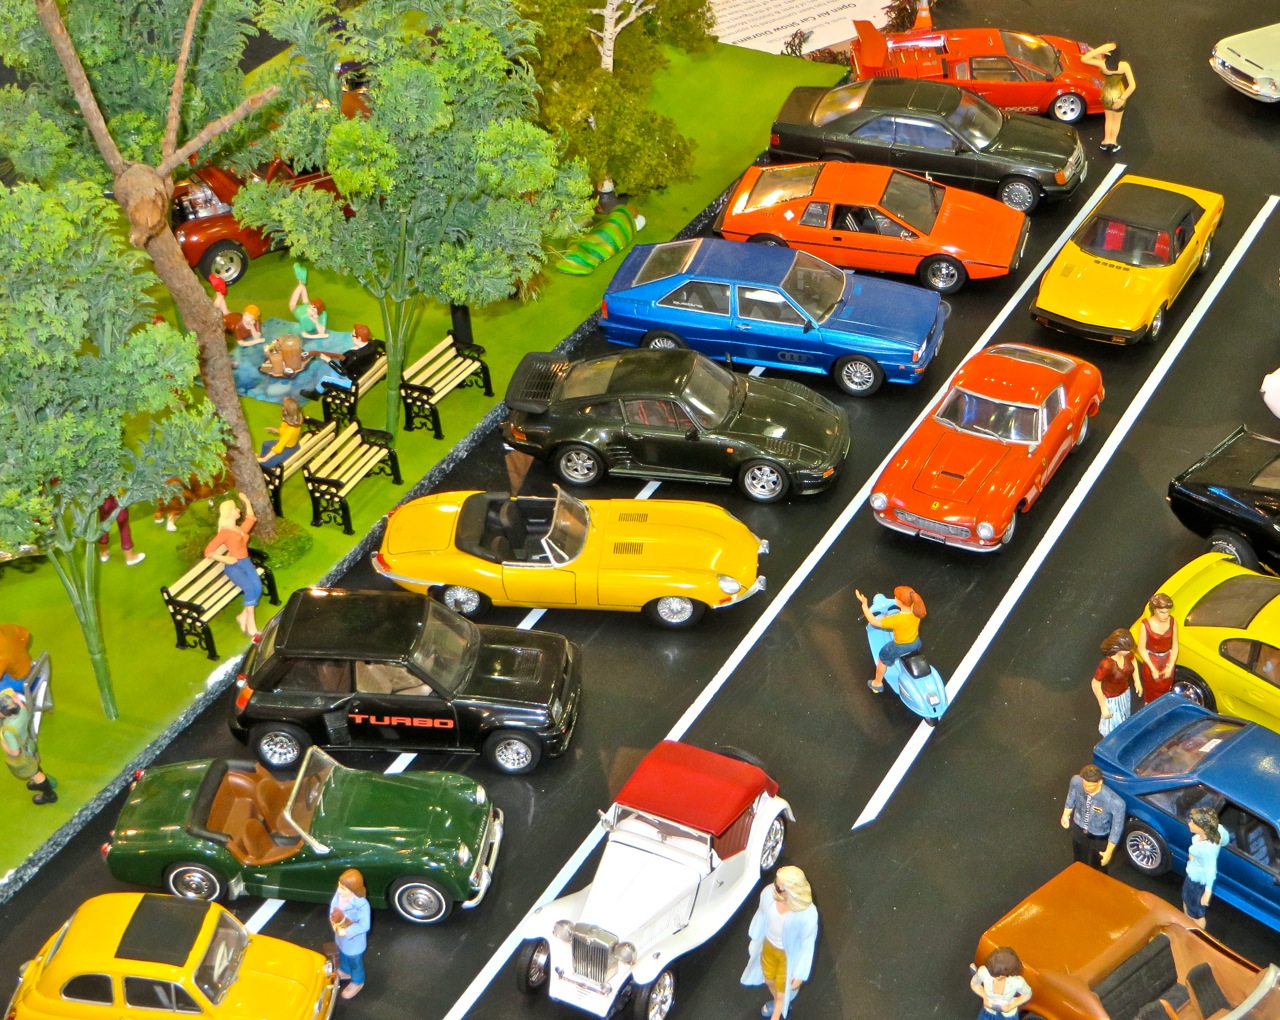
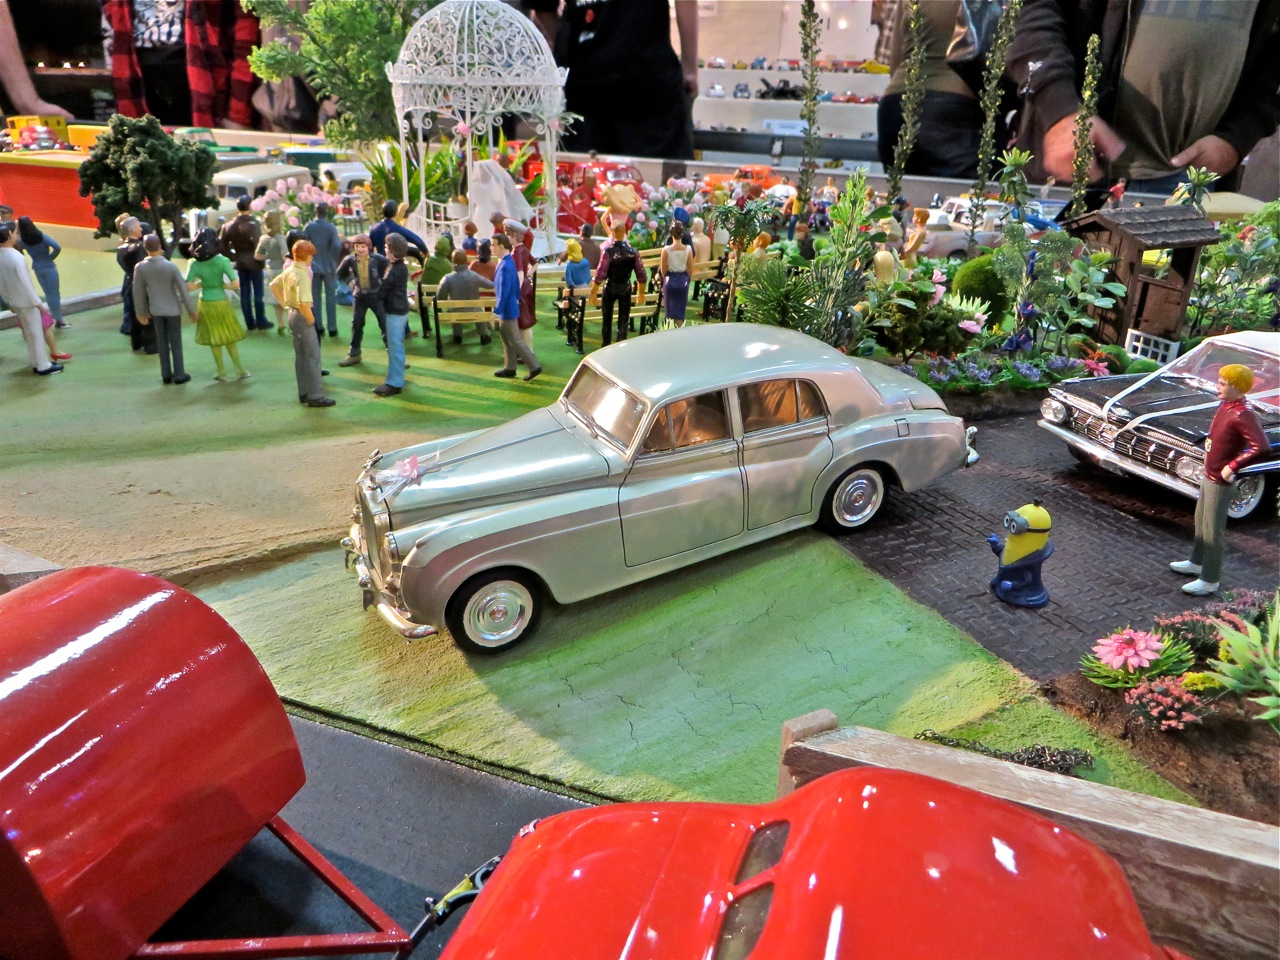
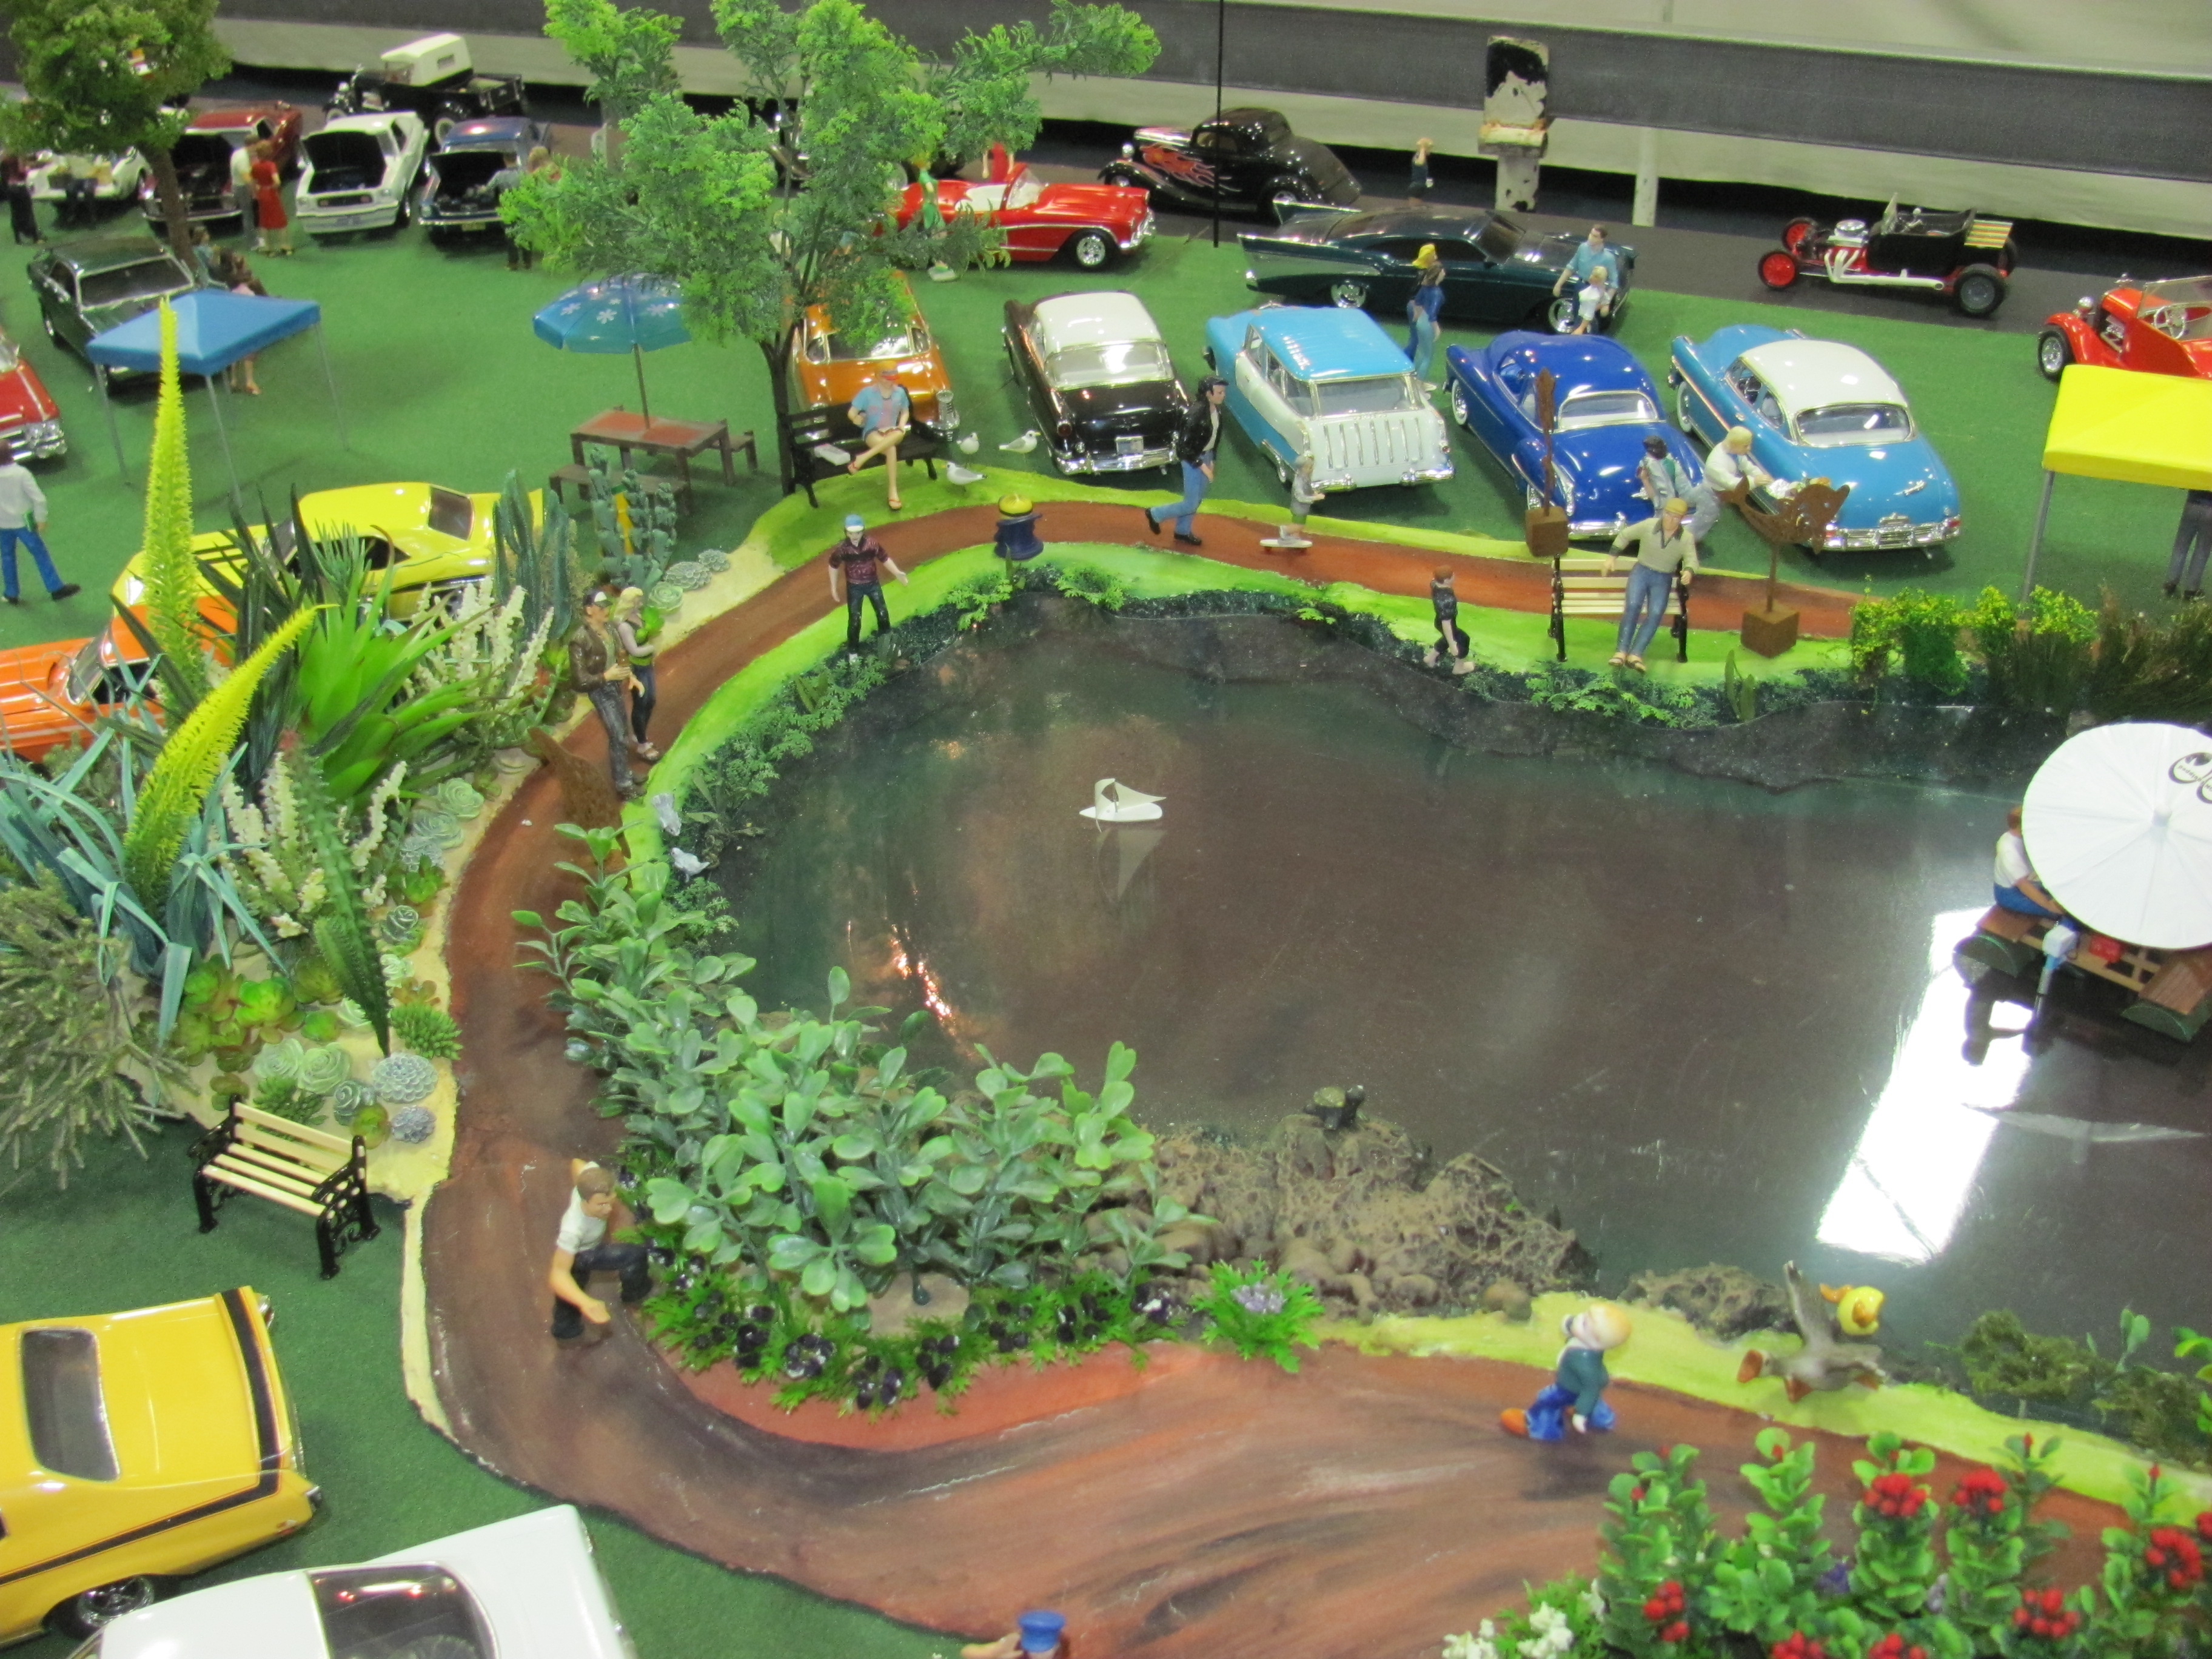
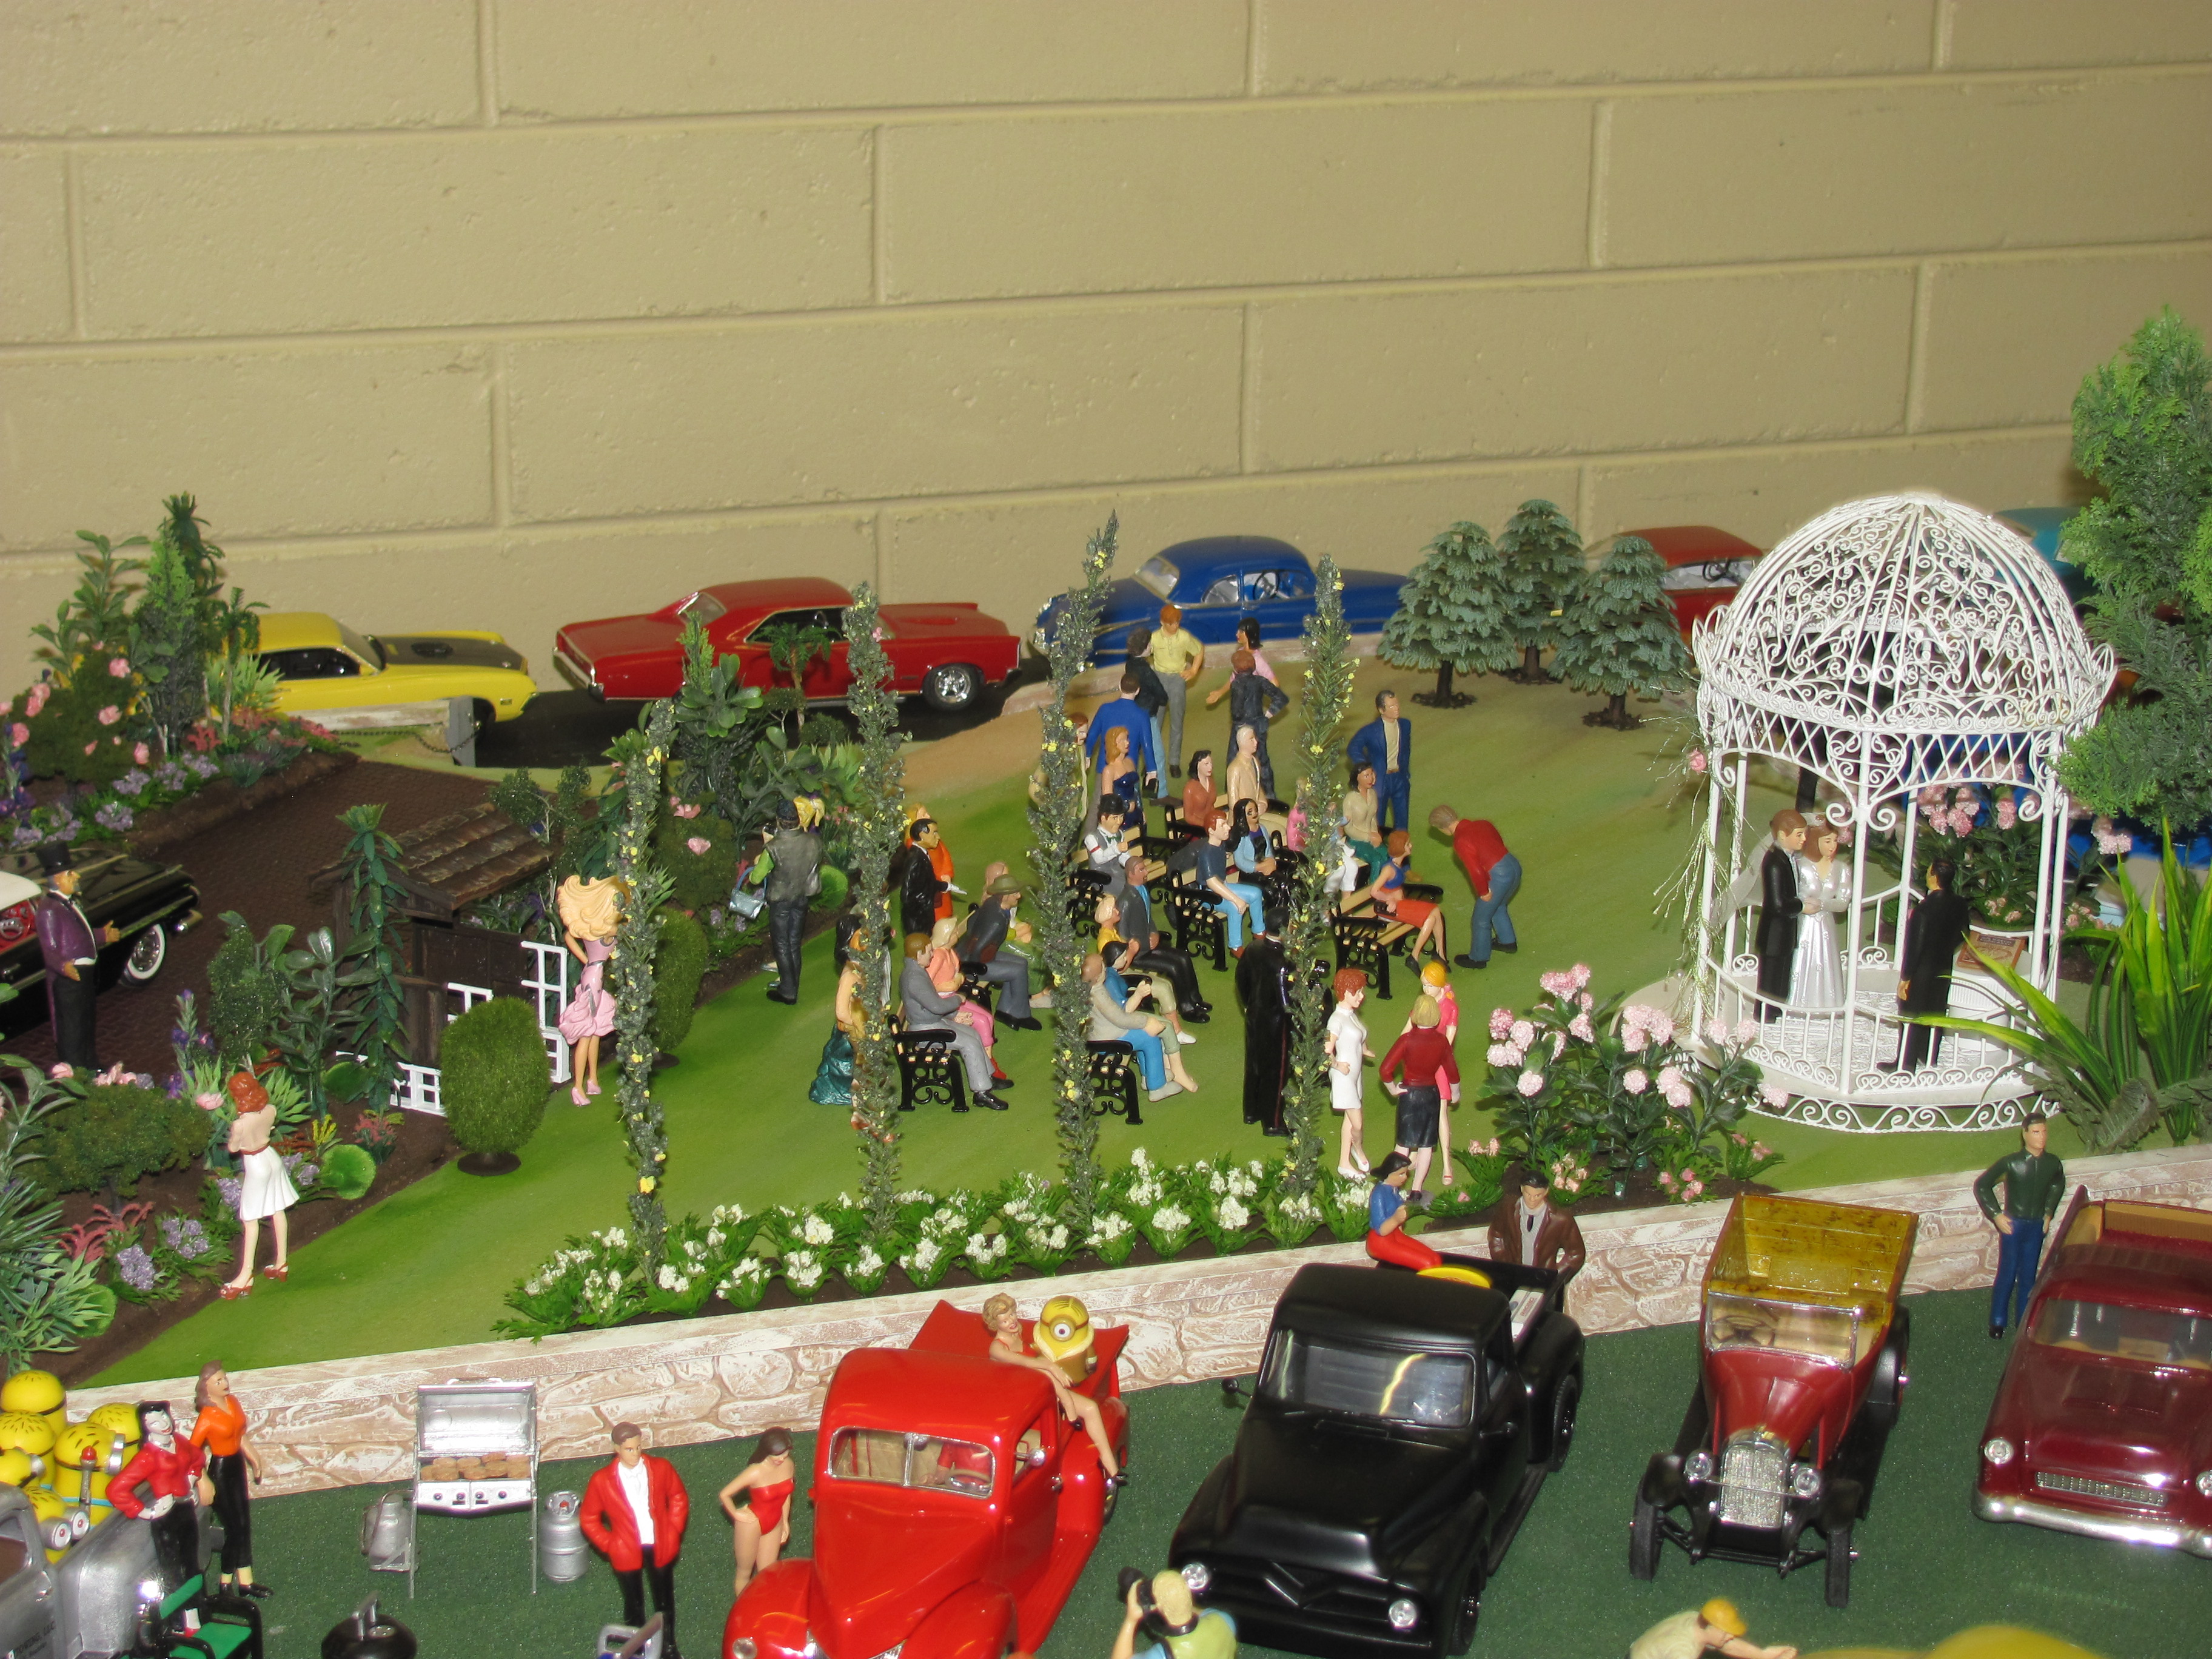
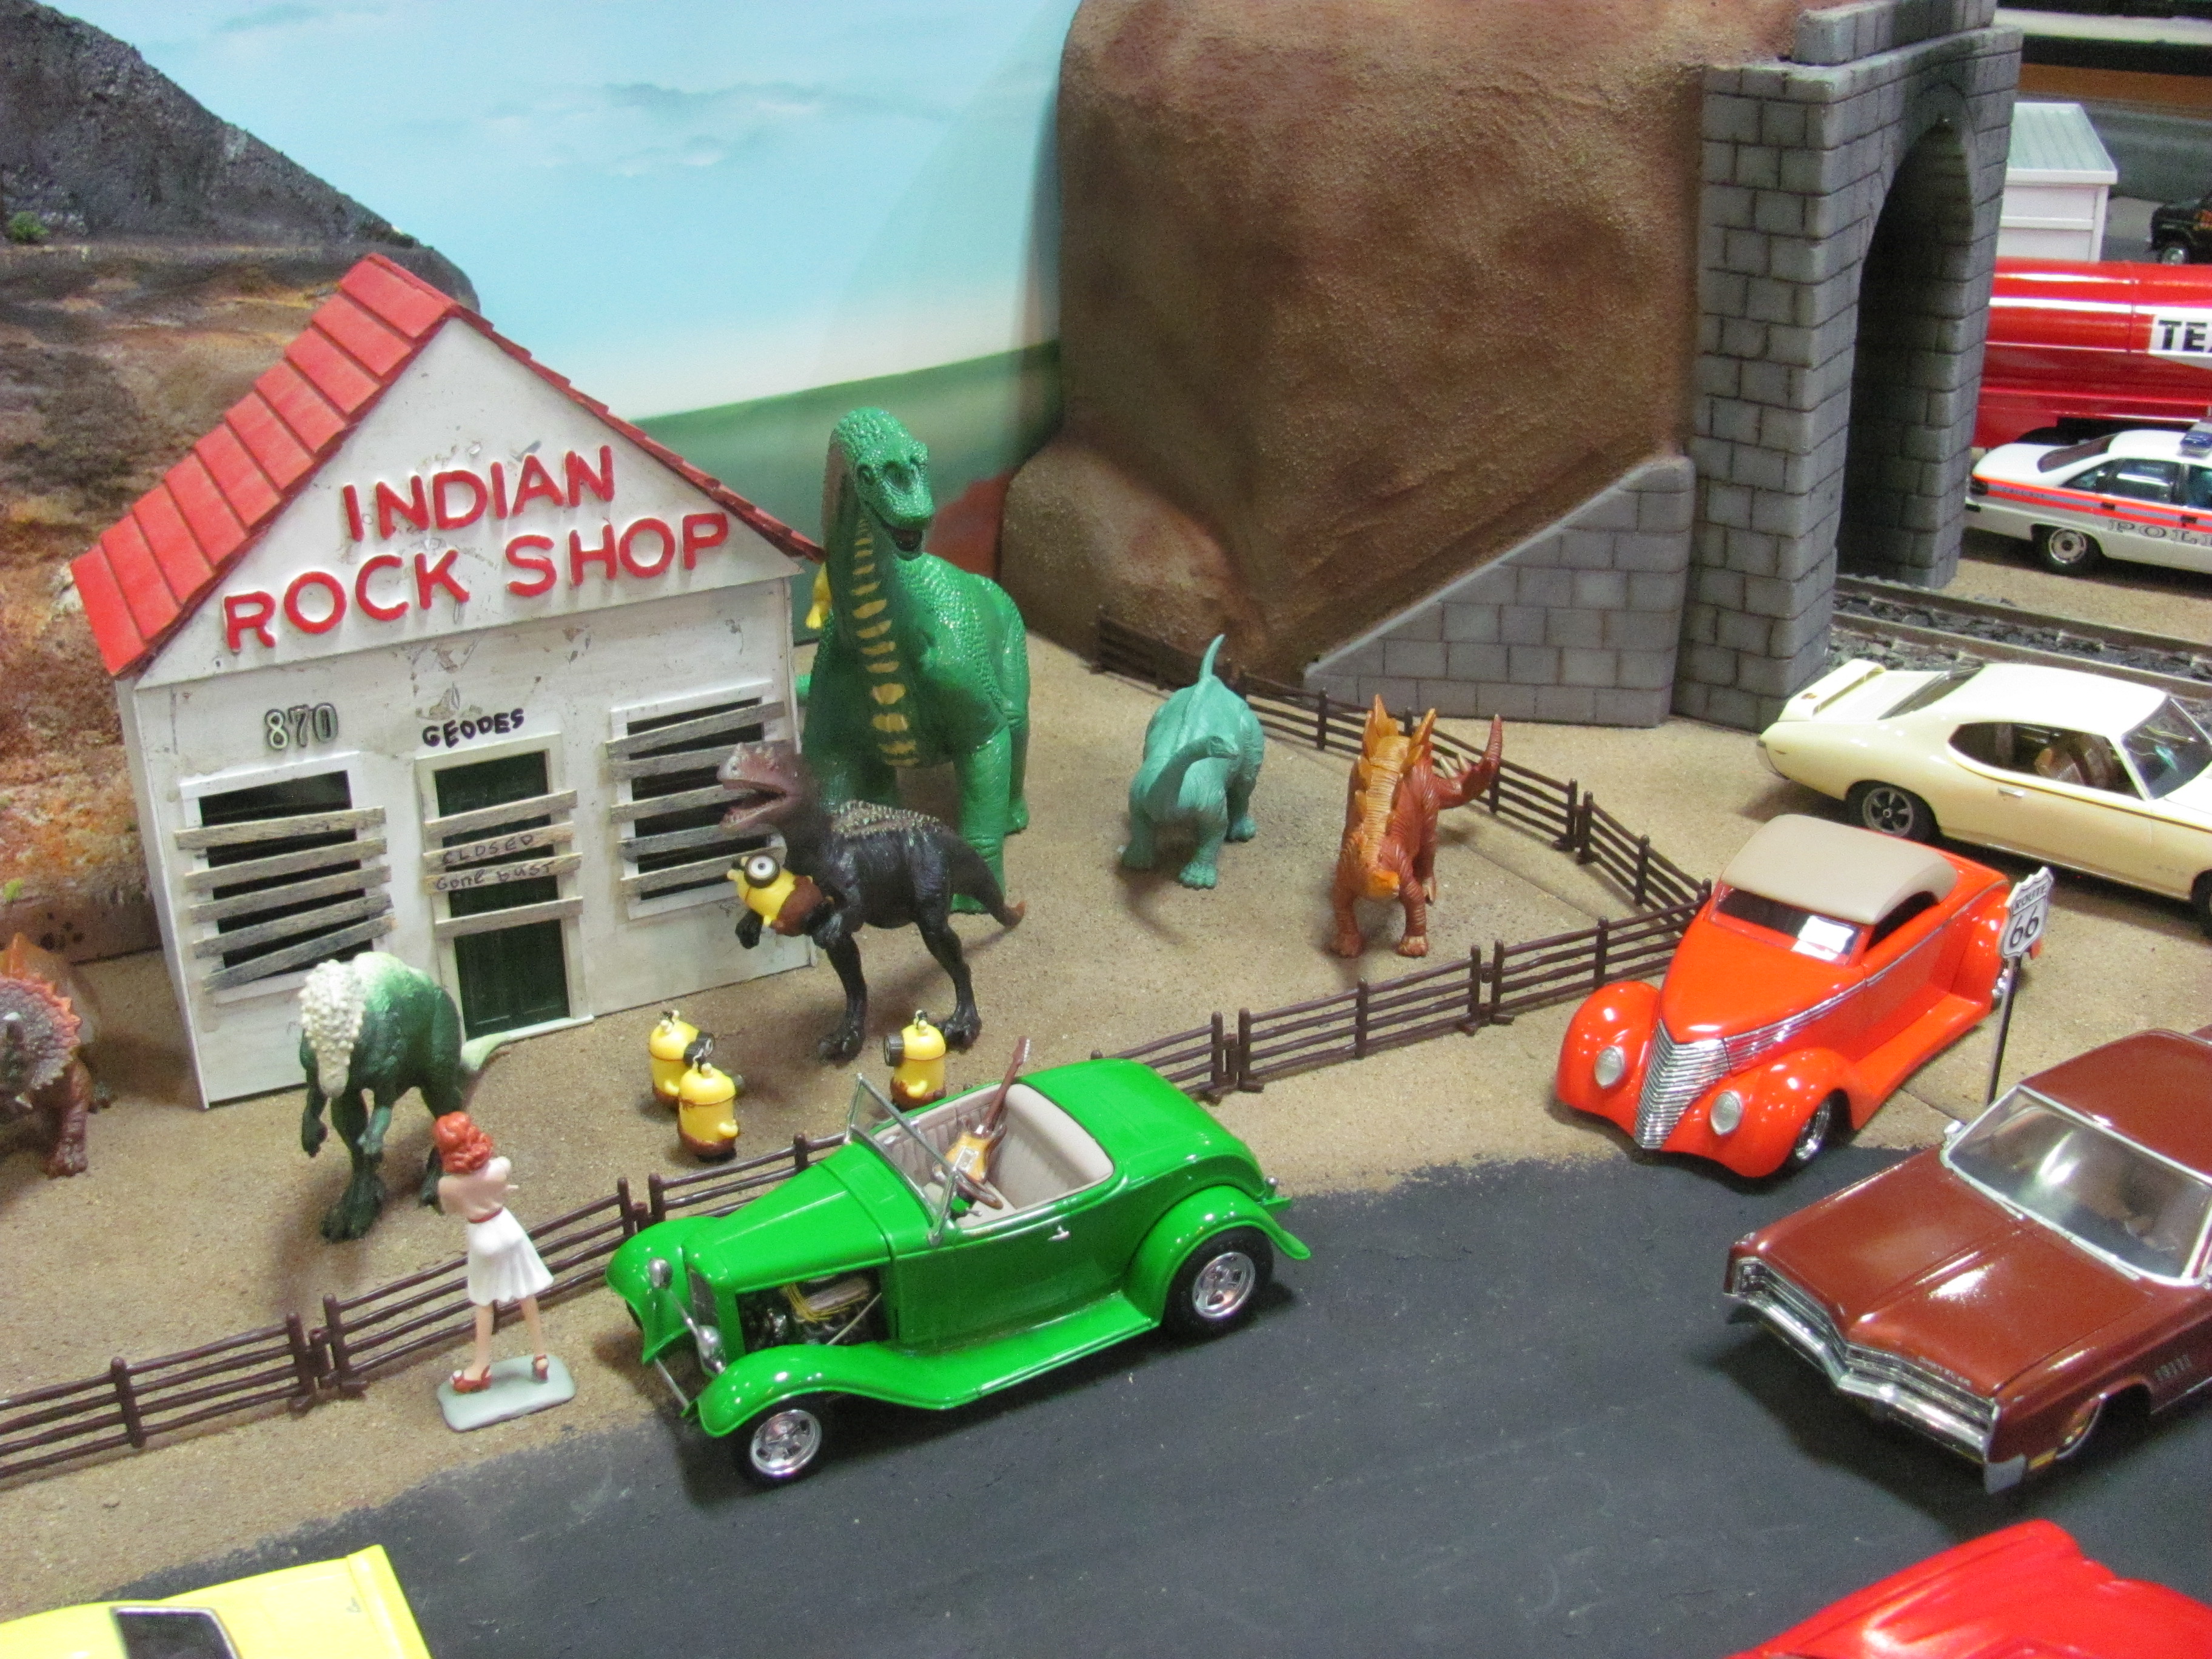
This is the giant diorama built by members of Perth and Districts Model Club last year, for display at three local shows. For over twenty years we have had a very successful event in Perth called Big Al's Poker RUn. It is open to any special interst vehicle so this was the inspiration for our display. It is approximately seven metres long by 1.5 metres wide. Initial mockup was done in my garage but most of the final assembly was done on sight at the Hot Rod and Street Machine Spectacular. At the risk of showing favouritism, I think the two most impressive sections are the lake and the wedding scene that were both constructed by my wife. She is a very skilled and creative lady but had no previous experience in model-making apart from hand-painting a lot of the figures that I use in my personal dioramas. She spent about two months on these two scenes and I think they are pretty special. Bonus points if anyone can identify the origins of the shingled entry to the wedding area - you will hahve to hunt for it! Cheers Alan

-
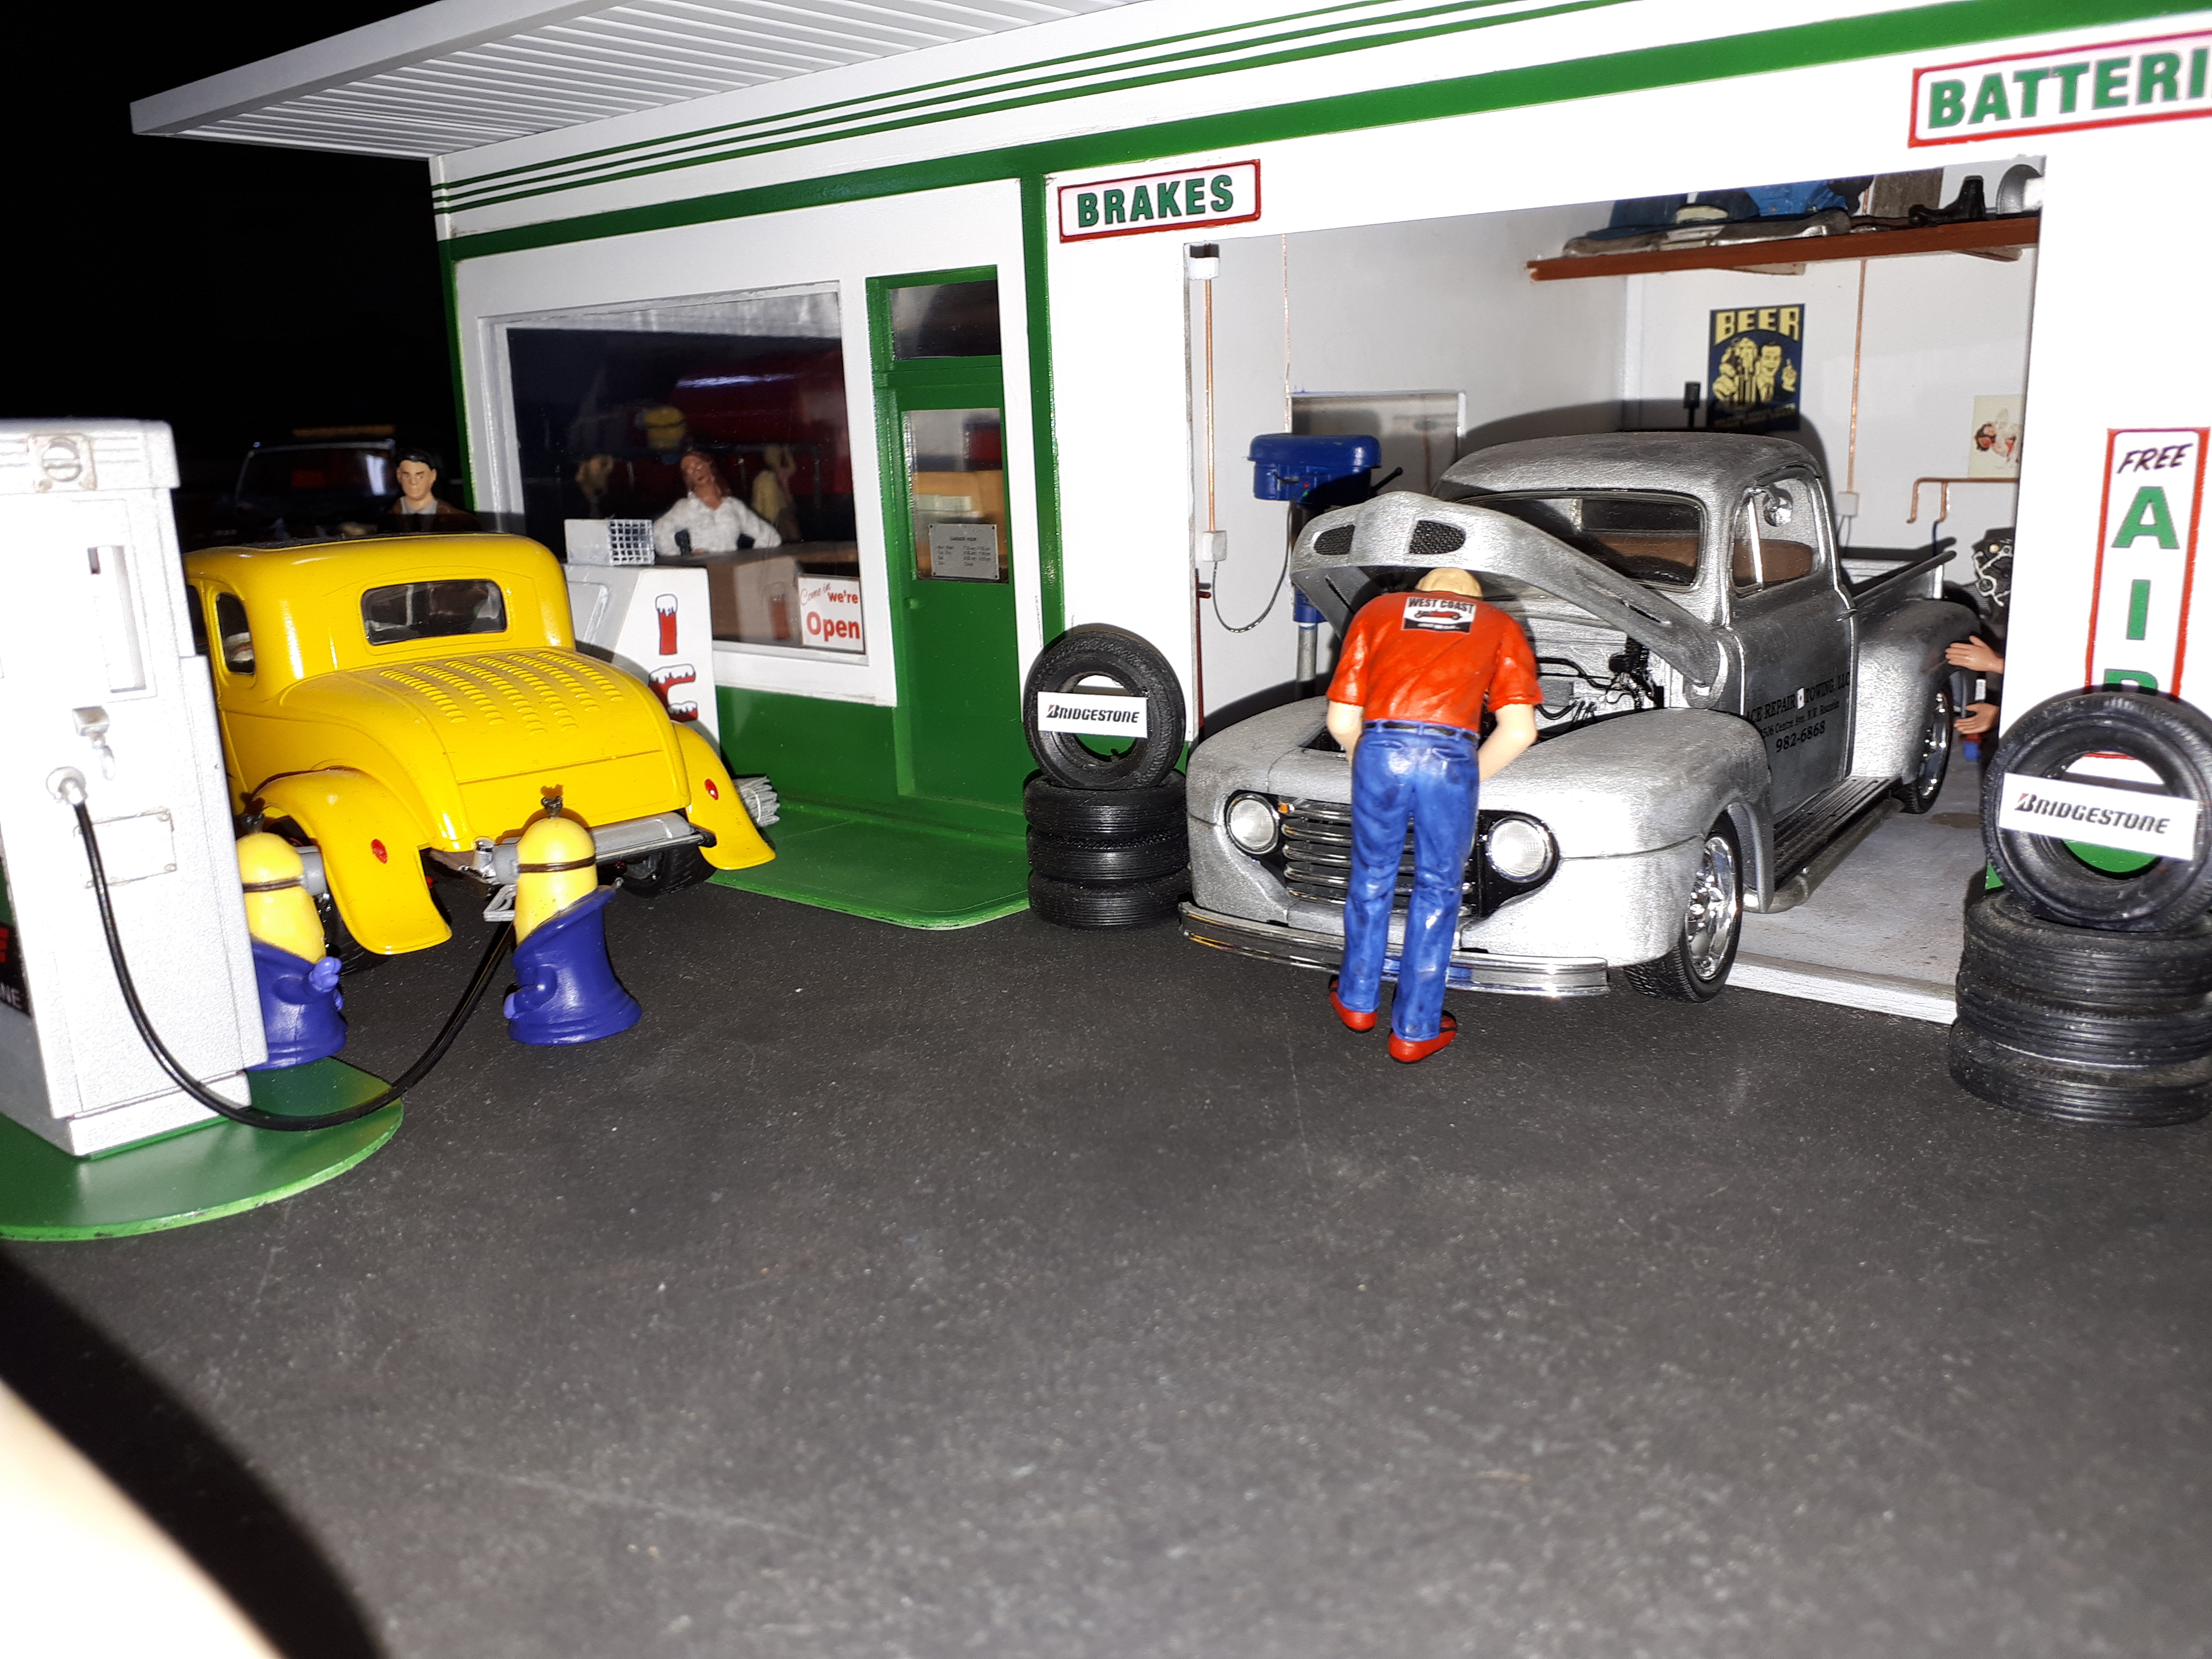
I am really enjoying your progress here Bill. My own service station was built over thirty years ago and Needs some refurbishing - there are a lot of good tips in this thread. Cheers Alan
-
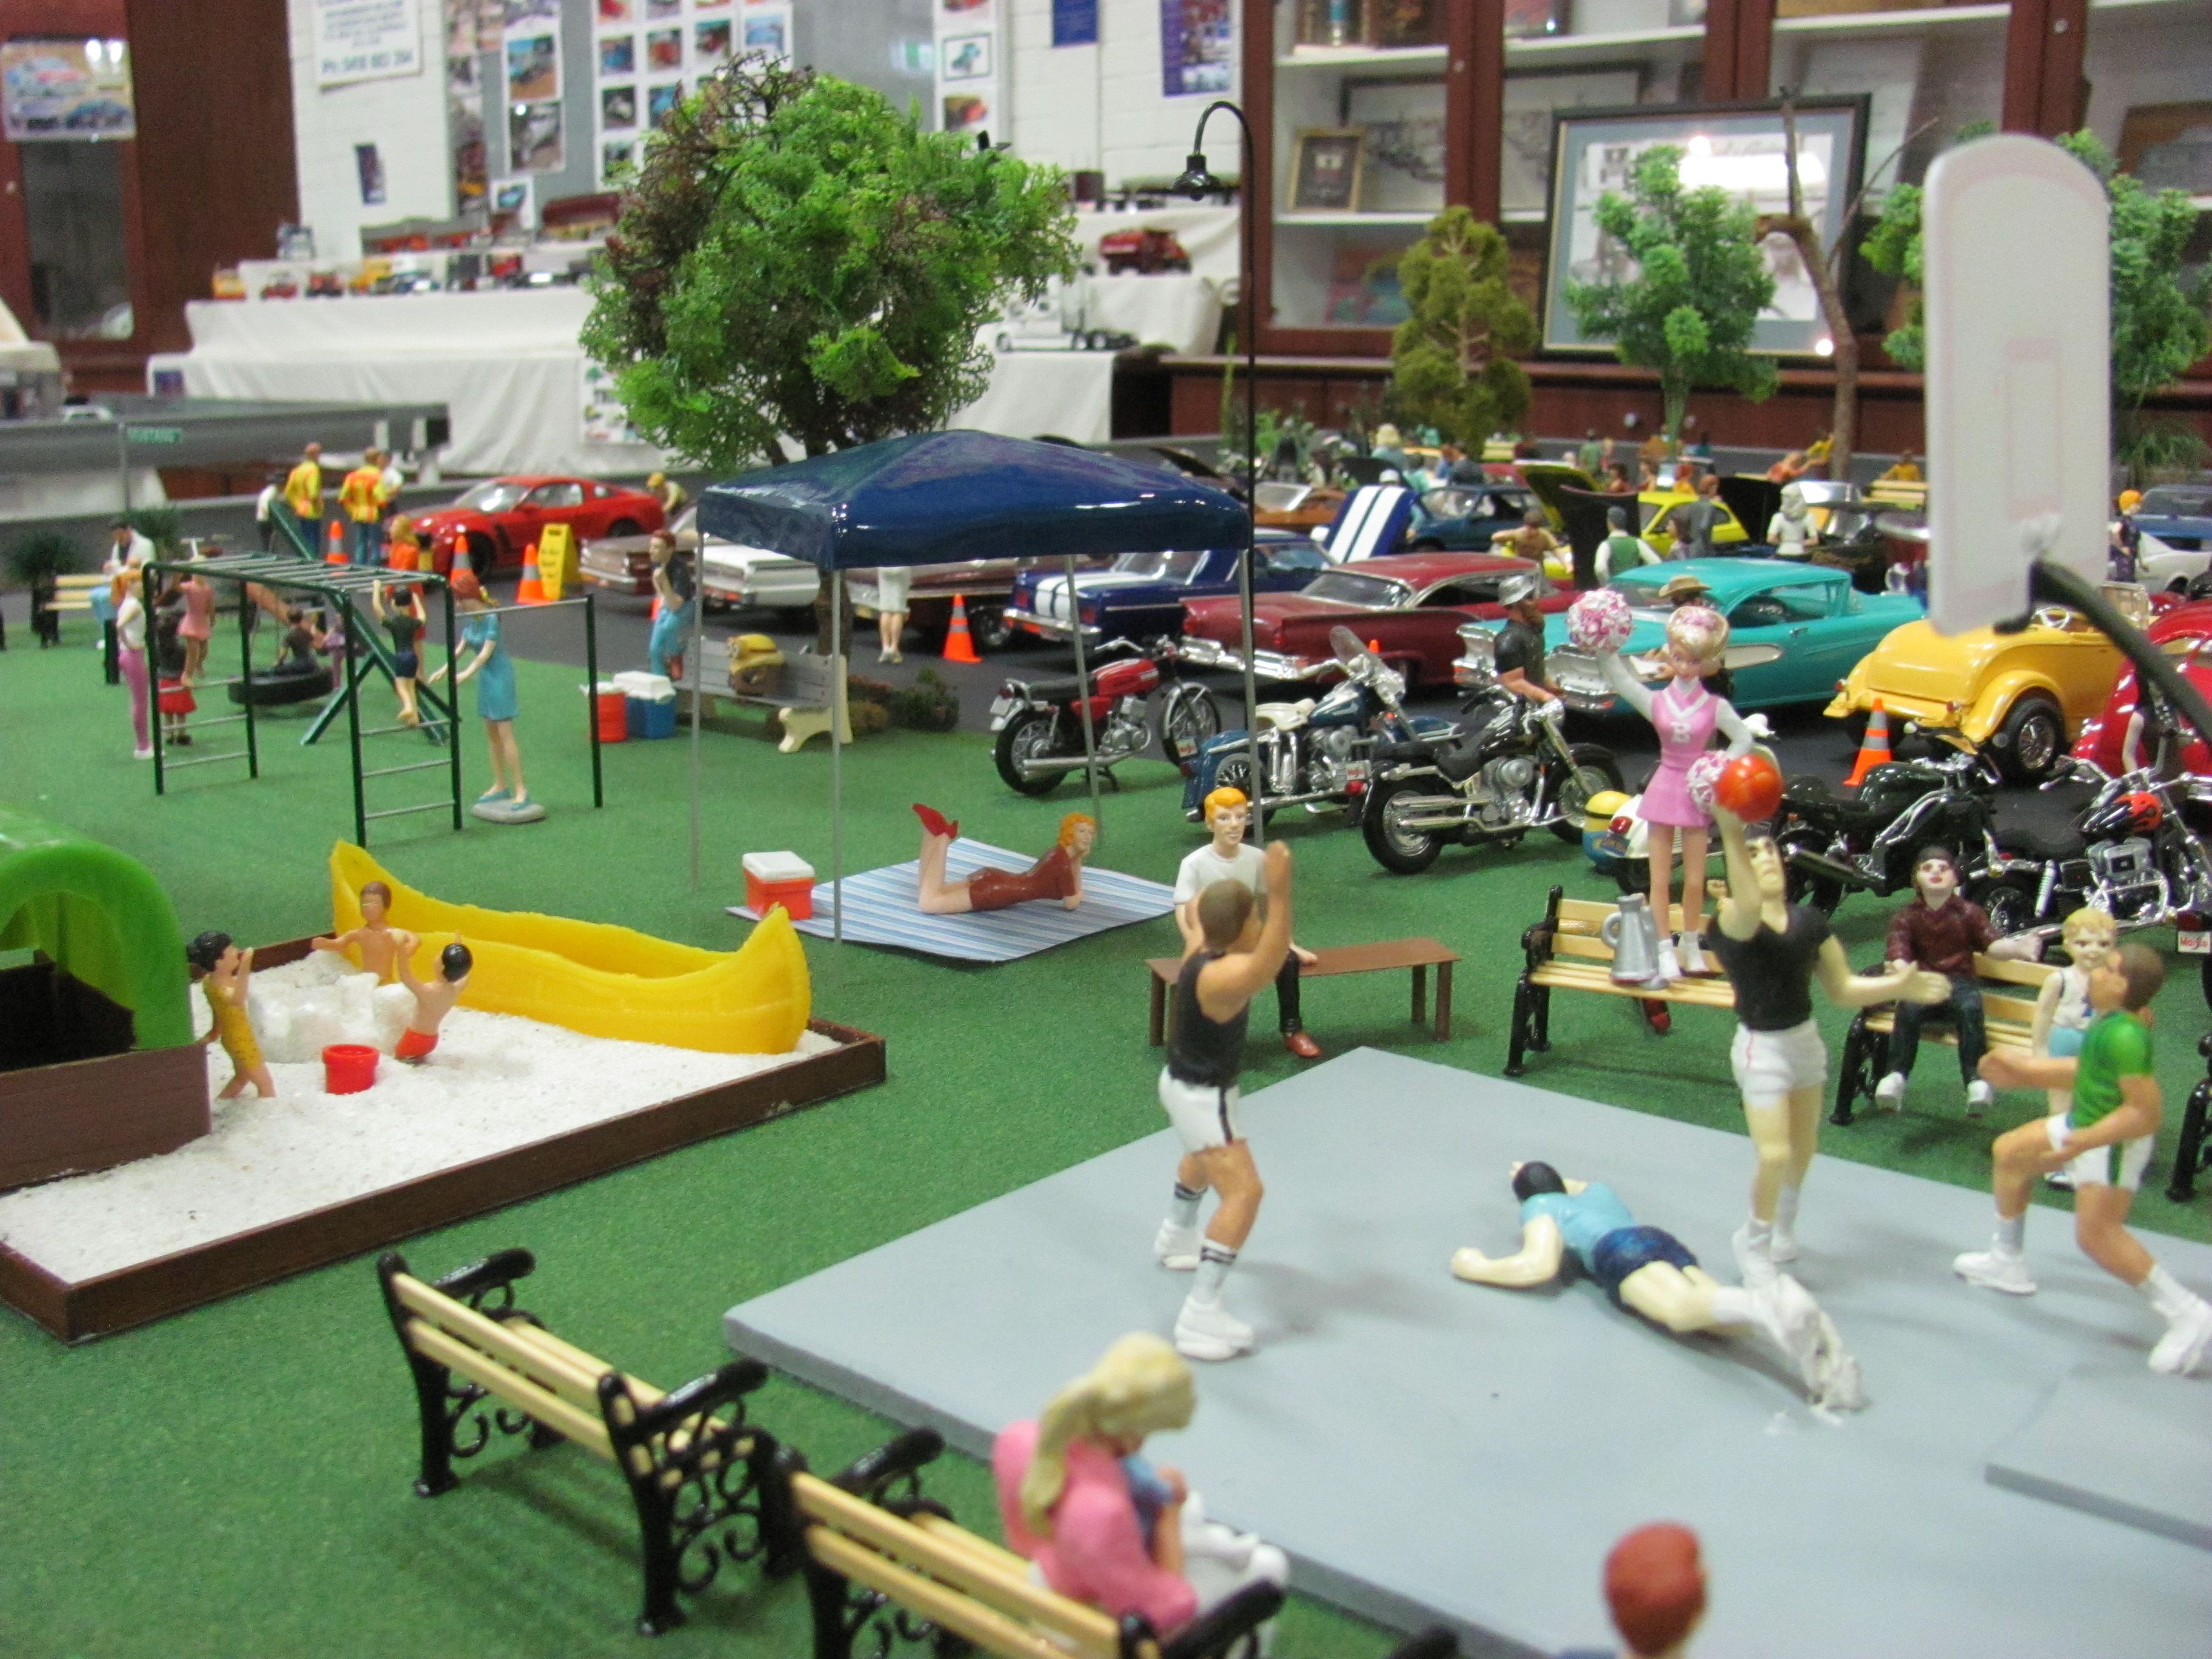
Thanks everyone for your very complimentary comments. You may be surprised to know that we got it together in under three months although some of us, me included, already had some buildings in our collection. We did have it set up in a guy's house at one stage - his wife was VERY understanding! As a club, we have also amassed quite a collection of figures. Our 2017 diorama had over 450 figures n it - this really makes a diorama come alive. All our club members have been allocated a colour and we put a dot on the soles of the shoes of the figures, to underneath the seats, rubbish bins etc so that they get back to the correct owners after a show. All my figures have red dots under their shoes! Even so, we usually have to have a session at our next club meeting to sort things out as some of the figures get new girlfriends over the weekend! You may have noticed some minions scattered about the display. Our Pontiac guy, Bruce, has about twenty of these and he sprinkles them around. It may not be perfectly to scale but the little kids go absolutely bananas looking for them!!! It's even better fun telling the kids they have to count how many there are - you get the big eye rolls from Mum and Dad when they realise how long it is going to take! Seeing as how there has been so much interest in our display, over the next few weeks I will put up some of our previous displays. Thanks again, Alan
-
Modelhaus Shasta w/ 60 Chevy SD resin build thread ..
Alan Barton replied to Dale Gribble's topic in WIP: Model Cars
Dale, I've run into this scale credibility problem before and it has a lot to do with how we view things in real life as distinct from scale. Let me give an example. Back in the day it would not be uncommon for someone to tow a 57 Chevy racecar with a 57 Chevy street car. If you grab two AMT 57 Chevies and put one on a trailer being towed behind the other , it will look ridiculous. And yet, it is correct. Its just that in real life, we would rarely take in the whole scene the way we do in scale. For another example, next time you are in traffic and what we call a temporary Australian comes squeezing between the lanes on his dirt bike, check out how high he is compared to the cars he is passing. If you created that scene in 1/25th scale no-one would believe you. If it was mine, I would keep building that cool 60 Delivery as you had planned and I think you will find it works out pretty good when it is all finished. I don't think the scale is an issue as caravans (sorry, campeer trailers) come in all sizes. Cheers Alan -
A nice, believable hot rod right there, Dennis. Not a tetanus risking rat rod, not an over the top magazine cover car, just a nice simple, drivable (with ear plugs!) hot rod. I love the detail on the radiator hose clamps and the way you grafted the 48 x-member in there. Actually, you've just given me inspiration for a 1:1 build I have planned for the future. It's a 29 coupe that will rest on seriously reworked original deuce rails. It never occurred to me before but I have a mint '35 X member stacked down the side of my house with other components and it would be a real cool way of keeping the chassis looking early 60's cool while aiming for 21st century chassis rigidity. Thanks for a look at your model and an idea for my full sized project! Cheers Alan
-
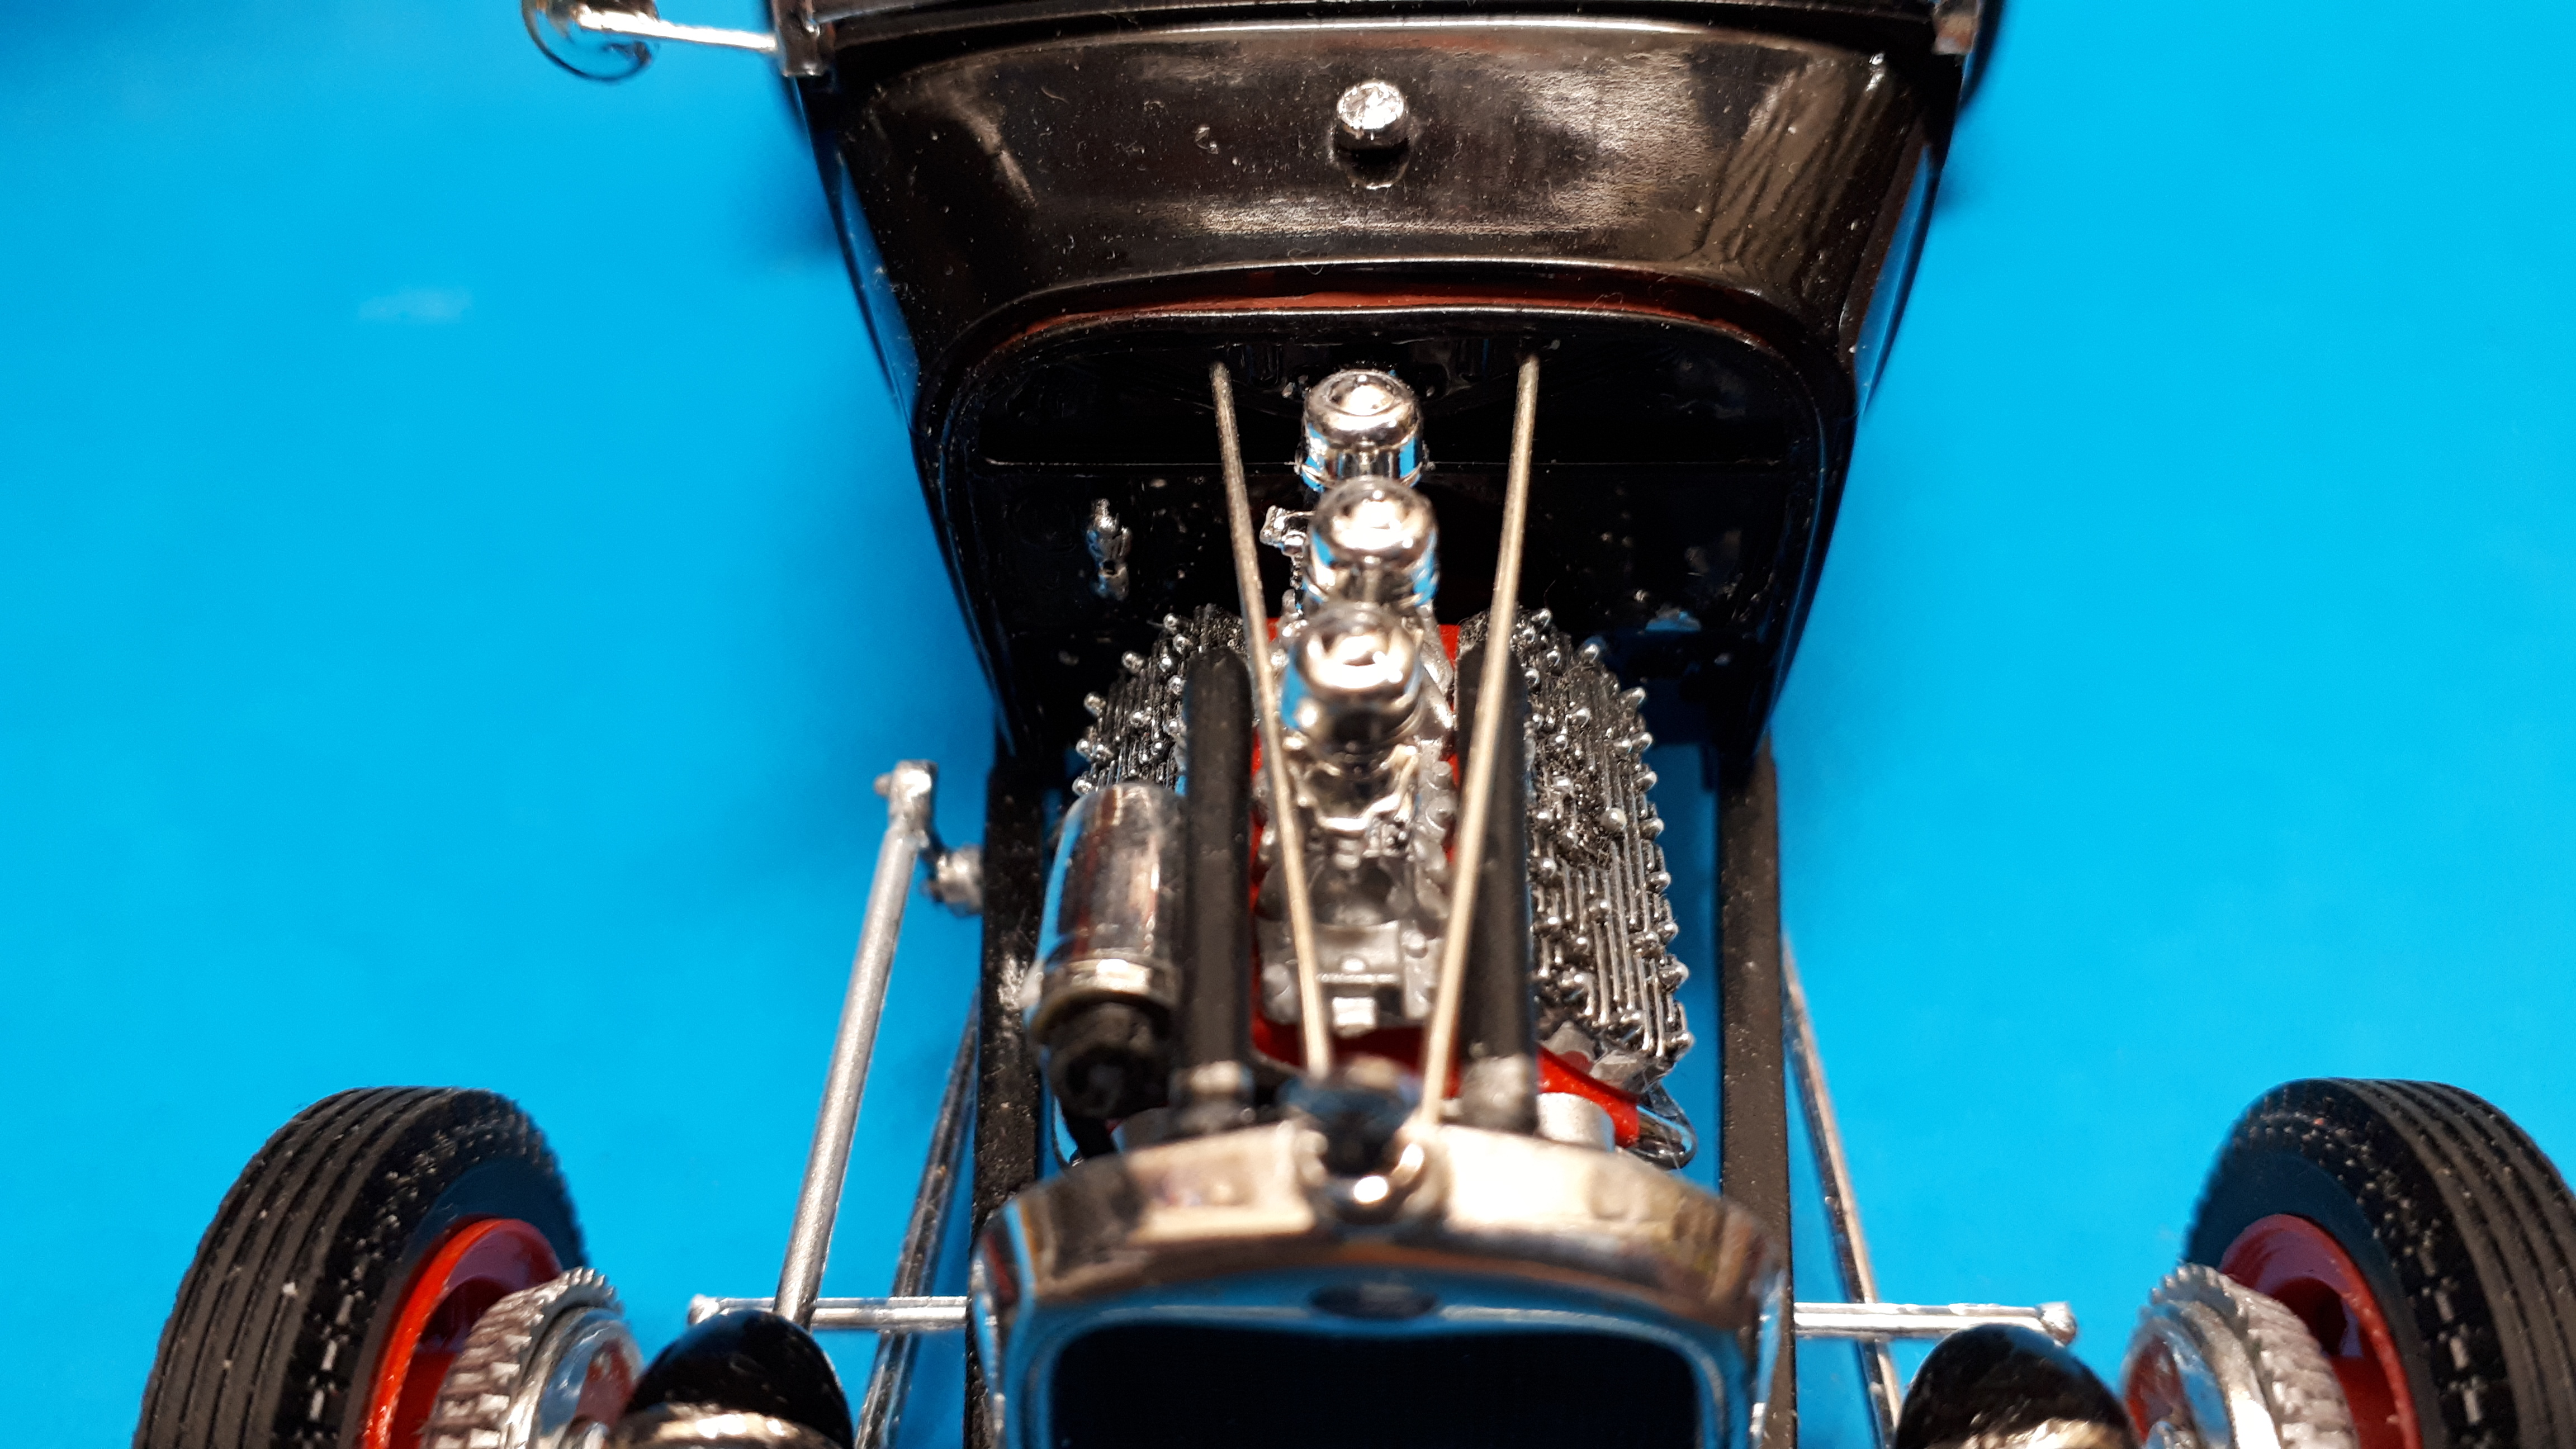
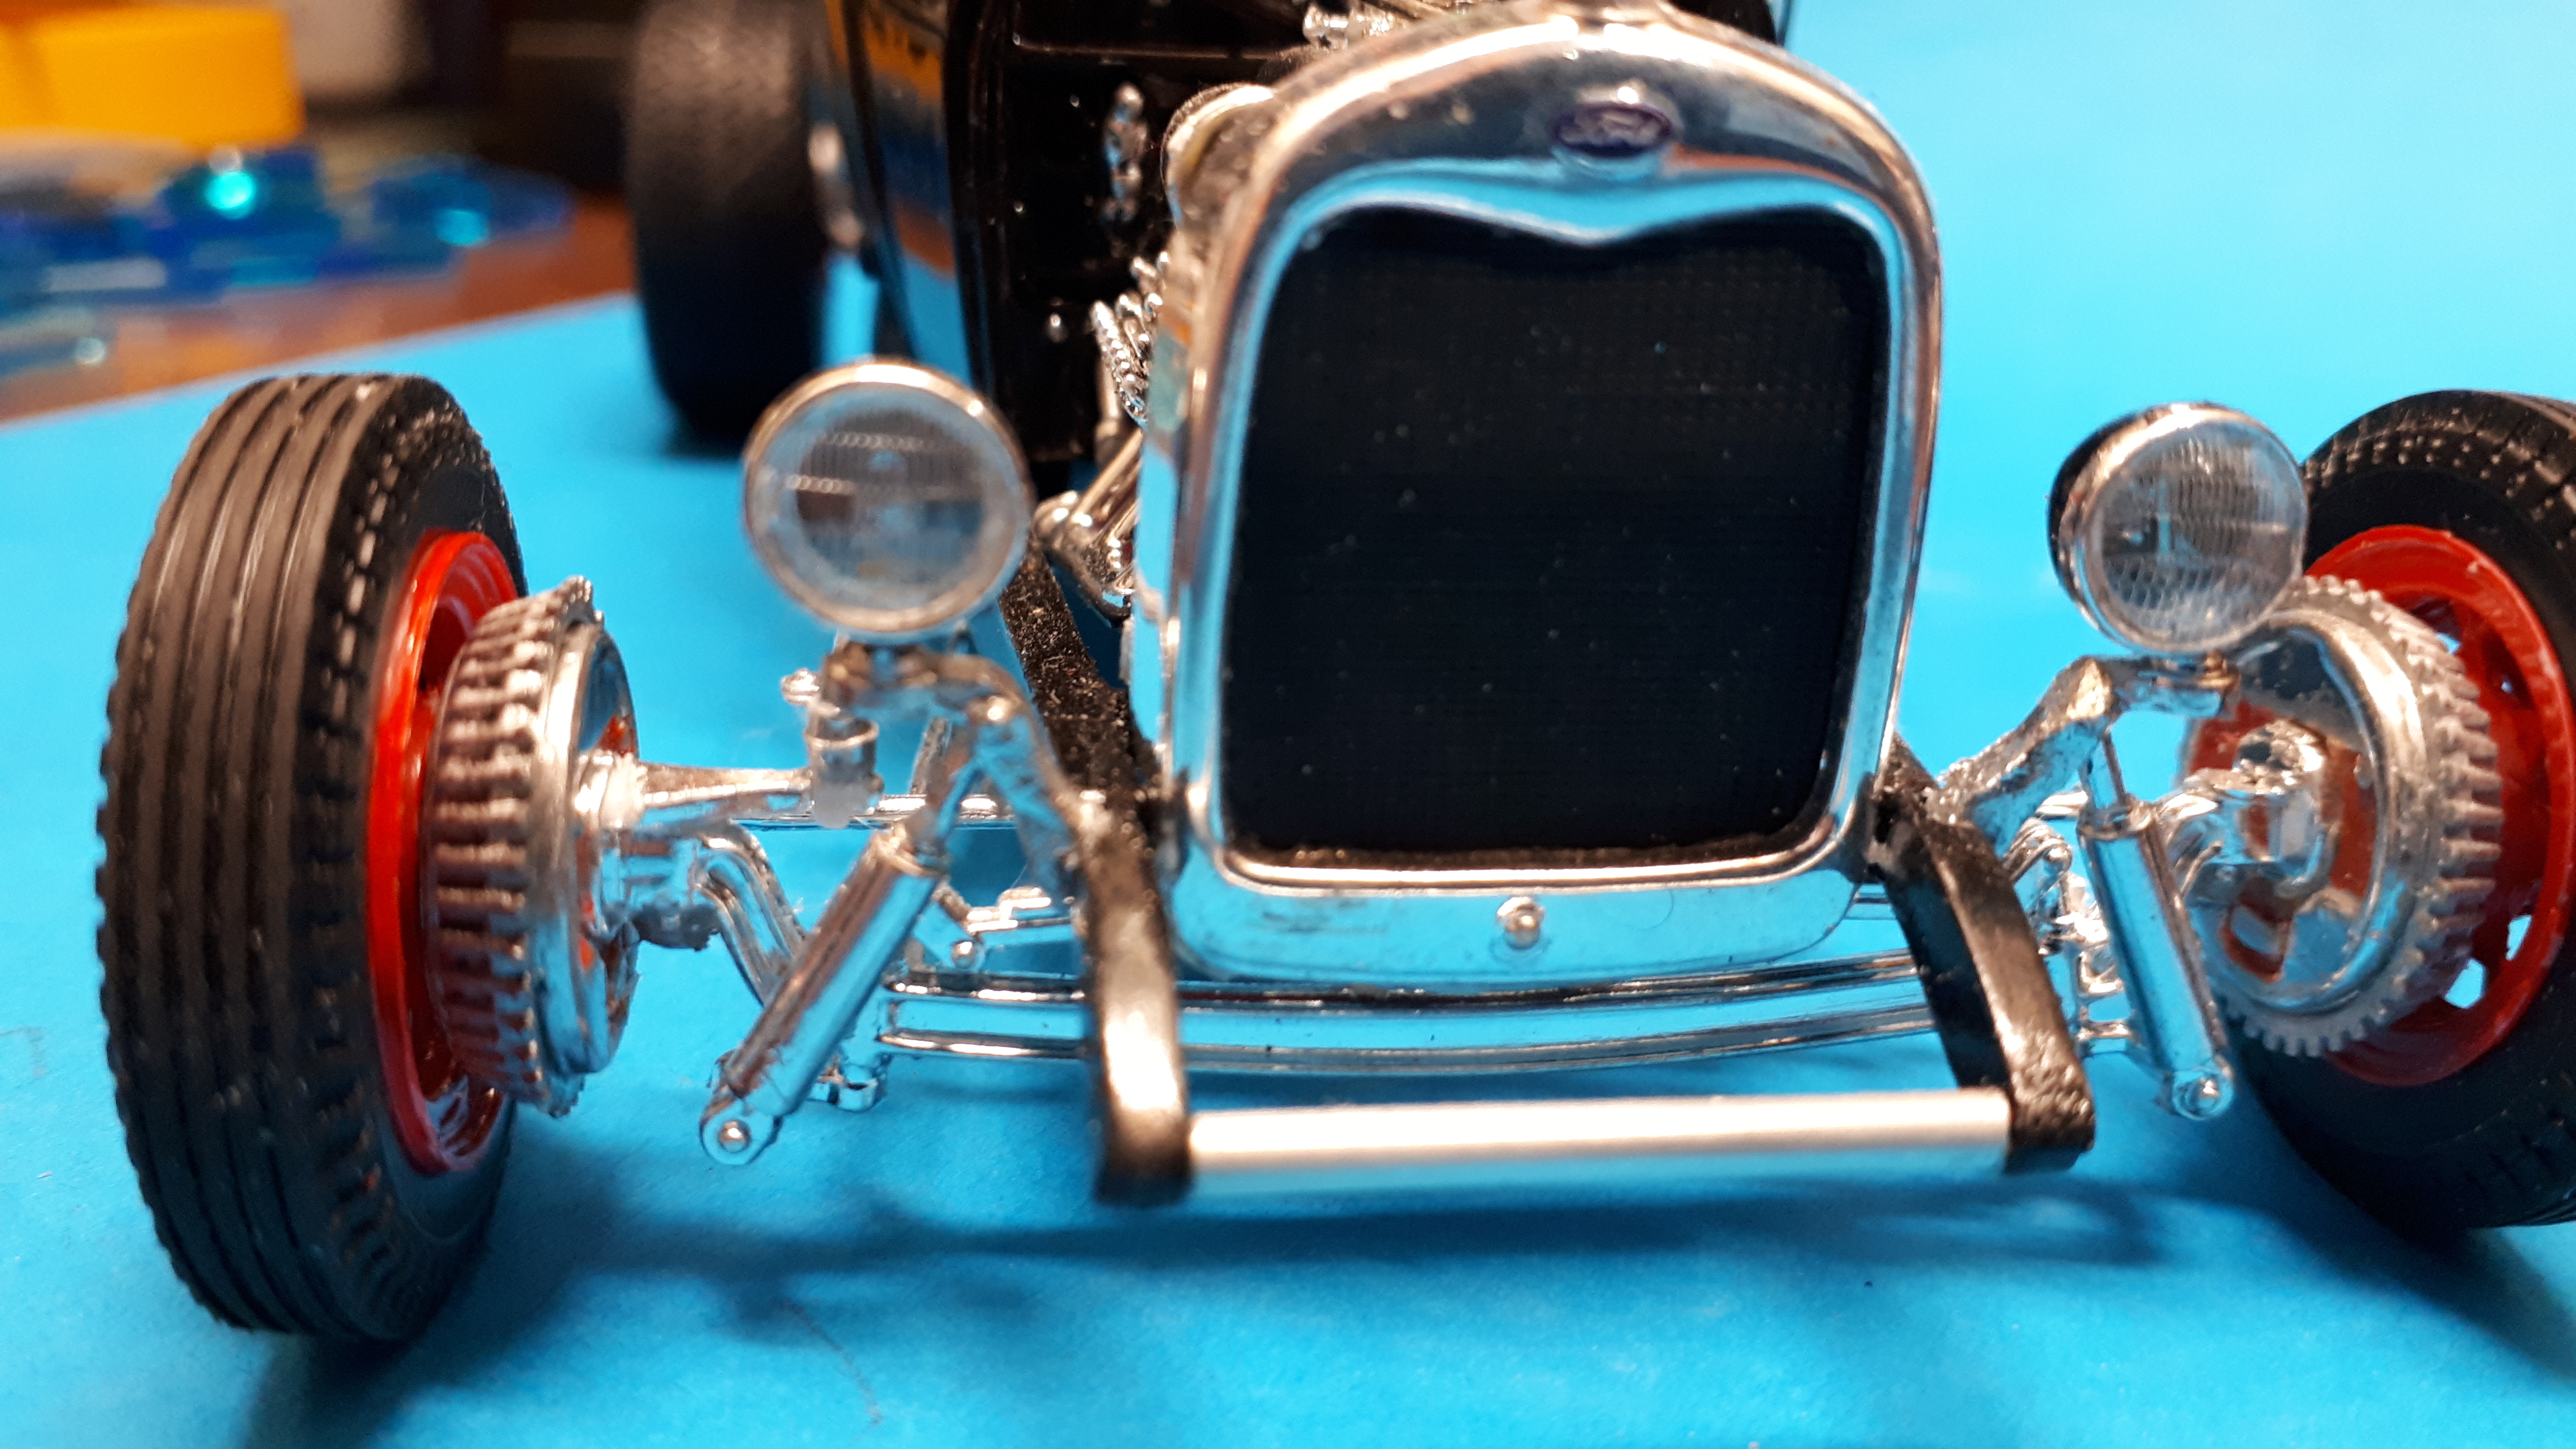
Thanks everyone, it is great to see how many people appreciate this iconic car! Chris, I just had to do something with the headlight posts but I didn't want to go to the trouble of replacing them and the shock mounts so I filled the holes, cut the shock off and drilled a hole to allow the shock shaft to ride up to the correct height and just generally massaged them as best I could. To my eye, the headlight placement on this kit is a spread a bit to far apart. At this stage, the black body might become a replica of a race car street rod that a very dear friend of mine built many years ago. He passed away ten years ago but his daughter displayed the car at our recent hot rod show. It was build on a 29 style chassis so the Revell kit will be perfect for that. Travis, I must admit I didn't think about the front brakes - I love finned drums so much they were going on regardless! But for people going for a perfect replica that is good information to know. Once I stick the steering wheel on the right hand side, I've pretty much blown that aspect anyhow! Another build I have on the bench at the moment is my take on the John Corno/John Buttera white hi-tech hiboys, It will be 90% Corno/Buttera, 10% A.B.! Here's my mate Iggy's hiboy - this thing is a very tractable street rod and an absolute weapon on the strip ( there is a bolt in cage for racedays.) His daughters raced this just as hard as he did!
-
Funny how different the two cars are when you start looking. That's Hollywood for you I guess. There is a great American Graffiti website with a whole list of bloopers. I don't recall hearing about this one before. Still my favourite movie of all time.
-
Brian, what a fantastic result! When you consider how much this model gets slammed on every model car forum known to man, you have simply looked at it for its potential and produced a completely unique yet totally believable model. It is totally feasible to imagine this car rocking up at the Detroit Autorama, the Grand National Roadster Show or SEMA and blowing everyone's mind. Excellent work - and yeah, loved the right hand drive! Cheers Alan
-
Thanks to a fabulous gesture by ChrisB Critter we now have the correct plates! Thank you so much Chris, it was such a nice thing for you to do. And I agree - it was the one thing missing. Thanks also to everyone here for the positive comments - I love how the car came out and even better that you guys are enjoying it as much as I am.
-
Super Model Car Sunday 8th July 2018 Perth Western Australia
Alan Barton replied to Alan Barton's topic in Contests and Shows
Thanks for the photos Chris. Great to hear that you enjoyed the show. It was an absolutely fantastic day in every possible way. It was sad to wrap it up after twenty fabulous years but it will give everyone involved a chance to look at a different format that will allow something new to come along in the future. I didn't want to see it die a slow lingering death but I could see things in the background that were going to affect the quality of the show in the future so I thought it better that we go out with a bang and we did! -
-
-
-
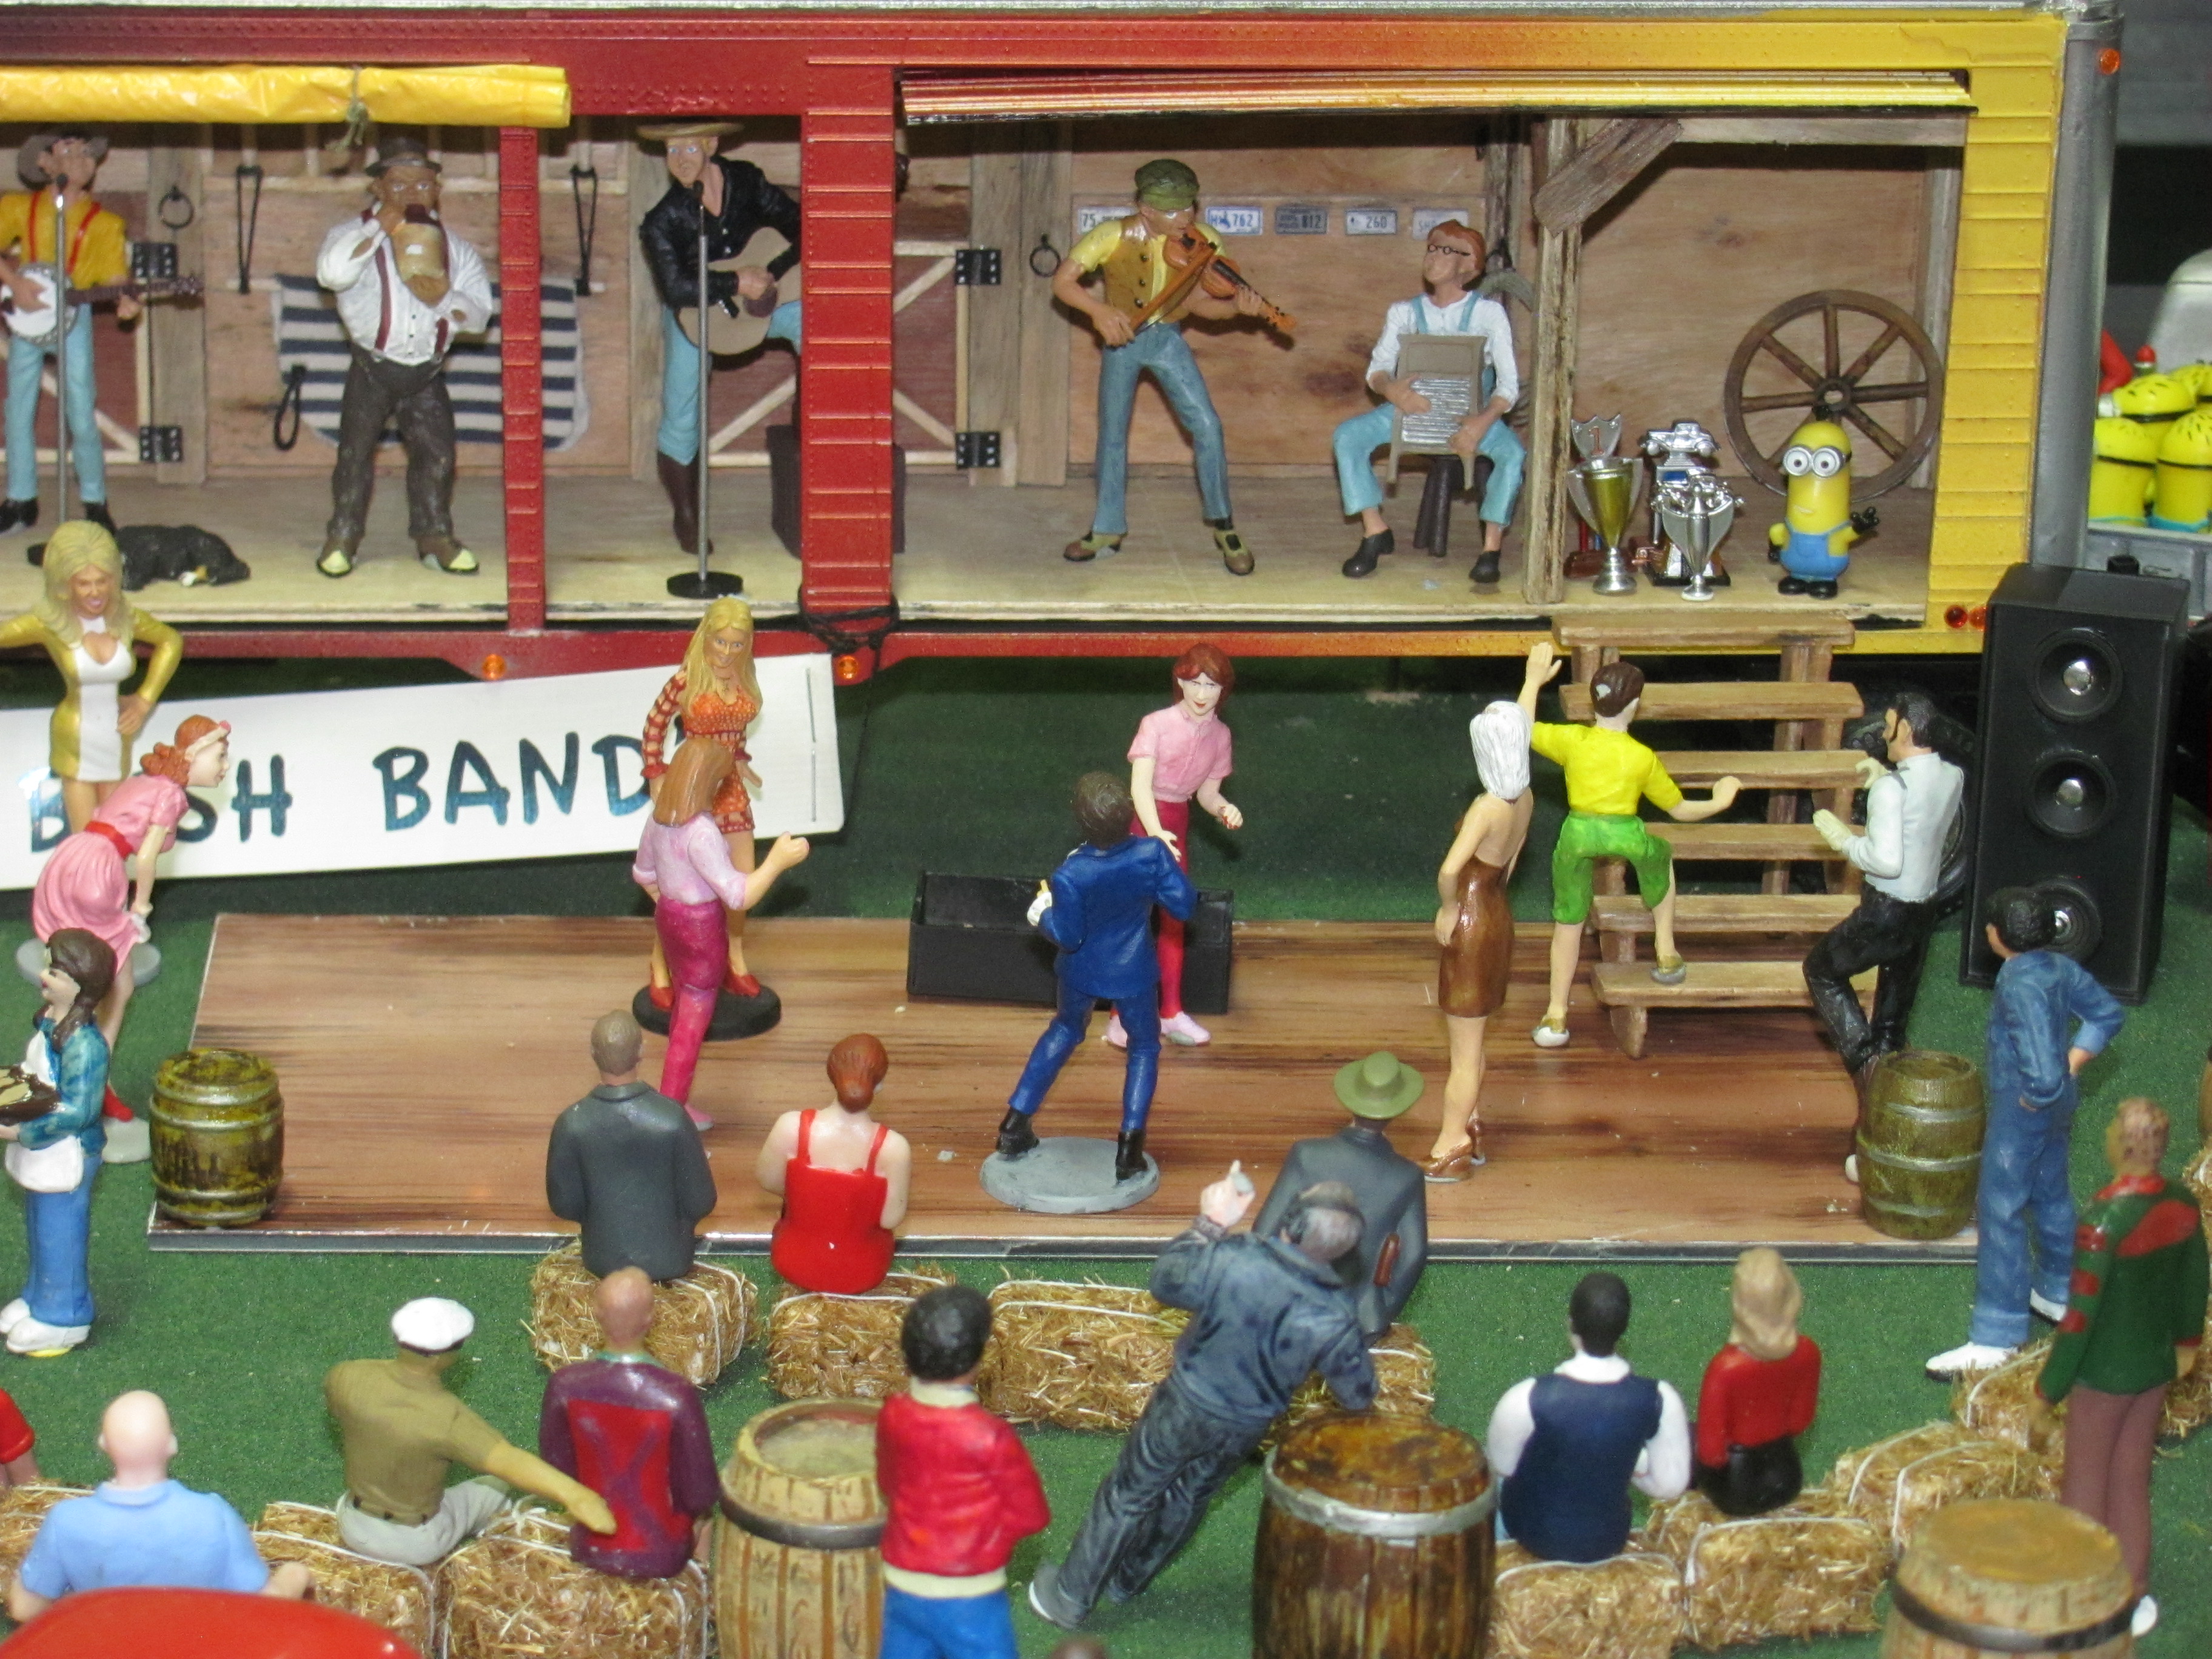
For the past five or six years the members of Perth and Districts Model Club here in western Australia have been collaborating to build giant dioramas to display at the annual Hot Rod and Street Machine Spectacular, the Super Model Car Sunday NNL and the WASMEX model show. This year we chose to do a representation of Route 66 with vignettes to represent typical features of each state along the way. The main culprits were Rob Rattray DIner, Gemini Rocket Man, Cadillac Ranch, Texas Gift shop, Rock shop and main cordinator, director and cattle prodder for the whole deal Alan Barton BP Garage and Motel Cucuracha Brodie Puleo Texaco Garage Tony Ashton Wig Wam Motel, Santa Monica Pier Grant Elliot Caves and tourist shop and Railway Crossing Nick Car yard Ian Catchpole Train Yves Zuber airbrushed backdrop, all 40 or so feet of it!
-
Your quality background and photography has done justice to a very fine model. It is a credit to you. I really enjoyed the accurate colour treatments in the interior. Cheers Alan
-
Group 29 - the thread for everyone's '29 Ford Roadster builds
Alan Barton replied to Phildaupho's topic in Model Cars
Thanks Bernard. The tyres are from a Japanese company called L&S if my memory serves correctly. I seem to recall that they came on a set of chromed, alloy wire mags, like the old Appliance wheels of the seventies, although with only four studs. Although L&S made full kits, I think these came from a parts pack. They make the nicest hiboy rears ever but sadly this model used up my last set and I'm running out of large Monogram Goodyears as well, my other go - to tyre. There just aren't that many scale 235-75/15s out there. And a small correction Bernard, those wires are the wide Kelsey Hayes units from the Monogram 30 Woody. Narrowing the fronts was quite a challenge but worth it to get the front and rear styles matching. Cheers Alan -
Group 29 - the thread for everyone's '29 Ford Roadster builds
Alan Barton replied to Phildaupho's topic in Model Cars
There's another "Why didn't I think of that?" moment Phil. I've got a bunch of spare Revell RP cabs and now I know what I will be doing with them soon. I also love your valance panel hanging off the frame - did you cut that from the fender unit or roll it up from thin aluminium? -
O.K., when I get home tonight I am going to dust that puppy and retake those photos - man, who would want to look after a black car?
-
Here is my finished version of Bud Bryan's iconic Rod and Custom project car. The model really does demonstrate the versatility of the Revell 29 Hiboy kit. With very minor modifications and enhancements, you can completely change the style of the car and still have a bunch of cool parts left over for future projects. For the sake of those who didn't buy them first time around, I do hope Revell rises to the occasion and reissues these when they have got their business issues sorted out. Engine and trans from the Revell 32 Tudor, wheels from the Monogram 30 Woody, rear tyres from a Japanese L&S kit ( cant remember what is was, it was a long time ago!) Rear axle and spring from Revell 30 Model A with a resin quick change.
-
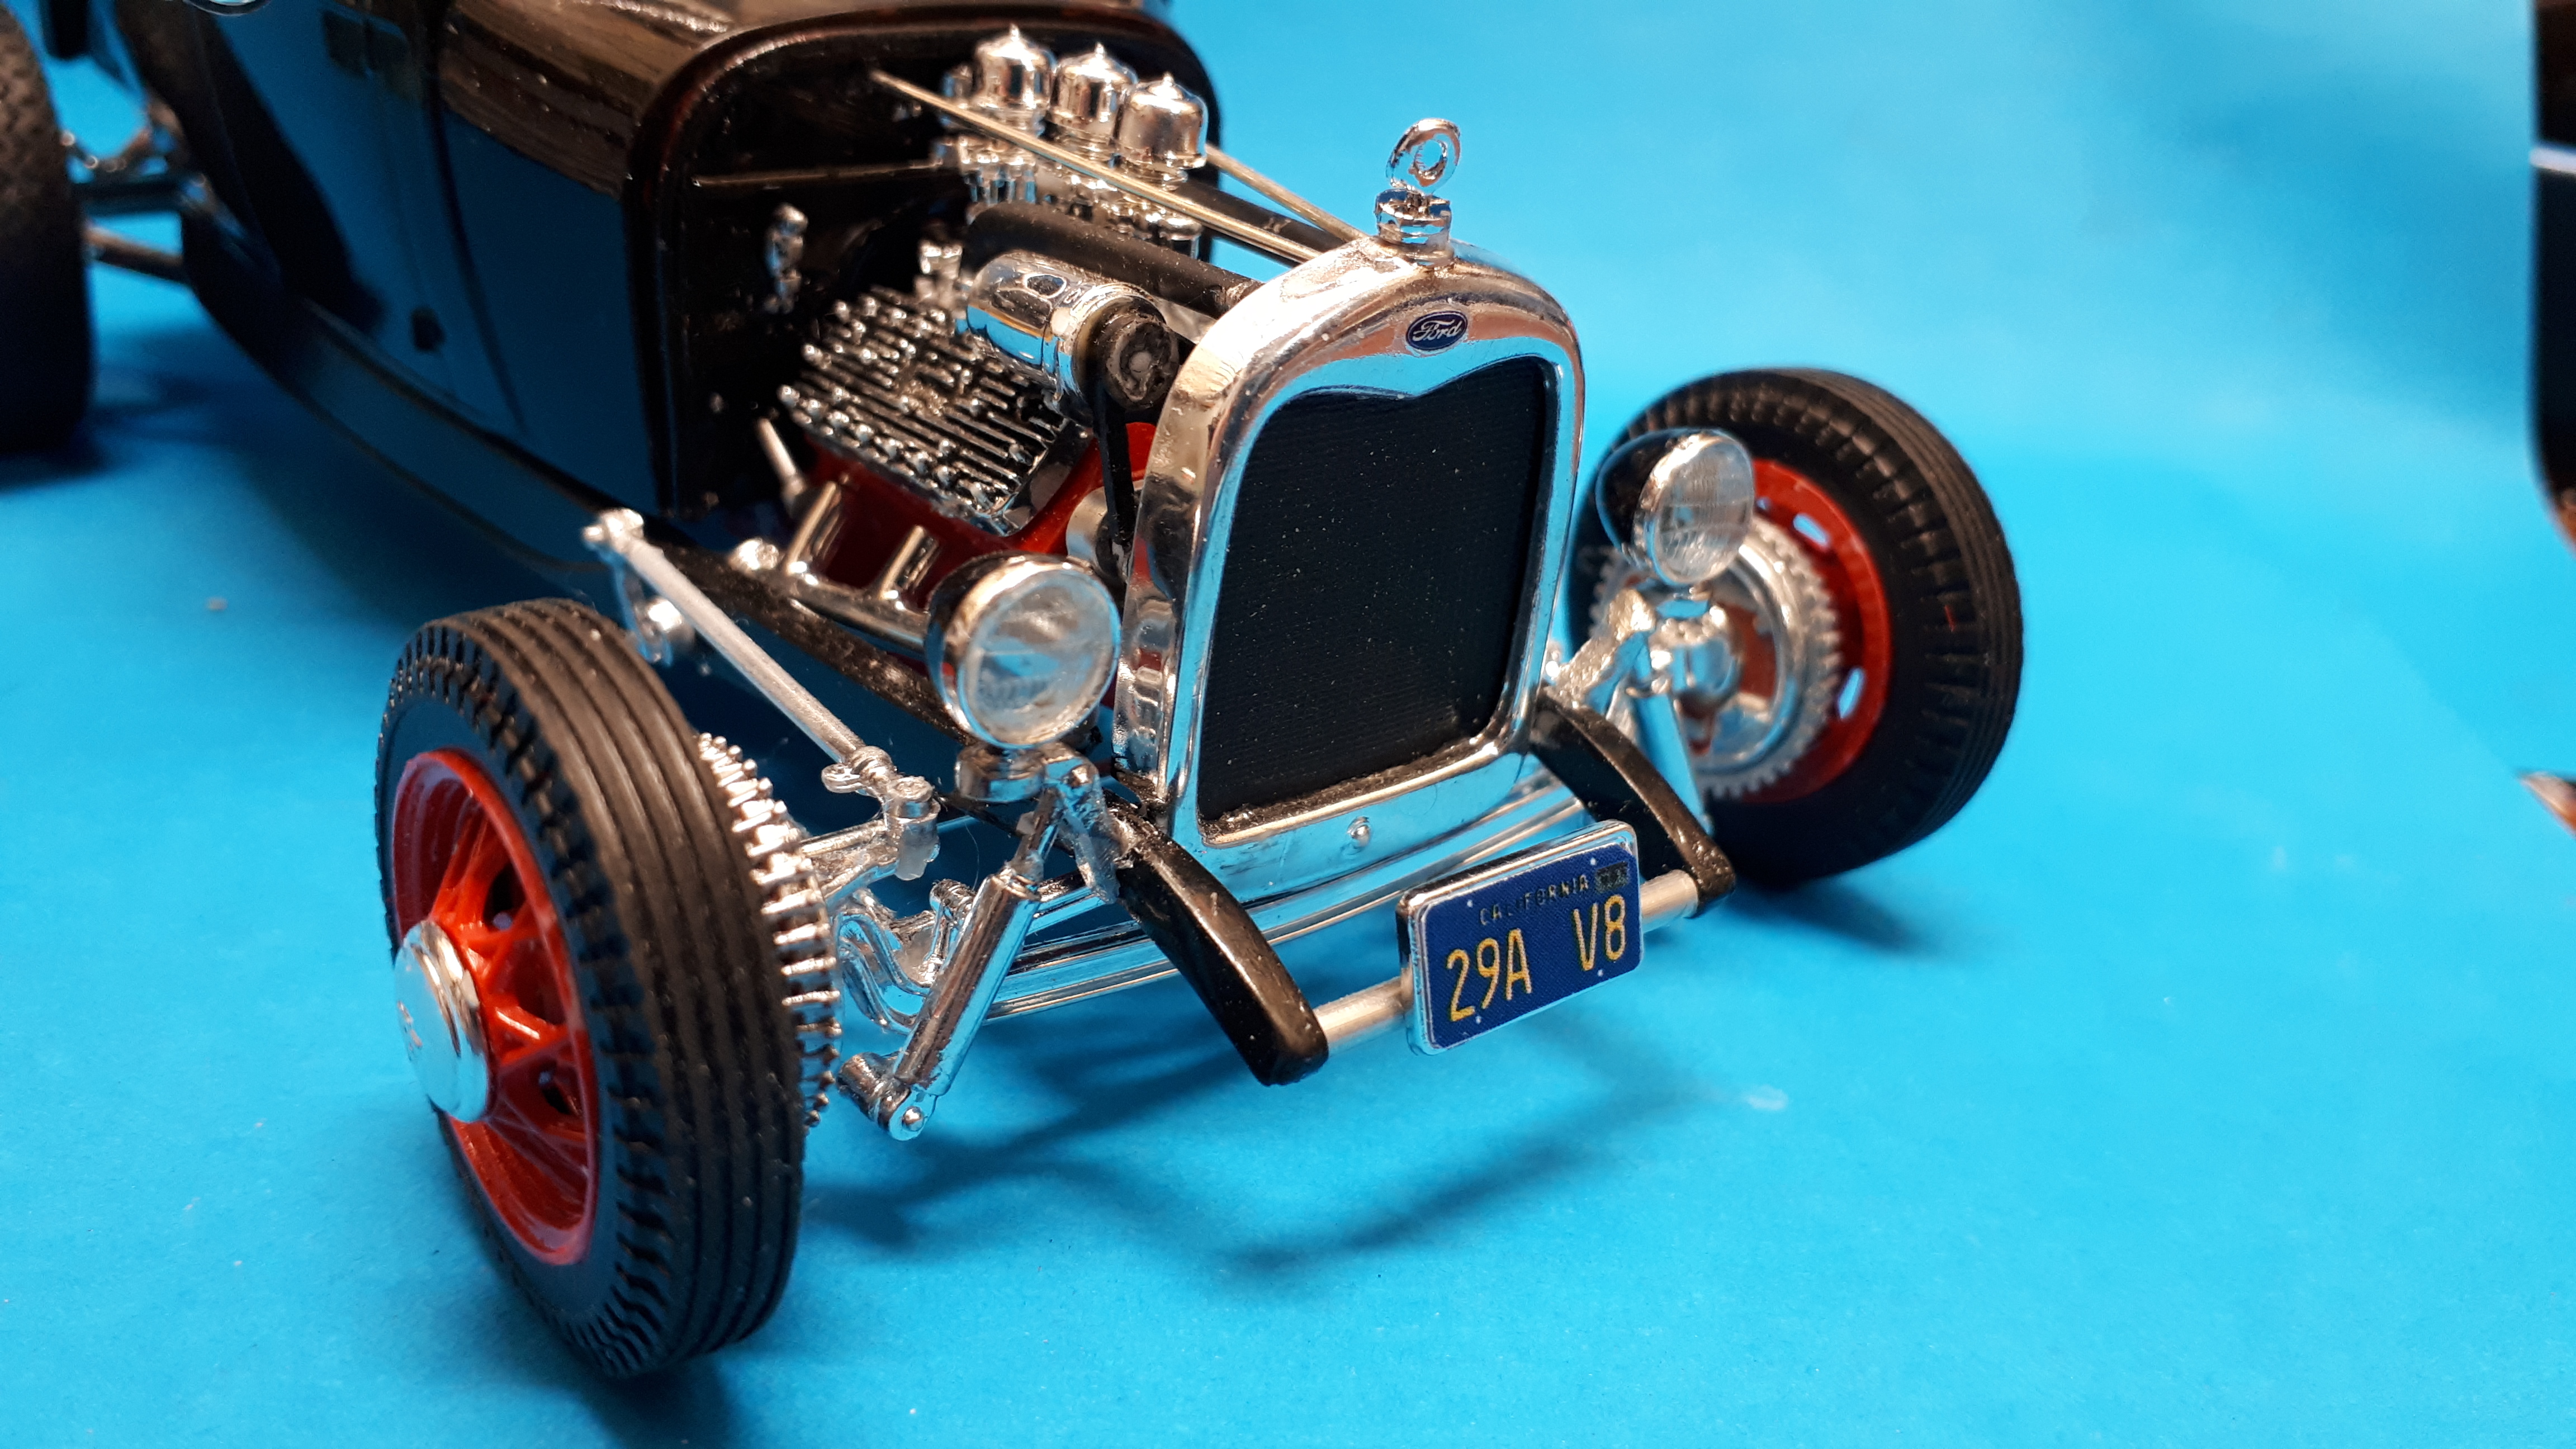
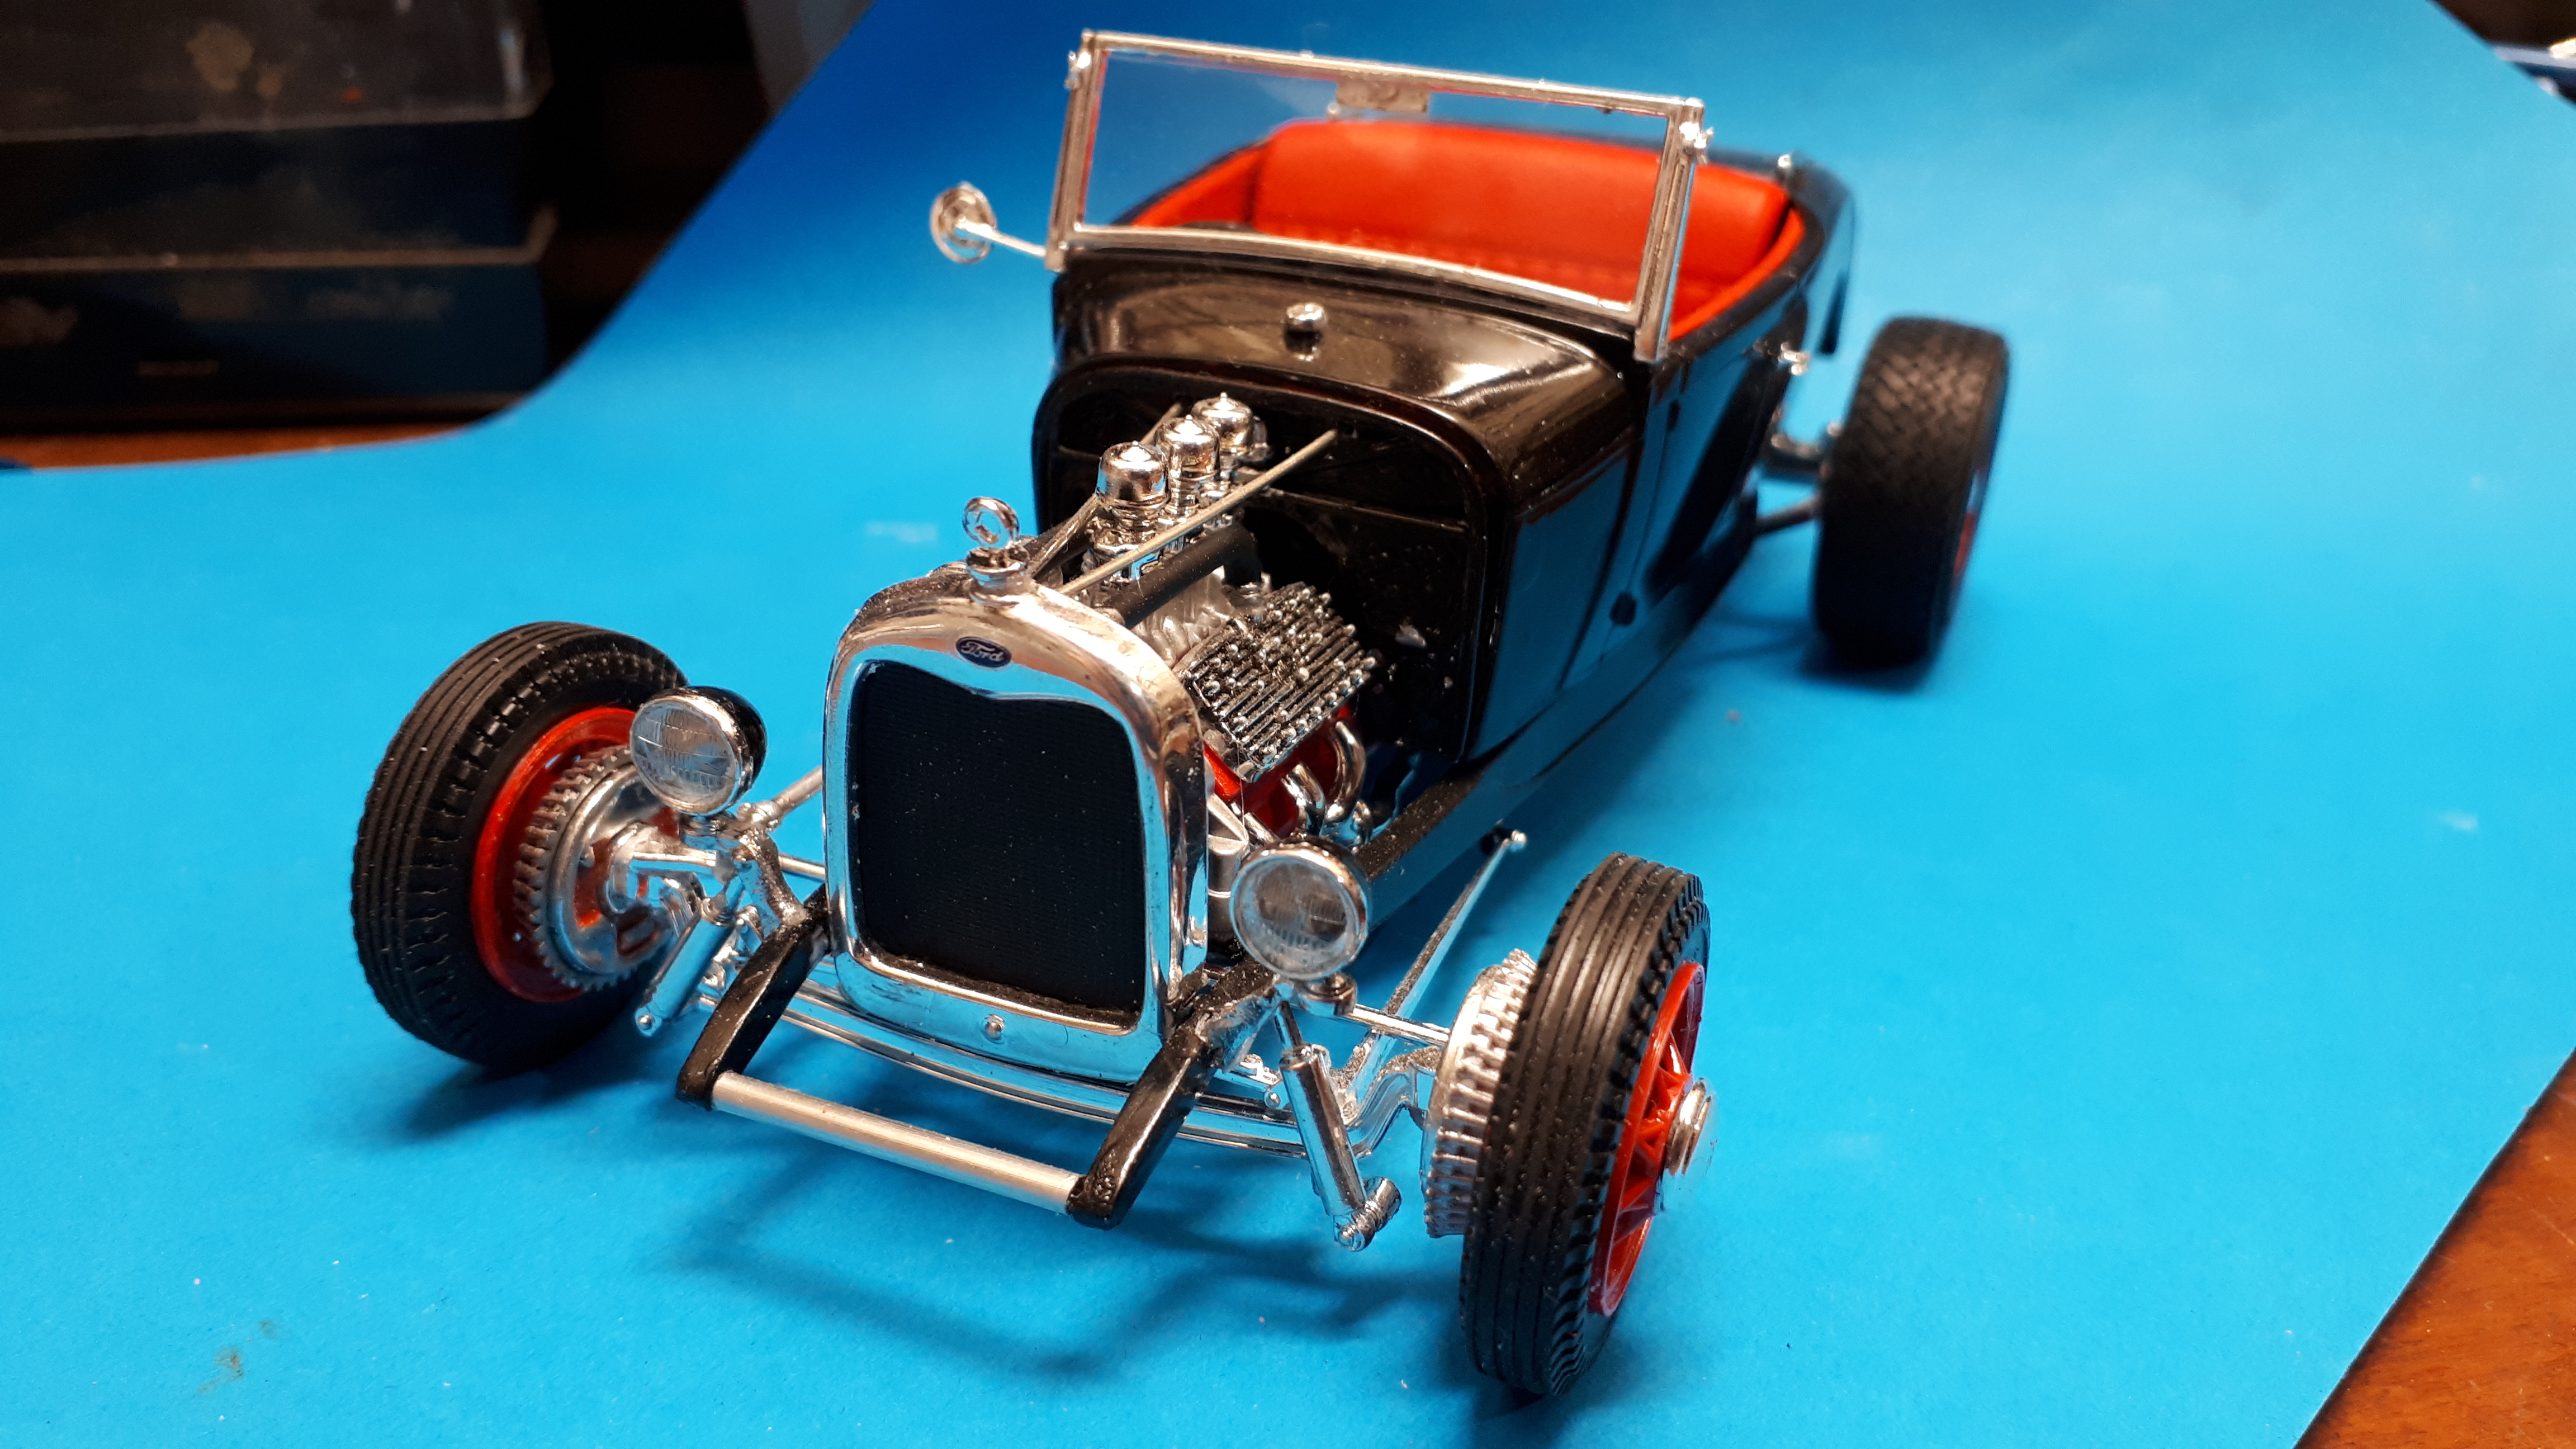
Yes Dave, I read that article by Pat Ganahl when I was still in high school, frustrated by the fact that at that time, AMT kits were not sold in Western Australia! All we could get was the Monogram Son of Ford, the Boss A bone and the SweeTee so my brothers and I bought them up in multiples to be able to build a rod of some sort! And yeah, horizontal, vertical, level, I don't know what the right way to describe the placement of the prisms cut into the headlight glass, other than they shouldn't be crooked! Speaking of headlights, I kept looking at those photos above and decided I couldn't stand them anymore, they had to be replaced. They are just too big for that era car. So last night, I gently removed the medium sized Revell kit lights and replaced them with the smallest sized lights after painting the buckets black. I'm much happier now! Cheers Alan