Alan Barton
-
Posts
2,128 -
Joined
-
Last visited
Content Type
Profiles
Forums
Events
Gallery
Everything posted by Alan Barton
-
Here's my build from a few years ago. Cool kit, very easy to build and looks great behind a rod because it is more proportional to the size of a rod than say the Hull Raiser or Hemi Hydro. I have two others nearly finished but have struggled to get the contrasting coloured seams on the deck looking neat and tidy. Time I had another crack at it.

-
Tom Geiger, I was expecting you to post an opinion on this puppy, knowing what's in YOUR basement........
-
I've had a brain fade but this reminds of a very cool drag car from the early sixties - two brothers if I remember correctly and they later built the Durachrome Bug funny car. Gunter Bros? Cheers Alan
-
'29 Ford Lakes Roadster UPDATED: 9/6/17
Alan Barton replied to Dennis Lacy's topic in WIP: Model Cars
This is looking magic, Dennis. After seeing this last night, I got all my Don Montgomery books out and got back into a Monogram 32 hiboy project that had stalled year ago. I love how you have nailed a period correct stance on this model ( and all your others for that matter!) Make sure you trace that interior firewall template before you glue it in! Work like that is no easier the second time around and a lot of the cars from the era we love had setback firewalls. Cheers Alan -
better chassis for builds?
Alan Barton replied to Tim H's topic in General Automotive Talk (Trucks and Cars)
Two I've used are the Revell Thunderbolt chassis under the AMT 65 Fairlane stock car - fitted like a glove. The other one is Revell's 65 Chevelle chassis under the AMT 64 and 65 El Camino and Station wagon kits. Cheers Alan -
Knock off kits..common?
Alan Barton replied to iamsuperdan's topic in General Automotive Talk (Trucks and Cars)
As a kid in the seventies I bought a Blue Beetle knockoff by Bandai. The obligatory poseable front wheels and hump in the floor for a Mabuchi motor were hideous and the grille shell lost something in the translation but as I recall the rest was OK. My failing memory recalls they may have done the Green Hornet and Black Widow as well. -
K&R Kustoms+Rods "barn find" dry lakes belly tanker
Alan Barton replied to Rocking Rodney Rat's topic in Model Cars
Mate, I've never met you but I reckon if I did we would get long like a house on fire! This is absolutely magnificent! The fact that no particular part stands out because they have all weathered uniformly - that is EXACTLY the patina you find when you crawl into some old shed and dig something out - and believe me, I've done that plenty of times Aussie shed patina is exactly the same as American barn patina. You are dead right abut the 10 pounds of potatoes in a five pound bag - if I remember rightly that is why I stopped building mine years ago. I've got no excuse now! Thanks fro sharing this with everyone - it is a true masterpiece. One last thing - I love that you used that plate out of the Revell chassis parts pack - I have had several of these over the years and for some reason it is still one of my v favourite parts - it just speaks to me. Great to see it in use. Cheers Alan -
K&R Kustoms+Rods belly tanker update: 8/12/17
Alan Barton replied to Rocking Rodney Rat's topic in WIP: Model Cars
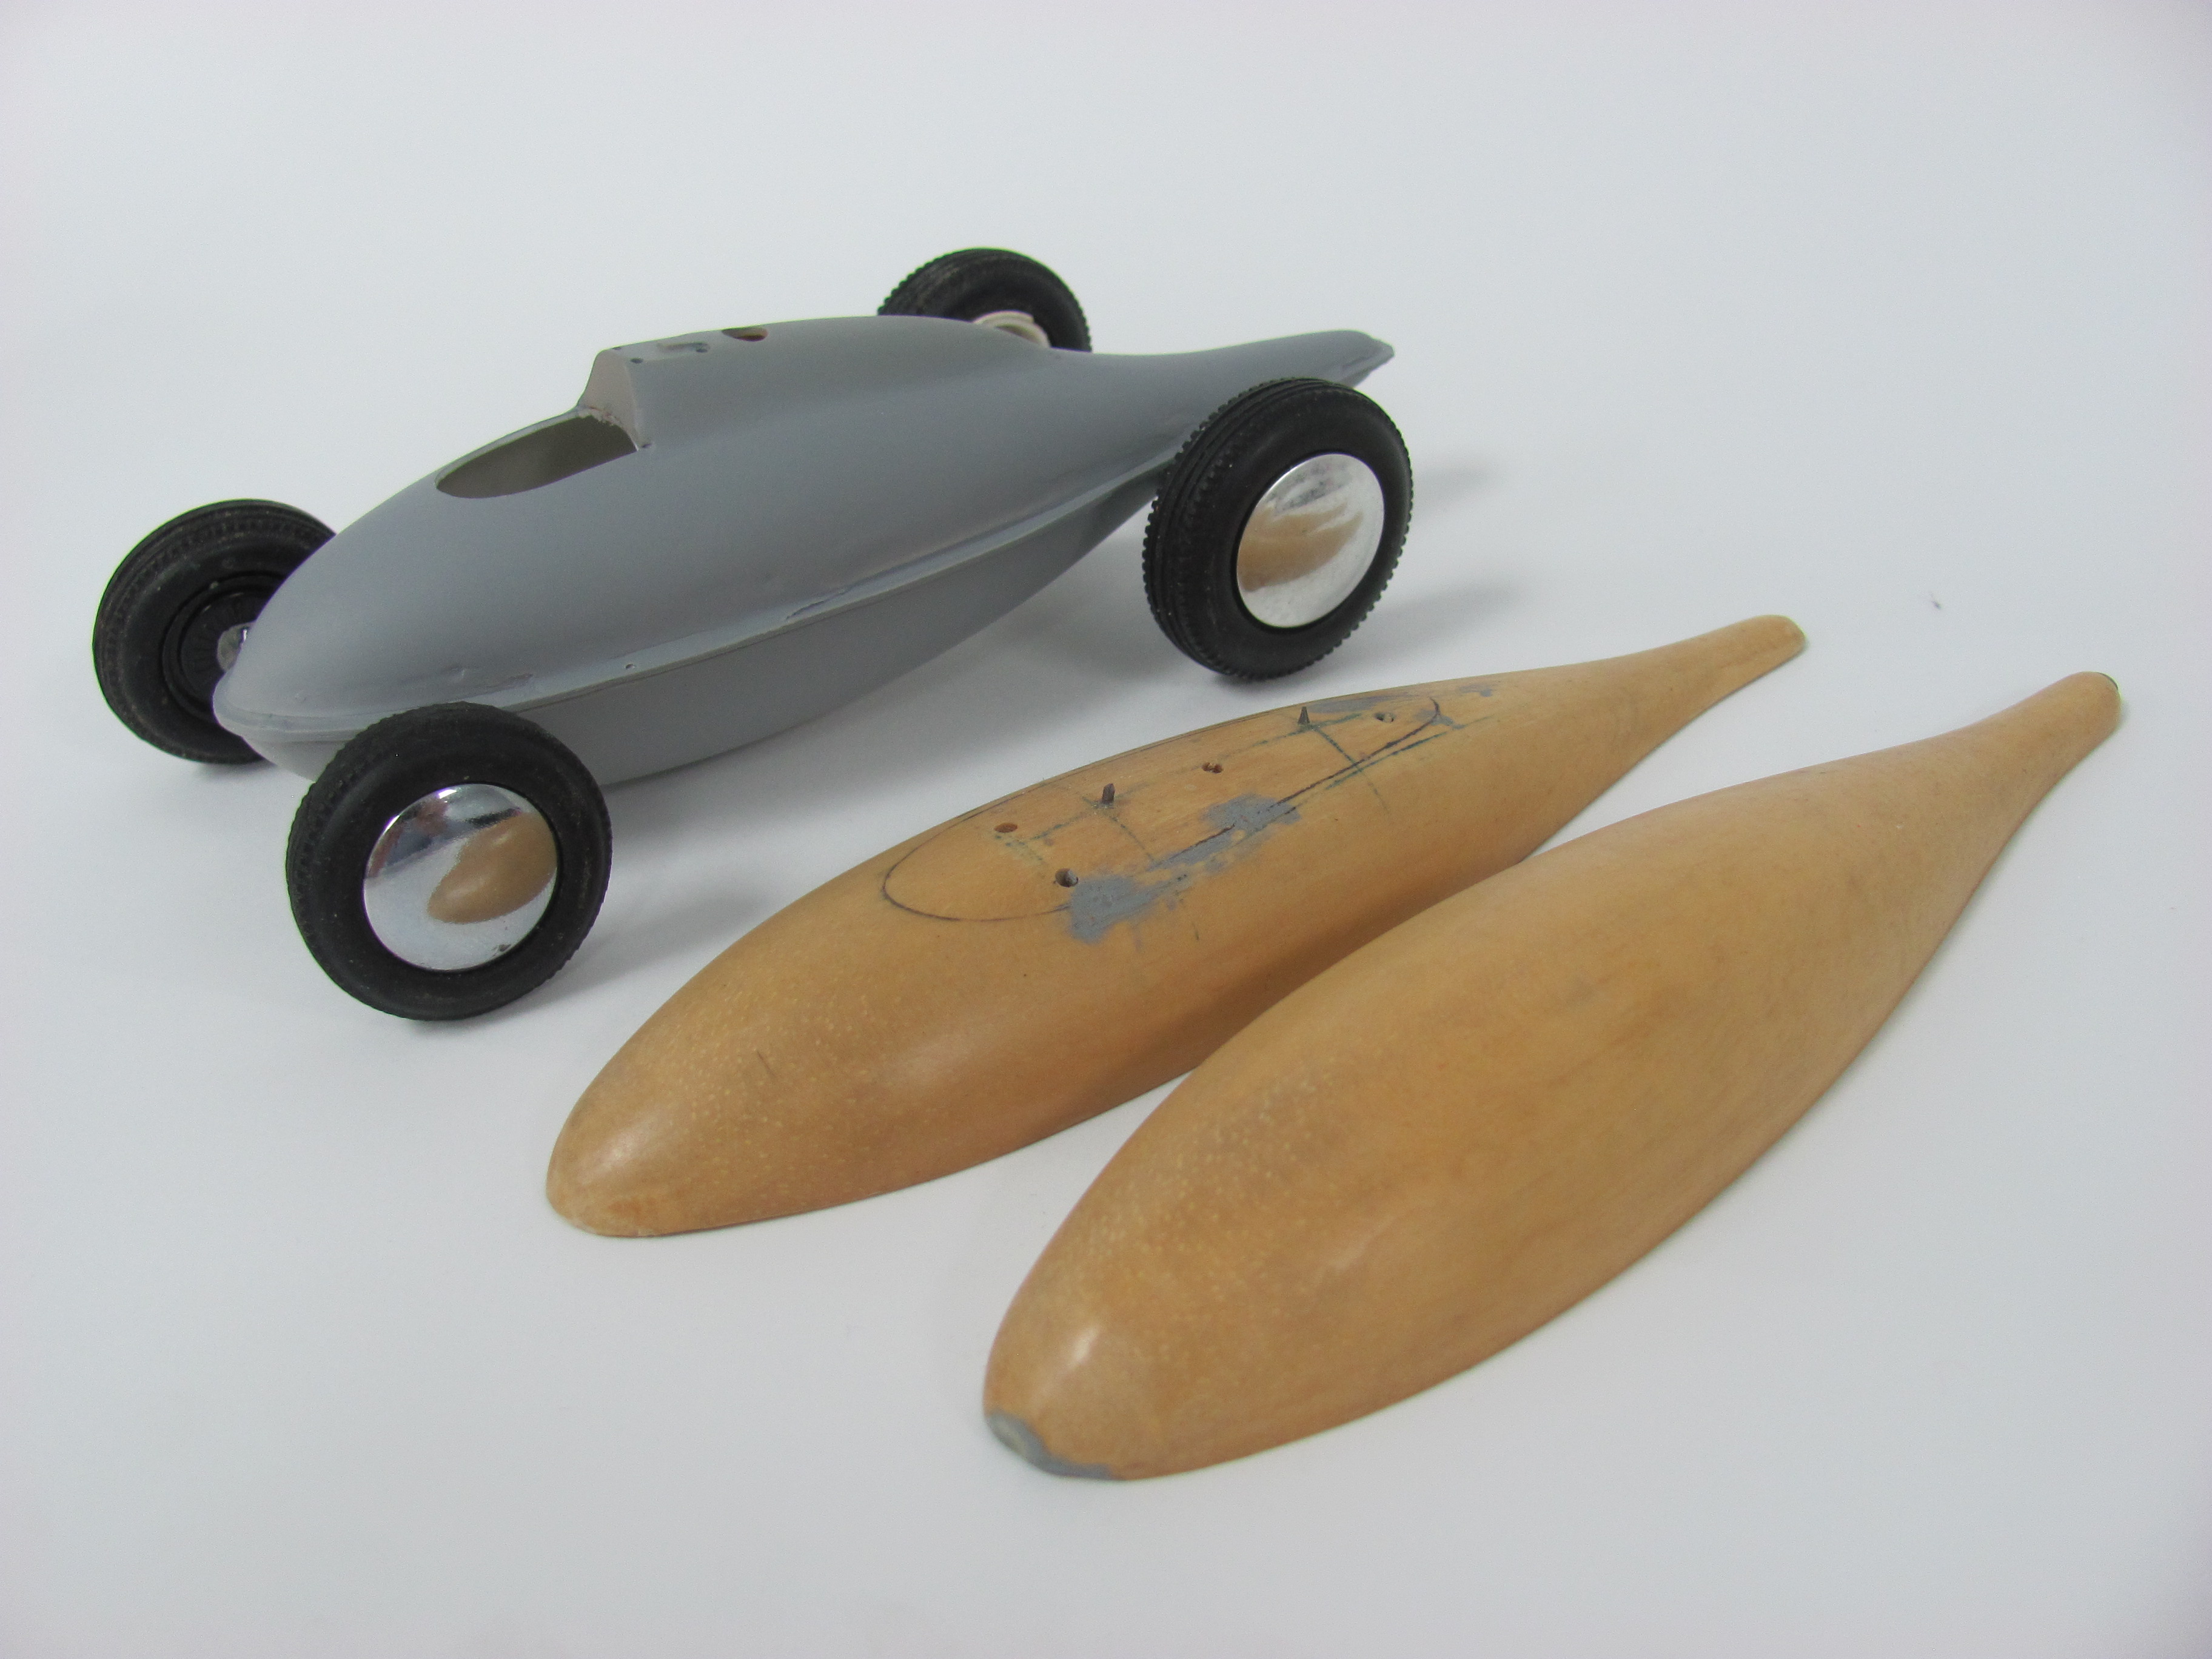
This is looking fantastic Rodney and like Bernard said earlier, not many people get a belly tanker right! I am very much looking forward to your finished project. Looking at that unidentified dash you spoke off, I am fairly certain it is from the AMT Grant King sprint car or its derivatives. The big switch between the two gauges is the clue. That sprint car steering box is from the same kit. I produced a vacform for one years ago but never did get it finished - one day! The images that you and Dennis have posted are inspiring me to get back onto mine! By the way Dennis, that slightly funky car you referred to looks to me to be a replica of the very first tank, the one Bill Burke built as a front engine car before he started on his rear engined versions. Here's how far I got before I got distracted!
-
Convert racing kit into stock - street car
Alan Barton replied to Fredd's topic in Model Building Questions and Answers
You certainly could just use flat plastic but getting a nice even edge on the wheel lip would be challenging for me. I've done it but........ Also, another old trick that I have used successfully is "welding" the replacement body parts or plastic sheet from the back with a soldering iron. There is far less chance of the plastic breaking out while you work it if you use this technique. I would do it outside - it gets a bit smelly! Good luck Alan -
Comfort Models, Ya Have One?
Alan Barton replied to martinfan5's topic in General Automotive Talk (Trucks and Cars)
Hands down the Monogram 32 Ford Roadster. I've built five and have another five in the works. The first hot rod kit I ever bought with my own money was Son of Ford. I've never understood the love for the AMT 32 as the Monogram builds a far more believable rod. It takes a little work to do fenderless, but will look light years better than a fenderless version of the AMT! AMT 57 Chevy and AMT Model A roadster would be up there too. Cheers Alan -
Convert racing kit into stock - street car
Alan Barton replied to Fredd's topic in Model Building Questions and Answers
Fredd, the hardest part of this conversion will be completing a nicely finished set of wheel arches. Can I suggest that you look around at other models to see if there is one with similar shaped and lipped openings? You could then cut these out of the donor body, oversize, and carefully trim, file and sand them until they are a perfect fit in the holes left by removing the racing flares. Without having a lot of knowledge of this era of car, maybe something like a BMW or a Mercedes might give you the correct shapes? Or a modern Japanese car? Let Goggle be your friend. This type of work does not take lots of skill, just lots of patience. I wouldn't expect to get better than one corner finished per session. I would draw clear fine axle centre lines on both bodies before I did any cutting and then I would redraw them from time to time as they wear off with handling. Use these centrelines to keep the body and the filler section lined up.You don't necessarily have to cut them out in a curve - you can just as easily saw and score a square section out of each body and sand to fit. If you take the time to make the new section of body work fit into the Alfa body as precisely as possible,, you will not risk damaging the wheel arches with aggressive sanding of filler material. Hope that helps Cheers Alan -
revell 51 FORD ANGLIA
Alan Barton replied to cruiseliner's topic in Model Building Questions and Answers
Pete, I just checked my Doyusha Bob Riesner Invader kit, the Oakland roadster show winner with two engines, and the transmission you wished to identify is right there! Cheers Alan -
Scott, I say go for it! It's really not that bad. Set an evening aside that you are not going to do anything else and do it. I fully intended to put this one back in the box but once I got started it was pretty straight forward, more so now that you now about the speedbumps along the way. The roof fits brilliantly , as does the windshield, big as it is. I'm hoping to get paint on this weekend if it's not too cold. Once it's painted I expect it will only take an hour or so to finish. Cheers Alan
-
That's one of the tidiest examples I've ever seen of this model Dave. I am really enjoying your catalogue of classic kits from the late sixties early seventies. Keep 'em coming! Cheers Alan
-
I built this model years ago and yes, the windshield posts do look thick. A reasonably easy fix is to carefully saw the windshield in half and spent an hour or two with a file and gently file it down until it is a perfect fit in the windshield opening rather than behind it. I have done this on a few notoriously thick local fibreglass aftermarket bodies and it makes a massive difference. It is easier to do it with the kit glass than to cut new stuff from acetate as it is very difficult to invisibly glue the thinner stuff when mounted in this manner. Love the colour - it looks stunning. Mine is the old Testor's metallic blue with white seats - sort of like brothers from a different mother! Cheers Alan
-
Thanks Alan, I will try and get some updates done this weekend. Cheers Alan
-
Thanks Edsel-Dan,for putting up your photos otherwise I would never have known it existed at all. Sometimes oddball stuff like this doesn't make it to Australia and I could have easily missed getting one. Your post was the reason I now have one! For those who want to follow the build of a Coronado, I have started a build thread. I put it in "On the workbench" but for some reason it has turned up in "All the rest". Considering how much interest there has been in this thread and how few replies there have been to my build post, I figure very few people have seen it. If you are interested in speedboats, that's where it is. Cheers Alan
-
This is the only issue of the Monogram 32 that I don't have. It seems to be a combo of the Son of Ford and the later yellow version. I don't know if many people know that both Lil Deuce and Son of Ford had the front headlight bar holes too far forward in the fenders. From your photos it looks like this Early Iron series was the one where the holes got moved to the correct spot. This is a lovely example of what I still think is the best deuce out there. You've inspired to get stuck into my Son of For - thanks Dave! Cheers Alan
-
I had this one when I was a kid and still have some scraps. I did a seventies style C cab, complete with cardboard sides(!) out of this. Nice to see at least one person did it properly. THis whle series was pretty cool in a funky way - years later I did get to complete an adult quality build on the Medicine van. Thanks for all these retro posts Dave, I am enjoying them a lot! Cheers Alan
-
Monogram 55 Chevy original release ( w/ all the Kustom parts)
Alan Barton replied to Lizz62's topic in Model Cars
Thanks for posting that Dave - I remember oggling the pictures in Model Car Science ads but have never seen photos of a built one until now. Who knew the Badman seats started out here? The little bumperettes are too cool. Cheers Alan -
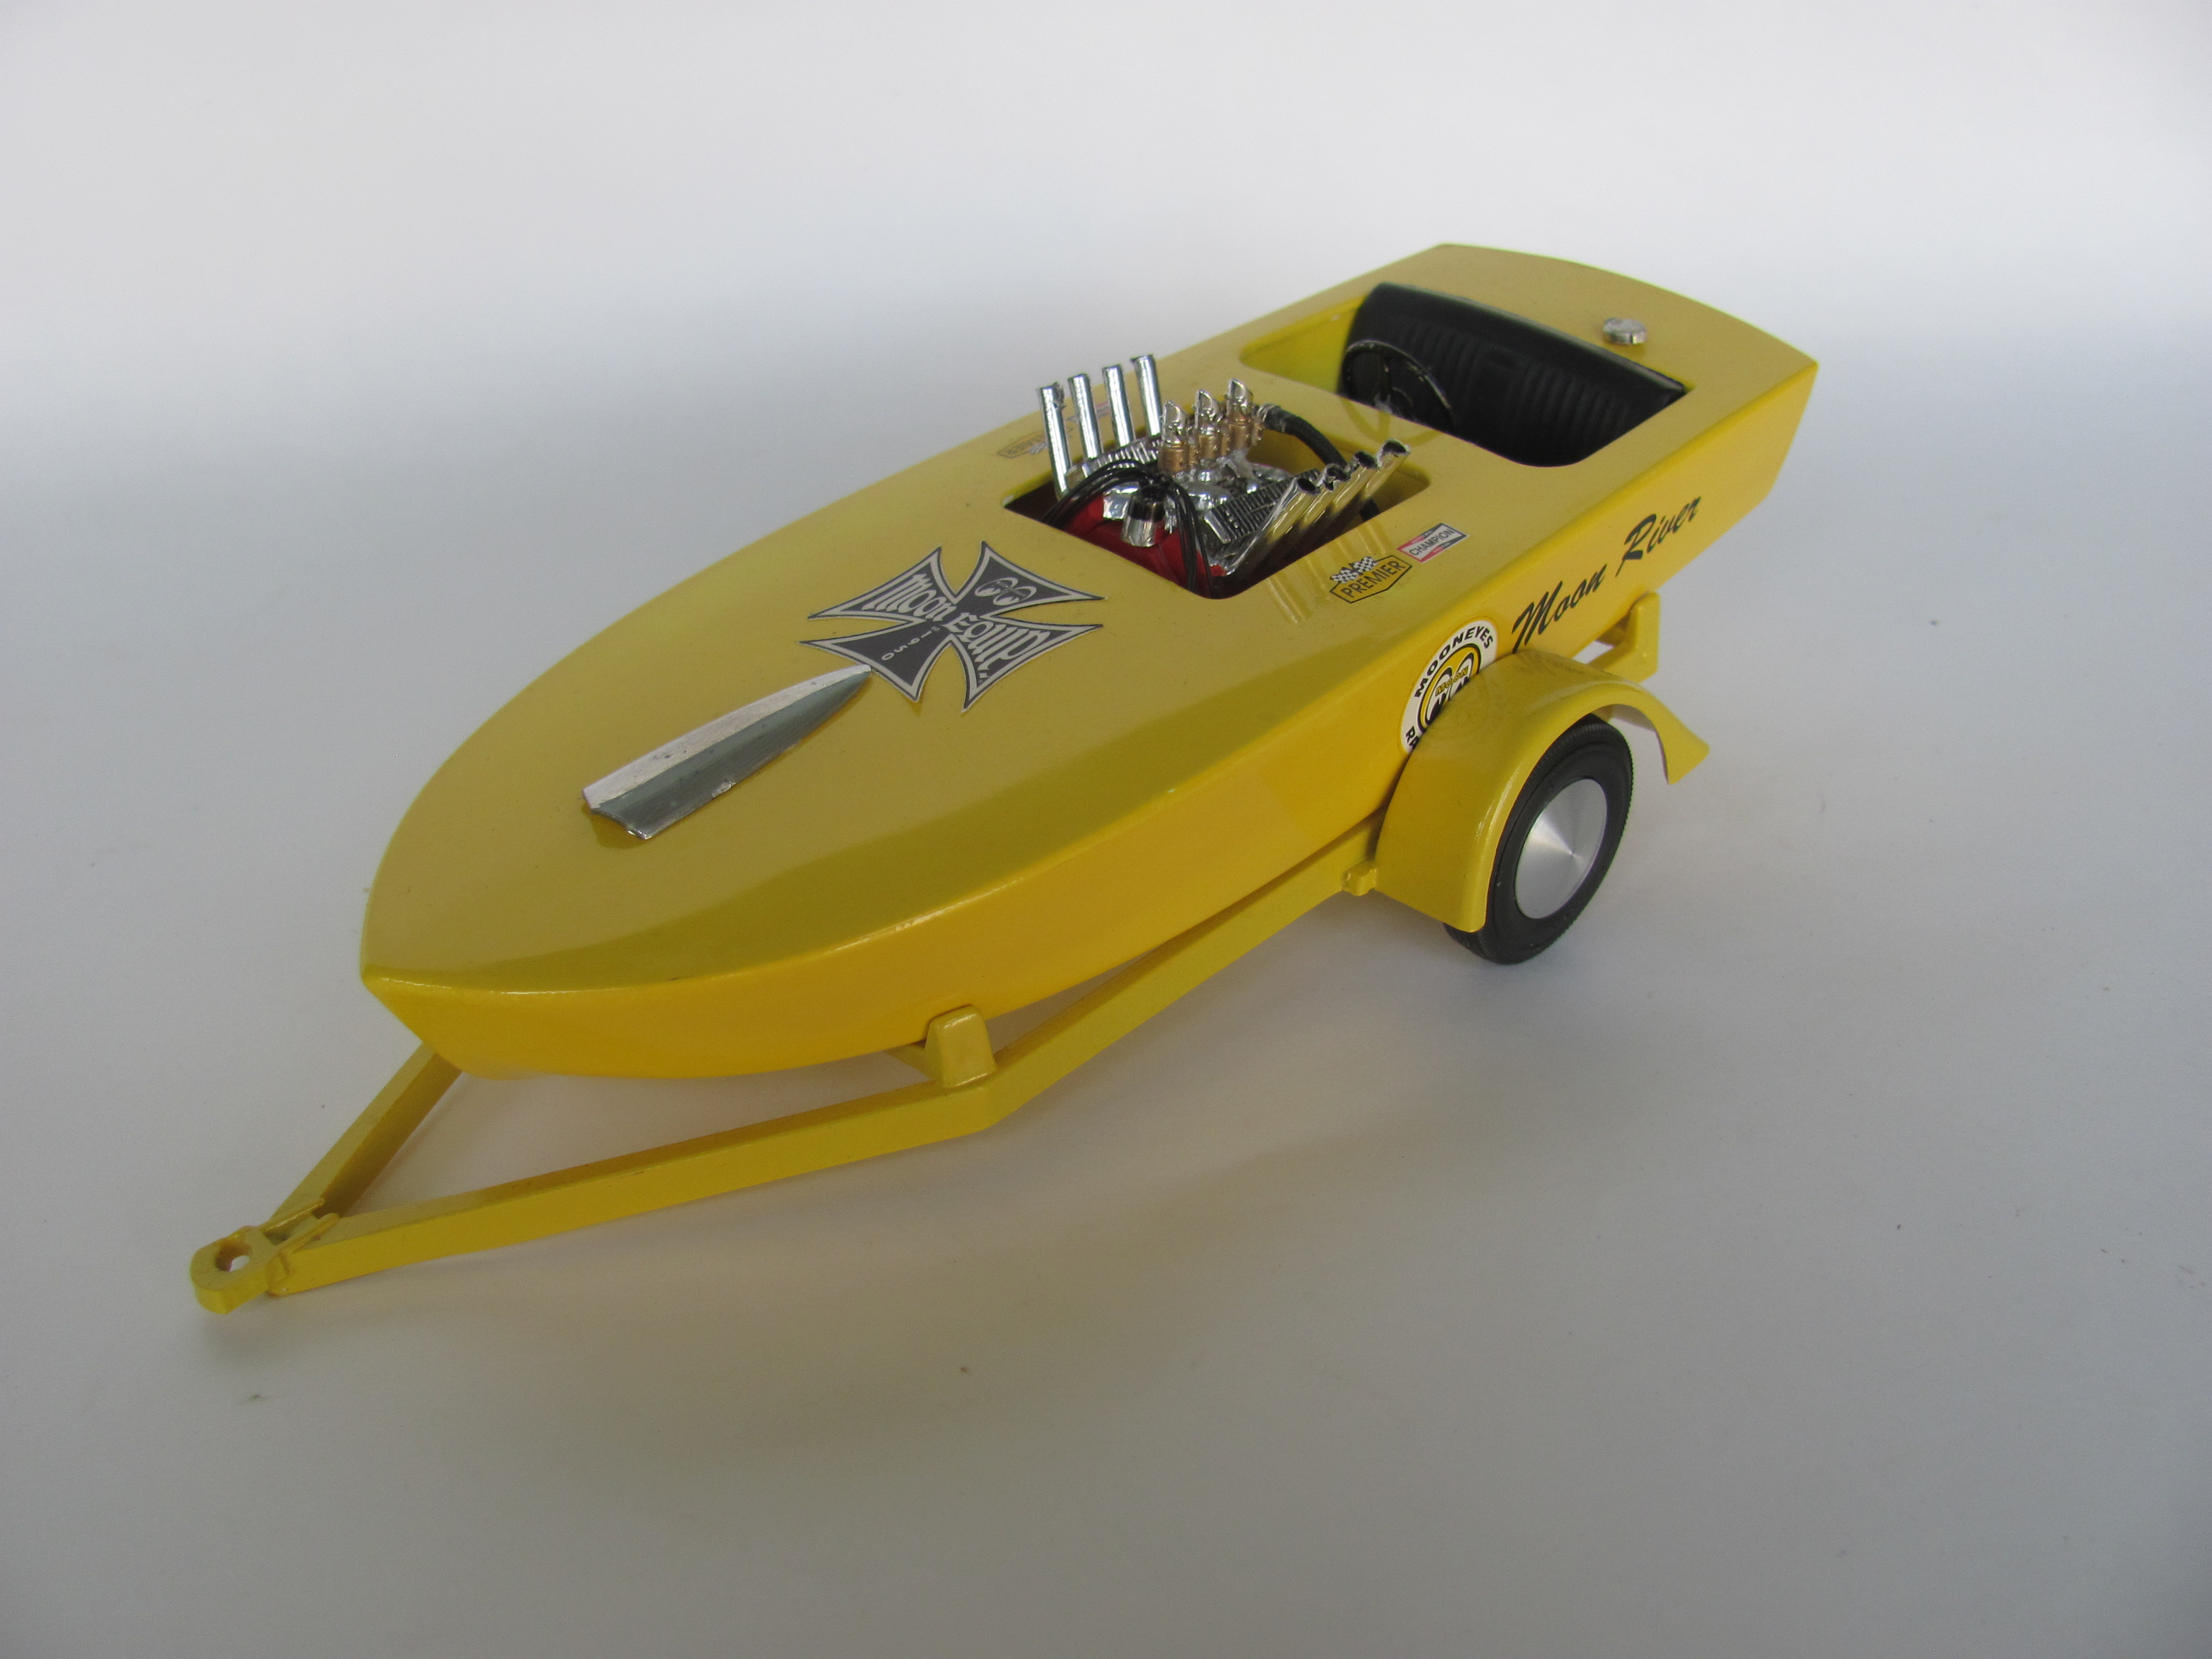
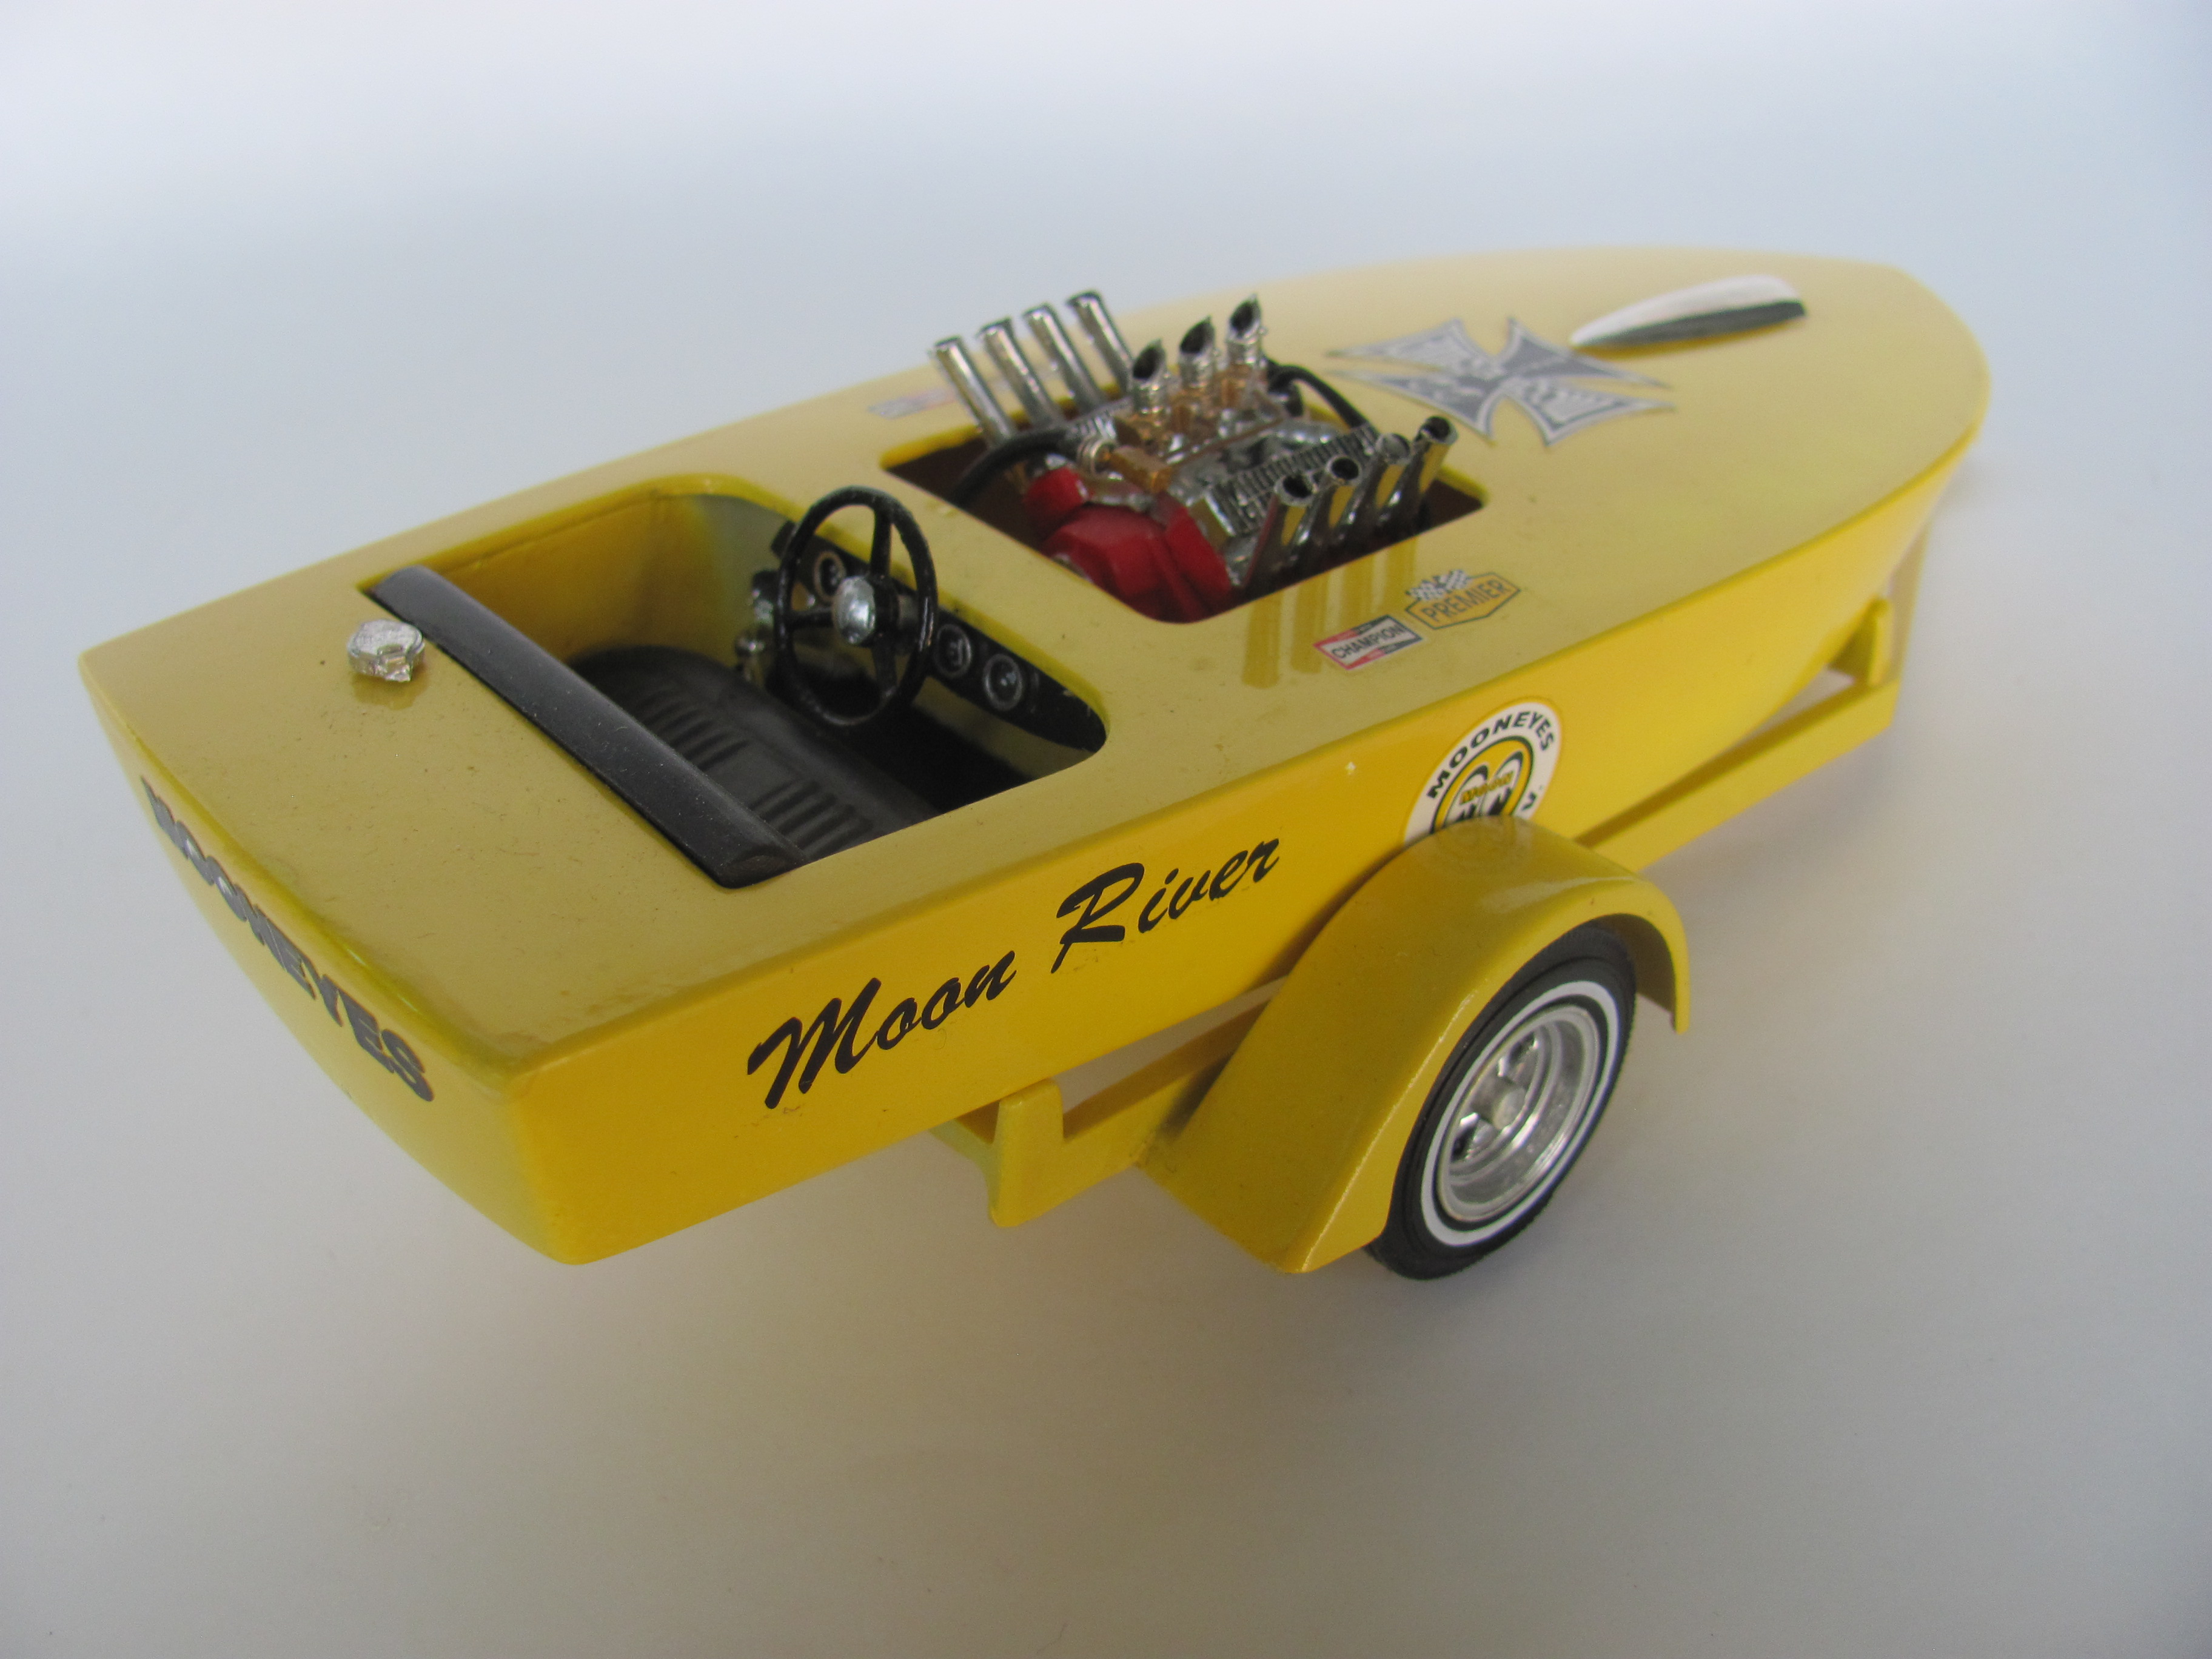
So here we are with a first mockup. I'm pretty happy with where this is going. When I build a trailer for it, I will be looking at a late 50's land yacht to tow it because it is a pretty big boat. Not out of scale, just big. I painted the seats with Testors Fabric red lacquer. Its the first time I used it and I'm very pleased with the effect. be warned that the paint maskouts indicated on the painting diagram DONT match the stitching design moulded into the seats. I chose to ignore the stitching and put it where they said to. The seats will fit in the fully assembled hull but to make life easier, it pays to pare down the tabs that help locate the very front seat. They don't have to be removed altogether, in fact, I just trimmed down the left hand side tab to about half its original thickness. This makes it easier to fit the seat inside the hull without stressing the joints. That windshield is humungous but apparently correct for the prototype. If I was going to customise this boat, I would consider fitting a modified interior, dash and windshield from a Monogram 59 Chevy or 59 Caddy convert. I reckon that would add a bit of class and a lot of detail! Cheers Alan
-
I like how closely you portrayed the feel of the original movie car. The motor looks like it could swallow you whole. Tough as all getup! Cheers Alan
-
Thanks guys. The thing about that anaemic looking engine, it sits on the hull with barely a hint of a mounting point and virtually no detail. Plus it is hidden under an enormous engine cover which needs to be accessed through the roof of the boat. In my house, I can't see this ever happening so I am just going to glue the engine cover on and put the engine in the parts box for .... who knows? Mind you, I do have spares of all the engines ChrisB mentioned. Hmmmm.... I figure I have a limited number of hours for modelling and a massive stash to work my way through. Trying to make a silk purse out of this sow's ear makes no sense. I have other boats underway that have fully exposed engines - I will bank the time for those efforts. Cheers Alan
-
Remember I mentioned there was a bit of flash? When the flash gets its own ejector pin, you're talking serious flash! Easy to remove as long as you are careful around the tips of the roof in this case.
-
While doing all this work I also noticed that the horizontal seam was going to be a complete mongrel to clean up. When the deck joins to the sides it makes a concave area and naturally a bit of glue gathers there as well. I really couldn't be bothered with the mess and smell of auto body filler so I picked a length of Evergreen half round and cemented that over the join. Problem solved! The thing is, as well as the concave joint, there are some really wonky lines running along the edge that would be a nightmare to foil. The Evergreen now gives me a smooth straight trim that will be a pleasure to foil.