Alan Barton
-
Posts
2,128 -
Joined
-
Last visited
Content Type
Profiles
Forums
Events
Gallery
Everything posted by Alan Barton
-
I figured someone would spot the wheels, Jay! It's just a quirk of mine. I only have a limited number of my favourite wheels, and also I like the effect different wheels can have on a rod. So, when I'm building low fat fendered rods or fifties and sixties classics, I sometimes run different wheels on each side. By changing the direction of the front row of my display cabinet, I have a whole new collection to show off! (And it never ceases to amaze me how many people do nit notice!!!!!) I wouldn't dream of doing it on a hiboy for example. And mike 51, right is right! Cheers Alan
-
-
-
I had a good session on the bench over Easter and finally got this one done. I did the bodywork and paint around 10 years ago and then it just stalled - I can't even remember the reason. A slot racing friend gave me the frame from a Revell 40 coupe and it is a perfect fit under the AMT, in case you were wondering. The Windsor powerplant is AMT, 66 Fairlane I think but can't be sure. The body was converted to a four door by cutting the B pillar from a spare body and fitting it as well as moving the original B pillar forward to suit the smaller doors of a four door. The 40 dash was converted to right hand drive and painted along with the body - I have since worked out how to scratchbuild a 39 dash but I am sticking with the 40 on this one - hey, the owner liked 40 dashes! The AMT interior is fairly plane so I used some Evergreen half round strip to add a bit of sculpturing to the door panels. The front and rear seats are from the AMT 57 Fairlane kit - they took very little massaging to fit the tub and I think they suit the style of this car - this is meant to be a current day, contemporary street rod, not a 50's nostalgia version. Something you could comfortably drive across Australia in! Hope you enjoy this conversion. Four doors are far more common in Australia than 2 doors so it fits my Aussie collection quite well.
-
it's always a brave step to have to go backwards when you have reached this stage. But hey, that body swage mark would have screamed at you every time you looked at this model, and you would have always shown it to people as -"yeah, I'm pretty happy with it EXCEPT for the door lines". So you did the right thing, painful as it is. (I never was good at going backwards myself!) Could I suggest that when you go to reapply the trim, just glue the straight middle section of the door first, let it dry, and then gently curve each end up to it's appropriate location. This will give you a greater chance of success than starting at one end and working along the model - the pressure of the original curve, say at the cowl, will fight you to the end! I have been watching this project from the very beginning - I always wondered why no-one did a 34 Chevy and I got to speak to Ed Sexton at the 2010 Toledo NNL and suggested to him that it was a very neglected model. It could be a great series like the 32 Ford kits and there is NO competition from any other manufacturer. This model is a credit to you Pat and I look forward to the finished project. Cheers Alan
-
Gunze Cobra Daytona Actually 1/25 scale?
Alan Barton replied to afx's topic in General Automotive Talk (Trucks and Cars)
While I agree wholeheartedly with Bill's comments about "measurements is measurements" and the normal process of measure twice, cut once and then check just to be sure should guarantee accuracy, I would like to relate a story told to me by a fellow model club member here in Perth over twenty years ago. Work commitments took him to Japan and he seized the opportunity to wrangle a tour of the Tamiya plant while he was there. After going through the plant his guide took him to a museum and gift shop area. In one of the display cabinets were two large wooden masters for the Ferrari Testa Rossa kit, probably around 1/10th scale. One of them looked absolutely magnificent, perfect in every detail, while the other was a bit funky and clunky. Arthur commented that the wonky one must have been their first effort but it wasn't accurate enough. The guide explained that the disproportionate master was, in fact, the dimensionally perfect one! After they had created the first master, a draft if you like, they employed an artist to "fix it" and make it look right. Apparently the human eye doesn't scale curves and angles too well and we usually look at a model from a considerably different angle to the real thing. The master that was carved to perfectly match the photos and dimensions just looked odd. Arthur also said that he saw a display of the reference photos they took and they were taken at about one inch intervals all the way around the full size car. They used the scale measurements to get the basic block and then used the photos to make sure it looked real. Considering that Tamiya is a bit of a bench mark for accuracy I always found that a particularly interesting story. Cheers Alan -
Milner dragster updated pics 6/16/17
Alan Barton replied to DrKerry's topic in WIP: Drag Racing Models
Here's a thought - does the real car still exist? The history and whereabouts of most of the AG cars are well documented but I have never seen reference to this one. Love that chute pack, by the way. Classic dragster styling at it's best! Cheers Alan -
Monogram's Hemi Fiat - 1/32nd Scale
Alan Barton replied to gasser59's topic in WIP: Drag Racing Models
Brad, I want you to know that seeing the way your Fiat was coming along was the inspiration I needed to finish my long stalled gold example that I posted here recently. I love the simplicity of your execution here - lots of care and some nice little touches like the steerable wheels. If only I could find the Willys and 34! Cheers Alan -
Sad Sad Sad News: Our Harry Passed Away
Alan Barton replied to Gregg's topic in General Automotive Talk (Trucks and Cars)
One of the great powers of the Internet is that you get to "know" people from your community who you might otherwise never meet. The work Harry put in behind the scenes to help keep our community together can never be overvalued it is priceless. The fact that he was an outstanding modeller was just icing on the cake. From all of us from all around the world, rest in peace Harry. -
Why Glue Bombs ?
Alan Barton replied to D. Battista's topic in General Automotive Talk (Trucks and Cars)
Ever since I was a kid I have had an inbuilt desire to make something out of junk and to save that junk from going to the tip. I often ask myself why I start on a glue bomb when there is a mint one on the shelf but somehow they talk to me. I build a variety of categories but two that I love to work on are speedway cars (dirt short track) and salt racers. Glue bombs are heaven sent for this sort of build. Hogged out wheels arches, smeared up windshields, no grill or bumpers - hey, I didn't need them anyway! I can then build a "nice" car out of the mint ones. This 64 Chevelle wagon harks back to my first year in high school. I had customised it to death and it lost its entire roof in the process. Why I never threw it out is beyond me but about ten years ago it talked to me. All I had left was the two side panels, tailgate and grille. A pair of otherwise useless Monogram Chev citations donated two rooves, two bumpers and two hoods. There's nothing underneath but who's looking anyway? Now we have a cool salt racer and the mint unbuilt kit that I purchased for $150 in 2013 at a Pennsylvania toy show will be built as close to showroom stock as I can to tow it to the salt. I have met other Aussie modellers who think the same as me and we all think it's a little strange but what the heck. And then, if you saw how my 1:1 29 roadster started out, that black roadster up the top of tis post is in mint condition! Cheers Alan -
There you go, I have done a belly tanker myself! Let me tell you an old woodworker's trick that will make splitting your mould much easier. Before you start carving, get two pieces of wood ( I use a timber called jelutong - great stuff if you can find it, very soft to carve but almost no grain and you can slice it beautifully in almost any direction.) Then, glue the two pieces of wood together with a piece of normal paper in between. Clamp it tight until it dries. Then mark out the shape on one side and start carving. The paper line down the middle is your centre line and will stay there throughout your carving. When you have finished your carving, sanding, sealing and priming, get a sharp chisel or plane blade, carefully place it along the paper line and give it a sharp tap with a mallet, the paper will spilt in half giving you two perfectly matched sides. When you place the halves on the bed of the vacform, rest them on something like some popsticks or similar. This will allow the plastic to pull down past the edges of your mould. After cutting them free you will then be able to sand them flat and get rid of any rough or rounded edges. Hope that helps Cheers Alan
-
I haven't vacformed for a few years but be warned, frustration levels can be very high with clear parts! The mould for a clear part must be scrupulously clean and polished - the tiniest spec of dust will look like a golf ball! Also, the temperature range for an effective pull is far smaller than white hi-impact styrene. If you are doing vacforming for the first time, I would strongly recommend that you use white for your first projects so that you get a handle on temperatures, number of holes required to suck every detail down, problems with undercuts etc. Don't let me put you off - vacforming is awesome fun and very addictive. It is perfectly suited to drag car, oval track and land speed racer parts that don't need fine detail like grilles, handles or chrome trim but do need scale thickness. Cheers Alan
-
My new workbench. (Done)
Alan Barton replied to landman's topic in General Automotive Talk (Trucks and Cars)
A man after my own heart - don't buy what you can recycle! There will be a piece of glass out there somewhere that someone doesn't need - just keep your dimensions in your head and grab it when you see it! It will happen. (An old patio door would be a good start! cheers Alan -
My new workbench. (Done)
Alan Barton replied to landman's topic in General Automotive Talk (Trucks and Cars)
That is a stunning bench you've built there Pat. Now do yourself a favour and go and have a piece of glass cut to place on top of your bench. Your craftsmanship will be visible forever and you will be able to clean up instantly every drop of glue paint or slime that ends up on it. You can mix putty, or paint, all sorts of things, then scrape it off with a blade. You can fabricate chassis or bodywork straight on the glass, and a little flick breaks it free the next day. Plus, every car you build will ALWAYs have all four tyres on the ground. I have had my glass top for over 25 years and there is no way I would ever go back to a wood or laminate top. For cutting, just have a small, say A4 cutting pad just off to one side for when you need it. Cheers Alan -
That just flat works! Perfectly balanced, nicely detailed a a great colour combo.. Like it a lot.
-
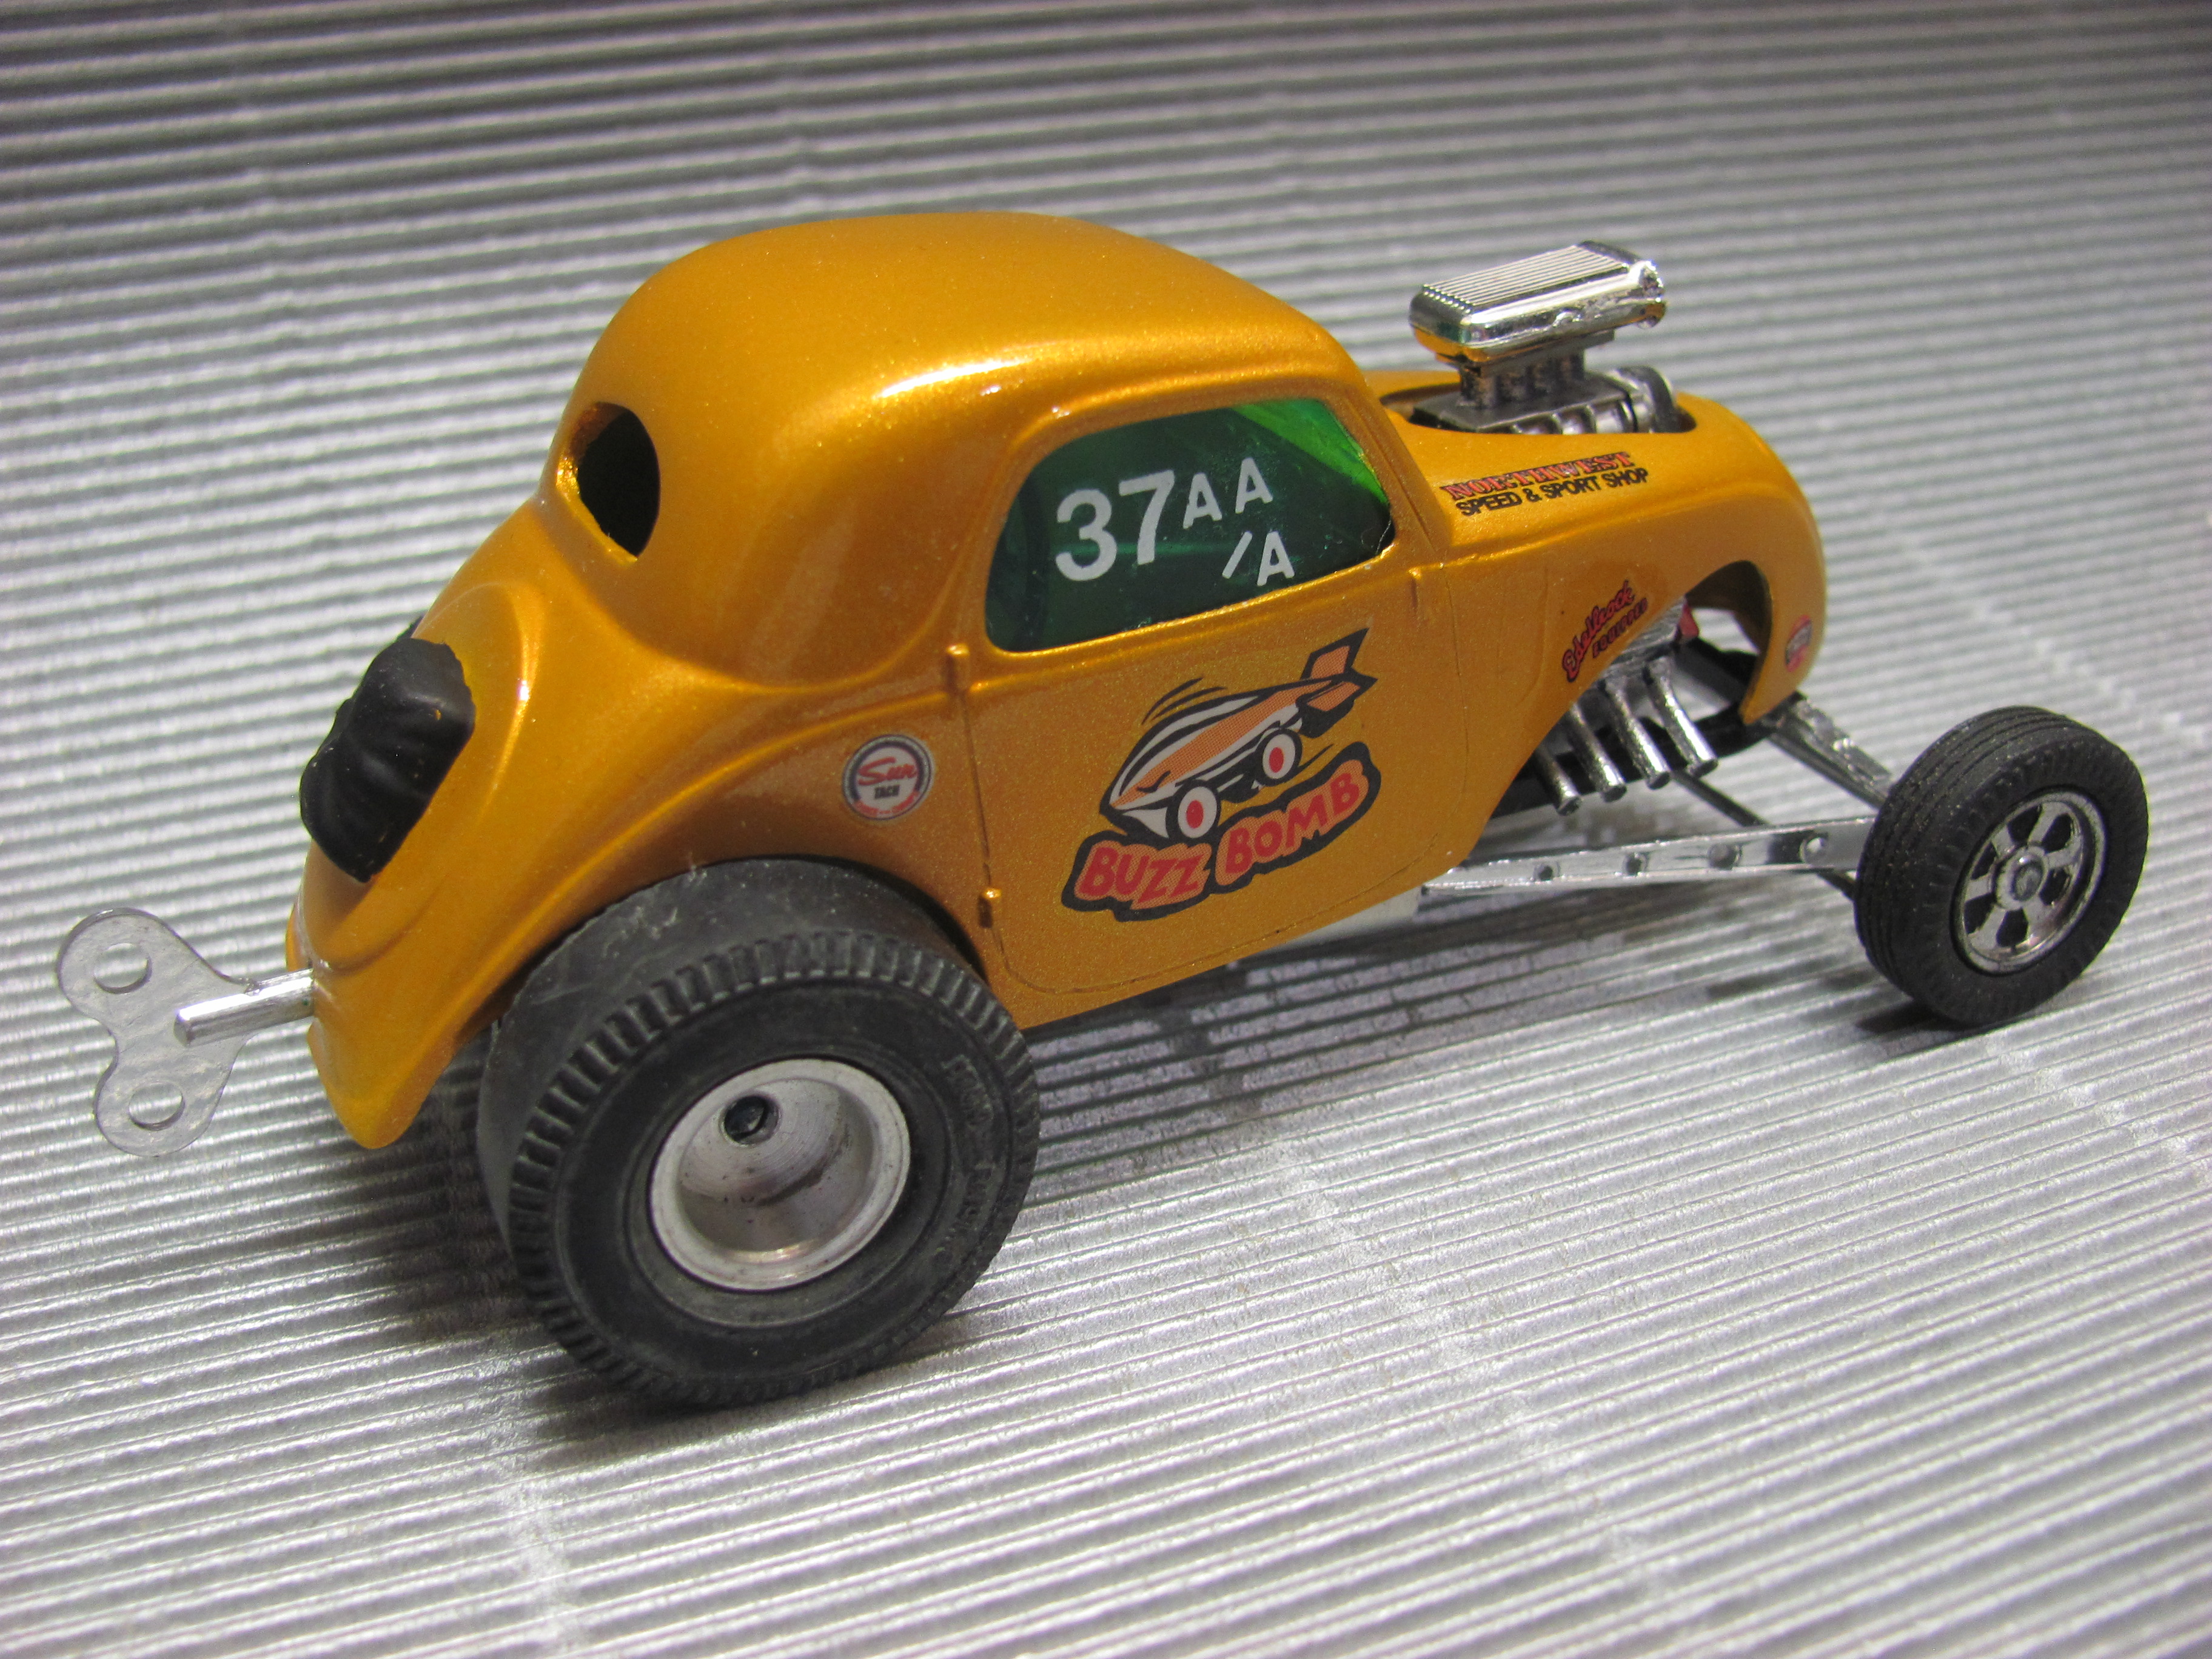
The nose had been hacked off some time in the past, then glued back on but losing a couple of mm in the process! The window unit was permanently welded into the car and a chunk about 6mm square was missing from the lower left hand rear corner of the body. The chassis was broken at the bellhousing and anything you can't see it that first photo was gone for all time. It has taken a year or so of on again, off again work, losing interest from time due t the amount of bodywork detailing required to bring it back from the dead. Rear wheels and tyres are slot car items while the fronts are from an old toy - it was that or nothing! I am not up for scratchbuilding a set of 12 spokes just yet so I am taking the lazy way out for now and we will see what turns up in the future. The front axle and spring are scratchbuilt from Evergreen, chromed with my new favourite tool, a 1mm Molotow Chrome pen. These things are brilliant! Radius rods are shortened items from an AMT 25 T. The bellypan was folded up from a piece of printer' plate and the windows are cut from file dividers (I had to smash the old unit out and it took some bodywork with it - more work! The rear corner was repaired with a scrap of styrene and a lot of filing and sanding. Finish is Testors 1 step lacquer with Cabots clear polyurethane varnish, all from the spray can. It was a lot of work but brings me one step closer to completing my collection of 1/32 scale rods. Anyone got a Willys or 34 Screamer they want to swap?

-
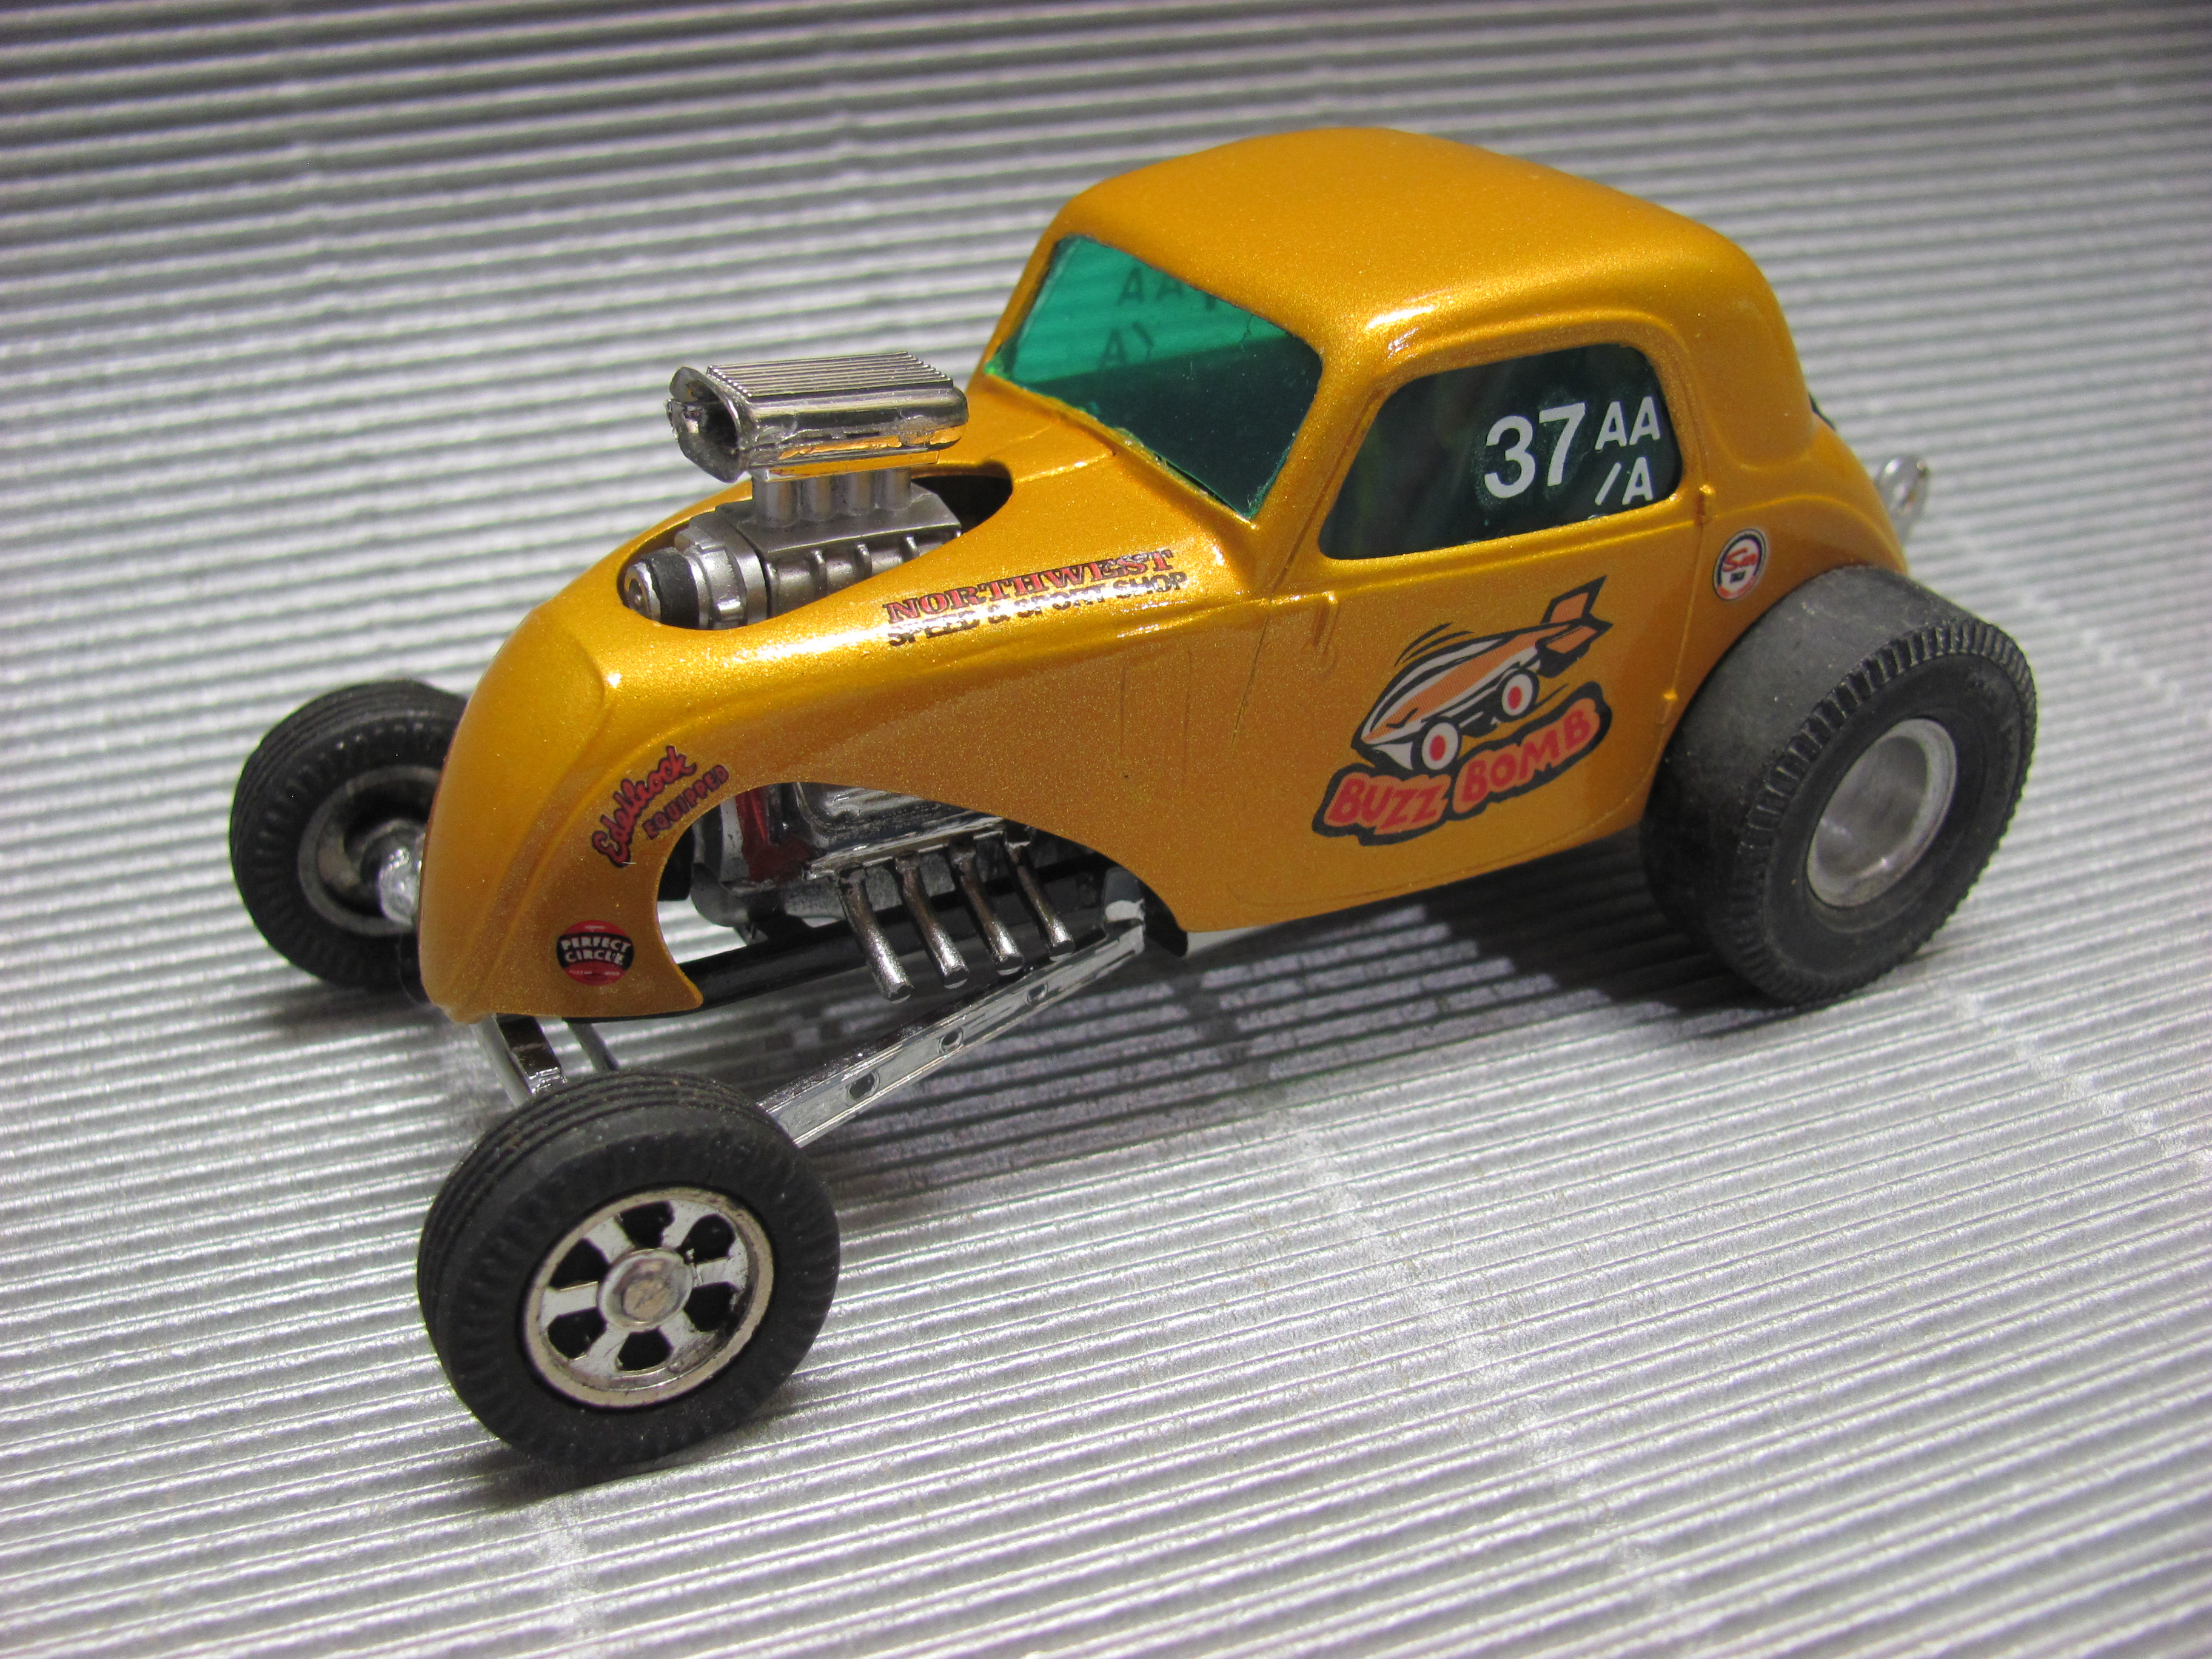
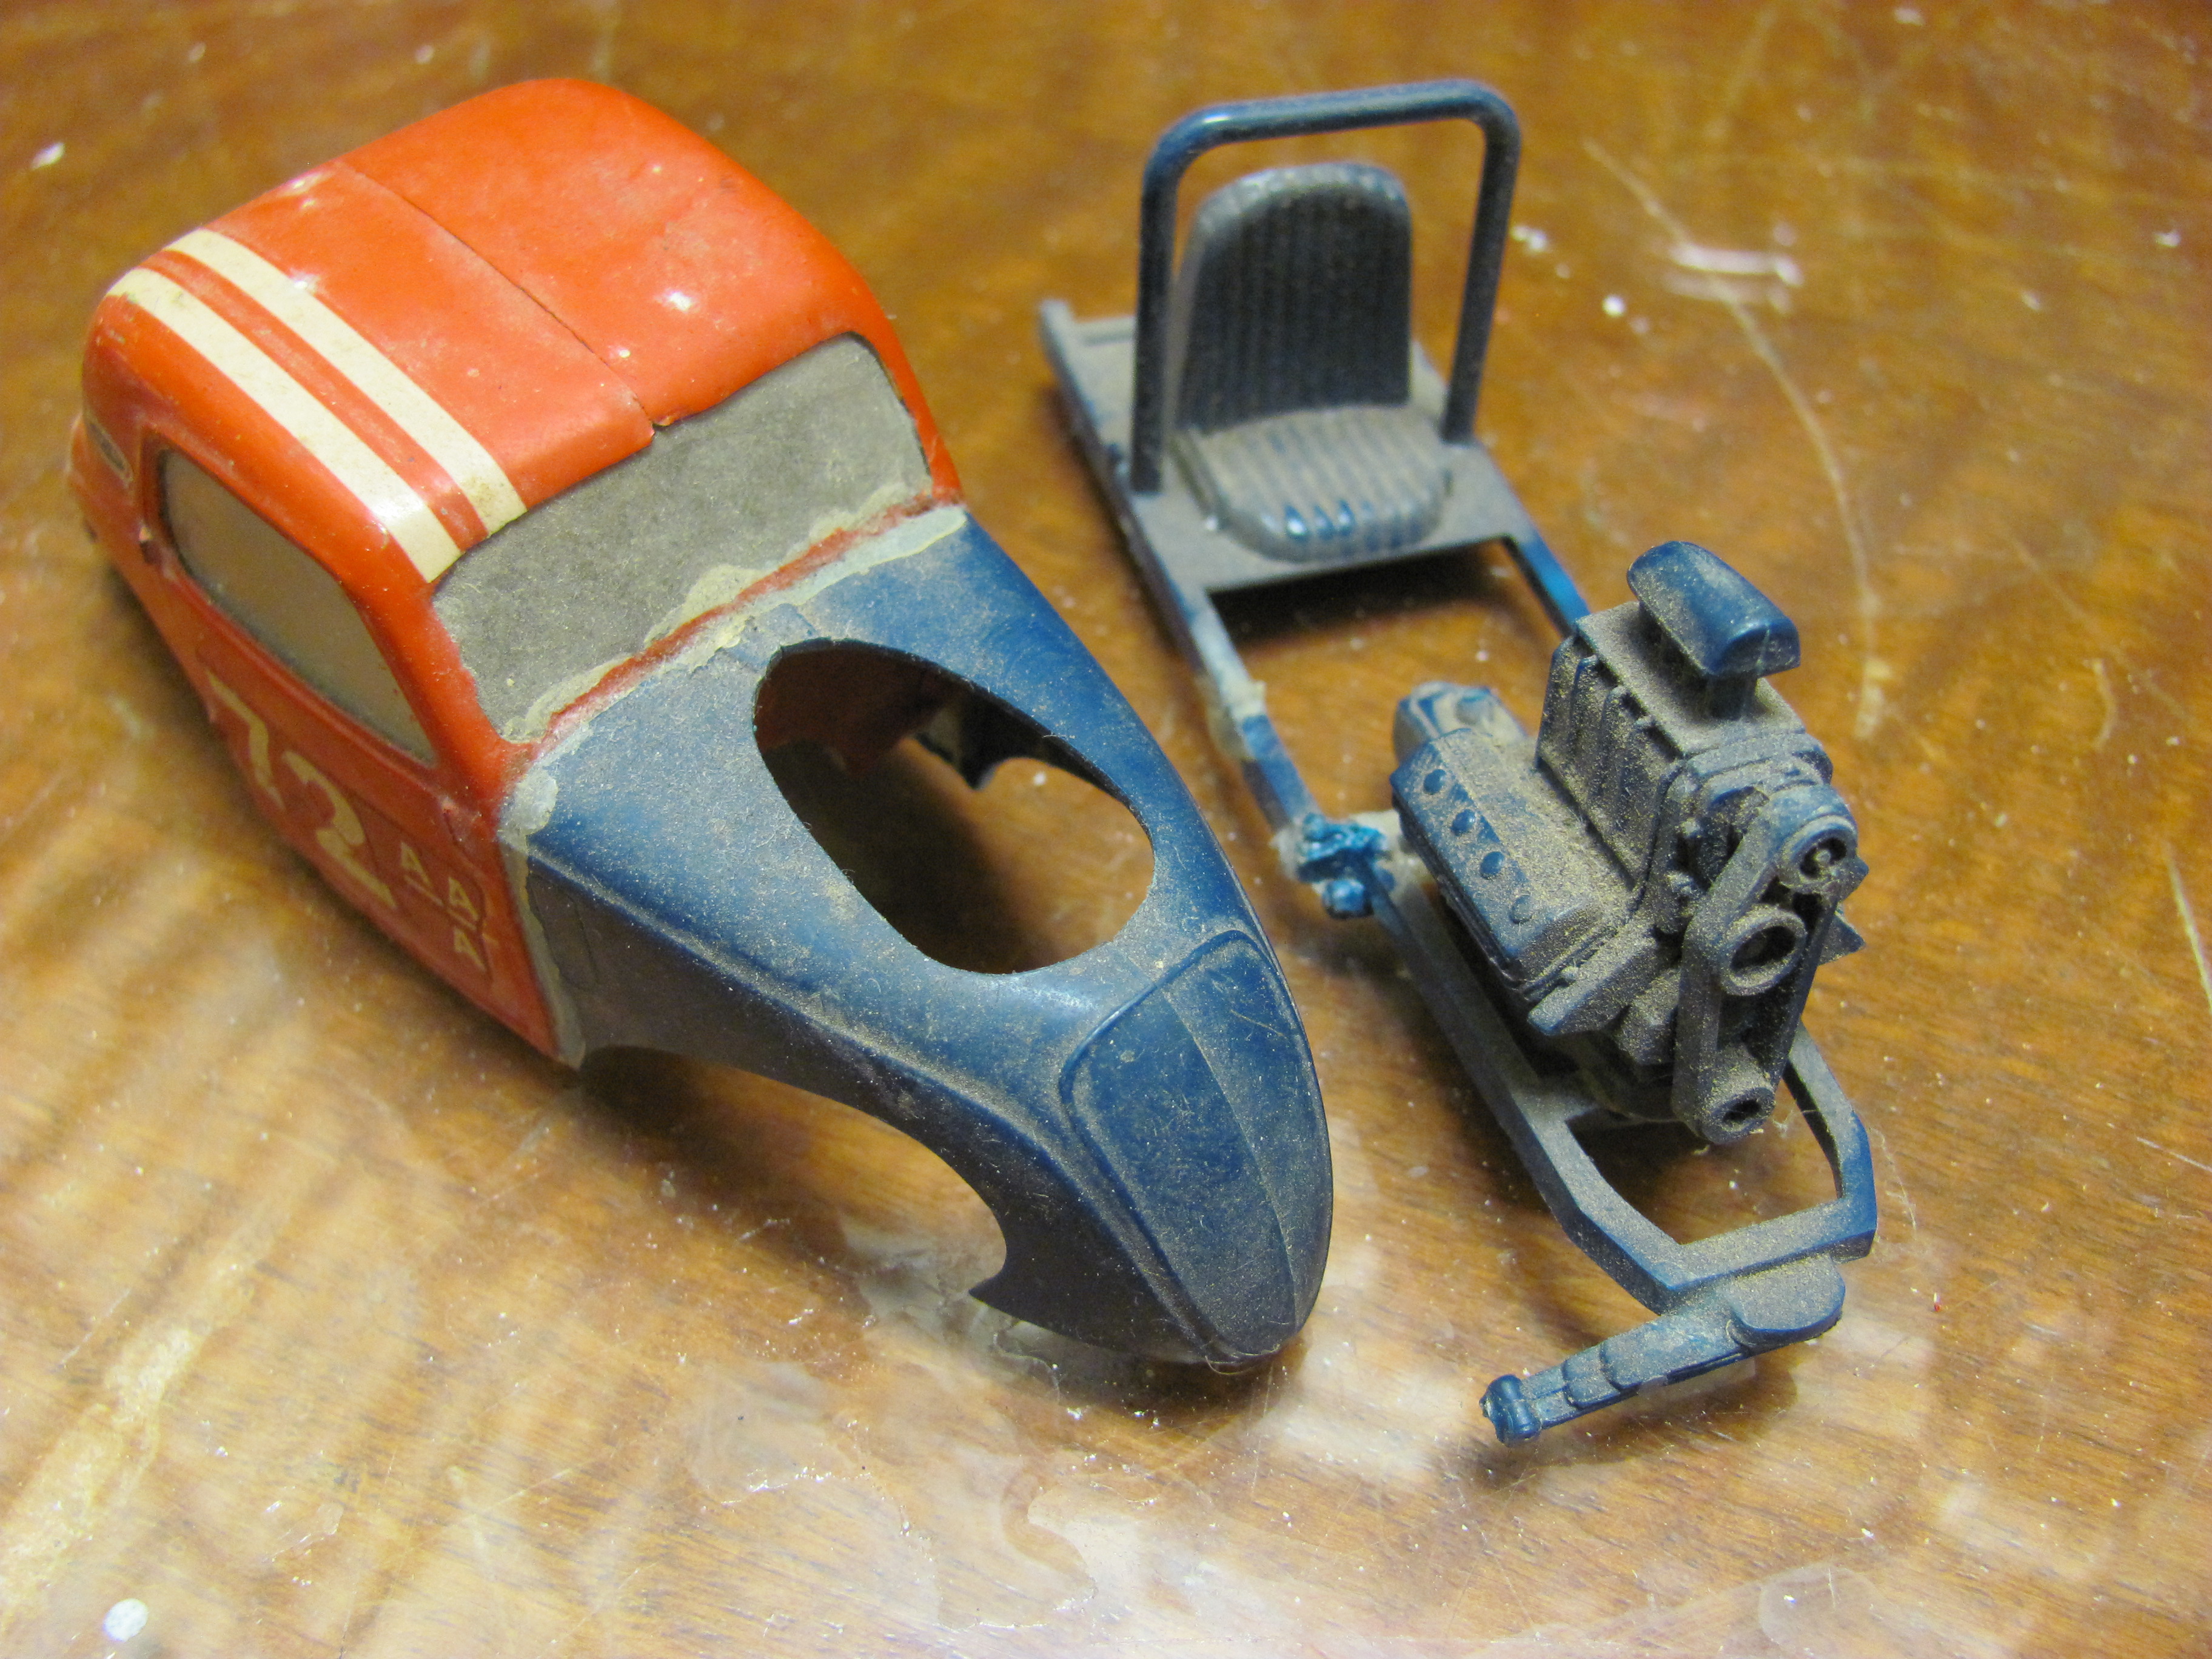
A few years ago during the running of our NNL here in Perth, Western Australia, a gentleman introduced himself to me, said he had spoken to me about an old model the year before, and would I like to have it? He produced the relic you see here, the Monogram Fiat Topolino Altered in 1/32 scale. I have an extensive collection of 1/32 scale rods but was still missing all three of the Monogram drag cars so I was ecstatic to finally have one to work with. Course, it was a little rough........
-
A magic combination of parts there Denis, it just looks natural. Will be watching for sure. Cheers Alan
-
Peter, mate, please don't raise the back of the trans and put blocks on the rear end. Instead, add a few shims on top of your front engine mounts. Your side view looks to me like that would raise the pan enough to keep the car low to the ground. I realise you might have to play with the transmission hump and firewall but it will be worth it. Stance should never be compromised by things like ground clearance! if it doesn't look good, who will want to ride in it? I really like where you are going with this. I've got a spare Viper motor at home - will have to have a look tonight! Cheers Alan
-
Model Cars Magazine Renewals
Alan Barton replied to Gregg's topic in General Automotive Talk (Trucks and Cars)
Pleased to say my copy arrived in Perth Western Australia yesterday. As the most remote capital city in the world it takes a bit longer than most. And what a great issue for a comeback - loved Harry's wagons (I'll never build one but loved reading about 'em) loved Tim's roadsters, loved the diecast 41 Chevy mods (couldn't put a finger on why mine looked odd - now I know), loved NNL East, loved the sketchpad.... a great read and worth the wait. Thanks Gregg and all involved. Cheers Alan -
Modelling Oddities/Mistakes
Alan Barton replied to NY Modeler's topic in General Automotive Talk (Trucks and Cars)
I cant get to my stash to take a photo right now but go and have another look at the box top for the recent Revell 29 Ford Hiboy. The blue car has the windshield on back to front. The photo on the side has it the right way around. I'm guessing the photographer knocked it off, stuck it back on and either didn't notice or didn't know any better! Cheers Alan -
Hey Bill, I have also been looking for these wheels for years. I finished my 22Jr at least 15 years ago, probably more, but it has 12 spoke Americans on the front because otherwise it would never have been finished. One thing I did notice when I photographed the car at the Petersen in 2010 was that the back of the wheel looks awfully like the back of the custom wheels in the old Revell 56 Chevy kit, with that kinda starfish look on an otherwise smooth dished back. Now if only we could find something that close for the front..... By the way, if you get started on the 22jr , give me a yell as I have a perfect fitting vacform tarp for that car., plus a heap of reference info. Thanks AFX for the great post!!! Cheers Alan
-
Late '50s Slingshot Dragster: a little more, Feb. 27
Alan Barton replied to Ace-Garageguy's topic in WIP: Drag Racing Models
Hey Bill, I recognise that brake master cylinder and handle setup - it is from the old Revell Parts Pack chromed hot rod chassis - the one that looks like an unboxed Model A frame but with a very rounded off "Z" job at the back. Like what you are doing here - I always thought that blue Monogram body was 1/32 but it seems to fit the 1/25th scale frame just fine. Cheers Alan -
Newbie with 1:32 scale question?
Alan Barton replied to Deuce Coupe's topic in Welcome! Introduce Yourself
James, I love my 1/32 scale collection and the boys here have provided you with nearly every source possible for 1/32 scale engines. I would like to add two more. Firstly, check out the chromed engines in diecast toy cars. Matchbox Superfast from the seventies turn up in a tatty state in swap meets, garage sales and antique shops. A lot of the engines in the drag or hot rod inspired toys are close to 1/32. Some Muscle Machines can have blowers and carbs that just might work for you And I know some people will laugh or snicker here, but the engine in the new tool AMT Ala Kart from a few years ago has a great 1/32 scale hemi in it. Most 1/25th scale modellers hate this undersized baby hemi but it looks good in a 1/32 scale car! And blunc, that 34 coupe of yours (the old Pyro/Lindberg, I'm guessing), is easily the most ambitious and beautifully finished 1/32 scale rod I have ever seen. What a fabulous project! James, I think you will find blunc has carefully cut and hinged the doors himself. Brave beyond brave! Cheers Alan. -
Tony , I did a blow by blow explanation of how to fix all the problems on these chassis (the Petty Dart is the worst by far) on another modelling forum. PM me and I will tell you where to find it. Don't give up on this model - it is horribly awkward but looks fabulous when finished - it is worth the effort! Cheers Alan