mrmike
-
Posts
5,324 -
Joined
-
Last visited
Content Type
Profiles
Forums
Events
Gallery
Everything posted by mrmike
-
Thanks Matt!
-
To me, the Mk. 10 doesn't have any appeal at all. Over sized and ungainly looking, even if it is a Jag. Having followed some sport cars from overseas, I have known what an E-Type is (an XKE). I'm sure that there are those who have no idea about what an E-Type, D-Type, Peugeot, Jensen, or Morgan is. They would probably talk about Ferrari, Lamborghini, or Aston Martin instead, if they know what those are. I vaguely remember hearing about "The Great Train Robbery" some years ago. I wasn't aware that the movie "Robbery" was loosely based on it.
-

Where can I get these wheels
mrmike replied to junkyardjeff's topic in General Automotive Talk (Trucks and Cars)
Those look like Radirs wheels and they should be in the Revell '64 Ford Fairlane Street Machine kit. -
I have heard the same about the metal parts for the Jaguar as they can be difficult to install. Whitewalls? IMHO, the white stripe tires look better than a wide whitewall tire, but I am going for a blackwall tire on my build. I have seen 'Brannigan' several times over the years since it's release in 1975. I never heard of 'Robbery' and it seems to be an interesting movie. I may have to rent it somewhere and watch it.
-
I agree, Walter! The Mk. II styling has a cultured look that only a Jaguar can carry. The same goes for the XKE. The sexy styling is unmatched by anyone!
-
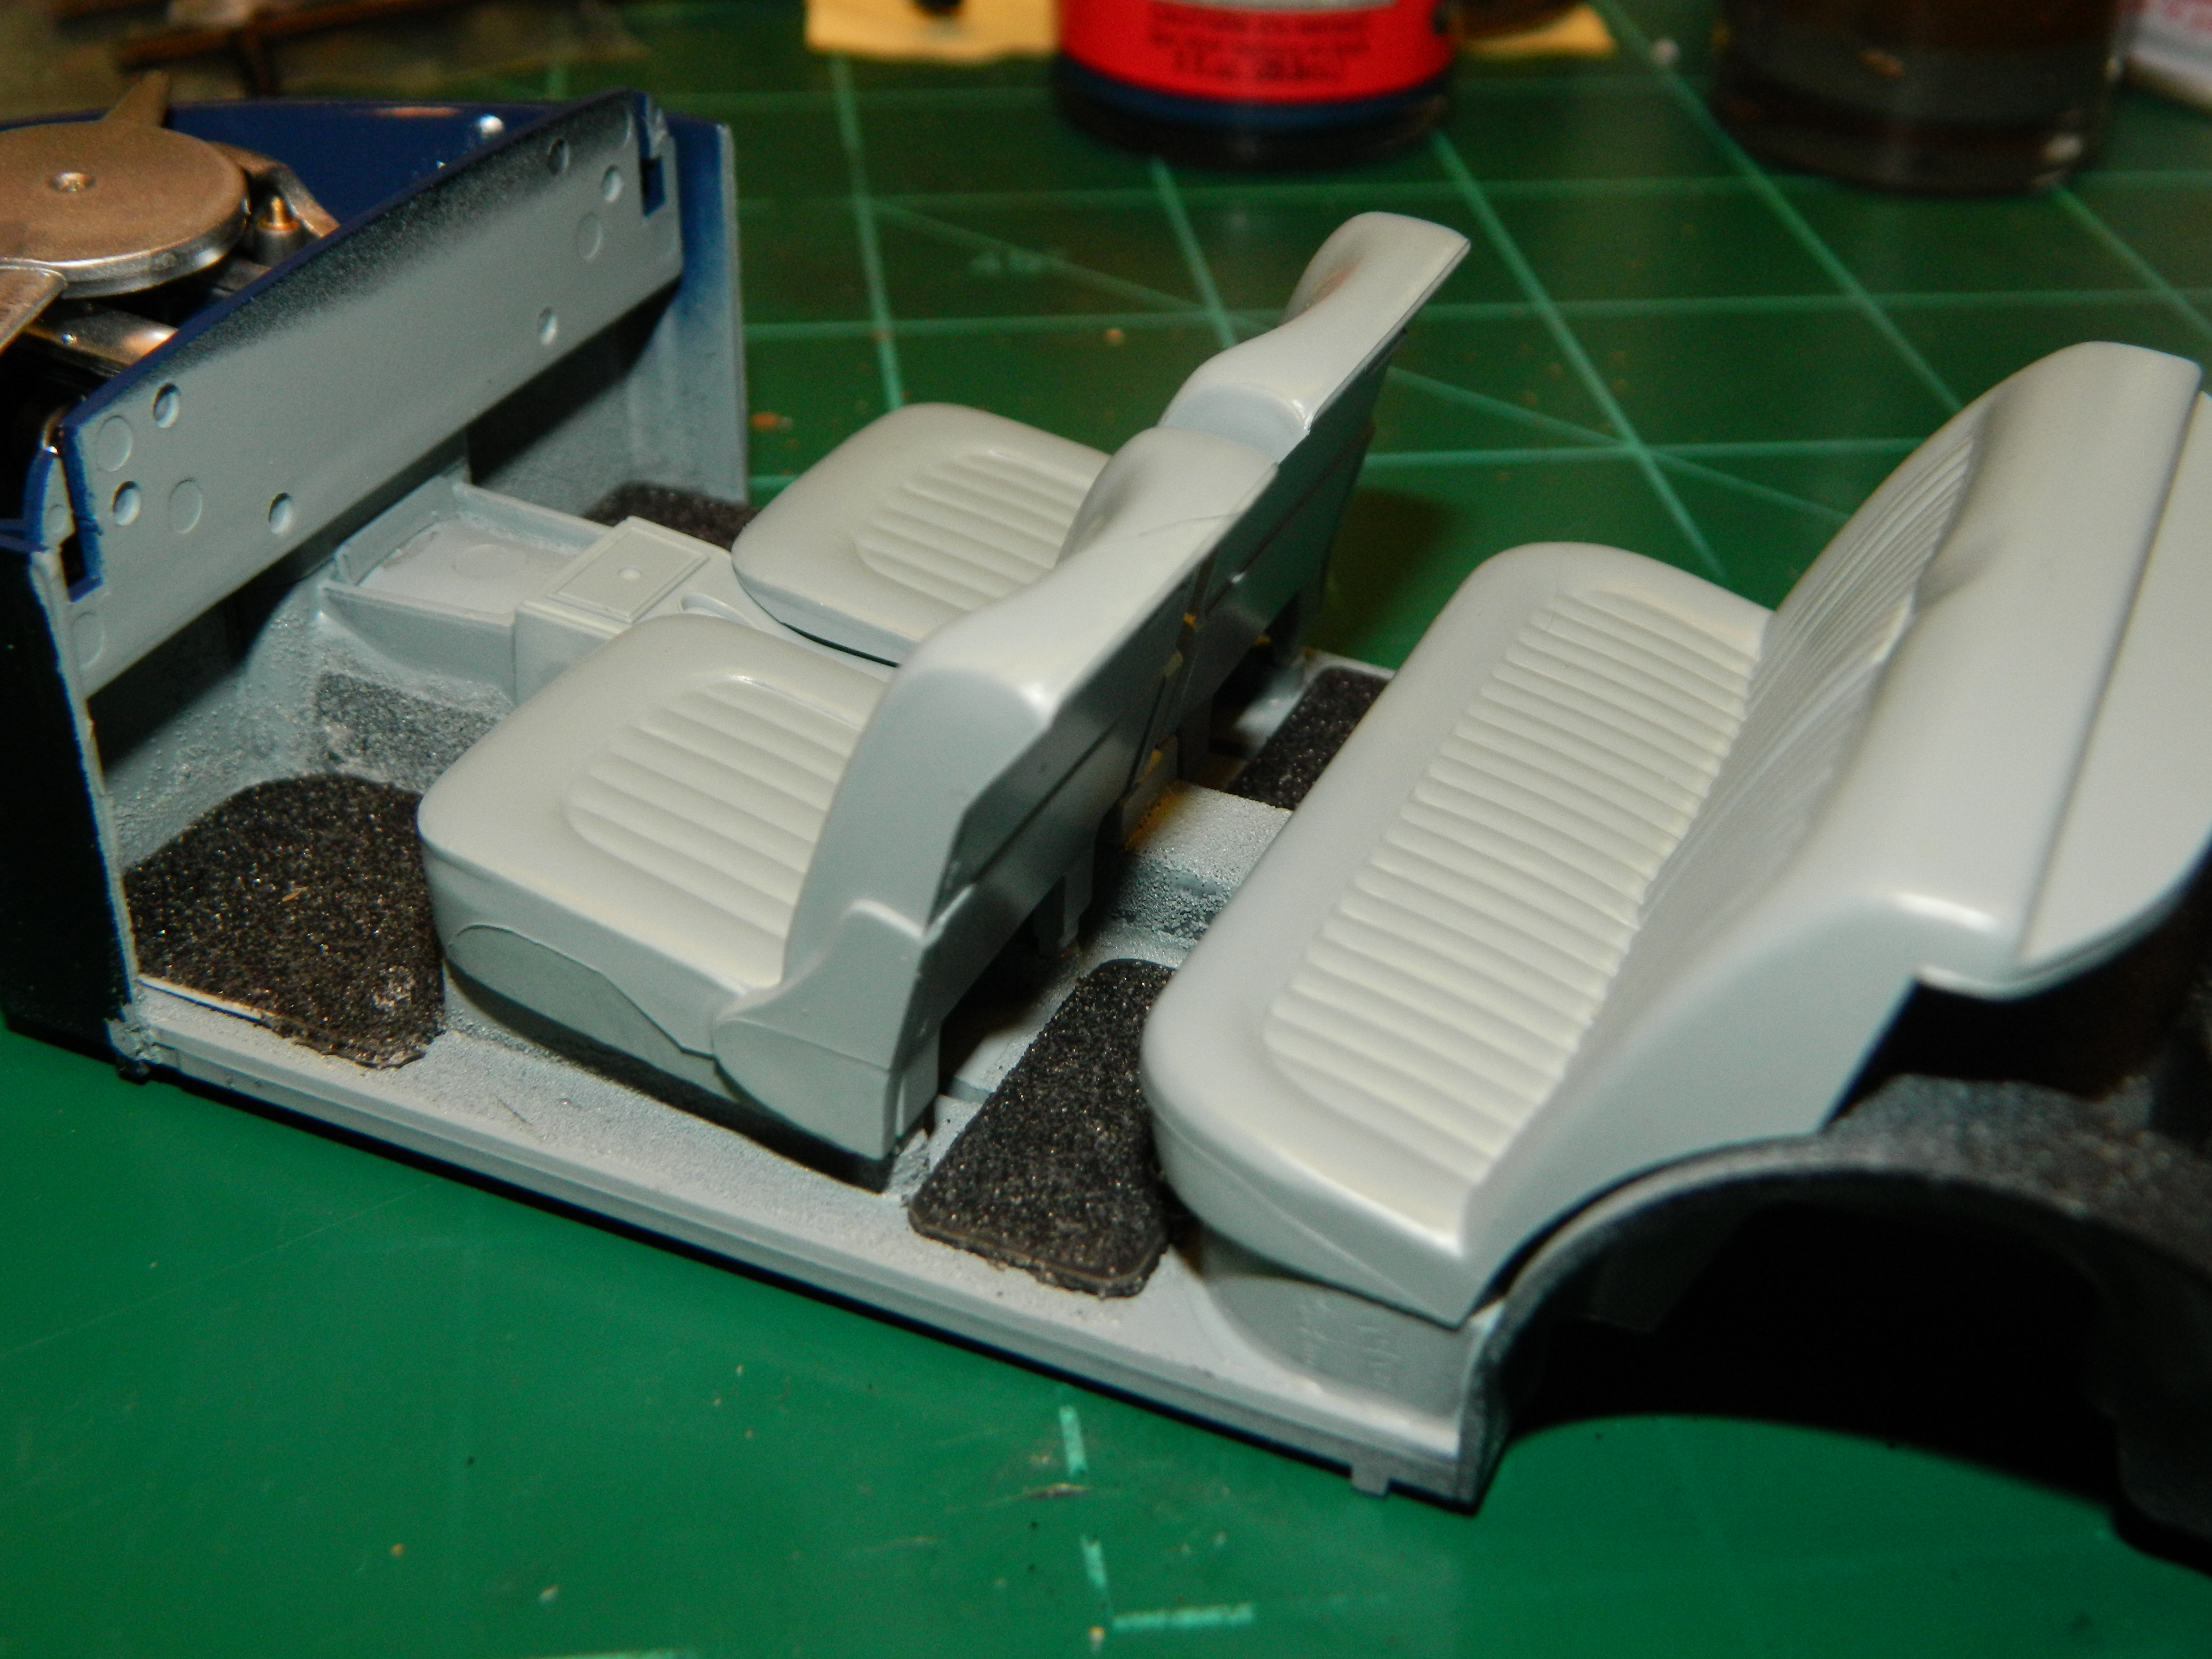
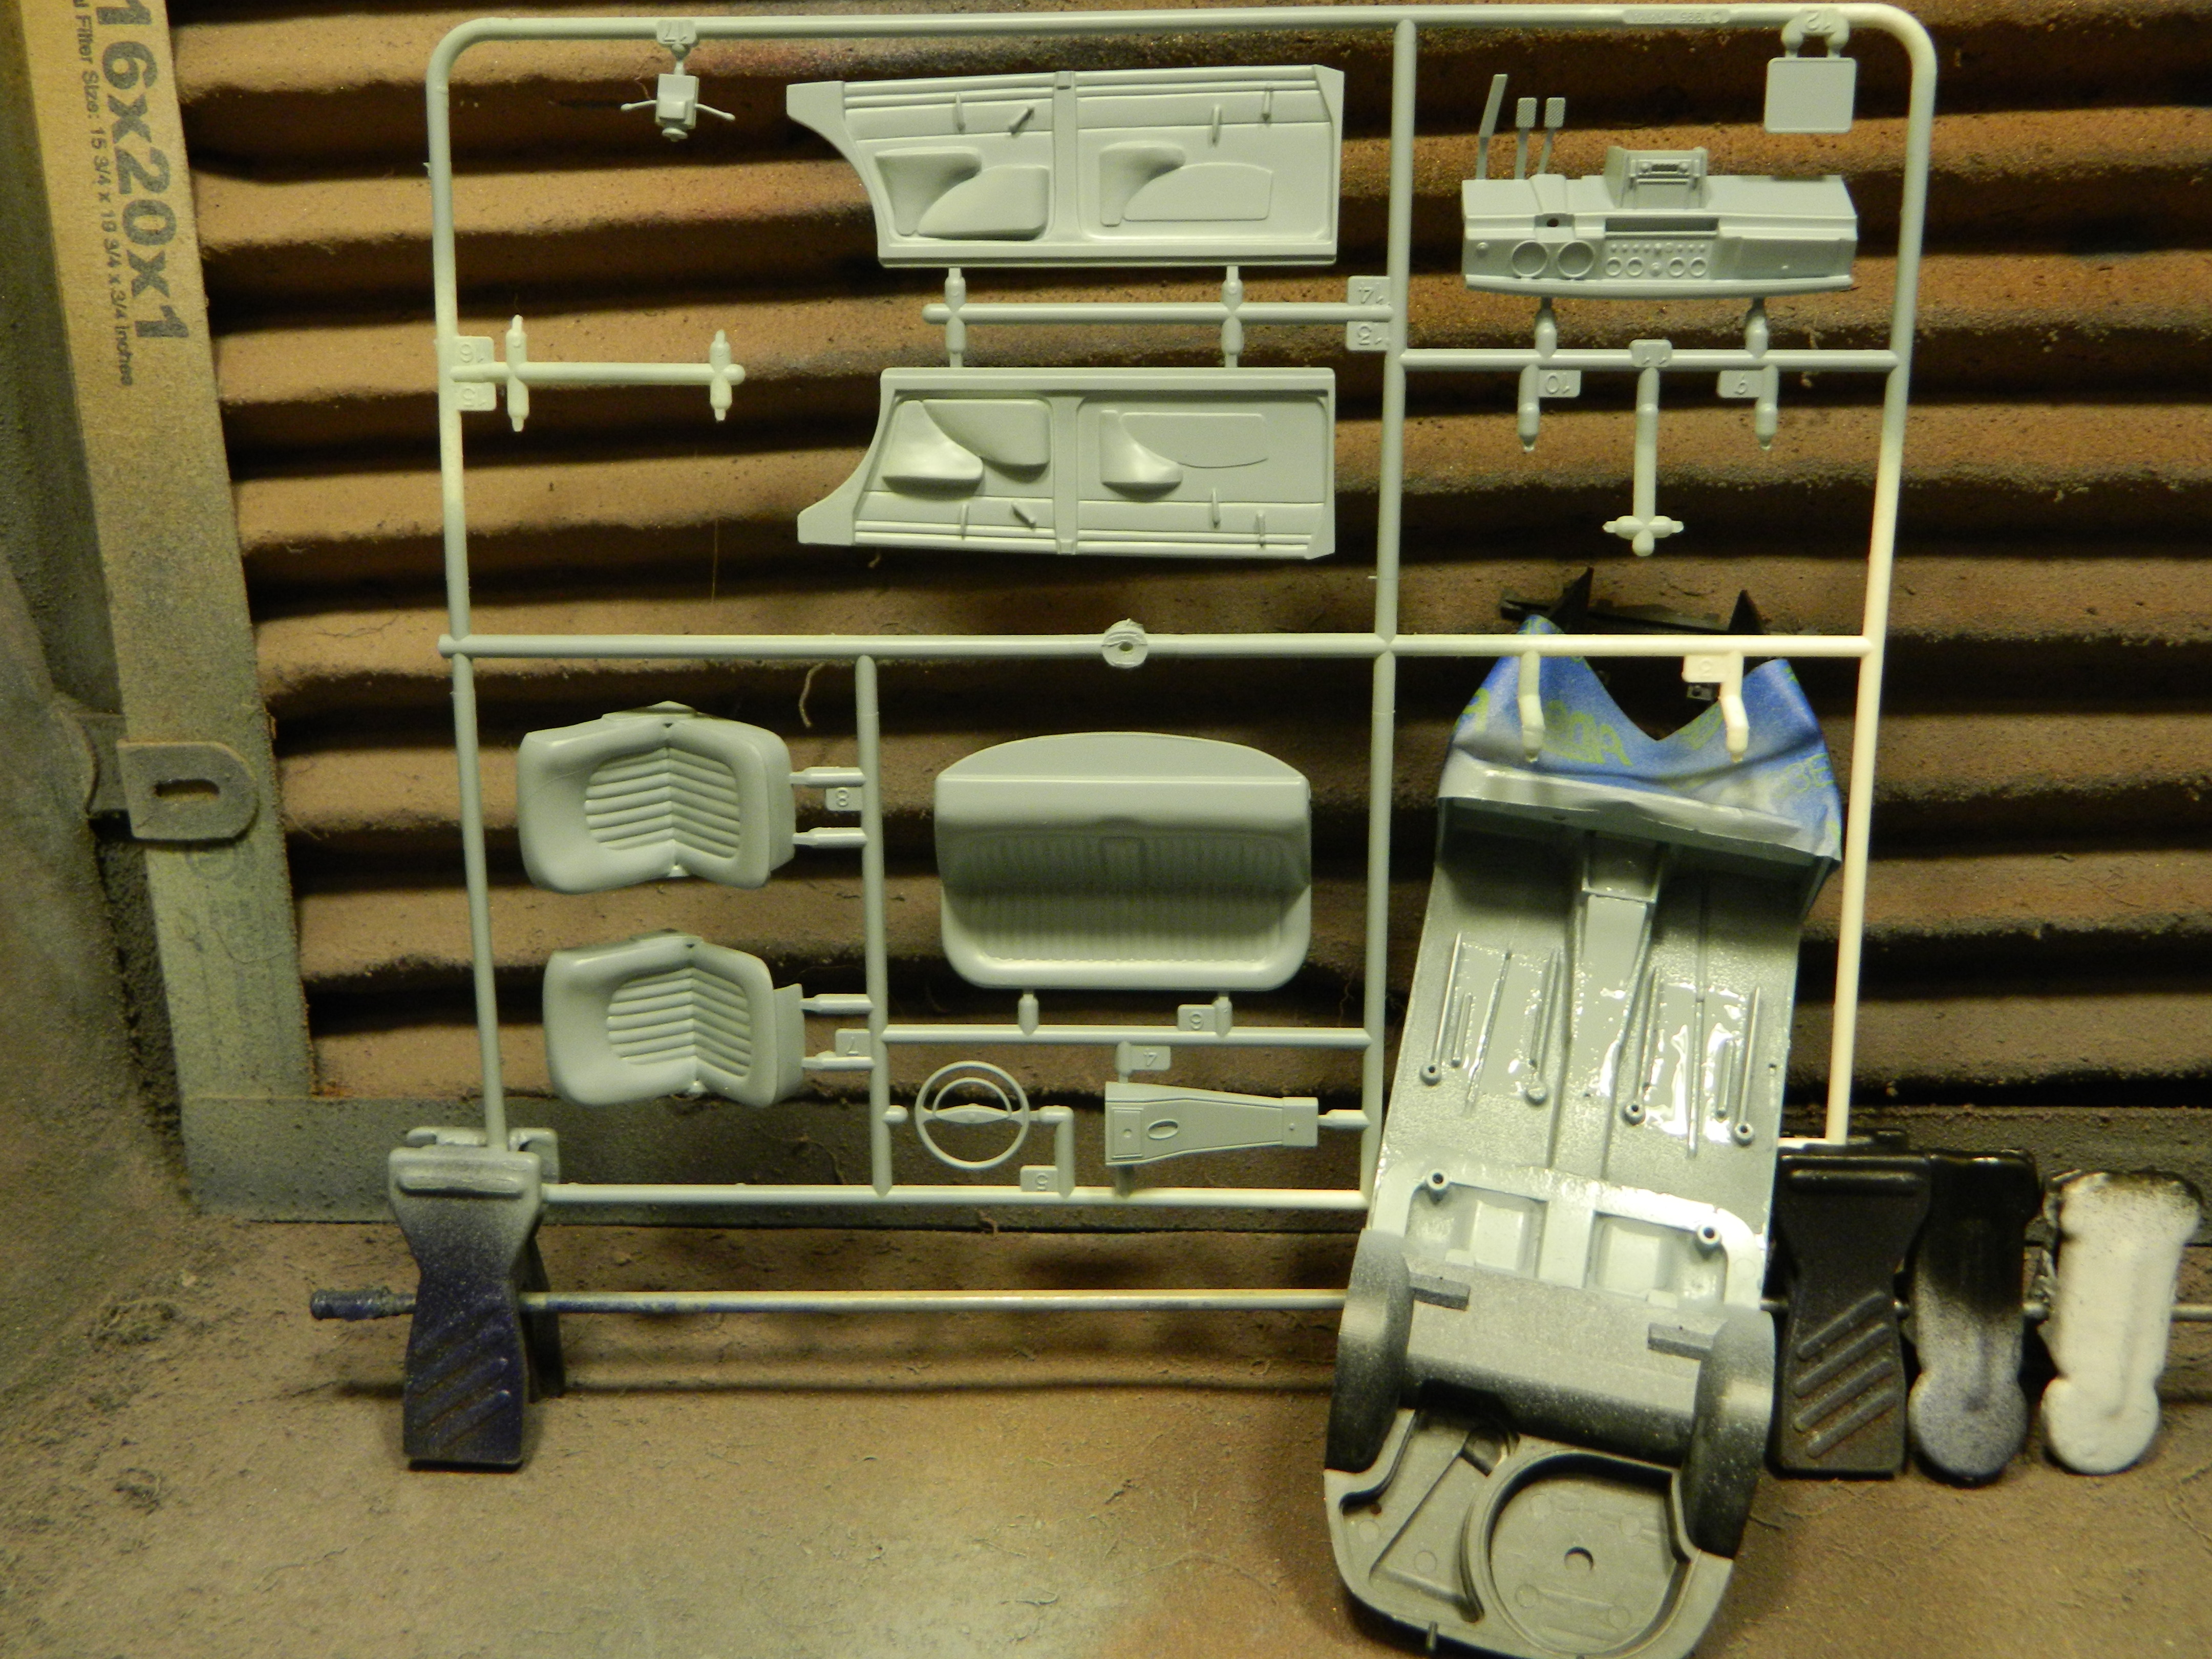
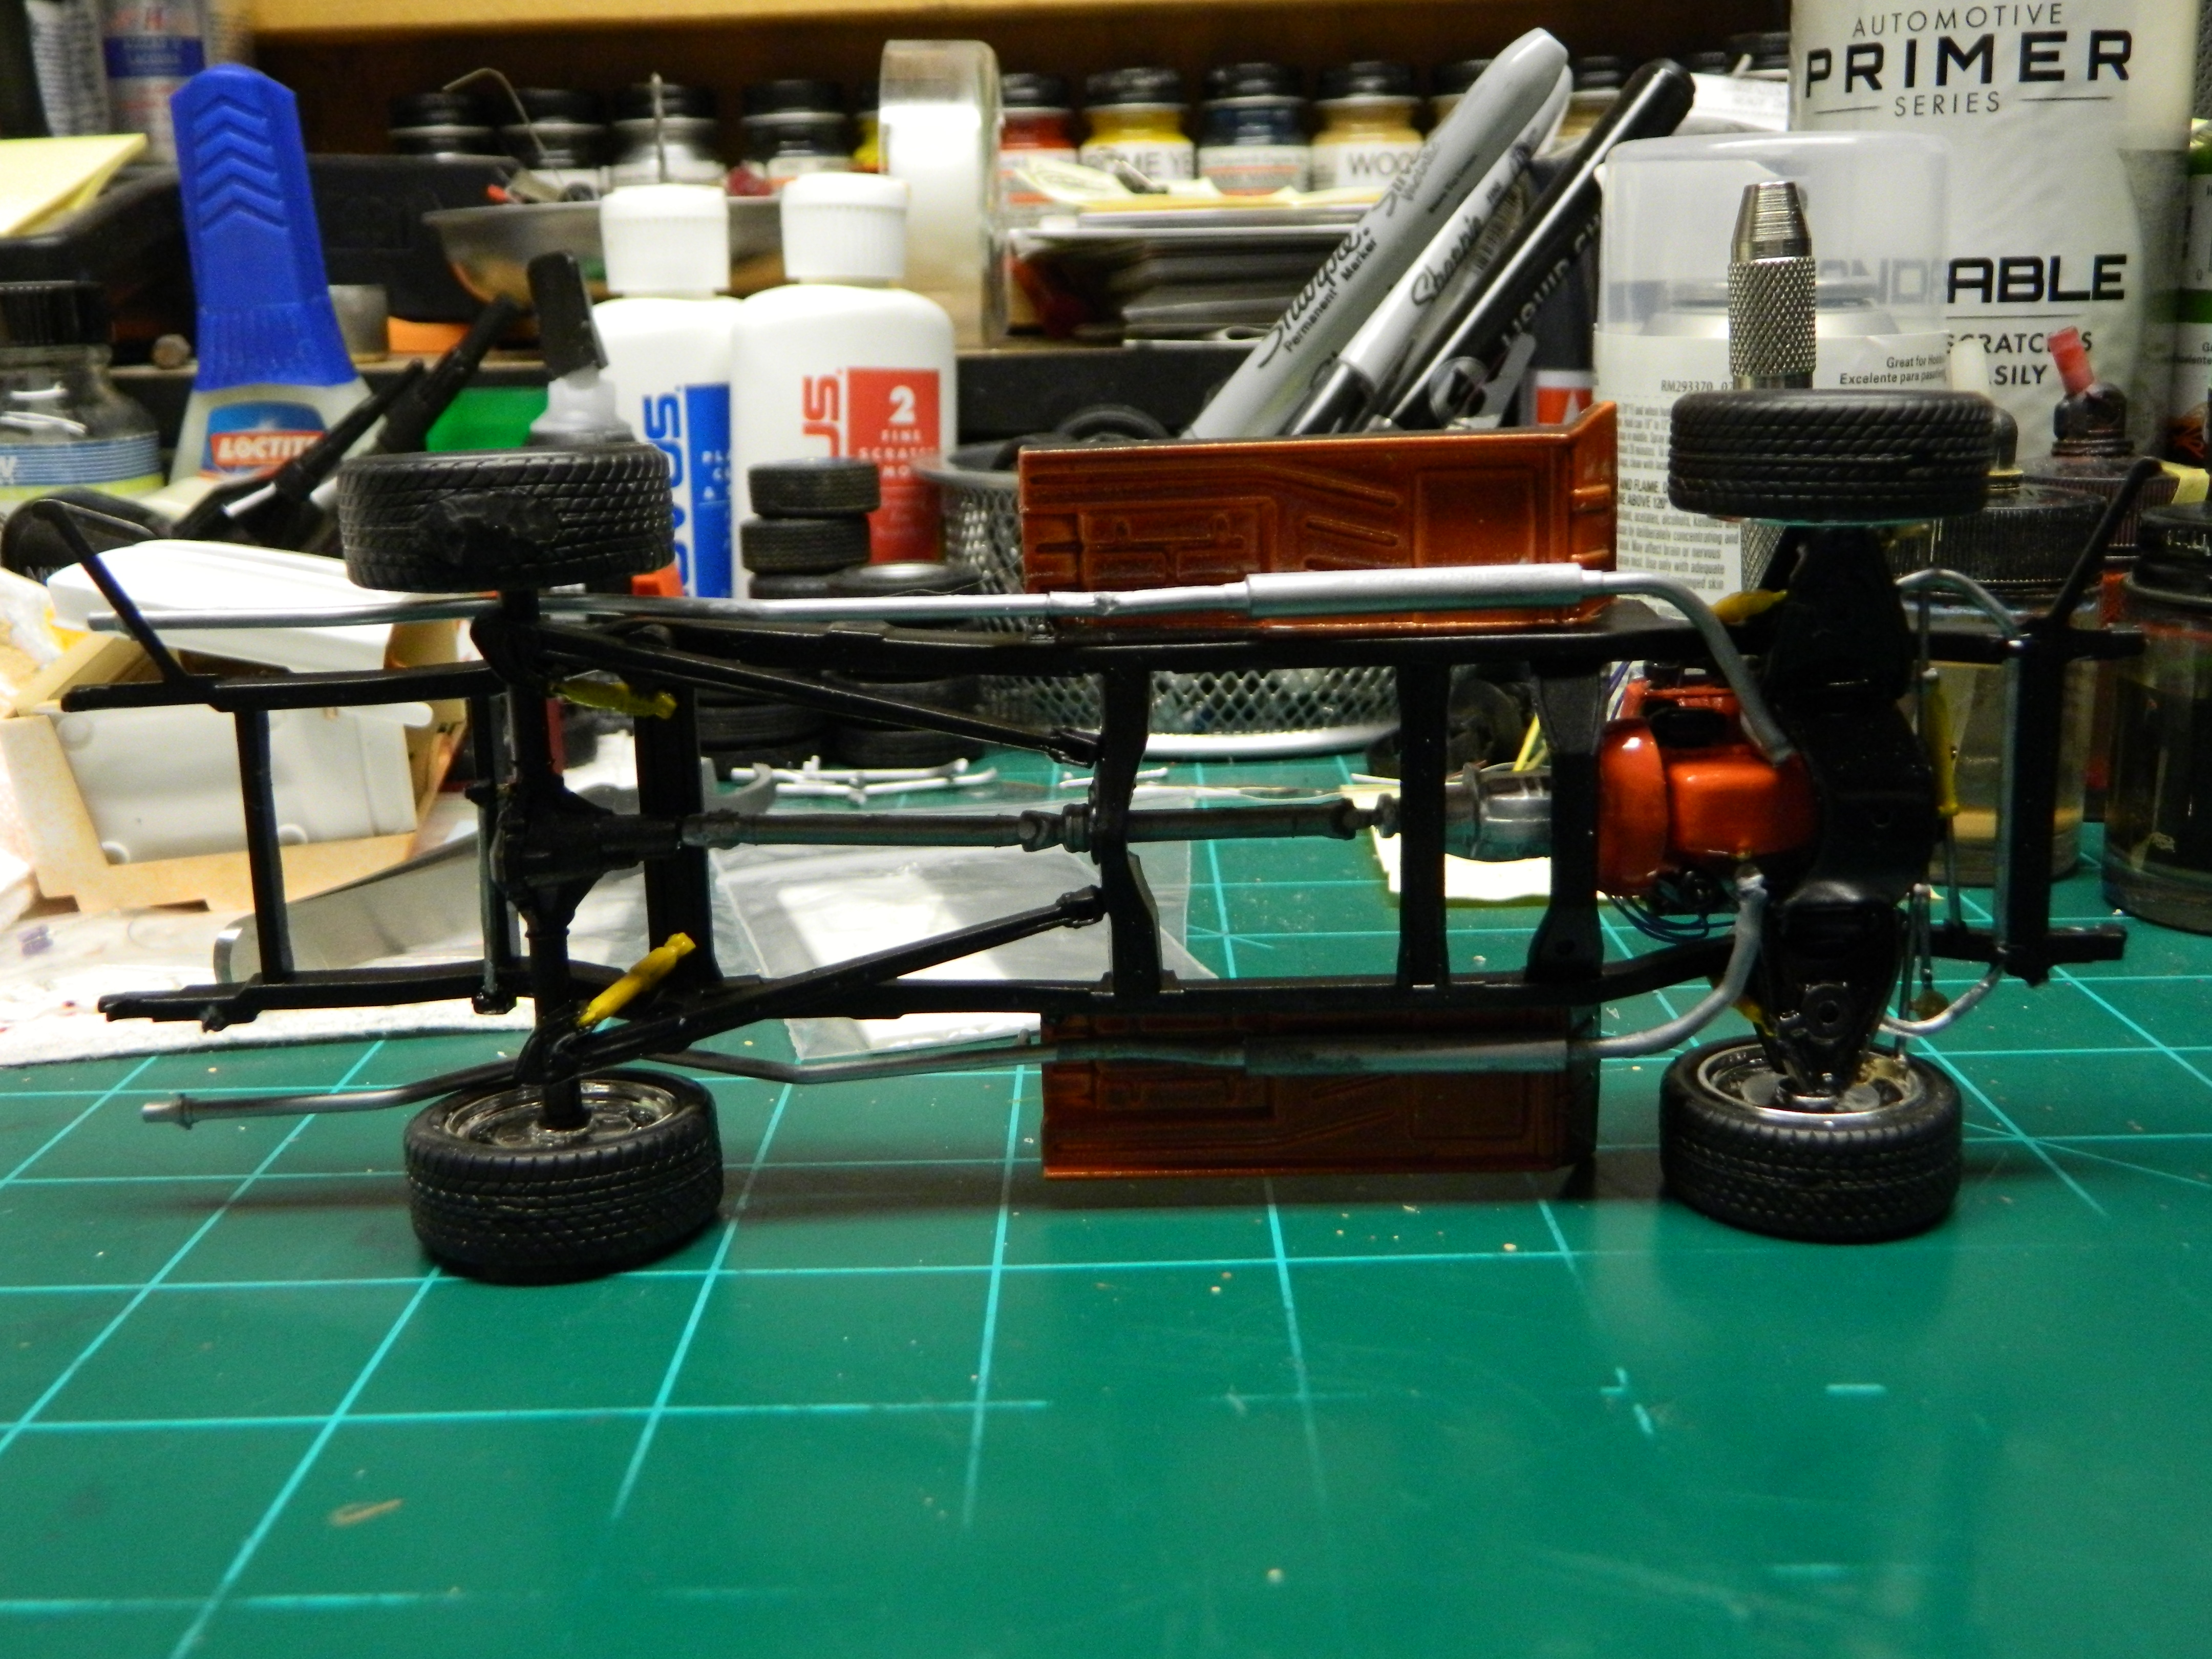
The Story McNally enters his suite at the Hotel and locks the door behind him. He pulls out the notebook from his jacket pocket, sits down at a table and starts reading through it. The notebook chronicles Crumbelt's interactions with a drug dealer who wants to ship drugs from London to Boston by keeping Crumbelt's failing business in Boston alive. The notebook lists meetings with various people including Metro Police who deemed the actions of the unknown drug dealer not severe enough to warrent any action at this time. The recent terrorist bombing in London may have pulled resources from this case to investigate the bombing instead. McNally's cellphone rings and it is DC Campbell demanding to know where McNally is. He tells her that he is at his Hotel suite and has been there since he returned in mid afternoon. She says she is coming over with DCI Ashenbell to talk with him and that he should remain at his suite. The call ends with McNally taking an empty plastic bag and wrapping the notebook and placing it outside on the ledge of the Hotel under a weight and away from the window. Twenty minutes go by and there's a knock on the door. McNally opens the door and invites Campbell and Ashenbell inside to talk. DCI Ashenbell demands to know of McNally's actions since midafternoon. McNally lies to the DCI about his whereabouts during the afternoon and early evening. He tells DCI Ashenbell that if he is interferring with Scotland Yard's case, to send him home with the caveat of him contacting the US State Department and filing a complaint against them for a lack of cooperation. Ashenbell stares at McNally, snorts, and leaves the suite with DC Campbell right behind him. McNally waits five minutes and then retrieves the notebook from the ledge before it starts to rain. From now on, he'll keep it locked up in the room safe. The Build The engine has been installed in the chassis. I have started work on the interior by installing the seats, center console, and the floor mats. McNally will return...

-
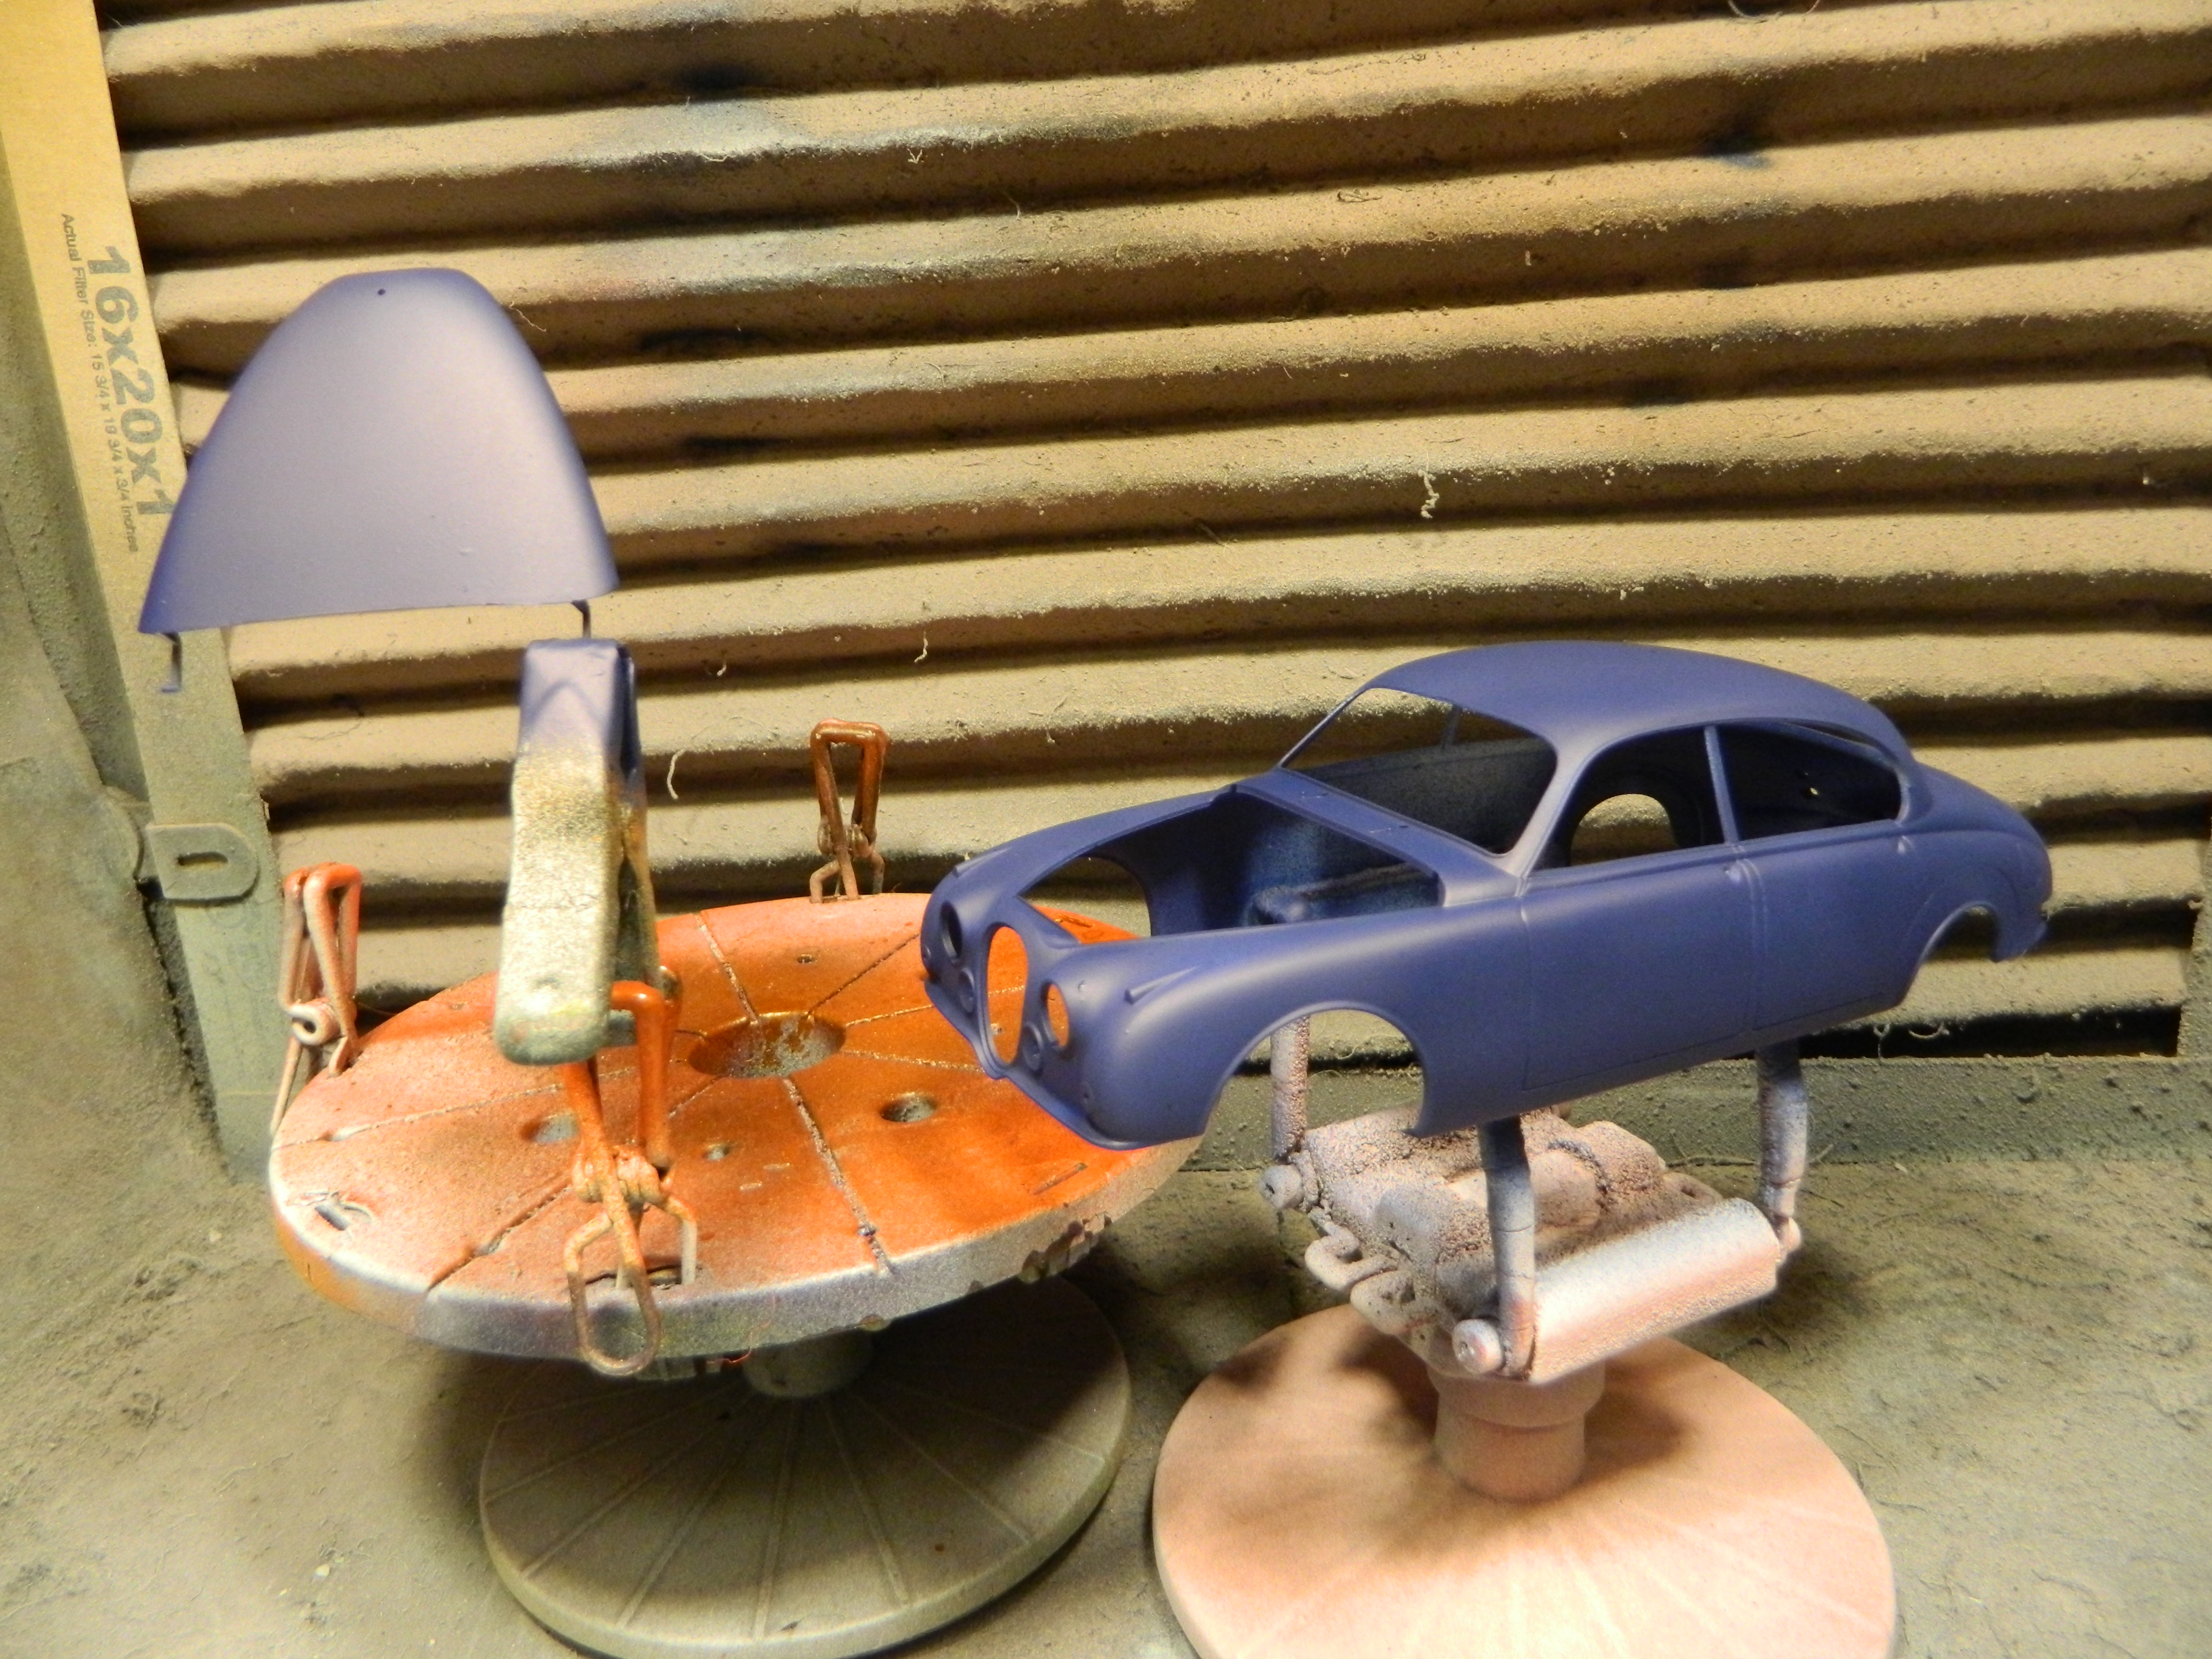
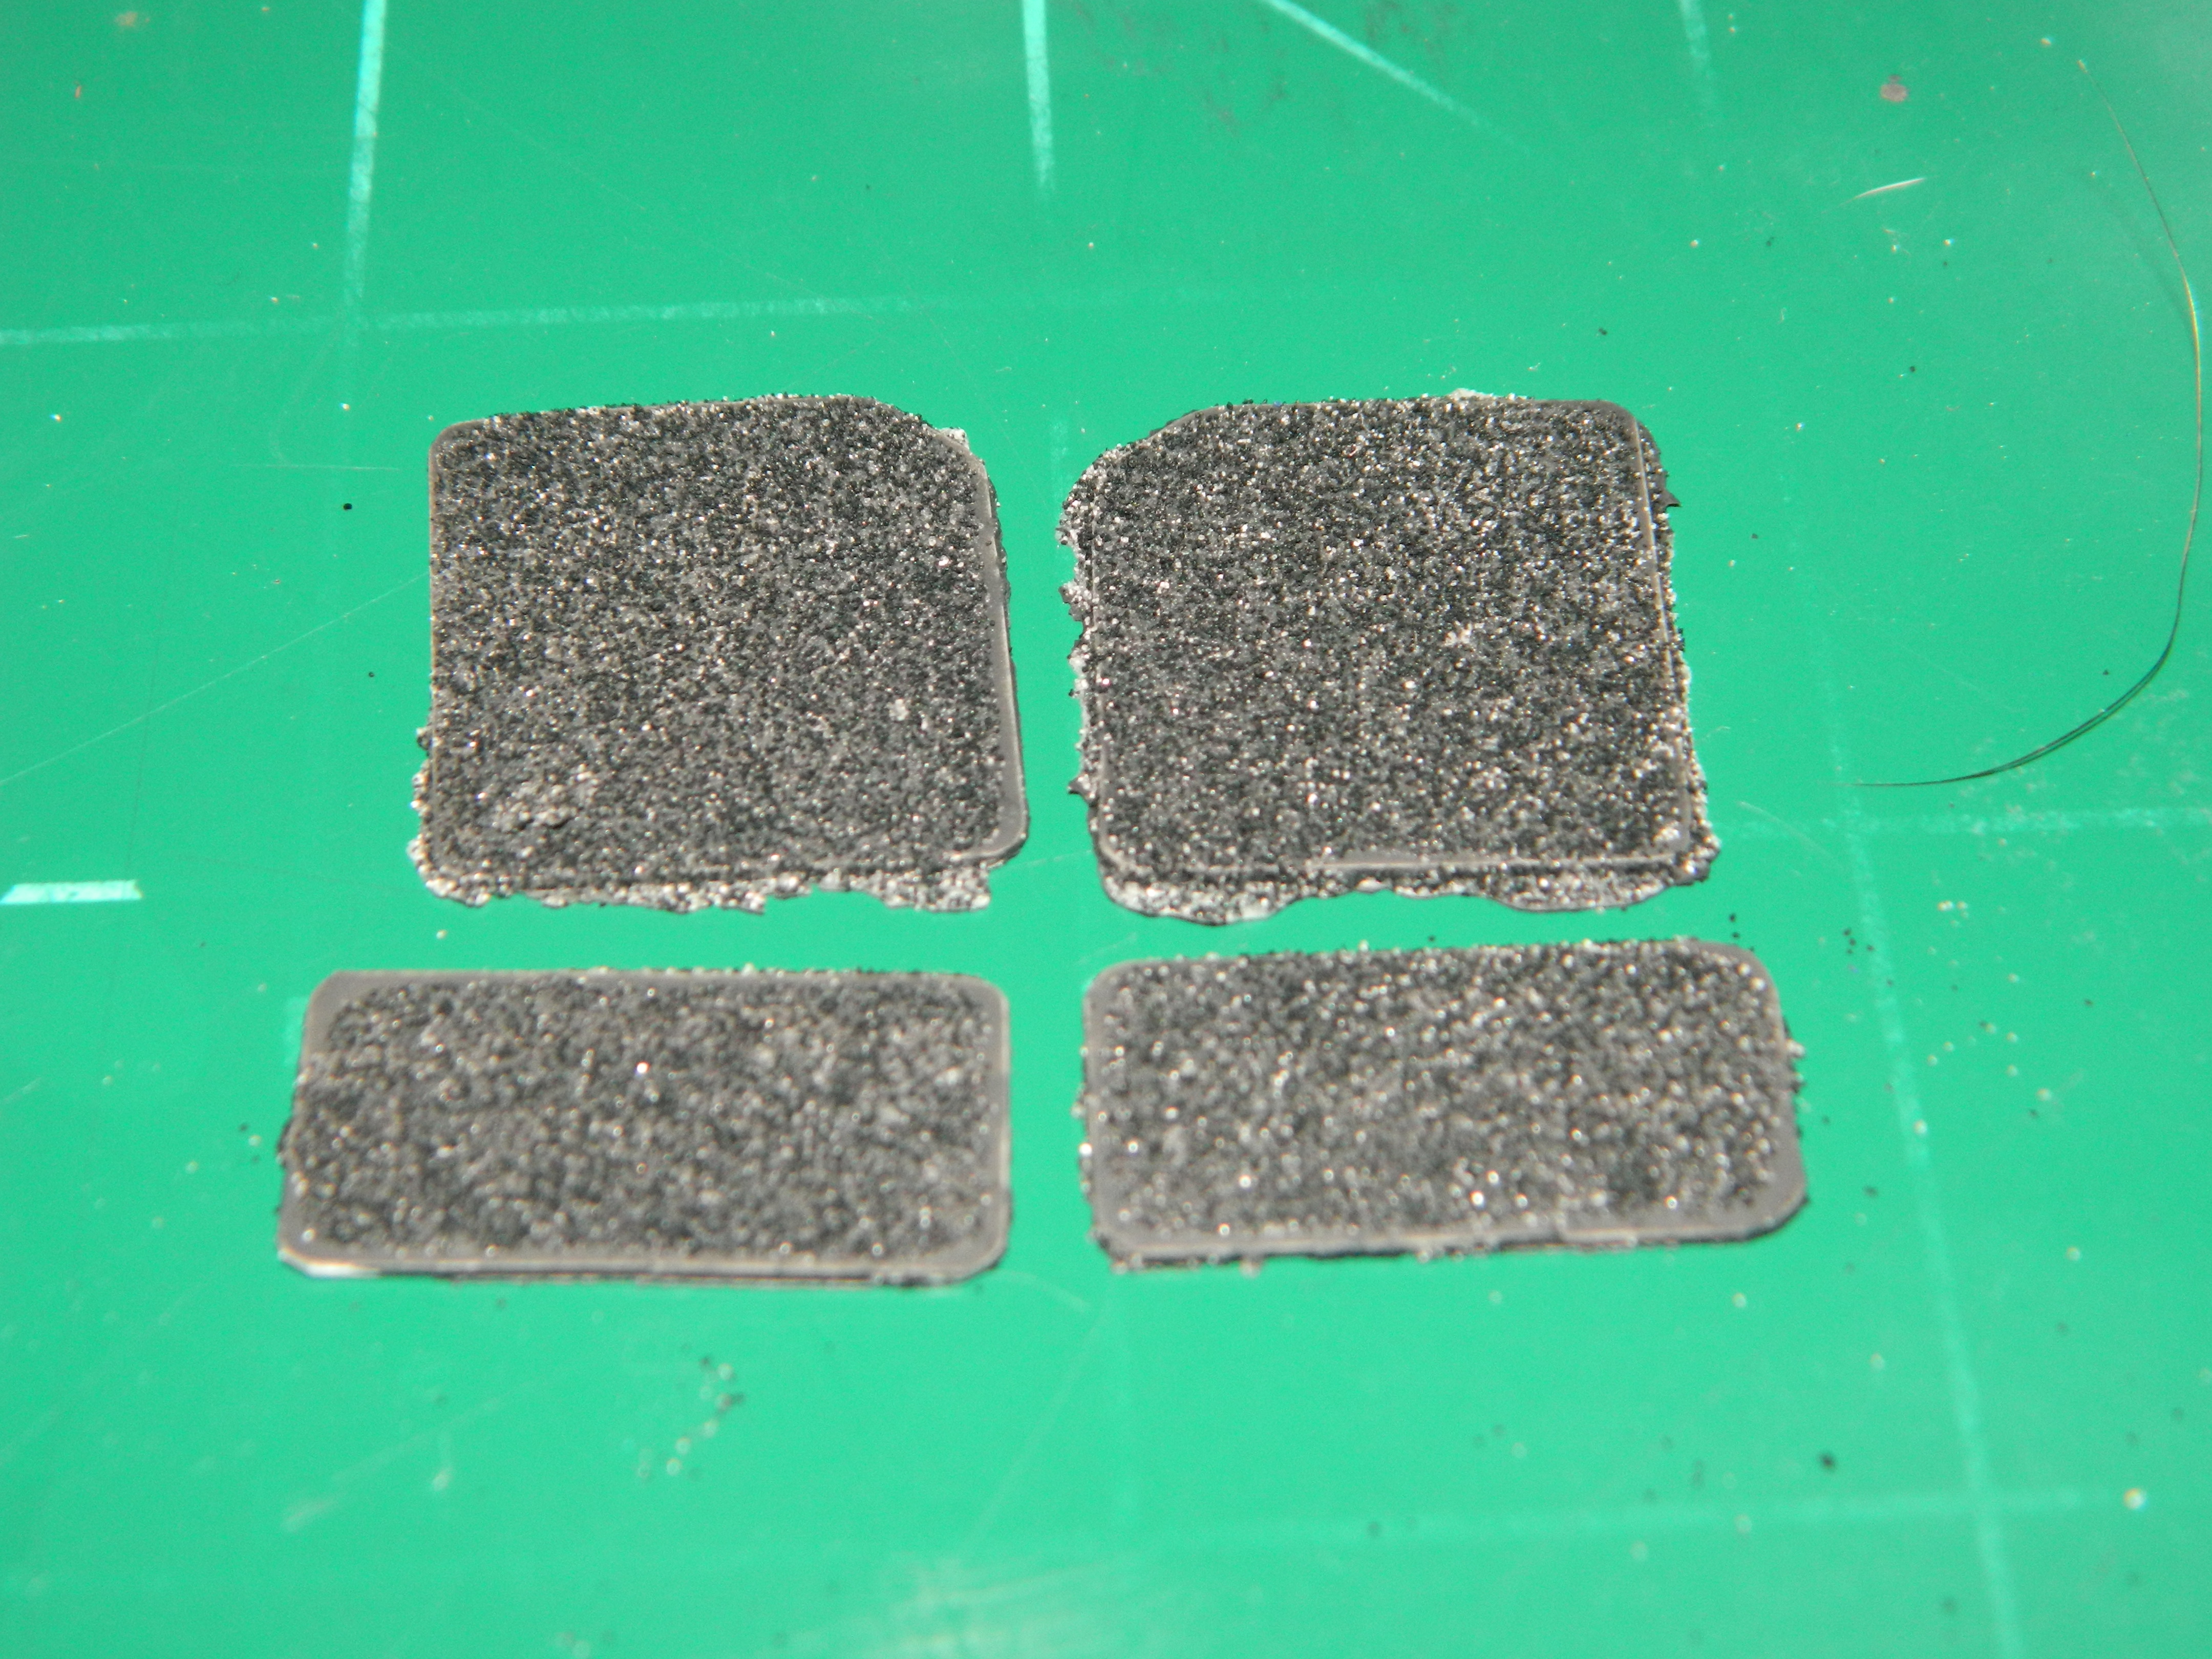
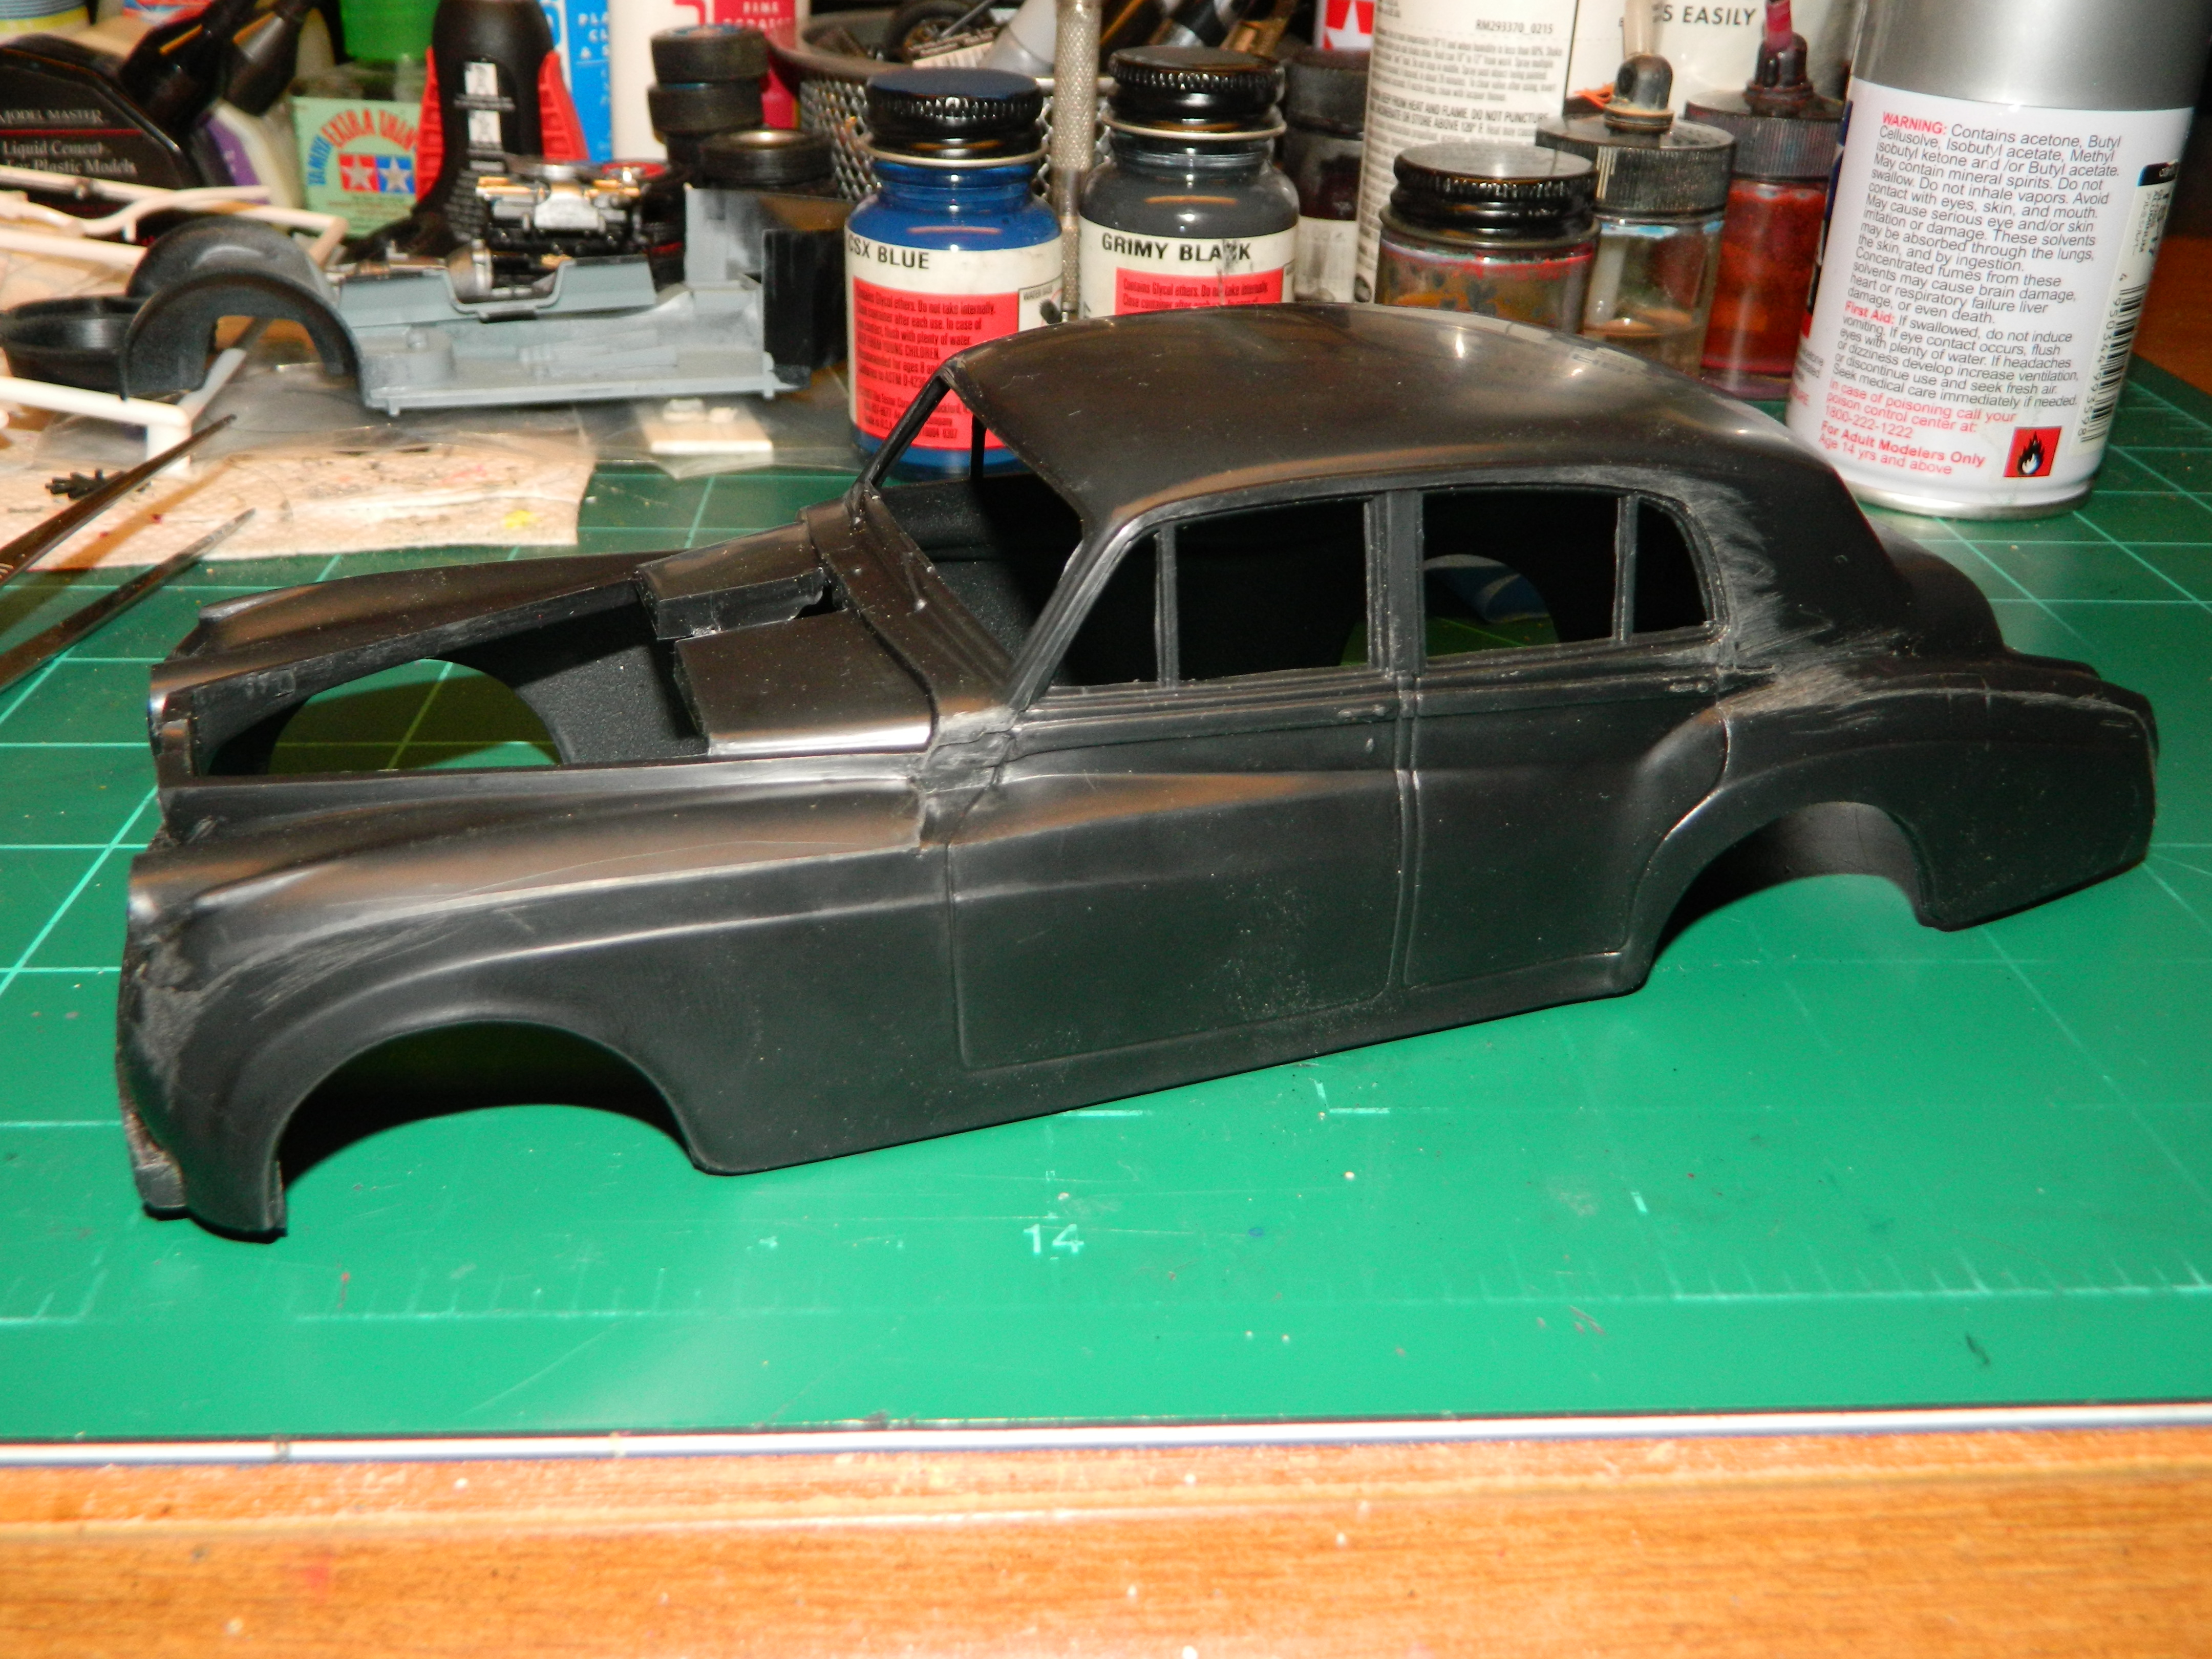
The Story McNally decides to check out Crumbelt Enterprises on his own, so he drives past the business and notices the Constable standing in front of the storefront, guarding the business. McNally drives about a 1/4 mile up the street and parks his rental and walks back towards an alley behind the business. He checks for CCTV cameras and sees none. At the back door, he picks the locks and opens the door to a back room filled with inventory and a nearby kitchenette with a coffee maker and a hotplate. He turns on his "headlight" and looks for an office and finds one. The search for clues begins as he searches the desk and the middle drawer does not pull out all the way. A sharp tug on the drawer pulls it out and he finds a slightly crumpled notebook in the back of the drawer with names and addresses, and notations detailing an attempt to smuggle cocaine into the US, specifically the Boston area where Crumbelt has a failing business there. McNally puts the small notebook into his coat pocket when he hears the front door being unlocked and the Constable walking in with his flashlight on. McNally shuts off his "headlight" and hides under the desk while the Constable searches the business and finds what he was looking for...a bathroom. When the Constable is finished, he walks past the office without shining his flashlight inside, goes out the front door and locks it without turning on the alarm. Apparently, he doesn't know how to set it. McNally returns to searching the office and not finding anything else. He leaves the business through the back door, locking it behind him and walking back to the rental car and back to his Hotel to look through the notebook that he found. The Build I fired up my paintbooth and airbrush for a littlepainting session this afternoon. I painted the hood and body with Polly Scale CSX Blue. When it has gassed out, I'll coat it with Tamiya TS-13 Gloss Clear. Before turning in last night, I cut out a set of floor mats. I painted them with Polly Scale Grimy Black and when the paint dried, I coated them with watered down white glue and sprinkled a mixture of white and black embossing powder. McNally will return...
-
Thank you Marty!
-
I have seen pictures of a Jag with steel wheels and the car does not look as elegant like it does with wire wheels. Maybe that's just me. It's a good thing I only paid $5 for the Rolls Royce kit as it is a badly molded kit. Someday, I will have to study the body and decide just how to go about fixing the front fenders. In the mean time, I have the Jaguar to work on and then the Morgan 4/4.
-
dose toys r us have model kits?
mrmike replied to theraif's topic in General Automotive Talk (Trucks and Cars)
The Toys R Us store here in Nashua, NH had maybe one or two kits that where related to a movie brand at one time, but that was all they had. They never seemed to have had anything that was really model related. I only went there because my grandson loves Legos, until recently when his interest started changing. -
Thank you Carl! They are great looking wheels and I knew I had to put them on this Chevy pickup!
-
Thank you Tony, Mike, and Mike! Actually, no I wasn't tempted to! Sorry!
-
Yes they are! I just picked up the Tamiya Morgan 4/4 and the wire wheels in that kit are just as beautiful! No apology is needed. You were asked a question and you answered it. No problem! Check the pictures below of my Rolls Royce. The mis-alignment is rather bad along with mold lines and a rubbery-like plastic. I'll deal with this some other time.
-
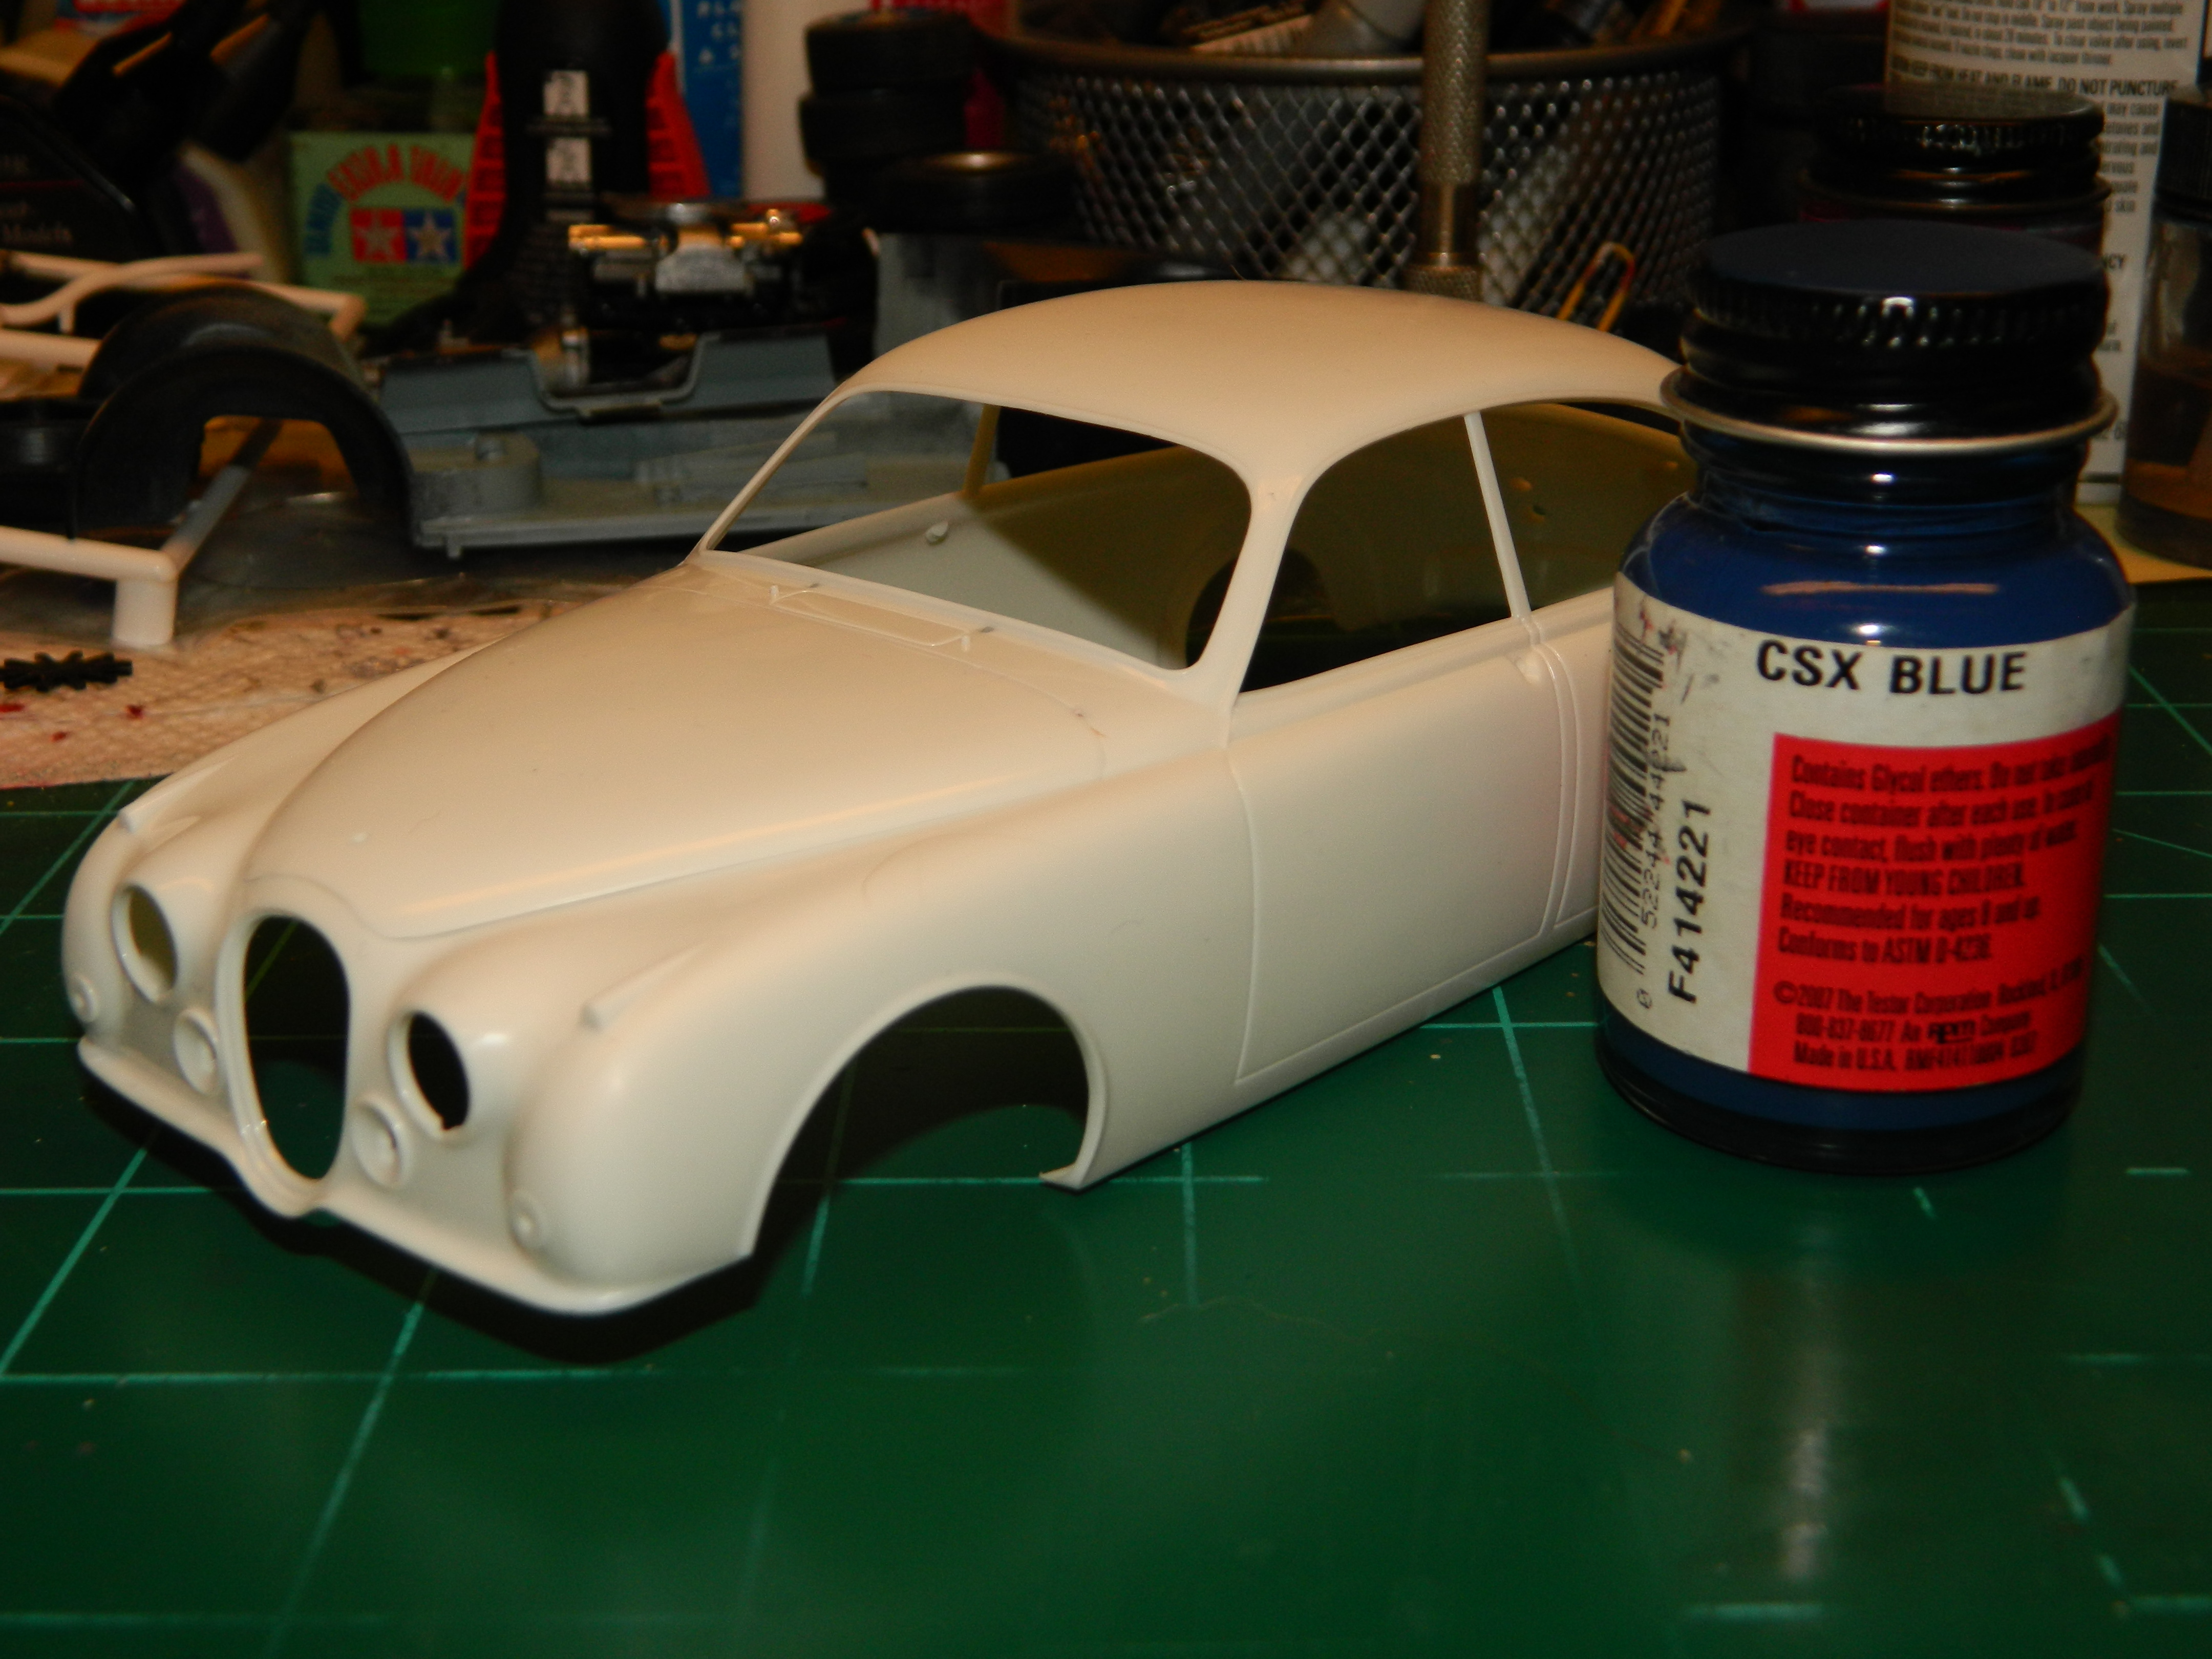
The Story McNally returns to his Hotel and has supper in the Dining Room consisting of a small steak, mashed potatoes, and a mixture of vegtables with a cold Budweiser. He signs his dinner check for his room and goes up to his suite. He calls Stateside to Boston Police Dept. Homicide and Lt. Det. Adam Troy. He asks Adam if he could do him a favor and check out Crumbelt Enterprises in Cambridge for him. He's looking for an address book or any computer files might give him a clue. Adam says he'll check it out for him since Scotland Yard never called BPD Homicide to check the business. He'll call McNally on his cellphone later with his results. He then calls Charlotte "Charlie" Rothmann and updates her on the case. He tells her of his frustration with Scotland Yard and how he is being "guided" not only through London, but his investigation as well. Charlie says she might be able to get the State Department involved if she has to. McNally replies that he doesn't want to involve the State Department right now, but he may have to later, if needed. For now, he'll try to stay out of Scotland Yard's way and try to find some clues on his on and if possible, without them looking over his shoulder. The Build I have been thinking about my color choices lately. I want this build to be more factory stock than not. On the Jag's body, I decided to use Polly Scale CSX Blue, a flat paint, but it is the shade of blue I want without the metallic. This will be gloss cleared when dry. For the floor mats, I'm using Polly Scale Grimy Black, a very dark grey and then a mixture of white and black embossing powder to give the mats some texture. McNally will return...
-
Thank you David! That piece of red carpeting is to be cut up using the masks in the instructions and they fit the interior in a specific manner. I didn't use mine since I was using a different color for the interior and the red would have clashed with the blue-grey that I chose. I have the Minicraft '62 Rolls-Royce Silver Cloud II for a TV/Movie Car build, but the mold mis-alignment on the front fenders has put that build on the back burner until I can figure out how to correct it. I wanted to build the Rolls-Royce from the 1963 American TV show Burke's Law starring the late Gene Barry.
-
David, I wish you good luck on your conversion! After a careful look, I found faint mold lines along the roof and the front fender tops of my body. They were removed rather quickly with some 600 grit sandpaper. Definitely a great kit!
-
After looking at the interior floor pan/chassis, I need to make some floor mats! I found a tutorial on Italian Horses website. Alex Kustov has an excellent web site with a tutorial section. http://italianhorses.net/Tutorials/Floormats/fmats.htm
-
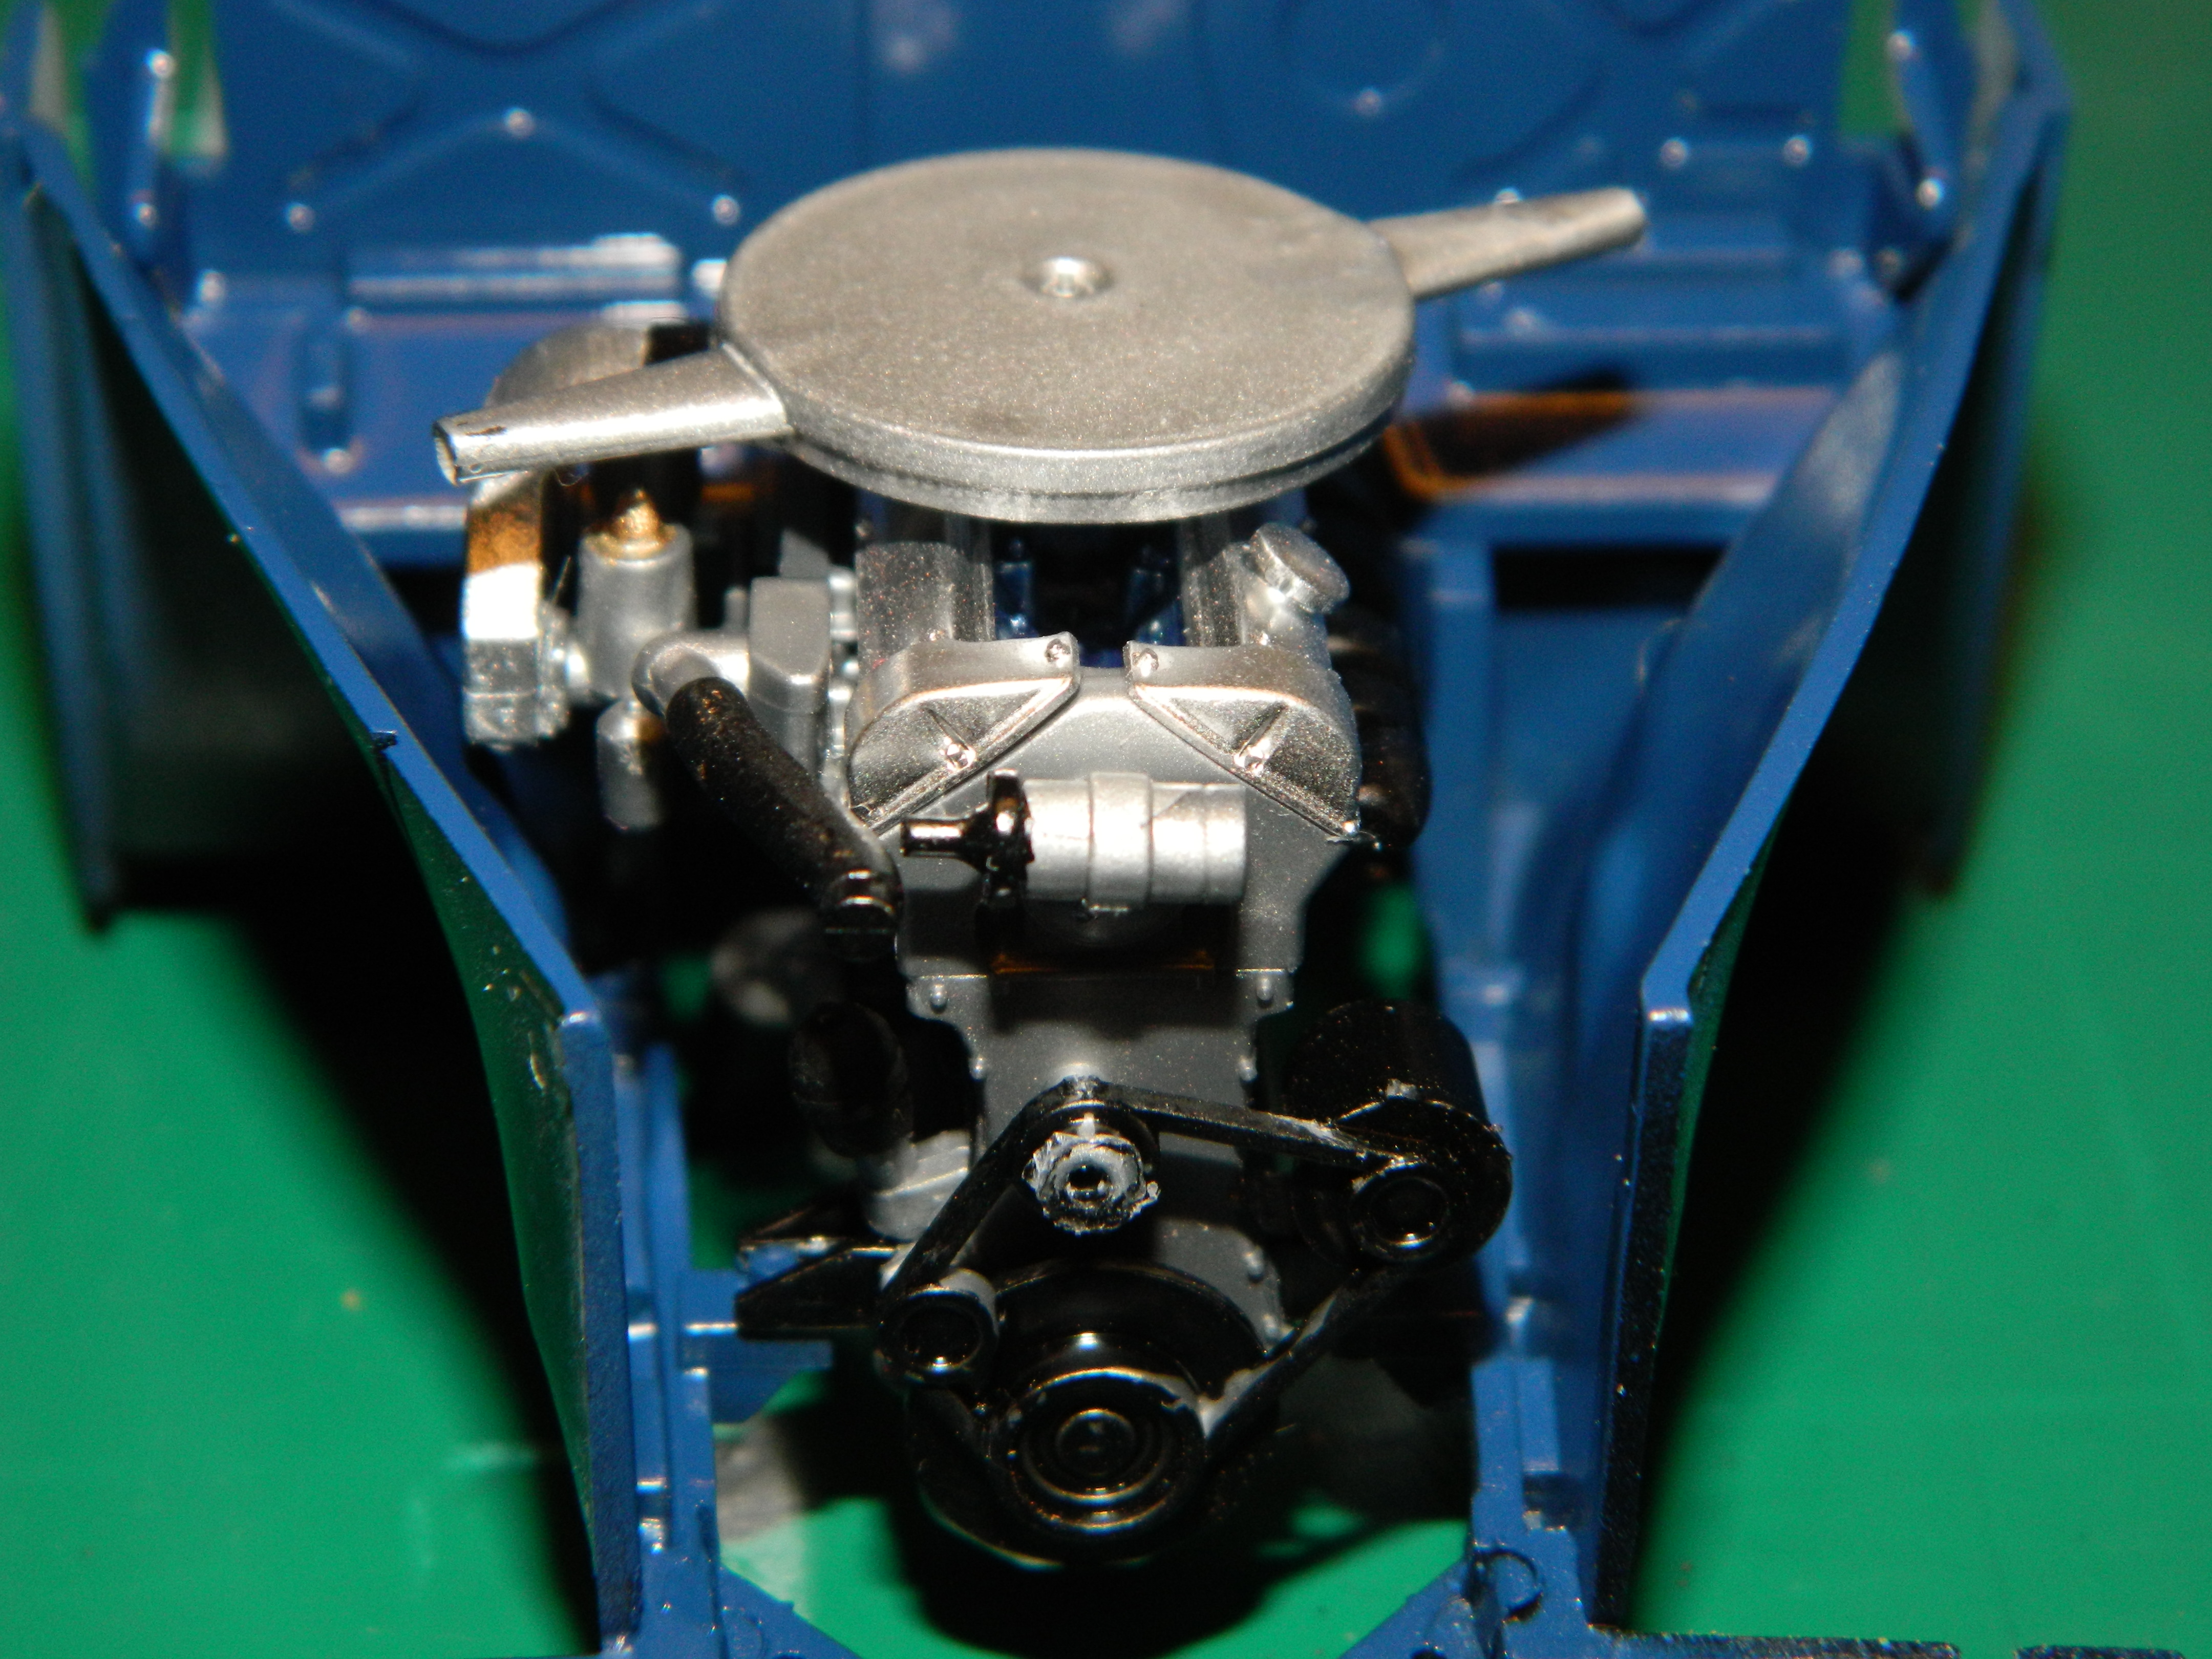
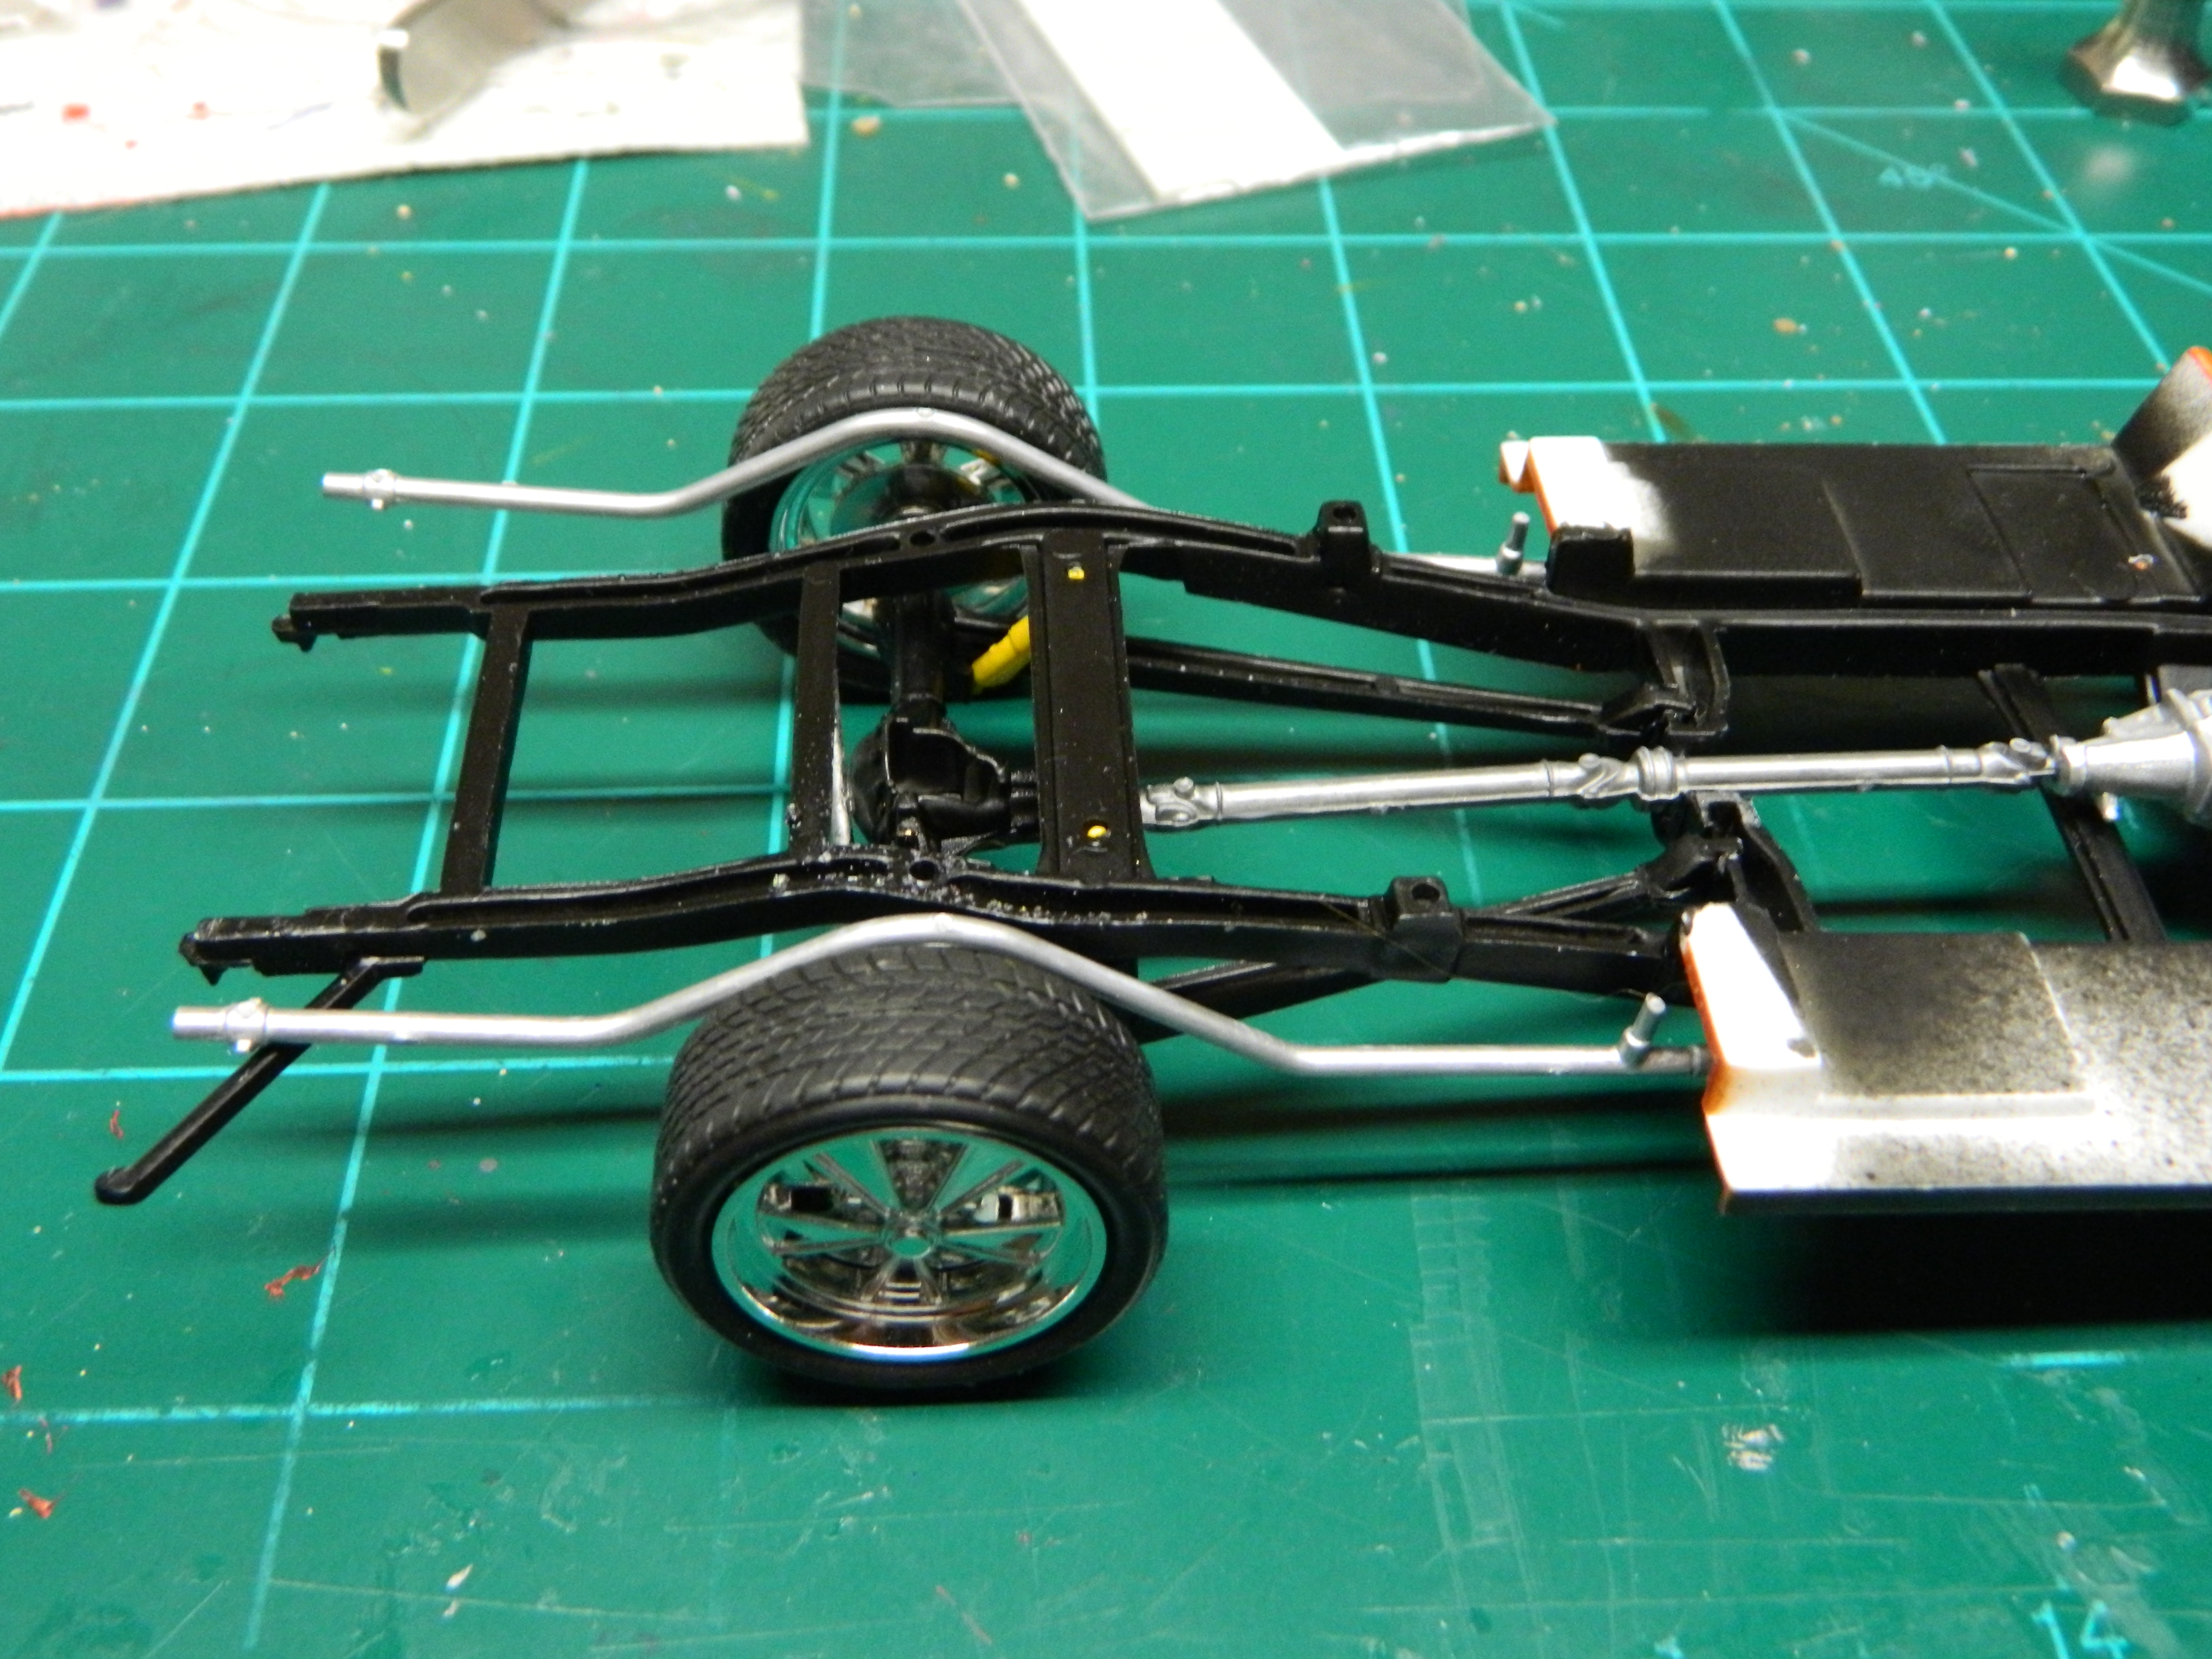
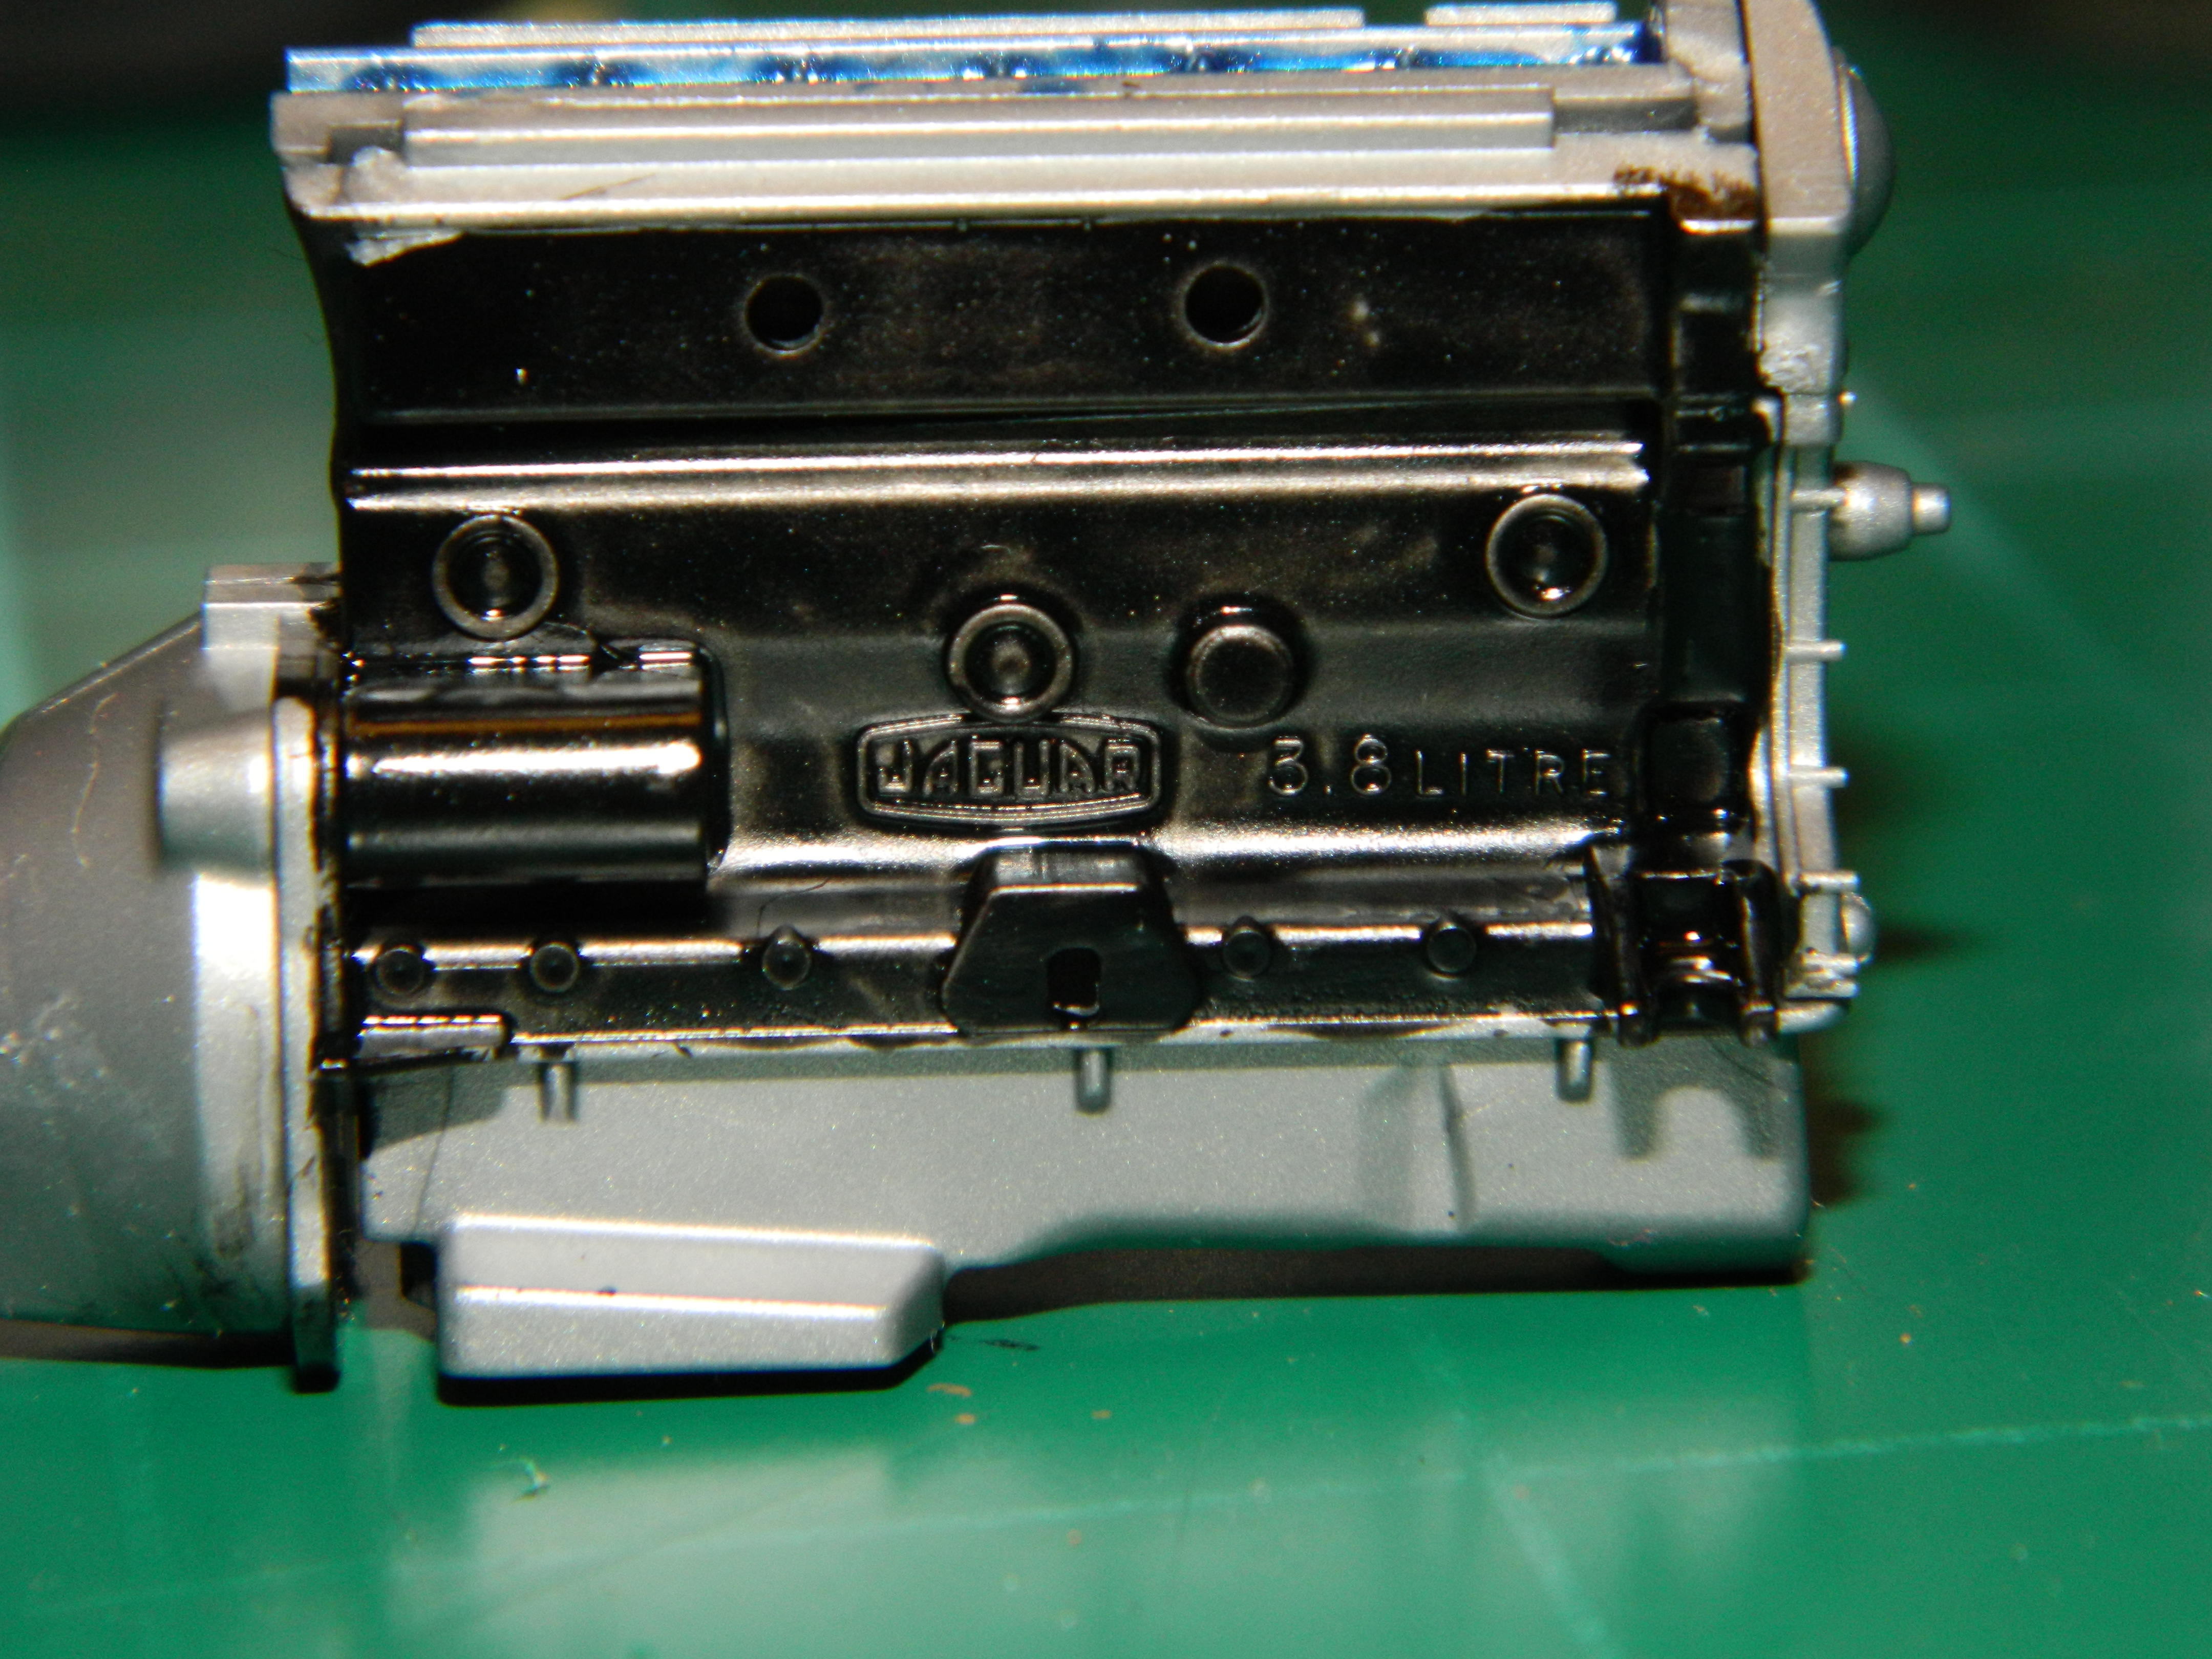
The Story The next morning McNally is up and dressed when he hears a knock on his door. He opens the door to Detective Constable Ashley Campbell of Scotland Yard. She is to guide him around London while he conducts his investigation. She sees the SIG Sauer P227 hanging under his left arm in a shoulder holster and she asks to see his permits, which gives to her for viewing. He offers his Federal Firearm permit, Massachusetts Firearm permit, and the temporary permit from Scotland Yard. DC Campbell looks them over and hands them back to the Boston PI and says that they are good. After grabbing a coffee from the dining room, they get into McNally's rented Vauxhall Astra and head over to Jonathan Crumbelt's flat. The Metro cops have already searched the flat and it is a mess, but this doesn't stop McNally from looking around, through, and under everything. He finds a set of car keys in the kitchenette drawer and goes down to the back of the apartment building to a separate buildings that were turned into garages. He unlocks the assigned garage door and finds a Jaguar Mk. II Saloon inside. He searches the interior and the trunk and finds nothing of interest. He closes up the Jag and the garage doors and pockets the keys. He informs DC Campbell that he wants to search Crumbelt's business, Crumbelt Enterprise, to which the Detective tells him no. Metro Police and Scotland Yard are still searching the business and it is off-limits to him. With no clues to find here at Crumbelt's flat or in his car, McNally will call it a day and he sends DC Campbell back to Scotland Yard. The Build I did some painting this afternoon of the interior parts. The chassis was flocked with embossing powder and painted with Tamiya AS-25 Dark Ghost Grey and I finished the 3.8 Liter Jaguar engine. McNally will return...
-
Thank you Joe! Probably taken it to the RTS Expo on March 18 in Taunton, Ma.
-
Looks great Tony!
-
Thank you Dennis! I'm glad you enjoyed it.
-
The Story McNally arrives at home and in the kitchen, he makes himself a sandwich with left over roasted chicken, lettuce, tomato, and mayo with a cold beer to wash it all down. He hears a knock at the front door and goes over to answer it and finds Lt. Det. Troy. "Got a cold beer for me," asks Adam? "In the fridge as always, Adam." Adam opens the bottle and takes a long swig of beer, sits at the table while McNally eats his sandwich. "Want a sandwich," asks McNally? "No thanks. I'm heading home to dinner to my wife and son. Here's the autopsy report for you," he says pulling out several sheets of paper from his jacket pocket. McNally puts his sandwich down and picks up the report and reads it. "Thanks Adam." "How's the search going?" "Slow. I'm still searching for clues." "Well, you got the autopsy report and I gotta get home to dinner," says Adam who finishes his beer and tosses the empty bottle away. "I'll talk to you later." Adam pops a piece of gum into his mouth and walks out of the house and back to his car. The Build I drilled out the backs of the wheels and they fit over the spindles perfectly. Then I added a dual exhaust system. I'll re-arch the pipes to clear the rear bumper later. McNally will return...
-
Thank you guys! I enjoyed this build, even with the few modifications that I made.
-
Thanks Tulio! Revell doesn't use brand names on tires because of licensing requirements. This can be expensive given the number of tire manufacturers out there. Many of Revell's kits say "Licensed by______" on the side of the box now as many manufacturers have trademarked their designs.
-
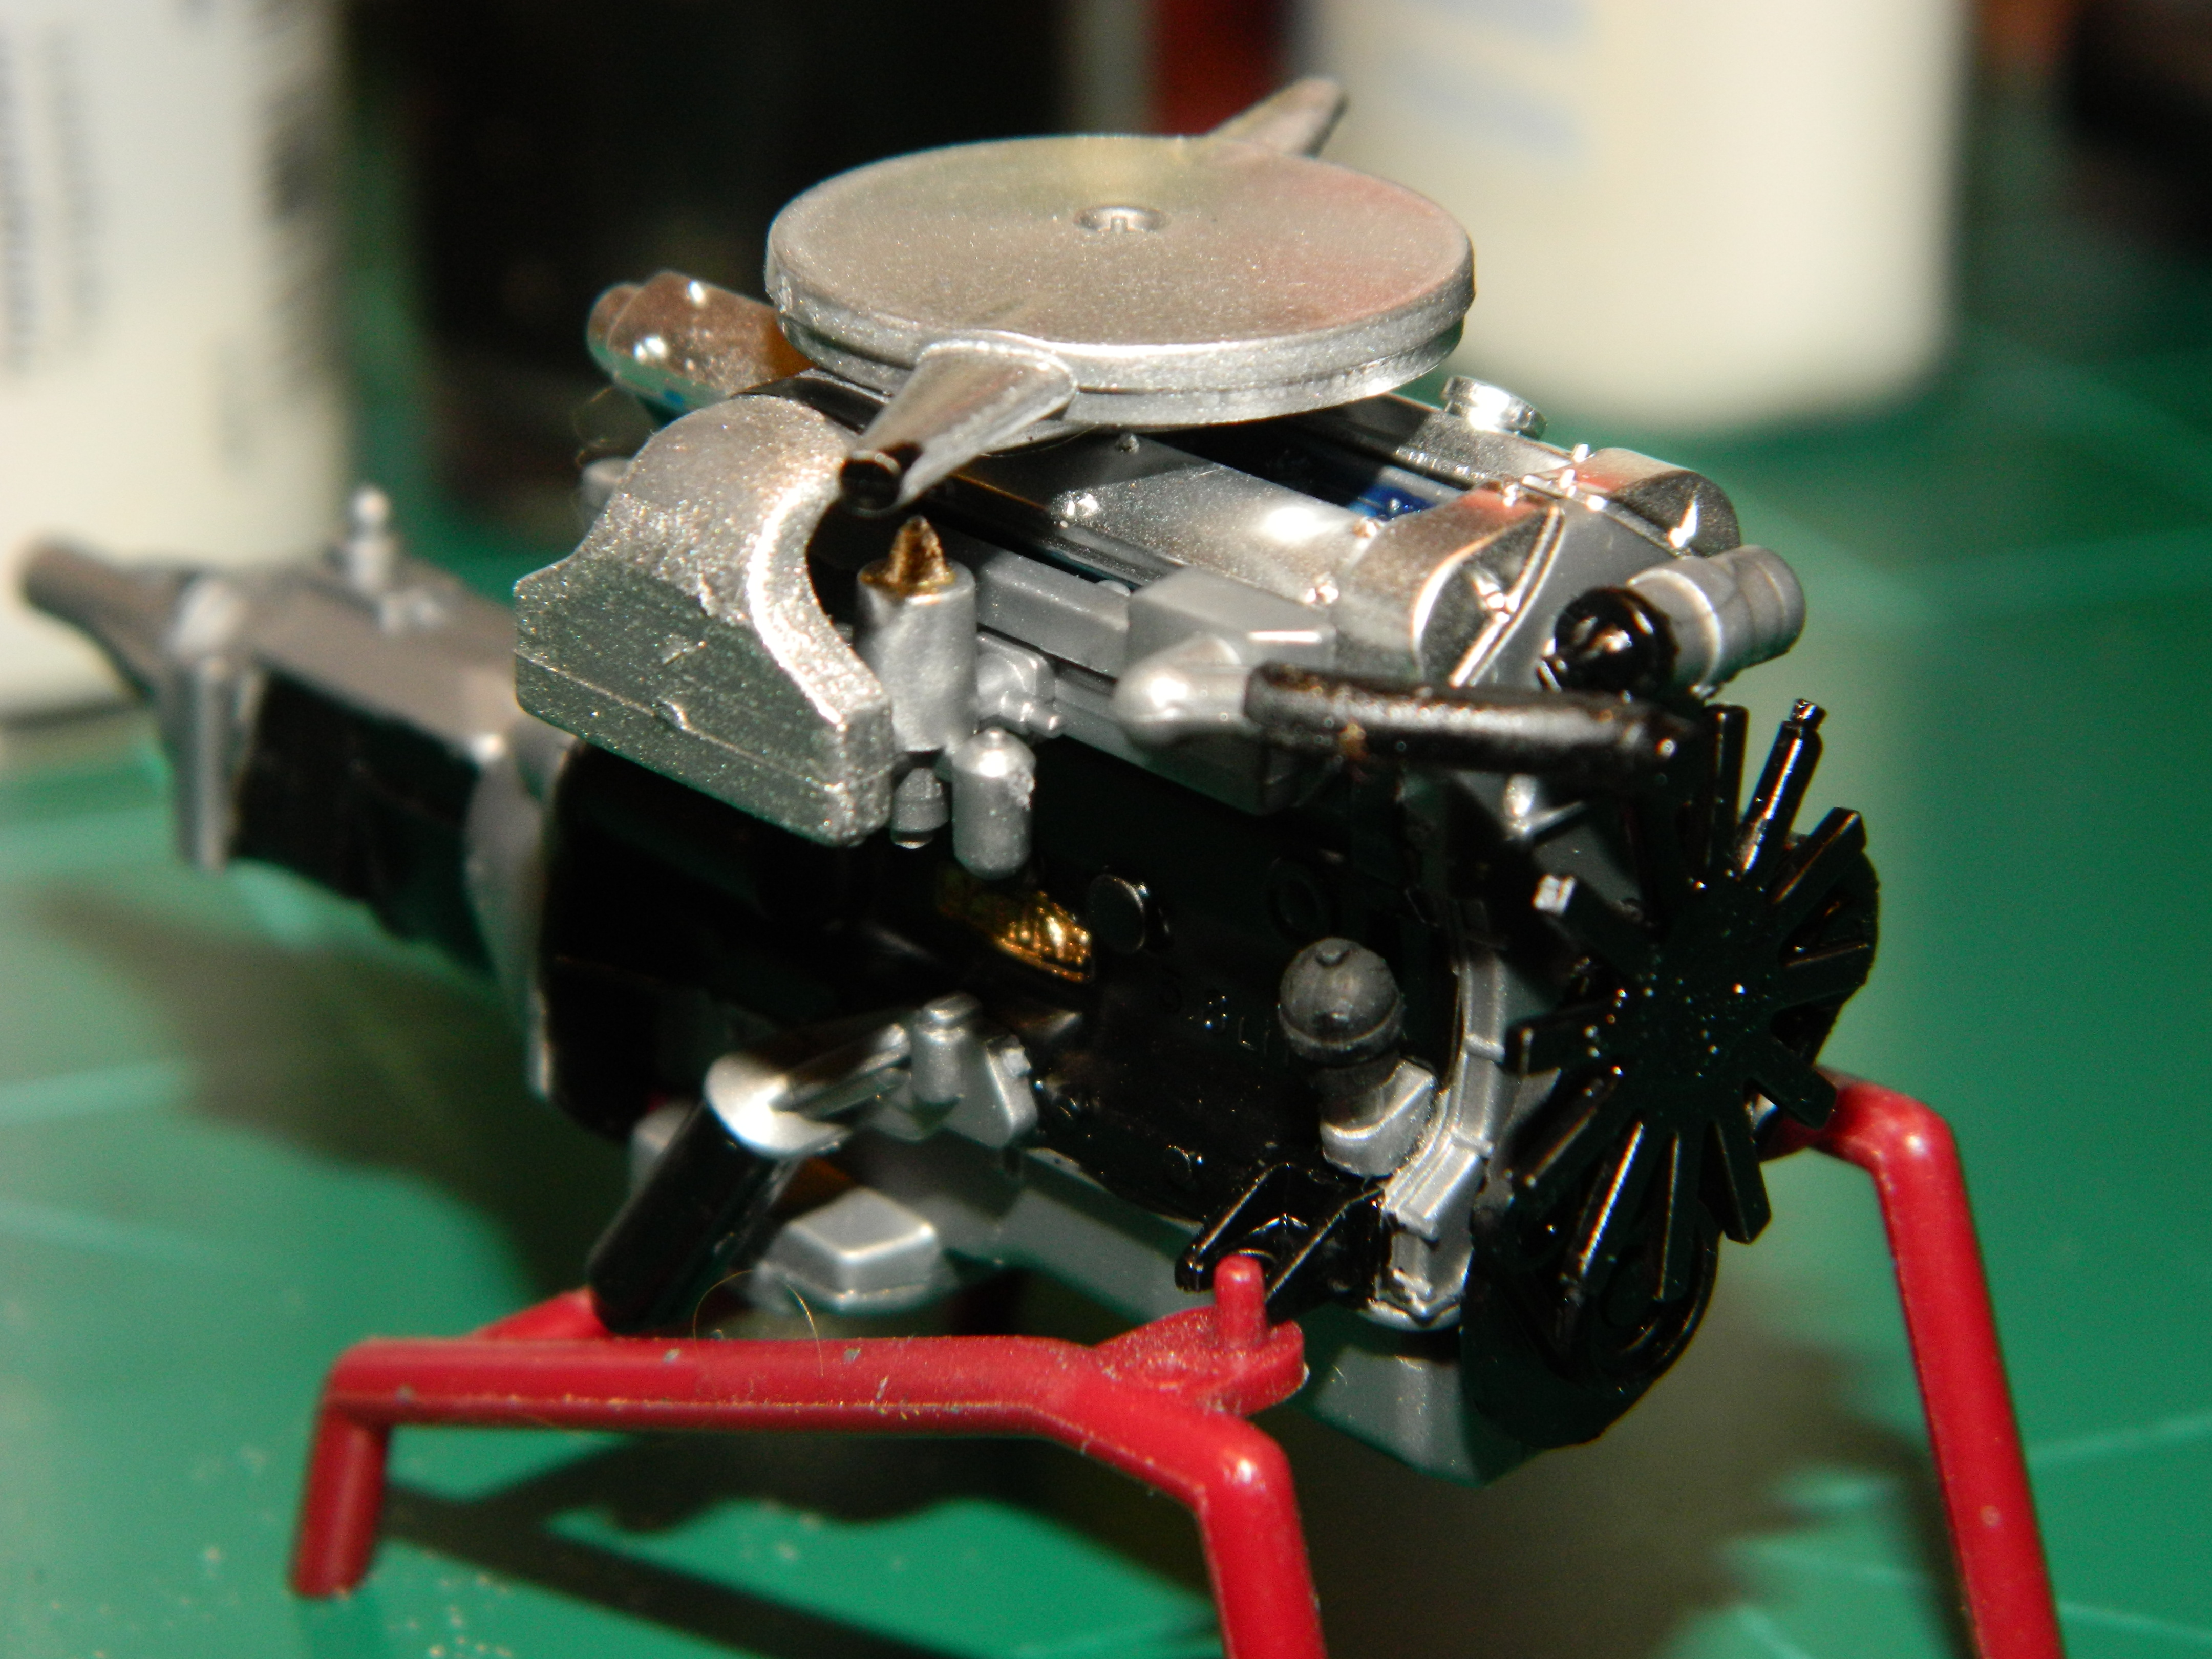
Thank you guys! The Story McNally gets off the plane at Heathrow Airport and catches a taxi to his hotel in central London. He checks in to his room and takes his SIG Sauer P227, unloads it and locks it in the room safe in the closet. He hangs up his clothes and leaves the room for the lobby and the consierge to enquire about a rental car. He is directed to a Rental kiosk and he rents an silver Vauxhall Astra 4-door sedan. He then heads to Scotland Yard to look up DCI Philip Ashenbell and inquire about the late Jonathan Crumbelt and the special gun permit that the DCI is holding for him. McNally finds a parking spot near Scotland Yard and walks inside to a counter manned by Constable Dalton who calls DCI Ashenbell and she tell him that McNally is here to see him. Constable Dalton tells McNally to have a seat in the waiting area and the DCI will be down for him shortly. A few minutes later DCI Ashenbell arrives to take McNally up to his office. The DCI is a gruff looking man who is not being friendly at all towards the Boston PI. His questions and answers to McNally are short and to the point and McNally feels like he is wasting his time there. The Build Although the wheels and tires assembly is not until later in the instruction sheet, I couldn't resist temptation and assembled them first. One set for the left side and one set for the right side of the Jag. I started assembling the engine and realized that I'll need to paint some components before assembling them together. Yes, its been a few years since I built a Tamiya kit! A closeup of the engine side telling you all that this is a 3.8 Liter Jaguar engine! McNally will return...