
nails3825
-
Posts
240 -
Joined
-
Last visited
Content Type
Profiles
Forums
Events
Gallery
Everything posted by nails3825
-
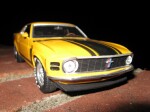
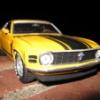
Thanks riknight I got some work done in the last couple of days, here's some updated photos... a lot of "first attempts" going on with this build ~ it's a great learning experience for me, regardless of how it turns out. The vinyl roof ~ this is my first attempt at such a thing but it was actually pretty easy to do. I taped off the roof line and used the spray adhesive method, which worked very well. Then I used thread to create the seam lines, here's the result. I also re-scribed the bottom of the door line(as best as I could) and replaced the trim that was sanded away. It's just a piece of .020 syrene rod, for those of you paying attention The headlights were a mess, a lot of glue and chunks of plastic... so I just drilled them out. Hopefully what I have planned to replace these will work, and look a lot better than the chrome plated orignals that were there. Only time will tell, I haven't gotten to that point yet I then gave the body a light sanding and primed the whole thing once again... it's now ready for paint ~ Which was done today using Testors "model master" panther pink Here's the end result ~ Of course I still have a lot of work to do but I'm happy with how it's coming along. I'm going to let the paint "cure" for a few weeks and then try my luck with the polishing, something I don't normally do... but I need to learn. Then I'll paint the vinyl top white and do the trim work. Hope you like it so far! Thanks for looking Any comments, critism, suggestions, tips or ideas are much appreciated/anticipated... haha.
-
I'm honored to be a part of your site, thank you I'll try to take better photos of my builds, just in case you want to use another photo or two
-
Wolfies 55 chevy Ragtop {And I mean Ragtop!!}
nails3825 replied to Wolfie427.com's topic in Model Cars
Nice! I especially like the flat tire Can't wait to see the finished Christine, all beat up and looking mean... that's going to look "killer" -
I like the color choice, nice work! I wouldn't mind taking it for a spin
-
Now that looks cool What did you use for the signal lights? They look like LEDS?
-
Looks good in black
-
Oh, that's sweet! The color really looks good on it
-
I like the charger, the bigger one of the two (black) Sorry to hear about your son, it's a fate that all men go through at one point or another in their life.
-
Nice build ~ it looks awesome! Where did the twister decals come from?
-
Your photo skills are just as good as your modeling skills! And they are both far better than any of my skills... but I do make a good pot of coffee. So much to learn Thanks for posting such an inspiration, it's an incredible job that makes you say "WOW"
-
Beautiful job! I like what you did with it, the color choice and all
-
Kyle Petty 42 Mello yellow stock car and Hauler
nails3825 replied to Mudpit602's topic in WIP: Model Cars
Looking good! I can't wait to see that '57 finished, it's going to look killer with that beast (engine) sticking out of the hood... -
Lancia Delta HF Integrale Evoluzione II Dealer's Collection
nails3825 replied to Kushikimi's topic in Model Cars
The 5th and 8th photos look like the real car, love that background! Great job -
Beautiful job ~ Your choice of color is perfect for the car, turning heads as it just sits there! (yummy)
-
Wow, the paint looks flawless on both of them... great job! I'm going to have to say the '70 Boss is my favorite of the two but toss me the keys to the Camaro and I won't complain
-
Thanks! I'm using sanding sticks from Stevens International... bought them at a LHS for under 10 bucks for a four pack (150,240,320 and 600 Grit)
-
Got some primer on the body today, just to make the blemishes pop out a little more... still need to do some sanding but not much. Here's what she's looking like so far. I deepened the trunk lines with a knife, never really done such a thing... is there a better way to do this? Any tips would be great ~ the drivers door will need some major scraping to get the panel line back As you can see here, the panel line is all but gone from the bottom of the door I have the rear window shaped as close as I could get it, using sanding sticks and files to match what it used to look like... the trim needs to be replaced too, but I have a pretty simple plan for this ~ hopefully. That's all for now ~ I'm taking my good ole' time with this one, something new for me... there are a lot of new things I'm attempting with this build as well Thanks for looking!
-
Looks like it's ready to race! Do you have the keys?
-
Glad you stuck with it, for having nothing but trouble it turned out great ~ That paint looks as smooth as glass!
-
Great job ~ The dog adds a nice touch There's a lot of little details I missed the first two times I viewed this one, I keep finding more!
-
Yum! If I was a car, this is what I would be
-
That looks awesome! The rusted exhaust looks real, incredible ~ haha, I like the little screw driver too... a nice touch.
-
That turned out great! Wish I had it in my collection
-
Finally got around to sanding the repairs, it took some time but the end result was pleasing The back window area needs a little more work, reshaping the opening and doing the trim over... that should be a challenge. Also, while sanding the lumps of J-B Kwik, I ended up removing some of the trim around the side windows and under the door ~ that shouldn't be too hard to fix/replace with some styrene strips? Here are some photos ~ Thanks to Caine440, I have some replacement parts for this build... such as the interior bucket and steering wheel ~ the originals were too damanged for me to fix, broken or (melted) from my childhood years. He also gave me a set of rims/tires and tail lights, along with an extra body and decals! Thanks again for your help, truly! That's all for now, hard to say when I'll be posting more but I'm trying to have it ready for paint before too long ~ thanks for looking!
-
A jeep should never be clean in my opinion You did an excellent job!