MrObsessive
-
Posts
9,785 -
Joined
-
Last visited
Content Type
Profiles
Forums
Events
Gallery
Everything posted by MrObsessive
-

Kits Which Were Once This, Then Became That
MrObsessive replied to Casey's topic in General Automotive Talk (Trucks and Cars)
That's actually going to be a very near in the future WIP of mine. I'll be doing some changes though......let's say to make it a bit more "streetable". -
I have the '71 Delta 88 kit..............would LOVE to get this one! Another one of those "lost '70's" cars you just don't see any longer. I don't know how I missed this thread...........this is the first time I've seen it! EXCELLENT work!!
-
Lookin' good Justin! I didn't know this was even being reissued by Tamiya! I have the original kit.......never touched it. I'd like to grab the reissue with all the neat stuff they added. Keep up the great work! ?
-
DeAgostini 1/8 scale 1967 Shelby GT 500 FINALLY done!
MrObsessive replied to MrObsessive's topic in Model Cars
It's got to be upwards of 20 lbs. It's an awkward 20 lbs though as it's DEFINITELY a both hands job to pick it up and (carefully) put it back down. As I mentioned, for whatever reason DeAgostini decided to do the rear axle in plastic. The rear wheels attach to that plastic axle with screws so one needs to be VERY careful setting it down gently. You're welcome Bruce! The wheels were a lot of work, but I just couldn't stand the painted look of those five spokes. It's work well worth the work in the end. ? -
Bruce, I thought about doing that initially, but left it alone as I didn't know what other issues might come up. I could take the door back apart and do as you described, but then I'd run the risk of damaging the interior door panel trim trying to pry it back out of place and then getting the interior door panel off to get to the glass. As you know, the glass bottom bolts directly to the inside of the door, so you'd have to take everything out first to do that. The window frames I believe were made that way to give the doors some sort of "friction" to keep them closed. It's not as much an issue on the passenger side. I still believe it's the dash and the thickness of the door panels themselves which is making the drivers side door stick out ever so slightly on that side. I may take it back apart in the future and do that, but I believe as heavy as this is and how cumbersome it is to handle, I'd best leave it alone at this point.
-
1970 Plymouth Sport Fury??
MrObsessive replied to Nick Notarangelo's topic in Model Building Questions and Answers
Erik, here's the Buick I got from him a while back. Lines are SPOT ON and this was actually a "test shot" of what he wants to offer as a full kit down the road. He has a Facebook page, but I know a number of fellas on here are not fans of Facebook. He gives you bumpers, but I can tell they are in fact directly 3D printed as you can see the resolution lines on 'em. Easy to smooth out then either have them plated or paint with a good chrome like paint.
-
1970 Plymouth Sport Fury??
MrObsessive replied to Nick Notarangelo's topic in Model Building Questions and Answers
There was one on eBay very recently from a fellow that I've bought from before. I have his '57 Buick Cabellero wagon and the '77 Lincoln Continental Mark V. He 3D prints the bodies and then casts them in resin. This one the auction just ended and mind you, this is just for the body. You'd have to come up with chassis, interior, glass, etc to make it complete. Body looks good to my eyes........you can check it out here. -
AHA!! I see I'm NOT the only one that buys shop manuals to see what's happening underneath! I really like how the chassis is coming along! I'm saving your thread as reference as I'd like to turn my wagon into a Rebel four door hardtop someday.
-
DeAgostini 1/8 scale 1967 Shelby GT 500 FINALLY done!
MrObsessive replied to MrObsessive's topic in Model Cars
Looks TERRIFIC Bruce! ?? -
grand sport corvette roadster
MrObsessive replied to 65slotcar's topic in Other Racing: Road Racing, Salt Flat Racers
Aaah.....GORGEOUS!! Is this one of Harold's (HRM) transkits? I won one of these years ago at the NNL East, and have yet to put it together. This is another one of my favorite '60's road racers along with the coupe Grand Sport. -
DeAgostini 1/8 scale 1967 Shelby GT 500 FINALLY done!
MrObsessive replied to MrObsessive's topic in Model Cars
Rex, the steering wheel was supposed to turn the wheels, but the gearing was quite ill fitting as the gears didn't mesh as tightly as they should. Instead of fussing with it, I left it alone. I'm not so sure with the sheer weight of this thing that it should be turned at all. On that note, one thing I learned is to NOT turn the model on its rear wheels on its axis. I did this trying to spin the model around on the table and actually snapped one of the wheels clean off the axle. It is THAT heavy. For whatever reason, DeAgostini made the rear axle out of plastic (two halves) instead of solid metal like the rest of the chassis. I was able to get it back together with no issue, but that's another one of those things I'm certain a novice builder couldn't deal with. Hours? I really didn't keep track. There were days I'd work on it, then there'd be a whole week go by when I didn't touch it. One other tip I recommend in regards to the doors.....If I were building this again, I'd shim up the hinges just a bit. When the doors are open, they're a bit too "floppy" for my tastes as the hinge bolts directly to the door and then attached with screws to the inside of the body. The hinge point itself is sloppy, but with the doors being closed 99% percent of the time, it's no big deal. Somewhere on my hard disc, I remember making a pros and cons list of this kit. I'll see if I can find it and post it here. -
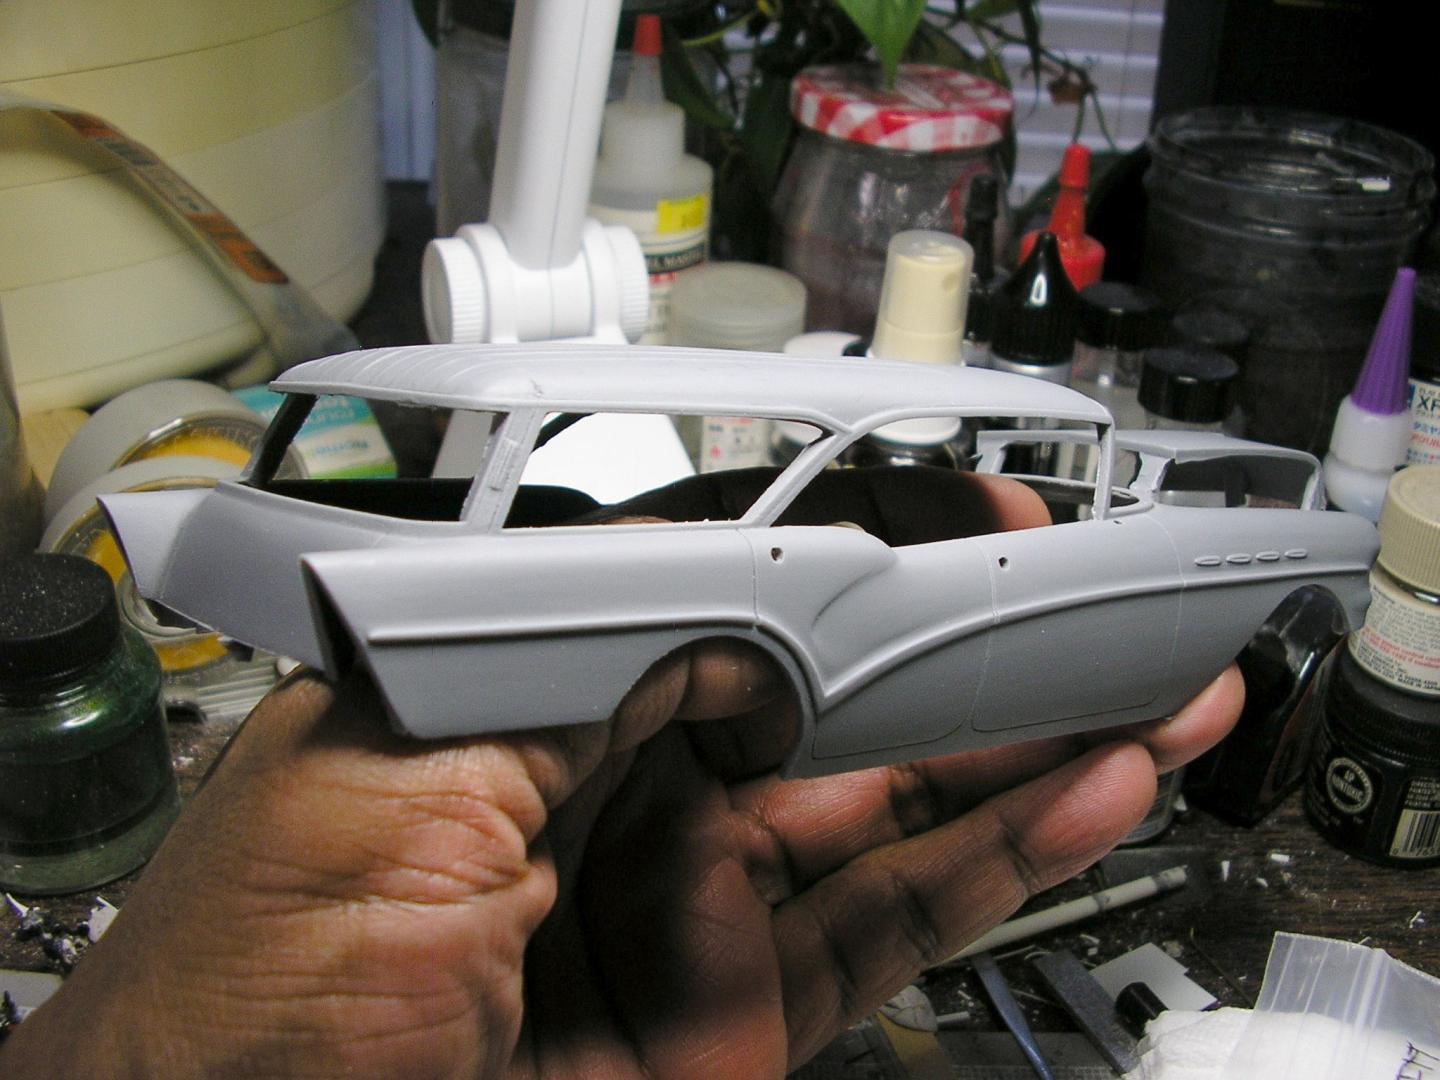
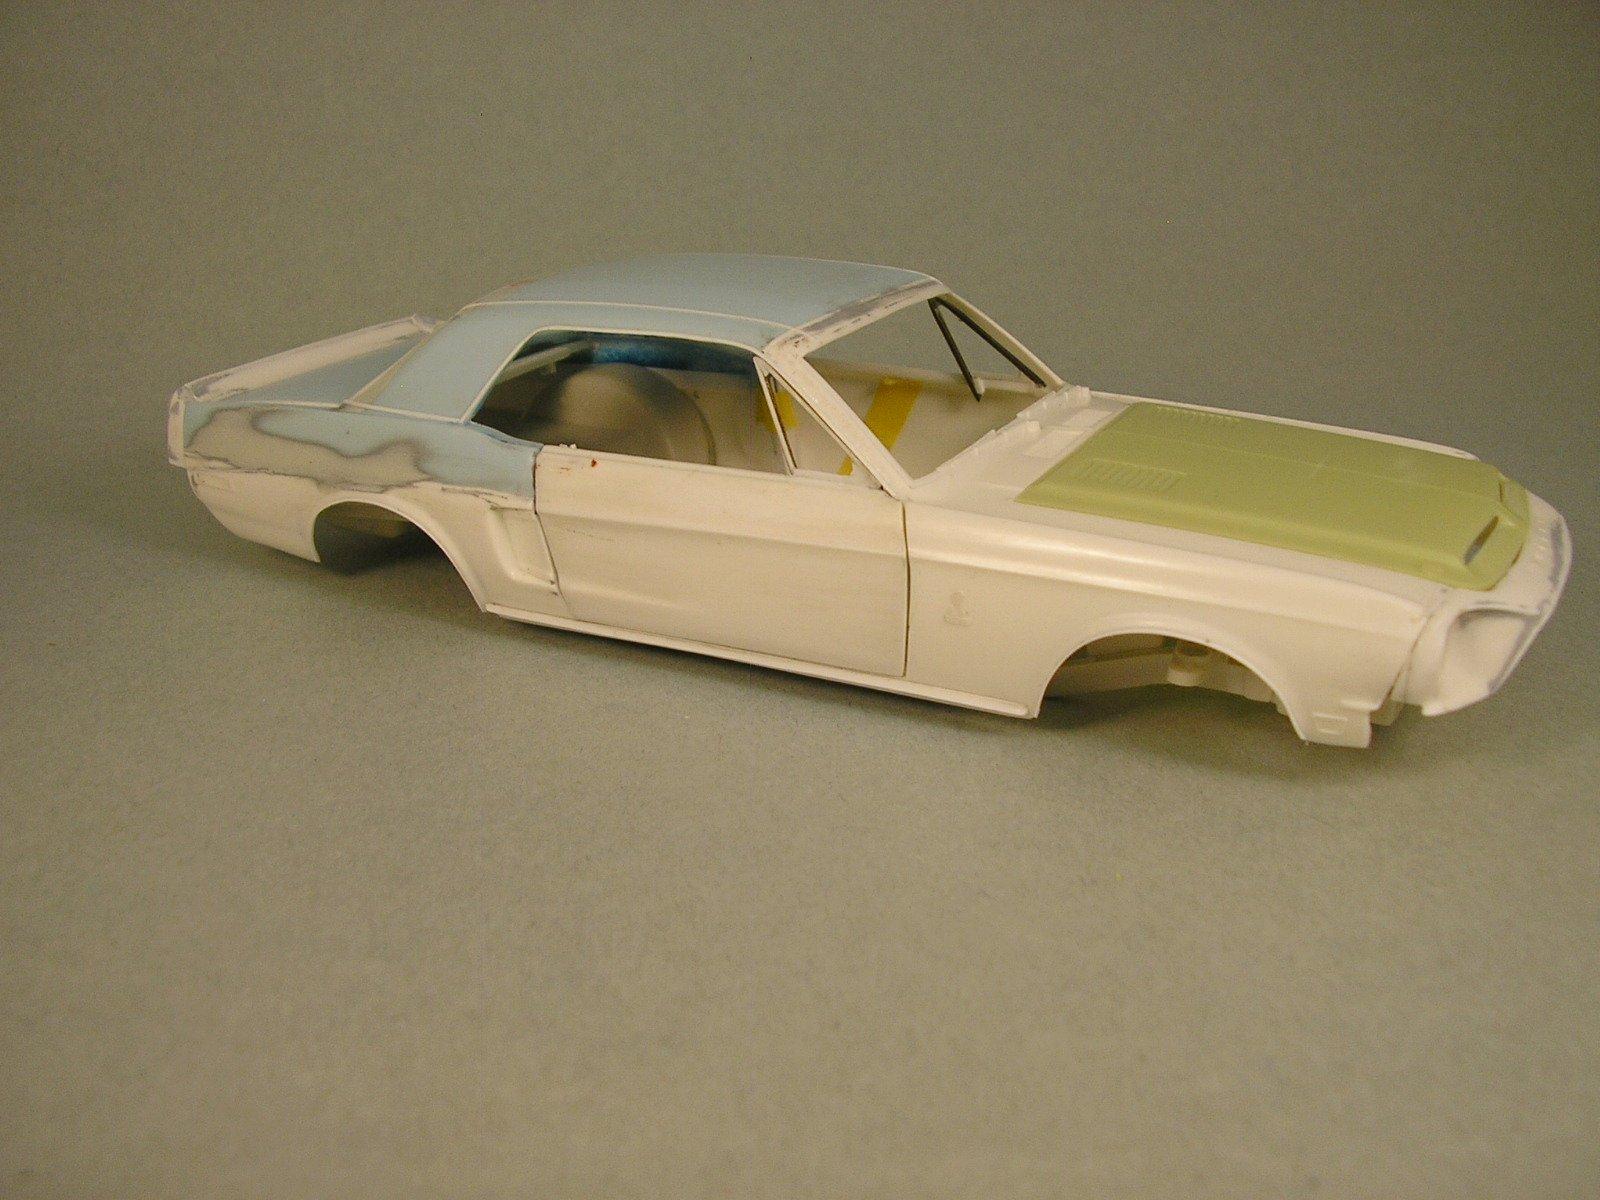
Has it been almost a YEAR since I posted on this?? I guess so as I see a March post date for the last time I mentioned something. Well, since the Mustang is in the history books as far as getting done, I gotta get back to this one. It's hard to believe that is been OVER 15 years since I started working on this. The reason I remember is because when I went to Puerto Rico in 2006, I remember taking this with me as there's pics of it sitting on one of the pavilion tables when we had a get together at a local park one night. Wow does time fly! Well, it's finally got some NEW paint on 'er. Here are some pics of how that went so far............... This is the second time I've repainted this Ford with the first paint job literally showing the bodywork that was done after a period of time. The entire body was first done in Duplicolor Gray with the BIN Zinsser sealer underneath. I wanted NO chance of any paint crazing the bodywork after all the work that was done to redo this. After the primer was thoroughly dry, I did the first color in Snowshoe White, an original '55 Ford color I got from Paintscratch.com. After the white was thoroughly dry, I painted the second color once again Regency Purple, a 1954-'55 color I got through Paintscratch. I'll be clearcoating the purple in the milder Tamiya X-22 Clear. I don't want to take the chance of ANY issues with clear after all the work done, so this is the mildest paint I have which should have no issues going over the hotter paint. After that's dried through, I'll rub out and polish the clear as I usually do. So far so good! No trace of where the redone work was on the roof. I highly recommend the BIN Zinsser as a sealer ESPECIALLY for the softer plastics that are being foisted on us these days in new kits. That's it for the time being. I'll try to clearcoat it in the coming days, let it dry and then rub out and polish the clear. Then it's on to getting everything back together again with some other details I had never gotten to. Thanks for looking!
-
Thanks Paul! As time moves on and my eyesight is not as good as it was even four years ago, the Mustang you see may be one of the last superdetailed ones I do from here on out. I had lost a bit of interest in it, but definitely want to get back to it and see it done. Right now I recently finished repainting the '55 Ford Victoria project which had its own issues with bodywork a while back. Now clearcoating is the next step in a little bit. I'll be shortly putting pics up of the SECOND time I've had to paint the Ford. Hopefully it's the last.
-
Ooooh...........If it were me doing this, I would add those strips before putting down any paint. Please do NOT use super glue. That'll make more of a mess than it's worth. Frankly, I'd strip the roof of the paint, put down your strips using a liquid cement (Tenax, or some other MEK equivalent) and then paint afterwards once I was satisfied with the roof. Here's a project I was working on (and will get back to within this year hopefully), where I added strips to simulate the seams for a vinyl roof. Note that there's no paint on the roof as of yet......that will come MUCH later after all is said and done with anymore bodywork and interior done. BTW, you mention cutting strips. Out there in the aftermarket there are those size strips made by Evergreen which will save you a LOT of work. The ones I used were a tad smaller and I did sand them down a bit as on the 1:1, they are not overly intrusive to the eye as far as seams. Hope this helps!
-
DeAgostini 1/8 scale 1967 Shelby GT 500 FINALLY done!
MrObsessive replied to MrObsessive's topic in Model Cars
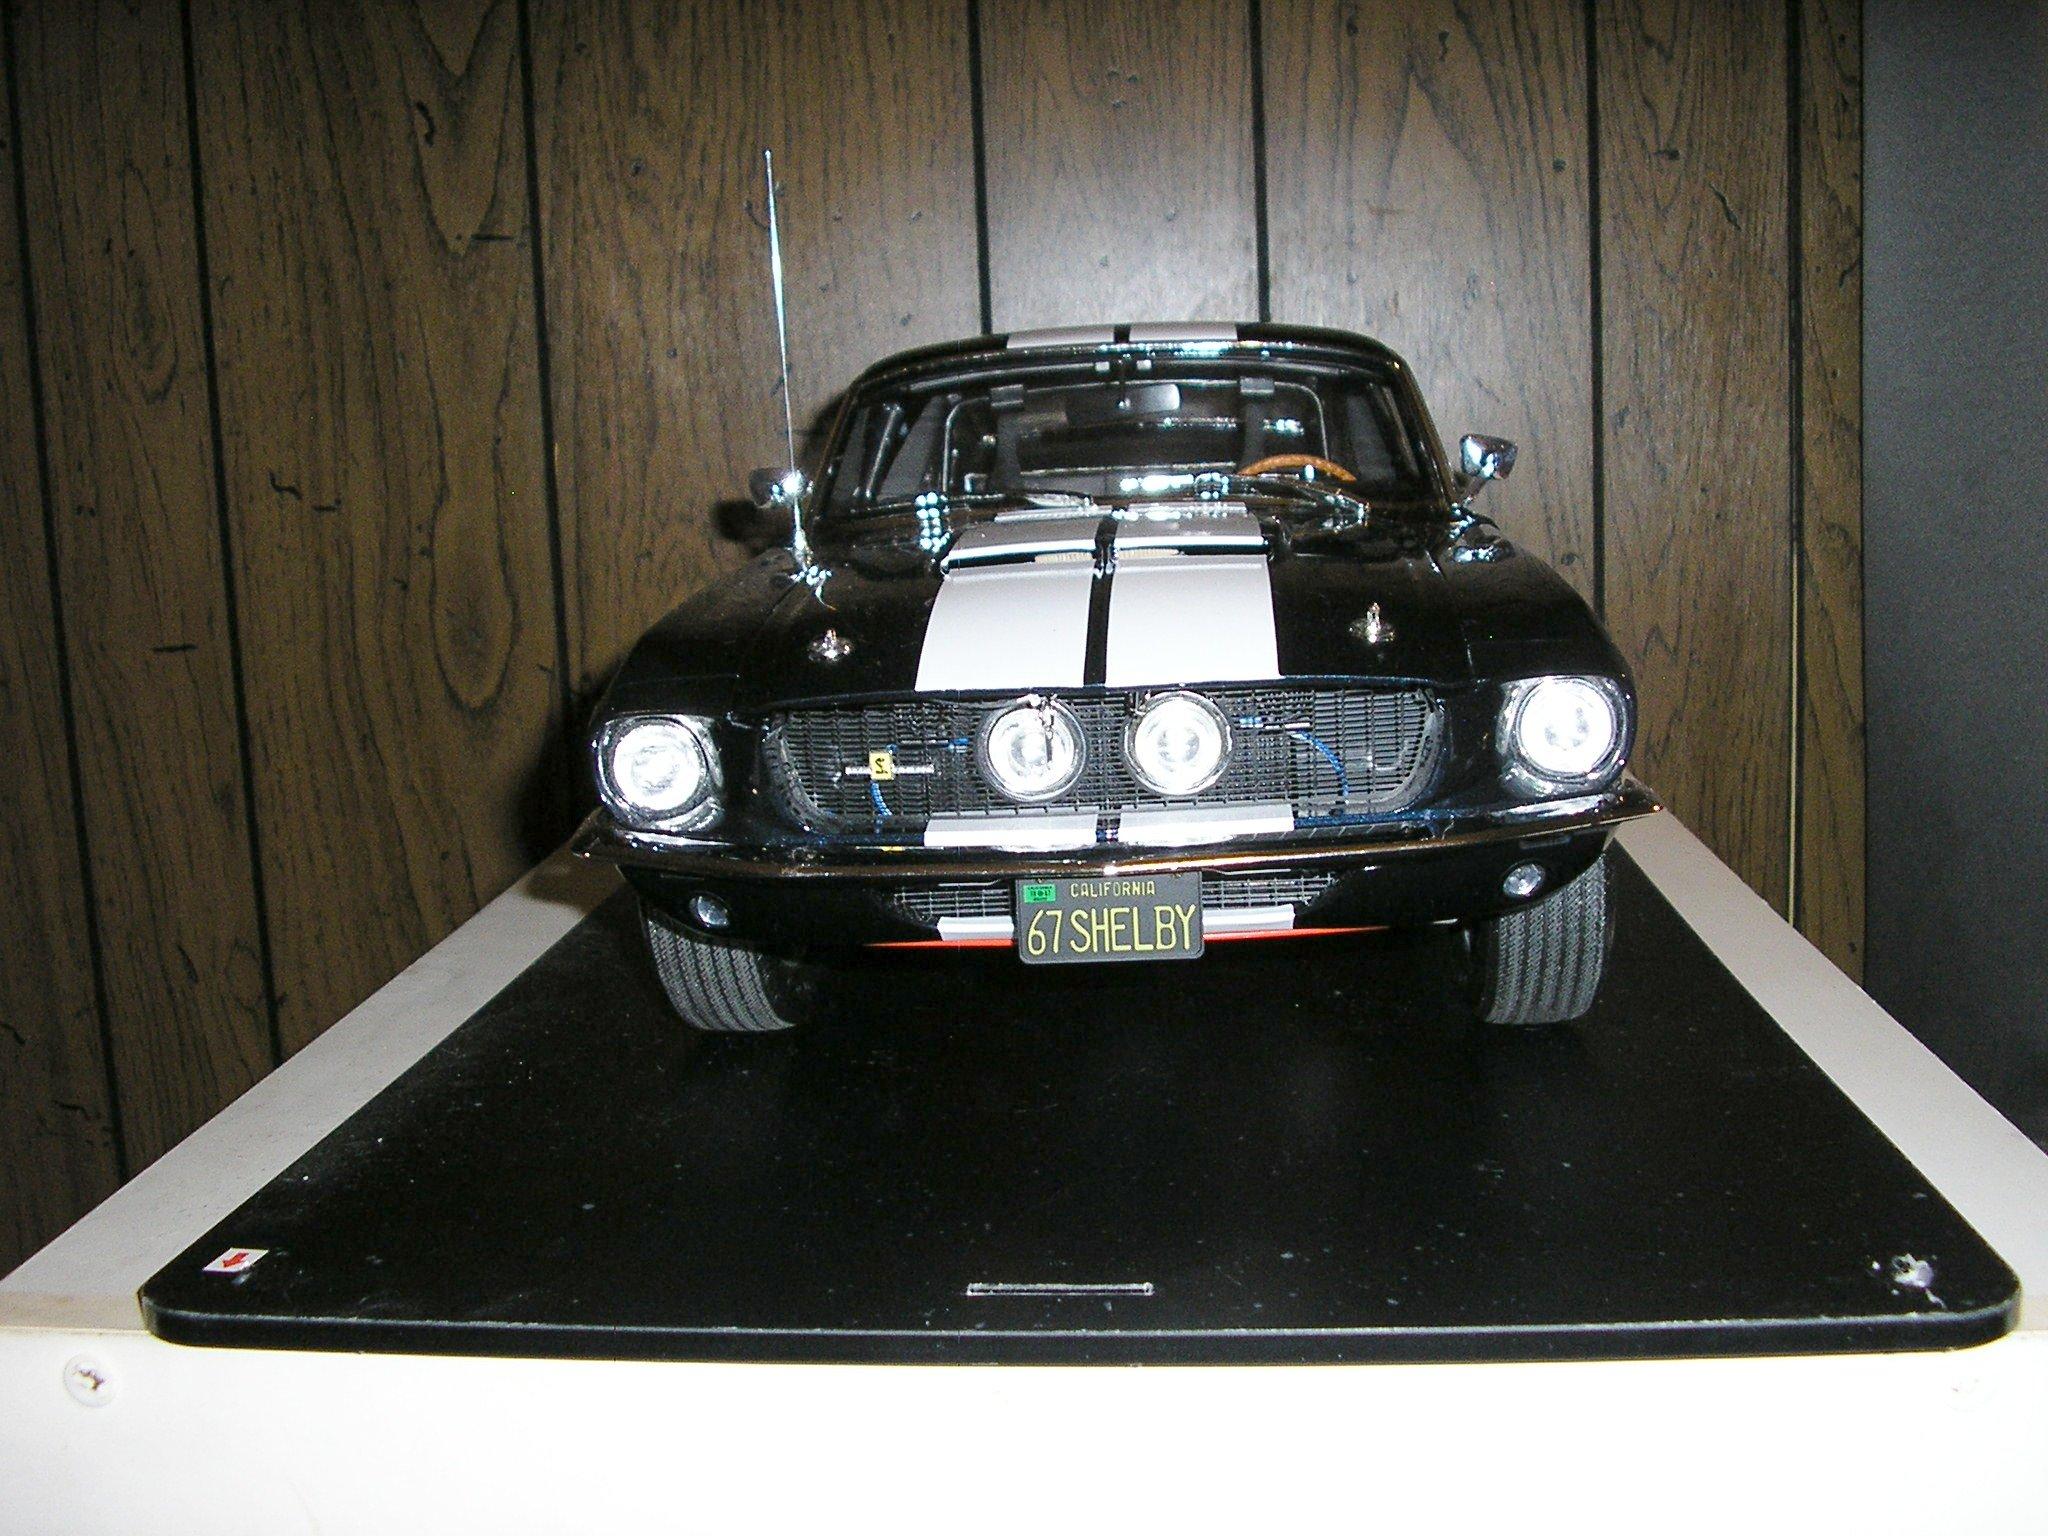
I gotta chuckle at this...........the lights and all do work as well as the horn blows when you press down on the steering wheel. The horn sound is HILARIOUS! When it sounds, it's sounds more like a 1967 VW than a '67 Mustang Shelby! Whoever created that sound card obviously is NOT familiar with the horn sounds of 1960's American cars. -
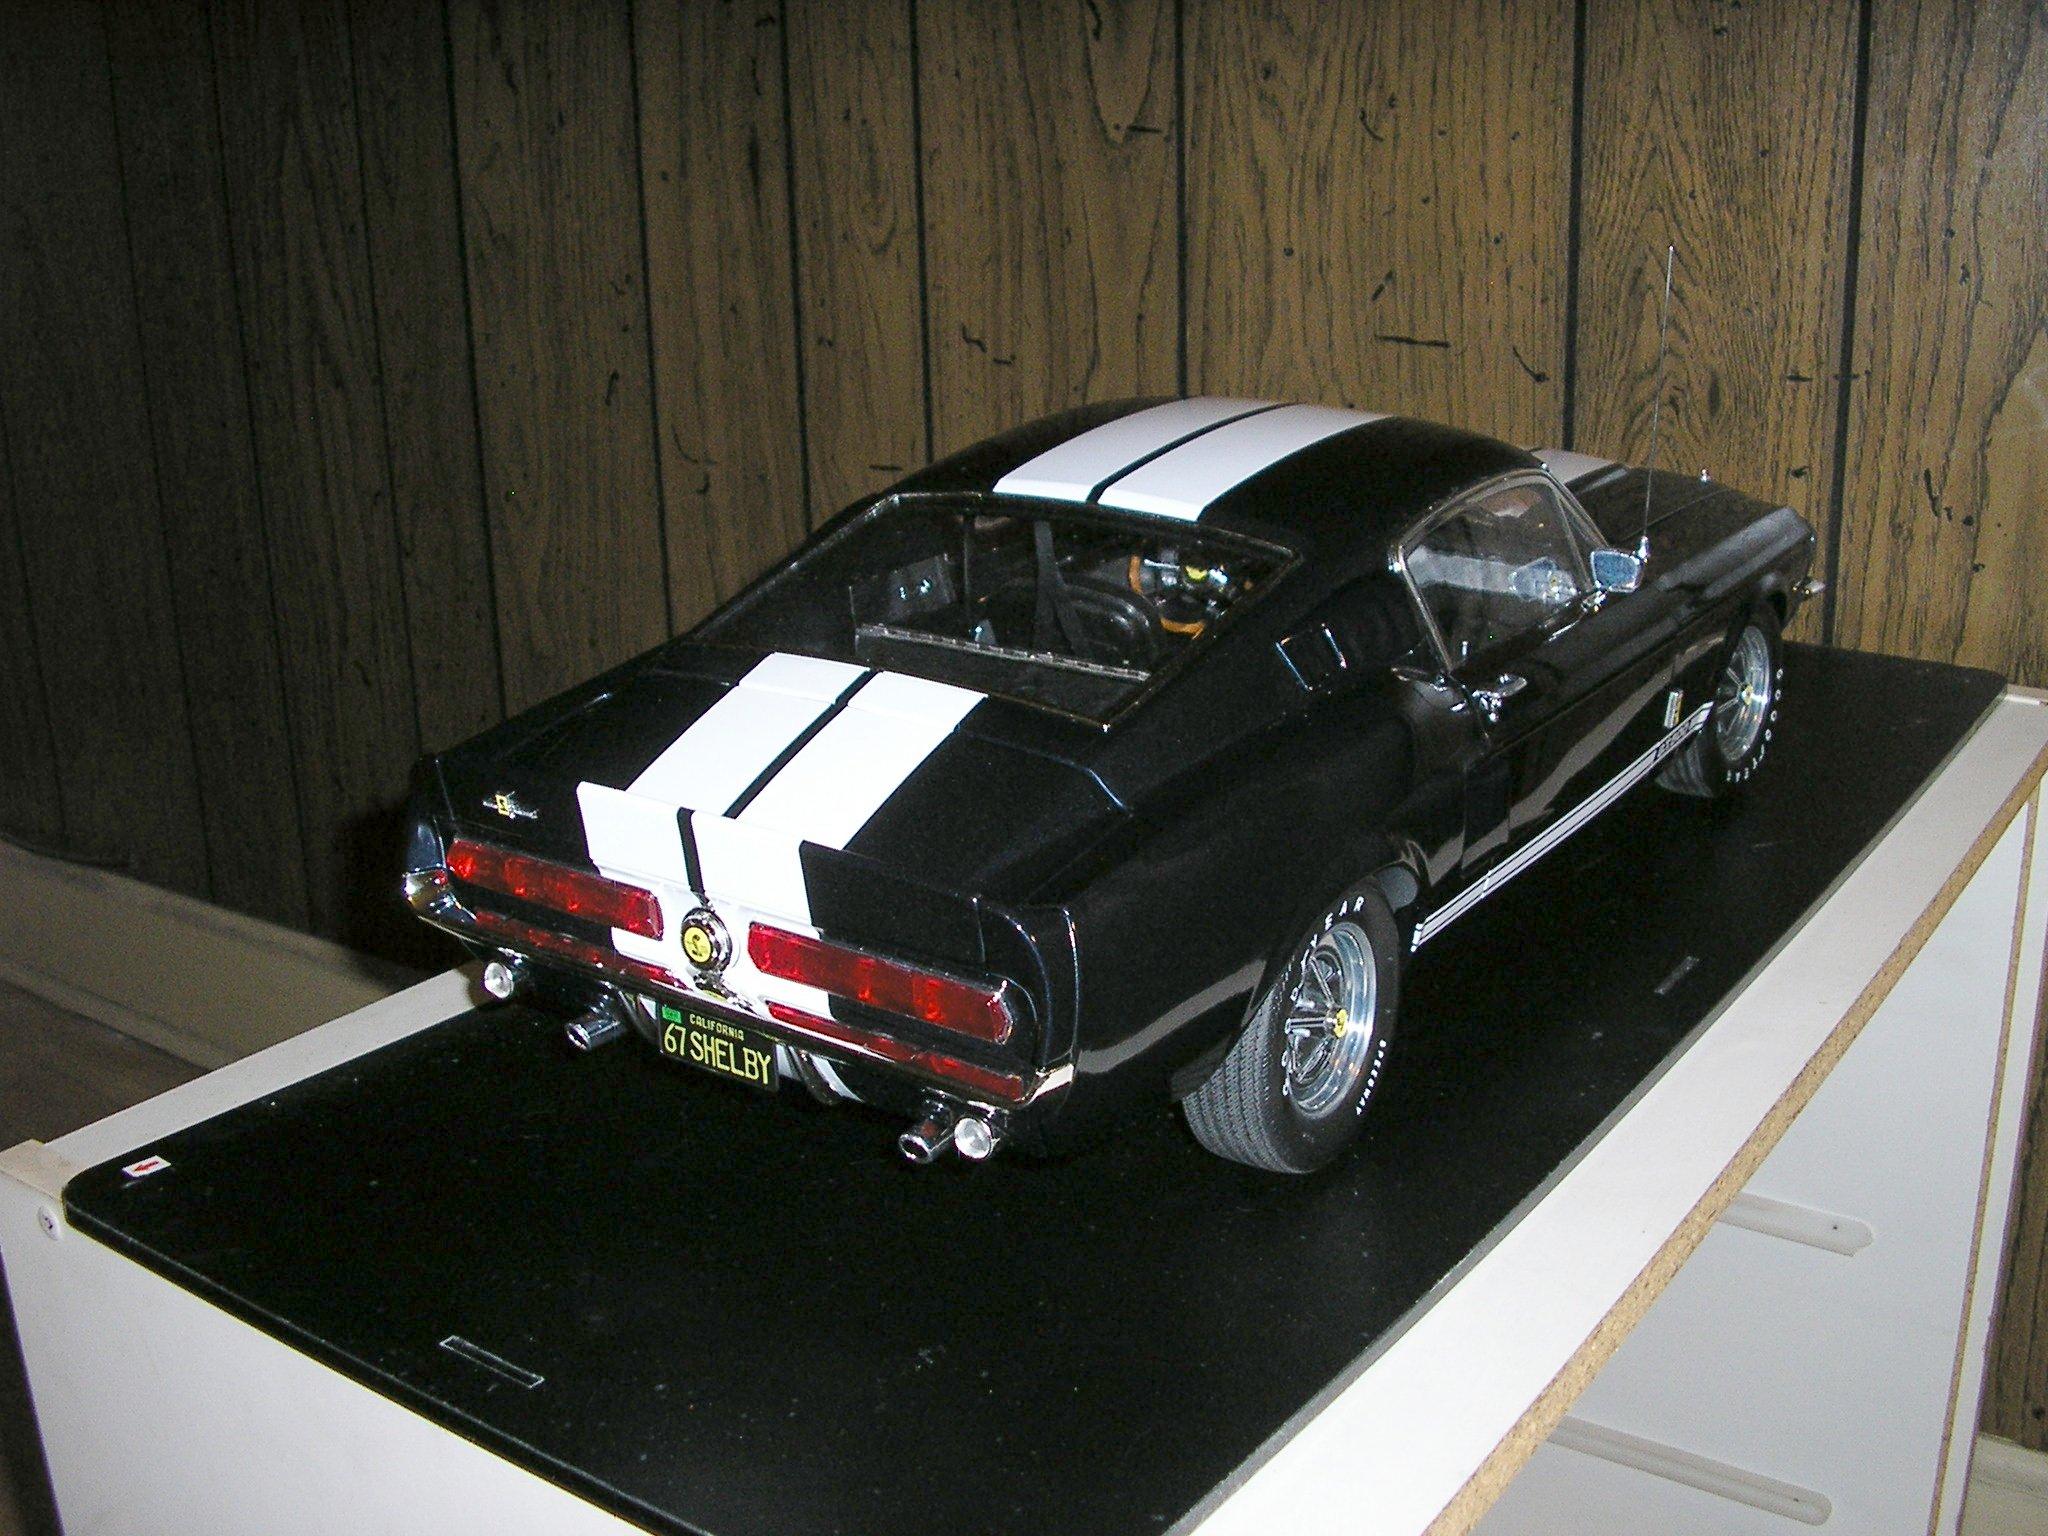
Here ya go Bruce! This was the best I could do at the moment given the type of lights I have in the house as I had to use the flash on the camera to get it to show up. I MIGHT take pics outside, but this thing is so heavy and it has to come from the upstairs, I'm not a fan of moving this thing at all. More than likely, I'll show this one time somewhere and that will be it as it's VERY cumbersome to move due to the weight and size of this thing. I'll have more pics posted at this thread here.
-
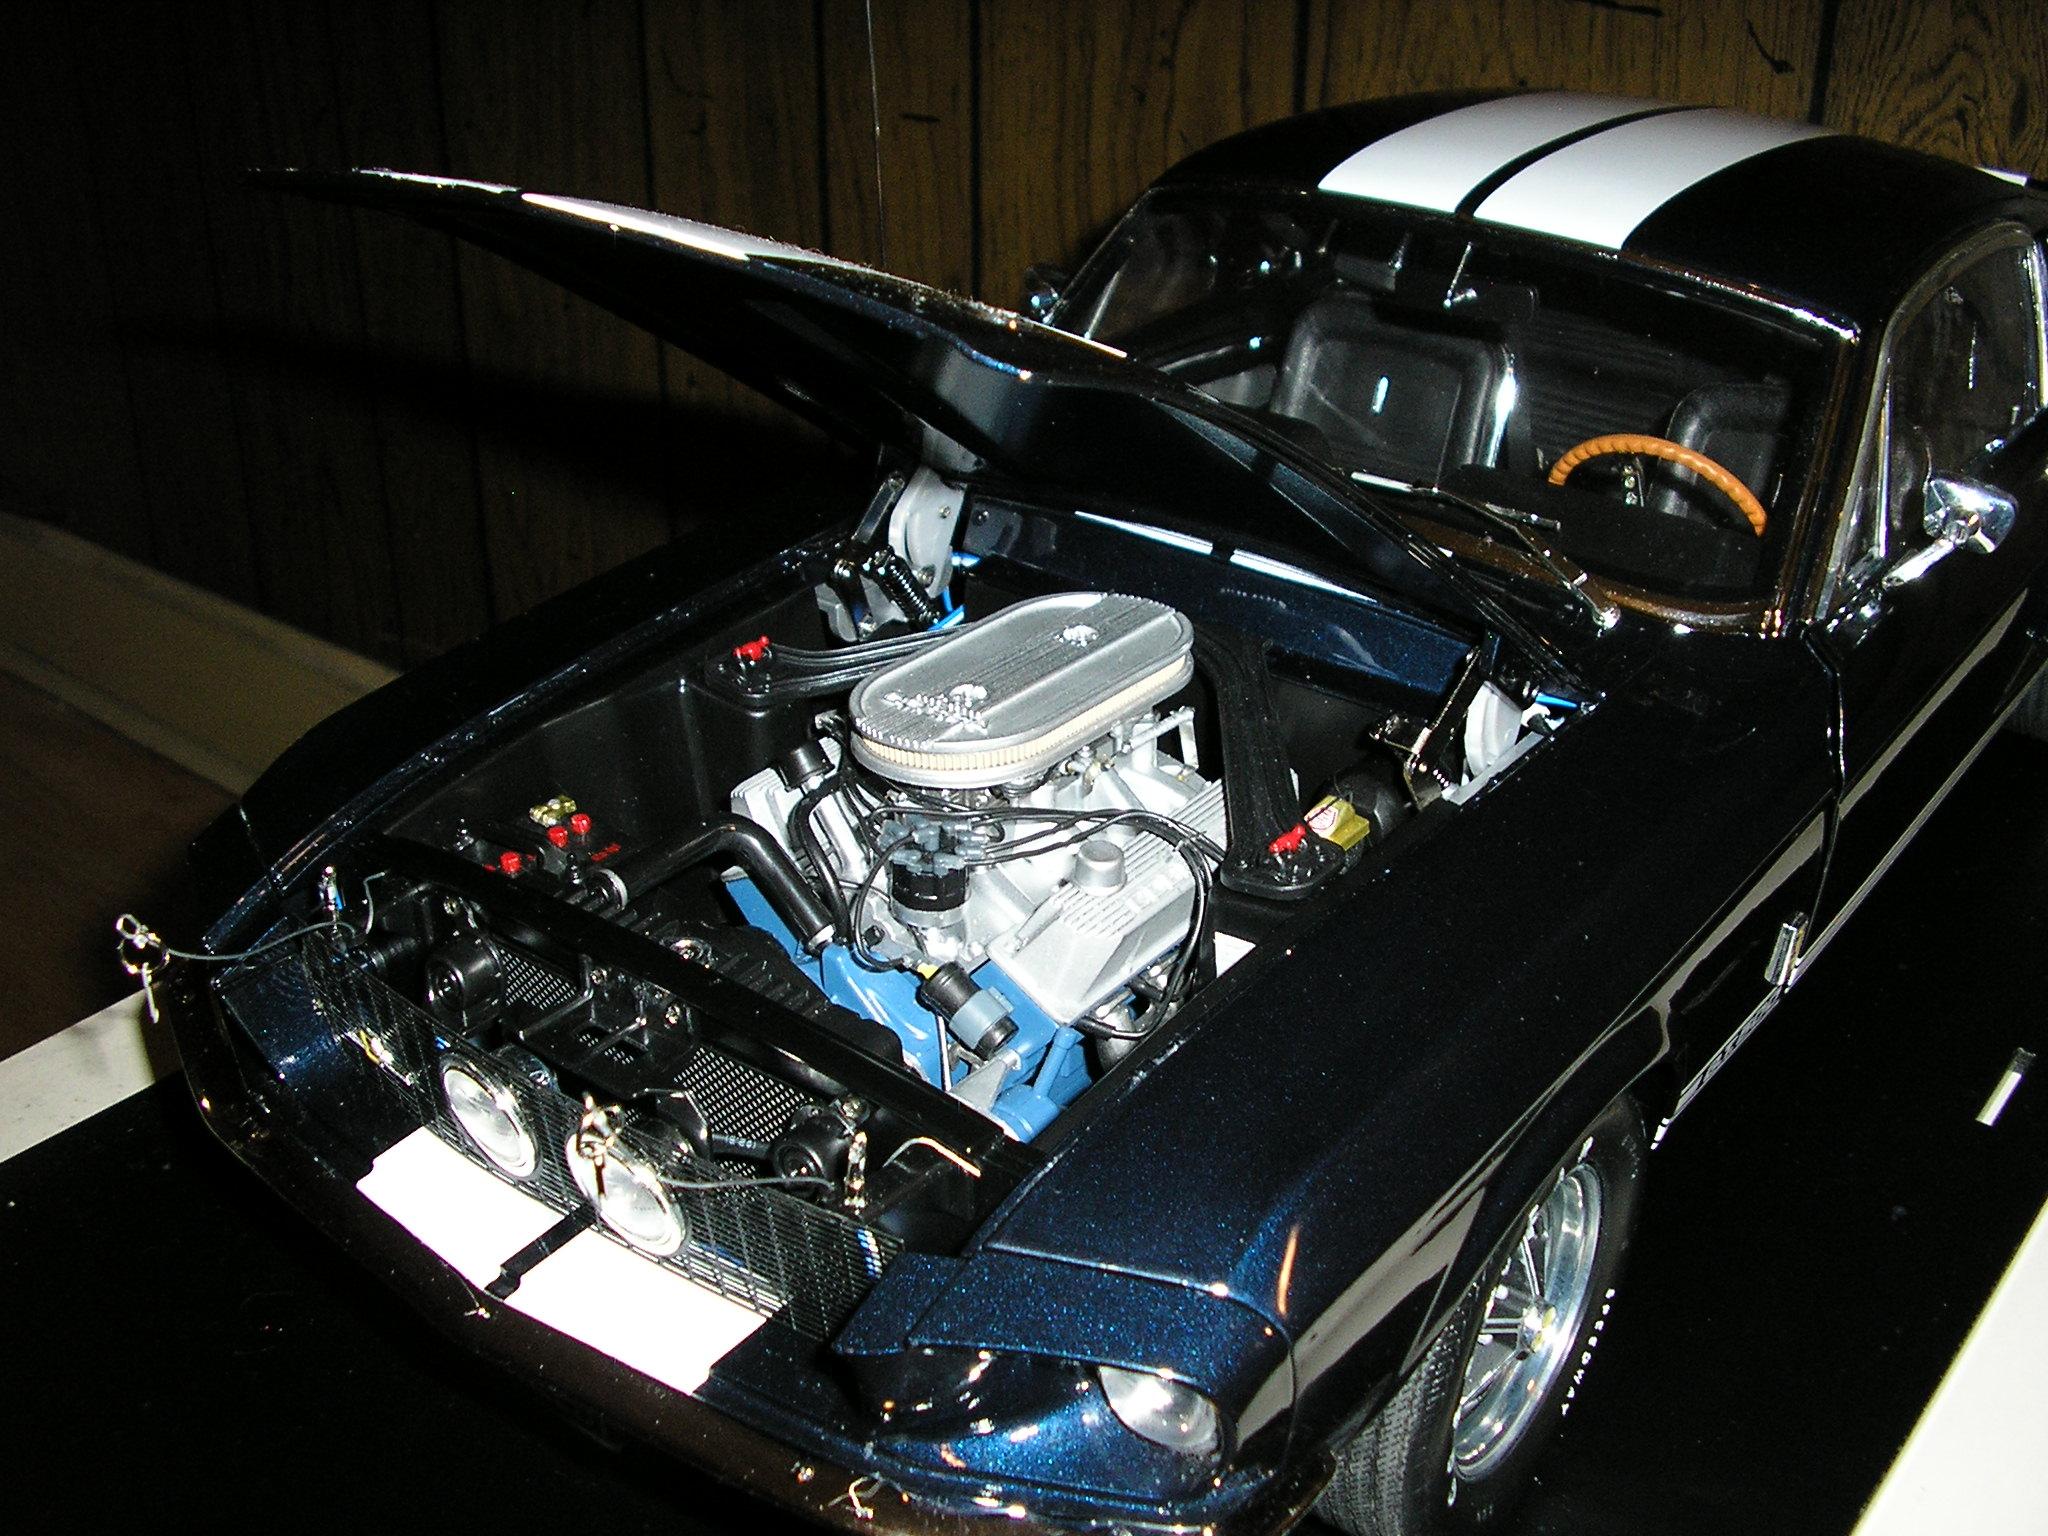
I actually finished this over the Christmas week while I was off, so this in effect is the only build I've gotten done for 2020. I had the parts for everything during the middle of '19, but with moving to a new house and finally getting motivated to start building again after being here for six months, I figure it was time to finally keep going on this and get it done. If I have to rate this kit as far as difficulty, I can only say this is NOT for beginners. I have to add that you will need more than the little screwdriver they give you to get this together and there are times you'll need epoxy/superglue as the screw/snap together assembly IMO is not permanent enough. One area that needs attention is how the doors fit. While the assembly is pretty straight forward, one problem I see is how the doors at the leading edge stick out just a wee bit too much for me. One needs to thin out the inner door panels a bit at the A pillars as I believe the dash is a bit too wide and it's butting against the doors making them not quite flush. All in all, a very nice kit for those of you that want to spend the money, and PLEASE make sure you have space to display it as it IS HUGE. My lighting is not the best due to the type of lights I have in the house so I had to use the flash on the camera. I'd like to take outside pics, but due to the sheer size and WEIGHT of this thing, I'm not crazy about carrying it down a flight of stairs and heaven forbid it falls. If I do take this to a show, it'll literally be a one time deal as carrying this around is seriously no joke. As you can see, I didn't go super crazy with details. Originally, I was going to add fuel/brake lines, but my better sense told me to leave that alone as I really don't want to have to turn this over to take pics. I could get a mirror to display the underside, but building this was more an effort to get back into building and to blow off the cobwebs of not being much into building for the better part of a year. I will say there's more detail that DeAgostini could have added for the money, but in their defense I do believe that this is one of their early efforts and later kits I've seen do have more detail. If this is a must have kit for you, I say take the plunge and get one as some of their other kits have sold out already and there's no guarantee they'll make 'em again. The Jaguar E-Type comes to mind as that was one I wanted, but I waited too long and now it's discontinued. BTW, for those of you that missed the thread of the build-up......it is here. Thanks for looking!
-
Bruce, I actually finished the whole car while I was on vacation over Christmas. Been super busy since getting back to work, but over the weekend I'll try to take pics of the whole thing. Unlike my much smaller stuff, the hangup will be a good place to get pics in the house with proper lighting to view it well. No putting this in my paint booth with poster board as my background! I do remember seeing a build suggestion online about the issue with the doors by someone else that was building his. He suggested thinning down the interior door panels somewhat as that seems to be the issue with that butting up against the dash. I wish I had seen that before I bolted the doors in, but one thing about this model is at least it can be unscrewed apart in case you make a mistake. Now if we could only get DeAgostini to do a '68 Shelby GT500KR convertible based on this!
-
Randy, is there a direct link to the one you saw on Shapeways? I've been to their site, but their searches are woefully cluttered. They never simply display what you're looking for. Way too much other stuff to wade through.
-
Lookin' good Bruce! One thing to watch out for. When it comes to getting the doors on, you might find that you'll have to sand away some of the inner door panel at the A pillar to get them to close properly. I had trouble with the driver's door in this regard and had to get the dremel out to get the door to shut better. Also, the doors have too much slop in them when it comes to the hinges. It might be a good idea to shim up the hinges somewhat to get them to not be so "floppy". I suspect though that 99% of the time the doors will be closed (like mine) so I wouldn't make a big production out of it. ?
-
Buying a builder
MrObsessive replied to slusher's topic in General Automotive Talk (Trucks and Cars)
I'll echo what Steve and Roger have said. There are those times that you could swear they used half a tube of glue to put the glass in. Such was the case with the '74 Corvette I bought as a cheap built-up (20 bucks) and the glass was a REAL tough job. My variable speed Dremel came to the rescue and I replaced the glass with my own fabrication anyway. Then there's the issue of damaged/deformed body panels due to so much glue so be prepared for that. Buying a built-up is good alternative to the super high prices some vintage kits can command. Just be prepared (and patient) with less than ideal build quality with too much glue being the toughest. -
Revell 67 Coronet 500 2 dr ht..
MrObsessive replied to moparfarmer's topic in Car Kit News & Reviews
Lemme go a bit further and my idea is a bit more sinister. Take the roof off of the Revell '67 Coronet and affix it to the lower part of the MPC '67 Charger. Much like what I did with Monogram's incorrect '59 Chevy roof and replaced it with the '60. Use part of the Revell Coronet's lower quarters and with a bit of reshaping, graft those into the MPC Charger's. Raise the roof crown ever so slightly on the Coronet roof so I can add in the proper curvature that the 1:1 has on both the windshield and the rear backlite. Lots of work, but bad body lines have been a very looooooong pet peeve of mine in this hobby and it drives me crazy especially when there's TONS of pics of these cars everywhere, as well as proper CAD systems to use. -
Revell 67 Coronet 500 2 dr ht..
MrObsessive replied to moparfarmer's topic in Car Kit News & Reviews
Unfortunately, this model reminds me an awful lot AMT's terrible hack job of the '58 Plymouth. Rear quarters and roof are the BIGGEST errors to my eyes and my idea was to do an awful lot of mixing and matching with the old MPC/Revell '67 Charger/Coronet quarters and trunk and a total reshaping of the roof which to my eyes is MUCH too flat. Yeah, I know some don't care but sorry.........I CANNOT stand bad body lines. -
I want to add Bruce that your getting parts packaged differently than I'm getting. Mine are coming in a blister pack, not in the plastic like they did yours. Also, I have to go to the printer shop to print out their instructions. I'm not crazy about looking at everything over my phone with as much difficulty I have with eyesight. I downloaded their PDF file, sent the file to our local Staples, then printed it out and have all the pages in a binder. MUCH easier for me in 3D and the print is MUCH bigger where I can see it. ?
-
Hey! I got one of those coming in my next shipment shortly! I have yet to even get started on it. Like the Mustang however, I can see where some rubbing out of the paint will be needed. Speaking of that, I finished up the Mustang this week, but DeAgostini didn't see fit to give you batteries for all the electrics. NO ONE around here has the batteries I need, so I had to go on the 'Bay to get the correct ones. Once they come in and things light up like they should, I can take photos in a good spot and I'll post 'em here.