MrObsessive
-
Posts
9,785 -
Joined
-
Last visited
Content Type
Profiles
Forums
Events
Gallery
Everything posted by MrObsessive
-
Geoff, thanks so much for the review! I'm also glad they molded the body the way they did. The 1:1 has no seam on the dogleg behind the door like that or on the cowl, so it's nice they did this correctly. I'll probably pick up the convertible when it comes out. LOVE the looks of both styles, the convertible to my eyes is more drool worthy though.
-

1967 Coronet and GTX Dogdish hubcaps
MrObsessive replied to VRM's topic in Car Aftermarket / Resin / 3D Printed
Thanks for the heads up Steve! They look GREAT! I located your auctions and I have both sets on my watch list. I've got a couple other things I'm looking at on there and I'll try and snag those before the auction ends. -
Monogram. Kinda pricey when they turn up on eBay (like a lot of 1/8th's) but deals can be found.
-
DeAgostini 1/8 1967 Shelby GT 500....Update! 2/5/19
MrObsessive replied to MrObsessive's topic in WIP: Model Cars
Just a real quick update. Since I'm snowed in and no work overnight, I figured what a good time to get some done on this thing. Got pretty much the entire front end done now............. The hood pins were a bit of a challenge as the pins themselves are plastic, but the clamps that go through them are solid metal. Well, one of the pins broke off while handling the body trying to work with it upside down, so I ended up pinning it back in with brass and some epoxy. That should be the way ALL small parts are mounted. Drill a hole for brass rod, cut it, then epoxy the part in. Makes for a MUCH stronger part down the road. One nit I have here is I notice the hood stripes don't overlap the leading edge of the hood.......instead they stop right at the edge. All pics I have of '67 Shelby's including ones I've seen live and in person, the hood stripes are always overlapped. This I'll remedy before it's all said and done. The next steps involve the rear end with attaching the trunk with its hinges, rear valence with taillights and wiring. Looks like I got more rubbing and out polishing to do as I see orange peel on the deck lid which MUST be gone. More later.......... -
You might see something on this page here that might help. I don't know if he makes that clear part, but I do see listed the type carb you have pictured.
-
Oooh! Very nice! I'll be checking this out as I have a built-up of this kit I won at our club's raffle years ago. Some don't like this gen of 'Vette, but I've liked the looks of them.....especially the later ones with the rounded tail. I'd have to paint the roof section on mine gloss black though. To my eyes, it's just looks a bit better with the "glass" roof" than body color, but that's just me. Keep up the nice work!
-
I might go for the Jag convertible.....I do have a couple other brands however that I haven't touched yet (Heller and Gunze). The VW Camper is a MUST HAVE though!
-
amt 1202 1/25 AMT 1963 Chevy II Nova Station Wagon - Craftsman Plus
MrObsessive replied to Casey's topic in Car Kit News & Reviews
I hear ya Lee! It's one of the reasons I've been zeroing in on the larger scales as of late. My eyes just aren't like they used to be despite an ever stronger prescription for glasses. I'm at a point where when I get back to doing "smaller scales", I'll just have to really take my time as the eyes tire quicker than they used to. -
DeAgostini 1/8 1967 Shelby GT 500....Update! 2/5/19
MrObsessive replied to MrObsessive's topic in WIP: Model Cars
Thanks Anton! And thanks fellas for the nice words! I don't get to work on this everyday, but at least this is on the downside of getting done and it's a GOOD FEELING! Maybe, just maybe I'll get this done before years end and I can chalk this up to a 2020 finish! -
amt 1202 1/25 AMT 1963 Chevy II Nova Station Wagon - Craftsman Plus
MrObsessive replied to Casey's topic in Car Kit News & Reviews
I wondered about that. I have an original built-up (not painted) and I thought about restoring that using the '66 chassis. Probably what I'd end up doing (with the newer kit) is building the interior on the flip side of the chassis, but some slicing and dicing will be needed to get rid of the interior floor thickness in the kit. It would require probably doing something with the rear wheel wells as they're a bit different from hardtop to wagon. Some work involved, but it's sure nice to see this kit back again! Watch the eBay prices on those fall like a stone. -
DeAgostini 1/8 1967 Shelby GT 500....Update! 2/5/19
MrObsessive replied to MrObsessive's topic in WIP: Model Cars
Just a little update today.......... I've had to spend a considerable amount of time rubbing out and polishing the body as while the paint job is not bad..........just a bit too orange peeled in spots and there's too much real estate in my eyes to just let that go. Especially for a car of this type. Race cars, you might be able to get away with that because, well......they're race cars. Street cars are another matter and the paint jobs should be as smooth as possible. You'll notice I've masked off the stripes......very early on when I got the body panels I tried to rub out the stripes in a hidden area on the nose. Very quickly the stripes began to "run" which told me that either those stripes were not clear coated, or they were some sort of decal. I decided to let them be as I didn't want the hassle of repainting stripes and the mess that would make. You can see here I've laid down first some Parafilm, then some Tamiya tape on top of that. I also like to cover up creases and whatnot as it never fails to rub through a corner, creating yet more work to fix it. LOTS of rubbing out/polishing I had to do on this hood. Finally got it to the gloss I wanted......this was not the final result. Forgot to take a pic of it after.........the orange peel is gone though which bugged me a lot. Here's where the teeth (in my case denture) gnashing came in! DeAgostini gives you the parts to do semi scissor hinges for the hood. Well, I forgot to pre drill the hole to make it easier for the screw to go in once I needed to attach the part. Sure enough, the screw head BROKE OFF leaving the bulk of the screw INSIDE the bored hole. Cursing then took place! At first I thought about leaving the hinges off altogether, but I searched around and found a drill bit that was very close in size to the original hole that was drilled. VERY CAREFULLY I drilled a new hole and then I was able to attach the hinge guide as seen here. It's a good thing they do give you extra screws to use. Something like this was bound to happen. Here's a semi-beauty shot with the body attached (not permanent) and the hood now attached with its proper hinges. I'm not crazy about the hinge guides being plastic. I don't know how long that'll hold up. On the other hand this won't be "played with" like a toy, so they shouldn't be too bad in holding up. This is not the spot where it'll be displayed once it's done. I have another area in my house where it'll be in its case. Gotta do some dusting........yet another reason why having cases for your models is a MUST. That's all for the moment. Next step is attaching the electrics for the head and fog lights with its wiring. After that, attaching the front end to the fenders and then it's on to putting on the trunk and lower rear valance. I'm sure I'll have to get out the polishing kit again for the trunk. Thanks for following along! -
The finish on your example looks a bit better Bruce than the one I'm working on. I spent quite a bit of time going over the body with a polishing kit and wet sanding the clear coat. One area on mine they didn't clear coat were the scoops. I started to rub those out and saw blue paint rubbing away. Whoops! I left those alone as I'm not so sure I'd get a proper color match with the paint I have in trying to repaint 'em. A detail set? That would be GREAT as these kits could have stood a bit more detail in the engine compartment particularly. I didn't go for doing the brake lines and such because there's no way I'm going to be picking this thing up and down constantly to show that off. It's simply too heavy for that. BTW, I just got a display case for it from DeAgostini. WOW!! Is that thing HUGE!! You have to put it together, but I have to WARN you it's considerably BIGGER than the kit itself so better make sure you got PLENTY of room to place it!
-
Late '50's/Early '60's Aston Martin Green
MrObsessive replied to MrObsessive's topic in Model Building Questions and Answers
Aaaah! Thanks Roger! I have to go to the auto parts store today, so I'll see if I can find that. Thanks a bunch! -
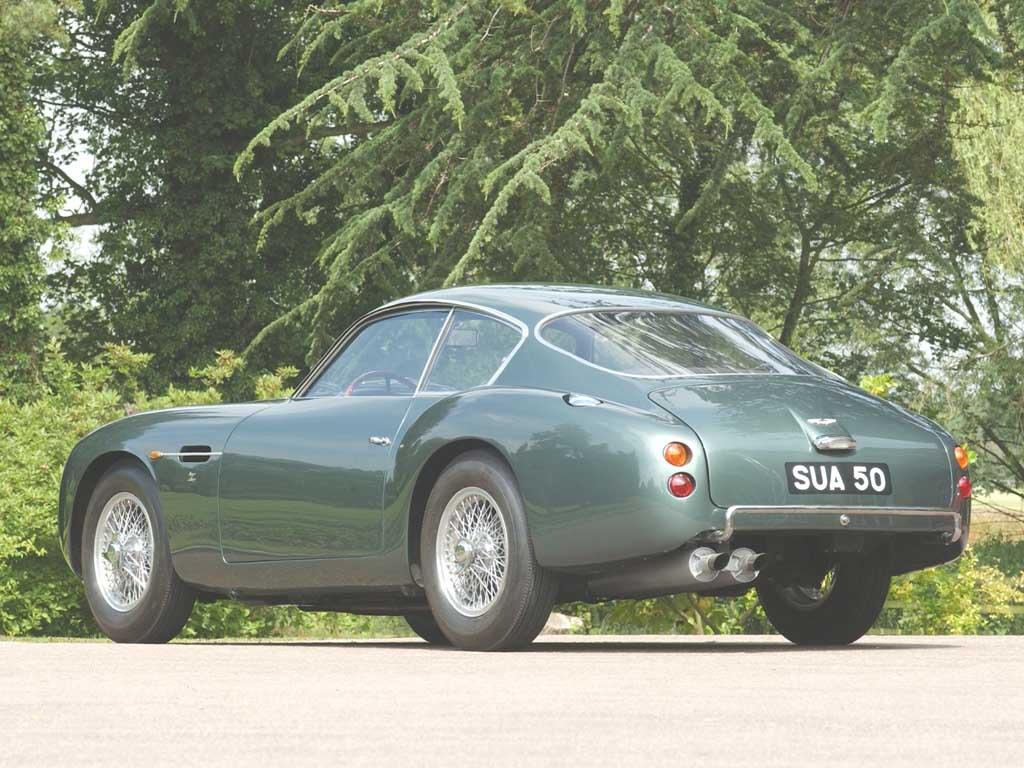
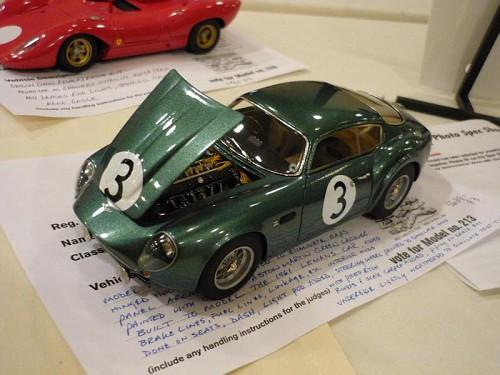
Anyone out there know a very good paint match for vintage Aston Martins? Particularly the green seen below? A bit ago, I got a "Holy Grail" of mine.......the MFH 1961 Aston Martin DB4 Zagato kit. It was started (body painted) and while it's not bad, it's had some nicks and dings in certain places where they can be seen. I'd like to strip it, redo it, but I don't remember the paint the fellow I got it from said he used. It's this car here I'd like to do down the road............... And here's the kit I've seen built up..........VERY nicely done whoever did this. Thanks for any info fellas!

-
While superglue can be used as a filler, be VERY CAREFUL when sanding it away as it's tougher than resin and may not sand at the same rate. I've had issues in the past where I've had to reconfigure contours as the superglue didn't sand away as fast as the surrounding resin. One idea to blunt that is to use some baking soda to "dilute" the superglue, thus making it easier to sand once it's flash hardened. Hope this helps!
-
My BIG WISH for 2021 is for Round 2 to somehow, someway bring back the 1/16 scale '57 Nomad! That one's been gone forever and the prices on eBay are CRAZY. Hopefully that tooling still exists.
-
Very sharp in pink! AMT got the lines on this pretty spot on back then and I wish the same effort had gone into their 1/25 scale one. I just got this one recently and I'm sooooo glad they FINALLY put this kit in a sturdy box! EVERY time I'd see these turn up on the 'Bay, I could close my eyes and bet the pics will show a bent windshield frame. I'd look and sure enough..........it would be bent. The stiffer box should solve that hopefully.
-
DeAgostini 1/8 1967 Shelby GT 500....Update! 2/5/19
MrObsessive replied to MrObsessive's topic in WIP: Model Cars
OK, got the wheel/tire fixed and took some quick pics so you can get an idea how this will look just the body test fitted for the time being. As I mentioned, the next chore will be rubbing out the clearcoat on the main body shell. The door is just placed there for the time being........the hinges get screwed on their supports after I get the paint polished out. Thanks for lookin'! -
DeAgostini 1/8 1967 Shelby GT 500....Update! 2/5/19
MrObsessive replied to MrObsessive's topic in WIP: Model Cars
It's nice to be off for a few days over this holiday because that means I get to spend some time at the work table and get some things done with this Shelby! I don't go back to work till Sunday night, so I can get to the downside of getting this one done. Recently, I went to our local fabric shop to see if I could find some type of vinyl material which came close to the "Burtex" pattern seen in Mustang trunks (and other Fords) of this era. This is what I came up with and while it's not an exact match, it's better than the primer colored trunk floor which to my eyes doesn't appear right. Now on to detailing the engine a bit and these ignition wires are WOEFULLY incorrect. No. This simply will NOT do. I ended up cutting off ALL the wires on the distributor and found some wiring which to me looks better. I did save the ends of their wiring which I can use as "spark plugs" and I had some wiring which had large enough insulation to make the boots. Here's the complete engine..........I'm not going to add every nut and bolt as I didn't want to run into later interference with other assemblies down the line. This will be fine as a bit of it will get hidden in the pretty crowded engine compartment. Engine is now bolted on the chassis mounts and it's there to stay. I figured it's time to take the body out of its box permanently and start test fitting it to the completed chassis and interior. Here's where things start to get tricky. They supply you with the circuit board and wiring diagram. I had to really take my time with this as the wires I had to make sure were NOT in the way as far as getting them smashed or pinched when it came to routing them. The circuit board............. The circuit board mounts just under the driver's side inner fender. Once the body is on, this will be pretty cleverly hidden. The wires just before I plugged them all in and routed them where they should be. Now on to the front end. After a quite long rubbing out and polishing session with both fenders, I got the front bulkhead now mounted to them. At this point, I'm about to mount the front end on to the main body shell. Not long ago, I got a HUGE length of chamois cloth to use for this purpose. They recommend using some soft cloth (or towel) to have underneath the body during this phase. I like the chamois cloths as they won't leave any scratches when polishing and they'll last almost indefinitely. I will have to spend some time and rub out/polish the body. While the paint job isn't bad, there's still a bit of orange peel to the clear coat and a model of this size to my eyes it's more than noticeable. One of the things I wish DeAgostini had did was to make the rear end out of solid metal and not plastic. Just before I posted the pics to Fotki, I was trying to take a pic of the bolted on front fenders to the body and had that mounted on the chassis/interior. I'll be darned if the driver's side rear wheel snapped COMPLETELY off the axle! The part that broke off I have that setting with thick super glue and shouldn't be anymore problem later on. Just one of those things you have to keep in mind as the weight of this thing is NO JOKE. I also highly stress that anyone attempting to build one of these, make sure you got PLENTY of room. This sucks up a LOT of space as it's being built and I literally had to clear off a quite a bit of things on my table just to get this to not be in the way and have more issues. That's it for now..............next update I hope to have the body totally on the chassis and fully screwed on. On my issue #85 out of 100 so this is definitely nearing its end. Thank goodness! -
Keeping things in SCALE, wires, hoses, etc.
MrObsessive replied to Oldmopars's topic in Tips, Tricks, and Tutorials
I don't necessarily go by exact size and measurements when doing something in a particular scale. I'll go by what looks correct to my eyes and go from there. Case in point: The 1/8 scale Shelby I'm working on has what looks to me HORRENDOUSLY oversized ignition wiring. Add to that the way they want you to route the wires, it looks like a GIANT spider sitting on top of the engine. It may in fact be the correct size for this particular car, but to me looks grossly out of place. I'm right now fixing all of that to something that looks more suitable to my eyes. It's never a one size fits all when it comes to things like this and what might seem "correct" in the specific measurements may not look all that great when it's put on a particular model or part. Just my 2 cents worth when it comes to this. -
OK Bruce...........I couldn't stand it any longer and I just went and ordered one of these on a subscription! This IS one of my favorite road racers out of the '60's and it'll go well with the Shelby as I'll have that one done long before this one is finished. Just to have somewhere to display these, I just bought off Amazon the other day a couple short three level bookcases which are definitely large enough (and sturdy) to put these on once done. So, that makes THREE of these beasts I'll have going on pretty much at the same time. The Shelby, this GT40, and the '55 Mercedes 300SL which I'm FINALLY getting parts again from Eaglemoss starting this week.
-
amt 1202 1/25 AMT 1963 Chevy II Nova Station Wagon - Craftsman Plus
MrObsessive replied to Casey's topic in Car Kit News & Reviews
Funny how time can have different perspectives. For example, I can remember when my Mom was 25..........she's now 80. My Dad who was a car guy, I can remember him in his early 30's. He passed away back in '13 and he was 80. He loved just about everything Chrysler and one of his favorites was the '57 Plymouth I've mentioned here from time to time. Yet another reason I cringe whenever I see the AMT '58 Plymouth as I can remember that car VERY well and knew it was wrong the millisecond I saw it. I have an Uncle (Dad's much younger brother) who'd appreciate that '63 Chevy II wagon as he had a '62 four door. VERY clean and rust free until one New Years Eve about 20 years ago, someone plowed into it while it was sitting in front of my aunt's house. BTW, I plan on buying that kit whenever it comes out. For no other reason than just to have it. I have the original Craftsman built up in its original box. Nice and cleanly built with no paint. I'd like to take the newer '66 Nova chassis and kitbash it with that. That would be a fun project as I don't have any other wagon kits I've built except for the Dodge Magnum years ago. -
amt 1202 1/25 AMT 1963 Chevy II Nova Station Wagon - Craftsman Plus
MrObsessive replied to Casey's topic in Car Kit News & Reviews
Good point James. I'm at the tail end of the Baby Boomers (staring at 60), and with all the kits I have, many of them stuff from the '60's........there's no way I'd live long enough to build them all. Like you said, there will come a point in time where no one will remember a '57 Chevy, '32 Fords, or a '69 Camaro. Just like I wouldn't remember cars out of the '30's and '40's like my Dad did. That's how time works. Generations come and go. -
Bruce, she's lookin' absolutely FANTASTIC! I know how you feel when it comes to not enough hours in the day. As a third shifter, there's just some days I don't get past "groking" parts before it's time to shelve things for the day. BTW, I talked to someone from Eaglemoss the other day about the delay in getting further parts for the 1/8 '55 Mercedes 300 SL I'm doing. Indeed she said that COVID caused major delays in getting things out and I should start getting parts again any day. Haven't received anything since June. Sometime down the road I'm going to break the bank and get one of those Cobras. Just the parts layout alone in the kit is a marvel in itself to see as I have their 250 GTO and the Daytona Spyder.
-
DeAgostini 1/8 1967 Shelby GT 500....Update! 2/5/19
MrObsessive replied to MrObsessive's topic in WIP: Model Cars
Rex, I'm on Issue 63 with the steering wheel linkage and wiring so at least I'm more than halfway done now! Yes, over the winter I should be totally done with it. The one issue that's going to take some time is rubbing out the body. Not bad, but the clear coat is a bit too orange peeled for me. I'll also need to clear out more space on the table. This thing is simply sucking up a lot of space for working on it!