

Luis Ayala
-
Posts
373 -
Joined
-
Last visited
Content Type
Profiles
Forums
Events
Gallery
Everything posted by Luis Ayala
-
Thank you all for your comments, I am glad you like it !!!!! This kit is really nice and fun to build. :wink:
-
Just wanted to share with you a couple of pics of one of my favorite builds. Hope you like it... :wink:
-
Thank you all for your comments!!!!! Rims arrived and are ready to install. Finally I received everything I needed to finish this one. I'll spend some time with it tommorrow to see if I can get the interios painted and the body with a couple of primer coats. I decided to install a set of "Hopping Hydros" two tone rims. Here are some of the extras for this one, Hope to post more pics soo..n. Hope you like it... :wink:
-
'63 Chrysler Turbine Car Update----Final Update!-6/23/07
Luis Ayala replied to MrObsessive's topic in WIP: Model Cars
WOW!!! May the force be with you Bill!!!!!!! Just kidding :wink: I am sure this will be one more of your exelent builds... :wink: -
Trumpeters 1978 Chevrolet Monte Carlo Landau Coupe
Luis Ayala replied to PeterLepold's topic in WIP: Model Cars
EXELENT WORK !!!!!!!!!!!!!!!!!!!!!!!!!! Thanks for sharing, your skills are amazing... Congratulations!!!! Man that "Wood" paint is just out of this world :shock: :shock: -
Here's an update of the Impala project. Have been very busy at work so this one will take some time to finish. I have prep much of the body parts for primer. Since I opened the doors, I sectioned the interior pannels to work easier later. Seats have been assembled and are ready for primer. The engine is also ready to prime. I had to remove a couple of molded parts, like the upper water hose, distribuitor, starter & oil filter. Those parts needed a little more attention to detail so I removed them to put new ones later. I love "Pro Weld" glue, it works so nice that the joint betwen the two parts of the engine just needed a little bit of sanding work and it was gone!!! I decided to open the glove compartment to put in some stuff. It's taking some time but I am very happy with the results so far. Hopefully it will get some primer very soon. Hope you like it so far
-
Chrome trees are always my worth nightmare. :x :x I have been using different products trying to achieve that mirror chrome look, but even with "alclad" the big pieces seem to turn out a little dull. Finally I think I found what would be the answer to my endless search for a reliable and affordable system to chrome parts. This company has a great variety of products; they have beatifull candy colors, prisma colors,etc. Take a look at this gorgeous candy colors. http://www.alsacorp.com/products/candyconc...candy_price.htm Now, when things get serious is here, watch this video and see for yourselvs :shock: :shock: !!!!!!!!!! http://alsacorp.com/products/killercans/kc...c_chrome1_H.wmv
-
Just BEAUTIFULL!!!!!!!!!!!!!!!!!!!!! :!: :!:
-
You had a great start on this one Simon!!!!!! Keep us posted!!!! :wink:
-
Great job Ajay!!!!!!!!!!!!!! I Agree with Daniel, my friends here at the Island are building more bikes than cars... :shock:
-
Thank you all for your comments!!!!!!!!!!!!!!!!!!!!!!! Gracias Ismael, ese modelo lo pinte con "spray" de Testors. Para esa epoca no conocia lo que era un "Airbrush". Soy un fiel aficionado a las pinturas con base de aceite "Enamel". Trabaje hace muuuuuchos años en un taller de hojalateria y para esa epoca eso era lo que se usaba. He usado las pinturas "lacquer" pero siempre les tiro mi "clear" favorito "Boyd's Clearcote". :wink: Hi Bill, My first model was a REVELL-MONOGRAM 1/24 '66 Malibu SS; I still have it and believe me I look at it from time to time. I painted the interiors with a small brush :shock: man it took forever to finish it :cry: It ended up with finger prints all over the place and my wife almost kill me when she saw paint all over my shirt... I remember the first time I went to a contest :shock: I felt like a fish out of the water. I started looking at the models at the tables and when I saw all the detailing, painting, etc. I almost grabbed my stuff and run for cover :shock: . To make the long story short, I decided to stay and ended the day with one " Top 15" award and a hand full of new friends... :wink: Hey, but this is a hobby and making friends and having fun is what this is all about... isn't it? :wink:
-
Is nice to work with and comes with a detailed installation sheet. Easy to cut, flexible and has a very strong adhesive. It is just like installing contact paper.
-
I build this kit about 4 years ago, when I started building model cars. This was on of my first builds (I think # 6 or so) and the only thing I added was some custom wheels. The paint is Daytona Yellow with Testors clearcote, both from spray cans. Just wanted to share some pics with you
-
Hi Bill, they stopped online orders as of July 31, 2003 but they are still in business. What they suggest is to place your order using their online catalog and e-mail it to them so it can be verified to see if all the items you want are currently available. Payments must be done by paypal or Postal Money order. Personal Checks will delay your order 3 to 4 weeks. :wink:
-
Try this ones from http://www.mas-parts.com/ Model Factory Hiro has also some nice Borrani wire wheels here: http://6904.teacup.com/modelfactoryhiro/shop/01_01_01/ Hope it helps... :wink:
-
That's OUTSTANDING !!!!!!!!!!!!!!!! work... Looks Absolutely GREAT :shock: :shock:
-
Looks Good man!!!! :wink: What color is that?
-
An old one from the shelf ... 1969 Oldsmobile W-30
Luis Ayala replied to Luis Ayala's topic in WIP: Model Cars
You are absolutely righ Bill !!!!!!!!!!! :oops: :oops: Sorry, I need to get me some glasses :shock: :shock: :? :? -
Well, :roll: :roll: still unpacking things after moving :? and while waiting for some parts to arrive for the Impala project, I decided to finish an old project, that has been sitting on the shelf for almost two years. I painted this one with Model Master Champagne Gold and Testors clearcote. By the time I painted it, I was using only spray cans. Airbrushing came about a year after this one. Here are some pics of my 1969 Oldsmobile W-30. Hopefully I'll finish this one tommorrow and post some pics. :wink:
-
Airbrush & Compressor recommendations?
Luis Ayala replied to dwhite645's topic in General Automotive Talk (Trucks and Cars)
You are absolutely right zebm1, I am sorry I didn't explain it right. :oops: Like I said I am not much of an expert, but since I only have a small 2gal compressor, my setup is quite simple and I use it only for airbrushing. Well, actually you don't have to install quick-connect fittings, you can always install a shut off valve, wich by the way I forgot to mention in the first place, behind one of the sides of the "T" that I suggested to install out of the on board tank regulator and leave everything there, instead of installing/removing all the setup every time you are going to use the airbrush. Then you can install your regular hose on the remaining side of the "T" and still use it for normal shop work . The main thing is that if you are setting up your shop for airbrushing, it doesn't matter if you have a compressor or not. Just hit this page and you will find the answer to all of your questions. :wink: -
Airbrush & Compressor recommendations?
Luis Ayala replied to dwhite645's topic in General Automotive Talk (Trucks and Cars)
Here are a couple of things that may usefull for your setup. Here's an universal moisture filter that's easier to install. Here are some links at MICRO-MARK that will give more info. http://www.ares-server.com/Ares/Ares.asp?M...ct&ID=81782 http://www.ares-server.com/Ares/Ares.asp?M...ct&ID=81768 What you will probably need to do is install a "T" at your compressor outlet and then run a separete short pipe for your airbrush using a new regulator and filter. That way you will still be able to use the regulator that's on board your compressor at 5PSI increments and when you are using the airbrush you can give it twist up to 50 PSI and then regulate your airbush at the desired pressure. Otherwise you will need to dismantel the compressor and install only the new regulator. Here is a PIC of the regulator you may look for: Use this link for more Info: http://www.dickblick.com/zz269/13/ Hope it helps!!! :wink: :wink: -
air brushing?????
Luis Ayala replied to slappy55's topic in General Automotive Talk (Trucks and Cars)
I have been using the Micro-Mesh polishing kit along with Novus products and Zymol car wax and I am pretty happy with the results. Here's some info... Micro Mesh-Polishing Kit Novus-1 Novus-2 Polishing Mates You may find all this products here: http://www.micromark.com/ Here is the Zymol product I use... You may read more info here: http://www.autosupermart.com/store/shop/zy...tml?id=tqX58kQ4 :wink: -
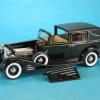
I installed one of MCG's vinil Tops on my 1933 Cadillac Town Car and they are very nice. I know a couple of guys that use ordinary masking tape for that. Here a couple of pics of my Cadillac Top.
-
Airbrush & Compressor recommendations?
Luis Ayala replied to dwhite645's topic in General Automotive Talk (Trucks and Cars)
I am glad the links help you out. Most compressors will have 3/8†NPT outlet. Depending on wich make of airbrush you buy, you will have a matching female adapter of the same size thread or will need to reduce it using an 1/4†NPT female hose adapter. I will suggest that you install the moisture trap first and then the airbrush. My airbrush already has the adapter so the only extra thing I added was the moisture trap. :wink: -
air brushing?????
Luis Ayala replied to slappy55's topic in General Automotive Talk (Trucks and Cars)
Chris, I started with the airbrush about a year ago but believe me I have seen people make stunning paint jobs out of rattle cans. The airbrush is for sure the best way to get a nice finish but there are a couple more things you have to keep in mind. Like Bluesman Mark says, the prep work is critical and after the painting is done, there comes the polishing time. Most of those shinny-glossy finishes you see out there is because of the polishing. Here are two pics of my 1953 Ford Vicky After & Before. Paint- Hampsted green-Rattle Can. Clearcote- Boyds- Airbrushed. After Polishing Before Polishing I will suggest for a starter setup that you can buy a testors airbrush kit that comes with a propeller tank so you can practice. Here is a link of what I suggest you can buy to start. This way you wont need to spent a lot of money right away and still have he feeling of the airbrush. http://www.testors.com/catalog_item.asp?itemNbr=1196 Hope it helps... :wink: