

Luis Ayala
-
Posts
373 -
Joined
-
Last visited
Content Type
Profiles
Forums
Events
Gallery
Everything posted by Luis Ayala
-
September Showdown pictures
Luis Ayala replied to Bob Doebley's topic in General Automotive Talk (Trucks and Cars)
Thanks for sharing those pics!!!!!!! It must have been a GREAT show... Congratulations to all who attended and specially the winners. -
How about some Re-Introductions?
Luis Ayala replied to Steve H.'s topic in General Automotive Talk (Trucks and Cars)
All right, my name is Luis Ayala and I have been married with a beautiful woman for the past 12 years. I live in Puerto Rico, and I am 40. I have two kids, a boy (10) and a girl (8). My wife has more hobbies than I do; she is into scrap booking, ceramic figures & glass mosaics. My kids and her are also into scale building, so you go figure… I run a small local forum at PR and with the help and support of my fellow modelers and “The Small World of MB†I host a small event every year on February, “Muscle Car Model Fest Madnessâ€. I have an Associate Degree in Production Engineering and I am a Nortel Networks Certified Design & Support Specialist. For the past 16 years I have been working in the communications field, 11 of them as a self employee (contractor) and 5 years as a regular employee of “Telefonica Empresas†involved with VOIP, Frame Relay & Point to Point Connections. When I was 12 my mother bought me a 57 Chevy molded in black. That was my first kit ever… She couldn’t afford to buy me more models at that time, so years went by and finally I officially started model building as a hobby on February 2003. I build mostly “Factory Stockâ€, but I always have room for any subject. I like cars from the 1930’s till the 1970’s but my main interest are cars between the 30’s & 50’s. -
Beautiful work Ismael!!!!! Congratulatios!!!!!!!!!!!!!
-
ABSOLUTELY GREAT!!!!!!!!!!!!!! Outstanding Job... Congratulations, the level of detail is just amazing...
-
Looks mean Lyle... the engine feels like it was factory installed !!!!!!! The interiors are just beautifull... even with a closed car it really shows the time you spent on detailing. How do you managed to get such a fine detail with the BMF ring inside those steelies, with not enven a scrath on them? That is a really tight spot to handle the "exacto" kinfe... I really admire your patience... Congratulations man, you did an awesome job as aussual...
-
Hey Marcos, you did it again brother!!!!!!!! AWESOME job man, congratulations!!!!!!!!
-
I think William and Ismael covered just about everthing... so I will just go over a few more things... The first thing I will say is DO NOT get dissapointed if you are having issues with your paint job, cause we all have had them. The most important thing is that you keep practicing untill you feel comfortable with it. Practice is the key for success so the more you practice, the better your skills will be. You don't need a kit to practice, you may use any plastic media you find available, or even on metal. The key for a nice paint is the prep work so make sure you wash all parts througly before laying any primer or paint over it. Keep in mind that your hands will also need to be clean while handling the kit so wash them once and then while you work on your kits. You must pick a spot to paint where your work is protected against dust and other airborn particles. A painting booth is a nice thing to have, but those are quite expensive, so a big package box will do for a while. As for the sanding, I always use 400 grit to get rid of mold lines before primer. You will find many options for primer selection, so since you are doing your first kits I will suggest you look for lacquer base primer in spray can. There are good automotive lacquer primers for about $5.00 and up that won't hurt the plastic. Painting a model kit is the same as painting a real car, you need to sand, use body filler, primer, sand it again, more body filler, more primer, untill you see a smooth and even surface for the paint to be laid on. I personally use 1000 and 2000 grit over the finished primer to leave some pores for the paint to adhere. Take your time, don't rush your paint job, you will find all the information on wich primer to use, wich paint is better, spray can Vs airbrush and tons of things here in this forum, and beleive me you will get all the help you need to get that smooth and glass shiny paint job you are loking for. Remember, keep it clean, don't rush it and pick a clean spot to work and the most important thing is that if something works fine for me, doesn't mean it will work fine for you... There are basic things that will lead you the way, but practicing and testing is what will help you choose wich will be the one thing that works best for you... Keep up the good work, and welcome to the forum!!!!! Luis
-
Thank you all for your comments guys!!!!!!!!!!!! It was a very nice kit to build.... Again, thanks for looking... Luis
-
Thanks Ismael !!!!!!!!!!!!! I am glad you like it!!!! I really had fun with my kids on this one. I was thinking on the "Piñones" thing, but my wife says that it is just an excuse to get some greasy "Alcapurrias & Bacalaitos"
-
A friend (Barbo) gave me this 1/6 "Shine Star" bike kit as a gift about a week ago. It was partially started, but all parts were there, so I decided to take it as a "Labor Day Project". The paint is "Rustoleum Grape", finished with "Boyds Clearcote". I painted it on Friday to let the paint dry enough. It took abot 4 hours to assemble and I had a lot of fun with my kids while putting it together. Is far from perfect but I am really happy with the final product. Hope you like it and thanks for looking.
-
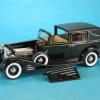
Well... while the paint on the victoria and the impala gets ready to polish, I decided to finish this mostly OOB Cadillac. The only extra things I decided to add were an MCG Vinil Top and BMF for the trim. Paint is kind of a closer shade to the "Gotham Gold" Factory Color. Hope you like it and thanks for looking.
-
Thanks Lyle, I really love the color. Sorry about the HOK paint man... I know the feeling, there is no rational explanation for that to happen, but you really managed to get the good out of the bad.
-
Beautiful work Lyle, those skirts and the buble reminds me of the "continental" look, really a nice touch man. BTW, what color is that?
-
WOW!!!! Looks GREAT man, love the engine detail.
-
removing paint from rattle cans
Luis Ayala replied to bob paeth's topic in General Automotive Talk (Trucks and Cars)
Found this on the web. http://www.acmenovelties.net/scale_models/decanting.php http://www.briansmodelcars.com/tutorials/tutorial/3 -
removing paint from rattle cans
Luis Ayala replied to bob paeth's topic in General Automotive Talk (Trucks and Cars)
Hi bob, I have seen a couple of methods, but the one I use only needs some good masking tape, a straw, a paper towel and a container. First tape the straw to the tip of the nozzle of the rattle can and make sure to seal it tight with the masking tape. Then place the other end of the straw inside of the container and use the paper towel to cover the openning leaving just a little gap for the pressure to be released. Press and hold the can tip and the paint will start to flow through the straw and drip into the container. Watch the level of paint on the container so it doesn't spill. Wait a couple of hours before using it or just leave it in the jar for a couple of days so it may "gas out". If you use it straigh out of the can it may start to bubble and either ruin your paint job or clog your airbrush. Another technique I saw was turning the can upside down and taking all the gas out, then making a hole on the can to get the paint. I personally don't like this one cause is kind of messy. The last one I saw was using hose straps, an ice maker kit, a release valve and a couple of couplings. Hope this helps. -
Ford F-150 Lightning pickup with retractable top
Luis Ayala replied to Peter Lombardo's topic in Model Cars
AMAZING I will be glad to see a "How to" tutorial!!!!!! Really amazing job Peter, congratulations... -
Beautifull color choice Mark!!!!! Your work is really amazing and I am sure this one will be another stunning build. I built the same kit back in 2005 and it was a pretty straight forward build. It is a VERY nice kit an it was a really fun project. I used the decals of the 1971 Monte Carlo winner. The only problem I remember was a small fit issue with the headlight lenses.
-
Heres a link with more info on this subject. Hope it helps. http://www.swannysmodels.com/TheCompleteFuture.html
-
Hey Marcos, the paint came out really smooth & shiny man, I agree that you don't have to polish it at all. Keep us posted!!!!!!
-
Thank you all for your comments!!!!!!! Here is a little progress update. I already installed the engine and the wiring is almost done. I added some hose straps and installed the battery. The chasis is also finished and the stock wheels are assembled and will be glued up later. I will start painting the interiors today and if the wheather is good I will try to paint the body in the weekend. Hope you like it and thanks for looking... Here are a couple of pics of the engine bay. The chasis... Here are a couple of "mock up" pics.
-
Since I finished working on the hinges, I started to work on the engine and chasis. The engine is almost finished and if everithing goes well I will hopefully lay some paint on the body and interiors on saturday. Hope you like it and thanks for looking.
-
Just finished with the door hinges and now I am working with the door jambs. Hope you like it and thanks for looking...
-
Thank you all for your comments. Hi Marcos, I will use a factory color combo. For the Body color I will use "Sungate Ivory" (PPG 80090). For the interiors, I will use the "dark brown leather" and "ivory vinyl" combination. The 1953 Crestline interiors harmonized with the exterior colors. The seat bolsters and headlining were in darker shades. The doors and quarter panels had 3-tone vinyl trim and chrome accents. I am trying to keep this one as close as a "Factory Stock" will be. Again thanks for looking.
-
This is one of the projets that I had in mind for our national event the CSAE (Caribbean Scale Auto Expo) on November. I started it on sunday night and so far I opened the doors and trunk. All the parts are cleaned, sanded and ready to paint. The body work is almost done, just a couple of mold lines to wipe out. I already hinged the trunk, but I ran out of epoxy and couldn't finish the door hinges. I will work on those tonight to see if I can shoot some primer on it by the end of the week. Hope you like it and thanks for looking.