
DanielG
-
Posts
657 -
Joined
-
Last visited
Content Type
Profiles
Forums
Events
Gallery
Everything posted by DanielG
-
Mine can't lose enough, I am always having to wash the bleeping things!
-

1990 Contest annual - then and now
DanielG replied to Jantrix's topic in General Automotive Talk (Trucks and Cars)
I can remember cutting bodies apart with a paring knife heated over an alcohol burner. Then one of my buds came up with a razor-saw, what a marvel of technology! -
My friend rode in the '40s and '50s, I don't know what model of bike was issued back then but I don't think that they were very user-friendly! I never rode bikes, only cars and trucks. By the way, you are still 'winner' until somebody can top you!
-
OK, you win! I will never complain about my knees again. On another note, almost all of the old BCP/RCMP Harley riders around here had to have hip replacements from kick starting the beasts.
-
For those of us older folk, some coffee comes in semi-clear plastic containers with a flip top lid.
-
And just what were you doing to that knee to just make it 'let go'?
-
Making the best of transparent "wire wheels"
DanielG replied to Matt Bacon's topic in Tips, Tricks, and Tutorials
My two cents; I would go with 'what you can achieve' and ditch the plastic and do some kind of wire-spoke job. -
You can also get little gems like these at bead shops: A little filing here and trimming there and they are useful for all sorts rod-ends.
-
This is just a heads-up for the T/A builders. There is a great 1:1 site: http://www.transamcountry.com . Very pic heavy for those of us that can't walk out on the street and check out the real car for research.
-
1990 Contest annual - then and now
DanielG replied to Jantrix's topic in General Automotive Talk (Trucks and Cars)
Oh, you kids! By 1990 it had been 20 years since I last built a model car (I had gotten into aircraft and armour). I was looking at some old cut-outs from Scale Modeler the other day and those builds that looked so good then would not get into a magazine today. -
Thanks a bunch! This forum and you guys are the greatest. I could turn those wheels out on my lathe (if I had to!) One more set of tires added to the mix. I am going to carry on with the later version if I can if only because I think it a little cooler! Thanks again.
-
Check out 'Adventures in Soldering...' in the workbench forum for all sorts of scratch building tips.
-
Thanks for the info. The earliest pictures I have found are of the '78 version before it was re-built for the '79 year so that is what I am trying to replicate. The wheels and tires in 1/18 scale are going to be a problem, I have not found the perfect combo yet and shudder at the thought of trying to re-work the facets of the wheels that I have. They (the facets) appear to be the proper design but are cast too thin and go into the centre too far (sigh).
-
OK, back at it! Started on re-shaping the under-nose. I have a question for the Trans Am experts before I go any further; Is the space ahead of the radiator open on the real car? Help with this question appreciated.
-
what to use for underhood detailing?
DanielG replied to jhuntsman's topic in Tips, Tricks, and Tutorials
Small, insulated wires looted from something for plug-wiring. Brass or copper wire for metal piping. Various sizes of rubber 'string' from a bead store for hoses. Clamps made from metal foil. Slices of styrene hex-rod for nuts and bolt-heads. Last but not least, paint, to give the desired 'look', whether it be old or new. Hope this helps. -
Dark washes over everything to build up the grunge factor. The tears etc. in the seats were made by cutting into the plastic with the back-side of a #11 blade and then carving out some material. Painting and washes to high-light the different materials. Hope this is a help.
-
Opinions on the best rattle can spray paint.
DanielG replied to rickd13's topic in Tips, Tricks, and Tutorials
Tamiya! (exception being the clear coating issues) -
No reason to quit. It is just a challenge that is all the sweeter when finaly mastered (which is why the posts on the Kambach I am building have gotten a little thin lately!). Play around with something else until the erge to engage in battle strikes you again!
-
This is the method that I use if painting on an untextured surface. Use two or more colours, put some drops on a mixing surface side by side and apply a broad, flat brush, picking up the paint across the end and mixing ever so slightly. Apply the paint in a single (if possible) brush stroke. The 'wood-grain' will magically appear! A bit of experimenting with colours and technique should give you the end result that you are looking for. If the surface has a 'wood' texture then I would start with a medium colour followed by a darker wash and then a lighter dry-brushing, or reverse, depending on the darkness of the surface grain desired. Printed doll's house flooring may also be an option or printing something off the interweb and making your own sheet or even a decal.
-
Too cool!
-
Question, some of those differences are huge, which kit is closer to the real car?
-
Are We Model Hoarders?
DanielG replied to mrmike's topic in General Automotive Talk (Trucks and Cars)
I have somewhere between 10 and 20, some complete and some already looted for parts! -
How long have you been modeling?
DanielG replied to wvsm's topic in General Automotive Talk (Trucks and Cars)
Off and on since 1954. Where has the time gone?! -
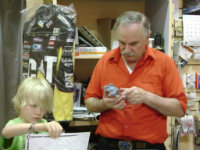
A Thank You to ALL Forum members.
DanielG replied to DRG's topic in General Automotive Talk (Trucks and Cars)
Donald, it is all about attitude. Below is a picture of my little buddy, Nolan. Therein lies a story (I don't mean the fat lip and barked face and missing tooth, that was a result of falling off his pogo-stick!). The sci-fi model that he is pictured painting has a LOT of extra glue just to make sure things stay stuck together. I casually mentioned that he might have gotten a little glue smeared all over the canopy, to which he simply replied " Yeah, I want it to look like it is all bashed up. Awesome!" So I guess my point is that he has fun building and as long as it looks 'awesome' to him, nothing else matters. Constantly comparing your models to others' is a mug's game, there will always be someone else 'better'. So, be like Nolan, have fun and keep building 'awesome' models! -
Sanding and shaping done, at least until primed. Next is to reshape the front fender swells into a more rounded downward curve.