
Nitro Neil
-
Posts
462 -
Joined
-
Last visited
Content Type
Profiles
Forums
Events
Gallery
Everything posted by Nitro Neil
-
Gassers with radiator?
Nitro Neil replied to Hayabusa's topic in Model Building Questions and Answers
Hi, here are the main differences between Gassers and Altereds per the NHRA rules for the mid-to-late 1960's To answer your specific question, Gassers were required to have radiators. Gassers were intended at "street" driven race cars, although most of them were only marginally streetable. Gasser Altered Stance Must sit level or with slight forward rake Nose-up stance allowed Radiator Required Not required Headlights Two working required Not required Interior Must have upholstery Can be stripped Seats Two required, seatbelts only required on driver's seat Only one required Wheelbase Factory wheelbase required Altered wheelbase allowed Engine Setback 10% of wheelbase 25% of wheelbase Starter Must be self-starting Not required Body No more than 4 inch change in body height No more than 10 inch change in body height -
Front Engine Dragster: The Old Master
Nitro Neil replied to ApexSpeed's topic in WIP: Drag Racing Models
Nice job... -
Started! Revell '49 Mercury Station Wagon
Nitro Neil replied to Art Anderson's topic in WIP: Model Cars
Wicked Pissa! Watching this one. It's the first stock version I have seen anyone doing. -
Pre built 1/24 engines?
Nitro Neil replied to RickHH's topic in Model Building Questions and Answers
Greg, that package says 1:24 scale. "Most of our Hobby Gear line is 1:24 scale." -
Wicked Pissa!
-
70's Ford Econoline
Nitro Neil replied to fat50's topic in Model Trucks: Pickups, Vans, SUVs, Light Commercial
I gotta ask, is there resin in that bong? Wicked Pissa! -
A Cautionary Reminder about what is - and is not - an NNL
Nitro Neil replied to tim boyd's topic in Contests and Shows
Tim, my motto in this hobby is "if you're not having fun, you're doing it wrong." I want to head to Toledo someday, but money is always an issue for me. -
32 Chevy Surfer Van
Nitro Neil replied to Tony N's topic in WIP: Model Trucks: Pickups, Vans, SUVs, Light Commercial
K, I have to give you a Wicked Pissa! on this one. I hate what that kit represents - MPC AMT ruined a perfectly good kit of a Chevy Panel Van to make that kit - but you are proving that maybe you can make a silk purse out of a sow's ear. Nice job. -
A Cautionary Reminder about what is - and is not - an NNL
Nitro Neil replied to tim boyd's topic in Contests and Shows
Sorry you took me seriously Tim. If you knew me better you'd know that I hardly ever say anything serious, other than in the case of a fire or some natural calamity. And even then you have to wonder. -
A Cautionary Reminder about what is - and is not - an NNL
Nitro Neil replied to tim boyd's topic in Contests and Shows
But would the NNL have sponsored a car entered in a competitive auto race? How would that work? -
And before you ask, I WISH that I played as good as I painted...
-
John, yes it's the same process. This is what I would do if it was my guitar and I wanted a deep rich color: 1. Stain the wood with a black stain, water based if you have it, oil based will work just fine if you don't. Let that dry and then dry sand the wood to bring the wood color back out. The result will be deep color in the grain and nice wood color showing around the grain. 2. Spray one coat of clear nitro lacquer on the guitar to seal that in and give it another light sanding. 3. Mix some of the StewMac Liquid Stain into some clear Minwax nitro lacquer, NOT the other stuff I mention earlier in the thread on the forum. The link is below. This stuff is VERY saturated with color so a little goes a loooooong way. You can use it as a wood stain and/or mix it with the lacquer. I would mix it with lacquer and make a candy color. Use that to spray your candy color on the guitar to taste. More coats means a darker color, but you probably know that. Check out the pictures in the reviews for this stuff to get an idea on what the blue can look like. Some guys used it as a stain and others used it to make candy paint. http://www.stewmac.com/shop/Finishing_supplies/Colors,_tints,_and_stains/ColorTone_Liquid_Stains.html 4. Once you have the color you like seal it with clear nitro and polish. Nitro lacquer will crack and craze on wood over time. That is normal and most guitarists like to see it because it shows other guitarists that you have the good stuff on your guitar. You may be able to find the liquid stain cheaper, but I like StewMac. I have bought lots of stuff from them over the years. When less expensive will do, I shop elsewhere. But StewMac makes stuff just for guitars and sometimes they are the only ones who make a product that will do what I need. They are like the Snap-On tools of guitar making. If you want a solid color, you can use an acrylic lacquer (like Duplicolor) for the color coats and then use nitro lacquer over that. Fender and Gibson have been doing that for a long time on their high-end guitars. Here is my Fotki link to some, not all, of the guitars I have painted over the years. http://public.fotki.com/NitroNeil/personal-stuff-1/guitars-and-gear/
-
I have painted a lot of guitars. My username is based on two things - I like dragsters that run nitro, and I only use nitro lacquer on my guitars. Finishing a guitar not only requires understanding the painting process, but you have understand how the finish will affect the sound and tone of the guitar. There are a few things to keep in mind. 1. Use nitrocellulose lacquers. Stay away from acrylic lacquers like DupliColor, because they will deaden the sound and take a lot longer to fully cure. Do Not use enamel or polyurethane. They are like putting a plastic bag over the guitar. Minwax sells a great nitrocellulose lacquer that they sell at Home Depot and Lowes. It doesn't say "nitrocellulose" on the label, but it is. It comes in spray and in a quart can. http://www.minwax.com/wood-products/interior-clear-protective-finishes/minwax-clear-brushing-lacquer 2. Stewart MacDonald sells pigments especially made for use with lacquers. http://www.stewmac.com/shop/Finishing_supplies/Colors,_tints,_and_stains/ColorTone_Liquid_Pigment_for_Lacquer.html 3. Minwax also sells a good lacquer-based sanding sealer. I would NOT recommend using a sanding sealer if you want to grain to show through because the sealers have silica in them which will dull the grain a little. Just put more lacquer on. 4. If it I was my guitar I would stain the bare wood with some dark stain - black or dark grey. That will make the grain "pop" more when you clearcoat it. Then I would put on some lacquer coats with the blue pigment from Steward MacDonald. Then cover with clear lacquer, wet-sanding every couple of coats until you have a nice gloss finish. Then hand polish just like you would a model car. I have a slow speed buffing wheel that gets the finish like a mirror. Don't use a regular buffing wheel because it will melt the paint. Here is one guitar I finished a few years ago. Feel free to PM about this. I would be happy to walk you through the process.
-
26th Annual MassCar Model Club Model Car Exhibitio
Nitro Neil posted an event in Model Car Shows/Events
Download the flyer in PDF format here: http://www.masscar.com/uploads/2/0/9/1/20913414/flyer2014.pdf -
Yes that is the correct product. It says "Finish" You DO NOT want the one with the dog on it.
-
Thanks, we do find it interesting. But we also find your spelling of Don Garlits' name humorous.
-
You can use Future to clear over the Alclad to protect it. And then you can use an enamel clear over that.
-
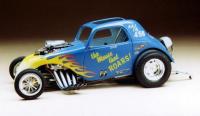
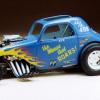
Hello from the backwoods of New Hampshire
Nitro Neil replied to A/FA Chevy's topic in Welcome! Introduce Yourself
Hi Greg, welcome. I was the track photographer over at NED and at LVD for most of the 1990's. I'm over by Keene. Your altered looks great. -
Brochures for old cars.
Nitro Neil replied to Lovefordgalaxie's topic in Tips, Tricks, and Tutorials
Tony, Thanks for that one, that was new to me. BTW, it's .org, not .com. http://www.ahpsoc.org/ -
Wicked Pissa! That means "really good" in Boston, Massachusetts. More please.
-
I have a few questions for you all
Nitro Neil replied to JTalmage's topic in Model Building Questions and Answers
I use CA glue for everything. -
Contest Question
Nitro Neil replied to Metalmad's topic in General Automotive Talk (Trucks and Cars)
I use cotton batting to cushion my models. The cotton won't react with any paint. Go to any fabric store and ask for the undyed cotton batting. -
This is turning out to be Wicked Pissa Art.
-
Lowrider Roof Pattern tutorial
Nitro Neil replied to BKcustoms's topic in Tips, Tricks, and Tutorials
Thanks Billy, you get a Wicked Pissa! from me. I will be saving this tutorial and will definitely try this in the future. -
Hey from Springfield, MA
Nitro Neil replied to LaughingIndian's topic in Welcome! Introduce Yourself
Mike, The Wings and Wheels IPMS club meets in West Springfield once a month... http://www.wwmodelclub.org/ They are hosting a model contest on March 30 in Chicopee. Here is the flyer in PDF format: http://www.wwmodelclub.org/flyers%20and%20forms/ValleyCon2014.pdf