69NovaYenko
-
Posts
835 -
Joined
-
Last visited
Content Type
Profiles
Forums
Events
Gallery
Everything posted by 69NovaYenko
-
 You have a very valid point. In 1967, Chevrolet was busy promoting their new pony car, the Camaro, and part of the promotional efforts included racing the Camaro in the SCCA Trans-Am series. So Chevrolet introduced the Z/28 option package which included among other things, a special 302 cubic inch small block. The 302 was created by installing the 283's crankshaft in a 327 small block, which allowed Chevy to comply with regulations and stay within SCCA racing's 305 cubic inch limit. Rated horsepower was said to be at just 290hp, but rumored to be a lot more. The 1967 Z-28 also came with competition suspension(which would include the rear sway bar and upgraded rear multi-leaf springs), broad racing stripes on the hood and trunk lid and could be combined with the RS option package. The `67 Z/28 did not sport an Z/28 badging.The 302 turned out to be one of Chevrolet's finest small block offerings. The kitted engine is certainty not a Chevy 302 engine. The cars history on the kits instruction sheet imply`s the kitted engine is a 396. So, perhaps some of these items are for future versions of this kit.
-
Addendum to the above commentary: As I look more closely the newly tooled Revell `67 Camaro "2 N 1" instruction sheet the obvious suddenly hit me. The rear sway bar must go with the race build option because this was not an a "standard" out the factory part however; the instructions do not specifically spell that out. The race option is not a straight-line "drag" car but more likely a "Trans-Am" or "Rally Road Racing" build option. Hence, the rear sway bar and multi-leaf rear springs to improve handling and stability in the turns. Additionally, the decal set with the white circled number "67" for both doors, hood and rear deck as well as the kits Trans-Am Mini-Lite style racing wheels further support my Trans-Am/Road Racing theory. Note: This kit has an outstanding decal sheet, probably one of the best I`ve seen in Revell`s newly tooled kits...I hope they keep it up...kudos.
-
thanks for the advise. It resolved my issue.
-
Finished applying bumble bee strip and came back the next day to discover that I had a small air bubble trapped under the dryed decal. The previous night I had applied decal setting solution so the dog gone decal has truly been down on the body. Any suggestions on how to get read of the air pocket will be appricated.
-
One seroius stash...Humor
69NovaYenko replied to 69NovaYenko's topic in General Automotive Talk (Trucks and Cars)
Casually let her see this stash it might give her some perspective on your tiny collection...:-) -
One seroius stash...Humor
69NovaYenko replied to 69NovaYenko's topic in General Automotive Talk (Trucks and Cars)
If you think your stash is big you need to pause for thought. :-) -
Stumbled upon this humorous image on-line. There`s no doubt that this is one serious stash. :-)
-
Bare Metal Foil Problems
69NovaYenko replied to 69NovaYenko's topic in Model Building Questions and Answers
Thanks for the suggestion. -
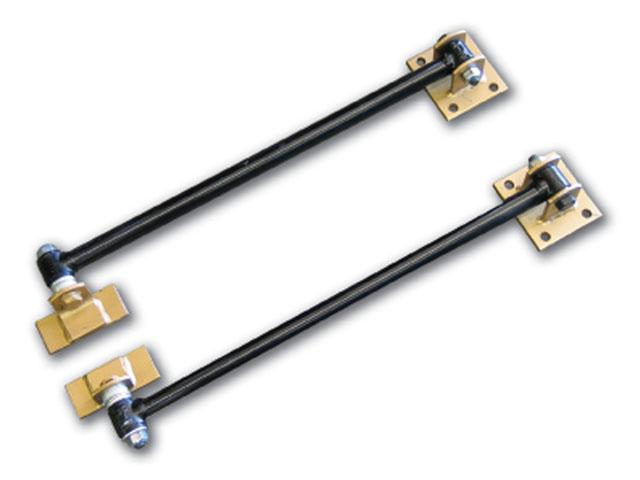
Again, you are correct Exotics Builder. Engineers and racers discovered that the non staggered shock configuration found under the the `67 Camaro allowed excessive rear wheel hop under hard acceleration. A number of racers resorted to radius style traction bars like the Cal-Tracs traction bars (pictured below) or slap traction bars to resolve the problem. What Chevy engineers came up with in `67 was a the round then later in the `67 model year the rectangle radius bars to resolve the issue (refer to picture and link below). http://www.camaros.og/radiusrod.shtml The other alternative, as you stated Exotics Builder, was swooping out the mono-leaf spring for a multi-leaf spring setup. In the following years 1968 and on Chevy engineers resolved this issue by staggering the rear shocks with one mounted forward and one mounted aft of the rear axle.
-
Not knowing for certain but, however it`s highly likely that the 1:1 car Revell used as the template for this kit had the optional F41 Suspension package. Thanks for the additional insight Esppo. VRM your additionally, information is also helpful. As far as Exotics Builder and VRM legitimate concerns about the kitted multi-leaf springs; the issue can be resolved fairly quickly with a the bit of quick sanding with a medium grit wet & dry paper which will turn those multi-leaf springs into single mono-leaf springs.
-
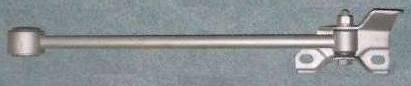
I have the newly tooled Revell `67 Camaro on the work bench. As I was looking over the build instructions the segment on the suspension assembly struck me as odd. Revell kitted the car with a “rear sway bar” part #39. Humm…I thought is this a mistake? I have several acquaintances that have owned or still own a first generation `67 Camaro and didn`t recall seeing a rear sway bar on the car. After several e-mails to these friends they all confirmed that they prized `67 pony cars did not have a rear sway bar. So I checked Team Camaro the online performance Camaro website. Low and behold I stumbled upon a forum thread from 2002 February about Camaro rear sway bars. The bar was '67 only part few were made and they were NEVER factory installed. The rear sway bar is featured along with many other racing parts in Wayne Guinns' book, “Camaro Untold Secrets”. He rear bar is identical to the front sway bar and was supposed to mount over the rear axle and attach to the trunk floor. Feel free to check the below link. http://www.camaros.net/forums/25-tech-2002/48348-1968-69-rare-rear-sway-bar.html#/forumsite/20677/topics/48348?page=1 So, whatever car Revell used as the template for this kit had a uniquely rare factory made race suspension part installed either by the dealership or by the owner…which is very cool. However, if one opts to install or not install the rear sway bar on their build either way is period correct. Just thought I would put that out there into the universe…just an FYI.
-
Bare Metal Foil Problems
69NovaYenko replied to 69NovaYenko's topic in Model Building Questions and Answers
Hummm..I thought lacquer was suppose to be in a couple of hours but, what you are both suggesting certainly cannot be ruled out. -
Bare Metal Foil Problems
69NovaYenko replied to 69NovaYenko's topic in Model Building Questions and Answers
The paint I used was Tru-Color lacquer. They are out of Phoenix, AZ. are know for their very accurate railroad colors but. However, recently they have ventured into automotive colors and are have a large and growing line of colors. I shot the color early morning and was attempted foiling later that afternoon. .
-
Bare Metal Foil Problems
69NovaYenko replied to 69NovaYenko's topic in Model Building Questions and Answers
Thanks for the advise folks. By the way what is suggested usable shelf life of this stuff. And, how can I be sure I getting "fresh" foil from my vendor. -
I cut and piece of foil for front window trim; carefully burnish it to the widows trim and with a fresh X-acto blade cut along the window trim frame. However, when I attempt to remove the excess foil it will not lift off. It is tenaciously adhered tot the car body. I try as I might I cannot remove the unburnished trimmed excuse. I have used finger nail, tweezers and even the back edge of he X-acto blade. I assure you I have been extra careful that I did not burnish the excess to the body. In the end I had to wet sand it off..of course this cut through my color coat so I had to mask the entire body and reapply a color coat to roof. This has happen three times with this project. Even though it has been properly stored could the foil be bad I have had it sine 2006. I cannot think of any other reason for this happening. Advice, suggestions or insights are welcomed. I`m about to re-shoot the roof for the third time.
-
"Wood Grain" Decals
69NovaYenko replied to 69NovaYenko's topic in Car Aftermarket / Resin / 3D Printed
Look forward to see the plywood plank panels project; hope you post pictures. -
"Wood Grain" Decals
69NovaYenko replied to 69NovaYenko's topic in Car Aftermarket / Resin / 3D Printed
Thanks for the suggestions everyone. Peeked at the Uschi sight they seem to have some VERY interesting decal sets. Pete J the link to a U.S. distributor makes me more prone to make a purchase of several of their items. I found the wood and leather decals particularly integrating. I have made purchases of overseas items in the past and deed dealing with exchange rates of various countries i.e. U.S. dollars v.s. Euros/Pounds/Franc/Marks etc., not to mention the painfully staggering wait (going thought customs/ item you bought is on a slow boat from the other side of the world etc. ) of door to door delivery. -
"Wood Grain" Decals
69NovaYenko replied to 69NovaYenko's topic in Car Aftermarket / Resin / 3D Printed
Uschi van der Rosten is in Germany the vendor I am refereeing to is a United States based outfit. -
I vividly recall there was an aftermarket vendor that make a "wood grain" decals . In fact they offered several different types of wood grain Rosewood, Burl, Walnut, Oak Maple, Cherry, Cedar etc. For the life of me I cannot recall ho it was can anyone tell me who that was and a web link?
-
Car song builds ?
69NovaYenko replied to Jon Haigwood's topic in General Automotive Talk (Trucks and Cars)
This list of popular culture car songs would be incomplete without mentioning Princes 1983 hit "Little Red Corvette" form the 1999 album. The song peaked at number six on Billboard Hot 100 singles chart in 1983. http://www.metacafe.com/watch/10777115/prince_little_red_corvette/
-
Oppps submitted post to wrong thread...
-
Maw Wedge Exhaust ?
69NovaYenko replied to Jon Haigwood's topic in Car Aftermarket / Resin / 3D Printed
So enlighten me folks in '64 Mopar released a 426 "Street Wedge" which I understand came from the factory in passenger cars and raced in the streets. How was it different from the 426 "Max Wedge" and the 426 "Race Hemi". In appearance the 426 "Street Wedge" Hemi phase III with the dual quad cross ram intake was in 1964 and was available to the general public. The 426 "Race Hemi" was not that readily accessible to Joe blow public. I was told that visually the only way to tell a 413, 426 Street Wedge, 426 Max Wedge or 440 for that mater is by the blocks serial numbers . True or false. So when you hear someone 1964 say they had 436 Hemi car they ran on the streets it was most likely a 426 "Street Hemi" like the one pictures below. -
Maw Wedge Exhaust ?
69NovaYenko replied to Jon Haigwood's topic in Car Aftermarket / Resin / 3D Printed
On page two of the thread `65 Plymouth Hemi Super Stock "Melrose Missile" Moebius/Model King which is found in the Car Kit News & Reviews section; Dave Metzner posted test shot photos of Moebius soon to be released `65 Plymouth Belvedere I. The kit will feature the factory dual exhaust Max-Wedge exhaust system with cut-outs that you are seeking. The Moebius`65 Melrose Missile kit will feature factory Hemi headers with cut outs in a single exhaust configuration. Here`s a link to the page: http://www.modelcarsmag.com/forums/topic/109184-65-plymouth-hemi-super-stock-melrose-missile-moebiusmodel-king/?page=2 Hope this helps.
-
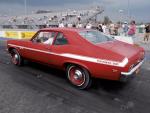
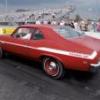
Outstanding build....truly digging on your rare era correct color chose. Factoid: There were only ten Yenko prepped 427 `69 Camaro`s painted in Olympic Gold. For additional inspiration check out the feature article "1969 Chevy Camaro COPO Yenko-Solid Gold" from Super Chevy magazine: http://www.superchevy.com/features/sucp-0607-1969-chevy-camaro-copo-yenko/
-
Non-Yellowing Clearcoat-In Search Of
69NovaYenko replied to 69NovaYenko's topic in Model Building Questions and Answers
So the yellowing issue is an enamel issue...thanks for the insight.