Rockford
-
Posts
1,939 -
Joined
-
Last visited
Content Type
Profiles
Forums
Events
Gallery
Everything posted by Rockford
-

White Road Commander 2
Rockford replied to DRIPTROIT 71's topic in WIP: Model Trucks: Big Rigs and Heavy Equipment
Always thought these were a great looking cabover. They tried to sell them here in GB but the LHD wasn't good. I think the idea was to buy them for work into the EU. That looks beautifully done too. You've done a great job so far. I remember seeing one in book in the 80s with brilliant factory paint scheme on it, looked like the mesas in Monument Valley, I'll see if it can find it. -
From what I've been able to find on the interwebs it is indeed conventional cabover which is a bit of a muddle but I suppose it doesn't fall into any one category. Didn't KW have CBE- cab beside engine, but they were genuine one-man cabs. Mack had the offset cab but that was a true conventional. I don't think IH chassis were really any different to any other except I have seen some with a height change just before the front suspension, ( have I got that right?). Sorry to hear about your screen, have you tried turning it off and on again? ? Whatever path you take it will be an interesting project to follow. Looking forward to seeing it take shape.
-
What an odd looking truck! That's the first time I've ever seen one of them. What does CONCO stand for:- CabOver Not CabOver? The driver got the worst of both worlds with that cab, barrow conventional type cab on top of the engine! Either way, it's an interesting project. I knew you wouldn't be able to last, you're as bad as me when I open boxes to look at what's inside and start gluing things together! ? Looking forward to seeing this take shape. Are you going to make your own chassis? You could use a Transtar chassis couldn't you?
-
My own Sundance
Rockford replied to Rockford's topic in WIP: Model Trucks: Big Rigs and Heavy Equipment
Thanks very much, very kind of you. -
My own Sundance
Rockford replied to Rockford's topic in WIP: Model Trucks: Big Rigs and Heavy Equipment
-
My own Sundance
Rockford replied to Rockford's topic in WIP: Model Trucks: Big Rigs and Heavy Equipment
Do you know, I've known about Letraset since I was in school and they never crossed my mind! What a good idea. If I'd thought about them I might have tried making the decals myself because the hood stripes aren't quite right, the top stripe finishes too early, I'm thinking of using leftovers to extend the white line to a point. However, I'll think about them for next time. I'd like to do a similar coloured truck for Will, as if they grew to 2 units over time. I could use them there. Thanks for the thought and the compliments. -
My own Sundance
Rockford replied to Rockford's topic in WIP: Model Trucks: Big Rigs and Heavy Equipment
Good suggestion. If I'd had thought about it before paint I'd have used 1mm square rod, then rubbed it right down until it was just proud. Then a little fine sanding after paint would bring a nice clean white line out. Never mind, it's on. I might paint the edge of the wheel opening white too. -
You've caught the truck's proportions just right! Excellent rendition of the real thing. It's unique too, no one else will have one because you designed and built it yourself. Great addition to the convoy. I'm looking forward to your next project.
-
My own Sundance
Rockford replied to Rockford's topic in WIP: Model Trucks: Big Rigs and Heavy Equipment
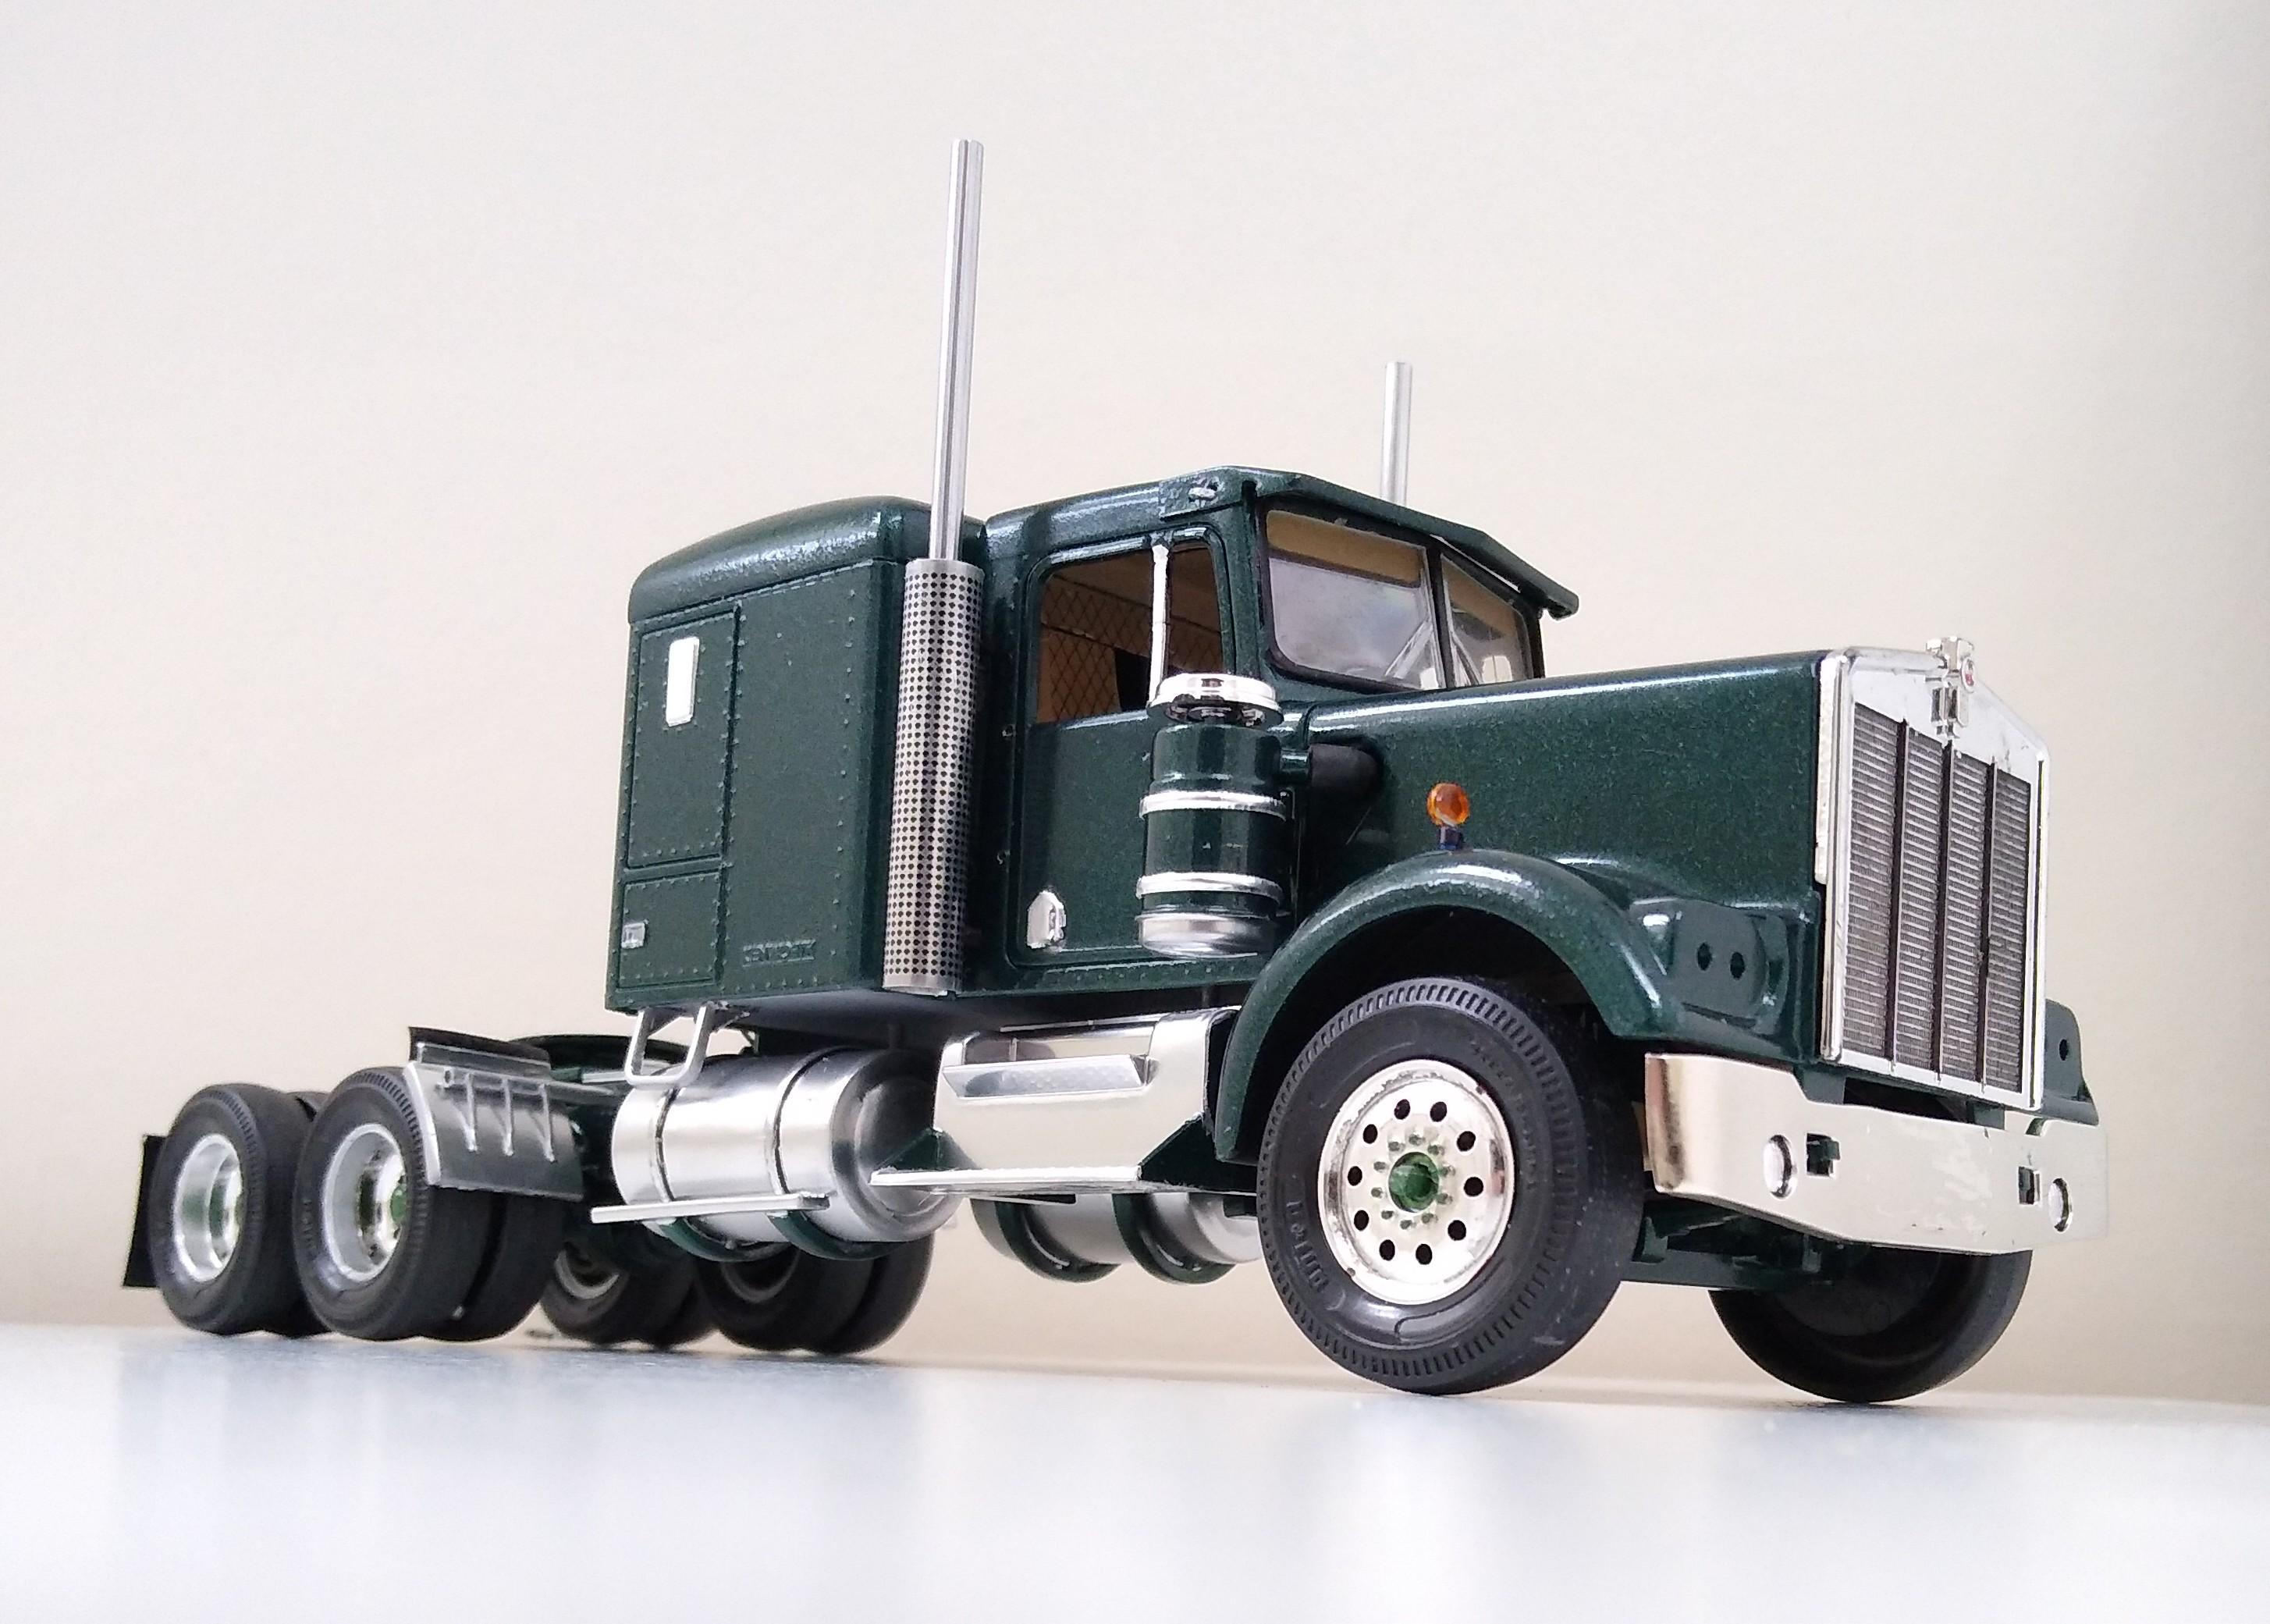
I decided to try and apply the white stripe on the wheel opening. I found a Tamiya paint bottle was slightly smaller than the arch, so I wrapped it in tape until it fit snugly. I trimmed the stripe decal right at the edge on one side but left a little film on the other side for support. After soaking the decal I laid it on the arch and wetted it with a brush to keep it floating, then teased it around the arch against the bottle. Pull the bottle away and it looks passable. Then there's the straight sections. I'll let it dry and try the other side tomorrow. Will it stay on? We'll have to see. I wish I could paint it but shaky hands. Other option is white electrical tape cut to 1mm.
-
Another "Convoy" Truck!
Rockford replied to Jürgen M.'s topic in WIP: Model Trucks: Big Rigs and Heavy Equipment
That looks fantastic! Well done. It will be interesting to see where you go next. Really enjoyed watching your progress on this one, fascinating stuff. -
My own Sundance
Rockford replied to Rockford's topic in WIP: Model Trucks: Big Rigs and Heavy Equipment
Maybe it's because of the scale, they're so much smaller. All is well though. -
My own Sundance
Rockford replied to Rockford's topic in WIP: Model Trucks: Big Rigs and Heavy Equipment
I'm pondering the white stripe issue. There's plenty of white stripe on the decal sheet so I'll have a go but I might have to sort an alternative. -
My own Sundance
Rockford replied to Rockford's topic in WIP: Model Trucks: Big Rigs and Heavy Equipment
Well, they're on. What a nightmare though. I found them very jelly-like to the point that it was almost impossible to keep the stripes straight. The Micro Set seemed to turn them even softer so I ended up using plain water to help move them around. Destroyed one stripe. However, they settled down excellently and looks good. I'm so relieved.
-
My own Sundance
Rockford replied to Rockford's topic in WIP: Model Trucks: Big Rigs and Heavy Equipment
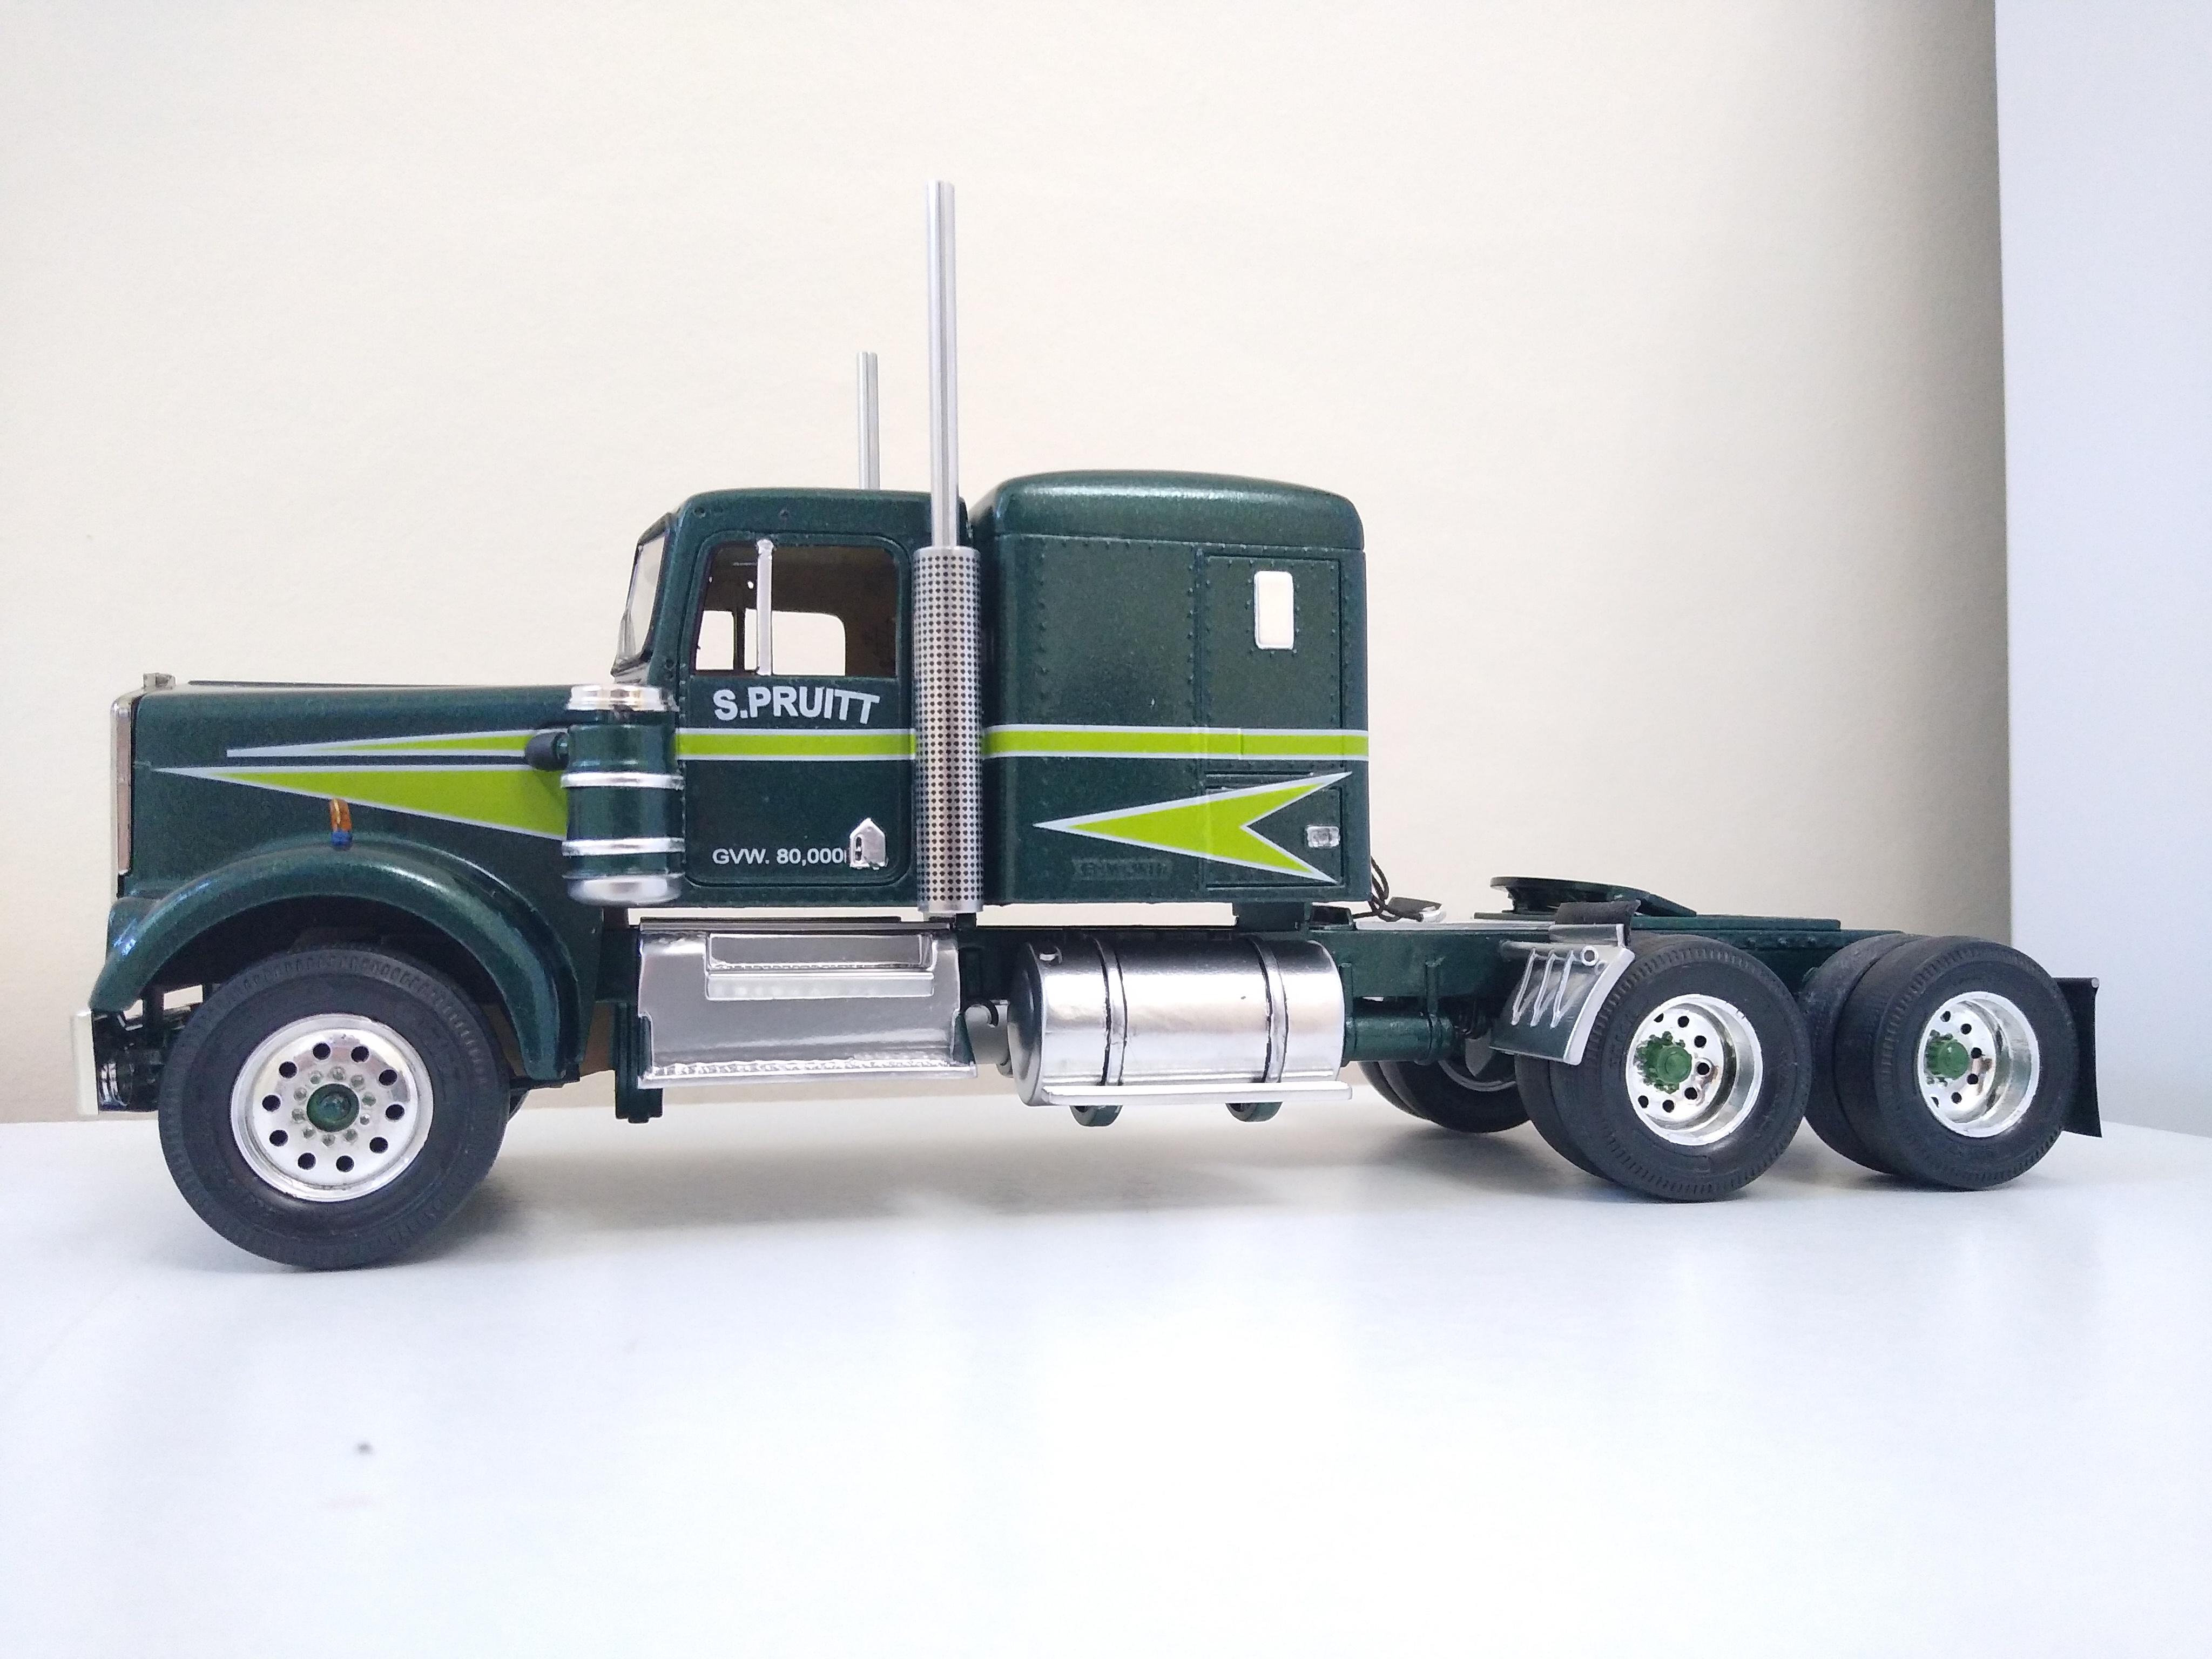
Thanks Jürgen, it's the first time I've used Modeltruckin' stuff so that's reassuring. Just trying to do everything I can remember to do before I go ahead. I like making my own decals and would have tried with this one but I couldn't see how to do the S.Pruitt on the door because it's white and arched. -
My own Sundance
Rockford replied to Rockford's topic in WIP: Model Trucks: Big Rigs and Heavy Equipment
Thanks Jurgen, that gives me some confidence. I've never used their decals before. -
My own Sundance
Rockford replied to Rockford's topic in WIP: Model Trucks: Big Rigs and Heavy Equipment
Did some chassis work today. Piped my air tanks up. Fitted the pogo stick and formed gladhands from 1.5mm aluminium tube. Fitted the quarter fenders and made mudflaps out of electrical tape. I checked the decal sheet I bought off Modeltruckin' and there's no KW emblem for the mudflaps. Drew a black line around the tank straps to simulate the rubber strips. I'm having to work very carefully so that I don't damage the chrome paint on the battery boxes. Overall I think it has the Sundance stance about it. Quite pleased. Approaching the decal stage, quite scary for some reason.
-
1/32 Mack F700
Rockford replied to The Brush's topic in WIP: Model Trucks: Big Rigs and Heavy Equipment
Very innovative mate, impressive stuff. -
Well saved! Looks good.
-
Sorry to hear about your submarine experience, but you definitely made a great save turning it into a payload. The tidy truck looks excellent. Great job.
-
I'm sorry you're having such issues, these things aren't cheap either! Hope it turns out ok.
-
Another "Convoy" Truck!
Rockford replied to Jürgen M.'s topic in WIP: Model Trucks: Big Rigs and Heavy Equipment
It's going to look great. -
Farm Floater Truck 1/24th scale
Rockford replied to Randy D's topic in WIP: Model Trucks: Big Rigs and Heavy Equipment
Seems a shame to put that engine under a hood, should be on display itself! Very realistic. Excellent stuff, well done. -
2× Chevy Bison
Rockford replied to Rockford's topic in WIP: Model Trucks: Big Rigs and Heavy Equipment
Decided to use the cheapo white topcoat that I bought for my Trailmobile that turned pink. Mainly because the weather was kind and the can was staring me in the face. Ran over the primer with a Scotchbrite and shot the colour. I'm really pleased with the result. Laid down really smooth. Thinking of a chassis colour to work with the red plastic and maybe bring it up the cab to fender level. (I've mentioned earlier that to me, the proportions of this truck reminds me of Sonny Pruitt's Kenworth, and I did think of mimicking that and putting W.Chandler on the door, but Will would have gone for an Aerodyne wouldn't he?)
-
W900l with Frameless Dump
Rockford replied to DRIPTROIT 71's topic in Model Trucks: Big Rigs and Heavy Equipment
Excellent work. Very clean build indeed! -
1969 Autocar A64F
Rockford replied to Chuck Most's topic in Model Trucks: Big Rigs and Heavy Equipment
Proper old school piece of machinery!