SpreadAxle
-
Posts
2,198 -
Joined
-
Last visited
Content Type
Profiles
Forums
Events
Gallery
Everything posted by SpreadAxle
-
BRBO Mack R685ST
SpreadAxle replied to gotnitro?'s topic in WIP: Model Trucks: Big Rigs and Heavy Equipment
that grille looks nice. -
AMT peterbilt 359
SpreadAxle replied to JUNK-MAN's topic in WIP: Model Trucks: Big Rigs and Heavy Equipment
You have done some great detail work thus far. -
OUTSTANDING!!!!
-
I was never crazy about the kit tail lights, so I went with round lights. I cut the tail light sections from an old amt Fruehauf flat bed and grafted them in. I just need to putty and sand them and they will be done.
-
There's not much to report as progress has been slow. Searching for parts and having to cast my own parts has taken up some of the time. Thankfully, I have a complete Transtar 2 kit to copy some of the key parts. For example, the bracket just ahead of the stack on the passenger side, was missing, so I cast a copy of it. When the cab is down, it rests on this bracket. The battery box cover I scratch built using the one from the fresh kit as a guide.
-
Check with Jerry at modeltruckin.com. What he doesn't have he will often make.
-
Watkins Kenworth 925
SpreadAxle replied to Hmann68's topic in Model Trucks: Big Rigs and Heavy Equipment
Outstanding. I really like this build. The red fuel tanks really look sharp. -
Special load trailer
SpreadAxle replied to BanD1t6's topic in Model Trucks: Big Rigs and Heavy Equipment
I love it. That is really cool. -
This a a nice combo
-
Brockway Construction Water Wagon
SpreadAxle replied to Warren D's topic in Model Trucks: Big Rigs and Heavy Equipment
That is really cool -
Ever wonder why the steer tires on your ERTL International kits stick out so far from under the fenders? Look at the photos and you will see why that happens. I did a comparison to show just how wide the Ertl steer axle happens to be compared to other axles. The ERTL axle is noticeably longer than the 2 amt axles shown. Eventually, the modified axle will be used in a project.
-
Mykit re-issue wish list includes the following: amt KW mixer amt Trailmobile moving van. The only time it was ever "re-issued" was when they did the 3 race car transport trailers in the late '80s or early '90s. Same trailer as the moving vans, they just included wheel covers, ramps, tool boxes, and other racing equipment. amt KW Alaskan Hauler Italeri/ROG Freightliner FLC with the 60" sleeper. International Paystar looger International F2674 International F/S 2575 amt California Hauler "little window" Pete 359 with the parts tree for the sleeper and sun visor included(the visor was on the sleeper parts tree) amt Fruehauf reefer. The Fruehauf dry van has come back twice in recent years, most recently as the Coca Cola van. It's the same kit with a reefer and its fuel tank added. Great Dane reefer from Ertl. amt Fruehauf flatbed Monogram 1/16 scale Fruehauf flatbed trailer( I deeply regret selling mine) Ertl John Deere back hoe and farm tractor ERTL Massey Ferguson farm tractor amt lowboy trailer and bulldozer set(it was available years ago) Ertl ih 1466 farm tractor Some "Fantasy kits" were suggested so here are mine: Italeri Freightliner aerodyne with an extra 60" flat top sleeper roof to give builders a choice. Italeri 48 foot reefer with the body molded to the proper height amt Autocar dump truck kit with the round fenders included as an option, along with an optional 5th wheel. amt Autocar Dump truck kit with the Challenge mixer body This fantasy kit list was done with current tooling in mind.
-
That's a really cool idea for this build.
-
BRBO Mack R685ST
SpreadAxle replied to gotnitro?'s topic in WIP: Model Trucks: Big Rigs and Heavy Equipment
I have the same tanker. I'll be following this build. -
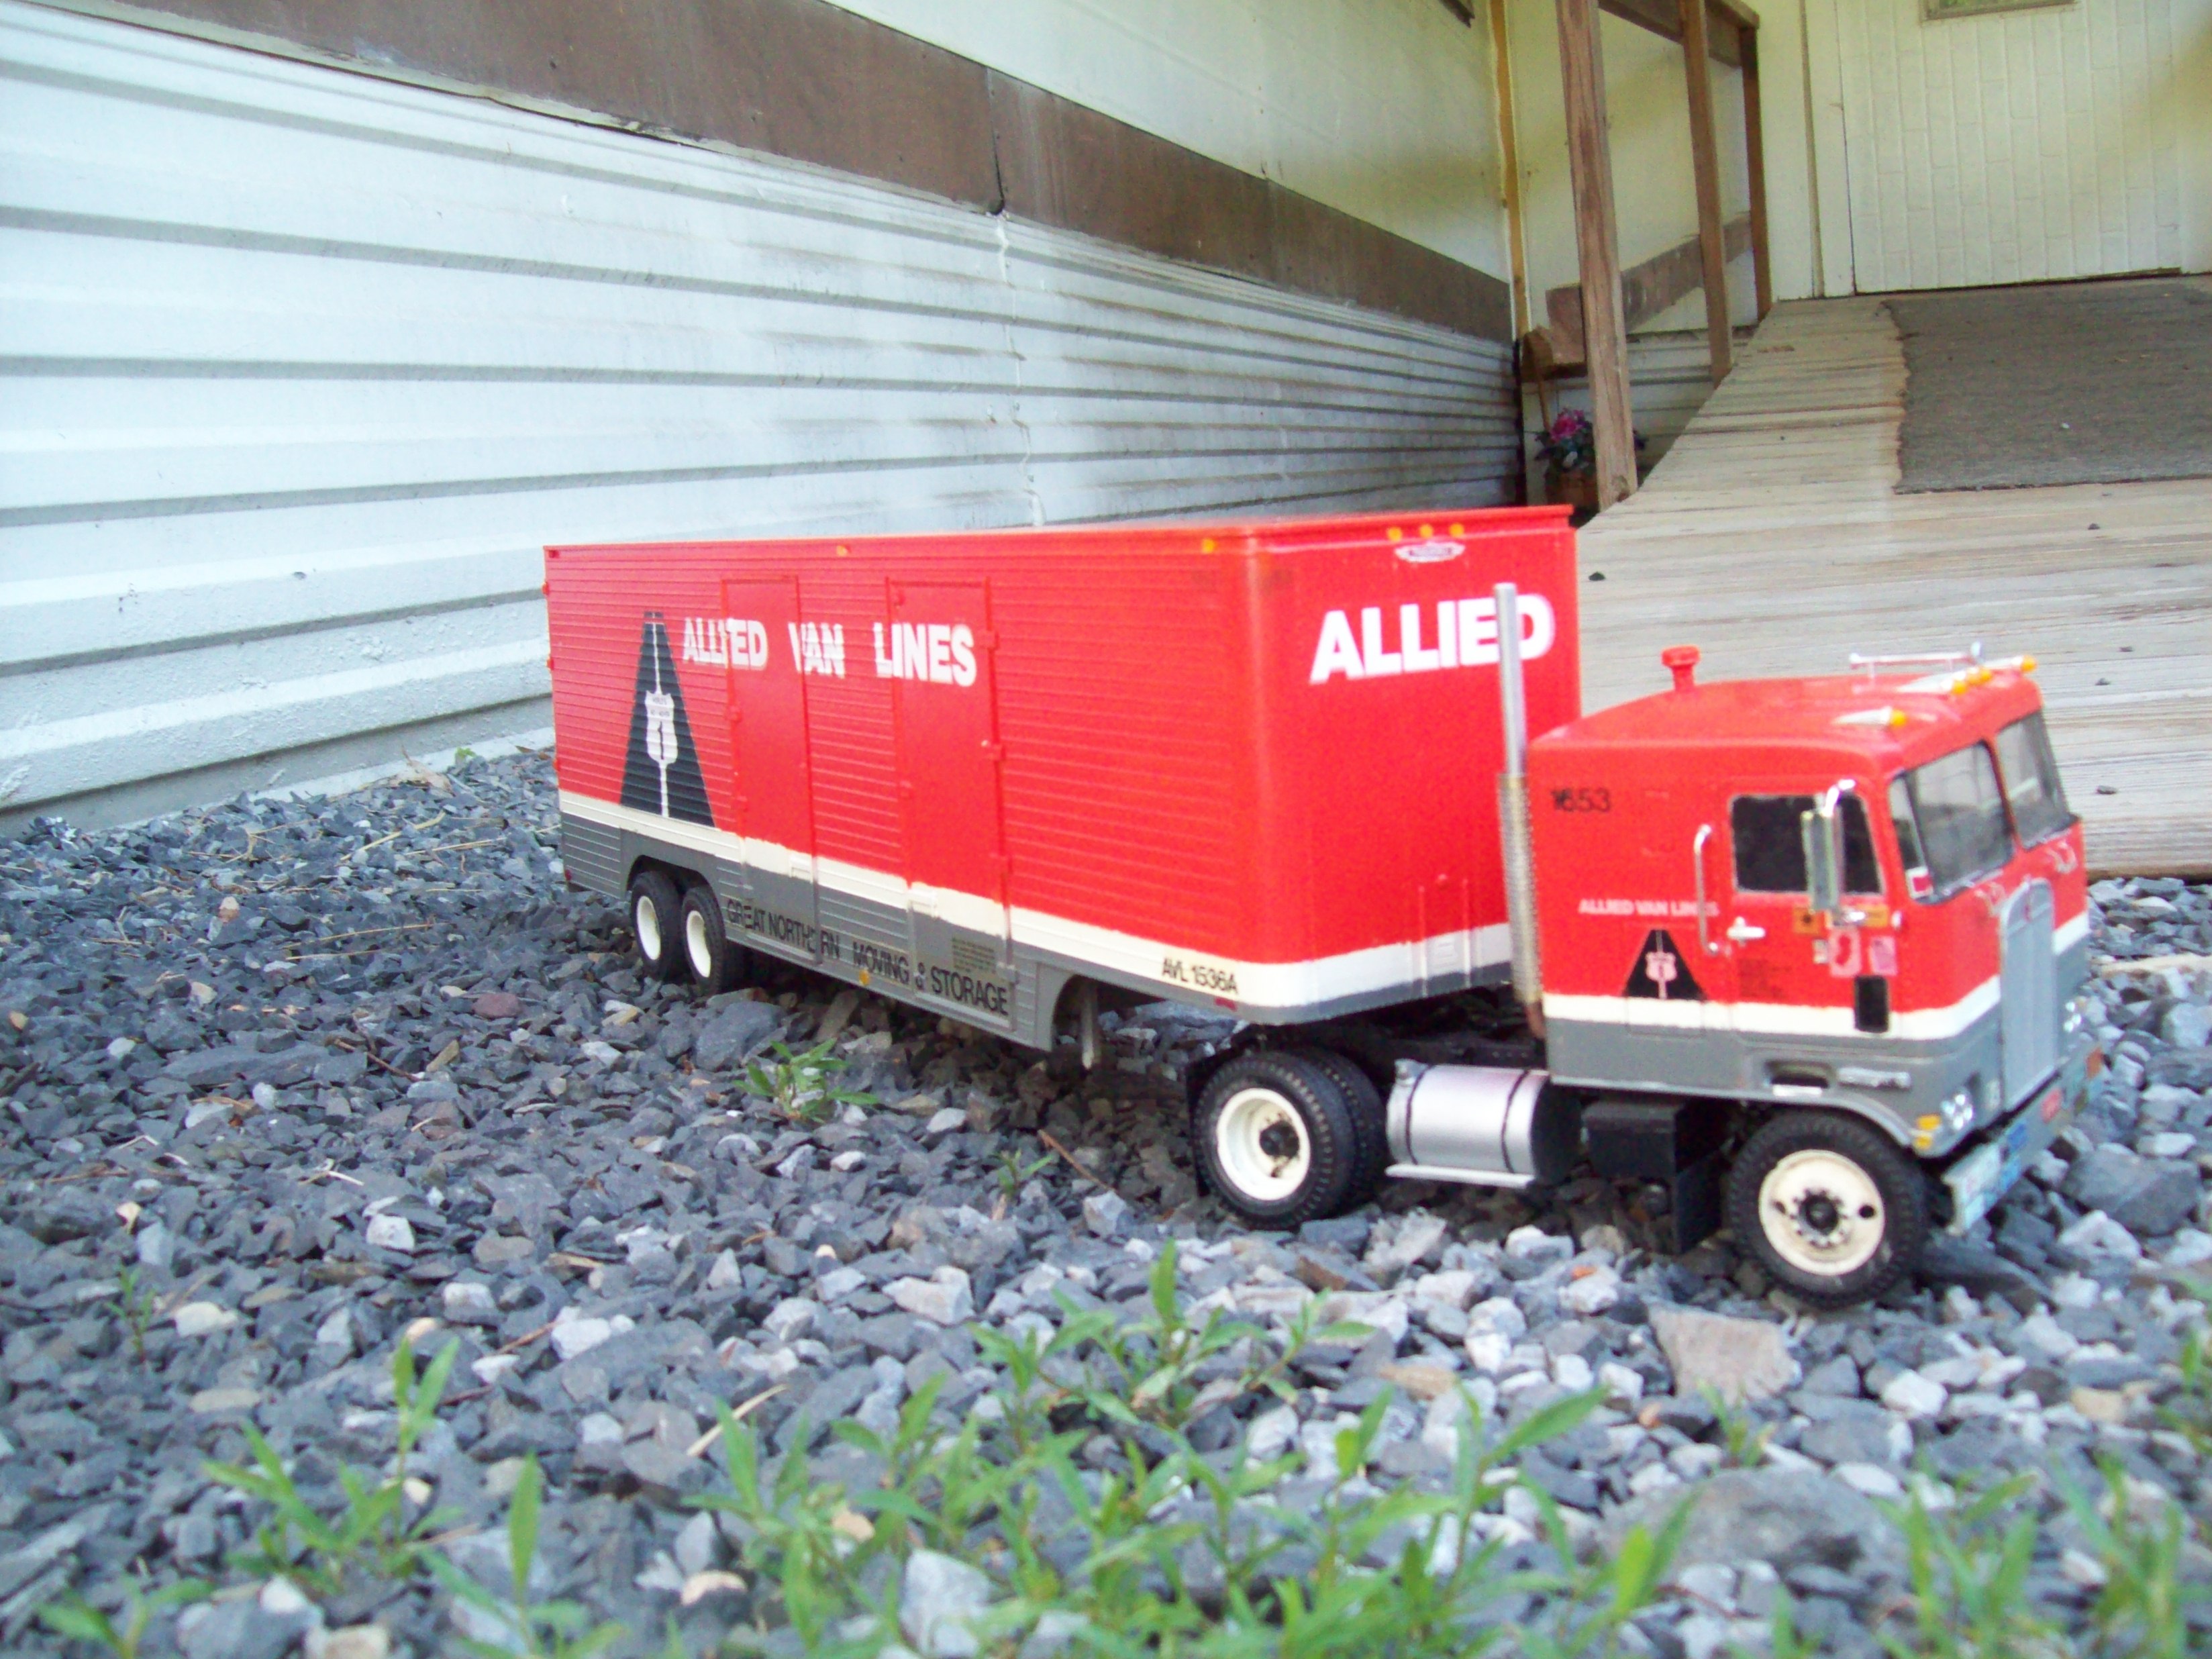
That's easy. It already is a Trailmobile moving van. Literally all you need is different decals. These trailers are the same kit as the Allied, Mayflower, and north American trailers released during the 1970s. Set aside everything that is meant for the interior like the tools and any racing equipment, as well as the wheel covers that come with these trailers. Add some moving company decals and you have your moving van. My Allied van shown here is an ebay rebuild. It was the Bill Elliott/Coors transporter.The KW and Allied van have been stripped and are being rebuilt because the paint job and decals(1970s decals with another set applied on top of them) were awful and it always bothered me. I have to get some more of these Allied decals. I have some decals from modeltruckin.com for Neptune Van Lines that will be going on this unit.

-
I've done a few things to it since my last post. I've shortened the wheelbase to a single axle. Here is the basic frame. I swapped out the kit's 5th wheel for a slider from amt. I shortened the slide plate to fit the frame. I pirated the 8v92 engine from a GMC General kit and I chopped it down to a 6V92. The alternator is cut from the engine of an International cabover kit. The white valve cover is resin. I had to cast one because I lost the other original valve cover. I'm happy to get some basics handled on this build.
-
B.R.B.O. cruiseliner daycab
SpreadAxle replied to signguy2108's topic in WIP: Model Trucks: Big Rigs and Heavy Equipment
You've done some nice work so far. -
B.R.B.O. Freightliner FLC update 2/7
SpreadAxle replied to k100's topic in WIP: Model Trucks: Big Rigs and Heavy Equipment
I have been dying to try this exact thing with the sleeper on the FLC. I do have some close up shots of one of these if you want to count rivets. This FLC sits(or at least it was a few years ago) at the TA in Stony Ridge, OH. It's hooked to an old moving van which was converted to a church. I have more pix, but this should get you started.
-
That looks great.
-
Keystone Aluminum Model Miniatures
SpreadAxle replied to SpreadAxle's topic in Truck Aftermarket / Resin / 3D Printed
I bought that same trailer body. I like it, but it will be awhile before I attempt to build it. -
Doug Wagner of Keystone is making bodies for various types of tankers. Check out his site and you will also find wheels and lug nuts. Prices are a 3 pot cement tank is $60 a 2 pot cement tank is $40 a single pot pup trailer tank is $30 Chemical ribbed tank is $80 And oval fuel tankers are 16.5” $68 22” $88 Straight truck fuel tank 11” is $58 all plus shipping to your zip code Also Jamie Rahmoeller (moluminum) and he is on Facebook he makes an accessory kit that goes with my trailers. You will have to get ahold him to buy them he sells resin tires n wheels, dome lids, all the valves you will need, front n rear fenders, axel assembly, resin wheels, chez lights for trailer, etc. also you have to scratch build the frame using evergreen or Plastruct or kit bashing.
-
The masters for that kit(TQ 57 International 9670) have been purchased by Dave Carey. Known as Models by Dave. He makes lots of great items related to International Trucks. It will be later this year when he can start making them.
-
As a side note, I've discovered I'm missing key chrome pieces. If any one has the handles that go below the windshield, or the handrails on the sides of the cab, or the door handle/steps for the cab doors please let me know. I only have one of the handrails(there should be 4), and neither of the 2 handles below the windshield. Thanks
-
Here are my first progress pix. Let's start with the cab. There are 2 running lights molded onto the front of the kit's cab that were optional. I sanded those away. Basic trailer body assembly done. I am converting the tail light panel to be able to accept 2 round tail lights rather than the single rectangular lights as per the kit. The air ride suspension lends itself well to an easy conversion into a single drive tractor. These single axle cabovers with sleepers were once pretty popular with the household movers. Both fleets and owner operators bought this type pf tractor at that time.My mistake was not cutting it about 2 or 3 scale feet ahead of where I did. I do have plenty of frame rail to add to get the length right.
-
B.R.B.O. IH CO 4070A
SpreadAxle replied to drinkone2's topic in WIP: Model Trucks: Big Rigs and Heavy Equipment
I can't wait to see where you go with this one.