

BigBad
-
Posts
1,585 -
Joined
-
Last visited
Content Type
Profiles
Forums
Events
Gallery
Everything posted by BigBad
-
Very classy!
-
 Thanks for your nice comments guys! it's always appreciated. I like it and I'm happy you like it too!
 -
I was waiting for this comment! I knew this would catch your eye! Thanks man, it's appreciated!
-
Amy Kenworth and Peterbilt
BigBad replied to Apriliadan's topic in Model Trucks: Big Rigs and Heavy Equipment
That was a major project! Nice rigs, clean builds with bound loads too. Job well done! -
AMT White Freightliner COE Single Drive
BigBad replied to Leonidas's topic in Model Trucks: Big Rigs and Heavy Equipment
Such a cute little truck! Your build is quite clean, I like the color, it makes the truck stand out! Very nice! Now when are these kits coming out, I want to build this! -
Ford LNT 8000 Snow Plow
BigBad replied to Ack! Ack-ack!'s topic in Model Trucks: Big Rigs and Heavy Equipment
Very clean build! Nice work! You actually foiled the grill or you shot it with chrome paint? Very good work any way you look at it for sure! -
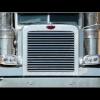
Hi guys, this is my annual build, an Italeri FLD120 with a Moebius 53 foot Great Dane roll up door dry van. I have seen these D&R rigs go up and down the highways since I was a kid. In the early 90's I was struck by the styling of the FLD as being a breakthrough at the time, being very good looking for a fleet truck. So, since I'm familiar with the Day & Ross "Ship The Big Orange" paint scheme and still liking the FLD so much, I decided to make one of my own! So here is the breakdown, I started with the Italeri kit that has the silver truck box art with the cab side exhausts. The truck is box stock except for shortened rear hubs, "baby moon" button hub covers, Michelin drive tires from SIA A&N and a replaced the roof air deflector with a unit from a Revell of G Pete 359. Air brake hoses are on the truck and trailer too. The Moebius smoothside is also almost bone stock, except for the scratch built wheel hubs and KFS 1/24 scale wheels and Italeri tires to match. All wheels roll on the rig, that's just something I have to keep. No I don't play with them, it's just that I need to keep the "functionality" on all my builds. The decals are from Jerry at Modeltruckin'. I still have to go through some last details like the connecting hoses and wires to get the whole package finished though. Here are the pictures...
-
I had that poster when I was a teen too! You hit this one right on the head, it's looking very much like the poster! Now all you need is the stainless reefer behind it! Brought me way back when for a minute! Thanks for sharing!
-
B.R.B.O FORD CL9000 done
BigBad replied to jacobus's topic in WIP: Model Trucks: Big Rigs and Heavy Equipment
looking really good up tp now! Ford sure made good looking big trucks at the day. Nice job Jac, you've outdone yourself with this one. -
Post your "Snap" kits.
BigBad replied to Petetrucker07's topic in Model Trucks: Big Rigs and Heavy Equipment
I think the Revell snap trucks are some of the best kits to hack up! They're inexpensive to start with, they fit nicely, you don't have to fiddle with the hoods and cabs to align, they have pretty good parts (save the rear wheels and all tires...), that can be used on many other trucks... Good castings for the bodies and straight frames. Ok, i'll admit they have their shortcomings, no brake air chambers and no sunvisors... But man, look at what the guys here can do with 'em! Impressive! -
Kenworth KW 523 Bullnose
BigBad replied to BlackDragon's topic in Model Trucks: Big Rigs and Heavy Equipment
Just like the real one! I like everything about it, I'm surprised about the 2 piece Italeri tires in the back, they look at home on this truck!! Interesting build and a nice piece! -
70's Diamond Reo Cabover
BigBad replied to extmcdriver's topic in Model Trucks: Big Rigs and Heavy Equipment
Pretty good! I like it! -
53" lowboy trailer & a few others
BigBad replied to signguy2108's topic in Model Trucks: Big Rigs and Heavy Equipment
I like your style... I like that Kenworth and the trailers, I already said good things about that Volvo... -
That red really makes it pop! Very nice! The grill and headlights are nicely trimmed in black, good detailing behind the cab... A good one!
-
Round 2 K123
BigBad replied to GearUpJammer's topic in WIP: Model Trucks: Big Rigs and Heavy Equipment
You could use some aluminum tubing as a sleeve to fit over the metal axle in the hub... I did that before and works nicely. You can find those at the hobby shop. -
B.R.B.O FORD CL9000 done
BigBad replied to jacobus's topic in WIP: Model Trucks: Big Rigs and Heavy Equipment
You've outdone yourself with this paint job Jac! Nice! -
Very nice build! The Lonestar looks great as a rotator wrecker!
-
Kenworth Bullnose (Illini Replica)
BigBad replied to BlackDragon's topic in WIP: Model Trucks: Big Rigs and Heavy Equipment
Good start to this one! -
B.R.B.O FORD CL9000 done
BigBad replied to jacobus's topic in WIP: Model Trucks: Big Rigs and Heavy Equipment
Hi Jacobus, nice start to your project! I like your rear suspension setup! I also have this kit, so I'm very interested in your build. I see you might mount the fuel tanks right in front of the rear wheels. The cutouts at the bottom rear of the cab are there for fuel filler neck clearance. You might want to fill these cut outs on the cab if you want to install the fuel tanks like you want them, unless you want to use 4 fuel tanks... Or just leave it the way it is. This is a picture of a CL9000 which has the fuel tanks in the stock locations, if you can blow up the picture you will see the fuel cap is aligned with the cutout in the cab skirt: Another pic: -
BRBO - International Prostar
BigBad replied to iamsuperdan's topic in WIP: Model Trucks: Big Rigs and Heavy Equipment
Download the ones from Revell's version on their site... :http://www.revell.de/fileadmin/import/images/bau/07408_%23BAU_2010_INTERNATIONAL_LONE_STAR.PDF Same thing for the Prostar: http://www.revell.de/fileadmin/import/images/bau/07411_%23BAU_INTERNATIONAL_PROSTAR.PDF -
late model KW W900L
BigBad replied to mistermodel's topic in WIP: Model Trucks: Big Rigs and Heavy Equipment
I started something similar to this over a year ago and it looks pretty similar to what you're doing here, except for the sleeper "condo" extension. I guess I'm going to follow this build closely! i bought a W900B hood from P&P and replaced the cowl area with the T600 hood cowl. Of course if you have access to KJ's hood... It'll take a little less work to accomplish. Good start to this project! Anyhoo, here are some pictures of mine. I added some skirting at the bottom of the cab and and prayed it flat black for sanding at this point. I was originally planned to ude the Moebius Lonetsar frame but i forgot about the 8 airbag suspension being quite different from the International setup. I'll post more pics this week. your's just might get me started again... -
20' EU Container trailer 1:24
BigBad replied to truckmodell's topic in WIP: Model Trucks: Big Rigs and Heavy Equipment
I agree with everybody here... This is just out of this world! Incredible amount of detial here, even the connectors are there! Very, very nice! Which brings me to ask, what is your day job? You know, the one that brings bread and butter on your table? Is this it, or you have have to work with a truck or engineering related job! This project is really work intensive. Unbelievably nice! -
I like this one better than the real one, it's got a Detroit!
-
Ford LN8000 Refuse Truck
BigBad replied to dragstueck's topic in Model Trucks: Big Rigs and Heavy Equipment
Incredible! -
KW W-900 {snap}
BigBad replied to Old Buckaroo's topic in Model Trucks: Big Rigs and Heavy Equipment
I like the paint scheme and colors, very nice conversion!