av405
-
Posts
1,201 -
Joined
-
Last visited
Content Type
Profiles
Forums
Events
Gallery
Everything posted by av405
-
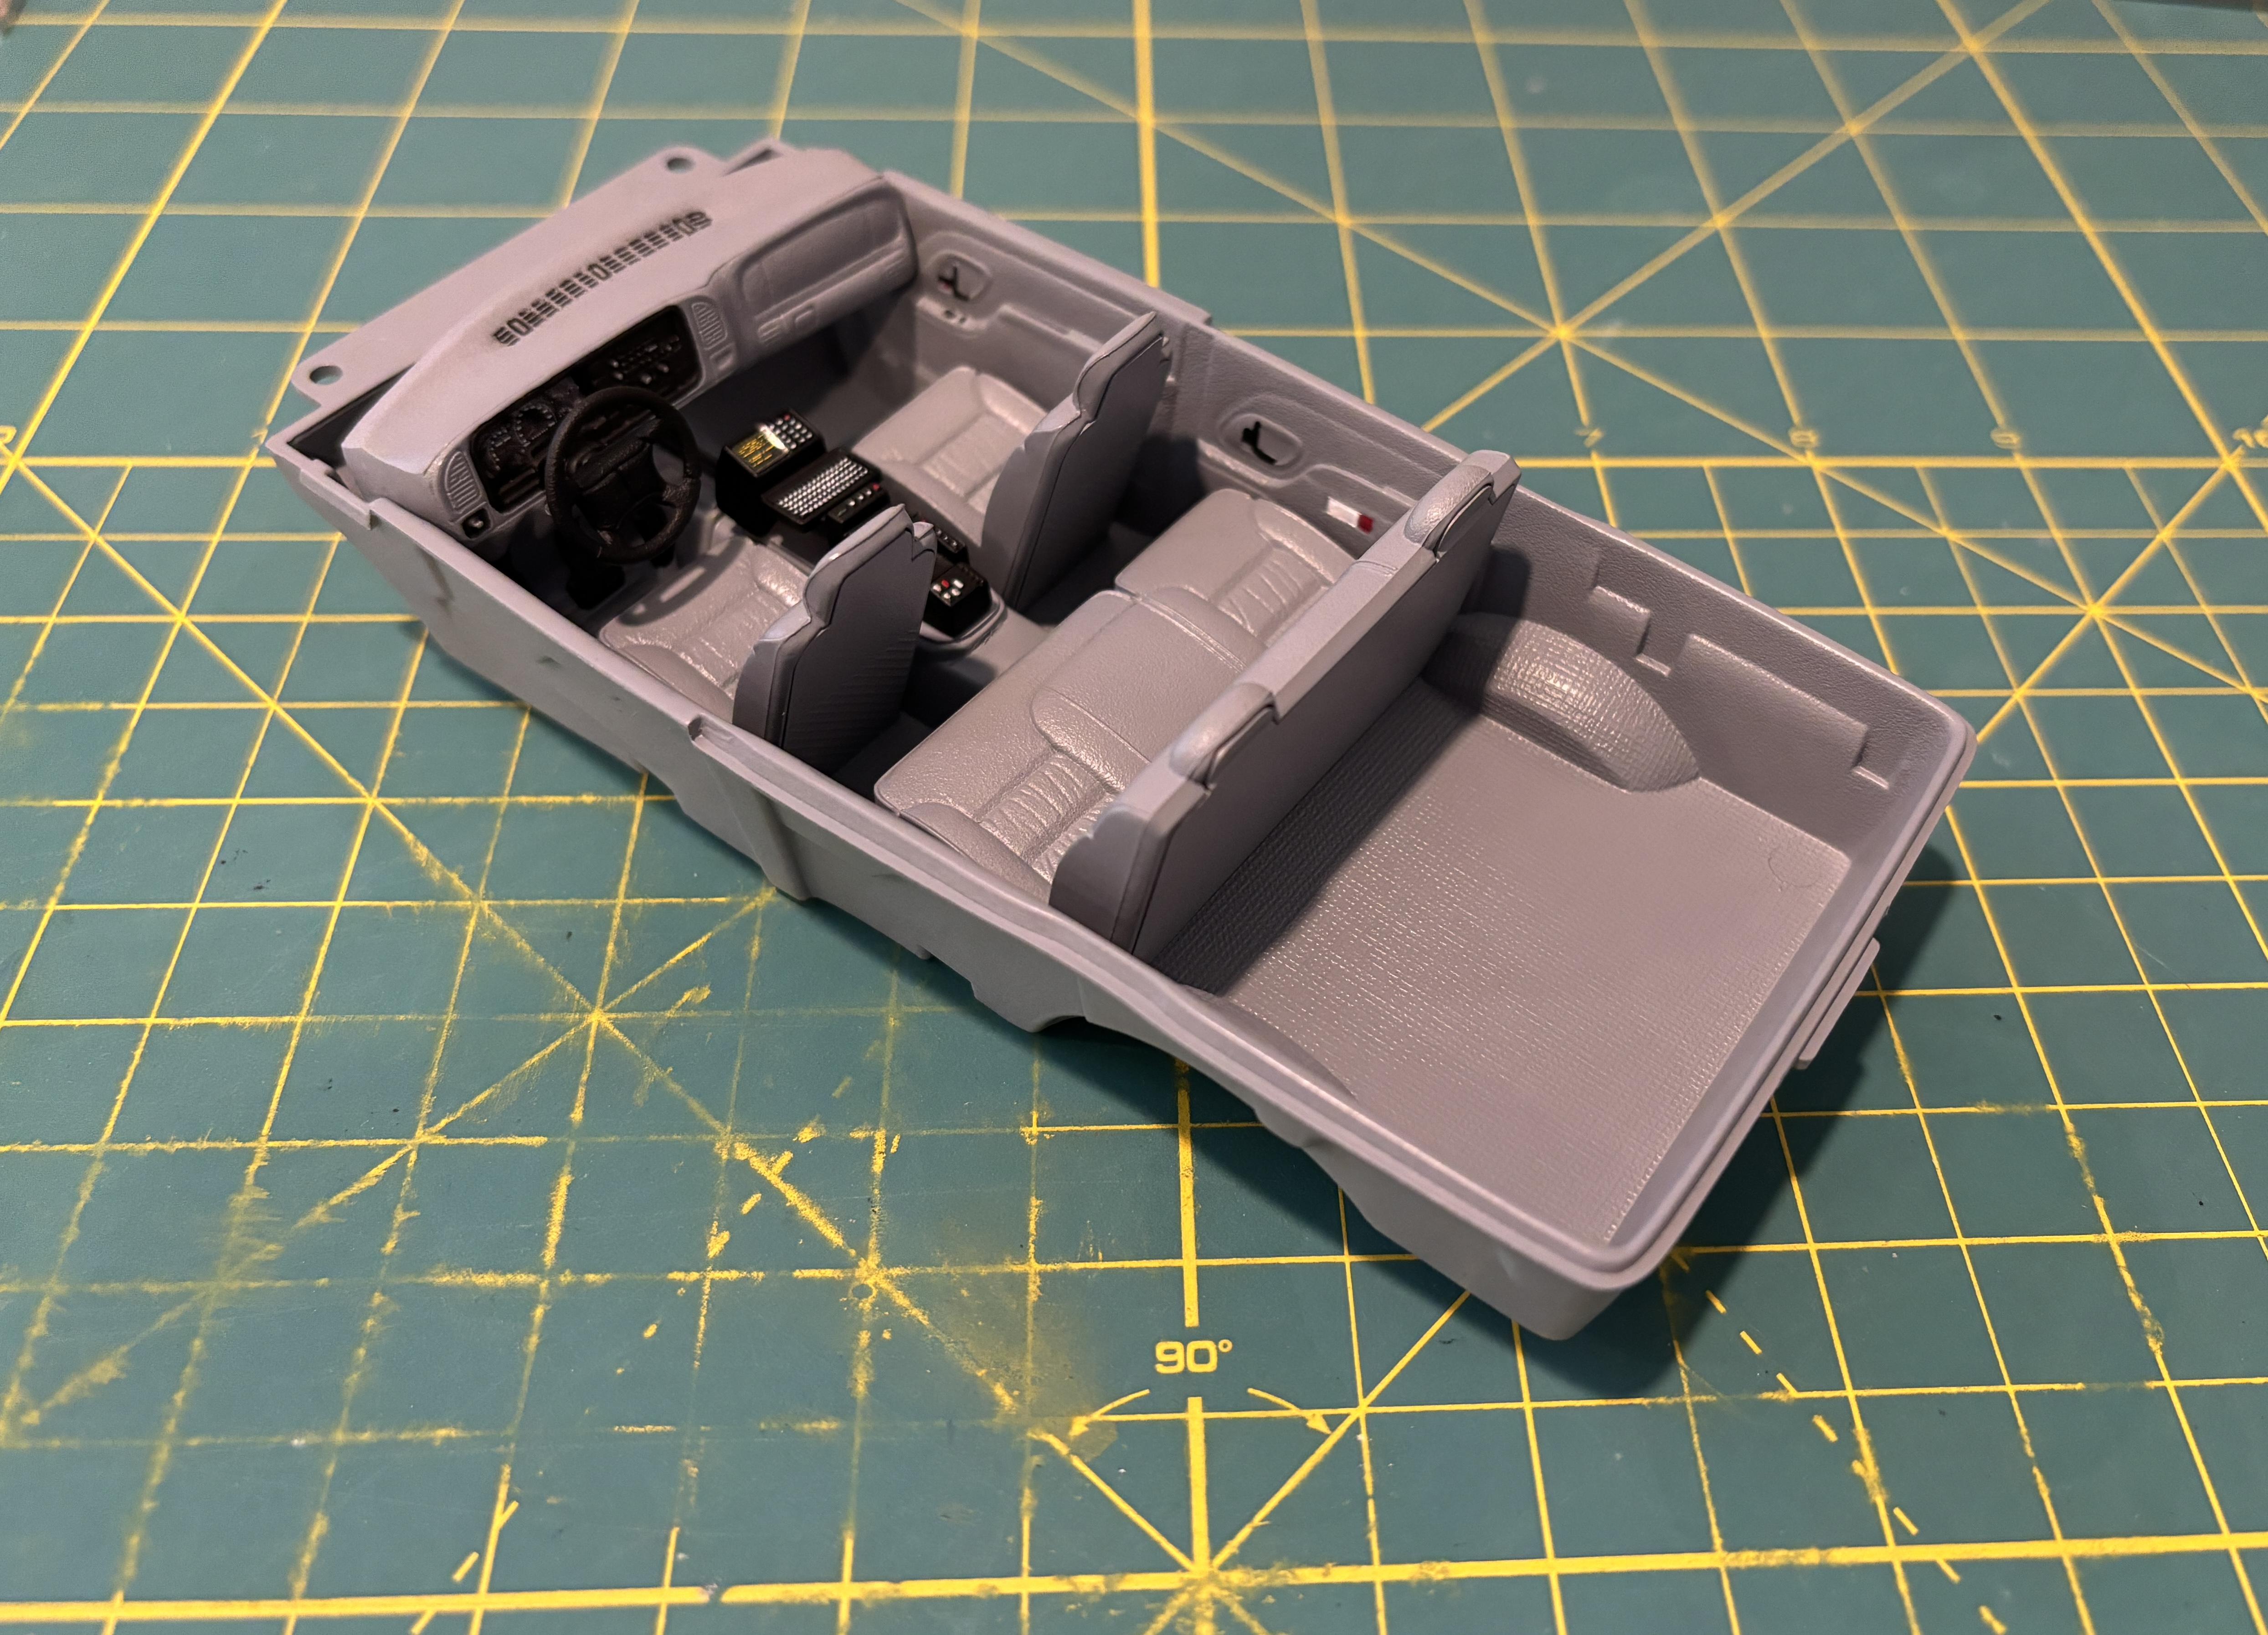
 Thank you! Speaking of which, the interior is all done. The dash gauge decal is from the C-3500 kit. There should be a center-mounted shotgun between the front seats, but there is no room to place it due to the molded in center console. This isn't my favorite interior work, but it'll do.
-
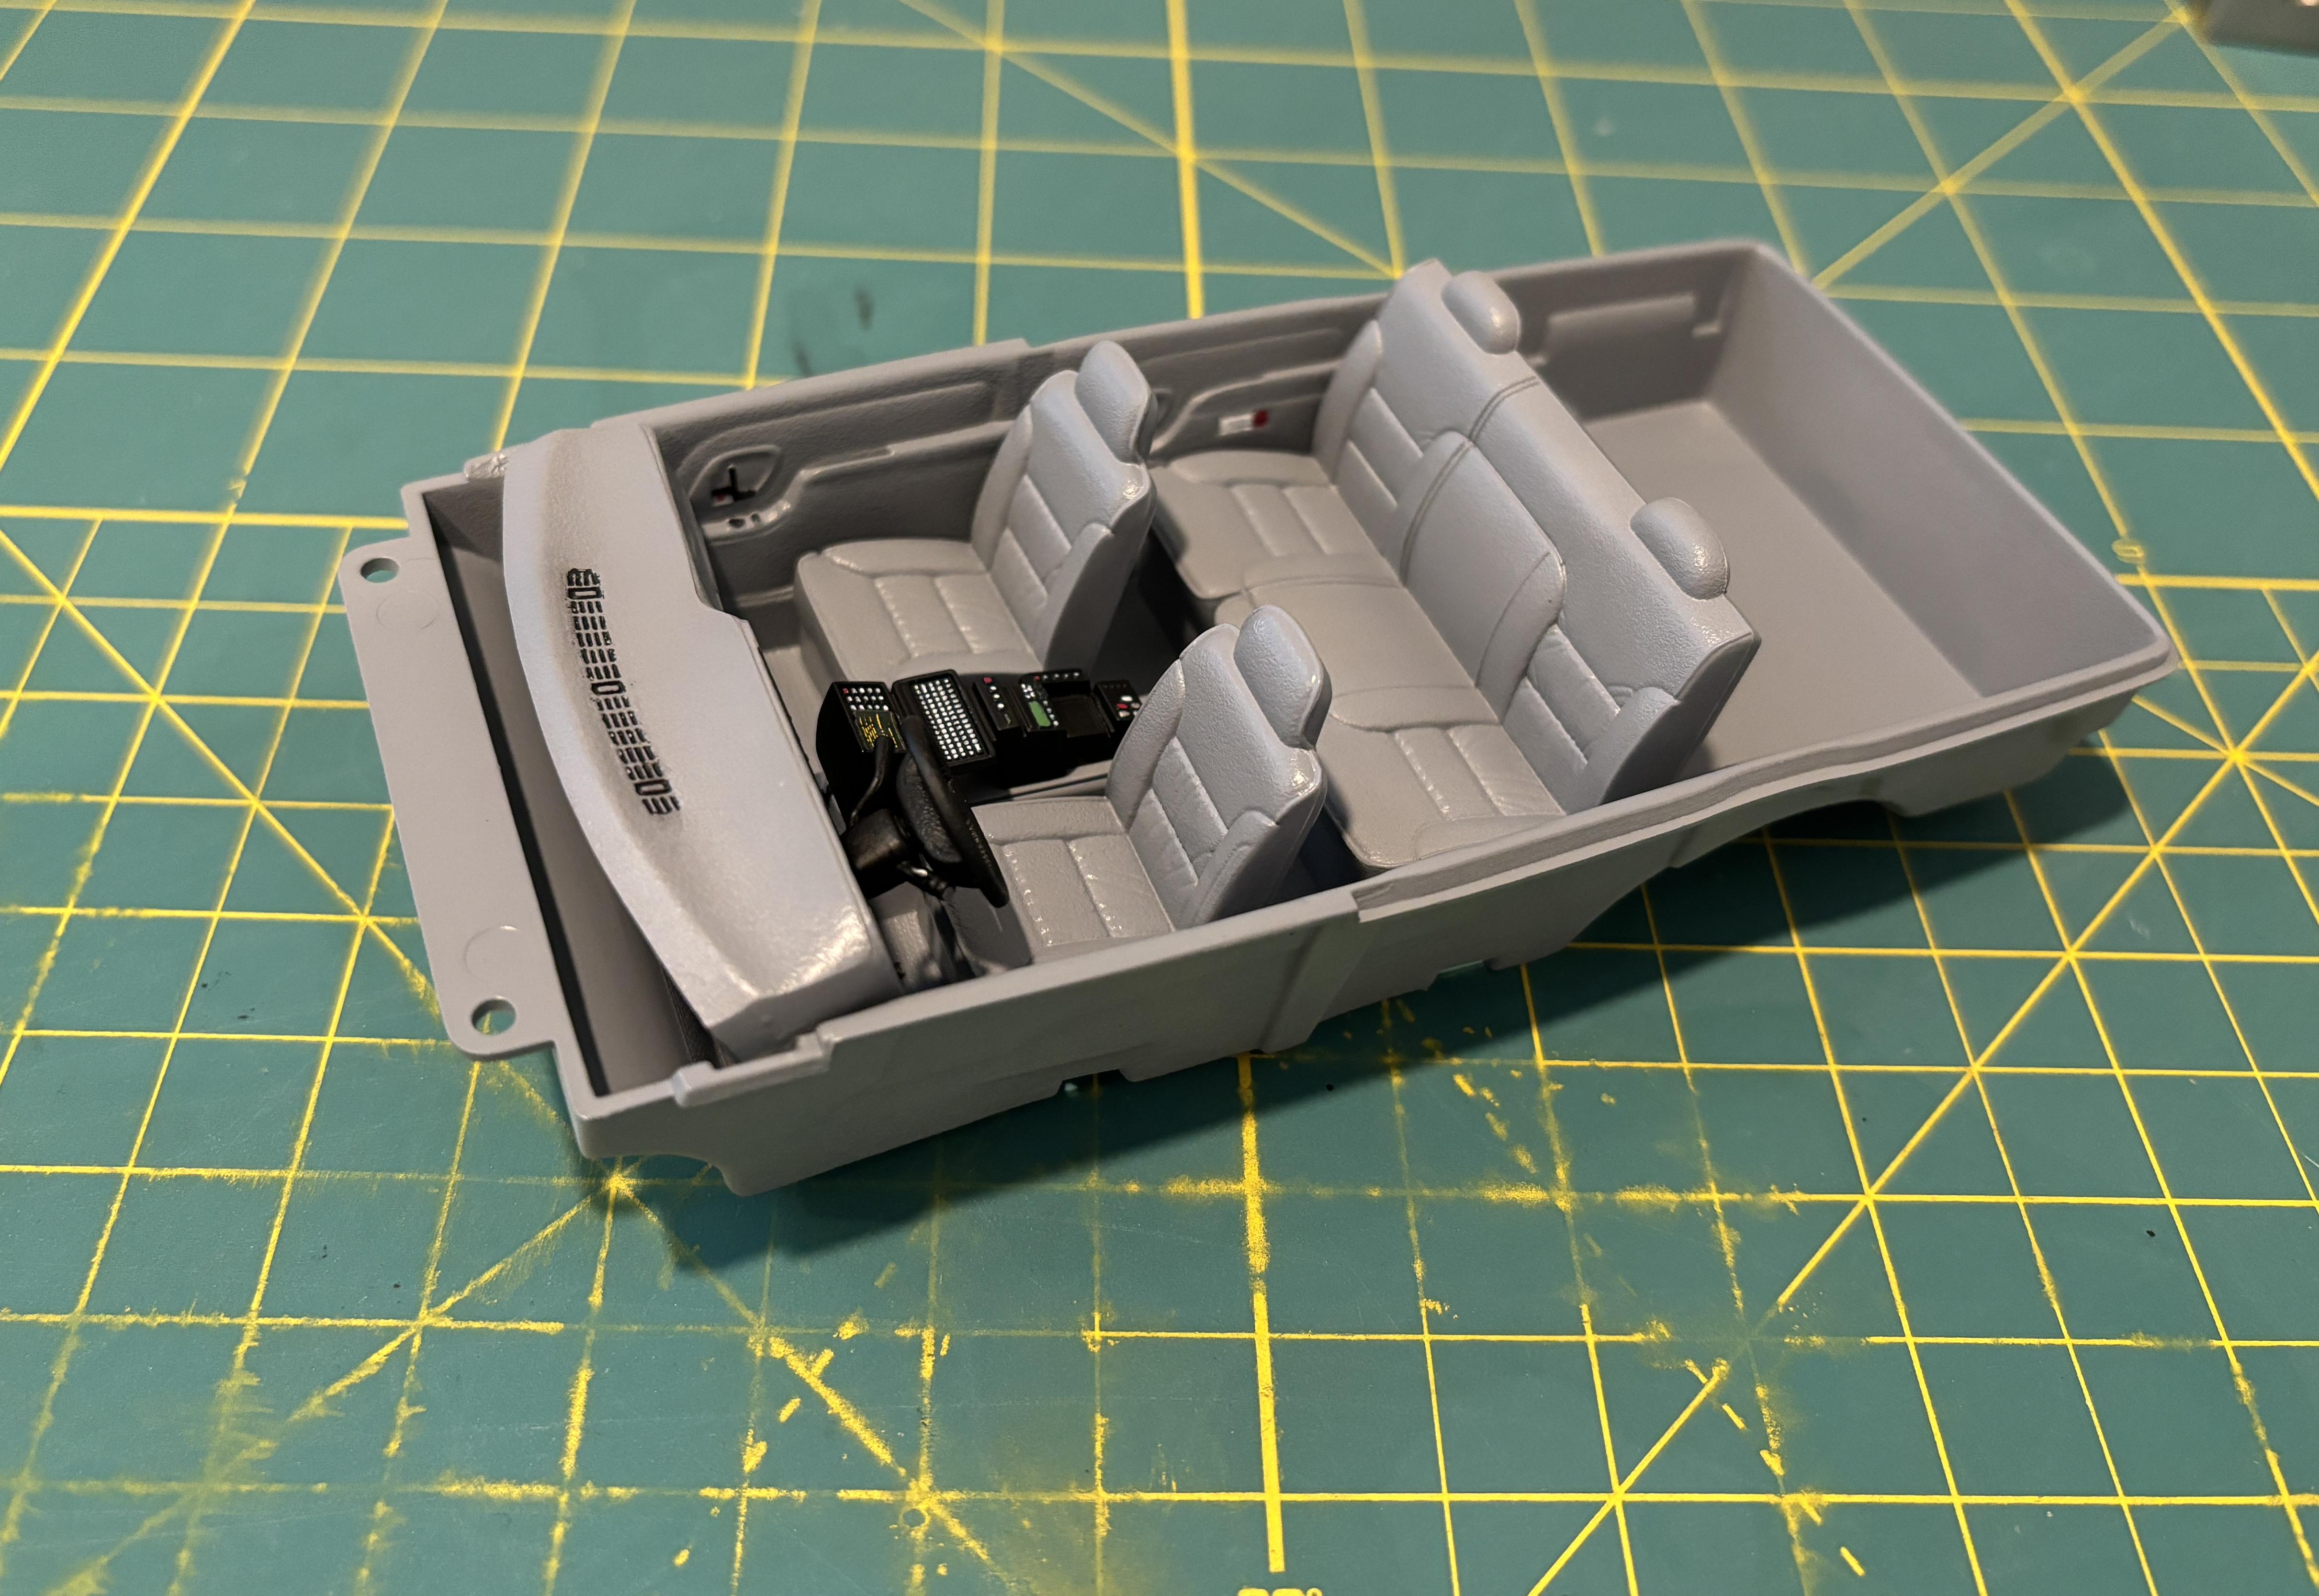
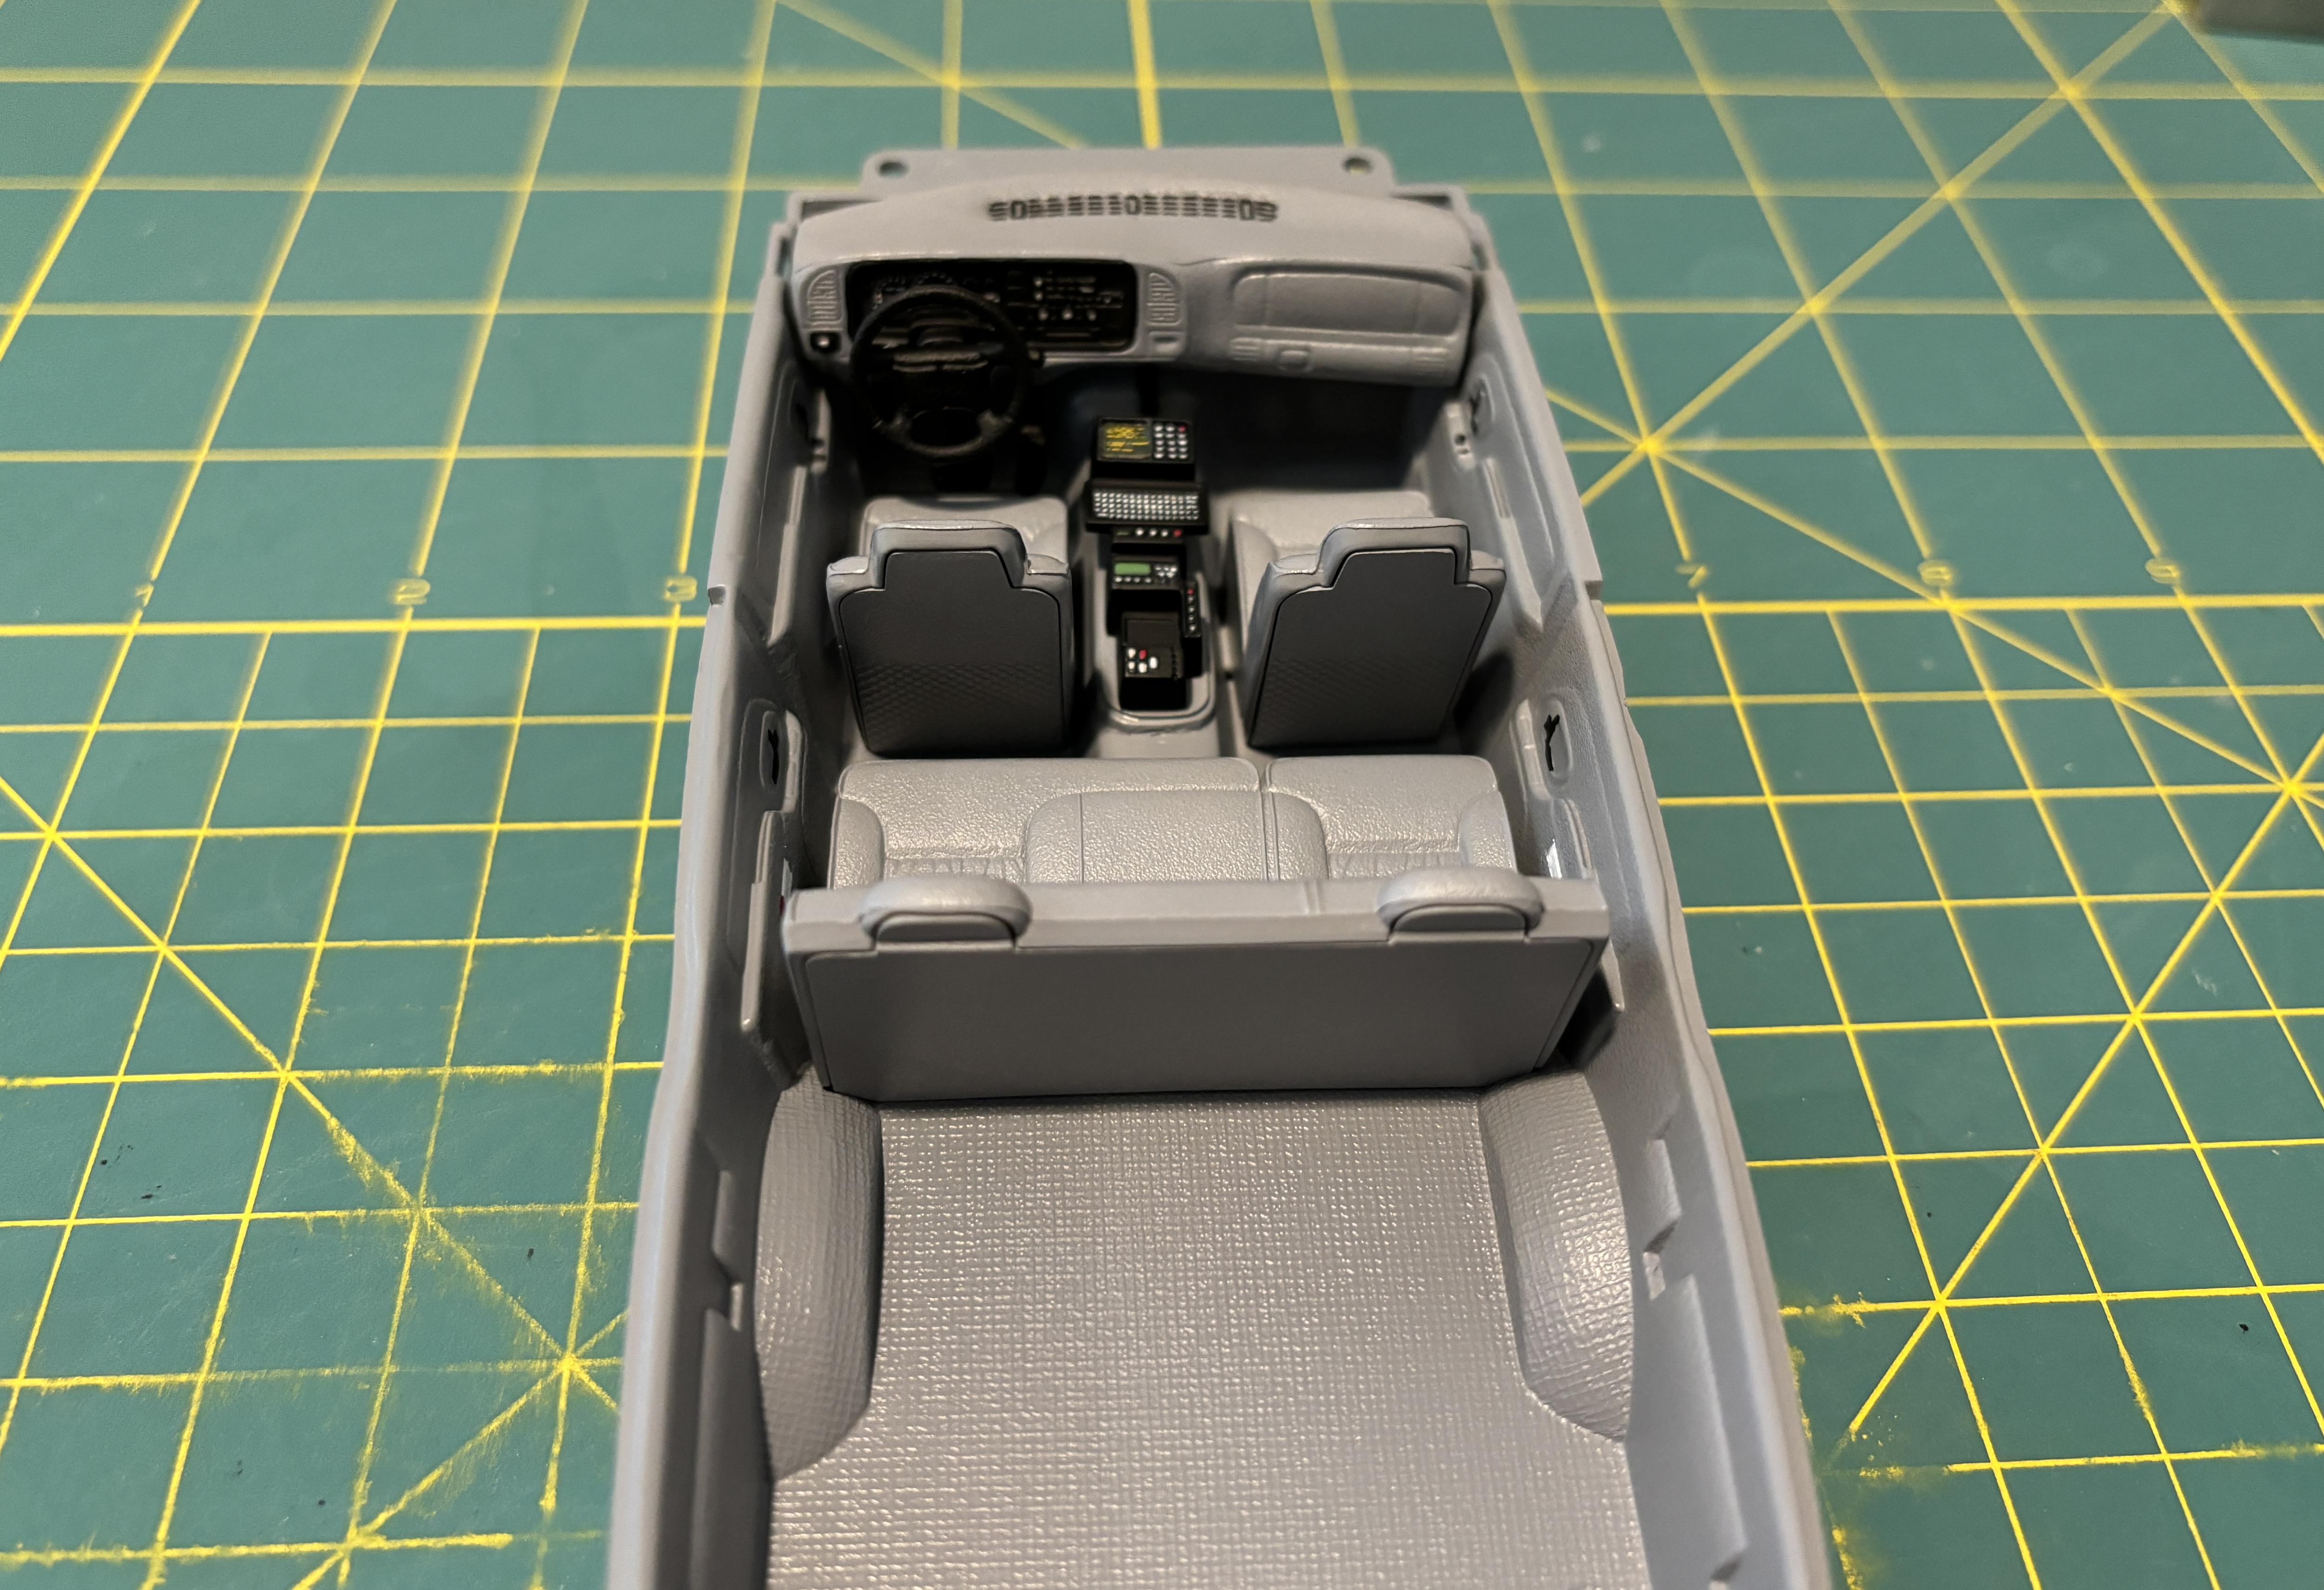
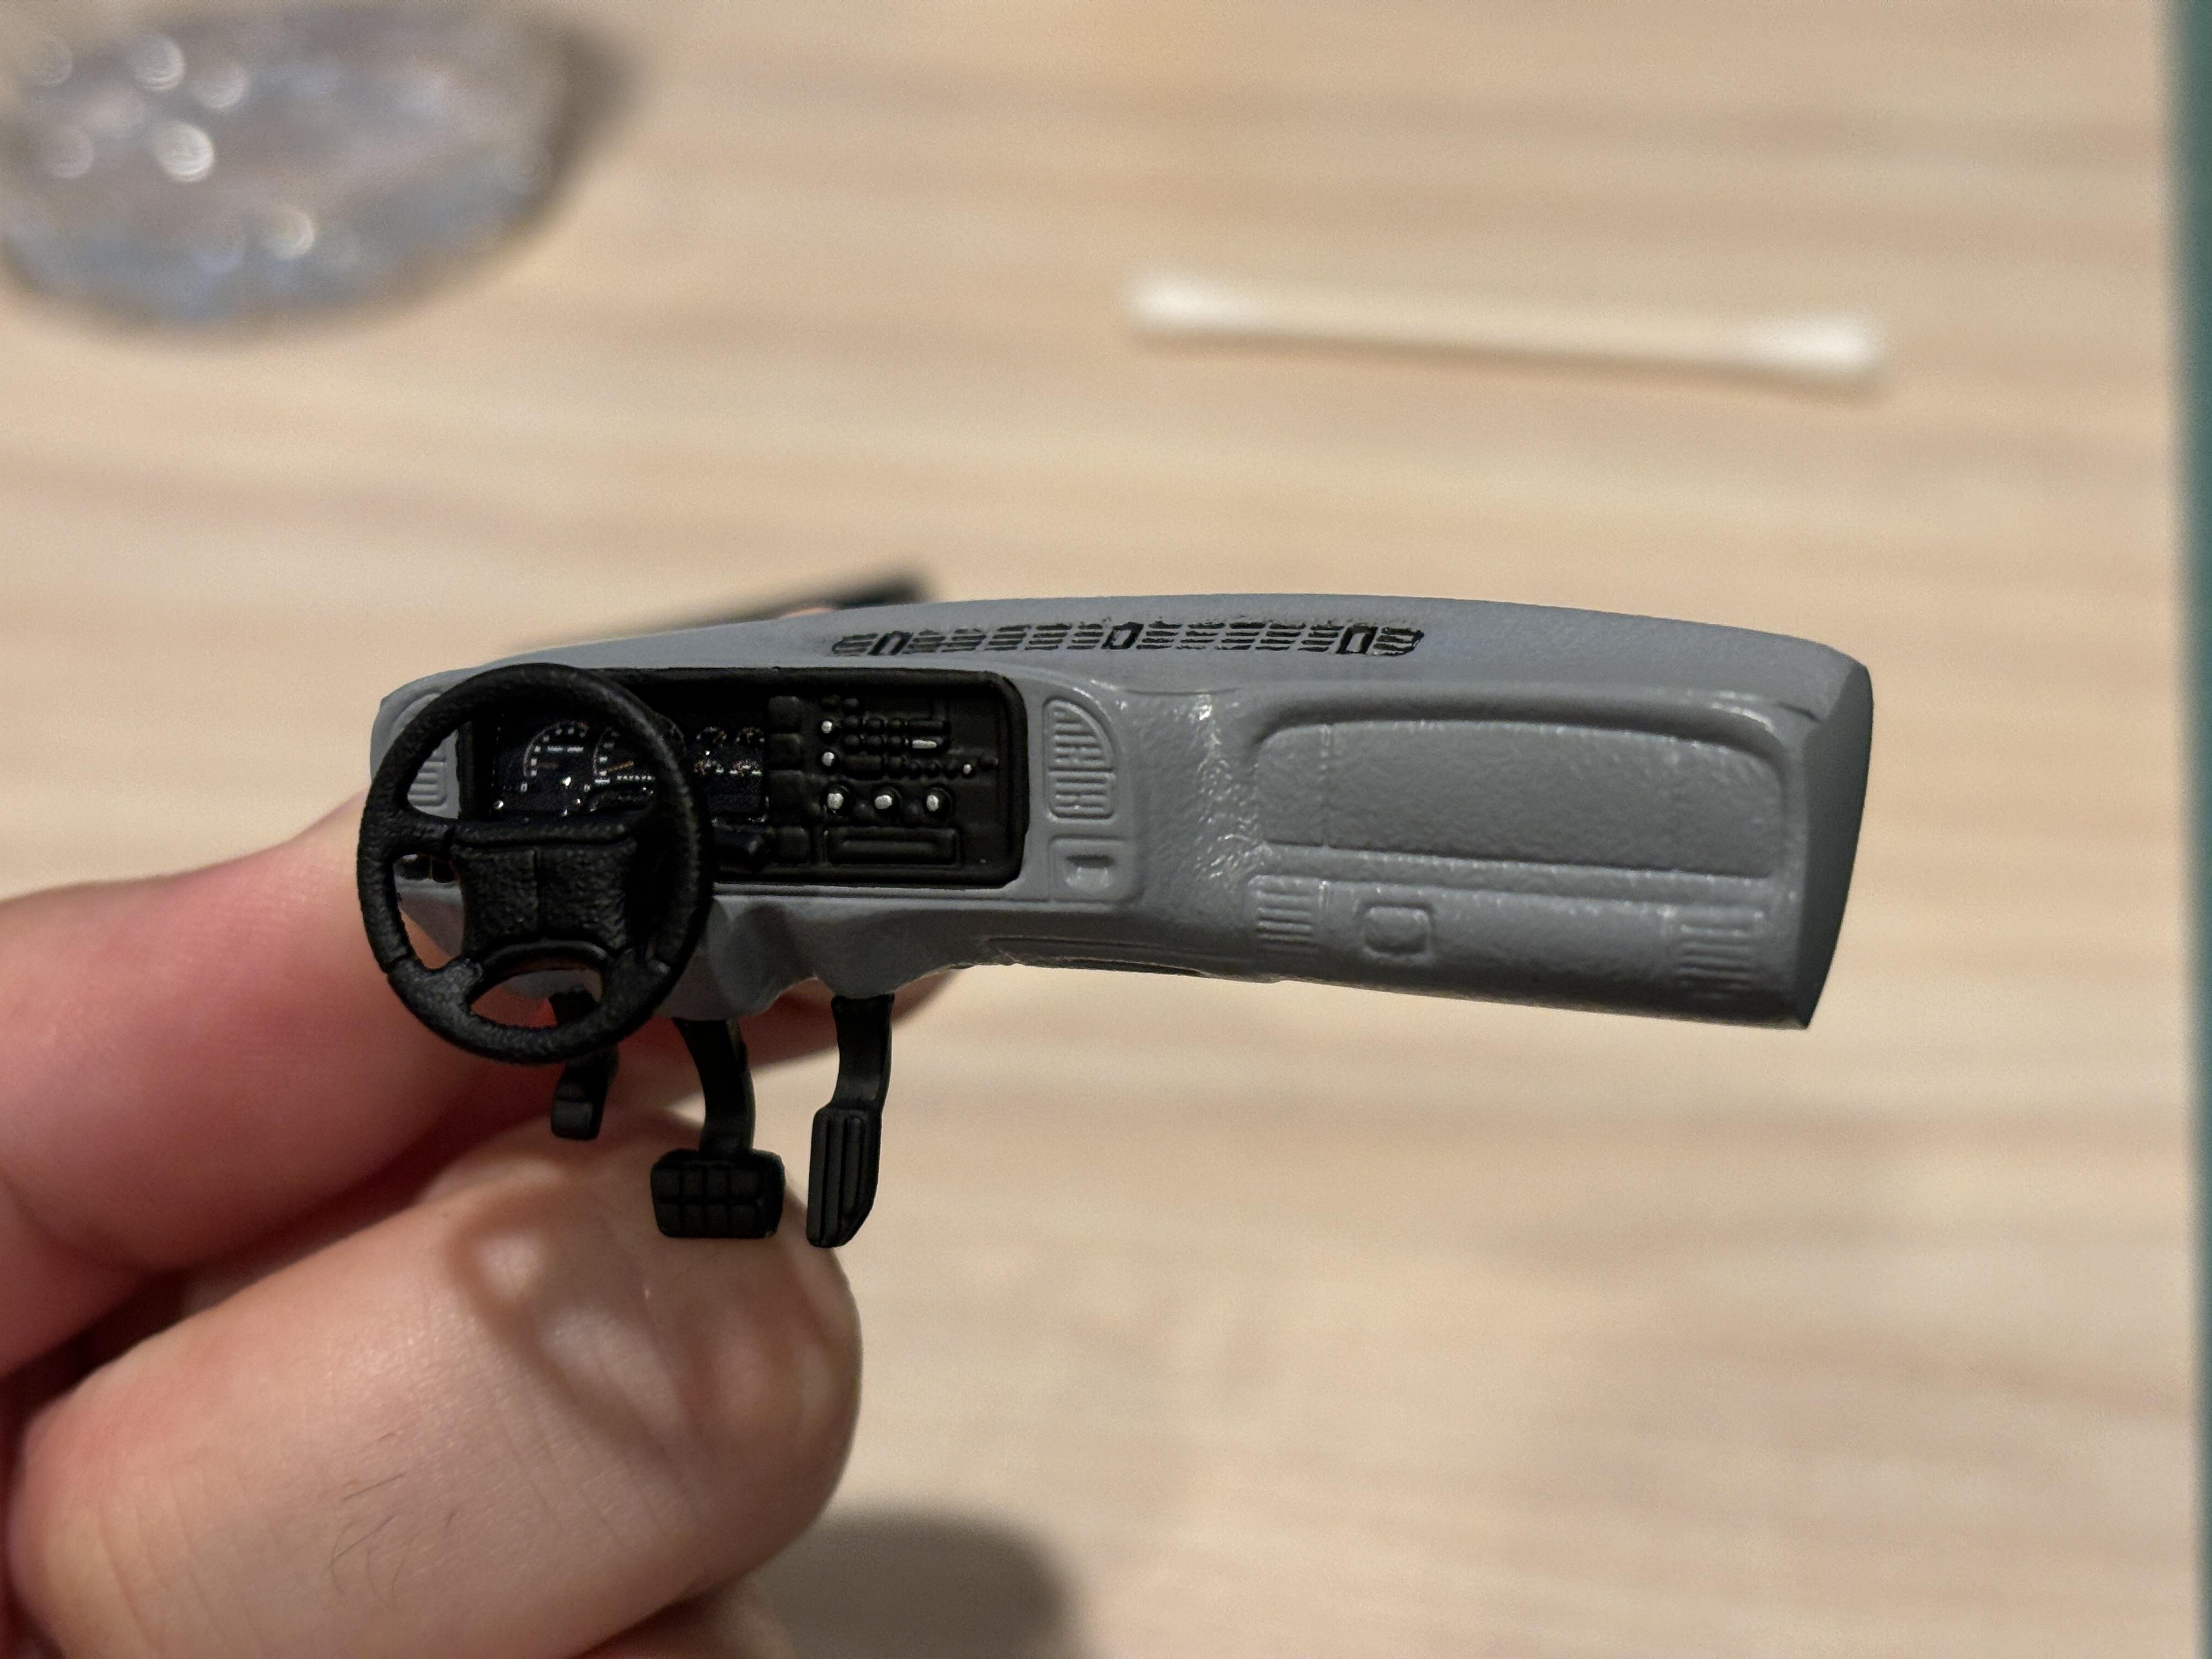
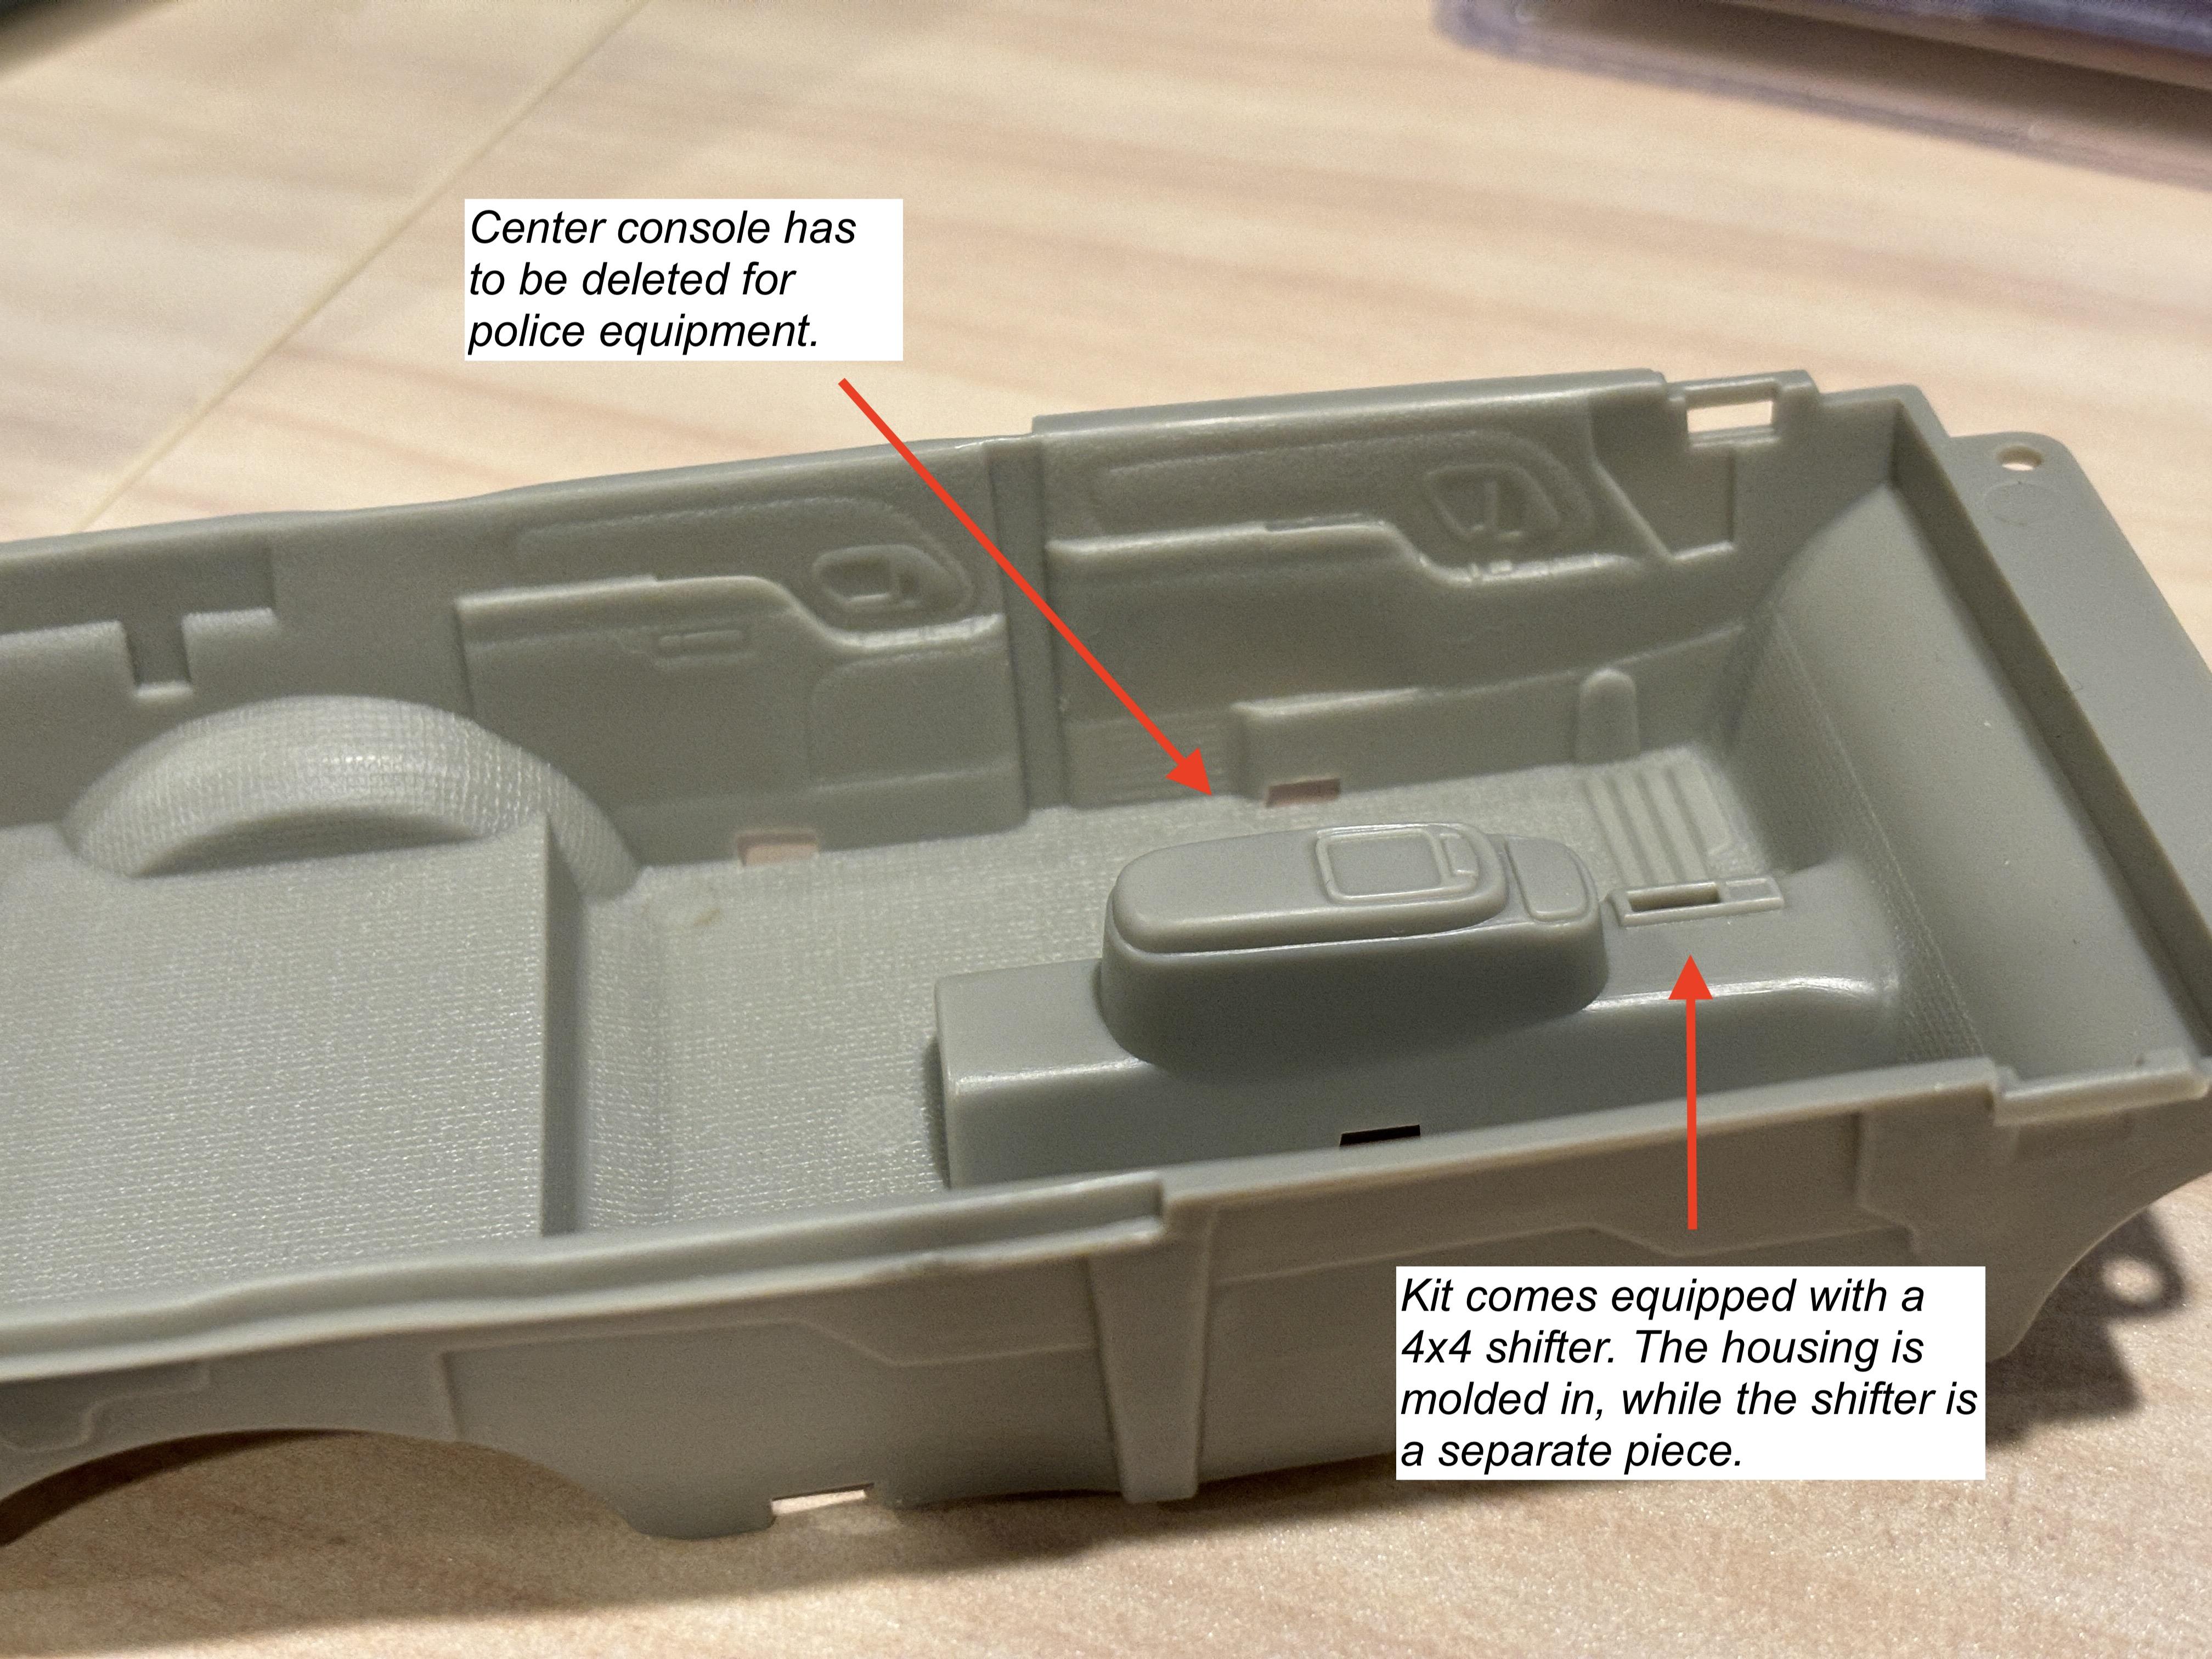
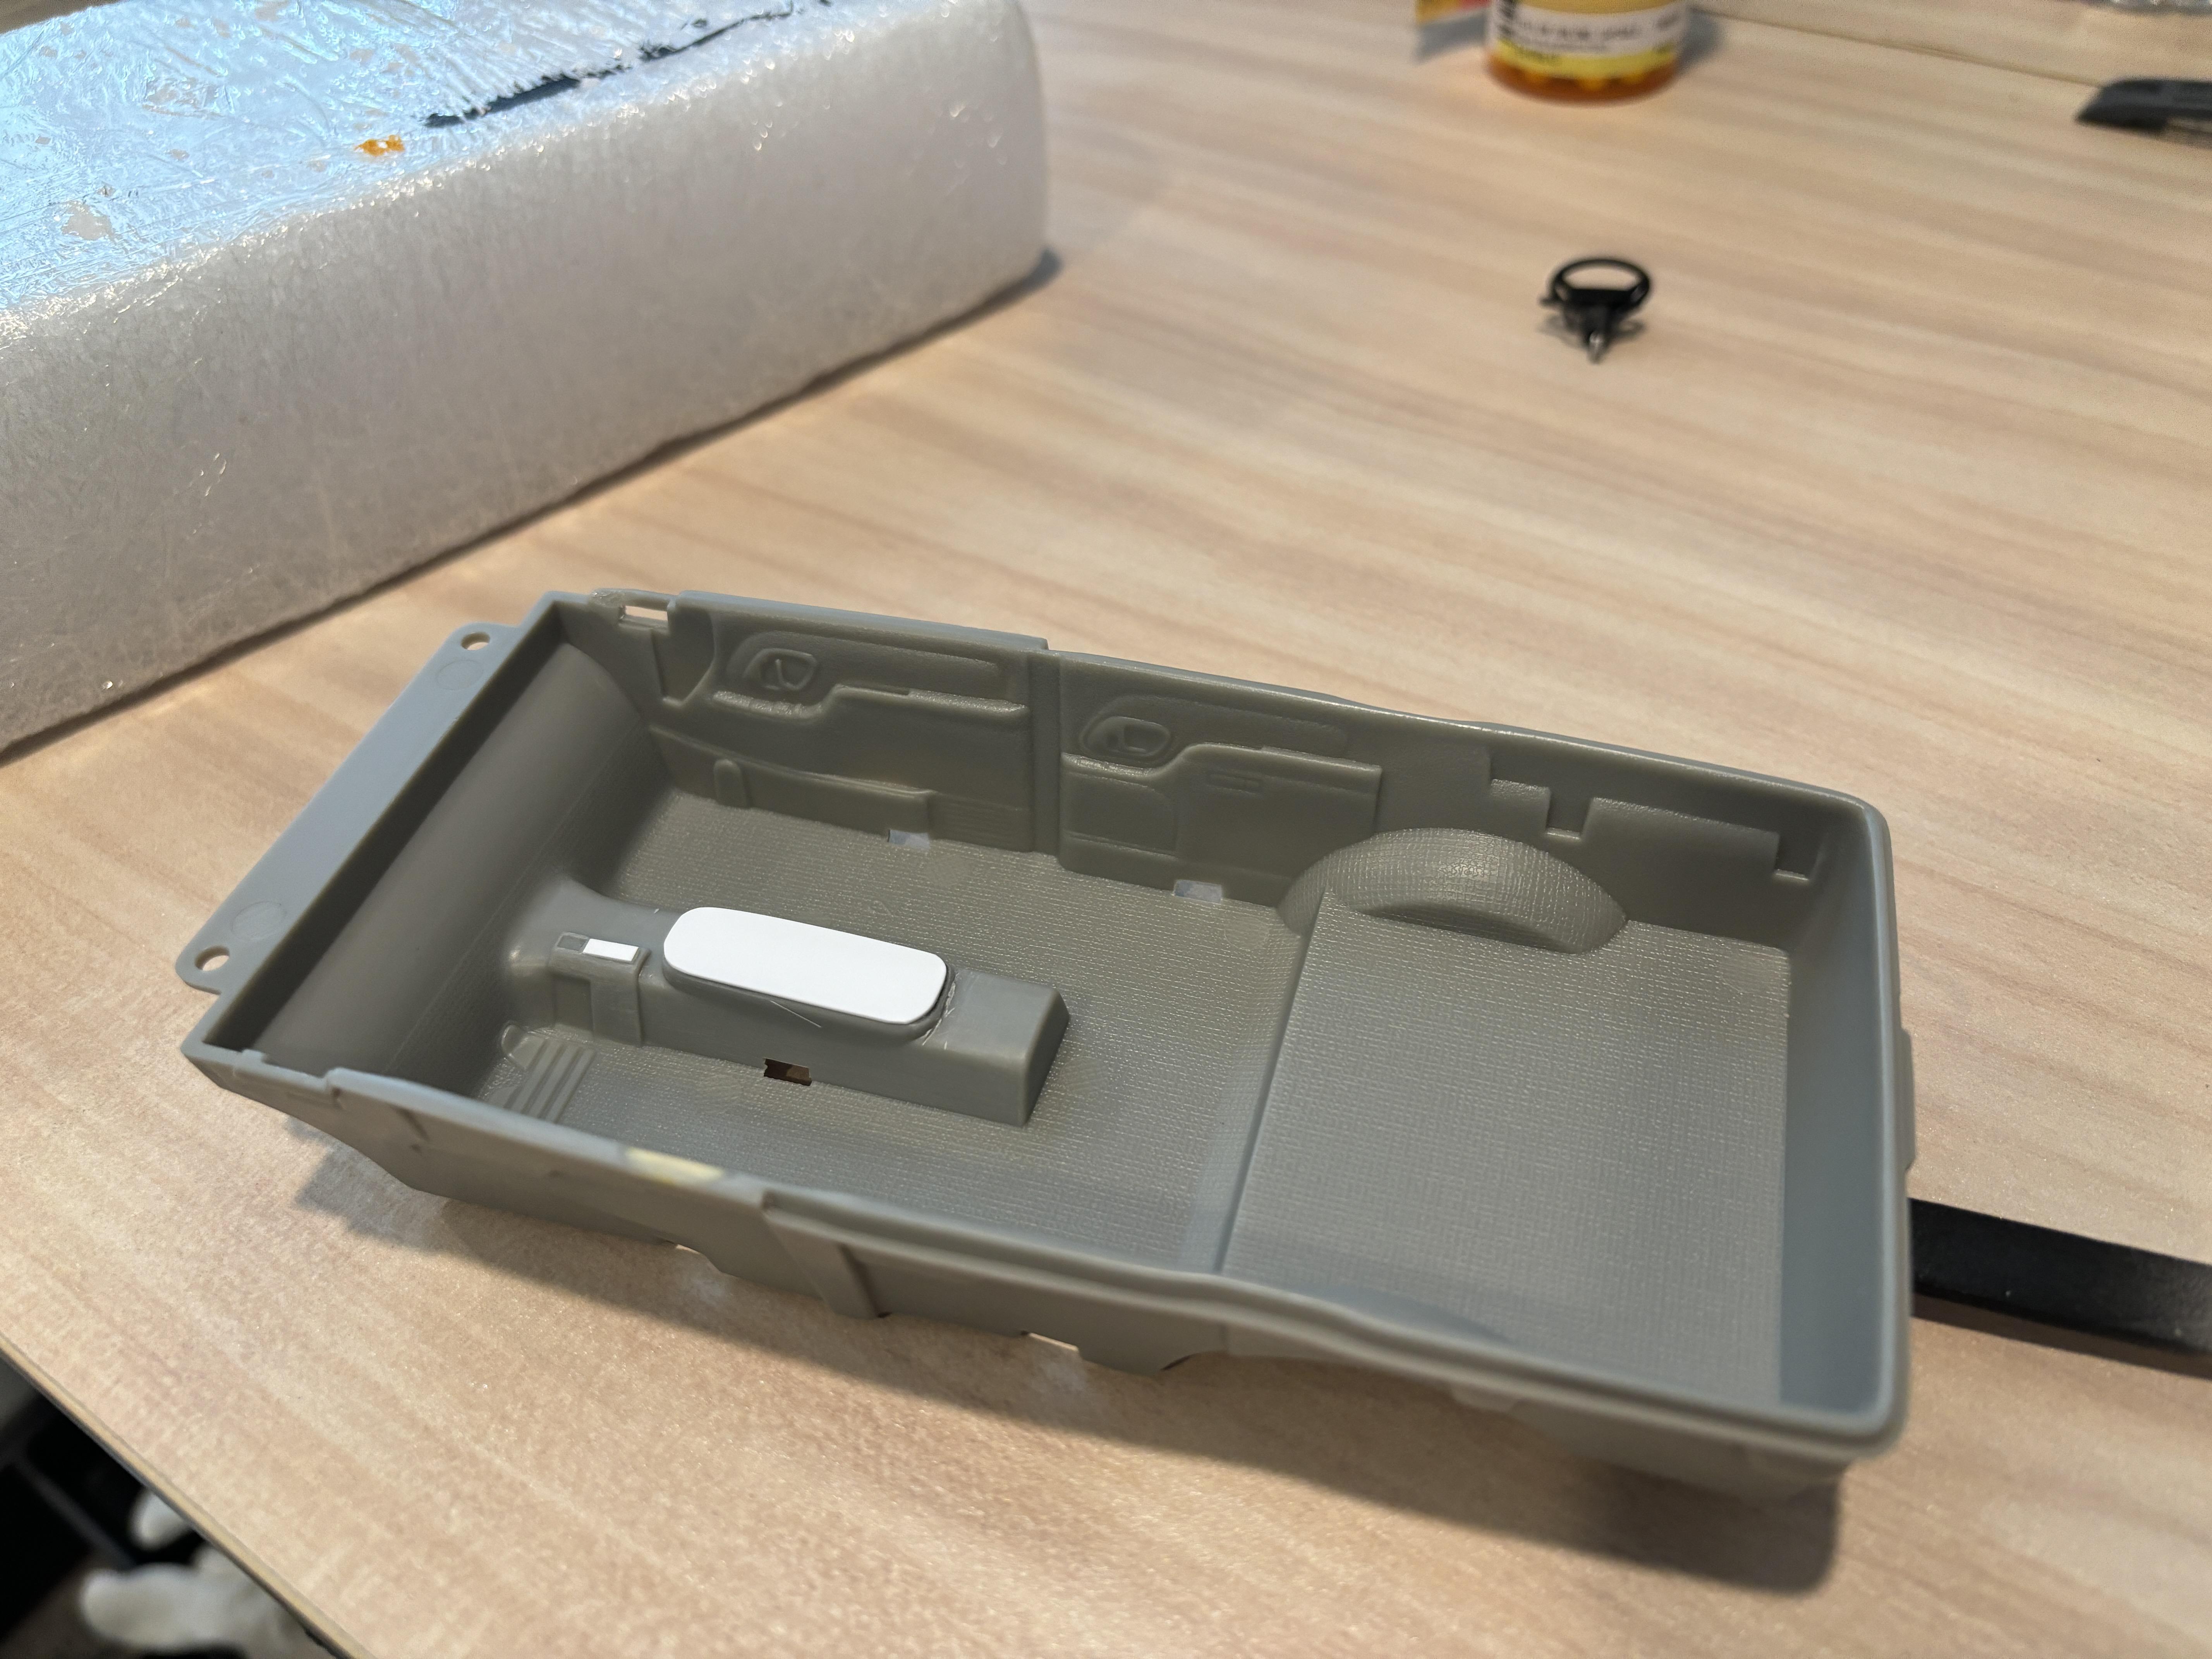
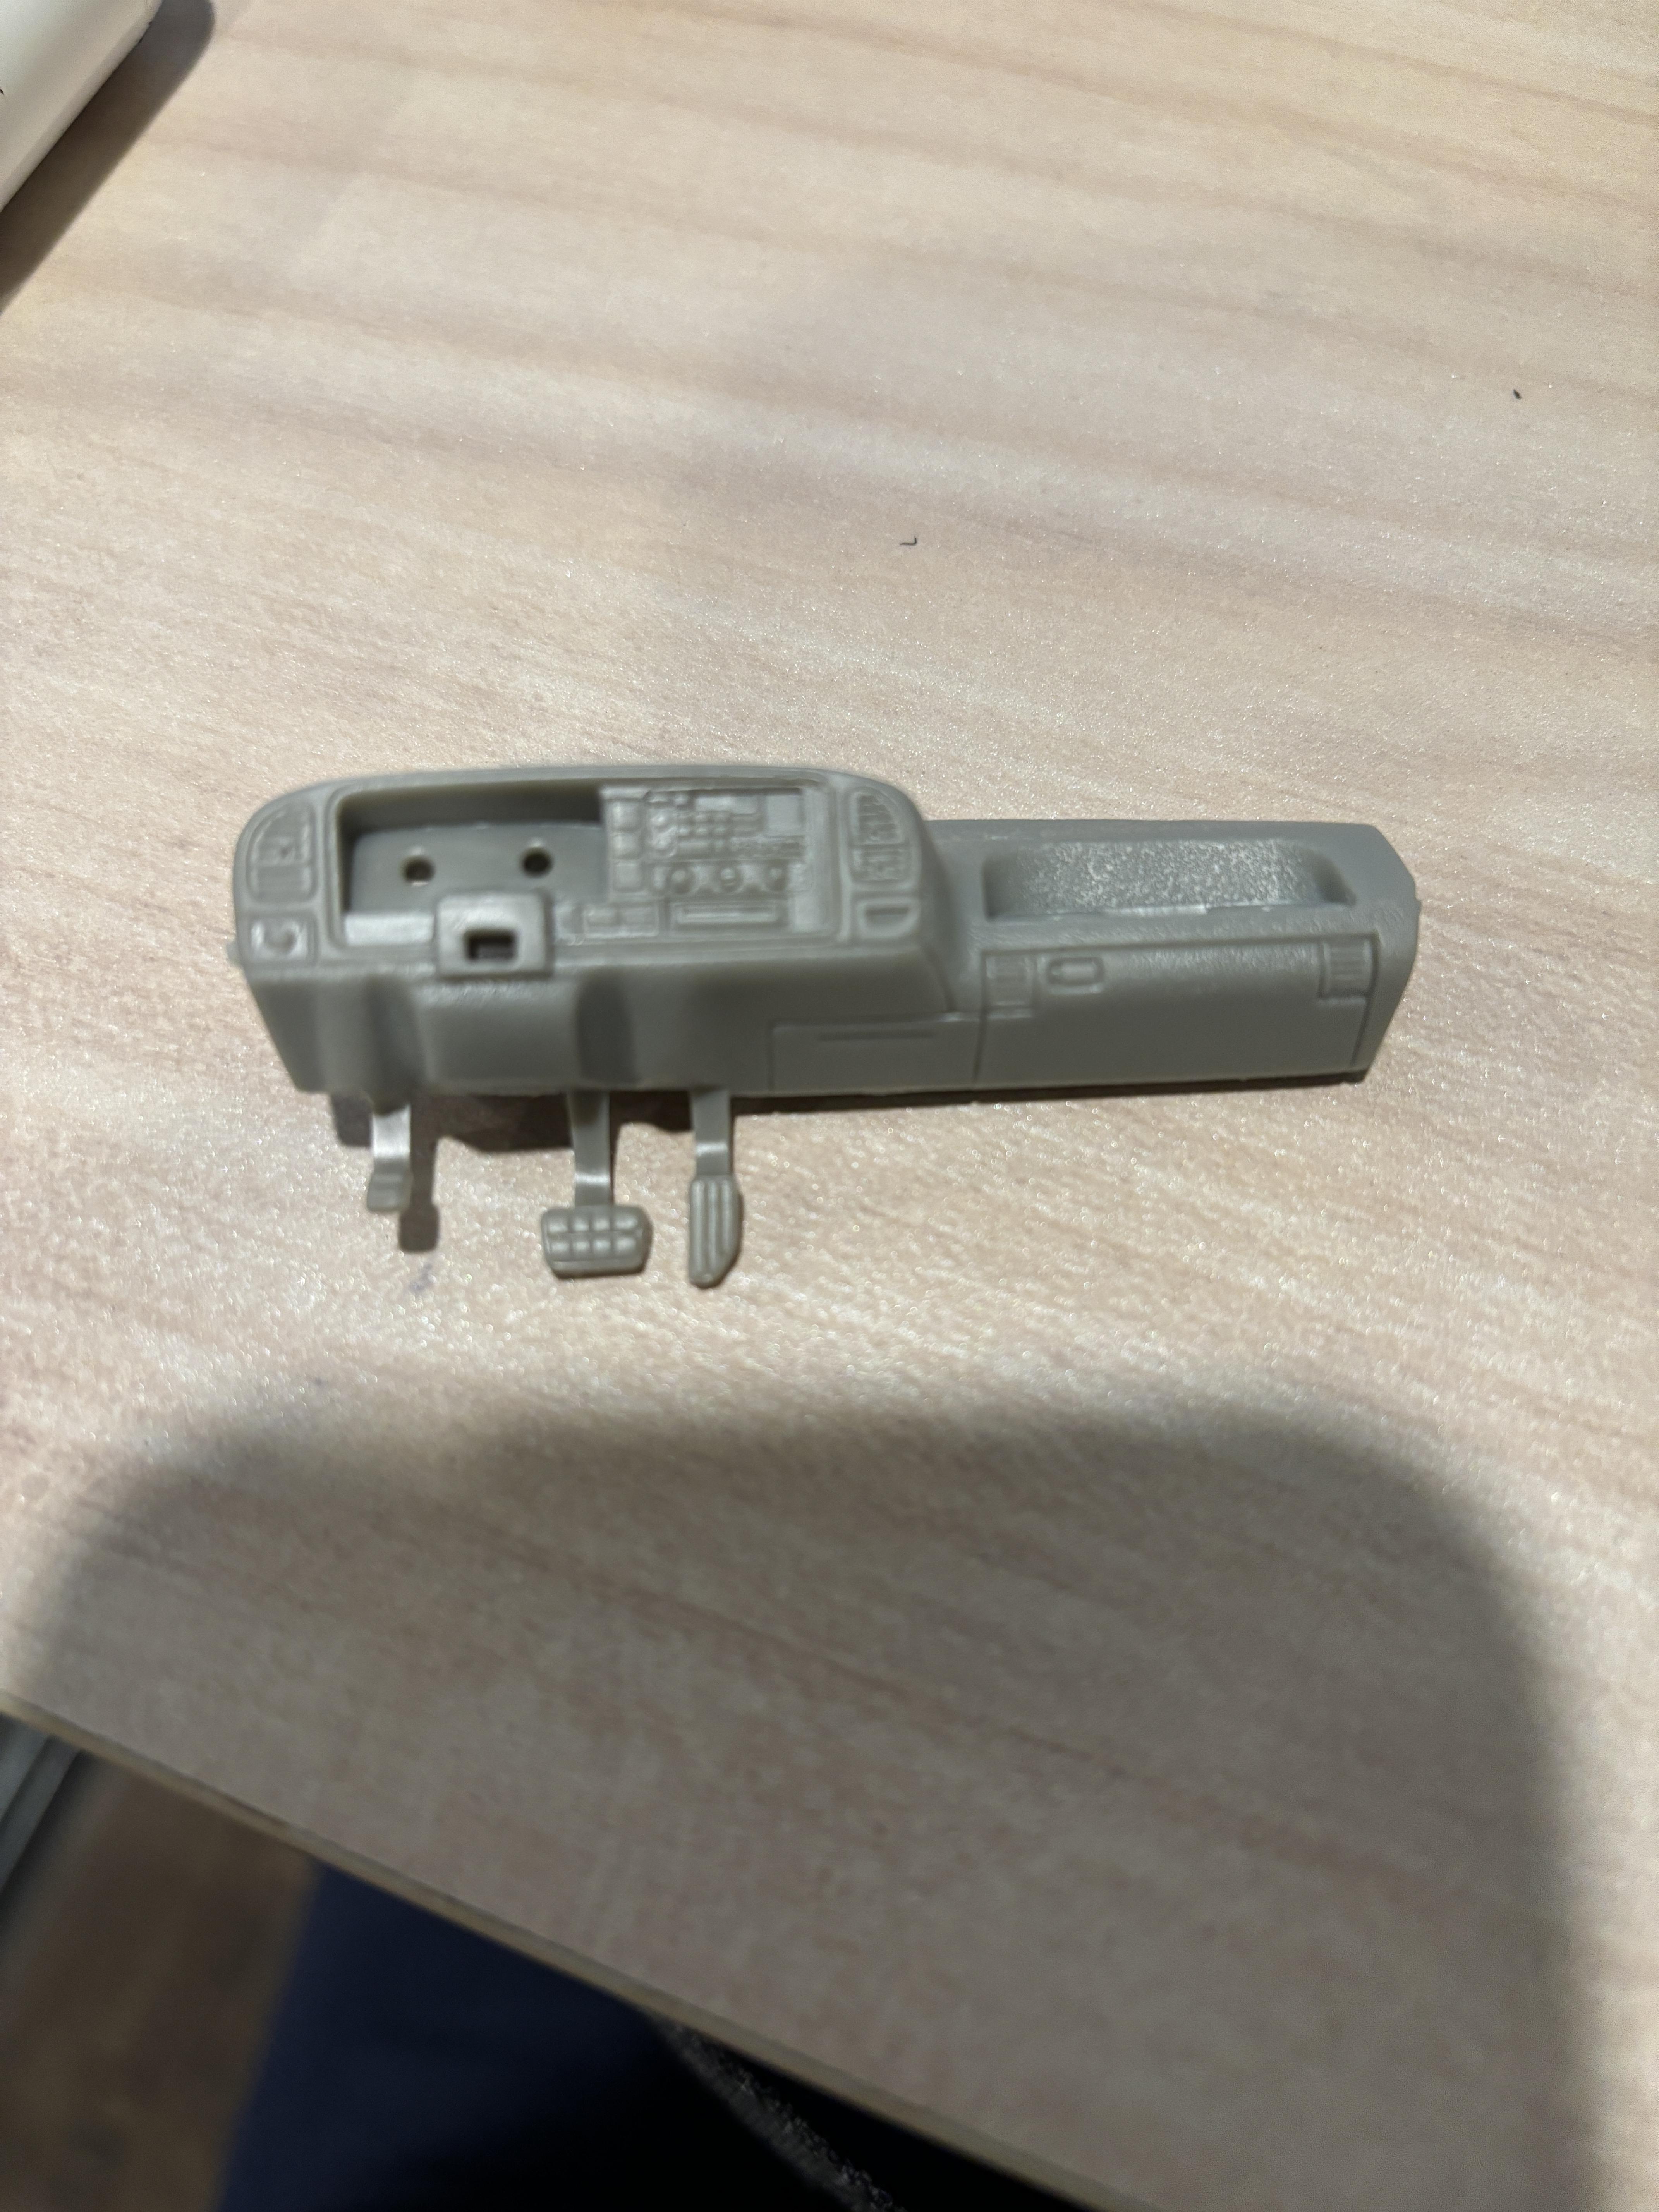
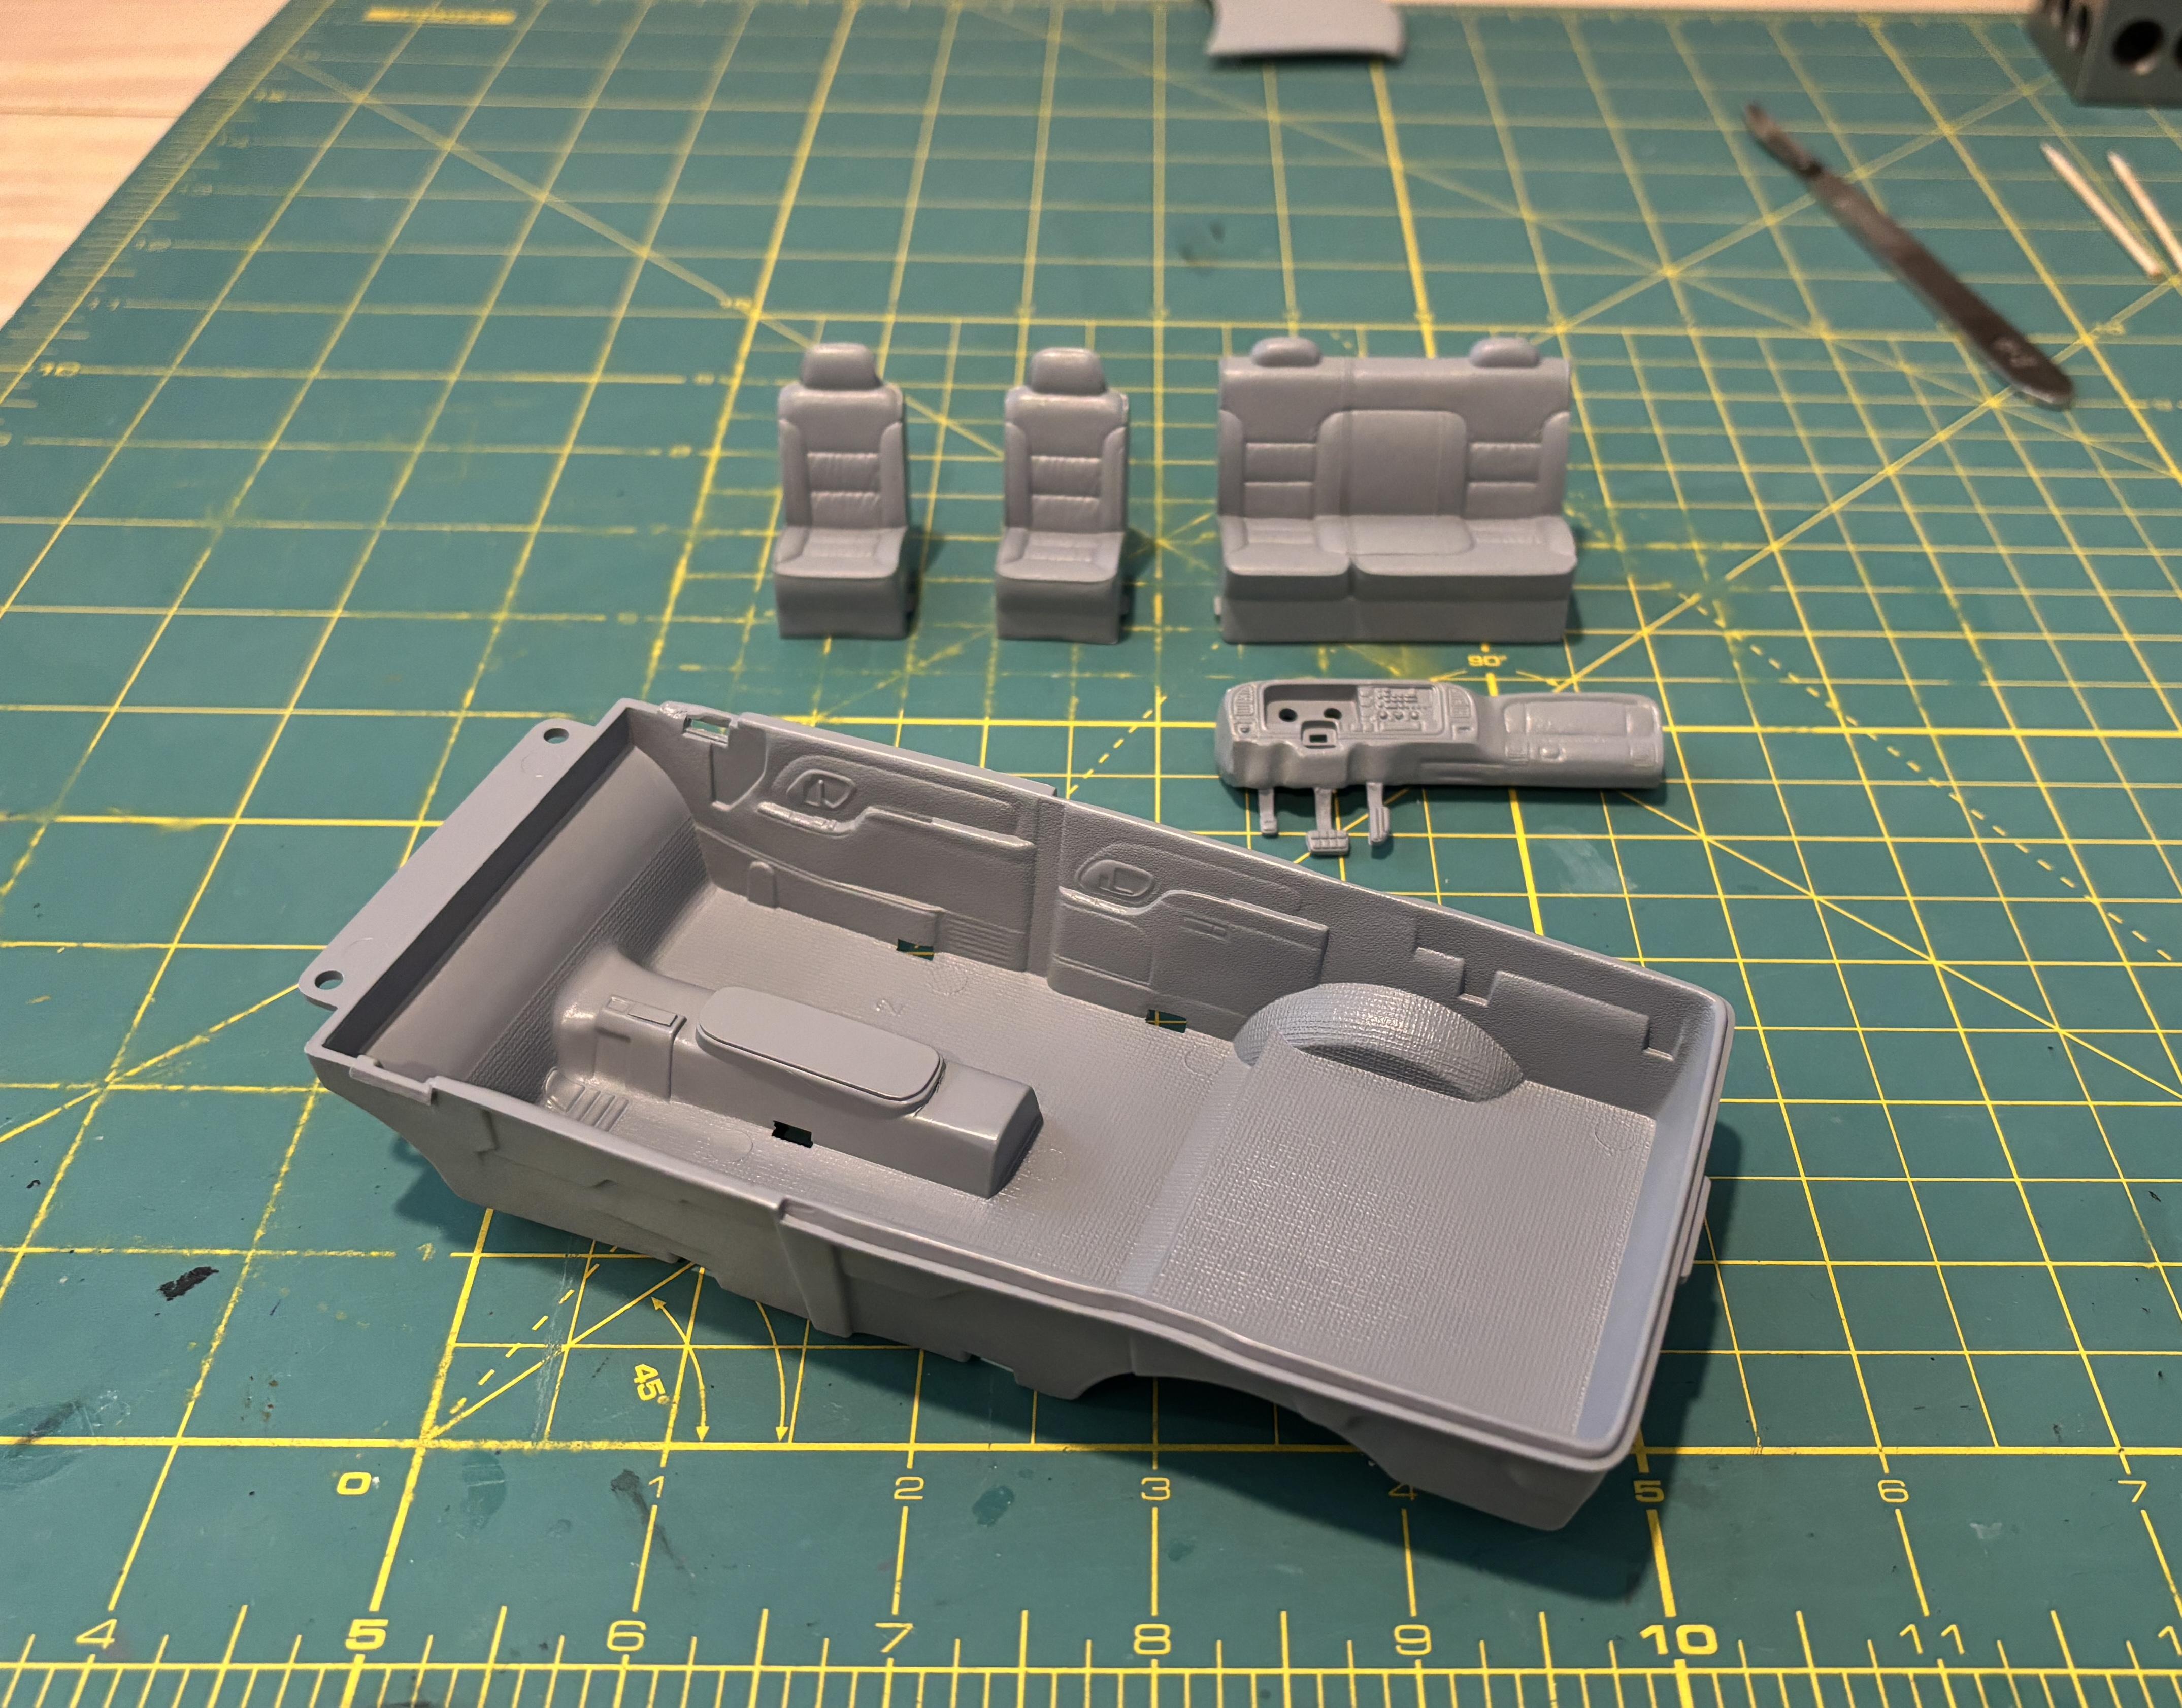
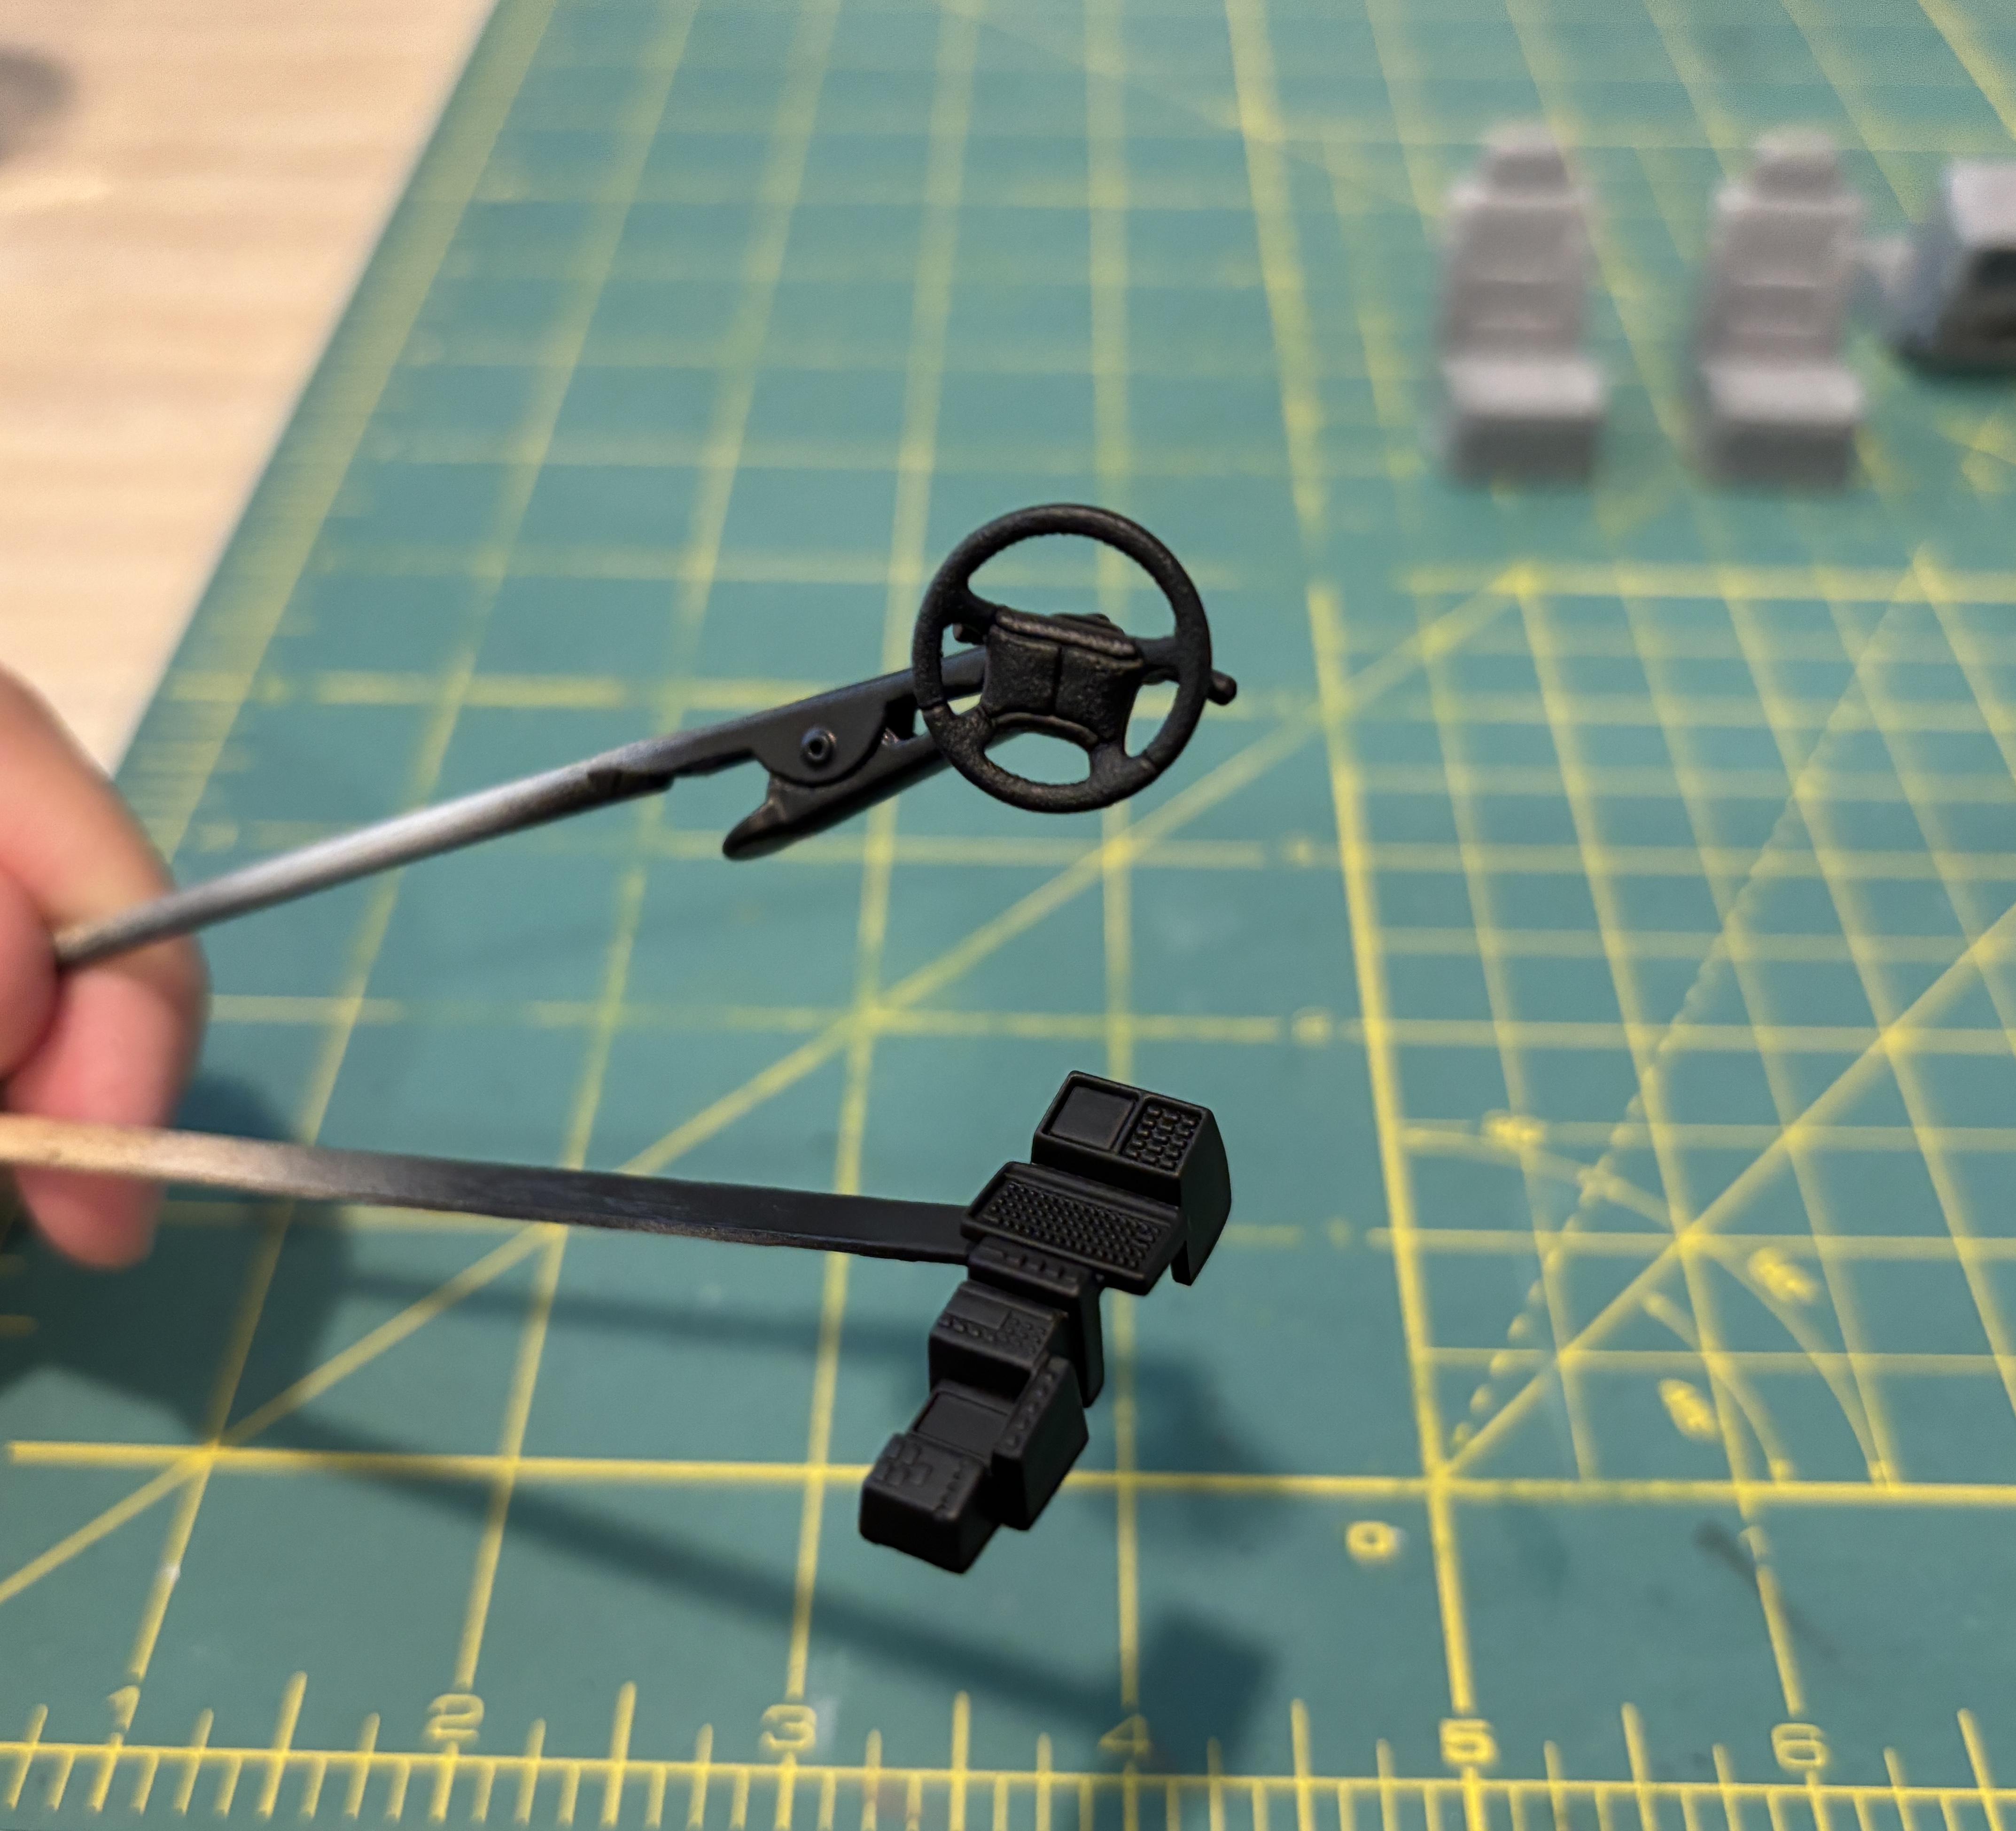
Thank you, Mike. It it weren't for all the modifications I'm making, this would be a easy kit to put together. I've got 2 more laying around, so I'll probably build a stock one in the future. The tail lights are done. Like with many other kits, the Tahoe's tail lights came with inner pegs to insert into pre-made holes in the tail light housing. I do not like the look that this achieves. I snipped the pegs and sanded down the back of the tail lights. I then polished the interior with some Novus #2 to address the sanding streaks. After this, I applied BMF on the back of the lights. If you look closely, the areas where the pegs were are still slightly visible. These are indentations in the plastic, so I decided not to sand further in an effort to erase them as I might make the tail lights too thin. I taped off a square and filled it in with a Silver Sharpie to "create" a break light lens. On my law enforcement builds, I always try to recreate the actual interior equipment used as best as possible. More so if I know what the interior layout was. I have some memories of how these Tahoes were equipped. But the molded in details of the interior tub, combined with my lack of accurate scale police equipment and patience to completely re-do the interior, means that I'm going to aim for an in-between solution. This is what the tub looks like: I carefully cut out the majority of the center console, sanded the are down, and covered it with a piece of Evergreen styrene. I also placed a piece of styrene over the 4x4 shifter housing. Again, not the cleanest look, but it'll have tp do: Since the Tahoe is a 1996, it comes with a dash that does not have a housing for a passenger-side airbag. For the 1997 model year, GM added passenger side airbags, necessitating a re-design of the dash. This coincided with the introduction of the Tahoe PPV. This is the Tahoe dash, sans passenger airbag: I took a 1997 dash with the passenger side airbag housing from a promo 1997 C-3500 to use on this kit. Again, I want to emphasize that the Tahoe and C-3500 molds are not from the same family, so I had to cut/sand down the sides of the truck dash to fit in the Tahoe tub. I also cut the pedals from the original Tahoe dash and glued them onto the C-3500 dash. Here's the C-3500 dash after these modifications: Here's the interior after being primed and then painted with Tamiya AS-28 Medium Gray. The lighting makes it look a bit lighter than it really is. I'll be using the center console from the Lindberg Crown Victoria kit. It's not really accurate to what LASD had, but I chose it because it has an MDT (computer) fairly similar to what LASD ran at the time: I used the steering wheel and column from the Tahoe and modified it to fit the C-3500 dash as it has much crisper detail than the C-3500 counterpart. Here it is after being painted alongside the police console:
-
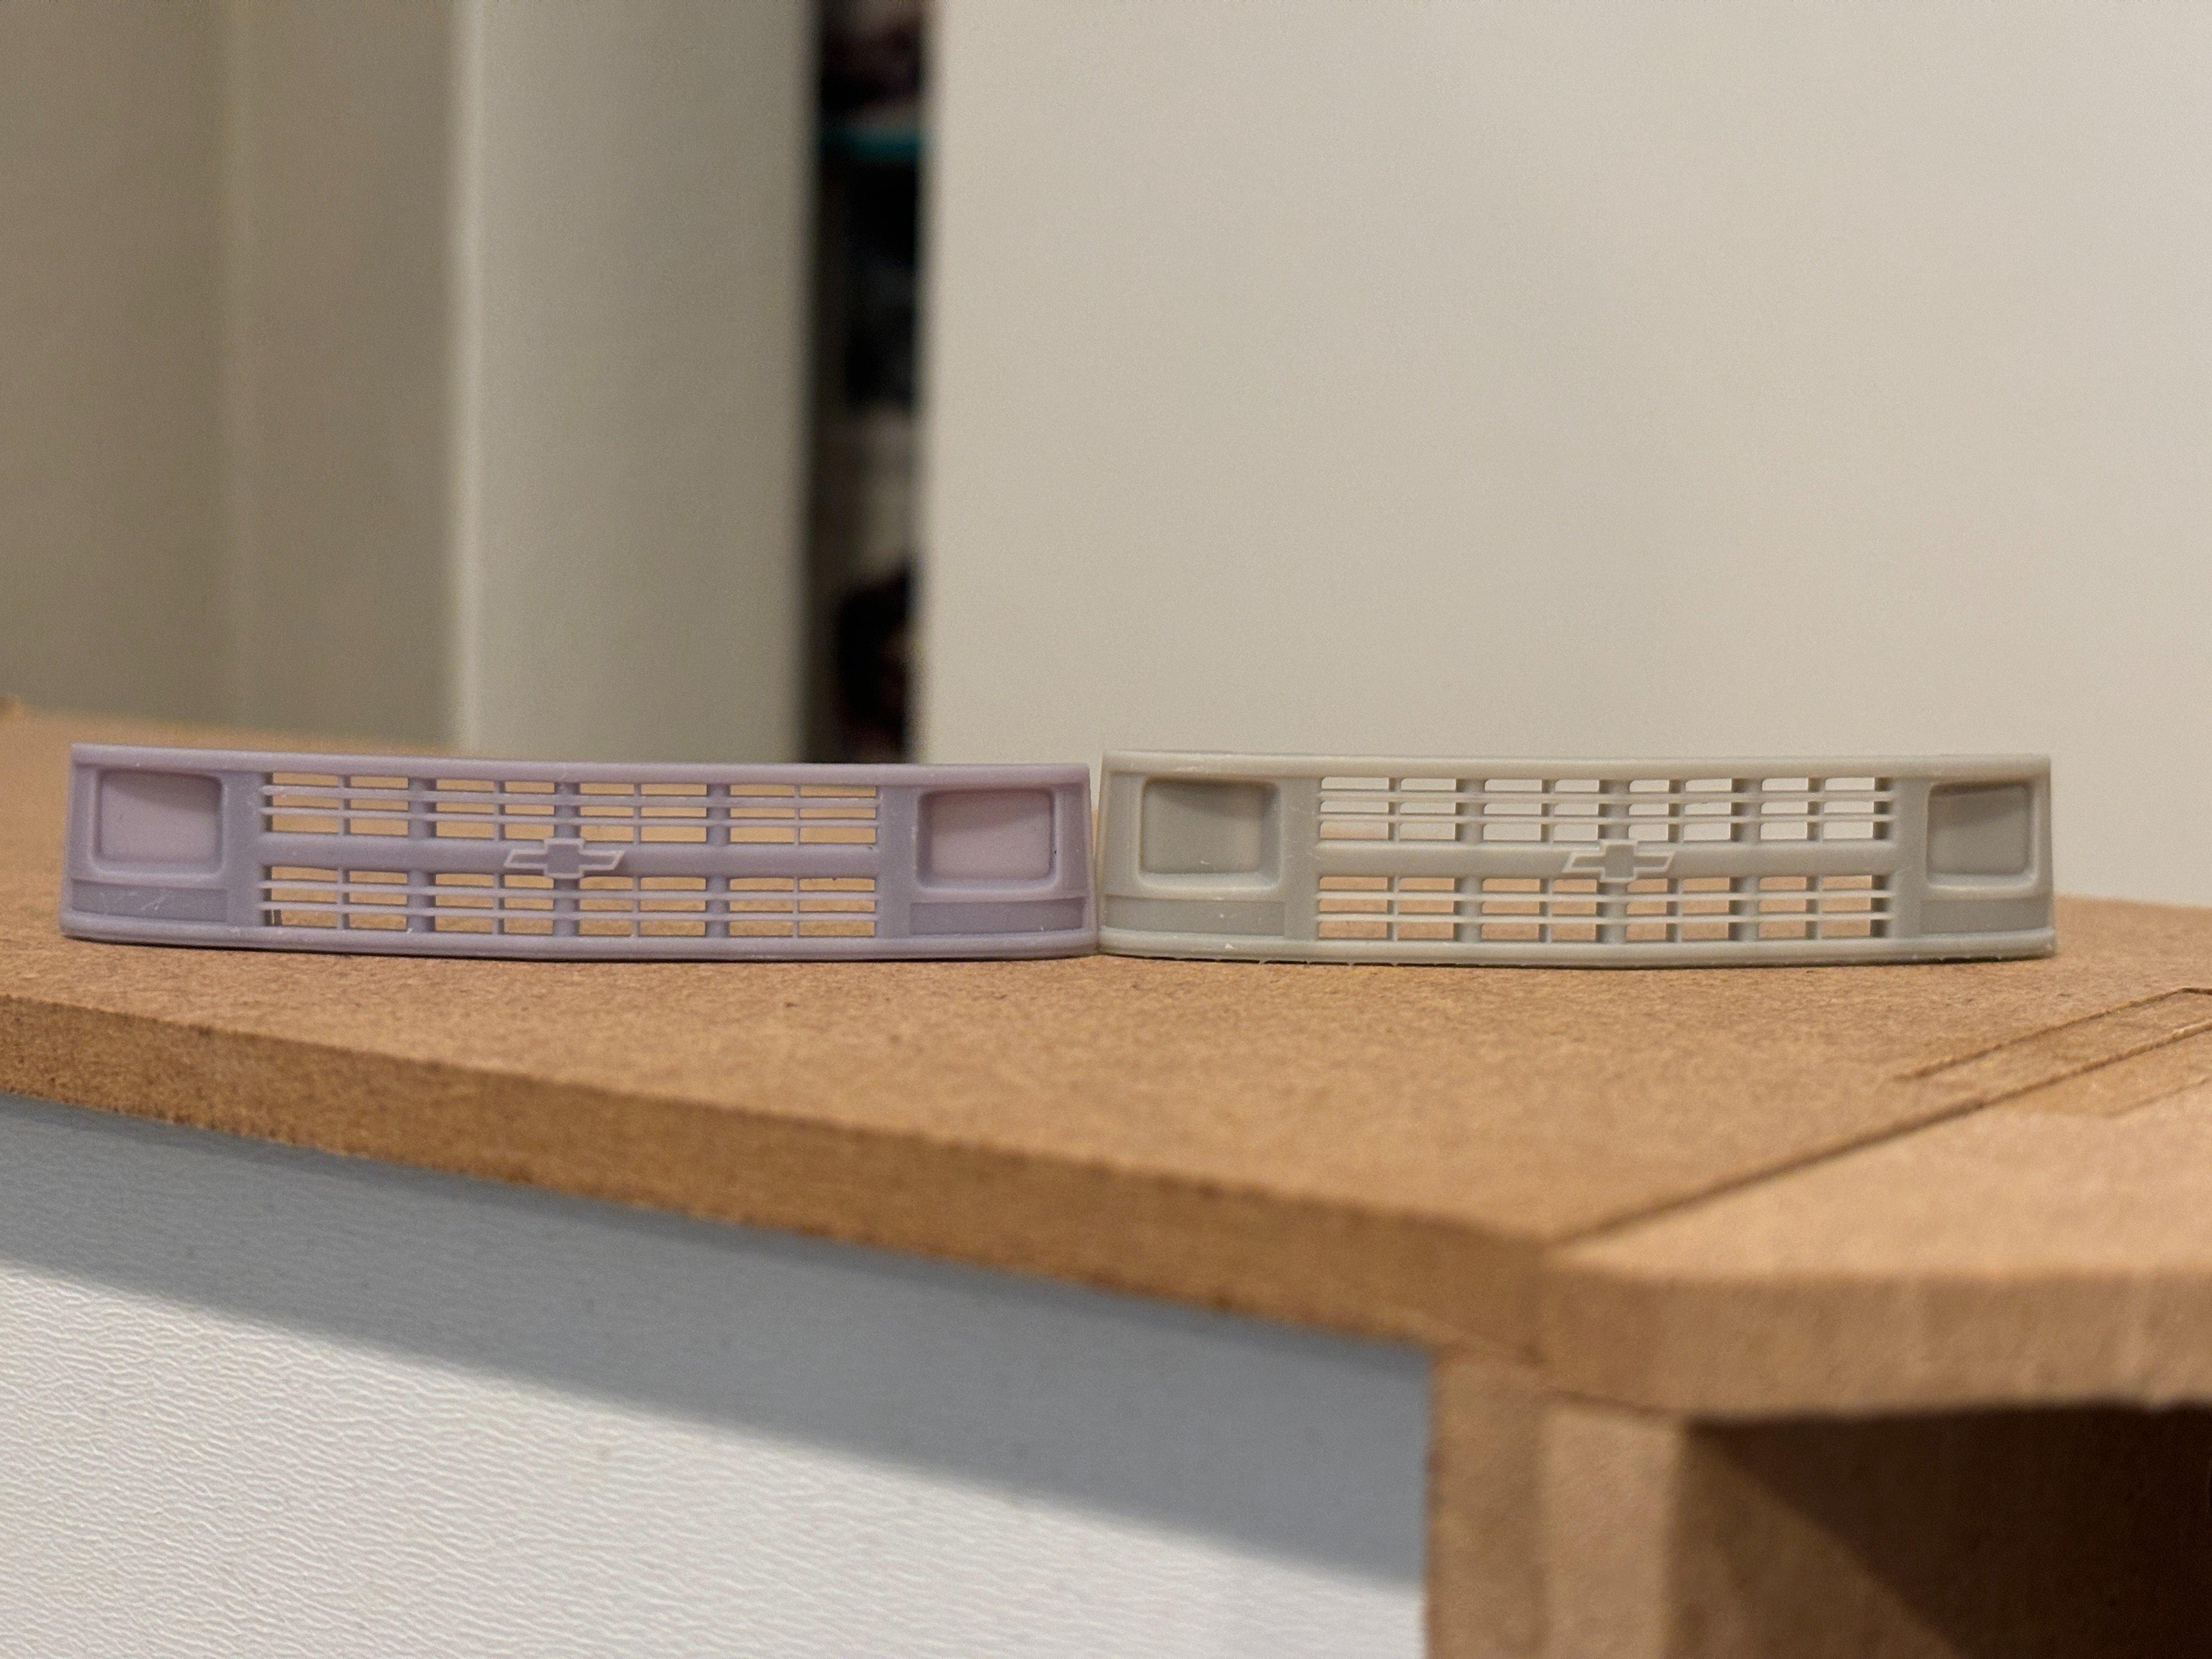
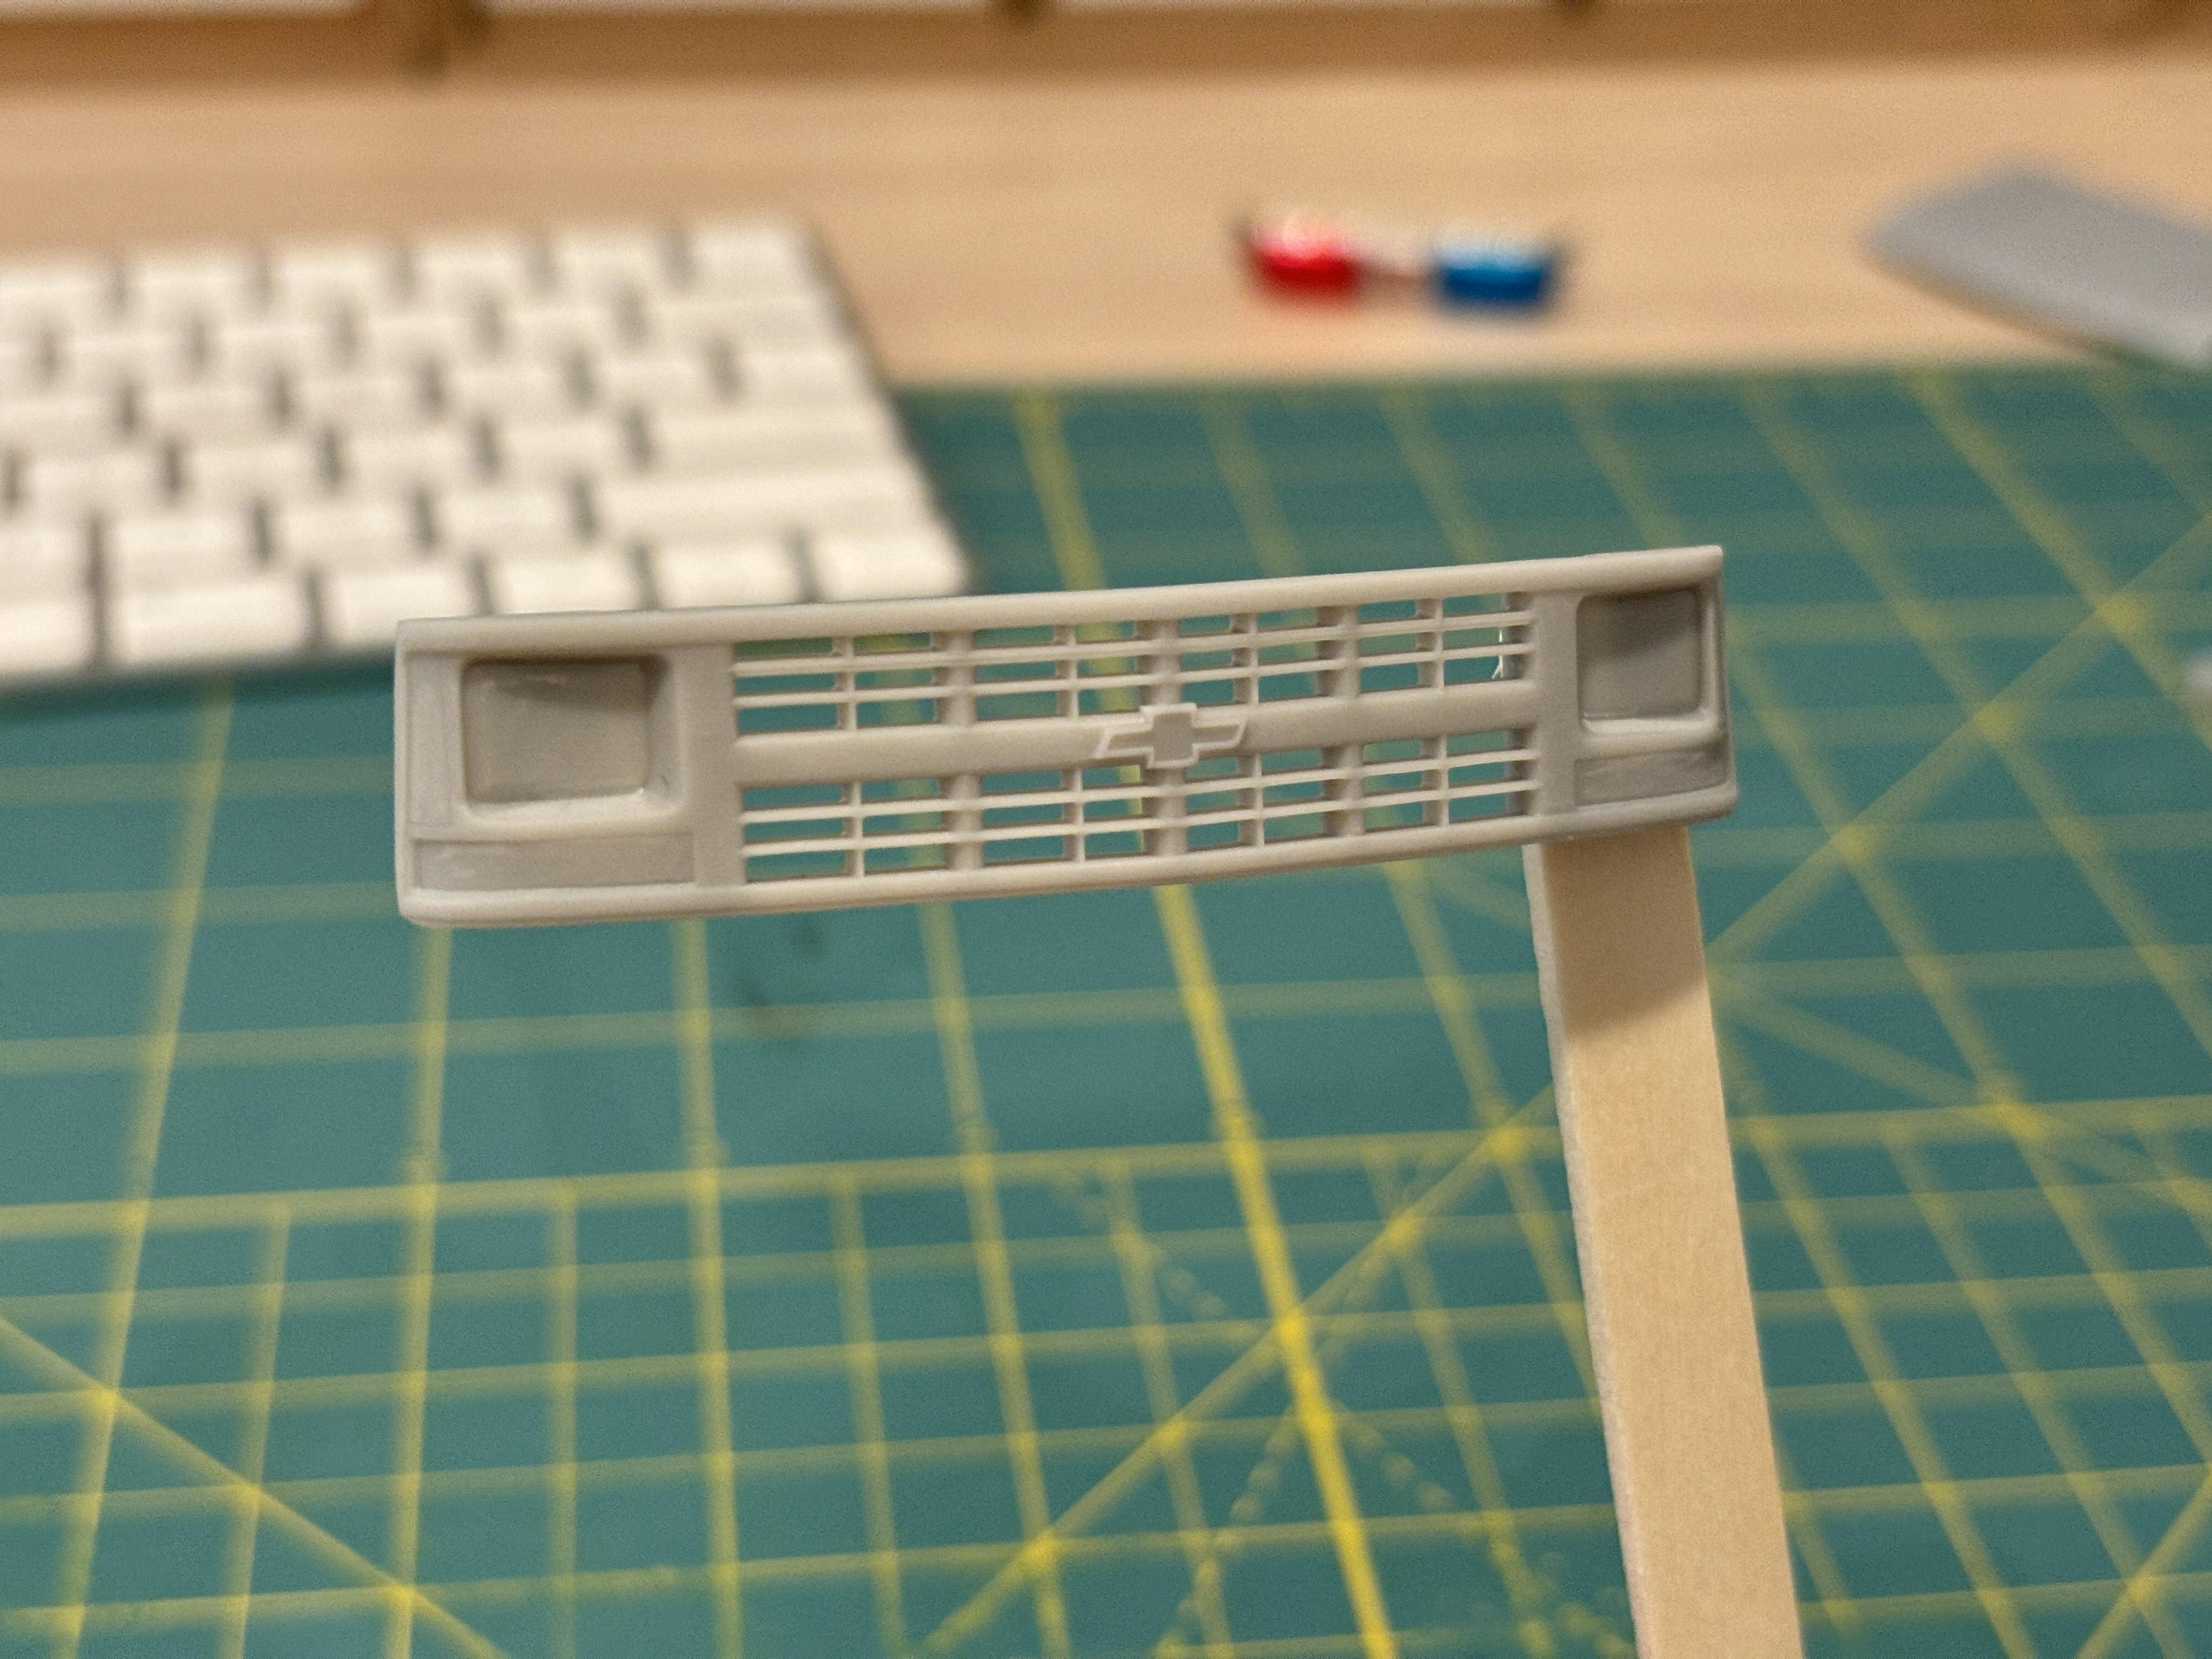
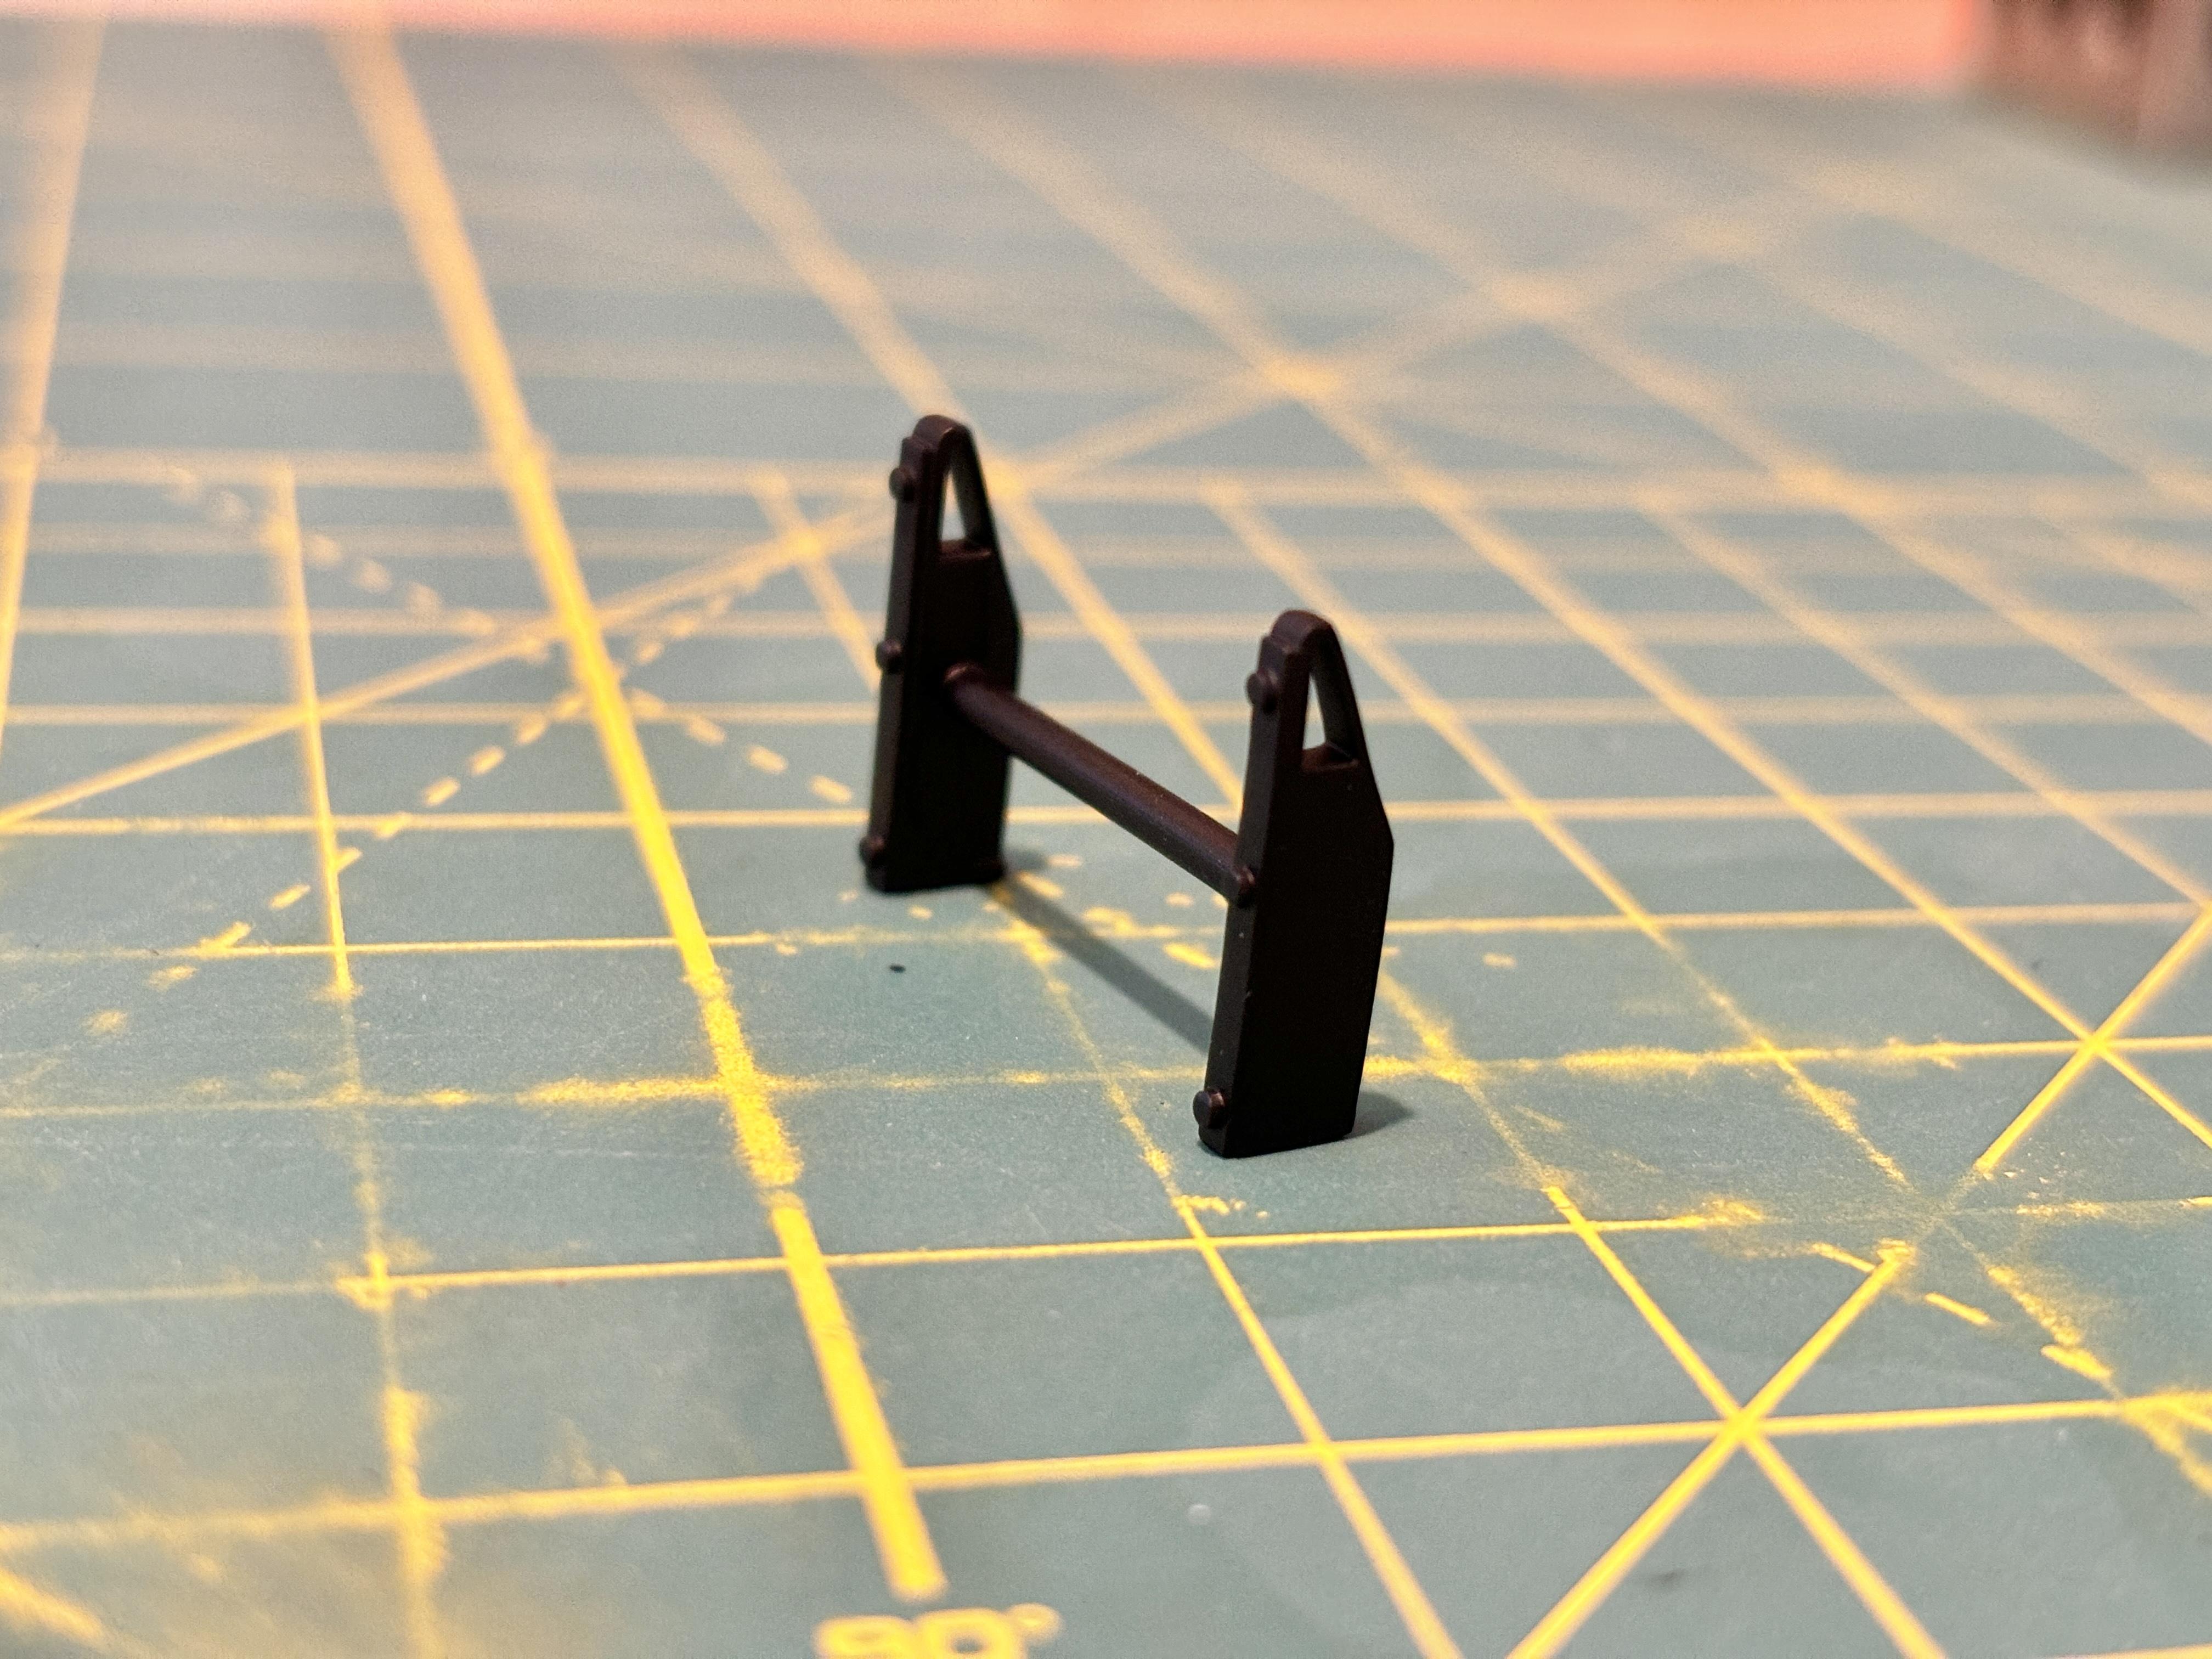
Thank you, Robert. It's what I aim for. Now onto the grill. I knew from the get-go that this build would live or die on my ability to source a good W/T grill. With the spread of 3D printed options, it finally became a reality. I first sourced the grill design from cults3D: https://cults3d.com/en/3d-model/various/1990-s-amt-chevy-c3500-stock-work-truck-grill Contrary to popular belief, the AMT GMT400 Chevy trucks and the AMT Tahoe of the same generation don't come from the same mold family. The grill on the Tahoe is the same width, but taller than on the truck counterparts. I had someone much more program literate than me take the 3D design I purchased and make it taller using a slicer program. Here's the result, with the original truck grill on the left and the modified Tahoe grill on the right. Here you can see the differences: Here's the Tahoe grill, in all it's crisp glory: The fascia was made to fit the Tahoe, but unfortunately the design does not correspond to fitting the Tahoe as-is: This required me to carefully obliterate much of the plastic on the front end. This is a curbside, promo-style kit, so I had more reign to do damage that will be hidden. I used putty after to fill in some areas to provide a better fit: Here's a test fit, with the grill snugly affixed: And here she is, with the body work sanded down and re-primed and the grill primed and painted in its final color of Tamiya TS-4 German Grey. I love this color for base/work grills of this era. I've begun applying some BMF to detail the grill more. I'm still figuring out how I'm going to paint the lights, but that'll be for another post: Another small detail that's done is the front push bar. Some of you may remember the now-defunct Rookie Resin. The owner is a member on this forum and he made some excellent pieces, mainly for pickup trucks. As I was looking through his catalog, I noticed that he offered an LASD-spec push bar. It wasn't advertised as such but I immediately recognized the design. What are the odds!? I snatched up a bunch because I know how volatile the aftermarket industry can be, and I'm glad I did with how things turned out. Compare to the real thing: It's all done after removal of the mounting plate, some light sanding and washing, and some Mr. Surfacer 1500 Black Primer:
-
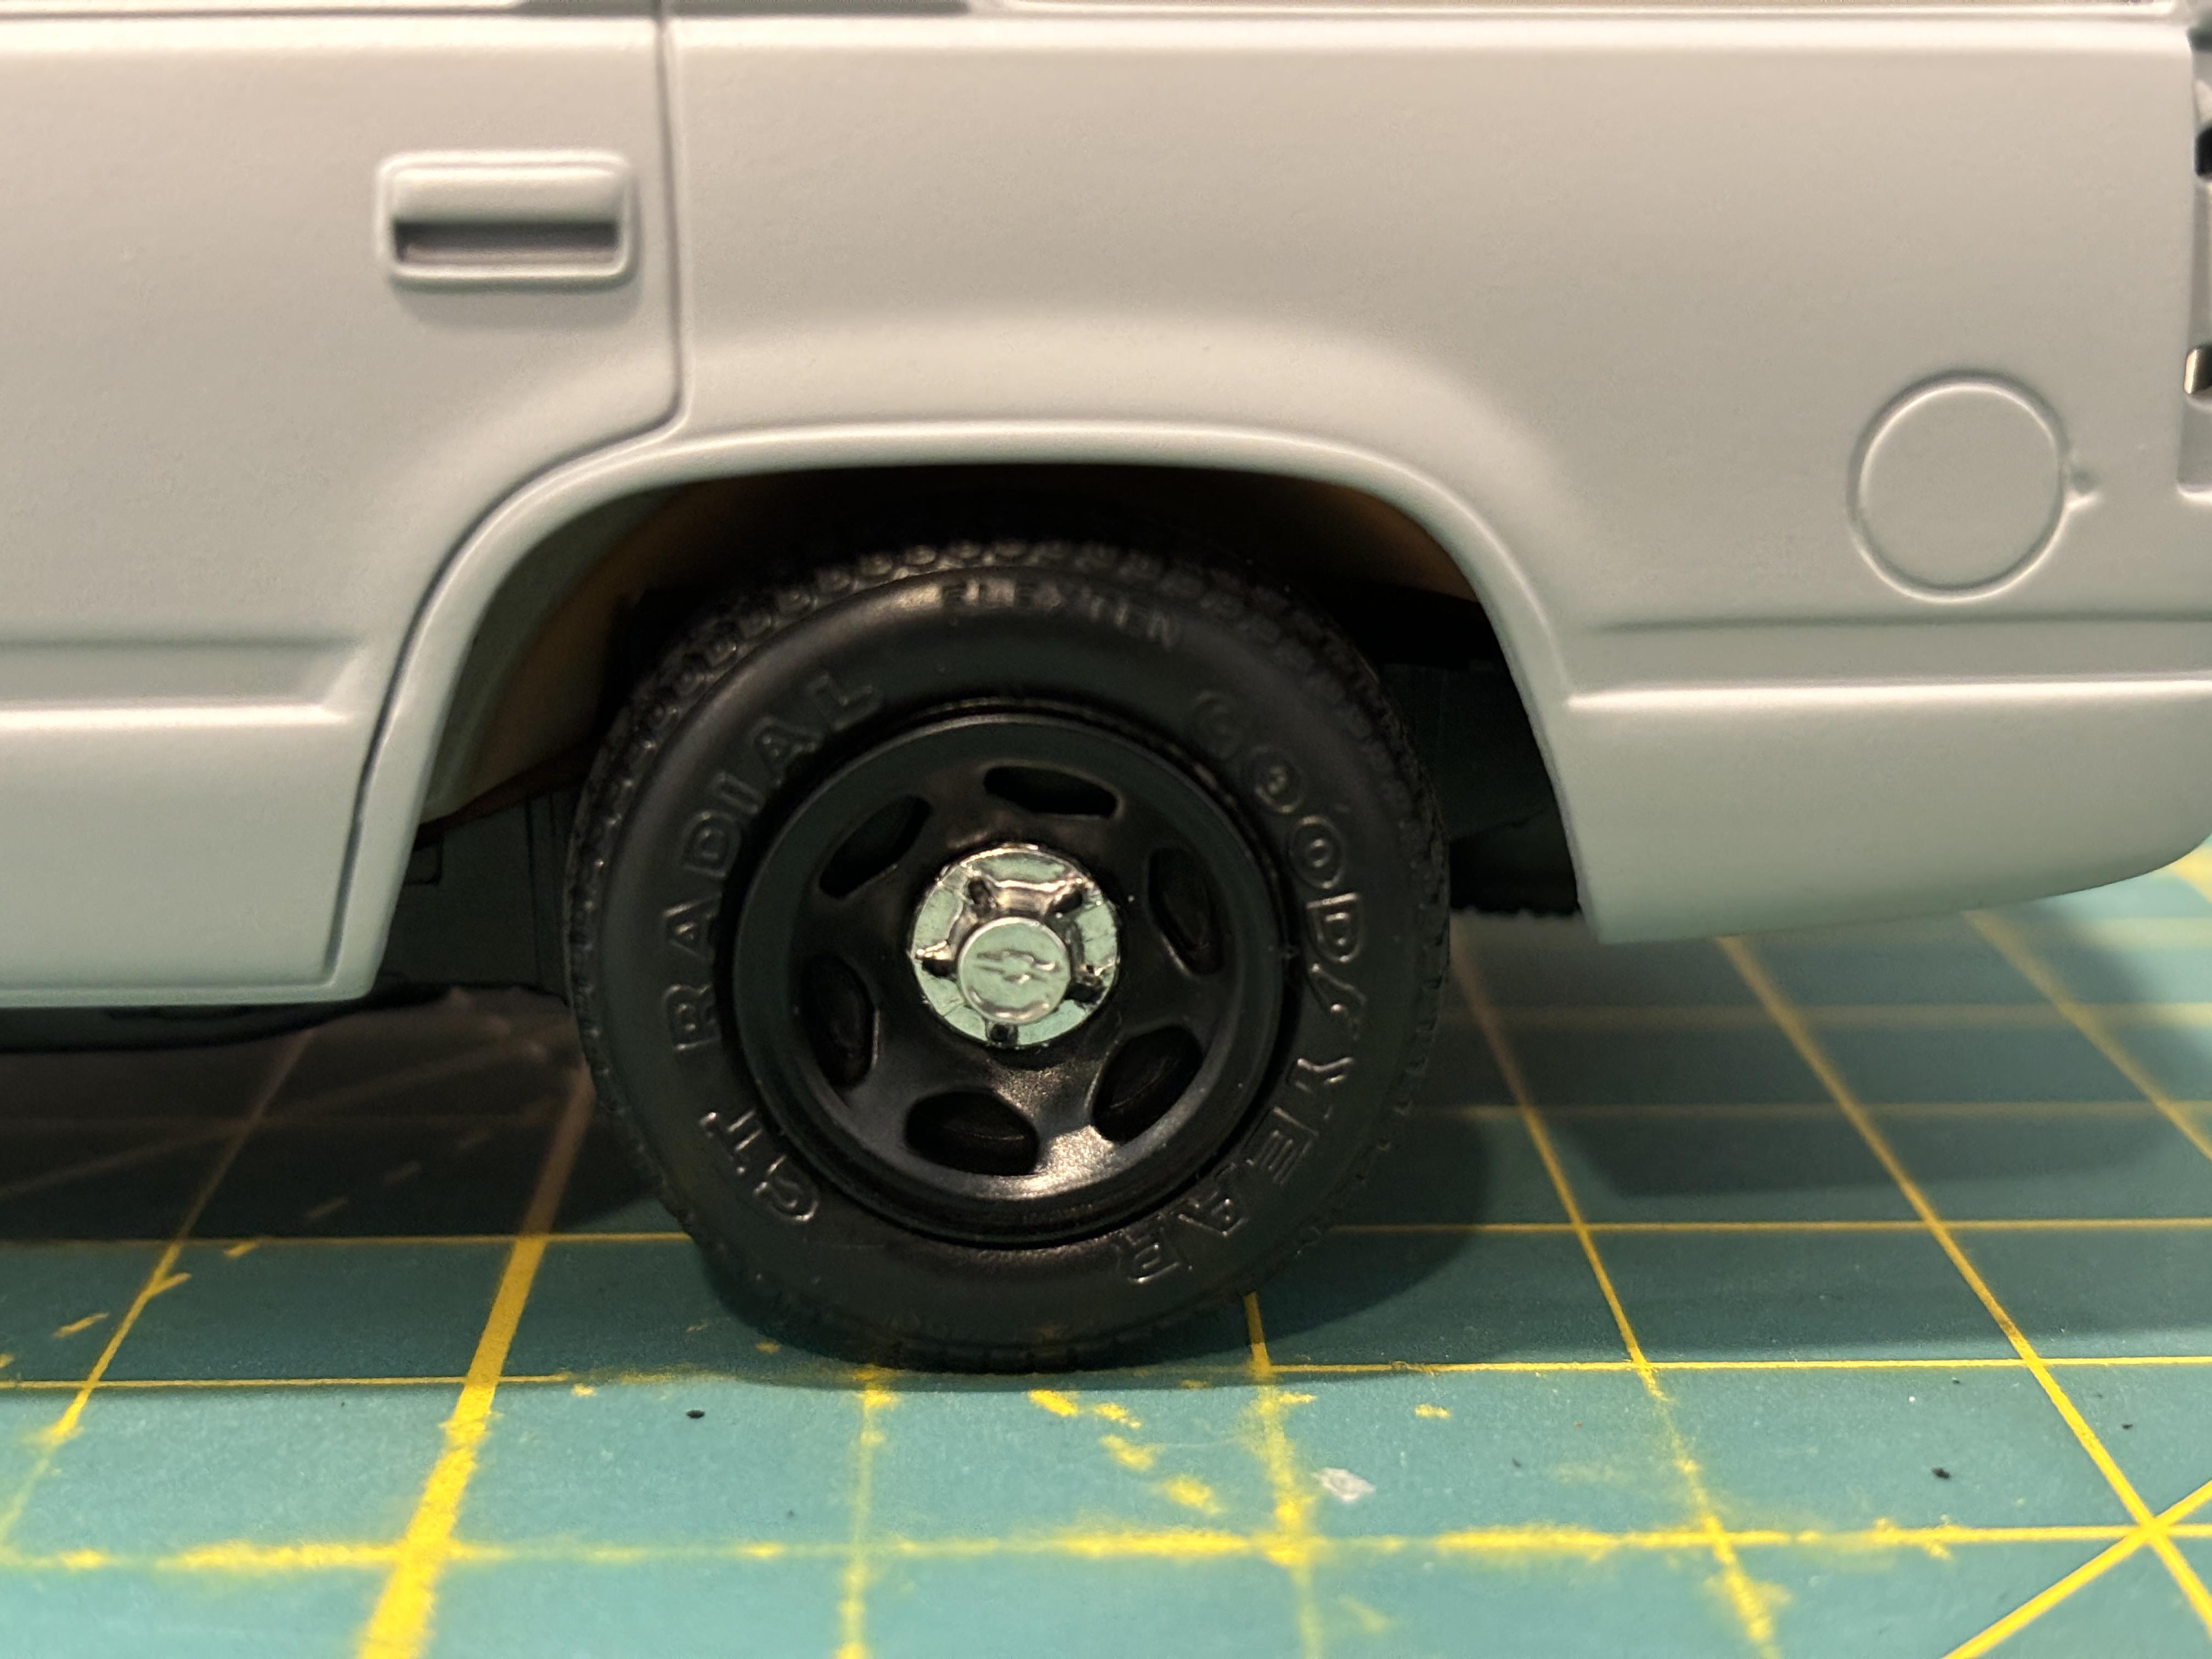
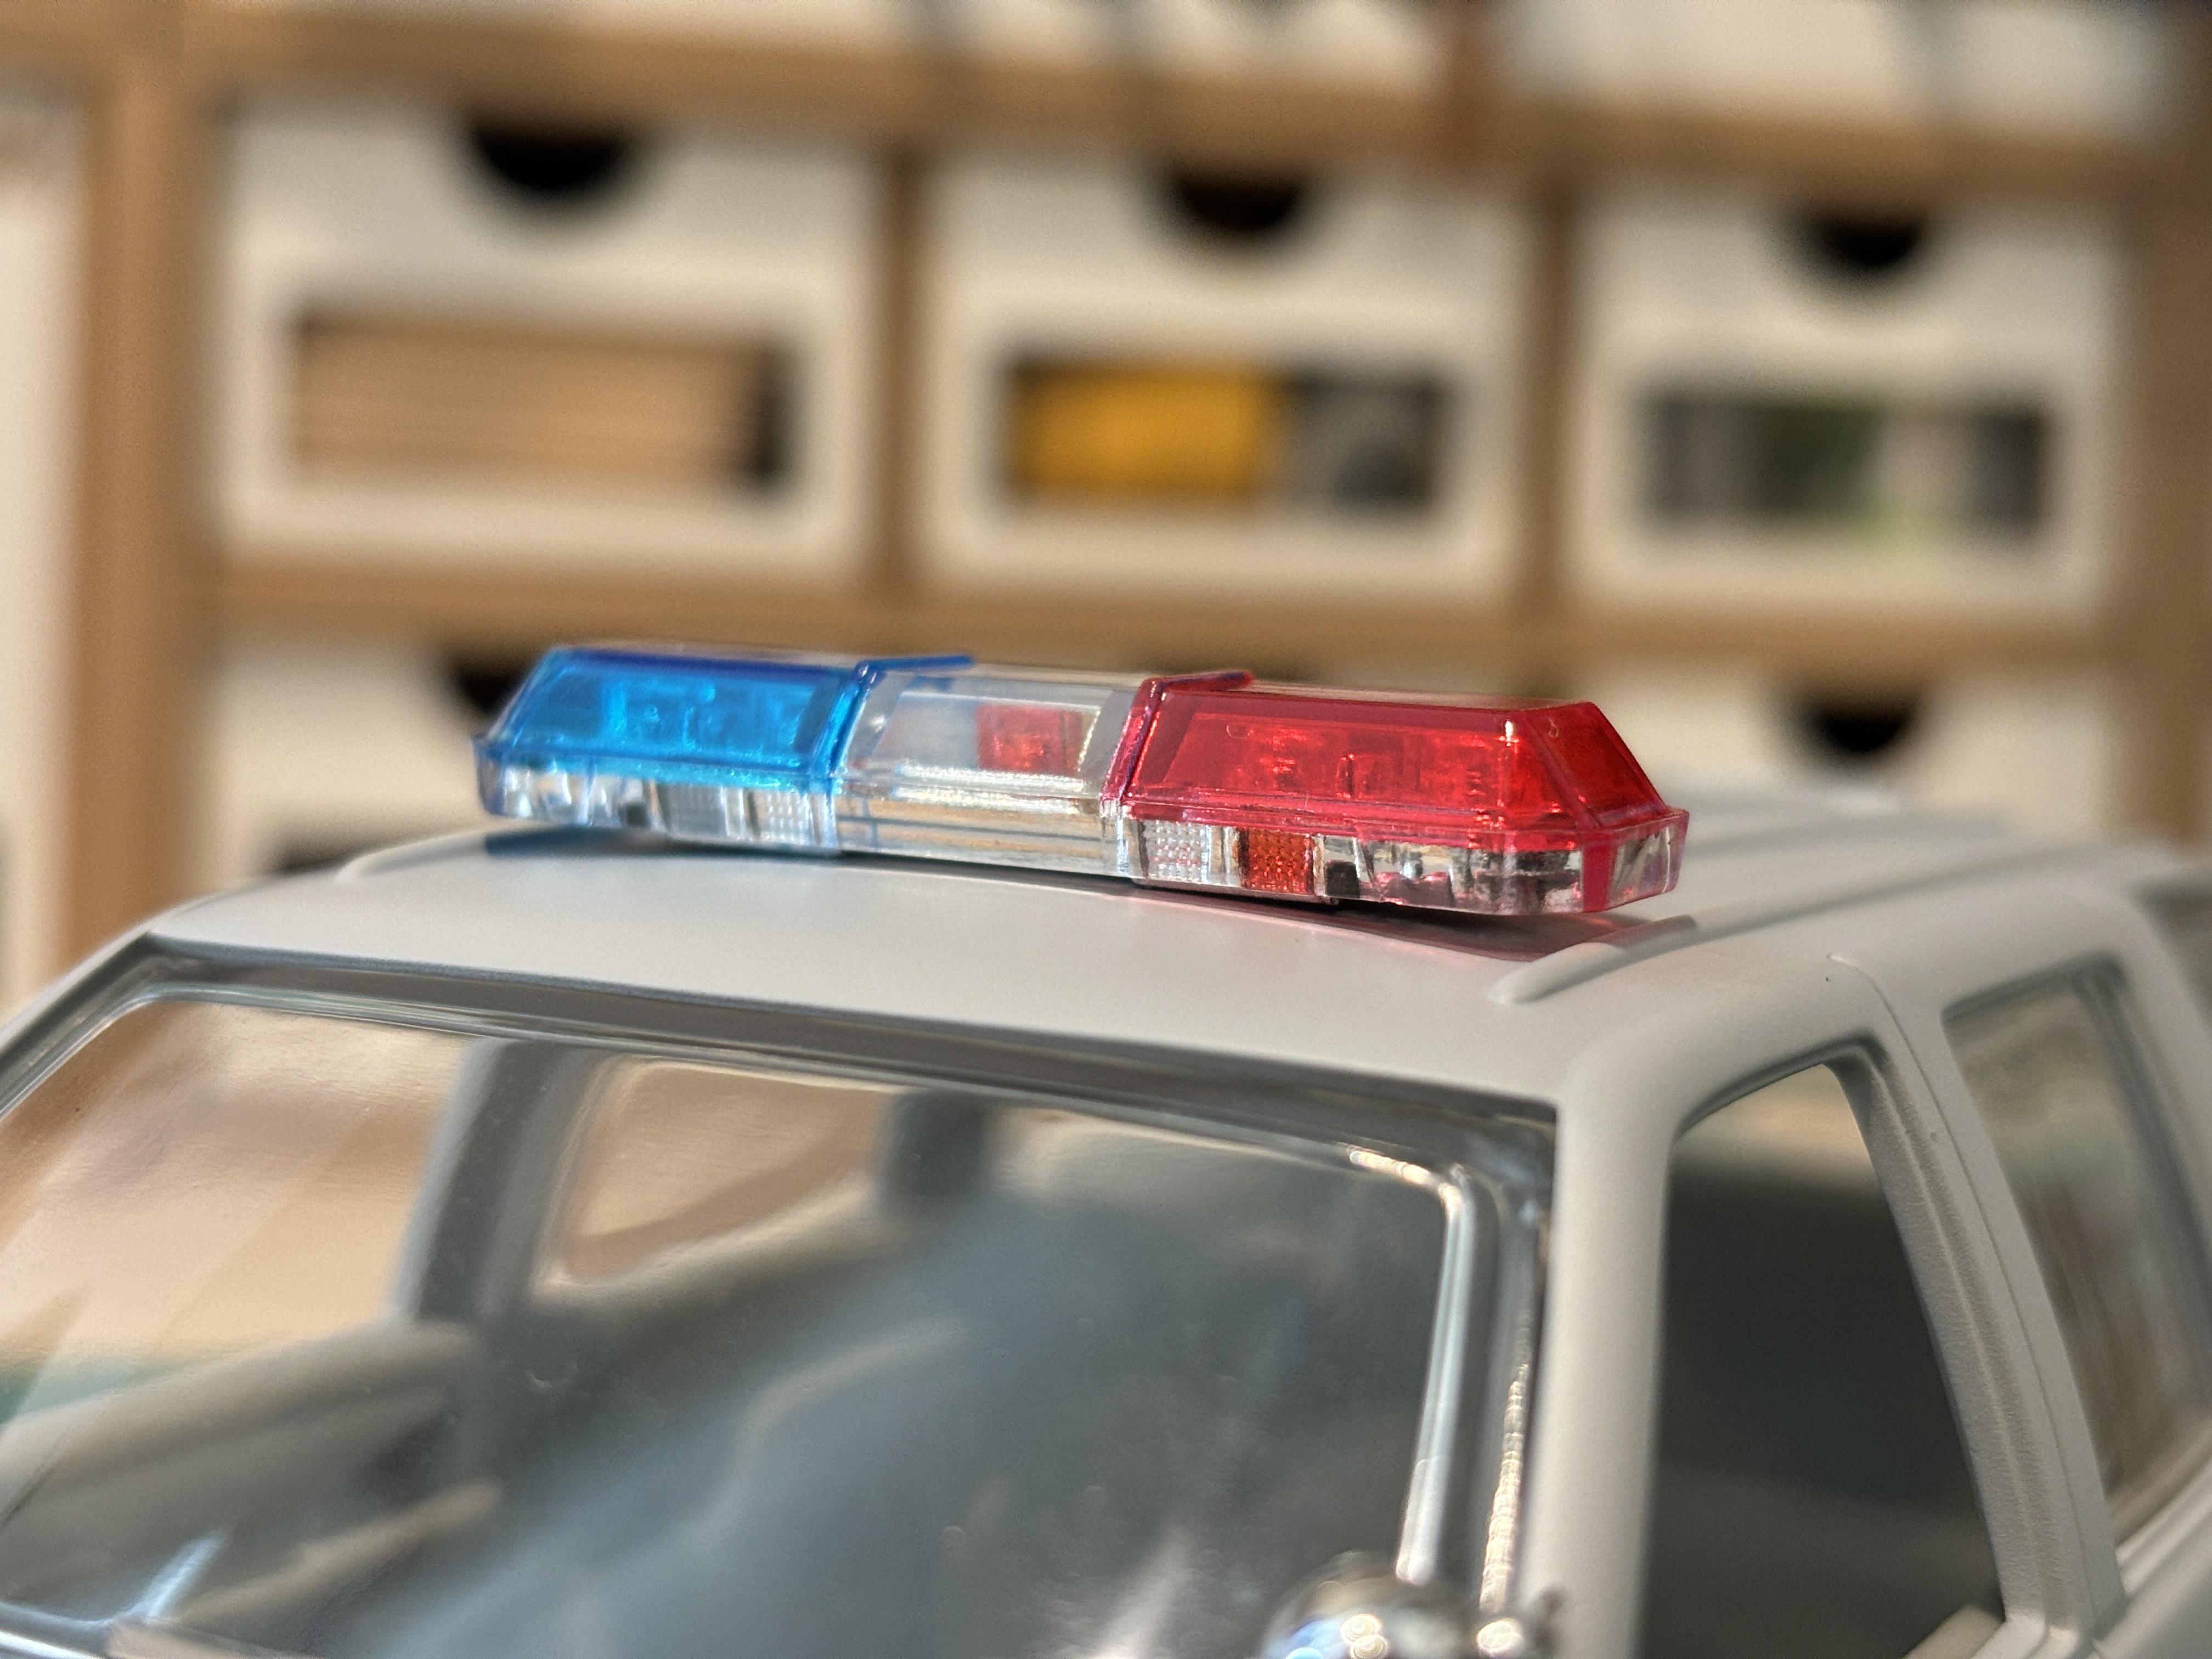
Thanks! The light bar is now done. I modified some light bar mounts that I purchased from Shapeways years ago and painted them. I also added the unit number decal on the back of the light bar. This number will match the roof number. Not sure why LASD used to add that number to the light bar as well, but they did. The wheels are also done. I painted the lug nuts with some black paint and a tooth pick. I then added the center cap decals that came on the recent issue of the AMT C-3500 kit. Love the way they look: Here's a nice little detail. I added a bumper sticker from a decal sheet I have: I was impressed to find that the same bumper sticker was also found on the real thing!
-
3D Tool boxes for f150...
av405 replied to Musclecarbuilder's topic in Truck Aftermarket / Resin / 3D Printed
Check out my WIP thread: -
Those aren't bad tips but it's not the only way. When I've used it in the past, I made sure I sanded down the parts and then cleaned them with clean water and a cloth. I painted with 2 passes, but in retrospect, the bursts out of the can are strong and smooth, so I could have painted with one smooth pass. 24 hrs is good, but I gave it a few days. But yes, you're on the right track. Clean parts, light passes to be on the safe side, and plenty of drying time. I recommend you paint a scrap part concurrent to your main piece(s). That way, you can use the scarp part to gauge when the piece is dry and safe to handle.
-
No need for a gloss black backing.
-
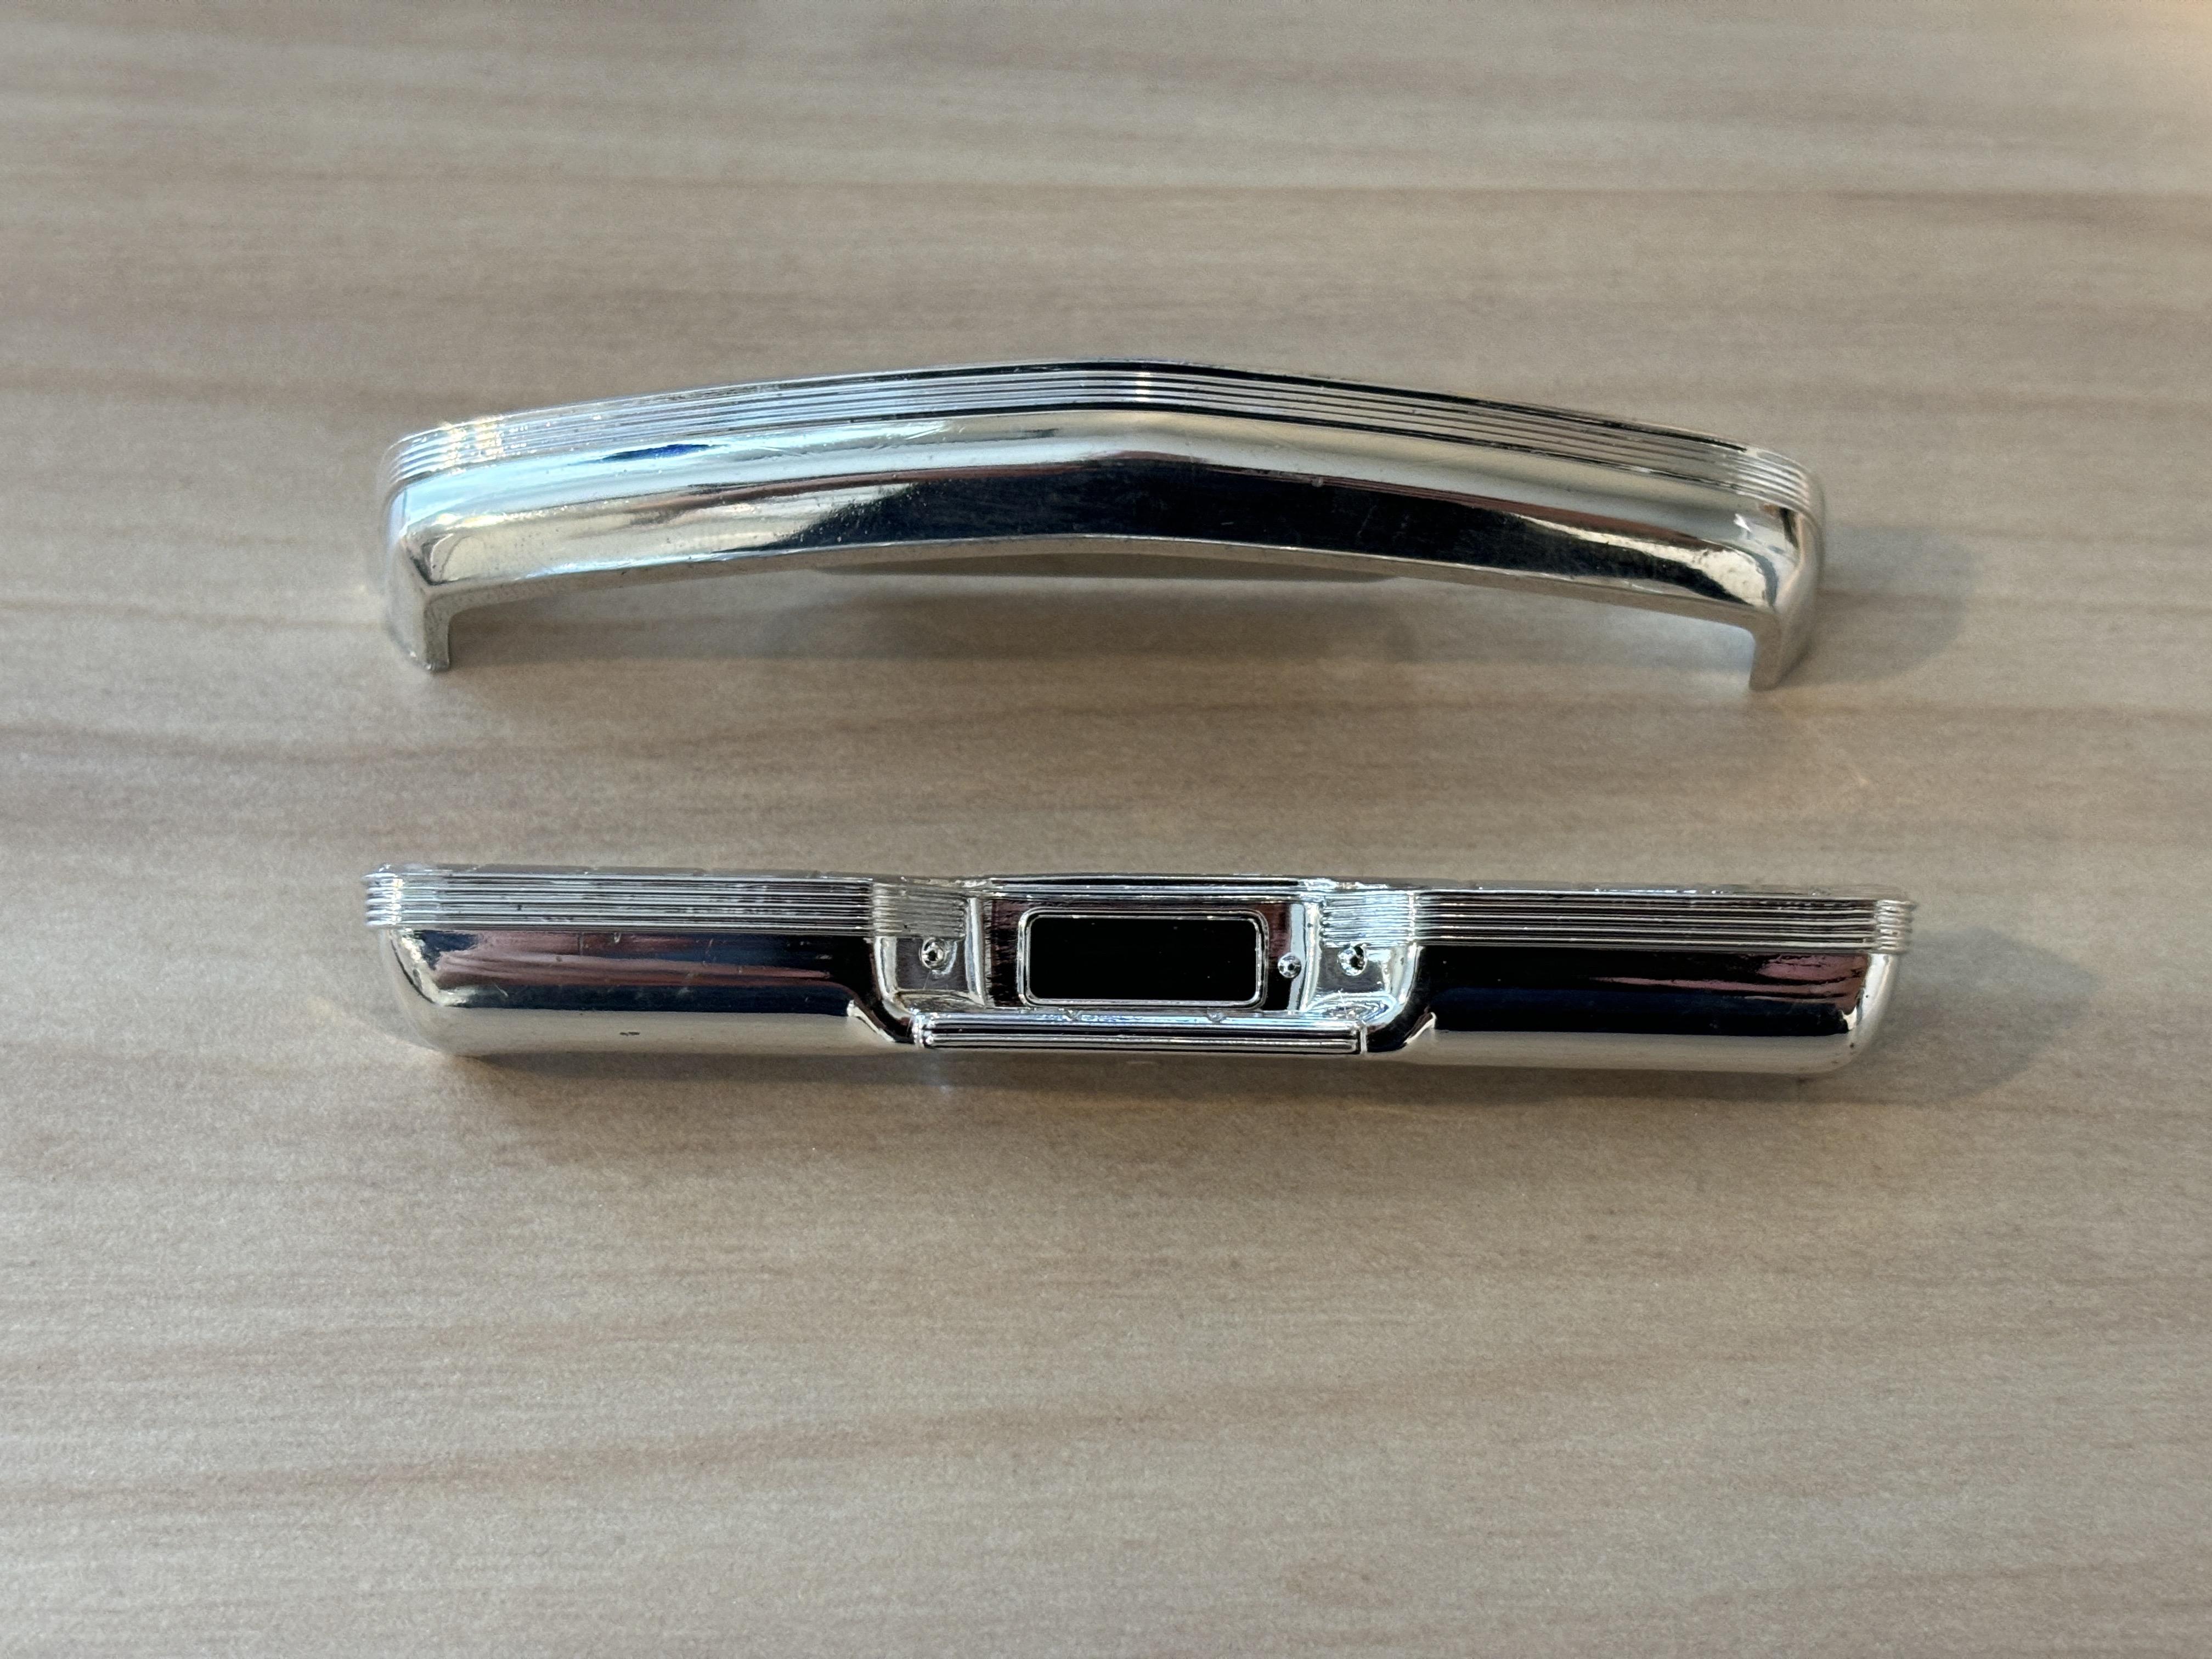
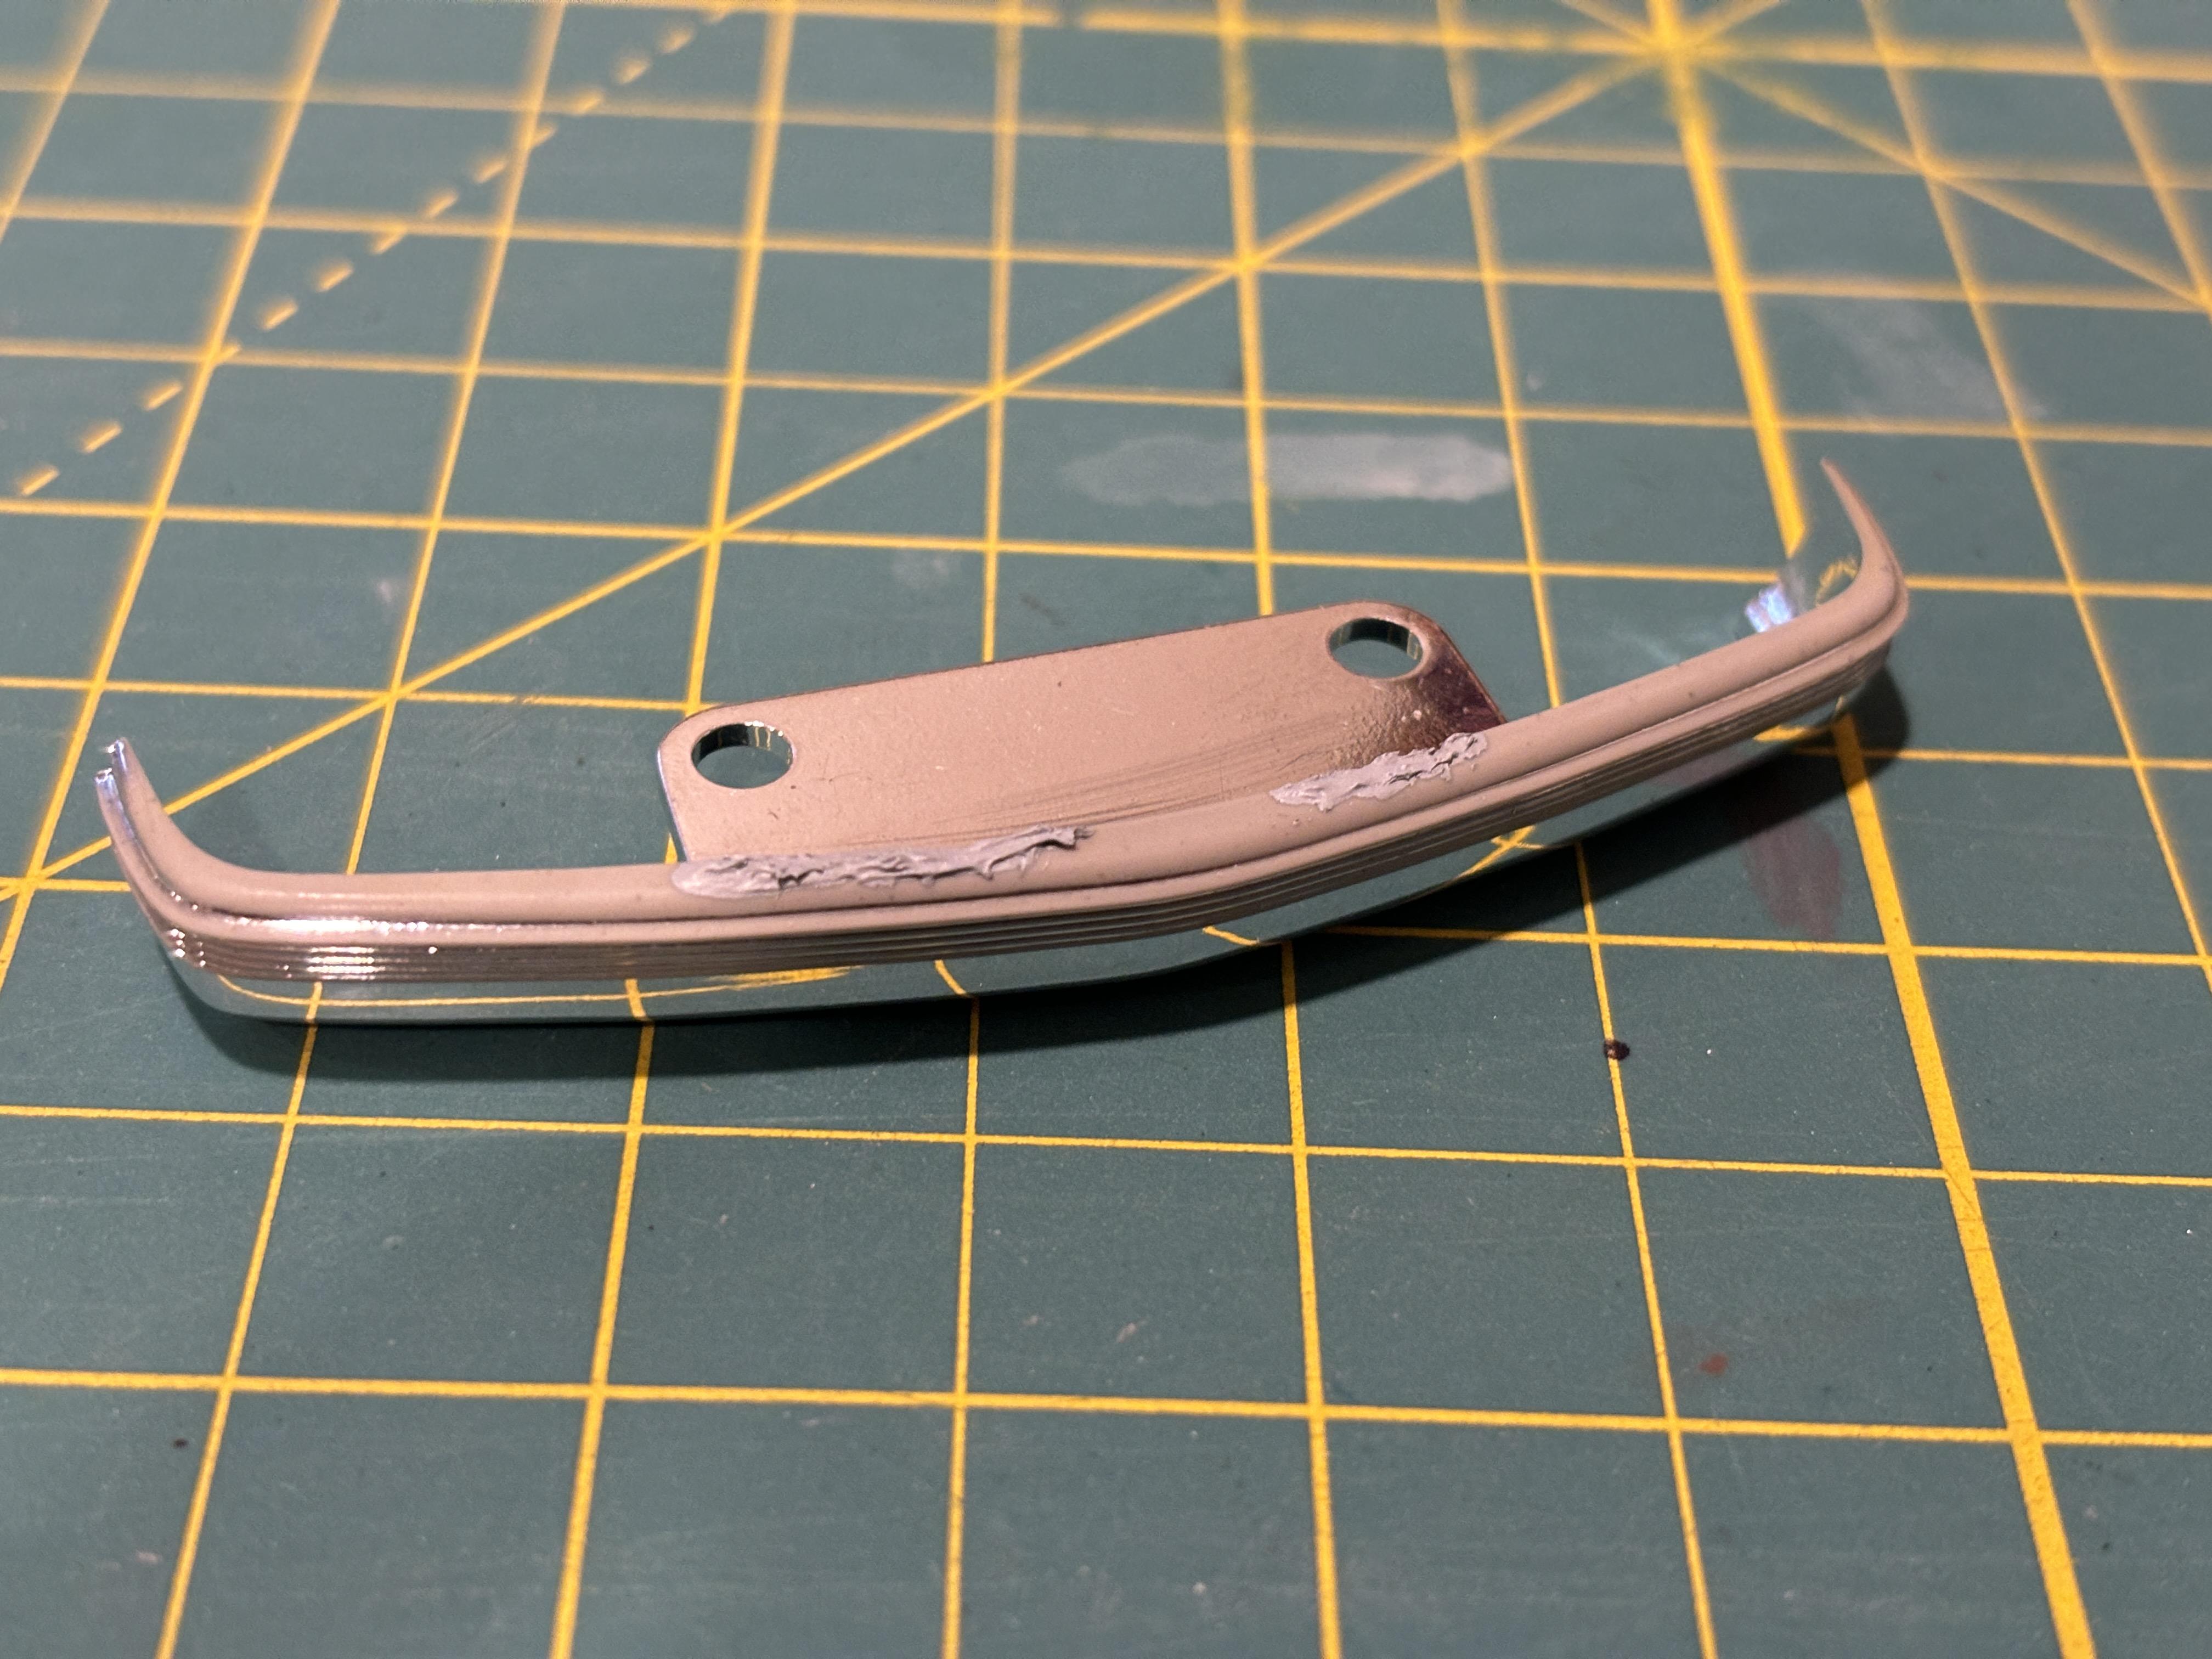
Next up: the bumpers. When I opened this nearly 30 year-old kit, I found the chrome on the bumpers to be intact but notably blemished. It's a bit hard to see in the picture below, but there are blemishes throughout. I initially thought about stripping the chrome and re-spraying with Revell Chrome, but I got nervous at the prospect of having to handle and possibly affect the finish on the spray chrome after. The front bumper had some nasty imperfections that needed to be dealt with. I sanded the chrome off the top to get the area as smooth as possible: I then filled in these areas with putty: Once that was done, I sanded the chrome on the "rubber" portions of the bumper down with 600 grit, masked, and painted the rubber with Mr. Surfacer 1500 Black Primer. I like to sand the chrome down first to promote better paint adhesion. I've had good luck starting with a light mist coat of black and then a second fuller coat to paint these smaller areas. Since I sanded the chrome off the top of the front bumper, I painted this area with the black primer and then applied bare metal foil. It's not as bright as the kit chrome, but it was the best solution I had and it's not a large area, so I can live with it. Plus, I will eventually install a front push bar, which will further obscure it. I'll eventually add a bumper sticker to the rear bumper and a license plate to the front bumper (plus the push bar), so hopefully this will cover up some of the kit chrome blemishes and draw attention away. I love working on these smaller parts. A little bit of effort can go a long way.
-
Thank you. Yes, I lowered it to a 2WD. It looks about right compared to the real thing. I like the detail on the Lindberg MX7000 light bar, but I always found it to be just a bit too short. It looks fine on sedans, but it looks small on the Tahoe. I'm working on some light bar mounts, so that should help. Thanks for the comparison pictures. The openings on the newer mold are nice, but I'm discouraged by the small size and ribs. I'm glad I didn't try to use those on this build. For the record, Custom Squads is no more. They took their website down a few weeks ago and Rosa, one of the owners, told me that they weren't going to be active anymore due to health issues. When I asked about a potential return, I didn't not get an email back. The website was taken down shortly after. I hope their health issues improve as they were a great source. I'm glad I stocked up on many parts from them over the years.
-
Thanks! Good trick, thank you. Thank you on both counts! Much appreciated
-
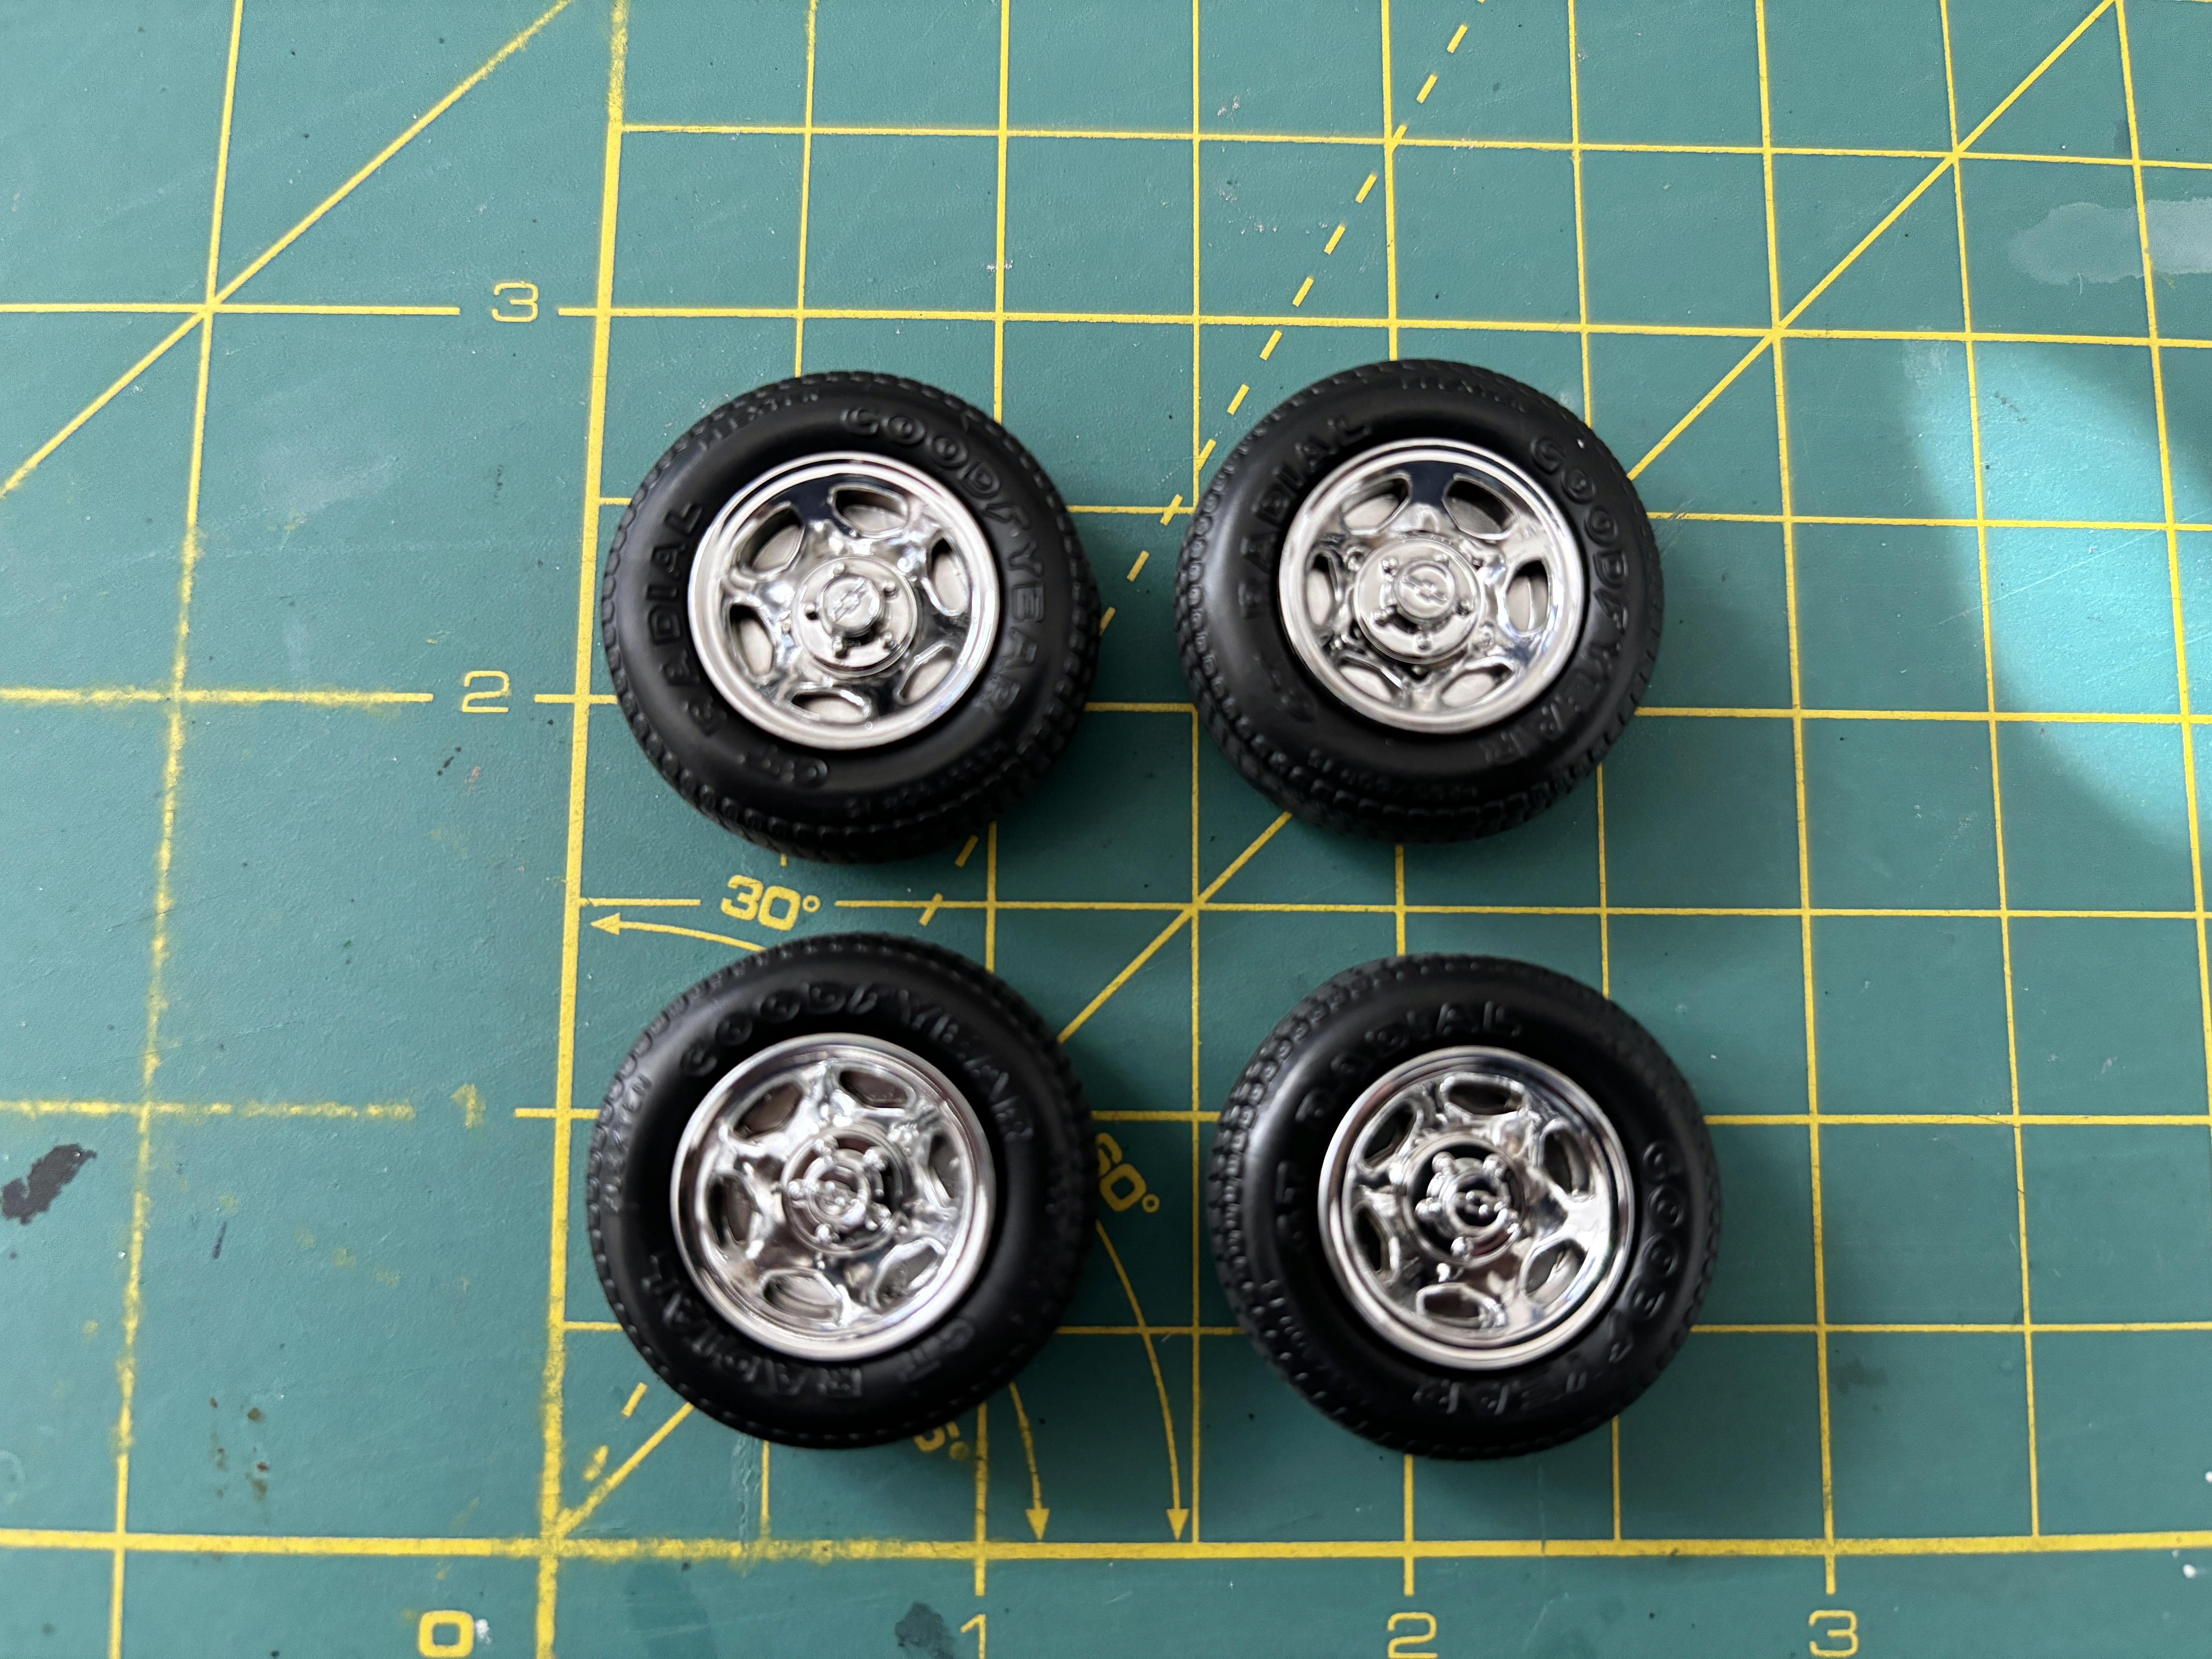
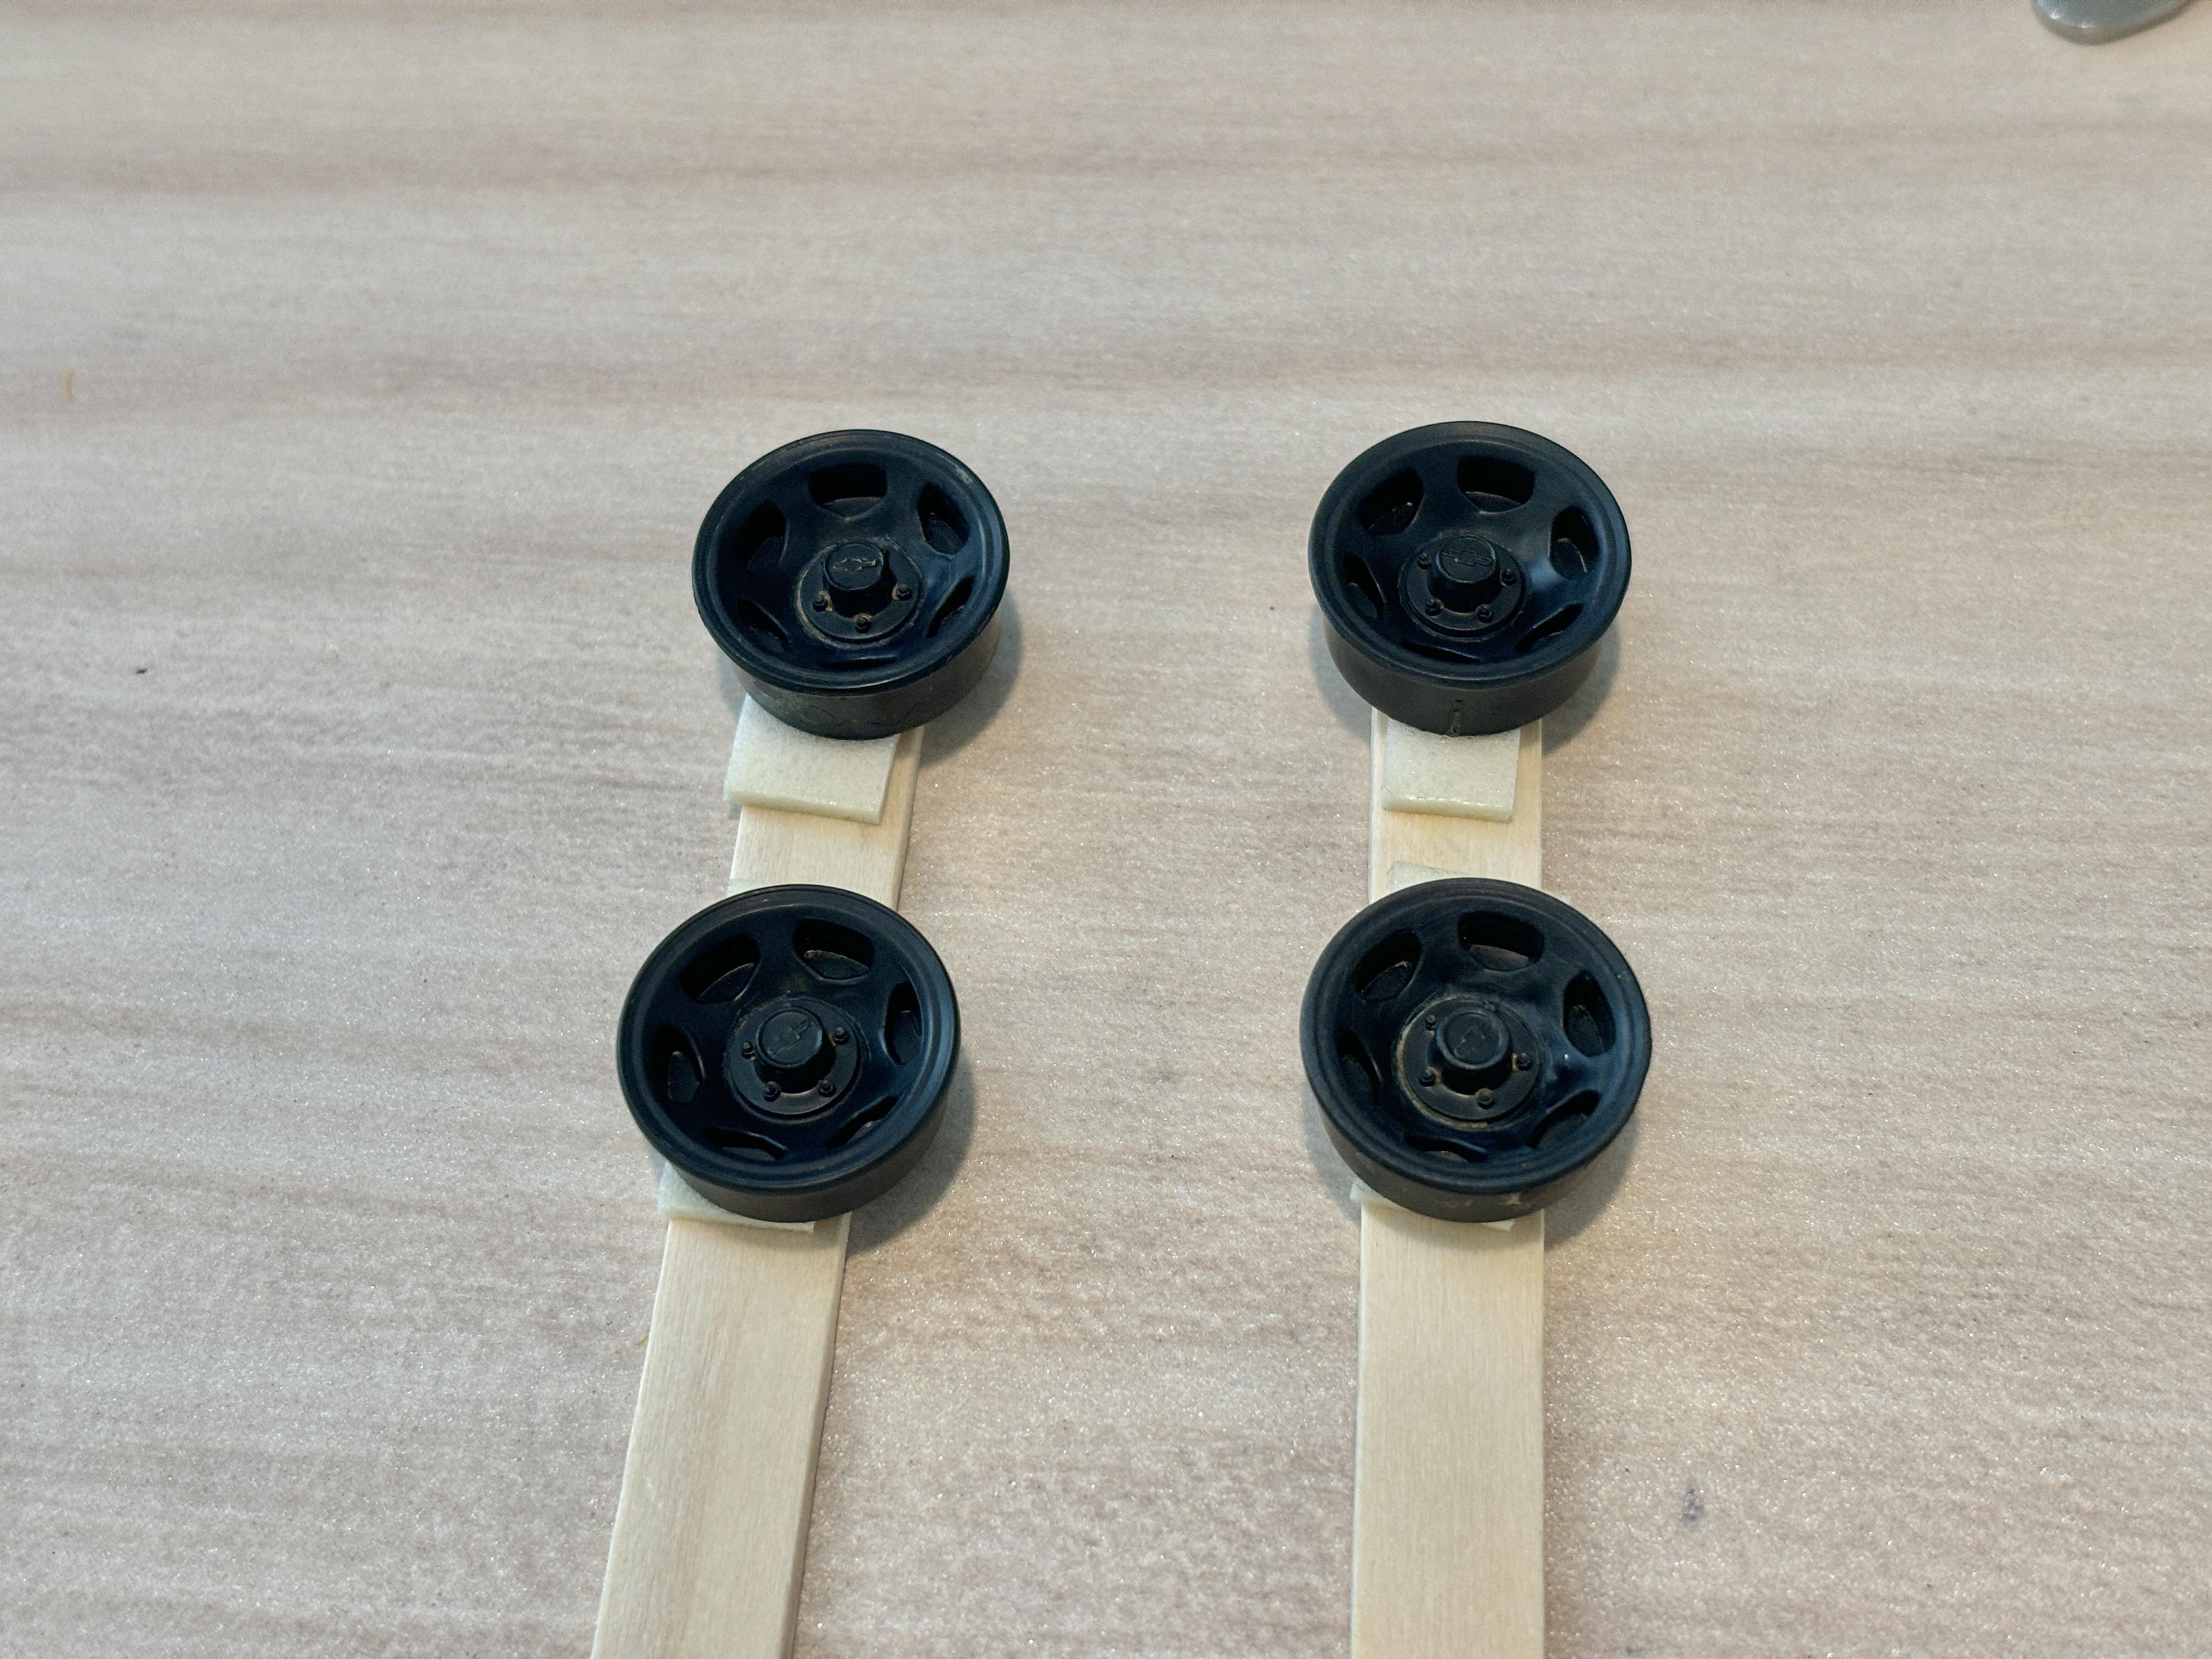
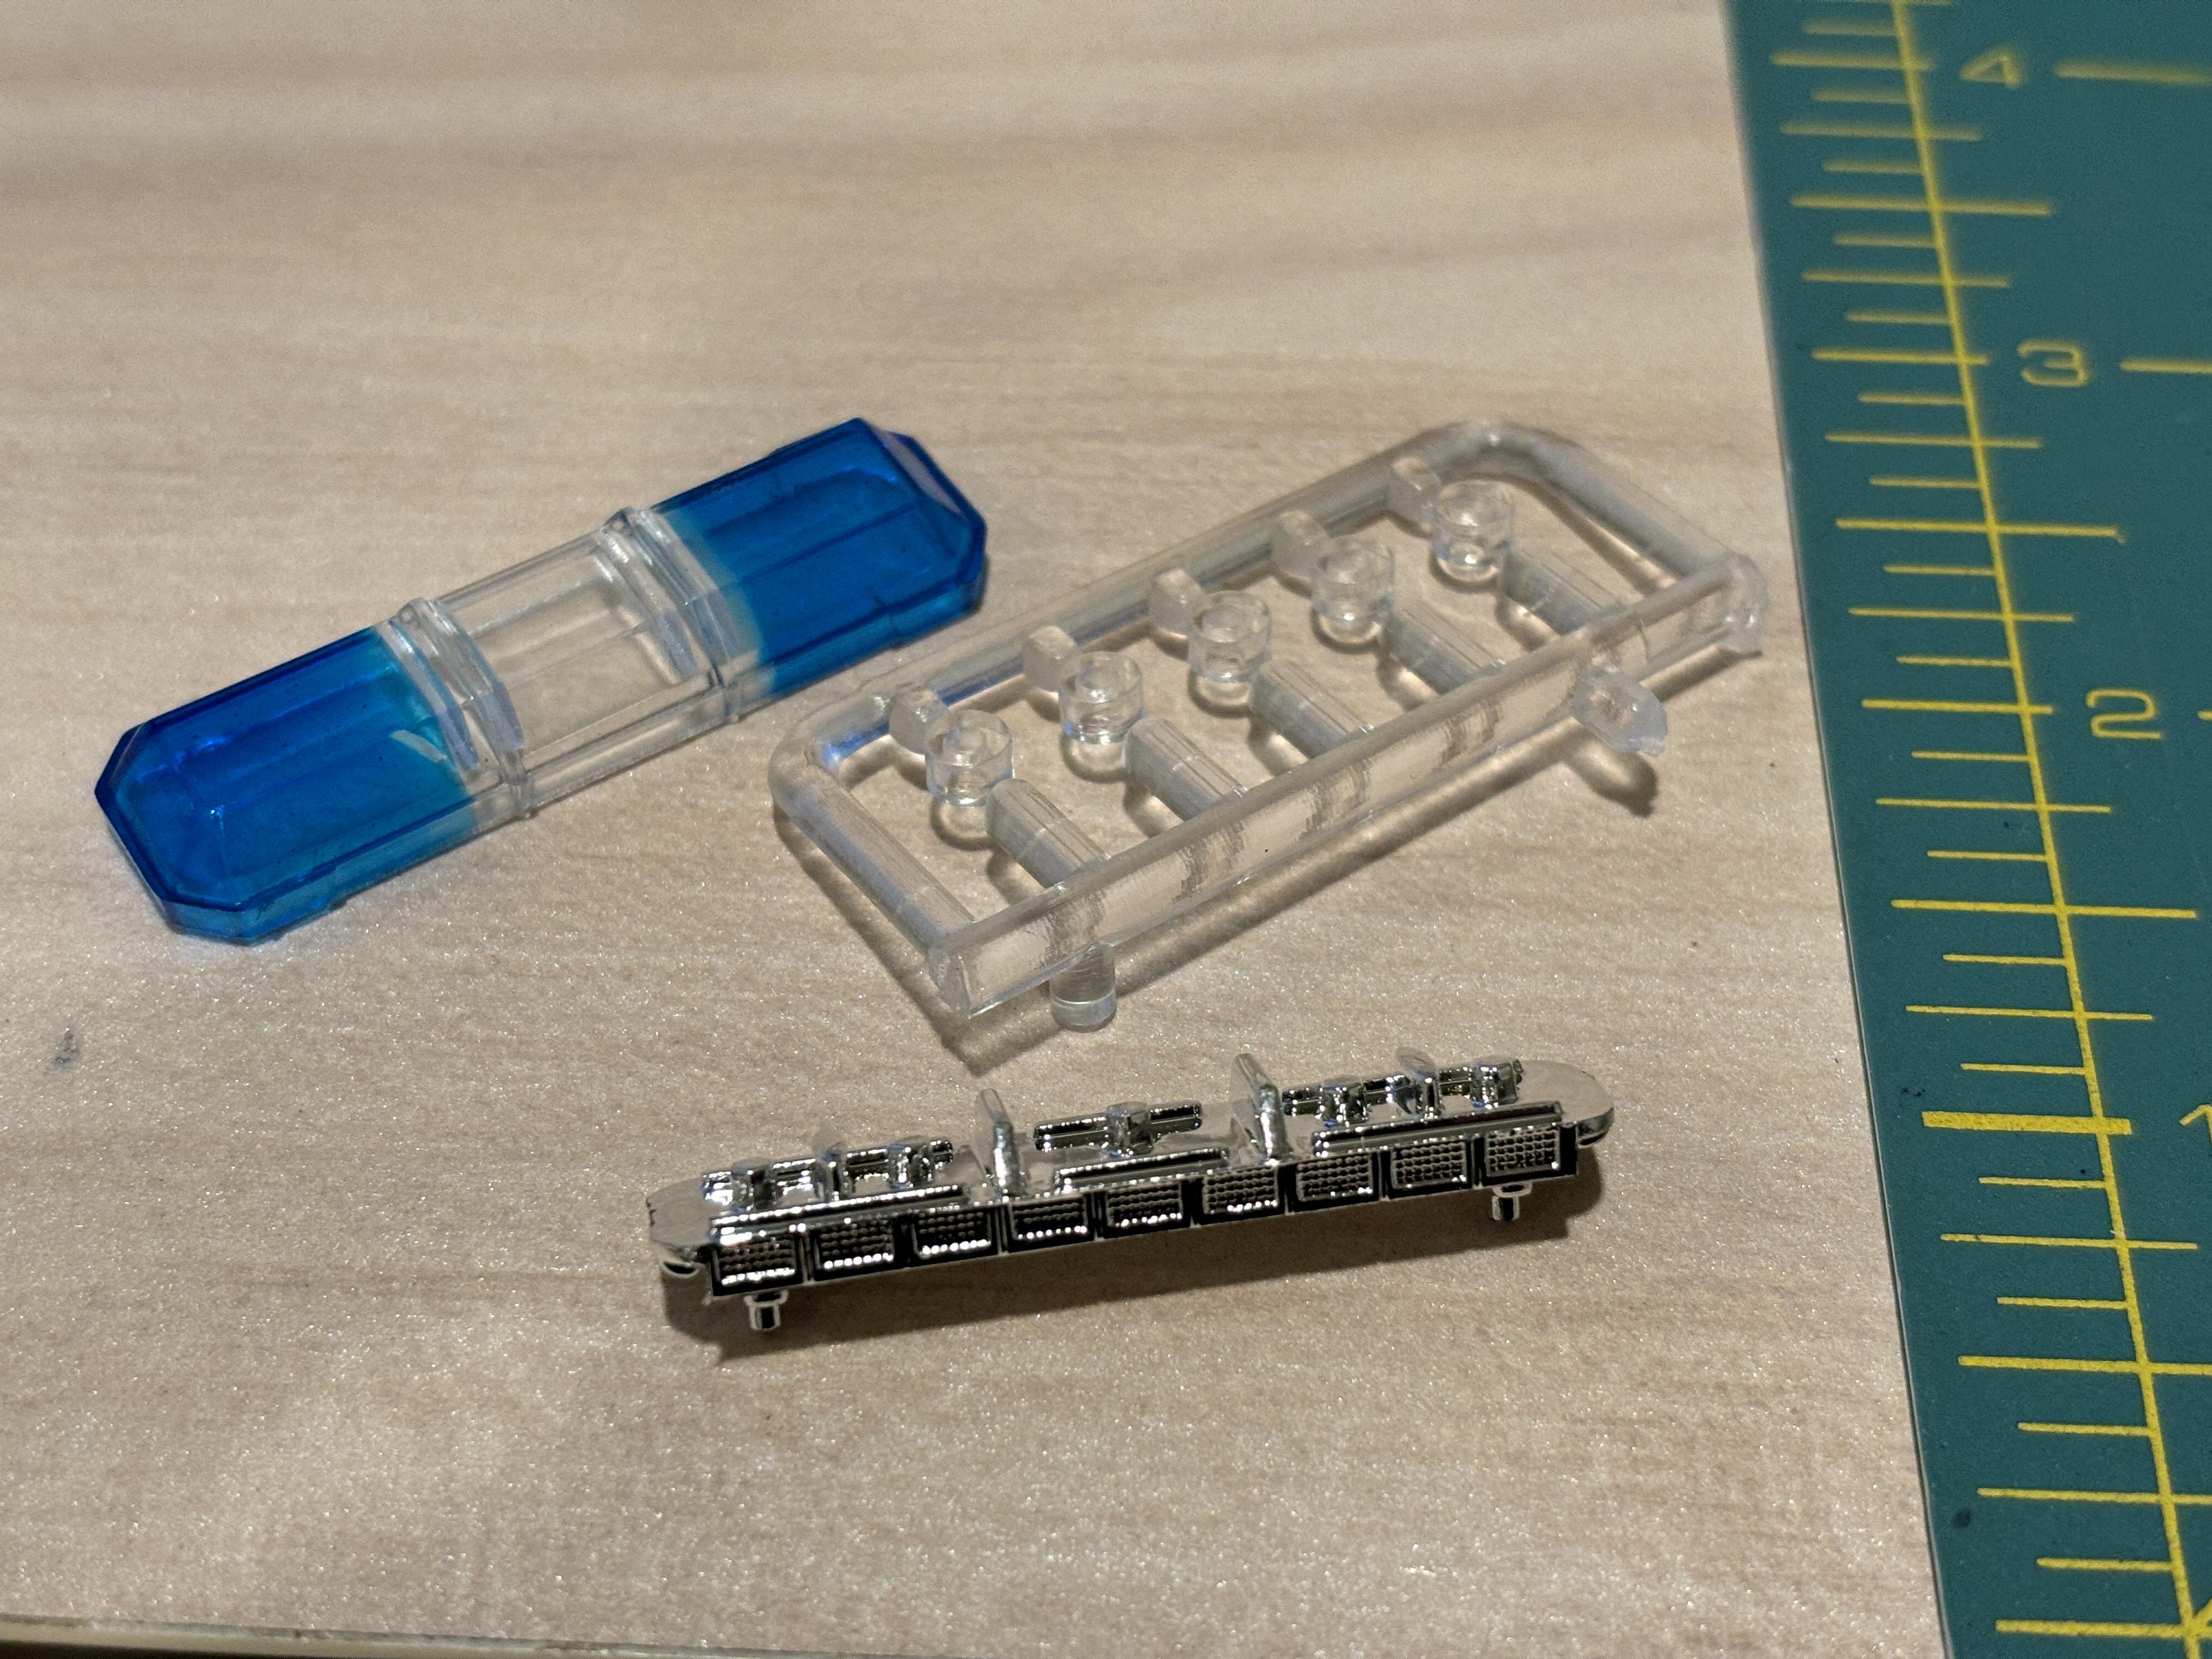
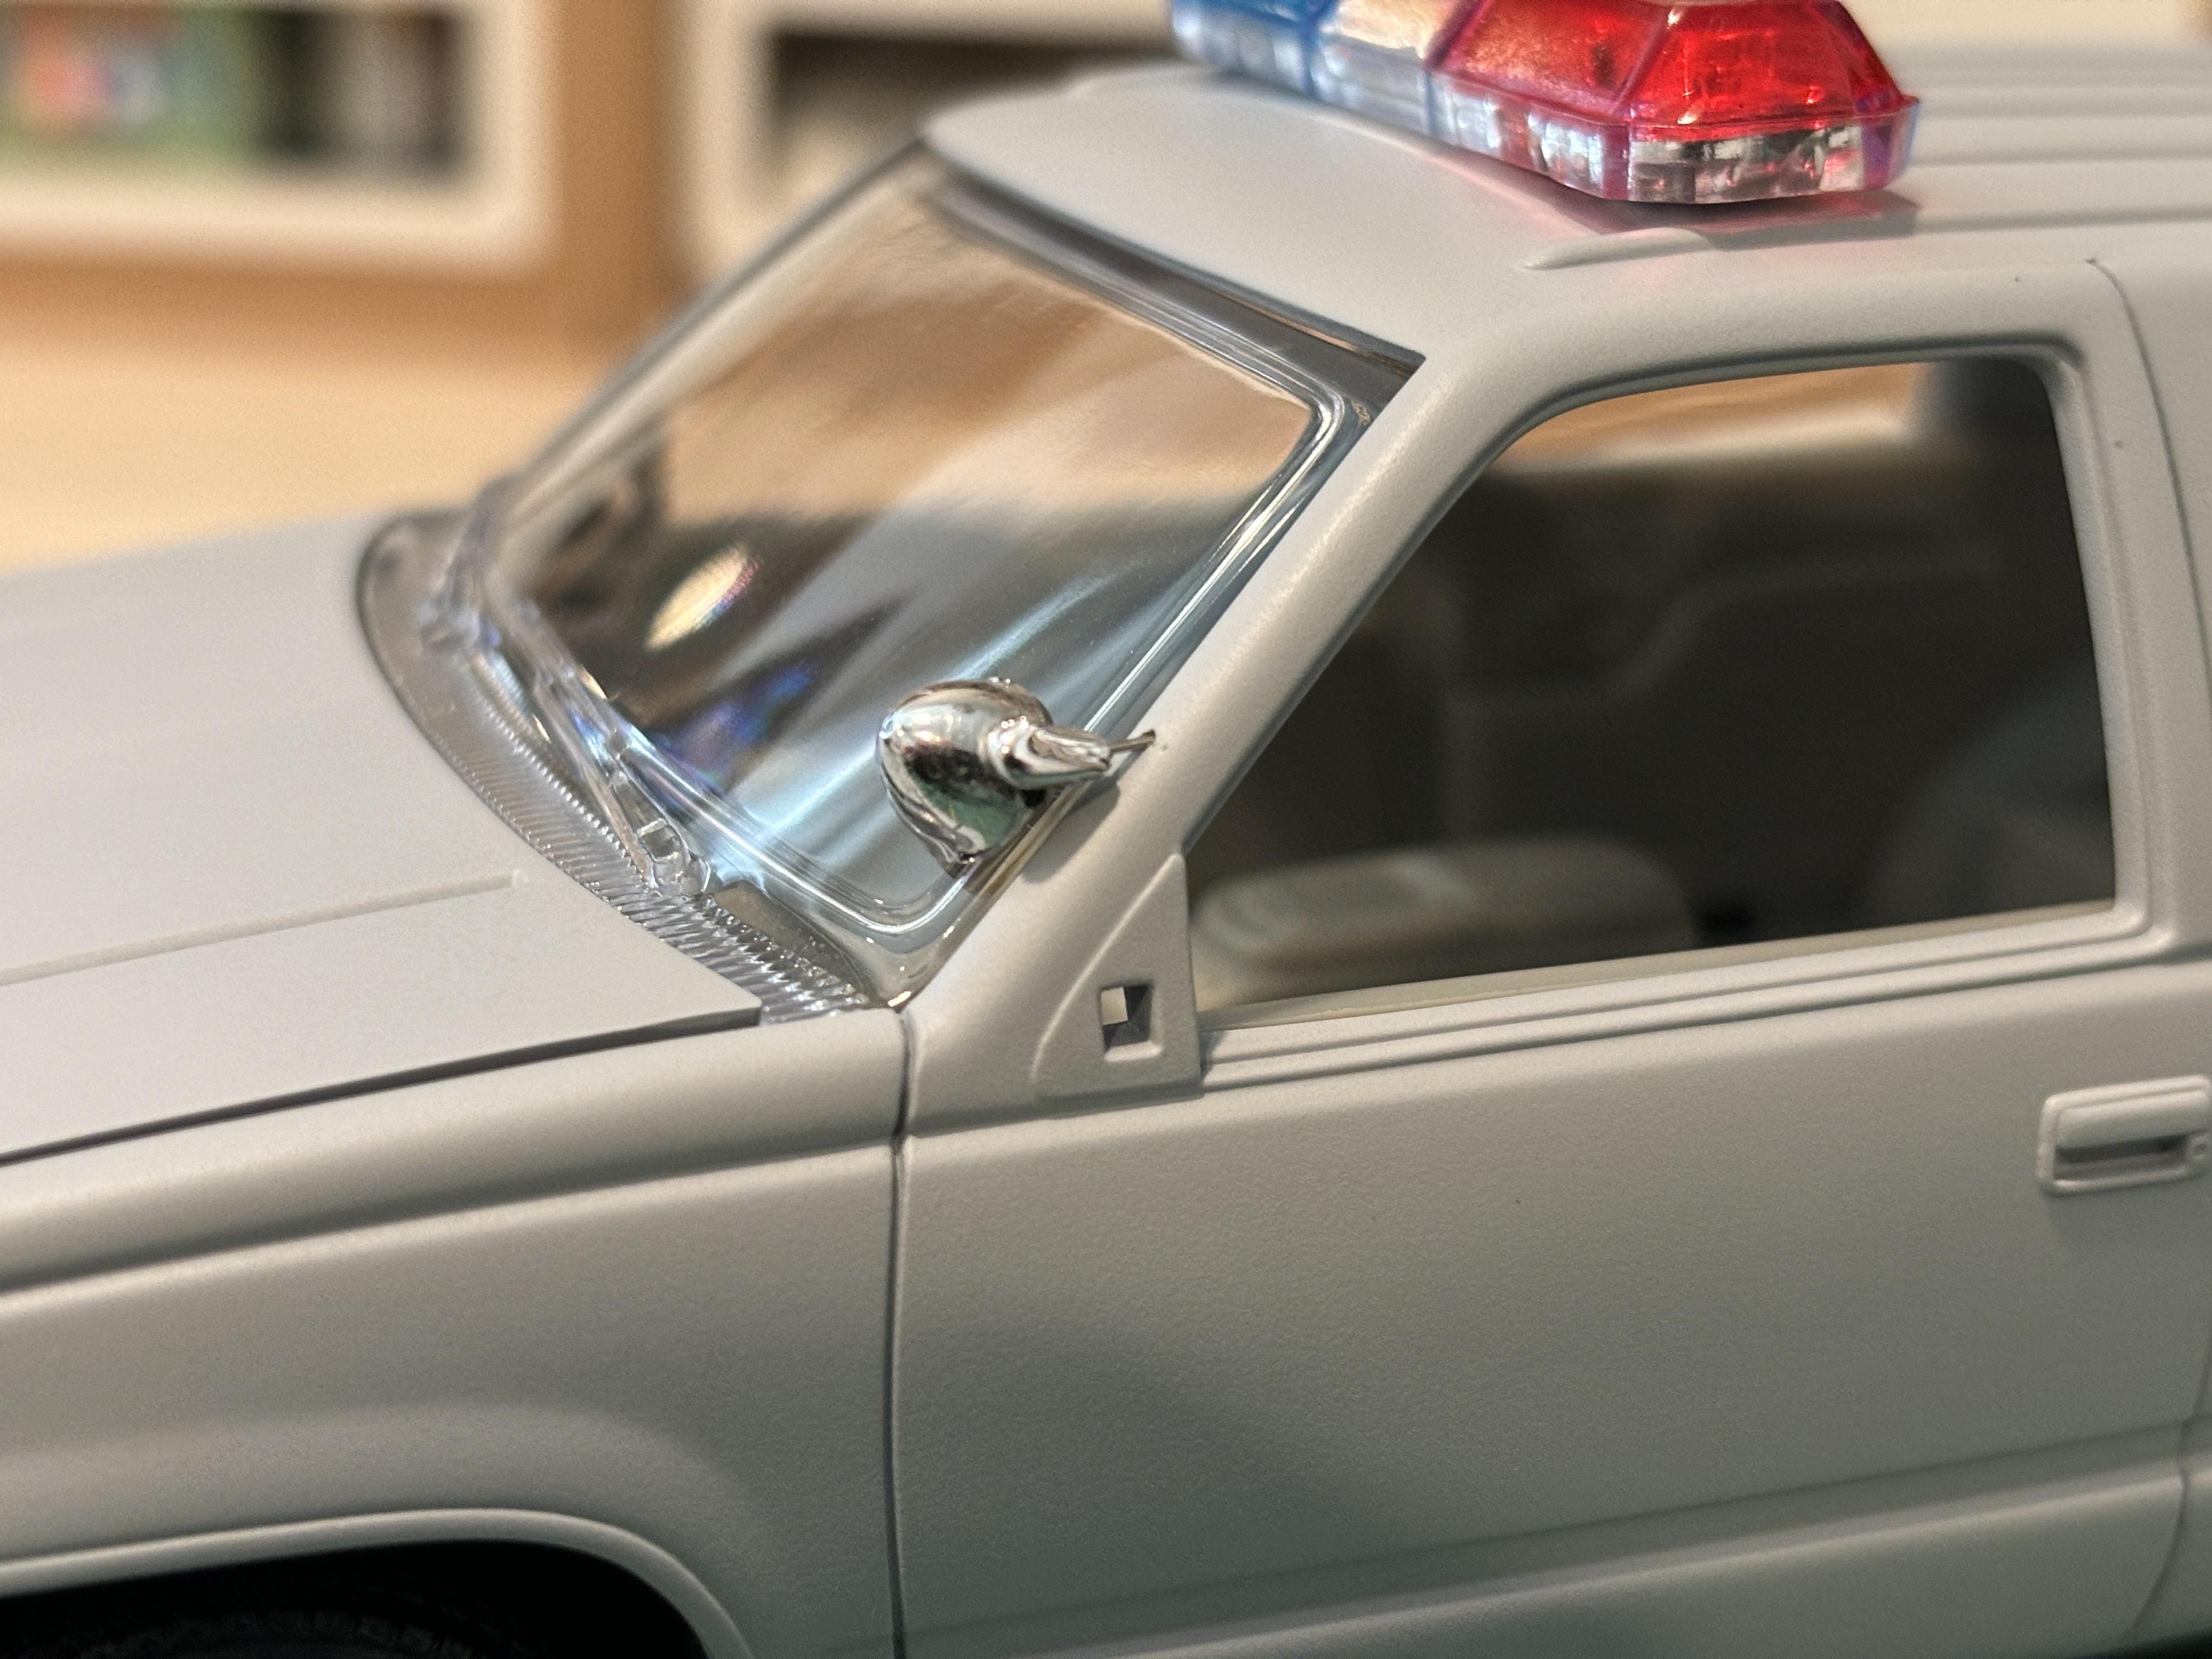
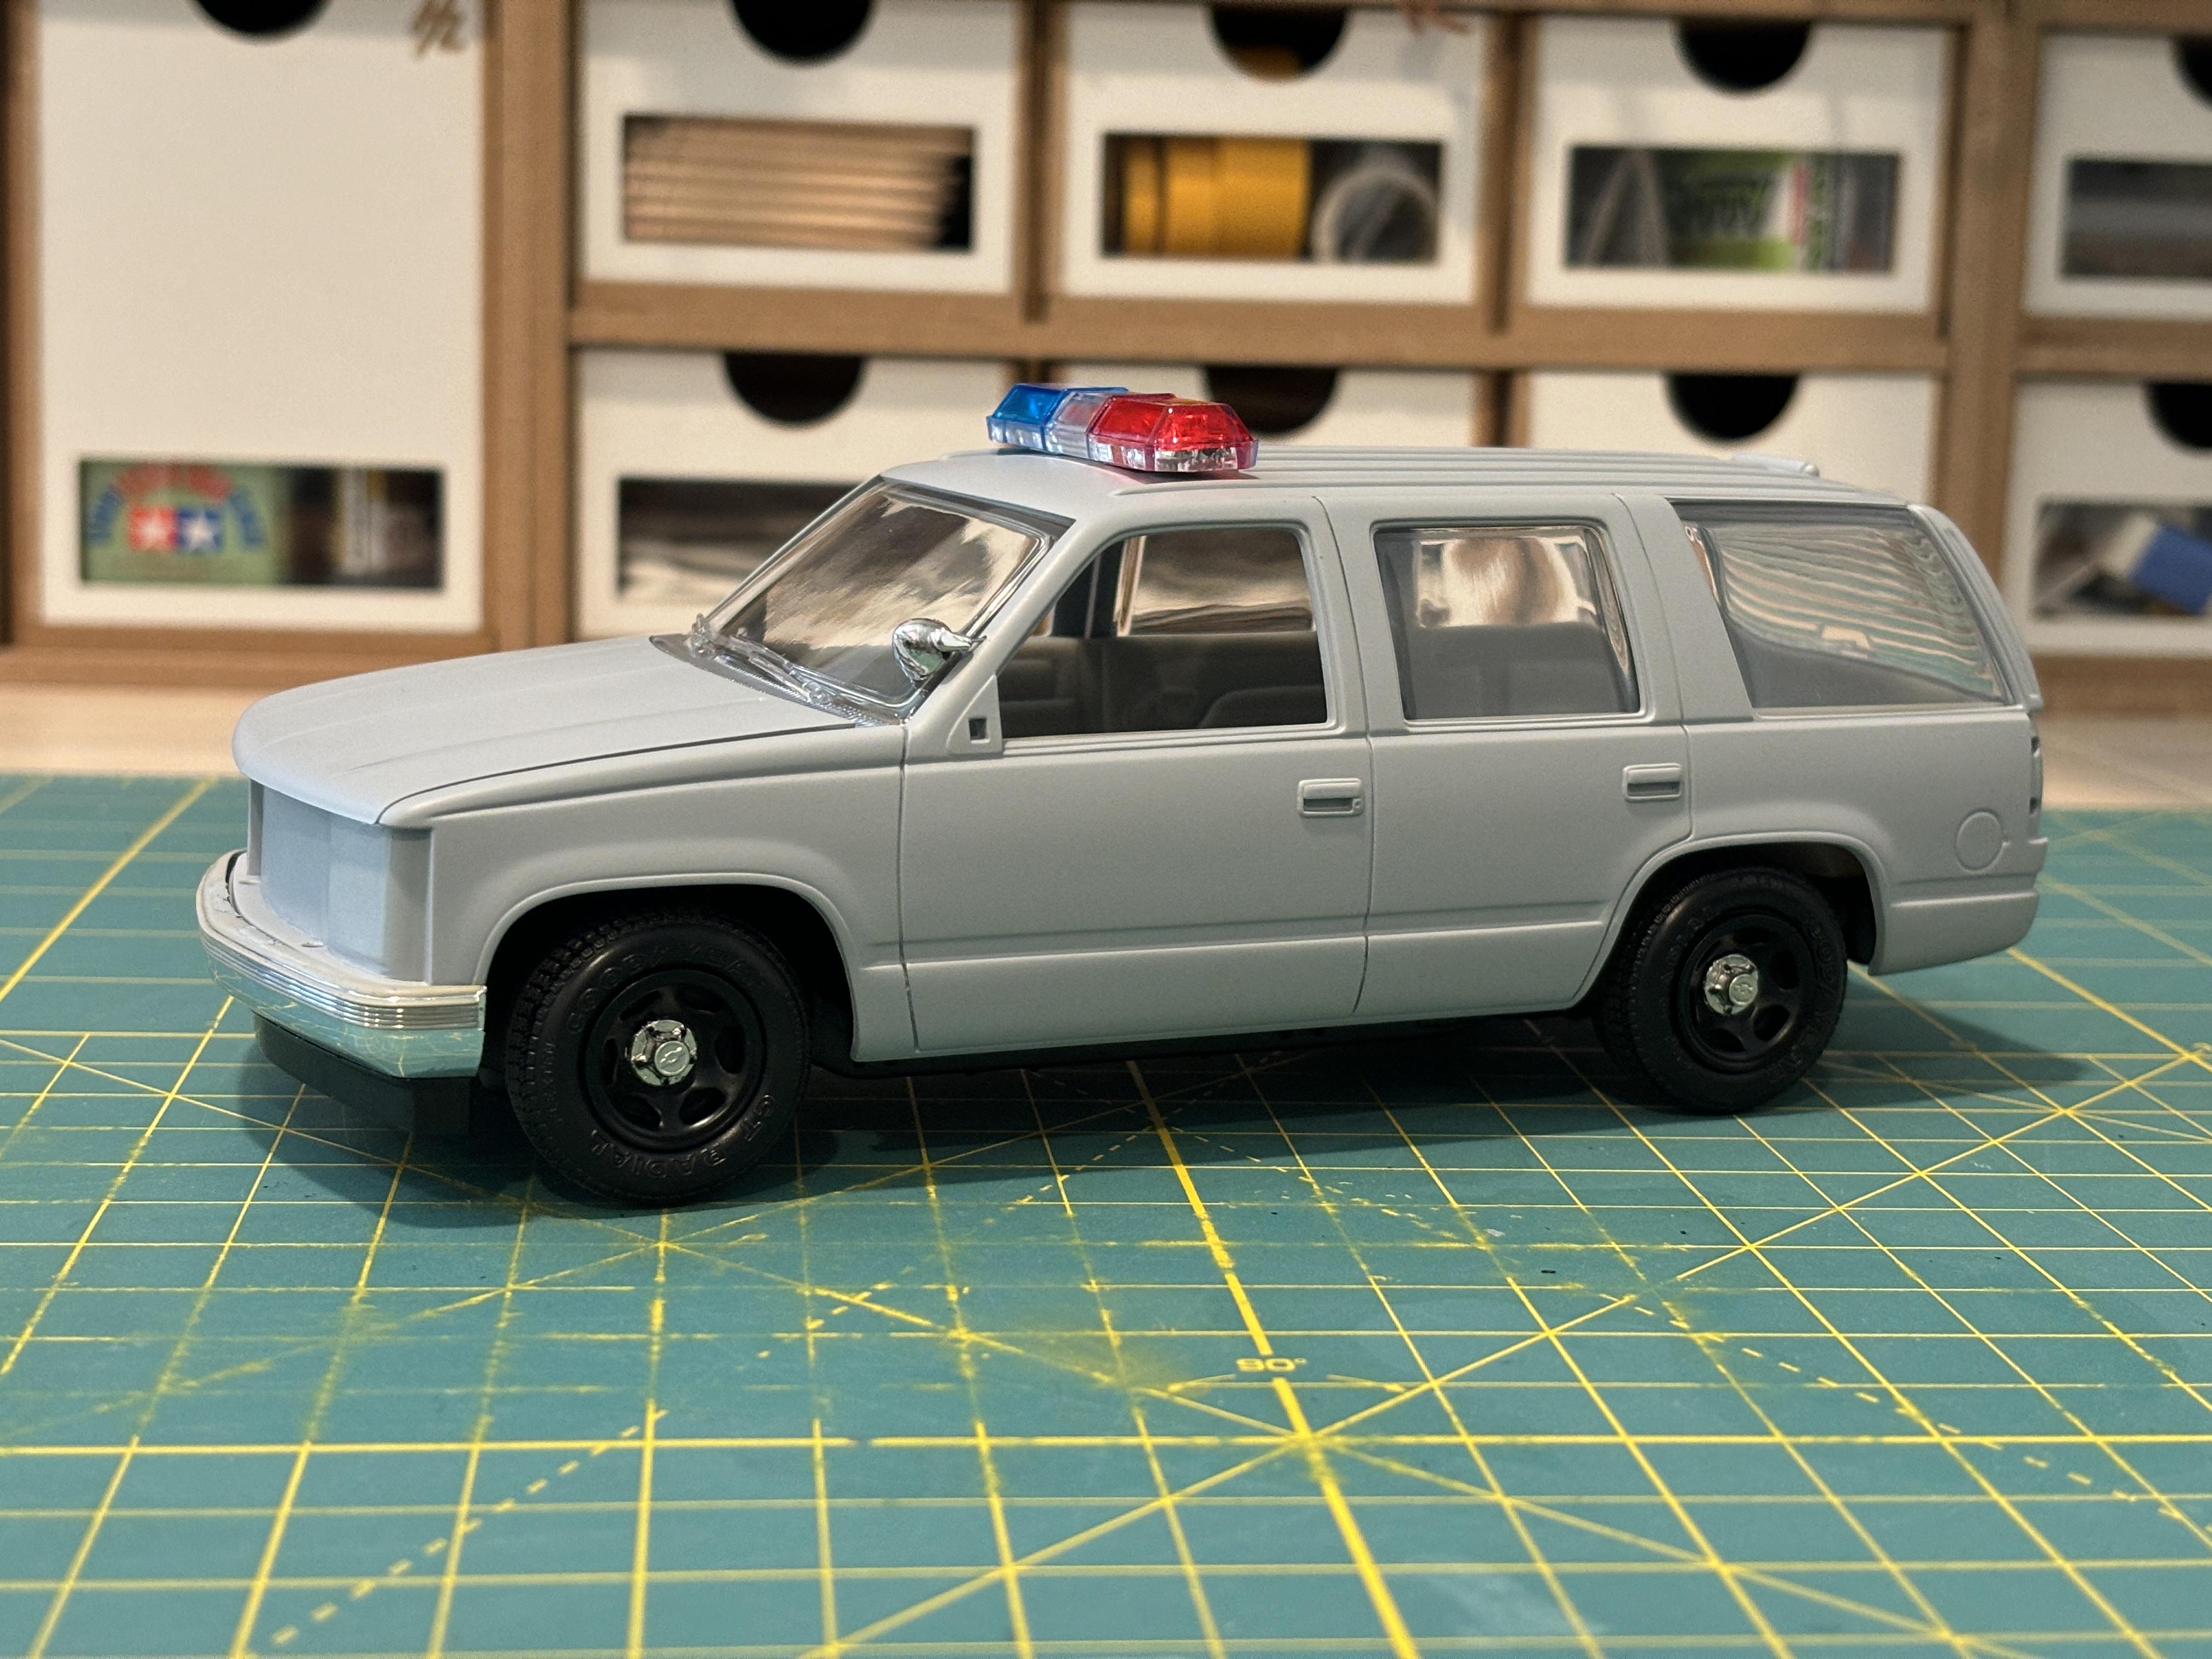
Thanks, Robert! The first-gen Tahoe PPVs used what Chevy called the "Optional chrome-plated' wheels, painted black. They could be ordered all chrome as an option, but most agencies opted for the utilitarian-looking black wheels. These wheels are best known for being equipped on the C-1500 454SS. A few years ago, I picked up a spare set of AMT 454SS wheels on ebay just with this project in mind. The recently released AMT 1992 Silverado truck kit also comes with these wheels, albeit re-designed. I haven't compared the wheels from the 454SS kit to the equivalent wheels on the new kit to see if there's any major differences. I initially tried to mask the center caps with blue tack and then painted the wheels black. I didn't like the uneven mask the tack gave me, so I stripped the wheels bare with Super Clean. This is my go-to for stripping kit chrome: I then primed the wheels and painted them with Tamiya TS-29 Semi Gloss Black. I used bare metal foil on the center caps. It's a hassle to apply BMF on such uneven surfaces, but I'd say it came out okay: I then went to work on the light bar. Lindberg made a great MX7000 light bar, so I robbed one from one of my Crown Victoria police car kits. I used 91% isopropyl alcohol to remove the clear blue paint from the light bar. It works quickly and I highly recommend it for these applications. I used Tamiya Clear Red, Clear Blue, and Clear Yellow to get my light bar up to LASD-specs: I grabbed some spot lights from the Crown Victoria kit and used extra fine pins to make the shafts: Here's the kit so far after converting it from a 4x4 to 2WD. I took a set of Goodyear GT Radial tires from the Revell Caprice police car kit as they are beefier than the tires that came with the 454SS wheels.
-
That's good to hear. I recall reading somewhere that the AMT Tahoe kits were all disassembled promos that were packed up as kits once AMT realized how many they had. Which would explain the blue bodies. Also, promo plastic has always felt a little different to me.
-
Great job! I love the way it came together.
-
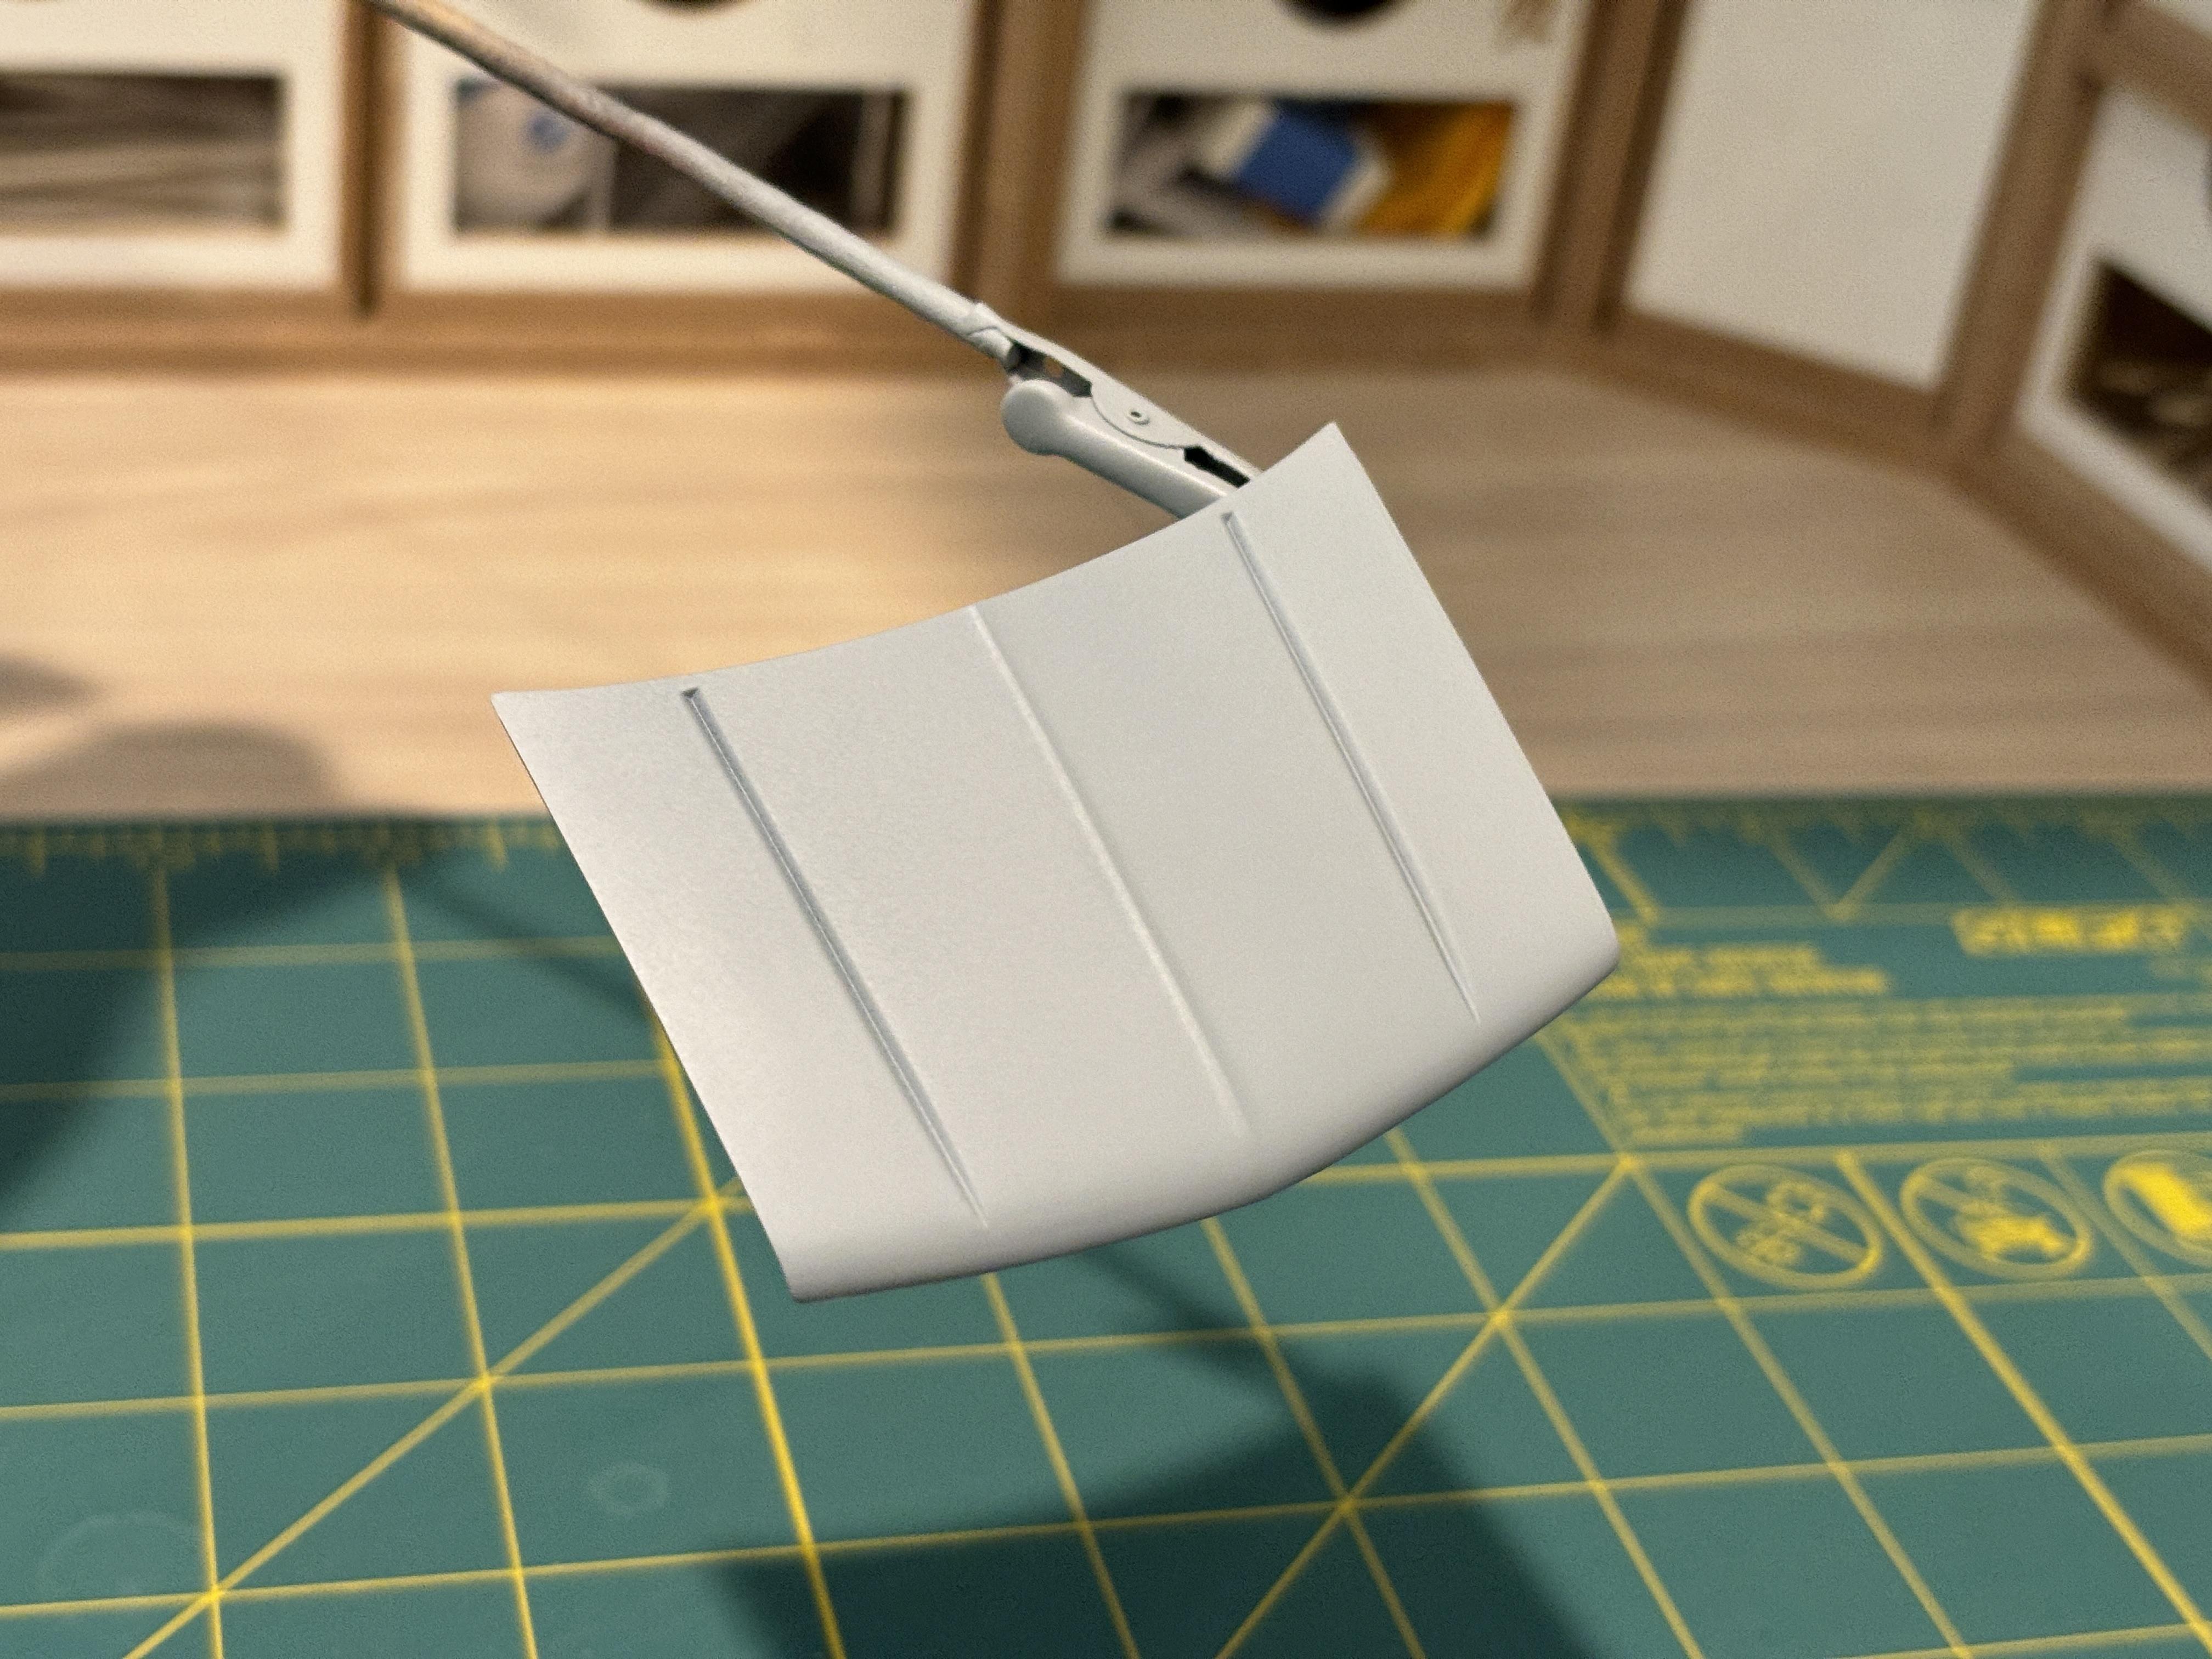
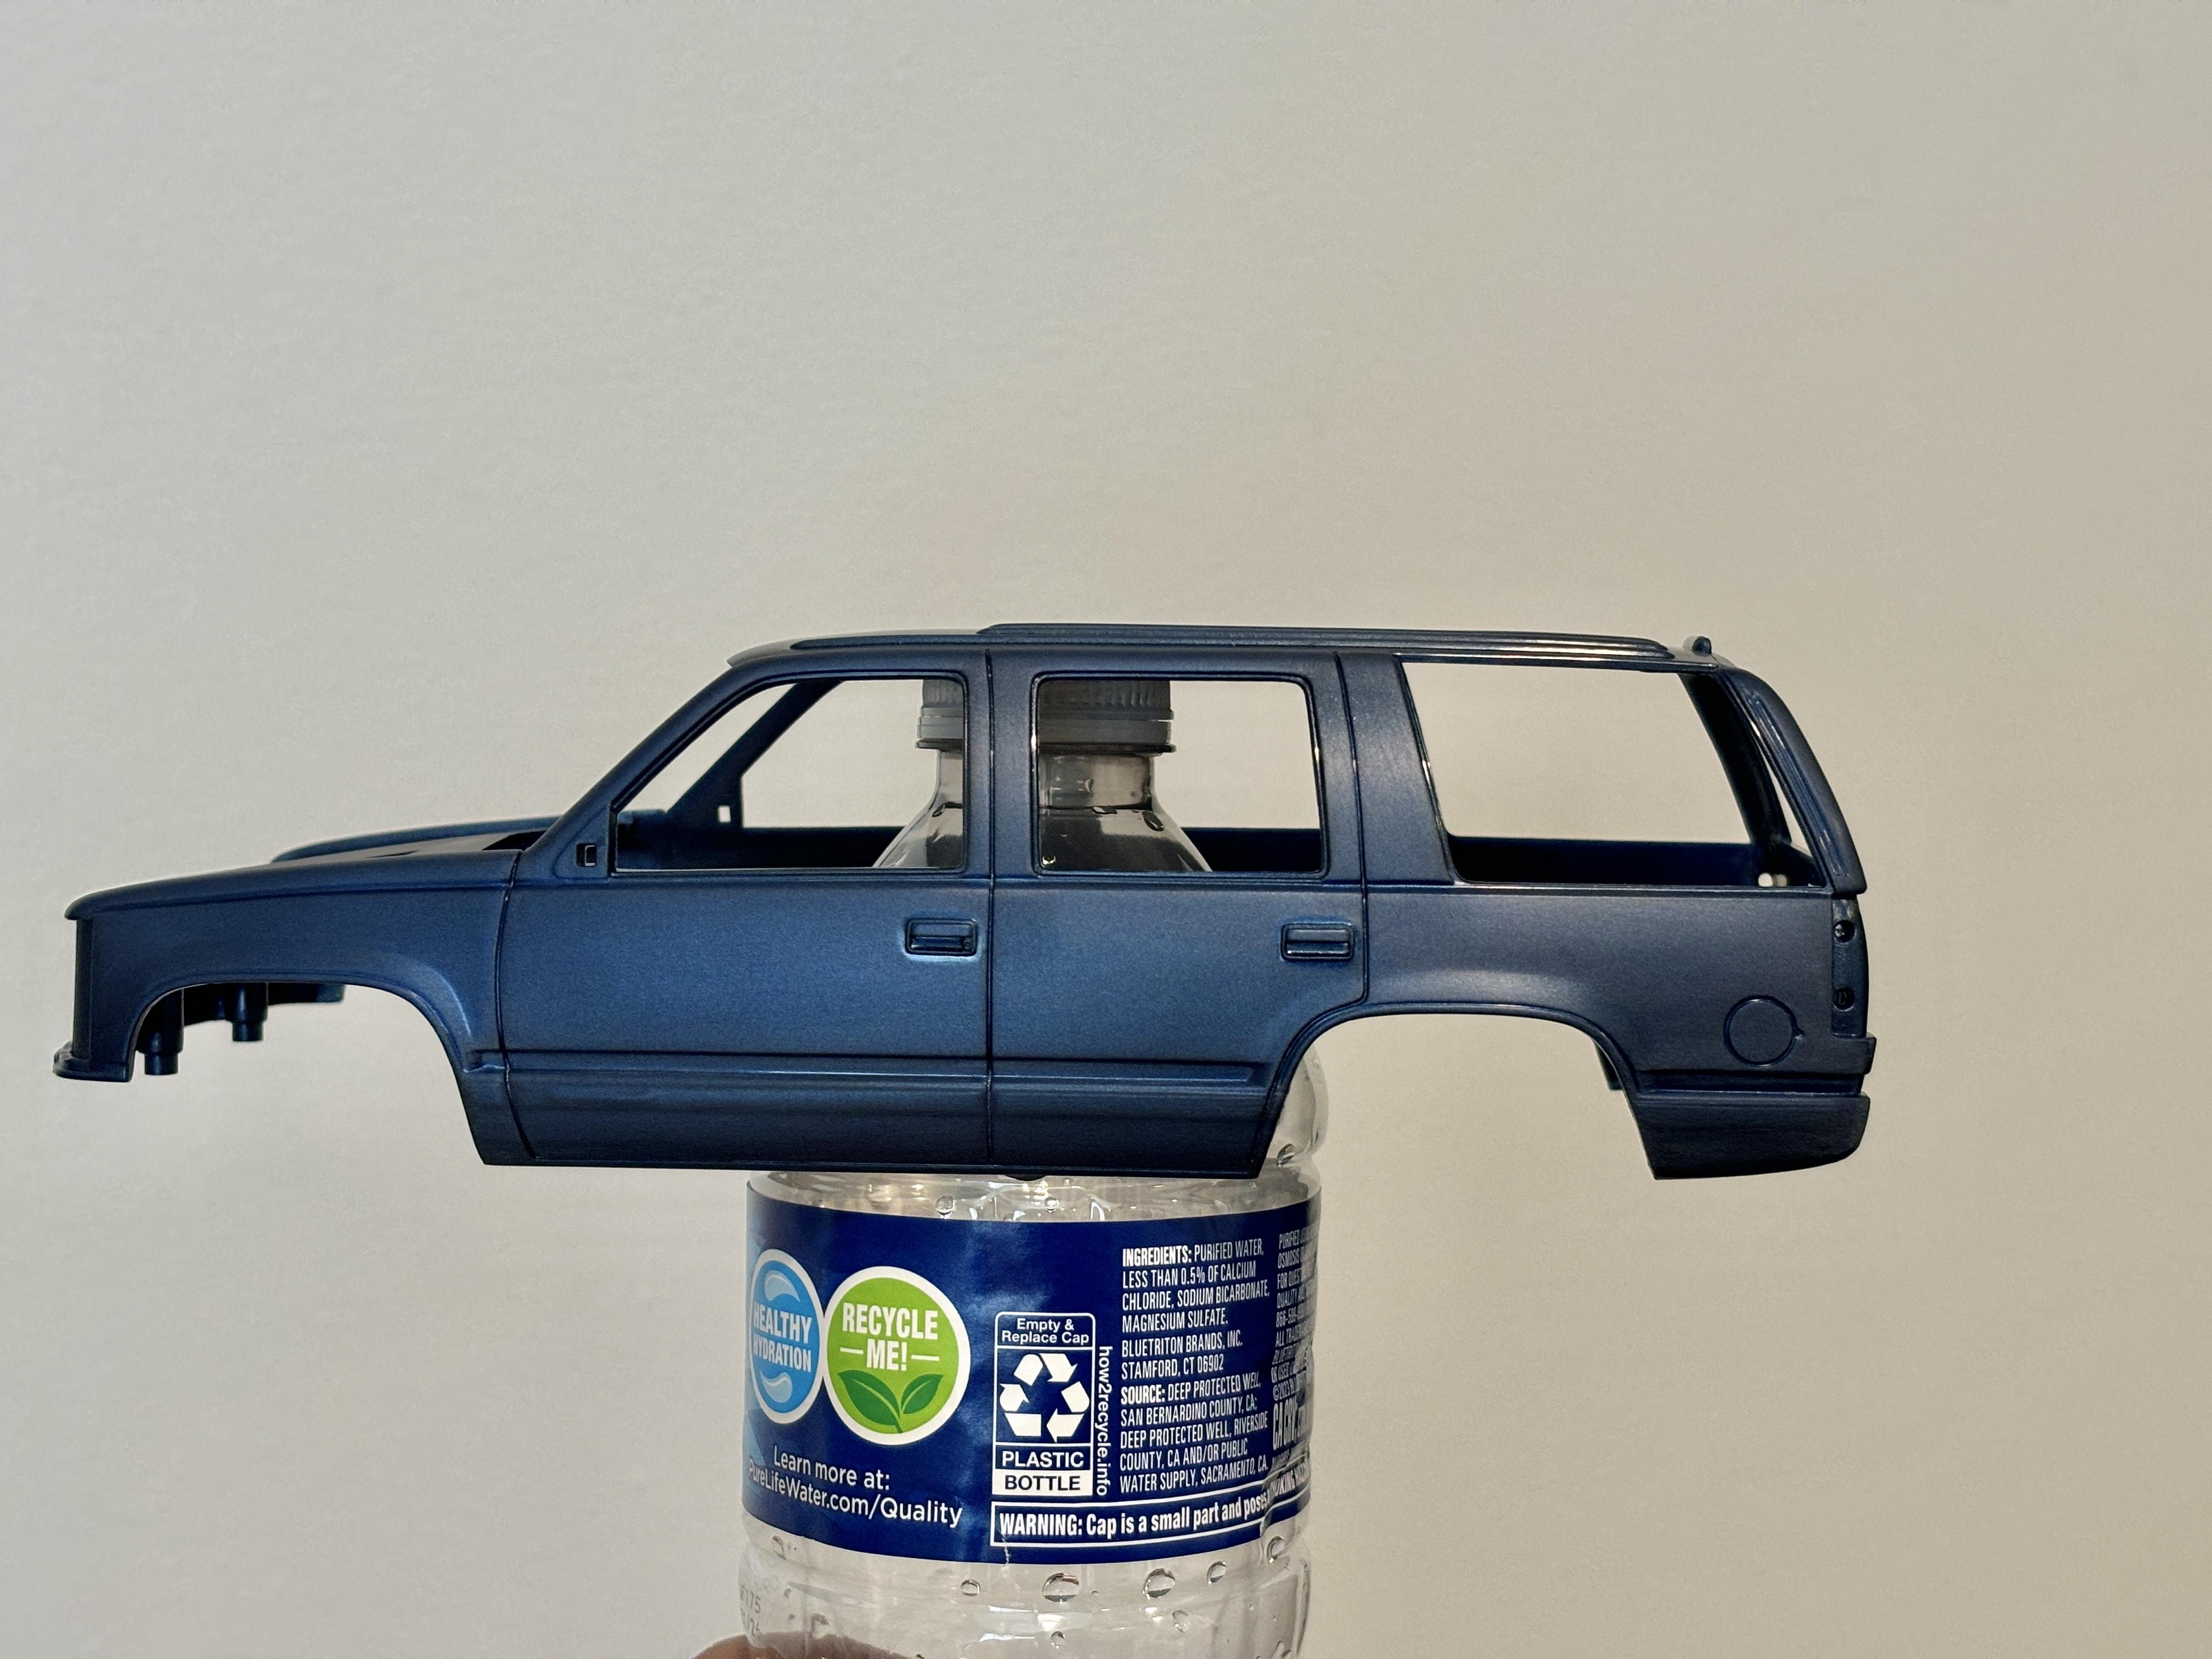
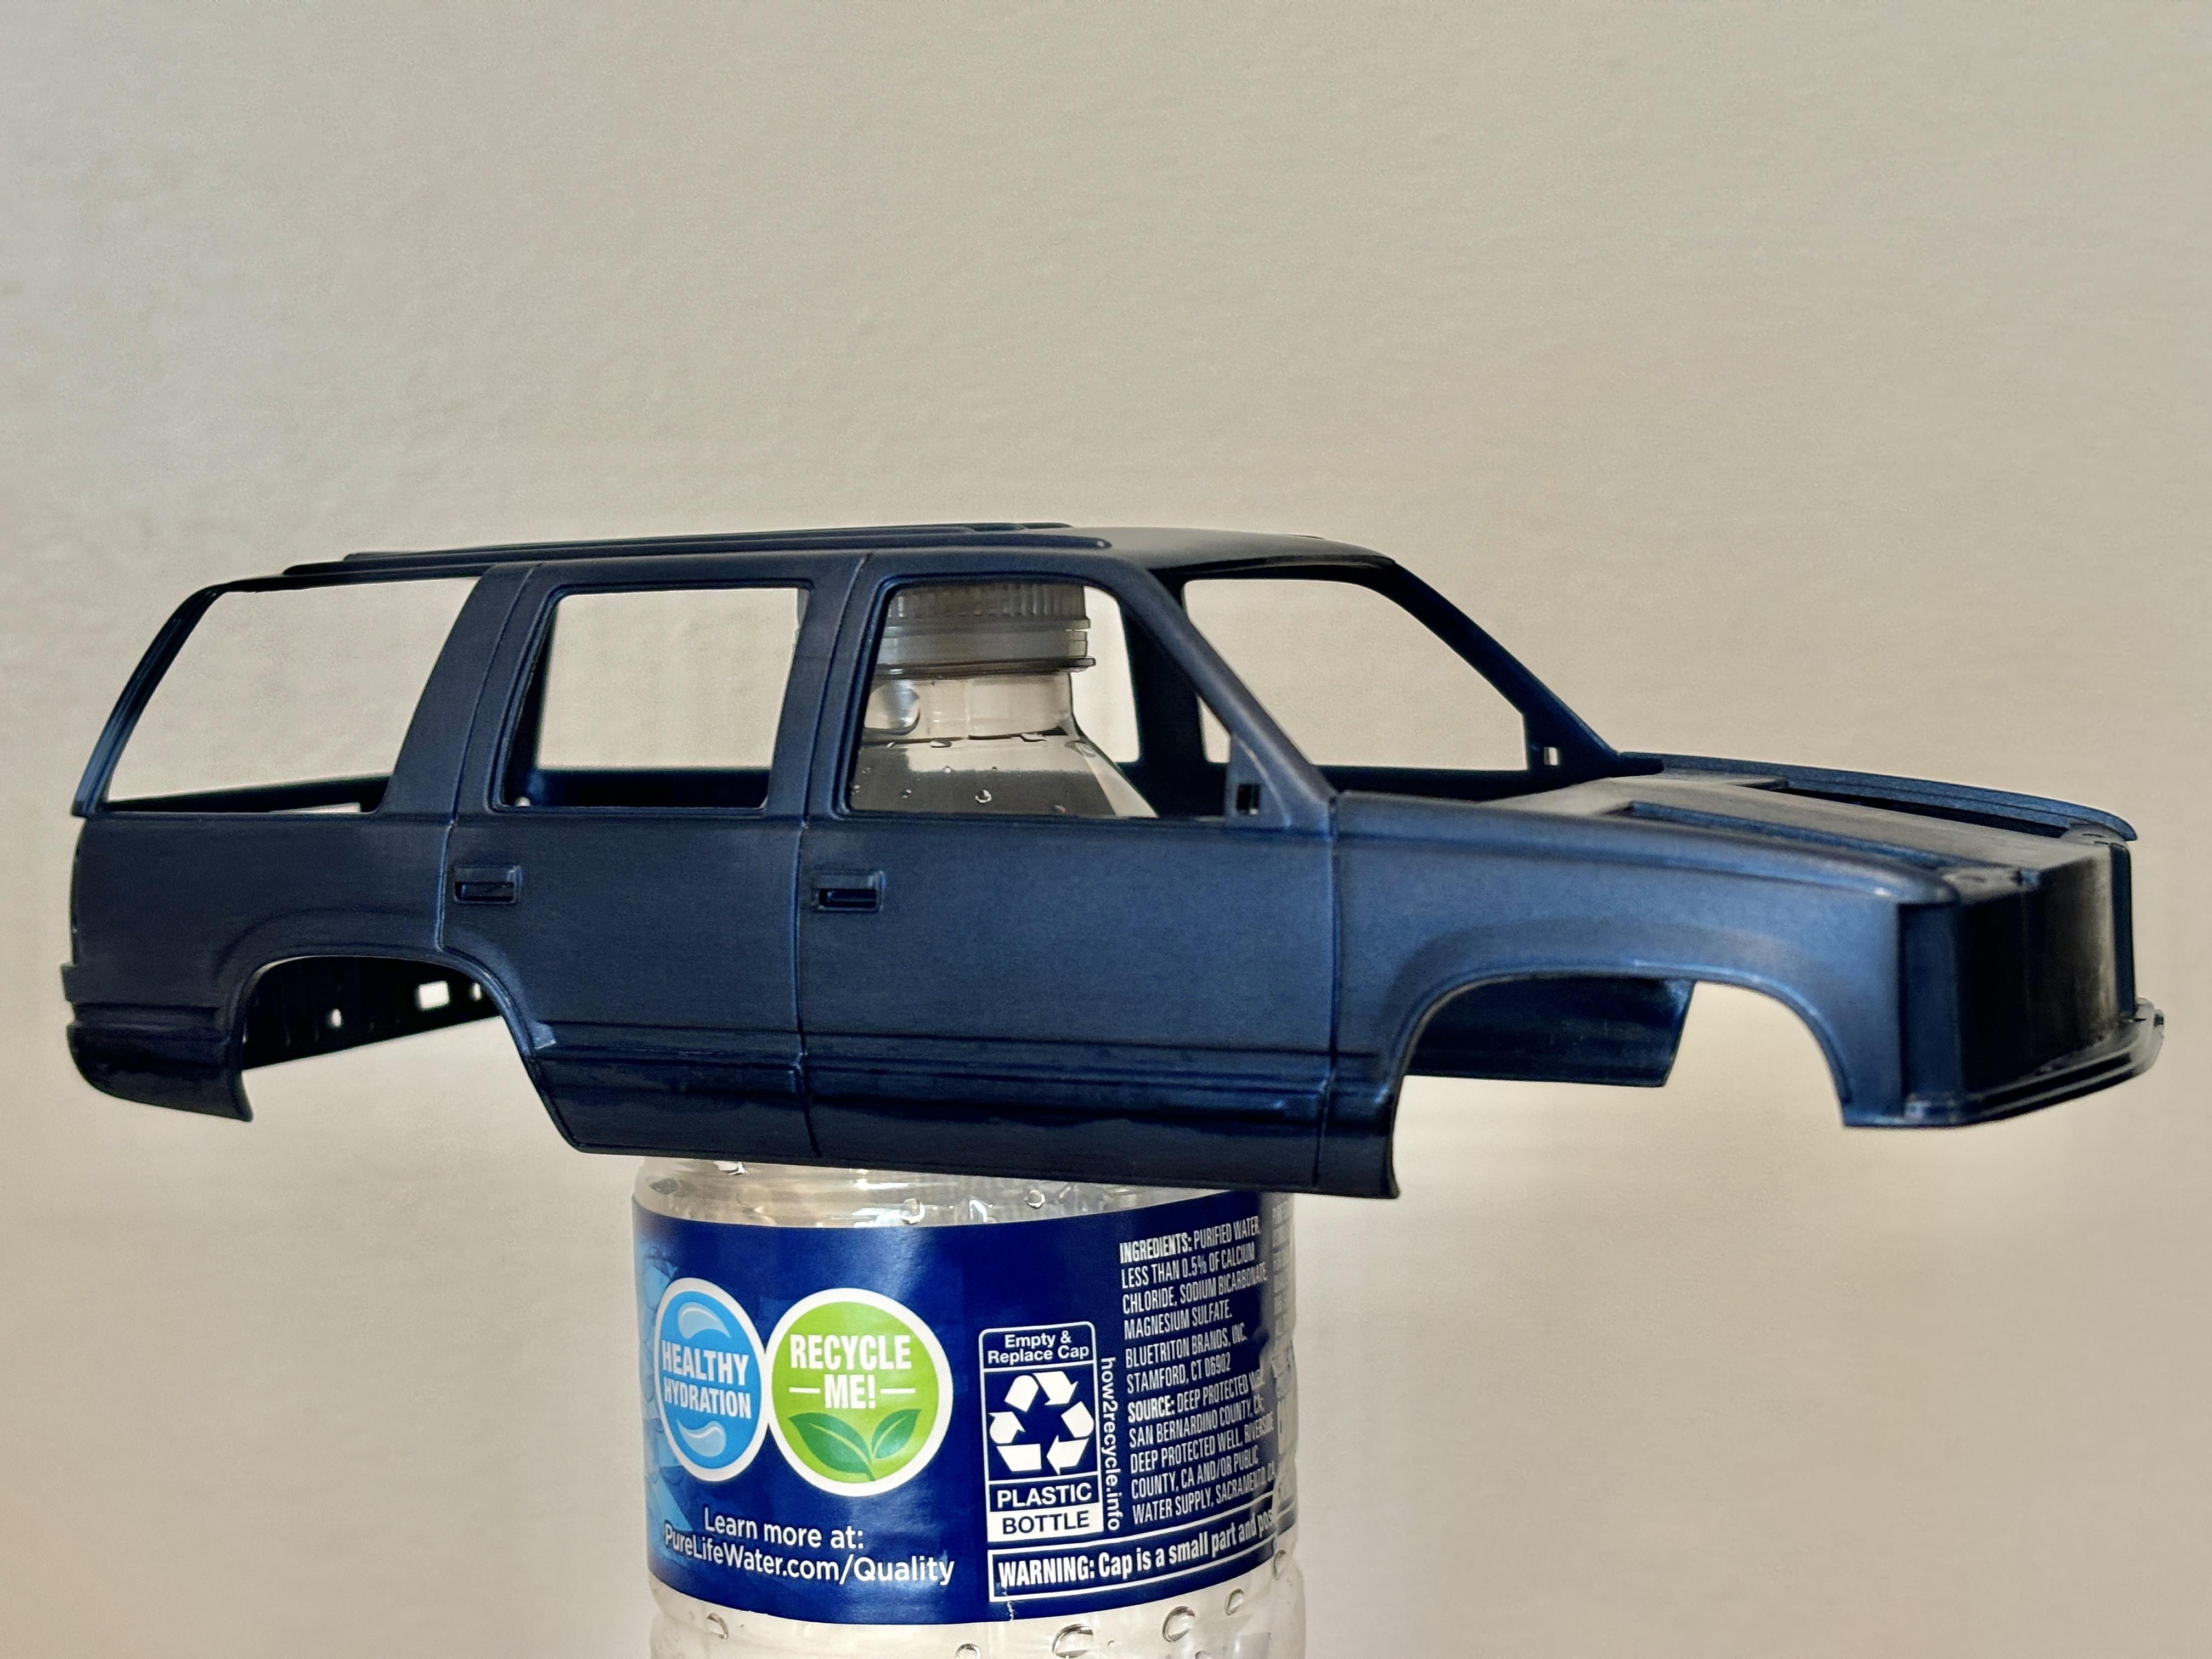
The work on the main body is done. Once I was finished with the body work, I wet sanded the body with 600 grit and washed it in warm water and Dawn dish soap. I let it air dry overnight and then wiped it down this morning with a microfiber towel. I followed this up with Mr. Surfacer 1500 Grey Primer. Everything looks pretty good and I didn't find any imperfections or scratches. I'm starting to get more comfortable with doing this type of body work. Some Tamiya Putty and sanding took care of the damage I did to the lower body near the front wheel well when I was removing the running boards: I did the best I could to address the molding issue up front. Some putty and careful sanding made it look much better, but not perfect. I'll probably leave it as-is. This part will be painted black, so it shouldn't be too noticeable. In case anybody's wondering, I drilled the holes on the A-pillar for spotlights. The spotlights on this generation of Tahoes sat up pretty high. I also sanded, cleaned and primed the hood. This will be a curbside build, so I'll be gluing the hood shut and painting everything together from here on out. I just wanted to prime it separately for now in case any issues came up that needed fixing. Overall, I'm happy with the progress so far. I don't plan on painting the body anytime soon, so I'll keep an eye on it to see if any ghosting shows through from the body work. I'll be doing some chassis work next.
-
Thank you, Alan. Very wise words that I'll be sure to remember.
-
You're far too kind. Apart from enjoying sharing tips with my fellow modelers, I use these WIPs as a future archive for myself so I can remember what I did when I want to build these kits again. Thank you! Yes, I'm definitely in the nerve wracking stage right now, but very excited.
-
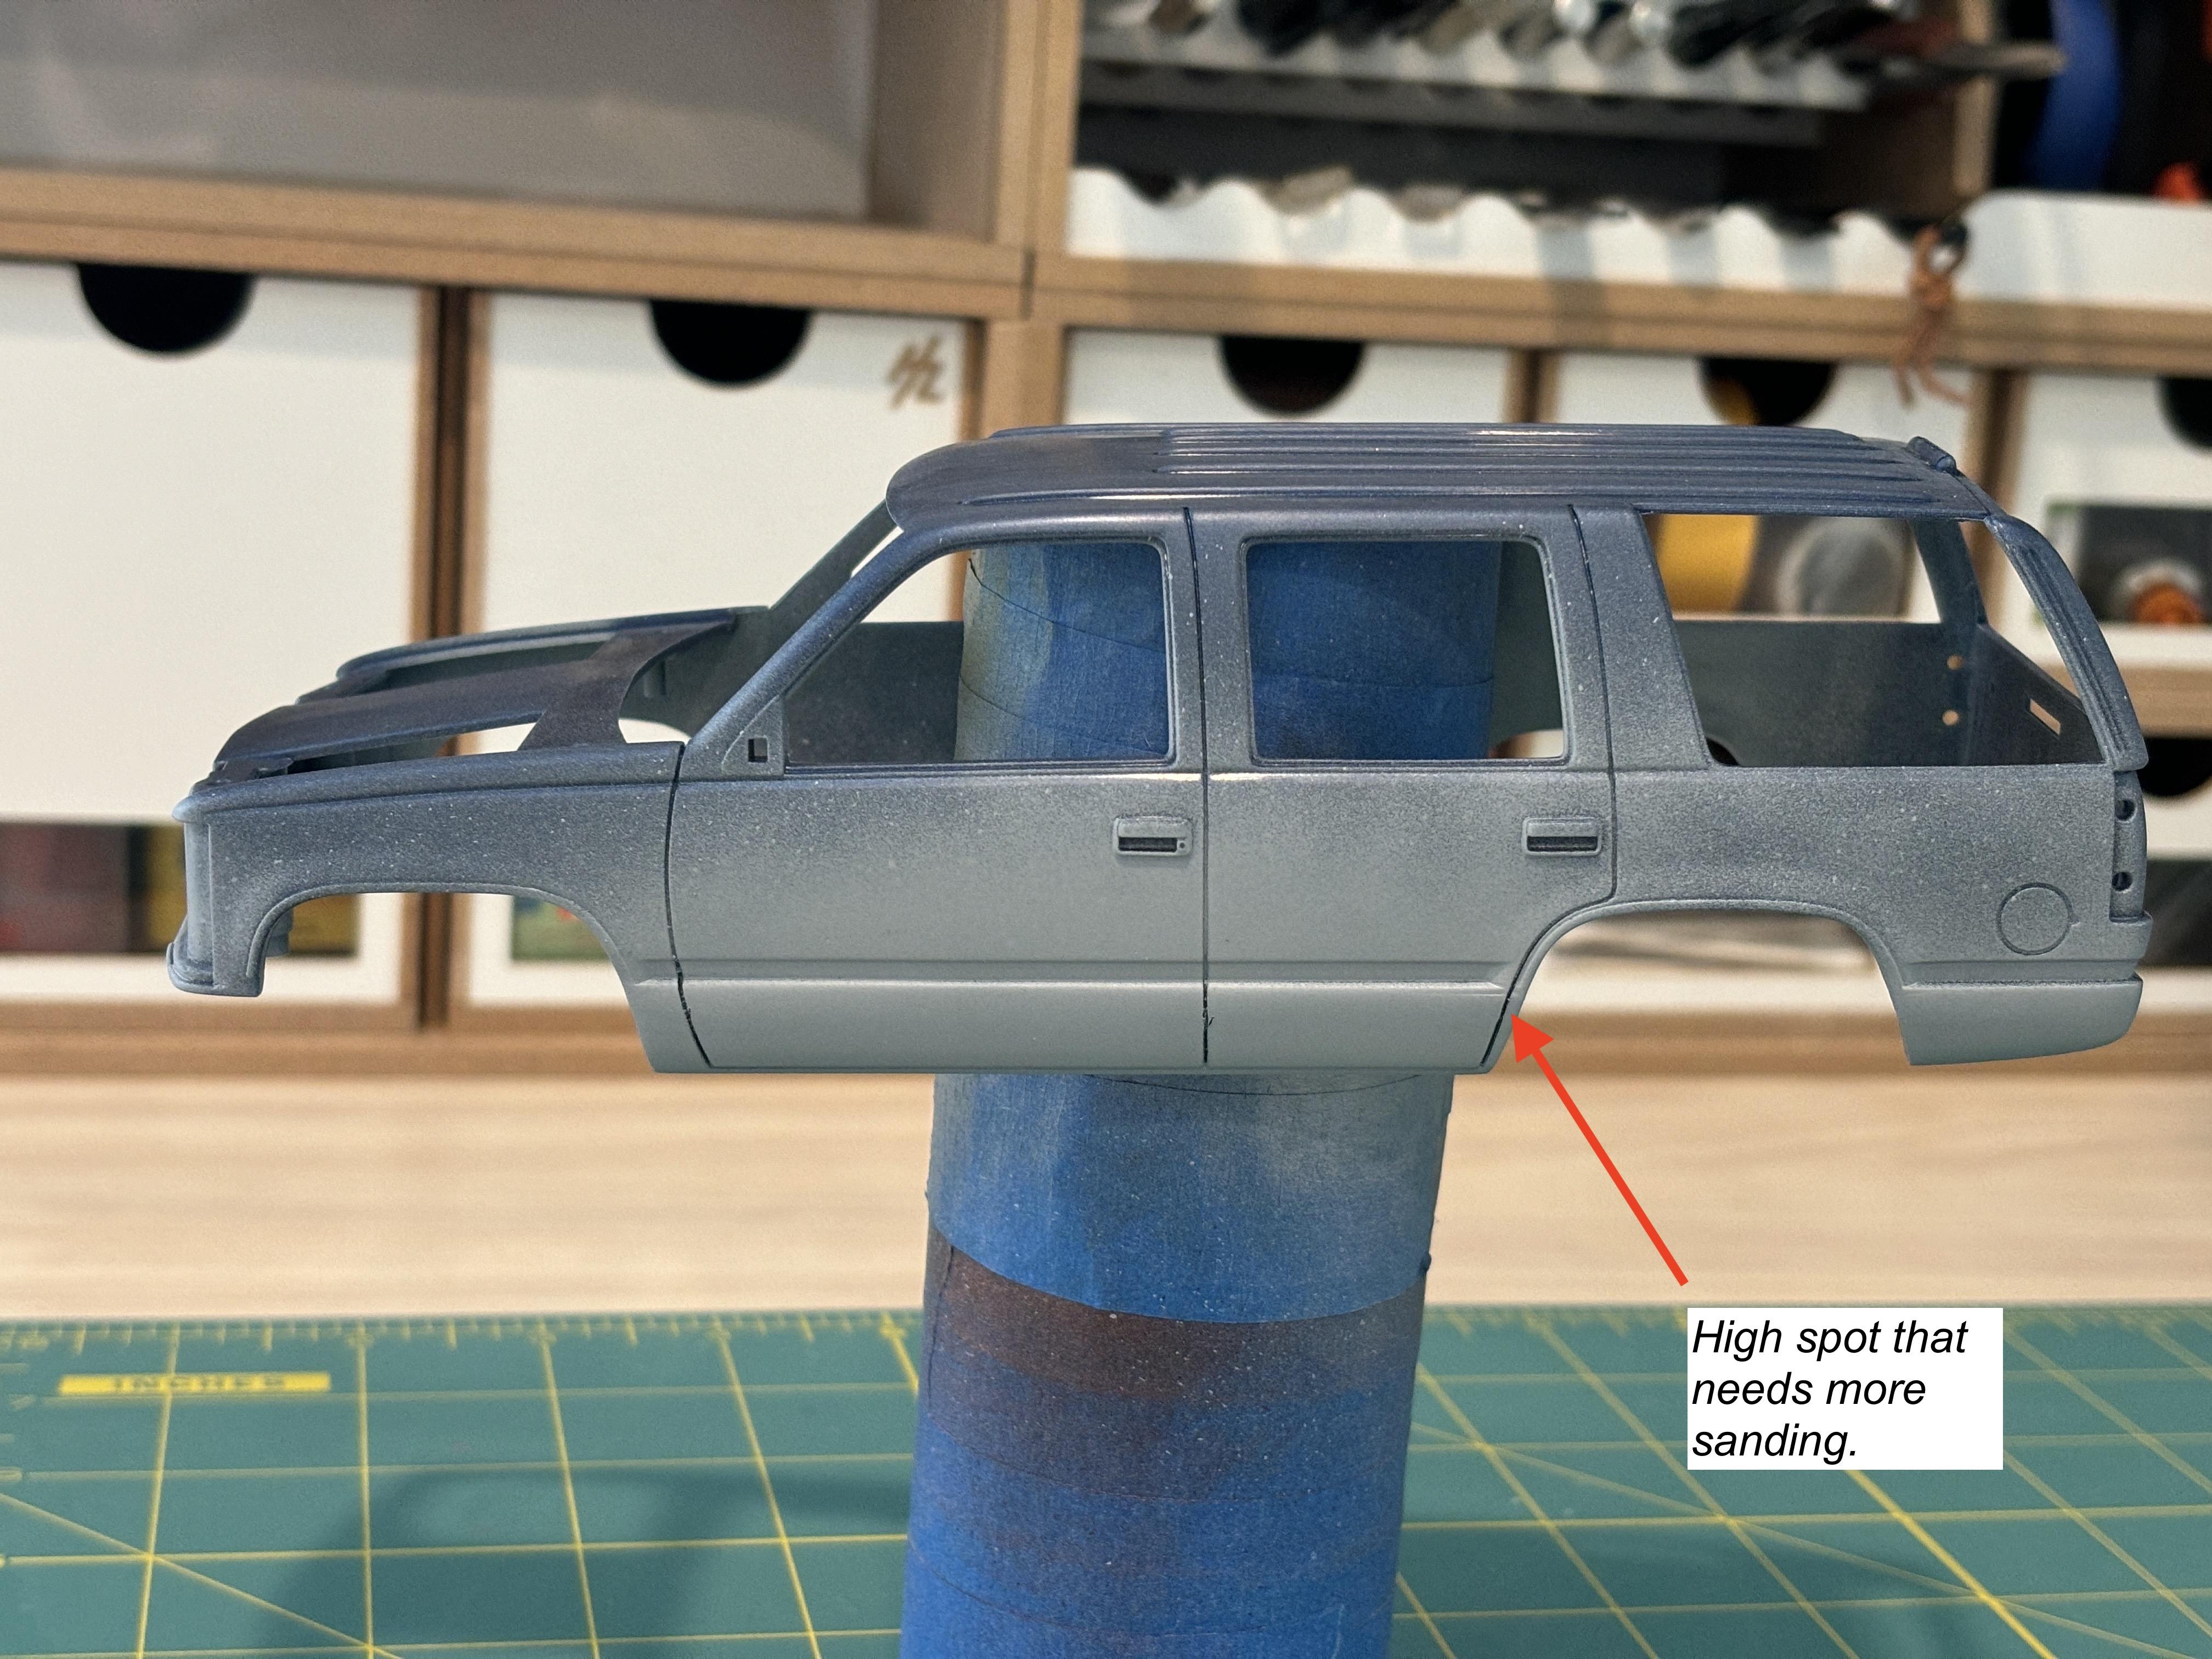
After applying the liquid cement and letting it dry for a day, I re-sanded with 600 grit and sprayed primer to highlight any imperfections. I only found a few, so I'll re-sand again until they disappear. When I was removing the running boards from the passenger side, I cut a bit too much into the body. It's not extremely noticeable, but I'll lay down some putty to fill it in and reshape. I'm also going to have to deal with this flaw on the front driver's side. I'll have to cut down the excess block of plastic and fill along the bottom.
-
Thank you Carl, very kind of you to say that.
-
I'm leaning toward one of the Accuscale/Code 7 sets that I have. The one that came with Santa Monica PD markings. It looks to be the most accurate. Chimneyville's take on LASD was pretty bad, so I sold those a long time ago. There's a decal maker on ebay that makes LASD decals labeled generically as "California Sheriff Decals" or something of that sort. Those aren't too good either. I've sent you a PM.
-
I remember your build and just ran into it again yesterday when I was searching the forum for similar builds. You did a great job on yours. I think yours is one of the few conversions I've seen with the side molding removed. I have markings from 3 different decal makers (2 of them defunct) that I've acquired over the years. I'll make the decision on what sheet to use when the time comes. Are you looking for LASD decals?
-
1994 Ford F250 XLT Lariat
av405 replied to Chuck Most's topic in Model Trucks: Pickups, Vans, SUVs, Light Commercial
Nicely done, you captured the look of the two-tone paint job well. -
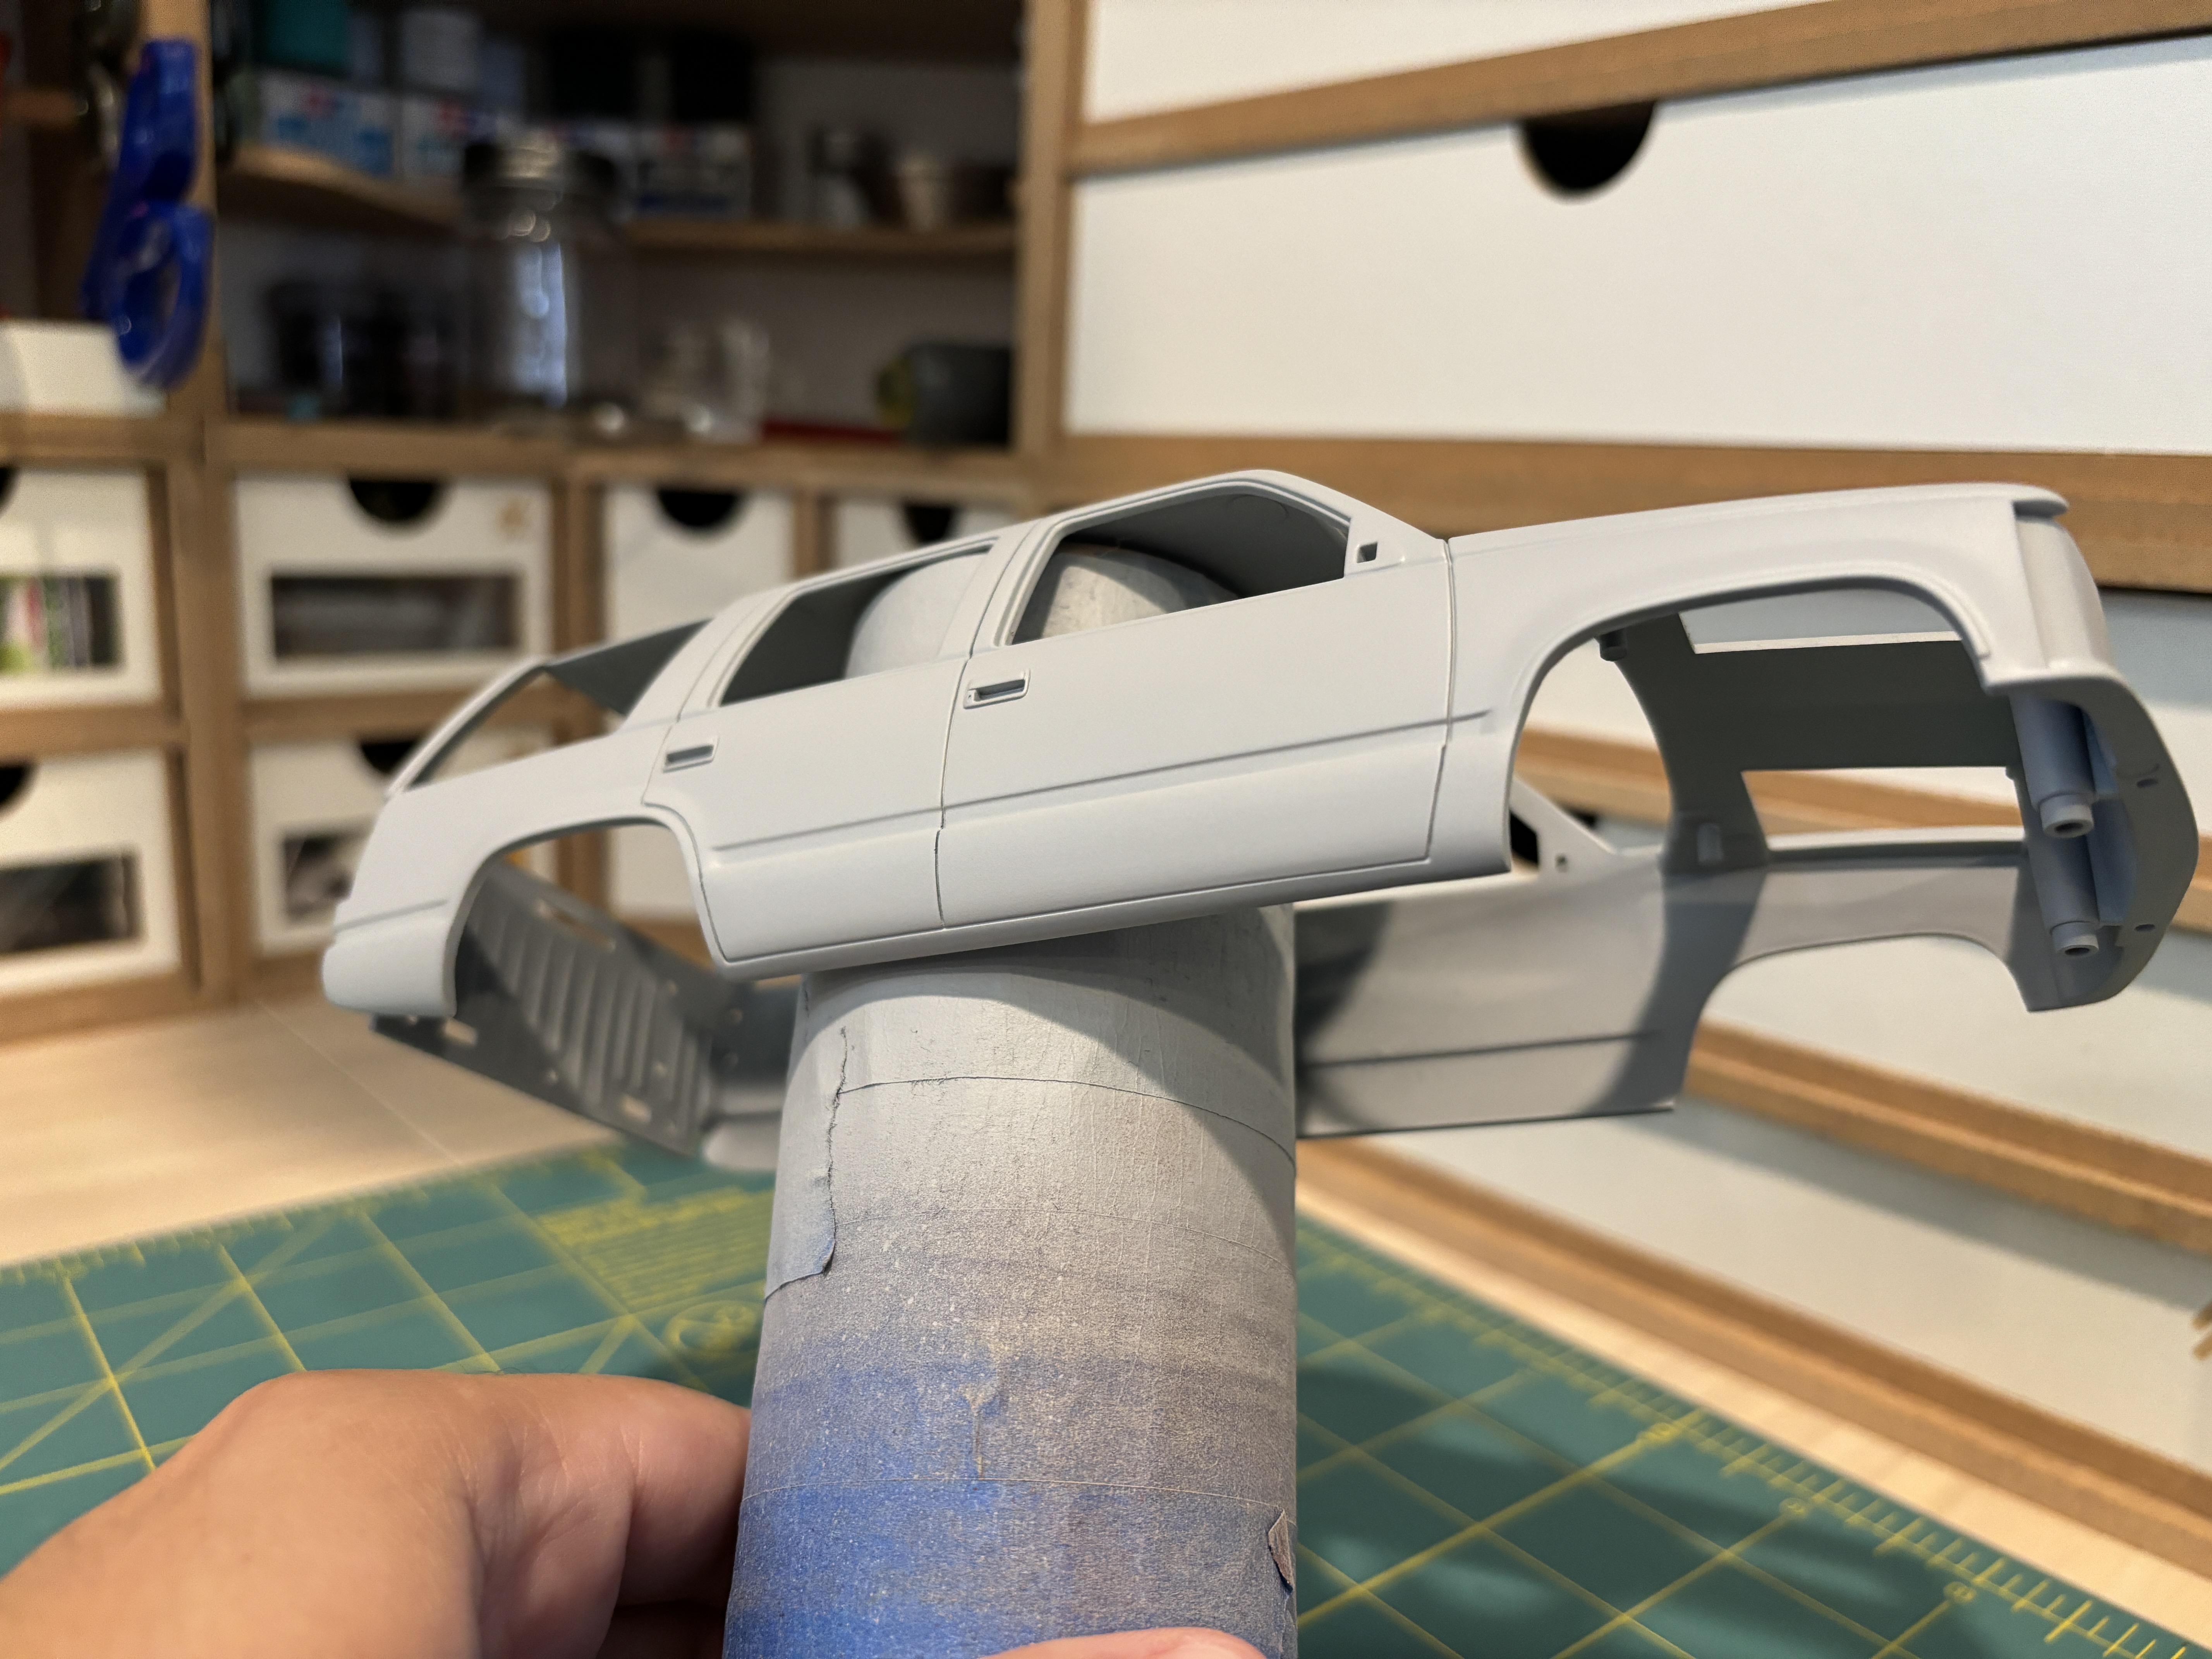
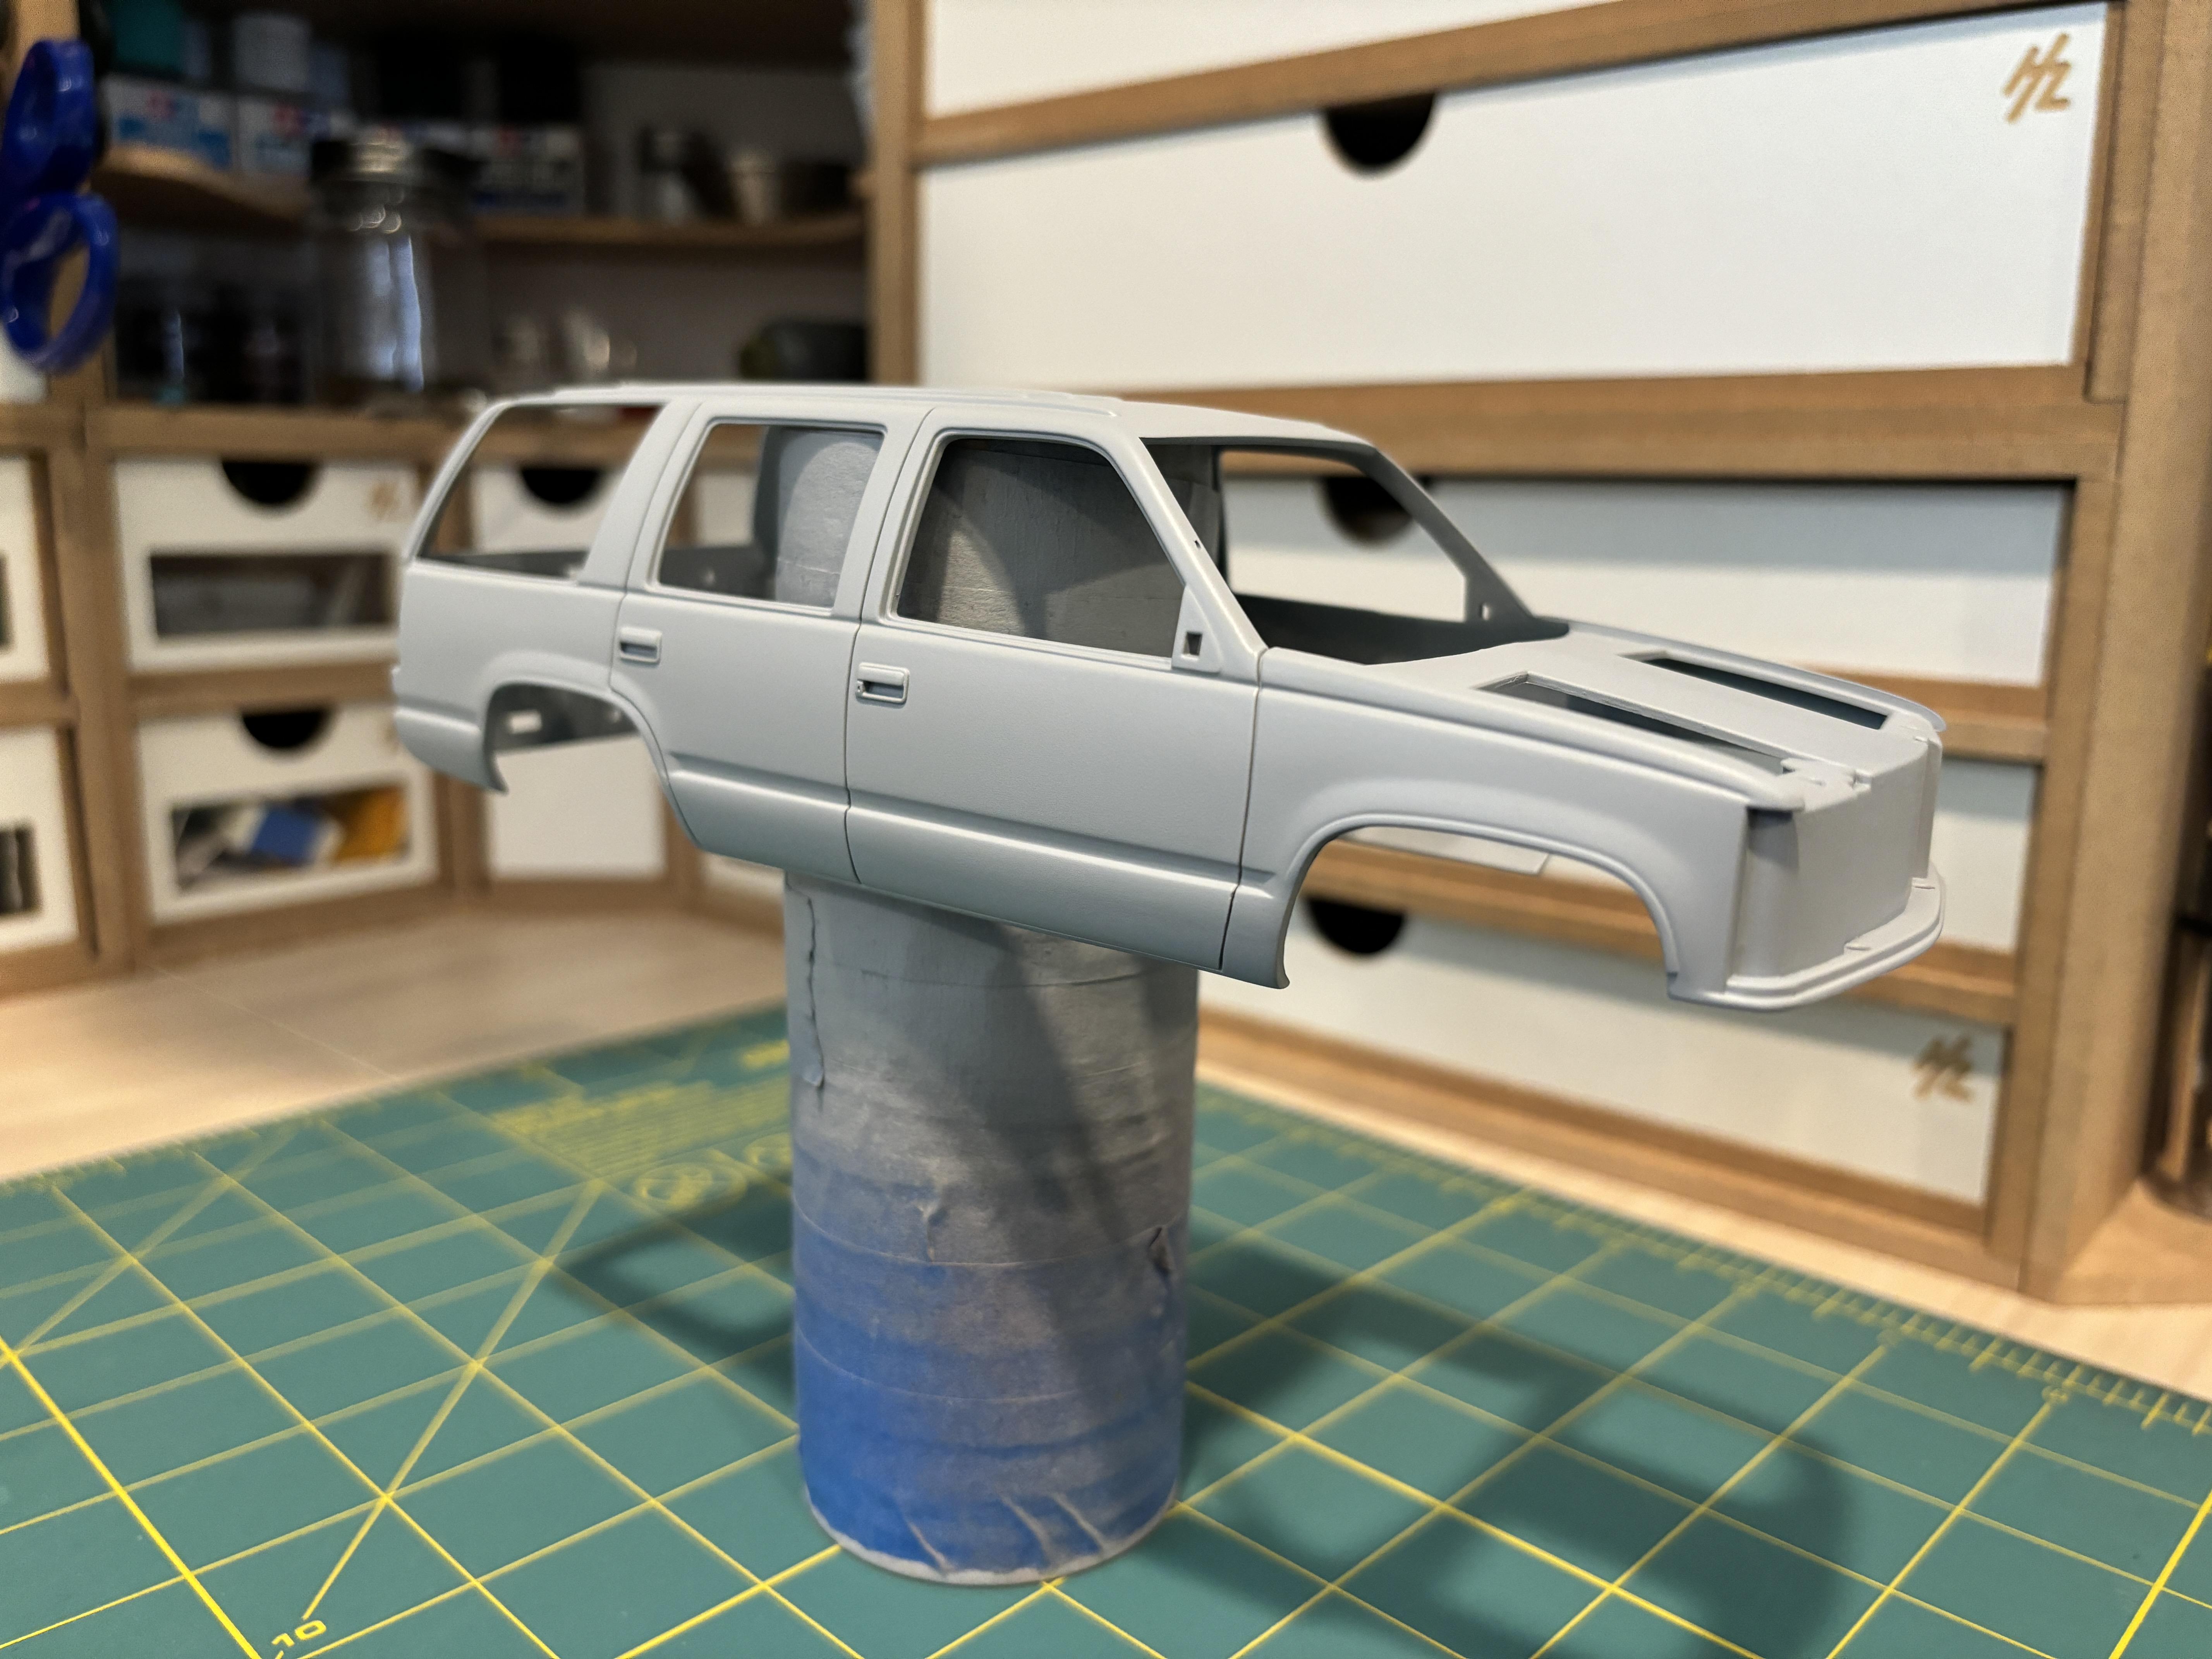
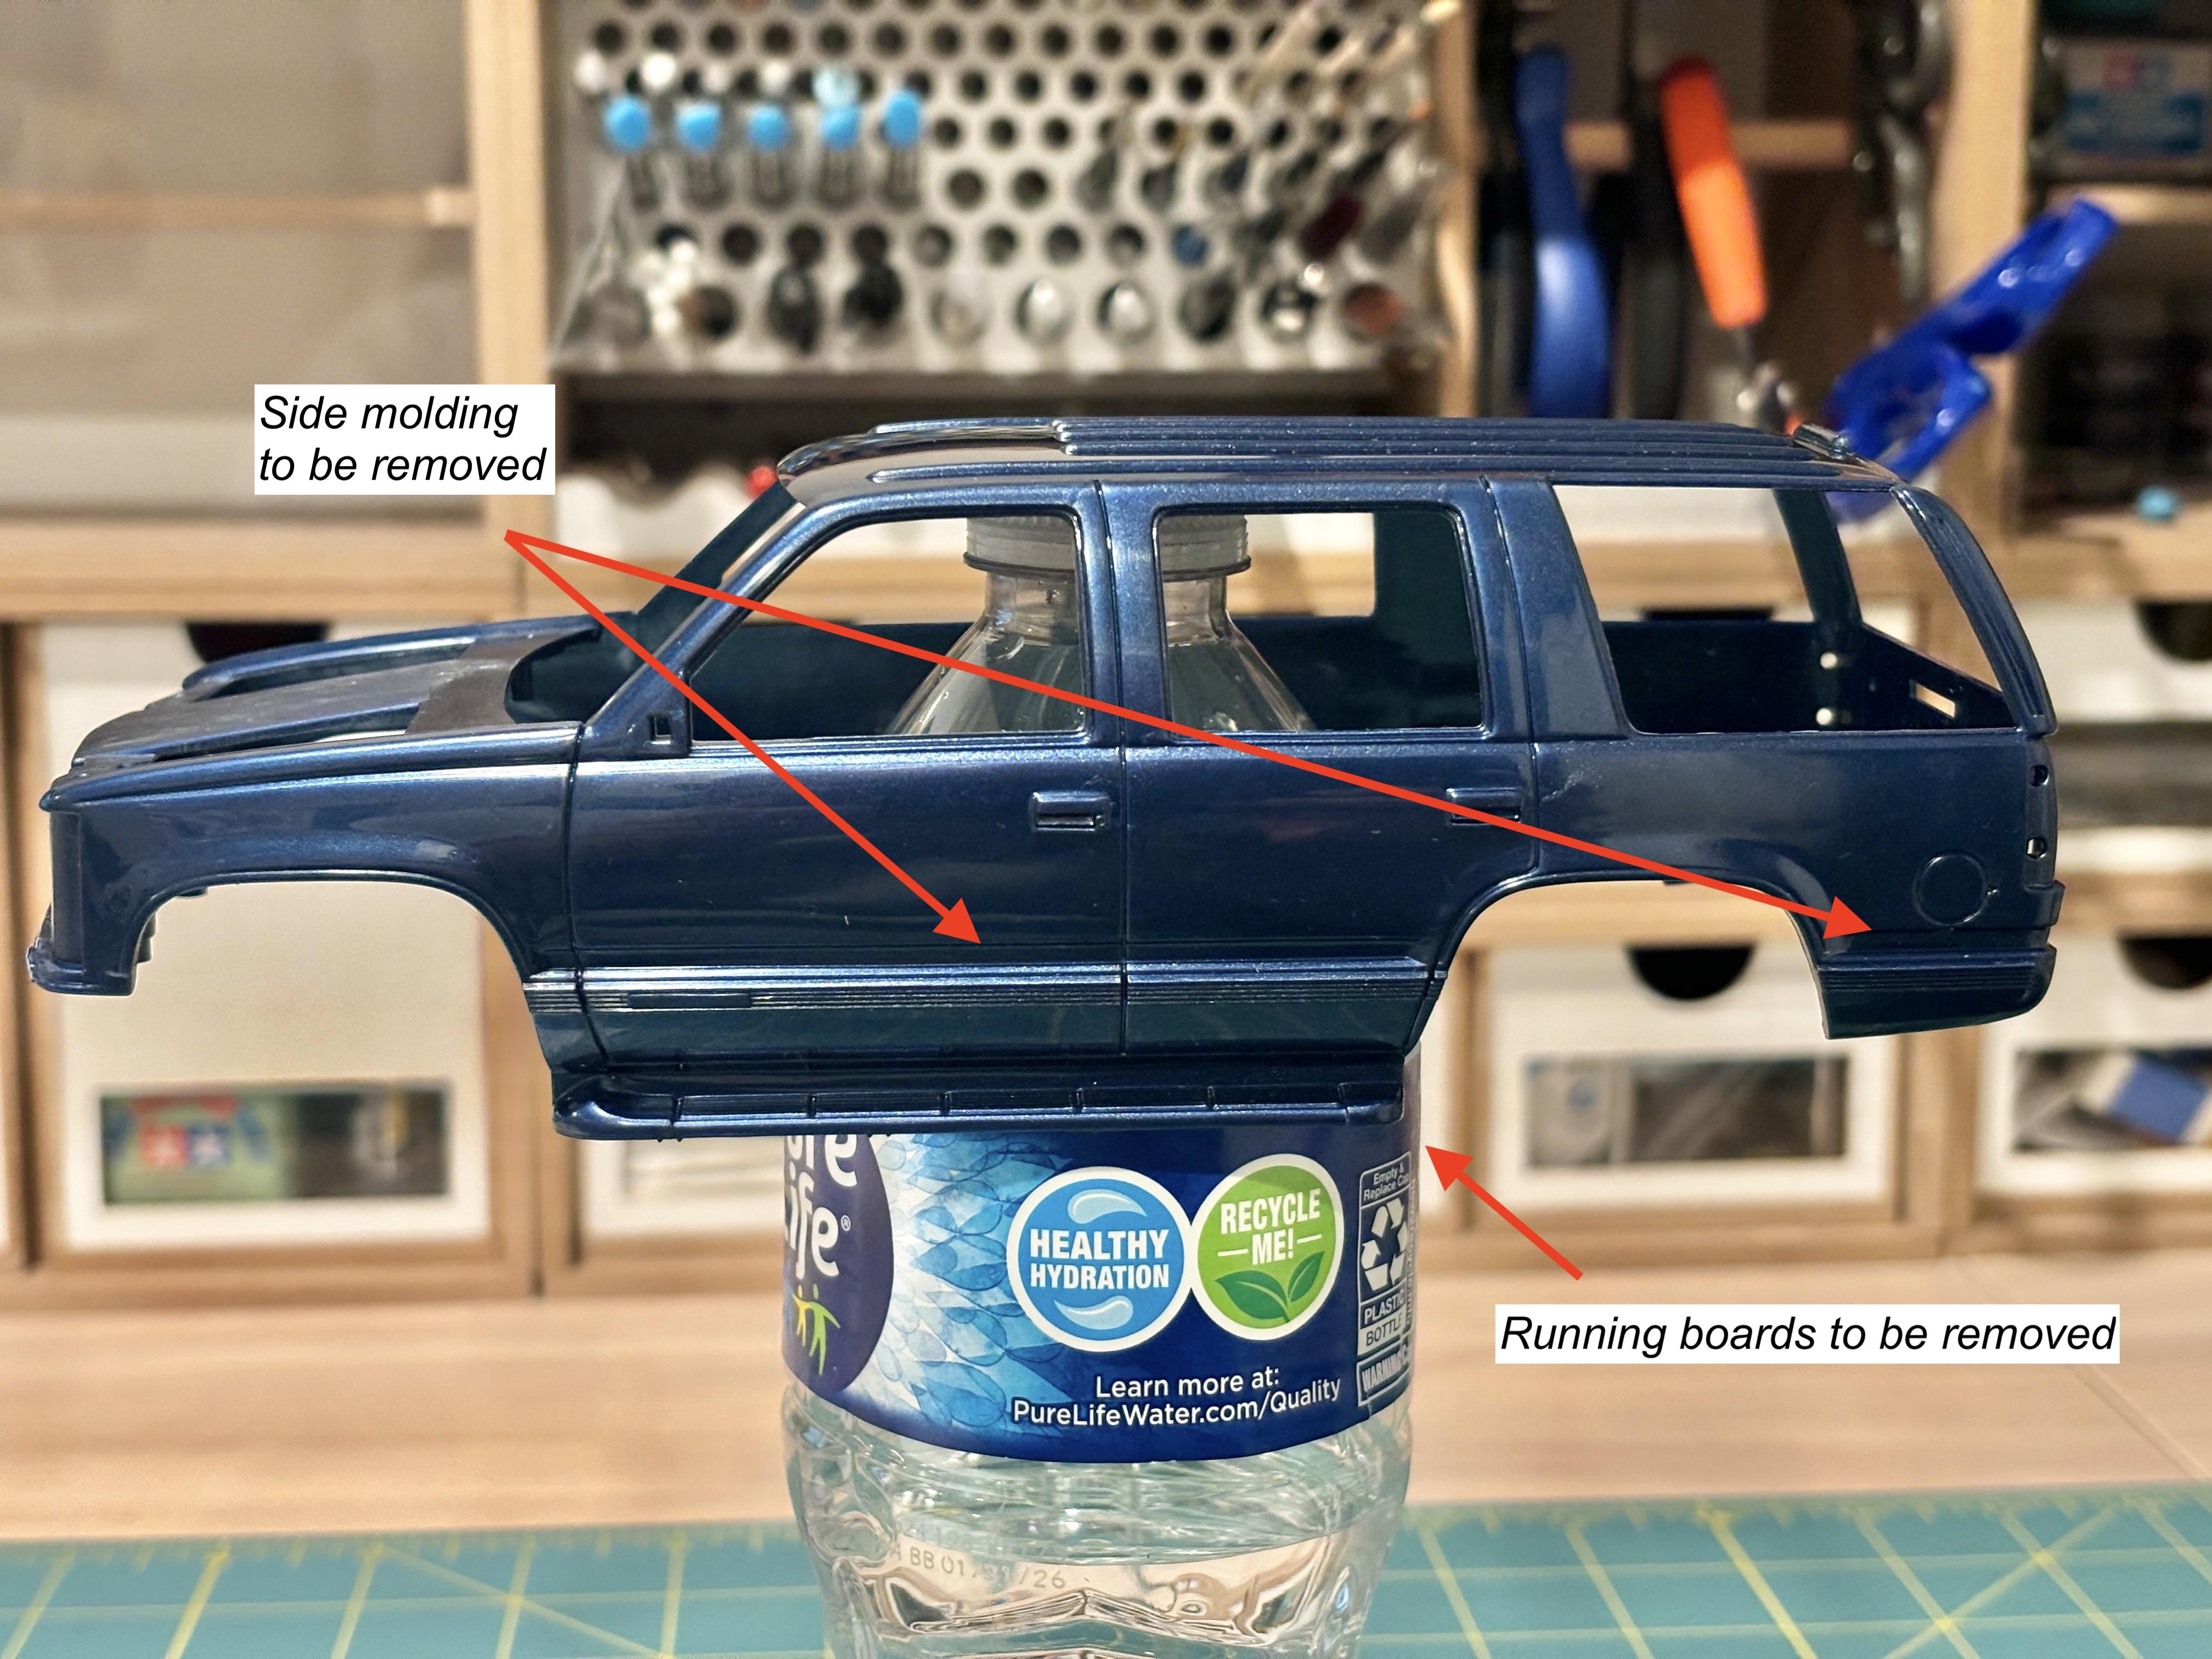
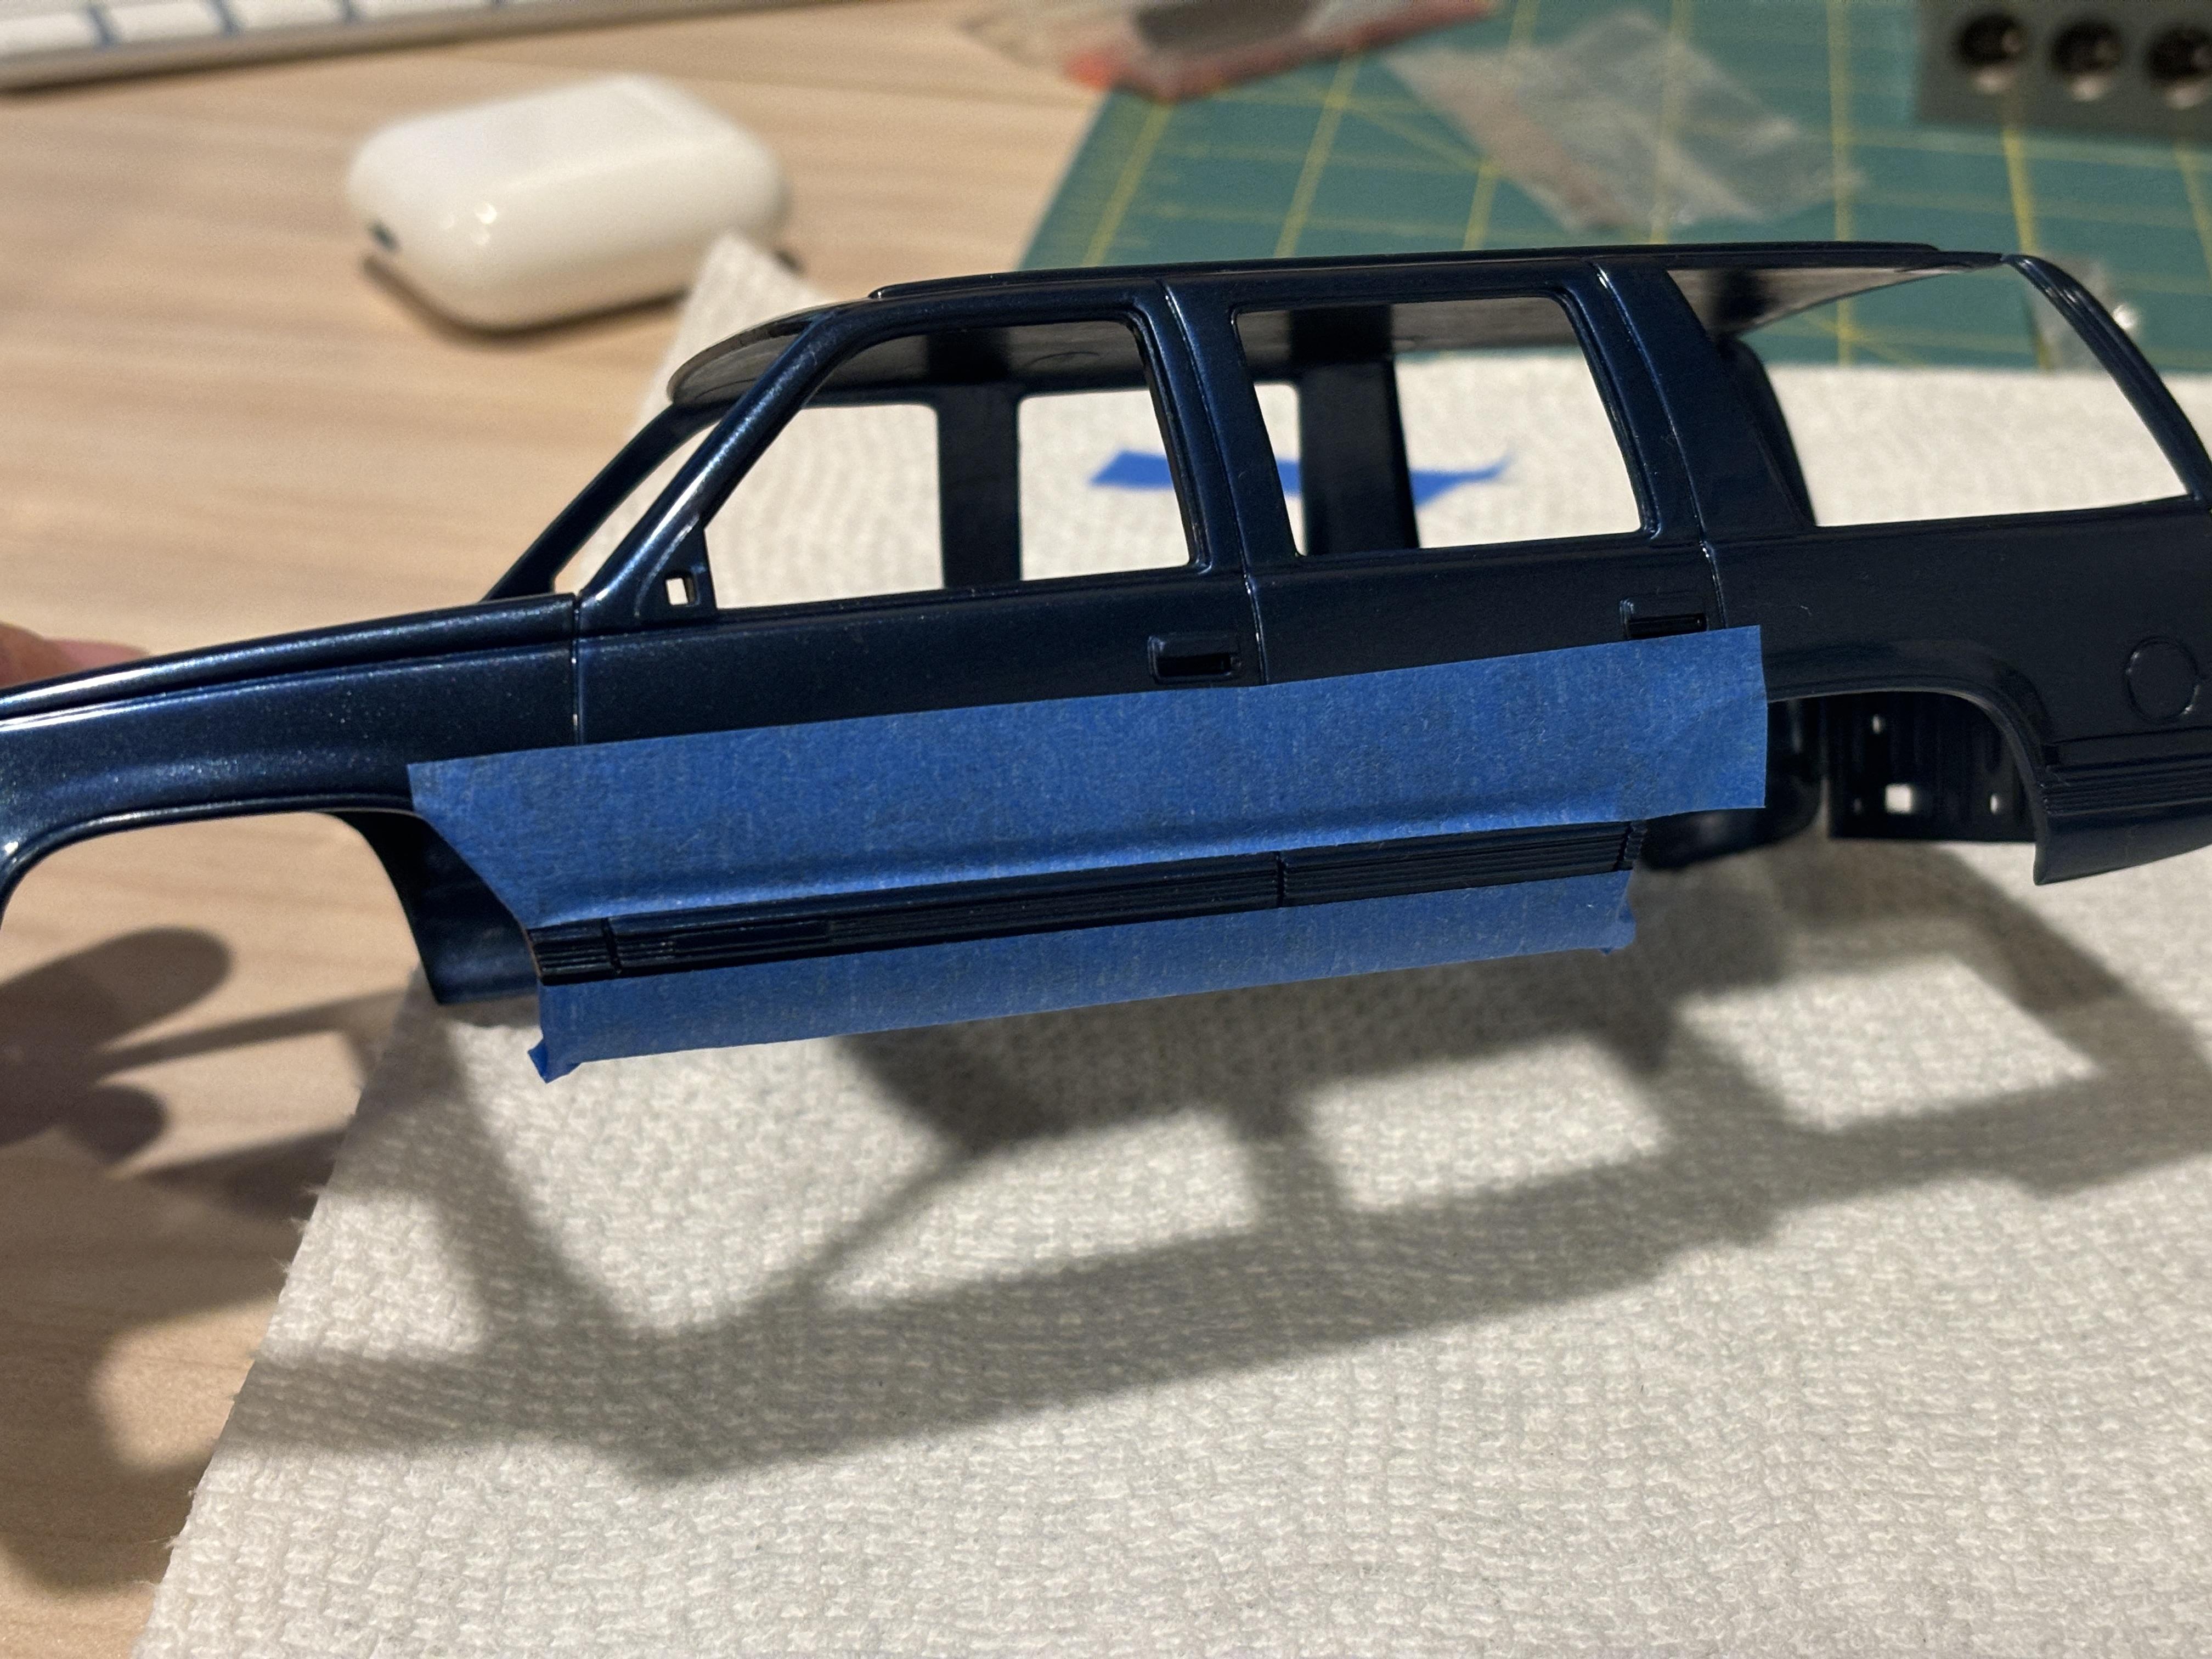
Let's get things started. One of the first steps to take is to remove the running boards and side door molding. The side molding was optional on PPVs and many agencies opted to keep it, but I will not as the agency I'm replicating did not have it on their Tahoes. I spent last night and this morning removing the boards and side trim. For those of you that followed my 1992 F-150 XL WIP thread, I spoke of how I did this, but I'll mention it again. I used a saw attachment for my xacto knife to remove the boards and xacto blades, files, and 400 grit sanding boards to remove the side molding. Placing painter's tape around helped prevent damage from a blade running askew. Here is the body after this work was done and a 600 grit sand was applied to the entire body to smooth things out. It's very easy to see the side molding outlines/ghosting left even after removing the actual molding. I brushed Plastruct liquid cement onto the areas that formerly had the side molding trim. The liquid glue will get rid of the ghosting left behind by removing the side trim. This is a method I learned from Bill Guery and I've applied it successfully mutliple times. I'll let the glue dry before sanding the body again and working on various other imperfections.
-
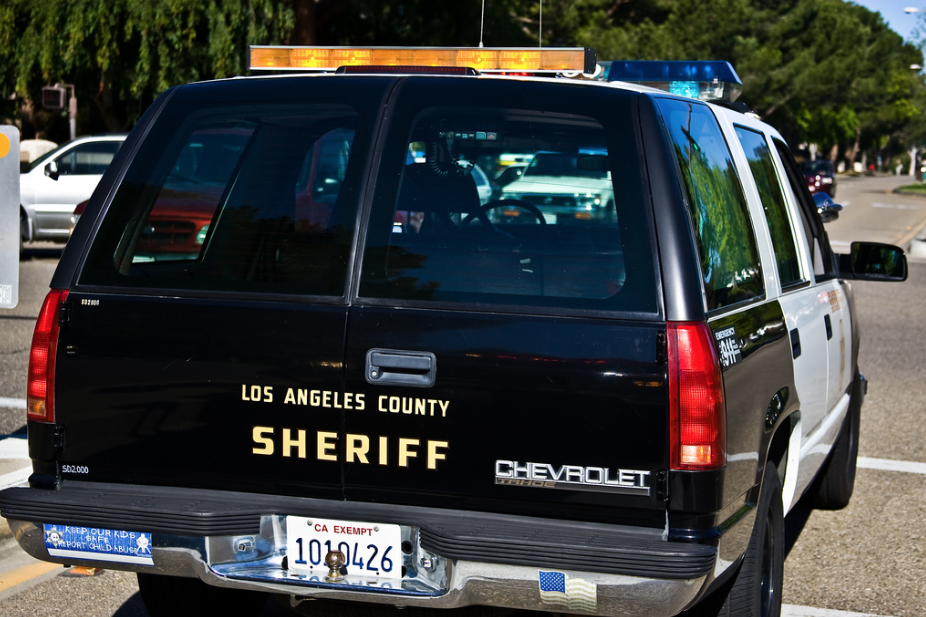
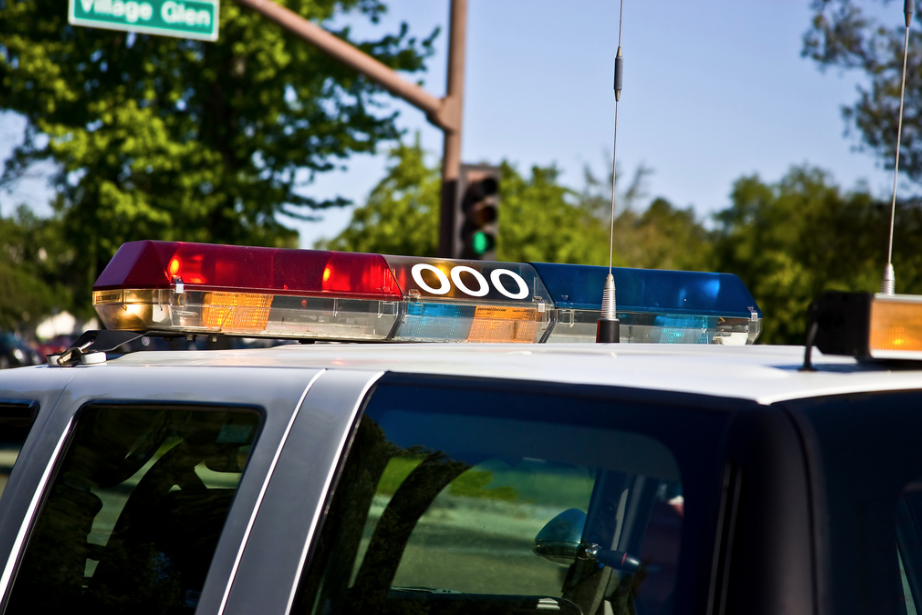
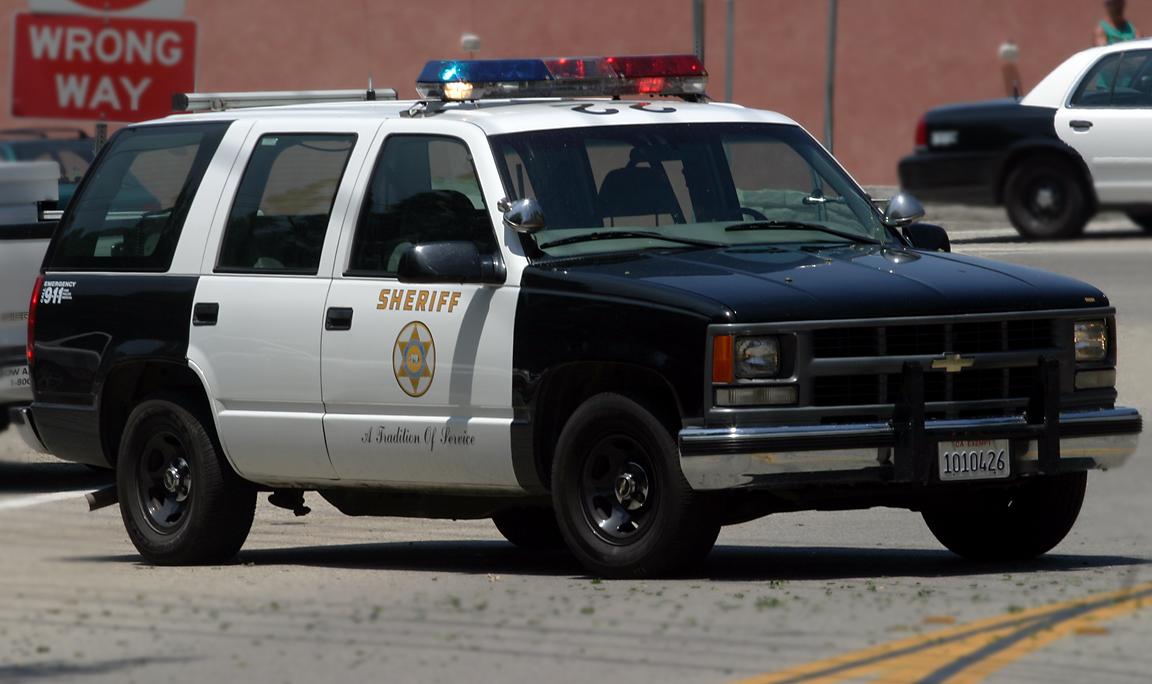
In the late 1990's, Chevrolet introduced the Chevrolet Tahoe Police Pursuit Vehicle (PPV). It was offered for the 1997-1999 model years and was one of the replacements for the popular Caprice 9C1. To my knowledge, it was the first pursuit-rated police package SUV designed specifically for everyday patrol use. You can say that this model was the OG police package SUV and in retrospect, was a sign of things to come in the 2000s. I remember it being used by many agencies, but mostly in specialized roles and not as fleet-wide replacements. Perhaps it was a bit ahead of its time as the Crown Victoria, and police package sedans in general, still reigned supreme. Chevy didn't re-introduce the Tahoe PPV until the 2005 model year, which slowly brought us to the era of police vehicles we're in now. With the history lesson out of the way, my next build is going to be a 1999 Tahoe in the markings of the biggest Sheriff's department in the world. I won't mention names due to long-standing copyright issues. This agency was an early user of the Tahoe and it was mainly issued to patrol sergeants. This thread will serve as a WIP for the build and as a tutorial for how to convert the AMT 1996 Chevy Tahoe LT kit into a Tahoe PPV. This is what I'm starting with: This is the goal: This is going to be a long-term build as my wife is expecting any day now, so don't expect this one to be done soon.
-
1992 Ford F-150 XL Work Truck
av405 replied to av405's topic in Model Trucks: Pickups, Vans, SUVs, Light Commercial
Thank you! Good point. My father has always had take home trucks and he really takes care of them and keeps them as clean as he can. He takes pride in appearances, or at least as much as someone in that field can. Even when his trucks are somewhat older, they look good. Thanks. I enjoyed the work truck you painted with Camel Yellow. It helped validate my decision to go with that color. I plan on building a fleet of "Southland Electric" trucks in the future, so the Camel Yellow will continue to come in handy. Do it! You build them in a way that I simply can't bring myself to do, but I enjoy your build style. -
1992 Ford F-150 XL Work Truck
av405 replied to av405's topic in WIP: Model Trucks: Pickups, Vans, SUVs, Light Commercial
Thank you, Dave.