fractalign
-
Posts
851 -
Joined
-
Last visited
Content Type
Profiles
Forums
Events
Gallery
Everything posted by fractalign
-
 Hey Guys. I purchased a Revell 1/16 Scale 3 Window Coupe a while back for a street style nostalgia gasser type build. I was impressed with the detail but even so I felt I could add more. I then proceeded to un chop the roof, open up the doors and add an open roof. On top of that I plan to open up the cowl vent and add inner door skins.The kit lends itself well to these modifications and I have been toying with the idea of doing a full one in resin, sourcing a different engine to the SBC possibly the sidevalve from the Minicraft 1/16 Model A kits or maybe a Hemi if I can find one. Which ever option I choose, the engine itself will be distinctly modified as well with Hillborn injection. The kits would still retain the same wheels but the tyres would be bias ply with white wall slicks at the back. The front end would be a straight tubular gasser style axle. The rear end would have a quick change rear with the traditional transverse leaf spring setup and the interior would have a traditional tuck and roll upholstery with a diamond tuft roof insert. I am planning on creating these parts for the build anyway, so I am wondering if anybody else would be interested in one as a kit. There are not many larger scale rods being done in resin so I am keen to get some feedback. Cheers !
 -
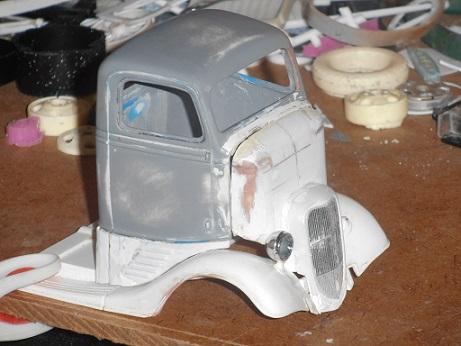
Hey Guys. It has been a while since I posted anything up. The big hold up was getting the hood and grill to line up. I was trying to work out how to fill the gap. I looked at some original images of Dearborn C.O.Es and realised the grill shell was set further back into the fenders. I then proceeded to cut out 3mm of the bottom edge of the grill shell to set it back. Even with that there was still a gap at the top, so I added a 3mm flange around the top half of the grill shell. It is now sitting flush with the hood. The other thing I did was cut out a hole at the front of the hood for the grill shell to sit inside. There is a 1mm flange at the back of the grill that locks into the hood. The next task will be to add the swage line and cowl vent and the hood will be finished.

-
Thanks for the encouragement, its all trial and error, more of the latter for me. but hopefully the worst is behind me !
-
I really like where this is going !
-
Hey Guys. It has been a slow week, but I finally re corrected the contour of the lower cab section by adding a 4mm wide strip between the side and rear section. As well as that I also re-curved the drivers side rear corner so that it now more closely follows the cab corner in shape. The other thing did was add a strip to the bottom of the hood so that its contour closely matches that of the fenders. I still need to do the same on the other side but at least I know how much material is needed to replicate the other side with. I am also very happy with the position of the hood as well. There is enough clearance between it and the headlight buckets. Next task will be to replicate this side on the other side and then fill in any tine gaps in both.
-
Hey Guys. Sorry for the lack of images But I have not had much time to work on it lately. The second most frustrating thing after the wheels has been creating the lower cab section and the hood, more importantly how to get them to sit flush over the contour of the fenders. I think I may have figured out a way to get this right, unfortunately it will have to wait till next week. I will be going away to tomorrow for an extended weekend. When I get back on Monday I might try and get the alignment issues worked out, if not Tuesday. Cheers !
-
Thanks for the positive feedback guys, I am hoping to have some more images up when I get some more parts completed !
-
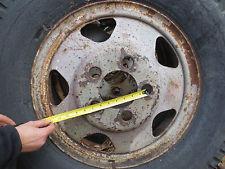
Hey Guys ! For the last couple of day I have been focussing on getting the wheel and grill finished. I am hoping to mould both tomorrow. I completely re-did the grill insert and shell. The peak at the top is more defined and the bottom is also more pointed. I need to work out the crank hole and it will be ready to mould. The wheel has been a little slower and more challenging. I measured the 1:1 this morning to see how closely this one compares. I should add the 1:1 image is sourced from google, the only reason I am using this images is because of the colour of the wheels are similar. The major change I mad in this wheel was around the rim its self. Like the 1:1 the outer rim is separate to the inner rim. This re-design makes the wheel far more accurate. Still quite a lot of cleaning up to do around the holes, so this may not get moulded tomorrow, but the grill almost certainly will one I have made the crank hole surround,
-
resin '35 Ford truck available anywhere?
fractalign replied to misterNNL's topic in Truck Aftermarket / Resin / 3D Printed
I am racing to get this one finished, hopefully by the weekend I can cast up the grill and start on the hood sides.
-
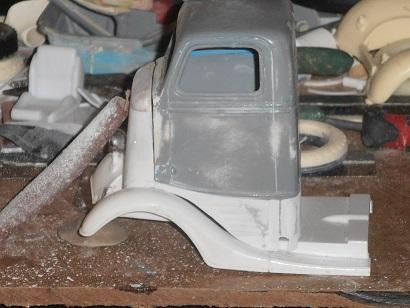
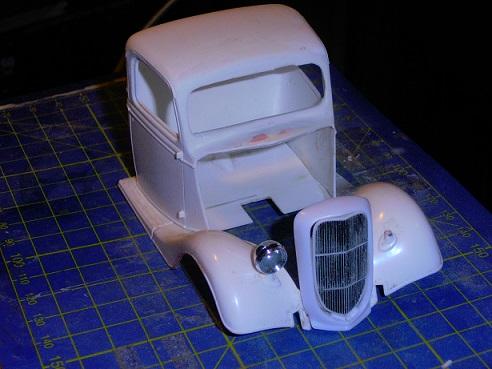
This is how it looks with the Dearborn cab sitting in place. You will notice the wheel next to it. This is not the wheel that I finished a couple of weeks ago, its a completely new one. To cut a long story short I was not happy with the outer rim band on the other wheel or the alignment of the triangular holes relative to their position inside the rim. The holes were not evenly spaced and the rim was too clunky. I created a gauge to cross reference the spacing of the hole and re-designed the outer rim. I also created a new punch to insure the holes are all the same size and shape. I managed to wreck four days of work last night when I machined down the outer rim too far that a section of it broke off. That turned out to be a blessing in disguise because this one is much stronger. I have been careful not to over machine this one. I am also not going to undercoat it either, the primer would only destroy the fine detail of the rim and the holes. Its hard to believe this wheel is only a little over 24 hours old. Its also hard to believe that I have finally created a wheel that I am happy with. I no longer need to create a wheel. This one looks to be in proportion. I am not sure if I will finish it tomorrow or the next day, but either way it will be a relief to be able to leave it and move onto other areas. With out a doubt this has been the hardest thing I have ever created but well worth the effort. Next task will be to finish off the grill and move back into finishing the hood and cab sections.
-
Hey Guys. Its been a while since I posted anything but the work has not stopped. I know I was supposed to be focussing on the hood and lower cab section but I decided to take time out from that. The reality is that I will need to create a contour gauge to make both parts line up with the fenders and that is not something I am ready to tackle just yet. When I originally posted this build, I made my intention clear that there would be three trucks and this is one of them. As you can see I have started work on the grill. The centre is actually an AMT 32 Ford grill insert that has been split three ways, and re-joined using strip styrene for the cross bars. One millimetre half round tubing makes up the perimeter. The lower lip of the grill shell is being re-shaped to suit the new insert.
-
I can't speak for the quality of the body because I have yet to get the kit but I actually prefer the AMT version because of the stock wheel wells. It would be very hard to build a full fendered version of this kit with the raised wheel wells. Also not sure why they did not include a 32 grill shell, most hi boys have them, the stock grill shell is more suited to a stock bodied version. Having said that, I am looking forward to getting this kit simply for the fact that its an all new tooling and the parts including the tyres and the chassis really stand out. I can certainly use them in my other model A builds.
-
Perry's Resin is a classic case of how not to run a resin business. There is no excuse, when it comes to the customer. Orders should be filled and product shipped with in the next working day. I keep reading stories about guys like this taking the money and hiding, or equally deplorable are the ones who happily rip off another caster's hard work. Is it any wonder resin casters have such a questionable reputation in the modelling world ? I really hope anyone who is owed parts by this guy can mount legal action to get either their parts or their money returned.
-
resin '35 Ford truck available anywhere?
fractalign replied to misterNNL's topic in Truck Aftermarket / Resin / 3D Printed
I have been doing a build on the Big Rigs Workbench Forum over the last year or so of a 1935 Dearborn C.O.E project if you want to check that. Most will share the same components as the ones I am planning to market.
-
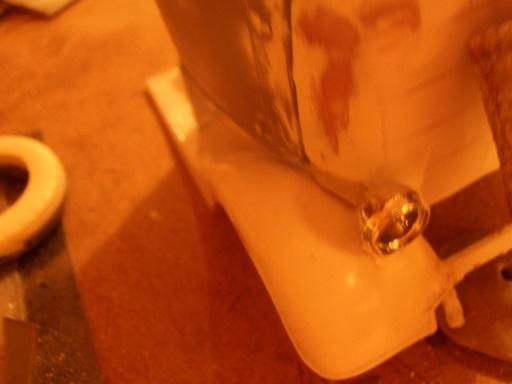
Hey Guys. Thanks for all the positive feedback. I did not get much done today but I did manage to glue the lower section to the cab along with the hood. I also glued to the headlight and grill shell into place. This is the only way I will know what extra material needs to be added to the hood. It will be a balancing act to get the hood sitting properly. The grill appears to taper back further in the diagrams so I will need to add extra material to the grill shell. As I mentioned in my previous post I am going to focus on this area until I am happy its sitting neatly in place. Once that is achieved I will take all the sections apart and finish off the chassis.
-
resin '35 Ford truck available anywhere?
fractalign replied to misterNNL's topic in Truck Aftermarket / Resin / 3D Printed
Thanks ! It has taken me 3 years to finally come up with a set that actually looks like the 1:1 version. -
resin '35 Ford truck available anywhere?
fractalign replied to misterNNL's topic in Truck Aftermarket / Resin / 3D Printed
Hey Tom. I have been working on a Resin 35 Ford Truck kit myself. I have already cast up the fenders and wheels, the grill and hood are being worked out at the moment. I don't expect the grill and hood to take to long. Once completed I will contact you so that we can work out shipping details Cheers, Rob.
-
Hey Guys. I finally managed to add all the trim to the sides of the lower cab section. Once added I cut each one so that they taper evenly. I am going to focus on this section and the hood since both need to sit flush in order for the cab to sit in place. I am really hoping I can get both finished by the end of the week so that I can move onto finishing the chassis.
-
1929 Coleman 4wd
fractalign replied to Chariots of Fire's topic in WIP: Model Trucks: Big Rigs and Heavy Equipment
Another cool early truck nearing completion, I can't wait to see this one completed ! -
Hey Guys. With the wheels done, I have been concentrating on moulding all the different types. I am hoping to cast them up tomorrow afternoon. The other thing I have been getting back into is doing the hood and lower cab section. I started shaping the half round to attach to the hood. I have also been working out the grill placement. I decided to start a fresh with the grill since the old one was a bit out of shape at the top. I have enough of the kits now that I can source new parts rather than work with the old ones. Such is the case with the grill. I finally started adding the strips that go along the sides of the lower cab section. There are five in total and they follow the taper of the front fenders. Once I have added the other two strips, I will start assembling this section. That will be the next task along with getting the swage on the hood done. I am really hoping to get the cab, hood and grill finished and cast, by the end of the month and so far its looking very likely.
-
Thanks for the feedback guys !
-
The last image shows the suspension which I am preparing to mould. You will notice the drum is now a separate unit u like the old one in the background. The drum sits nicely inside the rim, just like the 1:1. I am hoping to have all the underside finished along with the cab and hood before the end of the month.
-
With the construction of the wheels complete, I was able to turn my attention back to the cab and hood. You will notice the tyres in the background. I have been doing some casting and a came up with a novel solution for the excess resin. Because the hood was so thin from all the sanding, you will notice the car bog showing through, decided to use the resin to reinforce the inside of the hood. The resin sets rock hard so I will be able to sand the outer surface back further if need be without affecting the rigidity of the hood. I also used some of the resin on the outside along the joins and around the upper corners instead of putty.
-
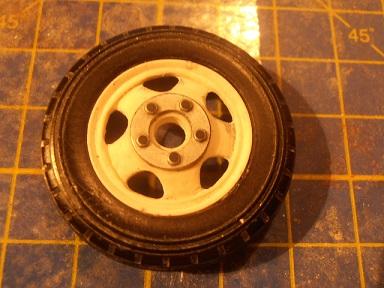
Hey Guys. Its been a while since I posted any images up but the work has not stopped. I have finally got the wheel to a stage where I am ready to move onto other things. I was hoping to mould and cast a few today but ran out of time. The last thing I did was replace the rim. The wheel itself is the same one that goes on the front. This is the backside where the front drums would sit. At the same time this is also the face side of the back wheel as is shown in the image. The rim like the hub came from the very expensive die cast 1:24 scale 34 BB Truck I purchased a while back. The only change I made to the rim was to tale a millimetre or so out of the diameter so that it would fit inside the tyre and line up with the other rim.
-
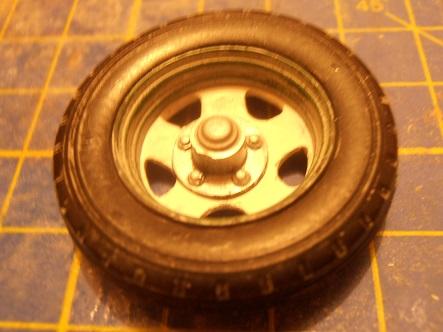
Hey Guys. I have managed to upload some more images. I have resized the images to suit, not perfect but a start. I may go back to using my old photo bucket site but for the moment this will do. You will notice I sanded down the lugs to create the impression of a more heavy duty hub. At the moment I am working on the brake drums with the intention of moulding and casting some if the weather is fine tomorrow. I am actually planning to get quite a bit done including the wheels and tyres as well weather and time permitting of course.