Bugatti Fan
-
Posts
3,294 -
Joined
-
Last visited
Content Type
Profiles
Forums
Events
Gallery
Everything posted by Bugatti Fan
-
Shame that it was not the Land Rover Defender from the first movie.
-
Scott, I really like what you have done to that old Porsche model. Not only the restyling but also your choice of colour scheme. Funnily enough I have an old Revell Porsche Targa Snapkit that one of my kids made (badly) about 25 years ago in my stash. Got me thinking! I also have the remnants of an Airfix Lotus Cortina that I attempted to customise way back in the 60's. Now that my skills have improved over the years I will be attempting to restore it back to how it should look.
-
My son shoots videos that he has to do lots of post production work on before they can be shown. It is quite time consuming putting together video footage after the shooting has been done. Photographers using Photoshop can attest to this when manipulating their still images after shooting. Video, however is a different ball game altogether! Cranky has probably simply gone off in another direction from forums like this to Youtube. So maybe we should not read to much into it.
-
OLD BIG SCALE JAGUAR QUESTION?!?!?!?!
Bugatti Fan replied to wraith's topic in General Automotive Talk (Trucks and Cars)
Impressive kit. Built one many years ago. But.......there was another 1/8 scale E Type of Japanese origin. One of these passed through my workshop, and it was a different kit altogether from the Monogram one. Cannot remember if it was Bandai, Otaki, Nichimo or some other makers kit? -
Large scale VAN kits
Bugatti Fan replied to Bugatti Fan's topic in General Automotive Talk (Trucks and Cars)
Hi Mark, I shipped the model to the museum about a year ago. I think it took some time before it was collected. Mark G. tells me that it arrived in good condition. Maybe next time you visit it will be on display. If you have a copy of MCM Jan 2015 you will be able to see my build article in it. It is the Airfix Wallace and Grommit Curse of the Were Rabbit Van (Austin A35) with leftover custom bits from Monogram 1/12 scale 57Chevy.
-
Your Porsche has certainly been a Labour of love Ken judging by the number of flaws that you had to correct on a lot of this size, and a credit to your modelling ability. I would have not expected a lot like this to be so troublesome considering the cost. Ken, are you a member of IPMS UK? If so can you message me either on this forum's message service or on the IPMS one of you are a member. Cheers!
-
Resin body slowly dying!!
Bugatti Fan replied to Lorne's topic in General Automotive Talk (Trucks and Cars)
Once 3D printing materials are proved to be stable, the great thing is that being made from a CAD program instead of a mould with a limited shelf life, the repeatability is endless, from one off parts to batches. The UV setting process that Pete mentioned in one of his posts appears to be most stable. My dentist repaired a chipped tooth two years ago using a UV setting compound that is still good today. -
Resin body slowly dying!!
Bugatti Fan replied to Lorne's topic in General Automotive Talk (Trucks and Cars)
Resin is a mixed compound, there are many types where their chemical make-up differs, so I would guess it depends on what manufacturers resin mix was used by the maker. Also, the mix has to be dead right, otherwise something that looks as though it is set could still be de gaussing for a considerable time after manufacture. Maybe there is a pattern as to what individual cottage industry manufacturer's products are more prone to this problem due to the actual resin they are using. Unfortunately at the time of casting they would be completely unaware of any inherent latent problems with the material they were using manifesting itself at a later date. Makes you wonder about the stability of materials that are being used for 3D printing as well in the long term? -
The thought of trying to read over 9500 previous replies to this thread?
-
Having mentioned some 1/16 scale kits of old timers by either Aurora of Lindberg, I see someone has put up a picture of a Stanley Steamer. This I think was also kitted in that particular range..
-
GREAT WAY TO USE UP ODDS AND ENDS FROM THE SPARES BOXES!
Bugatti Fan posted a topic in WIP: Dioramas
Looking at some of the posts on dioramas got me to thinking about and looking through all the odd bits and pieces that ended up in my spares box and will probably never end up on a car build. Whether it be extras from kits or from conversions. inevitably you end up over the years with just odd parts that you never seem to be able to find a use for. So now i have been thinking seriously about building a vintage workshop diorama whereby after some refinement many of these parts could be included hanging, stacked and just lying around to create atmosphere with maybe one or two cars in for work to be done. -
Large scale VAN kits
Bugatti Fan replied to Bugatti Fan's topic in General Automotive Talk (Trucks and Cars)
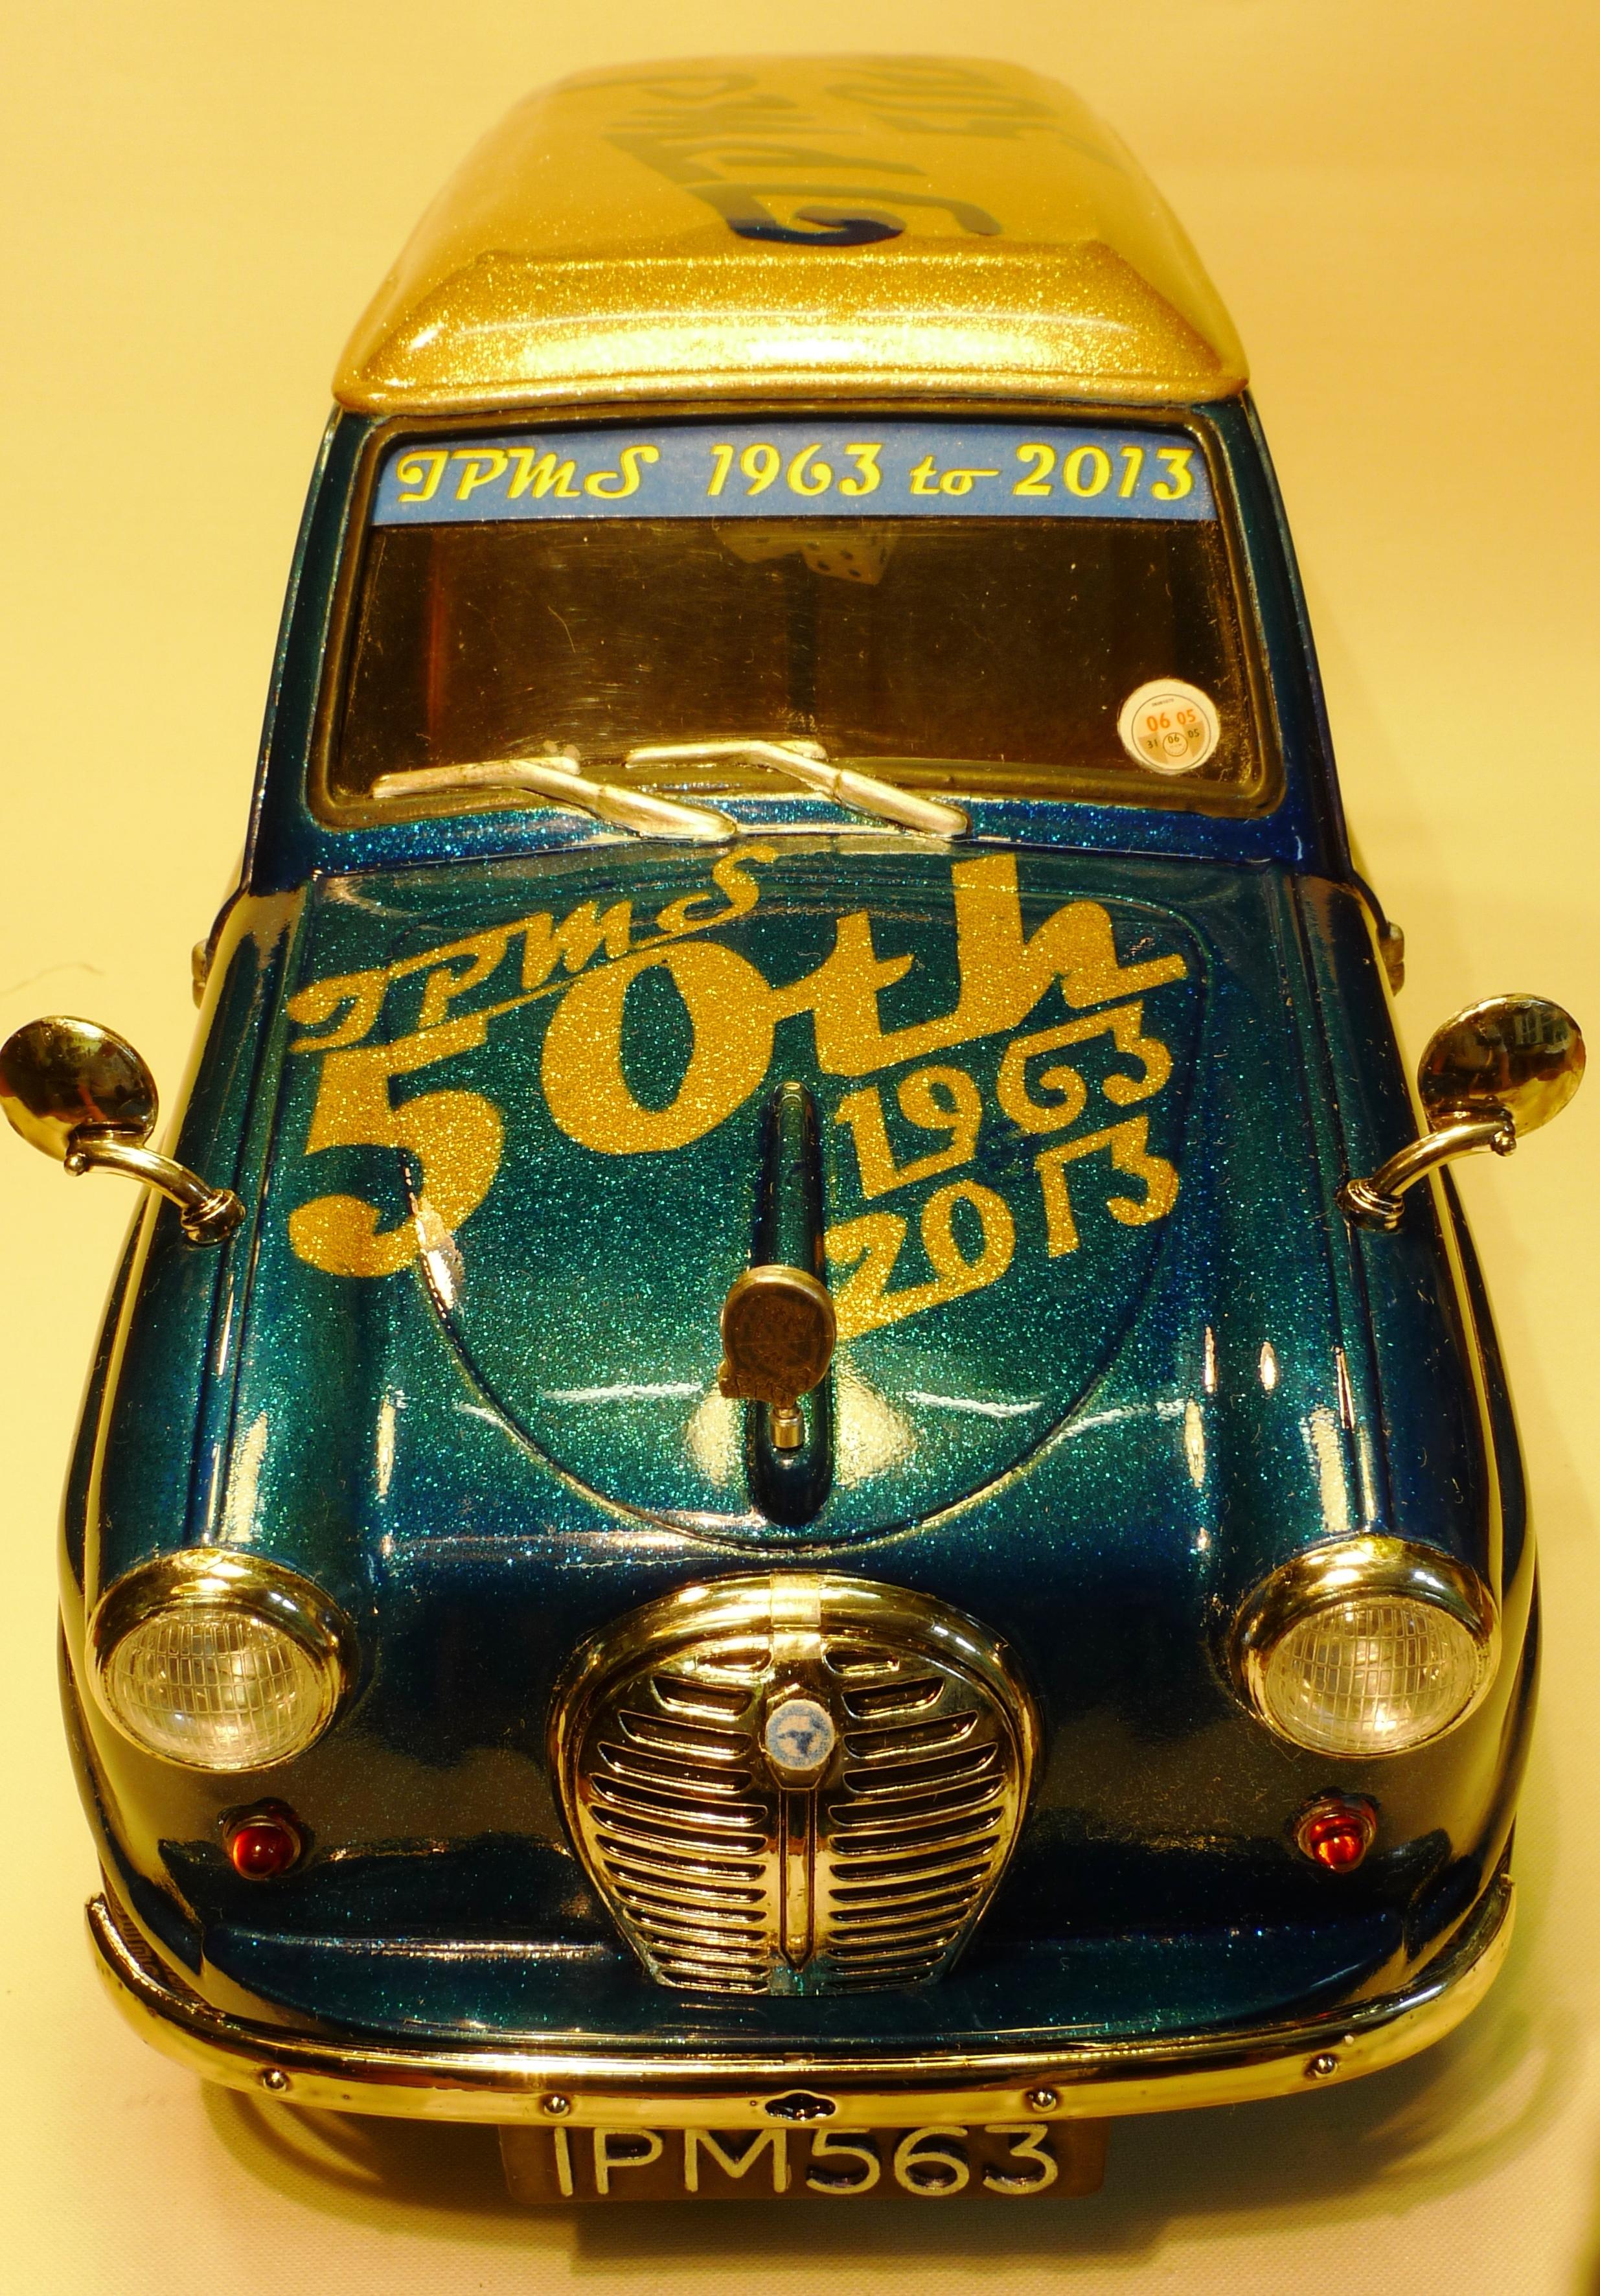
Mark, thanks for correcting my erroneous thinking about the scale of the Revell Big Bad Van being 1/12 instead of 1/16th. Many years since I have seen one over here in the UK. Nice size to practice custom paint jobs with the air brush. The Airfix Wallace and Grommit 'Curse of the Were Rabbit' Van based on the little Austin A35 Van common over here in the sixties scales at 1/12th. I used this to make a custom van to celebrate the 50th Anniversary of IPMS in 2013. MCM ran my article about it some time ago in 2014 I think. I used some of the the customising bits from the Monogram 1/12th scale 57 Chevy that I built stock at the time. The model has since been shipped to the International Model Car Builders Museum in Sandy Utah and is now on permanent exhibition there. That was a nice van model for doing a custom paint job in gold metal flake and Alclad's Blue Candy Colour. -
Anybody remember those truly awful car kits from Palmer?
-
A way to get around licensing?
Bugatti Fan replied to Oldcarfan27's topic in General Automotive Talk (Trucks and Cars)
Congratulations to all the car companies bean counters. Apart from screwing up our hobby for what little they would get in royalties from a market much more limited than ready made diecasts, would it really.make any difference to the bottom line in car companies annual revenue? -
Forgot to mention seeing the Curved Dash Oldsmobile, this was kitted in 1/16 scale by either Aurora or Lindberg way back when as part of a series of old timers that included a Stutz Bearcat, and a Mercer Raceabout. There were some others in this series that I cannot remember. In 1/32 scale some of the original Airfix car kits were of veteran vintage subjects. Revell made a few as did Gowland and Aurora back in the old days.
-
Richard, the Cugnot Steam Tractor has been released as a plastic kit way back in the 60's. I think it was in 1/32 scale by a French company (I think)). Now a very rare kit. As you said, some of the veteran cars would make great subjects, but with their limited appeal, I cannot see manufacturers investing large amounts on development and tooling for life that would probably make a loss for them. I too would like to see some veteran and vintage subjects but have to be realistic in my expectations. Like you I would like to see a Mercer Raceabout on 1/24 scale. Certainly a lovely subject. My own desires would be a Bugatti Brescia, or a Type 59 in 1/24 scale, not to mention some of the inter war Alfas, Auto Union and Mercedes racers in 1/24 scale.ICM have taken a brave step with the veteran Benz, having done variations of the Ford T.
-
I seem to remember Revell producing a 1/12 scale custom van kit named Big Bad Van, and AMY doing one in 1/16 scale. Can anyone confirm?
-
Guess you are right there Mark. Some people are good, some less so at answering emails.
-
Unfortunately, bad grammar and spelling seem to be becoming the norm. Even in the media we see crass mistakes time and again. I worked at a school as an Engineering CAD Technician for a few years just before I retired and was quite appalled by the poor spelling skills of some of the teaching staff who were themselves kids when the dumbing down process was in full swing. When I was a school pupil aged 14 to 15 way back in the late 50's one of my projects was to make a coffee table from mahogany complete with mortice and tenon joints. I could not believe how teaching practical workshop skills have almost completely collapsed in the school system here in the UK since then. The poor little mites are becoming more and more risk averse as schools are afraid that the parents will see some ready cash through ambulance chasing lawyers. No wonder we are witnessing a 'Snowflake' generation, great at playing computer games but not doing much else! We have seen less and less vocational education and more being encouraged to go to university (of which there are now far too many as opposed to technical colleges in the UK) and take 'Mickey Mouse' degrees that are of no use to anyone except to keep university lecturers in a job! The engineering and science graduates will be the ones getting highly paid jobs whereas the majority of average arts graduates will end up saying 'Would you like fries with that?'.
-
FORD GT40 KITS in 1/12 scale
Bugatti Fan replied to Bugatti Fan's topic in General Automotive Talk (Trucks and Cars)
Meng's GT40. A snap kit in 1/12th scale? As John McEnroe famously said ' You can not be serious!' -
FORD GT40 KITS in 1/12 scale
Bugatti Fan posted a topic in General Automotive Talk (Trucks and Cars)
Trumpeter gave us a 1/12th scale GT 40 a couple of years ago, and now Meng are bringing one out as well. If their Ford Pickup in 1/24th scale is anything to go by it should be good. A much less expensive alternative to the ultimate GT40 multi medium kit that Marshall Buck over at CMA (Creative Miniature Associates) is developing. I believe that certain after market suppliers have gone to town with detailing up kits for the Trumpeter GT40.....Wonder if they will retro make for the Meng kit? -
Ford vs. Ferrari Film
Bugatti Fan replied to Richard Bartrop's topic in General Automotive Talk (Trucks and Cars)
AND MENG'S NEW GT40 KIT IS ALMOST UPON US! -
Biggest pet peeves on builds.
Bugatti Fan replied to LL3 Model Worx's topic in General Automotive Talk (Trucks and Cars)
Lost track of the number of mistakes I have made on models over the years!!! As long as you learn from them, correct them and move on! -
Issue #206, Contest Issue, MAILED!!!
Bugatti Fan replied to Gregg's topic in General Automotive Talk (Trucks and Cars)
I gather that there is another proposed 'stand alone' contest copy in the offing? Would it not be more feasable to make it one of the subscriber copies whilst trying to catch up on schedule rather than divert resources? -
Some time ago I heard that Revell would be making a Land Rover kit this year. At first I thought it would just be a re pop of the old Monogram kit. But No! Revell GMBH have announced recently a brand newly tooled kit of a LWB Land Rover. I looked at their 2 built up models on Revell's PR stand at IPMS UK Scale Modelworld Telford earlier this month. A friend of mine Jim Whalen built up one of their display models and tells me that the kit is very good. I believe that it will be retailing at about £25 here in the UK. Naturally this new kit will have many, many conversion possibilities, and I can forsee after market suppliers already looking at the potential in making the most of this kit.