Ace-Garageguy
-
Posts
38,201 -
Joined
-
Last visited
Content Type
Profiles
Forums
Events
Gallery
Everything posted by Ace-Garageguy
-
 Nada problem. I DO make mistakes, so never hesitate to question anything. I've been wrong before.
 -
You're correct. Nailheads came in 264, 322, 364, 401, and 425. The 425 was Buick's big engine in 1966. Again, Buick replaced the last of the big-inch nailheads with the more modern 400 and 430 engines in 1967. But the 400 and 430 were essentially big-block versions of the cast-iron 300/340, themselves derived from the little 215 aluminum V8 architecture.
-
Fenderless Ford Roadster Hot Rods
Ace-Garageguy replied to regular guy's topic in Car Kit News & Reviews
Bob, I've already addressed the fact that you build a fenderless ROADSTER from the AMT kit exactly the same way you build the coupe. All the info I posted is relevant to both coupe and roadster. The '36 Ford roadster is identical in every way to the '36 Ford coupe, other the fact that one has a soft top and different cowl, windshield, and doors. -
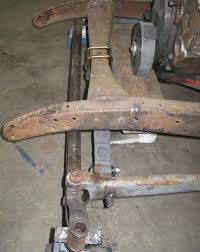
If that's '66, as the title of the thread states (and which I tend to believe, as it shows nailheads still on the line), they're likely 340s. The 340 is on the same general architecture as the 215, and has the oil filter mounted as shown, like the visually similar 400/430. Buick introduced both the 400 and 430 in-house "big block" design in 1967 to replace the nailhead.
-
Damm I love chopped '36 Ford 3-windows. I think if I could have ANY real 1:1 rod, that would be it.
-
Fenderless Ford Roadster Hot Rods
Ace-Garageguy replied to regular guy's topic in Car Kit News & Reviews
Thank you, and you are correct. The stock '36 Ford hangs the front axle behind the spring... Turning the assembly around on the model, to mount the axle ahead of the spring, gets rid of the stubby look of a fenderless '36 on stock suspension. All that's required is to add a tab to move the rear wishbone mount forward, or if the 'bones interfere with the oil pan, split the wishbones. Just like real. With the assembly reversed to push the axle forward, there's also a little fiddling required to attach the 'bones and spring to the axle correctly. There are several ways to do it. Here's a link to a bunch of guys arguing over it, and maybe one or two good photos...plus links to other links. https://www.jalopyjournal.com/forum/threads/how-do-you-push-an-early-ford-front-axle-out.547583/page-2
-
I know how you feel. After I had to put Spooky down, several people offered me kittens, but an old friend isn't replaceable like worn out socks. I've been semi-adopted by a feral momcat who has a family now, and it's nice to watch them grow up. They live under the house and are very wary of humans, but they've realized that food magically appears when they hear me in the morning, and when I get in at night. That's about as close to having another pet as I feel like for now.
-
Thanks Bob. Me too.
-
Good to know, Scott. I thought that's what I remembered, but I wasn't certain. I know very little about what's factory-correct for most US cars, so it's nice to know we have an authoritative source here on the board.
-
Scott...you often seem to know a lot about what options were available on what cars, and quite a bit about automotive history in general. Can I assume you have access to period sales brochures and other high-quality historical reference materials?
-
I like it. Interesting engine choice too. Looks good. Something appealing about little T buckets with big feet...kinda like puppies.
-
Nothing too horrible Scott, just a couple of issues that guys familiar with the real cars, and rodded versions of same, might wonder "why?" about (primarily in the firewall / cowl area, and how the roof opening was done). More info here, and in a couple other threads as well.
-
Thanks Ray. She's still moving along slowly, and is kinda too big to easily put away, so maybe she'll stay on the bench all the way through.
-
I just got a Moebius '65 Satellite primarily to see how well its chassis will work under the earlier model-year Johan bodies. Haven't had time to really check it out thoroughly...though it looks like the diff may be disappointingly under-scale. One of the intended results:
-
Nothing like a nice slice of pie.
Ace-Garageguy replied to Greg Myers's topic in General Automotive Talk (Trucks and Cars)
I like pie. -
Smart kids.
-
You can't make this stuff up. Jumping disproves gravity. Okayyyyyyyy..
-
And they usually deal with adversity, like losing a leg, with a lot more class and dignity than many humans. I'm glad she has a caring home.
-
Sorry, Ray. I know what it's like to lose a long-time furry friend.
-
Looking for advise on sandable primer
Ace-Garageguy replied to Oldmopars's topic in Model Building Questions and Answers
Yes sir, I figured you probably knew this. I just quoted you to add info on the same thought for anyone else who might be new to this stuff. -
Here ya go... And peoples been harpin on doing a nice '26-'27 roadster body for the next issue of Revell's model-A kits (if the Martians ever bring the molds back) for some time.
-
Round 2 AMT Advertising Suggestions
Ace-Garageguy replied to regular guy's topic in General Automotive Talk (Trucks and Cars)
Still alive and well with the traditional guys...
-
https://www.barnesandnoble.com/w/ford-speed-manual-bill-fisher/1118054138?ean=9781931128063 He went on to become a Corvair guru too. https://www.amazon.com/Hotrod-Corvair-Engines-Bill-Fisher/dp/B0007FWSSK The guy is a genuine wizard. I have everything he ever published. https://www.amazon.com/Bill-Fisher/e/B000APRIB4/ref=dp_byline_cont_book_1
-
Looking for advise on sandable primer
Ace-Garageguy replied to Oldmopars's topic in Model Building Questions and Answers
Several real-car body shop lines sell "sandable" as well as "high build" primers. SEM high-build is a high quality product , comes in multiple colors (black, white, rose, and gray)and fills very well. Keep in mind a couple of things, however. 1) Some of the real-car primers have "hot" solvents that will attack and craze many of the softer polystyrene grades that kits are made from today. EXPERIMENT FIRST, ON THE ACTUAL MODEL YOU"RE WORKING ON (back sides of parts that won't ever show). Here's one thread that addresses the problem. 2) "Sandable" primers are generally quite thin, and will only fill 400 grit sanding scratches, or finer. And some don't look like they're covering well, when in fact, they are. Duplicolor's white "sandable" takes several coate to achieve full-hiding, for instance. "High-Build" or "scratch-filler" primers will usually fill up to about 180 grit sanding scratches. 3) There are also "self etching" primers that are generally even hotter than the others, and a good bit of experimentation is in order before you commit to using them on something you care about. 4) The adhesion issue mentioned above can usually be prevented by scrubbing your raw parts with hot water, Comet, and a toothbrush, rinsing very thoroughly, and wiping the model carefully with 70% isopropyl alcohol and CLEAN white paper towels. -
But this one is without a doubt my favorite.