Ace-Garageguy
-
Posts
38,201 -
Joined
-
Last visited
Content Type
Profiles
Forums
Events
Gallery
Everything posted by Ace-Garageguy
-
Beautiful. I really enjoy walking / hiking in weather like that too, particularly close to the ocean, or in the desert.
-
 I've only ever seen the factory ones painted the same orange as the rest of the engine, chromed, or black (often wrinkle-black). I don't know what is factory-correct.
 -
X2. Great to see kids taking an interest in physical reality, and adults who take the time and make the effort to show it to them.
-
Electric wench... Then of course, there's the eclectic wench...
-
'57-'60 Ford T 950 Super Duty
Ace-Garageguy replied to leafsprings's topic in WIP: Model Trucks: Big Rigs and Heavy Equipment
Fine looking progress. I love old heavy trucks (though I know very little about them), so this is a real treat for me to see come together. -
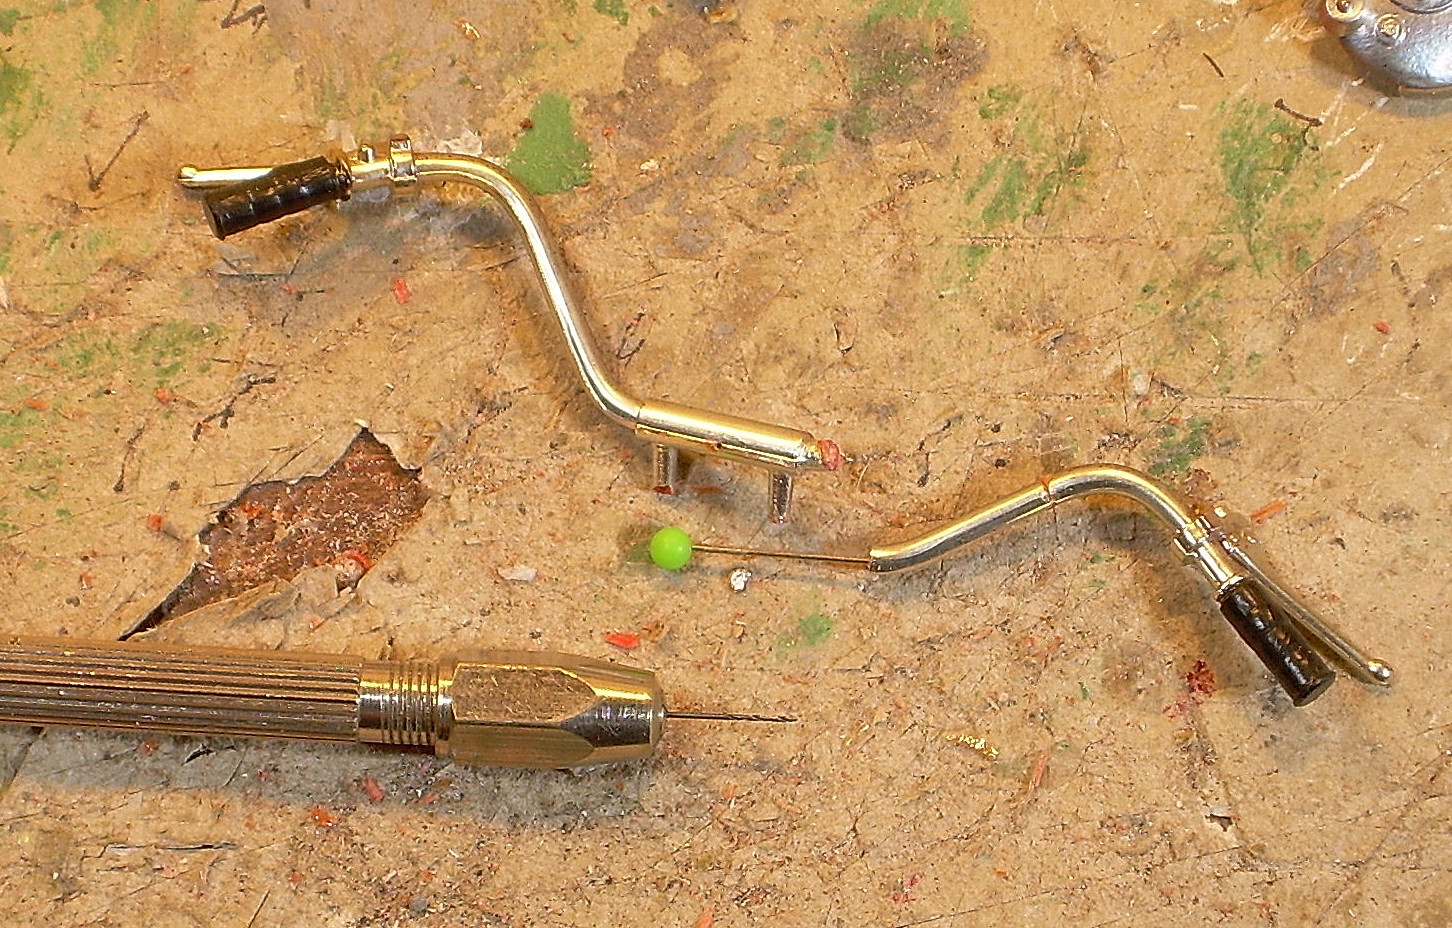
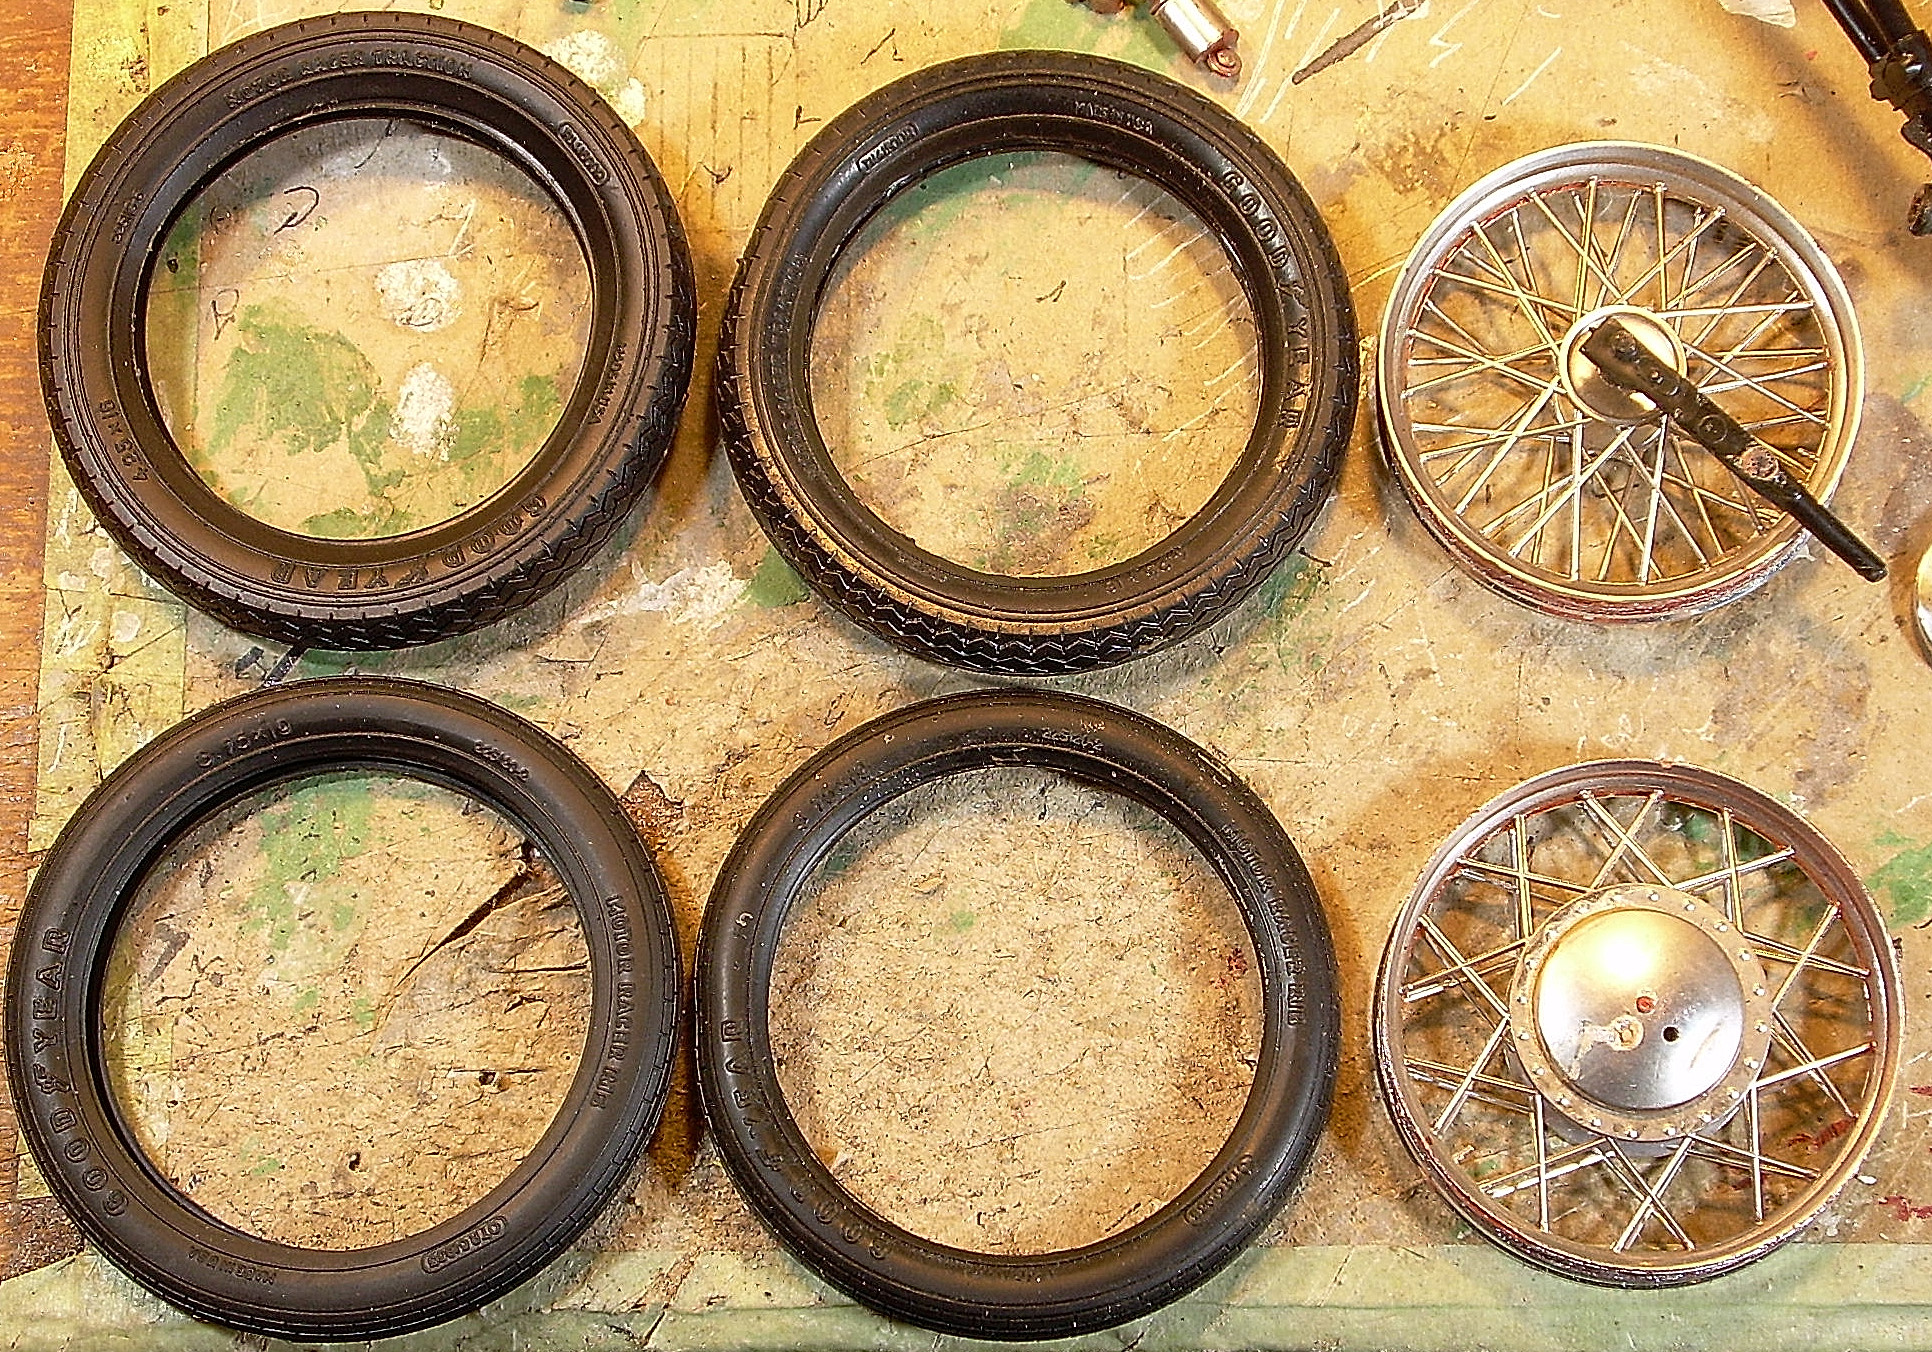
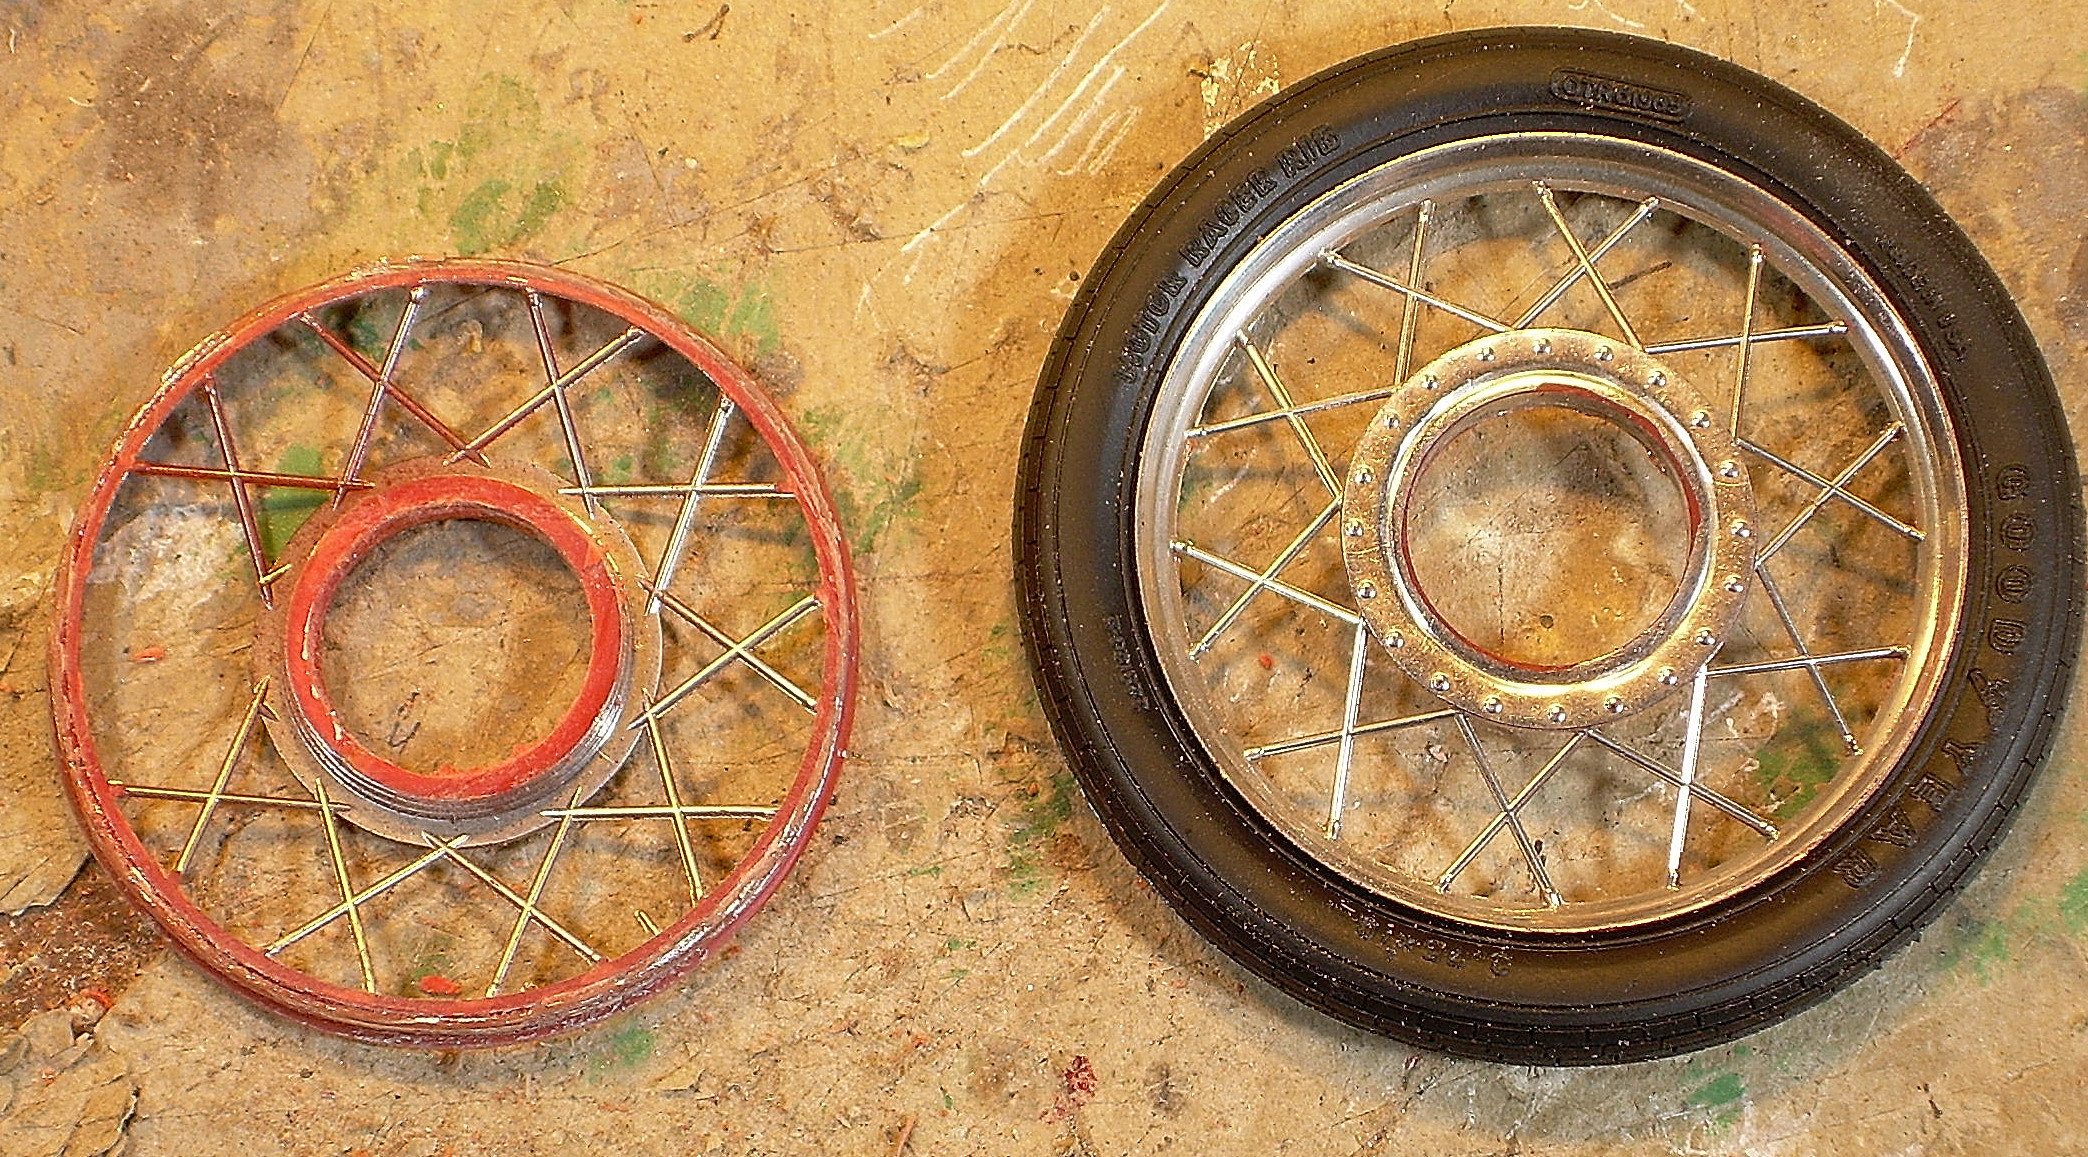
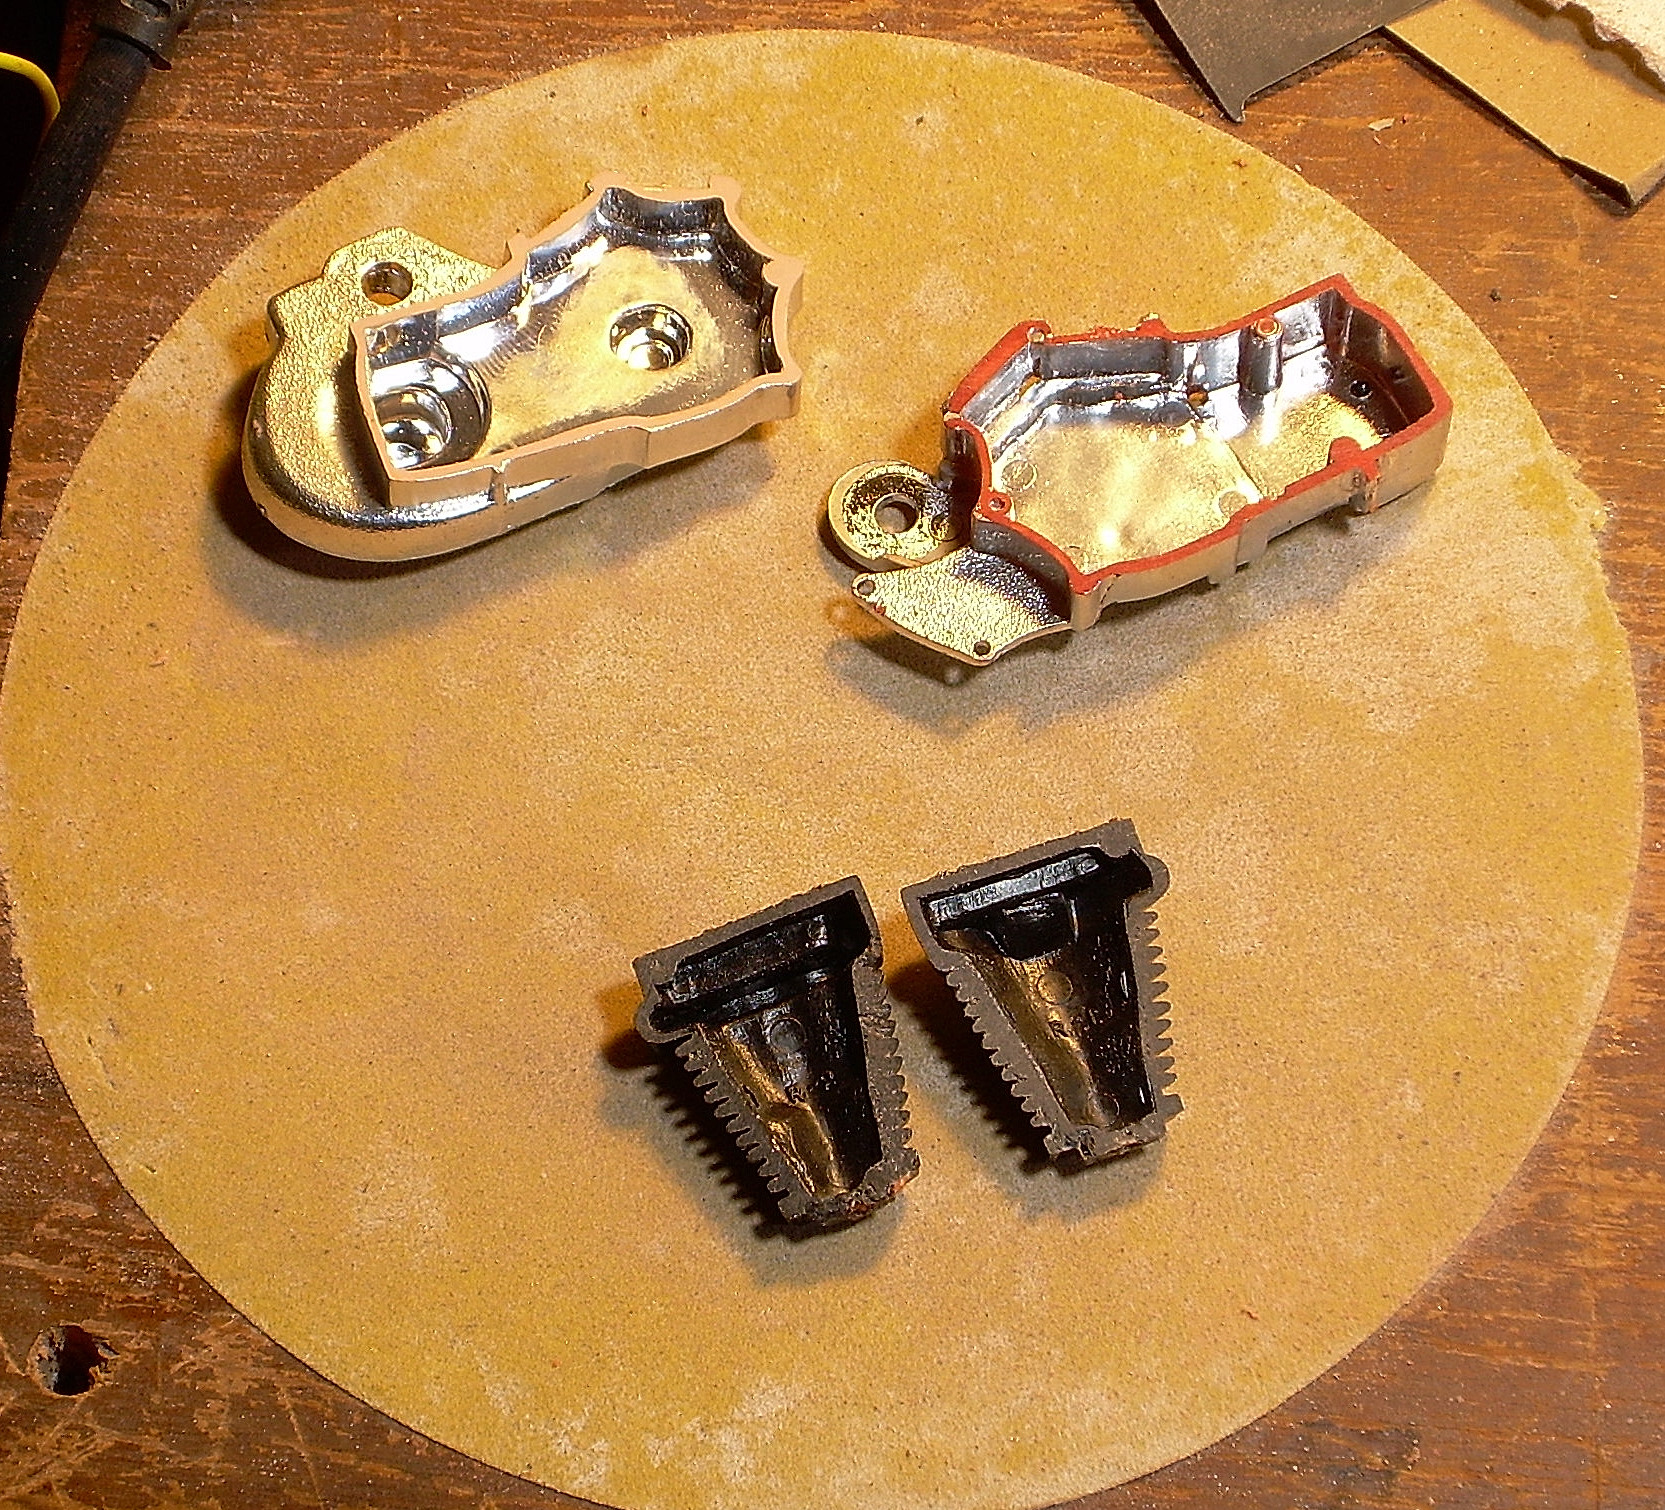
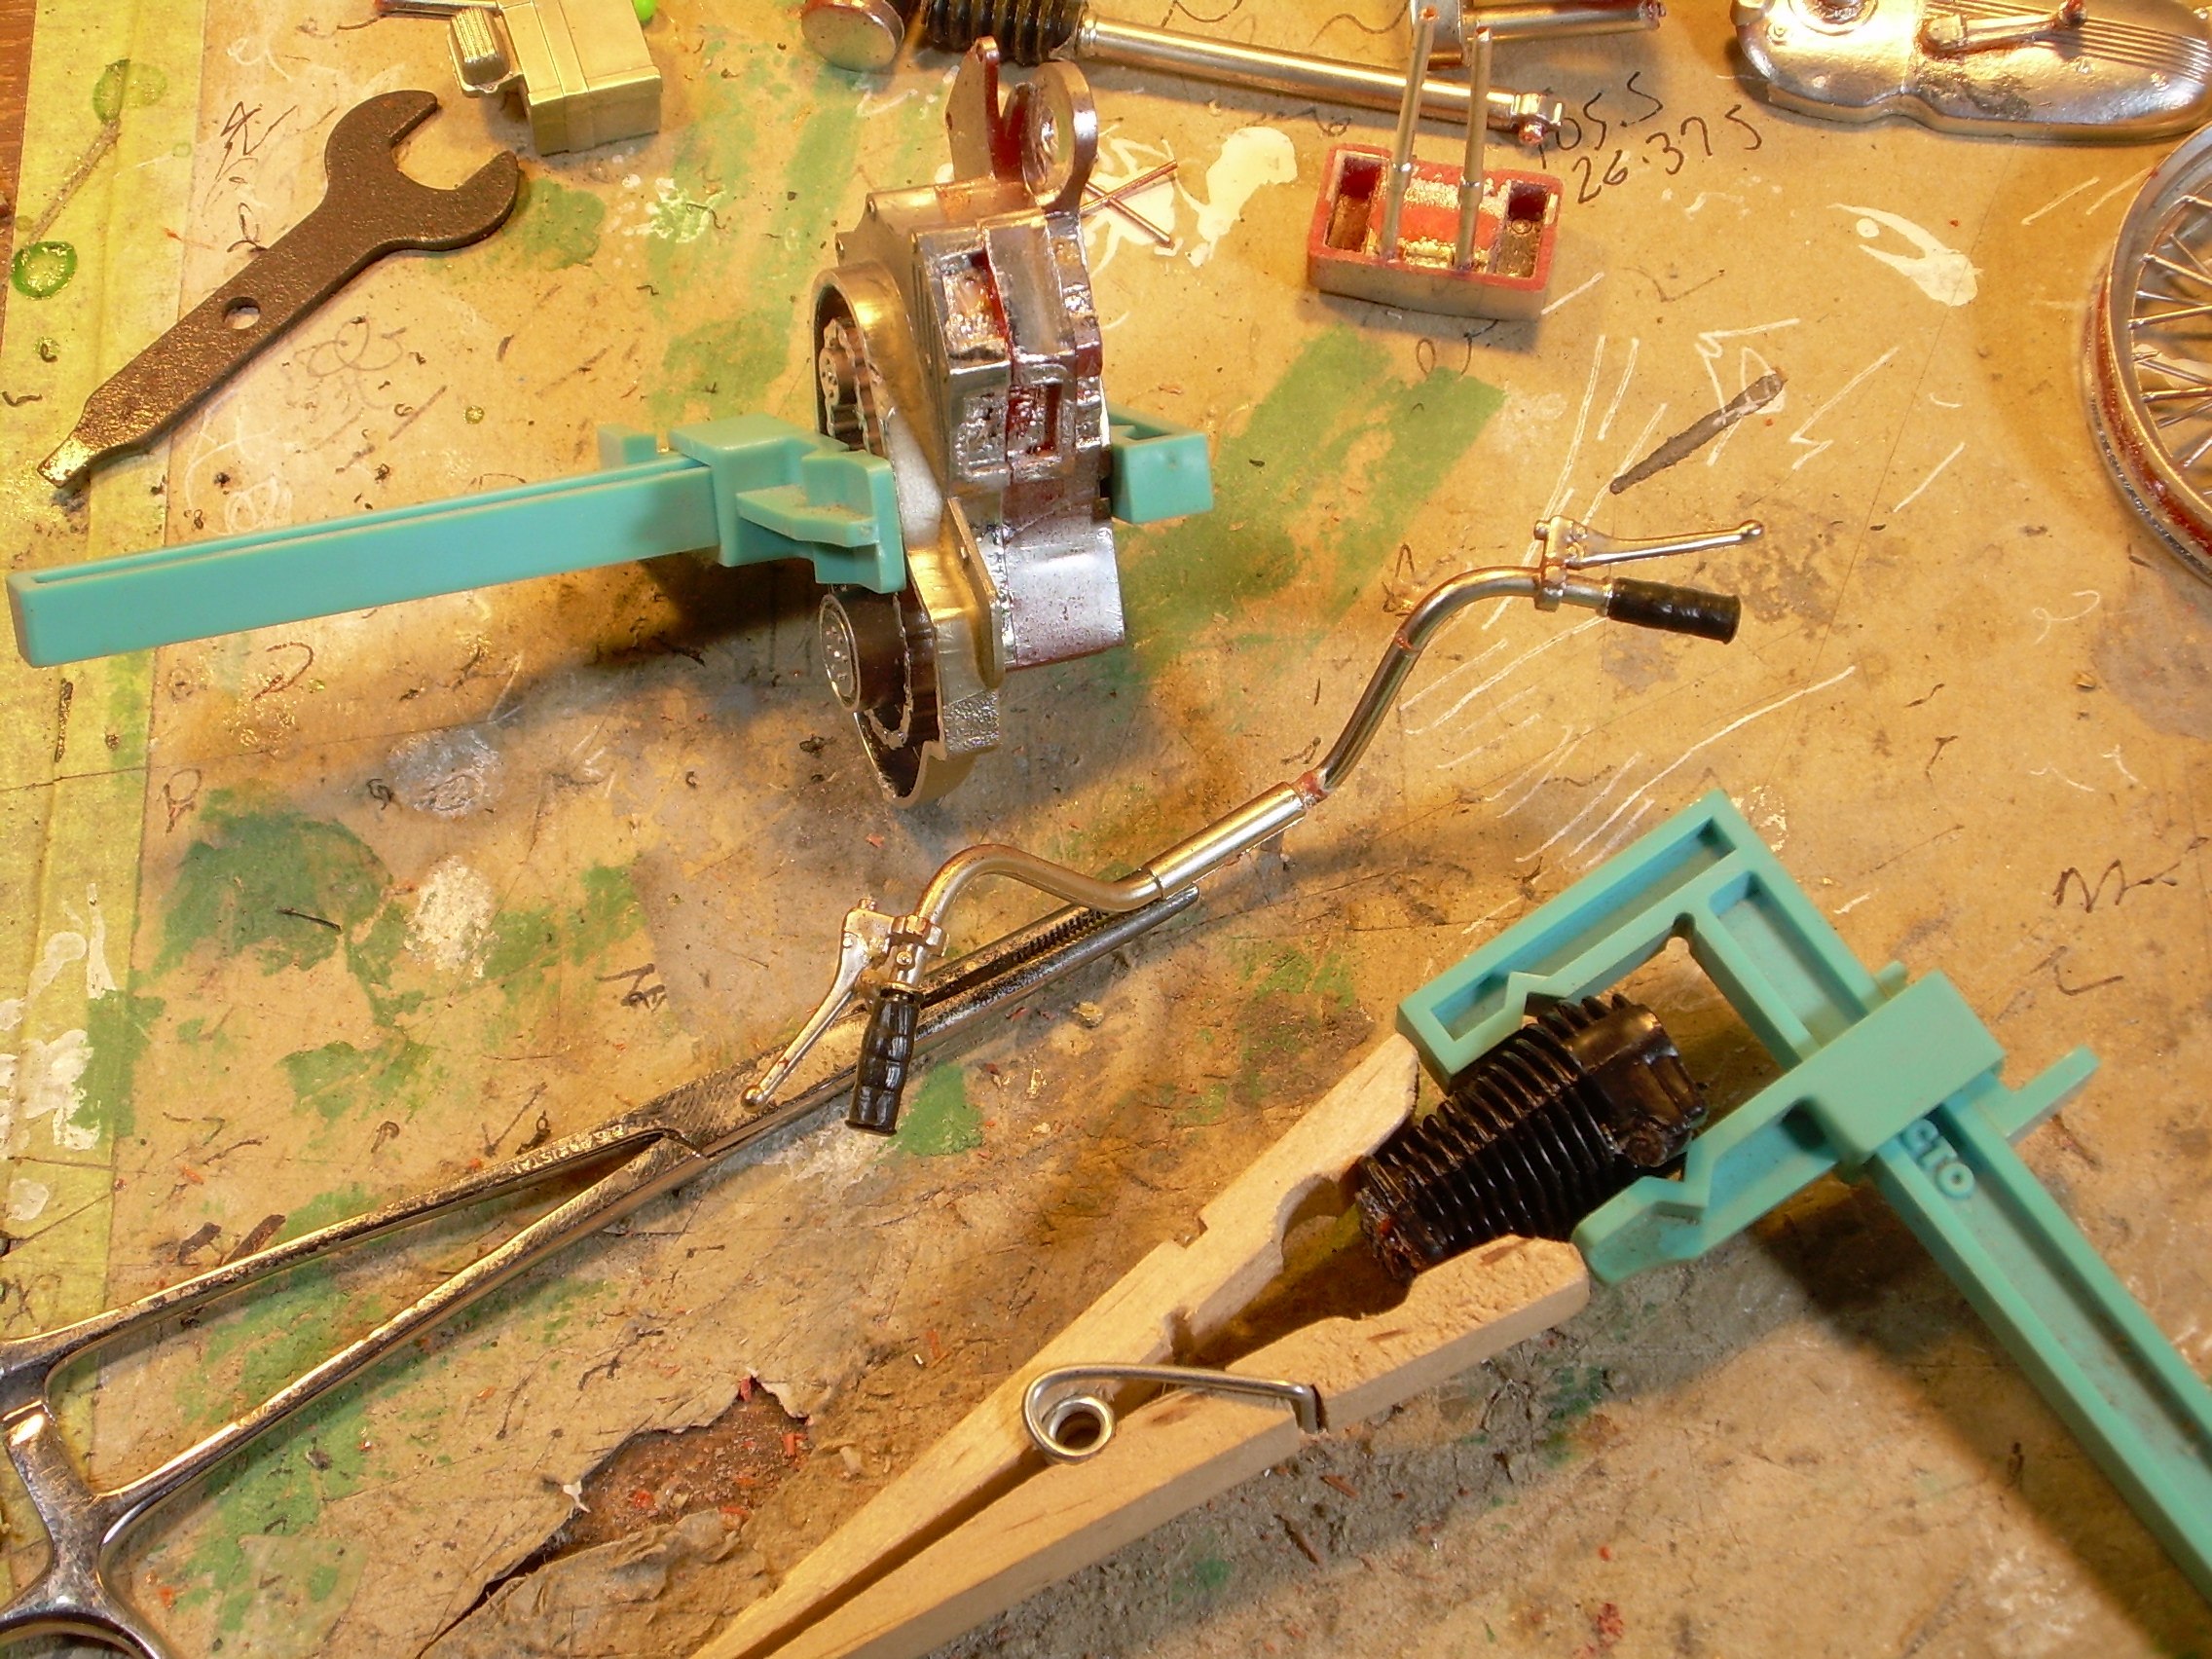
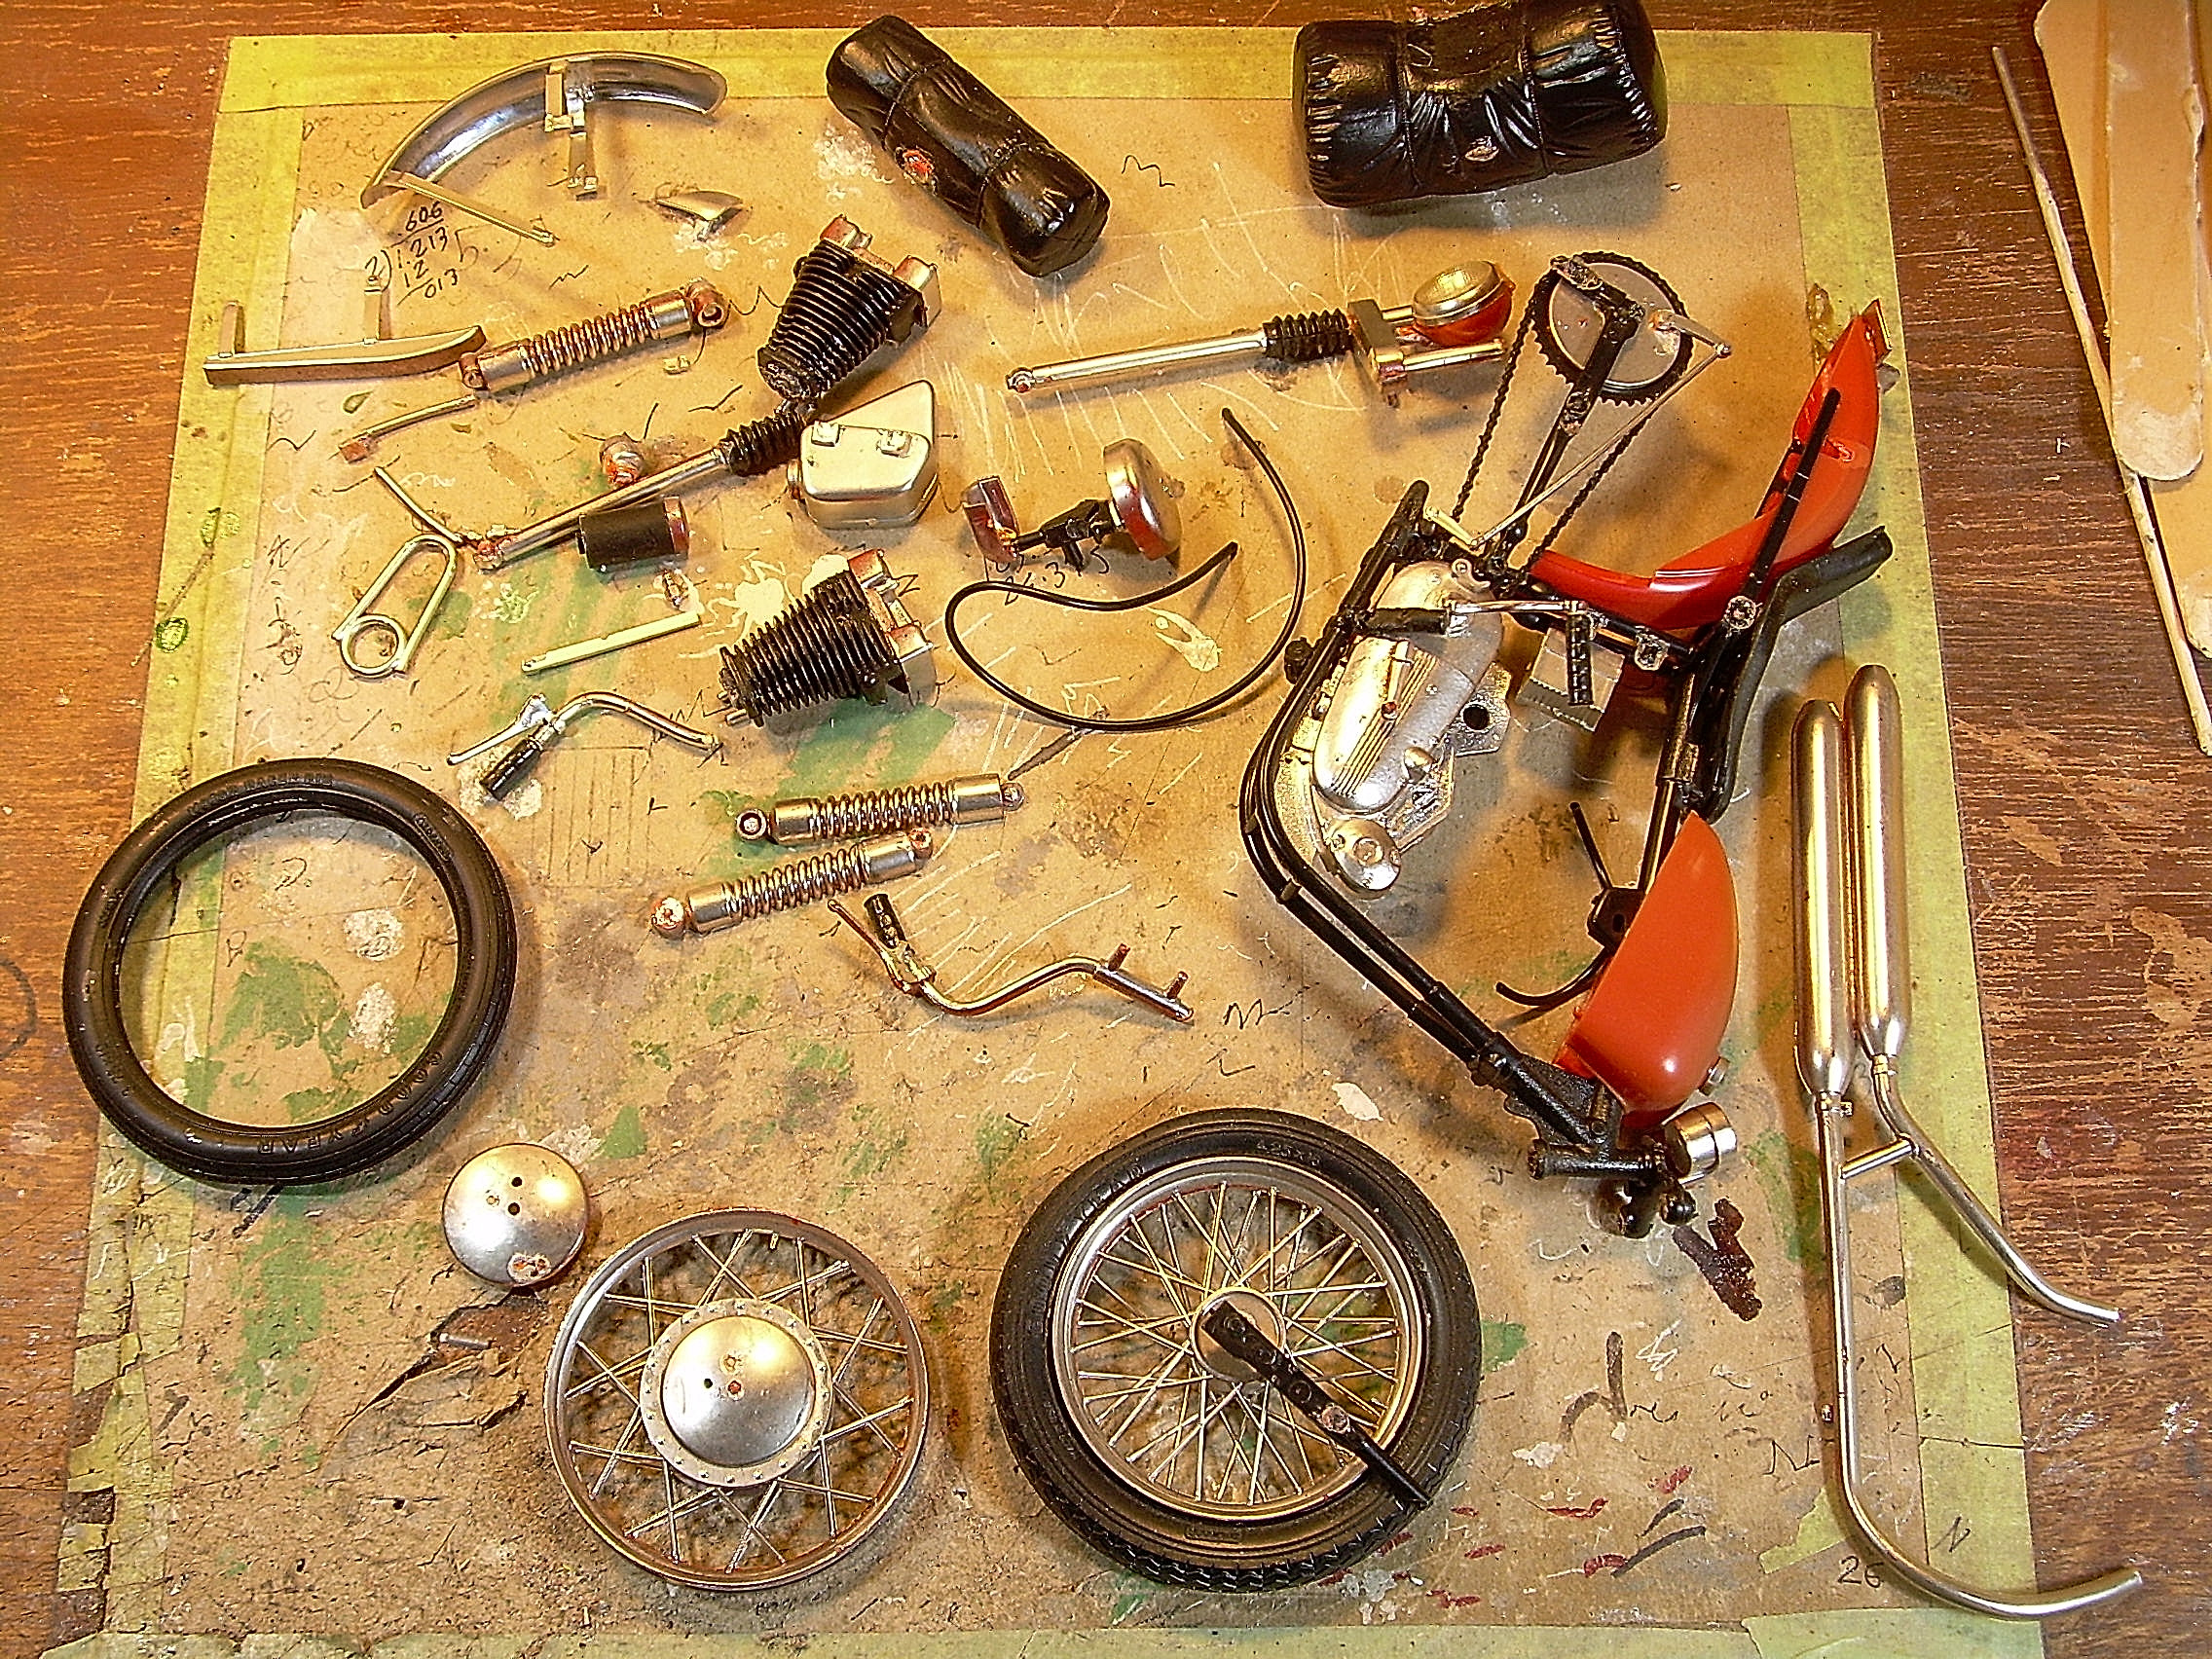
Thanks to all for your interest and comments. PART 2 There are a lot of relatively minor things to fix on this old model, so I'll be taking them one at a time as she goes back together. The handlebars were broken (and a previous repair at a different point seems to be strong enough to leave alone), so I drilled .025" holes in the broken ends to insert a length of steel pin for a reinforcement. The tires had both shrunk (badly warping the rear rim) and dissolved parts of the rims where the chrome had been scraped away for glue by the original builder. I was able to get the tires off the rims (with no additional damage) with the aid of a small, sharpened and bent screwdriver blade used like a tire-iron. The tires close to the rims are from this model. The ones on the left are repops from the same tooling, sourced from a fairly recent reissue of the old MPC Honda 750 race bike. Look closely, and you can see how badly the old ones have shrunk. The OD is almost 3/16" smaller on the originals. With some VERY careful sawing using a PE blade from MCG, I was able to split the heavily glued rims, again with very little additional damage. You have to work SLOWLY, with lotsa patience. The rims had also been assembled out-of-register, so the spokes didn't line up correctly. The new tire, a 19", fits the old front rim perfectly (but more on that later). The joining faces of the previously split jugs and engine cases were "milled" flat on a piece of 180 grit paper stuck to the bench. One jug, engine cases, and handlebars, glued back in correct register. Again, files and sandpaper will be used to address the seams after overnight drying. The engine cases are supposed to have a seam where the two halves are bolted together, and this will be re-scribed after the register problems are corrected.

-
Agreed. Thanks. Thanks to Aaron for the RMR cab shot too. Looks good.
-
-
What non-auto model did you get today?
Ace-Garageguy replied to chunkypeanutbutter's topic in The Off-Topic Lounge
Speaking of which...I just picked up a couple of much older reissues... ...and a semi-ripoff of the Monogram halftrack... -
Great to see stuff like this.
-
An exercise in fabrication - 426 Hemi DONE
Ace-Garageguy replied to landman's topic in WIP: Model Cars
Nice going, and great encouragement for people to stretch themselves a little when they don't have the part they want on hand. -
And note that the nailheads are blue. The red ones are 340s.
-
Where Belly Tankers Come From
Ace-Garageguy replied to Snake45's topic in General Automotive Talk (Trucks and Cars)
The Baby Albatross sailplane used a similar but not as cool laminating procedure to make its fuselage. If I remember correctly, the forms for this little guy were made from concrete. That's a Staggerwing wing hanging on the wall, by the way. The hangar is in Tehachapi, Ca. -
Where Belly Tankers Come From
Ace-Garageguy replied to Snake45's topic in General Automotive Talk (Trucks and Cars)
You never know. That's a lot of effort to put into making something for one use. The spiral wrapping of the lamination plies particularly looks like overkill for a one-use unit. Great photos though, and now you have me going off on another search... -
Where Belly Tankers Come From
Ace-Garageguy replied to Snake45's topic in General Automotive Talk (Trucks and Cars)
Very interesting link and photos, but those are all laminated wooden tanks. The "molds / forms" would have been large steel press tools. The 315 gallon P-38 tanks that are the most often seen lakester bodies are made from aluminum pressings, with riveted in ribs / bulkheads, and the two halves are bolted together. -
Stay safe, Carl.
-
COE Hummer
Ace-Garageguy replied to Grzegorz's topic in Model Trucks: Pickups, Vans, SUVs, Light Commercial
X2. -
Nice video. Well done. Orks are bad enough, but Orks with half-tracks could really ruin your day.
-
Anybody remember the one-season TV series Then Came Bronson ? The bike in the show was a modified 1968 XLCH Sportster. MPC made a kit of it, released in 1970 and '71, and never again (as far as I'm currently aware). Most of the survivors are partial kits with missing and broken bits, or gluebombs...and usually pretty expensive. "Bout a year ago, I picked up a semi-complete but poorly built and broken one. After a lot of research, collecting photos, info, and more parts, I'm ready to start the deconstruction and rebuilding process. First thing is to split some of the glued parts that are out of register (due to incorrect pin locations and sloppy building). I've found that an X-Acto chisel tip blade and a small hammer work very well for this sometimes. In the photo above, the shock unit on the right has been split apart, the halves surfaced, and then re-glued with the parts in correct alignment. After drying overnight, files and sandpaper are used to clean up the seams.
-
Nice. One of the all-around most impressive competent cars I've ever driven...just does everything well.
-
Model A Headlight Mounts
Ace-Garageguy replied to gwolf's topic in Model Building Questions and Answers
It just occurred to me that an easier way might be to find two symmetrical pieces of sprue that resemble the shape you want. Most sprue is round, but it's easy to flatten the sides neatly by gluing a piece of sandpaper (100-180 grit) to a very flat surface, and working the side of the sprue down. Turn over and repeat. This will also leave you with nicely rounded sides where you didn't flatten them. A lot of modelers try to scratch-build roll cages from sprue, but it's usually way too heavy looking in 1/24-1/25 scale. For this application, it might be perfect. -
Slant 6 cross ram
Ace-Garageguy replied to oldnslow's topic in General Automotive Talk (Trucks and Cars)
Put me on your list. I have a couple of "resting" projects that need those engines. -
Agreed 100%. A knockout build.
-
Sounds like he may be a malfunctioning robot.
-
Model A Headlight Mounts
Ace-Garageguy replied to gwolf's topic in Model Building Questions and Answers
Since those are either boxed sheetmetal fabrications or solid castings, you could carve them from .080" styrene sheet fairly easily. That would make them a scale 2" thick, which is about what they appear to be at the right-angle bend...though they appear to be thicker at the bottom.