Ace-Garageguy
-
Posts
38,203 -
Joined
-
Last visited
Content Type
Profiles
Forums
Events
Gallery
Everything posted by Ace-Garageguy
-
 Me three. I finally scored a set of unobtanium Modelhaus "medium duty" truck wheels and tires, and though very nice, they appear to be repops of larger OTR-truck parts originally tooled in 1/32. It would be nice to have a choice of heavier wheels, tires, axles, brakes, diffs and springs.
 -
I haven't heard from ebay seller and it is driving me nuts.
Ace-Garageguy replied to LDO's topic in The Off-Topic Lounge
In well over 2000 eBay transactions to date, I've encountered maybe 10 or 15 problem sellers, and thanks to eBay and PayPal's policies and complaint resolution procedures, I haven't lost a nickel so far. Even sellers with high numbers of positive feedback sometimes have real-life problems that delay shipping or communications, and MOST of them come through. So long as you paid via PayPal you're pretty well covered, usually even for "lost in the mail" or smashed flat when a PO forklift drives over something. It CAN take well over 30 days to get a refund if there's a glitch, but that's a whole lot better than nothing. -
Great info, very realistic look, much appreciated.
-
Resin mold release agent removal help
Ace-Garageguy replied to Khils's topic in Tips, Tricks, and Tutorials
I started doing it when I noticed occasionally primer would "pull away" from corners or details that sandpaper or Scotch-Brite couldn't effectively deal with. Doing a thorough scrub with a mild abrasive and hot water, and a thorough wipe-down with isopropyl alcohol just prior to spraying, and my contamination and adhesion problems dropped to zero. There is apparently one potential downside. The abrasive scrub, while "breaking" the gloss on injection molded plastic parts, also makes them just a little more sensitive to "hot" solvents in automotive aerosol primers. -
My experience with mixing colors is that adding clear to a metallic only serves to make it more transparent, taking more coats to get full coverage. If your spray technique is good enough so you don't get stripes from overlapping passes, it will in effect be "lighter" if you use fewer coats over a light base or primer...but the propensity to get streaks and blotches is higher. If you have a very fine neutral silver or pearl white tinting base, you might try a drop or two in a thimble full of color to see what that will do.
-
Seriously, a thing of great beauty. Most impressive, perfect color too. Are you planning to have her at this Sunday's ACME meeting?
-
Bingo. And the logical extension of that thought...as far as developing new market goes...is that when a "casual" or "first time" modeler buys a kit and has issues with warpage (there was a relatively high percentage of bad windshield frames in the Foose Caddy kit, and one of the sporty 4X4s was seriously bad...and I KNOW they weren't Moebius kits, but the thought is valid) or appearance (there are actually some "normal" people who can see instantly that some kits have glaring proportion and line problems), or assembly (there seemed to be rather a lot of experienced builders who didn't deal well with a Moebius Pontiac's front and back glass) he's going to be far less likely to buy ANOTHER kit than he would have been if his first one had been done right.
-
A real oddball. Not a great kit, intended to be motorized, but the proportions are right and it's a technically interesting car with a twin-tube chassis and a mid-mounted twin-cam 4 cylinder sidewinder. Kind of a baby Miura. And an ancestor of the Alfa Tipo 33. I didn't have much in 1/16, but a post by Jantrix got me looking around, and when one of these came up cheap ($9.99) nobody else wanted it. Just inventoried it, and it's only missing one seat.
-
A different view
Ace-Garageguy replied to Greg Myers's topic in General Automotive Talk (Trucks and Cars)
Well, just so's you know, cars that launch like that are set up WRONG. But hey...who cares about function long as it's FUN, right? Oh wait...silly me. I thought the object of drag racing was to go FAST. -
A different view
Ace-Garageguy replied to Greg Myers's topic in General Automotive Talk (Trucks and Cars)
Happy Chipmunk says "That way, EVERYBODY gets a medal!!" -
Looks to me like that crew is already cut pretty much to the bone. It's almost inconceivable to dig a hole without at LEAST an environmental-impact manager, and a specifications-compliance manager.
-
A different view
Ace-Garageguy replied to Greg Myers's topic in General Automotive Talk (Trucks and Cars)
Me too. But if I ever master BMF, look out. -
A different view
Ace-Garageguy replied to Greg Myers's topic in General Automotive Talk (Trucks and Cars)
As always, a "hobby" is supposed to be enjoyable. That means that how one man "enjoys" doing it really has no bearing on how another man enjoys it. That said, I don't feel the need to disparage someone's "unfinished" work, if that's what HE likes to produce...but I don't have to lower my OWN standards to fit into someone else's definition of "fun" either. I've learned over the years, for instance, that it's pointless to try to explain to modelers who just don't care that some of the things they come up with couldn't possibly work in reality...like that triple-GMC-blown Allison in the article. But that won't ever stop ME from building things that COULD work, and sweating most of the details. That's "fun" to me. And frankly, I really don't give much of a damm if I EVER "finish" one. -
I've read and "heard" from time to time that some of the older Johan kit bodies were purposely built narrower than scale-correct (to fit in promo boxes is one reason I've encountered). I have a Johan '61Dodge Phoenix, and the '64 Lindberg Mopar chassis units fit like they were made for each other. The body width scales to within an inch of the listed REAL car dimension. I also recently acquired a Johan '62 Dodge Dart, and the chassis for the later Lindberg is considerably wider. The '62 Johan body scales about 1.5" narrower than the published REAL spec, so that's still not very far off. These are all unibody cars, built on Mopar's newly designed platform. Though the factory specs show the '62 car to be about 2" narrower than its '61 brother overall, I can't see Dodge having used a different platform. The '64 Dodge, the subject of the Lindberg kits, is listed as being a little narrower overall than its '63 sibling. Of course, these differences are only a couple of millimeters in 1/25 scale, and the difference in chassis width (between the Johans and the Lindberg) is much more than that. My initial plan was to use the Lindberg chassis to replace the blobular Johans, and do a series of fairly accurate early SS cars. Any Mopar guys, or anyone familiar with doing these chassis swaps, please chime in. I also have a Johan '57 Olds promo that I've "heard" is suspiciously narrow too, though I haven't measured it. Input from guys who know these old kits well, like Mark and Art Anderson, would also be very welcome.
-
I'm sure a lot of you guys already know about this, but just in case you don't...it's a web project dedicated to collecting print documents, digitizing them, and making them available to the public. I just found the full 1962 Hot Rod Mag article on the Golden Lancer A/FX car (built by the Ramchargers guys) in their archives. Saved me many hours digging through my own HRM collection. For more info, click here: http://wildaboutcarsonline.com/cgi-bin/pub9990448202528.cgi?categoryid=9990448202528
-
Dude...it's 2018. "Accountability" is, like, so old fashioned. Get with the times, man. Things just happen. And anyway, a lot more effort ought to be put into making sure the construction crew is gender and ethnically balanced. It just DOESN'T MATTER if they know what they're doing. Besides...expecting everyone doing a job to be competent is discrimination.
-
Recaster Alert
Ace-Garageguy replied to Chief Joseph's topic in Car Aftermarket / Resin / 3D Printed
So what's ethical, and what's not? How far back do we go? Some of Modelhaus' offerings were almost certainly cribbed from promos, and nobody complained about that...but copying a Modelhaus kit would be a bad thing? And R&M makes parts that are very obviously copies from styrene injection molded kit parts...like their transverse springs directly from the old Revell parts pack. -
Recaster Alert
Ace-Garageguy replied to Chief Joseph's topic in Car Aftermarket / Resin / 3D Printed
I'm inclined to think it really depends, ethically at least, on the nature and extent of the "improvements". For example...many of the Flintstone models have significant scale and symmetry issues. Starting with a rough Flintstone body and making a GOOD master from it would take some serious effort...and skill. I would purchase something that was significantly BETTER with no qualms whatsoever. -
Recaster Alert
Ace-Garageguy replied to Chief Joseph's topic in Car Aftermarket / Resin / 3D Printed
I agree. Correcting flaws or converting a car to another year pretty much makes it your own in my mind. It takes highly skilled work to do that...not just mixing up some goop and copying exactly what somebody else has poured many hours of skill and effort into. I also agree with this...100%. -
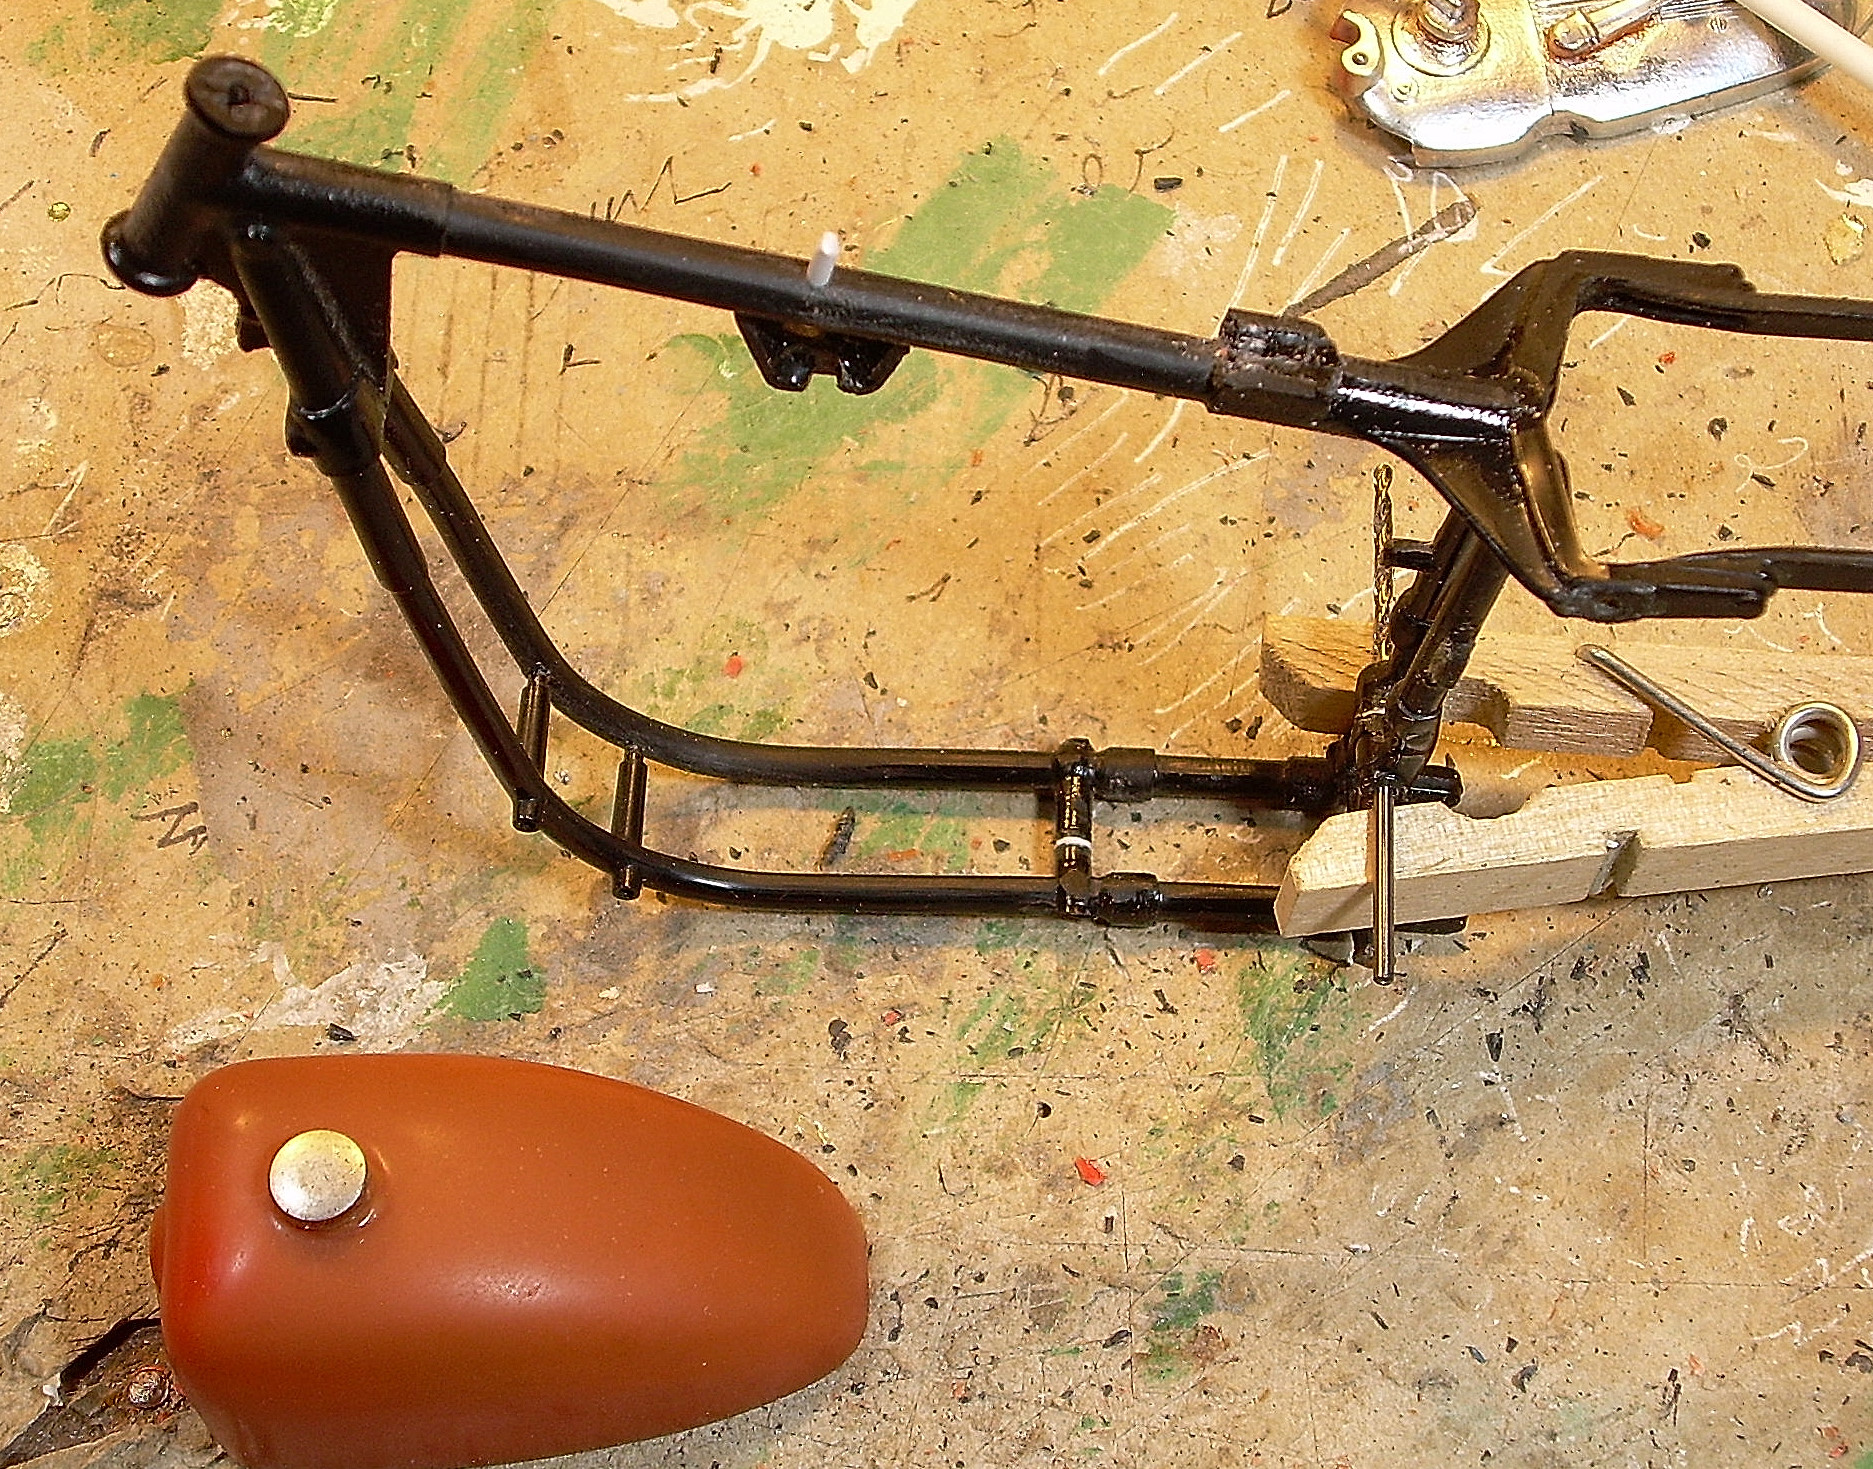
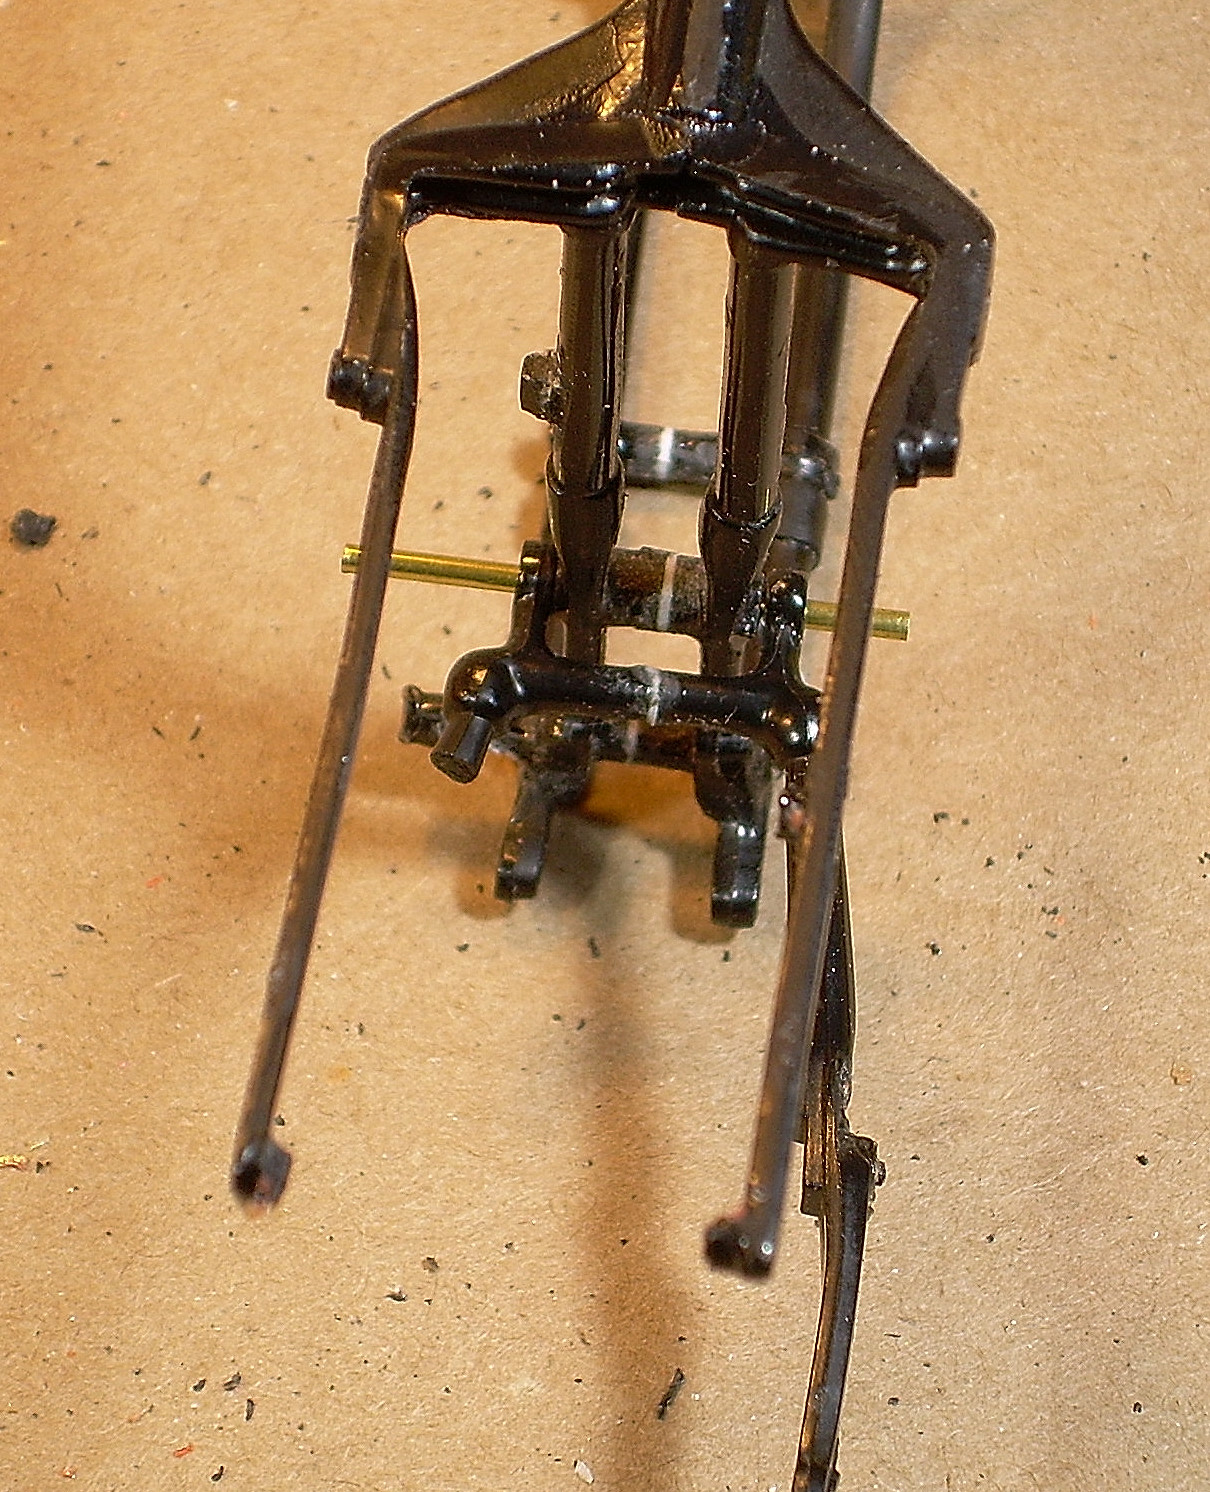
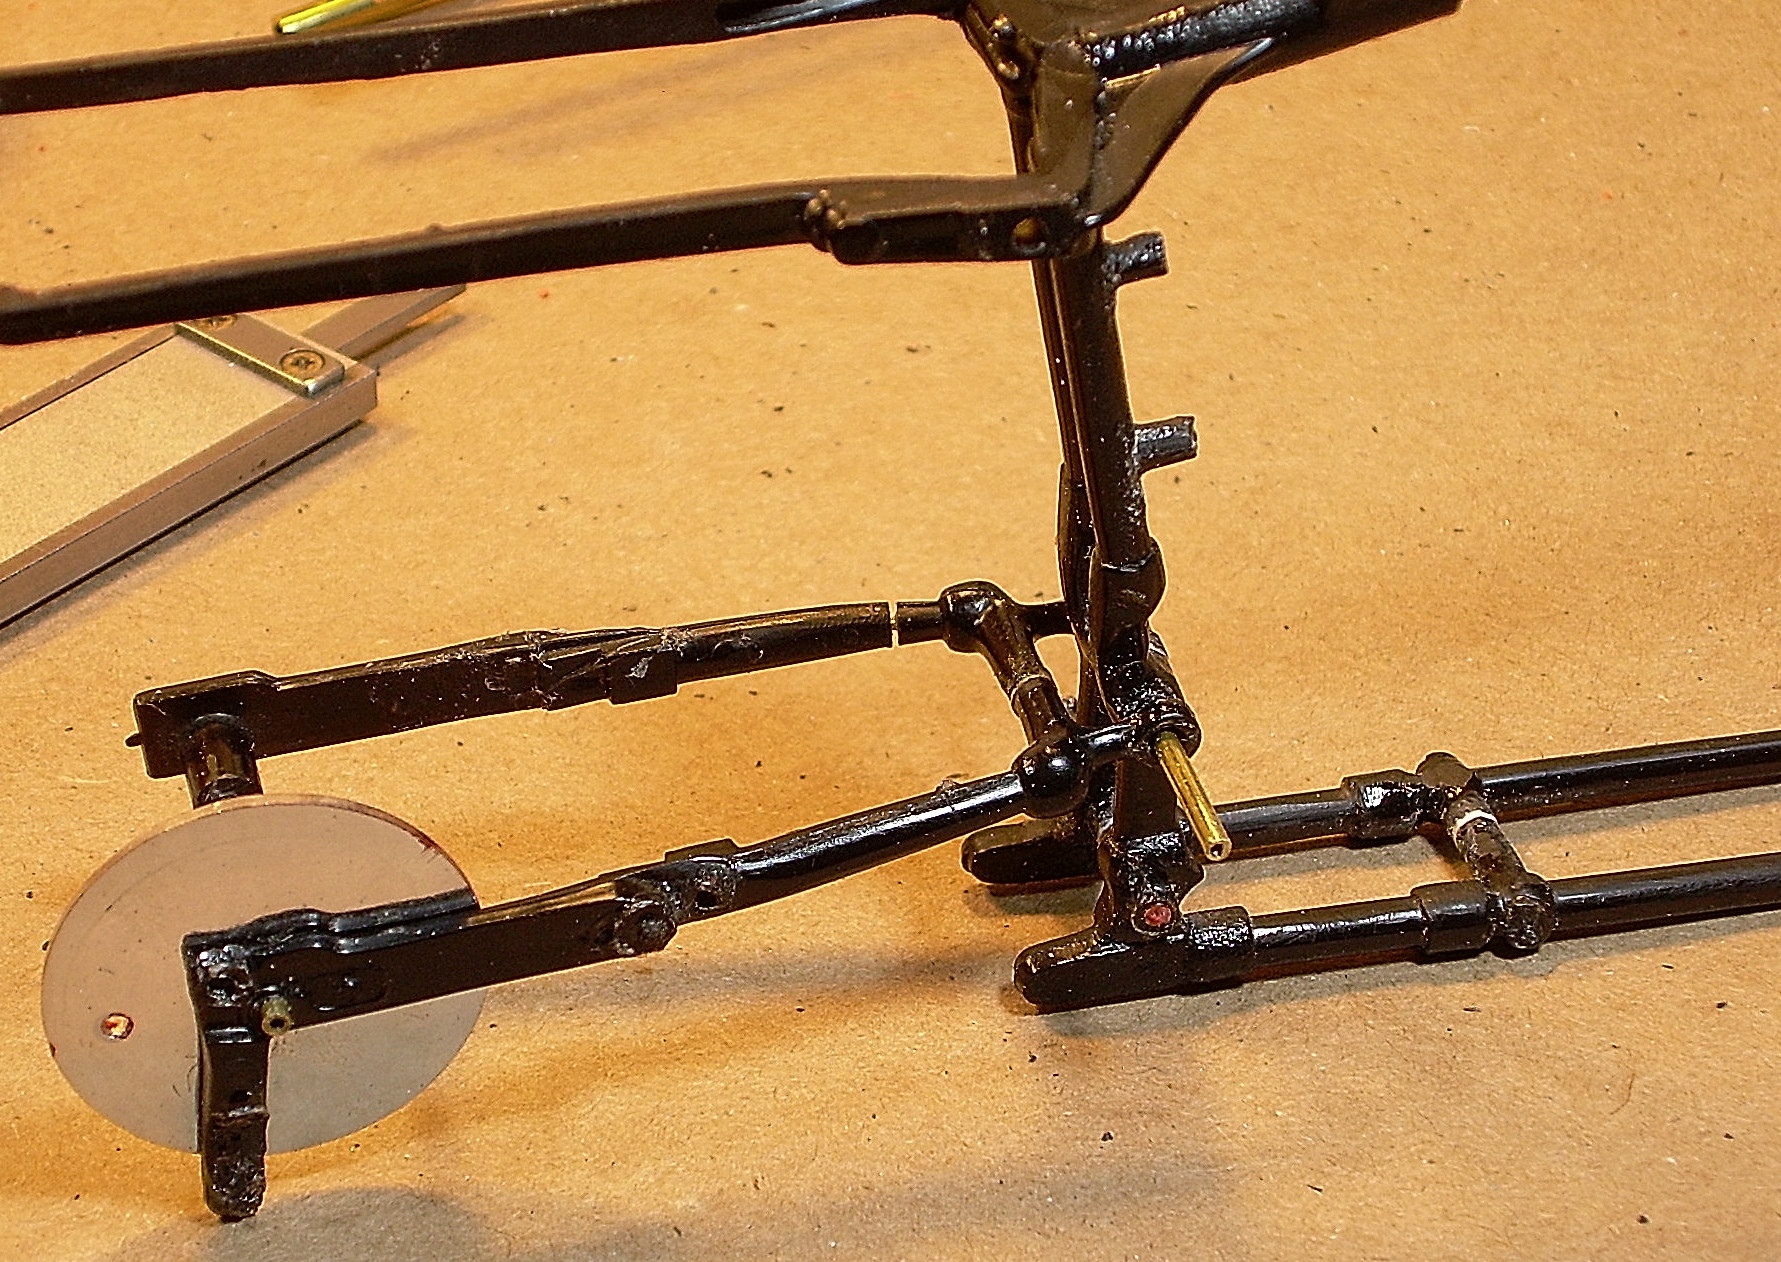
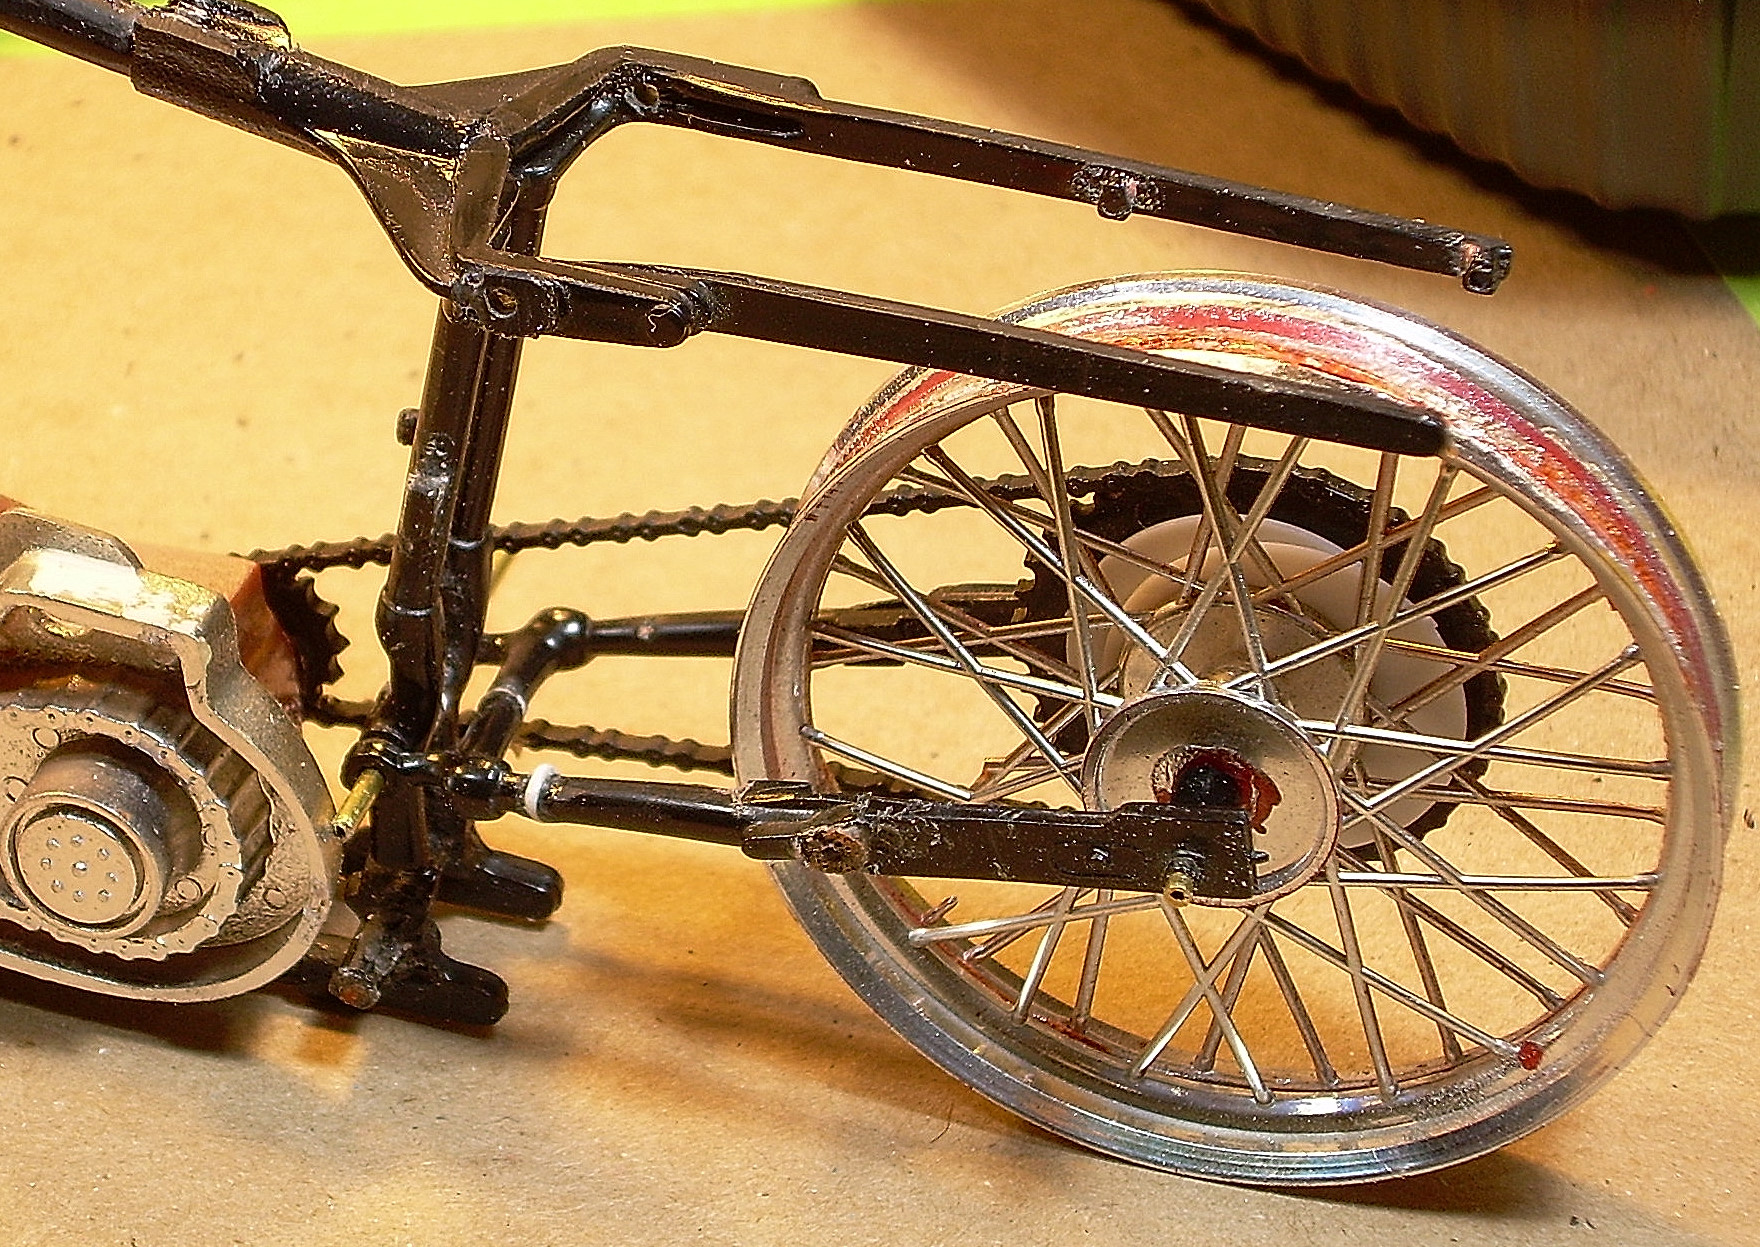
PART 4 So...after the frame set up nice and hard, the seam on the upper tube was lightly dressed, and the location of the locating pin for the tank was drilled in and replaced with a piece of 1/16" styrene round stock. The bushing for the swing-arm pivot was also carefully drilled with a 1/16" bit, a little at a time from each side, to insure it was square with the frame. The frame head has also been carefully drilled out to 1/16". Checking the tank fit, and another view of the drilling for the swing-arm shaft. The spacer "dots" are apparent here, and have been shaved down to match the frame cross-tubes. The swing arm was also broken. I cut the poorly-aligned side arms apart, put in another .010" spacer dot to replace the thickness of the saw kerf, drilled the ends to 1/16", and assembled the whole mess with the arms parallel. To determine exactly where the rest of the broken arm would have to go, it was necessary to get all the parts together that have to go between the axle ends of the swing arm. The brake drum was among the missing parts, so I guestimated how thick it should be from photos of real bikes, and used the two white styrene discs as a stand-in. In this shot, the broken ends of the LH arm have also been drilled for a .025" steel reinforcing pin. With the axle ends of the swing arm drilled for a 1/16" brass axle, and all the parts assembled (with the axle held parallel with the swing-arm pivot shaft) it was possible to determine how thick of a spacer would be required to replace the filed-off jagged ends of the LH arm. A feeler gauge showed it to be .020". A .020" dot was drilled and inserted between the pinned broken ends, and the wheel and other parts used as a jig to hold the ends in position as the glue set up.

-
How many builds?
Ace-Garageguy replied to NOBLNG's topic in General Automotive Talk (Trucks and Cars)
Main builds on the bench...only one at the moment: a 1/8 scale Harley Sportster "Bronson bike" restoration. First-string builds, well over 20. These are the ones that get worked on fairly regularly, and I know exactly where I'm going. "Resting" but not put away, well over 60. These are the ones where my idea has changed, or a problem has cropped up, or I need to acquire more parts, or do more research...and in some cases, to allow my skills to catch up with my vision (BMF). -
It's the end of the world as we know it...at least in the UK, at least for now... http://www.dailymail.co.uk/news/article-5445099/KFC-run-GRAVY-week-chicken-crisis.html "Now KFC has run out of GRAVY barely a week after the great chicken crisis as police release call from desperate customer who dialled 999 because his local restaurant was closed and he 'had to go to Burger King' "
-
Just remember that the exhaust port spacing isn't equal...rather it's kinda like a nailhead Buick with one runner cut off.
-
Ah yes...the controversial "Ronson" (anybody who ever smoked should get the reference), so nicknamed by its critics for its propensity to not fare as well as might have been hoped in actual combat... https://www.washingtonpost.com/archive/lifestyle/1986/05/08/the-man-who-made-war-on-a-weapon/7b47ff0e-59df-4201-845c-d19b1597b395/?utm_term=.2099b9a29056
-
Altereds, before the AWB cars
Ace-Garageguy replied to Greg Myers's topic in General Automotive Talk (Trucks and Cars)