DR JAY
-
Posts
288 -
Joined
-
Last visited
Content Type
Profiles
Forums
Events
Gallery
Everything posted by DR JAY
-
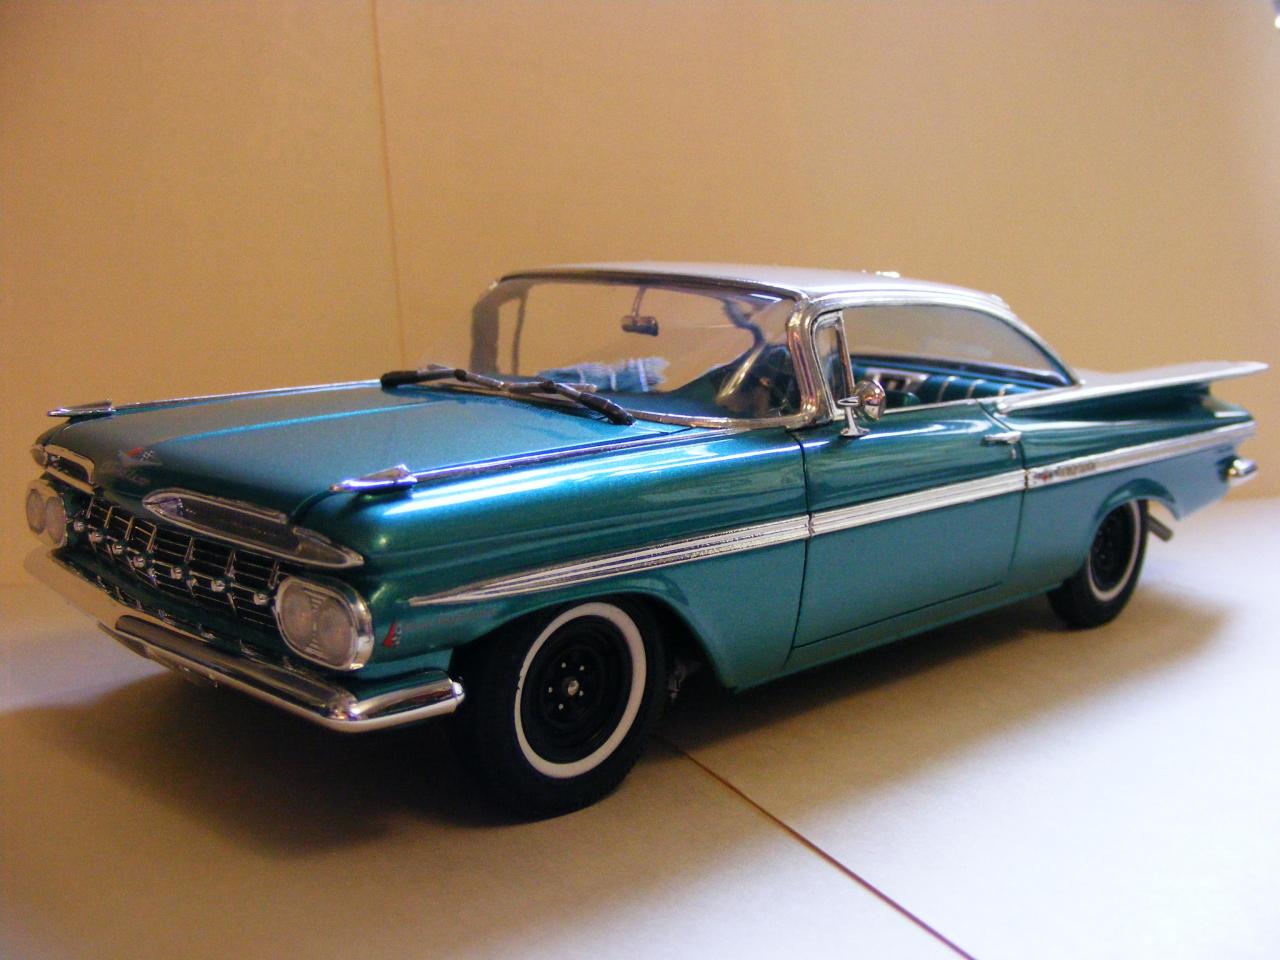
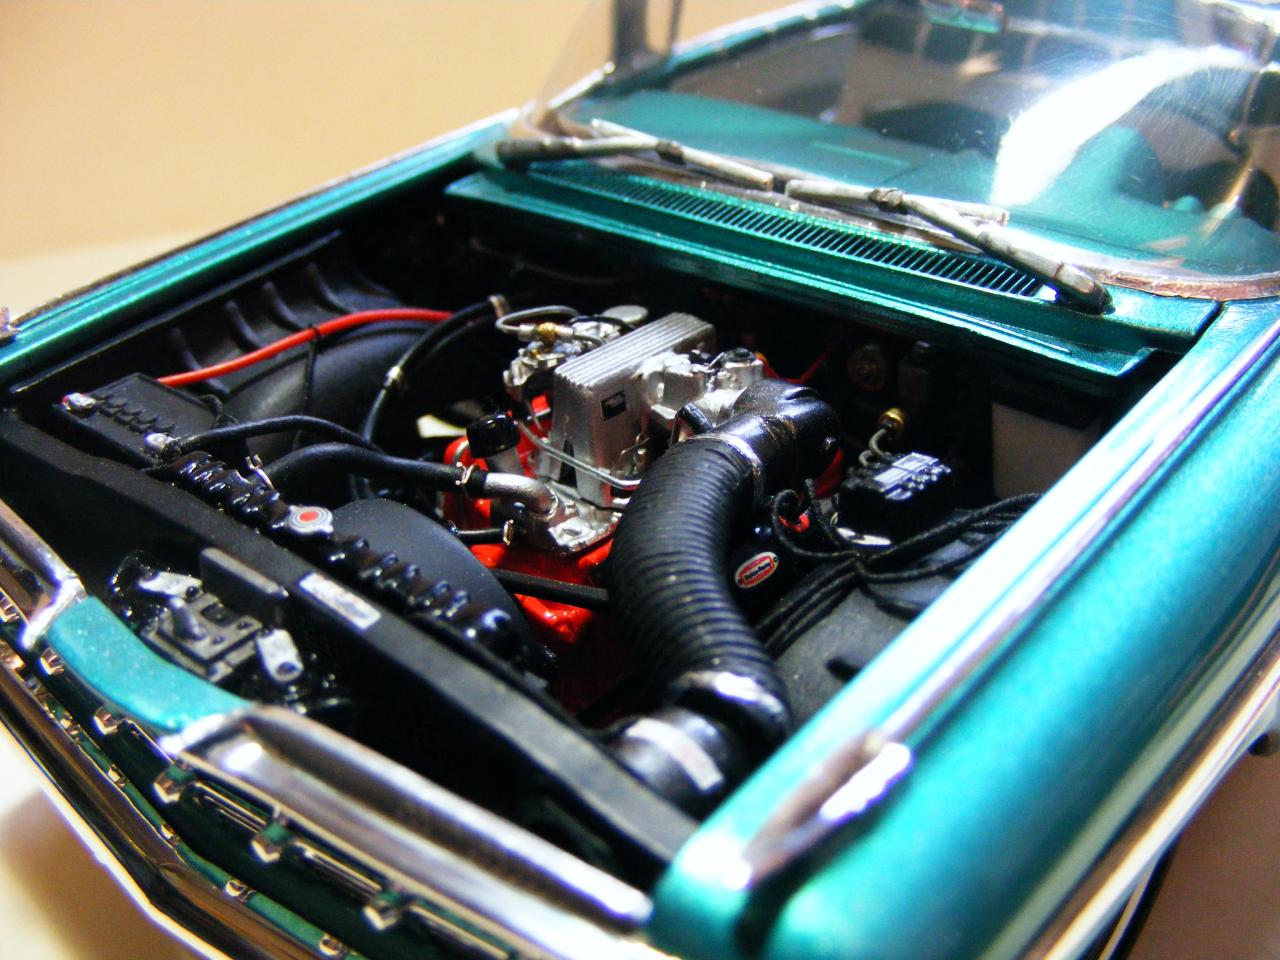
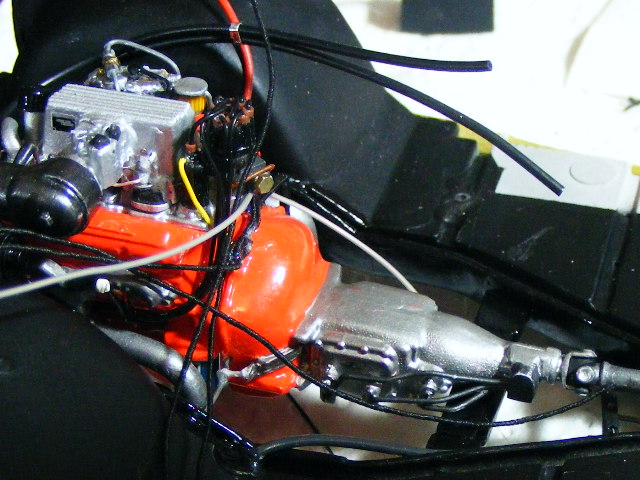
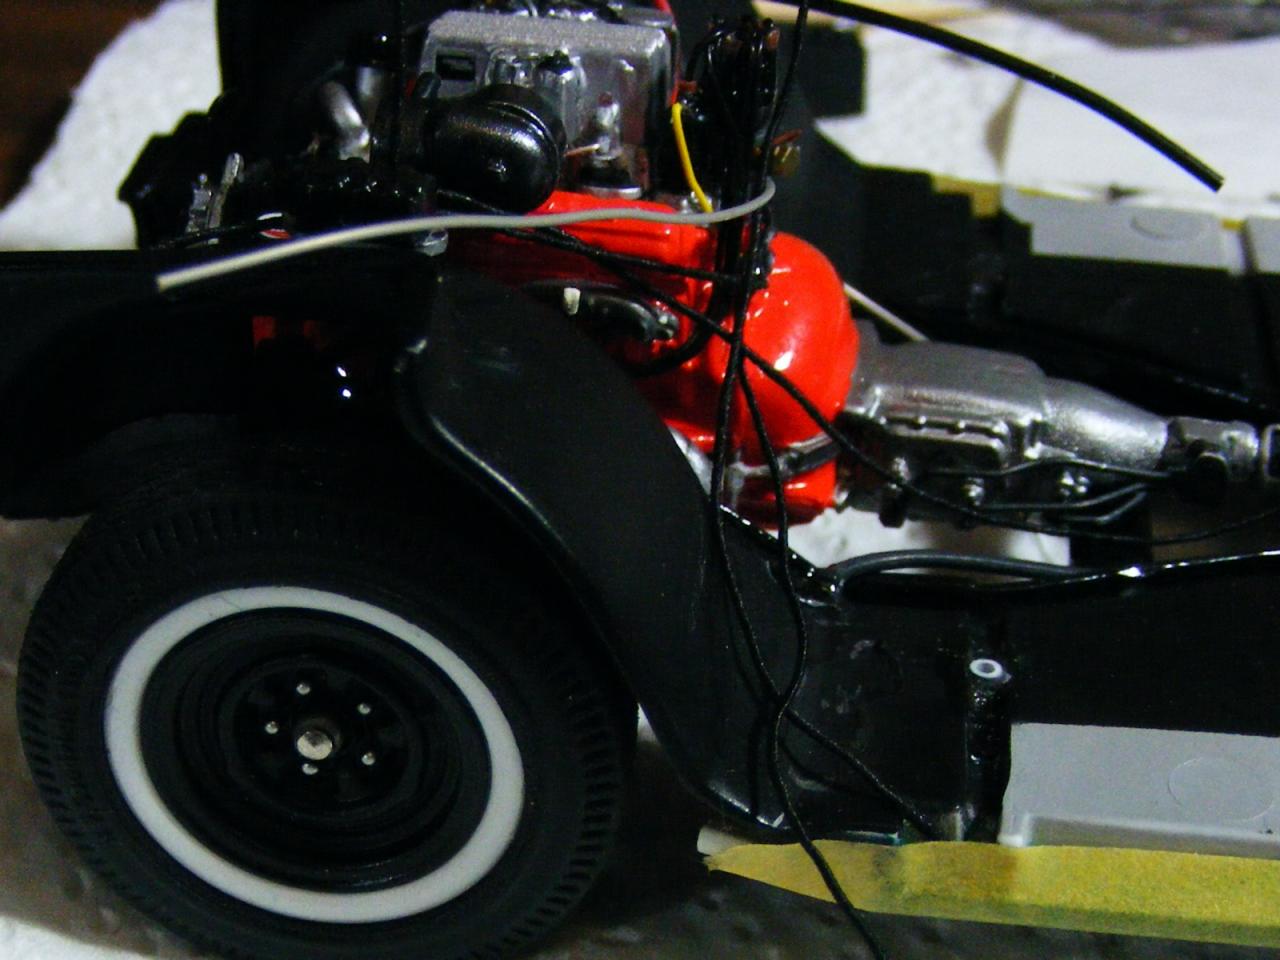
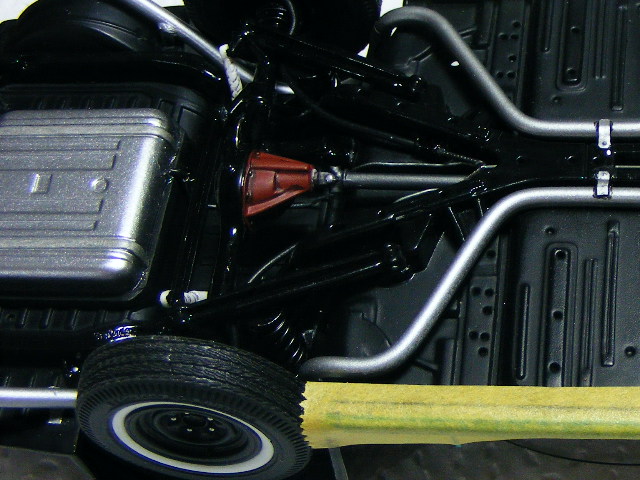
...One of 19 equipped that way, according to the average I took of the varying reports on production numbers during my research. There was supposed to be a print ad that appeared in Hot Rod and similar magazines back in the day, but I haven't seen it. For most people, that ad was the closest that they would come to seeing one. I have always been interested in factory performance of the 50s and early 60s that was offered in VERY limited numbers, like 421 Tempests, Tunnel Port Comets and...well-This. I started this one a few years ago and boxed it back up only 1/2 completed. To bust out of a building slump, I reopened the box and posted pictures in the Workbench section to keep me motivated. I chose to complete it as mostly stock with a couple of custom touches like the interior finish, exhaust and the non-inclusion of the fin mounted radio antennae that, in my opinion, bring distraction to the eye as it follows the line of the rear fender. A colour coordinated shift knob for the factory style "Wiggly Stick" shifter was the cherry on top... The fantastic engine and trans came from the Revell Pro Modeler 1958 Corvette kit-an excellent kit on it's own from which I plan to use the remaining parts to build a period gasser. The rest of the project used the Revell Impala parts with the exception of the wheels and tires, which were robbed from a 1962 Pontiac custom kit. I removed the cones from the centre spyders and made hubs to fill the holes. The exhaust was scratched from solder and home made mufflers and clamps and many blinding hours went into wiring and accurately plumbing the fuel injection system, from pumps to injectors. As I do on all of my projects, all linkages, cables, etc are in place to the best of my ability and knowledge. (Hence, The Building Slump...??) I matched Duplicolor aerosol paint the best I could to the Snowcrest White/ Crown Sapphire combo I myself would have ordered had I been around in late 58 to order this one myself. The 1959 Only Fuel Injection fender badges were made from decal scraps. Anyhoo, the in progress shots (Recent; Post-Unboxing...) are On The Workbench and the finished shots (Poor indoor shots as it's now winter here in Canada!) are here for your perusal. Feel free to leave honest comments if you wish...this is, after all, my first completed build of 2014!

-

1959 Impala Fuelly--Updated Nov 21, 2014...FINALLY finished!
DR JAY replied to DR JAY's topic in WIP: Model Cars
Thanks to everyone for the comments...I knew that if I posted In-Progress pics I would HAVE to finish this one. The rest of the pictures can be seen Under Glass, but I thought I should post one last shot to prove that I wasn't shut out in 2014. There were some issues during the final assembly that I didn't see coming as this is the 1st 59 Chevy kit I've built--like the space between the windshield and dash. I also would have stripped the bumpers and cleaned up the ends before shooting them with Alclad, but I had used extra bright foil on the trim and it would have made the bumpers look dull in comparison. I did, however, fasten the bumpers for easy removal should the mold lines ever bug me to the point of correcting them in the future. I still wonder if I should get a set of Modelhaus bolt covers for the wheels, but my preference for the look of steel wheels always wins in the end. Besides, I build mostly vintage drag and stock cars and any strip would have forced the removal of the wheel covers in Tech...
-
Great Job! Clean build of a beautiful race car.
-
Very cool--one of my favourite doorslammers.
-
Very cool build...I've always had a soft spot for that style.
-
1959 Impala Fuelly--Updated Nov 21, 2014...FINALLY finished!
DR JAY replied to DR JAY's topic in WIP: Model Cars
I recently had some time to get a little more finished. The scratchbuilt exhaust is finished and installed and the wheels are mounted on modified versions of the custom steelies with centre spiders that came from the AMT 62 Pontiac kit. I drilled the centre cones and made front hubs and rear axle flanges to fill the holes. The chassis is now a roller and the next areas to get some attention are the firewall and core support so I can finally complete the engine bay. More pictures when that and the engine bay wiring and plumbing is finished...possibly next weekend...
-
I'm really liking this...and it's not red!
-
Very Cool!
-
1959 Impala Fuelly--Updated Nov 21, 2014...FINALLY finished!
DR JAY replied to DR JAY's topic in WIP: Model Cars
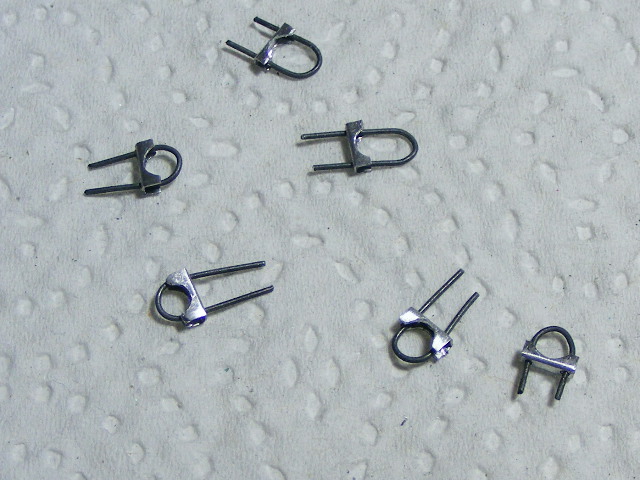
Very tedious, but since I made some for a project a long time ago, I feel I have to install them at every non-welded or bolted exhaust joint...exhaust clamps. The nuts are just pieces of hex rod with holes drilled through the centres (Not pictured)...
-
1959 Impala Fuelly--Updated Nov 21, 2014...FINALLY finished!
DR JAY replied to DR JAY's topic in WIP: Model Cars
I was really busy over the weekend winterizing the 1:1 family vessels, so all I've had time for was some exhaust scratchbuilding. I tried out a set of scratchbuilt (Solder) pipes and OEM style mufflers--and they looked pretty good--but, there will be a tiny element of mild custom in this build, so I built another set of pipes along with some scratchbuilt mufflers in the style of early Smithys or rolled seam thrush mufflers. I can almost hear the deep burbling that something like this would make at idle. I still need to finish bending one pre-pipe and fabrication of the exhaust clamps and hangers, but you get the idea so far. I'll put up more chassis shots once the exhaust is completed...Thanks for all the kind words, I'm kinda glad that it appears the slump is over!
-
1959 Impala Fuelly--Updated Nov 21, 2014...FINALLY finished!
DR JAY replied to DR JAY's topic in WIP: Model Cars
For the fender badging--and you're correct; one year only--I found that I can KINDA come close by altering a 1.24 set of crossed fender flags by cutting the checkers into a triangle and laying them over a triangular piece of solid red decal. The 1957 Fuel Injection fender scripts from the Revell Black Widow are the same font as what was used on the 59 fenders. They won't be 100%, but as small as the emblems are, it will be hard to see any difference unless you get nose prints on the hood. The colours are as close as I could get to Tasco Turquoise and Ermine White, followed by a coat of Tamiya pearl clear for a bit of inaccurate Pop. I used a custom paint scheme for the interior using the same colours along with some inaccurate BMF for the piping in order to separate the colours. I should have a lot more completed by this weekend. Thanks for the compliments...believe it or not, I hauled this one out to try and break a building slump. I hope it works! <More later... -
I started this one a few years ago and for some reason, boxed it up until last week. It still has a long way to go, but I figured that If I posted some pictures I would be shamed into finishing something this year, despite a hectic shift-work schedule. The Revell kit was the inspiration, along with a Pro Modeler 58 Vette supplying the engine and trans. The tires are from an AMT Thunderbird (LOVE the tread detail and wide whites!). I almost went blind plumbing it, but I think it turned out pretty well. More to come. Comment if you wish--I'm not allergic to criticism or helpful tips!
-
post your homemade tools for building!
DR JAY replied to markymarkr1's topic in Tips, Tricks, and Tutorials
...I'm assuming that I don't need to post a picture of the tool in this case: A Used-Up Bic Lighter. For my use, the lighter should be that specific brand as the shape suits my needs. I wrap a small piece of sandpaper around the lighter and tape it in place. The shape is perfect for modifying wheel arches as I primarily build 60s stock cars. I keep a few handy with different paper grits attached. They get used quite a bit in fabrication...I was quite surprised. Don't forget to remove the useful parts from the lighters; like the spring and fuel valves that can find uses in building. I think every build since I got back into the hobby in 97 has got at least one modified lighter component in it. (BTW- I use the lighters for bending stryene for roll cages...DON'T SMOKE, KIDS!) -
I learned scope diagnostics as an apprentice on a machine like that. You do outstanding work...
-
"Stockifying" Cars
DR JAY replied to chunkypeanutbutter's topic in General Automotive Talk (Trucks and Cars)
I am working on and off on a conversion of the AWB 63 Tempest to a Tempest SD 421....for a while now. Sorry, no pictures yet. I also did the same kind of conversion to the AWB Falcon, that time making a Dearborn Steel Tubing/ Match race replica using the Revell T-Bolt and a scratchbuilt interior with a stock dash from a wrecked promo... http://s1177.photobucket.com/user/drjay2/library/DST%20Falcon?sort=3&page=1 -
Favorite smells in the shop
DR JAY replied to chunkypeanutbutter's topic in General Automotive Talk (Trucks and Cars)
I spent 25 years on the bench as an automotive tech, but grew up in and around repair shops. Gotta say that I miss the smell of carb cleaner--not the garbage that comes in a can, but the 5 gallon pail we dipped disassembled carbs in that contained a liquid caustic enough to make your skin burn immediately. In the Hobby Lab, I think the smell of windex and Febreeze is best because it means that I finally broke down and gave it a thorough cleaning and a glancing brush with organization. In general--the smell of the dust burning off the pipes when I start the bike for the first ride of our short summer season. Anyone remember what leaded fuel smelled like when refeulling on a hot day? Sadly; all of these things cause enough brain damage to allow the public confession of the above facts... -
I've scratchbuilt a lot of stuff during my time in the hobby...I'll stop now.... This thing is CRAZY! Fantastic work!
-
Being a fan of limited production factory "race cars", I have to agree with the 1963 Pontiac Tempest SD. My own vote would be the 1964 Mercury Comet Wagon ala Ed Scartman/Don Nicholson...427 Hi Riser with the teardrop scoop, 4 speed and pie crust slicks. I guess it could be a 2-in-1 with the option to build stock, but for me those parts would always hit the spares bins..... .....that 64 Galaxie wagon was pretty neat lookin'!
-
I didn't see this mentioned (If It was, I must have missed it!), but something I call "The Reality Of Scale" is sometimes lacking. I am still sometimes guilty myself, but am unaware until I look at pictures I have taken of my work. Specific areas have been mentioned--hoses and high tension leads (Plug wires...) that look HUGE are the most common issues, but I would like to add some others.. Aftermarket/scratchbuilt parts out of scale--Those Accel "Supercoils"--you know; the large yellow ones with the tan tops that were originally used on large gas powered buses and were grey--shouldn't be larger than the 4 barrel carb on the intake manifold. Those coils look great when detailed, but when attached to a 1/25 engine they look somewhat cartoonish. Same goes for Multiple spark ignition boxes. I am cheap, so I try to build that stuff myself. I have had to make more than one attempt at stuff like that sometimes due to the almost-finished product being too large or small . Aftemarket pulleys look good, but when the machined aluminum part scales out to something that sticks out to the point a fan no longer fits or it looks like the front of an AMC 327 engine, my eye is immediately drawn to the inaccuracy. The same goes for rubber o-rings for belts...belts aren't round or thicker than heater hoses. Vent Windows--Shouldn't be body colour. Also, they are always cast too thick and with no detail. Sand 'em down a bit so that they aren't the same width as the A pillars. Even a vent window latch would be a welcome addition. Roll cages that are too large and don't fit right-- I build primarily vintage drag and Stock car models and know how much work it is to build cages from scratch, so why not make it fit snug inside the roof and A pillars. Using the "Right" diameter tubing also ensures that the cage doesn't look like it was made from drive shafts. Too Much Detail--when items are out of scale to start with, adding too many of them makes the result look like a Deals Wheels model. I understand the need to make a model "Pop" on the table for judging, but in my eye too much of anything tends to be gaudy--not flashy. Brake plumbing is a welcome addition to any model, but no manufacturer used tubing that scaled to 1/2 inch or fitting nuts that scaled to 3/4 inch in 1:1. And, Finally; Not Going "All The Way" with detail that has been started--You've made shift linkages, carb linkages and wired the engine...BUT: the "wiring" terminates at holes drilled into the firewall or component itself...there are no terminals or nuts, just a red bell wire, insulation and all, pushed into the top of a battery or the back of an alternator, and usually the wire is way too big. Shifter and carb linkages are a cool scratchbuilt detail, but a piece of wire bent at a "Curved" 90 degrees and stuck in a hole drilled in the carb or transmission side cover detracts from the overall appearance, especially if the throttle linkage is larger than the heater hoses. Now: this is just a response based on personal taste and observation, not an attempt to bash anyone's work or skills. This is a hobby, after all, and should be fun. My personal preferences come from a lifetime around automobiles, both stock and performance, as well as 25 years as a professional technician. I choose to add all of the detail that a 1:1 car has and that doesn't mean that everyone should do the same. I have tried to build box-stock, but even the addition of plug wires led to more details and before I knew it I was sitting at the bench adding ignition keys and headlight wiring and circuit breakers. I believe that anyone following this thread could take a tip or two to improve their builds for themselves but they should always remember that unless it's a build for a contest table, they are building for their own reasons and satisfaction. Condemnation from so-called "rivet counters" about not adding details they themselves would is of little consequence. After all; WHO actually built it? Keep improving detail to enlarge your arsenal of skills for future builds, not to appease the critics. I believe this thread to be beneficial to everyone, both novice and hobby room hermit.
-
Wow. I think I worked at that station! This is amazing...
-
Serious modeler envy
DR JAY replied to MustangGuy23's topic in General Automotive Talk (Trucks and Cars)
I think I may have cured my Runaway Hobby Room...my Girlfriend and her son moved into my palace and I agreed to let her set up her quilting stuff/sewing machine in 1/2 of the room. Limited space means less room for more loot...until she finds out how dusty it can get in Manland and decides to move her stuff to another room. I tried... -
I sure do like the Header-manifolds that came in the Impala kit...PERFECT for that Mystery-Motor 1963 Chevrolet conversion.
-
I really like where this is going...
-
Awesome and extremely clean builds of my favourite subject. I would sell my body parts for those kits today- especially the Pontiac. The condition of your 35 year old builds is why I too keep my stuff in display cases...Thanks for showing us!
-
"Old Punchy" ........
DR JAY replied to Old Coyote's topic in WIP: Stock Cars (NASCAR, Super Stock, Late Model, etc.)
Cool build once again, John!