DR JAY
-
Posts
288 -
Joined
-
Last visited
Content Type
Profiles
Forums
Events
Gallery
Everything posted by DR JAY
-

Talk About Time Consuming.........
DR JAY replied to JollySipper's topic in General Automotive Talk (Trucks and Cars)
Easy enough to wrap with clear vinyl after the artwork is finished -
Cool--thanks for the info. I need another Ford for a different project, so it looks like I can score the amber beacons as well!
-
The last Big Truck build I did was as a 12-13 year old kid. It was a Mack cabover with Ryder decals. I recall it coming with both a red light sprue as well as an amber sprue for the cab clearance lights. Both sprues, as I recall, had multiple choices for lenses as well as two beacon lights. I was wondering if Big Truck kits still came with the amber lamp tree and if that tree still came with the amber beacons. I am building a 1957 Chevrolet NAPCO 4x4 (Not topic friendly for this particular section of the forum, I know...) as a gas station service call truck and am looking for a source for the amber beacons. I believe the Mack cabover has been re released and there might be someone who frequents this section who can tell me if the amber sprues survived the re release and are still out there.
-
What kit can this motor be found in?
DR JAY replied to Ridge Rider's topic in Model Building Questions and Answers
The engine is a 440 from the 1/24 440-6 Superbee/Superbird/Roadrunner by the looks. The valve covers look to be from the same kit, although the left is upside down. Can't tell where the blower and intake are from, but the timing cover is from the 440-6 as well. (Currently working on the Superbee, so the parts are familiar) -
1969 Coronet R/T. Blue with a white bucket interior. Sadly, Dad has no pictures of that car but he assured me it was a handsome machine that went like a scalded ape and chewed through fuel like it was free. He sold it to a kid (Who apparently grenaded the 440 while Highway Racing outside our rural community and it became a yard ornament...) and replaced it with a new Chevrolet wagon with a 454 and a chronic overheating problem that he fixed after a few months with a brand new loaded big block Royal Monaco Brougham.
-
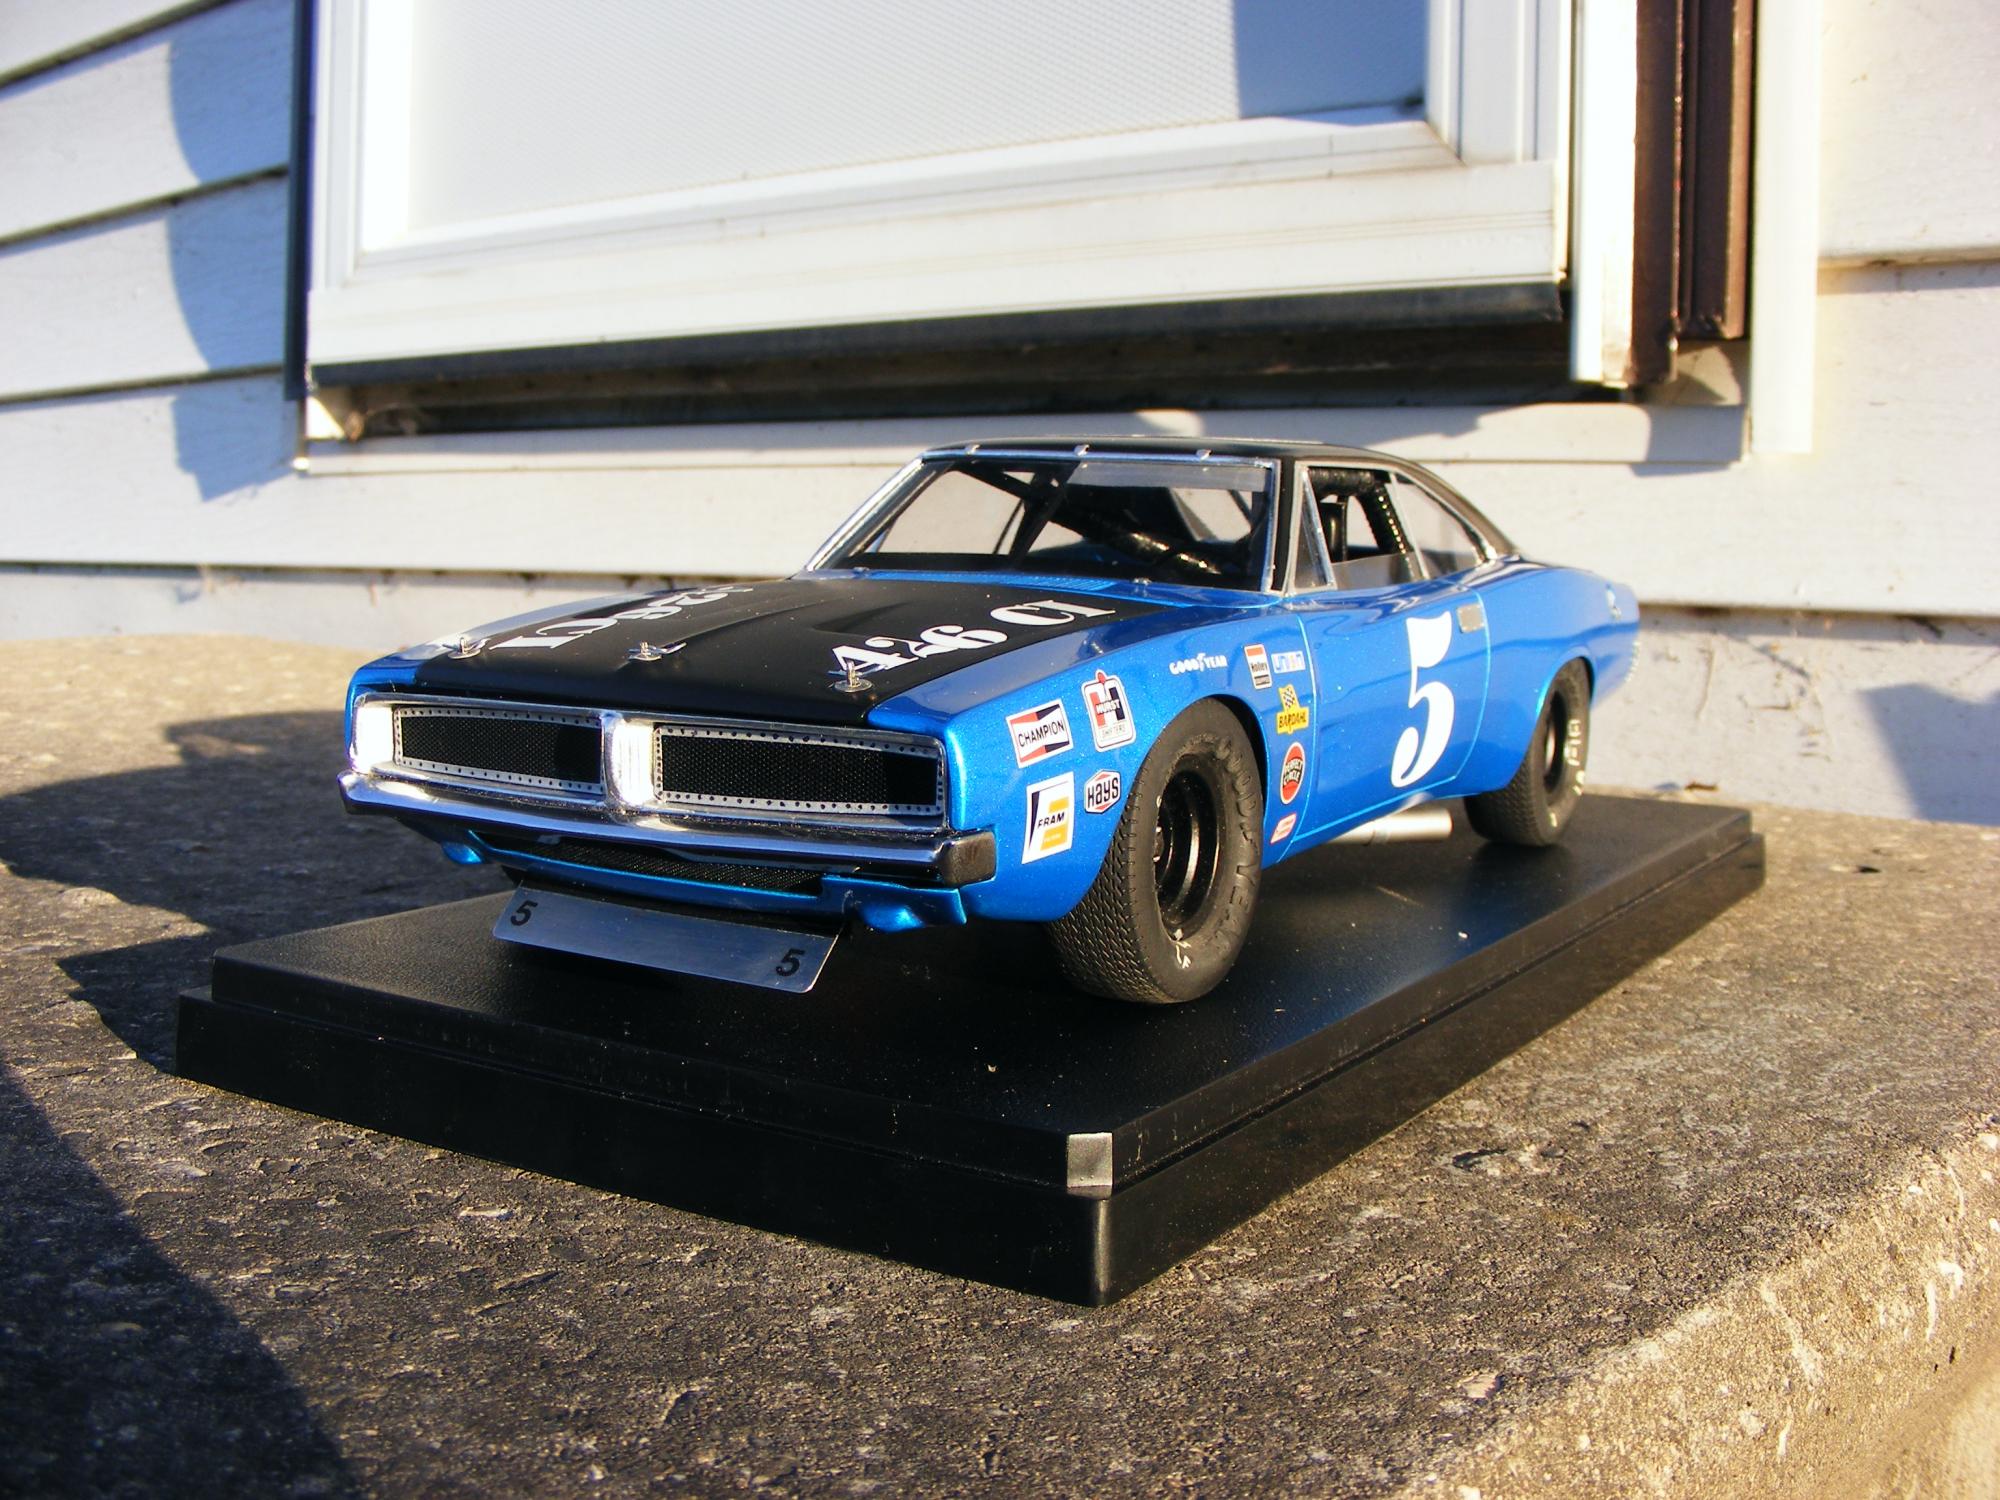
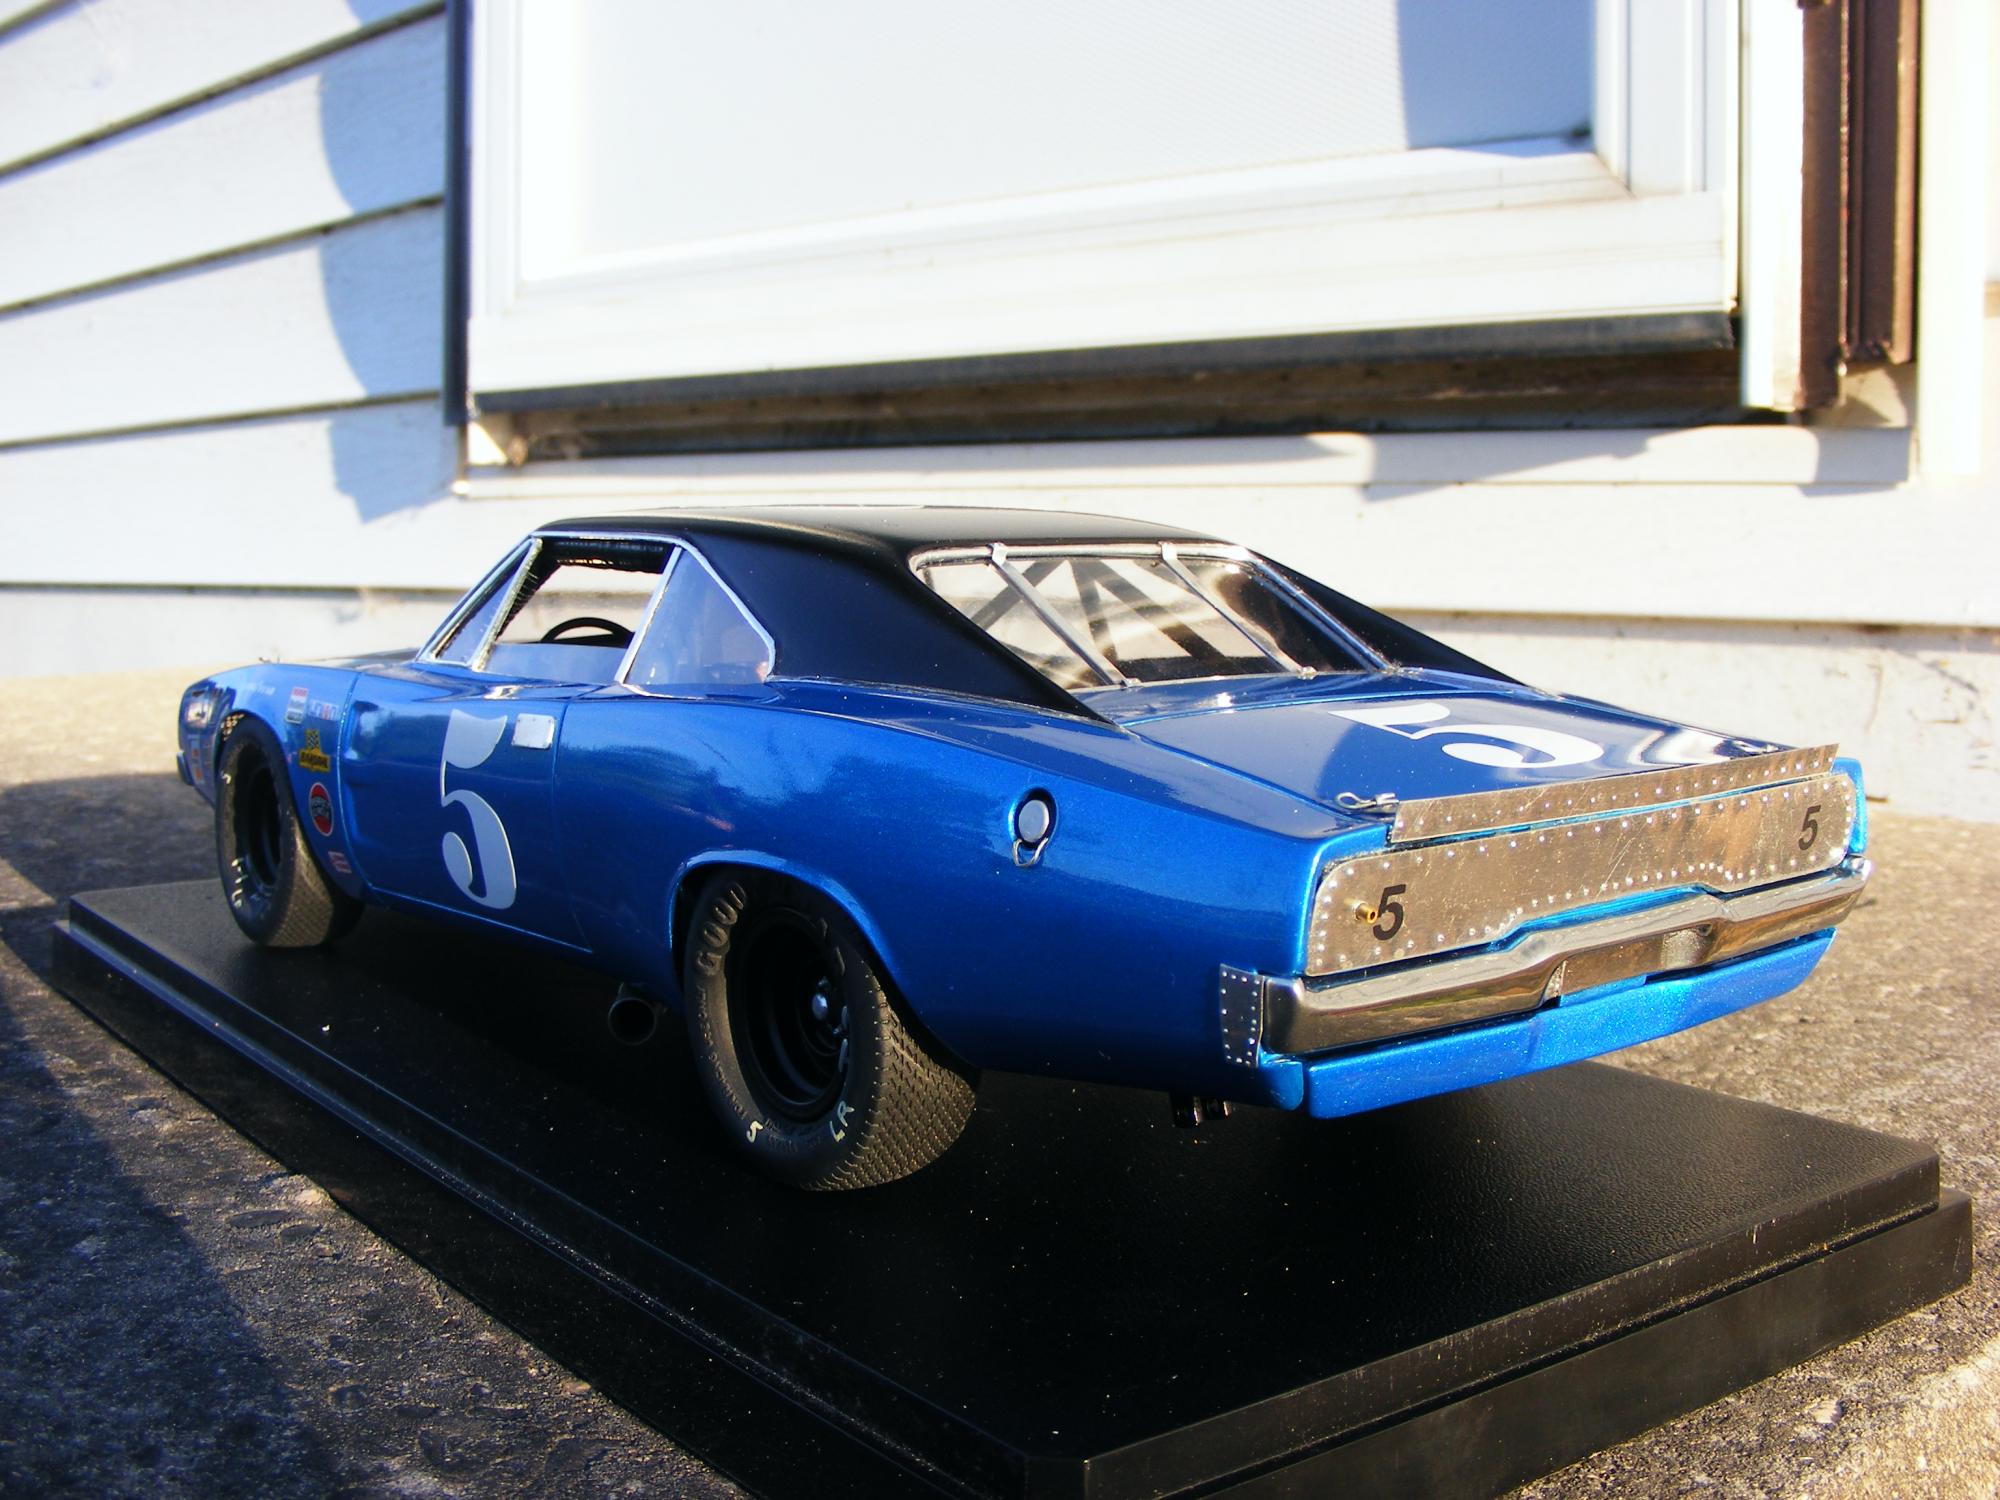
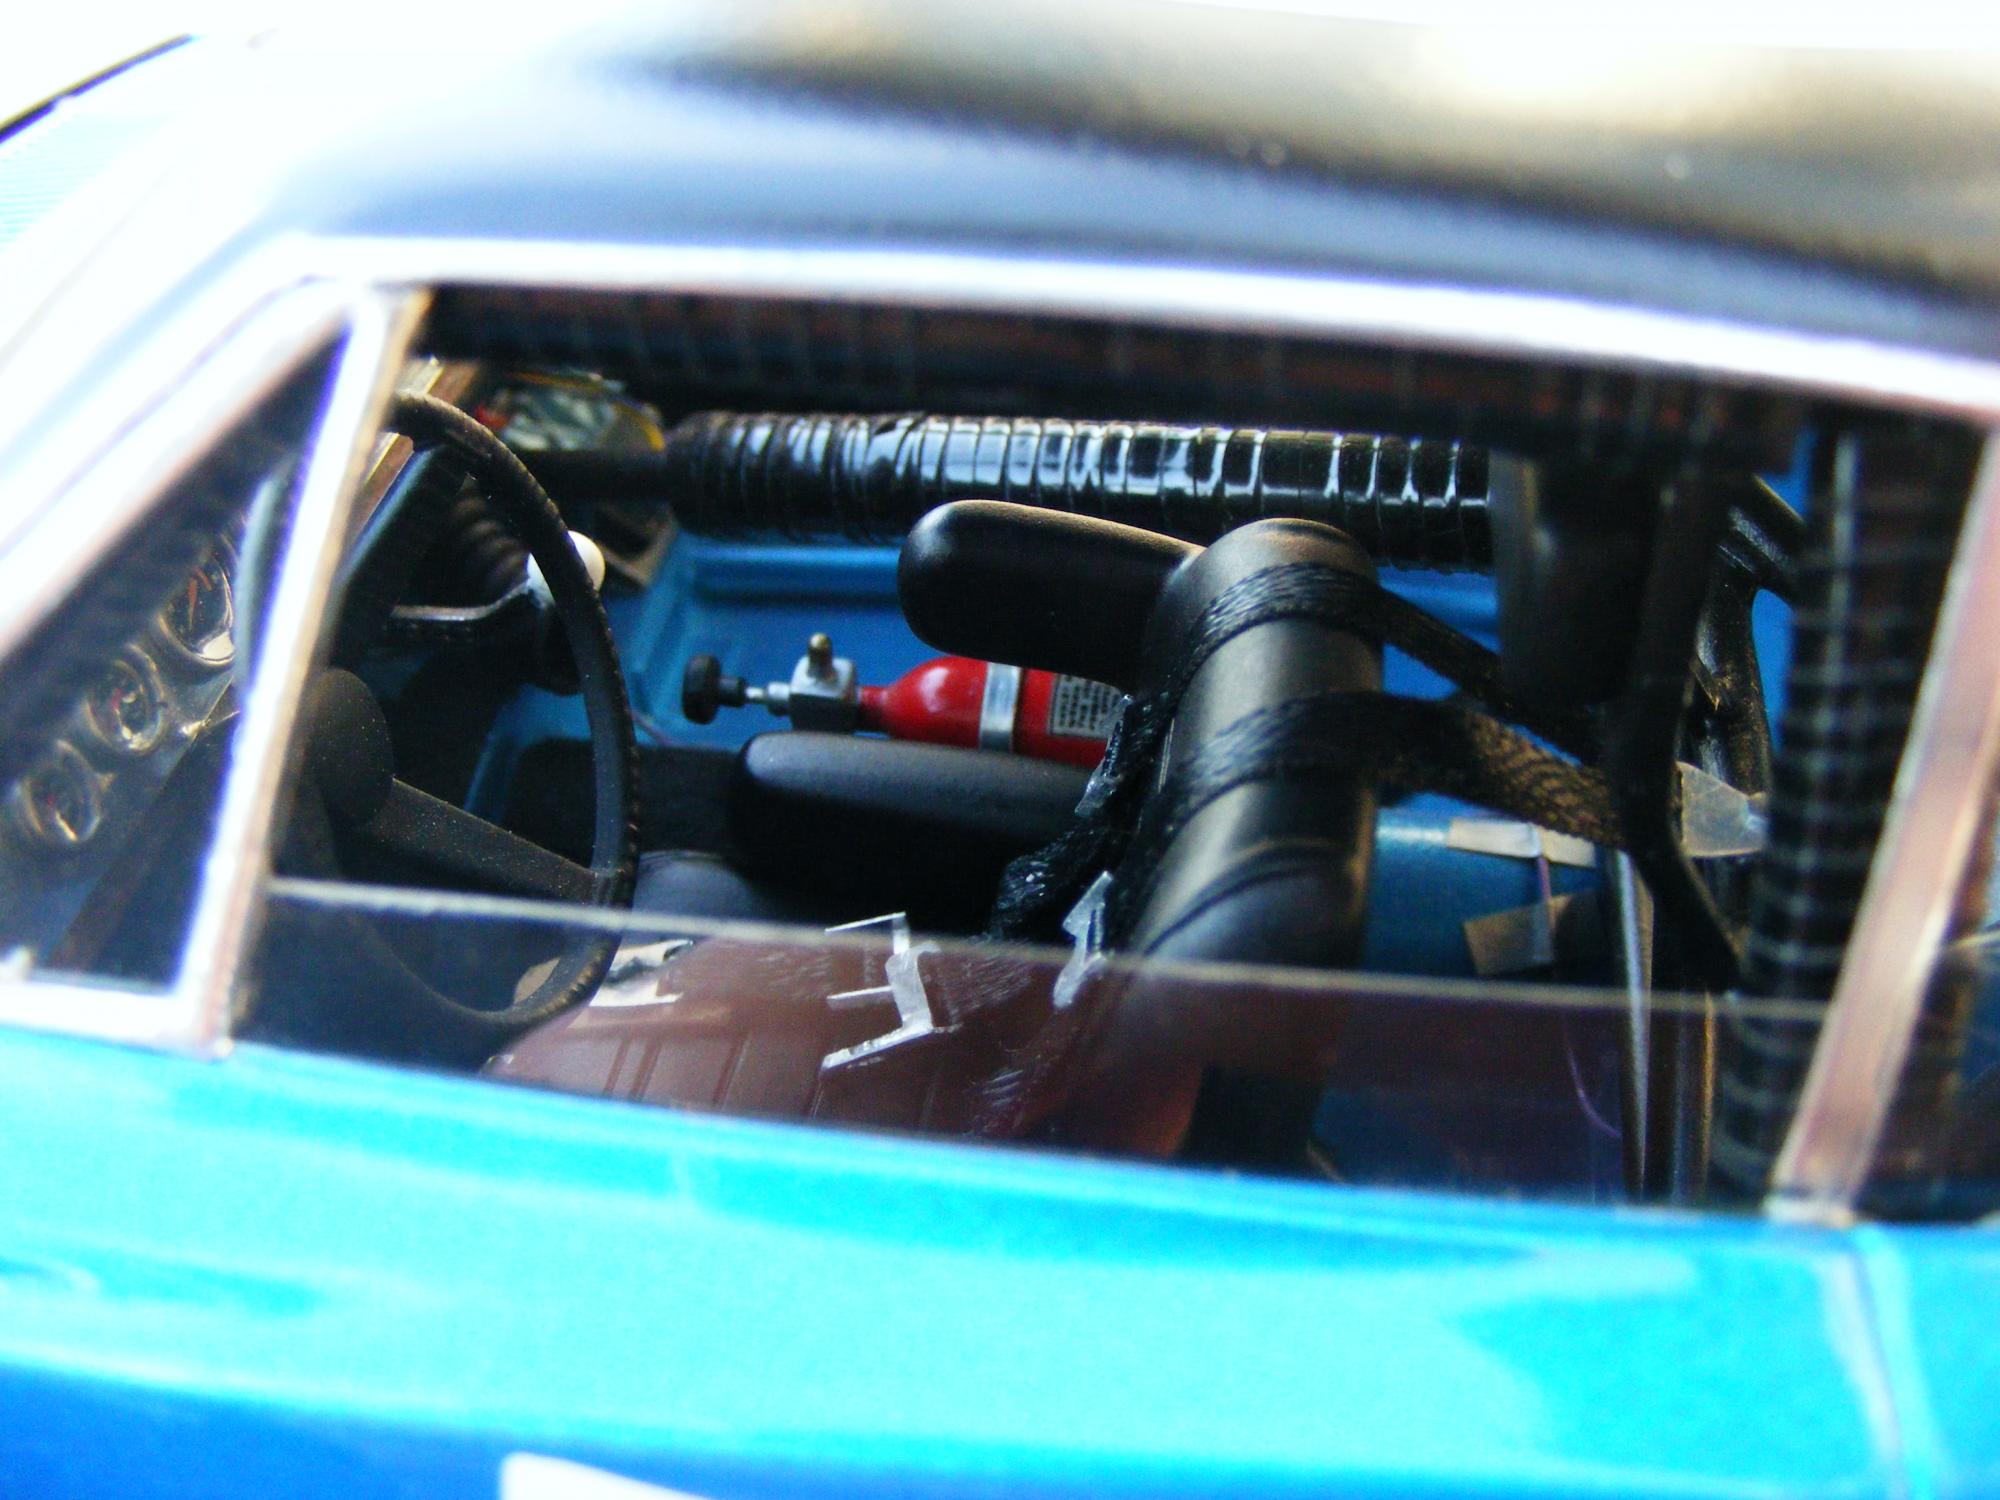
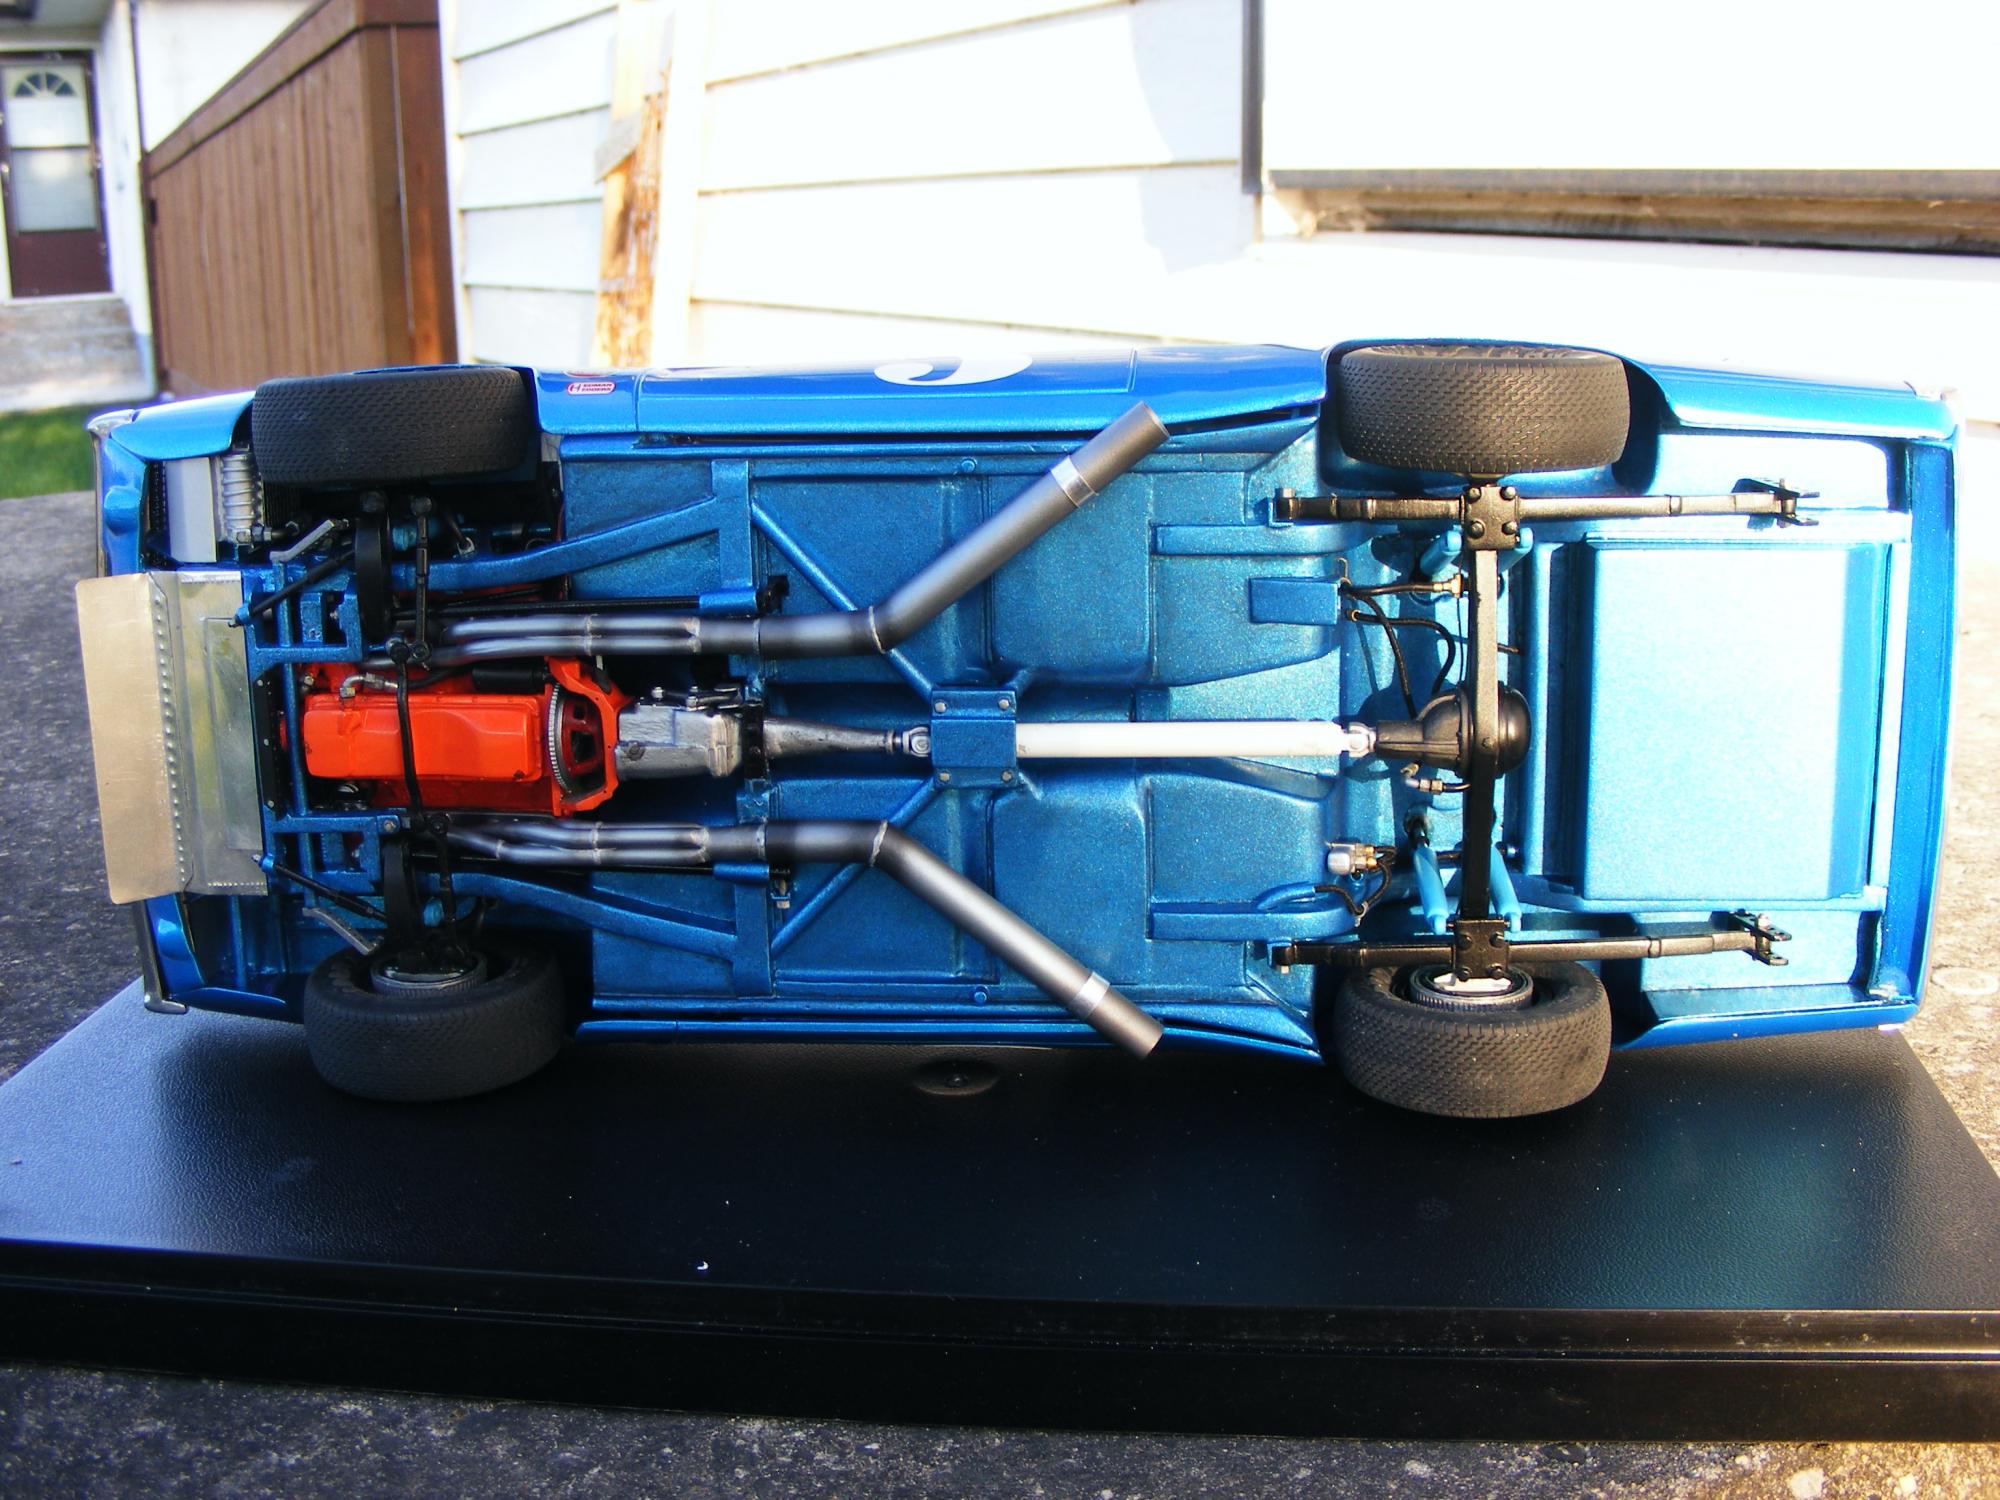
Hello folks. I had recently posted this build on another forum, but shortly afterward it went down for repairs and has remained that way for a couple of weeks now. I started this as soon as the DOH Charger was re released. The only aftermarket stuff I used were the photoetch oil cooler grille, the resin wheels, the nuts and bolts used for the suspension and wheel studs/nuts and the white vinyl numbers and hood call outs which were done on a friend's vinyl cutter. My reference was countless pictures of Nichels cages and chassis as well as advice from people who worked on and/or own Chrysler stock cars of this vintage. The #5 has no significance other that nobody actually ran that # in 1969. I see now that Scott and Futurattraction have come out with a handsome set of seatbelt hardware that would have saved me hours of work making my own. Anyhoo--here are a few outdoor shots of the finished product and the Photobucket link will take you to the in-progress shots of the build, which was my 1st large scale build ever. I'm not afraid of comments or tips. Thanks for looking. http://s1177.photobucket.com/user/drjay2/library/1969 Grand National Dodge Charger Project?sort=3&page=4
-
Great stuff! Thank You
-
Looking for a 1/24 Ford Maverick?
DR JAY replied to Snake45's topic in General Automotive Talk (Trucks and Cars)
Kinda sad that it's not a 73 or earlier...never was a fan of cow-catcher bumpers on anything. -
I had no idea this kit existed. Now that I do--I have to find and build one.Following
-
I've used Mr Hobby clear, called Mr Super Clear (Respectful people, those Japanese...) over Tamiya paint with absolutely no issues. I even used it over Tamiya Mica Blue without polishing required. A good thing since I had no interest in trying to polish an open race car trailer.
-
It's been down for a couple of days. I too hope it hasn't been axed as I frequent that site more often than I check my email. A wealth of information would be lost if they shut down. Still watching...
-
I 1st used Liquid Paper on whitewalls and lettering over 30 years ago. I can only speak for the bottle type with the brush in the cap...it dried normally but tended to crack and flake off if the tire was flexed during wheel installation
-
Welcome to the forum Mr Reynolds. Your contributions to the HAMB have already been helping me with detail info for a while. Thanks in advance...
-
Very Nice. I have to admit that my favourite part was the blue Aspen Kit Car.
-
Nice job on a forgotten machine. You did bring back some horrific memories as I used to have to fix these for a living. Engine replacements, Heater cores, ball joints, heater cores, engine replacements, heater cores, ball joints...
-
The project began as soon as I got the re released kit home and became an off-and-on project since then. I finally called it finished a couple of weeks ago. I had planned on taking better pictures, but a recent blast of a heat wave followed by the torrential rains of the past few days means that these are as good as it gets for now. The wheels are resin, the radiator face and oil cooler face are photoetch material and the nuts and bolts on the chassis as well as the wheel studs/nuts are bulk stuff from the model railroad section of my LHS. The rest is either scratchbuilt or modified parts from the kit. Paint and clear is my 1st try testing out the Testors One Coat system. Aside from heating the paint and clear in hot water 1st, I followed the instructions and the finish you see here came straight from the can. The link provided will take you to my Photobucket account where you can see the progress/building pictures if you're interested. I chose to build a car and use a number that never existed so I could put my name on the door. There were no decals available at the time that interested me enough to build those specific cars, and I had a feeling that the tables would be full of 43s and 71s--not to mention a sea of orange 01s. Feel free to comment. The link provided will take you to my Photobucket account where you can see the progress/building pictures if you're interested. http://s1177.photobucket.com/user/drjay2/library/1969 Grand National Dodge Charger Project?sort=3&page=1

-
If you could only choose ONE photo of any of your builds, wich would it be?
DR JAY replied to JAFFA's topic in Model Cars
Yeah...sorry. That was SUPPOSED to be a picture. Thanks for correcting it! -
If you could only choose ONE photo of any of your builds, wich would it be?
DR JAY replied to JAFFA's topic in Model Cars
I'd have to say the Modelhaus 59 Olds 98 I converted to a full detail Super 88 is my favourite... http://i1177.photobucket.com/albums/x357/drjay2/1959 Oldsmobile Super 88 project/1963GalaxieGrandNationalBuild-Lorenzen433.jpg -
Dodge is bringing back "Plum Crazy".
DR JAY replied to Custom Hearse's topic in General Automotive Talk (Trucks and Cars)
Let's hope the "New" Plum Crazy doesn't fade as quickly as it did on my 340 Demon... -
1/24 Revell Superbee Quarter stripes
DR JAY replied to DR JAY's topic in Car Aftermarket / Resin / 3D Printed
Thanks for the tips. Keith Marks and I are actually in the same model club here in Winnipeg. Those stripes are 1/25 for the AMT 1970 Superbee--I guessed that with a little surgery, and an extra set for length, they can be made to work. Joseph--If those wheels and tires turn out anywhere close to the rendering...I'm in for 3 sets right off the bat if they are to be made generally available! It looks fantastic! The 69 A12 project would be pushed to the front of the line with a set of these on hand...and a spare for the opened trunk... -
I mistakenly placed this in Parts Wanted...well--because they're parts I wanted. I'm building a grudge match hemi version of this kit and upon closer inspection of the Quarter stripes have noticed that the bees are backwards. No big deal for this project, but the next Superbee in line for construction is to be a very detailed stock A12 version. Does anyone know if the CORRECT quarter panel stripe decals are being produced in 1/24 by anyone in the after market? The Hemi Bee can be built without stripes--no big deal, it's a race car anyway--but I feel them to be important for the factory build. Any tips would be appreciated. Thanks for looking...
-
Yes, it said it was CAD designed and 3D printed. The small container is full of the screws included for assembly and it comes with all detailing items such as wiring, cast aluminum valve covers and plumbing.
-
Based on a Grand National stock car, the 1/16 Charger has the 8 3/4 removable carrier Chrysler rear axle--even comes with pretty reasonable representations of GN drum brakes.
-
... I was just gonna ask if they were the same size and width as the other wheel backs. larger would likely be for race tires.
-
Great stories! I can't wait to teach my grandson about carburetors, motorcycle riding, dirt ovals on Saturday night and what little I know about women. I also am on the edge of my seat about the time when he can come to Papa's house and build stuff in the hobby room. He may not end up enjoying it, but he sure will be offered every minute of time,every tool, paint and kit that I have. Seeing the pride in the faces of a child who made something with their own hands is reward enough. My 1st model at the age of 8 was the brand new Monogram Z28, molded in a ghastly yellow, My dad helped with the white lettering on the tires using flat white and a toothpick. Despite the many incarnations that model ended up going through, (Paint jobs; Raising and lowering; Engine swaps; Etc...) those perfectly lettered Good Years remained on the Camaro.