Lovefordgalaxie
-
Posts
3,273 -
Joined
-
Last visited
Content Type
Profiles
Forums
Events
Gallery
Everything posted by Lovefordgalaxie
-
55 Bel Air mild custom. (New pics Jan 11th)
Lovefordgalaxie replied to geetee66's topic in WIP: Model Cars
Loved the wheel and tire combo. Can never go wrong with some Wide Ovals. -
Thought that the first kit I had with it. When I got a second, that made me wonder what the issue is.
-
Engine wiring question
Lovefordgalaxie replied to DanR's topic in General Automotive Talk (Trucks and Cars)
Pulled it, because I wanted to make the #1 to be at the spot marked as #1 on the cap. -
Me too. His mom was too young and had no dilatation, or something of that order, and they had to take Kirk out in a hurry. He had no pulse and was all purple. The vet and his wife took turns reanimating him, and closing the incision on Leia, that was also fixed at the same time. It was touch and go for a while, but then he started breathing by himself. During the night, when I finally was able to make him to suck some milk, I knew he was going to be fine.
-
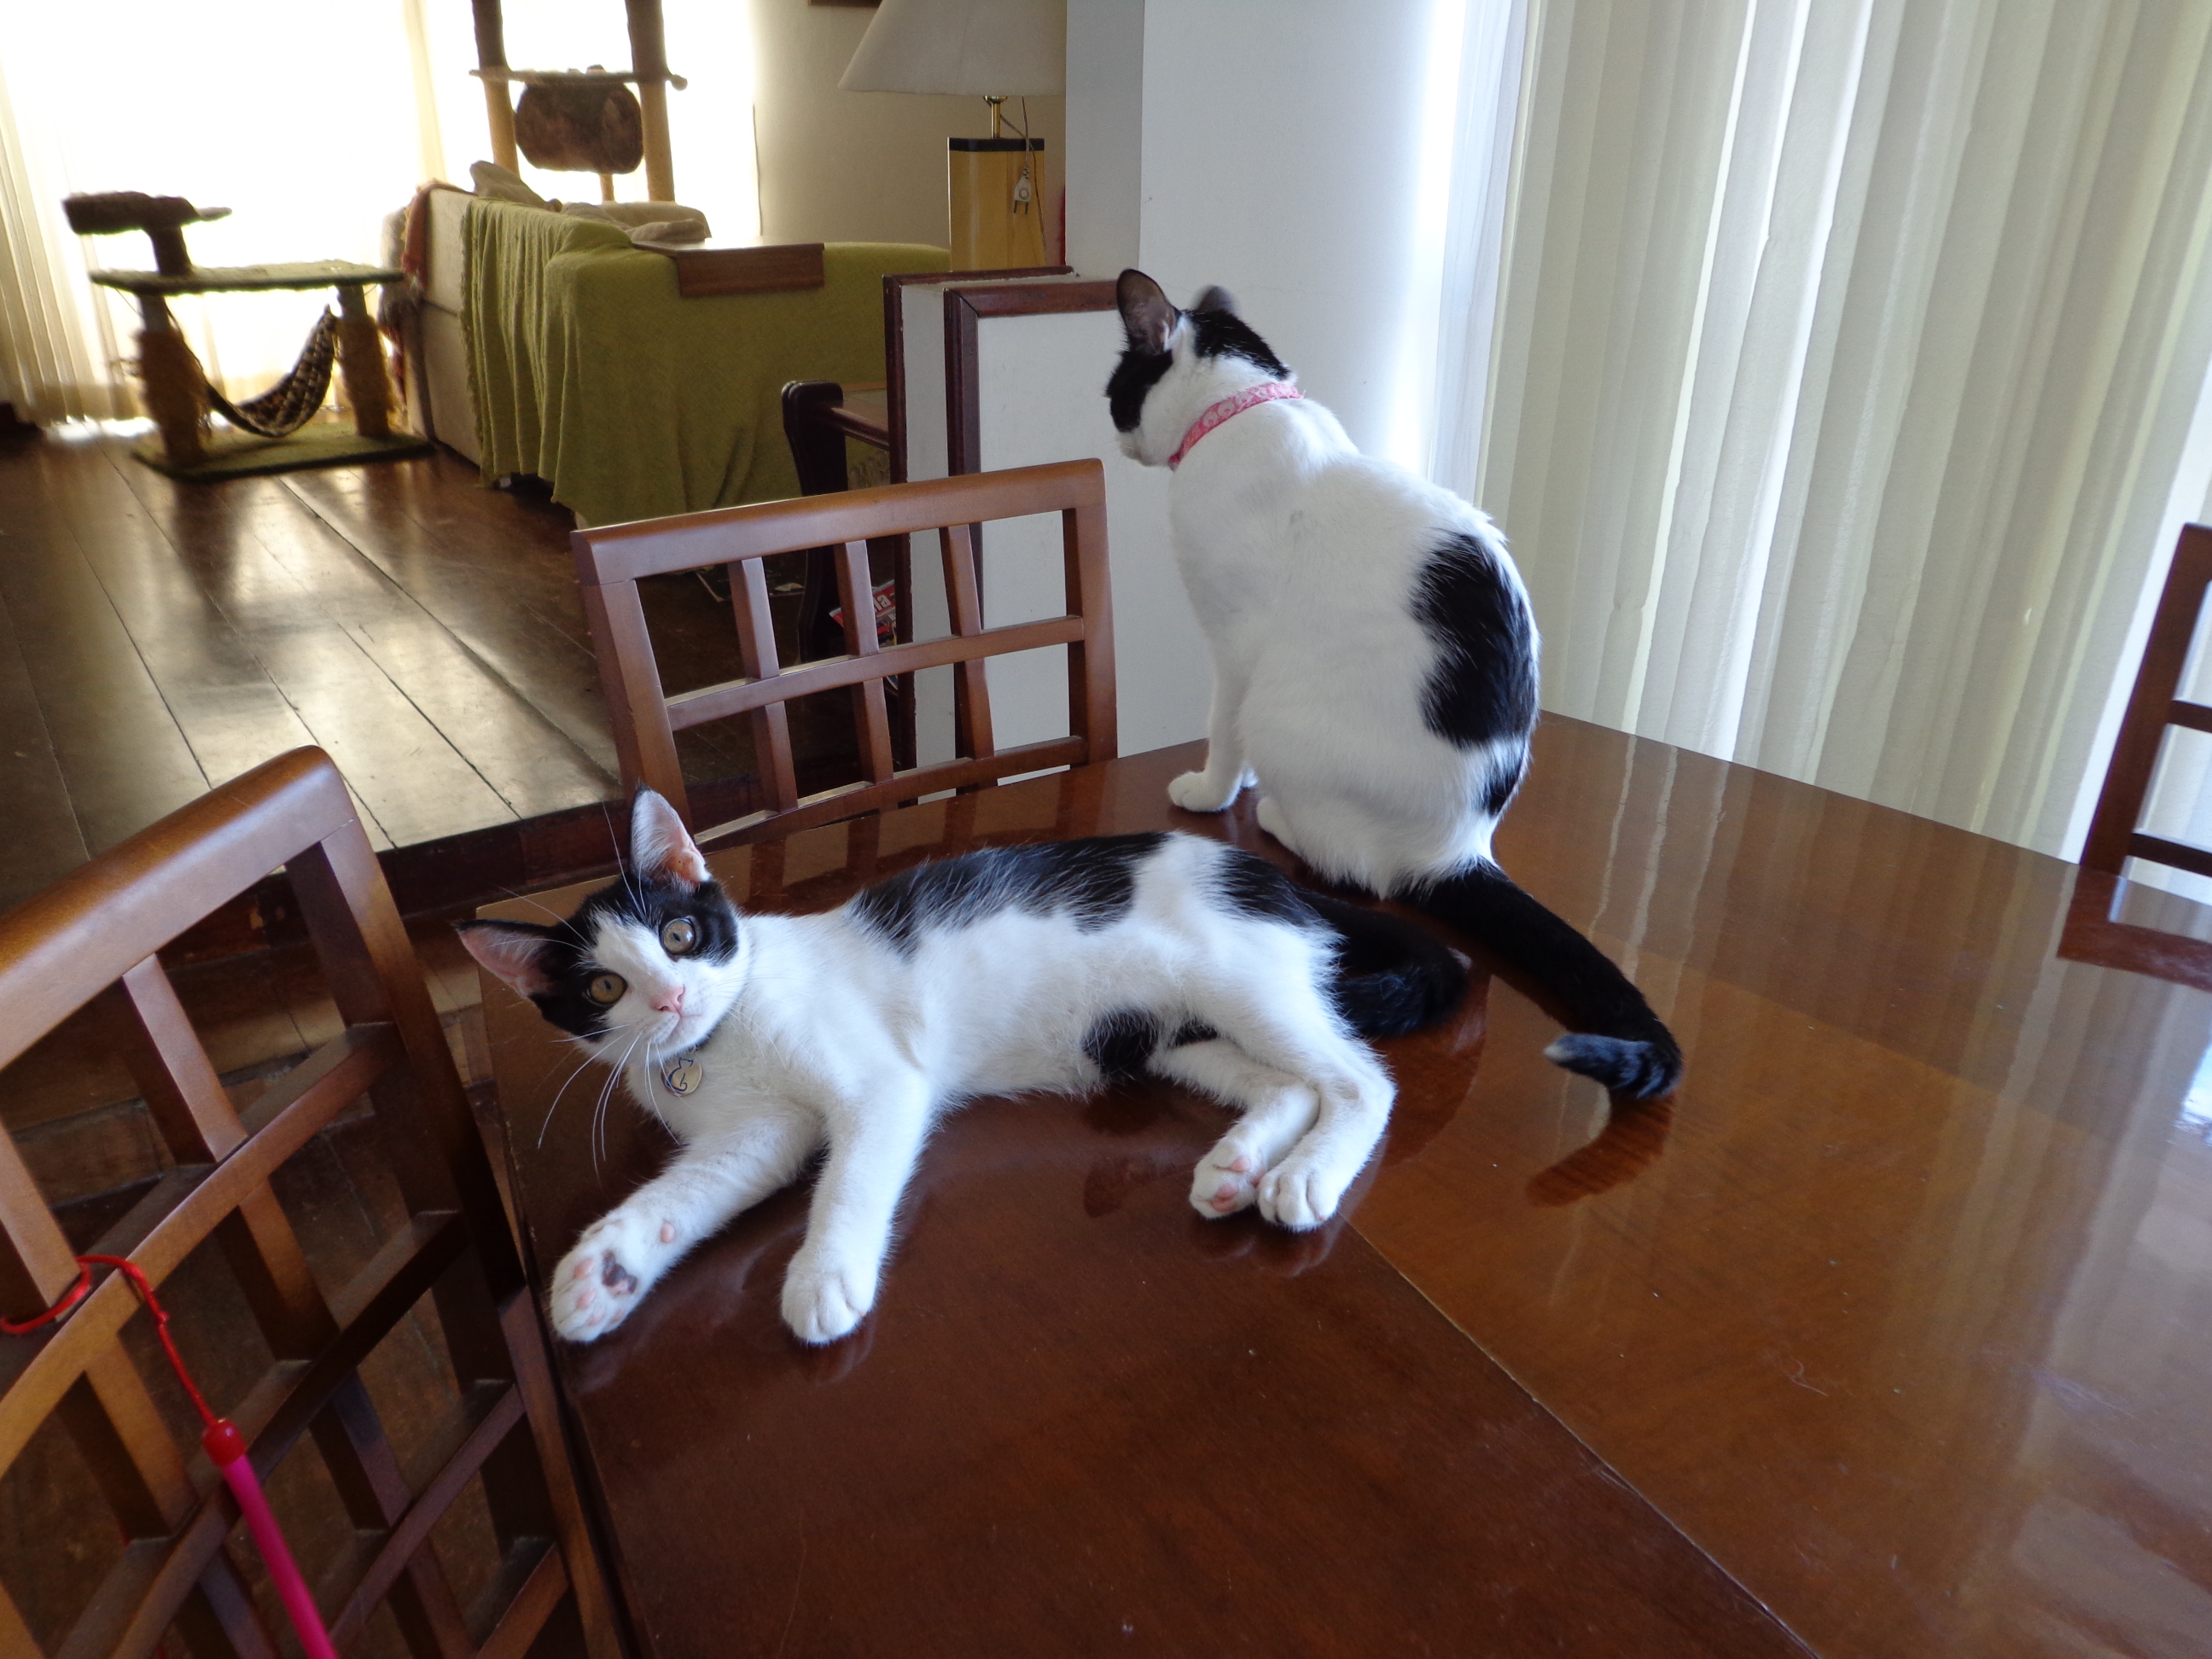
The gang: Mitch, born in 1998 and still thinks he is a young fellow: Mitch. by CCCP Digital Studio, on Flickr Lindsay, born in 2007, and huge model parts buster. Christmas Cats by CCCP Digital Studio, on Flickr Lindsay, my modeling assistant by CCCP Digital Studio, on Flickr Andrew, born in 2008. He has a picture taking radar. Can't take pictures of anything without him: Andrew by CCCP Digital Studio, on Flickr Aliana, born in 2008. Couldn't care less about messing with models and parts. Aliana by CCCP Digital Studio, on Flickr Michael. Born in 2007. Also likes a eventual jump on the bench. Mike by CCCP Digital Studio, on Flickr Lenin. Born in 2012. Is always with me while I make videos for youtube. Lenin by CCCP Digital Studio, on Flickr Svetlana. Born in 2016. She is in many of my youtube videos... Loves to jump on the bench, and sleeps on the corner inside a box. Svetlana. by CCCP Digital Studio, on Flickr Princess Leia. She was five months old when I adopted her in June this year. My mother was visiting, and she maned her. Princess Lea. by CCCP Digital Studio, on Flickr On August 22th this year, this happened: Princess Lea by CCCP Digital Studio, on Flickr Princess Leia had a surprise inside. I was about to take her to get fixed when she went into labor. Only one little guy was hiding there. The vet had to perform surgery as Leia was not able to deliver the kitten alone. The little guy was born dead, and had to be reanimated by the vet. I spent the following night trying to make him to nurse. Named him Kirk. yes after James Kirk, LOL!!! Here is Kirk a week after being born: Pricess Lea and Kirk by CCCP Digital Studio, on Flickr Kirk with Leia on September 7th: Pricess Lea and Kirk by CCCP Digital Studio, on Flickr Leia and Kirk today:

-
Like I said, it's more a curiosity and not really a problem, as all necessary parts are there. Since I got one kit that didn't have the issue, and two that have, it is really something that happened during production. I just hope the mold is not badly busted, because if so, I'm afraid the factory stock version of the Standard Coupe will net be re released soon.
-
I guess one tree for every three kits, if one of the hubcaps is really busted on the mold.
-
Today I bought another Monogram '40 Ford coupe kit, and confirmed something odd I thought was a isolated problem. The hubcaps and trim rings come on a separate bag, and on one of my previous kits one of the hubcaps had being cut out and replaced with another. How do I know that? The replacement hubcap still had two bits of sprue attached to it, and no, they were not from the same sprue that was in the bag with the remaining 3 hubcaps. I'm wondering if they busted the mold somehow, and are doing this to the newer kits. Not really a problem, more a curiosity anyway.
-
Now that's nice!!! Love the color, my favorite, for sure. I second the magnet tip for the skirts. I saw it done before for the same purpose. In the case I saw, there was a magnet glued to the inside of the rear hubcap, and another glued to the inside of the skirt.
-
Engine wiring question
Lovefordgalaxie replied to DanR's topic in General Automotive Talk (Trucks and Cars)
That fact made learn a lesson the hard way about 15 years ago: Never, ever presume the last guy that did work to a car did things the way you do. I never had reason to change the #1 cylinder position on a distributor, so I presumed nobody would do so without a good reason. Wrong!! 15 years ago, give or take a year, my friend Ângelo asked me to install new spark plugs, points, condenser, and plug wires on his 1973 Ford LTD Landau (Brazilian built car) The parts were in good shape, but he wanted new parts installed, as he found a NOS set of spark plugs, spark plug wires, points an condenser, all brand new and in the Ford boxes. I had the same parts myself, but I would only install them on my Galaxie when needed. Anyways, he was and still is my friend and wanted all those factory correct parts on his babied show car, so I decided to do as he wanted. I started by removing the old but still good spark plug wires, then the spark plugs, and finally the points and condenser. Changing spark plug wires on a 292 Y-Block is a boring job, as there are 04 spark plug wire brackets that have to be disassembled from the engine. Ângelo had a set of brand new brackets with their respective rubber pieces he bought as a kit from the U.S., I guess Dennis carpenter. I carefully ran the wires trough the rubber locators, placed them in their metal brackets, assembled them on the engine, and attached all plug wires to the distributor with the Nº 1 at the marked spot at the cover. Installed the condenser, the points, carefully set the gap (at the time I didn't have a distributor analyzer to accurately set things like the dwell, so I didn't pull the distributor from the engine, and followed the 0,45mm indicated on the book as correct points gap), and finished with the spark plugs. Well, after all that the car would not start. When a big flame came out of the carburetor, I realized someone had changed the #1 cylinder on the distributor, and the entire ignition order was out. Had to put the #1 cilinder in top dead center on compression stroke, and install the distributor the correct way. After that the car started and I just had to set the correct timing with the strobe gun. Now I always look carefully what has being done to a car before even thinking about taking anything apart. -
I had 7 cats, all like sons. This year I adopted a stray that found her way into my garage, and was really hungry. After getting rid of the flies, some vaccines, she joined the others. Things were just a bit complicated: She had a surprise inside... Yes, the furry, bit of happiness kind of surprise. My cats are always with me, and I don't care if there is cats hair in the paint. They are worth a lot more than models.
-
My New Years Modeling Resolution
Lovefordgalaxie replied to Renegade's topic in General Automotive Talk (Trucks and Cars)
Never understood this problem. I could never start a kit having one unfinished. I did two at a time, but finished both within hours of each other. By the way, it's a good idea to remove the plastic from the boxes and to take a good look at the kit, so if some part is missing, or damaged, you can take it back to the store, or order a replacement. -
1940 Ford Resto Rod (outdoor pictures added 08/12/17)
Lovefordgalaxie replied to Lovefordgalaxie's topic in Model Cars
Finally a sunny day. Added some outdoor pictures of the old hot rod Ford. -
Looks cool!!!! Love the giant Testors paint bottles next to the Ford, LOL!!! A Dealer here in Brasil had a custom made truck a lot like this one for their "Assistência Técnica" service. Just spent about an hour trying to find the picture on my computer. But I will, when I'm not looking for it...
-
1940 Ford Resto Rod (outdoor pictures added 08/12/17)
Lovefordgalaxie replied to Lovefordgalaxie's topic in Model Cars
Sorry for the delay on outdoor pictures guys. It's being rainy the last couple of days. -
1940 Ford Resto Rod (outdoor pictures added 08/12/17)
Lovefordgalaxie replied to Lovefordgalaxie's topic in Model Cars
Thanks!!! Thank you!! -
I would get some glass doors. Dust is the worse enemy of model cars. By the way, your collection looks great. If I tried to display mine like you do, my feline kids would think it's Christmas, and I just gave them some nice shelves for them to sleep on. They would just dislodge the cars, and play with the remains...
-
Looks great!! The radiator is specially impressive.
-
1940 Ford Resto Rod (outdoor pictures added 08/12/17)
Lovefordgalaxie replied to Lovefordgalaxie's topic in Model Cars
Thanks!! Yes I like to do so ever now and then, but without overdoing it. My idea is, if it was a 1:1 car, the owner should be able to have it all back to showroom stock with realative ease. I did that on my 1:1 Galaxie, as well. Added a isky cam, four barrel intake (FoMoCo part) and a Autolite 4100 four barrel, also a Ford part. Also added chrome air cleaner, valve covers and dual exhaust with glasspacks. Have all stock parts, and the car can be factory correct again in a weekend if I so desire, but it's a load of fun hearing the Y-Block V8 rumble trough the duals, when the secondaries open on the carburetor... I guess so. It would cruise at 60 with ease. The Columbia rear end is the only one available on the Revell Coupe kit. It's cool on this one, but I almost converted it to a stock piece on my factory stock build early this month. Just didn't as those rear ends were real popular when the car was new. Well, this is NOT the in box dual exhaust. The dual exhaust only came on the Street Rod kit, and that car has a newer Ford 9 inch rear, with a coil over rear suspension. The duals provided go over the rear end, rather than under it, and in my opinion they look very wrong because of that. With the Columbia rear end I think it would be very odd to have the pipes going on top of the axle. What I used on this car, was the dual exhaust provided on the Revell '48 Ford Convertible, the same source of the aftermarket heads, air cleaner, and extra carburetor. The alternator came from my parts box, and I had to modify the belts included in the '48 Convertible street rod engine to make them fit below the much lower radiator hoses on the '40. Engine block is 1948, and it's a direct fit. Yes, I had to modify the exhaust from the '48 Ford to fit the '40 Ford. First I cut about 6mm out of the mufflers, cut about 3mm out of the rear pipes where they meet the mufflers, and made my own pipes from the mufflers to the exhaust manifolds, that are stock Ford parts, and not the header style provided on the '48 Ford Convertible. Tricky part is making the exhaust to go trough the holes on the frame neatly. -
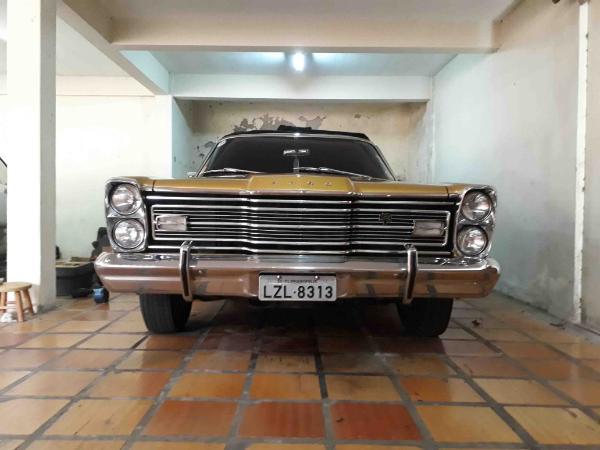
You better believe that licence plate. I would vote for this one for winner of the Cannon Ball Run.
-
This one was painted with Tamiya Metallic Green. Two cans of paint, and one can of silver leaf as base. 1951 Chevy Fleetline V8 by CCCP Digital Studio, on Flickr This one was also painted with Tamiya. Two cans and a half. No primer, paint over the bare plastic. Body, fenders, hood, wheels, all painted inside and out. 1940 Ford Sedan Delivery Deluxe by CCCP Digital Studio, on Flickr This 1/12 scale Monogram '57 Bel Air ate five cans of TS-14 black... More Bel Air Shots by CCCP Digital Studio, on Flickr
-
1940 Ford Resto Rod (outdoor pictures added 08/12/17)
Lovefordgalaxie replied to Lovefordgalaxie's topic in Model Cars
It looks awesome. Very hard to tell it's a model. I didn't know Tim Boyd. Maybe because I don't use to read Scale Auto, or even to MCM. Those kinds of magazines are almost impossible to get here. About 10 years ago it was possible to find Scale Auto at the airport newsstand, but it was priced like gold, and I only have a couple. I did a search here in the forum, and sure thing found him!! He does great work!! -
Yes, it is. What happens is Tamiya paint "shrinks" a lot, and won't bury the details. When I use Tamiya, I never use primer, as the paint is so thin and shrinks so much it will show every single orange peel on the primer itself. I sand the mold lines, do the eventual fix, and then sand the body all the way up to 3000 sanding paper, so no sanding scratches will remain. I first mist the body and all parts to be painted the same color a couple of times to create a good base, then I shoot some wet coats. Usually three or four, depending on the color I'm using and the color of the plastic. I use to wait about half an hour between coats. Usually, when i'm done, two cans are gone, and there is paint "powder" everywhere. I paint all body color parts at once, like the body, hood, wheels, a eventual splash pan, etc. This year I only used Tamiya TS to paint one car for myself, a '48 Ford wagon, but I'm a huge fan of their stuff, the TS-14 black in particular. It dries very fast, the result is always perfect, and it will accept a touch up with zero issues. From now on, I'll decant the precious liquid gold Tamiya sells, and use my airbrush.
-
1940 Ford Resto Rod (outdoor pictures added 08/12/17)
Lovefordgalaxie replied to Lovefordgalaxie's topic in Model Cars
Thanks Jim. Have pictures? Who is Tim?