THORDOOR220 Posted August 1, 2018 Author Share Posted August 1, 2018 On 7/28/2018 at 5:19 AM, mustang1989 said: This one's turning in to a pearl! Watching...... Thanks! I will likely post a few little update pictures tonight. I just started my union apprenticeship this week, and won't have as much time to work on models, so updates are probably going to be a bit more of a 'when I actually do something' basis, rather than weekly. Although with how this week is going so far, I wouldn't be surprised if I have tomorrow off, too (we're waiting on material, so can't really do anything at work). We'll see what all I can get done Quote Link to comment Share on other sites More sharing options...
Rat Roaster Posted August 1, 2018 Share Posted August 1, 2018 You might be the first poster of this kit to figure out that the raised detail on the right front inner fender are lame heater hoses. You did the right thing by making them go away. Quote Link to comment Share on other sites More sharing options...
THORDOOR220 Posted August 2, 2018 Author Share Posted August 2, 2018 (edited) 9 hours ago, Rat Roaster said: You might be the first poster of this kit to figure out that the raised detail on the right front inner fender are lame heater hoses. You did the right thing by making them go away. I can think of one other where they got rid of them: His car was more detailed than mine will be though. I think. Though I don't know that those were heater hoses. According to the instructions, they're a separate part. That's why I wasn't sure what they were. The part I'm referring to was replaced by actual hoses in that guy's car, red on the passenger side of the engine. It looks like I won't be posting pictures today. I had some hardware issues with my computer, so I spent much of the night fixing that. I made some progress on the car, namely finishing the engine, making front brake lines, and some painting/weathering, but I have some stuff to finish yet. Then I think I'll be assembling the brake lines, fuel lines, and exhaust onto the chassis, and then I will post pictures. Then it's on to interior (and parking brake cable now that I think about it), which means I need to figure out how to get a steering wheel to print half decently. That and I need to make U joints for the driveshaft. I didn't like the kit driveshaft, so I have a piece of brass rod cut to length. I'm still unsure of how to do U joints, but I'm sure I'll find something. edit: posting a mock up pic from my phone. Doesn't show a whole lot that you guys haven't seen, but thought I'd throw it up anyways. Looks pretty good so far, I think. Couldn't get the firewall to stay, so that isn't there, and obviously there's no interior yet. Getting there! Also, remembered to ask about glass. Anyone made windows from acetate sheet before? I'm thinking about making some for the sides, and maybe remaking the windshield and back window since they're awfully thick. Edited August 2, 2018 by THORDOOR220 Added picture Quote Link to comment Share on other sites More sharing options...
Slotto Posted August 3, 2018 Share Posted August 3, 2018 very nice Quote Link to comment Share on other sites More sharing options...
THORDOOR220 Posted August 6, 2018 Author Share Posted August 6, 2018 Okay, here's an update. I weathered the body, so now it looks like it isn't taken care of anymore. Rust spots here and there (just surface rust though), dirt, sand, and a little bit of black behind the wheel wells to show it does get driven like a hot rod still. I did forget to rust the rear windows, we'll see if I go back and do it yet. Did bare metal foil on all the trim, though it comes off super easy. There's a picture of the back of the car where you can see it coming off under the rear window. I've redone that window and part of the windshield a few times already, it's starting to get really annoying. I painted the engine bay and underside of the hood black (as you've seen in my previous post) and weathered those as well. The chrome is now glued to the hood, but not to the body. The brake lines and fuel line are attached, and the frame and floor pan are now one. The exhaust has hangers there at the back, holding them at the right height. I finished the engine finally, and then dropped it and broke the alternator off. Again. I've reattached it, but I need to find a way to tighten the belt up now. I fixed the steering wheel yesterday, though I don't have a picture. You'll see it when I do updates for interior, which I'll be doing this week. And finally, I made windows today. Both for the sides, the rear, and windshield. I think that's it. On to interior Quote Link to comment Share on other sites More sharing options...
Slotto Posted August 6, 2018 Share Posted August 6, 2018 Perfect rust placement. Looks great! Quote Link to comment Share on other sites More sharing options...
jaxenro Posted August 6, 2018 Share Posted August 6, 2018 Really good looks like a bunch of cars I remember i expect one of my friends to pull up in it so we can go cruising Quote Link to comment Share on other sites More sharing options...
THORDOOR220 Posted August 6, 2018 Author Share Posted August 6, 2018 6 hours ago, Slotto said: Perfect rust placement. Looks great! Thanks, I used a couple reference pictures to find where rust was common. Those cars were in much worse shape than this but they were still helpful. 6 hours ago, jaxenro said: Really good looks like a bunch of cars I remember i expect one of my friends to pull up in it so we can go cruising That's about what I would want one to think with this model. Something you can go beat around in and have fun with, while still being a mean machine all the same Quote Link to comment Share on other sites More sharing options...
Styrofoam04 Posted August 7, 2018 Share Posted August 7, 2018 (edited) Really love the weathering. The stripes are a little too clean. you might want to sponge dab some of the base coat to show weathering through the stripes Edited August 7, 2018 by Styrofoam04 Quote Link to comment Share on other sites More sharing options...
THORDOOR220 Posted August 8, 2018 Author Share Posted August 8, 2018 6 hours ago, Styrofoam04 said: Really love the weathering. The stripes are a little too clean. you might want to sponge dab some of the base coat to show weathering through the stripes That's not a bad idea, although stripes aren't always painted on top like that. I've seen cars more often where the stripe color was painted, masked, and then body color came last (before clear). At least for cars that were repainted, that doesn't seem to be how it's usually done from the factory. That's how I painted my model, which is rather evident in person. I didn't do a super great job of evening out the paint. I might do it anyways, we shall see. Quote Link to comment Share on other sites More sharing options...
Styrofoam04 Posted August 8, 2018 Share Posted August 8, 2018 I didn't realize that, always thought it was one then the other. Either way great work Quote Link to comment Share on other sites More sharing options...
THORDOOR220 Posted August 8, 2018 Author Share Posted August 8, 2018 4 hours ago, Styrofoam04 said: I didn't realize that, always thought it was one then the other. Either way great work I didn't either, not at first. I had it pointed out to me by a body guy that it's the easier way to do it. And thanks Quote Link to comment Share on other sites More sharing options...
THORDOOR220 Posted August 11, 2018 Author Share Posted August 11, 2018 Before I start, I want to ask, how long does it usually take for Detail Master stuff to ship? Here's the interior as it is, and I finished the bumpers (besides license plates). The headlights look pretty fake, unfortunately. The interior is turning out good though. You can't see it very well in the pictures, but the gauges are all painted in by a toothpick. None of this is finally assembled (besides the steering wheel and dash glass), and the shifter isn't present in the pictures either. I was going to make my own seat belt hardware, and found it more difficult than anticipated. So I have that and some floor mats coming from Detail Master, which is why I'm asking about shipping times. The model is pretty much on hold until those arrive. Once those get here, it's just the belts, assembly, and dirtying it up a bit. Still have to make a driveshaft, but I have an idea for that, and I want to make hood hinges yet (not your traditional model ones, more like the real ones, but I can't seem to find a small enough spring so there will likely be a prop rod still). After that, I think this build is about done. Oh, and since I was bored today, I decided to make a little manual and a model box to put in the car somewhere. I might yet do keys in the ignition as well, we'll see. I stole the model box idea from someone else on the forums (I forget his username), I thought it was a cool idea to have the model's kit in the back seat. Same with the keys idea. I thought about tools in there on the floor too, I guess it depends on how much time I want to spend making them (I'm too cheap to buy the Interior Junk sets from detail master apparently). Hope to get my stuff soon so I can continue. Till then, maybe I should start another.... Quote Link to comment Share on other sites More sharing options...
MeatMan Posted August 11, 2018 Share Posted August 11, 2018 Very nice build! I've got to work on weathering! Quote Link to comment Share on other sites More sharing options...
bill lanfear Posted August 11, 2018 Share Posted August 11, 2018 Very nice! Quote Link to comment Share on other sites More sharing options...
jaxenro Posted August 11, 2018 Share Posted August 11, 2018 Interiors too clean. Should be some squashed down McDonald's bags and a few empty beer cans and bottles kicking around the back floor. Least that's how I remember them from the later 70's. My first car was a yellow 1972 Cadillac Calais and I remember we used to take the labels from the Budweiser bottles that had floated loose in the cooler and line them up on the fenders like kill markings on a WWII fighter plane. Had both front fenders and the rear quarter panels covered at one point. Just kidding about the interior I love what you did with this one Quote Link to comment Share on other sites More sharing options...
THORDOOR220 Posted August 11, 2018 Author Share Posted August 11, 2018 4 hours ago, MeatMan said: Very nice build! I've got to work on weathering! Definitely do, this is the first car I've weathered and it's easily become my favorite part of the build. I don't know what makes it so entertaining, but I love it. 1 hour ago, jaxenro said: Interiors too clean. Should be some squashed down McDonald's bags and a few empty beer cans and bottles kicking around the back floor. Least that's how I remember them from the later 70's. My first car was a yellow 1972 Cadillac Calais and I remember we used to take the labels from the Budweiser bottles that had floated loose in the cooler and line them up on the fenders like kill markings on a WWII fighter plane. Had both front fenders and the rear quarter panels covered at one point. Just kidding about the interior I love what you did with this one Actually, I would agree that it's too clean. I'm working on weathering it, and I likely will add in some old receipts and such floating around. You can't see the dust all over as much in the picture, but I'm not quite done anyways. I'll finish that when I get the seat belts in (hopefully next week?). I also made a driveshaft and added the parking brake cable, but I'll show pictures of that later. Here's interior as is at the moment. Also, that idea with the Budweiser labels? Beautiful I don't think I'll be doing that with this car, but before too long I want to build a beater out of a 2nd gen camaro, and that is most definitely going to be on the fenders lol Quote Link to comment Share on other sites More sharing options...
jaxenro Posted August 12, 2018 Share Posted August 12, 2018 3 hours ago, THORDOOR220 said: Also, that idea with the Budweiser labels? Beautiful I don't think I'll be doing that with this car, but before too long I want to build a beater out of a 2nd gen camaro, and that is most definitely going to be on the fenders lol Definitely something you couldn't do today I could imagine going ten feet down the road and being pulled over. Times were different back then the drinking age was 18 and once or twice I remember getting pulled over where the cops just sent us home after we had been bar hopping up in Massachusetts (we lived in Connecticut). Basically they took two drunk 19 year olds and pointed us to the highway to get out of their state. It makes me cringe thinking about it now Quote Link to comment Share on other sites More sharing options...
mustang1989 Posted August 12, 2018 Share Posted August 12, 2018 (edited) Man there's some good ideas at work here with this build. Learning a lot here! Edited August 12, 2018 by mustang1989 Quote Link to comment Share on other sites More sharing options...
THORDOOR220 Posted August 12, 2018 Author Share Posted August 12, 2018 13 hours ago, jaxenro said: Definitely something you couldn't do today I could imagine going ten feet down the road and being pulled over. Times were different back then the drinking age was 18 and once or twice I remember getting pulled over where the cops just sent us home after we had been bar hopping up in Massachusetts (we lived in Connecticut). Basically they took two drunk 19 year olds and pointed us to the highway to get out of their state. It makes me cringe thinking about it now It would be a model, for that reason. My 1:1 cars I like to be 2 things: nice and fast. I wish you could get away with things like that still though, people getting offended and BLAH_BLAH_BLAH_BLAH just kinda ruin the fun. But I don't think this is the best place for potentially political conversations, so I'll leave it there. 13 hours ago, mustang1989 said: Man there's some good ideas at work here with this build. Learning a lot here! Hey, me too! I like to look through the forums a bit every day to see what other ideas I can 'borrow' as well, or at least use for inspiration. There's a lot of builds on here to thank for many of the ideas incorporated into this build, as well as some of my personal experiences. Figure if I keep this pace, I can maybe have a running 1/25 scale car by this time next year! ...Alright, maybe that's a *bit* far fetched. It would be cool though! Quote Link to comment Share on other sites More sharing options...
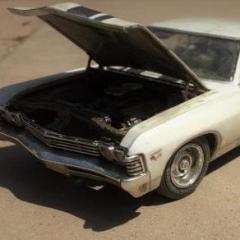
THORDOOR220 Posted August 12, 2018 Author Share Posted August 12, 2018 Alright, guys, I want your opinions on something. So I found these hood hinges in my parts box, off of a 66 chevy, and decided I'd use them instead of try to make my own. It just hit me that with these, the hood is going to have to stay open. So my question is, should I use them and keep the hood open (I won't need the wire prop rod at least), or go without them? The alternative to those would be make some, which I thought about trying to use mirror tape for it since that's stiff, but I can't seem to find a small enough spring to hold it open, so are there any designs similar to stock where they would be functional? I've seen them with shocks instead of springs, so thought about doing that and use a prop rod, acting like the shocks are worn out. I'm not quite sure what I want to do, what do you think? Here's pictures of it with the hood open vs closed, in case that helps. Quote Link to comment Share on other sites More sharing options...
jaxenro Posted August 12, 2018 Share Posted August 12, 2018 Personally I'd just use them and leave the hood open to show off what you did under it but I also seem to remember a few late sixties junkers where I needed to prop the hood open with an old broomstick. For some reason I didn't trust them to stay open when my head was under them so if you want to go that route it would fit also Quote Link to comment Share on other sites More sharing options...
THORDOOR220 Posted August 12, 2018 Author Share Posted August 12, 2018 That's kinda what I was thinking, too, since it'll be in a small glass case (when I buy one anyways). Maybe put a wrench or two on there somewhere, like it's getting worked on. And I have to do that with the hatch on my foxbody, and used to with my explorer as well. My nova has wound springs, like in a wind up watch, that hold the hood up, and those work well. I've seen people 3D print stuff like that that works well, but so small, I'm skeptical.... Anyways, I'll probably go that route. It would be cool to be able to close it, but I don't exactly play with my models, so it might be unnecessary. Maybe I'll make some with my GT350 kit later on, I don't think that has them either. Quote Link to comment Share on other sites More sharing options...
THORDOOR220 Posted August 20, 2018 Author Share Posted August 20, 2018 My stuff came in while I was camping over the weekend. Took the rest of my day today to finish interior, the rest will (probably) be done this week. Here's the finished interior, thought it would be good to get a picture while you can still actually see it. I could've added more clutter (and it was tempting!), but I decided against it, since most of the interior won't actually be seen anyways. What I've found interesting is despite this being my most dreaded parts of the build (couldn't tell you why), it ended up being my favorite, with all the little things like the keys, door locks, and the little crumpled piece of paper on the floor. I'm looking forward to seeing it in a completed car, hopefully you guys are as well. Quote Link to comment Share on other sites More sharing options...
jaxenro Posted August 21, 2018 Share Posted August 21, 2018 I like it this is probably my favorite build in a while it just seems so much like what I remember me and my friends having. Every time I look at it it brings back a memory The only thing missing is the Pioneer speakers on the rear shelf ? Quote Link to comment Share on other sites More sharing options...
Recommended Posts
Join the conversation
You can post now and register later. If you have an account, sign in now to post with your account.
Note: Your post will require moderator approval before it will be visible.