misterNNL Posted December 24, 2018 Share Posted December 24, 2018 Good luck mastering a nice technique like chipping. I really need to try that in the future myself. I tend to use mostly flat acrylics and dry brushing methods to add paint intrest to my stuff. I look forward to seeing your progress on this one. Quote Link to comment Share on other sites More sharing options...
Daxman Posted December 28, 2018 Author Share Posted December 28, 2018 I am the absolute worst when it comes to picking a final color for my cars. I started over, I'm going with red now. I removed the old 50's Aqua color with Easy Off. I went to spray my primer coat of grey with my airbrush and found that it was broken. I ordered a new airbrush from Amazon. It's supposed to be here tomorrow. In the meantime, I've been adding bits and pieces to the undercarriage. Lots of styrene rod melted into various shapes and Gundam parts. Quote Link to comment Share on other sites More sharing options...
misterNNL Posted December 28, 2018 Share Posted December 28, 2018 I,love the sheer complexity of the undercarriage assembly! Quote Link to comment Share on other sites More sharing options...
cobraman Posted December 29, 2018 Share Posted December 29, 2018 Your sick ! But in a good way. Very interesting and creative. Quote Link to comment Share on other sites More sharing options...
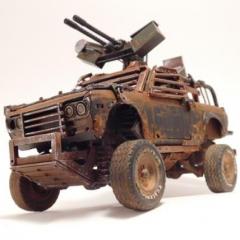
Daxman Posted January 2, 2019 Author Share Posted January 2, 2019 As usual for me, I had to try a few different colors before I was happy. I tried red and liked it, but didn't love it. I decided to remove the paint once again and go back to a retro green. I"m happy with the new body color, I will probably hit it with a satin or semi gloss clear coat when I'm finished with the weathering. I'm still debating on coloring the roof a cream color. I'm most likely going to do this. I love two tone as you can see by my previous jet cars. The area behind the front fenders, the jet exhaust port, will have an additional heat deflector as in the first photos. I just don't know exactly how they'll be mounted yet. I've added so many plumbing lines to the undercarriage. They all serve a purpose.....the purpose of looking cool! I have another few mock up pipes that go under the mid section and extend to the rear turbines. It makes the underside of the car look more balanced. They look great but I am fond of the look that this car has now. It appears that most of the weight of the car is under the front. It looks front heavy. I like it. My other jet cars all have most if the weight at the rear. Rear turbine extended. I have some of the engine covers painted body color. The engine bay will be dirty and I plan to add more hoses and wires of course. I love the visor that came with the kit. If I paint the roof cream, I'll integrate cream color into the visor. I'm excited to start weathering the internal parts. I think the slats with the bolt heads will look a lot different when I'm finished. I have a vision of what they'll look like, I just hope I can replicate it. I want them to look like oily weathered bare steel. On 12/23/2018 at 9:14 PM, misterNNL said: Good luck mastering a nice technique like chipping. I really need to try that in the future myself. I tend to use mostly flat acrylics and dry brushing methods to add paint intrest to my stuff. I look forward to seeing your progress on this one. Tom, I tried chipping when I painted it red. I need definitely need some practice. I ended up using acrylics and sandpaper. My favorite to work with as well. On 12/28/2018 at 5:35 PM, misterNNL said: I,love the sheer complexity of the undercarriage assembly! That's probably my favorite part of these builds. Going thru my huge scrap bin and trying to find anything that looks like it belongs. Bend some styrene rod and you have cool looking pipes to connect everything together. Thanks for looking!!!! I appreciate all of the feedback and comments! Quote Link to comment Share on other sites More sharing options...
ShawnS Posted January 2, 2019 Share Posted January 2, 2019 Such a brilliant idea and some outstanding work to bring that idea to life. Well done so far Daxman, keep up the good work. Quote Link to comment Share on other sites More sharing options...
afx Posted January 2, 2019 Share Posted January 2, 2019 You really have a knack for this style build Dax - looks great. Quote Link to comment Share on other sites More sharing options...
misterNNL Posted January 2, 2019 Share Posted January 2, 2019 Loving the latest color choice for the body. Using a single color seems to unify the project as a whole. I know exactly what you mean by scrounging your parts bins for usable bits. I have three big drawers full of them marked "gizmos" that I'm ways rooting through hoping to find what I need. When I don't find it I make it just like you do. Keep posting these great photos please. Quote Link to comment Share on other sites More sharing options...
Daxman Posted January 5, 2019 Author Share Posted January 5, 2019 On 1/2/2019 at 9:15 AM, misterNNL said: Loving the latest color choice for the body. Using a single color seems to unify the project as a whole. I know exactly what you mean by scrounging your parts bins for usable bits. I have three big drawers full of them marked "gizmos" that I'm ways rooting through hoping to find what I need. When I don't find it I make it just like you do. Keep posting these great photos please. I painted the top and visor with antique white. I love two tones! Sorry Tom! For the intake at the front. I cut out most of the original grill as shown in the early photo below. I wanted a large intake area to feed the front side turbines. I made a experimental grill out of some thin styrene. I wanted to show that the center design of the slats would continue down the grill. It also splits the grill into a right side and left side separate intake. I liked this idea, I just didn't like the look of the grill. So instead, I made the slats continue down, separating the two intakes. I placed some Gundam mechanical looking parts into the cavities for detail. Still not happy........ I decided to go extreme. I made 2 versions of different intakes. One round and one square. Here's the round intakes. I thought for sure, these were going to be the better of the two. Here's the square intakes. They fit the cavity better and they look like they belong. I'll be using these. I am going to paint the front angled sticking out part the same as the body color. I attached a carburetor to a Gundam piece and it became a Steam Punk turn signal. I'll mount a amber lens to the end and I don't think anyone will know it was a carb. The addition of these two square intakes at the front of the car has got me more motivated. I had lost some steam, but I think It'll move a little faster now that I'm happy with the front of the car. Thanks!! Quote Link to comment Share on other sites More sharing options...
Jonathan Posted January 5, 2019 Share Posted January 5, 2019 Man, oh Man - this is awesome work! I love the whole idea and have been watching your built. Very inspiring and creative! Quote Link to comment Share on other sites More sharing options...
Daxman Posted January 9, 2019 Author Share Posted January 9, 2019 I fit the front jet exhaust deflectors inside the front fenders. Not as I had originally planned, but I like the look and will probably stick with it. I'm having issues lining up the hood with the detailed finned piece I added. I need to do a little more work on the hood before it will all fit properly. Here's a good view of some more plumbing lines. The two front intakes now painted body color. I have temporary turn signals placed below the headlights. I think that I'll use Bare-Metal Foil for the chrome trim. I'll need to do some research on weathering metal foil. Haven't used the stuff in years. Under the hood, working on the fuel tank. I just got done removing the intake fan at the rear from the fan shroud. They came molded as a single unit. Thanks for looking!! Quote Link to comment Share on other sites More sharing options...
FabbricaP Posted January 9, 2019 Share Posted January 9, 2019 Looking awesome! Gundam parts must be perfect for this style lol Quote Link to comment Share on other sites More sharing options...
Daxman Posted January 17, 2019 Author Share Posted January 17, 2019 I changed my mind on the color again... On the side of the model box there was a photo of this car in gloss black. It looks like a villain's car, very sinister. I kept toying with the idea of flat black and gunmetal. I decided to give it a try. I also like the idea of a red interior. It's going to be tough for me, but I'll be doing this without any rust and corrosion. I will have to do some kind of wash to bring out the highlights. Still not sure where this is going. I'm toying with the idea of adding blue "heat" highlights to the silver pipes on the undercarriage. I'll need to practice on some spare pieces as I've never attempted it before. This kit has a ton of chrome parts to add. I've dulled them down with satin clear and can't wait to add them to the finished model. Quote Link to comment Share on other sites More sharing options...
afx Posted January 17, 2019 Share Posted January 17, 2019 I liked the original finish Dax. Look forward to seeing what you do with it now. Quote Link to comment Share on other sites More sharing options...
NOBLNG Posted January 17, 2019 Share Posted January 17, 2019 Beautiful work! I too thought you nailed it with the weathered green look. Quote Link to comment Share on other sites More sharing options...
Mr. Metallic Posted January 17, 2019 Share Posted January 17, 2019 I really liked the blue version, but it's your model. It still looks cool with the new color. I dig this, it reminds me of something out of The Fifth Element. The display base is cool too. Maybe a piece of clear acrylic rod would give a better impression of actually floating Cool stuff Quote Link to comment Share on other sites More sharing options...
misterNNL Posted January 17, 2019 Share Posted January 17, 2019 And here I was ready to forgive you for two-toning this thing and you fooled us all by starting over with the black.It is after all yours to do with as you wish so paint on my friend. I like the square style intakes myself as they are more industrial looking. Are those front fender exhaust inserts part of the original fender you removed ? All in all very creative and well done. I wish there was some opposing magnetic system a person could install cars like to actually make them hover for display. Quote Link to comment Share on other sites More sharing options...
GerN Posted January 18, 2019 Share Posted January 18, 2019 Superb in every respect! A great example of smashing through boundaries. Quote Link to comment Share on other sites More sharing options...
Daxman Posted February 3, 2019 Author Share Posted February 3, 2019 On 1/17/2019 at 1:26 PM, misterNNL said: And here I was ready to forgive you for two-toning this thing and you fooled us all by starting over with the black.It is after all yours to do with as you wish so paint on my friend. I like the square style intakes myself as they are more industrial looking. Are those front fender exhaust inserts part of the original fender you removed ? All in all very creative and well done. I wish there was some opposing magnetic system a person could install cars like to actually make them hover for display. I'm going back to the aqua, single tone. All my hover cars are two tone with one of the colors being white. It's time for a change. Yes, the fender inserts are part of the original fender where it met up with the door. I loved the look of the matte black, but I couldn't envision it as the final style. Clean builds are not my thing. Hopefully this will be the last time I strip the paint. I tried the hairspray technique once again and am happy with the results so far. I still need to add more effects to the weathering. Just wanted to show some progress. I need a lesson on weathering chrome. I made a new set of front intakes. These are recessed behind the headlights, not as aggressive as the last. I think I prefer these, as they are a little more subtle. I tried to get a good shot of the underside of the car. It's by far the most detailed hover car undercarriage I've ever done. There's a lot of stuff going on under there. When the model is complete, I need to mount it to this base in a way where the underside is more visible. Maybe a sharp banked turn to one side. Quote Link to comment Share on other sites More sharing options...
Karl LaFong Posted February 4, 2019 Share Posted February 4, 2019 Outstanding detail and design! Quote Link to comment Share on other sites More sharing options...
Daxman Posted February 11, 2019 Author Share Posted February 11, 2019 I experimented with a contrasting color for the base. I love the way the paint chipping turned out. Unfortunately, I don't like the red against the blue car. I added rust highlights. Still much more to do on the weathering. I plan to hit it with some more highlights as well as streaks. I want the engine bay to have grease and oil stains. Can't forget the layers of soot! I'm happy with these front intakes behind the headlights. They're a little too thick, so I plan to bevel the edges down. The hood has a problem fitting when the car is hovering on it's stand. The chassis flexes and the hood won't sit properly. Hopefully this gets fixed when I final glue the model. The shot below is my favorite part of the car. There's a lot going on with pipes. I want to add more to fill in the dark gap. I'm also not 100% happy with the exhausts on the front fenders. They're a bit too thick as well. I may change these. This will be oily and greasy. A better view of the plumbing. I will add a lever or two from the floor for flight controls. I had to cut part of the rear seat out to make room for the rear engine. I had nothing to cover the hole with, so I added another intake. Why not? I hope to add more detail to the undercarriage. More smaller gauge hoses and pipes. It's close to being done. I work so slow that it might take a few more weeks. I need to start putting on the final chrome pieces, like the mirrors and trim. I need to finish weathering the exterior as well as the interior. I need to make flight controls. Final plumbing. Repaint the base. Install the glass...then it should be done. Quote Link to comment Share on other sites More sharing options...
misterNNL Posted February 11, 2019 Share Posted February 11, 2019 I have a suggestion for holding that hood in place that I have used a few times when balance was a problem. Consider gluing a small but powerful magnet inside that fuel cell on top of the engine then attach a piece of metal plate on the underside of the hood directly above the magnet. I have used that trick to hold hinged car door shut,etc. Hobby Lobby has a nice selection of"rare earth"magnets that are very compact and easy to hide inside of panels. Quote Link to comment Share on other sites More sharing options...
Daxman Posted February 12, 2019 Author Share Posted February 12, 2019 14 hours ago, misterNNL said: I have a suggestion for holding that hood in place that I have used a few times when balance was a problem. Consider gluing a small but powerful magnet inside that fuel cell on top of the engine then attach a piece of metal plate on the underside of the hood directly above the magnet. I have used that trick to hold hinged car door shut,etc. Hobby Lobby has a nice selection of"rare earth"magnets that are very compact and easy to hide inside of panels. I've seen a few videos of people using magnets to hold doors closed. Seems like a good idea. Hopefully I can get it to fit. Quote Link to comment Share on other sites More sharing options...
Daxman Posted February 23, 2019 Author Share Posted February 23, 2019 I changed the fin design that was under the edge of the hood. It was causing fitment issues that I couldn't repair. I added some pipes and a few more gadgets sticking thru the side. The hood now rests better, although not in these photos evidently... Need to add more soot and rust highlights. I also need to even up the weathering on the chrome and paint the chrome strip above the door handle. I should have done that already! I plan to add 2 - 4 spotlights under the car. Hopefully I'll be done by next weekend. Quote Link to comment Share on other sites More sharing options...
Daxman Posted March 4, 2019 Author Share Posted March 4, 2019 I thought I'd be done this weekend. I wasn't happy with the hood fitment and the pipes coming out of either side, so I started again. I needed something to hold the hood level, and something to bring a little more style to the front end. I fabricated some new heavy steel ports made from square styrene tube. They remind me of the exhaust coming off the side of World War 2 planes. I'm very happy with these. I think it needed the detail and it needed to look more mechanical than just pipes. They don't serve a purpose other than to look cool. I also added two more pipes inside the fender gap. The more the merrier. I have more weathering to do. Not finished yet. I may still add lights to the undercarriage. Landing spotlights of some sort. I removed the visor supports and replaced them with much thinner styrene rod. Details under the hood. Quote Link to comment Share on other sites More sharing options...
Recommended Posts
Join the conversation
You can post now and register later. If you have an account, sign in now to post with your account.
Note: Your post will require moderator approval before it will be visible.