rightrudder Posted February 7, 2022 Posted February 7, 2022 (edited) I've been building models for a long time, but I've never done a kit bash. Well, that ends now! I'm waiting on some supplies for the Studebaker, so I dove into the Foose Impala kit in the interim. Thanks to everyone on the board for all your cool projects that have inspired me to take the next step. Kinda wacky, but I'm building a road race Impala with an unconventional engine choice that I'll reveal when the motor's in a presentable state. Will use Tamiya wheels/tires, and the cool thing here is they use poly caps in the hubs that allow the wheels to press on in a very precise way. Here's the front suspension and Brembo brakes. Hubs were first glued with styrene cement, then a fillet of 5-minute epoxy applied, so it's super stout. Hardest part was getting final alignment right, shooting for zero toe and a slight bit of negative camber. I wanted to get the widest meats in the back as possible without tubbing it, so here's Dremel progress so far. I had to narrow the rear wheels/tires by about 3 mm to make them fit, but thankfully the slicks are solid rubber so it wasn't too difficult. I probably won't get too crazy with the chassis, but there are lots of cool possibilities with the engine, interior and paint scheme. Edited February 7, 2022 by rightrudder 1
rightrudder Posted February 7, 2022 Author Posted February 7, 2022 51 minutes ago, MeatMan said: Sounds like a nice project! Thx! A nice change of pace. Working on the rear axle now, so hopefully I can post a stance shot by day's end.
rightrudder Posted February 7, 2022 Author Posted February 7, 2022 Fortunately, the Dremel work allowed me to get the ride height down to where I wanted it..not slammed, but proper race-car stance. Rear will be slightly higher than in photo; with the mockup, it was hard to align the body with frame in back. I absolutely love the BBS 3-piece modular wheels, from a Tamiya 911 kit. 3
chris chabre Posted February 8, 2022 Posted February 8, 2022 I LOVE those wheels! I have most of a set for the right car. I also have a set of turbo fans I cant wait to use. The combo is awesome so far!!! Ill be following
rightrudder Posted February 8, 2022 Author Posted February 8, 2022 Thx for taking a look, Chris! I'm planning a partial rollcage, chin spoiler, pipes exiting ahead of rear wheels, some tow hooks, etc. I did a dry fit with the interior tack-glued together, just so it would prop the body up to the correct height, and rear ride height looks a lot better. Rear was droopy in the pic I posted. 1
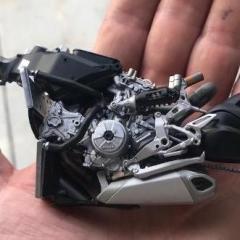
rightrudder Posted February 8, 2022 Author Posted February 8, 2022 Got the engine refreshed with a new coat of paint. It's a Porsche Carrera GT V-10, and I never liked how buried it was in the Porsche's structure; you could see the intake plenums and exhaust, but that was about it. Thought about titling this "When Porsche Comes to Chev." ? After slicing off the original transaxle, the GM slushbox fits nicely. The headers, which I think are absolutely gorgeous, stuck out at 90 degrees originally so I had to bevel them quite a bit to get them to tuck in alongside the engine. Even so, it's a very tight fit with the headers right up against the the upper control arms. Accessory drive is really wide too, but it only required a little notching of the body to fit. I know, the red cam covers are typically a Ferrari thing, but I wanted it to pop, and it'll go along with other red accents elsewhere in the build. 1
rightrudder Posted February 9, 2022 Author Posted February 9, 2022 Some progress on the interior. I shortened up the Carrera GT's flying buttress center console and it fits really well! Still needs putty work and paint. The hard part will be scratch-building a partial cage. I'm thinking a main roll hoop that's X-braced, door bars that extend under the dash, and braces rearward from top of hoop to rear parcel shelf, or maybe more steeply angled down between rear seat cushion and door panel.
bisc63 Posted February 9, 2022 Posted February 9, 2022 Fun project, will be watching this one! Love those big Chevies!
rightrudder Posted February 9, 2022 Author Posted February 9, 2022 11 hours ago, bisc63 said: Fun project, will be watching this one! Love those big Chevies! Thx! I dig the Impala's lines; they just need to be set off by fat slicks and a moderate drop. My build was inspired by a yellow Plymouth Satellite I saw on a road rally years ago that had the race treatment done. It looked so cool and unexpected, and the owner drove the wheels off it! Tired of waiting on my supplies shipment from back east (it's been over two weeks!), so I'm making the trek to Pegasus hobbies today for some other stuff I forgot to order, including styrene sheet, rod, racy decals and aluminum tubing. And more paint, of course!
Mattilacken Posted February 9, 2022 Posted February 9, 2022 Nice build! Right up my alley and I like what I see! That Porsche engine is gona look sweet in there!
rightrudder Posted February 9, 2022 Author Posted February 9, 2022 57 minutes ago, Mattilacken said: Nice build! Right up my alley and I like what I see! That Porsche engine is gona look sweet in there! Thanks! I'm a longtime road racer/autocrosser, so it's totally in my wheelhouse.
rightrudder Posted February 10, 2022 Author Posted February 10, 2022 (edited) Some progress on the rollcage...here's the main hoop. The door bars line up perfectly with those lower dash vents. Hey, no HVAC needed in a race car! Or drip rails or emblems, for that matter, so that will all be shaved. Edited February 10, 2022 by rightrudder
rightrudder Posted February 11, 2022 Author Posted February 11, 2022 Interior is mostly done; just gotta do a few paint touch-ups and add a couple more things...aftermarket tach on dashboard and a fire extinguisher. 2
89AKurt Posted February 11, 2022 Posted February 11, 2022 You're a nut, just like me! Look forward to watching this build.
rightrudder Posted February 11, 2022 Author Posted February 11, 2022 16 hours ago, Bills72sj said: Nice project. Following. 16 hours ago, 89AKurt said: You're a nut, just like me! Look forward to watching this build. Thanks, guys! Can't wait to dive into the exterior, planning for a three-color paint job. I'm finding it super fun to go off script here and make it up as I go. 1
rightrudder Posted February 12, 2022 Author Posted February 12, 2022 Added an aftermarket tach on top of the dash, and a fire extinguisher between the seats. I just have to put the chrome piece in the rear seat and the interior is finished.
Mattilacken Posted February 12, 2022 Posted February 12, 2022 Nice work on the dash and all! I think the seats Will pop More if you Woolf contras the ”hard” plastic where the seat belts go through. I believe they are carbon fiber on the carerra. But that’s just a thought ?
rightrudder Posted February 12, 2022 Author Posted February 12, 2022 Thanks, guys! Anton, you're right about the seats. Those belt guides are separate plastic pieces that glue in...they were originally painted titanium silver and the seats were a Coral color. At this point I think I'll leave them as is. It's a shame that on many of these models, you can't see a whole lot of the interior when the body's in place. 1
rightrudder Posted February 12, 2022 Author Posted February 12, 2022 3 hours ago, afx said: Nice work so far. AFX, your avatar is cool! I loved those AFX slot cars back in the day. Remember Jackie Stewart in one of their ads? "These AFX slot cars with Magna Traction really greeep the road!" 1
mvillena Posted February 12, 2022 Posted February 12, 2022 If you don't mind my saying so, you can use evergreen SOLID rod when scratchbuilding rollover bars and roll cages instead of tubing (hollow). Styrene tubing tends to kink when bent even with heat. With solid rod, it bends evenly without kinking (even without heat). When cold bending solid rod, just go slowly and overbend (i.e. if the desired bend is 90 degrees, bend to around 95 degrees) because the plastic has memory and will try to bend back to straight by itself. Of course, this tendency to "bend back" varies with the diameter of the plastic. The best way to bend styrene rods that I've found is to use steam from a kettle instead of a naked flame. Next best thing to use a small heat gun (see pic). Looks good!
rightrudder Posted February 12, 2022 Author Posted February 12, 2022 1 hour ago, mvillena said: If you don't mind my saying so, you can use evergreen SOLID rod when scratchbuilding rollover bars and roll cages instead of tubing (hollow). Styrene tubing tends to kink when bent even with heat. With solid rod, it bends evenly without kinking (even without heat). When cold bending solid rod, just go slowly and overbend (i.e. if the desired bend is 90 degrees, bend to around 95 degrees) because the plastic has memory and will try to bend back to straight by itself. Of course, this tendency to "bend back" varies with the diameter of the plastic. The best way to bend styrene rods that I've found is to use steam from a kettle instead of a naked flame. Next best thing to use a small heat gun (see pic). Looks good! Great info, Mike, and that is a neat mini heat gun. The tea kettle method sounds ideal, and as I'm always having a cup o' tea, convenient as well! The cage I built does use solid rod. I made the 90-degree bends with a Bic lighter, which as you say, heats a much larger area than necessary. The shallower bends (on the main hoop, above the door panels) I made by notching the rod, then filling the notch with putty after bending. Turns out the rollcage is highly functional. Clumsy me dropped the tub on the floor, and no damage. ? Informative discussion here. I always welcome input on technique, so keep it coming. ?
Recommended Posts
Create an account or sign in to comment
You need to be a member in order to leave a comment
Create an account
Sign up for a new account in our community. It's easy!
Register a new accountSign in
Already have an account? Sign in here.
Sign In Now