TarheelRick Posted November 16, 2023 Posted November 16, 2023 It is always most enjoyable to watch an artist at work, and this definitely is artistry at its finest. I thought heating a piece of styrene rod to build a roll cage was neat, but this build is way beyond anything I have ever witnessed. Please keep the updates coming.
Rattlecan Dan Posted November 16, 2023 Posted November 16, 2023 Indeed. Fantastic work. Carry on (please).
charlie libby Posted November 20, 2023 Author Posted November 20, 2023 hey tarheel rick, i lived in concord and harrisburg for 35 years while i worked in nascar. nice to hear from you. i also spent 4 years in the air force. got the doors formed and fitted, long process. made the hood sides and am not quite finished with them. got the belly pan attached with 1 mm. screws . windshield frame and roof are soldered on . got to start making decisions on frame motor and rear end. david and trevor, thanks for looking and your nice comments. hi francis , back to building i hope
charlie libby Posted December 4, 2023 Author Posted December 4, 2023 finished riveting the hood side panels ,forgot pictures. started on the independent rear and got a good start on rear brakes. got to make the 2 half shafts and the lower a-arms next. still dreaming up the chassis design ,not sure yet. andrew ,the motor is still up in the air. i am still looking at pictures. i have to decide soon so i can get it machined and build the chassis. i think almost anything will fit. i cant find any side view drawings of this. any info would be a great help
Bugatti Fan Posted December 5, 2023 Posted December 5, 2023 (edited) Nice to see a model being fashioned in metal throughout using traditional engineering techniques. Edited December 6, 2023 by Bugatti Fan
Big John Posted December 5, 2023 Posted December 5, 2023 Very cool project and I love seeing you scale down the English wheel for shaping the body panels. If I am not mistaken (often the case) I saw a proposal for the 1:1 car to be built for some rich South American land baron. At the time there were many suggestions for motor and tranny such as a Corvette LS1 and transaxle, which, to my mind, was the wrong direction. I was going to suggest using two Offenhauser 255 blocks and fab a custom crank case. This would give the car a 510ci straight 8, with all the porting and cam profiles worked out, and piston & rods, valvetrain parts readily available. Kind of a throwback to the Miller 8s which is what inspired Ettore Bugatti to base his twin cam layouts. Just a suggestion. Looking forward to your final solution.
charlie libby Posted January 2, 2024 Author Posted January 2, 2024 hi john, noel and mike. nice to hear from you and thanks for your suggestion. still thinking on the engine and transmission. looking at a lot of pictures. got alot done on the rear suspension. need to make need mount Coilovers. i have been working on the doors and rear deck lid. i also got the inner windshield frame soldered in. mounting the hinges on the doors was pretty easy, get them in the correct location on the car will be little more difficult. hope you all had a great Christmas and have a happy new year. 1
AmericanMuscleFan Posted January 3, 2024 Posted January 3, 2024 Great job Charlie! Your long and great experience in making real cars is evident, it's a real treat to watch! ?
charlie libby Posted January 6, 2024 Author Posted January 6, 2024 took a week to get on door hung. making the hinges and getting the inner hinge plates in the right place was tricky. i am going to finsh thr trunk hinges and build the shocks before i do the other door. used one long pin to get the hinges in line with each other so they open with out binding. they work very easy. the fit and gaps are fair.just a little finish work at bodywork time. 2
OldNYJim Posted January 7, 2024 Posted January 7, 2024 This is artisan-level craftsmanship - THANK YOU for sharing your work. Absolutely stunning (and beautiful)
AmericanMuscleFan Posted January 7, 2024 Posted January 7, 2024 Simply superb work Charlie! It's not easy to make this kind of hinges oriented like this work correctly, alignment is critical and it's nice to see them working perfectly! ?
MarkJ Posted January 8, 2024 Posted January 8, 2024 This is so beyond the normal type of model building it's making my head hurt to even try to think I could do something like this. Amazing work and I am tuned in till the finish which I know will be Awesome.
dust collectors Posted January 14, 2024 Posted January 14, 2024 This is some truly amazing work! Really do appreciate you taking the time to document and share.
charlie libby Posted January 18, 2024 Author Posted January 18, 2024 hello and thank you to all of you for taking the time to look. working away on the body. got the rear section between the body and the fenders complete . just getting started on the rear fenders. these 2 section are very time consuming to get right. very happy with doors and hinges , they fit and work well. i will finish the fender in wood to make sure i like the overall shape and size before i commit to brass. i think i found a wheel that i like . its on the 1936 bugatti 57G ,the tank. looks difficult but i am going to try one and see.make the rim and center in aluminum and the spokes german silver. i will finish the rear fenders and then attempt the wheel. still looking at and for engine pictures. since this car never existed i can use what ever.the 1 to 1 car i started was small block ford. but i want something European i would use the jag 6 if i had not just used it. the bogatti type 57 if i could find better pictures and just modernize it a little. I'll keep looking. maybe a modern BMW straight 6.
MarkJ Posted January 18, 2024 Posted January 18, 2024 Again, amazing work on this model. If you make spoke wheels for it, I will truly have to be helped up off the floor.
charlie libby Posted January 19, 2024 Author Posted January 19, 2024 hi mark , i have made spoke wheels before but these will be difficult. machining the angles for the spokes will be the tough part. i went to work on the rear fender today. as you can see i completed wooden buck and it looked about right. i started one half of the left rear and i think it came out pretty good so far. i did not notice that i was almost out of brass Sheetmetal so i ordered more today. this is going to take a large amount of brass to finish. here is a few pictures of the hammerform and the fender half . when i do the other half they will be silver soldered together. it took about 2 hours of hammering and had to be annealed 3 times. 3
MarkJ Posted January 19, 2024 Posted January 19, 2024 The bucks you make and then the hammering the sheet metal is all new to me. Did you come up with this on your own or did you read up on how to do this amazing work. I never realized how pliable the brass sheet metal is. Are you going to paint this amazing creation or are you going to leave it raw brass polished up? It seems like a sad thing to do to cover this wonderful model in paint. I have never laid eyes on a finished brass model before.
AmericanMuscleFan Posted January 25, 2024 Posted January 25, 2024 I am always amazed by your incredible skills Charlie, just the wooden templates are works of art and certainly take a lot of time to prepare. à It takes what it takes to create a work of art! ?
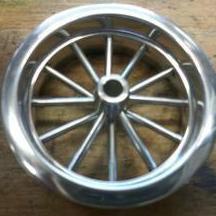
charlie libby Posted February 3, 2024 Author Posted February 3, 2024 hi mark ,hammer forms have been around for along time. i have been using them 30 or 40 years. i don't know idea they were. hi francis your wheels look great. here are a few pictures of the 2 halves of the fenders soldered together. and the filler between the fender and the body. the inside of the fender in picture 2 shows the solder. this was done with my favorite solder tool the resistance solderer. great tool. the wheels are looking good. 128 holes in each wheel, not counting 80 spot faces on the center hub to give a flat spot for the .035 hole to be drilled. the center hub is bolted in from the backside. they have 4o spokes only half ,40 more to go in each. i dont know why they look twisted in the picture, they are just straight .035 stainless safety wire. i have about 15 to 18 hours in each wheel and i have 2 more to go. i made the bore in the wheel .002 smaller than the wheel center then heated the rim so it would expand and dropped the center in on a spacer for the back space and let them cool. no glue needed. 1
Recommended Posts
Create an account or sign in to comment
You need to be a member in order to leave a comment
Create an account
Sign up for a new account in our community. It's easy!
Register a new accountSign in
Already have an account? Sign in here.
Sign In Now