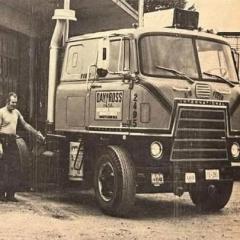
JerseeJerry55 Posted June 24 Posted June 24 Hi i have a weathering techniques question. As seen on the forum I am in the process of building an AMT IH CO4070A Transtar. Since I have both bad eyesight, and arthritis to boot I have chosen to paint the wheels Rustoleum Blossom White, rather than two tone. That being said my weathering techniques are good but not great. So I am looking for suggestions on how to properly, and realistically weather the wheels. Dust, road debris, slight trace amounts of rust are the objective. Please see pic I have attached so something along these lines.
DJMar Posted June 24 Posted June 24 In my experience, washes are going to be your primary way of getting this sort of subtle weathering, especially in scale. My usual technique - taken from years of military modeling - is to use pin washes with artist's oil paints and thinner. But over the last few years I've taken to using Reaper Miniatures Core Colors paints, used over enamels or lacquers. There are a few advantages. The paint dries quickly, and is not set until you seal it, which means you can wash off any mistakes with soap and water (or acrylic thinner) without disturbing the basecoat. It's easy to mix colors with them, especially dusty or muddy browns and shades of rust. I bought a few colors (orange, brown, black and white) for about $12 and have had them for more than 5 years now. One other option that might work for you are powdered pigments, such as those made by Vallejo. You can mix these with a little water and make very convincing dirt and mud effects, especially if you want something with a bit of texture. 1
StevenGuthmiller Posted June 25 Posted June 25 Well, I’m certainly no expert on weathering. I’ve never weathered a military model, model railroad or diorama. I’ve only done some basic weathering on a few chassis and engines using nothing more than acrylic craft paints, but I’ve been pleased with the results, and I didn’t have to go out and buy a couple hundred dollars worth of materials that I may or may not ever use again. I did this chassis with 3 colors of cheapo acrylic craft paint that I probably paid less than $5.00 for. Steve 5
mcs1056 Posted June 25 Posted June 25 OK. You can't leave us newbies hanging. What colors, and a litle technique guidance, please.
johnyrotten Posted June 25 Posted June 25 Craft paints work great for weathering, as do artist chalks. Washes,dry brushing and all the other techniques are all fun just to experiment with. This is actual rust ,ground fine and "glued" with createx 4030, before and after paint pictures 5
JerseeJerry55 Posted June 25 Author Posted June 25 9 hours ago, StevenGuthmiller said: Well, I’m certainly no expert on weathering. I’ve never weathered a military model, model railroad or diorama. I’ve only done some basic weathering on a few chassis and engines using nothing more than acrylic craft paints, but I’ve been pleased with the results, and I didn’t have to go out and buy a couple hundred dollars worth of materials that I may or may not ever use again. I did this chassis with 3 colors of cheapo acrylic craft paint that I probably paid less than $5.00 for. Steve Wow that looks awesome Steve. That's what I am going after. I've got Acrylic crafts paint in Black, and a number of different shades of Brown. Also some other colors. Thanks for sharing the pics.
Pierre Rivard Posted June 25 Posted June 25 Hi Jerry, there are many methods for weathering and some of them spectacular but difficult to achieve. I am moderately skilled and I love weathering but keeping it simple is a must for me. I use Vallejo washes (rust and oiled earth colors), acrylic paints and Vallejo pigments (Light yellow ochre, dark steel) I find weathering works best over a non glossy finish so I first apply a flat clear. On the Alfa (and the figurine) I used an oiled earth wash and then dry brushed dark pigments in areas to show racing grime and the lighter pigments on the tires. On the rusty floor pan I started with a gray foundation, then dabbed rust colored acrylics with a small sponge, there a rust wash. The materials I use dry fast and are easy to use. 5
JerseeJerry55 Posted June 25 Author Posted June 25 1 minute ago, johnyrotten said: Craft paints work great for weathering, as do artist chalks. Washes,dry brushing and all the other techniques are all fun just to experiment with. This is actual rust ,ground fine and "glued" with createx 4030, before and after paint pictures WOW I like that. I think for my intents and purposes the areas that I would really "muddy up the waters" on are engine (done), frame, under the fuel tanks, under the cab, exhaust pipes, stacks, mud flaps, the fifth wheel, and of course the wheels.
JerseeJerry55 Posted June 25 Author Posted June 25 2 minutes ago, Pierre Rivard said: Hi Jerry, there are many methods for weathering and some of them spectacular but difficult to achieve. I am moderately skilled and I love weathering but keeping it simple is a must for me. I use Vallejo washes (rust and oiled earth colors), acrylic paints and Vallejo pigments (Light yellow ochre, dark steel) I find weathering works best over a non glossy finish so I first apply a flat clear. On the Alfa (and the figurine) I used an oiled earth wash and then dry brushed dark pigments in areas to show racing grime and the lighter pigments on the tires. On the rusty floor pan I started with a gray foundation, then dabbed rust colored acrylics with a small sponge, there a rust wash. The materials I use dry fast and are easy to use. Pierre very cool I like your techniques. Simple is probably always the best. I have been trying weathering for a few years on past projects (usually the Revell Snap Peterbilt 359 truck cab. Concentrating on the Caterpillar Engine with a black wash, and the frame. I stand my belief that grime has no conscience. It just goes, and flows where it wants. Thanks for sharing. 1
johnyrotten Posted June 25 Posted June 25 Just now, JerseeJerry55 said: WOW I like that. I think for my intents and purposes the areas that I would really "muddy up the waters" on are engine (done), frame, under the fuel tanks, under the cab, exhaust pipes, stacks, mud flaps, the fifth wheel, and of course the wheels. Think about "how" the parts you're trying to weather get that way, and reproduce it. For road grime it's more grays, thin blacks. Oils are more brownish black ect. Honestly I mess around till I find what works right, and textures add a ton of detail you may not get any other way. It's all an illusion. The frame was rusted first, then painted to simulate a hastily done spray bomb job, so that's exactly how I did it.
JerseeJerry55 Posted June 25 Author Posted June 25 30 minutes ago, johnyrotten said: Think about "how" the parts you're trying to weather get that way, and reproduce it. For road grime it's more grays, thin blacks. Oils are more brownish black ect. Honestly I mess around till I find what works right, and textures add a ton of detail you may not get any other way. It's all an illusion. The frame was rusted first, then painted to simulate a hastily done spray bomb job, so that's exactly how I did it. I just finished up the Detroit for the 4070A. For the engine oil leakages (it is a Detroit after all) I used a combination of 3 different shades of Brown, and Black Craft paints and brushed the combo around then wiped it off. The transmission is Acrylic Gun Metal. Came out pretty good I think. The next CO4070A will have its engine painted Alpine (Detroit Diesel) Green. I think. 2
johnyrotten Posted June 25 Posted June 25 1 minute ago, JerseeJerry55 said: I just finished up the Detroit for the 4070A. For the engine oil leakages (it is a Detroit after all) I used a combination of 3 different shades of Brown, and Black Craft paints and brushed the combo around then wiped it off. The transmission is Acrylic Gun Metal. Came out pretty good I think. The next CO4070A will have its engine painted Alpine (Detroit Diesel) Green. I think. Absolutely looks great.👍👍 the engine fan will "pull" junk past the engine, you got more grime behind the blower, just like real life.
JerseeJerry55 Posted June 25 Author Posted June 25 13 minutes ago, johnyrotten said: Absolutely looks great.👍👍 the engine fan will "pull" junk past the engine, you got more grime behind the blower, just like real life. Johnny thank you. Now if I could just do actual paint jobs as good I'd be ahead of the game. LOL. 1
StevenGuthmiller Posted June 25 Posted June 25 4 hours ago, mcs1056 said: OK. You can't leave us newbies hanging. What colors, and a litle technique guidance, please. I mixed my own colors from a few different basic colors of craft paint to emulate 3 basic layers of grunge that I was looking for. Oily brown: (just dark brown and black) Rust: (brown with a little red) Road grime: (this is purely subjective and can vary a lot by your particular region, but I just used a little light tan) I started by mixing the colors and then thinning them to a wash consistency. Then, beginning with the oily brown, I washed over the parts. While the paint was still wet, I lightly "rolled" over the parts with a Q-tip to create a mottled affect, and then after the wash had dried somewhat, I used lightly dampened Q-tips to "roll" over the parts again to remove some of the paint in some areas. The key is to remember that there is basically no right or wrong look. It's weathering and is supposed to look haphazard. After the oily brown, I continued in more of a dry brush fashion with the rust, (trying to focus more on areas where you might find light rust) and the road grime, (again, in areas most likely to exhibit it) By a dry brush fashion I mean by dipping the brush in the paint and then rolling the brush over a paper towel to wick away most of the paint leaving almost no paint on the brush, and then using a dabbing motion to "stipple" the paint onto the model. Then again, using dampened Q-tips to dab and roll on the surface to "mute" the sharpness of the stippled paint, (if that makes any sense. ) Finally, I did another "dry brush" application, (as described above with the rust and road grime) with the oily brown. I used these same techniques and materials on the engine, focusing more on the underside of the engine and leaving the top side a bit cleaner. Oddly enough, the craft paint does a pretty good job of mimicking texture as well when applied in layers. Steve 4 1
peteski Posted June 25 Posted June 25 5 hours ago, StevenGuthmiller said: It's weathering and is supposed to look haphazard. Well, not quite. There has to be some logic applied to where certain types of weathering is applied. Like oil leak streaks have to follow gravity and go down. Oil pools have to be placed in the depressions in the surface. When mud is flung from the tires across the body, it also has to follow a logical path. These are just few of many such examples. You need to think how the 1:1 weathering looks and apply it to your miniature. There is definitely some logical pattern to weathering. Best way to do this is to look at photos or the actual vehicles and try to copy those patterns. If you just apply truly random weathering it will look weird and unrealistic. 1
StevenGuthmiller Posted June 26 Posted June 26 (edited) 3 hours ago, peteski said: Well, not quite. There has to be some logic applied to where certain types of weathering is applied. Like oil leak streaks have to follow gravity and go down. Oil pools have to be placed in the depressions in the surface. When mud is flung from the tires across the body, it also has to follow a logical path. These are just few of many such examples. You need to think how the 1:1 weathering looks and apply it to your miniature. There is definitely some logical pattern to weathering. Best way to do this is to look at photos or the actual vehicles and try to copy those patterns. If you just apply truly random weathering it will look weird and unrealistic. I suppose to some degree, but as is my philosophy with a lot of things, overthinking is usually more likely to net unrealistic results than just going with the flow. The sort of things you mention, (oil stains, flung mud, etc.) are just kind of the cherry on the cake. the main body of the weathering, (the type of things I incorporated into this Pontiac model, such as random rust, road grime and general dirt and filth) are basically randomly thrown around, with a few exceptions. Too much planning and regimentation can look just as unrealistic as too little, and of course, what you’re weathering depends a lot on how to weather. Just my opinion, but for basic light chassis weathering, I don’t think that a huge amount of attention needs to be paid to logic for the overall affect. Any “directional” affects can certainly be added at the end of the process should you decide to add them, but they’re not necessarily required. Steve Edited June 26 by StevenGuthmiller
Rodent Posted June 26 Posted June 26 You also have to have a backstory in your mind around where the vehicle was operated. Native California cars of the 1960s usually didn't have much weathering on the chassis after 60-80k miles other than light tan road splash. Definitely oil stains around cork valve cover gaskets, intake manifold end seals, transmission pan gaskets, and rear main seals especially of the multi-piece variety. Maybe even pinion seal seepage. If the leaks were bad enough, there was blow back. Power steering leaks on Fords with the control valve / ram system were common and resulted in caked on black gunk. I was able to return my 1:1 '68 mustang floors to almost new condition after 13 years and 60k miles with shop rags and Fantastik.
sidcharles Posted June 26 Posted June 26 there could be some logic applied to any phase of model making. i think that discussion has been made. if it's the actual technique we're after, there's plenty of sources and philosophies to choose. i know that military modelers are intimidating, so as a gateway, we can check in with Frank:
StevenGuthmiller Posted June 26 Posted June 26 It all boils down to how far down the rabbit hole you want to go. Do you plan on using these techniques on limited occasions, in specific areas? Or are you planning on using it liberally and often? For me, I'm not going to use weathering enough to justify spending a whole bunch of money on a lot of extra weathering specific materials. So my focus is on what can I do with what I already have on hand and use on a regular basis. I suppose you could call it being frugal. One of my biggest pet peeves is filling up my limited shop space with a whole bunch of extra stuff. I know from my own personal experience that most of those "extras" never get used. I tend to return to the tried and true "basics". But hey, that's just me. Steve 1
mcs1056 Posted June 27 Posted June 27 Seeing the results of "haphazard," I'll go with that process any day, thank you.
JerseeJerry55 Posted July 3 Author Posted July 3 Trying to weather the underside of my AMT '68 Camaro Z/28. Have never tried this technique before. Usually I just paint it Flat Black and away we go. However we shall see with this effort if I got away with it.
Straightliner59 Posted July 3 Posted July 3 When I want to replicate old steel, I generally start with a semi-gloss/satin black base. I use Krylon paint, because it dries quickly. About 15-20 minutes after I shoot it, I use a flat-tipped brush to work in a mixture of powdered pastels, usually a mix of tans, greys, pale yellows, and browns/brown-reds. I also hit the edges and corners with a soft drawing pencil. Finally, I lightly apply some pencil, using the side of the point, and rub it in, with a Q-Tip or soft cloth. I like the understated look. 3
sidcharles Posted July 3 Posted July 3 Q: do you use a spray fixative to hold/ protect the dry colors? thx sid 1
Straightliner59 Posted July 3 Posted July 3 1 hour ago, sidcharles said: Q: do you use a spray fixative to hold/ protect the dry colors? thx sid If I need to. Usually, if applied soon enough, the slightly tacky paint will fix it. I should add that I also use the pencil to pick out/highlight some of the bolts, and other raised details. 1
Beans Posted July 3 Posted July 3 One thing I remember from back in my armor building days is a little weathering can go a long way. I tend to have to stop myself. I find an affect I like and its easy to overdo it.. I like to use pastel chalks that I run across some sandpaper and grind down to powder. You can either just dump it on and blow off the excess or lightly brush it on. I have even wet a spot and let it dissolve in the water and clump and dry. This is a 1/76 armor piece weathered using a wash, dry brush, then pastel powder. 1
Recommended Posts
Create an account or sign in to comment
You need to be a member in order to leave a comment
Create an account
Sign up for a new account in our community. It's easy!
Register a new accountSign in
Already have an account? Sign in here.
Sign In Now