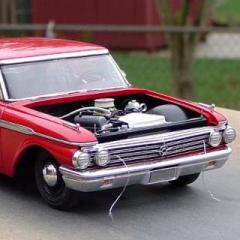
Jeff Sauber Posted August 30, 2010 Share Posted August 30, 2010 I've seen alot of discussion here lately about building highly detailed stuff and the misconception of needing lots of money and/or state of the art-high tech milling machines and lathes etc, in order to get the job done. Yes, being able to afford all those pre-made, pre-packaged, mass produced, detailing products certainly makes things easier, as well as being one of the select few who own and operate some of those high tech milling machines, but there ARE other options in case you're not one of those individuals that fall into that small group of folks that I just mentioned. I've been detailing stuff for nearly 20 years now. I have never owned a single piece of high tech equipment other than a cordless drill, a single speed dremel, bench grinder, a set of jewlers files, and a pin vise kit. That's it! Hardly what I'd call state of the art equipment. The cheap tools I use, may seem like a pretty crude and amteurish arsenal to have for attempting to super detail along side the "big boys" of the hobby, but using those "cheap tools" along with a little extra time and patience, can often yeild results that are just as good, and cost ALOT less. I've always been a big fan of high tech low budget building. Take a moment and check out the pics below....Most of what you are seeing I have built using cheap craft store and hardware store products. Yes, there is a little bit of PE and other various small aftermarket items included in some of the projects, but most of the detail you are seeing was fabricated and hand crafted on a very small budget. If I can get some extra time over the winter, I will do some scratchbuilding tutorials and show you how alot of these fancy parts can be created without the need of expensive tools and large bank accounts. 1 Quote Link to comment Share on other sites More sharing options...
Jeff Sauber Posted August 30, 2010 Author Share Posted August 30, 2010 Quote Link to comment Share on other sites More sharing options...
ROY AVERY Posted August 30, 2010 Share Posted August 30, 2010 FANTASTIC WORK Quote Link to comment Share on other sites More sharing options...
Marc @ MPC Motorsports Posted August 31, 2010 Share Posted August 31, 2010 I've been impressed with your work for a long time. How about a tutorial on how you do this? I would love to know. Quote Link to comment Share on other sites More sharing options...
Chuck Most Posted August 31, 2010 Share Posted August 31, 2010 You're right. I've always been a fan of the 'do more with less' mentality. Sometimes it just has more to do with being inventive and stretching the boundaries a bit than with spending big bucks on tools and supplies! Quote Link to comment Share on other sites More sharing options...
krow Posted August 31, 2010 Share Posted August 31, 2010 Neat stuff. Hope you didn't think I was accusing you (or anyone here) of check book modelling. The linkages and u-joints do not look store bought, but look like someone did some really good work in shaping and forming sheet aluminum into a dead solid perfect miniature version of the real thing. It's neat when people who are creative enough to devise a way to do this show a way to get there. Me, I'm still in basics mode, but it is neat to see the envelope stretched and even blowed up from time to time. Thanks! Ken Quote Link to comment Share on other sites More sharing options...
Greg Cullinan Posted August 31, 2010 Share Posted August 31, 2010 The pictures do it for me,we all should be building like this . I can't complete a model without getting glue on the finished product or a smooth paint job, Would you recommend I attempt some detail work now or keep working on the fundamentals ? Quote Link to comment Share on other sites More sharing options...
Chuck Most Posted August 31, 2010 Share Posted August 31, 2010 Would you recommend I attempt some detail work now or keep working on the fundamentals ? You could always work on both! Then, by the time you've gotten better at the basics, you'll be well prepared for the next level! Quote Link to comment Share on other sites More sharing options...
highway Posted August 31, 2010 Share Posted August 31, 2010 Jeff, thanks for finally posting a positive topic on this issue! I've seen and replied to the other topics you referred to also trying to pound the point home you don't need a seven figure bank account to build well detailed models. Even some of the aftermarket products can be purchased on a working man's income. You don't need a huge bank account for this hobby, just some patience and the willingness to try new things. I look forward to seeing some of your tutorials this winter! Quote Link to comment Share on other sites More sharing options...
Kaleb Posted August 31, 2010 Share Posted August 31, 2010 one of my major problems is chrome and aluminum...and the tiny detail stuff...for one i know its my brushes...my b-day is coming up hopefully i will get a good set. Quote Link to comment Share on other sites More sharing options...
charlie8575 Posted August 31, 2010 Share Posted August 31, 2010 I've been detailing stuff for nearly 20 years now. I have never owned a single piece of high tech equipment other than a cordless drill, a single speed dremel, bench grinder, a set of jewlers files, and a pin vise kit. That's it! Hardly what I'd call state of the art equipment. The best part is through Craigslist, your local shoppers, newspaper for sale ads, and what have you, you can pick up all of this stuff for very, very short money. You can probably get all of this for well under $100 if you don't mind used equipment, or you probably already have some of these. Even good quality new tools, like jeweler's files aren't really too expensive. Charlie Larkin Quote Link to comment Share on other sites More sharing options...
mredzadventure Posted August 31, 2010 Share Posted August 31, 2010 Wow! What great work. I will be watching close to this one . I have always been a kit builder. Box stock was the norm for me. I have been a little daunted by the details. I want to learn some of the tricks of the trade. Any cheap tip will help. I have already found a ton of useful info on this board. I have been lurking for awhile Quote Link to comment Share on other sites More sharing options...
Jeff Sauber Posted August 31, 2010 Author Share Posted August 31, 2010 I've hardly had any bench time this summer, but things tend to slow down for me in the colder months, so I hope to get to some tutorials that will cover some of the scratchbuilt metal parts I have used like block and pin steering linkages, Front struts & coilovers, driveshafts, U-joints, simple rack and pinion streering, Fuel cells, 4-links, etc... Most of this stuff can be created with K&S aluminum stock and hardware store aluminum sheet and bar...It's very inexpensive, but it can be time consuming until you get comfortable working small, and develop a groove or "system" that works. I'll try and cover the basic approaches I have come up with, and some of the the little things I do. I'm sure some you guys can and will take this stuff even further than I have. Once you get to scratch building stuff, it's hard to stop, and the sky is the limit. Quote Link to comment Share on other sites More sharing options...
Monte's Motors Posted August 31, 2010 Share Posted August 31, 2010 AMAZING !!!! I'm with ya on the low budget. Can't wait to see you show us the ropes. Quote Link to comment Share on other sites More sharing options...
ewaskew Posted August 31, 2010 Share Posted August 31, 2010 I agree with everything you said Jeff. I scratch build alot myself,I have a 69 Chevelle that has 230 pieces that were scratch built because I decided to build my own frame and one thing led to another. I am scratch building a lot of parts for a 1/12 scale Camaro,one thing is the Corvette style rear end that has the u-joints,and a how to on building them the way yours look would be great. The ones that I built are ok but building them the way yours look would be better. Your models look good with all the details,and knowing that a lot of it was scratch built,makes them all the more impressive. Keep up the good work. Quote Link to comment Share on other sites More sharing options...
Dragline Posted August 31, 2010 Share Posted August 31, 2010 I'm with you on this one J. I build fairly detailed stuff and if you all saw my tools you'd laugh. I literally have alomost nothing in the way of any tools outside of a god pin vise [maybe 8 bits total]. I make all my own barrel valves and distribution blocks out of Plastruct. A good sleeve of plastruct can last a looooong time when you're building little parts. I have plenty or reference pics available and I go to work to make what I need. I do use PE I admit, but it is really limited to throttle bits and safety belts pretty much. I do use Detail Master AN fittings but am currently using Plastruct hex stock on a 1/16th Garlits build and I have it down cold. They look every bit as good and I don't have to ration them. I'm also using the hex stock for bolt heads and many other items. Plastruct flat stock has so many uses I couldn't go over them in a single evening there's that many. Plastruct is not terribly expensive so I pick up a little each time I'm at the LHS. K&S aluminum rod is also a big deal that is pretty darned cheap. I buy a couple of pieces every time I'm at the LHS and my collection grows slowly but steadily. The things that cost me the most are paint and kits. I don't even own an airbrush. I think my finishes are as good as most and all I use are rattle cans and the experience I've gained using them. I've made mistakes, but learned from them. Bob Quote Link to comment Share on other sites More sharing options...
Foxer Posted August 31, 2010 Share Posted August 31, 2010 I've always been a devotee of "raiding Mom's sewing basket" for details. And your work has always inspired me, Jeff, but those two carbs in the first two photos! The innards and the top edges are what all carbs need ... got a quick comment about how those were done? You will have a big audience here if you do start some tutorials as you mention! Quote Link to comment Share on other sites More sharing options...
Smart-Resins Posted August 31, 2010 Share Posted August 31, 2010 You are forgetting two things that are required to do the detailing that you do without buying the stuff or haveing the fancy tools! One is the time to do it! Something I cant afford as much as I really wish I could! Second is skill! brother, thats something you have a lot of and I know I have nill to none of! But thats why I like watching some of these posts like yours and others that do it that way! Once in a while, I even see how to do something cool! Now comes a third issue for me. Thats a memory to remember these things! LOL! Quote Link to comment Share on other sites More sharing options...
iBorg Posted August 31, 2010 Share Posted August 31, 2010 Time for my two cents.... There's a difference between buying and modeling. I see J.'s work and I know its the result of a skilled craftsman. I see others post their work and I see the result of someone buying this and adding it to that. I have a lot of the "high tech" tools and I'm not sure they're a help or a hindrance. Having them is great. Knowing how to use them is a skill I lack. I spent the summer moving them and if I ever get my tools settled, I might actually model. And get off of this computer.... Mike Quote Link to comment Share on other sites More sharing options...
comp1839 Posted August 31, 2010 Share Posted August 31, 2010 you do some mighty fine work there, j. sauber. Quote Link to comment Share on other sites More sharing options...
Romell R Posted August 31, 2010 Share Posted August 31, 2010 Jeff i told you before and i'll tell you again.... Your model building skills are sick! But i do agree with you , you dont need pricey equipment to build great models. My favorite tool is my dremel and the better you get at using the tools you have at hand the more you will figure out to do with it. Keep up the good work Jeff and I'll be looking forward to your tutorials. Romell Quote Link to comment Share on other sites More sharing options...
Sixties Sam Posted August 31, 2010 Share Posted August 31, 2010 For me, a big part of the fun of model building is making a good looking model using ordinary materials and tools. I use a Dremel, a drill, and files a lot, and I often use cheap Walmart paint, and it looks good enough for me! I also like to get cheap kits from garage sales, flea markets, or ebay glue bombs and rebuild them. I also build most of my R/C planes from scratch. Most of the guys in our R/C club buy $200+ ready to fly stuff. I get $10 worth of balsa and build my own, and it flies as good as theirs. If I crash it, I'm out $10, not $200. It's a lot more fun that way for me. Sam Quote Link to comment Share on other sites More sharing options...
runsw/scissors Posted August 31, 2010 Share Posted August 31, 2010 any tips you can pass our way would be great! I've only been on this forum for a couple of months, and have learned more than I can retain sometimes. please guys keep sharing. you have helped many of us out more than you can know. Looking forward to more. Quote Link to comment Share on other sites More sharing options...
sak Posted August 31, 2010 Share Posted August 31, 2010 Would very much like to know how you make a working drivshaft/ U joints with a dremel. Quote Link to comment Share on other sites More sharing options...
Terror Posted August 31, 2010 Share Posted August 31, 2010 Sometimes the junk drawer in your house has the best aftermarket parts,also its what your eye makes not the tool. Quote Link to comment Share on other sites More sharing options...
Recommended Posts
Join the conversation
You can post now and register later. If you have an account, sign in now to post with your account.
Note: Your post will require moderator approval before it will be visible.