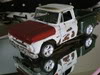
LAV25 Posted March 2, 2011 Posted March 2, 2011 (edited) Hey all, I just finished my first plastic model build since I was around 10 and wanted to show off. The build thread is here: http://www.modelcars...showtopic=40941 Edit: I rearranged my photobucket without thinking and nuked all the pics of the model. Here's a link to the album instead. I was trying to reproduce a truck that I bought when I was 17, a '66 Chevy Stepside: Now for some details: I didn't forget to put the mirrors on, the 1:1 didn't have them when I bought it. Looks like somebody spraypainted something on the sheet of plywood that served as a bed floor: Got to hate those Chicago winters with all the salt on the road: Ran out of room for pics, next post! -val Edited August 1, 2011 by LAV25
LAV25 Posted March 2, 2011 Author Posted March 2, 2011 More road rot: Kid doesn't know how to do bodywork, but he can spend $29.95 at Trak Auto for a chrome air cleaner: Are you sure this thing can be restored? Let me know what you think. Good and bad, criticism can help me do my next model even better! Oh, yeah, I know that the back of the cab doesn't fit right, unfortunately when I dented the doors I kind of warped the whole body. Other than that, fire away! -val
Bastardo Posted March 2, 2011 Posted March 2, 2011 Rims 'n tyres need some dirt, but appart from that she's sweet What technique did you use to replicate the rust?
LAV25 Posted March 2, 2011 Author Posted March 2, 2011 Rims 'n tyres need some dirt, but appart from that she's sweet What technique did you use to replicate the rust? The rust is a two part rust paint from Japan, pretty similar (I think) to the Sophisticated Finishes stuff that I've seen mentioned here. The first part seems to be a suspension of iron filings, put that on, let it dry for a day or so, and then the second part is a clear liquid that makes the first part rust, takes 3-5 days to hit its final color. I've got some dirt on the tires, it just doesn't show up well. Not sure how to get the chrome on the rims dirty looking, most things I've tried (on my RC cars) make it look like black chrome, or gold chrome, but don't give it that roaded look. Any suggestions would be very welcome. Thanks for looking. -val
Bastardo Posted March 2, 2011 Posted March 2, 2011 Ok, I know that 2-part rust thing, one of my friends used it before Thanx for the answer! About the chromed rims: I'd go for some strongly thinned oil-paint-based wash, and before it dried completely I'd scratch some chalk pastels (brown, black, grey, ...) onto the fresh oily stuff That would make it look like some dirt got caught in the rim's lines, holes, ... You can also try simulating scratches on the lip of one or more rims (I still remember the moment when my Seat Ibiza's almost new 15s with polished lips hit that curb a few years ago... Pain and agony...).
Foxer Posted March 2, 2011 Posted March 2, 2011 (edited) This came out looking good. All the little details make it yours. I was going to ask about the rust too ... it looks very realistic. Edited March 2, 2011 by Foxer
David G. Posted March 2, 2011 Posted March 2, 2011 Aside from what's already been mentioned, that's a great build. Your rusting technique is spot-on and you've really captured the feel of the 1:1 truck. David G.
retrobuilder Posted March 2, 2011 Posted March 2, 2011 Wow, this reminds me of several different years of 1:1 chevys i have owned. Great build, spot on.
Danno Posted March 3, 2011 Posted March 3, 2011 Great looking build! You really captured the essence of a mid-60's GM rust bucket pick-em-up! I know ... I had one, too. You might try shooting some Testors DullCote on the rims and tires. That'll make them look more "experienced" and will be a great jumping off point for any more weathering you want to do. It'll take the "fresh out of the carton" look off the chromeys. Great job!
Leonidas Posted March 3, 2011 Posted March 3, 2011 Looks like the truck has had a tough life. Awesome weathering!
LAone Posted March 3, 2011 Posted March 3, 2011 wow that looks great. for it being your first plastic kit, it sure looks great. i like the rust details, looks so real.
Nate Posted March 3, 2011 Posted March 3, 2011 Don't worry about the wheels. The owner just bought a new set of rims, 'cuz it's easier to put on a set of rims than to fix all of the rot.
LAV25 Posted March 3, 2011 Author Posted March 3, 2011 About the chromed rims: I'd go for some strongly thinned oil-paint-based wash, and before it dried completely I'd scratch some chalk pastels (brown, black, grey, ...) onto the fresh oily stuff That would make it look like some dirt got caught in the rim's lines, holes, ... You can also try simulating scratches on the lip of one or more rims (I still remember the moment when my Seat Ibiza's almost new 15s with polished lips hit that curb a few years ago... Pain and agony...). You might try shooting some Testors DullCote on the rims and tires. That'll make them look more "experienced" and will be a great jumping off point for any more weathering you want to do. It'll take the "fresh out of the carton" look off the chromeys. Thanks for the tips guys, I'll have to search around. Testors isn't an option here, but I've got some Mr. Super Clear Flat that might work. Oil based is going to take some research, I'm sure it's out there somewhere, just a matter of translation. -val
LAV25 Posted March 3, 2011 Author Posted March 3, 2011 (edited) Thanks very much everyone else (finding the limits of quoting the minesweeper way, sorry) I'm very happy with this, it almost makes me feel like I still own the beast. Actually, the model turned out rustier than the 1:1, but it just felt right that way. @Nate: Yup, the wheels on the 1:1 were the best looking part of the truck. The model wheels still need some road dust though, or better than that, REPLACEMENT! I'm really not a fan of low profile tires and big wheels, at least not on cars that don't need them (vettes etc). If anyone knows of a kit that has something similar to N50/15 wheels and tires in 1:25 scale, I'd be very appreciative. 1:1 N50/15: More later! -val Edited March 3, 2011 by LAV25
diymirage Posted March 3, 2011 Posted March 3, 2011 looks good...or bad..depending on how you look at it anyway, you want to get yourself some nice goodyear blue streak tires, they were in a ton of the MPC musclecar kits and probably my favorite scale model tires
seeker589 Posted March 4, 2011 Posted March 4, 2011 You do good rust! I love it. The wheels, too - nice contrast.
shatteredsoul76 Posted March 4, 2011 Posted March 4, 2011 It turned out great, that thing is spot-on.
Recommended Posts
Create an account or sign in to comment
You need to be a member in order to leave a comment
Create an account
Sign up for a new account in our community. It's easy!
Register a new accountSign in
Already have an account? Sign in here.
Sign In Now