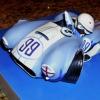
cobraman Posted March 10, 2013 Posted March 10, 2013 First off I would like to say that someone with more talent then I could have done a much better job with this kit. As built it is not 100% accurate. The instructions for this kit are a bit unclear at times. The build went pretty well until the final assembly. It was a bit tricky for me and I am not happy with the fit of the body panels. Still, all in all I think it came out pretty good. Comments are welcome good or bad. Thanks for looking.
TooOld Posted March 10, 2013 Posted March 10, 2013 The Mk8D is one of the best looking Can Am cars ever and you've done a great job ! I don't see anything wrong with it at all . I'd like to build one myself some day . The color looks like a perfect match , what paint did you use ?
cobraman Posted March 10, 2013 Author Posted March 10, 2013 Thanks Bob. I used Testors Competition Orange enamel.
philo426 Posted March 10, 2013 Posted March 10, 2013 (edited) Looks good and the fit of the body panels is a known issue from the time it was first released..Good job on a difficult kit1 Edited March 10, 2013 by philo426
slusher Posted March 10, 2013 Posted March 10, 2013 I think it looks excellent Ray. Best one l have seen. Very sharp build....
cruz Posted March 11, 2013 Posted March 11, 2013 You did great on a very challenging kit and you deserve the praise!
John Teresi Posted March 11, 2013 Posted March 11, 2013 Ray......please don`t cut yourself short.......personally I have seen your work and I can honestly say.......you did a wonderful job on this build........way better than I could have done 5 years ago.........on that 5 year journey it was pretty rough for me........but,all I could do was thrive to get better.........you are on your way.......stick with it and please don`t say that someone else could have built it better.......because,what really matters is if you are satisfied with it. ........again,excellent build.
Crazy Ed Posted March 11, 2013 Posted March 11, 2013 Well Done Ray. The Paint and your oob treatment combine for a very nice Build.
cobraman Posted March 11, 2013 Author Posted March 11, 2013 Thanks guys. You kind words mean a lot to me and do spur me to try and be better. At 61 I have been building for over 50 years. I feel I have hit the wall as far as getting better at building but I still enjoy it. I have read that as we get older something like model building and even jigsaw puzzels are a good way to keep the mind busy and to help keep hand and eye coordination. Did anyone notice I forgot to put the mirrors on ? I just did.
gtx6970 Posted March 11, 2013 Posted March 11, 2013 (edited) I like this one a lot. But if your not happy with it, send it on over, I'll dispose of it properly for ya Did I say I like this one ???? Well done. Edited March 11, 2013 by gtx6970
cobraman Posted March 11, 2013 Author Posted March 11, 2013 Thanks Bill. Funny thing about the mirrors. They are included but they are not on the model in the box photos. I guess they forgot em' too.
Tony T Posted March 11, 2013 Posted March 11, 2013 Nicely done, sir! Tough kit and you did it justice.
bbowser Posted March 11, 2013 Posted March 11, 2013 Looks pretty good to these 58 year old eyes! What kit is that, and what scale? I don't recall ever seeing one in 1/24-25?
Duntov Posted March 11, 2013 Posted March 11, 2013 This looks good.... assuming here that this is the AM kit.... I have it as well and it is not for the feint at heart...... you did an excellent job!!!!
wgflatliner Posted March 12, 2013 Posted March 12, 2013 (edited) I actually have a couple of these to build. What are some of the things i need to watch for when i go to work on mine? Yours looks good, by the way. Edited March 12, 2013 by wgflatliner
cobraman Posted March 12, 2013 Author Posted March 12, 2013 I actually have a couple of these to build. What are some of the things i need to watch for when i go to work on mine? Yours looks good, by the way. Mark, my only suggestion is to go slow. The directions are not always that clear. The rear suspension gave me some fits and needs to be just right due to other parts attaching to or fitting around. I also had a bit of a problem getting the pipes to match both level and the same length. I never got mine both the same length so I added some plastic tubing to make them equal. All in all it was a pretty fun build. I hope you post photos when you start yours.
Recommended Posts
Create an account or sign in to comment
You need to be a member in order to leave a comment
Create an account
Sign up for a new account in our community. It's easy!
Register a new accountSign in
Already have an account? Sign in here.
Sign In Now